This survey will take about 1 minute.
Your answers will help us to improve our website.
Monster Hunter World (MHW)
Guiding Lands Monsters and Locations
★ 2025/2/28: Monster Hunter Wilds is now available!
Join the hunt at our Monster Hunter Wilds Wiki!

The Guiding Lands is more complex and diverse than any other locale in Monster Hunter World (MHW). Here is a complete list of monsters, their special material, and where they appear in The Guiding Lands!
List of Contents
What is the Guiding Lands?
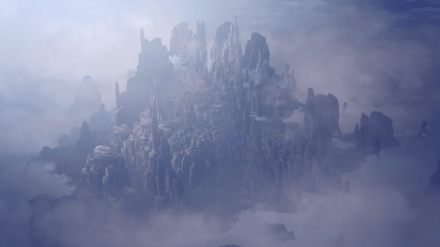
The Guiding Lands is a locale that appears after you finish Iceborne's main storyline. It consists of six regions: the Forest Region, the Wildspire Region, the Coral Region, the Rotten Region, the Volcanic Region, and the Tundra Region. Learn more about the Guiding Lands through the link below.
About Monsters in the Guiding Lands

Almost every monster in the game appears in The Guiding Lands. There are a few new ones as well!
Different types of monsters have a chance of appearing as you level a region up. We have a comprehensive list below if you want to check out which monster appears when and where!
How to Lure Monsters
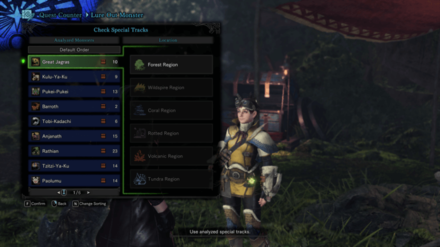
Monsters in The Guiding Lands usually leave behind special tracks from Signs of a Turf War. You can also get special tracks by slaying or capturing monsters, or by breaking a large monster's body part.
Once you fully analyze the special tracks, you can use these to lure out monsters from a specific region. You can do this by talking to the Handler at one of the campsites, then choose which specific monster you lure at which region. After a little while, the monster should appear at the region you chose.
When the region's level is high enough, any monster that you lure will automatically be a tempered version, so make sure to look out for that!
List of Monsters and Materials
List of Where Monsters Appear and their Unique Materials
| Monster | Normal Material | Tempered Material |
|---|---|---|
 Anjanath Anjanath |
Flickering Flamepelt Forest / Wildspire (1, 2, 3, 4) |
Tempered Flamepelt Forest / Wildspire (5, 6, 7) |
 Fulgur Anjanath Fulgur Anjanath |
Crackling Thunderpelt All Regions (1, 2, 3, 4) |
Tempered Thunderpelt All Regions (5, 6, 7) |
 Banbaro Banbaro |
Ancient Great Horn Coral / Rotten / Volcanic / Tundra (1, 2, 3) Forest / Wildspire (2, 3) |
Tempered Great Horn All Regions (4, 5, 6, 7) |
 Barioth Barioth |
Coldblooded Icefang Tundra (2, 3, 4, 5) |
Tempered Icefang Tundra (6, 7) |
 Barroth Barroth |
Muddy Crown Wildspire (1, 2, 3) |
Tempered Crown Wildspire (4, 5, 6, 7) |
 Blackveil Vaal Hazak Blackveil Vaal Hazak |
Twilight Fang Rotten (5, 6) |
Tempered Twilight Fang Rotten (7) |
 Brachydios Brachydios |
Glossy Ebonshell Volcanic (2, 3, 4, 5) |
Tempered Ebonshell Volcanic (6, 7) |
 Diablos Diablos |
Twisted Bravehorn Wildspire (2, 3, 4) |
Twisted Temperhorn Wildspire (5, 6, 7) |
 Black Diablos Black Diablos |
Blackcurl Tyranthorn Wildspire (3, 4, 5) |
Blackcurl Temperthorn Wildspire (6, 7) |
 Dodogama Dodogama |
Heavy Jaw Volcanic (1, 2, 3, 4, 5, 6, 7) |
N/A |
 Glavenus Glavenus |
Smoldering Tailedge Wildspire (2, 3, 4, 5) Forest / Volcanic (3, 4, 5) |
Tempered Tailedge Forest / Wildspire / Volcanic (6, 7) |
 Acidic Glavenus Acidic Glavenus |
Honed Tailblade Rotten (3, 4, 5) |
Tempered Tailblade Rotten (6, 7) |
 Great Girros Great Girros |
Night Hood Rotten (1, 2, 3, 4, 5, 6, 7) |
N/A |
 Great Jagras Great Jagras |
Rugged Mane Forest (1, 2, 3, 4, 5, 6, 7) |
N/A |
 Kirin Kirin |
Solemn Azure Horn Coral (5, 6) |
Tempered Azure Horn Coral (7) |
 Kulu-Ya-Ku Kulu-Ya-Ku |
Colorful Plume Wildspire (1, 2, 3, 4, 5, 6, 7) |
N/A |
 Kushala Daora Kushala Daora |
Stormcall Steelwing Forest / Volcanic (5, 6) |
Tempered Steelwing Forest / Volcanic (7) |
 Lavasioth Lavasioth |
Incandescent Magmafin Volcanic (1, 2, 3) |
Tempered Magmafin Volcanic (4, 5, 6, 7) |
 Legiana Legiana |
Smooth Icehide Coral / Tundra (2, 3, 4) |
Tempered Icehide Coral / Tundra (5, 6, 7) |
 Shrieking Legiana Shrieking Legiana |
Crystal Frozenhide Tundra (3, 4, 5) |
Tempered Frosthide Tundra (6, 7) |
 Namielle Namielle |
Enchanting Finehide Coral (5, 6) |
Tempered Trancehide Coral (7) |
 Nargacuga Nargacuga |
Assassin Cutwing Forest (2, 3, 4, 5) Coral (3, 4, 5) |
Tempered Cutwing Forest / Coral (6, 7) |
 Odogaron Odogaron |
Fatal Rendclaw Rotten (2, 3, 4) Coral (3, 4) |
Tempered Rendclaw Coral / Rotten (5, 6, 7) |
 Ebony Odogaron Ebony Odogaron |
Soulrender Talon All Regions (3, 4, 5) |
Tempered Talon All Regions (6, 7) |
 Paolumu Paolumu |
Rubbery Shell Coral (1, 2, 3) |
Tempered Rubbery Shell Coral (4, 5, 6, 7) |
 Nightshade Paolumu Nightshade Paolumu |
Obsidian Fur Wildspire (1, 2, 3, 4) Forest (2, 3, 4) |
Tempered Hide Forest / Wildspire (5, 6, 7) |
 Pukei-Pukei Pukei-Pukei |
Fragrant Poison Sac Forest / Wildspire (1, 2, 3) |
Tempered Poison Sac Forest / Wildspire (4, 5, 6, 7) |
 Coral Pukei-Pukei Coral Pukei-Pukei |
Hydrated Sac Coral (1, 2, 3) |
Tempered Torrent Sac Coral (4, 5, 6, 7) |
 Radobaan Radobaan |
Inkstained Oilshell+ Rotten (1, 2, 3) |
Tempered Oilshell+ Rotten (4, 5, 6, 7) |
 Rajang Rajang |
Bloodthirsty Glimmerpelt Forest / Wildspire / Coral / Rotten / Tundra (3, 4, 5, 6, 7) Volcanic (3) |
Tempered Glimmerpelt Volcanic (7) |
 Rathalos Rathalos |
King's Scale Forest (2, 3, 4) Volcanic (3, 4) |
Tempered Red Scale Forest / Volcanic (5, 6, 7) |
 Azure Rathalos Azure Rathalos |
Azure Scale Forest (3, 4, 5) Volcanic (4, 5) |
Tempered Azure Scale Forest / Volcanic (6, 7) |
 Silver Rathalos Silver Rathalos |
Moonlight Scale Volcanic (6, 7) Coral (6) |
Tempered Silver Scale Coral (7) |
 Rathian Rathian |
Queen's Scale Wildspire (1, 2, 3, 4) Forest (2, 3, 4) |
Tempered Green Scale Forest / Wildspire (5, 6, 7) |
 Gold Rathian Gold Rathian |
Scorching Scale Volcanic (6, 7) Wildspire (6) |
Tempered Gold Scale Forest / Wildspire (7) |
 Pink Rathian Pink Rathian |
Pink Scale Wildspire / Coral (2, 3, 4) |
Tempered Pink Scale Wildspire / Coral (5, 6, 7) |
 Ruiner Nergigante Ruiner Nergigante |
Extinction Greathorn Forest / Wildspire / Coral / Rotten / Volcanic (5, 6, 7) Tundra (5, 6) |
Annihilating Temperhorn All Regions (7) |
 Savage Deviljho Savage Deviljho |
Bloodstained Ebonhide All Regions (5, 6) |
Spattered Hide All Regions (7) |
 Seething Bazelgeuse Seething Bazelgeuse |
Crimson Blastscale Volcanic (4, 5, 6) |
Tempered Blastscale Volcanic (7) |
 Teostra Teostra |
Hellfire Mane Wildspire / Volcanic (5, 6) |
Tempered Crimson Mane Wildspire / Volcanic (7) |
 Lunastra Lunastra |
Azure Mane Wildspire / Volcanic (5, 6) |
Tempered Azure Mane Wildspire / Volcanic (7) |
 Tigrex Tigrex |
Strongman's Jaw Rotten (2, 3, 4, 5) Forest / Wildspire / Volcanic / Tundra (3, 4, 5) |
Tempered Jaw Forest / Wildspire / Rotten / Volcanic / Tundra (6, 7) |
 Brute Tigrex Brute Tigrex |
Shuddering Darkjaw Rotten (6) |
Tempered Ebonjaw Rotten (7) |
 Tobi-Kadachi Tobi-Kadachi |
Blinding Cathode Forest (1, 2, 3) |
Tempered Cathode Forest (4, 5, 6, 7) |
 Viper Tobi-Kadachi Viper Tobi-Kadachi |
Enticing Viperthorn Tundra (1, 2, 3, 4) |
Tempered Viperthorn Tundra (5, 6, 7) |
 Tzitzi-Ya-Ku Tzitzi-Ya-Ku |
Dazzling Photophore+ Coral (1, 2, 3, 4, 5, 6, 7) |
N/A |
 Uragaan Uragaan |
Metallic Scute Volcanic (2, 3, 4) |
Tempered Scute Volcanic (5, 6, 7) |
 Velkhana Velkhana |
Aurora Crownhorn Forest / Wildspire / Coral / Volcanic / Tundra (5, 6) |
Tempered Crownhorn Forest / Wildspire / Coral / Volcanic / Tundra (7) |
 Yian Garuga Yian Garuga |
Sinister Silverpelt Forest (3, 4, 5) |
N/A |
 Scarred Yian Garuga Scarred Yian Garuga |
N/A | Tempered Silverpelt Forest (6, 7) |
 Zinogre Zinogre |
Charged Deathly Shocker Forest / Coral (2, 3, 4, 5) |
Tempered Shocker Forest / Coral (6, 7) |
 Stygian Zinogre Stygian Zinogre |
Gushing Dragonhold Tundra (4, 5, 6) |
Tempered Dragonhold Tundra (7) |
Monsters Appearing in the Forest Region
| ▼ Monsters in the Forest Region per Level ▼ | |||
|---|---|---|---|
| Level 1 | Level 2 | Level 3 | Level 4 |
| Level 5 | Level 6 | Level 7 | |
Forest Region Level 1
| Ease of Luring Out ★★★ | |||
|---|---|---|---|
| Ease of Luring Out ★★ | |||
Forest Region Level 2
| Ease of Luring Out ★★★ | |||
|---|---|---|---|
| Ease of Luring Out ★★ | |||
| Ease of Luring Out ★ | |||
Forest Region Level 3
| Ease of Luring Out ★★★ | |||
|---|---|---|---|
| Ease of Luring Out ★★ | |||
| Ease of Luring Out ★ | |||
Forest Region Level 4
| Ease of Luring Out ★★★ | |||
|---|---|---|---|
| Ease of Luring Out ★★ | |||
| Ease of Luring Out ★ | |||
Forest Region Level 5
| Ease of Luring Out ★★★ | |||
|---|---|---|---|
| Ease of Luring Out ★★ | |||
| Ease of Luring Out ★ | |||
Forest Region Level 6
Forest Region Level 7
Monsters Appearing in the Wildspire Region
| ▼ Monsters in the Wildspire Region per Level ▼ | |||
|---|---|---|---|
| Level 1 | Level 2 | Level 3 | Level 4 |
| Level 5 | Level 6 | Level 7 | |
Wildspire Region Level 1
| Ease of Luring Out ★★★ | |||
|---|---|---|---|
| Ease of Luring Out ★★ | |||
| Ease of Luring Out ★ | |||
Wildspire Region Level 2
| Ease of Luring Out ★★★ | |||
|---|---|---|---|
| Ease of Luring Out ★★ | |||
| Ease of Luring Out ★ | |||
Wildspire Region Level 3
| Ease of Luring Out ★★★ | |||
|---|---|---|---|
| Ease of Luring Out ★★ | |||
| Ease of Luring Out ★ | |||
Wildspire Region Level 4
| Ease of Luring Out ★★★ | |||
|---|---|---|---|
| Ease of Luring Out ★★ | |||
| Ease of Luring Out ★ | |||
Wildspire Region Level 5
| Ease of Luring Out ★★★ | |||
|---|---|---|---|
| Ease of Luring Out ★★ | |||
| Ease of Luring Out ★ | |||
Wildspire Region Level 6
| Ease of Luring Out ★★★ | |||
|---|---|---|---|
| Ease of Luring Out ★★ | |||
| Ease of Luring Out ★ | |||
Wildspire Region Level 7
Monsters Appearing in the Coral Region
| ▼ Monsters in the Coral Region per Level ▼ | |||
|---|---|---|---|
| Level 1 | Level 2 | Level 3 | Level 4 |
| Level 5 | Level 6 | Level 7 | |
Coral Region Level 1
| Ease of Luring Out ★★★ | |||
|---|---|---|---|
| Ease of Luring Out ★★ | |||
| Ease of Luring Out ★ | |||
Coral Region Level 2
| Ease of Luring Out ★★★ | |||
|---|---|---|---|
| Ease of Luring Out ★★ | |||
| Ease of Luring Out ★ | |||
Coral Region Level 3
| Ease of Luring Out ★★★ | |||
|---|---|---|---|
| Ease of Luring Out ★★ | |||
| Ease of Luring Out ★ | |||
Coral Region Level 4
| Ease of Luring Out ★★★ | |||
|---|---|---|---|
| Ease of Luring Out ★★ | |||
| Ease of Luring Out ★ | |||
Coral Region Level 5
| Ease of Luring Out ★★★ | |||
|---|---|---|---|
| Ease of Luring Out ★★ | |||
| Ease of Luring Out ★ | |||
Coral Region Level 6
| Ease of Luring Out ★★★ | |||
|---|---|---|---|
| Ease of Luring Out ★★ | |||
| Ease of Luring Out ★ | |||
Coral Region Level 7
Monsters Appearing in the Rotten Region
| ▼ Monsters in the Rotten Region per Level ▼ | |||
|---|---|---|---|
| Level 1 | Level 2 | Level 3 | Level 4 |
| Level 5 | Level 6 | Level 7 | |
Rotten Region Level 1
| Ease of Luring Out ★★★ | |||
|---|---|---|---|
| Ease of Luring Out ★★ | |||
| Ease of Luring Out ★ | |||
Rotten Region Level 2
| Ease of Luring Out ★★★ | |||
|---|---|---|---|
| Ease of Luring Out ★ | |||
Rotten Region Level 3
| Ease of Luring Out ★★★ | |||
|---|---|---|---|
| Ease of Luring Out ★★ | |||
| Ease of Luring Out ★ | |||
Rotten Region Level 4
| Ease of Luring Out ★★★ | |||
|---|---|---|---|
| Ease of Luring Out ★★ | |||
| Ease of Luring Out ★ | |||
Rotten Region Level 5
| Ease of Luring Out ★★★ | |||
|---|---|---|---|
| Ease of Luring Out ★★ | |||
| Ease of Luring Out ★ | |||
Rotten Region Level 6
| Ease of Luring Out ★★★ | |||
|---|---|---|---|
| Ease of Luring Out ★★ | |||
| Ease of Luring Out ★ | |||
Rotten Region Level 7
| Ease of Luring Out ★★★ | |||
|---|---|---|---|
| Ease of Luring Out ★★ | |||
| Ease of Luring Out ★ | |||
Monsters Appearing in the Volcanic Region
| ▼ Monsters in the Volcanic Region per Level ▼ | |||
|---|---|---|---|
| Level 1 | Level 2 | Level 3 | Level 4 |
| Level 5 | Level 6 | Level 7 | |
Volcanic Region Level 1
| Ease of Luring Out ★★★ | |||
|---|---|---|---|
| Ease of Luring Out ★★ | |||
Volcanic Region Level 2
| Ease of Luring Out ★★★ | |||
|---|---|---|---|
| Ease of Luring Out ★★ | |||
| Ease of Luring Out ★ | |||
Volcanic Region Level 3
| Ease of Luring Out ★★★ | |||
|---|---|---|---|
| Ease of Luring Out ★★ | |||
| Ease of Luring Out ★ | |||
Volcanic Region Level 4
| Ease of Luring Out ★★★ | |||
|---|---|---|---|
| Ease of Luring Out ★★ | |||
| Ease of Luring Out ★ | |||
Volcanic Region Level 5
| Ease of Luring Out ★★★ | |||
|---|---|---|---|
| Ease of Luring Out ★★ | |||
| Ease of Luring Out ★ | |||
Volcanic Region Level 6
| Ease of Luring Out ★★★ | |||
|---|---|---|---|
| Ease of Luring Out ★★ | |||
| Ease of Luring Out ★ | |||
Volcanic Region Level 7
Monsters Appearing in the Tundra Region
| ▼ Monsters in the Tundra Region per Level ▼ | |||
|---|---|---|---|
| Level 1 | Level 2 | Level 3 | Level 4 |
| Level 5 | Level 6 | Level 7 | |
Tundra Region Level 1
| Ease of Luring Out ★★★ | |||
|---|---|---|---|
| Ease of Luring Out ★★ | |||
Tundra Region Level 2
| Ease of Luring Out ★★★ | |||
|---|---|---|---|
| Ease of Luring Out ★★ | |||
| Ease of Luring Out ★ | |||
Tundra Region Level 3
| Ease of Luring Out ★★★ | |||
|---|---|---|---|
| Ease of Luring Out ★★ | |||
| Ease of Luring Out ★ | |||
Tundra Region Level 4
| Ease of Luring Out ★★★ | |||
|---|---|---|---|
| Ease of Luring Out ★★ | |||
| Ease of Luring Out ★ | |||
Tundra Region Level 5
| Ease of Luring Out ★★★ | |||
|---|---|---|---|
| Ease of Luring Out ★★ | |||
| Ease of Luring Out ★ | |||
Tundra Region Level 6
| Ease of Luring Out ★★★ | |||
|---|---|---|---|
| Ease of Luring Out ★★ | |||
| Ease of Luring Out ★ | |||
Tundra Region Level 7
| Ease of Luring Out ★★★ | |||
|---|---|---|---|
| Ease of Luring Out ★★ | |||
| Ease of Luring Out ★ | |||
Monster Hunter World (MHW) Related Guides
| The Guiding Lands | |
|---|---|
Author

Guiding Lands Monsters and Locations
Please participate in our site
improvement survey
03/2026
improvement survey
03/2026
Would you assist in
improving Game8's site?
improving Game8's site?

×
We are listening to our users' valuable opinions and discussing how to act on them.
The information collected through this survey will be used for the purpose of improving our services. In addition, the information will only be disclosed a part of a statistic in a format that will not allow identification of personal information.
Begin Survey
Not Now
×
Please rate each item regarding Game8.co's Advertisements.
Amount of Ads
Very Dissatisfied
Somewhat Dissatisfied
Fine
Somewhat Satisfied
Highly Satisfied
Placement of Ads
Timing of Ad Display
Ad Loading Speed
Safeness of Ads
Content of Ads
×
Please rate each item regarding Game8.co's Quality of Articles.
Amount of information
Very Dissatisfied
Somewhat Dissatisfied
Fine
Somewhat Satisfied
Highly Satisfied
Frequency of updates
Speed of new information
Accuracy of articles
Understandibility of articles
Readability of sentences
×
Please rate each item regarding Game8.co's Usability of the Site.
Ease of finding information
Very Dissatisfied
Somewhat Dissatisfied
Fine
Somewhat Satisfied
Highly Satisfied
Loading Speed
Use of Color
Font Size
Visibility of Images
Easy to Understand Layout
×
Please rate each item regarding Game8.co's Message Boards, Comments.
Ease of Writing
Very Dissatisfied
Somewhat Dissatisfied
Fine
Somewhat Satisfied
Highly Satisfied
Readability
Ease in Finding Information
Comment Quality
Comment Quantity
Admin Response
×
Please rate each item regarding Game8.co's Site's new design.
Please rate our site's new design
Very Dissatisfied
Somewhat Dissatisfied
Fine
Somewhat Satisfied
Highly Satisfied
Do you think that the website's design change makes the site easier to use?
Has the new design made it easier for you to find information on the site?
Has the new design improved the overall visual appeal of the site?
How would you rate your overall satisfaction with the new design of the site?
×
How likely are you to recommend Game8 to someone you know?
Very Unlikely
0
1
2
3
4
5
6
7
8
9
10
Very Likely
If you have other opinions regarding potential improvement to the website, please share them with us. We would appreciate your honest opinion.
Note: This is a free response section, so you can proceed without entering anything.
Note: Please be sure not to enter any kind of personal information into your response.
Note: Please be sure not to enter any kind of personal information into your response.
×
Thank You
×
Thank you for participating in our survey! Your answers will help us to improve the quality of our website and services.
We hope you continue to make use of Game8.
We hope you continue to make use of Game8.
Close
Rankings
- We could not find the message board you were looking for.
Gaming News


![Everwind Review [Early Access] | The Shaky First Step to A Very Long Journey](https://img.game8.co/4440226/ab079b1153298a042633dd1ef51e878e.png/thumb)

![Monster Hunter Stories 3 Review [First Impressions] | Simply Rejuvenating](https://img.game8.co/4438641/2a31b7702bd70e78ec8efd24661dacda.jpeg/thumb)
Popular Games

Genshin Impact Walkthrough & Guides Wiki
Honkai: Star Rail Walkthrough & Guides Wiki
Umamusume: Pretty Derby Walkthrough & Guides Wiki
Pokemon Pokopia Walkthrough & Guides Wiki
Resident Evil Requiem (RE9) Walkthrough & Guides Wiki
Monster Hunter Wilds Walkthrough & Guides Wiki
Wuthering Waves Walkthrough & Guides Wiki
Arknights: Endfield Walkthrough & Guides Wiki
Pokemon FireRed and LeafGreen (FRLG) Walkthrough & Guides Wiki
Pokemon TCG Pocket (PTCGP) Strategies & Guides Wiki


Recommended Games
Diablo 4: Vessel of Hatred Walkthrough & Guides Wiki
Fire Emblem Heroes (FEH) Walkthrough & Guides Wiki
Yu-Gi-Oh! Master Duel Walkthrough & Guides Wiki
Super Smash Bros. Ultimate Walkthrough & Guides Wiki
Pokemon Brilliant Diamond and Shining Pearl (BDSP) Walkthrough & Guides Wiki
Elden Ring Shadow of the Erdtree Walkthrough & Guides Wiki
Monster Hunter World Walkthrough & Guides Wiki
The Legend of Zelda: Tears of the Kingdom Walkthrough & Guides Wiki
Persona 3 Reload Walkthrough & Guides Wiki
Cyberpunk 2077: Ultimate Edition Walkthrough & Guides Wiki


All rights reserved
©CAPCOM CO., LTD. 2018, 2019 ALL RIGHTS RESERVED.
The copyrights of videos of games used in our content and other intellectual property rights belong to the provider of the game.
The contents we provide on this site were created personally by members of the Game8 editorial department.
We refuse the right to reuse or repost content taken without our permission such as data or images to other sites.