
This is a guide to speedrunning all the holes in every course of Standard Golf in Mario Golf: Super Rush. Read on for tips and strategies on the quickest ways to make it through each hole and find out which character to pick when speedrunning the game.
Bowser with the Super Star Club Set is the best character to choose when speedrunning in Standard Golf Mode because of his high power stat and the ability to have three curve sections in the shot gauge.
How to Use Bowser: Character Stats and Abilities
When speedrunning, opt for Button Controls as oppose to using Motion Controls. Using Button Controls allows you to add spins to your shots and gives you more control when aiming.
Controls and Best Settings | How to Use Motion Controls
Pressing the B Button after making your shot allows you to fast forward through the animation of your ball flying through the air or rolling on the ground. Always use the fast-forward feature when possible to speed up the game.
You can use the Left Control Stick to curve your shots after setting the power. Curving your shots upwards adds more height to your ball while curving it downwards makes it lose height. Curving your ball downwards can be useful when positioning your ball near the hole.
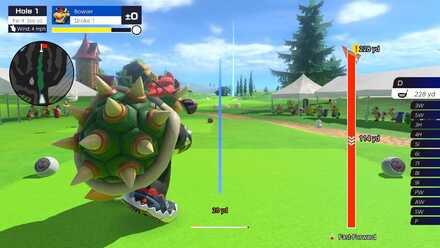
To get the most distance from your shot, curve your shots downwards during the first curve section of the shot gauge and curve your shot upwards at the final curve section of the shot gauge.
At the start of each hole, you can save time by aiming your shots before the announcer says, "Go!". Though you cannot yet set the power of shot, you can press the X Button to enter overhead view and ready your aim.
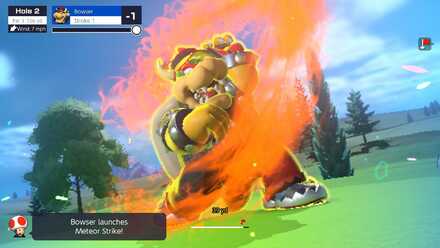
Do not immediately use your Special Shots once your shot meter is filled up. Take note of different holes that are either far or tricky to get through and save your Special Shots for those holes.
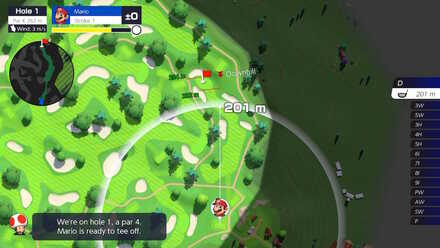
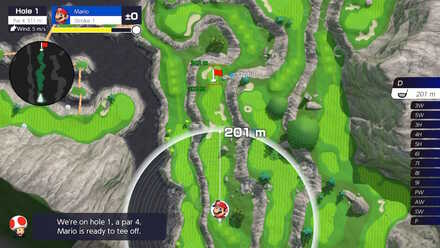
| Hole 1 |
|
| Stroke 1 |
Prioritize control and avoid overshooting your the ball to land in the Green with the Driver. |
| Stroke 2 |
Putt the ball into the hole. |
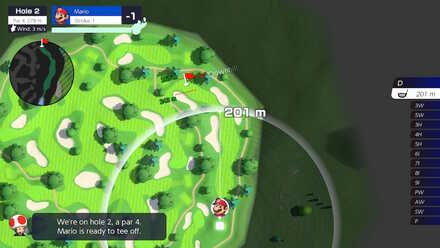
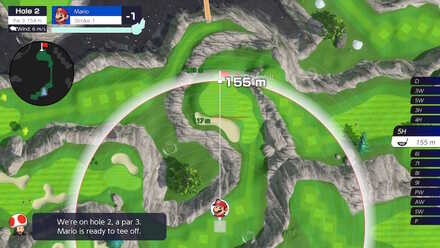
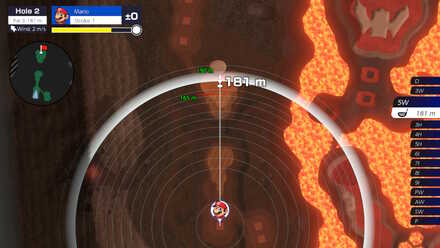
| Hole 2 |
|
| Stroke 1 |
Use the Driver to land in between the two bunkers. |
| Stroke 2 |
Hold back the power with your Driver and land on the Green close to the hole. |
| Stroke 3 |
Putt the ball in for a birdie. |
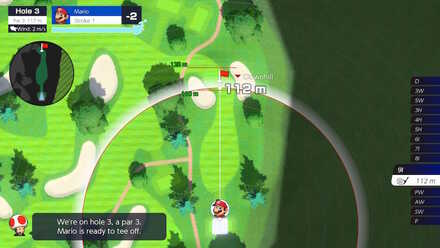
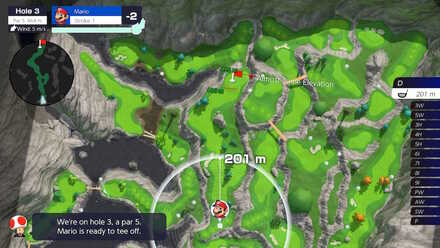
| Hole 3 |
|
| Stroke 1 |
Use the 8I and hold back on power a bit, having the ball land before the hole. |
| Stroke 2 |
If you can't hit a hole-in-one, a Birdie on the second shot is still very doable. |
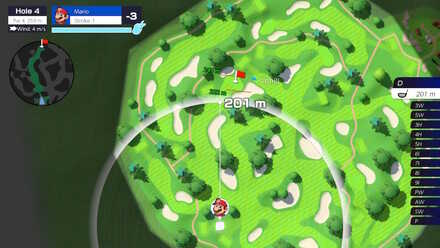
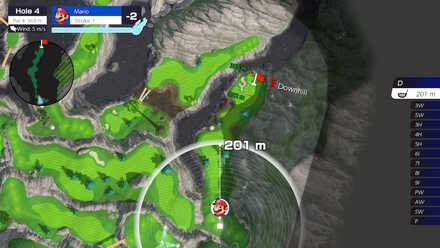
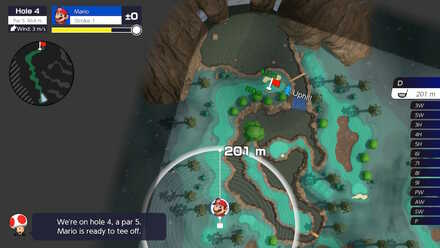
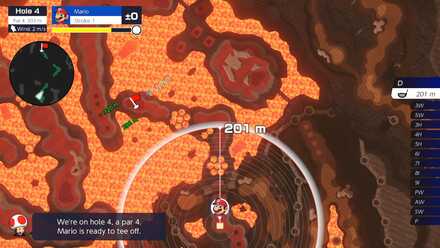
| Hole 4 |
|
| Stroke 1 |
Use the Driver to shoot over the bunker, but be careful with the tree to the right. |
| Stroke 2 |
Use the SW and make a standard shot to land on the Green close to the hole. |
| Stroke 3 |
Putt in for another Birdie. |
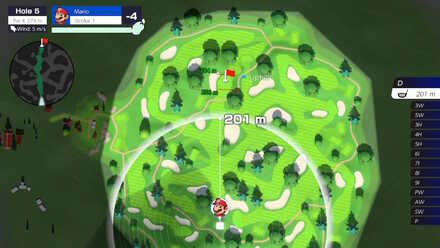
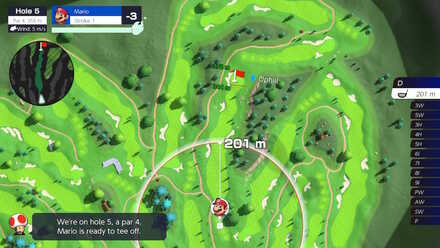
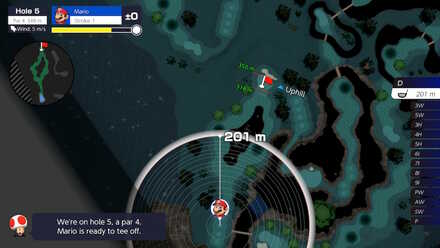
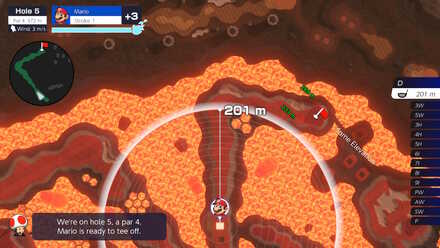
| Hole 5 |
|
| Stroke 1 |
Shoot the ball so that it lands just past the two bunkers. |
| Stroke 2 |
Use the AW and account for wind. Aim for an Eagle on stroke 2. |
| Stroke 3 |
If not, aim for a Birdie on stroke 3 and putt the ball in. |
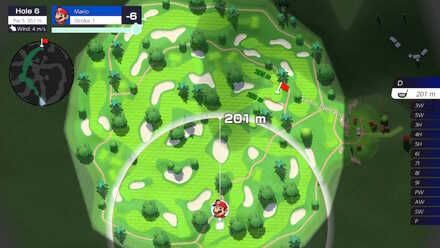
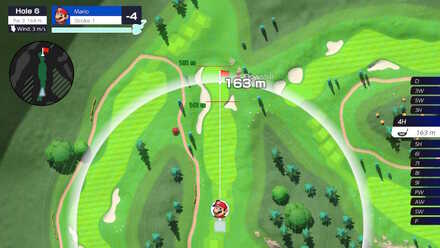
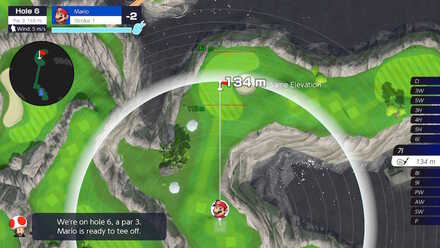
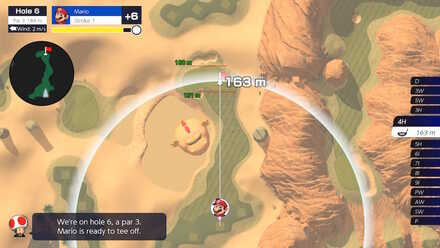
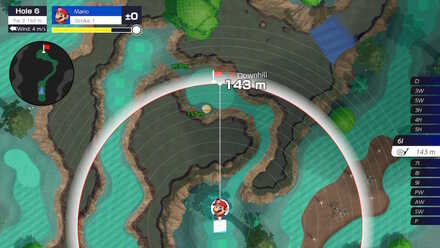
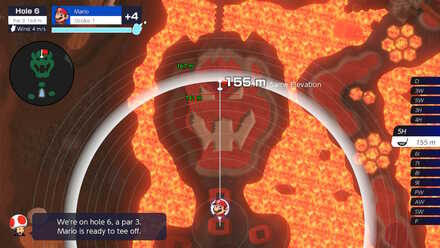
| Hole 6 |
|
| Stroke 1 |
Use the 5W to land between the two bunkers, but be careful of the tree to the right. |
| Stroke 2 |
Aim to land on the Green. |
| Stroke 3 |
Aim carefully during the Eagle Putt for a nice -2. |
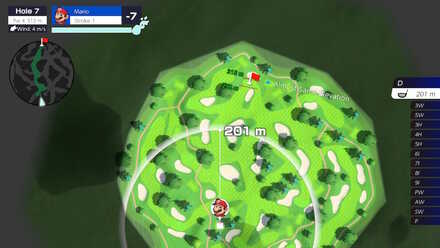
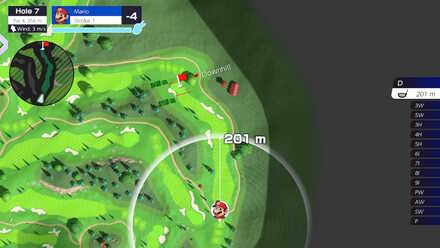
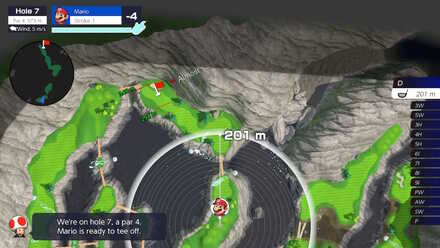
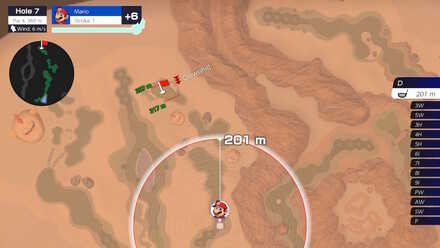
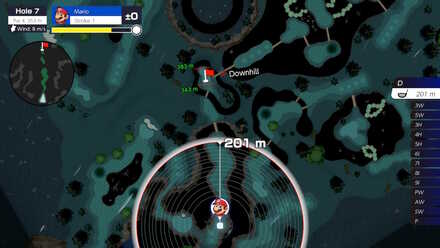
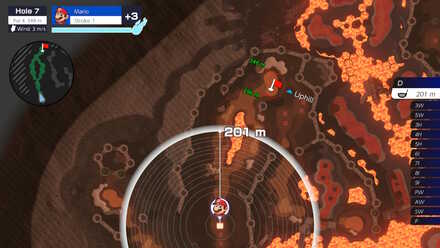
| Hole 7 |
|
| Stroke 1 |
Use the Driver to land between the two bunkers. |
| Stroke 2 |
Use the 7I or 8I to land on the Green, being careful of the bunkers near the hole. |
| Stroke 3 |
Putt in for a Birdie. |
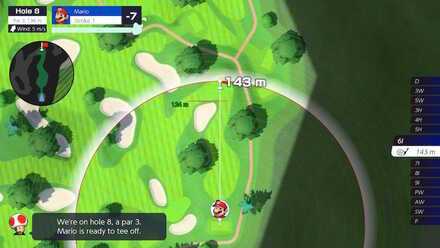
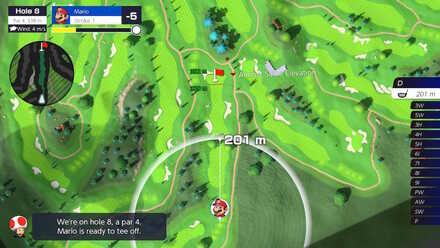
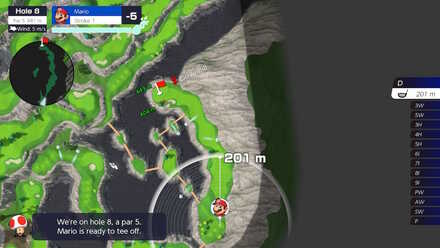
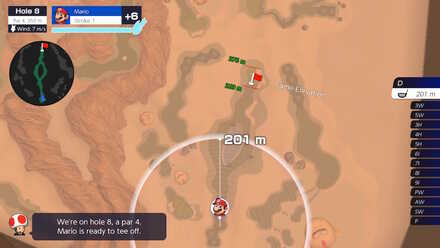
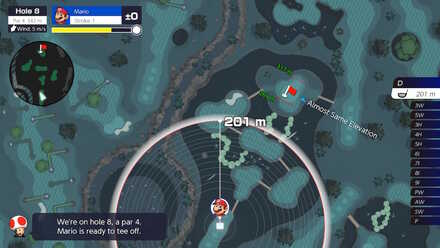
| Hole 8 |
|
| Stroke 1 |
Account for wind and use the 6I, holding back on power so the ball rolls in close to the hole. |
| Stroke 2 |
If you cannot get a hole-in-one, aim for a Birdie on the second stroke. |
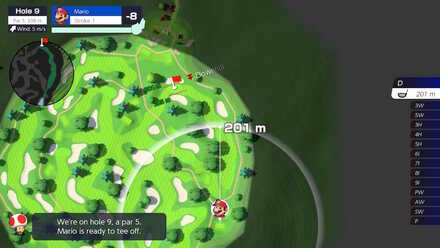
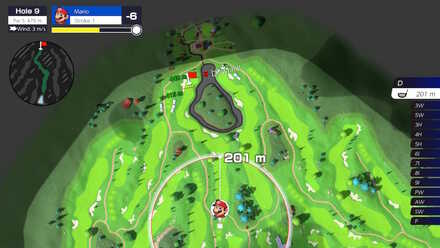
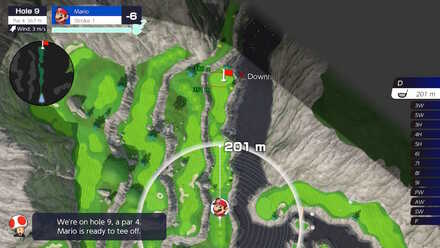
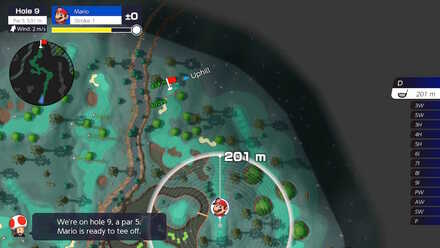
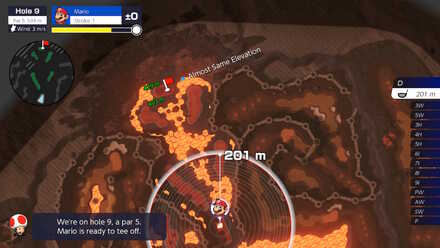
| Hole 9 |
|
| Stroke 1 |
Use the Driver and try to get close to the center of two bunkers. Be carfule of the trees to the left. |
| Stroke 2 |
Curve the shot by moving the analog stick after setting the power. Use the 7I and try to land on the Green with a curved shot. |
| Stroke 3 |
If done correctly, you have the chance at an Eagle Putt on stroke 3. |
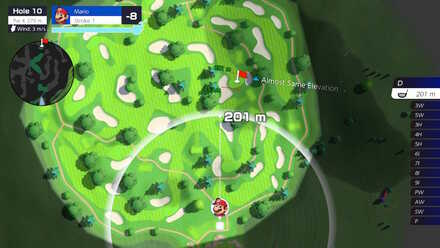
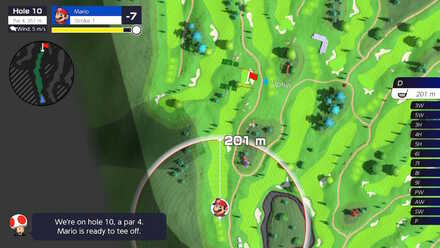
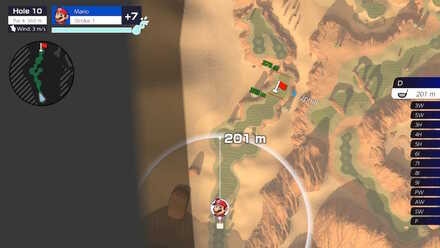
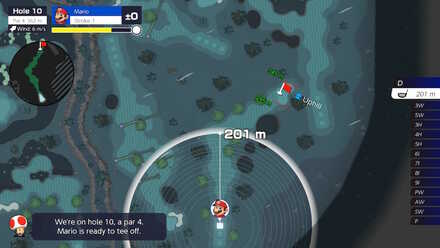
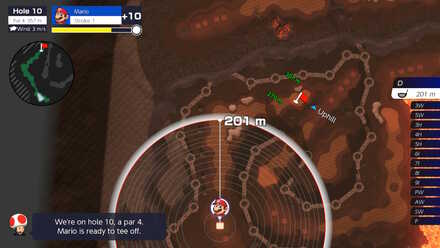
| Hole 10 |
|
| Stroke 1 |
Use the Driver to land between the bunker and the tree. |
| Stroke 2 |
Use the AW for either a potential Eagle, or to land on the Green. |
| Stroke 3 |
Putt in on stroke 3 for a Birdie. |
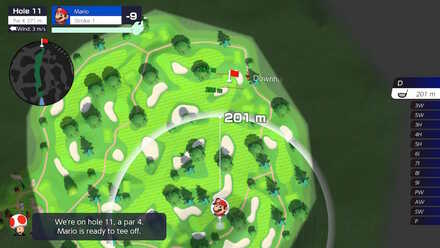
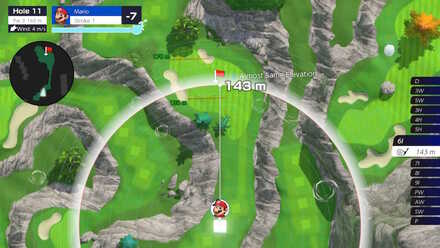
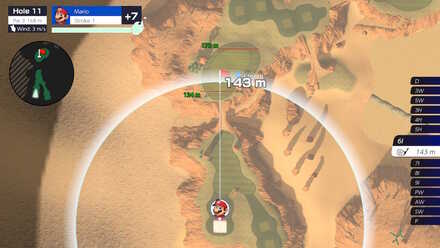
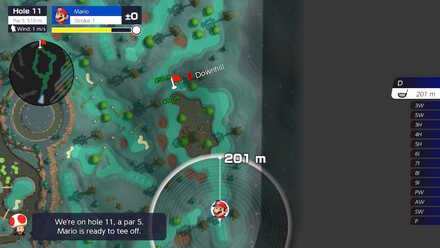
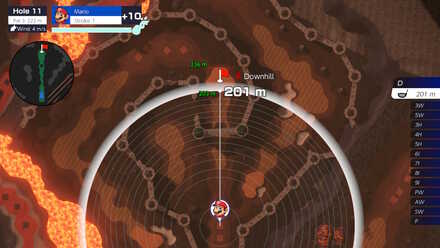
| Hole 11 |
|
| Stroke 1 |
Use the driver to get as close to the hole as possible, being careful of the tree to your left. |
| Stroke 2 |
Use the AW to land on the Green. |
| Stroke 3 |
Putt in for another Birdie. |
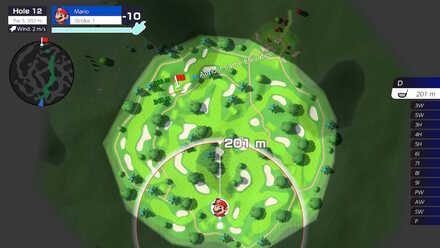
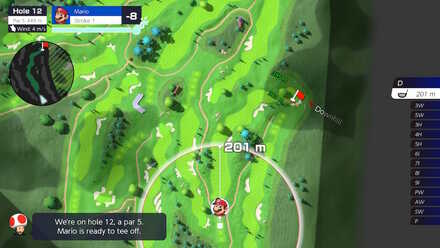
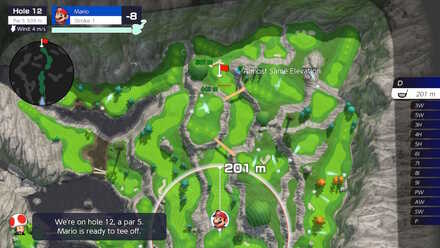
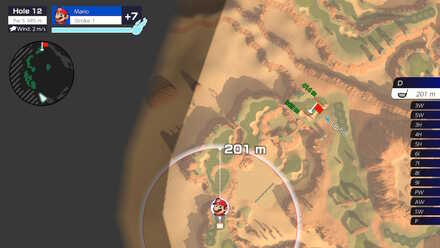
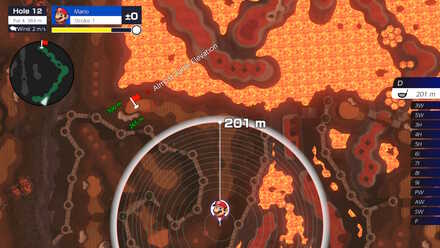
| Hole 12 |
|
| Stroke 1 |
Use the Driver to get between the first set of bunkers. |
| Stroke 2 |
Use the 5I to land on the Fairway past the tree and bunker straight ahead. |
| Stroke 3 |
Use the SW and a standard shot, account for wind and set the power carefully for a potential Eagle. |
| Stroke 4 |
If you cannot get an Eagle, putt in for a Birdie. |
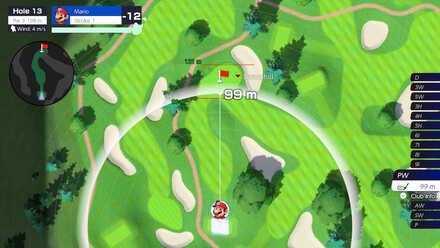
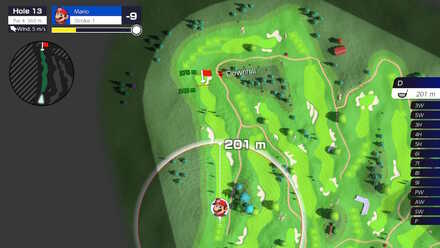
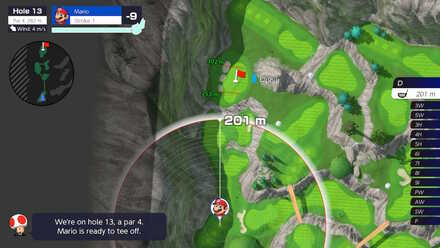
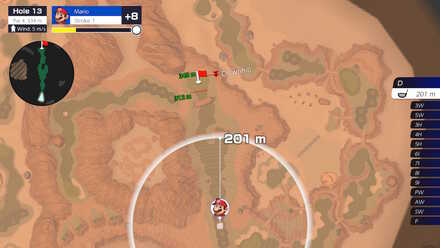
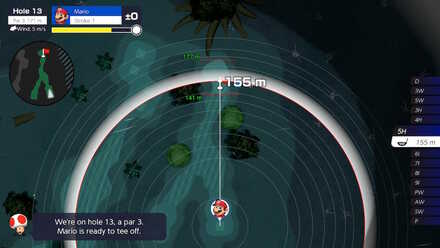
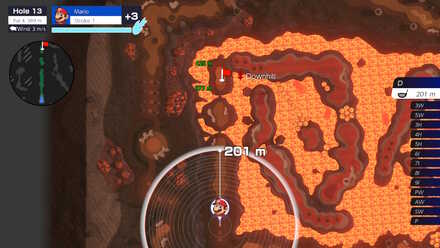
| Hole 13 |
|
| Stroke 1 |
Use the 9I, account for wind, and carefully set the power for a potential hole-in-one. |
| Stroke 2 |
If you cannot get a hole-in-one, you can get a Birdie Putt on stroke 2. |
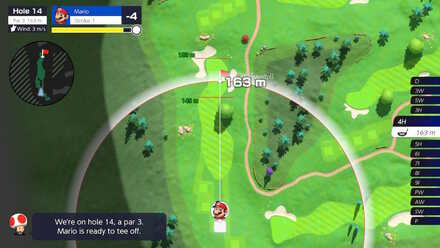
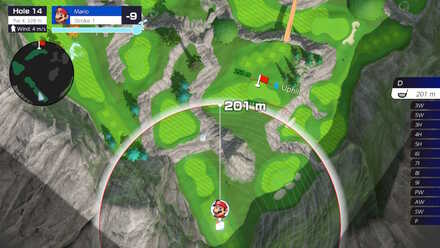
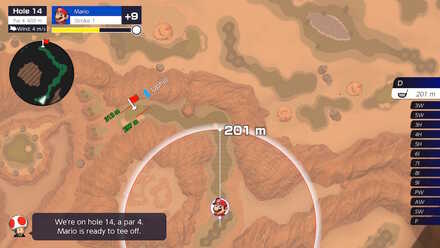
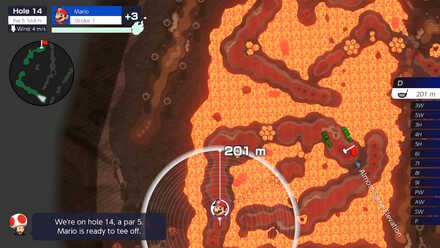
| Hole 14 |
|
| Stroke 1 |
Land the ball past the bunker, or if your character does not have enough power, you can land in the fairway just short of the bunker. |
| Stroke 2 |
Use the PW with a standard shot for a potential Eagle. |
| Stroke 3 |
If you cannot get an Eagle, aim for a Birdie on this stroke. |
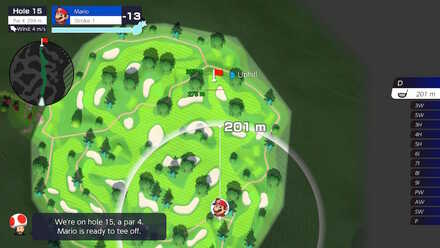
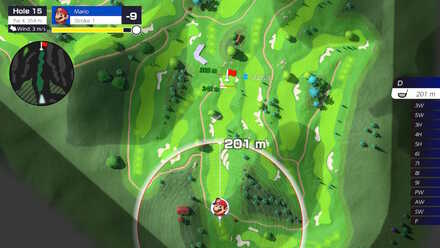
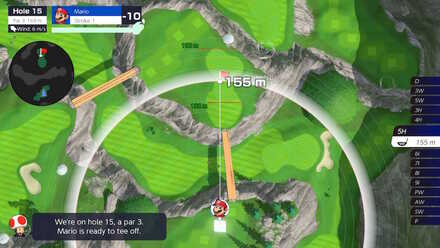
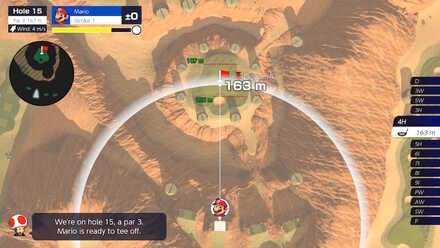
| Hole 15 |
|
| Stroke 1 |
Use the Driver to land between the bunkers. |
| Stroke 2 |
Use the PW with a standard shot for a potential Eagle. |
| Stroke 3 |
If you cannot get an Eagle, land on the Green and aim for a Birdie. |
Alternatively, if your character has a high power stat, you can use a special shot on stroke 1 to immediately land on the Green.
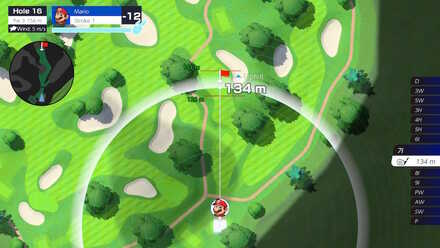
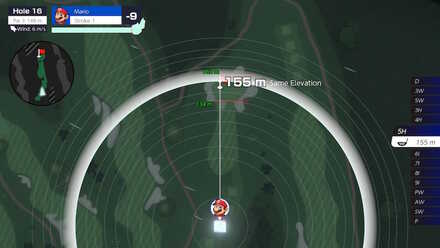
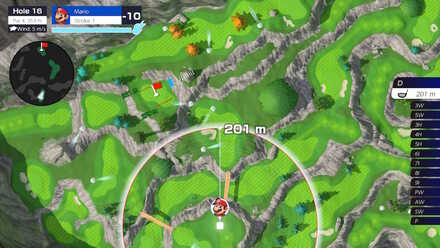
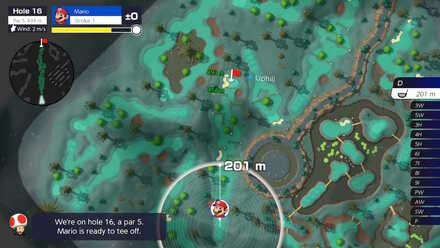
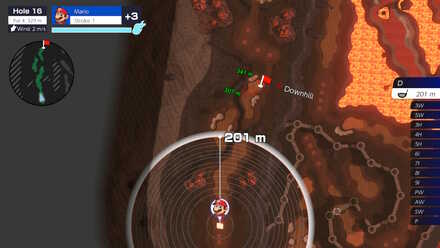
| Hole 16 |
|
| Stroke 1 |
Aim for a hole-in-one with the 6I. |
| Stroke 2 |
If you cannot get a hole-in-one, land on the Green for a Birdie. |
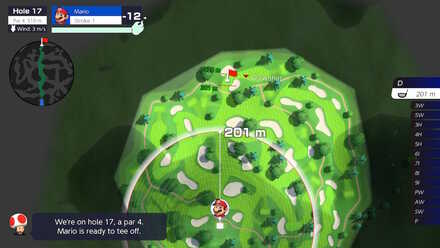
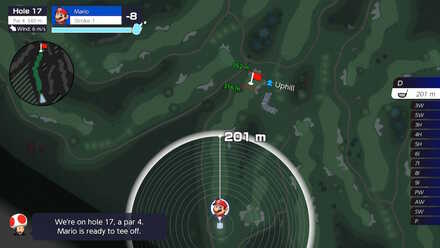
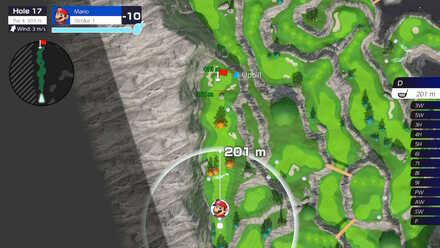
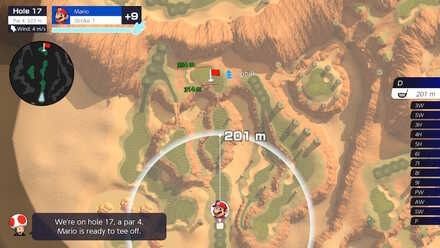
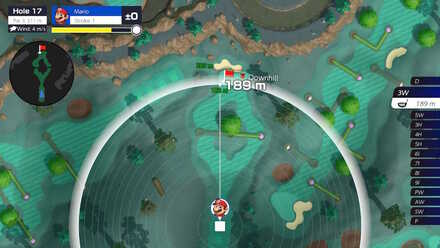
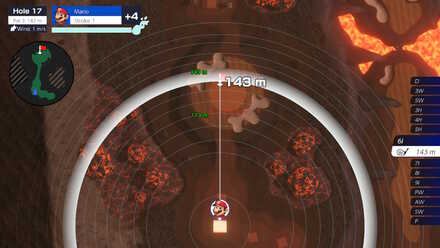
| Hole 17 |
|
| Stroke 1 |
Aim for the center of the intersection on the fairway with the Driver. |
| Stroke 2 |
Use the 9I and aim for an Eagle. |
| Stroke 3 |
If cannot get an Eagle, take the Birdie Putt on this stroke. |
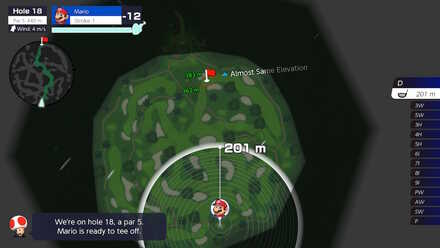
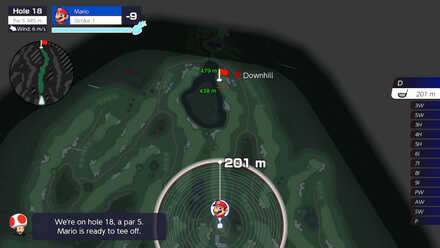
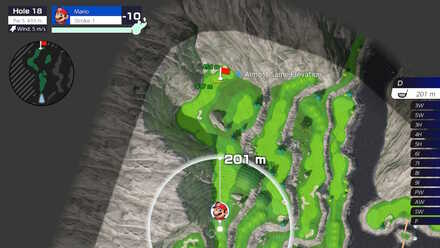
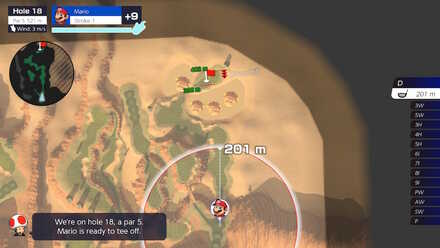
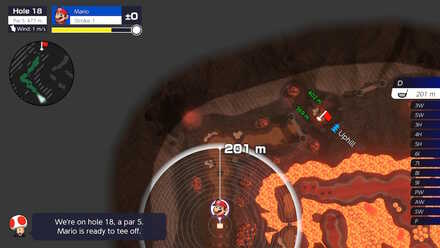
| Hole 18 |
|
| Stroke 1 |
Aim to land between the first set of bunkers using the Driver or 3W. |
| Stroke 2 |
Shoot over the bunker in front of you, being careful of the tree to the left to land on the Green. |
| Stroke 3 |
You can get a nice Eagle Putt to end the course. |
Rookie Course Walkthrough: List of Holes and How to Unlock
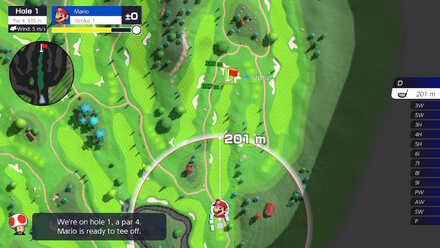
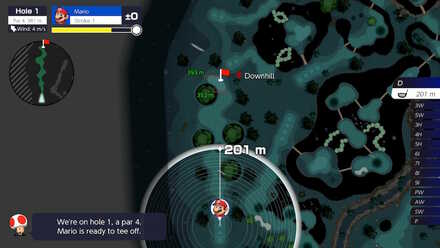
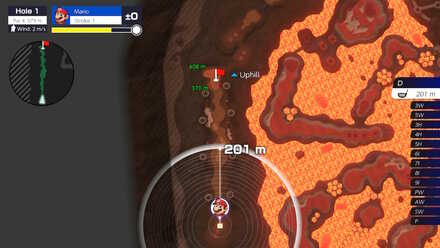
| Hole 1 |
|
| Stroke 1 |
Use the Driver and have the ball land on the Fairway near the middle bunker. |
| Stroke 2 |
Use the 4H, check the wind, set the power appropriately, and you may get an Eagle here. |
| Stroke 3 |
If it misses, you'll be in a good position for a Birdie Putt. |
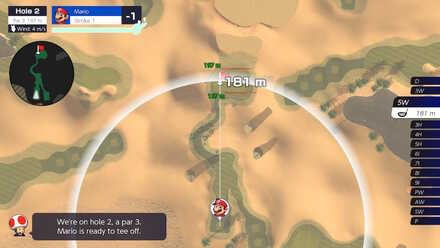
| Hole 2 |
|
| Stroke 1 |
Use the 6I for a potential hole-in-one. |
| Stroke 2 |
If you cannot get a hole-in-one, putt in for a Birdie. |
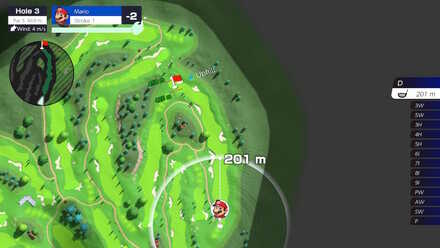
| Hole 3 |
|
| Stroke 1 |
Use the Driver to land the ball on the Fairway near the second bunker on the left. |
| Stroke 2 |
Hit the ball up to the Fairway past the 3rd bunker on the left and be careful of the tree to your left. |
| Stroke 3 |
Use the PW with a standard shot to land it on the Green, or get an Eagle with careful aiming. |
| Stroke 4 |
Get a Birdie with a calculated putt. |
Alternatively, if you are using a character with a high power stat, aim to the left so that you land on the long strip of fairway off to the side on stroke 1. On stroke 2, use a special shot to make it to the Green.
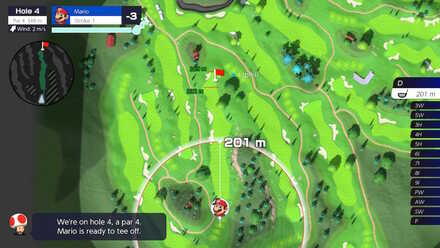
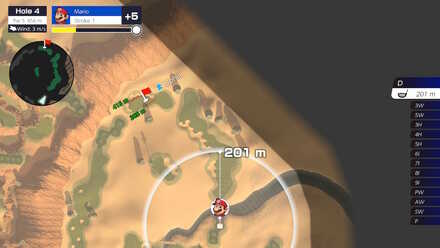
| Hole 4 |
|
| Stroke 1 |
Shoot straight down the Fairway with the Driver landing next to the first bunker. |
| Stroke 2 |
Be careful of the tree to the right and use the 5H for a potential Eagle |
| Stroke 3 |
If you cannot get an Eagle, carefully aim a putt for a Birdie. |
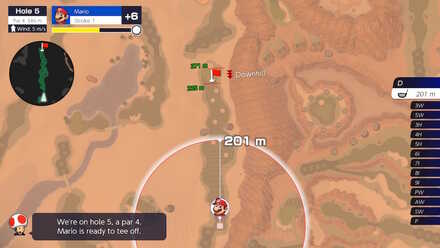
| Hole 5 |
|
| Stroke 1 |
Use the Driver and you should land near the first bunker on the left. |
| Stroke 2 |
Aim for the Green with the Driver. Be carefule not to overshoot the hole. |
| Stroke 3 |
Take the Birdie Putt. |
| Hole 6 |
|
| Stroke 1 |
Aim carefully with the 7W, account for wind and weather conditions, and add a backspin on the ball. |
| Stroke 2 |
If you do not get a hole-in-one, you should be in a good position for a Birdie. |
| Hole 7 |
|
| Stroke 1 |
Use the Driver to hit the ball up to the Fairway near the first bunker on the left. |
| Stroke 2 |
Use the 6I to hit the ball up to the Green. |
| Stroke 3 |
Take the Birdie Putt on this stroke. |
| Hole 8 |
|
| Stroke 1 |
Use the Driver and aim for the Fairway between the two trees. |
| Stroke 2 |
Use the 6I to hit the ball up to the Green. |
| Stroke 3 |
Take the Birdie Putt on this stroke. |
| Hole 9 |
|
| Stroke 1 |
Hit the ball up to the Fairway near the first bunker on the left with the Driver. |
| Stroke 2 |
Use the Driver to hit the ball over the water and land on the Fairway. |
| Stroke 3 |
Use the SW with a standard shot for a chance at an Eagle. |
| Stroke 4 |
If you cannot get an Eagle, hit another Birdie Putt. |
If the character you are using has a high power stat, you can get as far as the bunker near the water on stroke 1. On stroke 2, use a special shot to land on the Green or get a lucky Albatross.
| Hole 10 |
|
| Stroke 1 |
Aim for the Fairway near the bunker on the right. |
| Stroke 2 |
Use the 5H and aim carefully for a chance at an Eagle. |
| Stroke 3 |
If you cannot hit an Eagle, take a careful Birdie Putt. |
| Hole 11 |
|
| Stroke 1 |
Use the Driver to hit the ball straight down the Fairway, being mindful of the bunkers on either side. |
| Stroke 2 |
Use the 5H to land on the Green, being careful not to overshoot the hole. |
| Stroke 3 |
Take another Birdie Putt. |
| Hole 12 |
|
| Stroke 1 |
Use the Driver and aim straight down the Fairway. |
| Stroke 2 |
Use the 3W and curve the shot to the right to land on the Fairway near the hole. |
| Stroke 3 |
Use the SW to land on the Green |
| Stroke 4 |
Take the Birdie Putt. |
| Hole 13 |
|
| Stroke 1 |
Take a straight shot down the Fairway at full power with the Driver. |
| Stroke 2 |
Use the 3W to land on the Green, setting the power carefully as to not overshoot the hole. |
| Stroke 3 |
Go for another Birdie shot on this stroke. |
| Hole 14 |
|
| Stroke 1 |
Use the 7W, account for the weather conditions, be mindful of the tree to the right, and it's possible to get a hole-in-one here. |
| Stroke 2 |
If you cannot get a hole-in-one, take another Birdie Putt. |
| Hole 15 |
|
| Stroke 1 |
Use the Driver and aim for the Fairway past the first set of bunkers to the right |
| Stroke 2 |
Use the 3W to land on the Green. |
| Stroke 3 |
Take another Birdie on this stroke. |
| Hole 16 |
|
| Stroke 1 |
Use the 4H, account for wind, and put backspin on the ball to make sure the ball stays on the Green. |
| Stroke 2 |
If you cannot get a hole-in-one, you'll be in a good position for a Birdie. |
| Hole 17 |
|
| Stroke 1 |
Use the Driver and hit the ball up to the Fairway near the bunker to the right. |
| Stroke 2 |
Use the 5W to land on the Green being careful of the tree on the left. |
| Stroke 3 |
Get another Birdie on this stroke. |
| Hole 18 |
|
| Stroke 1 |
Hit the ball straight down the Fairway with the Driver. |
| Stroke 2 |
Use the Driver again to hit the ball up to the Fairway near the bunker to the left. |
| Stroke 3 |
Use the SW to land on the Green, or potentially score an Eagle. |
| Stroke 4 |
Score a Birdie to end the course. |
If you are using a character with a high power stat, on stroke 2, use a special shot to make it onto the Green.
Bonny Greens Course Walkthrough: List of Holes and How to Unlock
| Hole 1 |
|
Watch out for Brolders rolling around while aiming for a shot. |
| Stroke 1 |
Use the Driver to hit the ball up to the Fairway near the bunker to the left. |
| Stroke 2 |
Use the 7I to land on the Green |
| Stroke 3 |
Putt in on this stroke for a Birdie. |
| Hole 2 |
|
| Stroke 1 |
Rather than curving the shot around the bend, aim straight for the hole with the 4H. |
| Stroke 2 |
If you miss a hole-in-one, you can go for a Birdie. |
| Hole 3 |
|
Be careful not to land your ball near the Brolders. |
| Stroke 1 |
Hit the ball up to the Fairway near the first bunker on the left. |
| Stroke 2 |
Use a special shot and aim to the right of the large rock to land on the Green. |
| Stroke 3 |
Go for an Eagle Putt. |
| Hole 4 |
|
Watch out for the Ty-Foo about halfway through the course. |
| Stroke 1 |
Use the Driver to land just short of the Ty-Foo's wind and put backspin on the ball since there is a big downhill slope. |
| Stroke 2 |
Land on the Green |
| Stroke 3 |
Go for a Birdie Putt |
| Hole 5 |
|
| Stroke 1 |
Use the Driver and curve your shot to the right and land on the Fairway just before the bridge. |
| Stroke 2 |
Use the Driver again to land on the Green. |
| Stroke 3 |
Go for a Birdie Putt |
| Hole 6 |
|
Watch out for the two Ty-Foos to your left. |
| Stroke 1 |
Aim straight for the hole with the 5H. Your shot should go right over the wind streams regardless of timing. |
| Stroke 2 |
Go for the Birdie Putt on this stroke. |
| Hole 7 |
|
Watch out for the two Ty-Foos on this hole. |
| Stroke 1 |
Aim your first stroke with the Driver so that it lands past the bridge and just short of the second Ty-Foo's wind. |
| Stroke 2 |
Use the 4H to land on the Green |
| Stroke 3 |
Go for a Birdie Putt. |
| Hole 8 |
|
A few more Ty-foos can be found on this hole. |
| Stroke 1 |
Aim straight down the Fairway with the Driver, landing just short of the first Ty-Foo. |
| Stroke 2 |
Use the Driver again to make it past the second Ty-Foo. |
| Stroke 3 |
Use the PW to land on the Green. |
| Stroke 4 |
Go for a Birdie Putt on this stroke. |
If your character has enough power, you can curve stroke 1 to the left slightly so that it lands just beyond the first Ty-Foo.
| Hole 9 |
|
On this hole, you can find two groups of Brolders which can interrupt you while aiming. |
| Stroke 1 |
Aim your first shot with the Driver a bit to the right for a better chance of avoiding the first group of Brolder. |
| Stroke 2 |
Use the 5W and aim for the Green. |
| Stroke 3 |
Go for a Birdie Putt. |
| Hole 10 |
|
There are more Brolders to avoid on this hole. |
| Stroke 1 |
Aim your first shot with the Driver so that it lands just past the first group of Brolders. |
| Stroke 2 |
Use the 3W to thread the needle between the trees and land on the Green. Be careful not to land in the Bunker. |
| Stroke 3 |
Carefully aim your next putt for a Birdie. |
| Hole 11 |
|
| Stroke 1 |
Aim with the 5H and check the weather conditions to possibly get a hole-in-one. |
| Stroke 2 |
If you cannot get a hole-in-one. Take the Birdie Putt on this stroke. |
| Hole 12 |
|
The Brolders on this hole are not difficult to avoid, but watch out for the bridges that could block your shots. |
| Stroke 1 |
With the Diver and enough power, hit the ball past the first group of Brolders to land just under the first bridge. |
| Stroke 2 |
Use a special shot to land on the Green. |
| Stroke 3 |
Go for an Eagle Putt. |
| Hole 13 |
|
|
| Stroke 1 |
Use the Driver to land on the patch of Fairway to the right. |
| Stroke 2 |
Use the 8I to land on the Green. |
| Stroke 3 |
Go for the Birdie. |
| Hole 14 |
|
You will need to make use of the Tornadoes to make it through this hole. |
| Stroke 1 |
Aim for the tornado straight ahead with the Driver to land on the Fairway above. |
| Stroke 2 |
Use the 5W to land on the Green, being careful of the Ty-Foo near the hole. |
| Stroke 3 |
Get the Birdie with a careful putt. |
If you are using a character with a high power stat, you can aim to the right of the large rock and make it onto the Green on stroke 1.
How to Use Tornadoes
| Hole 15 |
|
The Ty-Foos near the hole will make it more difficult to get a hole-in-one. |
| Stroke 1 |
Aim to barely get on the Green with your first stroke. |
| Stroke 2 |
Go for a Birdie Putt. |
| Hole 16 |
|
You will make use of another Tornado for this hole while also avoiding the Ty-Foo's wind stream. |
| Stroke 1 |
Use the Driver to land on the Fairway near the bunker to the left. |
| Stroke 2 |
Use the 4H and aim for the tornado, curving your shot to the right and avoiding the Ty-Foo's wind stream. |
| Stroke 3 |
Make a careful Birdie Putt on stroke 3. |
| Hole 17 |
|
There is another Ty-Foo on this course, but it is easily avoided with the height of your shot. |
| Stroke 1 |
Use the Driver to shoot through the split tree to the left, landing on the Fairway just beyond it. |
| Stroke 2 |
Use the Driver again to aim for the Green. |
| Stroke 3 |
Go for another Birdie Putt. |
| Hole 18 |
|
| Stroke 1 |
Aim for the section of Fairway with no Brolders straight ahead. |
| Stroke 2 |
Use the 5W and aim left around the corner of the mountain. |
| Stroke 3 |
Use the 4H to land on the Green. |
| Stroke 4 |
Go for a Birdie Putt to end the course. |
You can use Bowser's special shot to make it to the Green from stroke 2.
Ridgerock Lake Course Walkthrough: List of Holes and How to Unlock
| Hole 1 |
|
| Stroke 1 |
Shoot straight down the Fairway with the Driver. |
| Stroke 2 |
Use the 6I to land on the Green, being careful to avoid the Pokey. |
| Stroke 3 |
Go for a Birdie Putt. |
| Hole 2 |
|
| Stroke 1 |
Aim for the Green. |
| Stroke 2 |
Get a Birdie. |
| Hole 3 |
|
| Stroke 1 |
Use the Driver to land between the first and second bunkers. |
| Stroke 2 |
Aim for the Green with the 3W. |
| Stroke 3 |
Go for the Birdie Putt. |
Alternatively, if you are using a character with a high power stat such as Bowser, aim a bit to the right and use a special shot to land on the Green on stroke 1.
| Hole 4 |
|
| Stroke 1 |
Aim to the left for the small patch of Fairway. |
| Stroke 2 |
Make it onto the Green. |
| Stroke 3 |
Go for an Eagle Putt. |
| Hole 5 |
|
| Stroke 1 |
Use the Driver and aim straight down the Fairway to land near the two Pokeys and bunkers. |
| Stroke 2 |
Aim for the Green with the 7I. |
| Stroke 3 |
Take the Birdie Putt. |
| Hole 6 |
|
| Stroke 1 |
Use the Driver to aim straight for the Green or to get a lucky hole-in-one. |
| Stroke 2 |
If you cannot get a hole-in-one, aim for a Birdie on this stroke. |
| Hole 7 |
|
| Stroke 1 |
Aim for the patch of Fairway to the right with the Driver. |
| Stroke 2 |
Aim for the Green using the 7W. |
| Stroke 3 |
Take the Birdie Putt. |
| Hole 8 |
|
| Stroke 1 |
Aim for the Fairway to either side of the water, being careful to avoid the ball rolling into the hazard area. |
| Stroke 2 |
Aim for th Green with the 7W. |
| Stroke 3 |
Take a Birdie Putt. |
| Hole 9 |
|
| Stroke 1 |
Aim straight with the Driver. |
| Stroke 2 |
Use the 7W to land on the patch of Fairway left of the hole. |
| Stroke 3 |
Use the SW to land on the Green. |
| Stroke 4 |
Take a Birdie Putt. |
If your character has enough power to reach the second strip of the Fairway on stroke 1, aim to land there and on stroke 2, use a special shot to land on the Green.
| Hole 10 |
|
| Stroke 1 |
Aim for the Fairway off to the right side with the Driver. |
| Stroke 2 |
Use the 5H to land on the Green. |
| Stroke 3 |
Take the Birdie Putt. |
| Hole 11 |
|
| Stroke 1 |
Aim for the Green with the 5H. |
| Stroke 2 |
Go for a Birdie. |
| Hole 12 |
|
| Stroke 1 |
Use the Driver and aim to land next to the second bunker to the right. |
| Stroke 2 |
Use the 7W to land just past the third bunker before the bridge. |
| Stroke 3 |
Use this stroke to land on the Green. |
| Stroke 4 |
Go for a Birdie Putt. |
When using a character with a high power stat, you can aim to the right on stroke 1 and land on the small patch of Fairway. On stroke 2 aim straight for the Green, your shot should clear over the cliff with no trouble.
| Hole 13 |
|
| Stroke 1 |
Use the Driver to land under the arch to the right. |
| Stroke 2 |
Use the Driver again to and curve the ball around the next arch to land on the Green. |
| Stroke 3 |
Score a Birdie Putt. |
| Hole 14 |
|
| Stroke 1 |
Use the Driver to land near the bunker to have a straight shot at the hole. |
| Stroke 2 |
Land on the Green with the Driver |
| Stroke 3 |
Take another Birdie Putt. |
| Hole 15 |
|
| Stroke 1 |
Aim straight for the Green. |
| Stroke 2 |
Get a Birdie. |
| Hole 16 |
|
| Stroke 1 |
Aim straight with the Driver, being careful of the Pokey. |
| Stroke 2 |
Use the 7I to land on the Green. |
| Stroke 3 |
Go for a Birdie Putt. |
| Hole 17 |
|
| Stroke 1 |
Aim slightly right with the Driver. |
| Stroke 2 |
Aim for the Green, being careful of the rock on the left. |
| Stroke 3 |
Go for the Birdie Putt. |
| Hole 18 |
|
| Stroke 1 |
Use the Driver to shoot straight down the Fairway. |
| Stroke 2 |
Use the Driver again to thread the needle between the Sandmaarghs, curving the shot to the right. |
| Stroke 3 |
If you land on the Green, you have a chance at an Eagle Putt. |
Balmy Dunes Course Walkthrough: List of Holes and How to Unlock
Due to the unpredictable weather conditions of Wildweather Woods, you may have to adjust many of your shots depending on rain and thunderstorms. Remember to hold your power back slightly when you land under thunderclouds and add more power to your shots in rainy weather.
Weather Conditions and Effects
| Hole 1 |
|
| Stroke 1 |
Use the Driver and aim straight down the field. |
| Stroke 2 |
Aim for the Green. |
| Stroke 3 |
Go for the Birdie. |
| Hole 2 |
|
| Stroke 1 |
Aim for the Green right away and try to get a hole-in-one. |
| Stroke 2 |
If you cannot get a hole-in-one, go for a Birdie Putt. |
| Hole 3 |
|
| Stroke 1 |
Try to make the ball land slightly right of the center of the mid section past the first group of Biddybuds with the Driver. |
| Stroke 2 |
Use the 3W to aim for the Green and be careful of the trees on either side of your shot. You may need to curve the shot depending on your positioning. |
| Stroke 3 |
Go for the Birdie. |
| Hole 4 |
|
| Stroke 1 |
Aim straight down the Fairway with the Driver to land just past the first group of Biddybuds. |
| Stroke 2 |
Use a Special Shot to land on the Green. |
| Stroke 3 |
Aim for an Eagle on this stroke. |
| Hole 5 |
|
| Stroke 1 |
Aim to the left with the Driver and put backspin on your shot so that it doesn't roll into the water. |
| Stroke 2 |
Use the 7W and aim for the Green being careful not to overshoot and land in the bunker. |
| Stroke 3 |
Make a Birdie Putt. |
| Hole 6 |
|
| Stroke 1 |
Go staight for the Green with the 5H, accounting for both the wind and the rain. |
| Stroke 2 |
If you miss a hole-in-one, go for a Birdie on this stroke. |
| Hole 7 |
|
| Stroke 1 |
Aim your shot with the Driver to land near the first bridge. If there is thundercloud near this area, try to avoid it. |
| Stroke 2 |
Use the 3W and aim for the hole. |
| Stroke 3 |
Take another Birdie Putt. |
| Hole 8 |
|
| Stroke 1 |
A thundercloud is likely to spawn on both the left and right platforms. Aim for the platform to the left and try to avoid the thundercloud if possible. |
| Stroke 2 |
If successful, you will land on the Fairway in position to shoot for the hole. |
| Stroke 3 |
Take a Birdie Putt, accounting for the rain and elevation. |
| Hole 9 |
|
| Stroke 1 |
Aim straight down the Fairway with the Driver and avoid any thunderclouds. |
| Stroke 2 |
Use the Driver again and aim down the next stretch of Fairway, being careful to avoid the trees on the right and the thundercloud ahead. |
| Stroke 3 |
Use the 7I to land on the Green. |
| Stroke 4 |
Take a calculated Birdie Putt. |
Alternatively, if your character has enough power, aim to the left to land on the closest patch of Fairway past the water. On stroke 2, use a special shot to land on the Green.
| Hole 10 |
|
| Stroke 1 |
Aim straight ahead with the Driver to land past the Biddybuds. |
| Stroke 2 |
Be careful of the tree on the left and use the 3W to land near the hole. |
| Stroke 3 |
Take a Birdie Putt, accounting for the rain and elevation. |
| Hole 11 |
|
| Stroke 1 |
Aim to the right side of the water in the center with the Driver. |
| Stroke 2 |
Aim for the Green such that your ball will pass over the water, being careful of any trees. |
| Stroke 3 |
Once on the Green, go for the Eagle Putt. |
| Hole 12 |
|
| Stroke 1 |
Aim with the 3W to position yourself to shoot for the Green. |
| Stroke 2 |
Being careful of the trees, use the 5H and land on the Green. |
| Stroke 3 |
Take the Birdie Putt, being careful of the Biddybuds near the hole. |
| Hole 13 |
|
| Stroke 1 |
Use the 4H and aim for the hole, being careful of the tree on the right. |
| Stroke 2 |
Go for the Birdie Putt. |
| Hole 14 |
|
| Stroke 1 |
Aim straight down the Fairway with the Driver. |
| Stroke 2 |
Use the 4H to land on the Green past the Biddybuds. |
| Stroke 3 |
Take the Birdie Putt. |
| Hole 15 |
|
| Stroke 1 |
Aim straight down the Fairway with the Driver to land near the bunker. |
| Stroke 2 |
Be careful of the tree on the right and use the Driver again to land on the Green. |
| Stroke 3 |
Take a Birdie Putt. |
| Hole 16 |
|
| Stroke 1 |
Use the Drive and aim left, landing near before the bunker. |
| Stroke 2 |
Use a special shot, and you should be able to make it to the Green. |
| Stroke 3 |
Take an Eagle Putt. |
| Hole 17 |
|
| Stroke 1 |
Use the Driver to aim on either side of the center tree depending on wind conditions, curving the shot to land on the Green. |
| Stroke 2 |
Take a Birdie Putt. |
| Hole 18 |
|
| Stroke 1 |
Start with the Driver and aim to land between the first two Piranha Plants. |
| Stroke 2 |
Aim for the Green with the 3W. |
| Stroke 3 |
Try for a Birdie Putt to finish the course. |
Wildweather Woods Course Walkthrough: List of Holes and How to Unlock
| Hole 1 |
|
| Stroke 1 |
Use the Driver to land on the Fairway towards the center. This patch of Fairway slopes a bit so use a backspin. |
| Stroke 2 |
Use the driver again and aim for the Green. |
| Stroke 3 |
Take the Birdie Putt. |
| Hole 2 |
|
| Stroke 1 |
Use the 5W to aim straight for the Green, avoiding the Whomp standing in the center. |
| Stroke 2 |
Take a careful Birdie Putt. |
| Hole 3 |
|
| Stroke 1 |
Use the Driver and aim for the patch of Fairway to the right. |
| Stroke 2 |
Aim for the Green. You may need to be using a character with a high power stat here. |
| Stroke 3 |
Once on the Green, take an Eagle Putt. |
| Hole 4 |
|
| Stroke 1 |
Aim for the bit of Fairway straight ahead with the Driver. |
| Stroke 2 |
Use the 5W and make it over to the Green. |
| Stroke 3 |
Take a careful putt, accounting for the slope for another Birdie. |
| Hole 5 |
|
| Stroke 1 |
Aim straight with the Driver. |
| Stroke 2 |
Use the 5H to make it onto the Green. |
| Stroke 3 |
Take a Birdie Putt. |
If you are using a character with a high power stat such as Bowser, use a special shot on this hole on stroke 1 to land directly on the Green.
| Hole 6 |
|
| Stroke 1 |
Use the 7W and aim straight for the hole and avoid the Bowser-shaped bunkers. |
| Stroke 2 |
Take a Birdie Putt. |
| Hole 7 |
|
| Stroke 1 |
Aim for the Fairway on the left with the Driver. |
| Stroke 2 |
Make use the 5H and land on the Green. |
| Stroke 3 |
Go for a Birdie on this stroke. |
| Hole 8 |
|
| Stroke 1 |
Use the Driver to land on the Fairway straight ahead. |
| Stroke 2 |
Use the 4H to make it on to the Green. |
| Stroke 3 |
Go for another Birdie Putt. |
Alternatively, if your character has enough power, it's possible to land on the Green with a high shot curved slightly to the left on stroke 1.
| Hole 9 |
|
| Stroke 1 |
Aim to the right platform with the Driver. |
| Stroke 2 |
Aim straight for the Green with a full powered shot. You may need to use a character with a high power stat to do so. |
| Stroke 3 |
Aim for the hole for an Eagle. |
| Hole 10 |
|
| Stroke 1 |
Use the Driver and aim straight ahead. |
| Stroke 2 |
Use the 7W to hit the ball over the Whomp and land on the Green. |
| Stroke 3 |
Take a Birdie Putt. |
| Hole 11 |
|
| Stroke 1 |
Without touching the analog stick, use the Driver for a high power shot over the wall and land near the Green. |
| Stroke 2 |
With a careful putt, you can take a Birdie here. |
Getting a Birdie here can be tricky depending on if your character had enough power to make it to the Green here or not.
| Hole 12 |
|
| Stroke 1 |
Aim straight ahead with the Driver. |
| Stroke 2 |
Use the 4H to land on the Green. |
| Stroke 3 |
Take a Birdie Putt. |
Alternatively, if you are using a character with a high power stat, use a special shot on stroke 1, aiming your shot to thread the needle between the two broken walls to land directly on the Green.
| Hole 13 |
|
| Stroke 1 |
Use the Driver to aim down the Fairway and land near the Bunker. |
| Stroke 2 |
Use the Driver on this stroke for a potential Eagle. |
| Stroke 3 |
If you cannot get an Eagle, go for a Birdie Putt. |
| Hole 14 |
|
| Stroke 1 |
Aim to the strip of fairway to the right with the Driver. |
| Stroke 2 |
Use this stroke to land on the Green. |
| Stroke 3 |
Take an Eagle Putt. |
| Hole 15 |
|
| Stroke 1 |
Aim your first shot with the Driver to land near the Bunker. |
| Stroke 2 |
Use the 5W to make it onto the Green. |
| Stroke 3 |
Putt in for a Birdie. |
| Hole 16 |
|
| Stroke 1 |
Aim your first shot with the Driver to land near the small bridge. |
| Stroke 2 |
Use the 7I to make it onto the Green. |
| Stroke 3 |
Putt in for a Birdie. |
| Hole 17 |
|
| Stroke 1 |
Use the 7I to make it onto the Green. |
| Stroke 2 |
Putt in for a Birdie. |
| Hole 18 |
|
| Stroke 1 |
Use the Driver to land near the bunker next to the Whomps. |
| Stroke 2 |
Use the Driver again and aim to land before the gate. |
| Stroke 3 |
Use the 9I to make it onto the Green. Your shot should pass under the gate. |
| Stroke 4 |
Make a putt for one last Birdie to end the course. |
Alternatively, if you are using Bowser, you can clear straight to the fairway by cutting over the corner on stroke 1. On stroke 2, use a special shot to clear straight over the gate and land on the Green.
Bowser Highlands Course Walkthrough: List of Holes and How to Unlock
Tips and Tricks Top Page


![Monster Hunter Stories 3 Review [First Impressions] | Simply Rejuvenating](https://img.game8.co/4438641/2a31b7702bd70e78ec8efd24661dacda.jpeg/thumb)


