Best Combos
Here are the best combos you should use in Stellar Blade. Know what the best combos are, how to learn them, and read on for a list of all the combos!
List of Contents
Best Combos
Onslaught IV
| Onslaught IV | |
|---|---|
| Command Input | |
The most useful combo is the Onslaught IV, and is a 5-hit combo alternating between heavy and light attacks. It's effective to most enemies and can easily take most out when you land the fifth hit.
The second and third hits of this combo has a short recovery time, so when an enemy attacks mid combo, it's easy to switch to a guard or a Perfect Dodge.
Rush Chain Combos
| Rush | Hold |
|---|
A helpful move when dealing with a far away enemy is to use a Rush attack. Using this will make Eve rush to the enemy's side and immediately perform an attack.
It is best to remember that Rush Attacks have a cooldown timer before you can perform another one. Its gauge is located just above the Rush icon at the bottom right of the screen.
Rush Chain I
| Rush Chain I | |
|---|---|
| Command Input | Hold |
The Rush Chain I combo can be used after succesfully hitting an enemy with a Rush attack. Rush chain I is a series of rapid attacks that deals huge damage to the enemies.
Rush Chain II
| Command Input | Hold |
|---|
Rush Chain II is a more powerful version of Rush Chain I as it consumes Beta Energy to perform it.
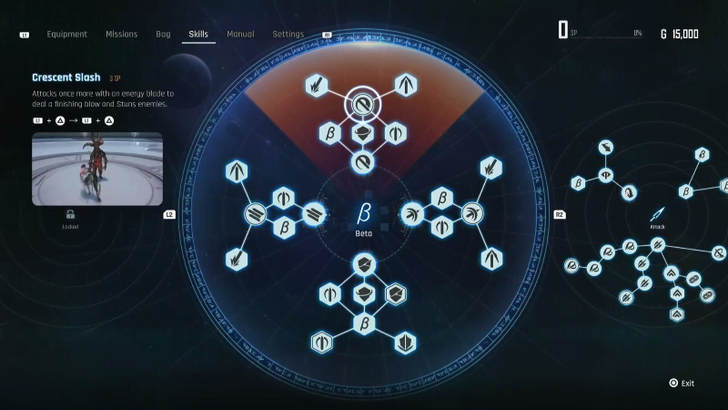
Beta Skill Combos
| Triplet to Quadruplet | |
|---|---|
| Command Input | |
Follow up combos are accessible to Beta Skills such as Triplet, Slash, and Shockwave if you press the same buttons again immediately after performing them. However, to have access to these combos, you will have to unlock their advanced versions first, namely: Quadruplet, Crescent Slash, and Cross Wave.
In order to perform these, you will need to have Beta Energy, but the follow up combos do not consume Beta Energy at all so feel free to do the combos whenever you perform a Beta Skill.
Continuous Light Attack Combo
| Continuous Light Attack Combo | |
|---|---|
| Command Input | |
Light attacks are not as powerful as the heavy attacks but its advantage is that it can hit rapidly and you can chain up to 4 hits with just using it. This combo is useful against hordes of enemies, especially when you are surrounded by them.
It's fast and since the slashes are horizontal, it also has a wide range, making sure that you hit multiple enemies at once.
Incursion II
| Incursion II | |
|---|---|
| Command Input | |
If an enemy manages to move back or step away during one of your attacks, immediately perform the Incursion II combo.
The last hit of this combo is a Rush attack and will make sure that you maintain close proximity to your enemy.
How to Learn Combos
Unlock Skill Trees
Combos can be learned through Unlocking Skill Trees by consuming SP.
You can unlock Skill Trees at nearby Camps. There are various combos already learned at the beginning of the game, but there are also powerful locked ones that can be learned, therefore collecting SP is key to unlock them further.
Obtaining SP
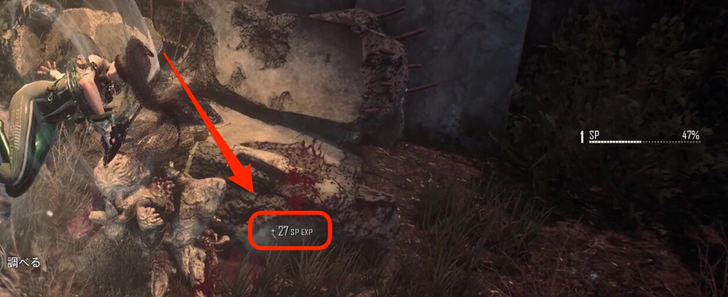
SP, along with EXP can be obtained by defeating enemies. One way to farm SP is by using the chair at a Camp to rest, this will respawn enemies in the area and you can defeat them again for more SP.
Combo List
Normal Attack Combos
| Combo | Command Input |
|---|---|
| Continuous Light Attack | |
| Incursion I | |
| Incursion II | |
| Incursion III | |
| Incursion IV | |
| Onslaught I | |
| Onslaught II | |
| Onslaught III | |
| Onslaught IV | |
| Rush | Hold |
| Rush Chain I | Hold |
| Rush Chain II | Hold
Consumes 1 Beta Energy |
| Aerial Blow |
Follow Up Combos After A Specific Skill
| Combo | Command Input |
|---|---|
| Counter I | After Perfect Parry, Hold
Consumes 1 Beta Energy |
| Counter II | After Perfect Parry, Hold
Consumes 1 Beta Energy |
| Counter Chain I | After Counter I,
Consumes 3 Beta Energy |
| Counter Chain II | After Counter II,
Consumes 3 Beta Energy |
| Reflection I | After Perfect Dodge, Hold
Consumes 1 Beta Energy |
| Reflection II | After Perfect Dodge, Hold
Consumes 1 Beta Energy |
| Chain Reflection I | After Reflection I,
Consumes 3 Beta Energy |
| Chain Reflection II | After Reflection II,
Consumes 3 Beta Energy |
| Quadruplet | |
| Crescent Slash | |
| Cross Wave |
Stellar Blade Related Guides

All Combat Tips and Combos
Comment
Author

Rankings
- We could not find the message board you were looking for.
Gaming News

![Star Savior Review [First Impressions] | Engaging, Entertaining, and Expensive](https://img.game8.co/4447603/8f500e9bf666bdb8adb1af478e9dfdbd.png/show)


Popular Games

Genshin Impact Walkthrough & Guides Wiki
Umamusume: Pretty Derby Walkthrough & Guides Wiki
Crimson Desert Walkthrough & Guides Wiki
Monster Hunter Stories 3: Twisted Reflection Walkthrough & Guides Wiki
Honkai: Star Rail Walkthrough & Guides Wiki
Pokemon Pokopia Walkthrough & Guides Wiki
The Seven Deadly Sins: Origin Walkthrough & Guides Wiki
Wuthering Waves Walkthrough & Guides Wiki
Zenless Zone Zero Walkthrough & Guides Wiki
Arknights: Endfield Walkthrough & Guides Wiki


Recommended Games
Fire Emblem Heroes (FEH) Walkthrough & Guides Wiki
Diablo 4: Vessel of Hatred Walkthrough & Guides Wiki
Cyberpunk 2077: Ultimate Edition Walkthrough & Guides Wiki
Yu-Gi-Oh! Master Duel Walkthrough & Guides Wiki
Super Smash Bros. Ultimate Walkthrough & Guides Wiki
Pokemon Brilliant Diamond and Shining Pearl (BDSP) Walkthrough & Guides Wiki
Elden Ring Shadow of the Erdtree Walkthrough & Guides Wiki
Monster Hunter World Walkthrough & Guides Wiki
The Legend of Zelda: Tears of the Kingdom Walkthrough & Guides Wiki
Persona 3 Reload Walkthrough & Guides Wiki


All rights reserved
© 2024 SHIFT UP Corporation. All rights reserved. Published by Sony Interactive Entertainment Inc.
The copyrights of videos of games used in our content and other intellectual property rights belong to the provider of the game.
The contents we provide on this site were created personally by members of the Game8 editorial department.
We refuse the right to reuse or repost content taken without our permission such as data or images to other sites.