 Great Swords
 Long Swords
 Swords and Shields
 Dual Blades
 Hammers
 Hunting Horns
 Lances
 Gunlances
 Switch Axe
 Charge Blade
 Insect Glaive
 Kinsects
 Bows
Bows Light Bowguns
 Heavy Bowguns
This survey will take about 1 minute.
Your answers will help us to improve our website.
Monster Hunter World (MHW)
How To Use Bow
★ 2025/2/28: Monster Hunter Wilds is now available!
Join the hunt at our Monster Hunter Wilds Wiki!
This is a guide on how to use the favorite weapon of every speedrunner in Monster Hunter World (MHW), the Bow. Read on more to learn about their controls and how to effectively use them.
List of Contents
Bow Basic Controls
Base Game Controls
Hold |
Aim |
|---|---|
| Shoot | |
| Special/Power Shot | |
| Dragon Piercer | |
| Select Coating | |
| Load/Unload Coating | |
While Aiming + |
Aim Slinger (unsheathed) |
Bow Mechanics
The Bow is a weapon with a very high skill ceiling. The Bow can be deal a decent amount of damage when used by new players and can become one of the highest damage dealing weapons when used by experts. This weapon is commonly used by speedrunners due to its very high damage output when used correctly. This requires players to correctly manage their stamina all the while hitting all of their shots.
The reason why this weapon has a very high skill ceiling is because played need to manage a lot of things at the same time to get the most out of the Bow. Having the correct armor skills, managing the player's stamina, using the correct coatings, contantly being aware of the player's positioning, and also aiming and hitting the monster at the right parts.
All of these causes the Bow to become one of the strongest weapons as well as one of the most difficult ones to master.
Coatings
Coatings allow the players attacks to have additional effects when attacking the monster. This allows players to increase their damage or apply some status ailments to the monster. Although there are times where the Bow will shoot out multiple arrows in 1 attack, only 1 coating will be consumed per attack.
Correctly managing the coatings with the number of arrows in an attack is an important mechanic to master when using the Bow.
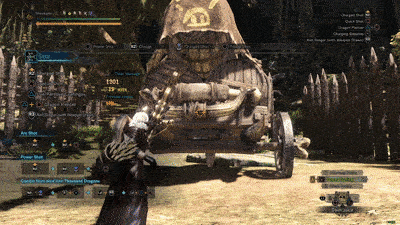
Bow Charge
Charging the Bow is one of the original mechanics when using this weapon. Charging the Bow can be done in different ways like holding down R2 or doing a Charging Sidestep when aiming. Every charge will increase the Bow's damage and number of arrows per attack up to a maximum of 4 charges.
Best Bow Combos
Dash Dancing
Dash Dancing is the highest damaging combo for the Bow. Executing this combo costs a lot of stamina so players need to carefully watch there stamina while doing this. There are multiple ways to reduce the stamina cost of the moves to prolong the combo and significantly increase the total damage of it.
This combo is also very versatile since every Charging Sidestep can allow the player to make different moves depending on the current situation.
| While Aiming |
Stamina Positive Combo
This combo is very important to Bow users since it allows them to regenerate a bit of stamina while attacking the enemy. With the right amount of Stamina Cost reduction and Stamina regeneration, the player's stamina will increase depending on the levels of the Stamina management skills.
| While Aiming |
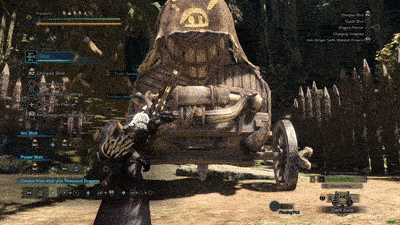
Dragon Piercer

The Dragon Piercer is a very special move for the Bow. This attack has a very long range and pierces the enemy, damaging them multiple times when they are hit. This move is also very effective for Large Monsters with a very long body like the Kulve Taroth or the Zinogre.
The Dragon Piercer's damage can also be increased depending on the current charge level of the Bow. Lastly, the Dragon Piercer is a very good part breaking move since the it can break parts easily and can even sever Large monster tails.
| While Aiming |
Arc Shot
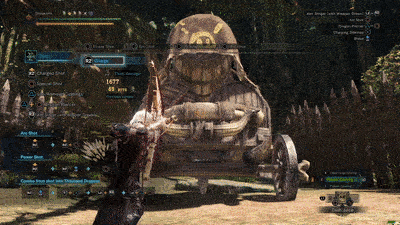
The Arc Shot is a very unique move to the Bow. The move rains down multiple pellets that deal very little damage but can deal a lot of stun damage. If a Large Monster is down, you can shoot 2-3 Arc Shots towards its head to stun and down them again before they can rise up.
While Aiming |
After a Power Shot > |
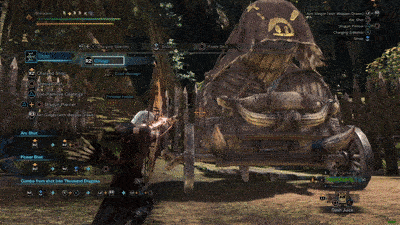
Thousand Dragons
The Thousand Dragons is the newest move added to the Bow in the Iceborne DLC. This move shoots multiple arrow similar to a shotgun and applies the effects of the Slinger Ammo the player is currently carrying except for Flash Pods and Dung Pods.
Related Links
Author

How To Use Bow
Please participate in our site
improvement survey
03/2026
improvement survey
03/2026
Would you assist in
improving Game8's site?
improving Game8's site?

×
We are listening to our users' valuable opinions and discussing how to act on them.
The information collected through this survey will be used for the purpose of improving our services. In addition, the information will only be disclosed a part of a statistic in a format that will not allow identification of personal information.
Begin Survey
Not Now
×
Please rate each item regarding Game8.co's Advertisements.
Amount of Ads
Very Dissatisfied
Somewhat Dissatisfied
Fine
Somewhat Satisfied
Highly Satisfied
Placement of Ads
Timing of Ad Display
Ad Loading Speed
Safeness of Ads
Content of Ads
×
Please rate each item regarding Game8.co's Quality of Articles.
Amount of information
Very Dissatisfied
Somewhat Dissatisfied
Fine
Somewhat Satisfied
Highly Satisfied
Frequency of updates
Speed of new information
Accuracy of articles
Understandibility of articles
Readability of sentences
×
Please rate each item regarding Game8.co's Usability of the Site.
Ease of finding information
Very Dissatisfied
Somewhat Dissatisfied
Fine
Somewhat Satisfied
Highly Satisfied
Loading Speed
Use of Color
Font Size
Visibility of Images
Easy to Understand Layout
×
Please rate each item regarding Game8.co's Message Boards, Comments.
Ease of Writing
Very Dissatisfied
Somewhat Dissatisfied
Fine
Somewhat Satisfied
Highly Satisfied
Readability
Ease in Finding Information
Comment Quality
Comment Quantity
Admin Response
×
Please rate each item regarding Game8.co's Site's new design.
Please rate our site's new design
Very Dissatisfied
Somewhat Dissatisfied
Fine
Somewhat Satisfied
Highly Satisfied
Do you think that the website's design change makes the site easier to use?
Has the new design made it easier for you to find information on the site?
Has the new design improved the overall visual appeal of the site?
How would you rate your overall satisfaction with the new design of the site?
×
How likely are you to recommend Game8 to someone you know?
Very Unlikely
0
1
2
3
4
5
6
7
8
9
10
Very Likely
If you have other opinions regarding potential improvement to the website, please share them with us. We would appreciate your honest opinion.
Note: This is a free response section, so you can proceed without entering anything.
Note: Please be sure not to enter any kind of personal information into your response.
Note: Please be sure not to enter any kind of personal information into your response.
×
Thank You
×
Thank you for participating in our survey! Your answers will help us to improve the quality of our website and services.
We hope you continue to make use of Game8.
We hope you continue to make use of Game8.
Close
Rankings
- We could not find the message board you were looking for.
Gaming News


![Monster Hunter Stories 3 Review [First Impressions] | Simply Rejuvenating](https://img.game8.co/4438641/2a31b7702bd70e78ec8efd24661dacda.jpeg/thumb)
Popular Games

Genshin Impact Walkthrough & Guides Wiki
Honkai: Star Rail Walkthrough & Guides Wiki
Umamusume: Pretty Derby Walkthrough & Guides Wiki
Pokemon Pokopia Walkthrough & Guides Wiki
Resident Evil Requiem (RE9) Walkthrough & Guides Wiki
Monster Hunter Wilds Walkthrough & Guides Wiki
Wuthering Waves Walkthrough & Guides Wiki
Arknights: Endfield Walkthrough & Guides Wiki
Pokemon FireRed and LeafGreen (FRLG) Walkthrough & Guides Wiki
Pokemon TCG Pocket (PTCGP) Strategies & Guides Wiki


Recommended Games
Diablo 4: Vessel of Hatred Walkthrough & Guides Wiki
Cyberpunk 2077: Ultimate Edition Walkthrough & Guides Wiki
Fire Emblem Heroes (FEH) Walkthrough & Guides Wiki
Yu-Gi-Oh! Master Duel Walkthrough & Guides Wiki
Super Smash Bros. Ultimate Walkthrough & Guides Wiki
Pokemon Brilliant Diamond and Shining Pearl (BDSP) Walkthrough & Guides Wiki
Elden Ring Shadow of the Erdtree Walkthrough & Guides Wiki
Monster Hunter World Walkthrough & Guides Wiki
The Legend of Zelda: Tears of the Kingdom Walkthrough & Guides Wiki
Persona 3 Reload Walkthrough & Guides Wiki


All rights reserved
©CAPCOM CO., LTD. 2018, 2019 ALL RIGHTS RESERVED.
The copyrights of videos of games used in our content and other intellectual property rights belong to the provider of the game.
The contents we provide on this site were created personally by members of the Game8 editorial department.
We refuse the right to reuse or repost content taken without our permission such as data or images to other sites.