Wasteland Tower Region: Korok Seed Map, Shrines, and Quests
★ Sequel: Tears of the Kingdom Guide here!
★ Get a head start with our Beginner's Guide
┗ The Best Recipes to Cook | Rupee Farming
★ Shrines Locations | Korok Seeds Locations
★ Explore after the story with our Post Game Guide
This page is a map of the Wasteland Tower Region in The Legend of Zelda: Breath of the Wild (BotW). Here you can find all Korok Seed locations in the Wasteland Tower Region, as well as quests, shrines, and other locations.
List of Contents
Wasteland Tower Region Korok Seed Map
Map of All Wasteland Tower Korok Seeds
| Wasteland Korok Seed Map |
|---|
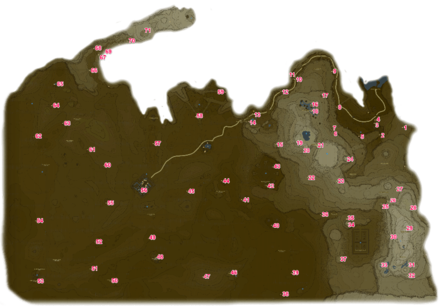 View Full Map Image |
How to Get All Wasteland Koroks
| Total No. | Korok in Region | Solution & Video Link |
|---|---|---|
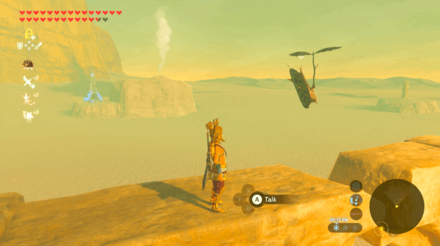
| 413 |
 Enlarge Enlarge |
Pinwheel Balloon
Shoot three, teleporting balloons. |
| 414 |
 Enlarge Enlarge |
Pinwheel Balloon
Shoot five moving balloons. |
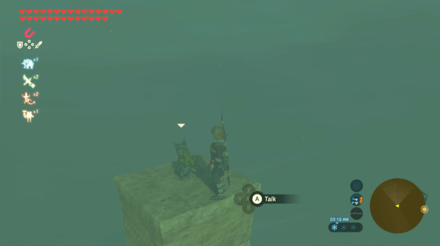
| 415 |
 Enlarge Enlarge |
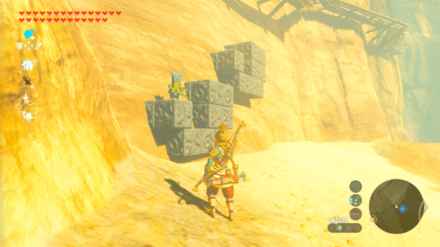
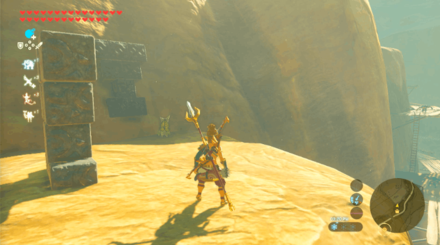
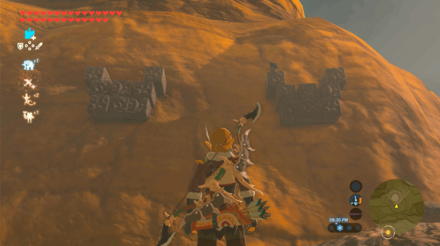
Metal Block
Use Magnesis on the block on top of the roof. Place it on the first block of the left set to match the blocks on the right. |
| 416 |
 Enlarge Enlarge |
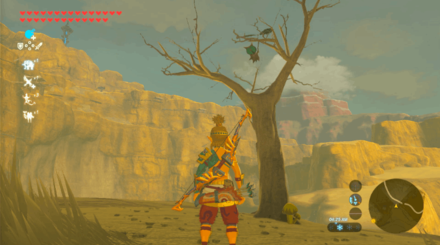
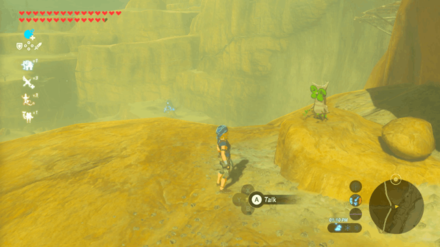
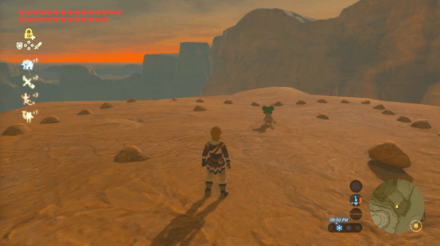
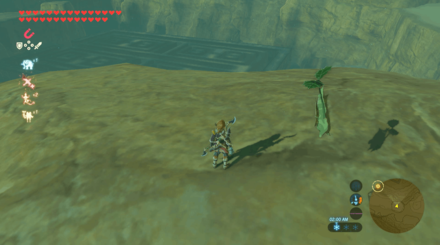
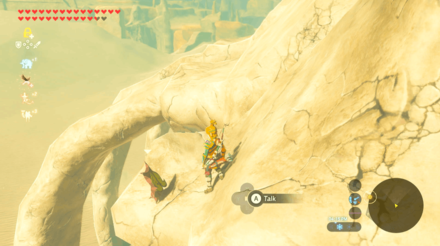
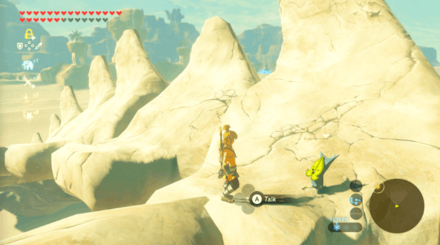
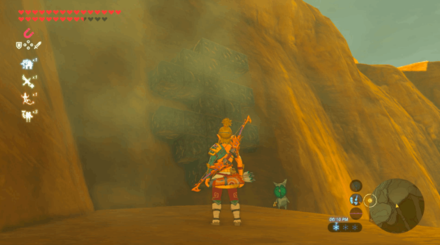
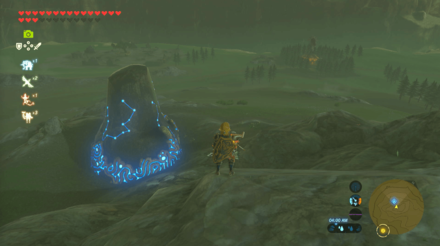
Peak Sparkles
Climb on the tree by the edge of the cliff with a Zapshroom on its base. Examine the sparkles on top of the tree. |
| 417 |
 Enlarge Enlarge |
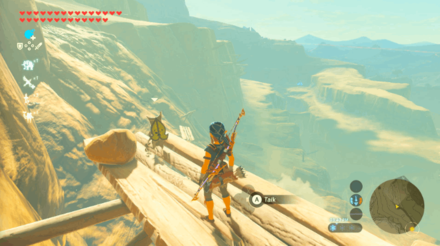
Metal Block
Use Magnesis on the cube on the wooden platform above the puzzle. Place the cube in the middle of the right set of blocks to match the left. |
| 418 |
 Enlarge Enlarge |
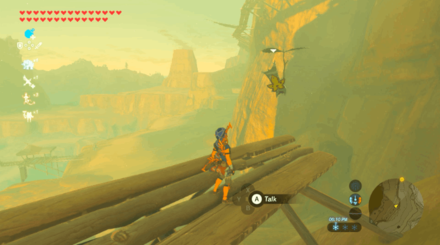
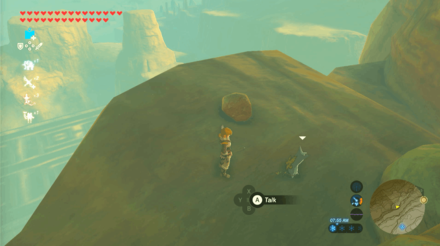
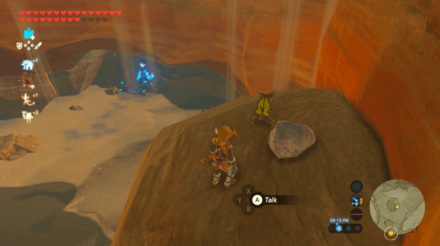
Rock
Pick up the rock at the far right end of the wooden platform. |
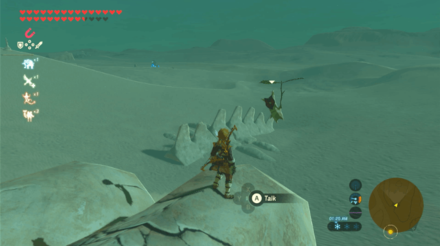
| 419 |
 Enlarge Enlarge |
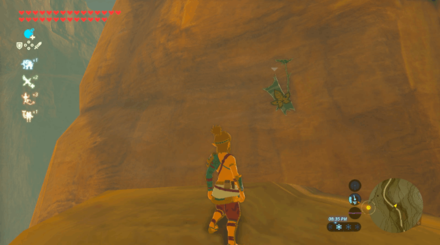
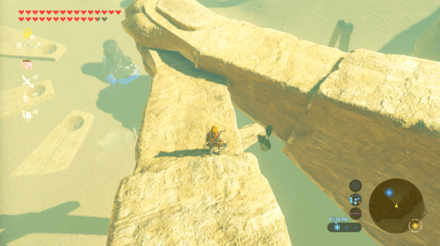
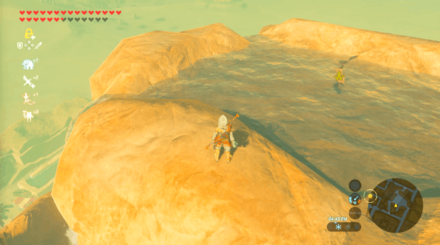
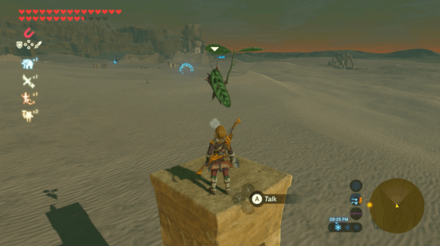
Timed Ring
Stand on the tree stump and glide down to the ring. |
| 420 |
 Enlarge Enlarge |
Rock
Pick up the rock at the end of the land bridge. |
| 421 |
 Enlarge Enlarge |
Metal Block
Use Magnesis on the cube on top of the right set of blocks and place it in the top middle of the left set of blocks. |
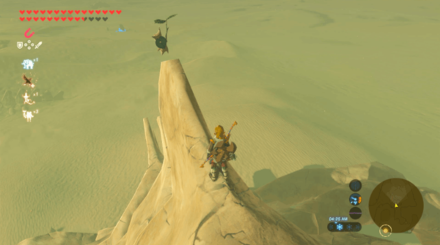
| 422 |
 Enlarge Enlarge |
Timed Ring
Run and paraglide down to the ring. |
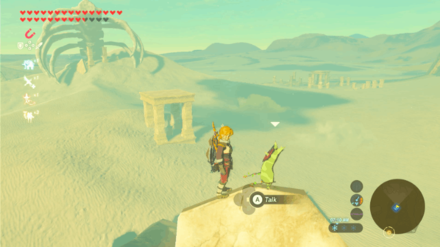
| 423 |
 Enlarge Enlarge |
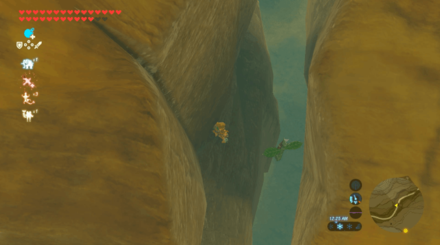
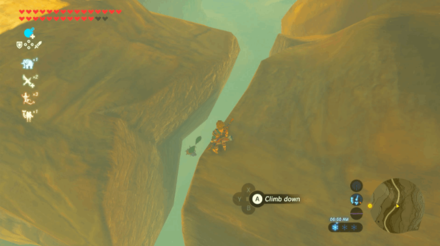
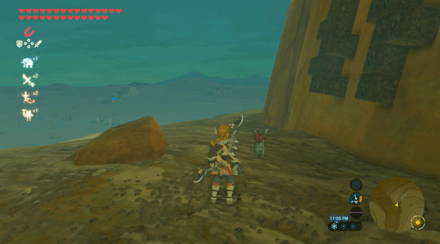
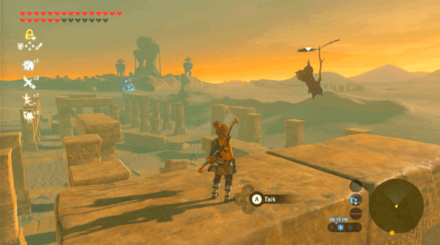
Peak Sparkles
Climb down the gap between the two archways and stand on the small landing to examine the sparkles. |
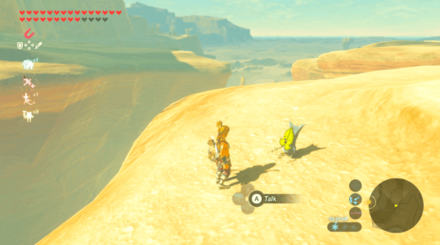
| 424 |
 Enlarge Enlarge |
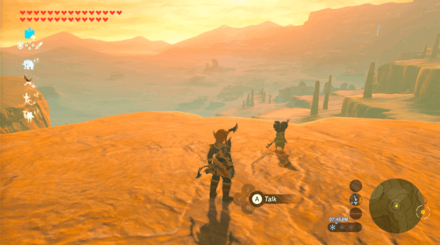
One Balloon
Shoot the balloon in between the cracks of the land bridge. |
| 425 |
 Enlarge Enlarge |
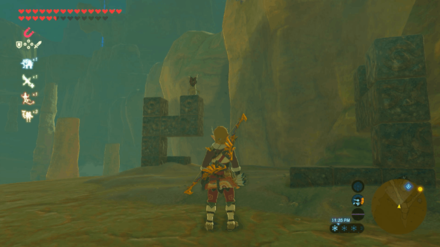
Rock
Pick up the rock on top of the tall rock pillar beside the stable full of Rushrooms. |
| 426 |
 Enlarge Enlarge |
Rock
Pick up the rock on the corner of the rocky mountains overlooking the shrine and stable. |
| 427 |
 Enlarge Enlarge |
Metal Block
Use Magnesis and place the moveable block in the middle of the left set of blocks. |
| 428 |
 Enlarge Enlarge |
One Acorn
Hit the hanging acorn beneath the rocks. |
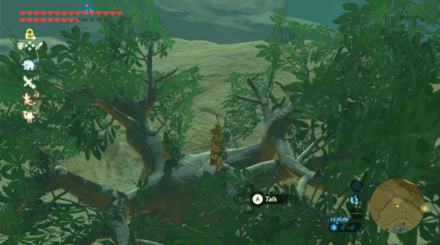
| 429 |
 Enlarge Enlarge |
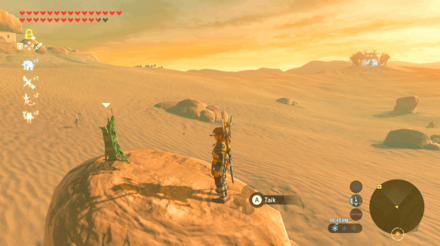
Rock
Pick up the rock on top of the thick tree by the edge of the cliff. |
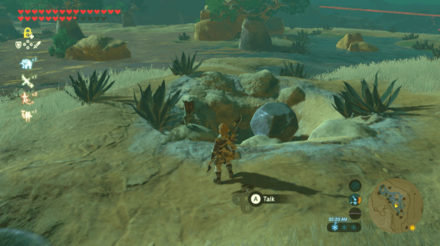
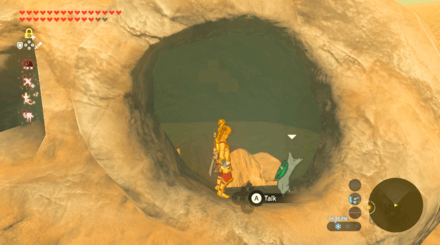
| 430 |
 Enlarge Enlarge |
Rock Pit
Push the big rock into the hole. Using Stasis makes it easier to move the rock. |
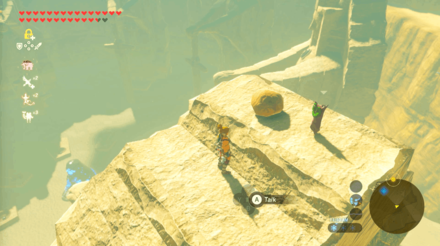
| 431 |
 Enlarge Enlarge |
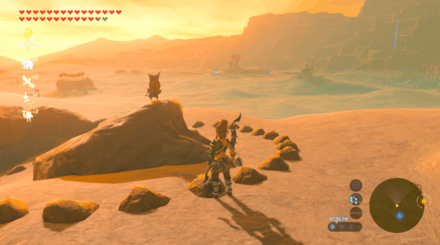
Rock
Pick up the rock on the corner ledge of Spectacle Rock. |
| 432 |
 Enlarge Enlarge |
Metal Block
Use Magnesis to match the left set of blocks to the right. |
| 433 |
 Enlarge Enlarge |
One Acorn
Hit the hanging acorn beneath the land brdige. |
| 434 |
 Enlarge Enlarge |
Rock
Pick up the rock on top of a tall rock pillar. |
| 435 |
 Enlarge Enlarge |
Metal Block
Use Magnesis to move the cube and match both sets of blocks. |
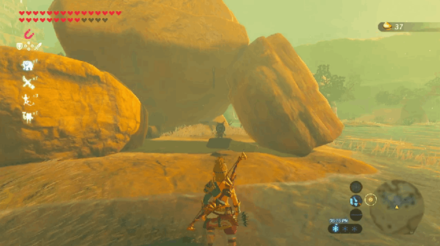
| 436 |
 Enlarge Enlarge |
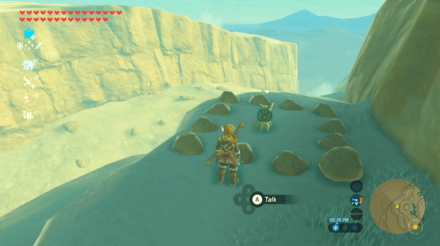
Rock Pattern
Place the two stray rocks on the east and south spirals of the rock pattern. |
| 437 |
 Enlarge Enlarge |
Rock Pattern
Place the rock opposite the 3 inner rocks inside the square rock pattern. |
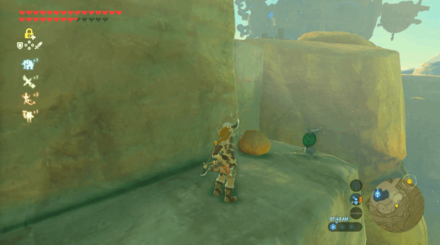
| 438 |
 Enlarge Enlarge |
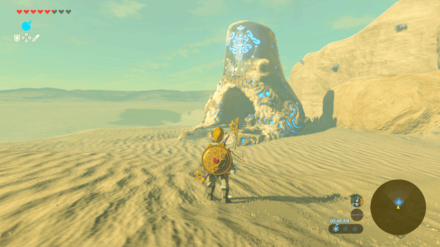
Hidden Rock
Destroy the wall of rocks and pick up the rock behind it. |
| 439 |
 Enlarge Enlarge |
Rock
Pick up the rock on the edge of the cliff. |
| 440 |
 Enlarge Enlarge |
Hidden Rock
Destroy the wall of rocks and pick up the rock behind it. |
| 441 |
 Enlarge Enlarge |
Rock
Pick up the rock on top of a tall rock pillar. |
| 442 |
 Enlarge Enlarge |
Rock
Pick up the rock by the edge of the rocky cliff. |
| 443 |
 Enlarge Enlarge |
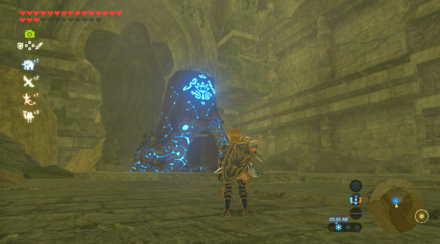
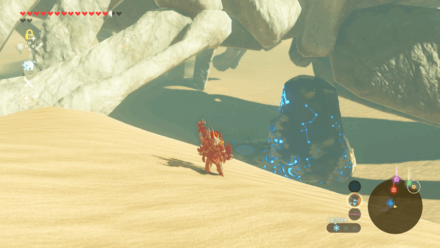
Ice Sparkles
Melt the ice beside the Guardian ruin using fire weapons or a torch, and examine the sparkles. |
| 444 |
 Enlarge Enlarge |
Rock Pattern
Pick up the nearby rock to the right of the pattern and place it on the top corner. |
| 445 |
 Enlarge Enlarge |
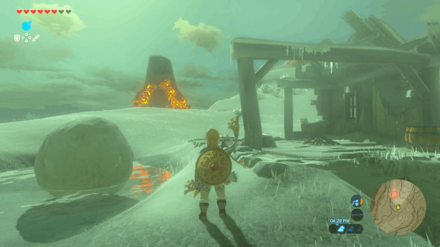
Ice Sparkles
Melt the ice in the shallow pool of water using fire weapons or a torch, and examine the sparkles. |
| 446 |
 Enlarge Enlarge |
Rock
Pick up the rock on top of the plateau. |
| 447 |
 Enlarge Enlarge |
Metal Block
Use Magnesis on the cube by the crates and place it in the middle of the right set of blocks. |
| 448 |
 Enlarge Enlarge |
Metal Block
Use Magnesis to place the cube on top of the left set of blocks. |
| 449 |
 Enlarge Enlarge |
Timed Ring
Paraglide to the other plateau and reach the dash ring. |
| 450 |
 Enlarge Enlarge |
Rock
Pick up the rock on top of the lone pillar on a rock. |
| 451 |
 Enlarge Enlarge |
Timed Ring
Reach the ring at the other side. Use Sand Boots or Revali's Gale to get there faster. A Molduking is nearby. |
| 452 |
 Enlarge Enlarge |
Metal Block
Use Magnesis on the cube hidden in the ceiling of the skull lair and place it on the middle top of the blocks. |
| 453 |
 Enlarge Enlarge |
Metal Block
Use Magnesis on the cube hidden behind a small rock nearby and place it in the middle of the blocks with a hole. |
| 454 |
 Enlarge Enlarge |
Rock
Pick up the rock at the very top of southeast stone statue. |
| 455 |
 Enlarge Enlarge |
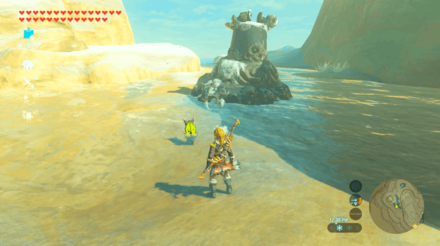
One Balloon
Hit the balloon located between the wrists of the northeast stone statue. |
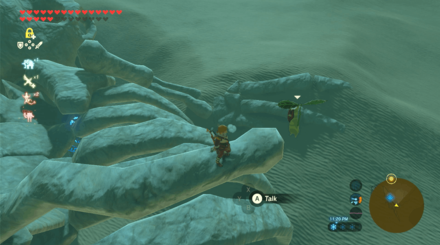
| 456 |
 Enlarge Enlarge |
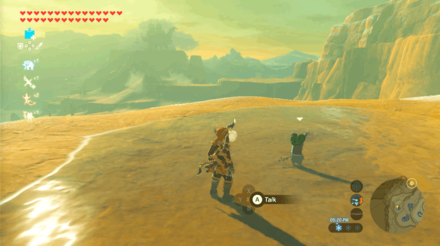
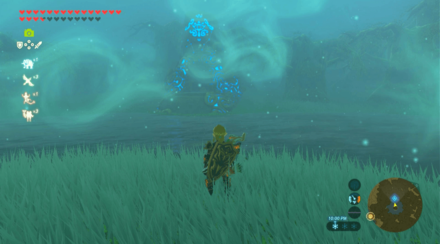
Follow the Flowers
Follow the flowers until the very end of the bones. |
| 457 |
 Enlarge Enlarge |
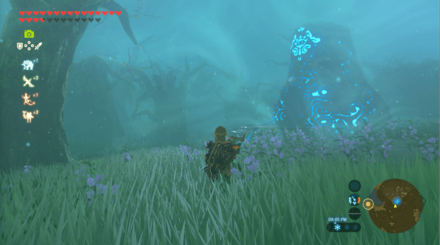
Follow the Flowers
Follow the flowers that apear on the nearby rocks. |
| 458 |
 Enlarge Enlarge |
Rock Pattern
Pick up the nearby rock and place it on the empty space in the circular rock pattern. |
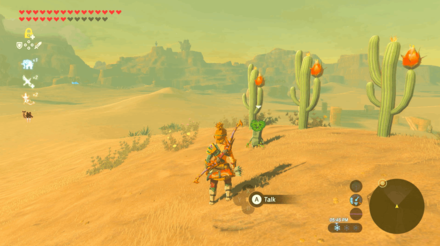
| 459 |
 Enlarge Enlarge |
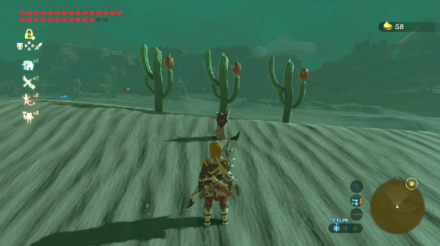
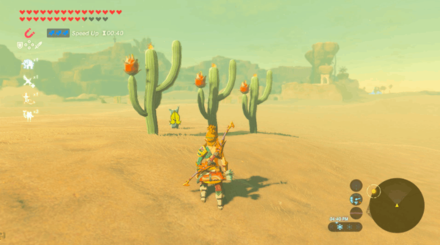
Fruit Match
Shoot the two extra voltfruits on the cactus with more than one fruit to match it with the other cacti. |
| 460 |
 Enlarge Enlarge |
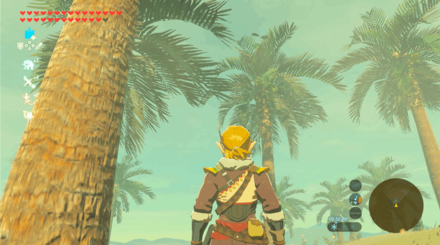
One Balloon
Shoot the balloon on top of the palm tree. There is a Molduga nearby. |
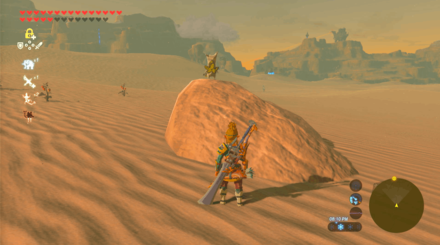
| 461 |
 Enlarge Enlarge |
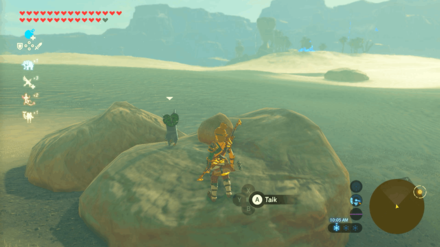
Rock
Pick up the rock on the small rock formation. |
| 462 |
 Enlarge Enlarge |
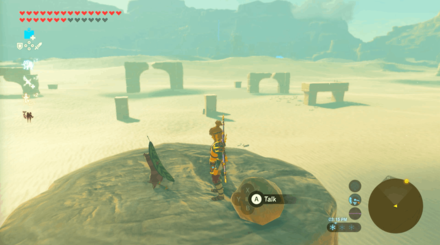
Rock
Pick up the rock on top of the large rock formation with ore deposits on its base. There is a Molduga nearby. |
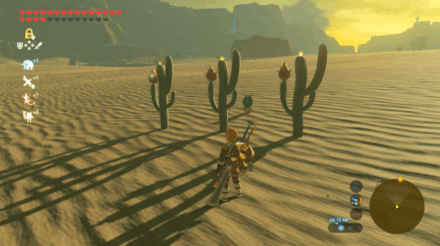
| 463 |
 Enlarge Enlarge |
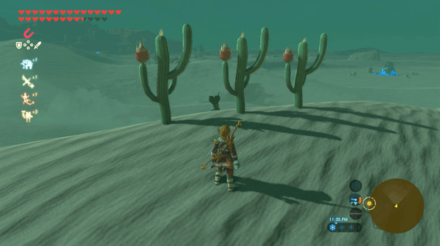
Fruit Match
Shoot the two extra voltfruits on the cactus with more than one fruit to match it with the other cacti. |
| 464 |
 Enlarge Enlarge |
Rock
Pick up the rock on the small rock formation. |
| 465 |
 Enlarge Enlarge |
Peak Sparkles
Climb the highest bone of the Gerudo Great Skeleton, above the Great Fairy Fountain, and examine the sparkles. |
| 466 |
 Enlarge Enlarge |
Fruit Match
Shoot the two extra voltfruits on the cactus with more than one fruit to match it with the other cacti. |
| 467 |
 Enlarge Enlarge |
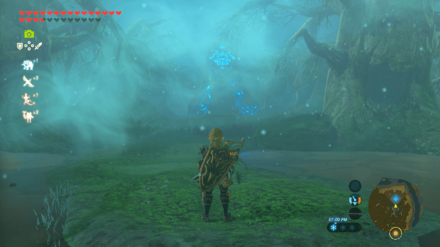
Follow the Flowers
Follow the flowers until the very end of the bones. There's a monster base underneath. |
| 468 |
 Enlarge Enlarge |
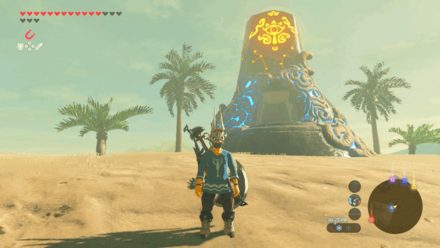
Peak Sparkles
Examine the sparkles at the very top of the large rock fountain in Gerudo Town. |
| 469 |
 Enlarge Enlarge |
Timed Ring
Glide and reach the ring on the other pillar before time runs out. |
| 470 |
 Enlarge Enlarge |
Metal Block
Use Magnesis to place the cube on the top corner of the other set of blocks. |
| 471 |
 Enlarge Enlarge |
Metal Block
Use Magnesis to place the cube on the mid-right section of the set of blocks. |
| 472 |
 Enlarge Enlarge |
Fruit Match
Shoot the two extra voltfruits on the cactus with more than one fruit to match it with the other cacti. |
| 473 |
 Enlarge Enlarge |
Timed Ring
Glide to the next pillar to reach the ring. |
| 474 |
 Enlarge Enlarge |
Fruit Match
Shoot the two extra voltfruits on the cactus with more than one fruit to match it with the other cacti. |
| 475 |
 Enlarge Enlarge |
Peak Sparkles
Climb the bones and examine the sparkles that appear when you stand near the pinwheel. |
| 476 |
 Enlarge Enlarge |
Peak Sparkles
Climb to the highest point of the bones and examine the sparkles. |
| 477 |
 Enlarge Enlarge |
Peak Sparkles
Climb to the highest point of the bones and examine the sparkles. |
| 478 |
 Enlarge Enlarge |
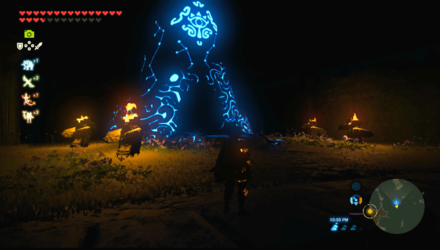
Follow the Flowers
Follow the flowers up the rock pillar. |
| 479 |
 Enlarge Enlarge |
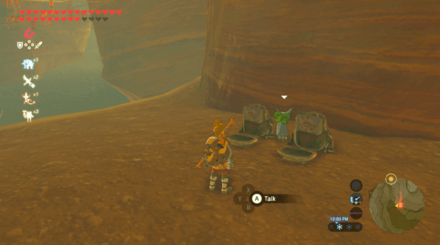
Fruit Offering
Place a Mighty Banana on each prayer bowls. |
| 480 |
 Enlarge Enlarge |
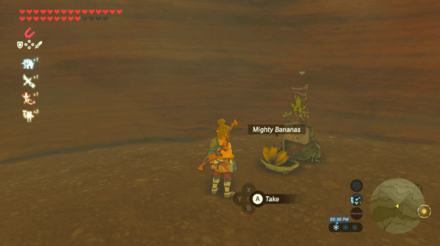
Fruit Offering
Place a Mighty Banana on the prayer bowl. |
| 481 |
 Enlarge Enlarge |
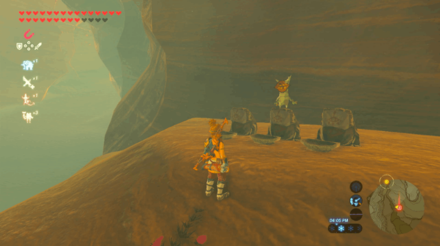
Fruit Offering
Place a Mighty Banana on all prayer bowls. |
| 482 |
 Enlarge Enlarge |
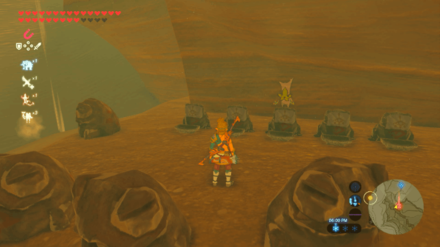
Fruit Offering
Place a Mighty Banana on all prayer bowls. |
| 483 |
 Enlarge Enlarge |
Rock
Pick up the rock on the ledge of the rock formation above the Yiga Clan base. |
Korok Seeds Map and All Korok Seed Locations
Shrines in Woodland Tower Region
Woodland Tower Region Shrines
| Woodland Region Shrine Map |
|---|
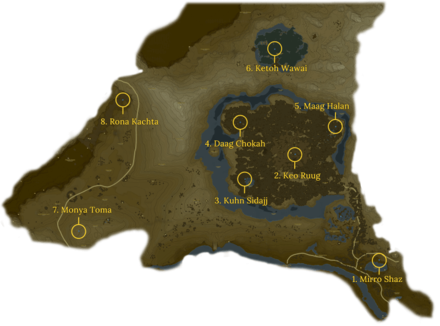 Enlarge EnlargeView Full Map Image |
| Shrine Number | Shrine | Overview |
|---|---|---|
| 1 |
 Enlarge Enlarge |
Trial: Tempered Power Location: Woodland Stable, Woodland Region Rewards: ・Iron Sledgehammer ・ Iron Sledgehammer ・ Giant Ancient Core |
| 2 |
 Enlarge Enlarge |
Trial: Fateful Stars Location: Korok Forest, Woodland Region Rewards: ・Knight's Claymore |
| 3 |
 Enlarge Enlarge |
Trial: Kuhn Sidajj's Blessing Requirements: Start The Hero's Sword and The Korok Trials Shrine Quest: Trial of Second Sight Location: Lake Saria, Woodland Region Rewards: ・Giant Ancient Core |
| 4 |
 Enlarge Enlarge |
Trial: Daag Chokah's Blessing Requirements: Start The Hero's Sword and The Korok Trials Shrine Quest: The Lost Pilgrimage Location: Korok Forest, Woodland Region Rewards: ・Ancient Core |
| 5 |
 Enlarge Enlarge |
Trial: Maag Halan's Blessing Requirements: Start The Hero's Sword and The Korok Trials Shrine Quest: The Test of Wood Location: Mido Swamp, Woodland Region Rewards: ・Giant Ancient Core |
| 6 |
 Enlarge Enlarge |
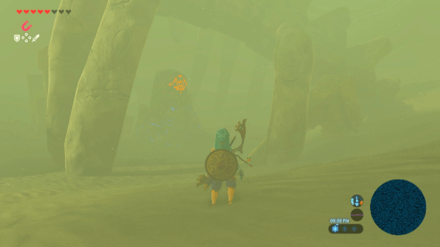
Trial: Ketoh Wawai's Blessing Shrine Quest: Shrouded Shrine Location: Typhlo Ruins, Woodland Region Rewards: ・Ancient Core |
| 7 |
 Enlarge Enlarge |
Trial: Drawing Parabolas Location: Salari Hills, Woodland Region Rewards: ・Thunderblade |
| 8 |
 Enlarge Enlarge |
Trial: Rona Kachta's Blessing Location: Forgotten Temple, Woodland Region Rewards: ・Great Flameblade |
| ▲ Back to All Shrines by Tower Region ▲ | ||
Shrines Map and All Shrine Locations
Shrines in Wasteland Tower Region
Wasteland Tower Region Shrines
| Wasteland Region Shrine Map |
|---|
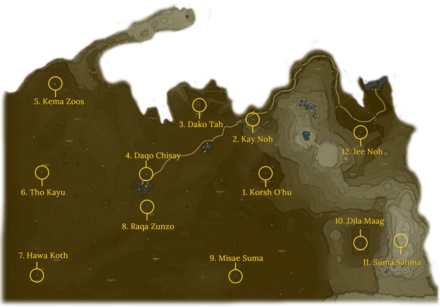 Enlarge EnlargeView Full Map Image |
| Shrine Number | Shrine | Overview |
|---|---|---|
| 1 |
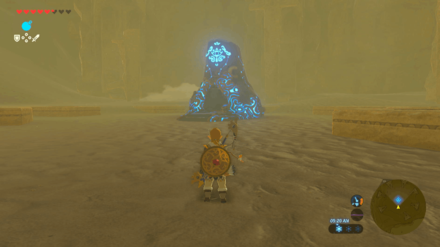 Enlarge Enlarge |
Trial: Korsh O'hu's Blessing Requirements: Clear Forbidden City Entry main quest Shrine Quest: The Seven Heroines Location: East Gerudo Ruins, Wasteland Region Rewards: ・Flamespear |
| 2 |
 Enlarge Enlarge |
Trial: Power of Electricity Location: Gerudo Desert Gateway, Wasteland Region Rewards: ・Gerudo Scimitar |
| 3 |
 Enlarge Enlarge |
Trial: Electric Path Shrine Quest: The Eye of the Sandstorm Location: Great Cliffs, Wasteland Region Rewards: ・Moonlight Scimitar ・ Ancient Core ・ Silver Rupee ・ Radiant Shield |
| 4 |
 Enlarge Enlarge |
Trial: The Whole Picture Location: Gerudo Town, Wasteland Region Rewards: ・Thunderblade |
| 5 |
 Enlarge Enlarge |
Trial: A Delayed Puzzle Shrine Quest: The Silent Swordswomen Location: West Barrens, Wasteland Region Rewards: ・Moonlight Scimitar |
| 6 |
 Enlarge Enlarge |
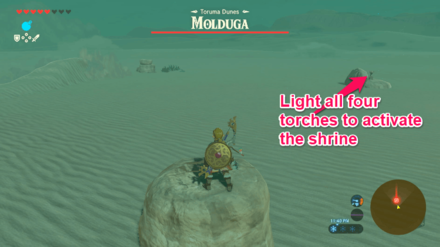
Trial: Tho Kayu's Blessing Location: Toruma Dunes, Wasteland Region Rewards: ・Golden Bow |
| 7 |
 Enlarge Enlarge |
Trial: The Current Solution Location: Dragon's Exile, Wasteland Region Rewards: ・Ancient Core ・ Gold Rupee ・ Sapphire |
| 8 |
 Enlarge Enlarge |
Trial: Raqa Zunzo's Blessing Requirements: Clear Divine Beast Vah Naboris Shrine Quest: The Undefeated Champ Location: Sand-Seal Rally, Wasteland Region Rewards: ・Radiant Shield |
| 9 |
 Enlarge Enlarge |
Trial: Misae Suma's Blessing Shrine Quest: The Perfect Drink Location: East Barrens, Wasteland Region Rewards: ・Diamond |
| 10 |
 Enlarge Enlarge |
Trial: Dila Maag's Blessing Shrine Quest: The Desert Labyrinth Location: South Lomei Labyrinth, Wasteland Region Rewards: ・Barbarian Armor |
| 11 |
 Enlarge Enlarge |
Trial: Suma Sahma's Blessing Requirements: Cold Resistance Level 2 Shrine Quest: Secret of the Snowy Peaks Location: Mount Granajh, Wasteland Region Rewards: ・Moonlight Scimitar |
| 12 |
 Enlarge Enlarge |
Trial: On the Move Location: Gerudo Canyon, Wasteland Region Rewards: ・Opal |
| ▲ Back to All Shrines by Tower Region ▲ | ||
Shrines Map and All Shrine Locations
Quests in Wasteland Tower Region
Main Quests
| Quest | Type | Quest Giver & Location |
|---|---|---|
| Divine Beast Vah Naboris | Main Quest | Riju Gerudo Town |
| Forbidden City Entry | Main Quest | Benja Gerudo Town |
Side Quests
| Quest | Type | Quest Giver & Location |
|---|---|---|
| An Ice Guy | Side Quest | Guy Kara Kara Bazaar |
| Good-Sized Horse | Side Quest | Zyle Gerudo Canyon |
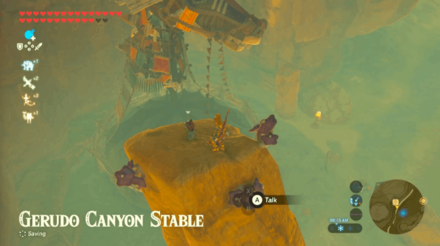
| Rushroom Rush! | Side Quest | Pirou Gerudo Canyon Stable |
| Missing in Action | Side Quest | Sesami Gerudo Canyon Stable |
| The Forgotten Sword | Side Quest | Bozai Gerudo Desert |
| Tools of the Trade | Side Quest | Isha Gerudo Town |
| The Secret Club's Secret | Side Quest | Greta Gerudo Town |
| The Mystery Polluter | Side Quest | Dalia Gerudo Town |
| The Eighth Heroine | Side Quest | Bozai Gerudo Desert |
| Medicinal Molduga | Side Quest | Malena Gerudo Town |
| The Search for Barta | Side Quest | Liana Gerudo Town |
| The Thunder Helm | Side Quest | Riju Gerudo Town |
Shrine Quests
| Quest | Type | Quest Giver & Location |
|---|---|---|
| The Undefeated Champ | Shrine Quest | Tali Sand-Seal Rally |
| Secret of the Snowy Peaks | Shrine Quest | Mountain Peak Log Mount Granajh |
| The Eye of the Sandstorm | Shrine Quest | Nobiro Kara Kara Bazaar |
| The Seven Heroines | Shrine Quest | Rotana Gerudo Town |
| The Desert Labyrinth | Shrine Quest | ??? South Lomei Labyrinth |
| The Silent Swordswomen | Shrine Quest | Laine Gerudo Town |
| The Perfect Drink | Shrine Quest | Pokki East Barrens |
DLC Quests
| Quest | Type | Quest Giver & Location |
|---|---|---|
| EX Champion Urbosa's Song | DLC Main Quest | ??? East Gerudo Mesa |
All Locations in Wasteland Tower Region
| Yiga Clan Hideout | Yarna Valley | West Gerudo Ruins | West Barrens |
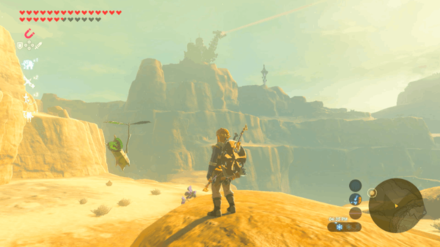
| Toruma Dunes | Stalry Plateau | Spectacle Rock | Southern Oasis |
| South Lomei Labyrinth | Sand-Seal Rally | Palu Wasteland | Northern Icehouse |
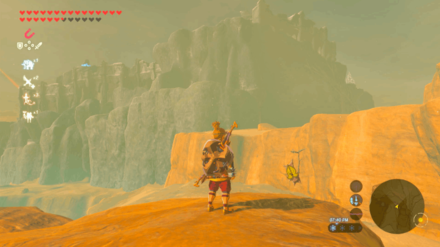
| Mount Granajh | Koukot Plateau | Karusa Valley | Kara Kara Bazaar |
| Great Fairy Fountain (Gerudo Great Skeleton) | Great Cliffs | Gerudo Great Skeleton | Gerudo Desert Gateway |
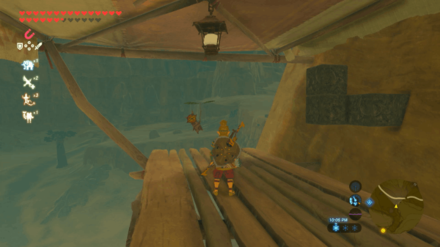
| Gerudo Canyon Stable | Gerudo Canyon Pass | Gerudo Canyon | East Gerudo Ruins |
| East Gerudo Mesa | East Barrens | Dragon's Exile | Daval Peak |
| Champion's Gate | Arbiter's Grounds |
Zelda: BotW Related Guides

Points of Interest
| All Maps and Locations | |
|---|---|
| Shrines | Stables |
| Great Fairy Fountains | Korok Seeds |
Tower Regions
Comment
Author

The Legend of Zelda: Breath of the Wild Walkthrough & Guides Wiki
Wasteland Tower Region: Korok Seed Map, Shrines, and Quests
Rankings
- We could not find the message board you were looking for.
Gaming News


![Monster Hunter Stories 3 Review [First Impressions] | Simply Rejuvenating](https://img.game8.co/4438641/2a31b7702bd70e78ec8efd24661dacda.jpeg/thumb)
Popular Games

Genshin Impact Walkthrough & Guides Wiki
Honkai: Star Rail Walkthrough & Guides Wiki
Umamusume: Pretty Derby Walkthrough & Guides Wiki
Pokemon Pokopia Walkthrough & Guides Wiki
Resident Evil Requiem (RE9) Walkthrough & Guides Wiki
Monster Hunter Wilds Walkthrough & Guides Wiki
Wuthering Waves Walkthrough & Guides Wiki
Arknights: Endfield Walkthrough & Guides Wiki
Pokemon FireRed and LeafGreen (FRLG) Walkthrough & Guides Wiki
Pokemon TCG Pocket (PTCGP) Strategies & Guides Wiki


Recommended Games
Diablo 4: Vessel of Hatred Walkthrough & Guides Wiki
Cyberpunk 2077: Ultimate Edition Walkthrough & Guides Wiki
Fire Emblem Heroes (FEH) Walkthrough & Guides Wiki
Yu-Gi-Oh! Master Duel Walkthrough & Guides Wiki
Super Smash Bros. Ultimate Walkthrough & Guides Wiki
Pokemon Brilliant Diamond and Shining Pearl (BDSP) Walkthrough & Guides Wiki
Elden Ring Shadow of the Erdtree Walkthrough & Guides Wiki
Monster Hunter World Walkthrough & Guides Wiki
The Legend of Zelda: Tears of the Kingdom Walkthrough & Guides Wiki
Persona 3 Reload Walkthrough & Guides Wiki


All rights reserved
© 2020 Nintendo. The Legend of Zelda, Wii U, and Nintendo Switch are trademarks of Nintendo.
The copyrights of videos of games used in our content and other intellectual property rights belong to the provider of the game.
The contents we provide on this site were created personally by members of the Game8 editorial department.
We refuse the right to reuse or repost content taken without our permission such as data or images to other sites.