Lake Tower Region: Korok Seed Map, Shrines, and Quests
★ Sequel: Tears of the Kingdom Guide here!
★ Get a head start with our Beginner's Guide
┗ The Best Recipes to Cook | Rupee Farming
★ Shrines Locations | Korok Seeds Locations
★ Explore after the story with our Post Game Guide
This page is a map of the Lake Tower Region in The Legend of Zelda: Breath of the Wild (BotW). Here you can find all Korok Seed locations in the Lake Tower Region, as well as quests, shrines, and other locations.
List of Contents
Lake Tower Region Korok Seed Map
Map of All Woodland Tower Korok Seeds
| Lake Korok Seed Map |
|---|
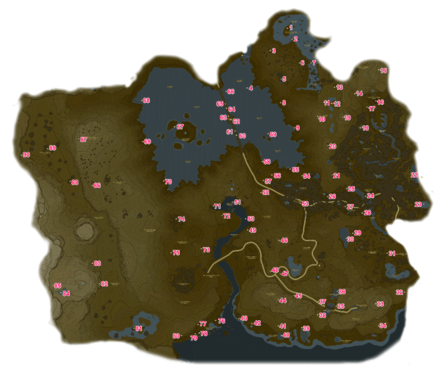 Enlarge EnlargeView Full Map Image |
How to Get All Lake Koroks
| Total No. | Korok in Region | Solution & Video Link |
|---|---|---|
| 323 |
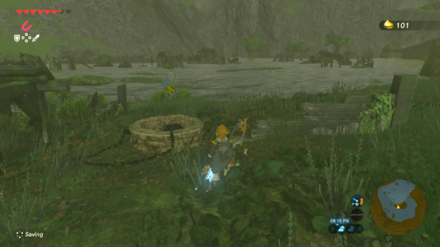 Enlarge Enlarge |
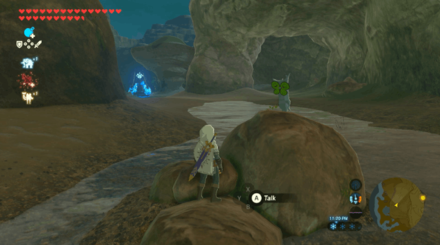
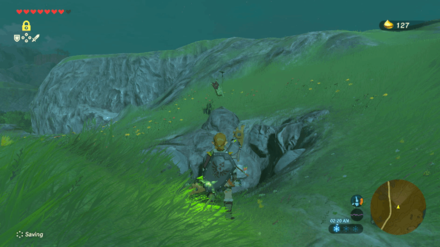
Chained Ball
Use Magnesis to move the rock into the well. |
| 324 |
 Enlarge Enlarge |
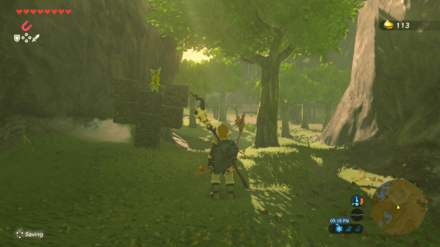
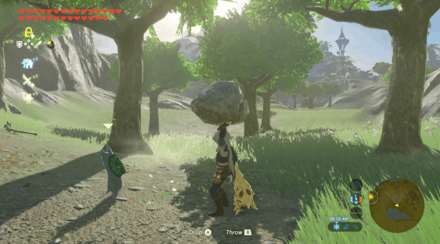
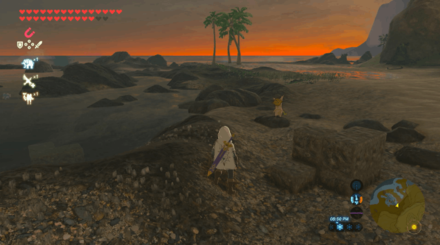
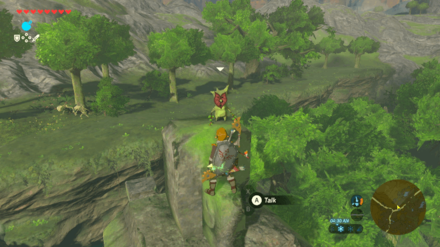
Rock
Lift the rock inside the ruined structure to reveal the Korok. |
| 325 |
 Enlarge Enlarge |
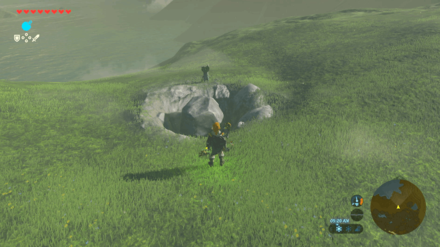
Chained Ball
Use Magnesis to move the chained rock and place it into the stump that has the well in it. |
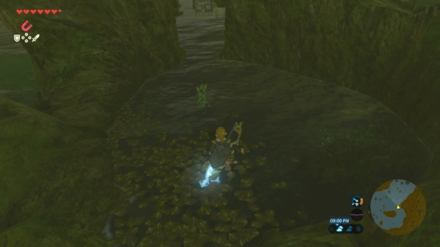
| 326 |
 Enlarge Enlarge |
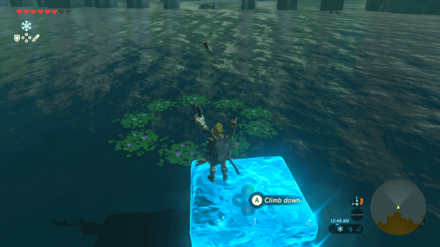
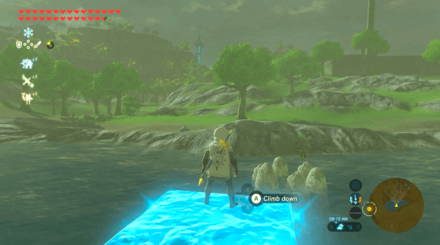
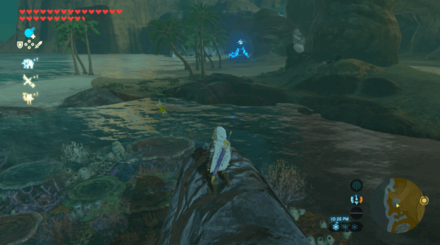
Water Ring
Use Cryonis to create a pillar to dive into the ring. |
| 327 |
 Enlarge Enlarge |
Chained Ball
Use Magnesis to move the chained rock and place it into the stump that has the well in it. |
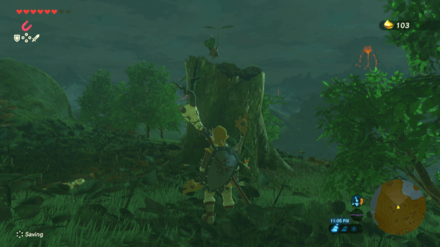
| 328 |
 Enlarge Enlarge |
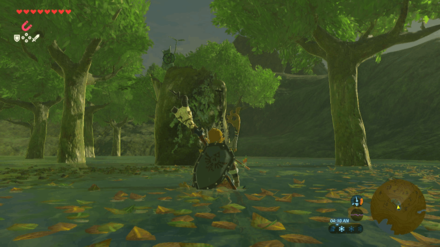
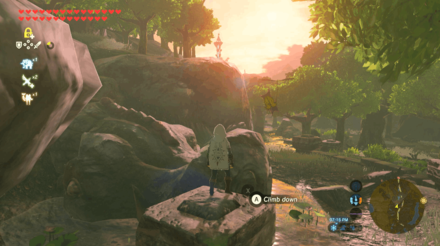
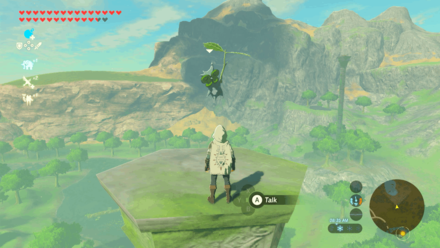
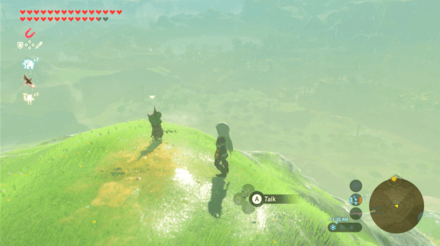
Follow the Flowers
Find the first flower inside the giant tree stump and follow it leading east of the starting location. |
| 329 |
 Enlarge Enlarge |
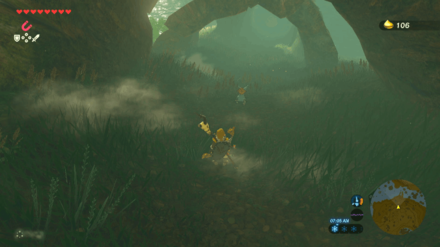
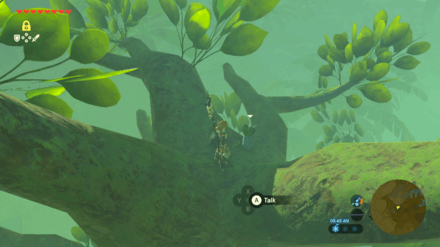
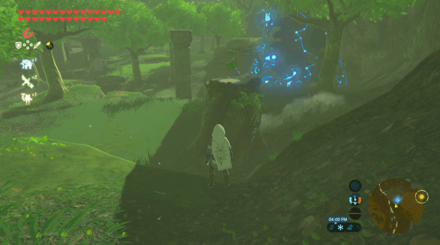
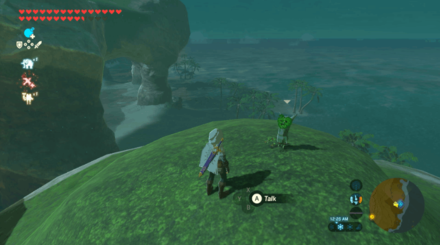
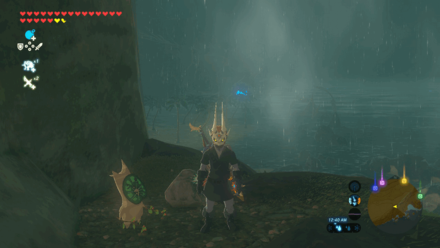
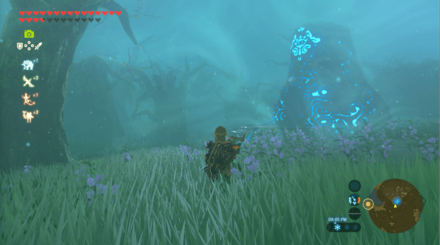
Moving Sparkles
Chase after the sparkles to reveal the Korok. You can wait for the sparkles to remain stationary under the giant tree trunk to examine it. |
| 330 |
 Enlarge Enlarge |
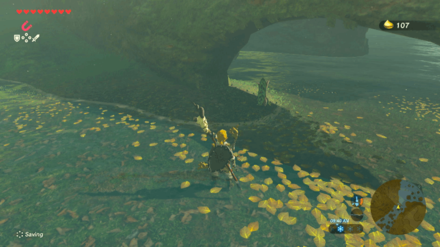
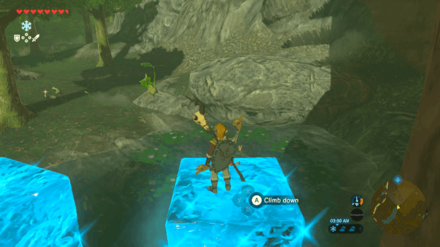
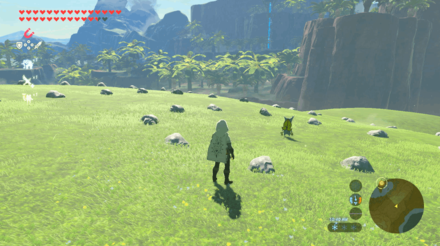
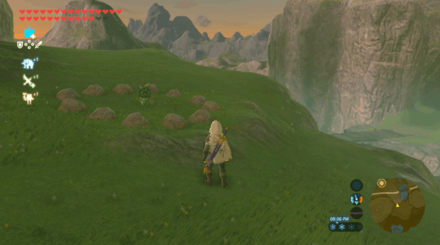
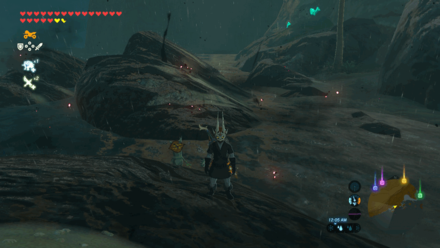
Rock Pit
Use Stasis on one of the boulders and hit it once so it rolls down near the hole. Push the boulder into the hole to reveal the Korok. |
| 331 |
 Enlarge Enlarge |
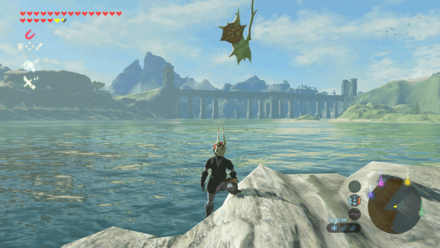
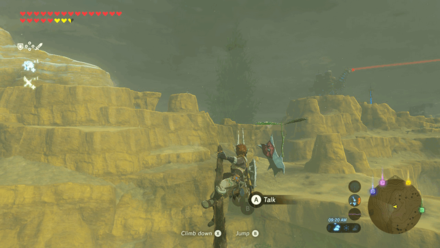
Pinwheel Balloon
Use a bow and arrow to shoot down the three balloons. Aim at one place and wait for the balloons to move to your reticle to shoot them down easily. |
| 332 |
 Enlarge Enlarge |
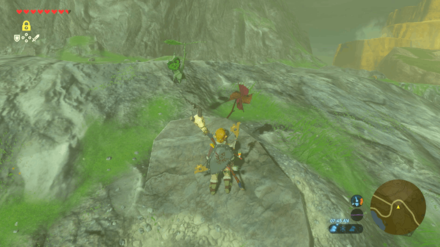
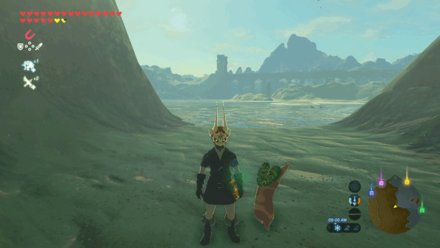
Numbered Flowers
Run through the flowers in order, starting from the first flower to the set of five flowers. |
| 333 |
 Enlarge Enlarge |
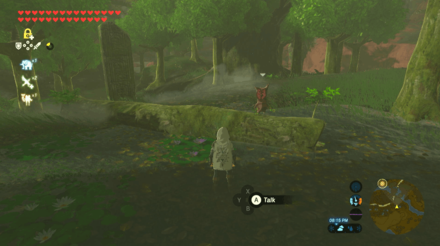
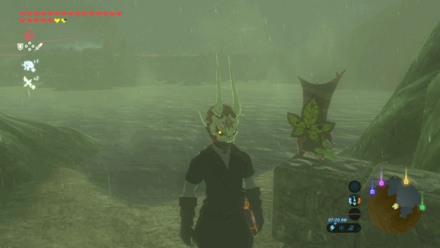
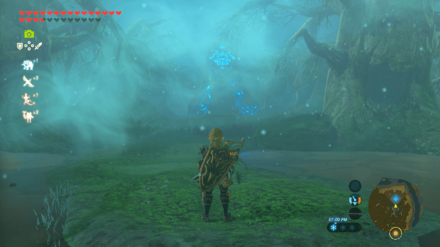
Moving Sparkles
Chase after the sparkles to reveal the Korok. |
| 334 |
 Enlarge Enlarge |
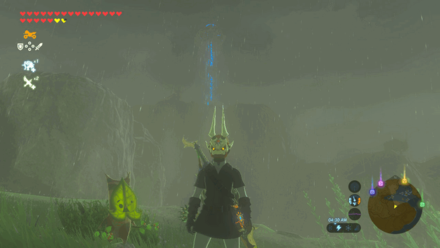
Moving Sparkles
Chase after the sparkles to reveal the Korok. |
| 335 |
 Enlarge Enlarge |
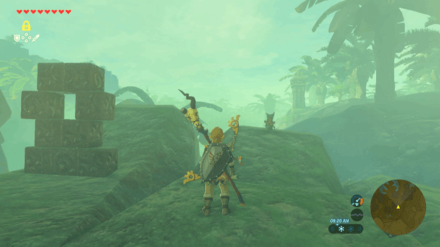
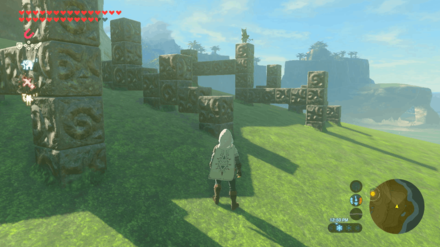
Metal Block
Pick up the block on top of the tree and place it on the empty spot of the block pattern on the cliff to match the block pattern next to the tree. |
| 336 |
 Enlarge Enlarge |
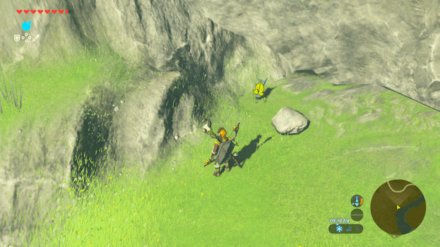
Hidden Rock
Use the Remote Bomb to bomb the breakable wall. Lift up the rock to reveal the Korok. |
| 337 |
 Enlarge Enlarge |
Rock Pit
Push the boulder down the hill and move it towards the elevated hill. Use Stasis and hit the boulder 8 times to move it up the hill. Wait for the Stasis rune to recharge and use it on the boulder and hit it 8 times again. If done correctly, the boulder should move on top of the hill and you can roll it down the hole to reveal the Korok. |
| 338 |
 Enlarge Enlarge |
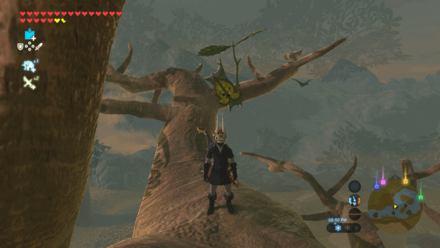
Rock
Climb the tree and lift up the rock on top of it. |
| 339 |
 Enlarge Enlarge |
Metal Block
Use Magnesis to pick up the block on the east side and bring it to the block pattern on the west side and have it match the block pattern from the east side. |
| 340 |
 Enlarge Enlarge |
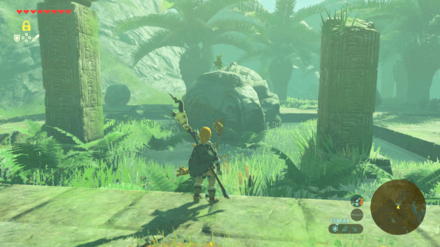
Rock Pit
Use Stasis on the boulder on top of the pillar and throw a weapon to push it off the pillar. Use Stasis and hit the boulder three times to move it towards the empty corner to match the other boulders surrounding the statue. |
| 341 |
 Enlarge Enlarge |
Rock
Climb on top of the hill and lift the rock at the top to reveal the Korok. |
| 342 |
 Enlarge Enlarge |
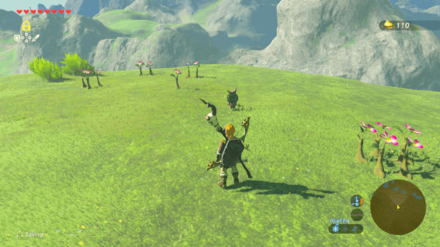
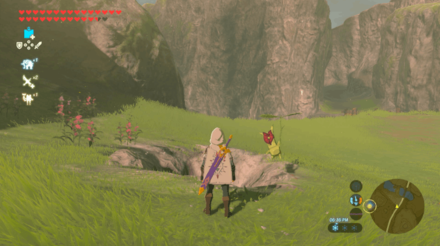
Fruit Match
Pick the two Hearty Durians from the tree that has too many of the fruits to match the middlemost and leftmost trees to reveal the Korok. |
| 343 |
 Enlarge Enlarge |
Rock
Climb on top of the hill and lift the rock at the top to reveal the Korok. |
| 344 |
 Enlarge Enlarge |
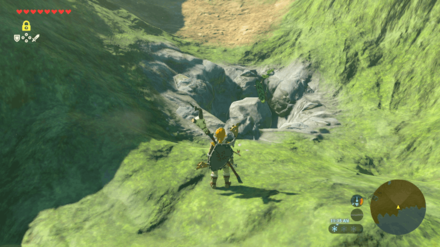
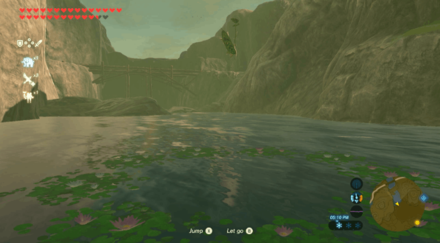
Rock
Lift the rock above the waterfall to reveal the Korok. |
| 345 |
 Enlarge Enlarge |
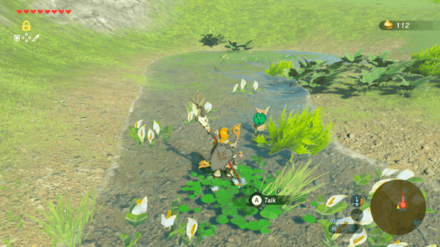
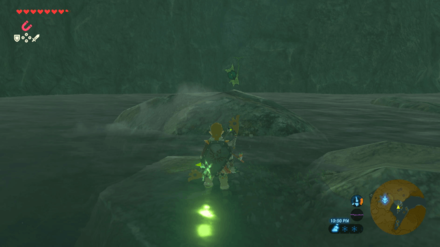
Moving Sparkles
Chase after the sparkles on the lake to reveal the Korok. |
| 346 |
 Enlarge Enlarge |
Other
Use Stasis on the chained boulder on top of the elevated rock. Switch to Magnesis and use it on the submerged rock and place it on the empty elevated rock. |
| 347 |
 Enlarge Enlarge |
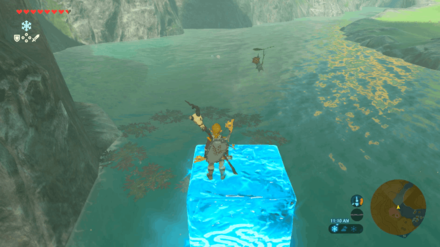
Water Ring
Use Cryonis to create a pillar to dive into the ring. |
| 348 |
 Enlarge Enlarge |
Chained Ball
Use Magnesis to place the ball into the tree stump. |
| 349 |
 Enlarge Enlarge |
Follow the Flowers
Follow the flowers around the statue. |
| 350 |
 Enlarge Enlarge |
Moving Sparkles
Chase and examine the moving sparkles. |
| 351 |
 Enlarge Enlarge |
Hidden Rock
Use Stasis and hit the platform to move it away. Pick up the rock hidden beneath it. |
| 352 |
 Enlarge Enlarge |
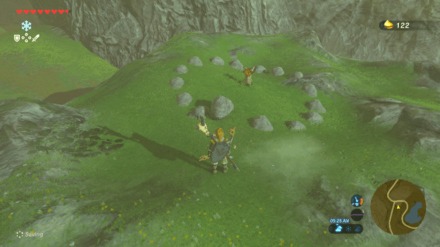
Rock Circle
Throw the rock into the middle of the rock circle. |
| 353 |
 Enlarge Enlarge |
Timed Ring
Step on the stump above the pillar and glide to the other pillar to reach the ring. |
| 354 |
 Enlarge Enlarge |
Rock Pattern
Place the nearby rock on the gap of the spiral pattern. |
| 355 |
 Enlarge Enlarge |
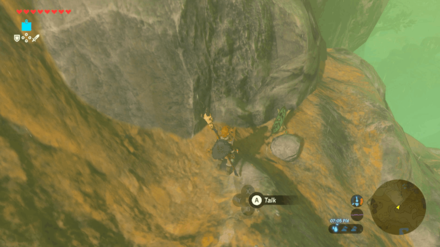
Rock
Pick up the rock on the peak of the mountain. |
| 356 |
 Enlarge Enlarge |
Metal Block
Use Magnesis to pick up the cube on the first set of blocks. Place it on the fourth set to match it with the second set. |
| 357 |
 Enlarge Enlarge |
Rock Pattern
Get the nearby rock and place it on the gap of the rock circle. |
| 358 |
 Enlarge Enlarge |
Water Ring
Dive into the middle of the ring on the water. |
| 359 |
 Enlarge Enlarge |
Rock Pit
Push the rocks down the hill into the hole. |
| 360 |
 Enlarge Enlarge |
Rock Pattern
Get the rock on top of the nearby hill and place it on the gap of the circle pattern. |
| 361 |
 Enlarge Enlarge |
Metal Block
Use Magnesis to grab the cube in the water and place it on the other set of blocks to match the two sets. |
| 362 |
 Enlarge Enlarge |
Water Ring
Dive into the middle of the ring of seaweed on the water. |
| 363 |
 Enlarge Enlarge |
Moving Sparkles
Chase and examine the moving sparkles. |
| 364 |
 Enlarge Enlarge |
Rock
Pick up the rock on the small rock formation beside Shoqa Tatone Shrine. |
| 365 |
 Enlarge Enlarge |
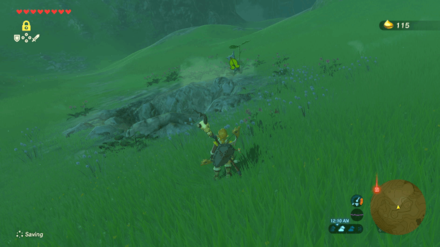
Hidden Rock
Push out the boulder and pick up the rock hidden beneath it. |
| 366 |
 Enlarge Enlarge |
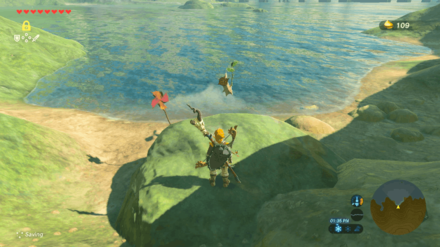
Pinwheel Balloon
Shoot the five moving balloons. |
| 367 |
 Enlarge Enlarge |
Rock Pit
Push the rock down into the hole. |
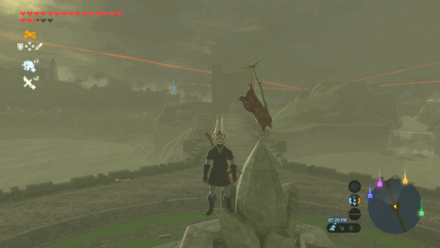
| 368 |
 Enlarge Enlarge |
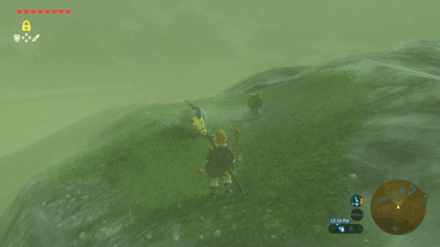
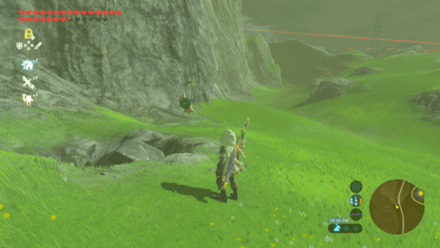
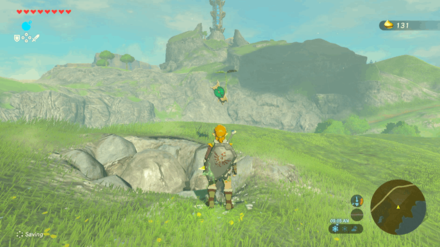
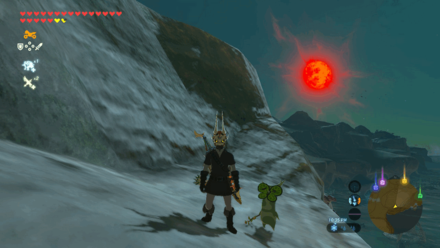
Timed Ring
Run towards the peak northwest of the starting point. Use Revali's Gale to ascend quickly to the peak to reach the dash ring before the time runs out. |
| 369 |
 Enlarge Enlarge |
Rock Pattern
Pick up the rock south of the rock pattern and place it on the empty spot to reveal the Korok. |
| 370 |
 Enlarge Enlarge |
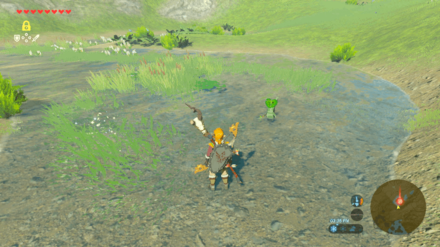
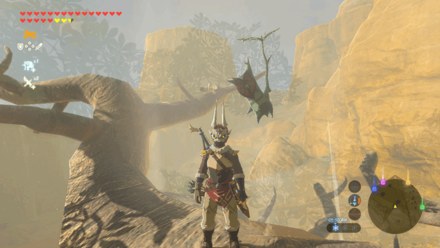
Jumping Acorn
Stand next to the pinwheel and use Statis on the acorn before shooting it with an arrow. Do this to each acorn to reveal the Korok. |
| 371 |
 Enlarge Enlarge |
Hidden Rock
Use a Remote Bomb to destroy the breakable wall and lift the rock to reveal the Korok. |
| 372 |
 Enlarge Enlarge |
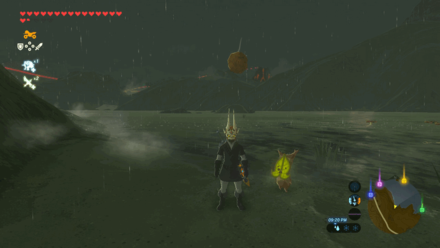
Water Ring
Dive into the ring to reveal the Korok. Make sure to defeat the two Octoroks first as they will attack once you are on the water. |
| 373 |
 Enlarge Enlarge |
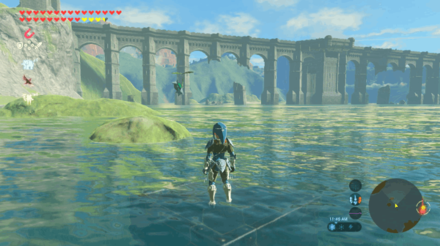
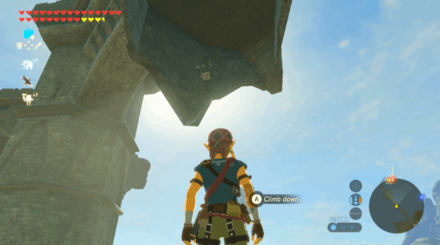
Metal Block
Tilt the camera to a top-down view and use Magnesis to find the block underwater. Create a Cryonis block facing the Lake Tower and place the block on top of it. Use the zoom-in function to find the block pattern on the wall. Use Magnesis to place the block on the leftmost block pattern to match the rightmost block patterh to reveal the Korok. |
| 374 |
 Enlarge Enlarge |
Rock Pit
Roll the boulder into the hole west of the starting point to reveal the Korok. |
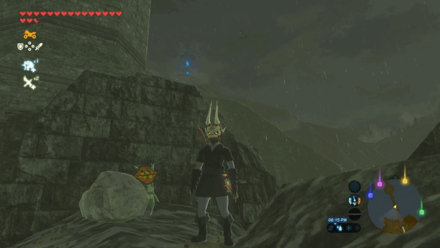
| 375 |
 Enlarge Enlarge |
Rock
Climb on top of the pillar and lift the rock to reveal the Korok. |
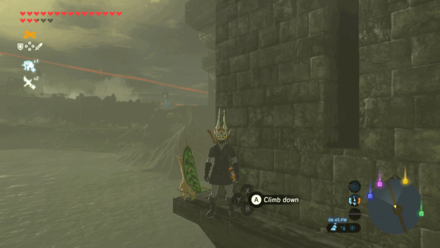
| 376 |
 Enlarge Enlarge |
Rock Pit
Push the boulder into the hole to reveal the Korok. |
| 377 |
 Enlarge Enlarge |
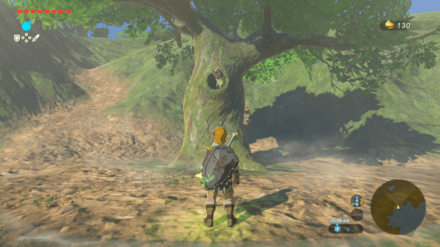
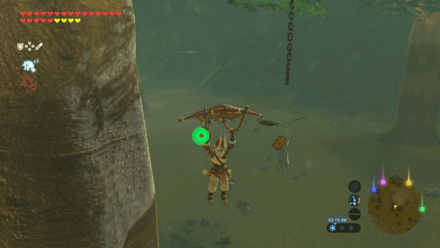
One Acorn
Shoot the acorn in the hole of the tree to reveal the Korok. |
| 378 |
 Enlarge Enlarge |
Rock Pit
Roll the boulder into the hole to reveal the Korok. |
| 379 |
 Enlarge Enlarge |
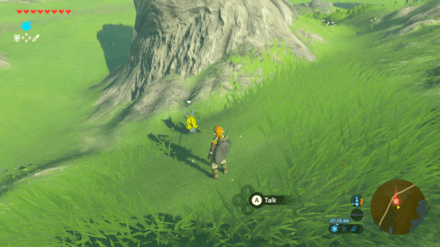
Moving Sparkles
Chase after the sparkles to reveal the Korok. |
| 380 |
 Enlarge Enlarge |
Rock
Pick up the rock to reveal the Korok. |
| 381 |
 Enlarge Enlarge |
Other
Use Magnesis to place the metal crate into the gap of the box pattern. |
| 382 |
 Enlarge Enlarge |
Rock
Pick up the rock to reveal the Korok. |
| 383 |
 Enlarge Enlarge |
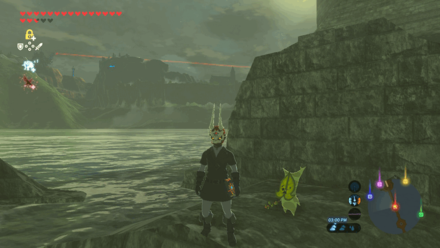
Follow the Flowers
Follow the flowers on the side of the bridge and down bellow a broken pillar. |
| 384 |
 Enlarge Enlarge |
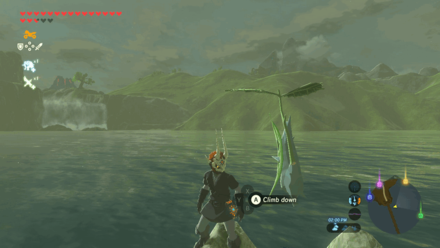
Peak Sparkles
Climb up the fountain at the center of the bridge and examine the sparkle to reveal the Korok. |
| 385 |
 Enlarge Enlarge |
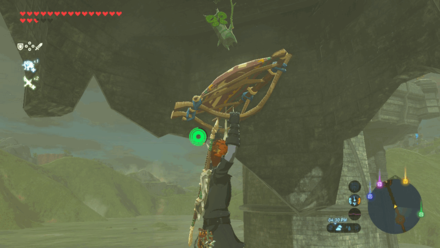
Other
Glide from the bridge center to the pillar and you'll find a Tree Branch. Pick up the Tree Branch to reveal the Korok. |
| 386 |
 Enlarge Enlarge |
One Balloon
Hit the balloon to reveal the Korok. |
| 387 |
 Enlarge Enlarge |
Hidden Rock
Use Stasis on the metal slate and hit it with weapons to blast it off, revealing the rock below. Pick the rock up to reveal the Korok. |
| 388 |
 Enlarge Enlarge |
Rock Circle
Throw the rock into the middle of the rock circle. |
| 389 |
 Enlarge Enlarge |
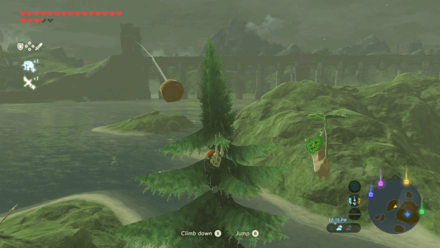
Peak Sparkles
Climb up the tree and examine the sparkle to reveal the Korok. |
| 390 |
 Enlarge Enlarge |
Timed Ring
Step on the stump and use Revali's Gale and glide towards the ring in time to reveal the Korok. |
| 391 |
 Enlarge Enlarge |
Rock
Pick up the rock to reveal the Korok. |
| 392 |
 Enlarge Enlarge |
Metal Block
Use Magnesis on the metal block at the bottom of the water near the block pattern and place it at the left pattern matching it with the right pattern to reveal the Korok. |
| 393 |
 Enlarge Enlarge |
Rock
Pick up the rock to reveal the Korok. |
| 394 |
 Enlarge Enlarge |
Rock Pattern
Get the rock hidden in the bushes and place it to complete the rock pattern to reveal the Korok. |
| 395 |
 Enlarge Enlarge |
Follow the Flowers
Follow the flowers up to the peak of the hill. |
| 396 |
 Enlarge Enlarge |
Timed Ring
Glide down then use Revali's Gale to reach the ring on top of the enemy camp. |
| 397 |
 Enlarge Enlarge |
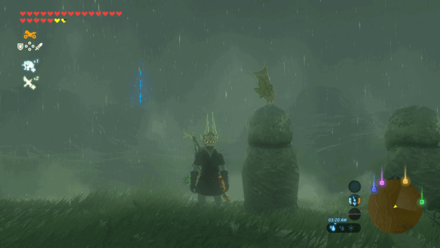
Fruit Offering
Place an apple on the empty statue to complete the statues with apples and this will reveal the Korok. |
| 398 |
 Enlarge Enlarge |
Rock Pattern
Complete the rock pattern to reveal the Korok. |
| 399 |
 Enlarge Enlarge |
Hidden Rock
Use a Rune Bomb to blast the stone rubble and lift the single rock in it to reveal the Korok. |
| 400 |
 Enlarge Enlarge |
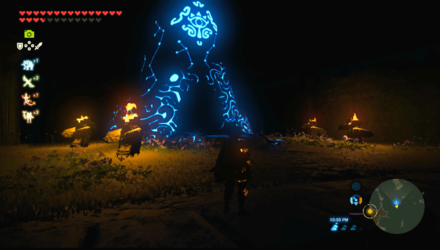
Moving Sparkles
Chase the sparkle and examine it to reveal the Korok. |
| 401 |
 Enlarge Enlarge |
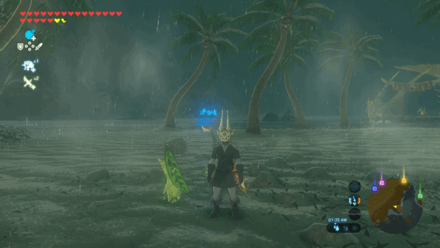
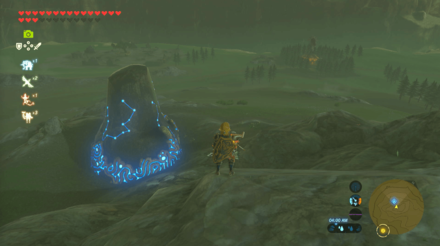
Peak Sparkles
Climb up the palm tree and examine the sparkle to reveal the Korok. |
| 402 |
 Enlarge Enlarge |
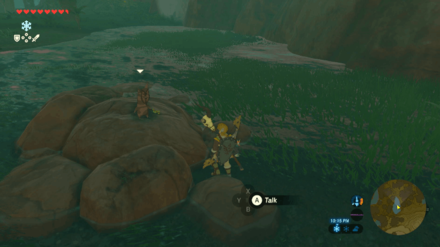
Rock
Pick up the rock to reveal the Korok. |
| 403 |
 Enlarge Enlarge |
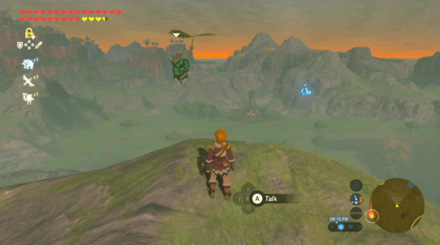
Timed Ring
Climb up the tree to find a tree stump with a leaf pointing towards the direction of the ring. Step on the stump and use Revali's Gale and glide towards the ring in time to reveal the Korok. |
| 404 |
 Enlarge Enlarge |
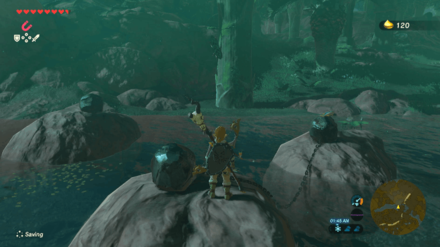
Metal Block
Use Magnesis to place the nearby cube on top of the left set of blocks. |
| 405 |
 Enlarge Enlarge |
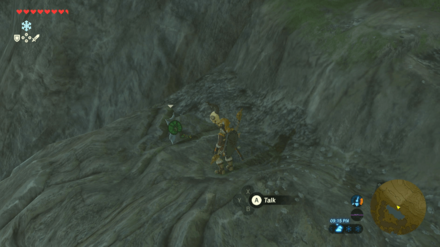
Hidden Rock
Use a Rune Bomb to blast the stone rubble and lift the single rock in it to reveal the Korok. |
| 406 |
 Enlarge Enlarge |
Moving Sparkles
Chase after the sparkles and examine it to reveal the Korok. |
| 407 |
 Enlarge Enlarge |
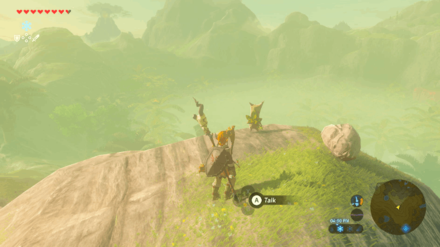
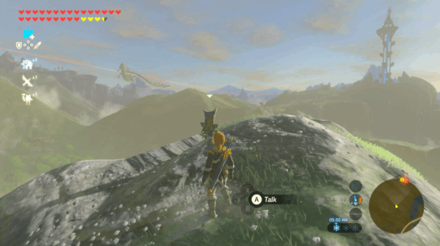
Pinwheel Balloon
Shoot the moving balloon when you go near the pinwheel at the edge of the cliff to reveal the Korok. |
| 408 |
 Enlarge Enlarge |
One Acorn
Shoot the acorn inside the log to reveal the Korok. |
| 409 |
 Enlarge Enlarge |
Peak Sparkles
Climb on the tree by the edge of the cliff and interact with the sparkle t reveal the Korok. |
| 410 |
 Enlarge Enlarge |
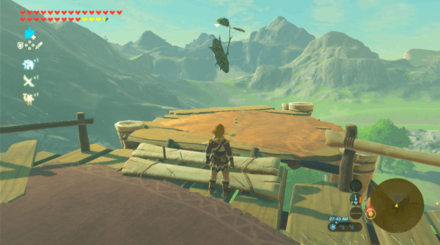
One Balloon
Shoot the balloon at the top of the huge tree. |
| 411 |
 Enlarge Enlarge |
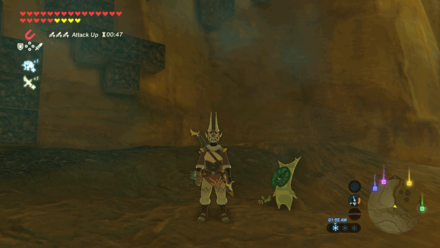
One Acorn
Hit the acorn hanging on the branch. |
| 412 |
 Enlarge Enlarge |
Metal Block
Use Magnesis to get the metal block on the second block pattern, and put it in the first block pattern that matches the third pattern. |
Korok Seeds Map and All Korok Seed Locations
Shrines in Woodland Tower Region
Woodland Tower Region Shrines
| Woodland Region Shrine Map |
|---|
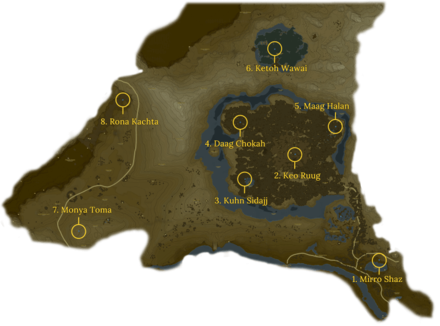 Enlarge EnlargeView Full Map Image |
| Shrine Number | Shrine | Overview |
|---|---|---|
| 1 |
 Enlarge Enlarge |
Trial: Tempered Power Location: Woodland Stable, Woodland Region Rewards: ・Iron Sledgehammer ・ Iron Sledgehammer ・ Giant Ancient Core |
| 2 |
 Enlarge Enlarge |
Trial: Fateful Stars Location: Korok Forest, Woodland Region Rewards: ・Knight's Claymore |
| 3 |
 Enlarge Enlarge |
Trial: Kuhn Sidajj's Blessing Requirements: Start The Hero's Sword and The Korok Trials Shrine Quest: Trial of Second Sight Location: Lake Saria, Woodland Region Rewards: ・Giant Ancient Core |
| 4 |
 Enlarge Enlarge |
Trial: Daag Chokah's Blessing Requirements: Start The Hero's Sword and The Korok Trials Shrine Quest: The Lost Pilgrimage Location: Korok Forest, Woodland Region Rewards: ・Ancient Core |
| 5 |
 Enlarge Enlarge |
Trial: Maag Halan's Blessing Requirements: Start The Hero's Sword and The Korok Trials Shrine Quest: The Test of Wood Location: Mido Swamp, Woodland Region Rewards: ・Giant Ancient Core |
| 6 |
 Enlarge Enlarge |
Trial: Ketoh Wawai's Blessing Shrine Quest: Shrouded Shrine Location: Typhlo Ruins, Woodland Region Rewards: ・Ancient Core |
| 7 |
 Enlarge Enlarge |
Trial: Drawing Parabolas Location: Salari Hills, Woodland Region Rewards: ・Thunderblade |
| 8 |
 Enlarge Enlarge |
Trial: Rona Kachta's Blessing Location: Forgotten Temple, Woodland Region Rewards: ・Great Flameblade |
| ▲ Back to All Shrines by Tower Region ▲ | ||
Shrines Map and All Shrine Locations
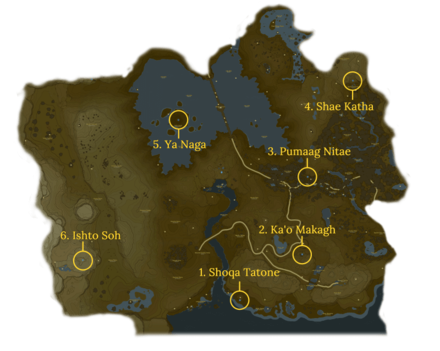
Shrines in Lake Tower Region
Lake Tower Region Shrines
| Lake Region Shrine Map |
|---|
 Enlarge EnlargeView Full Map Image |
| Shrine Number | Shrine | Overview |
|---|---|---|
| 1 |
 Enlarge Enlarge |
Trial: A Modest Test of Strength Requirements: Clear Locked Mementos main quest Shrine Quest: Guardian Slideshow Location: Puffer Beach, Lake Region Rewards: ・Royal Broadsword |
| 2 |
 Enlarge Enlarge |
Trial: Metal Doors Open the Way Location: Highland Stable, Lake Region Rewards: ・Traveler's Bow ・ Gold Rupee ・ Opal |
| 3 |
 Enlarge Enlarge |
Trial: A Minor Test of Strength Location: Faron Woods, Lake Region Rewards: ・Boomerang |
| 4 |
 Enlarge Enlarge |
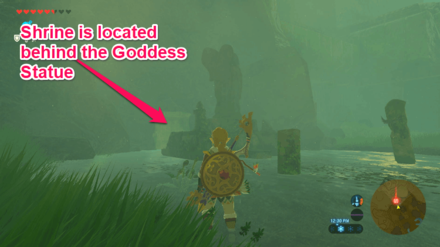
Trial: Shae Katha's Blessing Shrine Quest: The Serpent's Jaws Location: Spring of Courage, Lake Region Rewards: ・Thunderspear |
| 5 |
 Enlarge Enlarge |
Trial: Shatter the Heavens Location: Hylia Island, Lake Region Rewards: ・Eightfold Blade |
| 6 |
 Enlarge Enlarge |
Trial: Bravery's Grasp Location: Mount Granajh, Lake Region Rewards: ・Topaz ・ Ancient Core |
| ▲ Back to All Shrines by Tower Region ▲ | ||
Shrines Map and All Shrine Locations
Quests in Lake Tower Region
Main Quests
| No quests to display in this region. |
Side Quests
| Quest | Type | Quest Giver & Location |
|---|---|---|
| The Horseback Hoodlums | Side Quest | Perosa Highland Stable |
| Hunt for the Giant Horse | Side Quest | Straia Mounted Archery Camp |
Shrine Quests
| Quest | Type | Quest Giver & Location |
|---|---|---|
| The Serpent's Jaws | Shrine Quest | Kass Pagos Woods |
| Guardian Slideshow | Shrine Quest | Loone Puffer Beach |
DLC Quests
| Quest | Type | Quest Giver & Location |
|---|---|---|
| EX Treasure: Garb of Winds | DLC Side Quest | Misko's EX Journal 2 Deya Village Ruins |
| EX Treasure: Merchant Hood | DLC Side Quest | Misko's EX Journal 2 Deya Village Ruins |
All Locations in Lake Tower Region
| Zonai Ruins | Zokassa Ridge | Taobab Grasslands | Spring of Courage |
| Puffer Beach | Popla Foothills | Parache Plains | Pappetto Grove |
| Pagos Woods | Oseira Plains | Nette Plateau | Nautelle Wetlands |
| Mounted Archery Camp | Mount Faloraa | Menoat River | Malanya Spring |
| Laverra Beach | Lake of the Horse God | Komo Shoreline | Ibara Butte |
| Hylia Island | Horse God Bridge | Herin Lake | Harker Lake |
| Harfin Valley | Haran Lake | Guchini Plain | Grinnden Plains |
| Fural Plain | Finra Woods | Farosh Hills | Faron Woods |
| Dracozu River | Dracozu Lake | Deya Village Ruins | Deya Lake |
| Darybon Plains | Damel Forest | Cora Lake | Bridge of Hylia |
| Barula Plain |
Zelda: BotW Related Guides

Points of Interest
| All Maps and Locations | |
|---|---|
| Shrines | Stables |
| Great Fairy Fountains | Korok Seeds |
Tower Regions
Author

The Legend of Zelda: Breath of the Wild Walkthrough & Guides Wiki
Lake Tower Region: Korok Seed Map, Shrines, and Quests
Rankings
- We could not find the message board you were looking for.
Gaming News

![Monster Hunter Stories 3 Review [First Impressions] | Simply Rejuvenating](https://img.game8.co/4438641/2a31b7702bd70e78ec8efd24661dacda.jpeg/show)


![Monster Hunter Stories 3 Review [First Impressions] | Simply Rejuvenating](https://img.game8.co/4438641/2a31b7702bd70e78ec8efd24661dacda.jpeg/thumb)
Popular Games

Genshin Impact Walkthrough & Guides Wiki
Honkai: Star Rail Walkthrough & Guides Wiki
Umamusume: Pretty Derby Walkthrough & Guides Wiki
Pokemon Pokopia Walkthrough & Guides Wiki
Resident Evil Requiem (RE9) Walkthrough & Guides Wiki
Monster Hunter Wilds Walkthrough & Guides Wiki
Wuthering Waves Walkthrough & Guides Wiki
Arknights: Endfield Walkthrough & Guides Wiki
Pokemon FireRed and LeafGreen (FRLG) Walkthrough & Guides Wiki
Pokemon TCG Pocket (PTCGP) Strategies & Guides Wiki


Recommended Games
Diablo 4: Vessel of Hatred Walkthrough & Guides Wiki
Cyberpunk 2077: Ultimate Edition Walkthrough & Guides Wiki
Fire Emblem Heroes (FEH) Walkthrough & Guides Wiki
Yu-Gi-Oh! Master Duel Walkthrough & Guides Wiki
Super Smash Bros. Ultimate Walkthrough & Guides Wiki
Pokemon Brilliant Diamond and Shining Pearl (BDSP) Walkthrough & Guides Wiki
Elden Ring Shadow of the Erdtree Walkthrough & Guides Wiki
Monster Hunter World Walkthrough & Guides Wiki
The Legend of Zelda: Tears of the Kingdom Walkthrough & Guides Wiki
Persona 3 Reload Walkthrough & Guides Wiki


All rights reserved
© 2020 Nintendo. The Legend of Zelda, Wii U, and Nintendo Switch are trademarks of Nintendo.
The copyrights of videos of games used in our content and other intellectual property rights belong to the provider of the game.
The contents we provide on this site were created personally by members of the Game8 editorial department.
We refuse the right to reuse or repost content taken without our permission such as data or images to other sites.