Central Tower Region (Central Hyrule): Korok Seed Map, Shrines, and Quests
★ Sequel: Tears of the Kingdom Guide here!
★ Get a head start with our Beginner's Guide
┗ The Best Recipes to Cook | Rupee Farming
★ Shrines Locations | Korok Seeds Locations
★ Explore after the story with our Post Game Guide
This page is a map of the Central Tower Region (Central Hyrule) in The Legend of Zelda: Breath of the Wild (BotW). Here you can find all Korok Seed locations in the Central Tower Region, as well as quests, shrines, and other locations.
List of Contents
Central Tower Region Korok Seed Map
Map of All Central Tower Korok Seeds
| Central Hyrule Korok Seed Map |
|---|
 Enlarge EnlargeView Full Map Image |
How to Get All Central Koroks
| Total No. | Korok in Region | Solution & Video Link |
|---|---|---|
| 788 |
 Enlarge Enlarge |
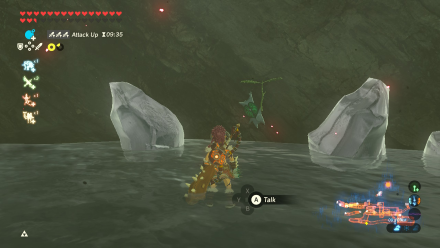
Water Ring
Jump into the center of the circle of lily pads. |
| 789 |
 Enlarge Enlarge |
Rock Circle
Shoot a rock into the circular rock formation in the water. |
| 790 |
 Enlarge Enlarge |
Rock
Lift the rock to reveal a Korok. |
| 791 |
 Enlarge Enlarge |
Rock
Lift the rock atop the tree to reveal a Korok. |
| 792 |
 Enlarge Enlarge |
Rock
Lift the rock to reveal a Korok. |
| 793 |
 Enlarge Enlarge |
Jumping Acorn
Shoot the two acorns behind the trees. |
| 794 |
 Enlarge Enlarge |
Rock Pattern
Complete the triangular rock formation by placing a rock on its empty spot. |
| 795 |
 Enlarge Enlarge |
Rock Circle
Erect an ice pillar using Cryonis near the edge of the circular rock formation, then throw a rock into it. |
| 796 |
 Enlarge Enlarge |
Chained Ball
Use Magnesis on the metal part of the ball and chain, then place it on the broken tree trunk. |
| 797 |
 Enlarge Enlarge |
One Acorn
Shoot the acorn in the tree trunk. |
| 798 |
 Enlarge Enlarge |
Rock
Lift the rock in the well to reveal a Korok. |
| 799 |
 Enlarge Enlarge |
Metal Block
Use Magnesis to grab the metal block from one of the block puzzles, then place it on the other block puzzle so it matches the other one. |
| 800 |
 Enlarge Enlarge |
Rock
Lift the rock resting on the ledge of the cliff by Aquame Bridge to reveal a Korok. |
| 801 |
 Enlarge Enlarge |
One Acorn
Shoot the acorn hanging under thr bridge. |
| 802 |
 Enlarge Enlarge |
Timed Ring
Climb the tree, then step on the tree stump. Afterwards, race to the finish line before the timer runs out. |
| 803 |
 Enlarge Enlarge |
Rock
Lift the rock to reveal a Korok. |
| 804 |
 Enlarge Enlarge |
One Acorn
Shoot the acorn inside the tree trunk. |
| 805 |
 Enlarge Enlarge |
Rock
Lift the rock atop the cliff to reveal a Korok. |
| 806 |
 Enlarge Enlarge |
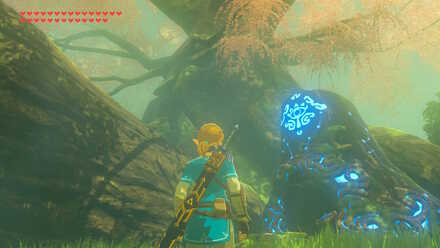
Moving Sparkles
Chase the sparkles, then examine it to reveal a Korok. |
| 807 |
 Enlarge Enlarge |
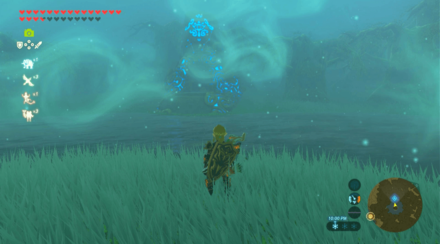
Moving Sparkles
Chase the sparkles, then examine it to reveal a Korok. |
| 808 |
 Enlarge Enlarge |
Pinwheel Balloon
Shoot all three balloons from where the pinwheel is. |
| 809 |
 Enlarge Enlarge |
Hidden Rock
Remove the pile of leaves in one corner of the ruins by burning them or by using a weapon, then lift the rock buried underneath. |
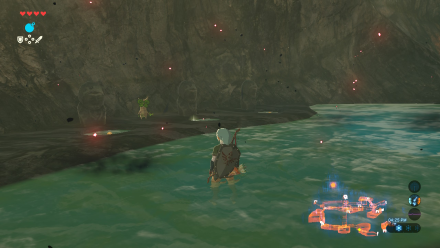
| 810 |
 Enlarge Enlarge |
Water Ring
Dive into the center of the circle of lily pads. |
| 811 |
 Enlarge Enlarge |
One Acorn
Shoot the acorn hanging from the tree. |
| 812 |
 Enlarge Enlarge |
Follow the Flowers
Follow the flower until a Korok is revealed. |
| 813 |
 Enlarge Enlarge |
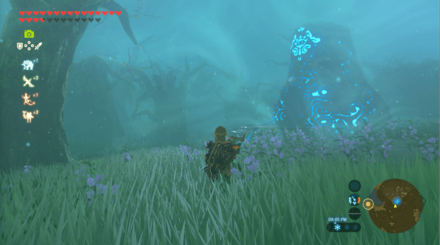
Moving Sparkles
Chase the sparkles, then examine it to reveal a Korok. |
| 814 |
 Enlarge Enlarge |
Rock Pattern
Complete the circle rock formation by placing a rock on the empty spot. |
| 815 |
 Enlarge Enlarge |
Fruit Offering
Place an apple on the prayer bowl. |
| 816 |
 Enlarge Enlarge |
Water Ring
Dive into the center of the circle of lily pads. |
| 817 |
 Enlarge Enlarge |
Metal Block
Use Magnesis to get the metal block underwater, then use it to complete the block puzzle on the shore. |
| 818 |
 Enlarge Enlarge |
Rock
Lift the rock atop one of the broken walls in Sage Temple Ruins. |
| 819 |
 Enlarge Enlarge |
Follow the Flowers
Follow the flower until a Korok is revealed. |
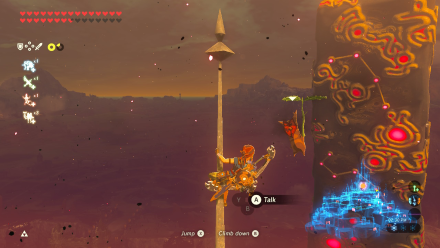
| 820 |
 Enlarge Enlarge |
Peak Sparkles
Climb the pole, then examine the sparkles on top. |
| 821 |
 Enlarge Enlarge |
Moving Sparkles
Chase the sparkles, then examine it to reveal a Korok. |
| 822 |
 Enlarge Enlarge |
One Acorn
Shoot the acorn in the tree trunk. |
| 823 |
 Enlarge Enlarge |
One Balloon
Shoot the balloon hiding above the tree. |
| 824 |
 Enlarge Enlarge |
Jumping Acorn
Shoot the acorn flying around. |
| 825 |
 Enlarge Enlarge |
Rock
Lift the rock positioned between a few large boulders. |
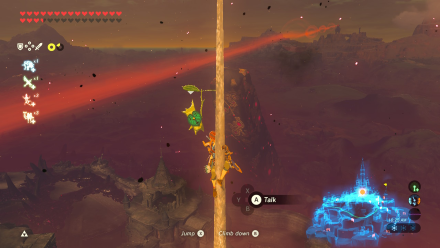
| 826 |
 Enlarge Enlarge |
Peak Sparkles
Climb the pole, then examine the sparkles on top. |
| 827 |
 Enlarge Enlarge |
One Acorn
Shoot the acorn hanging from the broken-down cart. |
| 828 |
 Enlarge Enlarge |
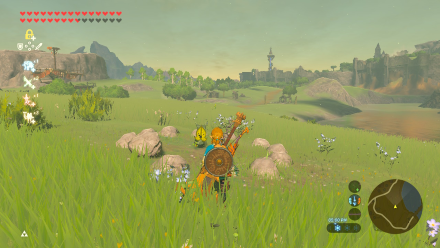
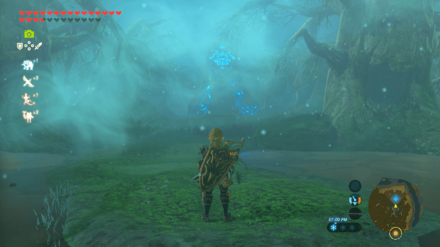
Moving Sparkles
Chase the sparkles, then examine it to reveal a Korok. |
| 829 |
 Enlarge Enlarge |
Moving Sparkles
Chase the sparkles, then examine it to reveal a Korok. |
| 830 |
 Enlarge Enlarge |
Rock Pattern
Complete the circular rock pattern by placing rocks on the empty spots. |
| 831 |
 Enlarge Enlarge |
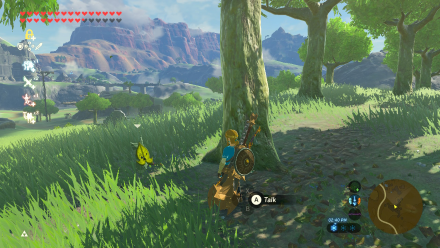
Rock
Lift the rock atop the tree to reveal a Korok. |
| 832 |
 Enlarge Enlarge |
Jumping Acorn
Shoot the acorns bouncing from behind the broken wall. |
| 833 |
 Enlarge Enlarge |
Pinwheel Balloon
Shoot all three balloons from where the pinwheel is. |
| 834 |
 Enlarge Enlarge |
One Acorn
Shoot the acorn inside the tree trunk. |
| 835 |
 Enlarge Enlarge |
Fruit Offering
Place an apple on the empty prayer bowl. |
| 836 |
 Enlarge Enlarge |
Numbered Flowers
Walk on the flowers from 1 to 5 to reveal a Korok. |
| 837 |
 Enlarge Enlarge |
Rock
Lift the rock atop the hill to reveal a Korok. |
| 838 |
 Enlarge Enlarge |
Rock
Lift the rock atop the hill to reveal a Korok. |
| 839 |
 Enlarge Enlarge |
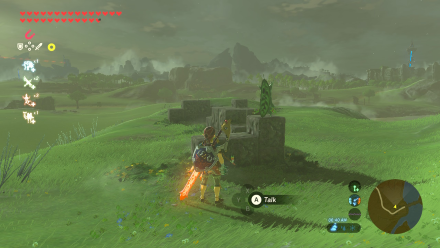
Other
Climb the pillar, then use Stasis on the boulder. Hit it with a one-handed weapon to push it off the pillar. Finally, place the boulder on the small hole on the ground. |
| 840 |
 Enlarge Enlarge |
Rock
Lift the rock under Rebonae Bridge. |
| 841 |
 Enlarge Enlarge |
Fruit Match
Shoot the 4 extra apples from the apple tree with more than one apple to match it with the 2 other apple trees. |
| 842 |
 Enlarge Enlarge |
One Acorn
Shoot the acorn hanging under Orsedd Bridge. |
| 843 |
 Enlarge Enlarge |
Pinwheel Balloon
Shoot all three balloons from where the pinwheel is. |
| 844 |
 Enlarge Enlarge |
Rock
Lift the rock from the broken tree. |
| 845 |
 Enlarge Enlarge |
Rock Circle
Erect an ice pillar using Cryonis near the circular rock formation, then throw a rock into it. |
| 846 |
 Enlarge Enlarge |
Peak Sparkles
Climb the tree, then examine the sparkles at the peak. |
| 847 |
 Enlarge Enlarge |
Rock
Lift the rock under the hollowed out tree trunk. |
| 848 |
 Enlarge Enlarge |
Water Ring
Dive into the center of the circle of lily pads. |
| 849 |
 Enlarge Enlarge |
Moving Sparkles
Chase the sparkles, then examine it to reveal a Korok. |
| 850 |
 Enlarge Enlarge |
Rock Circle
Erect an ice pillar using Cryonis near the circular rock formation, then throw a rock into it. |
| 851 |
 Enlarge Enlarge |
Rock
Lift the rock from the broken fountain to reveal a Korok. |
| 852 |
 Enlarge Enlarge |
One Acorn
Shoot the acorn in the tree trunk. |
| 853 |
 Enlarge Enlarge |
Metal Block
Use Magnesis to get the metal block from the block puzzle on the other side of the river. Place the metal block on the incomplete block puzzle so it matches the other one. |
| 854 |
 Enlarge Enlarge |
Hidden Rock
Remove the pile of leaves, then lift the rock buried underneath to reveal a Korok. |
| 855 |
 Enlarge Enlarge |
Peak Sparkles
Climb the flag pole, then examine the sparkles at the peak. |
| 856 |
 Enlarge Enlarge |
Hidden Rock
Lift the metal door with Magnesis, then lift the rock buried underneath to reveal a Korok. |
| 857 |
 Enlarge Enlarge |
Pinwheel Balloon
Pop all the ballon from where the pinwheel is. You can use bomb arrows to pop the balloons easily. |
| 858 |
 Enlarge Enlarge |
Rock
Lift the rock atop one of the pillars in the Sacred Ground Ruins. |
| 859 |
 Enlarge Enlarge |
Other
Shoot the shield on the wall using a bow and arrow. |
| 860 |
 Enlarge Enlarge |
Timed Ring
Step on the tree stump, then rush to the yellow ring to reveal a Korok. |
| 861 |
 Enlarge Enlarge |
Rock
Lift the rock to reveal a Korok. |
| 862 |
 Enlarge Enlarge |
Hidden Rock
Bomb the breakable wall, then lift the rock buried underneath to reveal a Korok. |
| 863 |
 Enlarge Enlarge |
Rock
Lift the rock atop the stone structure to reveal a Korok. |
| 864 |
 Enlarge Enlarge |
Rock
Lift the rock atop the hill to reveal a Korok. |
| 865 |
 Enlarge Enlarge |
Rock Pattern
Complete the circular rock pattern by placing a rock on the empty spot. |
| 866 |
 Enlarge Enlarge |
Hidden Rock
Bomb the breakable wall by the edge of the cliff, then lift the rock buried underneath to reveal a Korok. |
| 867 |
 Enlarge Enlarge |
One Balloon
Pop the balloon hiding behind the tree. |
| 868 |
 Enlarge Enlarge |
Rock Pattern
Pick up a rock atop one of the walls nearby, then place it in the middle of the rock formation. |
| 869 |
 Enlarge Enlarge |
Water Ring
Dive into the center of the circle of lily pads. |
| 870 |
 Enlarge Enlarge |
Rock
Lift the rock atop the hill that houses Noya Neha shrine. |
| 871 |
 Enlarge Enlarge |
Jumping Acorn
Shoot the acorn bouncing behind the trees to reveal a Korok. |
| 872 |
 Enlarge Enlarge |
Other
Place a Rusty Shield on the empty prayer bowl. |
| 873 |
 Enlarge Enlarge |
Metal Block
Use Magnesis to lift the metal block from the block pattern underwater, then place it on the block pattern on the shore so it matches the one underwater. |
| 874 |
 Enlarge Enlarge |
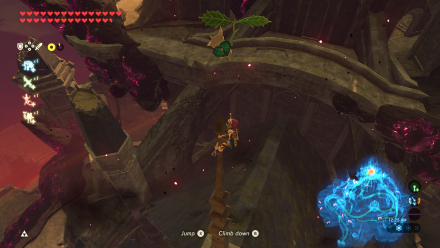
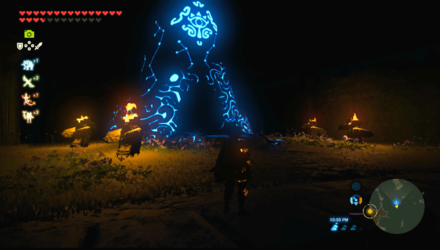
Rock
Lift the rock behind the tall malice structure to reveal a Korok. |
| 875 |
 Enlarge Enlarge |
One Acorn
Shoot the acorn under the bridge to Hyrule Castle. |
| 876 |
 Enlarge Enlarge |
Follow the Flowers
Go under the bridge to Hyrule Castle, then follow the trail of flower to its end to reveal a Korok. |
| 877 |
 Enlarge Enlarge |
Rock
Lift the rock atop the main gate of Hyrule Castle. |
| 878 |
 Enlarge Enlarge |
Other
Shoot the shield on the wall using a bow and arrow. |
| 879 |
 Enlarge Enlarge |
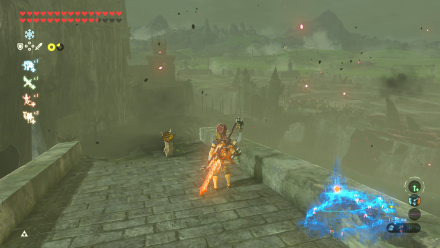
Pinwheel Balloon
Shoot the balloon with a bow and arrow from where the pinwheel is. |
| 880 |
 Enlarge Enlarge |
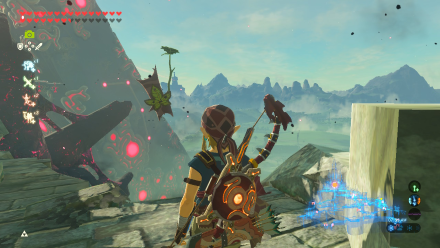
Pinwheel Balloon
Pop all three balloons floating behind the malice. |
| 881 |
 Enlarge Enlarge |
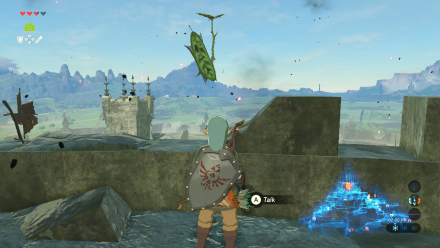
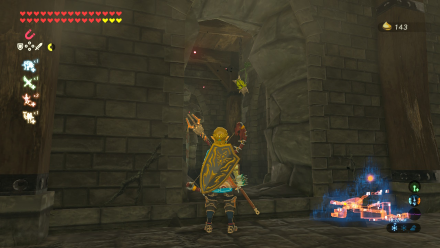
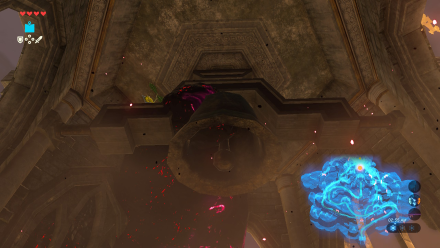
One Acorn
Shoot the acorn hanging from the ceiling. |
| 882 |
 Enlarge Enlarge |
Rock
Lift the rock to reveal a Korok. |
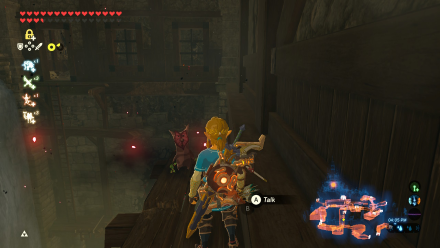
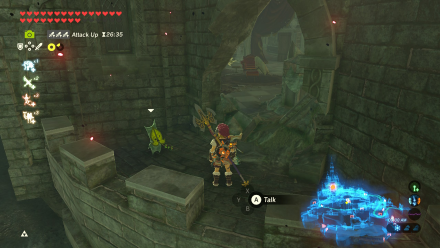
| 883 |
 Enlarge Enlarge |
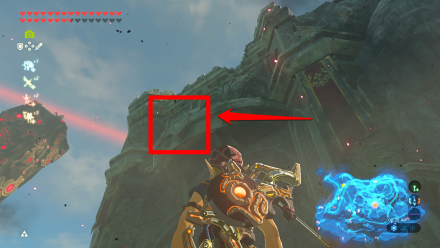
Peak Sparkles
Climb the first gatehouse until you reach its peak, then examine the sparkles at the top. |
| 884 |
 Enlarge Enlarge |
Hidden Rock
Bomb the breakable wall , then lift the rock buried underneath. |
| 885 |
 Enlarge Enlarge |
Other
Get the egg near the decayed guardian, then place it on the empty prayer bowl. Wait for it to become a hard-boiled egg to reveal a Korok. |
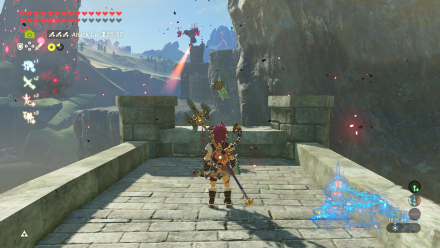
| 886 |
 Enlarge Enlarge |
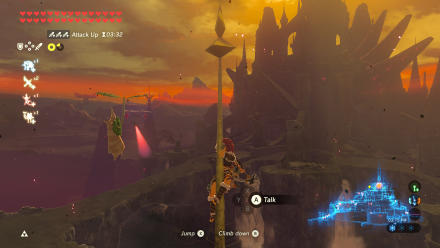
Peak Sparkles
Climb the peak of the tower that houses Princess Zelda's Study, then examine the sparkles at the top. |
| 887 |
 Enlarge Enlarge |
Rock
Lift the rock on the wooden ledge to reveal a Korok. |
| 888 |
 Enlarge Enlarge |
Rock
Lift the rock at the balcony of Princess Zelda's room. |
| 889 |
 Enlarge Enlarge |
Pinwheel Balloon
Pop all five ballons from where the pinwheel is. |
| 890 |
 Enlarge Enlarge |
Rock
Lift the rock on the ledge to reveal a Korok. |
| 891 |
 Enlarge Enlarge |
Hidden Rock
Bomb the breakable wall, then lift the rock underneath to reveal a Korok. |
| 892 |
 Enlarge Enlarge |
Water Ring
Dive into the center of the circle of lily pads. |
| 893 |
 Enlarge Enlarge |
Rock
Lift the rock near the broken wall to reveal a Korok. |
| 894 |
 Enlarge Enlarge |
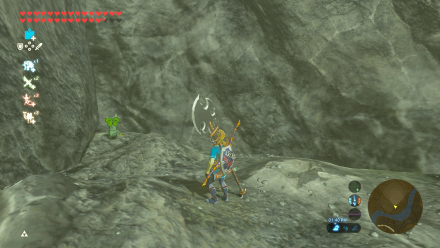
Ice Sparkles
Melt the biggest boulder of ice, then examine the sparkles afterwards. |
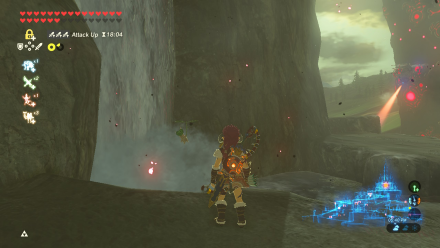
| 895 |
 Enlarge Enlarge |
Peak Sparkles
Climb the second gatehouse until you reach its peak, then examine the sparkles at the top. |
| 896 |
 Enlarge Enlarge |
One Acorn
Shoot the acorn hanging from the ceiling. |
| 897 |
 Enlarge Enlarge |
Hidden Rock
Bomb the breakable wall, then lift the rock buried underneath. |
| 898 |
 Enlarge Enlarge |
Timed Ring
Step on the tree stump, then race to the finish line indicated by a ring of yellow dots. |
| 899 |
 Enlarge Enlarge |
One Balloon
Shoot the balloon hiding at the ceiling. |
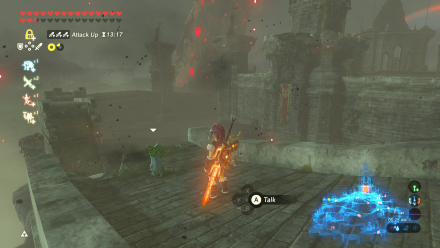
| 900 |
 Enlarge Enlarge |
Peak Sparkles
Climb to the very top of Hyrule Castle, then examine the sparkles at the peak. |
Korok Seeds Map and All Korok Seed Locations
Shrines in Woodland Tower Region
Woodland Tower Region Shrines
| Woodland Region Shrine Map |
|---|
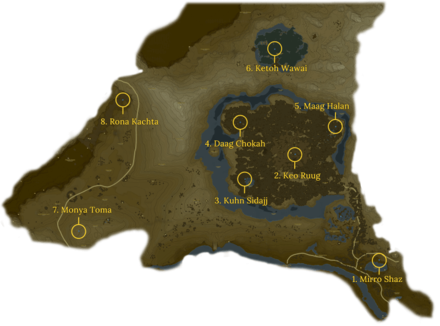 Enlarge EnlargeView Full Map Image |
| Shrine Number | Shrine | Overview |
|---|---|---|
| 1 |
 Enlarge Enlarge |
Trial: Tempered Power Location: Woodland Stable, Woodland Region Rewards: ・Iron Sledgehammer ・ Iron Sledgehammer ・ Giant Ancient Core |
| 2 |
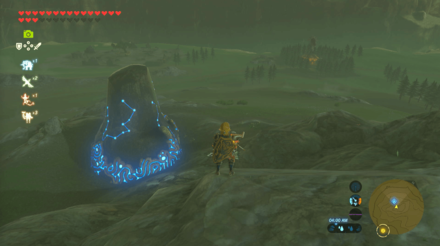
 Enlarge Enlarge |
Trial: Fateful Stars Location: Korok Forest, Woodland Region Rewards: ・Knight's Claymore |
| 3 |
 Enlarge Enlarge |
Trial: Kuhn Sidajj's Blessing Requirements: Start The Hero's Sword and The Korok Trials Shrine Quest: Trial of Second Sight Location: Lake Saria, Woodland Region Rewards: ・Giant Ancient Core |
| 4 |
 Enlarge Enlarge |
Trial: Daag Chokah's Blessing Requirements: Start The Hero's Sword and The Korok Trials Shrine Quest: The Lost Pilgrimage Location: Korok Forest, Woodland Region Rewards: ・Ancient Core |
| 5 |
 Enlarge Enlarge |
Trial: Maag Halan's Blessing Requirements: Start The Hero's Sword and The Korok Trials Shrine Quest: The Test of Wood Location: Mido Swamp, Woodland Region Rewards: ・Giant Ancient Core |
| 6 |
 Enlarge Enlarge |
Trial: Ketoh Wawai's Blessing Shrine Quest: Shrouded Shrine Location: Typhlo Ruins, Woodland Region Rewards: ・Ancient Core |
| 7 |
 Enlarge Enlarge |
Trial: Drawing Parabolas Location: Salari Hills, Woodland Region Rewards: ・Thunderblade |
| 8 |
 Enlarge Enlarge |
Trial: Rona Kachta's Blessing Location: Forgotten Temple, Woodland Region Rewards: ・Great Flameblade |
| ▲ Back to All Shrines by Tower Region ▲ | ||
Shrines Map and All Shrine Locations
Shrines in Central Tower Region
Central Tower Region Shrines
| Central Region Shrine Map |
|---|
 Enlarge EnlargeView Full Map Image |
| Shrine Number | Shrine | Overview |
|---|---|---|
| 1 |
 Enlarge Enlarge |
Trial: Trial of Power Requirements: Bow and arrows Location: Mount Daphnes, Central Hyrule Region Rewards: ・Edge of Duality ・ Knight's Broadsword ・ Ancient Core ・ Silver Rupee ・ Diamond |
| 2 |
 Enlarge Enlarge |
Trial: Passing of the Gates Location: Outskirt Stable, Central Hyrule Region Rewards: ・Feathered Edge |
| 3 |
 Enlarge Enlarge |
Trial: A Minor Test of Strength Location: Digdogg Suspension Bridge, Central Hyrule Region Rewards: ・Ancient Core |
| 4 |
 Enlarge Enlarge |
Trial: Metal Connections Location: Riverside Stable, Central Hyrule Region Rewards: ・Amber |
| 5 |
 Enlarge Enlarge |
Trial: A Modest Test of Strength Location: Crenel Hills, Central Hyrule Region Rewards: ・Frostspear |
| 6 |
 Enlarge Enlarge |
Trial: A Minor Test of Strength Location: Quarry Ruins, Central Hyrule Region Rewards: ・Royal Halberd |
| 7 |
 Enlarge Enlarge |
Trial: A Minor Test of Strength Location: Castle Town Prison, Central Hyrule Region Rewards: ・Knight's Shield |
| 8 |
 Enlarge Enlarge |
Trial: A Major Test of Strength Location: Hyrule Castle, Central Hyrule Region Rewards: ・Flameblade |
| ▲ Back to All Shrines by Tower Region ▲ | ||
Shrines Map and All Shrine Locations
Quests in Central Tower Region
Main Quests
| Quest | Type | Quest Giver & Location |
|---|---|---|
| Destroy Ganon | Main Quest | King Rhoam Kakariko Village |
Side Quests
| Quest | Type | Quest Giver & Location |
|---|---|---|
| The Royal White Stallion | Side Quest | Toffa Outskirt Stable |
| A Rare Find | Side Quest | Trott Outskirt Stable |
| My Hero | Side Quest | Aliza Outskirt Stable |
| A Royal Recipe | Side Quest | Gotter Riverside Stable |
| The Royal Guard's Gear | Side Quest | Parcy Riverside Stable |
Shrine Quests
| No quests to display in this region. |
DLC Quests
| Quest | Type | Quest Giver & Location |
|---|---|---|
| EX Treasure: Phantasma | DLC Side Quest | Misko's EX Journal Outpost Ruins |
| EX Treasure: Twilight Relic | DLC Side Quest | Misko's EX Journal Outpost Ruins |
| EX Treasure: Fairy Clothes | DLC Side Quest | Misko's EX Journal Outpost Ruins |
| EX Treasure: Ancient Mask | DLC Side Quest | Misko's EX Journal Outpost Ruins |
| EX Royal Guard Rumors | DLC Side Quest | Super Rumor Mill V4 Riverside Stable |
| EX The Champions' Ballad | DLC Main Quest | Zelda Shrine of Resurrection |
All Locations in Central Tower Region
| Windvane Meadow | Whistling Hill | West Passage | Water Reservoir |
| Second Gatehouse | Sanctum | Sage Temple Ruins | Sacred Ground Ruins |
| Romani Plains | Riverside Stable | Regencia River | Ranch Ruins |
| Quarry Ruins | Princess Zelda's Study | Outskirt Stable | Orsedd Bridge |
| Observation Room | Mount Gustaf | Mount Daphnes | Moat Bridge |
| Manhala Bridge | Mabe Prairie | Lockup | Library |
| Lake Kolomo | Kolomo Garrison Ruins | King's Study | Hyrule Forest Park |
| Hyrule Cathedral | Hyrule Castle Town Ruins | Hyrule Castle Moat | Hylia River |
| Helmhead Bridge | Guard's Chamber | Gleeok Bridge | Giant's Forest |
| Gatepost Town Ruins | Forest of Time | First Gatehouse | Exchange Ruins |
| East Passage | Docks | Dining Hall | Digdogg Suspension Bridge |
| Crenel Hills | Coliseum Ruins | Central Square | Castle Town Watchtower |
| Castle Town Prison | Carok Bridge | Bottomless Swamp | Boneyard Bridge |
| Aquame Lake | Aquame Bridge | Applean Forest | Ancient Tree Stump |
Zelda: BotW Related Guides

Points of Interest
| All Maps and Locations | |
|---|---|
| Shrines | Stables |
| Great Fairy Fountains | Korok Seeds |
Tower Regions
Author

The Legend of Zelda: Breath of the Wild Walkthrough & Guides Wiki
Central Tower Region (Central Hyrule): Korok Seed Map, Shrines, and Quests
Rankings
- We could not find the message board you were looking for.
Gaming News


![Monster Hunter Stories 3 Review [First Impressions] | Simply Rejuvenating](https://img.game8.co/4438641/2a31b7702bd70e78ec8efd24661dacda.jpeg/thumb)
Popular Games

Genshin Impact Walkthrough & Guides Wiki
Honkai: Star Rail Walkthrough & Guides Wiki
Umamusume: Pretty Derby Walkthrough & Guides Wiki
Pokemon Pokopia Walkthrough & Guides Wiki
Resident Evil Requiem (RE9) Walkthrough & Guides Wiki
Monster Hunter Wilds Walkthrough & Guides Wiki
Wuthering Waves Walkthrough & Guides Wiki
Arknights: Endfield Walkthrough & Guides Wiki
Pokemon FireRed and LeafGreen (FRLG) Walkthrough & Guides Wiki
Pokemon TCG Pocket (PTCGP) Strategies & Guides Wiki


Recommended Games
Diablo 4: Vessel of Hatred Walkthrough & Guides Wiki
Cyberpunk 2077: Ultimate Edition Walkthrough & Guides Wiki
Fire Emblem Heroes (FEH) Walkthrough & Guides Wiki
Yu-Gi-Oh! Master Duel Walkthrough & Guides Wiki
Super Smash Bros. Ultimate Walkthrough & Guides Wiki
Pokemon Brilliant Diamond and Shining Pearl (BDSP) Walkthrough & Guides Wiki
Elden Ring Shadow of the Erdtree Walkthrough & Guides Wiki
Monster Hunter World Walkthrough & Guides Wiki
The Legend of Zelda: Tears of the Kingdom Walkthrough & Guides Wiki
Persona 3 Reload Walkthrough & Guides Wiki


All rights reserved
© 2020 Nintendo. The Legend of Zelda, Wii U, and Nintendo Switch are trademarks of Nintendo.
The copyrights of videos of games used in our content and other intellectual property rights belong to the provider of the game.
The contents we provide on this site were created personally by members of the Game8 editorial department.
We refuse the right to reuse or repost content taken without our permission such as data or images to other sites.