Akkala Tower Region: Korok Seed Map, Shrines, and Quests
★ Sequel: Tears of the Kingdom Guide here!
★ Get a head start with our Beginner's Guide
┗ The Best Recipes to Cook | Rupee Farming
★ Shrines Locations | Korok Seeds Locations
★ Explore after the story with our Post Game Guide
This page is a map of the Akkala Tower Region in The Legend of Zelda: Breath of the Wild (BotW). Here you can find all Korok Seed locations in the Akkala Tower Region, as well as quests, shrines, and other locations.
List of Contents
Akkala Tower Region Korok Seed Map
Map of All Akkala Tower Korok Seeds
| Akkala Korok Seed Map |
|---|
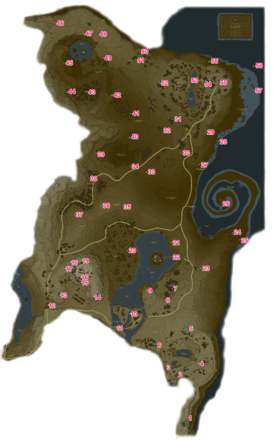 Enlarge EnlargeView Full Map Image |
How to Get All Akkala Koroks
| Total No. | Korok in Region | Solution & Video Link |
|---|---|---|
| 209 |
 Enlarge Enlarge |
Hidden Rock
Use the Remote Bomb rune to break the wall. Lift the rock to reveal the Korok. |
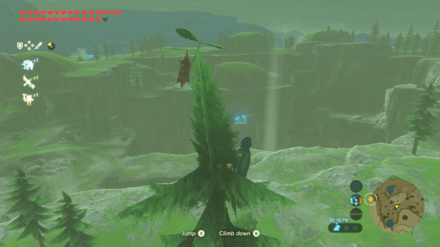
| 210 |
 Enlarge Enlarge |
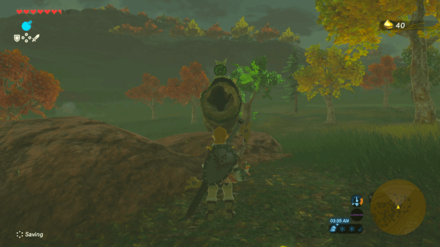
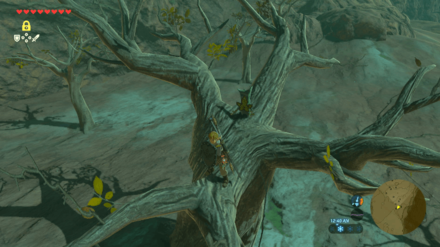
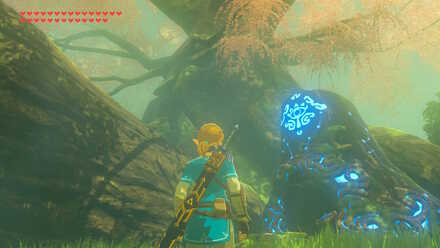
Peak Sparkles
Climb on top of the tallest pine tree in the area and examine the sparkles on top to reveal the Korok. |
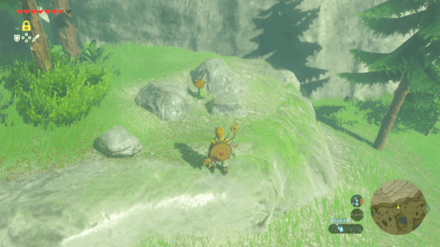
| 211 |
 Enlarge Enlarge |
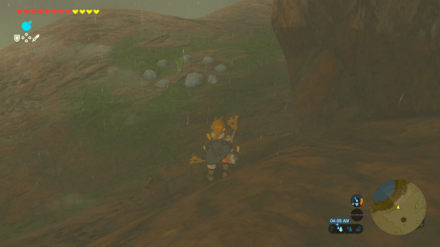
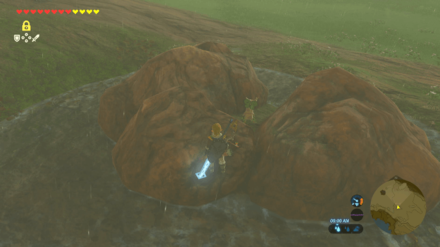
Hidden Rock
Use Stasis to remove the large rock surrounded by smaller rocks. Pick up the small rock underneath to reveal the Korok. |
| 212 |
 Enlarge Enlarge |
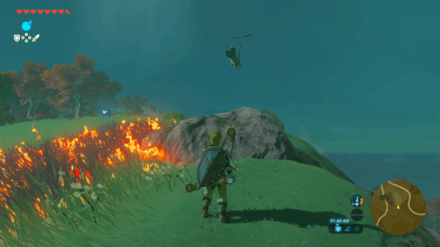
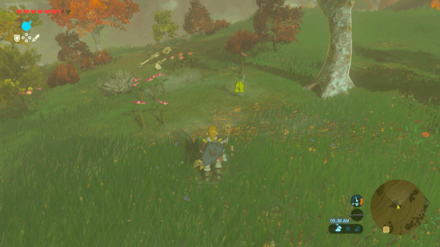
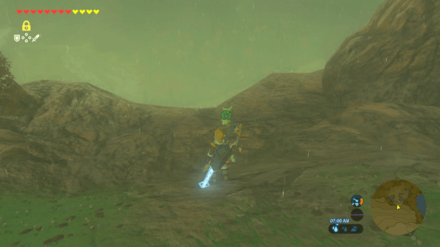
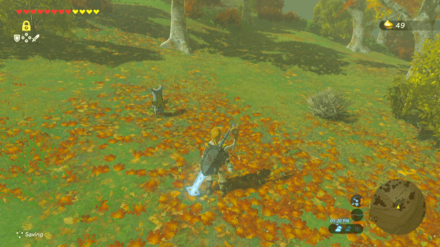
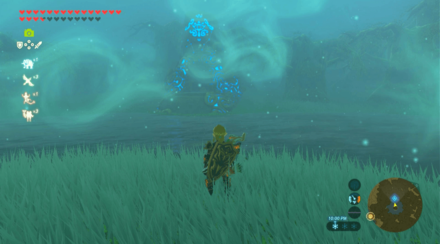
Moving Sparkles
Examine the flying leaves to reveal the Korok. |
| 213 |
 Enlarge Enlarge |
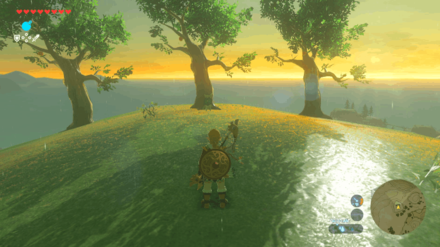
Fruit Match
Pluck the apples on the middle tree to match the two trees on its sides. |
| 214 |
 Enlarge Enlarge |
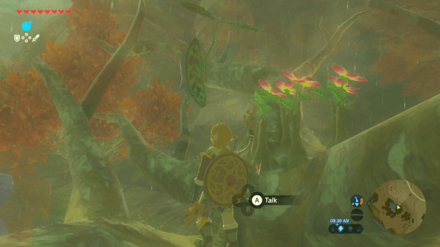
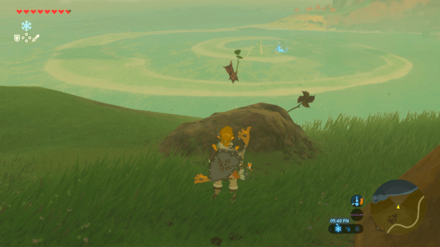
Pinwheel Balloon
Stand near the pinwheel and use a bow and arrow to pop the balloons. Use an Ice Arrow or Shock Arrow, if it's raining, to pop the farthest balloon. |
| 215 |
 Enlarge Enlarge |
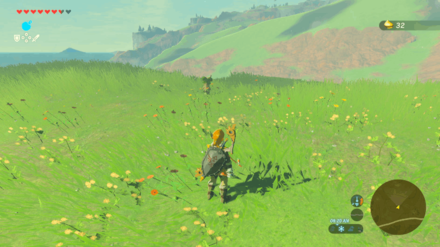
Numbered Flowers
Run through the yellow flowers starting from the single flower to the five flowers. The fifth flowers are on top of the tree behind the fourth flowers. |
| 216 |
 Enlarge Enlarge |
Fruit Match
Pluck the apples on the leftmost tree to match the middle and rightmost trees. |
| 217 |
 Enlarge Enlarge |
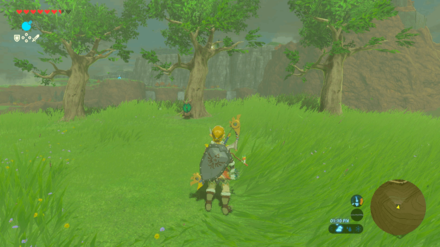
Fruit Offering
Place an apple on the empty bowl to reveal the Korok. |
| 218 |
 Enlarge Enlarge |
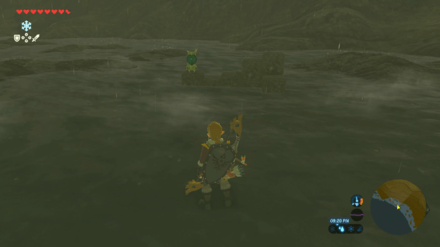
Rock Circle
Pick up the rock nearby and throw it into the stone circle. |
| 219 |
 Enlarge Enlarge |
Rock
Pick up the lone rock under the wooden bridge. |
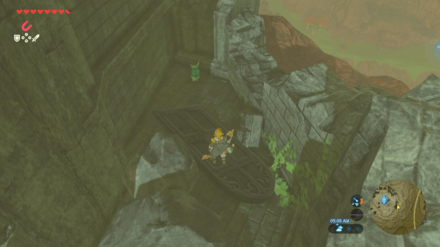
| 220 |
 Enlarge Enlarge |
Hidden Rock
Glide towards the ruined pillar under the bridge. Use Stasis to remove the slab to find the lone rock that you can lift to reveal the Korok. |
| 221 |
 Enlarge Enlarge |
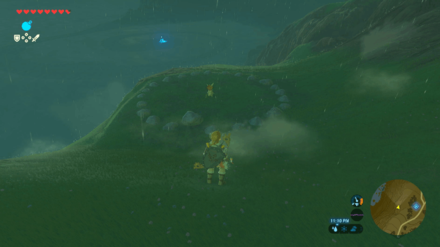
Rock Pattern
Pick up the rock near the dead guardian and place it on the gap on the rock pattern to reveal the Korok. |
| 222 |
 Enlarge Enlarge |
Hidden Rock
Use Magnesis to lift the metal door to find the rock underneath it. Lift the rock to reveal the Korok. |
| 223 |
 Enlarge Enlarge |
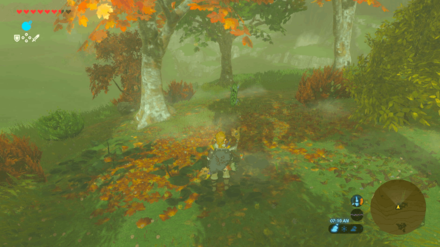
Hidden Rock
Slash the pile of leaves and lift the rock to reveal the Korok. |
| 224 |
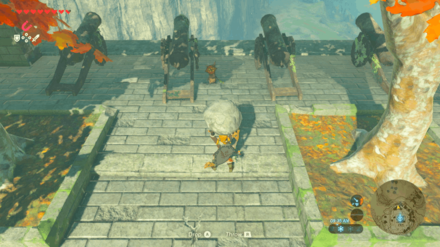 Enlarge Enlarge |
Rock
Lift up the rock near the cannon to reveal the Korok. |
| 225 |
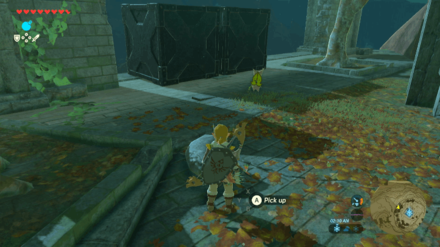 Enlarge Enlarge |
Hidden Rock
Slash the pile of leaves near the two metal blocks. Lift the rock to reveal the Korok. |
| 226 |
 Enlarge Enlarge |
Hidden Rock
Slash the pile of leaves and lift the rock to reveal the Korok. |
| 227 |
 Enlarge Enlarge |
Hidden Rock
Use Magnesis to lift the metal door to find the rock underneath it. Lift the rock to reveal the Korok. |
| 228 |
 Enlarge Enlarge |
Rock
Climb on top of the ruined structure and lift the rock to reveal the Korok. |
| 229 |
 Enlarge Enlarge |
Rock Pattern
Pick up the rock south of the stone circle and place it on the missing spot. |
| 230 |
 Enlarge Enlarge |
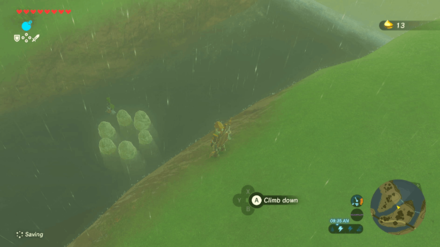
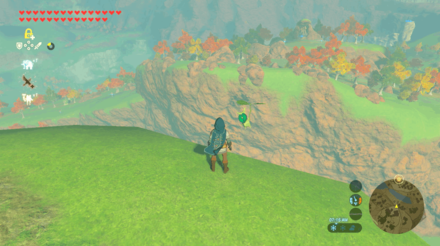
Follow the Flowers
Follow the flower and climb down under the bridge to reveal the Korok. |
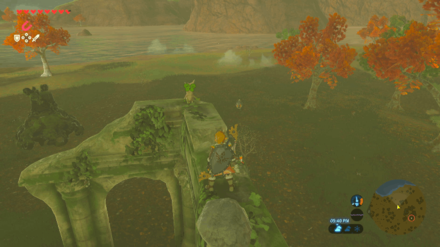
| 231 |
 Enlarge Enlarge |
Timed Ring
Step on the stump to activate the dash ring and climb up the pillars to reach the ring at the top of the highest pillar. Use Hasty foods to boost your movement speed or use Revali's Gale to fly up through the ring. |
| 232 |
 Enlarge Enlarge |
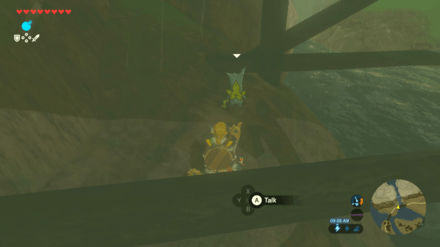
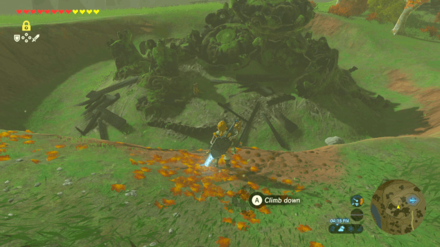
Follow the Flowers
Follow the flower as you descend down to the ruins. Use Paraglider to descend faster. |
| 233 |
 Enlarge Enlarge |
Metal Block
Use Magnesis to pick up the block on top of the ruined structure west of the block puzzle. Place the block so it matches the left side of the block pattern to reveal the Korok. |
| 234 |
 Enlarge Enlarge |
Hidden Rock
Slash the pile of leaves and lift the rock to reveal the Korok. |
| 235 |
 Enlarge Enlarge |
Pinwheel Balloon
Stand near the pinwheel and use a bow and arrow to pop the three balloons. |
| 236 |
 Enlarge Enlarge |
Metal Block
Use Magnesis to pick up the block underwater and place it on the empty spot to create a stairway block pattern to reveal the Korok. |
| 237 |
 Enlarge Enlarge |
Rock Pattern
Pick up the rock on the left side of the stone circle and place it on the missing spot to reveal Korok. |
| 238 |
 Enlarge Enlarge |
Timed Ring
Dash towards the cliff to reveal the Korok. |
| 239 |
 Enlarge Enlarge |
Numbered Flowers
Run through the yellow flowers starting from the single flower to the five flowers. The third set of flowers is behind a bush on the left side. |
| 240 |
 Enlarge Enlarge |
Hidden Rock
Slash the pile of leaves and lift the rock to reveal the Korok. |
| 241 |
 Enlarge Enlarge |
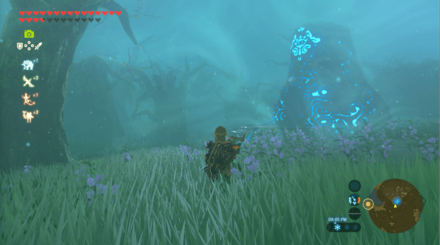
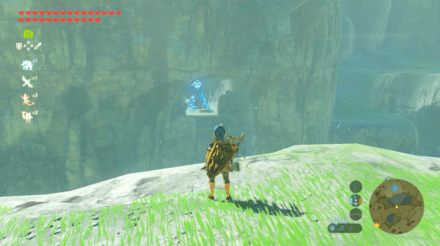
Moving Sparkles
Chase after the sparkles to reveal the Korok. |
| 242 |
 Enlarge Enlarge |
Metal Block
Use Magnesis to pull the block and place it on the rightmost block pattern to match the one on the left side to reveal the Korok. |
| 243 |
 Enlarge Enlarge |
Fruit Match
Pluck the apples on the rightmost tree to match the other two trees. |
| 244 |
 Enlarge Enlarge |
Hidden Rock
Slash the pile of leaves and lift the rock to reveal the Korok. |
| 245 |
 Enlarge Enlarge |
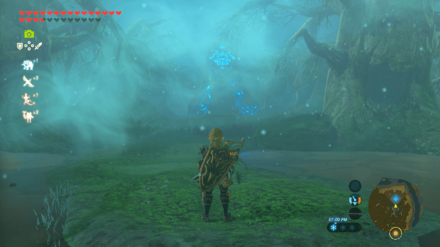
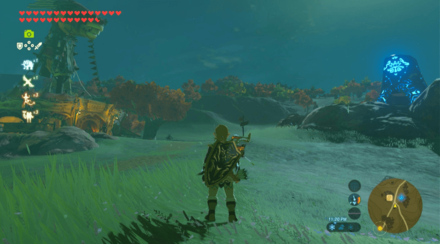
Moving Sparkles
Chase after the sparkles near the brown rock formation to reveal the Korok. |
| 246 |
 Enlarge Enlarge |
Peak Sparkles
Climb the tallest pine tree in the area and examine the sparkles at the top of the tree. |
| 247 |
 Enlarge Enlarge |
Metal Block
Use Magnesis to pick up the block on top of the cliff on the left side of the block pattern. Place the block in the middle of the upper pattern to match the lower pattern. |
| 248 |
 Enlarge Enlarge |
Rock
Lift up the rock on the elevated platform to reveal the Korok. |
| 249 |
 Enlarge Enlarge |
Other
Use a bow and arrow to hit the acorn inside the hollow log to reveal the Korok. |
| 250 |
 Enlarge Enlarge |
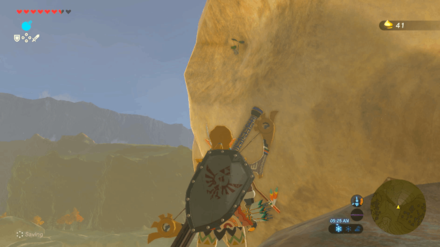
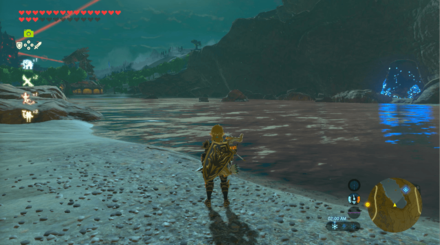
One Balloon
Use a bow and arrow to hit the balloon on the side of the taller cliff to reveal the Korok. |
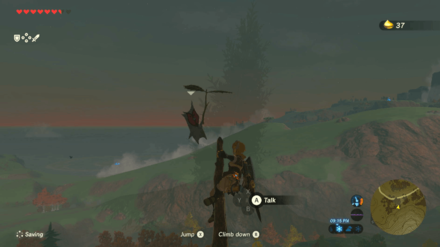
| 251 |
 Enlarge Enlarge |
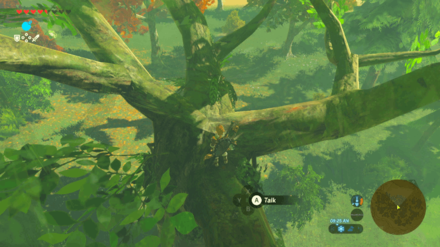
Rock
Climb up the large tree in the area and lift up the rock on top of it to reveal the Korok. |
| 252 |
 Enlarge Enlarge |
Hidden Rock
Use Stasis to remove the metal slab and lift the rock underneath it to reveal the Korok. |
| 253 |
 Enlarge Enlarge |
Timed Ring
Step on the stump to activate the dash ring and use Revali's Gale to reach the dash ring quickly. |
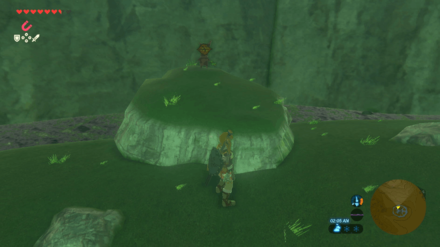
| 254 |
 Enlarge Enlarge |
Rock
Climb on top of the large tree in the middle of the area and lift the rock on top of it to reveal the Korok. |
| 255 |
 Enlarge Enlarge |
Rock Pattern
Pick up the rock from the Bokoblin camp north of the stone circle. Place it on the missing spot of the stone circle to reveal the Korok. Watch out for the Bokoblins in the camp as they use Bomb Arrows to attack. |
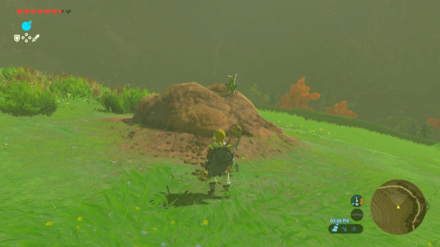
| 256 |
 Enlarge Enlarge |
Hidden Rock
Use Stasis to remove the boulder and lift the small rock underneath it to reveal the Korok. |
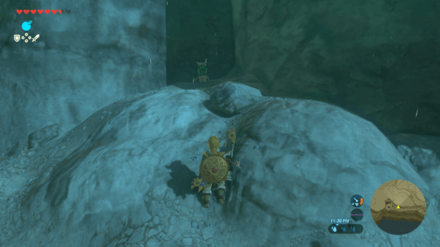
| 257 |
 Enlarge Enlarge |
Hidden Rock
Use Stasis to remove the metal slab and lift the rock underneath it to reveal the Korok. |
| 258 |
 Enlarge Enlarge |
Numbered Flowers
Run through the yellow flowers starting from the single flower to the five flowers. |
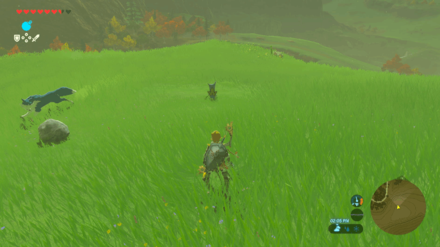
| 259 |
 Enlarge Enlarge |
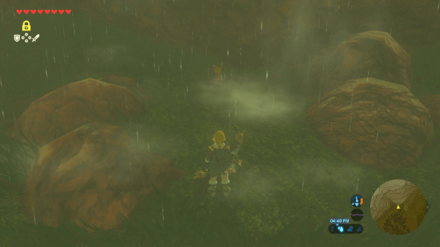
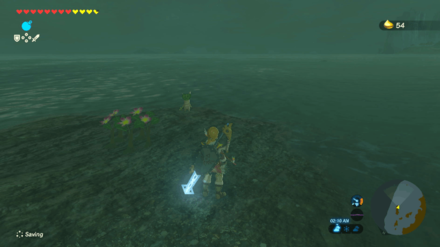
Rock Pit
Use Stasis to move one of the boulders into the hole northwest of the boulders' location. It is recommended to defeat the Blue-Maned Lynel in the area and to save before solving this puzzle as there is a chance that the boulder may fall down the cliffs when using Stasis. |
| 260 |
 Enlarge Enlarge |
Hidden Rock
Slash the pile of leaves and lift the rock to reveal the Korok. |
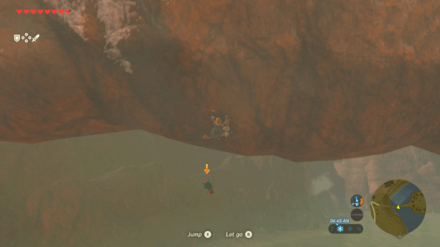
| 261 |
 Enlarge Enlarge |
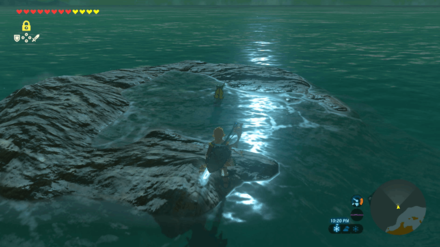
Timed Ring
Step on the stump and use Revali's Gale to reach the dash ring on the other side of the tall cliff. If you do not have Revali's Gale, you can wear a Climbing Armor set to climb faster and use energizing foods and elixirs to recover stamina as you climb. |
| 262 |
 Enlarge Enlarge |
Rock
Lift up the rock on the pile of dead guardians to reveal the Korok. |
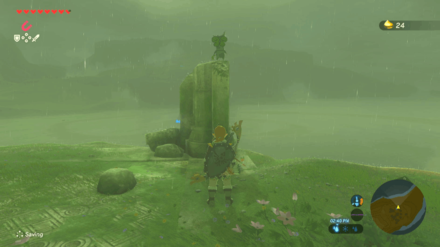
| 263 |
 Enlarge Enlarge |
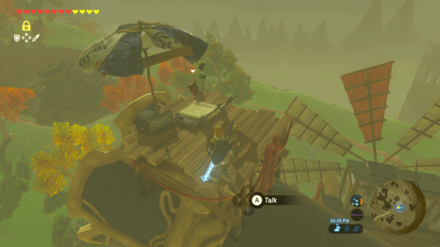
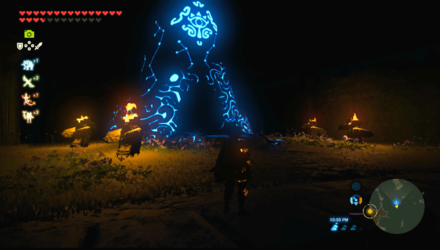
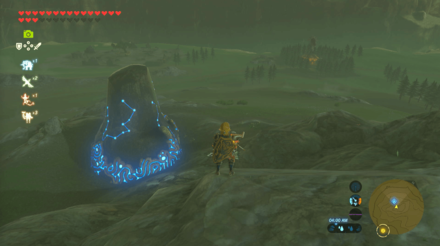
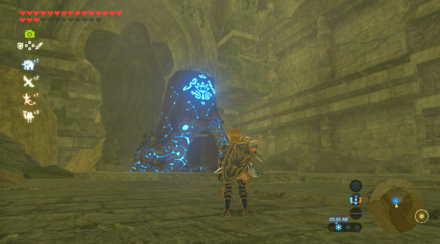
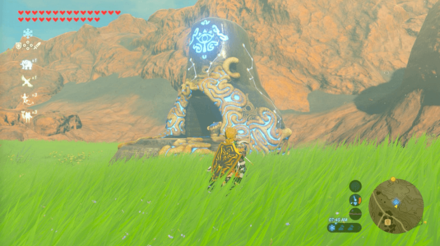
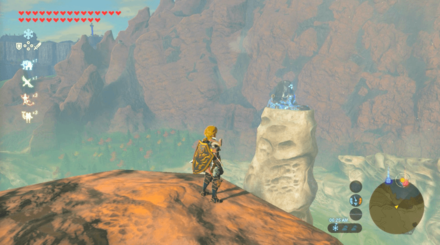
Ice Sparkles
Climb to the top of the Akkala Ancient Tech Lab and examine the stationary sparkles to reveal the Korok. |
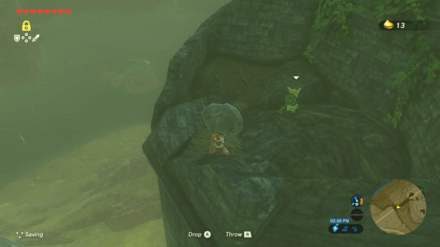
| 264 |
 Enlarge Enlarge |
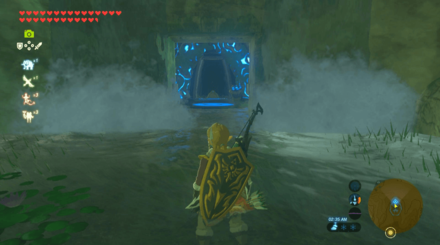
Hidden Rock
Use the Remote Bomb rune to break the wall. Lift the rock to reveal the Korok. |
| 265 |
 Enlarge Enlarge |
Numbered Flowers
Run through the yellow flowers starting from the single flower to the five flowers. The single flower can be found on top of the dead guardian in the area. |
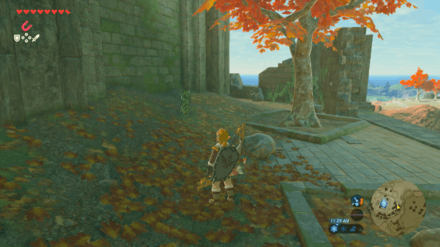
| 266 |
 Enlarge Enlarge |
Hidden Rock
Use Cryonis to create platforms to reach the location. Use Stasis to remove the metal slab and lift the rock underneath it to reveal the Korok. |
Korok Seeds Map and All Korok Seed Locations
Shrines in Woodland Tower Region
Woodland Tower Region Shrines
| Woodland Region Shrine Map |
|---|
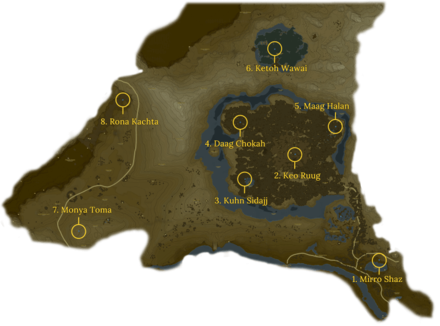 Enlarge EnlargeView Full Map Image |
| Shrine Number | Shrine | Overview |
|---|---|---|
| 1 |
 Enlarge Enlarge |
Trial: Tempered Power Location: Woodland Stable, Woodland Region Rewards: ・Iron Sledgehammer ・ Iron Sledgehammer ・ Giant Ancient Core |
| 2 |
 Enlarge Enlarge |
Trial: Fateful Stars Location: Korok Forest, Woodland Region Rewards: ・Knight's Claymore |
| 3 |
 Enlarge Enlarge |
Trial: Kuhn Sidajj's Blessing Requirements: Start The Hero's Sword and The Korok Trials Shrine Quest: Trial of Second Sight Location: Lake Saria, Woodland Region Rewards: ・Giant Ancient Core |
| 4 |
 Enlarge Enlarge |
Trial: Daag Chokah's Blessing Requirements: Start The Hero's Sword and The Korok Trials Shrine Quest: The Lost Pilgrimage Location: Korok Forest, Woodland Region Rewards: ・Ancient Core |
| 5 |
 Enlarge Enlarge |
Trial: Maag Halan's Blessing Requirements: Start The Hero's Sword and The Korok Trials Shrine Quest: The Test of Wood Location: Mido Swamp, Woodland Region Rewards: ・Giant Ancient Core |
| 6 |
 Enlarge Enlarge |
Trial: Ketoh Wawai's Blessing Shrine Quest: Shrouded Shrine Location: Typhlo Ruins, Woodland Region Rewards: ・Ancient Core |
| 7 |
 Enlarge Enlarge |
Trial: Drawing Parabolas Location: Salari Hills, Woodland Region Rewards: ・Thunderblade |
| 8 |
 Enlarge Enlarge |
Trial: Rona Kachta's Blessing Location: Forgotten Temple, Woodland Region Rewards: ・Great Flameblade |
| ▲ Back to All Shrines by Tower Region ▲ | ||
Shrines Map and All Shrine Locations
Shrines in Akkala Tower Region
Akkala Tower Region Shrines
| Akkala Region Shrine Map |
|---|
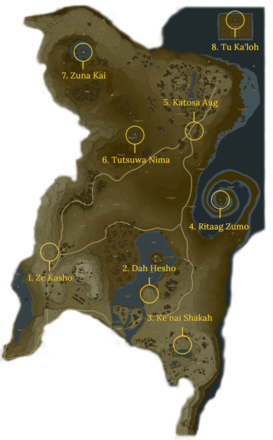 Enlarge EnlargeView Full Map Image |
| Shrine Number | Shrine | Overview |
|---|---|---|
| 1 |
 Enlarge Enlarge |
Trial: Ze Kasho Apparatus Location: South Akkala Stable, Akkala Region Rewards: ・Silverscale Spear |
| 2 |
 Enlarge Enlarge |
Trial: A Minor Test of Strength Location: Kaepora Pass, Akkala Region Rewards: ・Giant Ancient Core |
| 3 |
 Enlarge Enlarge |
Trial: A Modest Test of Strength Location: Ulria Grotto, Akkala Region Rewards: ・Sapphire |
| 4 |
 Enlarge Enlarge |
Trial: Ritaag Zumo's Blessing Shrine Quest: Into the Vortex Location: Rist Peninsula, Akkala Region Rewards: ・Giant Ancient Core |
| 5 |
 Enlarge Enlarge |
Trial: Kotasa Aug Apparatus Location: East Akkala Stable, Akkala Region Rewards: ・Great Frostblade |
| 6 |
 Enlarge Enlarge |
Trial: A Major Test of Strength Shrine Quest: The Spring of Power Location: Spring of Power, Akkala Region Rewards: ・Flamespear |
| 7 |
 Enlarge Enlarge |
Trial: Zuna Kai's Blessing Requirements: Clear Robbie's Reasearch side quest Shrine Quest: The Skull's Eye Location: Skull Lake, Akkala Region Rewards: ・Flameblade |
| 8 |
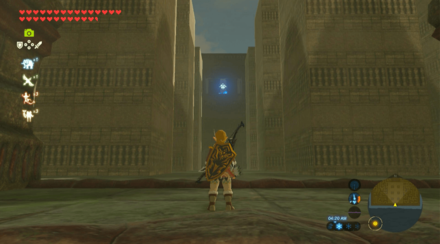 Enlarge Enlarge |
Trial: Tu Ka'loh's Blessing Shrine Quest: Trial of the Labyrinth Location: Lomei Labyrinth Island, Akkala Region Rewards: ・Barbarian Helm |
| ▲ Back to All Shrines by Tower Region ▲ | ||
Shrines Map and All Shrine Locations
Quests in Akkala Tower Region
Side Quests
| Quest | Type | Quest Giver & Location |
|---|---|---|
| Little Sister's Big Request | Side Quest | Jana South Akkala Stable |
| A Shady Customer | Side Quest | Hoz East Akkala Stable |
| Hobbies of the Rich | Side Quest | Hagie Tarrey Town |
| A Parent's Love | Side Quest | Ruli Tarrey Town |
Shrine Quests
| Quest | Type | Quest Giver & Location |
|---|---|---|
| The Spring of Power | Shrine Quest | Nobo East Akkala Stable |
| Trial of the Labyrinth | Shrine Quest | ??? Lomei Labyrinth Island |
| Into the Vortex | Shrine Quest | Stone Tablet Rist Peninsula |
| The Skull's Eye | Shrine Quest | Jerrin Akkala Ancient Tech Lab |
DLC Quests
| Quest | Type | Quest Giver & Location |
|---|---|---|
| EX Teleportation Rumors | DLC Side Quest | Super Rumor Mill V2 South Akkala Stable |
All Locations in Akkala Tower Region
| Ulria Grotto | Ulri Mountain | Ukuku Plains | Tumlea Heights |
| Torin Wetland | Tempest Gulch | Spring of Power | South Lake Akkala |
| South Akkala Stable | South Akkala Plains | Skull Lake | Shadow Pass |
| Shadow Hamlet Ruins | Rok Woods | Rist Peninsula | Ordorac Quarry |
| North Akkala Valley | North Akkala Foothill | North Akkala Beach | Malin Bay |
| Lomei Labyrinth Island | Lake Akkala | Kanalet Ridge | Kaepora Pass |
| Great Fairy Fountain (Tarrey Town) | East Akkala Stable | East Akkala Plains | East Akkala Beach |
| Bloodleaf Lake | Akkala Wilds | Akkala Span | Akkala Parade Grounds |
| Akkala Falls | Akkala Citadel Ruins | Akkala Bridge Ruins | Akkala Ancient Tech Lab |
Zelda: BotW Related Guides

Points of Interest
| All Maps and Locations | |
|---|---|
| Shrines | Stables |
| Great Fairy Fountains | Korok Seeds |
Tower Regions
Author

The Legend of Zelda: Breath of the Wild Walkthrough & Guides Wiki
Akkala Tower Region: Korok Seed Map, Shrines, and Quests
Rankings
- We could not find the message board you were looking for.
Gaming News

![Monster Hunter Stories 3 Review [First Impressions] | Simply Rejuvenating](https://img.game8.co/4438641/2a31b7702bd70e78ec8efd24661dacda.jpeg/show)


![Monster Hunter Stories 3 Review [First Impressions] | Simply Rejuvenating](https://img.game8.co/4438641/2a31b7702bd70e78ec8efd24661dacda.jpeg/thumb)
Popular Games

Genshin Impact Walkthrough & Guides Wiki
Umamusume: Pretty Derby Walkthrough & Guides Wiki
Pokemon Pokopia Walkthrough & Guides Wiki
Honkai: Star Rail Walkthrough & Guides Wiki
Monster Hunter Stories 3: Twisted Reflection Walkthrough & Guides Wiki
Arknights: Endfield Walkthrough & Guides Wiki
Wuthering Waves Walkthrough & Guides Wiki
Zenless Zone Zero Walkthrough & Guides Wiki
Pokemon TCG Pocket (PTCGP) Strategies & Guides Wiki
Monster Hunter Wilds Walkthrough & Guides Wiki


Recommended Games
Diablo 4: Vessel of Hatred Walkthrough & Guides Wiki
Cyberpunk 2077: Ultimate Edition Walkthrough & Guides Wiki
Fire Emblem Heroes (FEH) Walkthrough & Guides Wiki
Yu-Gi-Oh! Master Duel Walkthrough & Guides Wiki
Super Smash Bros. Ultimate Walkthrough & Guides Wiki
Pokemon Brilliant Diamond and Shining Pearl (BDSP) Walkthrough & Guides Wiki
Elden Ring Shadow of the Erdtree Walkthrough & Guides Wiki
Monster Hunter World Walkthrough & Guides Wiki
The Legend of Zelda: Tears of the Kingdom Walkthrough & Guides Wiki
Persona 3 Reload Walkthrough & Guides Wiki


All rights reserved
© 2020 Nintendo. The Legend of Zelda, Wii U, and Nintendo Switch are trademarks of Nintendo.
The copyrights of videos of games used in our content and other intellectual property rights belong to the provider of the game.
The contents we provide on this site were created personally by members of the Game8 editorial department.
We refuse the right to reuse or repost content taken without our permission such as data or images to other sites.