 Acidic Glavenus
 Blackveil Vaal Hazak
 Brute Tigrex
 Coral Pukei-Pukei
 Ebony Odogaron
 Frostfang Barioth
 Fulgur Anjanath
 Furious Rajang
 Gold Rathian
 Nightshade Paolumu
 Raging Brachydios
 Ruiner Nergigante
 Savage Deviljho
 Scarred Yian Garuga
 Seething Bazelgeuse
 Shrieking Legiana
 Silver Rathalos
 Stygian Zinogre
 Viper Tobi-Kadachi
This survey will take about 1 minute.
Your answers will help us to improve our website.
Monster Hunter World (MHW)
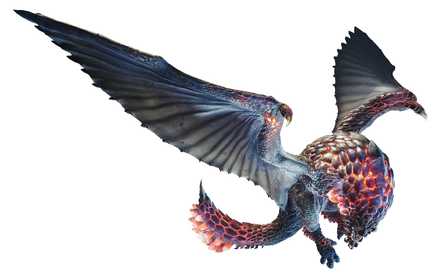
Seething Bazelgeuse Weakness and Strategy Guide
★ 2025/2/28: Monster Hunter Wilds is now available!
Join the hunt at our Monster Hunter Wilds Wiki!
Learn how to beat Seething Bazelgeuse in the Iceborne expansion for Monster Hunter World (MHW)! This guide explains everything about Seething Bazelgeuse's weakness, carves, rewards, and a complete strategy guide for beating and capturing it. Find out what parts are breakable and severable, and what drops and Monster materials are available.
List of Contents
Seething Bazelgeuse Weakness, Body Parts, and Resistances
Seething Bazelgeuse Characteristics
 |
|||||
| Roar | Wind | Tremor | Blight | Status | |
|---|---|---|---|---|---|
| Big | High | Small | Fire | None | |
| Breakable Parts | |||||
| Head, Back, Wings, Tail | |||||
Locations and Areas Visited
| Map | Starting Area | Visited Areas | Rest Spot |
|---|---|---|---|
 Elder's Recess Elder's Recess
|
9 (1st time) / 7 | 2 / 3 / 4 / 5 / 7 / 8 / 9 / 11 | 3 |
*The starting location may change depending on the Quest.
Weakness, Body Parts, Extracts
No body part information is currently known for this Monster. Check back for more details as we continue to investigate!
Vulnerability to Status Effects and Items
| Poison | ★★ | Flash | ★★ |
|---|---|---|---|
| Paral | ★★ | Shock | ★★ |
| Sleep | ★★★ | Pitfall | ★★ |
| Stun | ★★ | Ivy | ? |
| Blast | ★ | Dung | ★★ |
| Exhaust | ? | Meat | ❌ |
| Mount | ★★ | Screamer | ❌ |
Countermeasures against Seething Bazelgeuse
Recommended Weapon Element and Armor Skills
| Recommended Weapon Element | |
|---|---|
| Ice Weapon | Seething Bazelgeuse is weakest against ice. |
| Recommended Armor Skills | |
| Fire Resistance | Fire Resistance can help mitigate some of the damage from the purple bomb scales. |
| Blast Resistance | On top of Fireblight, Seething Bazelgeuse can also give you Blastblight. If you do not want to have to deal with both, you can always get Blast Resistance to Lvl 3. |
| Divine Blessing | Divine Blessing has a chance to halve the damage you take per hit at Lvl 3, which can be useful for Seething Bazelgeuse's continuous attacks. However, it only has a chance to activate, so be careful—this is only a failsafe. |
| Health Boost | Seething Bazelgeuse has a lot of attacks that do huge damage, so having a maxed out health pool will be helpful. |
| Earplugs | Seething Bazelgeuse has a big roar, so getting your Earplugs skill to Lvl 5 would be useful. |
How to Beat Seething Bazelgeuse
Purple Bomb Scales

The Purple Bomb scales of Seething Bazelgeuse has a wide explosion range and it can take a huge chunk of your health. Be sure to check your position and avoid these bombs as soon as they drop.
Huge Explosion

The Seething Bazelgeuse has a powerful attack that can cause a huge explosion after it drops his purple scales. This can immediately cart you if you manage to get hit by this attack. It is best that you leave the area during this attack to avoid its wide explosion range.
Weakening the Scales
You can weaken the scales by hitting them using your slinger pod with Puddle Pods, Scatternut, and Crystal Bursts. Hitting Seething Bazelgeuse with these different types of ammo can down him for a few seconds which can be used as an opportunity to attack with your most powerful skills.
Tail Attacks

Unlike the normal variant, Seething Bazelgeuse has a few more tail attacks that have been added to his pattern. These attacks can be difficult to avoid if you commit too much on attacking. It is best that you do not try to finish off your combos and prioritize dodging during the hunt.
Also, cutting the tail can shorten the range of his tail attacks significantly. It is best that you prioritize cutting the tail whenever possible.
Avoid Using Rocksteady Mantle
Using Rocksteady Mantle will prevent you from getting blown away by the explosions. This can be dangerous if there are a handful of scales present in the area as it can hit you multiple times without pushing you out of its range.
Seething Bazelgeuse Attack Patterns
| Attack | Attack Power | Guardable | Exhaustion |
|---|---|---|---|
| Tail Sweep | 50 | ◯ | 25 |
| Continuous Tail Attack | 65 | ◯ | 30 |
| Continuous Tail Attack (3rd Hit) | 75 | ◯ | 40 |
| Spiral Head Thrust | 30 | ◯ | 10 |
| Body Slam | 45 | ◯ | 25 |
| Glider Attack | 45 | ◯ | 20 |
| Tail Slam | 45 | ◯ | 20 |
| Head Attack | 75 | ◯ | 30 |
| Continuous Head Attack | 75 | ◯ | 30 |
| Crush | 80 | ◯ | 40 |
| Crush (Enraged) | 90 | ◯ | 40 |
| Crush Attack (Gliding) | 60 | ◯ | 25 |
| Rush | 50 | ◯ | 25 |
| Bomb Scale (Explosion) | 30+ Fire(30) | ◯ | 30 |
| Bomb Scale | 40+ Fire(40) | ◯ | 40 |
| Detonator Breath | 20 | ◯ | 10 |
| Explosion Breath | 50+ Fire(20) | ◯ | 60 |
| Enraged Full Explosion | 90+ Fire(30) | Guard Up | 60 |
Seething Bazelgeuse Carves and Rewards
Carvings and Hunt Rewards
| Obtain Rate (%) | |
|---|---|
| MR |
Bazelgeuse Flail
/ Tail 70 Bazelgeuse Gem / Body 5 Bazelgeuse Shard / Body 30 Flickering Silvershell / Body 22, Tail 27 Bazelgeuse Mantle / Body 2, Tail 3 Bazelgeuse Hardclaw / Body 17 Distilled Blast Fluid / Body 13 Scorching Silverwing / Body 11 |
Rewards for Each Body Part
| Obtain Rate (%) | |
|---|---|
| MR |
Scorching Silverwing
/ Wings 69 Bazelgeuse Hardclaw / Wings 35 Flickering Silvershell / Torso 69 Distilled Blast Fluid / Head 61, Torso 30 Bazelgeuse Gem / Head 5 Bazelgeuse Shard / Head 32 Bazelgeuse Mantle / Head 2, Torso 1 |
Breakable Body Parts
| Defense Value | How to Break | |
|---|---|---|
| Head | 400 | Set durability to 0, twice. |
| Torso | 350 | Set durability to 0, once. |
| Left Wing | 200 | Set durability to 0, once. |
| Right Wing | 200 | Set durability to 0, once. |
| Tail | 400 | Reduce durability by 1100 using cut damage. |
Shiny Drops
| Obtain Rate (%) | |
|---|---|
| MR Drops |
Bazelgeuse Shard
/ 50 Bazelgeuse Hardclaw / 28 Large Wyvern Tear / 22 |
Quest Clear & Investigation Rewards
| Obtain Rate (%) | |
|---|---|
| MR Quest |
Bazelgeuse Flail
/ 9 Bazelgeuse Gem / 3 Flickering Silvershell / 25 Bazelgeuse Shard / 22 Bazelgeuse Hardclaw / 16 Distilled Blast Fluid / 14 Scorching Silverwing / 11 |
| MR Silver |
Bazelgeuse Mantle
/ 8 Bazelgeuse Hardclaw / 24 Distilled Blast Fluid / 18 Flickering Silvershell / 14 Scorching Silverwing / 14 Bazelgeuse Flail / 12 Bazelgeuse Gem / 10 |
| MR Gold |
Bazelgeuse Hardclaw
/ 22 Distilled Blast Fluid / 16 Bazelgeuse Mantle / 16 Scorching Silverwing / 13 Flickering Silvershell / 12 Bazelgeuse Tail / 11 Bazelgeuse Gem / 10 |
Plunderblade Rewards
Plunderblade
| Obtain Rate (%) | |
|---|---|
| MR |
Bazelgeuse Shard
/ 41 Flickering Silvershell / 33 Bazelgeuse Hardclaw / 25 Bazelgeuse Mantle / 1 |
Palarang
| Obtain Rate (%) | |
|---|---|
| MR |
Bazelgeuse Shard
/ 50 Bazelgeuse Hardclaw / 28 Large Wyvern Tear / 22 |
Quests Where Seething Bazelgeuse Appears
| Type | Quest Name |
|---|---|
| Assigned | M★5 - The Second Coming |
| Optional | M★5 - Seething with Anger |
| Event | M★5 - Talk about a Party Foul |
| Optional | M★5 - The Purr-Fect Room: Silver |
| Event | M★6 - Alt Rock Recess |
Related Links
All Monster Guides

Iceborne Monsters
 Alatreon Alatreon
|
 Banbaro Banbaro
|
 Barioth Barioth
|
 Beotodus Beotodus
|
 Brachydios Brachydios
|
 Fatalis Fatalis
|
 Glavenus Glavenus
|
 Master Rank Kulve Taroth Master Rank Kulve Taroth
|
 Namielle Namielle
|
 Nargacuga Nargacuga
|
 Rajang Rajang
|
 Safi'jiiva Safi'jiiva
|
 Shara Ishvalda Shara Ishvalda
|
 Tigrex Tigrex
|
 Velkhana Velkhana
|
 Yian Garuga Yian Garuga
|
 Zinogre Zinogre
|
Monster Variants
Arch-Tempered Elder Dragons
 Arch-Tempered Velkhana Arch-Tempered Velkhana |
 Arch-Tempered Namielle Arch-Tempered Namielle
|
Monsters by Game
| All Monsters by Game | |
|---|---|
 Iceborne Iceborne |
 Monster Hunter World Monster Hunter World |
Comment
Author

Seething Bazelgeuse Weakness and Strategy Guide
Please participate in our site
improvement survey
03/2026
improvement survey
03/2026
Would you assist in
improving Game8's site?
improving Game8's site?

×
We are listening to our users' valuable opinions and discussing how to act on them.
The information collected through this survey will be used for the purpose of improving our services. In addition, the information will only be disclosed a part of a statistic in a format that will not allow identification of personal information.
Begin Survey
Not Now
×
Please rate each item regarding Game8.co's Advertisements.
Amount of Ads
Very Dissatisfied
Somewhat Dissatisfied
Fine
Somewhat Satisfied
Highly Satisfied
Placement of Ads
Timing of Ad Display
Ad Loading Speed
Safeness of Ads
Content of Ads
×
Please rate each item regarding Game8.co's Quality of Articles.
Amount of information
Very Dissatisfied
Somewhat Dissatisfied
Fine
Somewhat Satisfied
Highly Satisfied
Frequency of updates
Speed of new information
Accuracy of articles
Understandibility of articles
Readability of sentences
×
Please rate each item regarding Game8.co's Usability of the Site.
Ease of finding information
Very Dissatisfied
Somewhat Dissatisfied
Fine
Somewhat Satisfied
Highly Satisfied
Loading Speed
Use of Color
Font Size
Visibility of Images
Easy to Understand Layout
×
Please rate each item regarding Game8.co's Message Boards, Comments.
Ease of Writing
Very Dissatisfied
Somewhat Dissatisfied
Fine
Somewhat Satisfied
Highly Satisfied
Readability
Ease in Finding Information
Comment Quality
Comment Quantity
Admin Response
×
Please rate each item regarding Game8.co's Site's new design.
Please rate our site's new design
Very Dissatisfied
Somewhat Dissatisfied
Fine
Somewhat Satisfied
Highly Satisfied
Do you think that the website's design change makes the site easier to use?
Has the new design made it easier for you to find information on the site?
Has the new design improved the overall visual appeal of the site?
How would you rate your overall satisfaction with the new design of the site?
×
How likely are you to recommend Game8 to someone you know?
Very Unlikely
0
1
2
3
4
5
6
7
8
9
10
Very Likely
If you have other opinions regarding potential improvement to the website, please share them with us. We would appreciate your honest opinion.
Note: This is a free response section, so you can proceed without entering anything.
Note: Please be sure not to enter any kind of personal information into your response.
Note: Please be sure not to enter any kind of personal information into your response.
×
Thank You
×
Thank you for participating in our survey! Your answers will help us to improve the quality of our website and services.
We hope you continue to make use of Game8.
We hope you continue to make use of Game8.
Close
Rankings
Gaming News


![Everwind Review [Early Access] | The Shaky First Step to A Very Long Journey](https://img.game8.co/4440226/ab079b1153298a042633dd1ef51e878e.png/thumb)

![Monster Hunter Stories 3 Review [First Impressions] | Simply Rejuvenating](https://img.game8.co/4438641/2a31b7702bd70e78ec8efd24661dacda.jpeg/thumb)
Popular Games

Genshin Impact Walkthrough & Guides Wiki
Honkai: Star Rail Walkthrough & Guides Wiki
Umamusume: Pretty Derby Walkthrough & Guides Wiki
Pokemon Pokopia Walkthrough & Guides Wiki
Resident Evil Requiem (RE9) Walkthrough & Guides Wiki
Monster Hunter Wilds Walkthrough & Guides Wiki
Wuthering Waves Walkthrough & Guides Wiki
Arknights: Endfield Walkthrough & Guides Wiki
Pokemon FireRed and LeafGreen (FRLG) Walkthrough & Guides Wiki
Pokemon TCG Pocket (PTCGP) Strategies & Guides Wiki


Recommended Games
Diablo 4: Vessel of Hatred Walkthrough & Guides Wiki
Fire Emblem Heroes (FEH) Walkthrough & Guides Wiki
Yu-Gi-Oh! Master Duel Walkthrough & Guides Wiki
Super Smash Bros. Ultimate Walkthrough & Guides Wiki
Pokemon Brilliant Diamond and Shining Pearl (BDSP) Walkthrough & Guides Wiki
Elden Ring Shadow of the Erdtree Walkthrough & Guides Wiki
Monster Hunter World Walkthrough & Guides Wiki
The Legend of Zelda: Tears of the Kingdom Walkthrough & Guides Wiki
Persona 3 Reload Walkthrough & Guides Wiki
Cyberpunk 2077: Ultimate Edition Walkthrough & Guides Wiki


All rights reserved
©CAPCOM CO., LTD. 2018, 2019 ALL RIGHTS RESERVED.
The copyrights of videos of games used in our content and other intellectual property rights belong to the provider of the game.
The contents we provide on this site were created personally by members of the Game8 editorial department.
We refuse the right to reuse or repost content taken without our permission such as data or images to other sites.