All Implant Bios Locations (Collectibles) and How to Unlock the Grim Reaper Trophy
★Game8's Dead Space Remake is now live!
★ game8 Review of the Callisto Protocol - Is it Worth Playing?
☆ All Implant Bios Locations
★ Use the guns in our Best Weapons Guide!
☆ How to Use Contraband Pack & List of Contents
★ Clips of All Death Animations
☆ Season Pass Guide - Price and All Contents!
Implant Bios are collectibles in The Callisto Protocol that you can find while venturing through Black Iron Prison. Read on to see all locations for all 43 Implant Bios and Audio Logs in order to unlock the Grim Reaper Trophy!
List of Contents
All Implant Bios Locations
| The game can sometimes not record Implant Bios and Audio Logs properly in your Data-Bios menu. We recommend creating backup saves and always double-checking your Data-Bios to ensure that you have collected them. |
| Data-Bios by Chapter | |||
|---|---|---|---|
| Cargo | Outbreak | Aftermath | Habitat | Lost | Below | Colony | Tower |
Chapter 1: Cargo
Jacob Lee: Jacob's Job (Audio Log)
| 1 |  At the start of the game, after gaining control of Jacob, enter the first door on the left marked "Unlocked". |
|---|---|
| 2 | 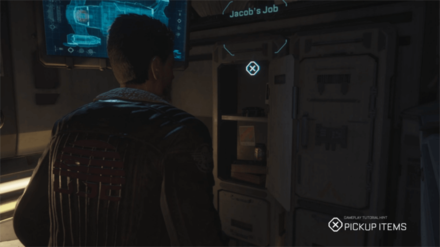 Once inside, open the locker beside the bed to find the Data-Bio. |
Cargo Walkthrough and Data Bio Locations
Chapter 2: Outbreak
Dr. Caitlyn Mahler: Mahler’s Appointment (Audio Log)
| 1 | 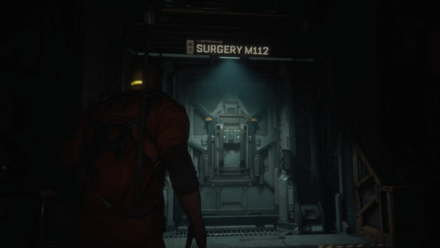 After sneaking past the first Security Unit you meet, enter the Surgery M112 room. |
|---|---|
| 2 | 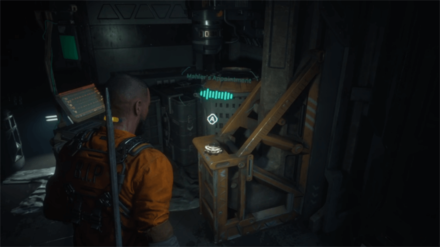 Once inside, look to your right to find the Data-Bio at the corner of the room. |
Elias Porter: Elias's Anticipation (Audio Log)
| 1 | 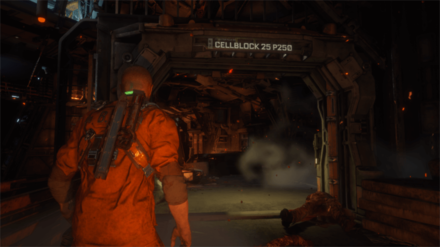 After obtaining the Stun Baton, return to Cellblock 25 P250 and clear out the four enemies that ambush you there. |
|---|---|
| 2 | 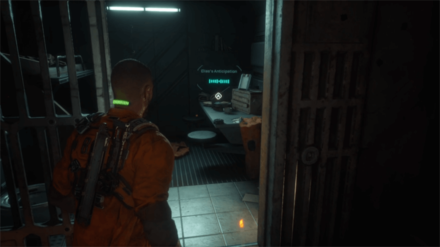 Once you've cleared out the enemies, leap over the small platform and turn right to find Elias's cell and the Data-Bio inside of it. |
Cpt. Leon Ferris: Ferris's Lament (Audio Log)
| 1 | 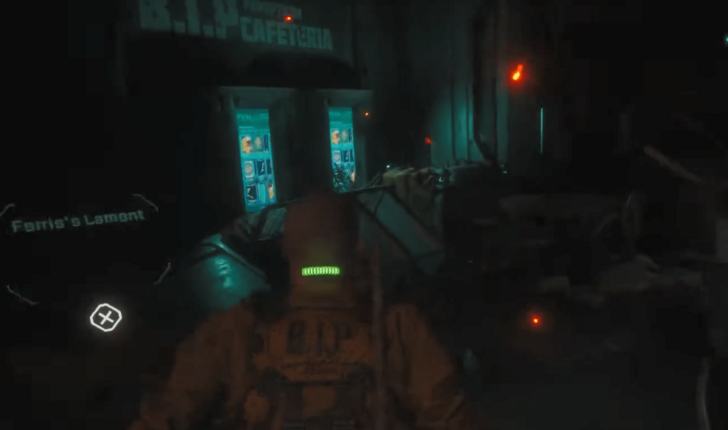 Close to the beginning of the chapter, you'll pass through an area called the B.I.P. Cafeteria. The recording is visible on a table as you pass by the vending machines. |
|---|---|
| * |  Note: If your version of the game is not updated, this collectible may be located close to the end of the level, just after the cutscene where Ferris confronts you with the GRP. |
Outbreak Walkthrough and Data Bio Locations
Chapter 3: Aftermath
Sgt. Eric Jane: Locked Door (Implant Bio)
| 1 | 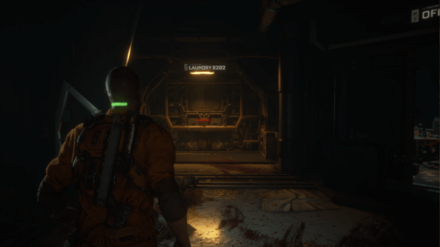 After reaching the area with a broken Security Unit, clear out the enemies in the room and go up to Laundry B202's door. |
|---|---|
| 2 | 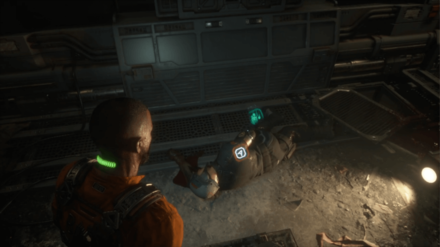 Elias will tell you to find a guard's corpse to get security credentials for the door. Go back to the corpse near the broken Security Unit and interact with it to get this Implant Bio. |
Ofc. Pruitt Matos: Laundry (Implant Bio)
| 1 | 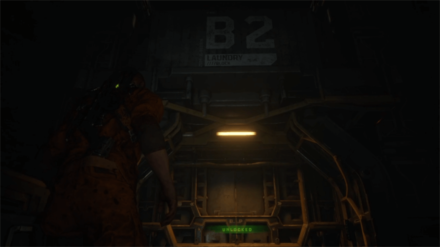 After entering Laundry B202, go to the end of the room and turn right at the intersection to reach the B2 Laundry Block. |
|---|---|
| 2 | 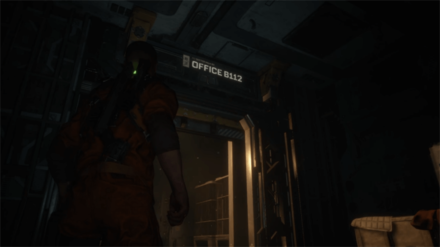 Enter the B2 Laundry Block and hug the left side until you find Office B112. |
| 2 | 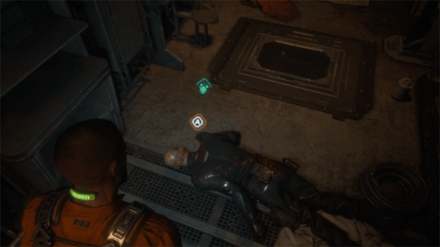 Go inside the office and interact with the corpse on the ground to get this Implant Bio. |
Duncan Cole: Secret Room 1 (Audio Log)
| 1 | 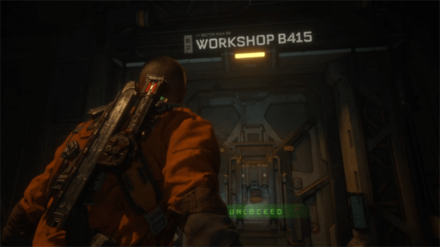 After entering the B3 Maintenance Block, move past the door to Maintenance B414 to reach Workshop B415. |
|---|---|
| 2 |  Unlock and enter the workshop, then go through the vent on the right side of the room. |
| 3 |  After exiting the vent, continue heading down the underground path until you find a hidden room. |
| 4 |  Go to the table at the far end of the room to get this Data-Bio. |
Dr. Ewan Hayes: MedLab Outbreak (Implant Bio)
| 1 |  Go through Maintenance B414 to reach Medical Ward C101 and pry the doors open. |
|---|---|
| 2 |  After entering the medical ward, interact with the corpse in scrubs on the ground to get this Implant Bio. |
Ofc. Dachs Symmons: Hanged Guard (Implant Bio)
| 1 |  After getting the GRP, continuing making your way through the chapter until you reach Maintenance C110. |
|---|---|
| 2 |  Pry open the maintenance room's doors and interact with the corpse at the center of the hanging bodies to get this Implant Bio. |
Ofc. Kerry Brown (Implant Bio)
| 1 | 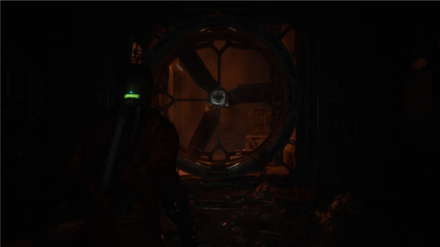 After riding the falling elevator down the shaft, make your way through the basement until you reach a spinning fan lit by orange lights. |
|---|---|
| 2 | 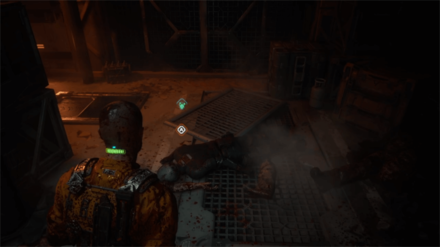 Go around the corner and reach the back of the fan to find a corpse containing the Implant Bio. An enemy will ambush you from the vent below after reaching the corpse, so take them out before you pick it up. |
Tadhg Song (Implant Bio)
| 1 |  After riding the gondola and clearing out the SHU Gearroom, climb up the area using the platforms near the sides of the entrance. |
|---|---|
| 2 |  Interact with the corpse at the far end of the upper floor to get this Implant Bio. |
Dani Nakamura (Data-Bio)
| 1 | 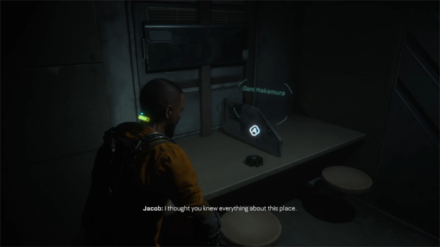 After getting locked inside Dani Nakamura's cell, check the table to find her Data-Bio. |
|---|
Aftermath Walkthrough and Data Bio Locations
Chapter 4: Habitat
Dr. Caitlyn Maher: Corruptors (Audio Log)
| 1 |  After leaving the vents from the sewage-filled area, turn right to see a platform with a ladder leading up beside some spike grids. |
|---|---|
| 2 | 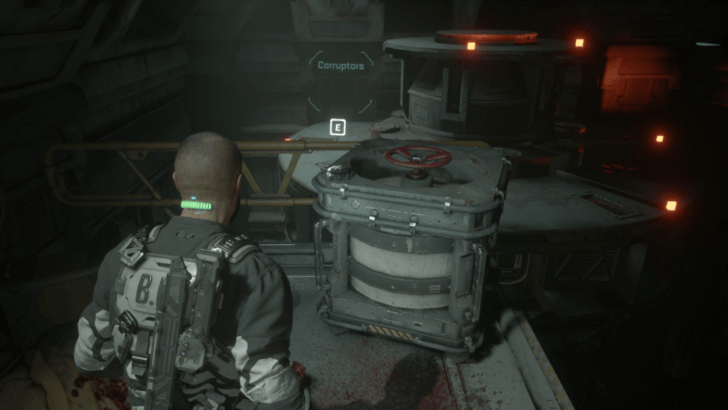 Continue climbing up another set of ladders and move to the far end of the catwalk to see a corpse, some ammo, and the Data-Bios on top of a container. |
Ofc. Bruno Vorenus: Crosswired (Implant Bio)
| 1 |  Beside the door to Purification B H207 is a small bloody crawlspace. Head through it to reach a large dark room and clear out all of the enemies inside. |
|---|---|
| 2 | 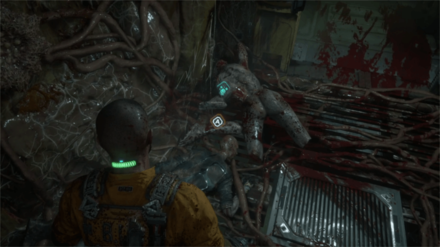 After clearing out the enemies, go to the door leading to Access Hall H271 and interact with the corpse beside the door to get this Implant Bio. |
Dr. Jae Moon-Bell: Cocoons (Audio Log)
| 1 | 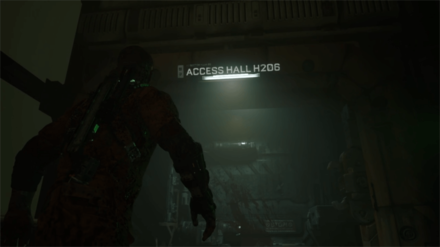 After reaching Access Hall H206, walk past the door to Water Control H262 to reach Storage Hall H239. |
|---|---|
| 2 | 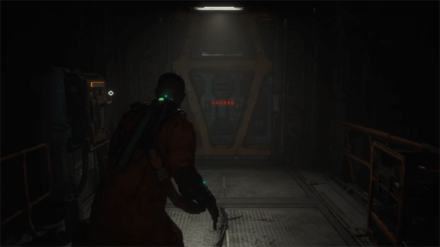 Enter and proceed through Storage Hall H239 until you reach a locked door. Swap the two Gate Fuses to unlock the door. |
| 3 | 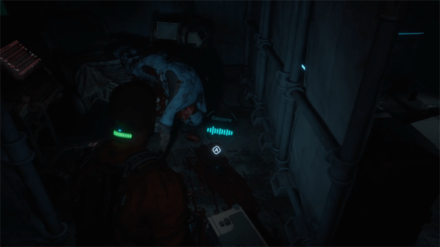 Go through the locked door and continue heading forward until you reach a medical room. Go to the far end of the room and check the ground below the corpse to get this Data-Bio. |
Ofc. James Reese: Suicide Guard (Implant Bio)
| 1 | 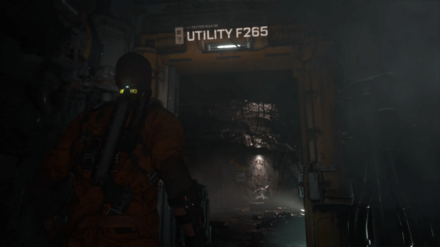 Proceed through the chapter until you reach Utility F265. Enter the room and defeat the mutated enemy that ambushes you inside. |
|---|---|
| 2 | 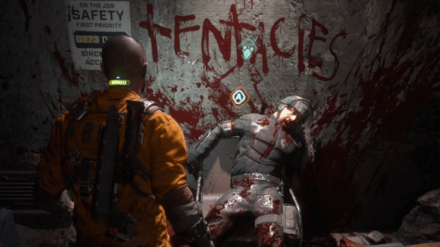 After defeating the monsters, walk up to the corpse beneath the bloody graffiti and interact with it to get this Implant Bio. |
Ofc. James Reese: Security (Audio Log)
| 1 | 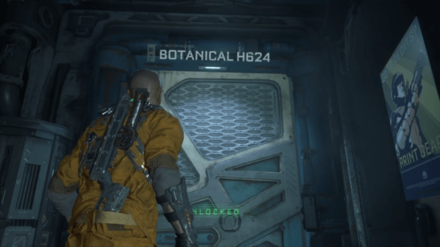 After reaching Oxygen Processing H623, turn left to find the door to Botanical H624. |
|---|---|
| 2 | 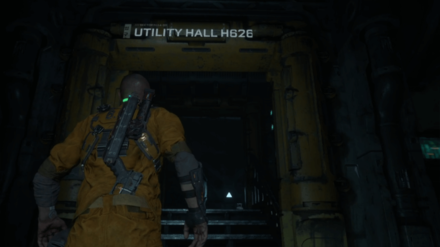 Proceed through Botanical H624 until you reach Utility Hall H626 at the end of the room. |
| 3 | 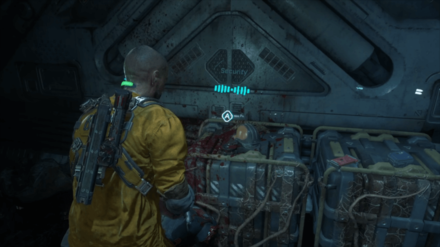 Turn right as you enter the utility hall to see a narrow space. Squeeze through it to find this Audio Log beside the corpse on the ground. |
Sgt. Bill Pekelo (Implant Bio)
| 1 | 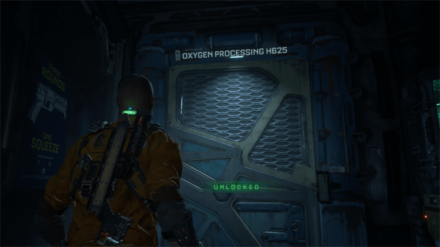 From Oxygen Processing H623, turn right to find the door to Oxygen Processing H625. Enter the room and clear out all the enemies inside. |
|---|---|
| 2 | 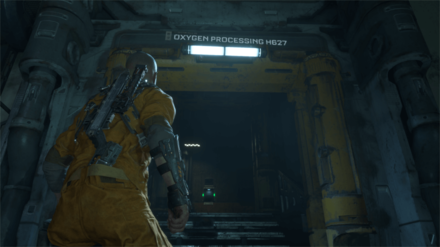 After defeating the enemies, head to the end of the hallway to find Oxygen Processing H627. |
| 3 | 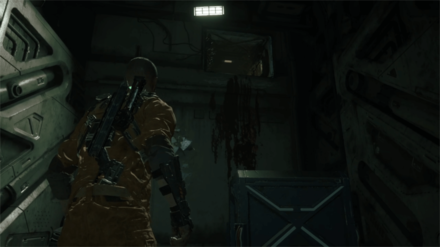 Proceed through Oxygen Processing H627 until you find a bloody vent at the end of the corridor. |
| 4 | 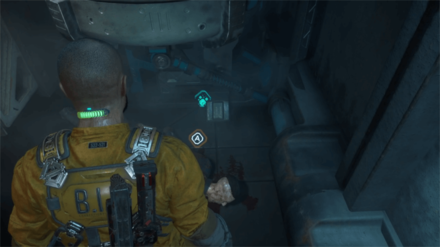 Climb through the vent to reach a small room. Interact with the corpse on the ground to get this Implant Bio. |
Ofc. Kyle Serra: Evacuation (Audio Log)
| 1 | 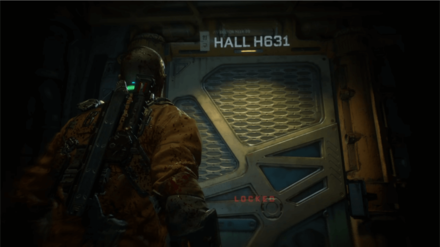 After reaching Utility H630, turn left to find the door to Hall H631. Interact with the door panel to unlock it and clear out the enemies inside. |
|---|---|
| 2 | 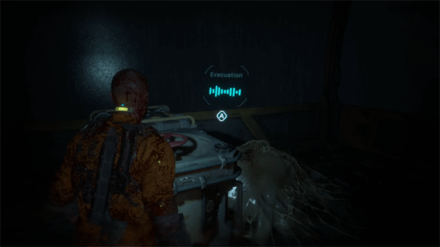 After defeating the enemies, head to the far end of the room to find the Audio Log across the Tram Depot Entrance. |
Habitat Walkthrough and Data Bio Locations
Chapter 5: Lost
Miranda Kristofich: Terraforming (Audio Log)
| 1 |  After opening the gate at the start of the chapter, go straight past the door marked C2 Surface Exploration to reach a set of buildings. Enter the building on the left. |
|---|---|
| 2 |  Once inside, check the shelf on the left side of the building to find this Audio Log. |
Richard Cids (Implant Bio)
| 1 |  Proceed through the chapter until you need to help a trapped worker. Survive the incoming horde of enemies, then head to the door with orange lights above it. |
|---|---|
| 2 |  Defeat the monster as it breaks down the door, then enter the room and interact with the corpse on the ground to get this Implant Bio. |
Dr. Caitlyn Mahler: Combustors (Audio Log)
| 1 |  Proceed through the tunnels until you reach the first intersection lit by an orange overhead light. Head through the room on the left. |
|---|---|
| 2 |  Once inside, you can find the Audio Log on top of a small table. |
Lt. Devon Wayne: Close the Gate (Implant Bio)
| 1 |  After receiving the TK4 Riot Shotgun from Dani Nakamura, head straight up the stairs and into the next room. |
|---|---|
| 2 | 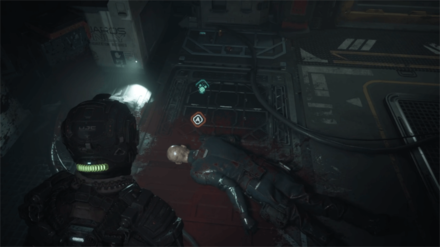 Once inside, interact with the corpse on the ground at the far end of the room to get this Implant Bio. |
Ofc. Aaron Taycho (Implant Bio)
| 1 | 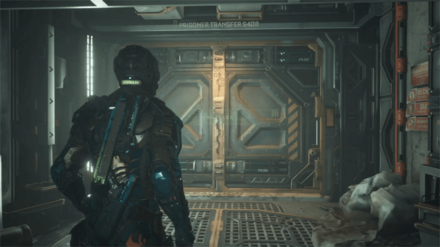 Proceed through the chapter until you reach the large doorway to Prisoner Transfer S408. |
|---|---|
| 2 |  Once inside, head to the corpse stuck inside the machine at the far end of the ground floor to get this Implant Bio. Note that extracting this Implant Bio will trigger a horde of enemies. |
Max Barrow: Max’s Concern (Audio Log)
| 1 |  After returning to your crashed ship, head inside and go through the second doorway on your left. |
|---|---|
| 2 | 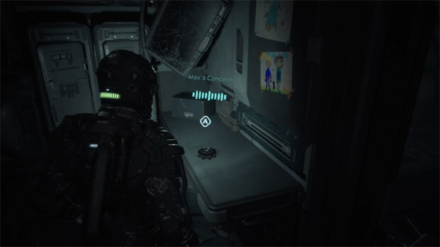 Once inside, you can find the Audio Log on top of the desk on the right side of the room. |
Sgt. Scott Dvitny: Eradication (Implant Bio)
| 1 |  After the cutscene at the crashed ship, follow Dani through a set of narrow metal doors. You will enter a large room with vehicles to either side. |
|---|---|
| 2 |  Check behind the vehicle to the left of the door and interact with the corpse there to get this Implant Bio. |
Dr. Caitlyn Mahler: Shipments (Audio Log)
| 1 |  Proceed through the chapter until you reach the elevator room with dying Security Unit robots. |
|---|---|
| 2 | 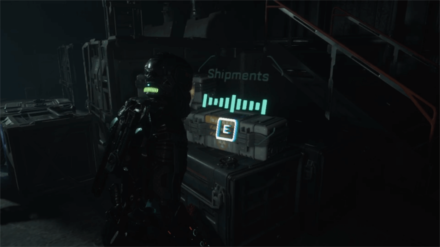 Once inside, you can find this Audio Log at the right side of the room on top of some crates. |
Lost Walkthrough and Data Bio Locations
Chapter 6: Below
Dr. Sheehan Yune: Field Log 1 (Audio Log)
| 1 |  After cutting yourself free from the wires and clearing out the area, proceed through the chapter until you see a doorway marked L1 CMV Maintenance 2A. |
|---|---|
| 2 |  You can find the Audio Log on top of the desk to the right of the doorway. |
Dr. Sheehan Yune: Field Log 2 (Audio Log)
| 1 |  Proceed through the chapter until you reach an area filled with blind enemies and a doorway with an orange glow. |
|---|---|
| 2 |  Clear out the enemies or sneak past them and go through the doorway. |
| 3 | 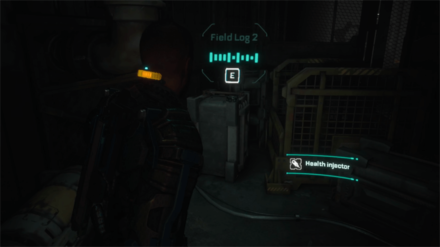 Once inside, you can find the Audio Log to the left at the end of the corridor. |
Dr. Sheehan Yune: Field Log 3 (Implant Bio)
| 1 |  After retrieving the keycard and heading through the Access Junction, move forward until you reach a tunnel with a Hard Hat Area sign. |
|---|---|
| 2 | 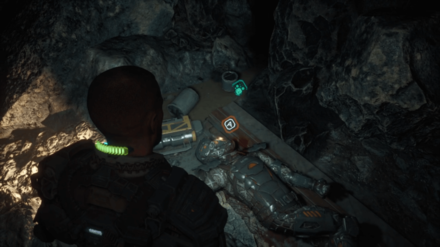 Reach the end of the tunnel to find the corpse containing this Implant Bio on the ground. |
Yannick Sage: Secret Room 2 (Audio Log)
| 1 |  After climbing the ladder toward the Power Reactor room, turn left to find a tight crevice on the wall. |
|---|---|
| 2 |  After getting past the crevice, proceed through the cave and defeat the enemies along the way. |
| 3 | 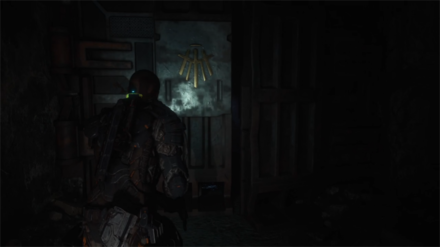 You will eventually reach a gate marked with a golden symbol. Turn right and move around the corner to get past the gate and end up in the room behind it. |
| 4 | 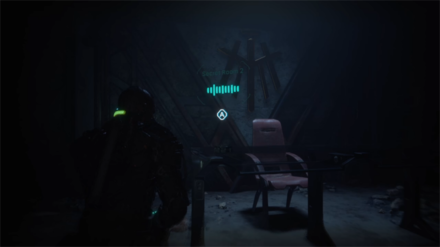 Once inside the room, take out the long-necked enemy that ambushes you and go to the table at the far end of the hall to find this Audio Log. |
Arden Jeddha: Arcas Evacuation (Implant Bio)
| 1 |  Near the end of the chapter, you will ride a platform to the location of the old colony. |
|---|---|
| 2 | 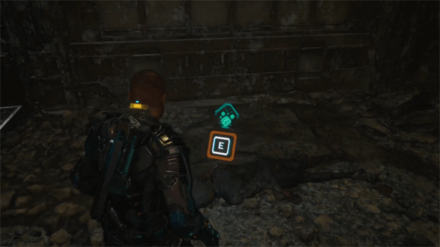 After arriving, you'll see a corpse just past the landing ramp containing the Data Bios. This corpse may also be located near the large door, depending on your version of the game. |
Below Walkthrough and Data Bio Locations
Chapter 7: Colony
Alex Wang: Miner Log 1 (Implant Bio)
| 1 | 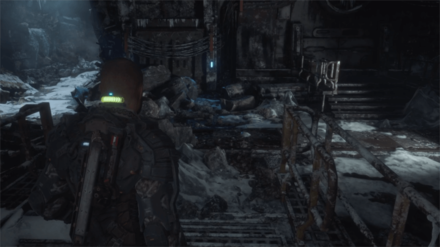 At the start of the chapter, go down the small flight of stairs in front of you and head left. |
|---|---|
| 2 | 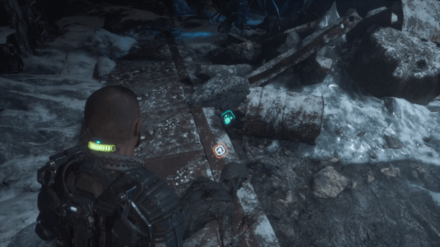 You can find the corpse containing this Implant Bio right before the cave entrance. |
Derryn Barr: Miner Log 2 (Audio Log)
| 1 |  After talking to Dani about meeting up at the light tower, head through the building on your left. |
|---|---|
| 2 | 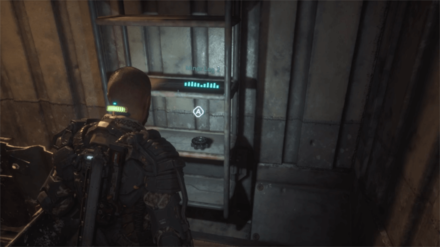 Once inside, you can find this Audio Log on a shelf beside the ladder going down. |
Derryn Barr: Miner Log 3 (Implant Bio)
| 1 | 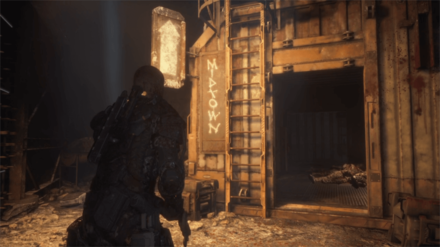 Proceed through the chapter until you reach a ladder with a Midtown sign and use it to get to the upper floor. |
|---|---|
| 2 | 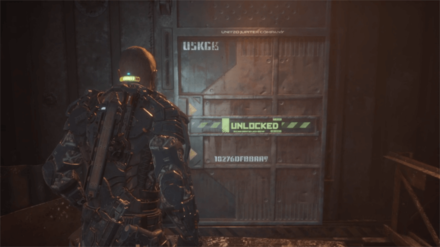 After climbing the ladder, turn right and enter the closed door marked "Unlocked". |
| 3 | 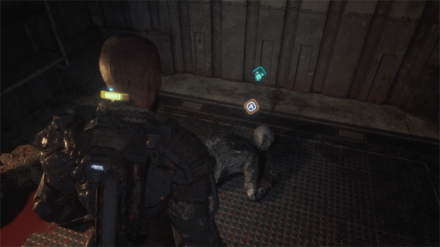 Once inside, move through the house to reach the corpse containing this Implant Bio. It will be guarded by a blind enemy, so take them out before picking it up. |
Yannick Sage: The Mole (Implant Bio)
| 1 |  After getting the keycard, call and ride the elevator up to HighTown. |
|---|---|
| 2 |  You will find the corpse containing this Implant Bio immediately after exiting the elevator. |
Buidhe Reddwork: HighTown (Implant Bio)
| 1 |  After climbing up the flights of stairs in HighTown, head through the first building on the right. |
|---|---|
| 2 | 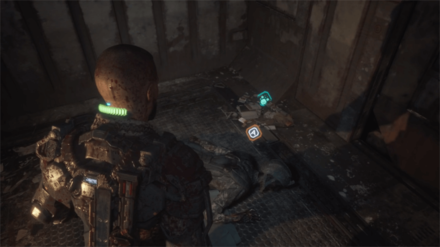 Once inside, you can find the corpse containing this Implant Bio on the ground. Note that there is an enemy in the adjacent room, so take them out first before picking it up. |
Ji-Kwan Park: Miner Log 4 (Implant Bio)
| 1 | 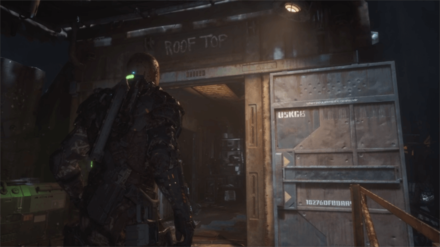 After getting the Gate Fuse, unlock the Rooftop door and enter the room. |
|---|---|
| 2 | 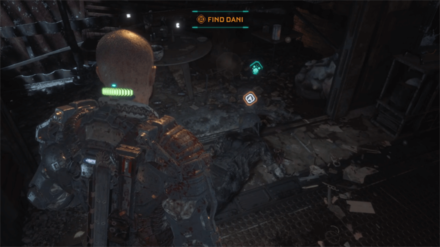 Once inside, climb the ladder and find the corpse containing the Data Bios on the roof. Depending on your version of the game, this corpse might be on the floor in front of the ladder instead. |
Duncan Cole: Disagreement (Audio Log)
| 1 |  Near the end of the chapter, after the cutscene with Dani, exit the platform and turn right. |
|---|---|
| 2 | 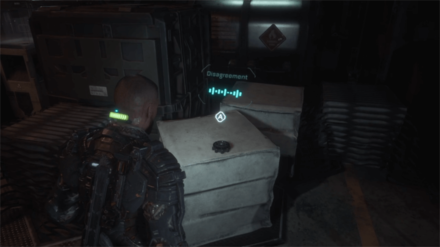 You can find this Audio Log on top of a box near the platform's exit. |
Colony Walkthrough and Data Bio Locations
Chapter 8: Tower
Dr. Tala Ismene: Observation (Audio Log)
| 1 |  After unlocking the door to Panopticon Surveillance B330 with a Gate Fuse, head through and turn toward the hallway on the left. |
|---|---|
| 2 | 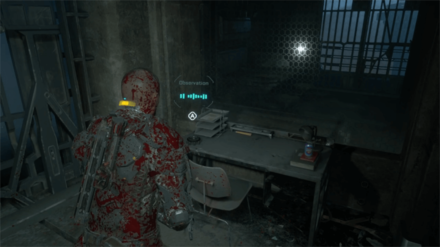 Reach the end of the hallway to find this Audio Log on top of a table. Note that two enemies will ambush you when you reach the Audio Log, so take them out first before picking it up. |
| * | 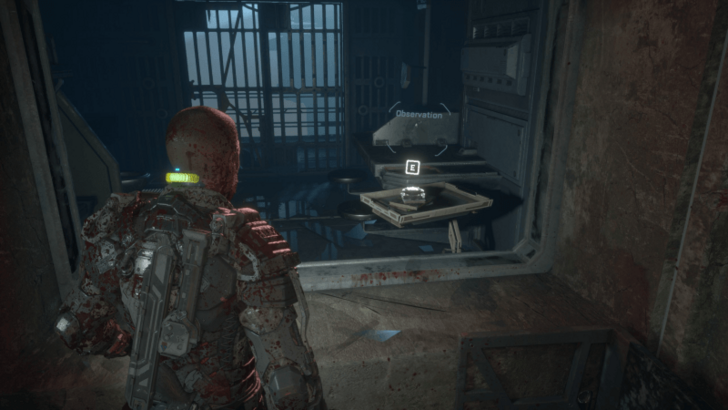 Depending on your version of the game, this Audio Log may also be on a table inside the broken window of one of the cells nearby. |
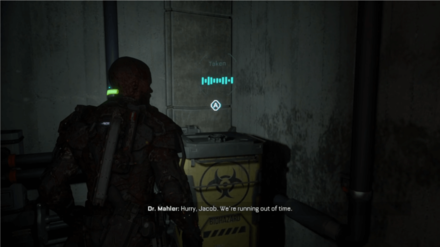
Dr. Tala Ismene: Taken (Audio Log)
| 1 | 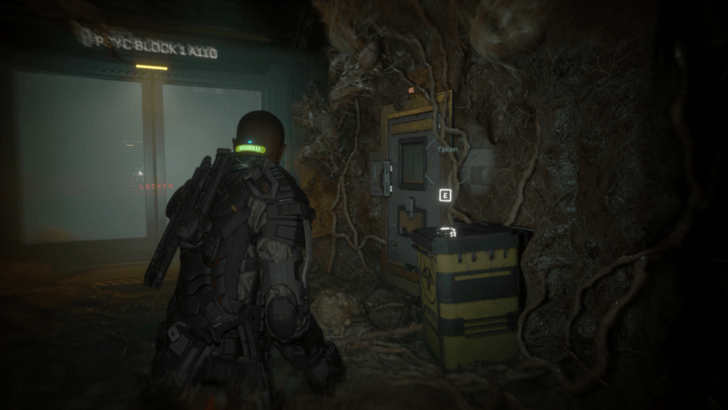 This Audio Log can be found on a biohazard container right outside the entrance to Psyc Block 1 A110. |
|---|---|
| * |  In older versions of the game, this Audio Log is located on a container up a set of stairs near the vent exit of Access Hall M150. |
Edward Bates: Experimentation (Audio Log)
| 1 |  After defeating the two-head near the surgical theater, head through the door to Research Checkpoint R001. |
|---|---|
| 2 |  Proceed past the security checkpoint and through the doors marked "Unlocked". |
| 3 |  Once inside, you can find this Audio Log on a small metal structure on the right side. |
Duncan Cole: Cole’s Triumph (Audio Log)
| 1 |  After heading up the elevator with Dani, move forward to the next room. |
|---|---|
| 2 |  You can find this Audio Log on a table at the far left side of the room. |
Tower Walkthrough and Data Bio Locations
Reward for Collecting All Implant Bios
Unlocks the Grim Reaper Trophy/Achievement
 Gold Gold
G: 100 |
|
|---|---|
| Harvest and read all implant bios. |
To unlock the Grim Reaper trophy, you will have to collect a total of 42 Audio Logs and Implant Bios from each chapter of The Callisto Protocol. This means that you can miss one of either Data-Bio and still be eligible for the trophy.
Trophy List and Achievement Guide
How to Listen to Audio Logs While Moving
Pause and Unpause After Playing a Log
You can listen to Audio Logs while walking around by pausing and unpausing the game after starting one in the Data-Bios menu.
The Callisto Protocol Related Guides

Trophy List and Achievement Guide
All Trophy Guides
| All Trophy and Achievement Guides | |
|---|---|
| Implant Bios Locations | The Commonality Trophy |
Author

All Implant Bios Locations (Collectibles) and How to Unlock the Grim Reaper Trophy
Rankings
- We could not find the message board you were looking for.
Gaming News


![The Seven Deadly Sins: Origin [First Impressions] | A Promising Start](https://img.game8.co/4440581/584e0bfb87908f12c4eab6e846eb1afd.png/thumb)
![The Liar Princess and the Blind Prince Review [PC] | Lovely to Look at but Tedious to Play](https://img.game8.co/4442586/8d95f5faf05780f1765ce7e0938bd825.jpeg/thumb)
![Marathon Cryo Archive Map Teased as [REDACTED] on Selection Screen](https://img.game8.co/4442236/6357203e58172f6de57f1991e7c39b22.png/thumb)
Popular Games

Genshin Impact Walkthrough & Guides Wiki
Umamusume: Pretty Derby Walkthrough & Guides Wiki
Pokemon Pokopia Walkthrough & Guides Wiki
Honkai: Star Rail Walkthrough & Guides Wiki
Monster Hunter Stories 3: Twisted Reflection Walkthrough & Guides Wiki
Arknights: Endfield Walkthrough & Guides Wiki
Wuthering Waves Walkthrough & Guides Wiki
Zenless Zone Zero Walkthrough & Guides Wiki
Pokemon TCG Pocket (PTCGP) Strategies & Guides Wiki
Monster Hunter Wilds Walkthrough & Guides Wiki


Recommended Games
Diablo 4: Vessel of Hatred Walkthrough & Guides Wiki
Cyberpunk 2077: Ultimate Edition Walkthrough & Guides Wiki
Fire Emblem Heroes (FEH) Walkthrough & Guides Wiki
Yu-Gi-Oh! Master Duel Walkthrough & Guides Wiki
Super Smash Bros. Ultimate Walkthrough & Guides Wiki
Pokemon Brilliant Diamond and Shining Pearl (BDSP) Walkthrough & Guides Wiki
Elden Ring Shadow of the Erdtree Walkthrough & Guides Wiki
Monster Hunter World Walkthrough & Guides Wiki
The Legend of Zelda: Tears of the Kingdom Walkthrough & Guides Wiki
Persona 3 Reload Walkthrough & Guides Wiki


All rights reserved
© 2022 Krafton, Inc. All Rights Reserved. STRIKING DISTANCE STUDIOS and THE CALLISTO PROTOCOL are trademarks or service marks of Striking Distance Studios, Inc. KRAFTON is a registered trademark or service mark of KRAFTON, Inc.
The copyrights of videos of games used in our content and other intellectual property rights belong to the provider of the game.
The contents we provide on this site were created personally by members of the Game8 editorial department.
We refuse the right to reuse or repost content taken without our permission such as data or images to other sites.