This survey will take about 1 minute.
Your answers will help us to improve our website.
Silent Hill 2 Remake
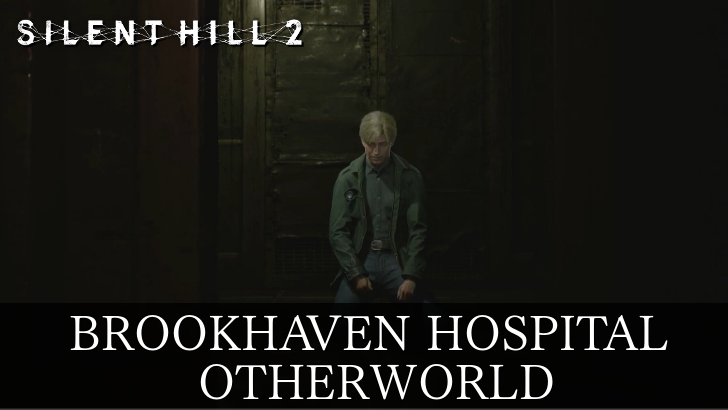
Brookhaven Hospital Otherworld Walkthrough and Guide
★ Complete all Story Chapters to get New Game+
☆ Solve all Puzzles and see all Codes
★ Get all Endings and explanations
☆ Beat all Bosses, like Pyramid Head
★ Collect all Weapons and Items
☆ Read our Beginner's Guide for tips
Here's a full Brookhaven Hospital Otherworld walkthrough for the Silent Hill 2 remake. See how to pass through the Lady of the Door, other puzzle solutions, and all Otherworld Hospital maps!
| ◀︎ Previous Area | Next Area ▶︎ |
|---|---|
| Brookhaven Hospital | South Vale Otherworld |
List of Contents
Brookhaven Hospital Otherworld Walkthrough
- Locate the Chained Box
- Find the Keypad Code
- Find the Combination Lock Code
- Find the Lapis Eye Key
- Solve the Chained Box Puzzle
- Find the Lady of the Door's Rings
- Run From Pyramid Head
- Leave Brookhaven Hospital Otherworld
Locate the Chained Box

Once James comes into consciousness, he will be in the Brookhaven Hospital Otherworld. The map used to navigate this place will be named the Brookhaven Hospital Map, though the building's layout will be different. Open the doors into the Dayroom and head down to the hallway where you can find a save point to your left.
Walk toward the elevator and head over to the second floor. Upon exiting, you will immediately see a Chained Box covered under a white cloth which you will need to solve in order to progress the area. There will also be a save point on the wall behind it for your usage.
Hospital Box Code (Chained Box) Guide
Find the Keypad Code

Make your way toward the Laundry Room by walking down the east wing hall of the hospital, and break through the wall. Push the cabinet blocking the entrance to Room L2, wheel the laundry cart inside up against the wall to Room L3, and access the small space. Walk across to the Observation Room where you can find the Director's Office Key on top of a book in front of a TV.
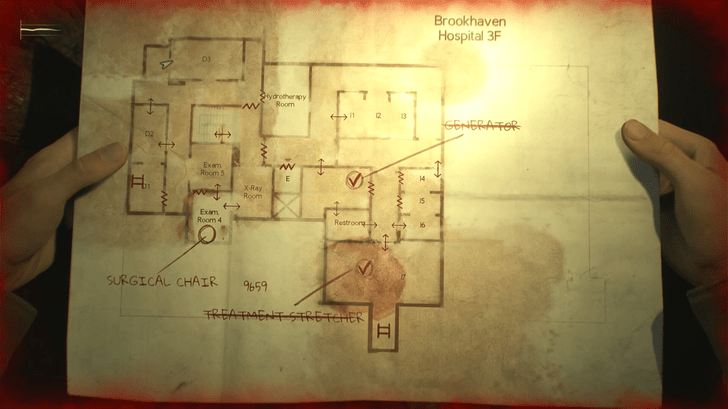
Head back into the hallway and open the Director's Office. Climb up the ladder to the third floor where you will find a Treatment Stretcher to your left. To power it on, navigate your way toward the Generator by following the red wire on the floor and into an unnamed room beside the elevator. Activate the generator, return to the Treatment Stretcher, and turn it on to reveal the Keypad Code: 9659.
Find the Combination Lock Code

Head to the second floor Restroom, in front of the Laundry Room, and cross into Room L1 through a gap in the wall. Go to Room M1 to fix the bent hospital clock hand, then break the wall in Room M3 to access Room M2. Grab the Calendar Page, count the pills in the sink, and watch the lights flicker through a hole in the wall.
Return to the clock, set the hand to 2:00, and prepare for enemies after alarms ring. Use the Calendar Page as a clue to solve the Combination Lock Code based on the pills, hospital clock, and the number of times the light went dark which gives you the code: 1622.
Find the Lapis Eye Key
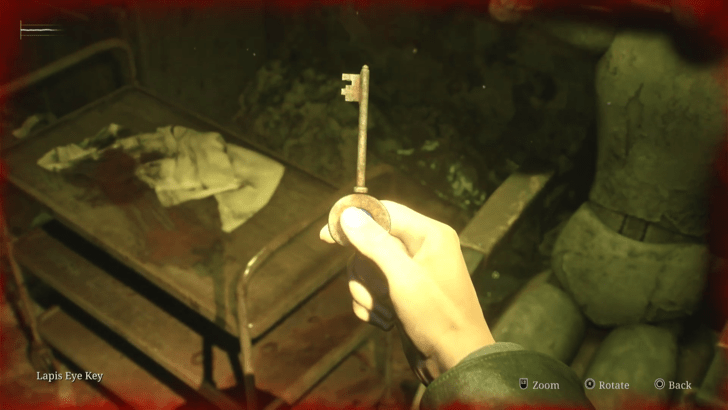
Walk to the Women's Locker Room by crawling through a small space from the Nurse's Lounge. Make your way to the stairwell, climb to the third floor, and head into Exam Room 4. Pick up the Instrument of Force on the instrument table and use it on the Medical Dummy's left arm. Afterward, head to Room D2's northern exterior wall and break through to access a ladder leading down to the first floor Pantry.
From there, pass through the Cafeteria and Storage Room until you reach an unnamed area beside the Restroom where you can collect a Key of Bliss. Return to the Surgical Chair on the third floor via the pantry ladder and use the Key of Bliss on the Medical Dummy's left eye to get the Lapis Eye Key.
Lapis Eye Key Location and How to Use
Solve the Chained Box Puzzle
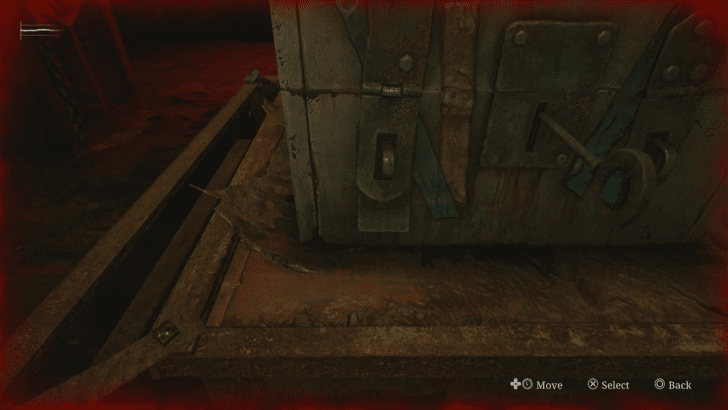
Return to the Chained Box Puzzle and input the Keypad Code, Combination Lock Code, and finally unlock the box with the Lapis Eye Key. James will find that the box is empty, though a curtain drops from behind him revealing a statue with the -1 Elevator Button in its mouth. To progress further, you will need to insert rings on the Lady of the Door's fingers.
Find the Lady of the Door's Rings
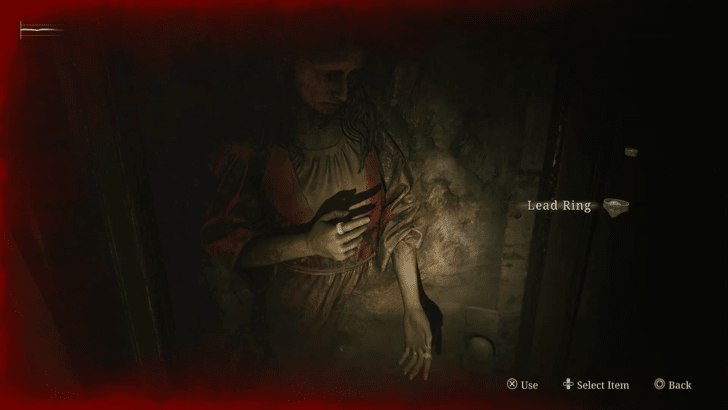
Head to the second floor elevator and insert the -1 Elevator Button to access the Basement. Before the elevator descends, a recording of the Trick or Treat quiz show will play, with the answers to it being 2, 3, and 1—you can keep these in mind for later. Once in the basement, head right and enter the Pump Room, where you'll find a Copper Ring on a table. Afterward, a cutscene will trigger, reuniting James with Maria.
Walk to the other side of the hallway and climb up the stairwell to the first floor, then head to the Doctor's Lounge by passing through the Pool and Shower Rooms. Open a refrigerator in the middle of the room to obtain a Lead Ring. With both rings in your possession, head back to the Lady of the Door on the second floor, and insert the rings into her fingers to open the door.
Optional: Open the Decorative Box in the Pharmacy
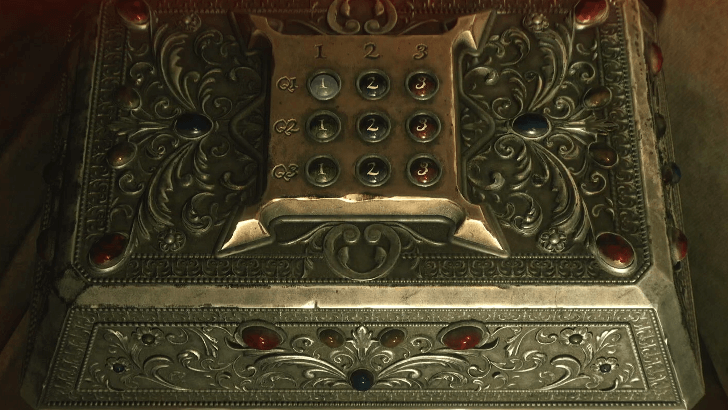
After obtaining the Lead Ring from the Doctor's lounge, you may optionally stop by the Pharmacy by passing through the Locker Rooms. Inside, you can find a Decorative Box on top of a table. Input the answers for the elevator quiz: 2-3-1 on each row to open the box. This rewards you with Shotgun Ammo and Syringes that you can use later on.
Run From Pyramid Head

As you descend the stairs, find a save point on the first door you encounter, and continue downward until you reach the basement. Continue forward on the linear path until you reach a certain point where Pyramid Head appears through the same door you exited from.
In this encounter, he will be much more agile compared to previous instances, so do not attempt to fight him off. Instead, don't look back and keep your distance by running down the halls, because being hit by his spear will kill you instantly. A cutscene will play once you get close enough to the elevator, which results in Maria dying before James' eyes, leaving him alone in the elevator as it ascends.
Leave Brookhaven Hospital Otherworld

Now on the first floor, make your way to the Lobby and find the Hospital Entrance Key inside the Reception Office where you may also find a save point. After picking up the key, James will see Laura outside the window, running away from the hospital. Make your way to the hospital's front door and exit Brookhaven Hospital into South Vale Otherworld.
South Vale Otherworld Walkthrough
Brookhaven Hospital Otherworld Maps
All Brookhaven Hospital Otherworld Maps
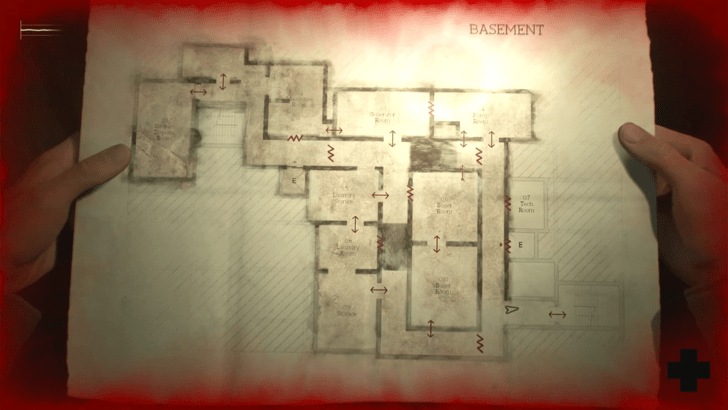 Basement |
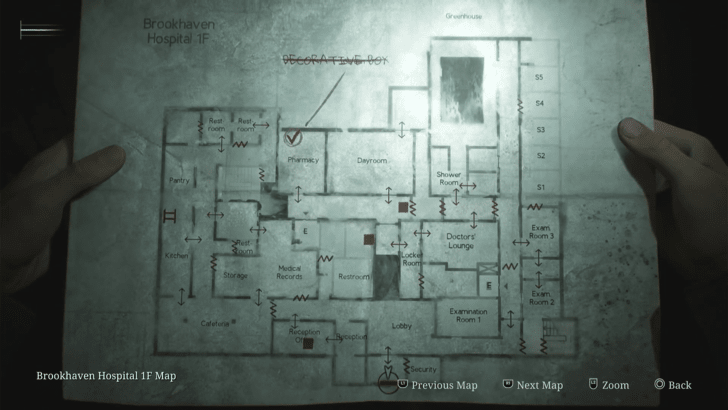 1F |
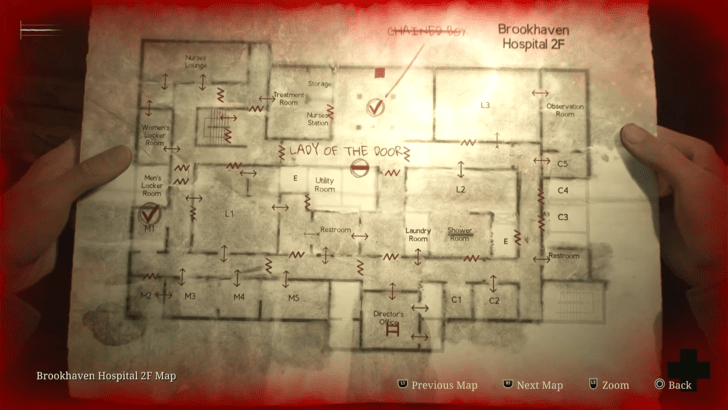 2F |
 3F |
Brookhaven Hospital Otherworld Puzzles
All Puzzles
| Hospital Box Code Guide | Elevator Quiz Answers | Decorative Box |
Silent Hill 2 Remake Related Guides

Story Walkthrough and All Chapters
All Story Chapters
| Story Walkthrough Chapters | ||
|---|---|---|
| Eastern South Vale | Wood Side Apartments | Blue Creek Apartments |
| Western South Vale | Brookhaven Hospital | Brookhaven Hospital Otherworld |
| South Vale Otherworld | Historical Society | Toluca Prison |
| Labyrinth | Lakeview Hotel | Lakeview Hotel Otherworld |
Comment
Author

Brookhaven Hospital Otherworld Walkthrough and Guide
Please participate in our site
improvement survey
03/2026
improvement survey
03/2026
Would you assist in
improving Game8's site?
improving Game8's site?

×
We are listening to our users' valuable opinions and discussing how to act on them.
The information collected through this survey will be used for the purpose of improving our services. In addition, the information will only be disclosed a part of a statistic in a format that will not allow identification of personal information.
Begin Survey
Not Now
×
Please rate each item regarding Game8.co's Advertisements.
Amount of Ads
Very Dissatisfied
Somewhat Dissatisfied
Fine
Somewhat Satisfied
Highly Satisfied
Placement of Ads
Timing of Ad Display
Ad Loading Speed
Safeness of Ads
Content of Ads
×
Please rate each item regarding Game8.co's Quality of Articles.
Amount of information
Very Dissatisfied
Somewhat Dissatisfied
Fine
Somewhat Satisfied
Highly Satisfied
Frequency of updates
Speed of new information
Accuracy of articles
Understandibility of articles
Readability of sentences
×
Please rate each item regarding Game8.co's Usability of the Site.
Ease of finding information
Very Dissatisfied
Somewhat Dissatisfied
Fine
Somewhat Satisfied
Highly Satisfied
Loading Speed
Use of Color
Font Size
Visibility of Images
Easy to Understand Layout
×
Please rate each item regarding Game8.co's Message Boards, Comments.
Ease of Writing
Very Dissatisfied
Somewhat Dissatisfied
Fine
Somewhat Satisfied
Highly Satisfied
Readability
Ease in Finding Information
Comment Quality
Comment Quantity
Admin Response
×
Please rate each item regarding Game8.co's Site's new design.
Please rate our site's new design
Very Dissatisfied
Somewhat Dissatisfied
Fine
Somewhat Satisfied
Highly Satisfied
Do you think that the website's design change makes the site easier to use?
Has the new design made it easier for you to find information on the site?
Has the new design improved the overall visual appeal of the site?
How would you rate your overall satisfaction with the new design of the site?
×
How likely are you to recommend Game8 to someone you know?
Very Unlikely
0
1
2
3
4
5
6
7
8
9
10
Very Likely
If you have other opinions regarding potential improvement to the website, please share them with us. We would appreciate your honest opinion.
Note: This is a free response section, so you can proceed without entering anything.
Note: Please be sure not to enter any kind of personal information into your response.
Note: Please be sure not to enter any kind of personal information into your response.
×
Thank You
×
Thank you for participating in our survey! Your answers will help us to improve the quality of our website and services.
We hope you continue to make use of Game8.
We hope you continue to make use of Game8.
Close
Rankings
- We could not find the message board you were looking for.
Gaming News


![Monster Hunter Stories 3 Review [First Impressions] | Simply Rejuvenating](https://img.game8.co/4438641/2a31b7702bd70e78ec8efd24661dacda.jpeg/thumb)
Popular Games

Genshin Impact Walkthrough & Guides Wiki
Honkai: Star Rail Walkthrough & Guides Wiki
Umamusume: Pretty Derby Walkthrough & Guides Wiki
Pokemon Pokopia Walkthrough & Guides Wiki
Resident Evil Requiem (RE9) Walkthrough & Guides Wiki
Monster Hunter Wilds Walkthrough & Guides Wiki
Wuthering Waves Walkthrough & Guides Wiki
Arknights: Endfield Walkthrough & Guides Wiki
Pokemon FireRed and LeafGreen (FRLG) Walkthrough & Guides Wiki
Pokemon TCG Pocket (PTCGP) Strategies & Guides Wiki


Recommended Games
Diablo 4: Vessel of Hatred Walkthrough & Guides Wiki
Cyberpunk 2077: Ultimate Edition Walkthrough & Guides Wiki
Fire Emblem Heroes (FEH) Walkthrough & Guides Wiki
Yu-Gi-Oh! Master Duel Walkthrough & Guides Wiki
Super Smash Bros. Ultimate Walkthrough & Guides Wiki
Pokemon Brilliant Diamond and Shining Pearl (BDSP) Walkthrough & Guides Wiki
Elden Ring Shadow of the Erdtree Walkthrough & Guides Wiki
Monster Hunter World Walkthrough & Guides Wiki
The Legend of Zelda: Tears of the Kingdom Walkthrough & Guides Wiki
Persona 3 Reload Walkthrough & Guides Wiki


All rights reserved
©2024 Konami Digital Entertainment
The copyrights of videos of games used in our content and other intellectual property rights belong to the provider of the game.
The contents we provide on this site were created personally by members of the Game8 editorial department.
We refuse the right to reuse or repost content taken without our permission such as data or images to other sites.