This survey will take about 1 minute.
Your answers will help us to improve our website.
Silent Hill 2 Remake
Toluca Prison Walkthrough and Guide
★ Complete all Story Chapters to get New Game+
☆ Solve all Puzzles and see all Codes
★ Get all Endings and explanations
☆ Beat all Bosses, like Pyramid Head
★ Collect all Weapons and Items
☆ Read our Beginner's Guide for tips

Here's a full Toluca Prison walkthrough for the Silent Hill 2 remake. Check out our guide for all prison puzzle solutions and Toluca Prison maps!
| ◀︎ Previous Area | Next Area ▶︎ |
|---|---|
| Historical Society | Labyrinth |
List of Contents
Toluca Prison Walkthrough
- Jump Down to Toluca Prison
- Locate the Scales
- Unlock the Headless Serpent Door
- Get the Medium Weight and Armory Key
- Unlock the Hornless Ox Door
- Get the Heavy Weight
- Unlock the Eyeless Boar Door
- Get the Light Weight
- Unlock the Wingless Dove Door
- Get the Lightest Weight
- Unlock the Hangman Puzzle
- Solve the Hangman Puzzle
Jump Down to Toluca Prison
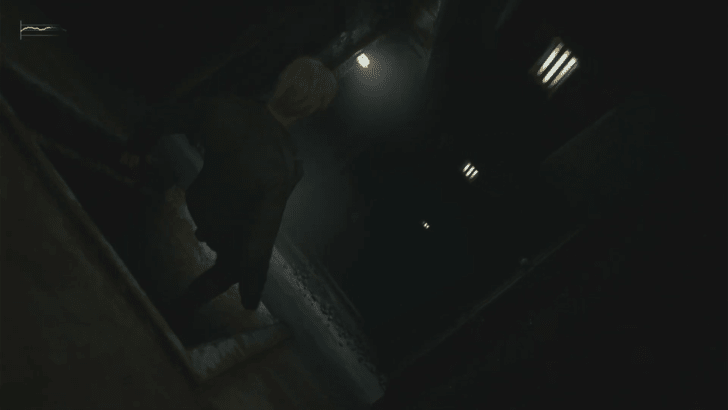
James will end up in the Toluca Prison Canteen where you will come across a dead body slumped over one of the tables. A cutscene with Eddie will trigger after getting within its proximity.
Afterward, exit into the main hallway, enter the first door you see to access a save point, and pick up the Toluca Prison Map on the bulletin board. There will also be a gun cabinet containing a Rifle which you will need to find the key for.
Locate the Scales
From the Armory, head right through the double doors leading into the cell blocks. You can switch on the overhead lights by pulling down on the levers installed on the walls which reveals any Mannequins and its new variant: the Spider Mannequin that lurk in the dark. However, the lights will only stay on for a limited amount of time.
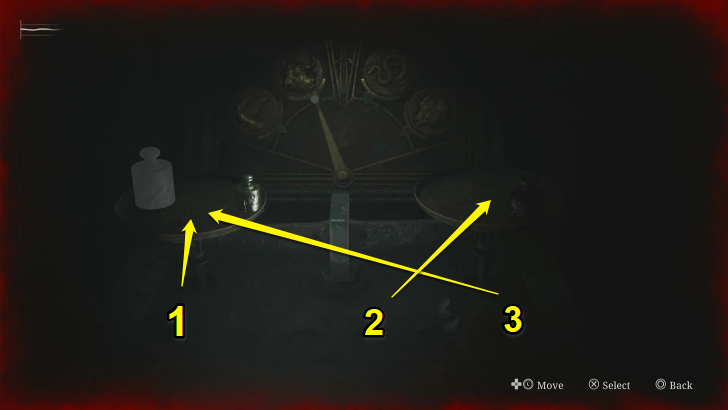
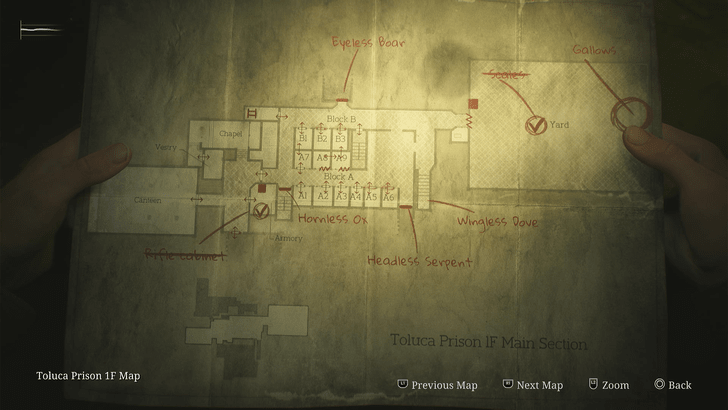
Pass through Block B and into the Yard where you will find Scales hidden underneath a white cloth, with a Neutral Weight already included. This will be your key to unlocking all of the animal doors spread across the prison, so come back to it constantly.
Weights and Scales Puzzle Guide
Unlock the Headless Serpent Door

Walk back from the cell blocks toward the Chapel where you can find The Heaviest Weight at the altar. Head back to the Scales and place The Heaviest Weight on the right pan while placing the Initial Weight on the left pan to unlock the Headless Serpent Door located next to Cell A6 in Block A.
Get the Medium Weight and Armory Key
Now with access to the Serpent Section, navigate the cell blocks and reach the Witness Room by going through the door adjacent to Cell E10. Solve the Witness Room Generator Puzzle by turning all switches up in a sequential order, causing a power surge that opens all cells within the Serpent Section, and the Death Chamber.
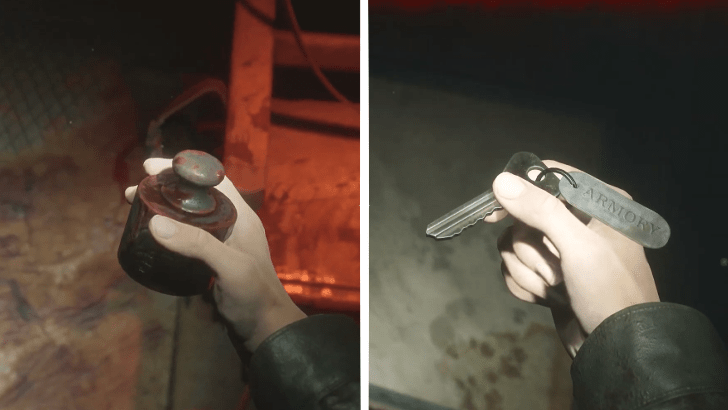
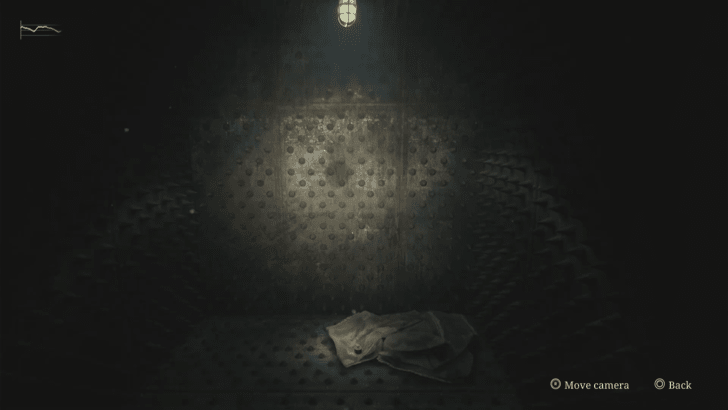
Find a Medium Weight on the electric chair inside the Death Chamber and head toward Cell E10, where you can break a wall and gain access to the unnamed rooms behind it. Head through and turn to your left where you can see an opened key locker bearing the Armory Key. Exit the Serpent Section and make your way back to the Armory to unlock the Gun Cabinet and acquire a Rifle.
Prison Generator Switch Solution
Unlock the Hornless Ox Door
Return to the Scales in the Yard and open the Hornless Ox Door by placing both the Initial Weight and The Heaviest Weight on the left pan, while placing the Medium Weight on the right, then proceed to the door beside Cell A1 in Block A.
Get the Heavy Weight
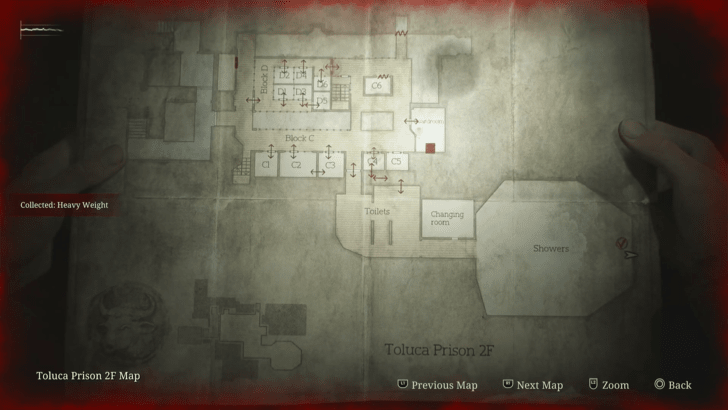
Proceed through the Hornless Ox Door and ascend to the second floor of the prison. Head to your right and straight into the Guardroom where you can find the Block D Key from a drawer. Unlock the doors to Cell Block D and enter Cell D5 to get a Shiv Key, which you will need to unlock Cell C4.
After unlocking Cell C4 with the Shiv Key, climb through the hole in the cell and squeeze through the pipes to get in the Showers by cutting through the Toilets. Reach into a hole at the far-right end of the room to obtain a Heavy Weight. Exit the area and return to the Scales.
Unlock the Eyeless Boar Door
To unlock the Eyeless Boar Door, place The Heaviest Weight, the Heavy Weight, and Medium Weight on the right pan, then place the Initial Weight on the left. Proceed to the door directly in front of Cell B3 in Block B.
Get the Light Weight

Inside the Boar Section, head toward the Infirmary and find an Upper Floor Key on the desk in the backrooms. Use it to unlock the stairwell to the upper floor, next to the Men's Room, and go up the stairs until you reach the Warden's Room on the third floor where you will see a typewriter.
Pressing any key on the typewriter outputs the letters forming the word SICK. Once the word is completed, it unlocks the desk drawer containing the Light Weight.
Unlock the Wingless Dove Door
Return to the Scales once more and place all of the weights on the left pan, but leave the Medium Weight on the right pan to unlock the Wingless Dove Door. From the Yard, turn left on the first corner you see and go down the stairs to access the Basement. Note that after passing the debris to the entrance of the main basement room, your path back to the Wingless Dove Door will be blocked.
Get the Lightest Weight
Once in the Basement, make your way around the cells, peek through the door viewer of Cell F6 and see The Lightest Weight on top of a white sheet, and head toward Cell F15. Crawl through the open space into an unnamed room and press the panel on the wall that opens Cells F5 and F6.
Exit the room and walk over to Cell F6 where you can pick up The Lightest Weight and the Confession note on the wall. The doors to the cell will close after picking up the weight, but will open again after a short while. To exit the area, head over to Cell F9 and destroy the wall into Cell F10 to access a ladder that leads to the upper floor, then return to the Scales.
Unlock the Hangman Puzzle
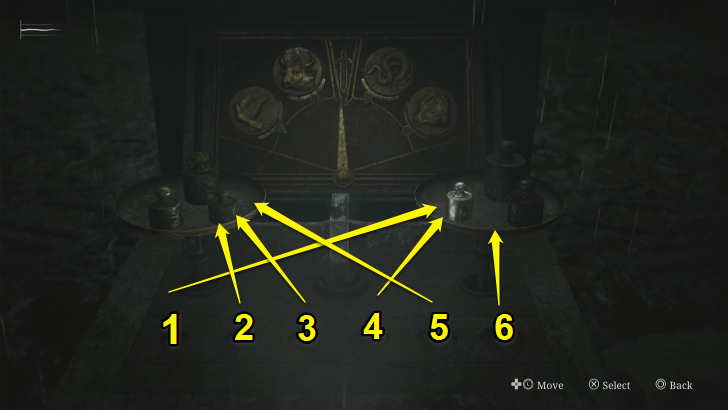
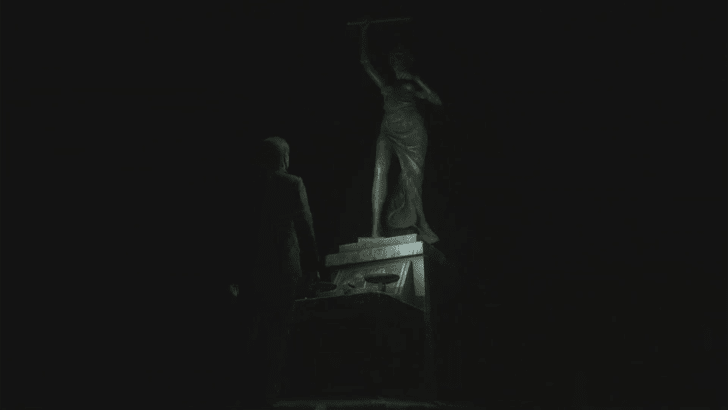
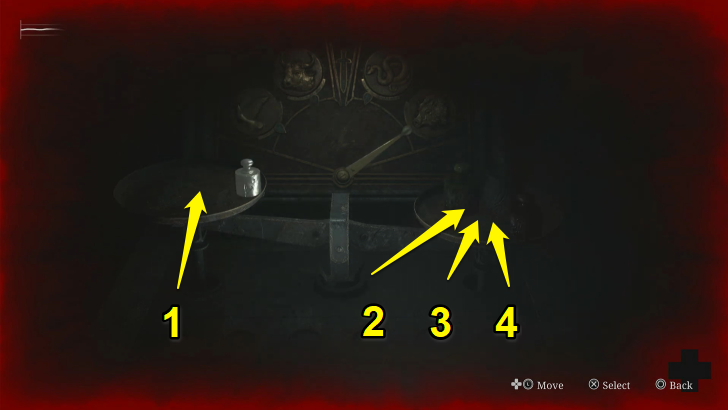
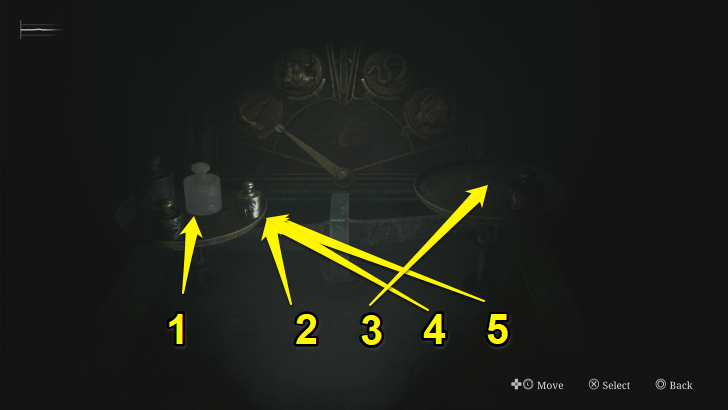
Return to the Yard where the scenery has shifted and rain begins to pour. Place the left-most Initial Weight, the Medium Weight, and the Heaviest Weight on the right; place the Lightest, Light, and Heavy Weight on the left. Afterward, the statue will drop an Execution Lever into James' hands.
Solve the Hangman Puzzle
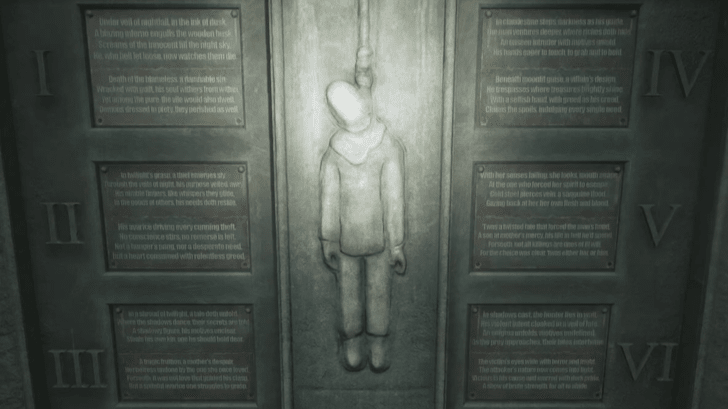
Insert the Execution Lever on its base in front of the diagram at the Hangman Puzzle. Watch as the diagram unfolds itself into a cabinet that mirrors the nooses hanging from the gallows. The notes placed on every number serve as the first verse to a poem that details that prisoner's crime, which must be completed by attaching the appropriate second verse written on the cards provided below.
You can solve the puzzle by piecing together the verses based on the tear lines to reconstruct the complete poem until the game autosaves and you can no longer move the verses.
Pull the Noose of the Innocent Prisoner
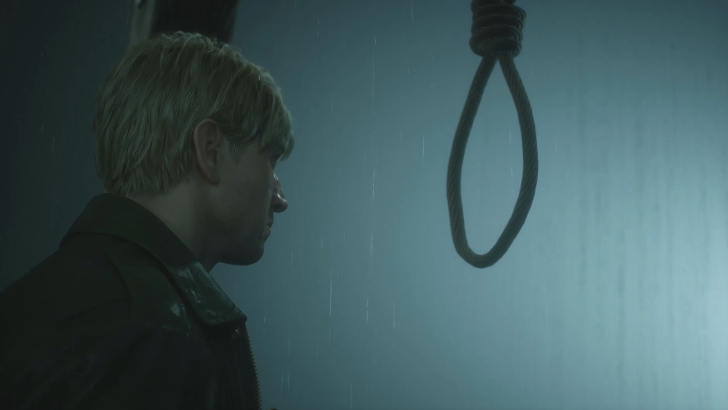
Once assembled, James must pull the noose of the innocent prisoner, which is determined by the full poem. In Light difficulty, the answers are consistently Noose I or Noose VI across all playthroughs.
For Standard and Hard difficulties, the answers are randomized per playthrough, requiring you to piece together all poems to gain context before making a judgment. If incorrect, James must retry the puzzle. Successfully pulling the correct noose will then drop him through a trapdoor that drops him in the Labyrinth.
Toluca Prison Maps
All Toluca Prison Maps
 1F Main Section |
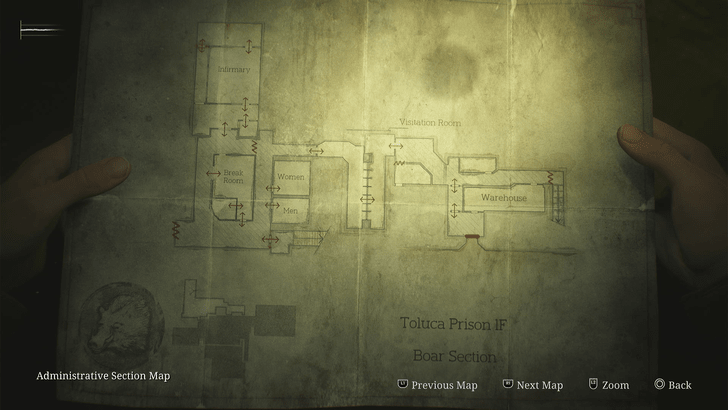 1F Boar Section |
 1F Serpent Section |
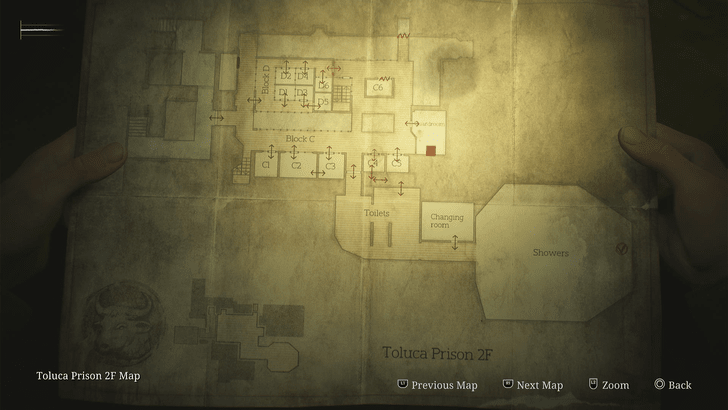 2F |
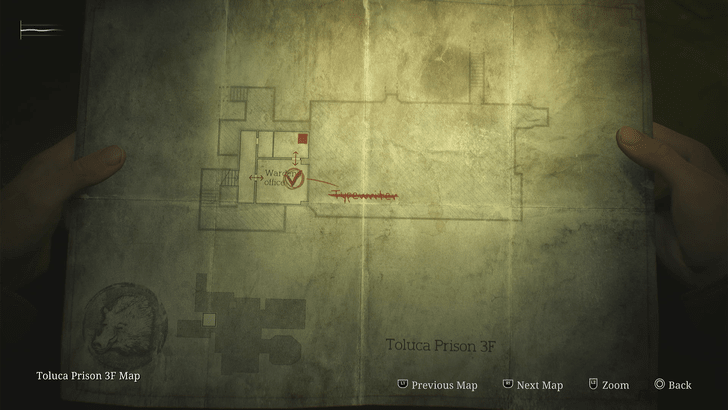 3F |
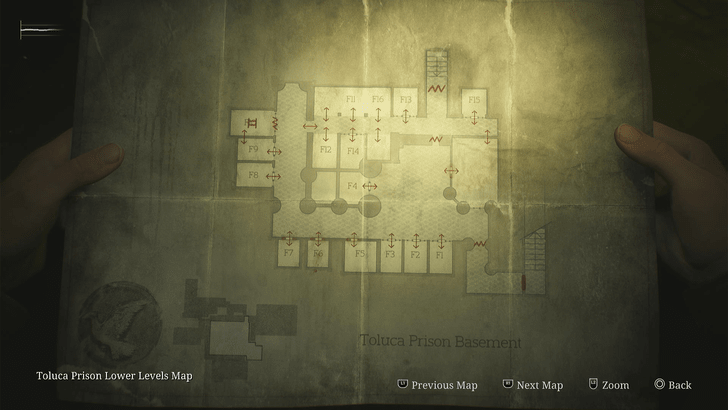 Basement |
Toluca Prison Puzzles
All Puzzles
| Prison Generator | Weights and Scales | Hangman Puzzle |
Silent Hill 2 Remake Related Guides

Story Walkthrough and All Chapters
All Story Chapters
Comment
Author

Toluca Prison Walkthrough and Guide
Please participate in our site
improvement survey
03/2026
improvement survey
03/2026
Would you assist in
improving Game8's site?
improving Game8's site?

×
We are listening to our users' valuable opinions and discussing how to act on them.
The information collected through this survey will be used for the purpose of improving our services. In addition, the information will only be disclosed a part of a statistic in a format that will not allow identification of personal information.
Begin Survey
Not Now
×
Please rate each item regarding Game8.co's Advertisements.
Amount of Ads
Very Dissatisfied
Somewhat Dissatisfied
Fine
Somewhat Satisfied
Highly Satisfied
Placement of Ads
Timing of Ad Display
Ad Loading Speed
Safeness of Ads
Content of Ads
×
Please rate each item regarding Game8.co's Quality of Articles.
Amount of information
Very Dissatisfied
Somewhat Dissatisfied
Fine
Somewhat Satisfied
Highly Satisfied
Frequency of updates
Speed of new information
Accuracy of articles
Understandibility of articles
Readability of sentences
×
Please rate each item regarding Game8.co's Usability of the Site.
Ease of finding information
Very Dissatisfied
Somewhat Dissatisfied
Fine
Somewhat Satisfied
Highly Satisfied
Loading Speed
Use of Color
Font Size
Visibility of Images
Easy to Understand Layout
×
Please rate each item regarding Game8.co's Message Boards, Comments.
Ease of Writing
Very Dissatisfied
Somewhat Dissatisfied
Fine
Somewhat Satisfied
Highly Satisfied
Readability
Ease in Finding Information
Comment Quality
Comment Quantity
Admin Response
×
Please rate each item regarding Game8.co's Site's new design.
Please rate our site's new design
Very Dissatisfied
Somewhat Dissatisfied
Fine
Somewhat Satisfied
Highly Satisfied
Do you think that the website's design change makes the site easier to use?
Has the new design made it easier for you to find information on the site?
Has the new design improved the overall visual appeal of the site?
How would you rate your overall satisfaction with the new design of the site?
×
How likely are you to recommend Game8 to someone you know?
Very Unlikely
0
1
2
3
4
5
6
7
8
9
10
Very Likely
If you have other opinions regarding potential improvement to the website, please share them with us. We would appreciate your honest opinion.
Note: This is a free response section, so you can proceed without entering anything.
Note: Please be sure not to enter any kind of personal information into your response.
Note: Please be sure not to enter any kind of personal information into your response.
×
Thank You
×
Thank you for participating in our survey! Your answers will help us to improve the quality of our website and services.
We hope you continue to make use of Game8.
We hope you continue to make use of Game8.
Close
Rankings
- We could not find the message board you were looking for.
Gaming News


![Everwind Review [Early Access] | The Shaky First Step to A Very Long Journey](https://img.game8.co/4440226/ab079b1153298a042633dd1ef51e878e.png/thumb)

![Monster Hunter Stories 3 Review [First Impressions] | Simply Rejuvenating](https://img.game8.co/4438641/2a31b7702bd70e78ec8efd24661dacda.jpeg/thumb)
Popular Games

Genshin Impact Walkthrough & Guides Wiki
Honkai: Star Rail Walkthrough & Guides Wiki
Umamusume: Pretty Derby Walkthrough & Guides Wiki
Pokemon Pokopia Walkthrough & Guides Wiki
Resident Evil Requiem (RE9) Walkthrough & Guides Wiki
Monster Hunter Wilds Walkthrough & Guides Wiki
Wuthering Waves Walkthrough & Guides Wiki
Arknights: Endfield Walkthrough & Guides Wiki
Pokemon FireRed and LeafGreen (FRLG) Walkthrough & Guides Wiki
Pokemon TCG Pocket (PTCGP) Strategies & Guides Wiki


Recommended Games
Diablo 4: Vessel of Hatred Walkthrough & Guides Wiki
Fire Emblem Heroes (FEH) Walkthrough & Guides Wiki
Yu-Gi-Oh! Master Duel Walkthrough & Guides Wiki
Super Smash Bros. Ultimate Walkthrough & Guides Wiki
Pokemon Brilliant Diamond and Shining Pearl (BDSP) Walkthrough & Guides Wiki
Elden Ring Shadow of the Erdtree Walkthrough & Guides Wiki
Monster Hunter World Walkthrough & Guides Wiki
The Legend of Zelda: Tears of the Kingdom Walkthrough & Guides Wiki
Persona 3 Reload Walkthrough & Guides Wiki
Cyberpunk 2077: Ultimate Edition Walkthrough & Guides Wiki


All rights reserved
©2024 Konami Digital Entertainment
The copyrights of videos of games used in our content and other intellectual property rights belong to the provider of the game.
The contents we provide on this site were created personally by members of the Game8 editorial department.
We refuse the right to reuse or repost content taken without our permission such as data or images to other sites.