This survey will take about 1 minute.
Your answers will help us to improve our website.
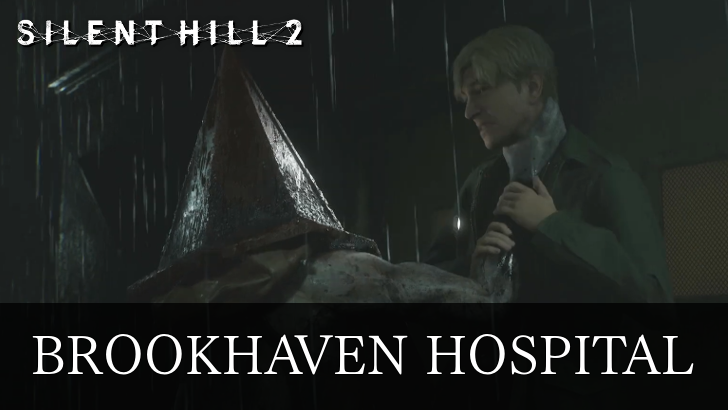
Silent Hill 2 Remake
Brookhaven Hospital Walkthrough and Guide
★ Complete all Story Chapters to get New Game+
☆ Solve all Puzzles and see all Codes
★ Get all Endings and explanations
☆ Beat all Bosses, like Pyramid Head
★ Collect all Weapons and Items
☆ Read our Beginner's Guide for tips
This is a full Silent Hill 2 Remake Brookhaven Hospital Guide that explains key points, like how to get three bracelets for a puzzle, or tips for the boss in the hospital. Check out our guide for all Brookhaven Hospital maps, puzzle solutions, and more!
| ◀︎ Previous Area | Next Area ▶︎ |
|---|---|
| Western South Vale | Brookhaven Hospital Otherworld |
List of Contents
Brookhaven Hospital Walkthrough
- Enter Brookhaven Hospital
- Open the Reception Office Key Locker
- Head to the Basement
- Power Up the Elevator
- Head to the Director's Office
- Find the Marked Bracelet
- Find the Bloodstained Bracelet
- Find the Filthy Bracelet
- Solve the Bracelet Puzzle
- Open the Director's Safe
- Go to the Rooftop
- Fight Flesh Lips
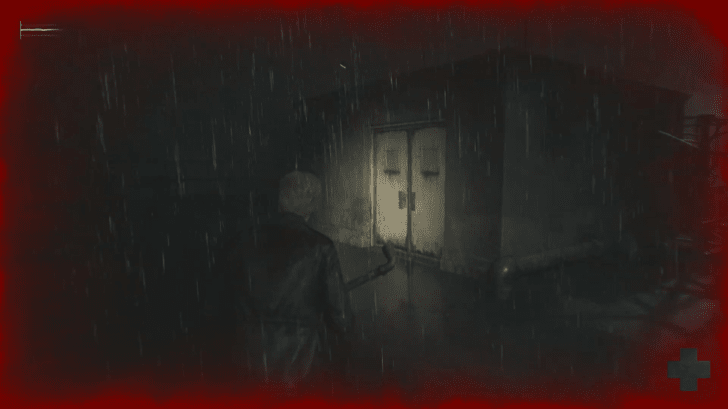
Enter Brookhaven Hospital
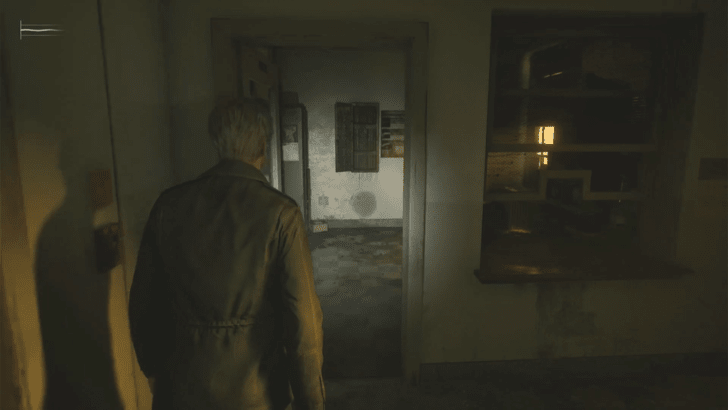
Enter Brookhaven Hospital and pick up the Brookhaven Hospital Map from a brochure stand by the front desk. Then, head to the Reception Office to find a save point and the Key Locker containing the Basement Key.
If you head toward the stairwell at the eastern wing of the hospital, you will encounter Laura but she will run off to the second floor of the hospital which is inaccessible at this point.
Open the Reception Office Key Locker
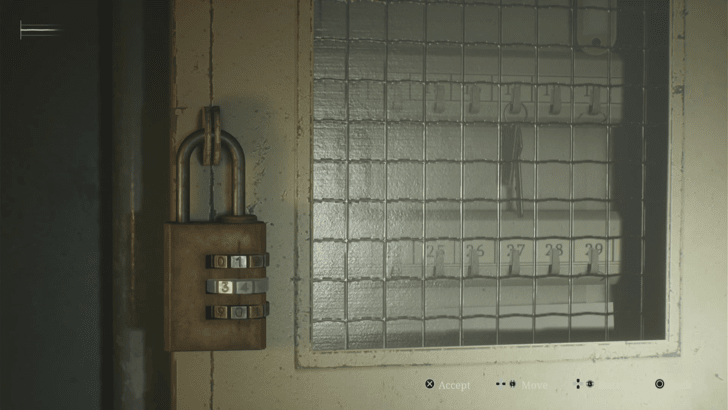
You can find a Nurse's Memo by breaking through the window in Exam Room 3 to enter the room between it and Exam Room 2. It provides hints to open the Reception Office keybox, which awards the Basement Key.
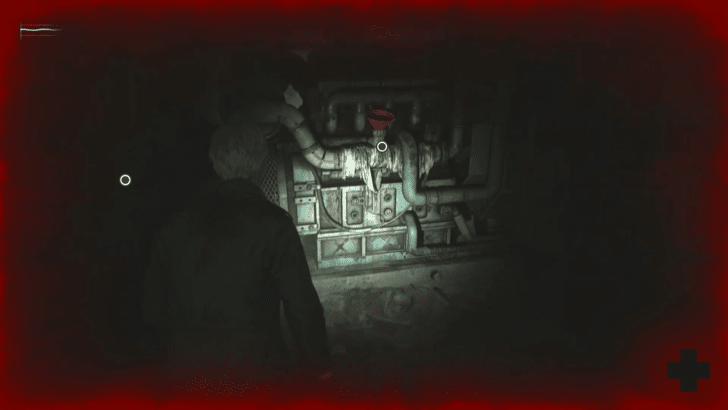
Head to the Basement

Head down to the Basement by using the Basement Key and grab a Brookhaven Hospital Basement Map from the bulletin board in front of the door. Go to the Generator Room from the Pump Room to find the Generator with no fuel.
Power Up the Elevator
Head to the Boiler Room to find an Empty Fuel Can at the far left corner of the room. Then, go to the Laundry Room and move a cart from the linen storage area to access a gap in the wall.
Slip through into the Storage Room to locate the Fuel Tank. Fill up the Empty Fuel Can, refuel the Generator, and activate it restore power to the Elevator. Select Floor 2 for a cutscene where James leaves Maria to rest in Room C5.
Return to Maria in Room C5 for Maria Ending

After you leave Maria in Room C5, you may still come back to the room and check in on her. Do this often if you are looking to get the Maria ending. Otherwise, make sure you do not visit her at all.
Head to the Director's Office
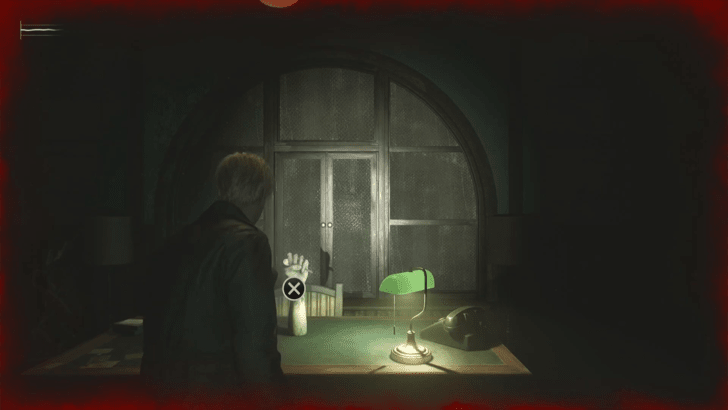
Explore the second floor to find a save point in Room C3. Head over to the Director's Office at the southern part of the hospital, and find the Director's Hand on the table and the Director's Safe behind a red curtain.
Three Evaluation Cards sit on the desk at the right side of the room, which will serve as clues to the Bracelets needed for the hand puzzle. There is also another save point inside the attached room at the right side of the office.
Find the Marked Bracelet
Navigate to the Nurse's Lounge on the west wing of the second floor to find the L1 Room Key. Use it to open Room L1, cross over to the next room, and head into the Utility Room.
Crawl inside the hole in the wall to make it back to the first floor, then crawl into the Medical Records room to find the Marked Bracelet. Head back up to the second floor via the stairs.
Find the Bloodstained Bracelet
Go over to the Women's Locker Room to get a Bent Needle from behind a teddy bear, and a Shotgun from one of the lockers. Go to the third floor via the stairs in front of the Treatment Room and peer through the opening on the metal door to catch a glimpse of Laura.
Continuing to the left hallway, break the window of Exam Room 5 and climb in to retrieve the 1F Inner Ward Key. Walk back to the first floor to unlock the inner ward, then go through the Dayroom, Garden, and Greenhouse to reach the Pool. Obtain a Medical Tube from the small room beside the Pool's Shower Room.
Drain the Pool to find the Bracelet

Combine the Medical Tube and Bent Needle, and use them on the drain in the hospital Pharmacy to fish out the Maintenance Key.
Then head back to the Pool, unlock the latch on the floor using the Maintenance Key, and activate the pool pump to drain the water. Climb down the Pool and break the wall with an eye symbol to obtain the Bloodstained Bracelet.
Open the Small Chest for Bliss Ending
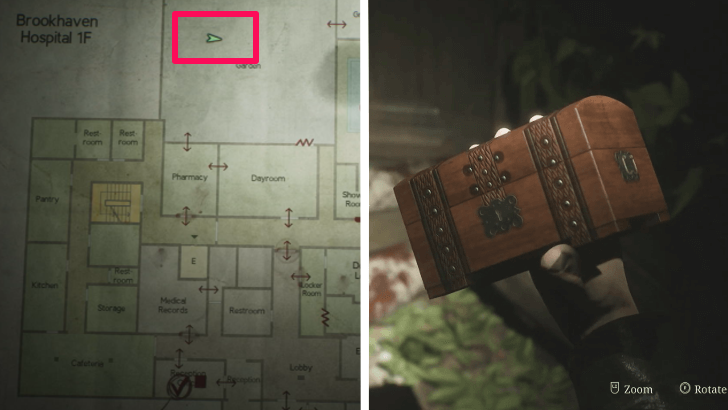
Considering that you have obtained the Rusted Key from the Bowling Alley Safe, head inside the gazebo in the hospital's Garden where you can find a Small Box. Open it with the key to obtain a White Claudia which you will need later on to get the Bliss ending.
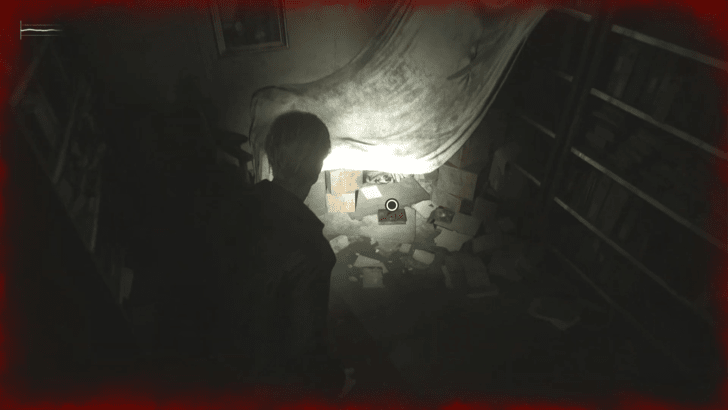
Find the Filthy Bracelet

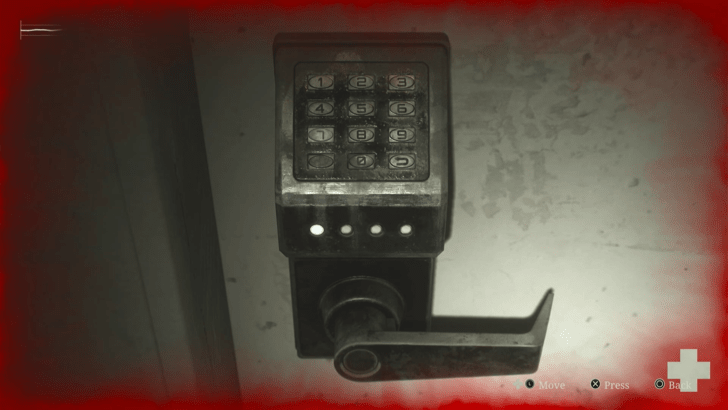
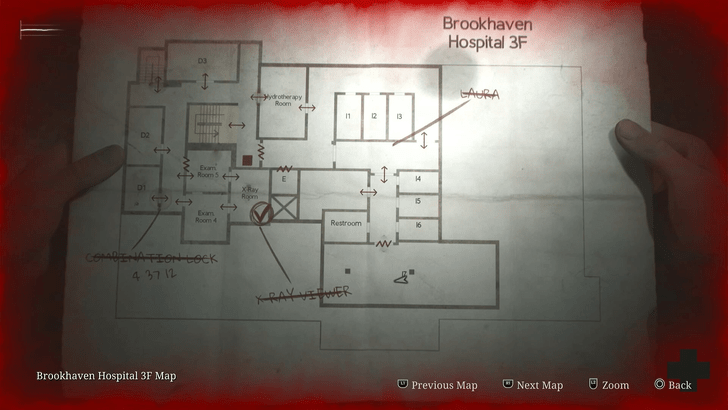
Make your way to Room D1 on the third floor and use the code 4-37-12, obtained from the X-Ray puzzle. Turn the knob according to what is written on the door, then go inside and find the Filthy Bracelet under the room's bed sheets.
To solve the X-Ray Puzzle and get the code for Room D1, you will need to collect several radiographs and bring them to the X-Ray Room. To start collecting clues for the puzzle, head to the Nurses Station on the second floor.
Unlock the Nurses Station Door
Find the Staff Memo stuck on the Nurses Station divider. It directs you to the Doctor's Lounge on the first floor to get the Nurse Station Keypad Code. Then head to the Pantry, to get the Mold Remover by the garbage chute.
Return back to the keypad and enter the correct digits to access the Treatment Room, where you will find a Moldy Radiograph inside a bathtub. Combine it with the Mold Remover to obtain a Cleaned Up Radiograph.
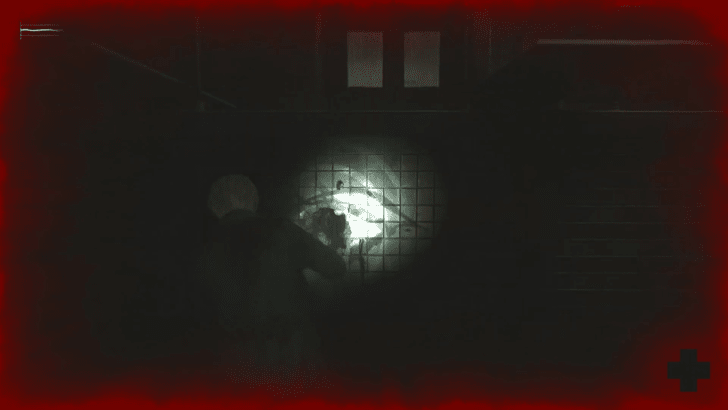
Solve the X-Ray Puzzle
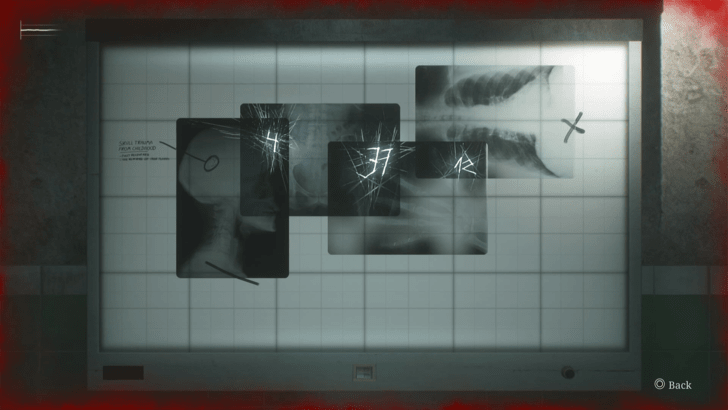
Climb back up to the third floor to find the X-Ray puzzle in the X-Ray Room, by going through Exam Room 5. In the same room, you can find the X-Ray Memo and the Radiograph of a Pelvis which you can display on the X-Ray Viewer along with the Cleaned Up Radiograph.
Rearrange the radiographs using the marks on the viewer as a guide, to align the scratches on each radiograph in order to reveal the Room D1 Lock Combination.
Solve the Bracelet Puzzle
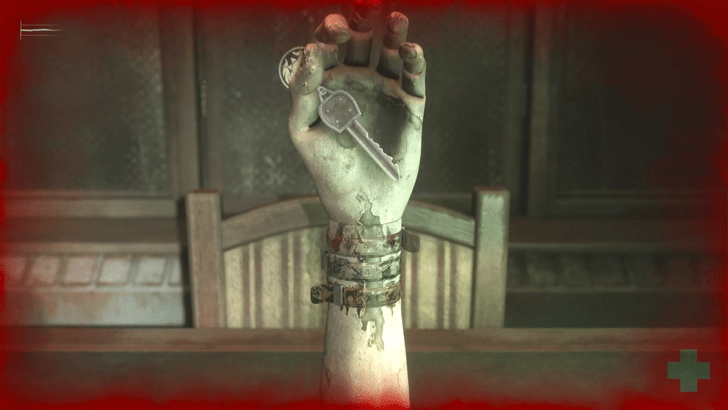
Return to the Director's Office on the second floor and place all of the collected Bracelets on the Director's Hand in the middle of the room. Align the clear parts of the Bracelets that have numbers peeking through to get 92-45-71, which grants the Director's Storage Room Key.
Use the key on the door inside the room where you can find a save point in the Director's Office and get the Safe Button inside, then place it on the Director's Safe.
Open the Director's Safe
| Book Symbols | Director's Safe |
|---|---|
 |
 |
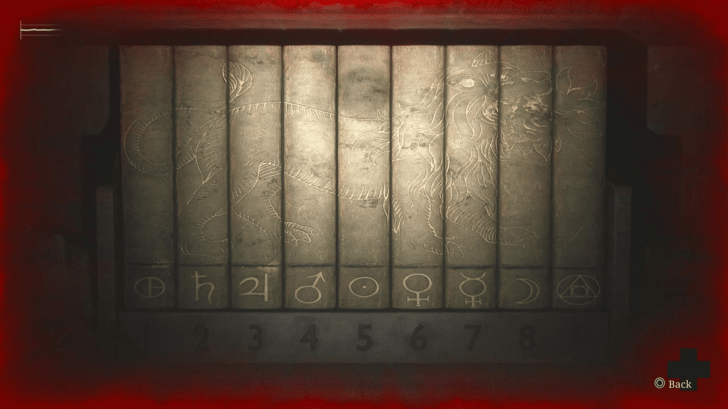
In the Director's Storage Room, rearrange the Director's Books on the shelf to form an image of a beast. The symbols on the spines will represent the Director's Safe Combination.
Match the symbols to numbers from the Director's Hand (92-45-71) like a cryptogram to unlock the safe, where you will find the Rooftop Key on the inside.
Go to the Rooftop
Climb to the rooftop via the stairwell found at the upperleftmost part of 3F. Open the door with the Rooftop Key and navigate towards the only room on roof. Read the Page From A Diary found on the floor and exit the room.
This triggers a cutscene where Pyramid Head throws James down the elevator shaft, sending him back down to the elevator on the third floor. Go around the hall past Rooms I1-I3 to find Laura behind the yellow double doors.
Fight Flesh Lips

After Laura traps James inside Room I7, you will be forced to battle and defeat Flesh Lips by whatever means necessary. It will periodically drop from the ceiling and try to attack, so be sure to dodge and hit back with a melee attack when possible.
Later in the fight, Flesh Lips will become mobile and attack James with its archnid-like legs. You may use a Handgun or a Shotgun during this stage for more efficiency. After defeating it, another Flesh Lips emerges from the ceiling and drags James away, who then gets wheeled through the Brookhaven Hospital Otherworld.
Brookhaven Hospital Maps
All Brookhaven Hospital Maps
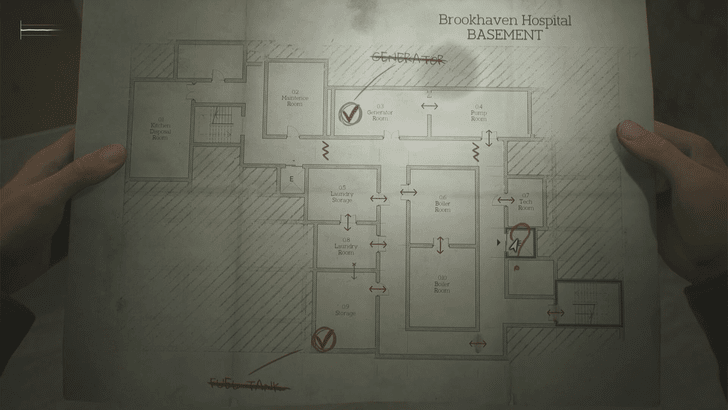 Basement |
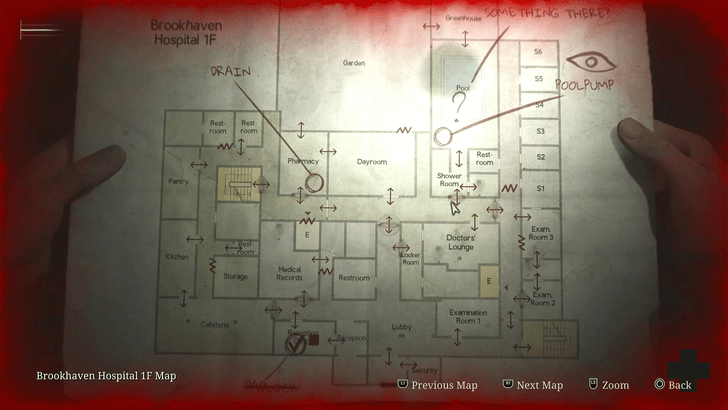 1F |
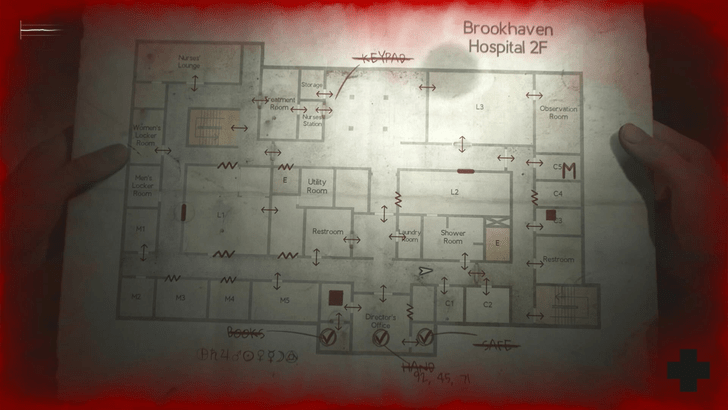 2F |
 3F |
Brookhaven Hospital Puzzles
All Puzzles
| Nurses Station Keypad Code | Hospital Padlock Code | X-Ray Puzzle |
| Bracelet Puzzle | Director's Books Puzzle | Hospital Safe Code |
| 3rd Floor Hospital Door |
Silent Hill 2 Remake Related Guides

Story Walkthrough and All Chapters
All Story Chapters
| Story Walkthrough Chapters | ||
|---|---|---|
| Eastern South Vale | Wood Side Apartments | Blue Creek Apartments |
| Western South Vale | Brookhaven Hospital | Brookhaven Hospital Otherworld |
| South Vale Otherworld | Historical Society | Toluca Prison |
| Labyrinth | Lakeview Hotel | Lakeview Hotel Otherworld |
Comment
1  Anonymous over 1 year
Doesn’t event tell you how you’re supposed to get to Laura to fight fleshlips. The hydrotherapy room is closed, I can’t just “go around the hall”
Author

Brookhaven Hospital Walkthrough and Guide
Please participate in our site
improvement survey
03/2026
improvement survey
03/2026
Would you assist in
improving Game8's site?
improving Game8's site?

×
We are listening to our users' valuable opinions and discussing how to act on them.
The information collected through this survey will be used for the purpose of improving our services. In addition, the information will only be disclosed a part of a statistic in a format that will not allow identification of personal information.
Begin Survey
Not Now
×
Please rate each item regarding Game8.co's Advertisements.
Amount of Ads
Very Dissatisfied
Somewhat Dissatisfied
Fine
Somewhat Satisfied
Highly Satisfied
Placement of Ads
Timing of Ad Display
Ad Loading Speed
Safeness of Ads
Content of Ads
×
Please rate each item regarding Game8.co's Quality of Articles.
Amount of information
Very Dissatisfied
Somewhat Dissatisfied
Fine
Somewhat Satisfied
Highly Satisfied
Frequency of updates
Speed of new information
Accuracy of articles
Understandibility of articles
Readability of sentences
×
Please rate each item regarding Game8.co's Usability of the Site.
Ease of finding information
Very Dissatisfied
Somewhat Dissatisfied
Fine
Somewhat Satisfied
Highly Satisfied
Loading Speed
Use of Color
Font Size
Visibility of Images
Easy to Understand Layout
×
Please rate each item regarding Game8.co's Message Boards, Comments.
Ease of Writing
Very Dissatisfied
Somewhat Dissatisfied
Fine
Somewhat Satisfied
Highly Satisfied
Readability
Ease in Finding Information
Comment Quality
Comment Quantity
Admin Response
×
Please rate each item regarding Game8.co's Site's new design.
Please rate our site's new design
Very Dissatisfied
Somewhat Dissatisfied
Fine
Somewhat Satisfied
Highly Satisfied
Do you think that the website's design change makes the site easier to use?
Has the new design made it easier for you to find information on the site?
Has the new design improved the overall visual appeal of the site?
How would you rate your overall satisfaction with the new design of the site?
×
How likely are you to recommend Game8 to someone you know?
Very Unlikely
0
1
2
3
4
5
6
7
8
9
10
Very Likely
If you have other opinions regarding potential improvement to the website, please share them with us. We would appreciate your honest opinion.
Note: This is a free response section, so you can proceed without entering anything.
Note: Please be sure not to enter any kind of personal information into your response.
Note: Please be sure not to enter any kind of personal information into your response.
×
Thank You
×
Thank you for participating in our survey! Your answers will help us to improve the quality of our website and services.
We hope you continue to make use of Game8.
We hope you continue to make use of Game8.
Close
Rankings
- We could not find the message board you were looking for.
Gaming News


![Monster Hunter Stories 3 Review [First Impressions] | Simply Rejuvenating](https://img.game8.co/4438641/2a31b7702bd70e78ec8efd24661dacda.jpeg/thumb)
Popular Games

Genshin Impact Walkthrough & Guides Wiki
Honkai: Star Rail Walkthrough & Guides Wiki
Umamusume: Pretty Derby Walkthrough & Guides Wiki
Pokemon Pokopia Walkthrough & Guides Wiki
Resident Evil Requiem (RE9) Walkthrough & Guides Wiki
Monster Hunter Wilds Walkthrough & Guides Wiki
Wuthering Waves Walkthrough & Guides Wiki
Arknights: Endfield Walkthrough & Guides Wiki
Pokemon FireRed and LeafGreen (FRLG) Walkthrough & Guides Wiki
Pokemon TCG Pocket (PTCGP) Strategies & Guides Wiki


Recommended Games
Diablo 4: Vessel of Hatred Walkthrough & Guides Wiki
Cyberpunk 2077: Ultimate Edition Walkthrough & Guides Wiki
Fire Emblem Heroes (FEH) Walkthrough & Guides Wiki
Yu-Gi-Oh! Master Duel Walkthrough & Guides Wiki
Super Smash Bros. Ultimate Walkthrough & Guides Wiki
Pokemon Brilliant Diamond and Shining Pearl (BDSP) Walkthrough & Guides Wiki
Elden Ring Shadow of the Erdtree Walkthrough & Guides Wiki
Monster Hunter World Walkthrough & Guides Wiki
The Legend of Zelda: Tears of the Kingdom Walkthrough & Guides Wiki
Persona 3 Reload Walkthrough & Guides Wiki


All rights reserved
©2024 Konami Digital Entertainment
The copyrights of videos of games used in our content and other intellectual property rights belong to the provider of the game.
The contents we provide on this site were created personally by members of the Game8 editorial department.
We refuse the right to reuse or repost content taken without our permission such as data or images to other sites.
the game is bugged. reload the quick save after being thrown by pyramid head works for me