SEED Floating Fortress Walkthrough and Story Guide
★ Follow along with our Story Walkthrough.
☆ Build your bonds by giving the best gifts for each character!
★ Learn how dishes are prepared in our Cooking Guide.
☆ Wield the strongest types of weapons in combat.
★ Earn SEED Points to develop and improve town.
☆ Capture Wanted Monsters to increase your SEED Rank!
This is a walkthrough and story guide for SEED Floating Fortress in Rune Factory 5 (RF5). Read on to learn more about how to reach and complete SEED Floating Fortress, important items to pick up, and strategies for defeating the Boss Monster!
| Previous | Next |
|---|---|
| Cloudheim | Calamity's Edge |
List of Contents
SEED Floating Fortress Map
| 1F | 2F | 3F |
|---|---|---|
 |
 |
 |
SEED Floating Fortress Complete Walkthrough
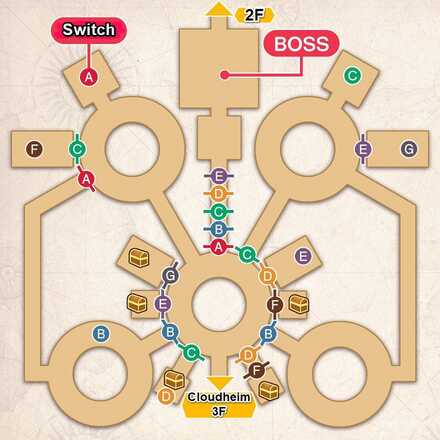
SEED Floating Fortress 1F
|
|
| 1 | Head to the open room next to the northwest circle and press switch A ★Please refer to the maps above for the switch and gate labels. To complete this dungeon, you will need to open specific switches and enter new paths. |
|---|---|
| 2 | Use the unblocked path on the west side, head to the southwest circle, and press switch B. |
| 3 | Return to the central area and use the newly opened east path to reach switch C on the northeast circle. |
| 4 | Go back to the central area and press switch D inside the southwest room. |
| 5 | Then, return to the central area, go inside the unlocked northeast door, and press switch E ★ The path to the boss room should now be cleared. |
| 6 | Check the small room west of the central area for a Mediseal. This is a useful spell that will remove Seal, a condition where you cannot use runes or spells. |
| 7 | Go back to the northwest circle and activate switch F inside the west room. |
| 8 | Move to the northeast circle and activate switch G inside the east room. |
| 9 | Grab the rest of the treasures at the central area ★ Obtain the recipe for Dry Curry in the east room. ★ Obtain the recipe for Sunfish Sashimiin the southeast room. ★ Obtain Golden Cabbage Seeds, Golden Potato Seeds, and Golden Pumpkin Seeds in the northwest room. |
| 10 | Run all the way north and defeat the Wood Golem |
| 11 | Move to 2F |
6. Obtain the Mediseal
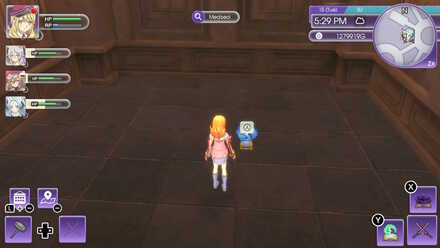
Don't forget to grab the Mediseal inside the small room west of the central area. You can cast it to remove the Seal status on your character or your party members.
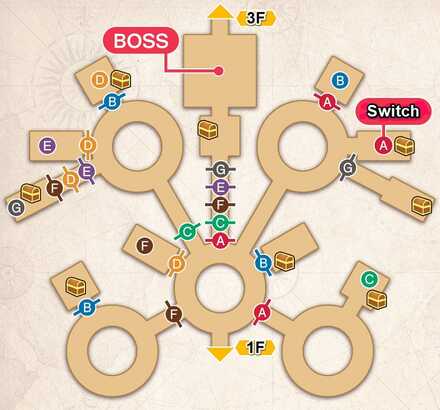
SEED Floating Fortress 2F
|
|
| 1 | Go to the northeast circle and activate switch A in the east room. |
|---|---|
| 2 | Go to the southeast circle and activate switch C. |
| 3 | Return to switch A at the northeast circle and deactivate it ★ In tihs floor, you'll have to turn switches on and off to fully explore this floor. Some switch will leave one door open and one door closed. |
| 4 | Press switch B in the next room |
| 5 | Go to the northwest circle and press switch D in the north room ★ Obtain the recipe for Pineapple Juice after clearing the room. |
| 6 | Return to the central area and press switch F in the northwest room |
| 7 | Return to switch B in the north room of the northeast circle and deactivate it |
| 8 | Obtain the recipe for Grilled Glitter Snapper inside the room on the southwest circle |
| 9 | Go back again to switch B in the north room of the northeast circle and press it again |
| 10 | Now, go to the northwest circle and press switch E in the west room |
| 11 | Deactivate switch D |
| 12 | On the same circle, enter the southwest room and press switch G |
| 13 | Return to switch A inside the east room of the northeast circle and press it again ★ Along the way, you can enter the northeast room of the central area for a chest with a Small Crystal. ★ The chest in the southeast room of the northeast circle contains 4 Greenifier+. |
| 14 | Follow the corridor north and defeat Aries |
| 15 | Move to 3F |
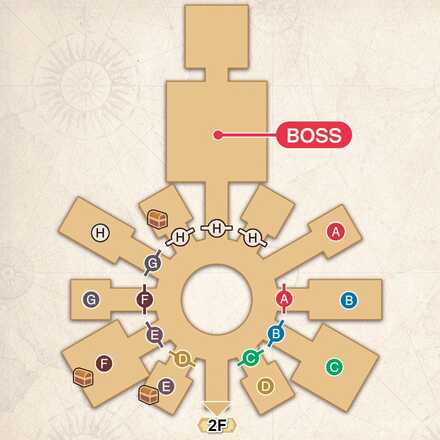
SEED Floating Fortress 3F
|
|
| 1 | Press switch A in the northeast room |
|---|---|
| 2 | From here, go around the central area clockwise or by going right while activating the switches in each room ★ Obtain the recipe for Gyoza in the room with switch E. ★ Obtain the recipe for Stew in the room with switch F. ★ Obtain the recipe for Anette's Necklace next to the room with switch H. |
| 3 | Head north and defeat Audumbla |
| 4 | Return to the captain's office after the cutscene |
How to Beat the Bosses in SEED Floating Fortress
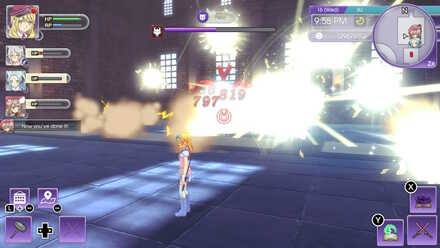
Wood Golem
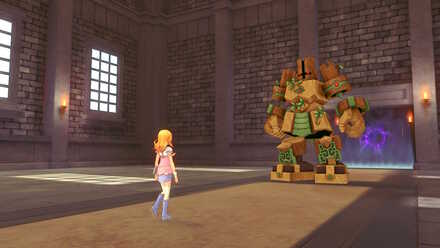 |
| Battle Tips |
|---|
| ・Has quick rushing attacks ・Watch out for the laser barrage |
Dodge Laser Barrage
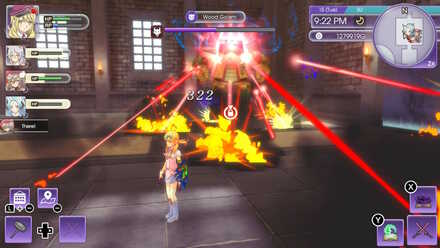
During the second phase, the Wood Golem will start using a laser barrage attack, which it telegraphs by levitating. This attack will hit a wide area around it continuously so be sure to have enough HP during this phase in case it catches you off guard.
Aries
 |
| Battle Tips |
|---|
| ・Scatters paralyzing clouds ・Stay away from its sleep breath |
Avoid Paralyzing Clouds
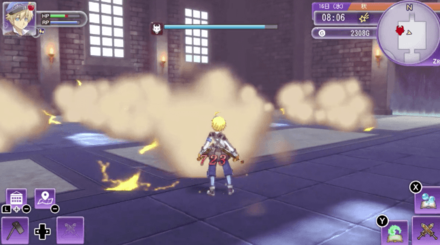
Aries can scatter clouds around the room that deal damage and can inflict Paralysis on contact. Pay attention to your surrounding while running around the room or when dodging.
Dodge Sleep Breath
Its most dangerous attack is its sleep breath, which has a high chance of inflicting Sleep while also dealing damage. If this attack manages to put you to sleep, you will be defenseless and will continuously receive damage from the breath attack.
If you have a hard time dodging it, try consuming food with Slp Res to reduce the chances of receiving the Sleep status from this attack.
Food With Sip Res
| Food | Sleep Resist % | Ingredients |
|---|---|---|
| Cheese Bread | 50% | Flour, Cheese, Egg, Milk |
| Dumplings | 70% | Dumpling Powder |
| Chocolate Sponge Cake | 100% | Flour, Chocolate, Egg, Milk |
Audumbla
 |
| Battle Tips |
|---|
| ・Has quick attacks ・Light orb will ricochet on ice pillars |
Light Orb Bounces on Ice Pillars
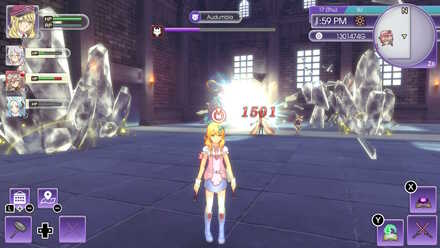
During the second phase, Audumbla will create ice pillars around the room. These ice pillars will deal damage if they spike up on your character.
After the pillars are placed, Audumbla's next move will usually be to launch a light orb that will ricochet on the ice pillars. Take note of their positions to know the trajectory of the light orb.
Rune Factory 5 Related Guides

All Walkthrough Guides
Author

SEED Floating Fortress Walkthrough and Story Guide
Rankings
- We could not find the message board you were looking for.
Gaming News


![Nova Roma Review [Early Access] | Newer, Better, and More Confusing](https://img.game8.co/4455512/2cbf8926e9a1c72a3ff056088f801ef4.png/thumb)
Popular Games

Genshin Impact Walkthrough & Guides Wiki
Umamusume: Pretty Derby Walkthrough & Guides Wiki
Crimson Desert Walkthrough & Guides Wiki
Monster Hunter Stories 3: Twisted Reflection Walkthrough & Guides Wiki
Honkai: Star Rail Walkthrough & Guides Wiki
Pokemon Pokopia Walkthrough & Guides Wiki
The Seven Deadly Sins: Origin Walkthrough & Guides Wiki
Wuthering Waves Walkthrough & Guides Wiki
Zenless Zone Zero Walkthrough & Guides Wiki
Arknights: Endfield Walkthrough & Guides Wiki


Recommended Games
Fire Emblem Heroes (FEH) Walkthrough & Guides Wiki
Diablo 4: Vessel of Hatred Walkthrough & Guides Wiki
Cyberpunk 2077: Ultimate Edition Walkthrough & Guides Wiki
Yu-Gi-Oh! Master Duel Walkthrough & Guides Wiki
Super Smash Bros. Ultimate Walkthrough & Guides Wiki
Pokemon Brilliant Diamond and Shining Pearl (BDSP) Walkthrough & Guides Wiki
Elden Ring Shadow of the Erdtree Walkthrough & Guides Wiki
Monster Hunter World Walkthrough & Guides Wiki
The Legend of Zelda: Tears of the Kingdom Walkthrough & Guides Wiki
Persona 3 Reload Walkthrough & Guides Wiki


All rights reserved
©2022 Marvelous Inc. All Rights Reserved. Licensed to and published by XSEED Games / Marvelous USA, Inc.
The copyrights of videos of games used in our content and other intellectual property rights belong to the provider of the game.
The contents we provide on this site were created personally by members of the Game8 editorial department.
We refuse the right to reuse or repost content taken without our permission such as data or images to other sites.
ty so much. wouldve been impossible to ever clear this quest without this post.