This survey will take about 1 minute.
Your answers will help us to improve our website.
Metroid Prime 4: Beyond
Great Mines 100% Exploration Guide
★ Story Walkthrough | Upgrades and Abilities
☆ Characters | Bosses | Puzzles
★ Viewros Map: Energy Tank | Missile Expansion | Shot Expansion
★ Game Details: amiibo Unlocks | How Long to Beat | Switch Edition Differences

This is an exploration guide to Great Mines in Metroid Prime 4: Beyond. See the different details on Great Mines, collectibles, and unlockables you can find in this area!
| Great Mines Guides | |
|---|---|
| Walkthrough | Exploration Map |
List of Contents
Great Mines Interactive Map
| ・Click on the arrow in the upper left corner to access our sidebar to check all other pins and even search for individual pins. ・Pins checked off the map will reflect in the list below. ・For map pin suggestions, please list down as much information as you can including reward data or complex acquisition methods. ・For images, uploading a full rectangular screenshot with a resolution of at least 728 x 410 pixels will be highly appreciated. ・Do not forget to mention which Map Layer you are suggesting a pin for. We encourage users to sign up and log in to save your progress with the map. |
Great Mines Collectibles
Energy Tanks
| Jump to a section! | |
|---|---|
| Energy Tanks | Missile Expansions |
| Shot Expansions | Scout Bots |
| Logbook Scans | - |
| ✔️ | Overworld View | Map Location |
|---|---|---|
 |
 |
|
|
Energy Tank 1
Area: Level 3 - Chasm Required Upgrade: Psychic Power Bomb How to Get: Go to the 3rd floor via the Pit area in the 2nd floor. Use Psychic Power Bombs to break the walls then use Psychic Boost Ball together with the control stick to get momentum to reach the tether. Then use bomb jump using your Psychic Bombs and Morph Ball with the right timing to get the extra height needed for the upgrade. |
||
 |
 |
|
|
Energy Tank 2
Area: Main Shaft - Level 2 Required Upgrade: Psychic Boost Ball How to Get: Use the Psychic Boost Ball on the Spinner to reveal a bridge, then scan the Psychic motes and use the Psychic Boots to jump across the platforms and obtain the upgrade. |
||
Missile Expansions
| Jump to a section! | |
|---|---|
| Energy Tanks | Missile Expansions |
| Shot Expansions | Scout Bots |
| Logbook Scans | - |
| ✔️ | Overworld View | Map Location |
|---|---|---|
 |
 |
|
|
Missile Expansion 1
Area: Level 2 - Narrow Crevice Required Upgrade: Psychic Grapple How to Get: Use the Psychic Grapple to grapple across Crystal Crawlers along a chasm. Find this upgrade on the opposite side. |
||
 |
 |
|
|
Missile Expansion 2
Area: Level 2 - Blast Mining Required Upgrade: Super Missile How to Get: Use the Super Missile to destroy the ore wall, revealing the upgrade. |
||
 |
 |
|
|
Missile Expansion 3
Area: Level 2 - Easing Tunnel Required Upgrade: Psychic Power Bomb How to Get: Use the Psychic Power Bomb on the Bomb Slot in the wall to make a cart appear. Shoot the ore in the cart with a Super Missile to reveal the upgrade. |
||
 |
 |
|
|
Missile Expansion 4
Area: Level 2 - Transit Tunnel B Required Upgrade: Super Missile How to Get: Shoot the chest with the four red circles using a Super Missile to reveal the upgrade. |
||
 |
 |
|
|
Missile Expansion 5
Area: Level 1 - Transit Tunnel A Required Upgrade: Super Missile How to Get: Shoot the door with four red circles with a Super Missile. Find the upgrade in the room on the other side. |
||
 |
 |
|
|
Missile Expansion 6
Area: Level 1 - Main Shaft Required Upgrade: Psychic Spider Ball How to Get: From the start, go clockwise around the tower, then follow the course of Magnetic Tracks around to the back. At the end, time your Morph Bombs well to reach the top and find the upgrade. |
||
 |
 |
|
|
Missile Expansion 7
Area: Level 3 - Transit Tunnel E Required Upgrade: Psychic Spider Ball How to Get: Get onto the Ore Loading Machinery and use Morph Ball to roll to the end of the machine |
||
Shot Expansions
| Jump to a section! | |
|---|---|
| Energy Tanks | Missile Expansions |
| Shot Expansions | Scout Bots |
| Logbook Scans | - |
| ✔️ | Overworld View | Map Location |
|---|---|---|
 |
 |
|
|
Shot Expansion 1
Area: Level 1 - Command Center Required Upgrade: Psychic Lasso How to Get: On the ceiling, find a latch you can open by scanning it, then using the Psychic Lasso. The upgrade is inside. |
||
 |
 |
|
|
Shot Expansion 2
Area: Level 2 - Main Shaft Required Upgrade: Psychic Spider Ball How to Get: Scan the Psychic aura to make a Psychic Boost Rail appear. Ride the rail to get the upgrade. |
||
 |
 |
|
|
Shot Expansion 3
Area: Level 2 - Crystal Crevice Required Upgrade: Psychic Grapple How to Get: Instead of grappling across the gap on the Crystal Crawlers, look behind you on the wall of the entrance to see a Crystal Crawler. Grapple up then jump across the tops of the rock to find the Shot Expansion on the farthest rock. |
||
 |
 |
|
|
Shot Expansion 4
Area: Level 3 - Main Shaft Required Upgrade: Psychic Spider Ball How to Get: On the side of the building, find the blue switch with a Magnetic Track next to it. Shoot the switch to activate the Magnetic Track, then go up the track with the Psychic Spider Ball. On top of the building, use the Control Beam to reach down to hit the switch again and reactivate the Magnetic Track, and ride it to the top to reach the upgrade. |
||
 |
 |
|
|
Shot Expansion 5
Area: Level 2 - Quarry Required Upgrade: Super Missile How to Get: Use a Super Missile on the door with red circles to reveal a Morph Ball track. In the track, use Morph Bombs on the panels to rotate sections of the track. Rotate the panels to create a path to reach the upgrade. |
||
 |
 |
|
|
Large Shot Expansion 1
Area: Level 1 - Garnbocask Site B Required Upgrade: Psychic Power Bomb How to Get: Use a Psychic Power Bomb to destroy the ore wall. Find the upgrade in the room on the other side. |
||
Scout Bots
| Jump to a section! | |
|---|---|
| Energy Tanks | Missile Expansions |
| Shot Expansions | Scout Bots |
| Logbook Scans | - |
| ✔️ | Overworld View | Map Location |
|---|---|---|
 |
 |
|
|
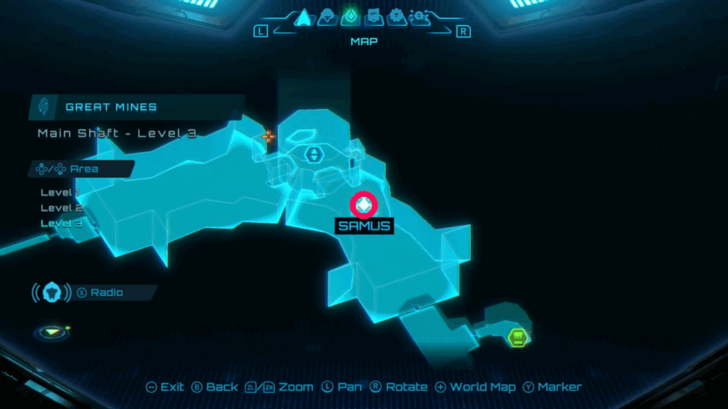
Scout Bot
Area: Main Shaft - Level 3 Required Upgrade: Thunder Shot How to Get: On the bottom floor, on the ground outside next to the room with the elevator shaft. |
||
Logbook Scans
| Jump to a section! | |
|---|---|
| Energy Tanks | Missile Expansions |
| Shot Expansions | Scout Bots |
| Logbook Scans | - |
| ✔️ | Overworld Scan | Map Location |
|---|---|---|
 |
 |
|
|
Entry: Maul Griever
Category: Biology Subcategory: Viewros Area: Level 1 - Drilling Site How to Get: Maul Grievers can be found in the Level 1, Drilling Site section of the Great Mines. They are relatively large and can be easily tracked by Samus when scanning. |
||
 |
 |
|
|
Entry: Metareeta
Category: Biology Subcategory: Viewros Area: Level 1 - Natural Cavern A How to Get: Metareetas can be found on Level 1, Natural Cavern A in the Great Mines and can be scanned unaware first before they start combat. |
||
 |
 |
|
|
Entry: Pop Crawler
Category: Biology Subcategory: Viewros Area: Level 1 - Garnbocask Site A How to Get: Pop Crawlers can be found in Level 1, Garnbocask Site A of Great Mines. They can be safely scanned from range. |
||
 |
 |
|
|
Entry: Snare Weed
Category: Biology Subcategory: Viewros Area: Level 1 - Garnbocask Site B How to Get: Snare Weed can be found in Level 1, Garnbocask Site B of Great Mines. Safely scanned before approaching them. |
||
 |
 |
|
|
Entry: Cave Shren
Category: Biology Subcategory: Viewros Area: Lower Grotto How to Get: Cave Shrens can be scanned in the Lower Grotto section of the Great Mines. Scanning them on first approach before they attack is the easiest way to get their logbook data. |
||
 |
 |
|
|
Entry: Cave Roach
Category: Biology Subcategory: Viewros Area: Level 2 - Narrow Crevice How to Get: Pop Crawlers can be found in Level 2, Narrow Crevice of Great Mines and can be scanned there in groups. |
||
 |
 |
|
|
Entry: Crystal Crawler
Category: Biology Subcategory: Viewros Area: Level 2 - Narrow Crevice How to Get: Crystal Crawlers can be found in Level 2, Narrow Crevice of Great Mines and can be scanned on the walls. |
||
 |
 |
|
|
Entry: Maul Griever Brute
Category: Biology Subcategory: Viewros Area: Level 2 - Quarry How to Get: Maul Griever Brutes are upgraded versions of the Maul Griever and can be found in Level 2, Quarry of Great Mines. Like their counterpart, they are large enough to scan without issues. |
||
 |
 |
|
|
Entry: Winged Lizard
Category: Biology Subcategory: Viewros Area: Level 3 - Main Shaft How to Get: Winged Lizards can be found in Level 3, Main Shaft of Great Mines. Look to the sky to properly scan them as they are relatively far away from you. |
||
 |
 |
|
|
Entry: Goura Ghaspore
Category: Biology Subcategory: Viewros Area: Level 3 - Ghaspore Habitat B How to Get: Goura Ghaspores can be found in Level 3, Ghaspore Habitat B of Great Mines. Look to the sky to properly scan them as they are relatively away from you. |
||
 |
 |
|
|
Entry: Omega Griever
Category: Biology Subcategory: Viewros Area: Level 3 - Crystal Extraction How to Get: Omega Griever is the boss of Great Mines, located at Level 3, Crystal Extraction and can be scanned mid-combat. |
||
 |
 |
|
|
Entry: Spin Dartwing
Category: Biology Subcategory: Viewros Area: Level 1 - Transit Tunnel A How to Get: Spin Dartwings can be scanned at the Transit Tunnel A in Great Mines. They immediately fly and attack as soon as they spot you, so make sure to use your Psychic Visor before entering the room. |
||
Where to Find Great Mines
Northeast of Chrono Tower

Great Mines can be found at the top right part of the map, northeast of Chrono Tower.
Viewros (Sol Valley) Interactive Map
Metroid Prime 4: Beyond Related Guides
Viewros (Sol Valley) Interactive Map
List of All Areas and Biomes
| UTO Research Center | Fury Green | Volt Forge |
| Ice Belt | Flare Pool | Great Mines |
| Chrono Tower | - | - |
List of All Collectibles
| Logbook Scans | Missile Expansions | Shot Expansions |
| Energy Tanks | Mech Parts | Scout Bots |
| Psychic Power Bomb Expansions | Boost Tanks | - |
Comment
Author

Great Mines 100% Exploration Guide
Please participate in our site
improvement survey
03/2026
improvement survey
03/2026
Would you assist in
improving Game8's site?
improving Game8's site?

×
We are listening to our users' valuable opinions and discussing how to act on them.
The information collected through this survey will be used for the purpose of improving our services. In addition, the information will only be disclosed a part of a statistic in a format that will not allow identification of personal information.
Begin Survey
Not Now
×
Please rate each item regarding Game8.co's Advertisements.
Amount of Ads
Very Dissatisfied
Somewhat Dissatisfied
Fine
Somewhat Satisfied
Highly Satisfied
Placement of Ads
Timing of Ad Display
Ad Loading Speed
Safeness of Ads
Content of Ads
×
Please rate each item regarding Game8.co's Quality of Articles.
Amount of information
Very Dissatisfied
Somewhat Dissatisfied
Fine
Somewhat Satisfied
Highly Satisfied
Frequency of updates
Speed of new information
Accuracy of articles
Understandibility of articles
Readability of sentences
×
Please rate each item regarding Game8.co's Usability of the Site.
Ease of finding information
Very Dissatisfied
Somewhat Dissatisfied
Fine
Somewhat Satisfied
Highly Satisfied
Loading Speed
Use of Color
Font Size
Visibility of Images
Easy to Understand Layout
×
Please rate each item regarding Game8.co's Message Boards, Comments.
Ease of Writing
Very Dissatisfied
Somewhat Dissatisfied
Fine
Somewhat Satisfied
Highly Satisfied
Readability
Ease in Finding Information
Comment Quality
Comment Quantity
Admin Response
×
Please rate each item regarding Game8.co's Site's new design.
Please rate our site's new design
Very Dissatisfied
Somewhat Dissatisfied
Fine
Somewhat Satisfied
Highly Satisfied
Do you think that the website's design change makes the site easier to use?
Has the new design made it easier for you to find information on the site?
Has the new design improved the overall visual appeal of the site?
How would you rate your overall satisfaction with the new design of the site?
×
How likely are you to recommend Game8 to someone you know?
Very Unlikely
0
1
2
3
4
5
6
7
8
9
10
Very Likely
If you have other opinions regarding potential improvement to the website, please share them with us. We would appreciate your honest opinion.
Note: This is a free response section, so you can proceed without entering anything.
Note: Please be sure not to enter any kind of personal information into your response.
Note: Please be sure not to enter any kind of personal information into your response.
×
Thank You
×
Thank you for participating in our survey! Your answers will help us to improve the quality of our website and services.
We hope you continue to make use of Game8.
We hope you continue to make use of Game8.
Close
Rankings
- We could not find the message board you were looking for.
Gaming News


![Monster Hunter Stories 3 Review [First Impressions] | Simply Rejuvenating](https://img.game8.co/4438641/2a31b7702bd70e78ec8efd24661dacda.jpeg/thumb)
Popular Games

Genshin Impact Walkthrough & Guides Wiki
Honkai: Star Rail Walkthrough & Guides Wiki
Umamusume: Pretty Derby Walkthrough & Guides Wiki
Pokemon Pokopia Walkthrough & Guides Wiki
Resident Evil Requiem (RE9) Walkthrough & Guides Wiki
Monster Hunter Wilds Walkthrough & Guides Wiki
Wuthering Waves Walkthrough & Guides Wiki
Arknights: Endfield Walkthrough & Guides Wiki
Pokemon FireRed and LeafGreen (FRLG) Walkthrough & Guides Wiki
Pokemon TCG Pocket (PTCGP) Strategies & Guides Wiki


Recommended Games
Diablo 4: Vessel of Hatred Walkthrough & Guides Wiki
Cyberpunk 2077: Ultimate Edition Walkthrough & Guides Wiki
Fire Emblem Heroes (FEH) Walkthrough & Guides Wiki
Yu-Gi-Oh! Master Duel Walkthrough & Guides Wiki
Super Smash Bros. Ultimate Walkthrough & Guides Wiki
Pokemon Brilliant Diamond and Shining Pearl (BDSP) Walkthrough & Guides Wiki
Elden Ring Shadow of the Erdtree Walkthrough & Guides Wiki
Monster Hunter World Walkthrough & Guides Wiki
The Legend of Zelda: Tears of the Kingdom Walkthrough & Guides Wiki
Persona 3 Reload Walkthrough & Guides Wiki


All rights reserved
© Nintendo. Metroid and Nintendo Switch are trademarks of Nintendo.
The copyrights of videos of games used in our content and other intellectual property rights belong to the provider of the game.
The contents we provide on this site were created personally by members of the Game8 editorial department.
We refuse the right to reuse or repost content taken without our permission such as data or images to other sites.