Chrono Tower Walkthrough and Guide
★ Story Walkthrough | Upgrades and Abilities
☆ Characters | Bosses | Puzzles
★ Viewros Map: Energy Tank | Missile Expansion | Shot Expansion
★ Game Details: amiibo Unlocks | How Long to Beat | Switch Edition Differences

This is a guide for the Chrono Tower area in Metroid Prime 4: Beyond. Check out how to progress through Chrono Tower, as well as guides for any bosses, upgrades, abilities, rewards and puzzles in the area here.
| Chrono Tower Guides | |
|---|---|
| Walkthrough | Exploration Map |
List of Contents
| ◀ Previous Area | Next Area ▶︎ |
|---|---|
| Great Mines | - |
Chrono Tower Interactive Map
| ・This map shows the interior of Chrono Tower, which you access after collecting all Mech Parts. Note that the Mech Parts are scattered around the map of Sol Valley. |
Chrono Tower Main Walkthrough
| Note: If you are aiming for a 100% completion, visit our All Missables and Points of No Return page. For a 100% completion guide of this area, visit the Chrono Tower 100% Exploration Guide. |
| Chrono Tower Main Objectives | |
|---|---|
| 1 | Find Reger Tokabi in Sol Valley |
| 2 | Visit Base Camp in Fury Green |
| 3 | Look for the Five Mech Parts in Sol Valley ┗ Boss Battle: Varmis |
| 4 | Get the Sixth Mech Part in Flare Pool ┗ Boss Battle: Behemoth |
| 5 | Save Your Progress |
| 6 | Proceed to Chrono Tower ┗ Boss Battle: Sylux |
Find Reger Tokabi in Sol Valley
| Objectives | |
|---|---|
| 1 | 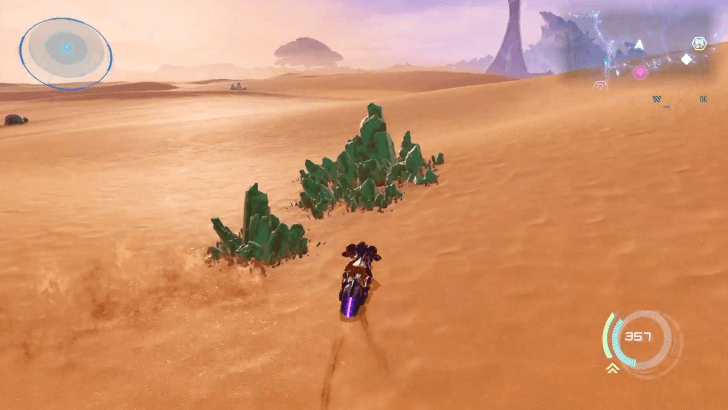 After leaving the Great Mines, MacKenzie will provide you with some ideas on your next objectives. Open your map and MacKenzie will tell you to find Reger Tokabi in Sol Valley. It is recommended to collect Green Crystals as you progress from here onwards. ▶︎ Viewros (Sol Valley) Interactive Map |
| 2 | 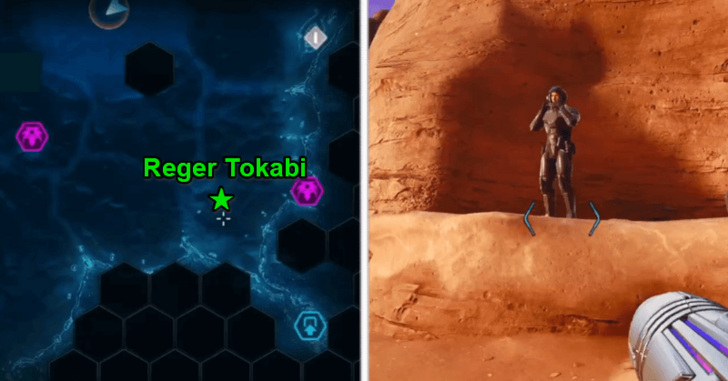 Reger Tokabi's camp is located near the entrance of Flare Pool and the southern G.F. Debris. Toggle Vi-O-La to travel to the camp. You can tell if Tokabi is nearby if his harmonica is audible. ▶︎ Where to Find Tokabi: How to Get Teleporter Chip |
| 3 | 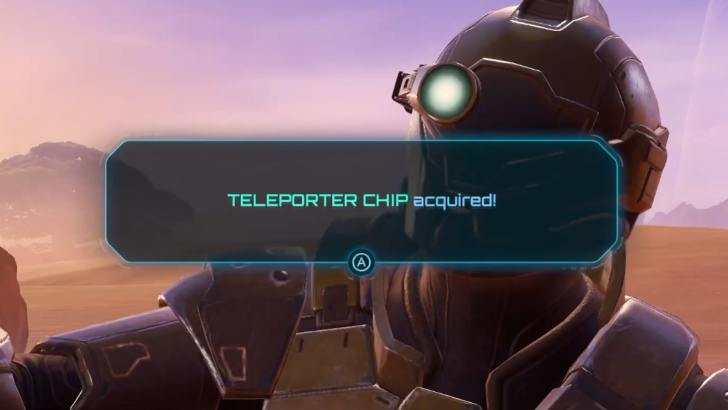 After the cutscene with Reger Tokabi, you will acquire a Teleporter Chip. Deliver this to Base Camp in Fury Green to have MacKenzie examine it. |
Visit Base Camp in Fury Green
| Objectives | |
|---|---|
| 1 | 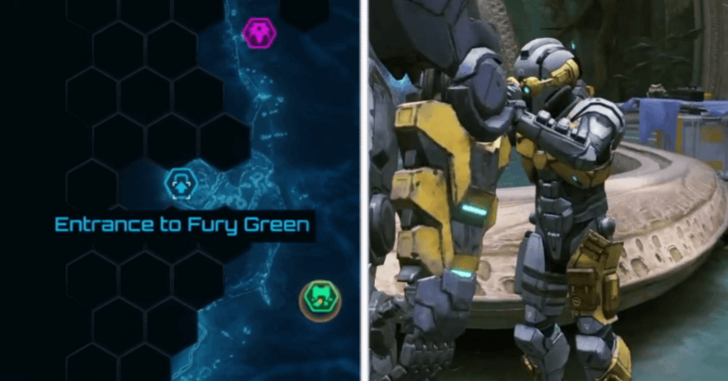 Riding Vi-O-La, head to the Fury Green Cargo Launcher to the west side of Sol Valley. Visit Base Camp to talk to MacKenzie about the Teleporter Chip. ▶︎ Fury Green 100% Exploration Guide |
| 2 |  MacKenzie will modify the Teleporter Chip into Teleporter Patches. With this, you will be able to collect the six Mech Parts scattered around Sol Valley, which you will need to disable the force field around Chrono Tower. |
Look for the Five Mech Parts in Sol Valley
| Objectives | |
|---|---|
| 1 | 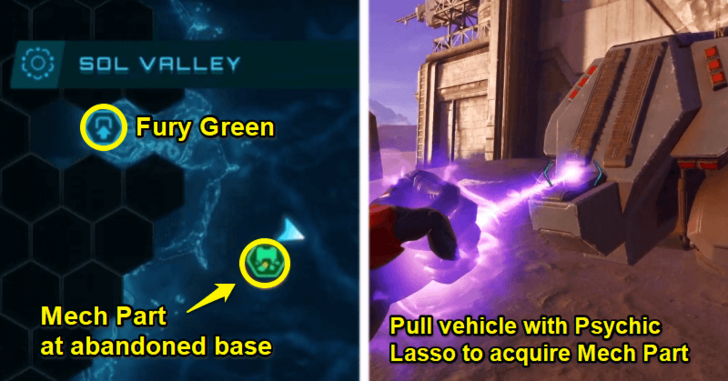 The first Mech Part is located southeast of Fury Green, in the western area of Sol Valley. Go around the abandoned base to find a vehicle crashed against the wall. Pull it with the Psychic Lasso and attach a Teleporter Patch to send it to Base Camp. ┣ How to Use the Psychic Lasso ┗ Where to Find All Mech Parts ▶︎ Psychic Lasso How to Unlock and Effects ▶︎ All Mech Part Locations |
| 2 | 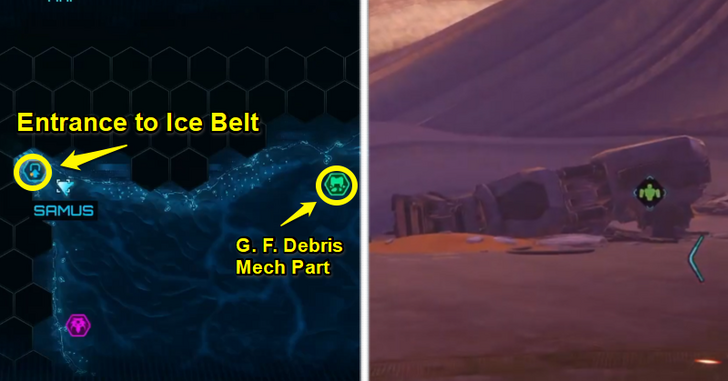 At the entrance of Ice Belt, cross the room past the elevator and use Psychic Grapple to reach the other end of the hallway. You will pass by two more doors to reach another area outside. Attach the Teleporter Patch to the Mech Part in front of the area to send it to Base Camp. ┗ How to Use the Psychic Grapple ▶︎ Psychic Grapple How to Unlock and Effects |
| 3 | 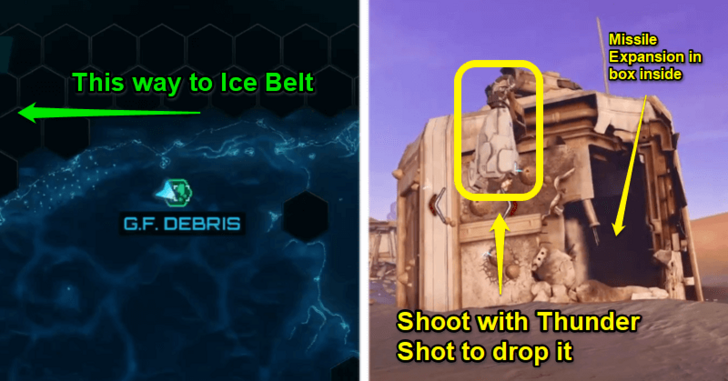 Head to the northernmost part of Sol Valley to find another G. F. Debris. The Mech Part is hanging from the debris. Shoot it with Thunder Shot to drop it on the ground. Attach a Teleporter Patch to send it to Base Camp. ┗ How to Use the Thunder Shot ▶︎ Thunder Shot Effects: Where to Use Thunder Chip |
| 4 | 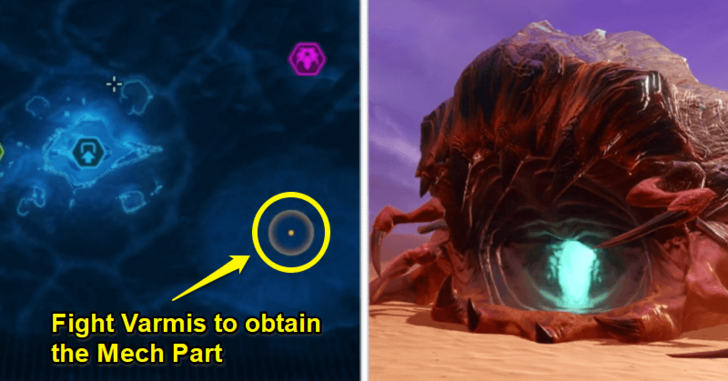 Head east of Sol Valley, where MacKenzie will point out the nearby Federation Wreckage. Approach the wreckage site to find the Transfer Pod, which will be swallowed by Varmis. Defeat Varmis by shooting and ramming its tail tip with Vi-O-La. After defeating Varmis, enter its mouth by toggling Morph Ball with the Y button. Roll inside then plant a Psychic Bomb to blow up Varmis from within. With the Mech Part expelled, attach the Teleporter Patch. ┗ How to Plant a Psychic Bomb ▶︎ How to Beat Varmis ▶︎ Psychic Bomb How to Unlock and Effects |
| 5 | 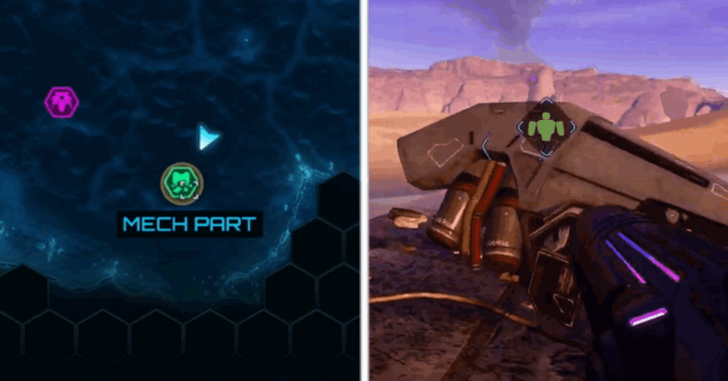 Go down south of Sol Valley, particularly southwest of Tokabi's camp. Another G.F. Debris can be spotted here. Eliminate the enemies within the vicinity, then jump on top of the debris to find the Mech Part. |
How to Use the Psychic Lasso
Press the ZL button and aim at your desired target with the right joystick. Then, press the left joystick to begin pulling the target.
Psychic Lasso How to Unlock and Effects
Where to Find All Mech Parts
After receiving the Teleporter Patches from Mackenzie, you can find all six mech parts you need to progress the story, scattered throughout the desert in Sol Valley.
How to Use the Psychic Grapple
Aim at a grapple prompt, then press and hold the ZL button to grapple away to the other side of the room.
List of All Upgrades and Psychic Abilities
How to Use the Thunder Shot
Equip the Thunder Shot subweapon by pressing the left directional button, then fire a shot with the R trigger.
Thunder Shot Effects: Where to Use Thunder Chip
How to Plant a Psychic Bomb
To plant a Psychic Bomb, plant a regular bomb in Morph Ball mode. Press the Y button to toggle Morph Ball mode, then plant a bomb with B or ZR.
Psychic Bomb How to Unlock and Effects
Get the Sixth Mech Part in Flare Pool
| Objectives | |
|---|---|
| 1 |  Travel to Flare Pool and pass through the entrance until you reach the Lava Lake Bridge. Drive along the side of the bridge and stop at the bridge's underside, where there is Koornicite Ore. Destroy the ore with a Super Missile to reveal a gate, then drive inside. ┗ How to Shoot Super Missiles ▶︎ Flare Pool 100% Exploration Guide ▶︎ Super Missile How to Unlock and Effects ▶︎ Flare Pool Revisit |
| 2 | 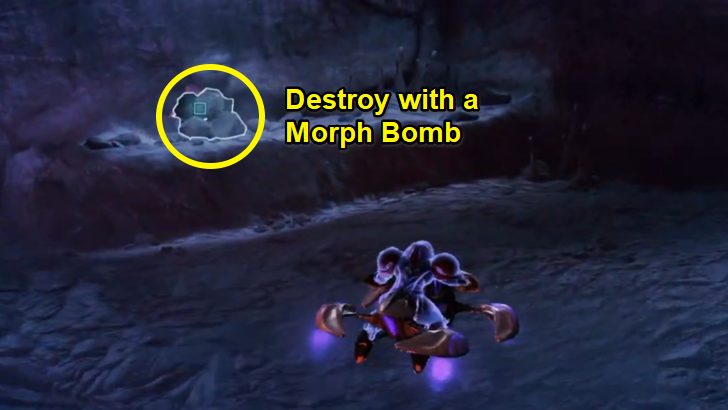 Inside the Lava Works, the next gate will not open. Dismount Vi-O-La on the ground and toggle Morph Ball to bomb the pile of rocks. You can also shoot the rocks with a charged beam. Roll into the passage and navigate your way inside by avoiding the lava and using Psychic Spider Ball on Tether Nodes. ┗ How to Hang from Tether Nodes ▶︎ Psychic Spider Ball How to Unlock and Effects |
| 3 | 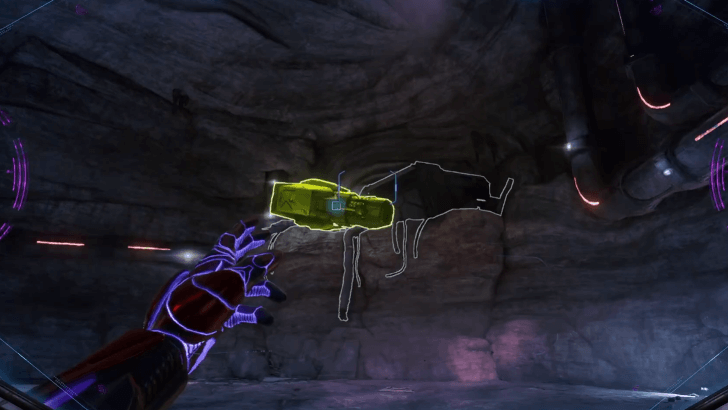 Out of the passage, shoot the door to enter an arena-like area. Scan the large Mech Part in front of you. Shortly after, a cutscene will play, revealing the mini-boss Behemoth. |
| 4 |  To obtain the Mech Part, first defeat Behemoth. Note that its weakness is its eyes. After beating it, the Mech Part will fall into the arena, allowing you to attach a Teleporter Patch and send it back to Base Camp. ▶︎ How to Beat Behemoth |
| 5 | 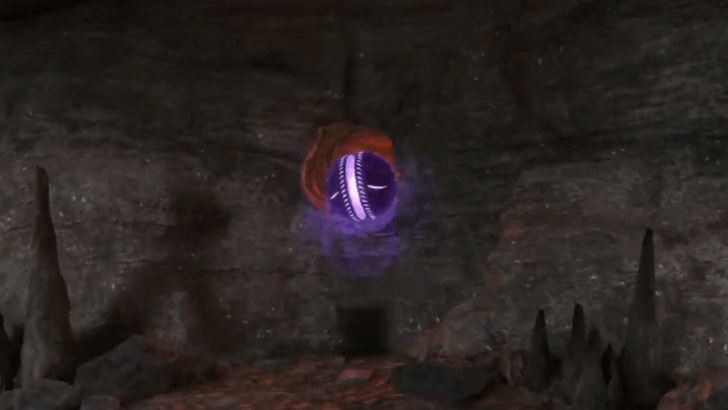 With all Mech Parts collected, leave Flare Pool to return to Fury Green. To leave Behemoth's arena, leave the way you came via the narrow passage. Toggle Morph Ball to hop back into the hole and make your way back. |
How to Shoot Super Missiles
Switch to the Missile subweapon by pressing the right directional button. Afterwards, aim at your target by charging up your Missile through the R Button to become a Super Missile, then release this for a powerful blast.
Super Missile How to Unlock and Effects
How to Hang from Tether Nodes
Switch to Morph Ball by pressing the Y button, then roll toward a Tether Node. Press the ZL trigger to generate a psychic rope to tether yourself to the node. Release the trigger to launch yourself to your desired direction.
Psychic Spider Ball How to Unlock and Effects
Save Your Progress
| Objectives | |
|---|---|
| 1 | 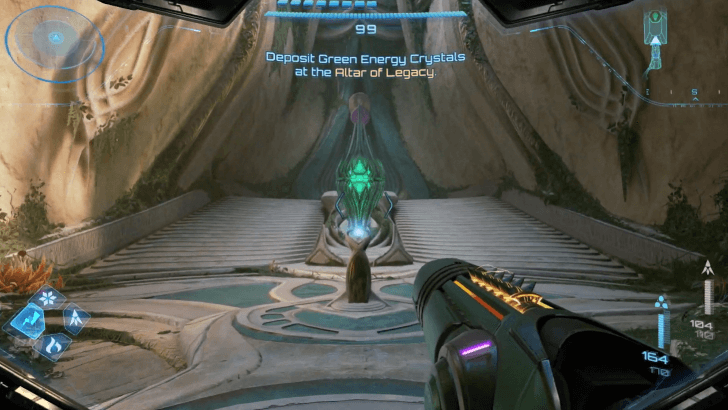 Go back to the Altar of Legacy in Fury Green and deposit the Green Crystals that you have collected on your journey. The Altar of Legacy will require you to farm Green Energy Crystals at least 100% to obtain the last suit in the game, the Legacy Suit, and the Memory Fruit, which you will need to get to Chrono Tower. ┗ How to Activate Legacy Suit Barrier ▶︎ How to Farm Green Crystals and Rewards ▶︎ Legacy Suit How to Unlock and Effects |
| 2 | 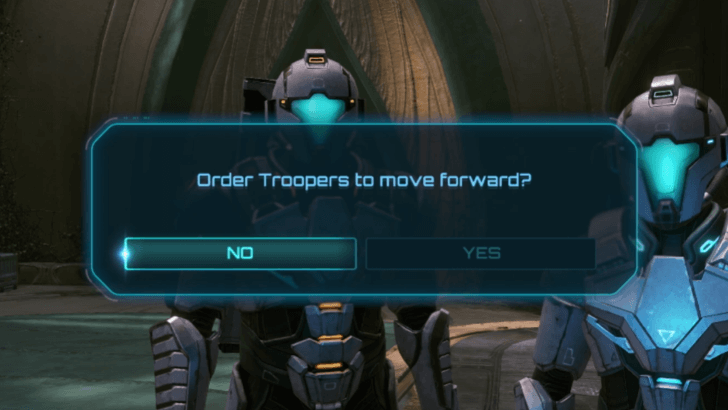 Return to Base Camp, where a cutscene will unfold. Take note that ordering the troopers forward is a point of no return. Save your progress first in the next room. This will be a good opportunity to go back on missed items, abilities, and collectibles. ▶︎ All Missables and Point of No Return |
How to Activate Legacy Suit Barrier
To activate the Legacy Suit's protective barriers, switch to the Psychic Visor, then press and hold the R Button to generate the barriers. This will consume 35 Missile Ammo.
Proceed to Chrono Tower
| Objectives | |
|---|---|
| 1 | 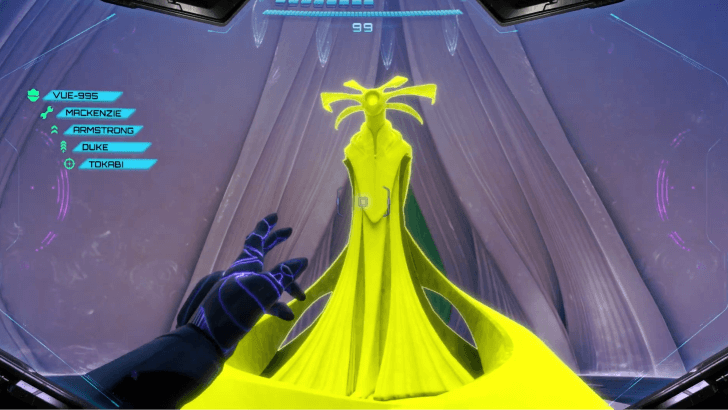 Keep going further into the tower until you find a Lamorn Statue at the end. Scan this and let the cutscene play. |
| 2 |  Move to the next room with a spherical structure in the middle. Use your Psychic Visor on the floating chip on top of it. Insert this chip into the sphere to reveal an elevator. Ride the elevator to reach the top of the tower. |
| 3 | 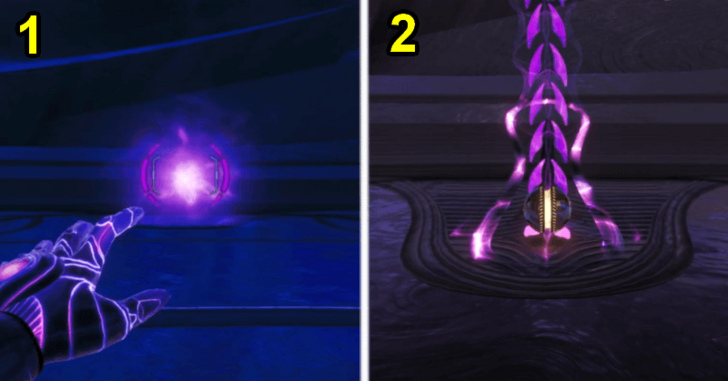 Once you reach the top of the tower, there will be a glowing mist to the side. Summon a Psychic Ball Track by toggling Psychic Visor. Roll along the path in Morph Ball mode to reach a chamber with Psychic Healing Pods. |
| 4 | 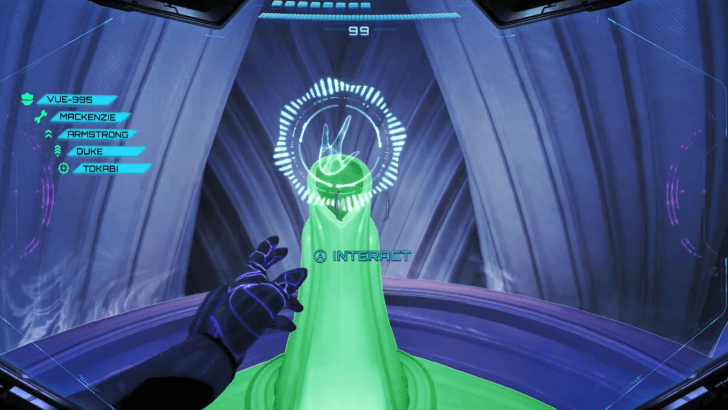 In the chamber with Psychic Healing Pods, you will see a central structure with a terminal to scan. Interact with it to activate the Master Teleporter. |
| 5 | 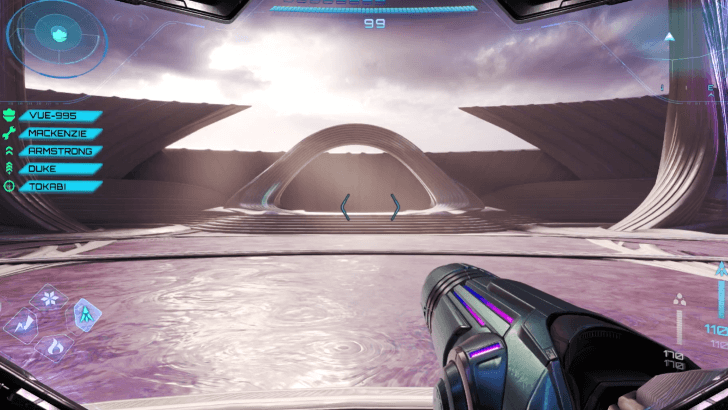 After reuniting with your companions, present the Master Teleportation Keys by approaching the Master Teleporter. Another cutscene will unfold from here. |
| 6 | 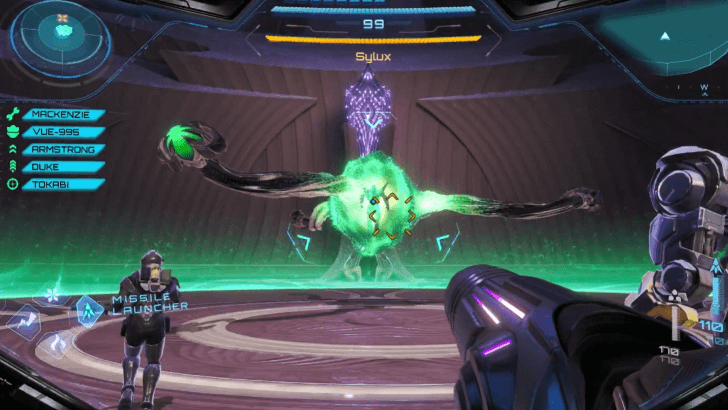 Sylux will be the final boss fight in the game. The battle has three phases, with the last two phases being a showdown between you and Sylux in a wormhole and on an isolated stage. For the first phase of the battle, you will be accompanied by: ・ VUE-995 ・ Mackenzie ・ Armstrong ・ Duke ・ Tokabi ▶︎ How to Beat Sylux (Final Boss) |
| 7 | 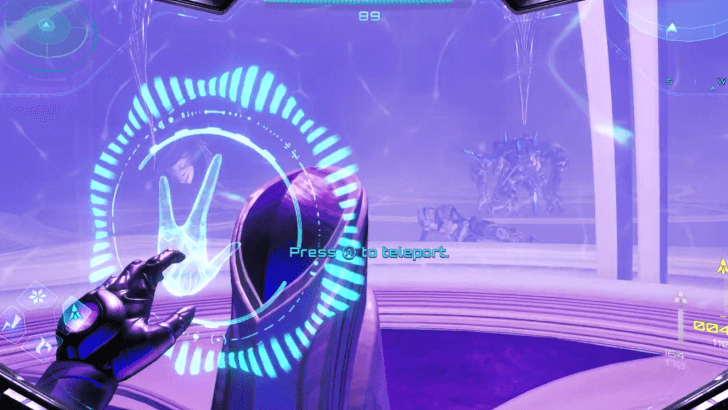 Once given the prompt, activate the telporter. Watch the cutscene until the credits, and a secret cutscene at the end of it. |
All Chrono Tower Bosses
Varmis Boss Fight
| Boss Overview | |
|---|---|
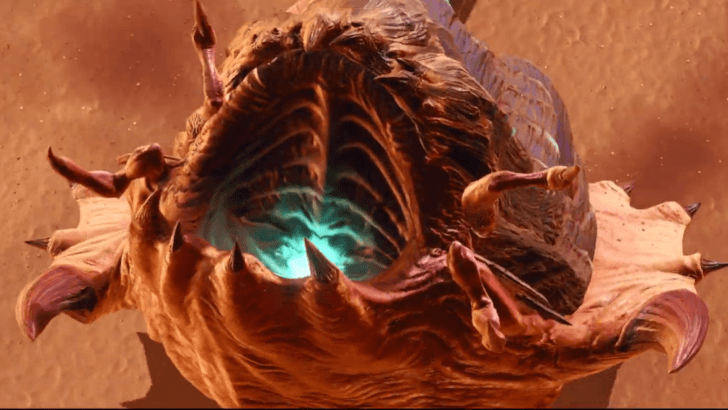
| |
| Map | Viewros |
| Area | Sol Valley |
| Required Upgrade | None |
| Weak Point | |
| ・Tail Tip | |
How to Beat Varmis: Quick Boss Tips
- Shoot and ram at Varmis' tail tip.
- Get away from Varmis once it charges forward.
Behemoth Boss Fight
| Boss Overview | |
|---|---|
|
| |
| Map | Flare Pool |
| Area | Expansion Site |
| Required Upgrade | Ice Shot |
| Weak Point | |
| ・Eyes | |
How to Beat Behemoth: Quick Boss Tips
- Shoot its exposed eyes.
- Dodge away from its lava projectiles.
- Jump over shockwaves.
- Dash away when it charges toward you.
- Shoot mouths with Ice Shot to block it from shooting projectiles.
Sylux (Final Boss) Boss Fight
| Boss Overview | |
|---|---|

| |
| Map | Chrono Tower |
| Area | Pinnacle |
| Required Upgrade | Psychic Lasso |
| Weak Point | |
| ・Nanomachine Arms | |
How to Beat Sylux: Quick Boss Tips
- Shoot nanomachine arms then disarm them with Psychic Lasso.
- Keep shooting at Sylux once stripped of his barriers.
- Avoid or dodge his arms' elemental attacks.
- Dodge his arm spin.
- Evade his shockwaves and lunges.
All Chrono Tower Unlocks
Legacy Suit
The Legacy Suit is obtained along with the Memory Fruit and is exchanged for Green Energy Crystals farmed at 125%. This also emits protective barriers that will cost 35 Missile Ammo during battle.
Legacy Suit How to Unlock and Effects
Metroid Prime 4: Beyond Related Guides

Complete Story Walkthrough and Guide
All Walkthrough Guides
| Story Walkthrough | |
|---|---|
| Prologue Walkthrough | Fury Green Walkthrough |
| Volt Forge Walkthrough | Ice Belt Walkthrough |
| Flare Pool Walkthrough | Great Mines Walkthrough |
| Chrono Tower Walkthrough | - |
Comment
Author

Chrono Tower Walkthrough and Guide
Rankings
- We could not find the message board you were looking for.
Gaming News

![Monster Hunter Stories 3 Review [First Impressions] | Simply Rejuvenating](https://img.game8.co/4438641/2a31b7702bd70e78ec8efd24661dacda.jpeg/show)
![Monster Hunter Stories 3 Review [First Impressions] | Simply Rejuvenating](https://img.game8.co/4438641/2a31b7702bd70e78ec8efd24661dacda.jpeg/thumb)
![The Seven Deadly Sins: Origin [First Impressions] | A Promising Start](https://img.game8.co/4440581/584e0bfb87908f12c4eab6e846eb1afd.png/thumb)

Popular Games

Genshin Impact Walkthrough & Guides Wiki
Umamusume: Pretty Derby Walkthrough & Guides Wiki
Pokemon Pokopia Walkthrough & Guides Wiki
Honkai: Star Rail Walkthrough & Guides Wiki
Monster Hunter Stories 3: Twisted Reflection Walkthrough & Guides Wiki
Arknights: Endfield Walkthrough & Guides Wiki
Wuthering Waves Walkthrough & Guides Wiki
Zenless Zone Zero Walkthrough & Guides Wiki
Pokemon TCG Pocket (PTCGP) Strategies & Guides Wiki
Monster Hunter Wilds Walkthrough & Guides Wiki


Recommended Games
Diablo 4: Vessel of Hatred Walkthrough & Guides Wiki
Cyberpunk 2077: Ultimate Edition Walkthrough & Guides Wiki
Fire Emblem Heroes (FEH) Walkthrough & Guides Wiki
Yu-Gi-Oh! Master Duel Walkthrough & Guides Wiki
Super Smash Bros. Ultimate Walkthrough & Guides Wiki
Pokemon Brilliant Diamond and Shining Pearl (BDSP) Walkthrough & Guides Wiki
Elden Ring Shadow of the Erdtree Walkthrough & Guides Wiki
Monster Hunter World Walkthrough & Guides Wiki
The Legend of Zelda: Tears of the Kingdom Walkthrough & Guides Wiki
Persona 3 Reload Walkthrough & Guides Wiki


All rights reserved
© Nintendo. Metroid and Nintendo Switch are trademarks of Nintendo.
The copyrights of videos of games used in our content and other intellectual property rights belong to the provider of the game.
The contents we provide on this site were created personally by members of the Game8 editorial department.
We refuse the right to reuse or repost content taken without our permission such as data or images to other sites.