Walkthrough Part 1: Tantegel Castle to Craggy Cave
This is a walkthrough guide from Tantegel Castle to Craggy Cave for Dragon Quest 1 HD-2D Remake (DQ1). Read on for a full walkthrough guide to each area, including all enemies and bosses, sparkly spot locations, secret spots, and mini medal locations!
| Next Guide ▶ |
|---|
| Quagmire Cave to Green Dragon Boss Fight |
List of Contents
 Attention! Attention! |
This page contains major spoliers for Dragon Quest 1 HD-2D Remake! Continue reading on at your own risk. |
|---|
Tantegel Castle to Craggy Cave Walkthrough Guide
| Jump to an Area Walkthrough! | |||
|---|---|---|---|
| 1 | Tantegel Castle and Town | 2 | Erdrick's Hollow |
| 3 | Tantegel Castle and Wayfarer's Chapel | 4 | Forgotten Ruins |
| 5 | The Bridge and Kol | 6 | Shrine of Rain |
| 7 | Galenholm | 8 | Roadside Inn |
| 9 | Nameless Ruins | 10 | Faerie Village |
| 11 | Craggy Cave | 12 | Faerie Village (Revisit) |
Tantegel Castle and Town
| 1 | 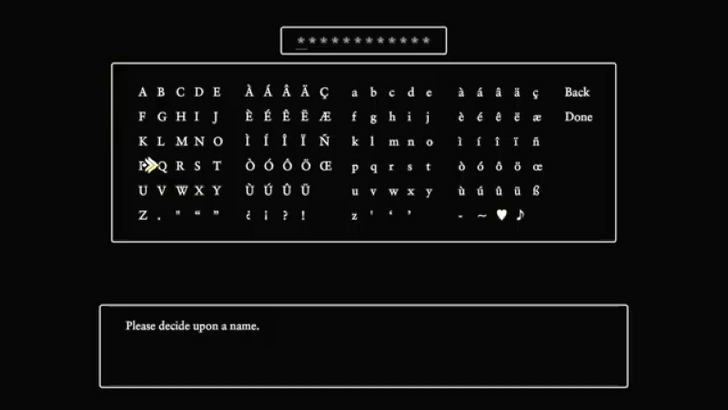 Start the game by naming your character. The first four letters of your name will affect your starting stats, so don’t hesitate to restart and try different names until you land on a set of stats you like. After selecting your game's difficulty, the game will start and you’ll begin inside the throne room of Tantegel Castle. After a brief cutscene, speak to the King to receive your first objective and begin your adventure. ▶Does the Protagonist Have a Canon Name? |
|---|---|
| 2 | 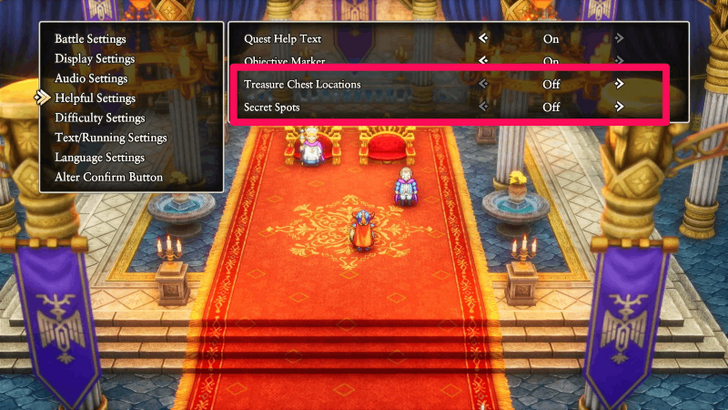 Once you’ve gained control, head into the game settings and tweak the options to your liking. The default setup works fine, but we recommend adjusting the Helpful Settings so that you'll see every treasure and Secret Spots in the map. ▶ All Secret Spot Locations |
| 3 | 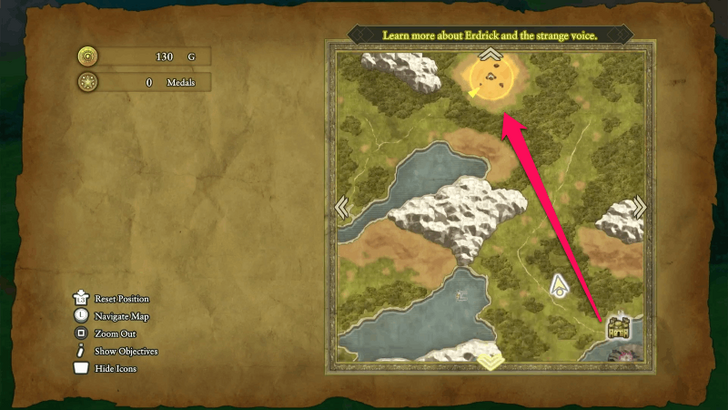 After exploring Tantegel Castle and Town, leave the area and travel north to find Erdrick’s Hollow. Battle monsters along the way to earn EXP and gold, and keep an eye out for Sparkly Spots, which can reward you with useful items or early high quality equipment. ▶ Erdrick’s Hollow Dungeon Guide |
| 4 | 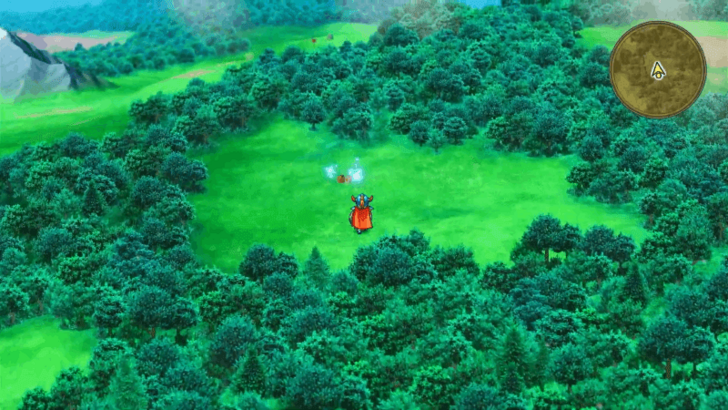 While traveling, you'll notice sparkling glints in the overworld, these are Sparkly Spots. These spots often contain better gear or valuable gold. It’s worth taking short detours to grab these before heading into Erdrick’s Hollow. ▶ List of All Sparkly Spots |
Erdrick's Hollow
| 1 |  You’ll enter Erdrick’s Hollow starting at B1. Move forward to trigger a short cutscene. Afterward, you can proceed to B2, but before doing so, make sure to open all the treasure chests on this floor. You’ll find a Leather Shield, Sand Smoke Scroll, Sacred Knife, and a Dragon Scale, all of which will be useful early on. |
|---|---|
| * | Scrolls teach your Hero new skills once used, so it’s best to use them right away after obtaining them. This lets you access more abilities early, giving you an edge in upcoming battles. ▶ List of All Scrolls and Locations |
| 2 | 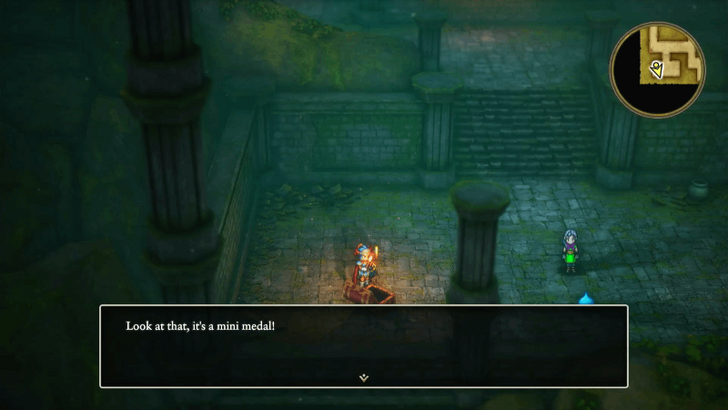 Upon reaching B2, look for a treasure chest near the girl speaking to a Slime, it contains a Mini Medal. Continue following the path to reach Erdrick’s Tablet, opening any remaining chests along the way, and read the inscription on the headstone when you arrive. ▶All Mini Medal Locations and Rewards |
| 3 | After reading the inscription and watching the cutscene, use a Chimaera Wing to exit Erdrick’s Hollow and teleport back to Tantegel. |
Tantegel Castle and Wayfarer's Chapel
| 1 | 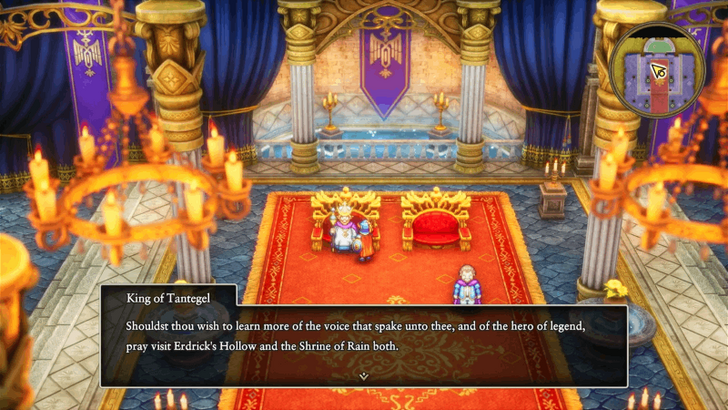 Upon returning to town, head straight back to the castle and talk to the King. Report your progress, and he’ll instruct you to head toward the Shrine of Rain next. |
|---|---|
| 2 | 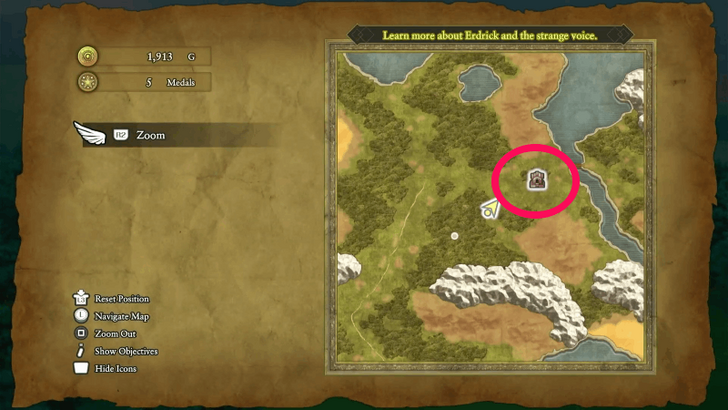 After reporting to the King, travel north until you reach the Wayfarer’s Chapel. Doing so will unlock it as a Zoom/Chimaera Wing teleport point, making future travel easier. |
Forgotten Ruins
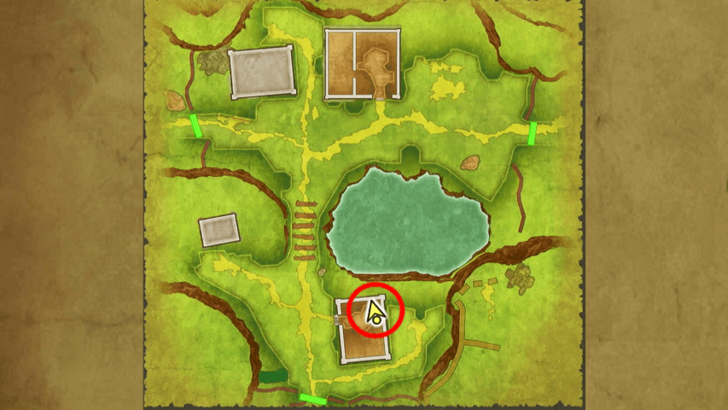
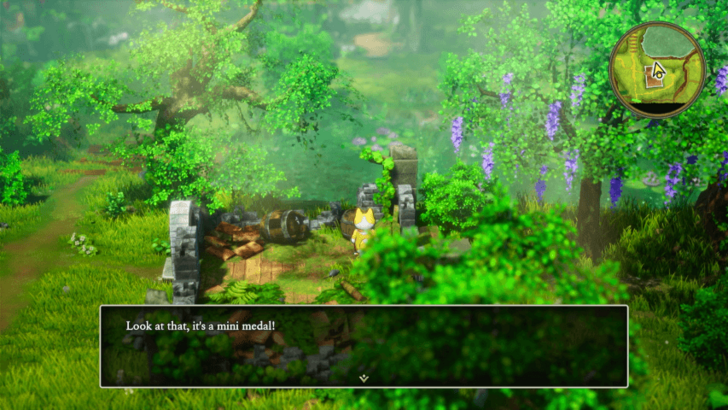
| 1 |  Leave the chapel and cross the bridge to reach the Forgotten Ruins. Search the barrel near one of the houses to find a Mini Medal. You’ll also spot an NPC with an exclamation mark near the pond, that’s Zalen. Talk to him before you move on. ▶All Zalen Sidequest Locations |
|---|
The Bridge and Kol
| 1 | 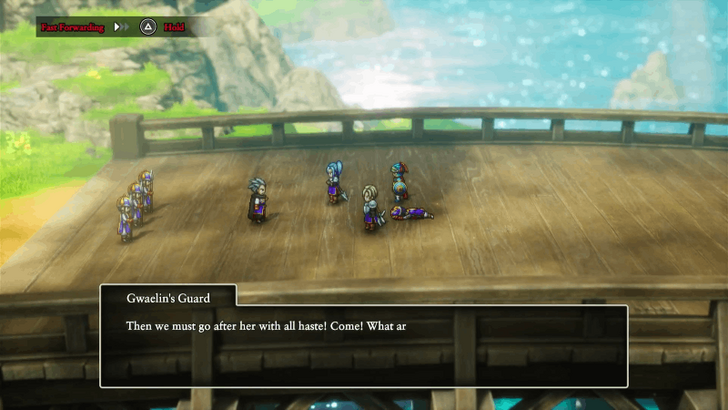 After leaving the Forgotten Ruins, continue south to reach the bridge. A short cutscene will play and once it ends, cross over to the other side. There’s nothing major here, so keep going. |
|---|---|
| 2 | 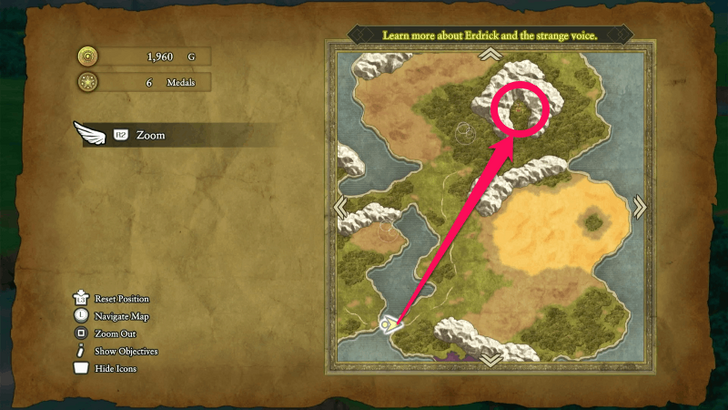 After crossing the bridge, head north to reach the village of Kol, nestled in a forest surrounded by mountains. Check for Sparkly Spots along the way for bonus loot. |
| 3 | Once you arrive, visit the shop on the left to restock essential items, especially Chimaera Wings. If you’ve saved enough gold, consider upgrading your weapons. Don’t forget to check the pots nearby for a hidden Mini Medal before leaving. |
| 4 | 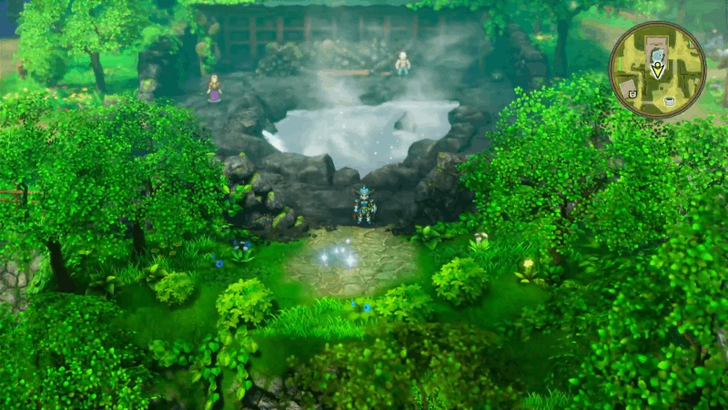 Head to the hot spring next and examine the sparkling glint on the ground to obtain the Faerie Flute, a key item you’ll need for an upcoming boss fight. |
| 5 | 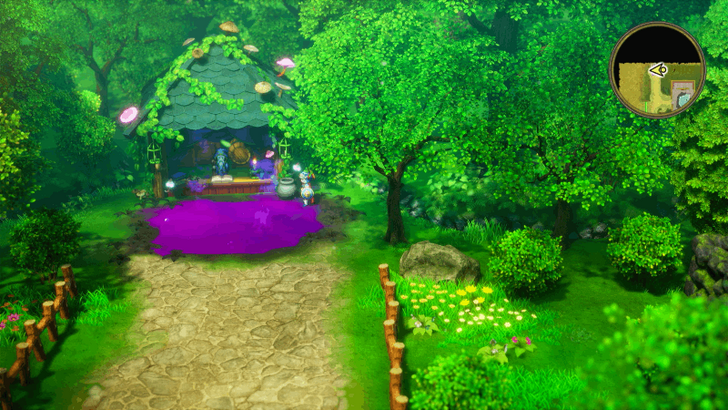 Near the stall with the poison puddle, examine the nearby pot to find another Mini Medal. Feel free to explore Kol and loot every barrel and pot for bonus items, though most equipment gotten from here isn’t worth the detour. Once done, you can leave the village and begin your journey toward the Shrine of Rain. |
Shrine of Rain
| 1 | 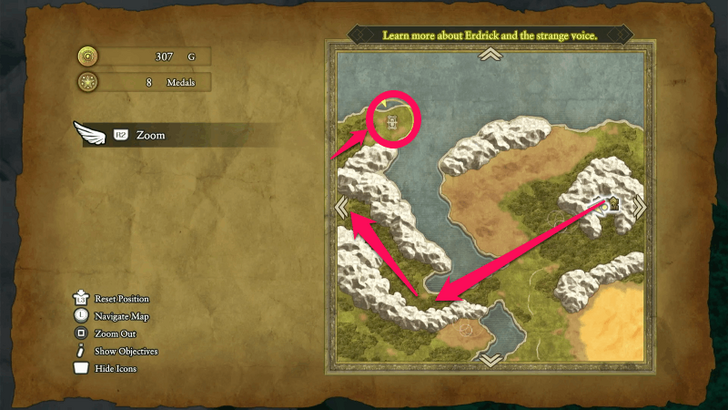 Your next destination is the Shrine of Rain, found west of Kol. It’s marked on the map, but the monsters along the route will be noticeably stronger, so come prepared with good gear and healing items. |
|---|---|
| 2 | 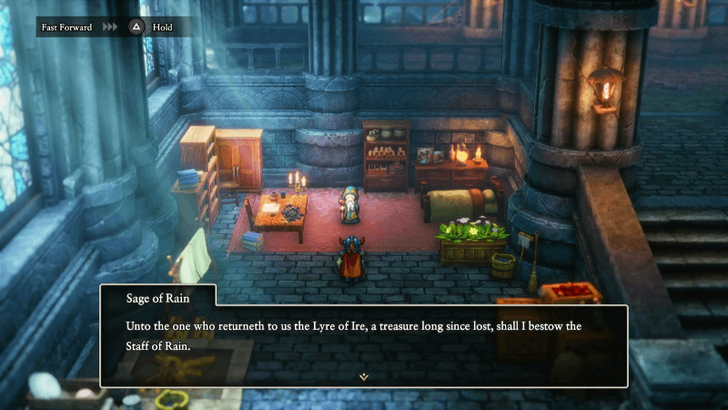 Inside the Shrine, interact with the red exclamation point to trigger a short cutscene with the Sage of Rain. This encounter advances the story, so don’t skip it. |
| 3 | 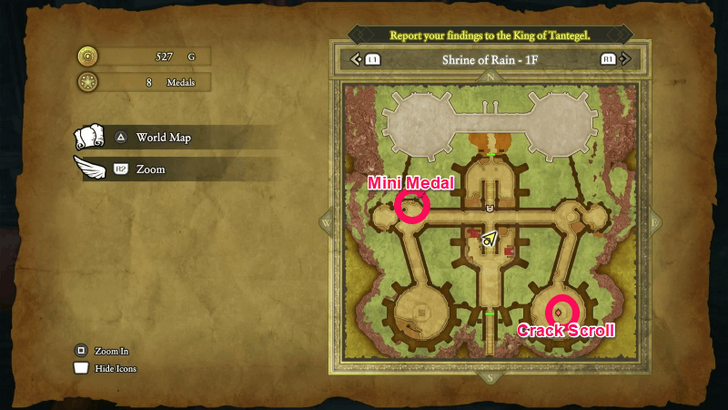 Before heading out, explore the Shrine fully. Open the treasure chest on the right for a Crack Scroll and search the pots on the left for a Mini Medal. Don’t miss these easy pickups! |
| 4 | 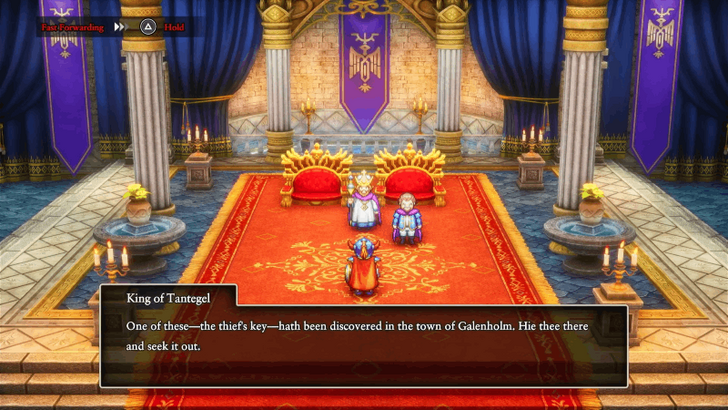 Use Zoom or a Chimaera Wing to fast-travel back to Tantegel Castle. Talk to the King to report your progress, he’ll now direct you toward Galenholm, your next stop. |
Galenholm
| 1 | 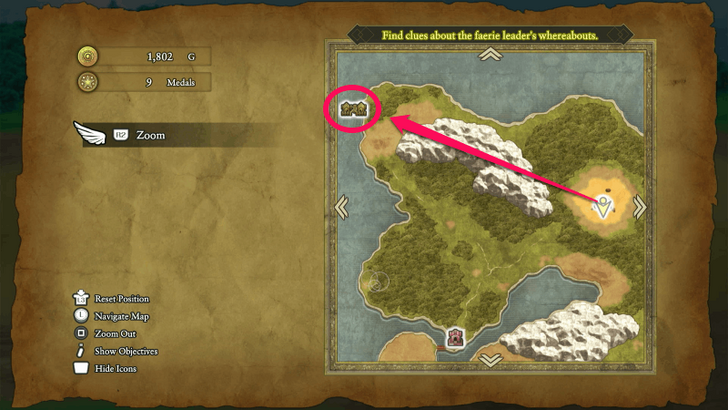 Galenholm is found northwest of Erdrick’s Hollow. Use a Chimaera Wing to return to the hollow, then walk the rest of the way. Once you enter and cross the bridge, a cutscene will automatically trigger, note that this only happens if you’ve already cleared the Shrine of Rain. |
|---|---|
| 2 | Visit the equipment shop and gear up. Save enough gold to buy the Iron Axe and Chain Mail, both are strong early upgrades. Skip buying the Iron Shield for now; you’ll find one later inside the Craggy Cave. |
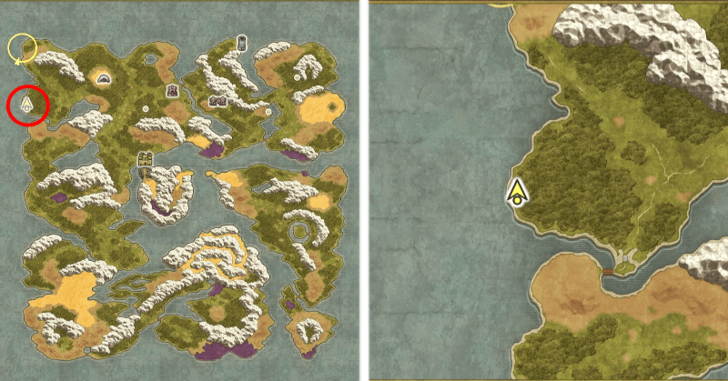
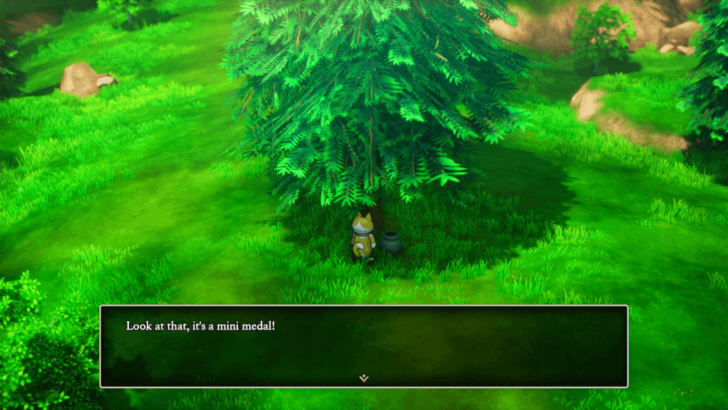
| 3 | 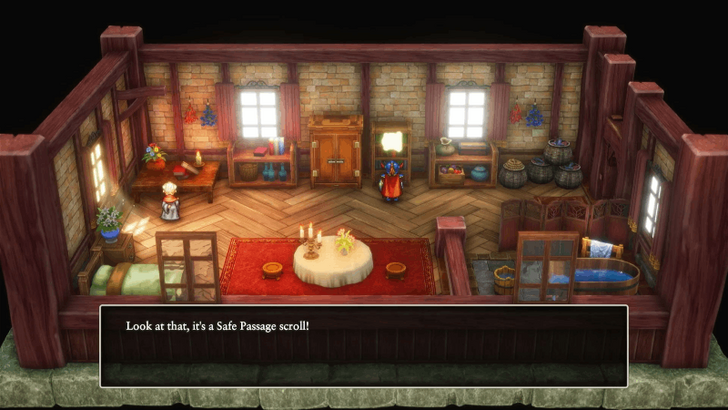 Check the bottom-right house in Galenholm and inspect the bookshelf to find the Safe Passage Scroll, which teaches a spell that prevents floor damage, extremely useful for exploring caves safely. Before leaving, visit the fishing harbor on the left side of town to pick up a Mini Medal. |
Roadside Inn
| 1 | 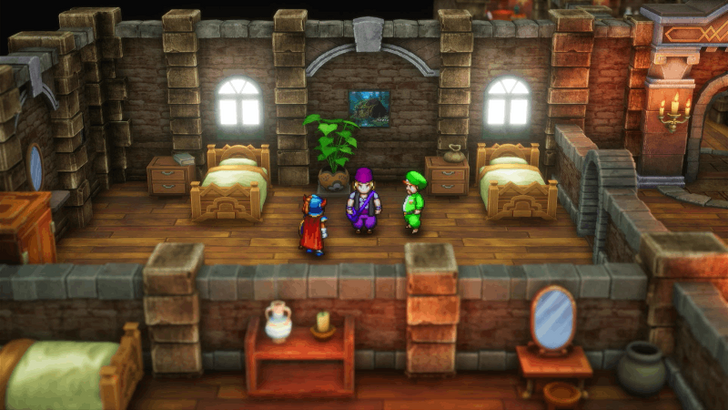 Leave Galenholm and travel south until you reach the Roadside Inn. Enter one of the rooms to trigger a short cutscene, then search the drawers for a Mini Medal. |
|---|---|
| 2 | Spend time here in the overworld area to strengthen your Hero. Monsters in this region are much stronger, perfect for level grinding. |
Nameless Ruins
| 1 | Continue south from the Roadside Inn to reach the Nameless Ruins, located near a poison swamp. |
|---|---|
| 2 | 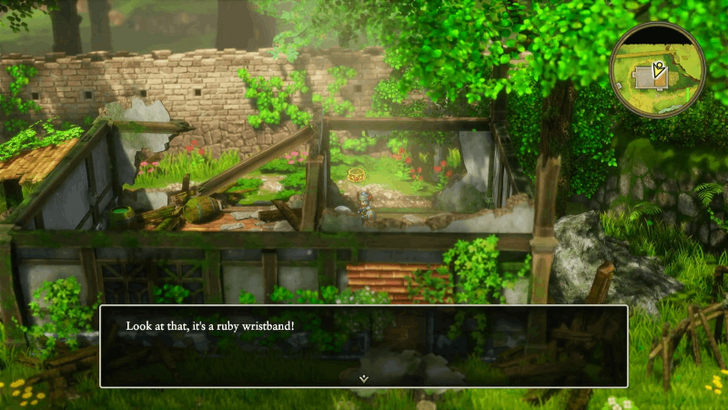 Explore the ruins to find the Ruby Wristband, an accessory that grants +8 Defense, a great accessory for early game. |
| 3 | 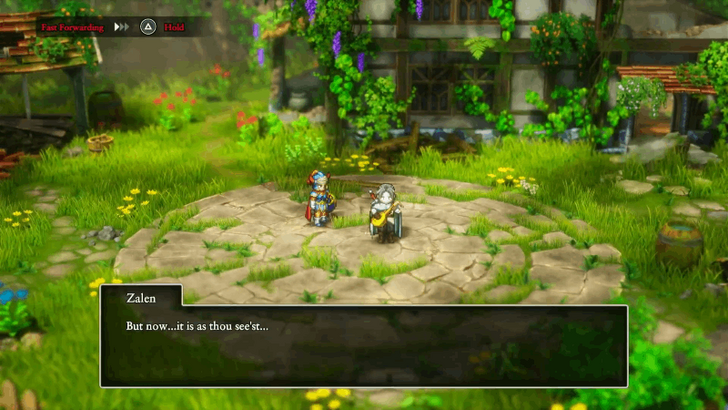 If you previously met Zalen in the Forgotten Ruins, you’ll find him again here. Talk to him before leaving to continue his storyline. |
Faerie Village
| 1 | 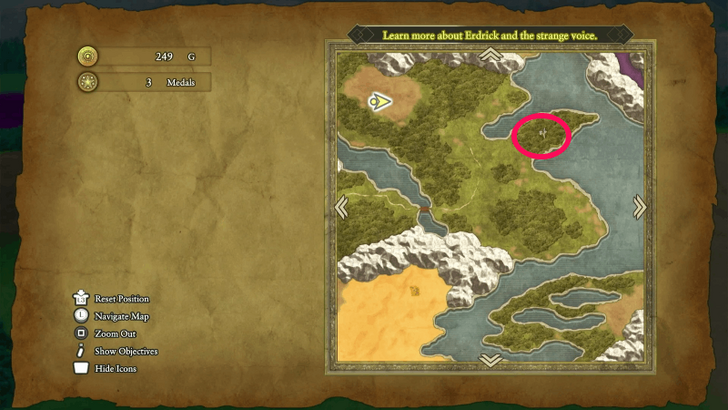 After leaving the Nameless Ruins, travel southeast to reach the Faerie Village, a peaceful settlement filled with treasure and scrolls. |
|---|---|
| 2 | 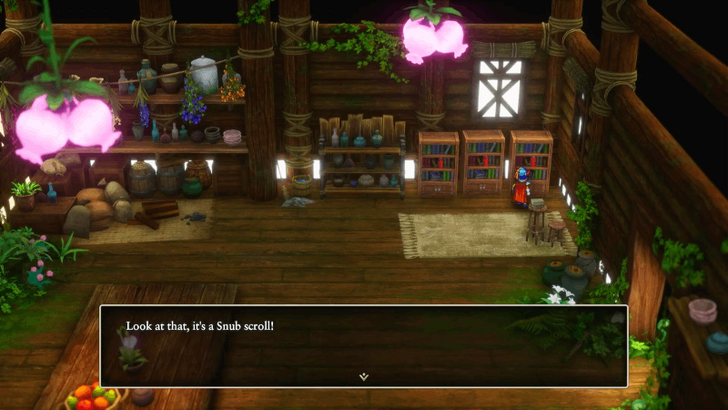 In the left-side house, check the bookshelf for a Snub Scroll and open the treasure chest to find a Crackle Scroll. Both can be learned immediately to enhance your spell repertoire. The Crackle spell in particular, will help greatly in the boss fights to come. |
| 3 | 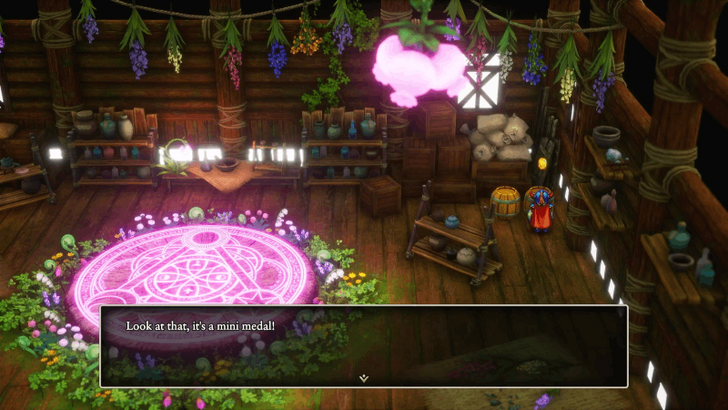 Enter the right-side house and search every container. You’ll find the following: ・Mini Medal ・Full Moon Ring ・Magic Water ・2 Spirit Waters |
Craggy Cave
| 1 | 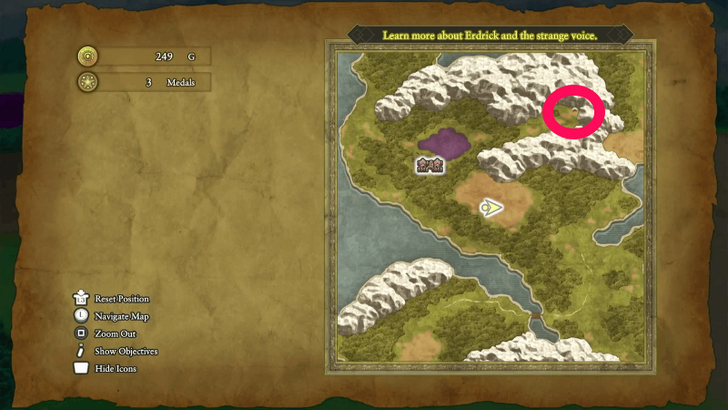 After collecting all the treasures in the Faerie Village, head north, just east of the poison swamp, to reach Craggy Cave. The enemies here hit harder, so stock up and heal before entering. |
|---|---|
| 2 | 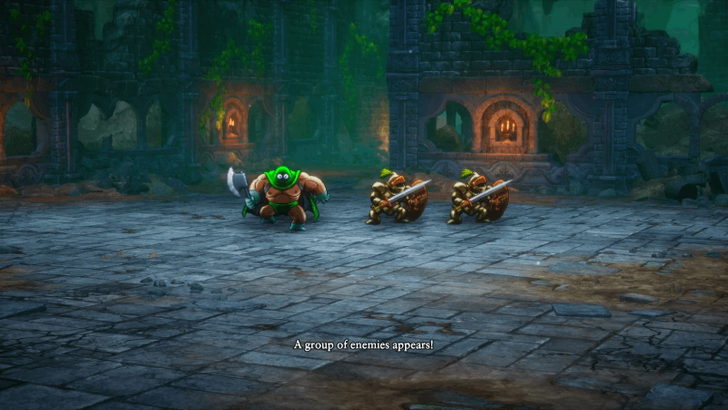 Take a few steps inside to trigger a cutscene and you’ll face Robbin ’Ood and his gang. Focus on defeating the Robbin ’Oodlums first, since they’ll heal their boss. Use AoE spells like Sizzle or Crackle to hit everyone at once. Once the minions are down, unleash high-damage single-target attacks to finish Robbin ’Ood himself. ▶ How to Beat Robbin 'Ood |
| 3 | 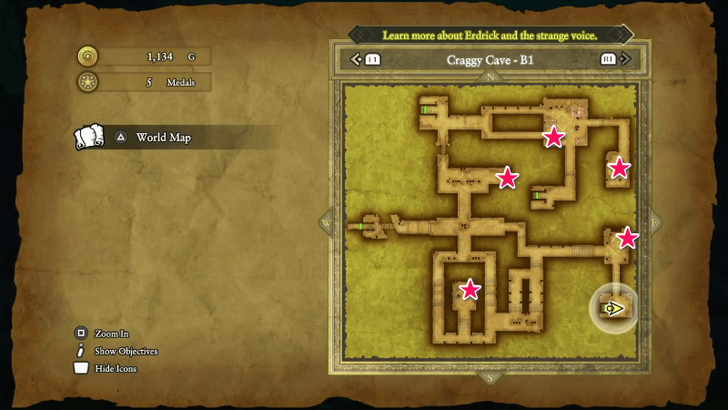 After the battle, Robbin 'Ood will ask you to help one of his comrades lost on B2, but before heading there, you should open every chest on B1 to obtain the following items: ・Mini Medal ・Ten Ton Toupee ・340 Gold ・Boomerang ・Nose for Treasure Scroll |
| 4 | 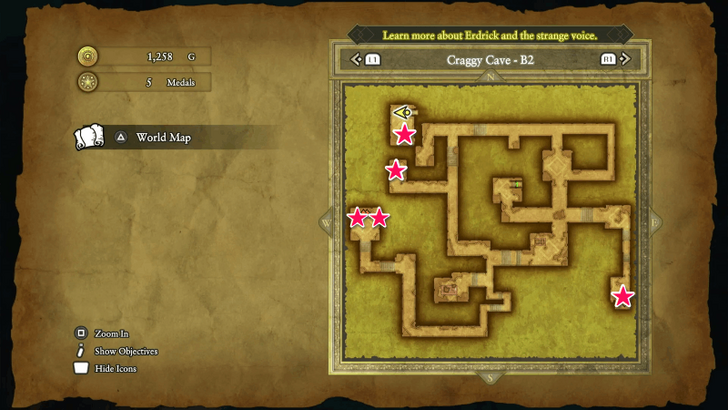 There are three staircases leading to different B2 areas but only the top and middle ones are worth using. The bottom stairs lead to a dead end. Take the top-left stairs first to grab a Muster Strength Scroll, then use the middle stairs to access the main B2 floor. In here, you’ll find: ・ Bronze Shield, ・2 Magic Waters, ・Choker ・Zombie Mail. With the exception of the Choker and Zombie Mail only becoming available after you beat the Sorcerer. |
| 5 | 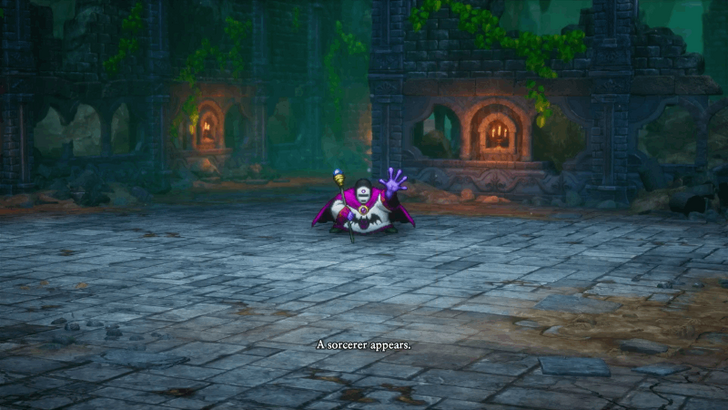 At the bottom-left of the map, approach the marked location to trigger another boss fight against The Sorcerer. Watch out for Fizzle, which prevents you from casting spells. To counter this, rely on your Flame Slash ability, which deals great damage even if it's not a spell. Use healing items if you’re silenced mid-battle. ▶ How to Beat Sorcerer |
| 6 | 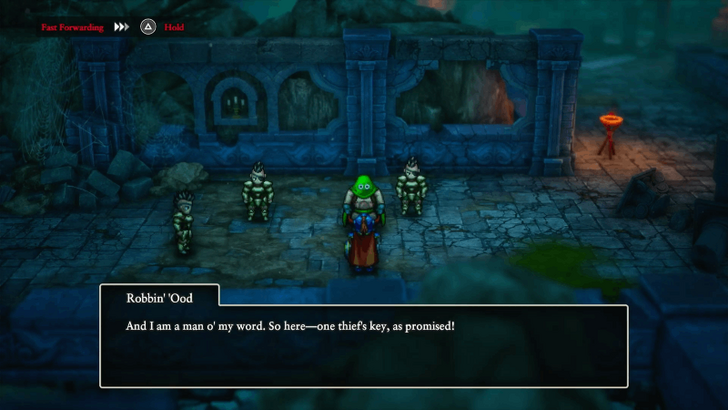 After defeating the Sorcerer, a short cutscene will play, and you’ll gain access to the two treasure chests containing a Choker and Zombie Mail. Return to the cave entrance and speak with Robbin ’Ood to complete his quest and he’ll reward you with the Thief’s Key. |
Faerie Village (Revisit)
| 1 | 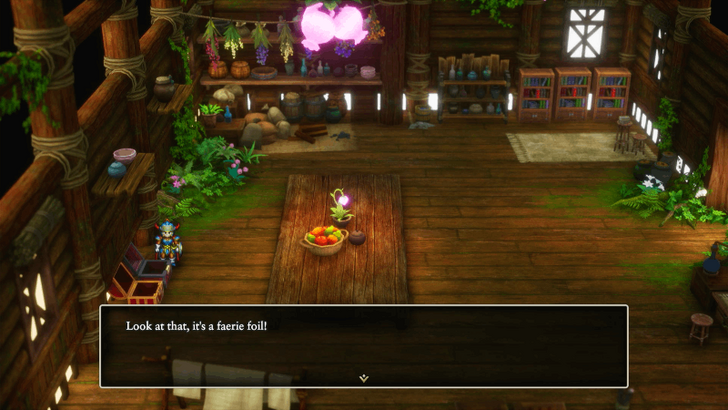 With the Thief’s Key in hand, revisit the Faerie Village. Use it to unlock the chest inside the left house and claim the Faerie Foil, a powerful weapon that’ll serve you well for the next few regions. |
|---|
Encounterable Enemies and Bosses
Enemies
 Slime
Slime Dracky
 She-Slime
 Ghost
Ghost Drackolyte
 Scorpion
 Skeleton
 Prestidigitator
 Lunatick
 Bewarewolf
 Legerdeman
 Iron Scorpion
 Scarewolf
 Drohl Drone
 Fightgeist
 Drackyma
 Batterfly
 Ratscal
 Bubble Slime
 Toxic Toad
 Corpse Corporal
 Dragonfry
 Putrefido
 Funghoul
 Healslime
 Spirit
 Cumaulus
 Crabid
 Shade
Shade Antgobbler
 Morphean Mushroom
List of All Monsters and Enemies
Robbin 'Ood
 Robbin 'Ood |
|
| EXP | 330 |
|---|---|
| Gold | 154 |
Robin 'Ood is weak against fire, so an effective skill against him is the protagonist's Flame Slash. After defeating the Robin 'Oodlums, you can use this skill to deal with the boss.
Sorcerer
 Sorcerer |
|
| EXP | 700 |
|---|---|
| Gold | 360 |
The sorcerer is weak to Thunder spells like Zap. So focus your offense on using the Zap spell, which you learn at level 7. Be careful, since this enemy uses Kafizzle, which seals Spells. If you get sealed, use physical attacks.
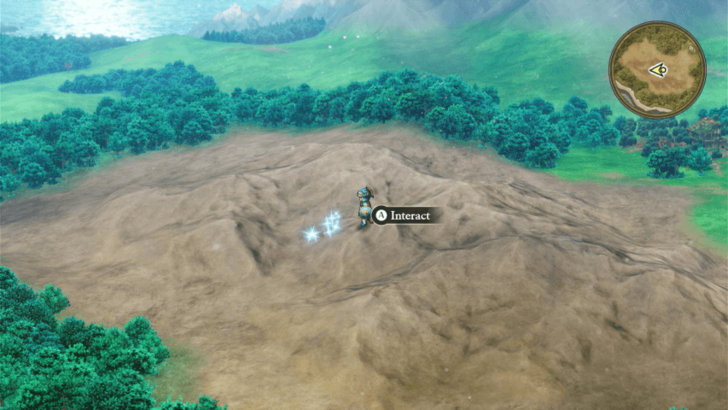
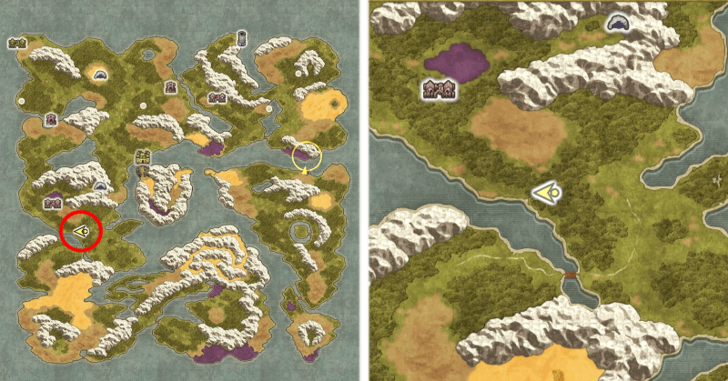
All Sparkly Spot Locations
| Location | Rewards |
|---|---|
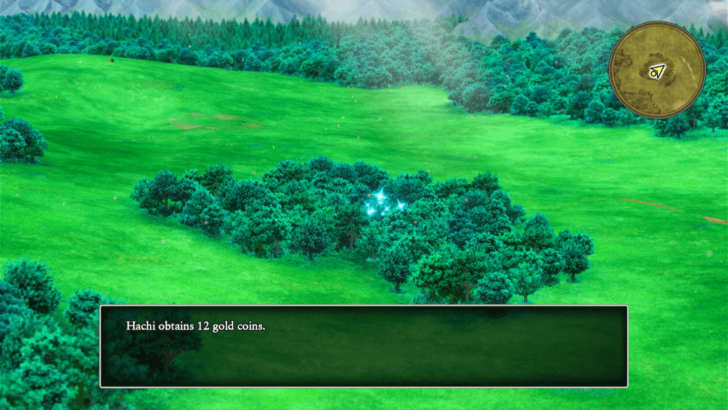
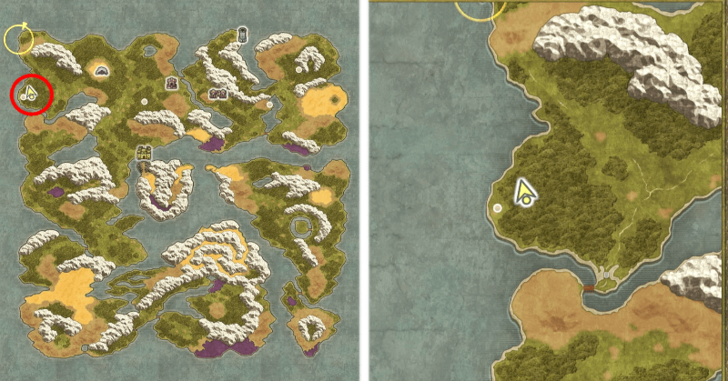
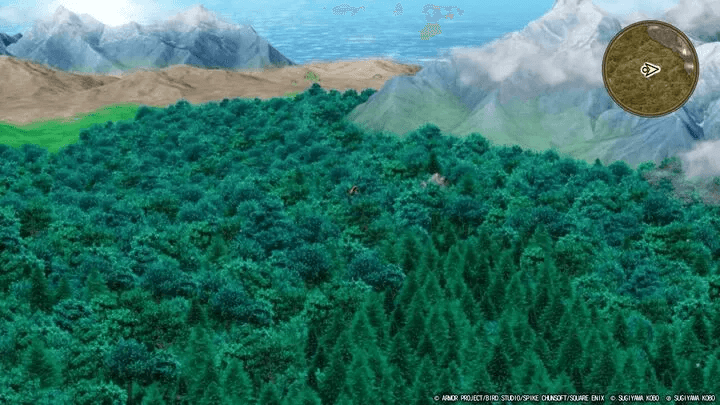
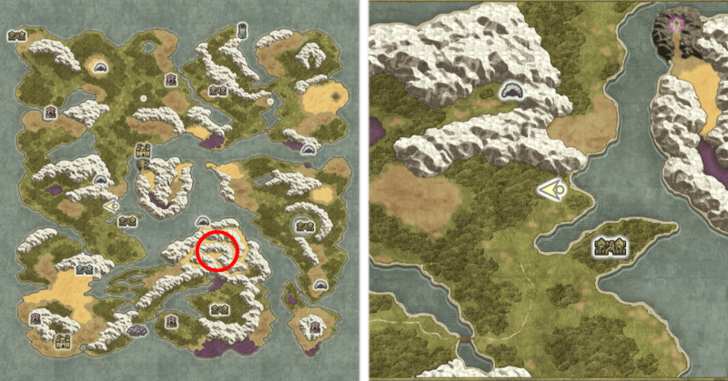
  Found in the center surrounded by trees. |
• Plain Clothes x1 • Oaken Club x1 • Gold x18 |
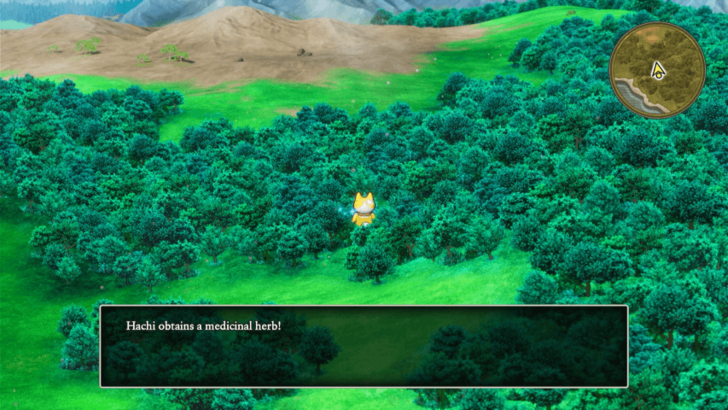
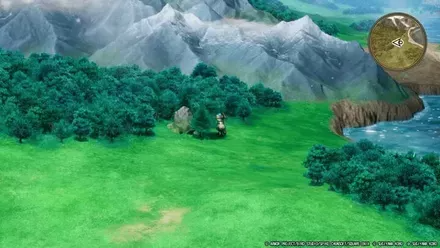
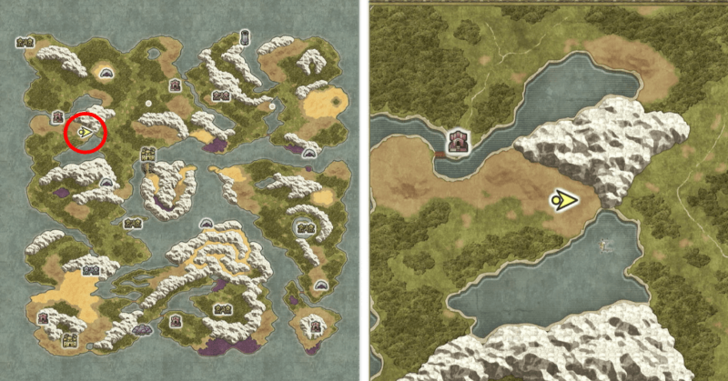
  Found near a bunch of trees just west of Tantagel. |
• Medicinal Herb x1 • Seed of Stamina x1 |
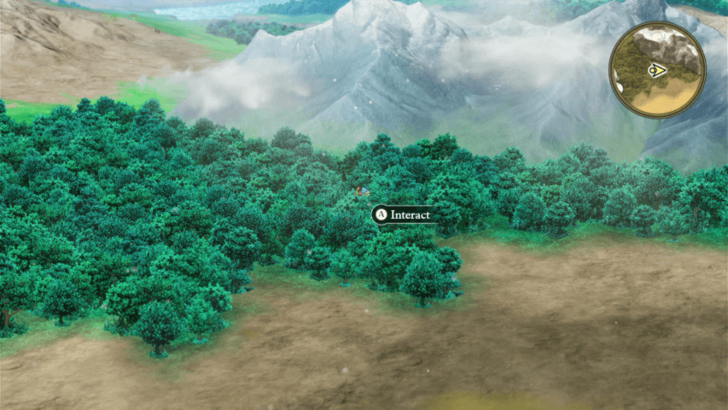
  Found near a bunch of trees and a trail. |
• Chimera Wing x1 • Gold x7 • Wayfarer's Clothes x1 |
  Found near the shore just south of Erdrick's Hollow. |
• Dazzle-me-not x2 |
  Found near trees just west of Erdrick's Hollow. |
• Antidotal Herbs x2 • Seed of Agility x1 |
  Found near the ocean north of the Tantegel. |
• Leather Suit x1 • Leather Shield x1 |
  Found near the lake east of Erdrick's Hollow. |
• Seed of Defence x1 • Medicinal Herb x1 |
  Found buried in a cluster of trees west of Erdrick's Hollow. |
• Holy Water x2 • Magic Water x1 • Gold x12 |
  Found buried in a cluster of trees near the shore southwest of Erdrick's Hollow. |
• Turban x1 • Gold x213 |
  Found near a bunch of trees and a trail just south of Kol. |
• Copper Sword x1 • Wayfarer's Clothes x1 • Pouch of Musk x1 |
  Found buried in a cluster of pointed trees. |
• Dazzle-me-not x2 |
  Found in the dirt area surrounded by trees southwest of the Shrine of Rain. |
• Seed of Wisdom x1 • Seed of Luck x1 |
  Found in a bunch of trees just southeast of the Nameless Ruins. |
• Medicinal Herb x1 • Strong Medicine x1 |
  Found in the trees between two mountains just northeast of Tantegel. |
• Medicinal Herbs x2 |
  Found on a grassy area near the bridge leading to Kol. |
• Chimaera Wings x2 • Gold x33 |
  Found in the center of a bunch of trees surrounded by dirt and sand just south of Kol. |
• Dragon Scale x1 • Magic Water x1 |
  Found near the shore west of Kol. |
• Plain Clothes x1 • Hardwood Headwear x1 • Tangleweb x1 |
  Found just northeast of Kol. |
• Seed of Magic x1 |
  Found in a bunch of trees near a mountain southwest of the Shrine of Rain. |
• Leather Armour x1 • Scale Shield x1 • Gold x227 |
  Found on the ground near a bunch of trees just west of Erdrick's Hollow. |
• Antidotal Herb x2 • Seed of Agility x1 |
  Found in a bunch of trees near a mountain just west of Erdrick's Hollow. |
• Medicinal Herb x2 • Seed of Strength x1 |
  Found near the mountain just northwest of Erdrick's Hollow. |
• Bamboo Pole x1 • Plain Clothes x1 • Leather Hat x1 |
  Found in the center of a bunch of trees just south of the Roadside Inn. |
• Dazzle-me-not x2 • Medicinal Herb x1 |
  Found buried in a bunch of trees near the mountain south of the Roadside Inn. |
• Seed of Defence x1 • Unsealant x2 • Gold x227 |
  Found near the shore southeast of Faerie Village. |
• Divine Dagger x1 • Cloak of Evasion x1 • Magic Water x1 |
  Found on the poisonous ground southeast of Wayfarer's Chapel. |
• Antidotal Herb x1 • Holy Water x1 • Divine Dagger x1 |
  Found in the trees north of Erdrick's Hollow. |
• Antidotal Herb x2 |
Here is a list of all known Sparkly Spot locations you can find during this part of the walkthrough. We’re still looking for more, so check back soon for updates!
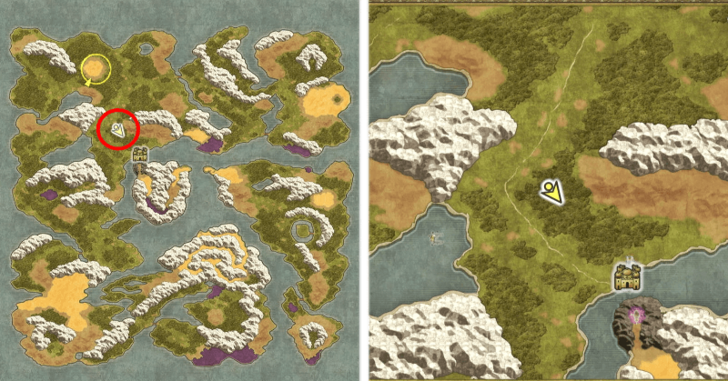
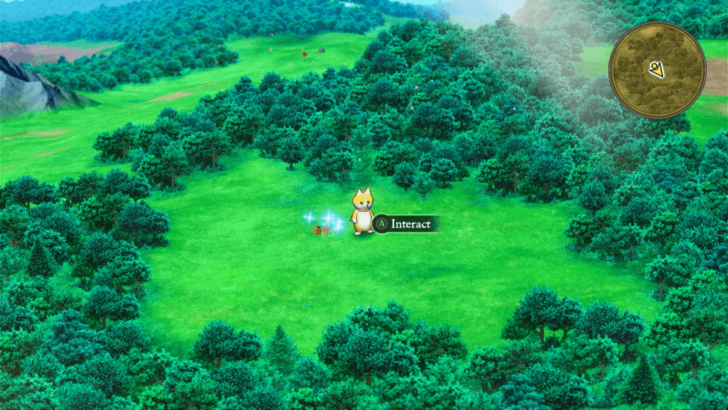
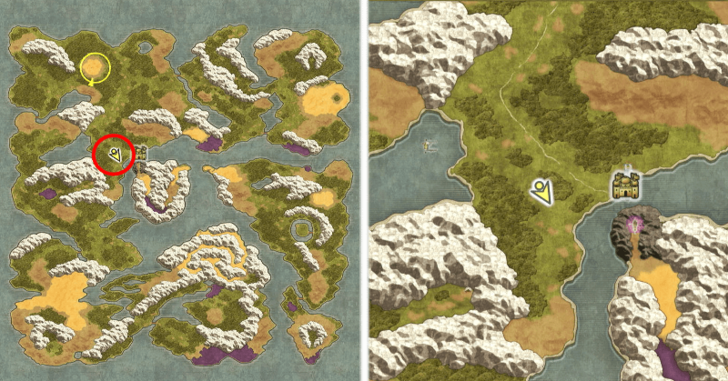
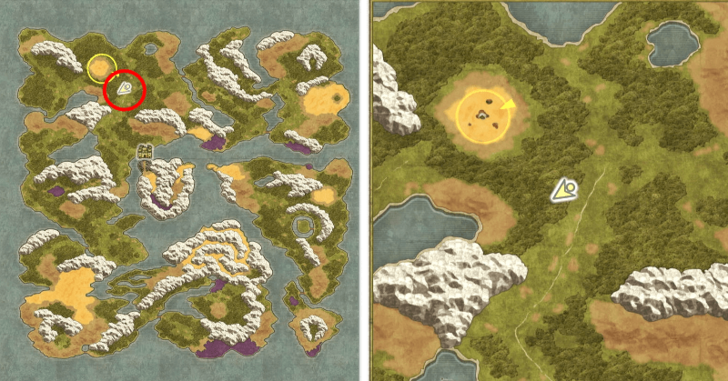
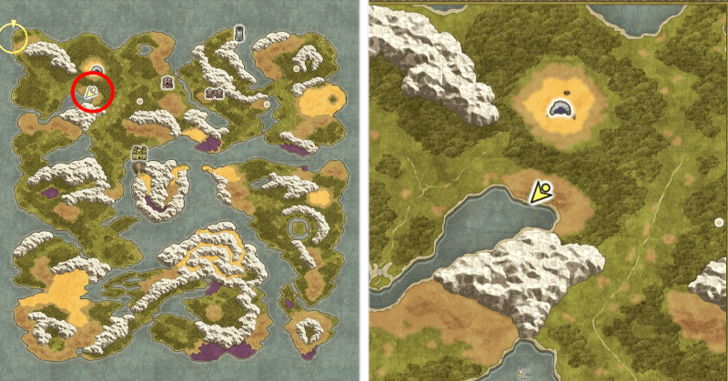
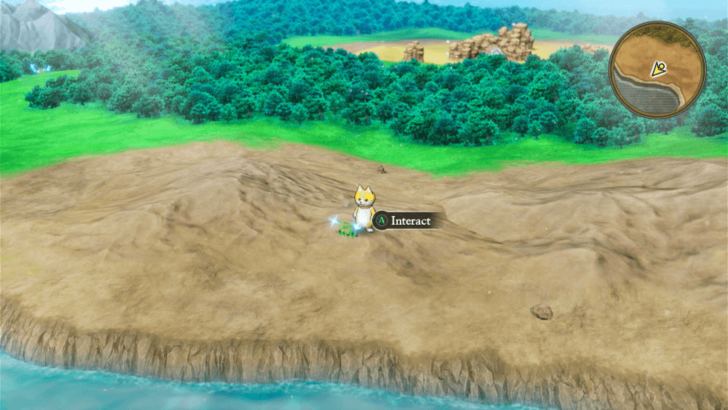
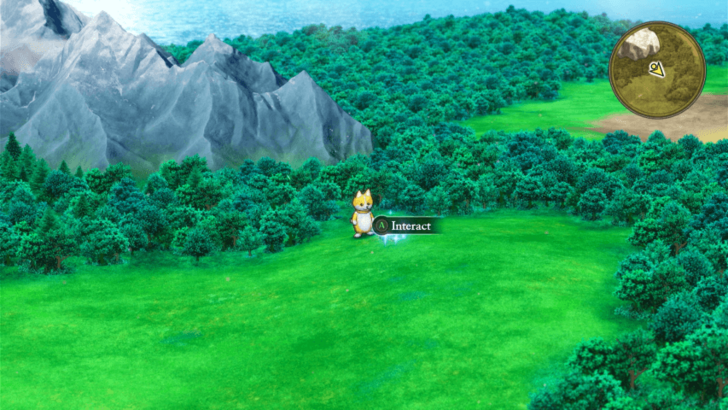
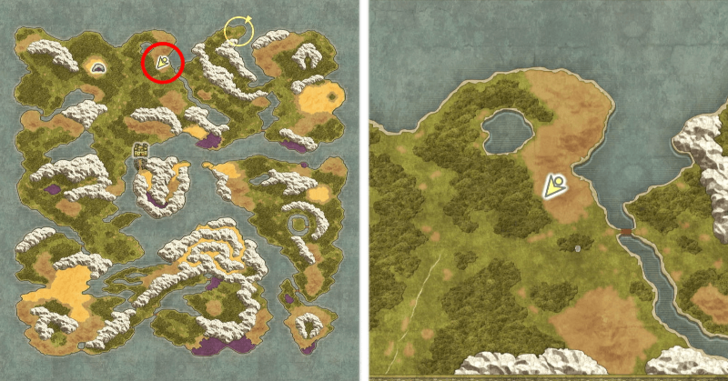
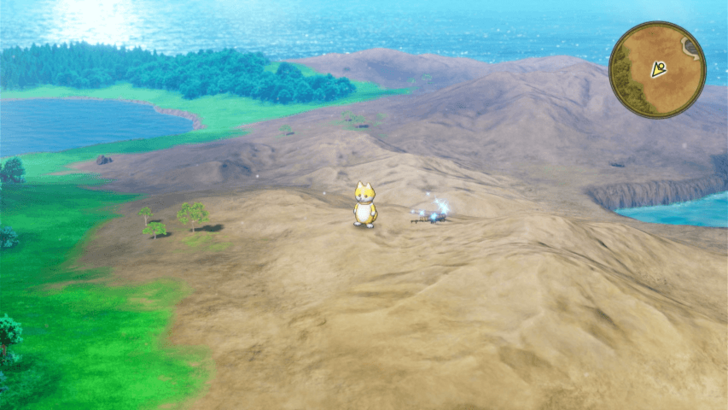
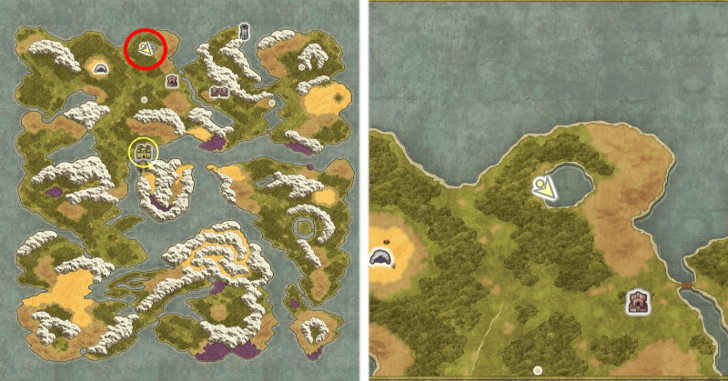
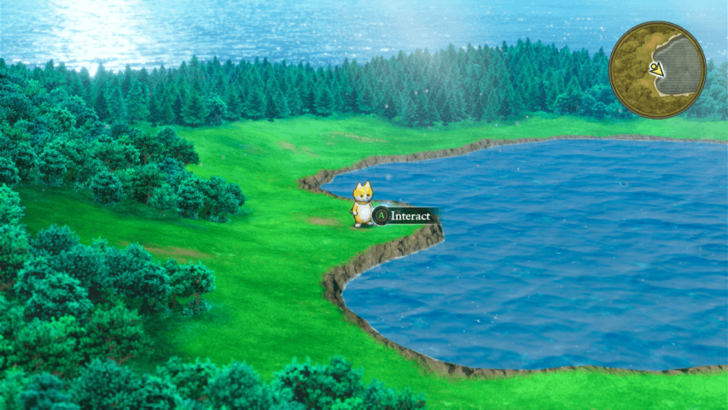
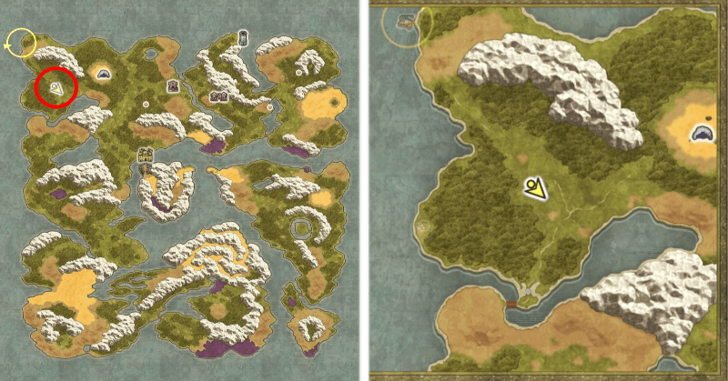
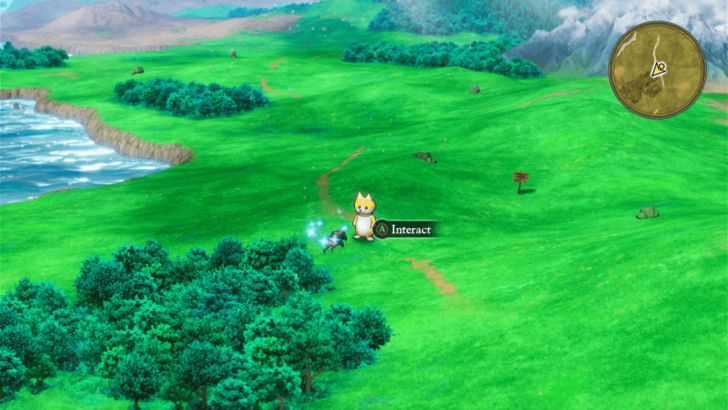
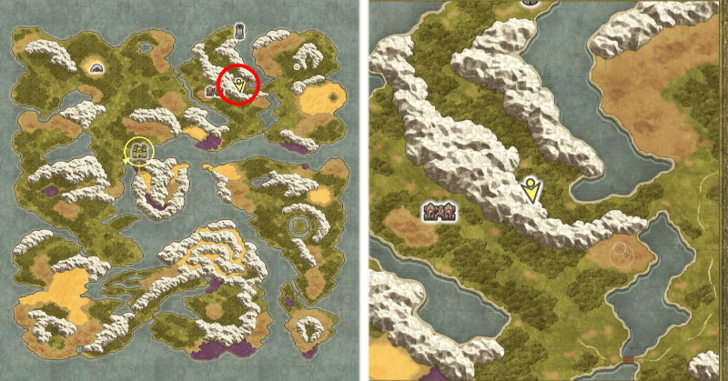
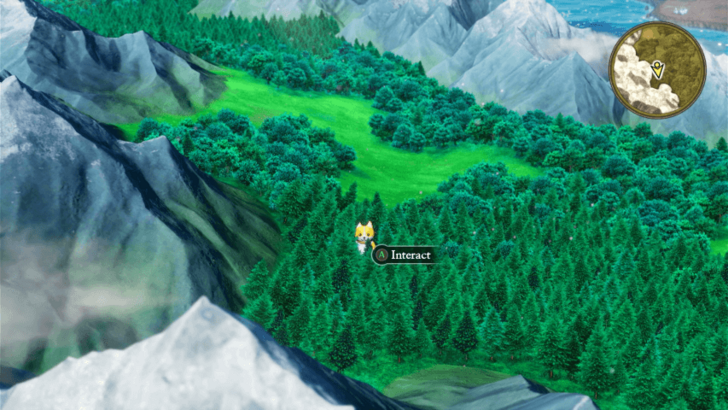
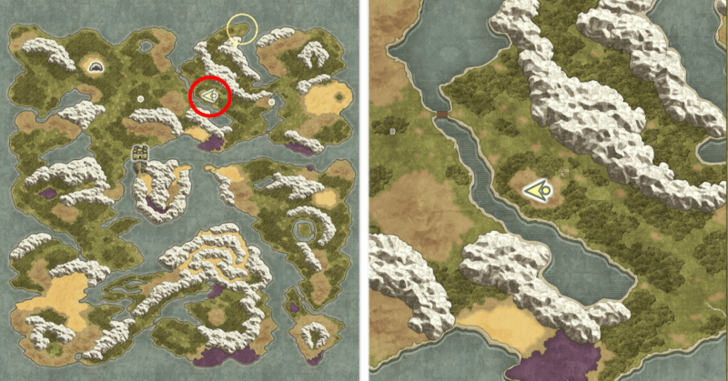
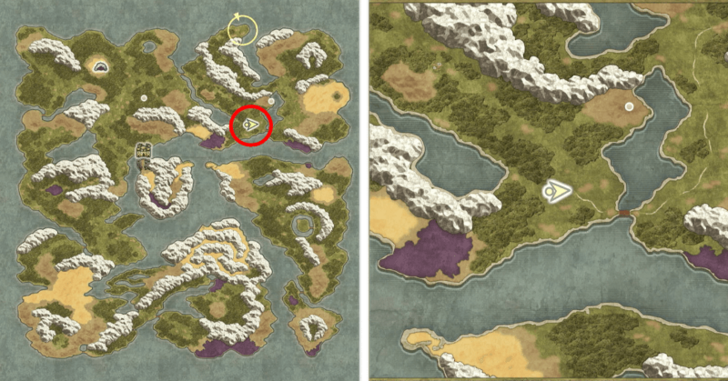
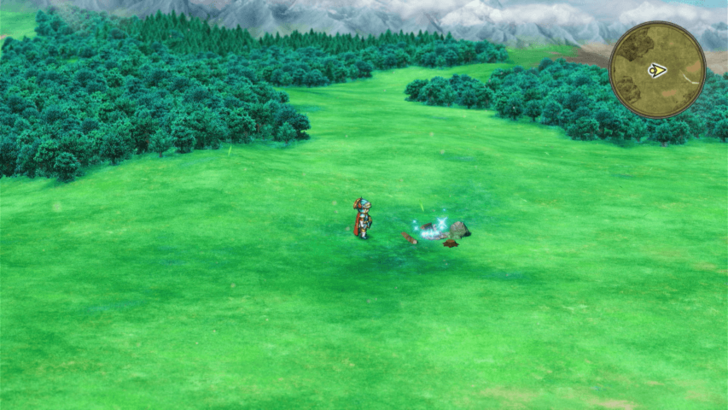
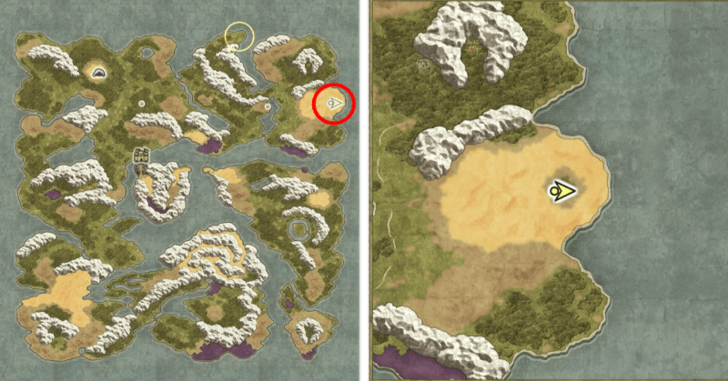
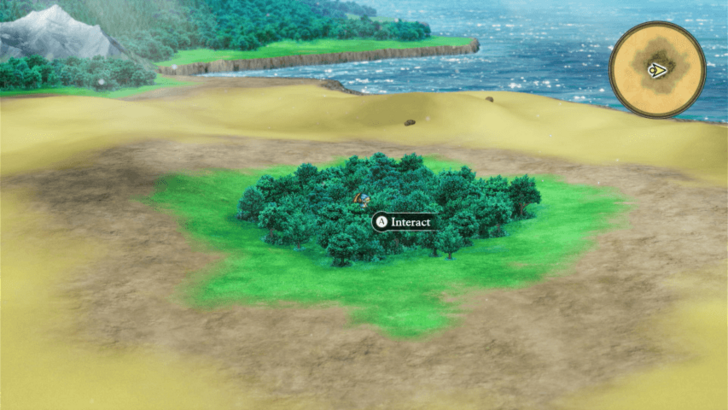
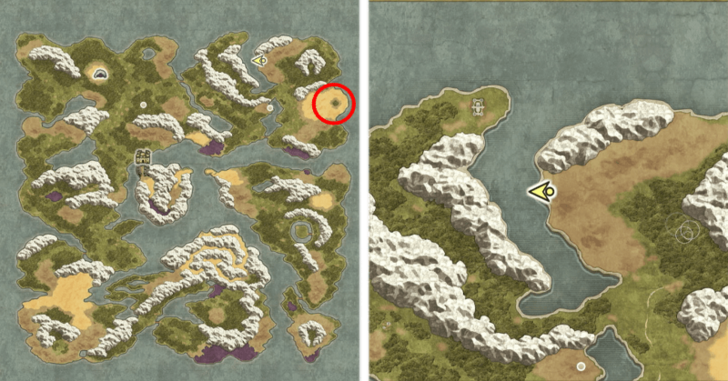
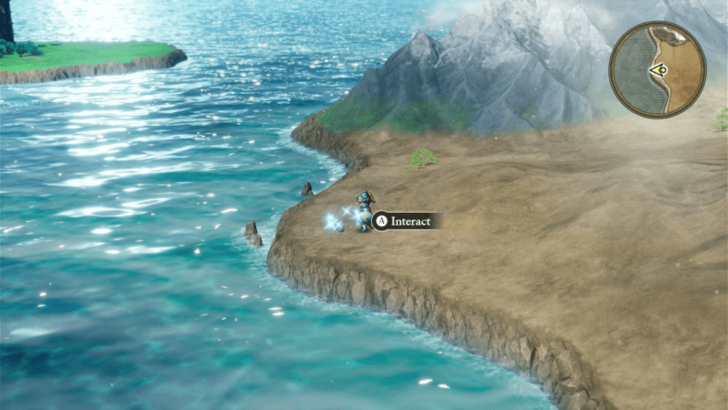
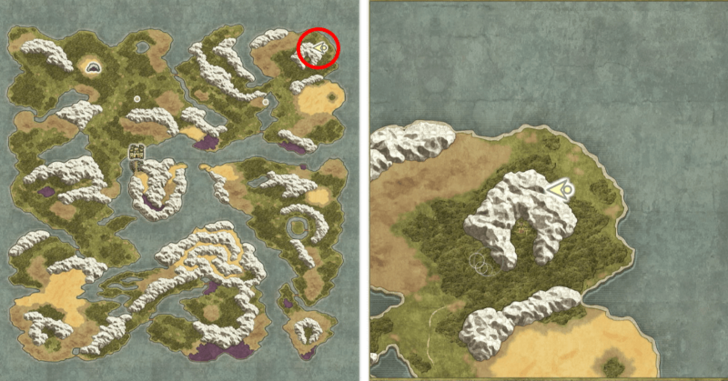
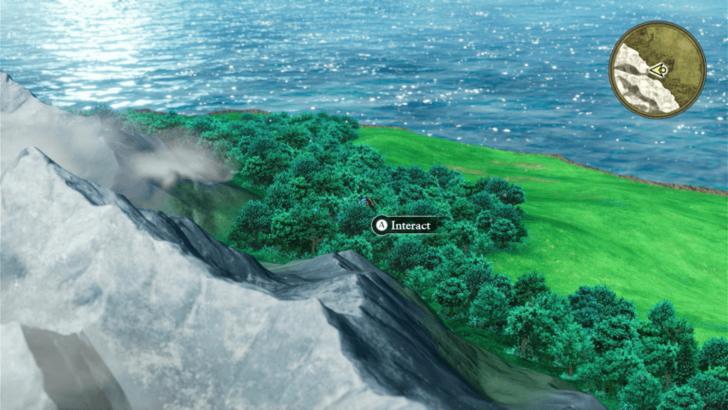
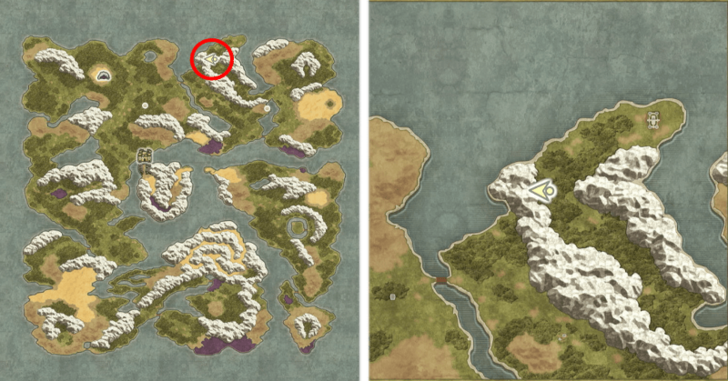
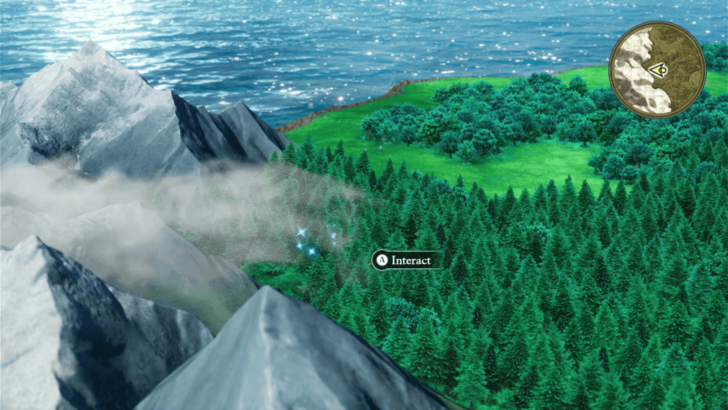
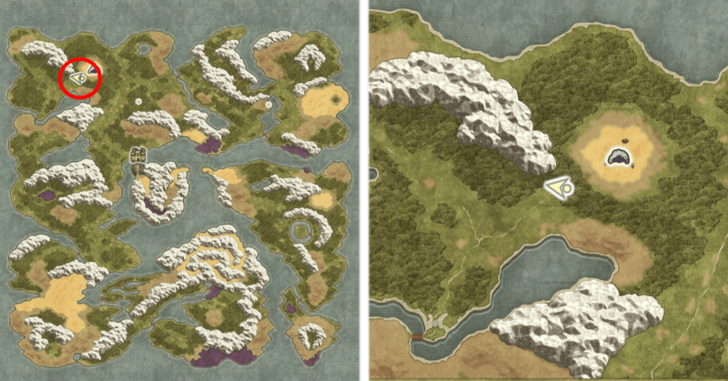
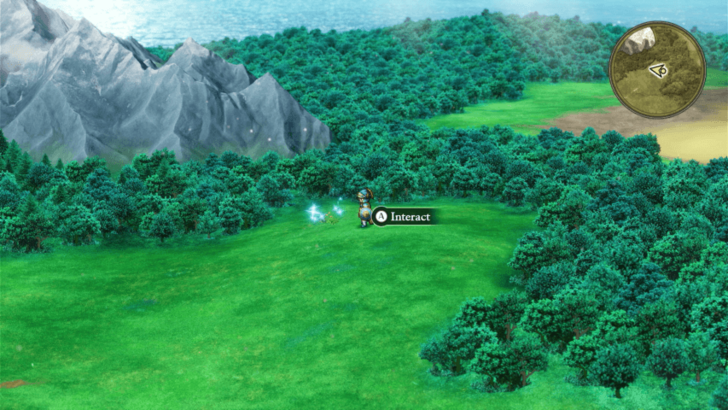
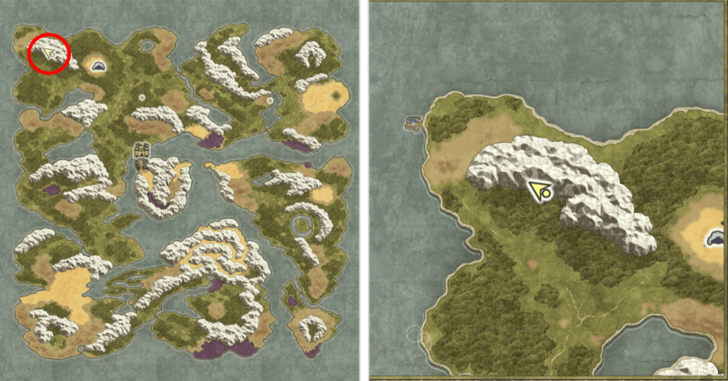
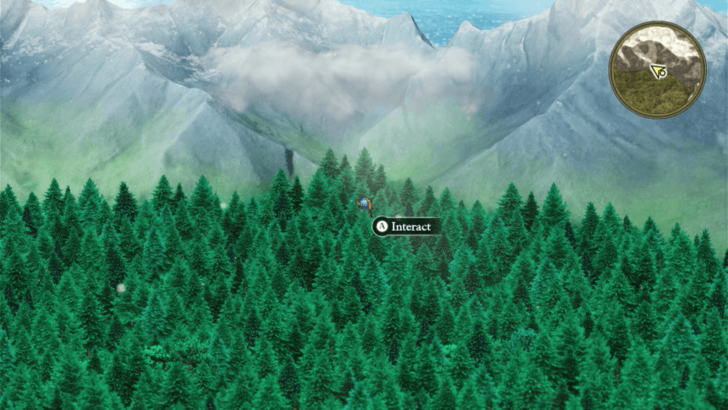
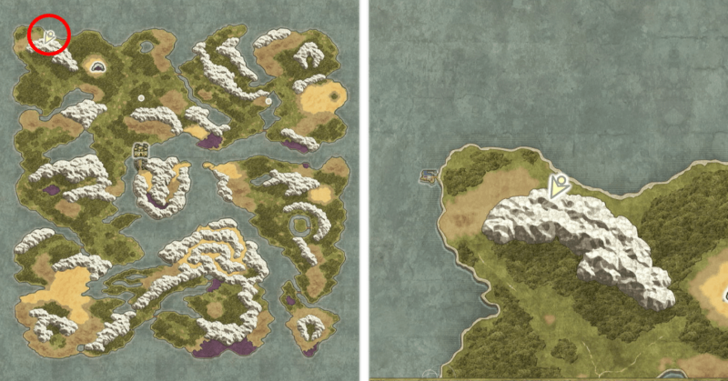
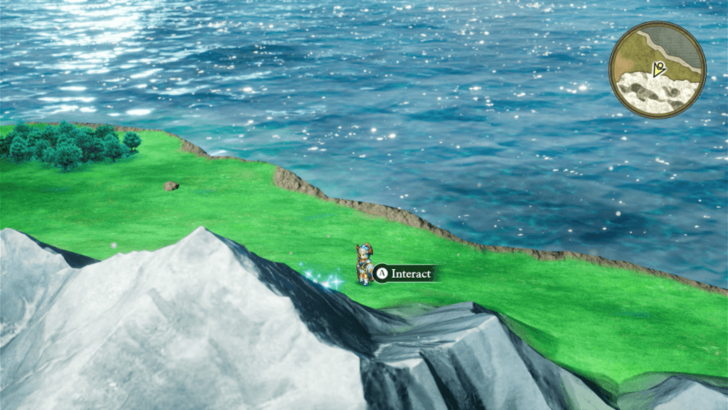
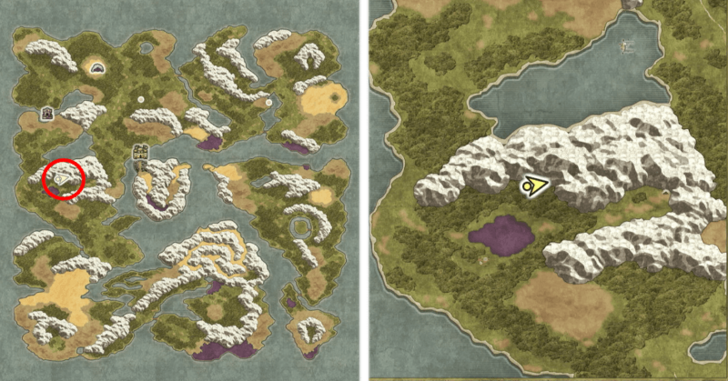
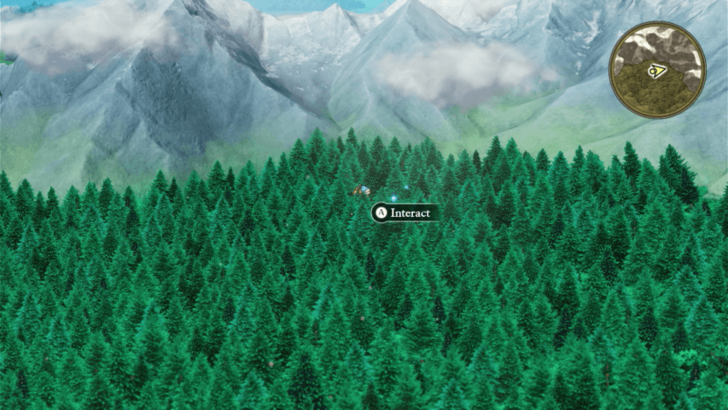
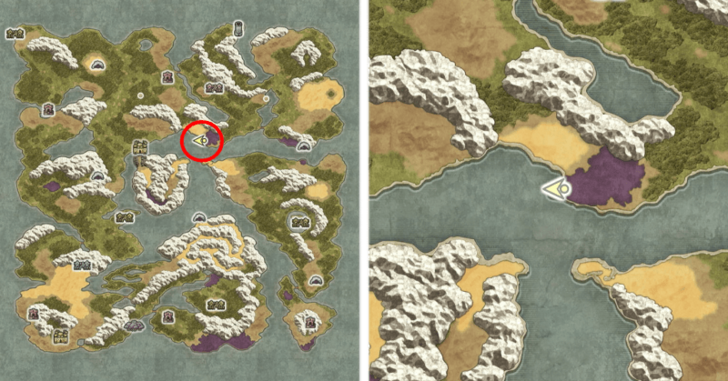
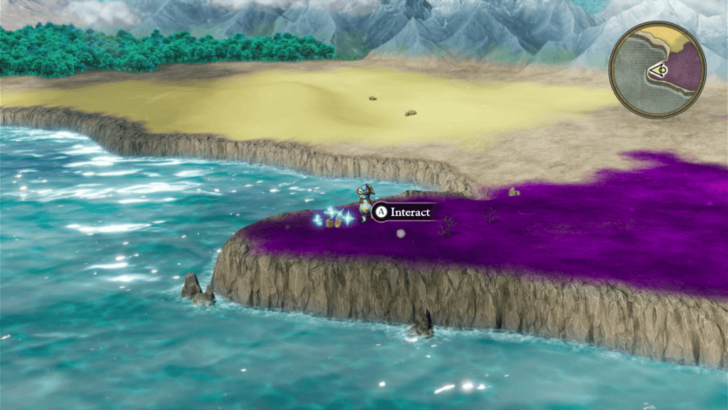
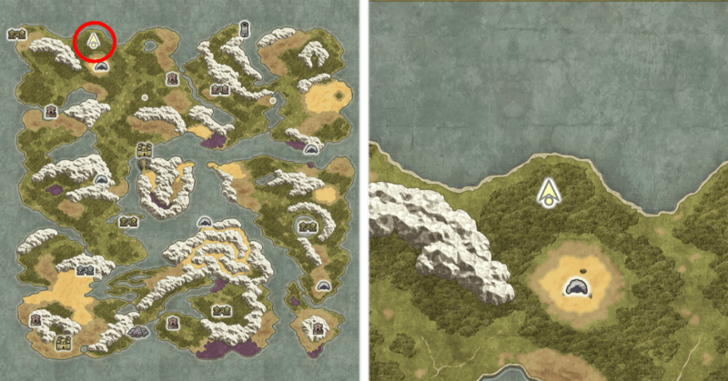
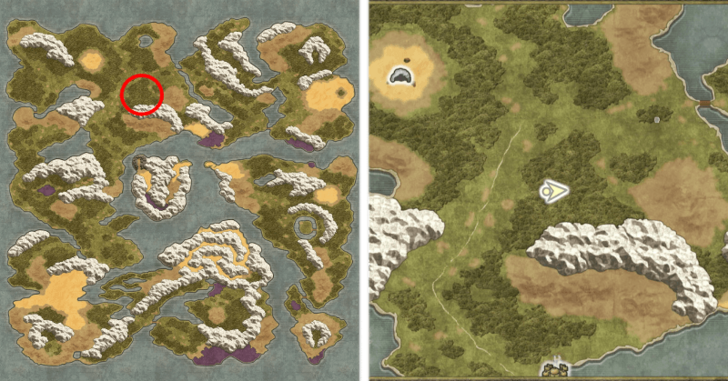
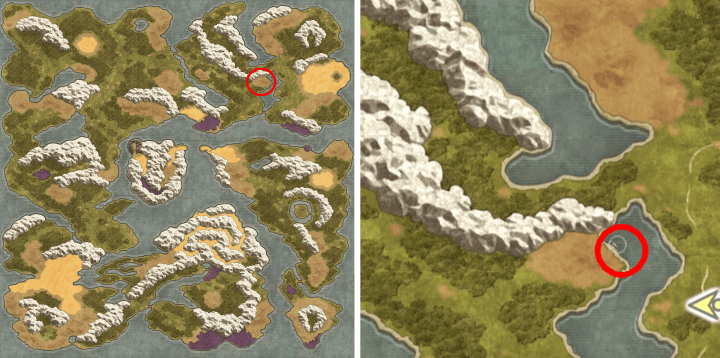
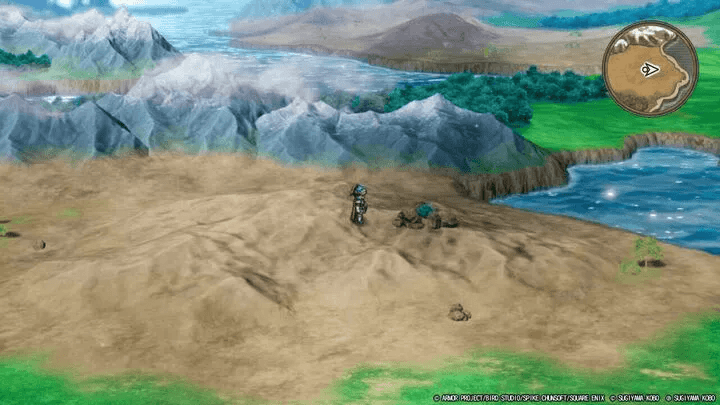
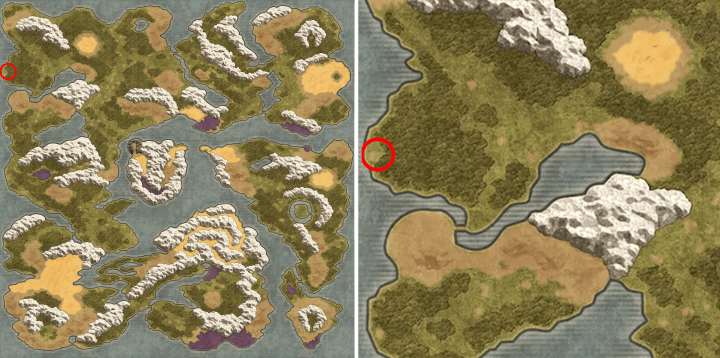
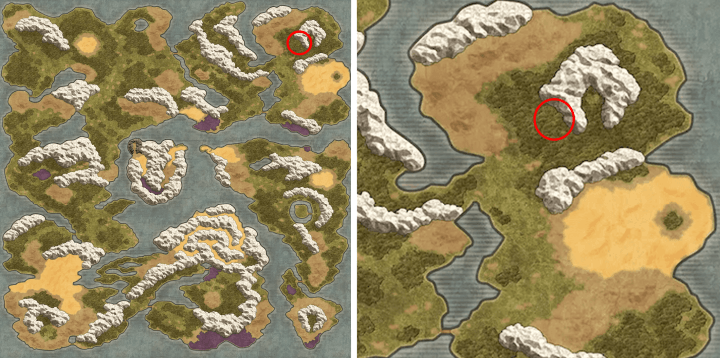
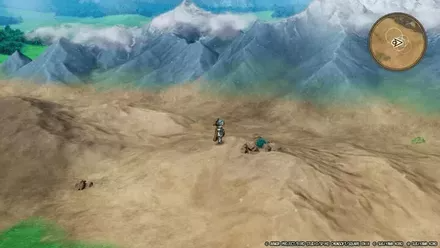
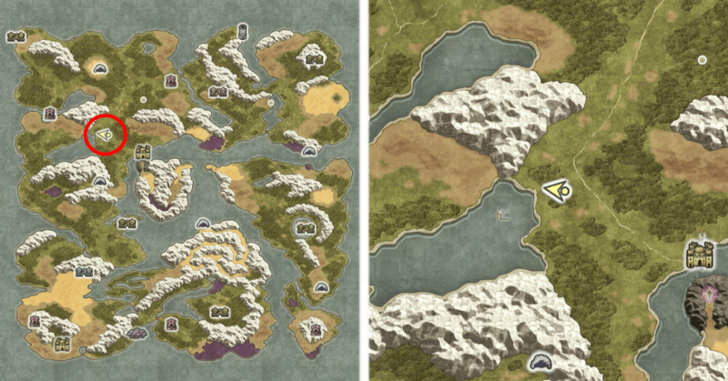
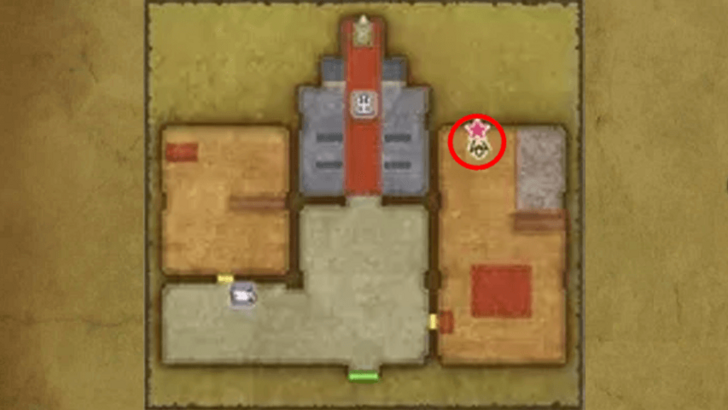
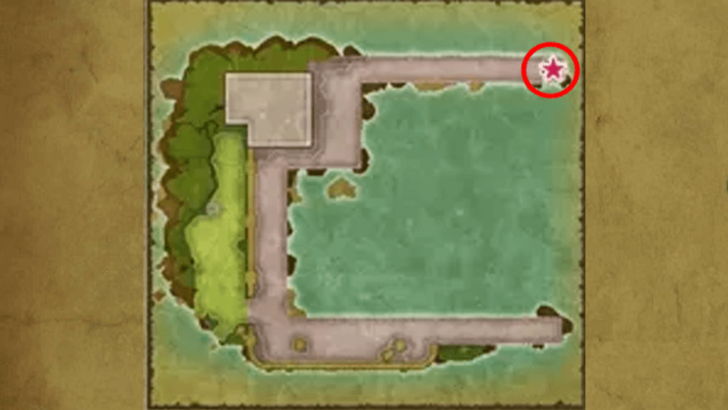
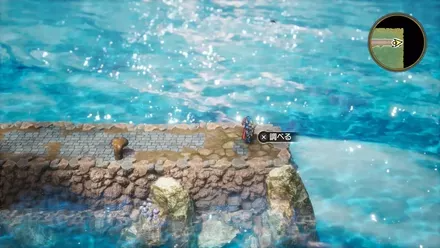
All Secret Spot Locations
| Map Image | World Image |
|---|---|
 |
 |
 |
 |
 |
 |
 |
 |
 |
 |
 |
 |
 |
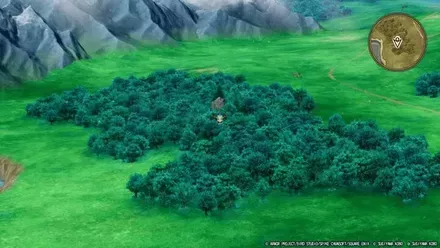 |
Here is a list of all known Secret Spot locations you can find during this part of the walkthrough. We’re still looking for more, so check back soon for updates!
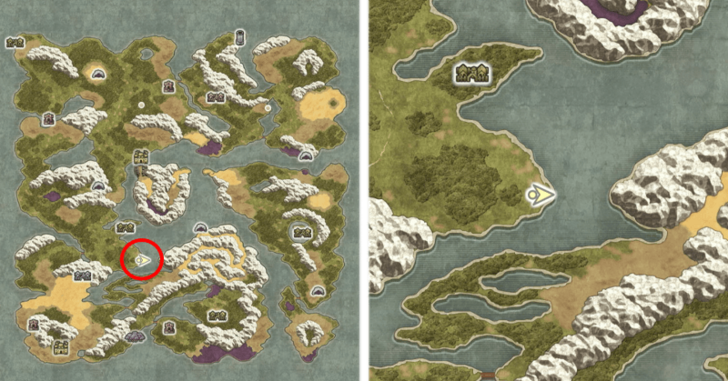
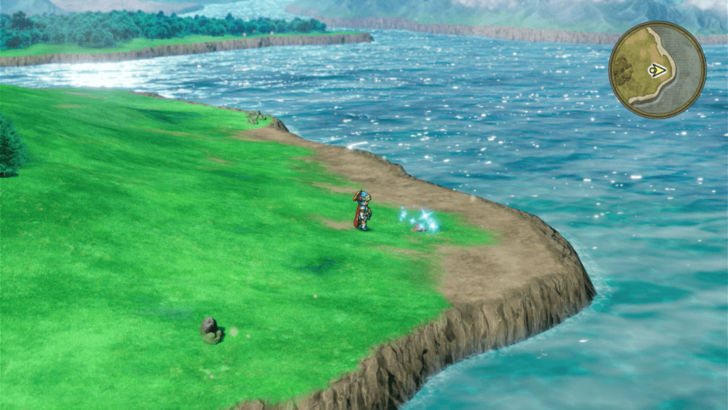
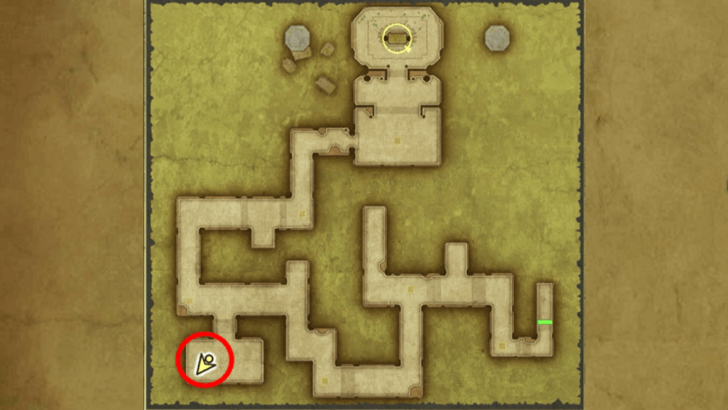
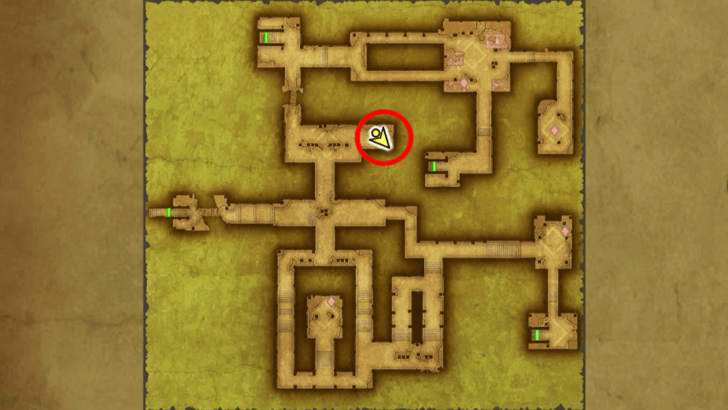
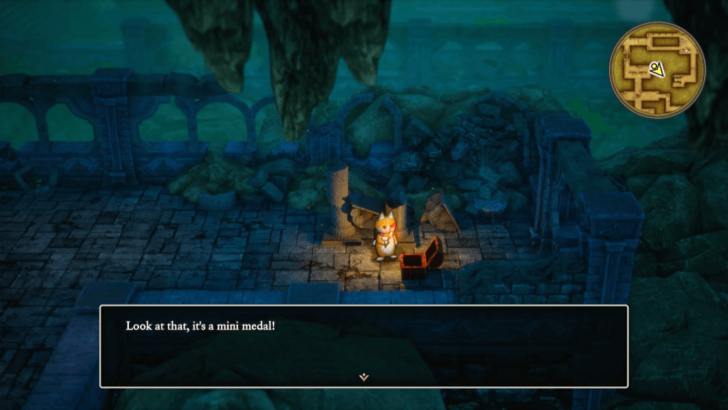
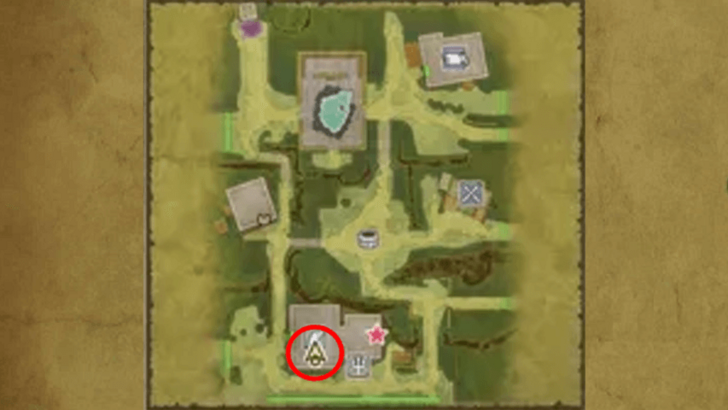
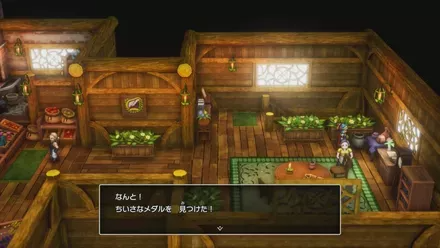
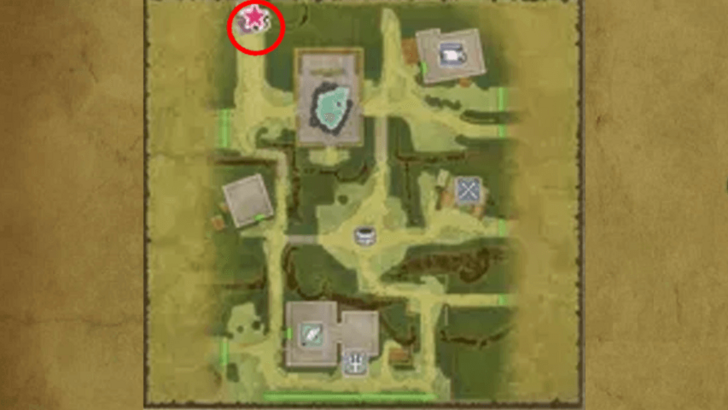
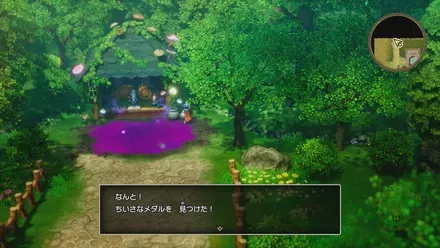
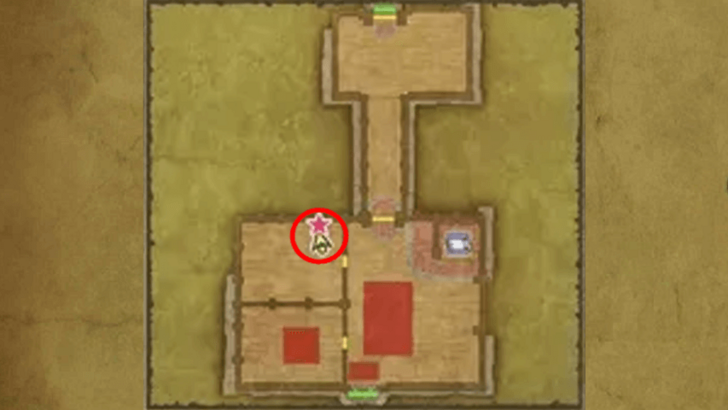
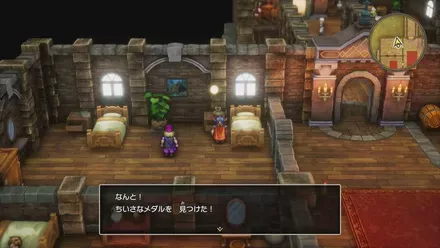
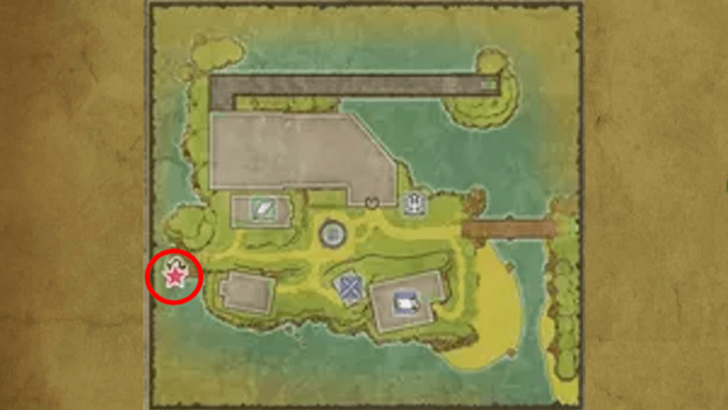
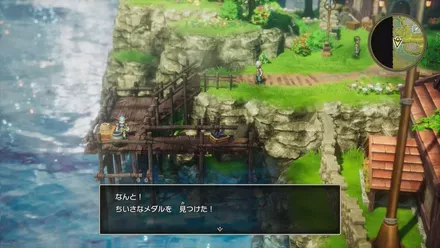
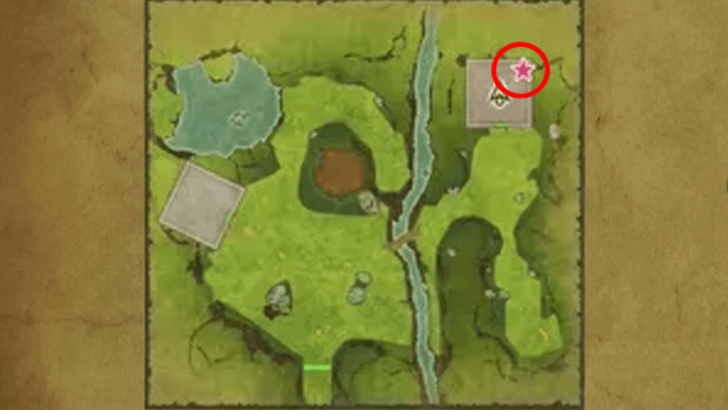
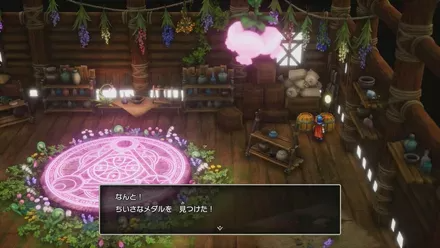
All Mini Medal Locations
| Map Image | World Image |
|---|---|
 |
 |
 |
 |
 |
 |
 |
 |
 |
 |
 |
 |
 |
 |
 |
 |
 |
 |
 |
 |
 |
 |
 |
 |
 |
 |
Here is a list of all known Mini Medal locations you can find during this part of the walkthrough.
All Mini Medal Locations and Rewards
Dragon Quest 1 HD-2D Remake Related Guides
List of All Story Walkthroughs
| 1 | Tantegel Castle to Craggy Cave |
|---|---|
| 2 | Quagmire Cave to Green Dragon Boss Fight |
| 3 | Weirdwood to Weeping Isle |
| 4 | Preparations Before the Final Dungeon |
| 5 | Dragonlord's Castle and Final Boss |
| 6 | List of All Endings |
Comment
Author

Walkthrough Part 1: Tantegel Castle to Craggy Cave
Rankings
- We could not find the message board you were looking for.
Gaming News

![Star Savior Review [First Impressions] | Engaging, Entertaining, and Expensive](https://img.game8.co/4447603/8f500e9bf666bdb8adb1af478e9dfdbd.png/show)


Popular Games

Genshin Impact Walkthrough & Guides Wiki
Umamusume: Pretty Derby Walkthrough & Guides Wiki
Crimson Desert Walkthrough & Guides Wiki
Monster Hunter Stories 3: Twisted Reflection Walkthrough & Guides Wiki
Honkai: Star Rail Walkthrough & Guides Wiki
Pokemon Pokopia Walkthrough & Guides Wiki
The Seven Deadly Sins: Origin Walkthrough & Guides Wiki
Wuthering Waves Walkthrough & Guides Wiki
Zenless Zone Zero Walkthrough & Guides Wiki
Arknights: Endfield Walkthrough & Guides Wiki


Recommended Games
Fire Emblem Heroes (FEH) Walkthrough & Guides Wiki
Diablo 4: Vessel of Hatred Walkthrough & Guides Wiki
Cyberpunk 2077: Ultimate Edition Walkthrough & Guides Wiki
Yu-Gi-Oh! Master Duel Walkthrough & Guides Wiki
Super Smash Bros. Ultimate Walkthrough & Guides Wiki
Pokemon Brilliant Diamond and Shining Pearl (BDSP) Walkthrough & Guides Wiki
Elden Ring Shadow of the Erdtree Walkthrough & Guides Wiki
Monster Hunter World Walkthrough & Guides Wiki
The Legend of Zelda: Tears of the Kingdom Walkthrough & Guides Wiki
Persona 3 Reload Walkthrough & Guides Wiki


All rights reserved
© ARMOR PROJECT/BIRD STUDIO/SPIKE CHUNSOFT/SQUARE ENIX
© SUGIYAMA KOBO ℗ SUGIYAMA KOBO
The copyrights of videos of games used in our content and other intellectual property rights belong to the provider of the game.
The contents we provide on this site were created personally by members of the Game8 editorial department.
We refuse the right to reuse or repost content taken without our permission such as data or images to other sites.