Mipha, the Zora Princess Walkthrough: All Treasure Chests and Korok Seeds Locations

A walkthrough for Chapter 2: Mipha, the Zora Princess in Hyrule Warriors: Age of Calamity for the Nintendo Switch. Mipha, the Zora Princess maps, main enemies and battlefield materials, locations of Korok seeds and treasure chests, how to unlock, as well as rewards for completing this battle can be found in this guide.
List of Contents
Mipha, the Zora Princess Overview
Battle Info
| Mipha, the Zora Princess | |
|---|---|
| Story Chapter | Chapter 2 |
| Recommended Level | 6 |
| Region | Lanayru |
| Unlock Conditions | Clear the Battle: Road to the Ancient Lab |
| Restricted Allies | Link |
Rewards
| First-Clear Rewards | None |
|---|
Mipha, the Zora Princess Battlefield Materials and Main Enemies
Battlefield Materials
Mipha, the Zora Princess Walkthrough
Map
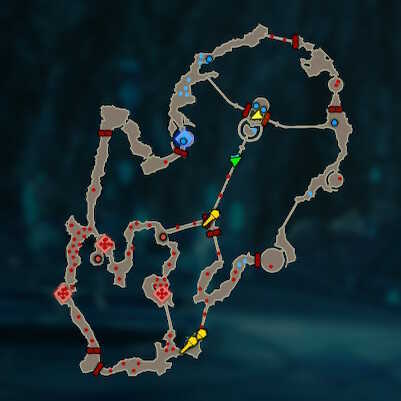
Objectives
| Objectives | |
|---|---|
| 1 | Head to the marked locations on your map and defeat the strong enemies that you will encounter to rescue the Zora Captains. |
| 2 | 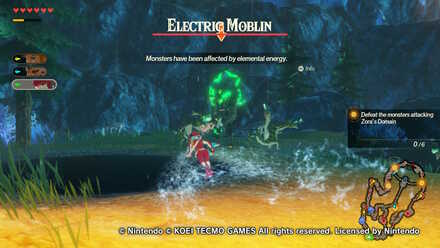 Defeat the Electric Moblin in the southwestern area of the map. |
| 3 | Wipe out the remaining enemies attacking the domain. You might want to split up for this objective as the captains on each marked area can be overwhelmed by the enemies. |
| 4 | Make your way to Ploymus Mountain and defeat the Lynel. |
| 5 | 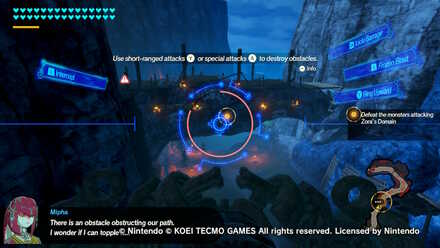 Defeat more attacking enemies using Divine Beast Vah Ruta. Don't forget to hold L to guard against incoming attacks. |
| 6 | 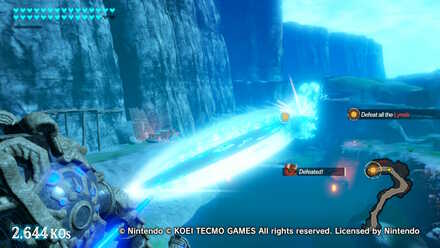 Defeat the rest of the Lynels on your way, preferably with a special attack, to finish the battle. |
Mipha, the Zora Princess Tips and Strategies
Split the Party

Since the objectives are scattered around the map, order your other characters to move to an objective and switch to them to quickly defeat the marked enemies.
How to Beat the Lynel
Follow the Rune Prompt

Some of the Lynel's attacks can be interrupted with runes. Keep an eye out for prompts and use the indicated rune to stagger the Lynel before dishing out damage.
This will quickly deplete its weak-point gauge so repeat the process until you can perform a Weak-Point Smash and deal massive damage.
How to Perform a Weak-Point Smash
Get Away When It Roars

Stay away from the Lynel when it roars, as it will be followed by a fire blast. Take note that the roar will also indicate how wide the blast radius is so you'll know how far you should be from the Lynel during the attack.
Use Mipha's Special Ability
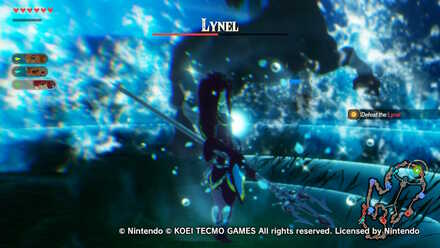
If you're out of healing items and you're still getting brutalized by the Lynel, charge up Mipha's special attack and use it to heal the entire party.
Mipha, the Zora Princess Korok Seed and Treasure Chest Locations
| Icon | How to Use |
|---|---|
 | Show Names This button reveals the Name of every icon currently shown. |
 | Show Pins This button will toggle between showing and hiding all the pins that you have already marked as acquired. |
 | Fullscreen This button will change the map display to fill the screen. |
 | Search Mode Toggle This button will display a search bar which you can use to search for an individual pin by its name. |
 | Icon Mode Toggle In Search Mode, this button will toggle you back to Icon Mode, removing the search bar and displaying the icons again. |
 | All Pins This button is shown along with the Icons on the right when there are over 6 types of pins. Click it for a full selection of all available pin types. |
 | Counter Tracks the number of pins you have of a certain type. The pin type shown is set to the page and currently cannot be changed; however, all pin type counters can be viewed by clicking the checklist icon on the right side. |
| View All Counters This icon is found on the right side of the Counter. When a map has more than one pin type, click this icon to see Counters for all pin types. |
All Story Guides

Story Walkthrough: List of Chapters
 The Battle of Hyrule Field
 Road to the Ancient Lab
 Mipha, the Zora Princess
 Daruk, the Goron Hero
 Revali, the Rito Warrior
 Urbosa, the Gerudo Chief
 The Yiga Clan Attacks!
 Freeing Korok Forest
 The Road Home, Besieged
 Akkala Tower
 Destroy the Yiga Clan!
 When Courage Fails
 Calamity Strikes
 Water and Fire
 Air and Lightning
 Relentless as a Waterfall
 Each Step Like Thunder
 The Great Plateau
 All Hyrule, United
 The Future of Hyrule
 EX To Zelda's Side
 EX Battle of Goponga Village
 EX Battle for Kakariko Village
 EX Searching Hyrule Forest
 EX Liberate the Ancient Lab
 EX The Princess and the King
 EX The Yiga Clan's Retreat
 EX Guardian of Remembrance
Author

Mipha, the Zora Princess Walkthrough: All Treasure Chests and Korok Seeds Locations
Rankings
- We could not find the message board you were looking for.
Gaming News
![Animal Crossing: New Horizons Review [Switch 2] | Needlessly Crossing Over to a New Generation](https://img.game8.co/4391759/47d0408b0b8a892e453a0b90f54beb8a.png/show)


Popular Games

Genshin Impact Walkthrough & Guides Wiki
Honkai: Star Rail Walkthrough & Guides Wiki
Arknights: Endfield Walkthrough & Guides Wiki
Umamusume: Pretty Derby Walkthrough & Guides Wiki
Wuthering Waves Walkthrough & Guides Wiki
Pokemon TCG Pocket (PTCGP) Strategies & Guides Wiki
Abyss Walkthrough & Guides Wiki
Zenless Zone Zero Walkthrough & Guides Wiki
Digimon Story: Time Stranger Walkthrough & Guides Wiki
Clair Obscur: Expedition 33 Walkthrough & Guides Wiki


Recommended Games
Fire Emblem Heroes (FEH) Walkthrough & Guides Wiki
Pokemon Brilliant Diamond and Shining Pearl (BDSP) Walkthrough & Guides Wiki
Diablo 4: Vessel of Hatred Walkthrough & Guides Wiki
Super Smash Bros. Ultimate Walkthrough & Guides Wiki
Yu-Gi-Oh! Master Duel Walkthrough & Guides Wiki
Elden Ring Shadow of the Erdtree Walkthrough & Guides Wiki
Monster Hunter World Walkthrough & Guides Wiki
The Legend of Zelda: Tears of the Kingdom Walkthrough & Guides Wiki
Persona 3 Reload Walkthrough & Guides Wiki
Cyberpunk 2077: Ultimate Edition Walkthrough & Guides Wiki


All rights reserved
© Nintendo © KOEI TECMO GAMES All rights reserved. Licensed by Nintendo.
The copyrights of videos of games used in our content and other intellectual property rights belong to the provider of the game.
The contents we provide on this site were created personally by members of the Game8 editorial department.
We refuse the right to reuse or repost content taken without our permission such as data or images to other sites.