This survey will take about 1 minute.
Your answers will help us to improve our website.
Sea of Thieves
Shores of Gold Tall Tale Guide
★SoT PS5 Version and Season 12 are Now Live!
★New Pre-Order and Edition Bonuses for the PS5!
★Check out our Beginner's Guide for new players.
★Tall Tales | World Events | Trading Companies

A walkthrough guide for Shores of Gold Tall Tale in Sea of Thieves. Read on to see a complete Tall Tale walkthrough and guide for Shores of Gold, including info on how to get all its Commendations and a list of its completion rewards.
| ◄ Previous Tall Tale | Next Tall Tale ▶ |
|---|---|
| Revenge of the Morningstar | - |
List of Contents
Shores of Gold Overview and Location
| Shores of Gold | |
|---|---|
| Story Arc | Shores of Gold |
| Quest Location | Next to Grace Morrow outside the Tavern at Morrow's Peak Outpost. |
| Reward |
8000 Gold (High Seas) 2400 Gold (Safer Seas) Gold Hoarder Skull Gold Hoarder Jacket |
| ◄ Previous Tall Tale | Next Tall Tale ▶ |
| Revenge of the Morningstar | - |
Find Grace at Morrow's Peak Outpost (V-17)
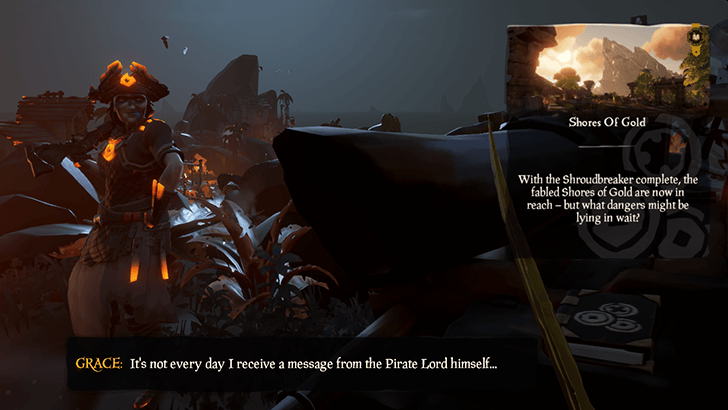
To start the Shores of Gold Tall Tale, head over to Morrow's Peak Outpost (V-17) and talk to the NPC called Grace in front of the Charred Parrot Tavern. Vote to start at the Tall Tale book next to her to begin the quest.
Note: If you are not at Morrow's Peak and want the option to Dive to Location, simply start the Tall Tale via your ship's quest table to unlock it.
Shores of Gold Walkthrough
Sail to the Shores of Gold (Y-3)
| Shores of Gold Map | |
|---|---|
 |
|
| Map Location | World View |
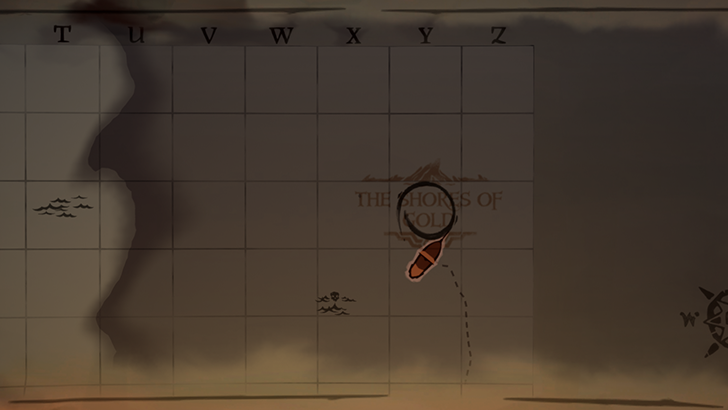 Middle of Grid Y-3 |
 South East Shore |
After speaking to Grace at Morrow's Peak Outpost, sail off the map towards the Shores of Gold (Y-3). The Shroudbreaker should protect your ship from getting destroyed after you enter the red sea.
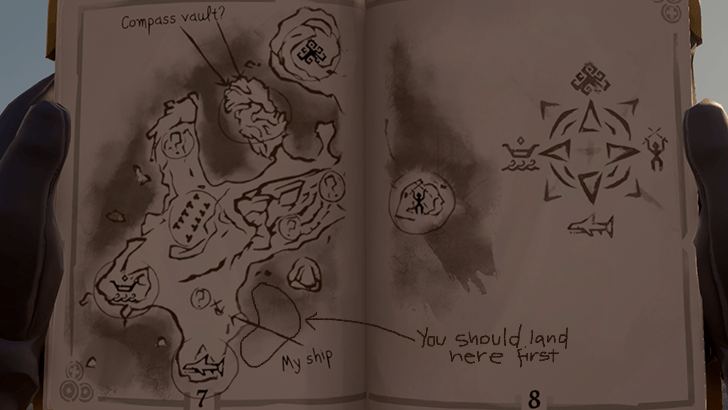
If you sailed from Morrow's Peak Outpost directly to the Shores of Gold, you would have landed at the southern side of the island. Use the map on Page 7 of the Tall Tale book to get your bearings upon landing.
Acquire Four Vault Medallions
| All Vault Puzzle Solutions | |
|---|---|
| Southern Vault | Eastern Vault |
| Northern Vault | Western Vault |
Click on any of the links above to jump to a puzzle solution!
To solve the mystery of the Shores of Gold, you will need to solve 4 Vault Puzzles scattered throughout the island. These will reward you with the 4 Medallions that you need to unlock the Compass Vault marked on your map.
Southern Vault - Shark Medallion
| Southern Vault Puzzle Solutions | |
|---|---|
 Combination 1 Combination 1 |
 Arrow, Bear, Kraken |
 Combination 2 Combination 2 |
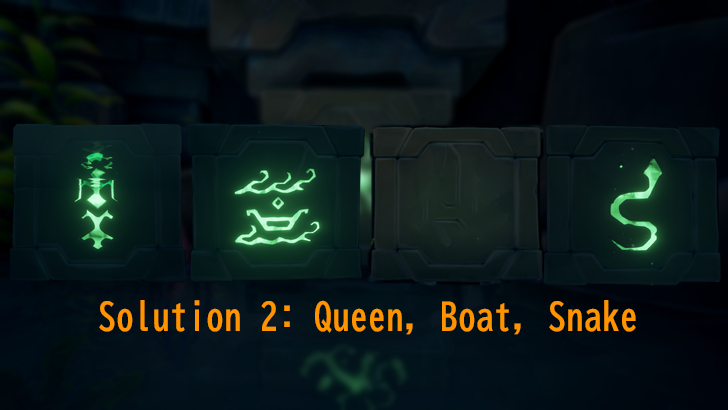 Queen, Boat, Snake |
 Combination 3 Combination 3 |
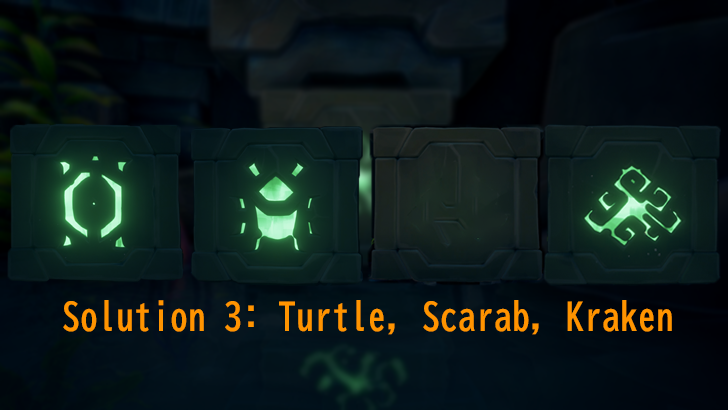 Turtle, Scarab, Kraken |
To solve this puzzle, you will need to take note of the possible combinations found on Page 10 of the Tall Tale book. There will be 3 combinations for you to input, so make sure you have your Tall Tale book out before starting the vault puzzle.
After you light all 4 braziers, the puzzle will start and you will need re-create the 3 combinations using the rotating blocks inside the vault. The catch is that one block is blank and does not rotate, so you will need to select 3 out of the 4 symbols per circle to re-create the patterns.
Eastern Vault - Warrior Medallion

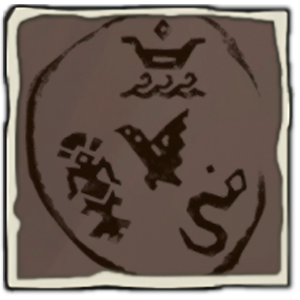
The Eastern Vault simply requires you to re-create the Gold Hoarders Insignia (shown above) using the rotating blocks. If done correctly, you should easily be able to open the vault and retrieve the Warrior Medallion.
However, unlike the other vaults, the Eastern Vault fills up with water really fast. Try not to waste time inputting the solution if you want to avoid drowning.
Northern Vault - Kraken Medallion
| Northern Vault Puzzle Solution | |
|---|---|
 1st Sequence: Make all 4 blocks Snake Symbols. 2nd Sequence: Make all 4 blocks Three Person Symbols. |
Once you start the Northern Vault puzzle, a series of insta-kill, wooden stake traps will start activating. Avoid them while matching all of the blocks for 2 rounds in order to open the vault and get the Kraken Medallion.
Tip: If playing solo, make sure to park your ship next to the Northern Vault so that respawning won't have you traveling back all the way north to retry the puzzle.
Western Vault - Boat Medallion
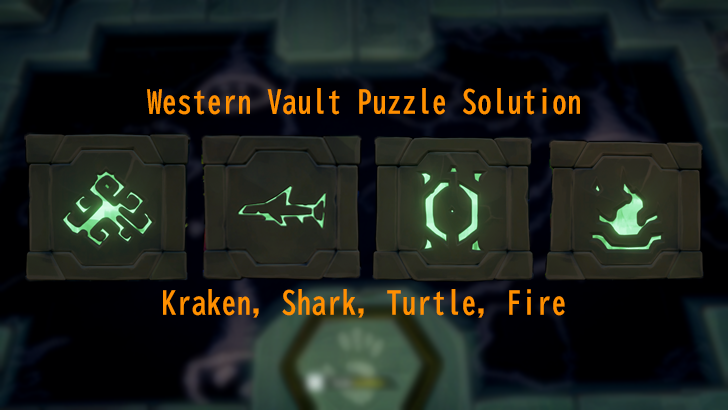
The Western Vault is by far the longest puzzle to solve out of the 4 vaults. You will need to go to the 4 question mark (?) locations on the map and find the symbols you need in order to open the vault.
Once you've collected all 4 symbols from the question mark locations, return to the vault and rotate the blocks to show the Kraken, Shark, Turtle, and Fire. This should open the vault granting you access to the Boat Medallion.
Note: If you want to find out how to follow the clues and get the solution shown above, check out the step-by-step guide below.
How to Solve the Western Vault Puzzle
| 1 |  After lighting the braziers inside the vault, a projection will show up highlighting and numbering certain areas of the island. These are the question mark locations on Briggsy's Map showing you where you can find and take note of the 4 needed symbols. |
|---|---|
| 2 |  First, head to the northeast side of the island to collect Symbols 1 and 3. Step on the pressure plate of Symbol 1 and look down at the water to the south east. There should be a pillar that shows the Kraken if you use your spyglass. |
| 3 | 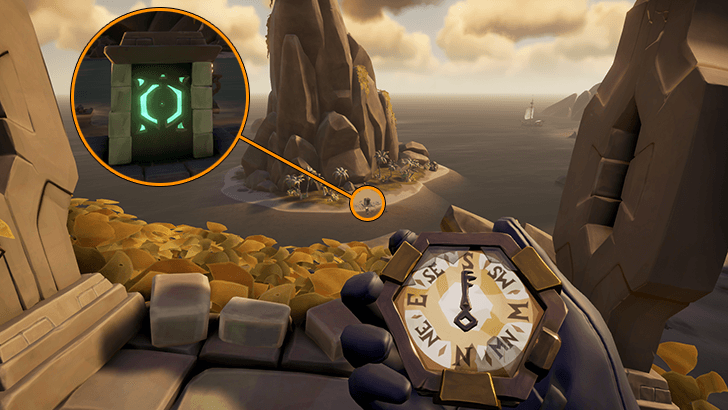 Next, backtrack up the cliff to reach the pressure plate for Symbol 3. Step on it to reveal a pillar to your south. This pillar will be backwards but if viewed from the other side, it should show the symbol of a Turtle. |
| 4 |  Return to the wreck of Briggsy's Ship and find Symbol 2 nearby. The statue you're looking for will look like a larger stone version of the Shroudbreaker. Flip the levers on either side of it to reveal the Shark. |
| 5 | 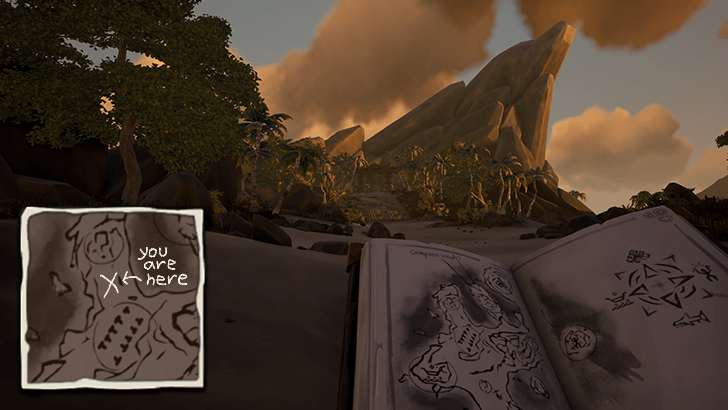 Finally, head to the northern section of the island to find Symbol 4. Go past the giant statues until you find a set of Ancient Ruins. |
| 6 |  Flip the lever at the center of the ruins (beside the stairs) and it should partially open a vault door that shows you a clue. The hook indicates the pedestal you need to stand on in order to reveal Symbol 4. |
| 7 | 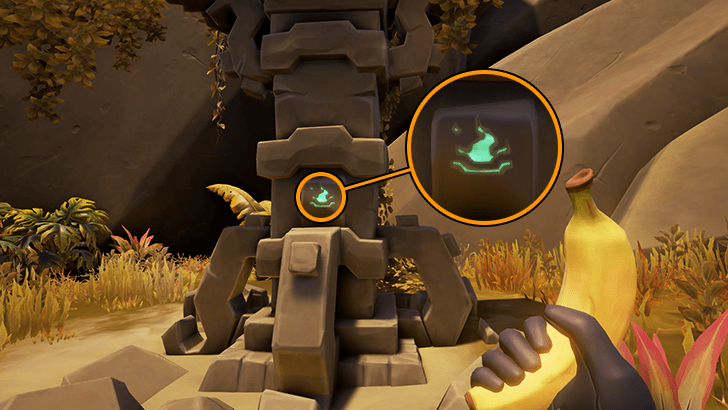 Head to the northwest pillar and stand on the pressure plate to reveal the Fire symbol. |
| 8 | With all 4 symbols secure, head back to the Western Vault and turn the blocks to form the pattern as follows (from left to right blocks): Kraken, Shark, Turtle, Fire. Enter the solution to open the vault and get the Boat Medallion. |
Use the Medallions to Open the Compass Vault

Once you have all 4 medallions secure, head to the Compass Vault at the north east end of the island. Place the medallions into the stone relief to open the vault. Retrieve the Gold Hoarder Coin inside and bring it back to your ship.
Use Your Ship's Cannons to Land on the Headless Statue
Before you can use the Gold Hoarder Coin, you will first need to find the entrance to the large Gold Hoarders vault underneath the island. Sail to the north of the island and park your ship near the giant stone statues.
Next, align your cannon so that it faces the giant headless stone statue. Once the shot is lined up, climb into the cannon and shoot yourself towards the stone statue. If done correctly, you should see the entrance on its lap. Go down and flip the lever to open the way to the Gold Hoarder vault entrance.
Eat Cooked Food and Resupply Before Entering the Vault
Skeletons, traps, and a difficult boss fight await you inside the Gold Hoarder vault. Make sure to eat cooked food and resupply before you enter the vault to make exploration easier.
Explore the Gold Hoarder Vault
With the way open, retrieve the Gold Hoarder Coin from your ship and go through the now open door at the foot of the headless statue. Inside, place the coin on the pedestal to open the Gold Hoarder vault. Explore it until you reach the treasure room at the very end.
Note: The entire section until the boss room will be a platforming level. Navigate the traps and defeat any Skeletons that spawn until you reach a large drawbridge that you have to lower using a four-person capstan. This marks the entrance to the treasure room.
Defeat the Gold Hoarder Boss

Upon entering the treasure room, you and your crew will have to defeat a powerful boss called the Gold Hoarder. Deal with his skeletal minions and defeat him in order to complete the Shores of Gold Tall Tale.
Leave the Shores of Gold
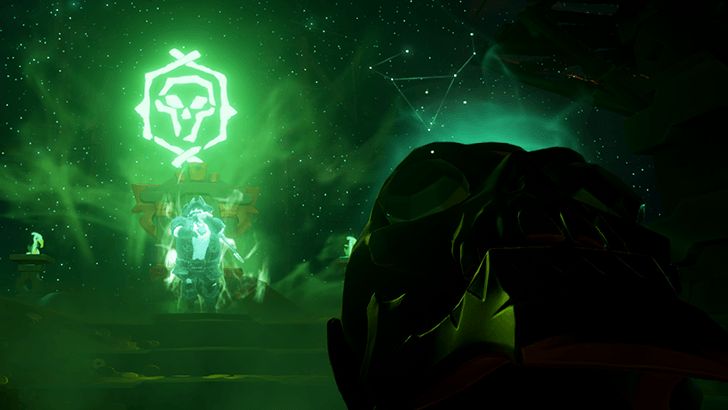
Once the Gold Hoarder is defeated, the Pirate Lord will appear and speak to you. After he's done speaking, collect the Gold Hoarder Skull, return to your ship, and leave the Shores of Gold. The skull can be sold at any Order of Souls tent for gold and reputation.
All Shores of Gold Journal Locations
| No. | All Shores of Gold Journal Locations |
|---|---|
| 1 | I Forgot to Stop |
| 2 | Let's Not Mention This… |
| 3 | Dreams |
| 4 | No Shortcuts! |
| 5 | Climbing Masterclass |
| 6 | Why Are They Here? |
| 7 | Where the Gold Goes |
| 8 | I Only Wanted One… |
| 9 | Answers |
| 10 | A Last Act of Free Will |
All Shores of Gold journals can be found in Tribute Peak (Y-3). This allows you to collect all the journals you need for The Stain of Greed commendation in one go.
I Forgot to Stop Journal Location
Head to the shipwreck near the beach of Tribute Peak (Y-3). You can find the I Forgot to Stop journal on the rear end of the hull, inside the captain's quarters.
Let's Not Mention This… Journal Location
Along the way to the compass room, the next journal Let's Not Mention This… can be found before the broken mast, atop the barrels on the left. You'll encounter the broken mast just before crossing the bridge.
Dreams Journal Location
The next journal, Dreams, can be found as soon as you enter the compass room. From the entrance, turn right, and you should see a crate with the journal on it.
No Shortcuts! Journal Location
As you proceed through the tall tale, you'll gain access to a new area with a set of statues. Just behind these, there's a path that leads you to ruins. Examine the ruins, and in the middle, you'll find the journal No Shortcuts!
Climbing Masterclass Journal Location
Next, look for the headless statue from the same set. From the headless one, the Climbing Masterclass journal will be on the fourth statue, directly atop its left hand, which you can reach by catapulting yourself using a cannon.
Why Are They Here? Journal Location
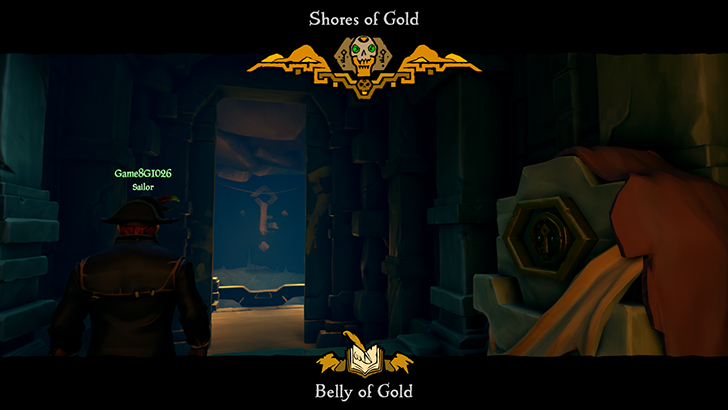
At the Belly of Gold checkpoint, you can find the next journal Why Are They Here? to your left inside another crate. This will be on the next room after placing the Gold Hoarder coin to open the cave door.
Where the Gold Goes Journal Location
As you continue exploring the cave from the previous journal, you should see an area lit by a blue mushroom. The Where the Gold Goes journal will be on the left side, and you'll need to use your lantern to see it if it's not too visible.
I Only Wanted One… Journal Location
After reaching the end of the broken mast pathways, you'll see another crate before the next section. Inside one of the crates will be the I Only Wanted One… journal.
Answers Journal Location
As you head deeper into the chambers, you will see a wooden scaffolding on the other side of the spike traps. On top of this scaffolding, you will find the Answers journal.
A Last Act of Free Will Journal Location
The last journal, A Last Act of Free Will, will be in the next room after you pull all three levers down. It will also be on a scaffolding, specifically on the right side.
Shores of Gold Commendations and Rewards
| Commendation | Reward | How to Unlock |
|---|---|---|
| Gold and Glory | Gold Hoarder Figurehead | Legendary Commendation: Complete all commendations for 'Shores of Gold'. |
| Lord of Gold | None | Legendary Commendation: Complete the Tale 5 times. |
| Path to Forsaken Fortune | None | Discover the Gold Hoarder Coin. |
| Seeker of Grand Adventure |
Shores of Gold Curse “Sailor of the Shores of Gold” Title | Legendary Commendation: Complete all Tall Tale commendations. |
| Shores of Gold | Gold Hoarder Jacket | Complete 'Shores of Gold'. |
| The Fabled Island | None | Reach the Shores of Gold. |
| The Stain of Greed | None | Discover all 10 of Briggsy's Journals. |
Sea of Thieves Related Guides
All Tall Tales
| Maiden Voyage | |
|---|---|
| 1 | Maiden Voyage |
| Shores of Gold | |
| 1 | The Shroudbreaker |
| 2 | The Cursed Rogue |
| 3 | The Legendary Storyteller |
| 4 | Stars of a Thief |
| 5 | Wild Rose |
| 6 | The Art of the Trickster |
| 7 | The Fate of the Morningstar |
| 8 | Revenge of the Morningstar |
| 9 | Shores of Gold |
| Ashen Age | |
| 1 | The Seabound Soul |
| 2 | Heart of Fire |
| A Pirate's Life | |
| 1 | A Pirate's Life |
| 2 | The Sunken Pearl |
| 3 | Captains of the Damned |
| 4 | Dark Brethren |
| 5 | Lords of the Sea |
| The Legend of Monkey Island | |
| 1 | The Journey to Melee Island |
| 2 | The Quest for Guybrush |
| 3 | The Lair of LeChuck |
Comment
Author
Shores of Gold Tall Tale Guide
Please participate in our site
improvement survey
03/2026
improvement survey
03/2026
Would you assist in
improving Game8's site?
improving Game8's site?

×
We are listening to our users' valuable opinions and discussing how to act on them.
The information collected through this survey will be used for the purpose of improving our services. In addition, the information will only be disclosed a part of a statistic in a format that will not allow identification of personal information.
Begin Survey
Not Now
×
Please rate each item regarding Game8.co's Advertisements.
Amount of Ads
Very Dissatisfied
Somewhat Dissatisfied
Fine
Somewhat Satisfied
Highly Satisfied
Placement of Ads
Timing of Ad Display
Ad Loading Speed
Safeness of Ads
Content of Ads
×
Please rate each item regarding Game8.co's Quality of Articles.
Amount of information
Very Dissatisfied
Somewhat Dissatisfied
Fine
Somewhat Satisfied
Highly Satisfied
Frequency of updates
Speed of new information
Accuracy of articles
Understandibility of articles
Readability of sentences
×
Please rate each item regarding Game8.co's Usability of the Site.
Ease of finding information
Very Dissatisfied
Somewhat Dissatisfied
Fine
Somewhat Satisfied
Highly Satisfied
Loading Speed
Use of Color
Font Size
Visibility of Images
Easy to Understand Layout
×
Please rate each item regarding Game8.co's Message Boards, Comments.
Ease of Writing
Very Dissatisfied
Somewhat Dissatisfied
Fine
Somewhat Satisfied
Highly Satisfied
Readability
Ease in Finding Information
Comment Quality
Comment Quantity
Admin Response
×
Please rate each item regarding Game8.co's Site's new design.
Please rate our site's new design
Very Dissatisfied
Somewhat Dissatisfied
Fine
Somewhat Satisfied
Highly Satisfied
Do you think that the website's design change makes the site easier to use?
Has the new design made it easier for you to find information on the site?
Has the new design improved the overall visual appeal of the site?
How would you rate your overall satisfaction with the new design of the site?
×
How likely are you to recommend Game8 to someone you know?
Very Unlikely
0
1
2
3
4
5
6
7
8
9
10
Very Likely
If you have other opinions regarding potential improvement to the website, please share them with us. We would appreciate your honest opinion.
Note: This is a free response section, so you can proceed without entering anything.
Note: Please be sure not to enter any kind of personal information into your response.
Note: Please be sure not to enter any kind of personal information into your response.
×
Thank You
×
Thank you for participating in our survey! Your answers will help us to improve the quality of our website and services.
We hope you continue to make use of Game8.
We hope you continue to make use of Game8.
Close
Rankings
- We could not find the message board you were looking for.
Gaming News


![Everwind Review [Early Access] | The Shaky First Step to A Very Long Journey](https://img.game8.co/4440226/ab079b1153298a042633dd1ef51e878e.png/thumb)

![Monster Hunter Stories 3 Review [First Impressions] | Simply Rejuvenating](https://img.game8.co/4438641/2a31b7702bd70e78ec8efd24661dacda.jpeg/thumb)
Popular Games

Genshin Impact Walkthrough & Guides Wiki
Honkai: Star Rail Walkthrough & Guides Wiki
Umamusume: Pretty Derby Walkthrough & Guides Wiki
Pokemon Pokopia Walkthrough & Guides Wiki
Resident Evil Requiem (RE9) Walkthrough & Guides Wiki
Monster Hunter Wilds Walkthrough & Guides Wiki
Wuthering Waves Walkthrough & Guides Wiki
Arknights: Endfield Walkthrough & Guides Wiki
Pokemon FireRed and LeafGreen (FRLG) Walkthrough & Guides Wiki
Pokemon TCG Pocket (PTCGP) Strategies & Guides Wiki


Recommended Games
Diablo 4: Vessel of Hatred Walkthrough & Guides Wiki
Fire Emblem Heroes (FEH) Walkthrough & Guides Wiki
Yu-Gi-Oh! Master Duel Walkthrough & Guides Wiki
Super Smash Bros. Ultimate Walkthrough & Guides Wiki
Pokemon Brilliant Diamond and Shining Pearl (BDSP) Walkthrough & Guides Wiki
Elden Ring Shadow of the Erdtree Walkthrough & Guides Wiki
Monster Hunter World Walkthrough & Guides Wiki
The Legend of Zelda: Tears of the Kingdom Walkthrough & Guides Wiki
Persona 3 Reload Walkthrough & Guides Wiki
Cyberpunk 2077: Ultimate Edition Walkthrough & Guides Wiki


All rights reserved
©Microsoft 2024. Microsoft, Rare, the Rare logo, Sea of Thieves are trademarks of the Microsoft group of companies.
©Disney. All trademarks and copyrights are property of their respective owners.
MONKEY ISLAND © & ™ 2024 Lucasfilm Ltd. All rights reserved.
The copyrights of videos of games used in our content and other intellectual property rights belong to the provider of the game.
The contents we provide on this site were created personally by members of the Game8 editorial department.
We refuse the right to reuse or repost content taken without our permission such as data or images to other sites.