Astra Malorum Easter Egg Walkthrough
This is the Astra Malorum easter egg walkthrough for Call of Duty: Black Ops 7 (BO7) zombies. Learn all the Astra Malorum steps and a full guide for the main quest easter egg.
List of Contents
Astra Malorum Easter Egg Walkthrough
Jump to a section!
Power on the Telescope
| 1 | Repair the Harmonic Oculus |
|---|---|
 Reach the Observatory Dome and Interact with the Harmonic Oculus to start the repair objective. |
|
| 2 | Find Two Harmonic Components |
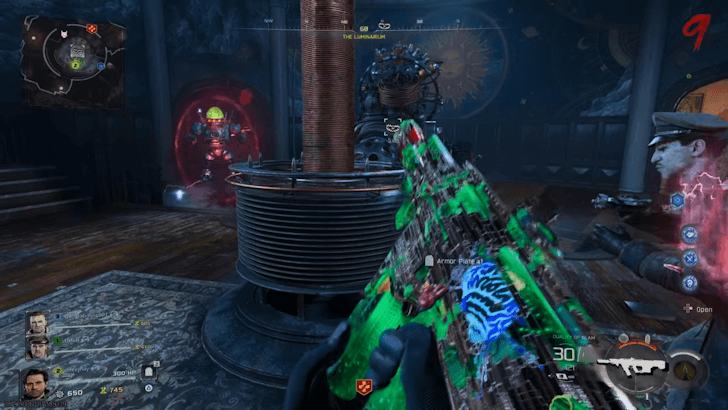
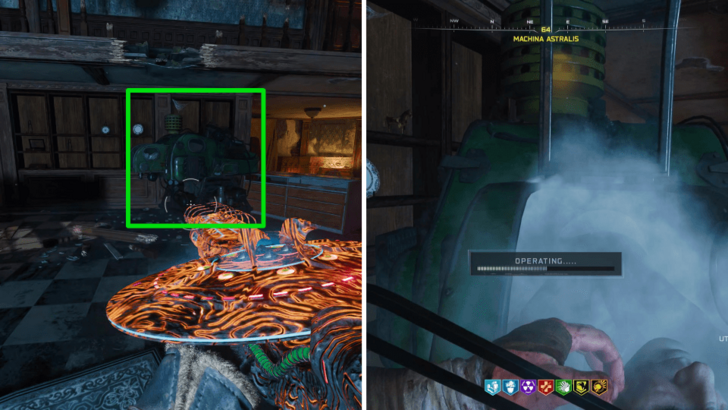
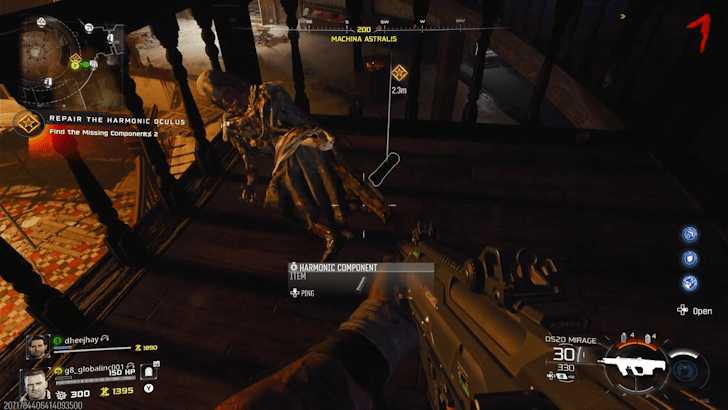 Search the Luminarium and Machina Astralis for the missing harmonic components. Both pieces will be found beside a dead zombie. Their spawn locations each match will be random. Tip: You can actually already pick up them while on the way to turning on the power. |
|
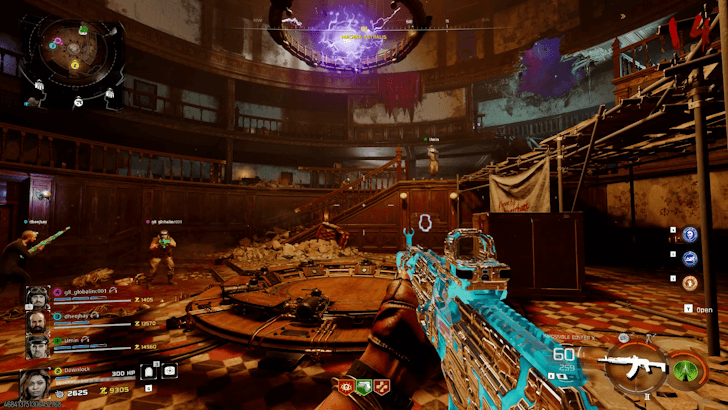
| 3 | Defend the Harmonic Oculus |
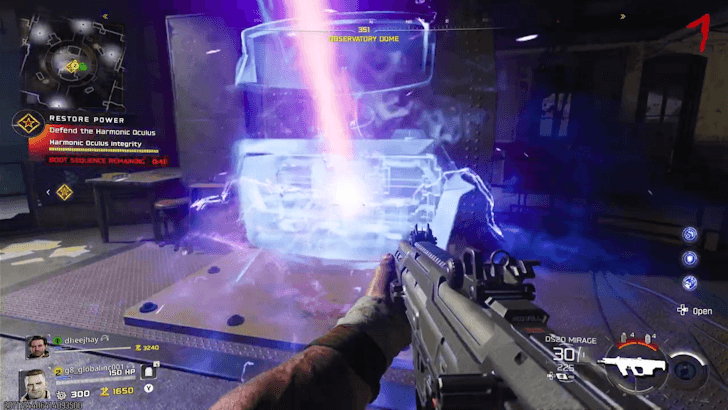 Return to the Observatory Dome and install the Harmonic Components. After placing them, activate the power and defend the Harmonic Oculus as it restores energy. Once the sequence completes, the Pack-a-Punch will be unlocked. |
Collect 4 Contraptions to Power Traps
After restoring the power, you need to get Contraptions to activate traps and kill Oscar. These can be done in any order.
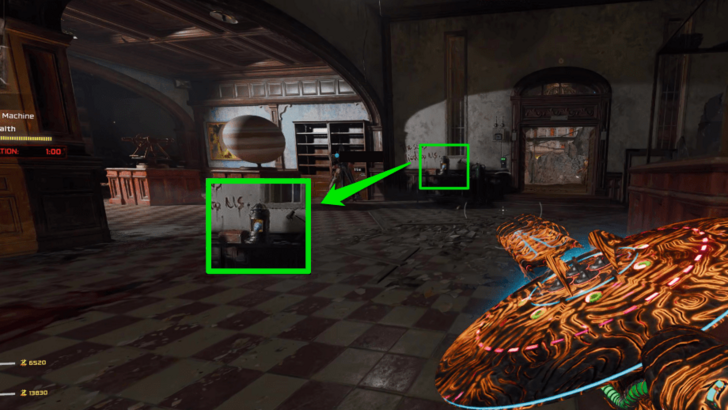
| 1 | Find Oscar |
|---|---|
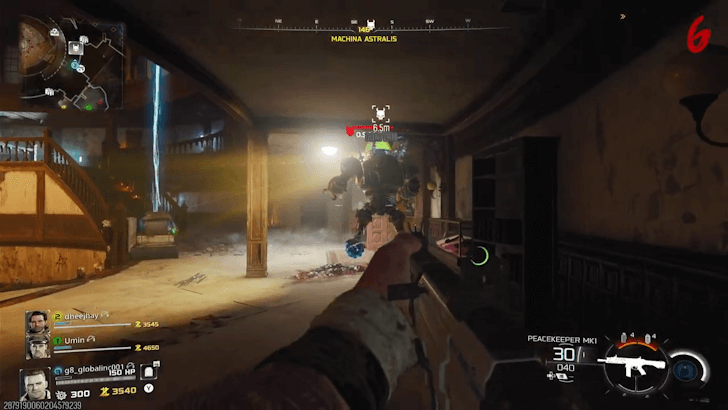 Oscar will spawn at a random location on the map. You can easily track it by checking your map and looking for the Elite Enemy icon: |
|
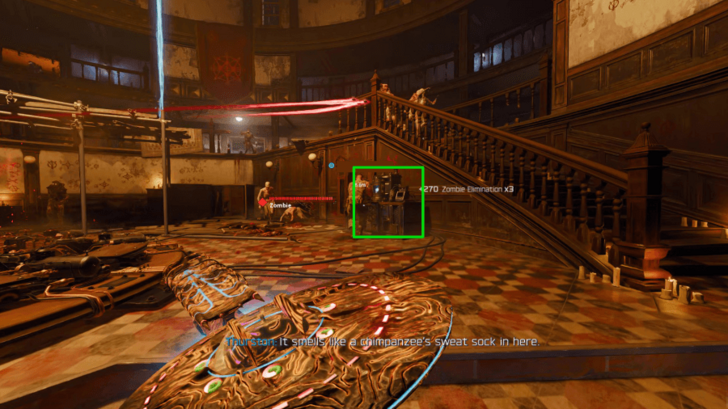
| 2 | Destroy and Collect the Damaged Drone |
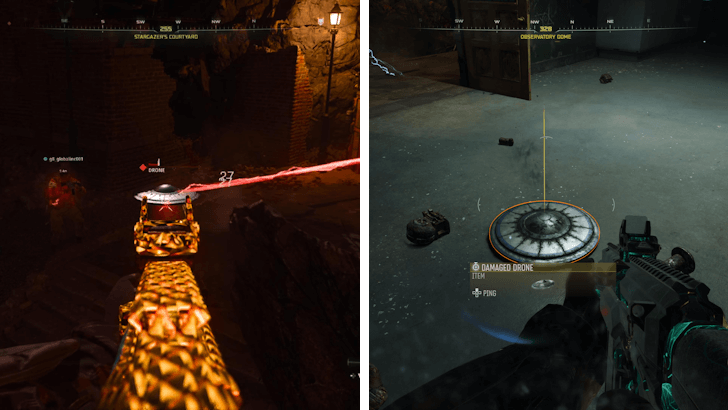 Once Oscar sees you or once you shoot it, it will summon a protective drone. Focus your fire on the drone and destroy it to collect the Damaged Drone quest item. |
|
| 3 | Get Car Battery from Ol' Tessie |
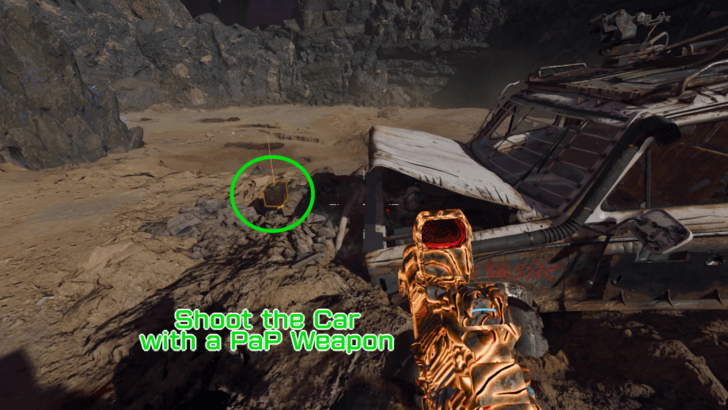 You can get the Car Battery from Ol' Tessie once you Pack-A-Punch a weapon and shoot the car. The car battery pops out of the hood. |
|
| 4 | Get the Aberrant Wiring |
To get the Aberrant Wiring, you need to look for a blinking lamp outside the buildings. Shoot it for the wire to drop With the Aberrant Wiring, Car Battery, and Damaged Drone, you can activate the Luminarium trap. |
|
| 5 | Obtain 3 Absolute Zero Fragments |
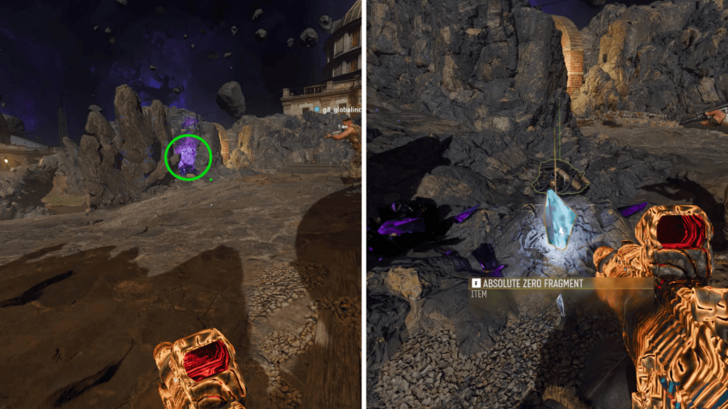 You need to get 3 Absolute Zero Fragments for the Rocket Ship's trap next. To harvest the fragments, you need to shoot the purple crystals that spawn on the map with Cryo Freeze on your weapon. You can get Cryo Freeze via Arsenal Machines for 500 Salvage. You can find tons of purple crystals at the Stargazer's Courtyard located in the middle of the map. |
Kill Oscar with Museum Infinitum Trap (Rocket Ship)
| 1 | Lure Oscar to the Museum Infinitum |
|---|---|
 First thing to do is to lure Oscar to the Museum Infinitum. If you killed him, you must progress the round to let him respawn. |
|
| 2 | Kill Oscar with the Rocket Ship |
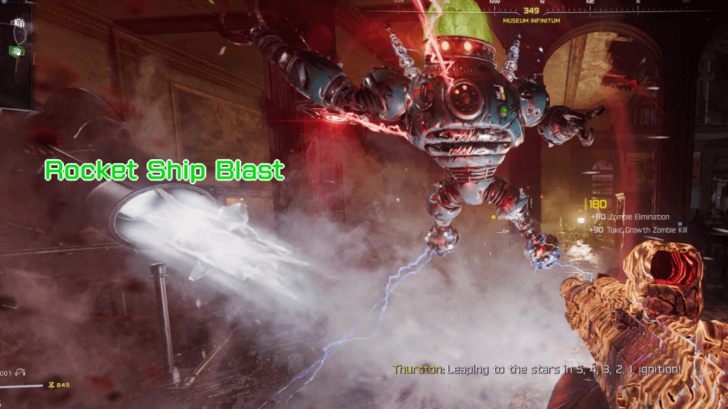 Go to the Rocket Ship and wait for Oscar to get behind it. Activate the ship once he is in place and try to hold him there to destroy him with the final blast. |
|
| * | Collect Another Set of Fragments if You Fail |
| If you failed to kill Oscar via the Rocket Ship, you can still redo the Rocket Ship in the same round as long as you get another set of 3 Absolute Zero Fragments. |
Shiny Trinket Walkthrough: What to Do With Shiny Trinkets
Kill Oscar with the Luminarium Trap (Electro-Volt Projector)
| 1 | Lure Oscar to the Luminarium |
|---|---|
 Have Oscar follow you to the Luminarium (the western room with Jugger-Nog). If you killed him in the current round, you will need to advance to the next round for him to respawn. |
|
| 2 | Activate the Electro-Volt Projector Trap |
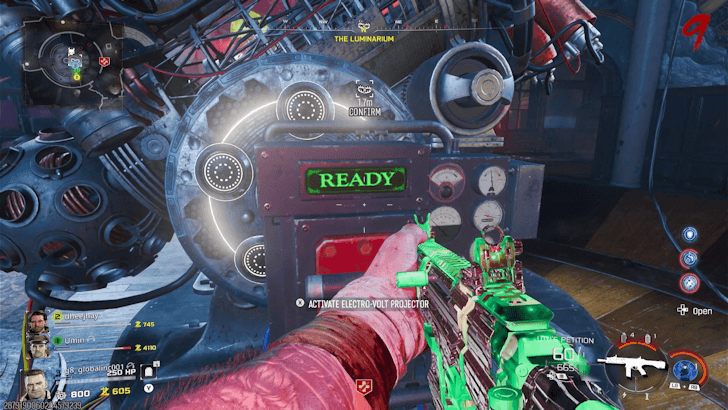 Interact with the Electro-Volt Projector Trap in the middle of the room. You will need the car battery to activate it. |
|
| 3 | Wait for Battery Overcharge |
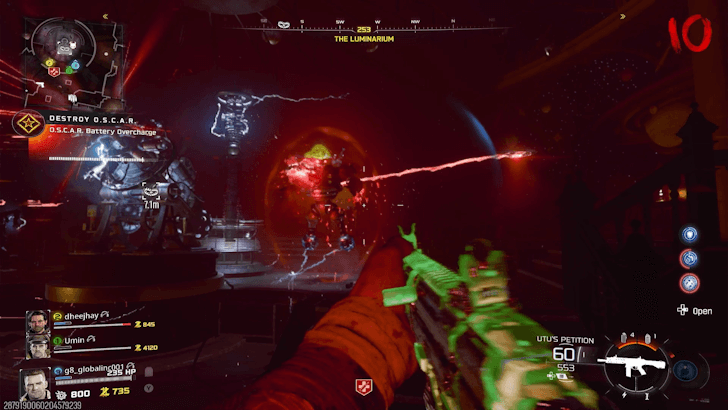 Stay in the Luminarium with Oscar and survive until the battery overcharge completes. Once it finishes, Oscar will be instantly destroyed. He will drop another Shiny Trinket, which you can use to spawn a Ravager ally. |
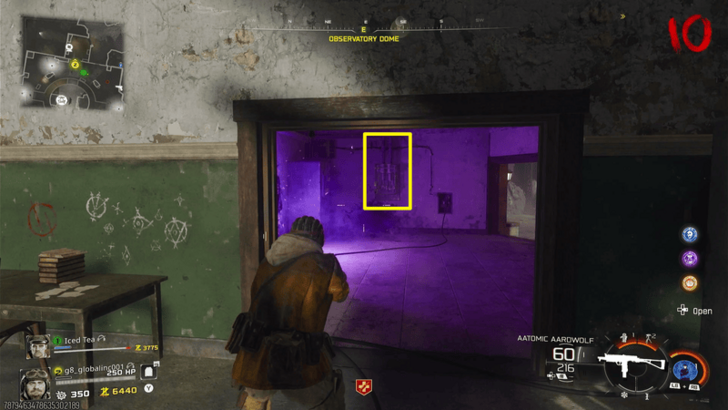
Kill Oscar with the Observatory Dome Trap (Telescope)
| 1 | Lure Oscar to the Observatory Dome |
|---|---|
 Have Oscar follow you to the Observatory Dome. If you killed him in the current round, you will need to advance to the next round for him to respawn. |
|
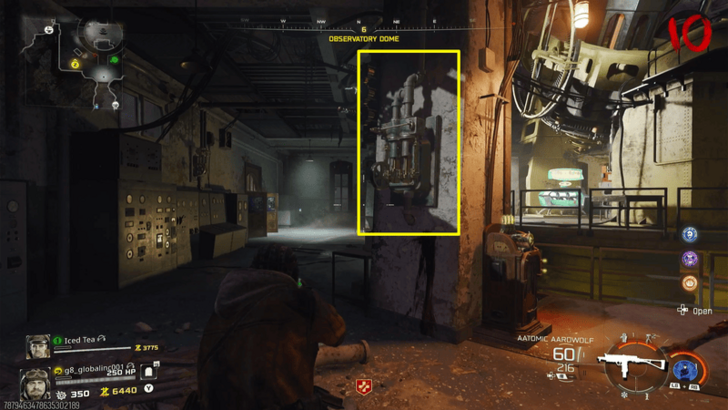
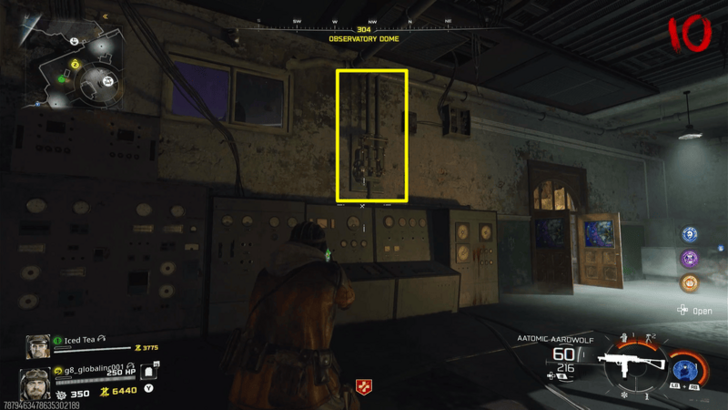
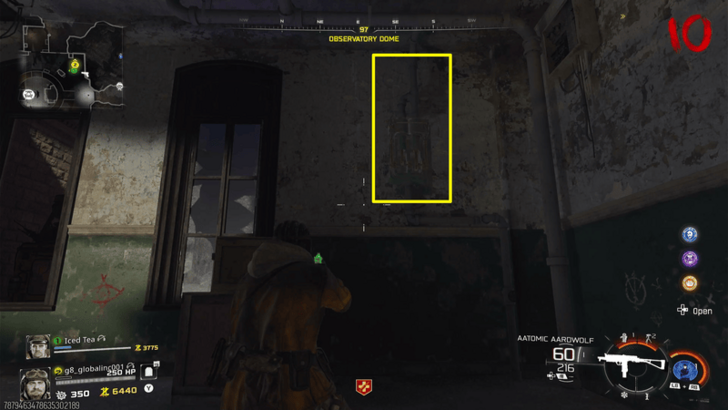
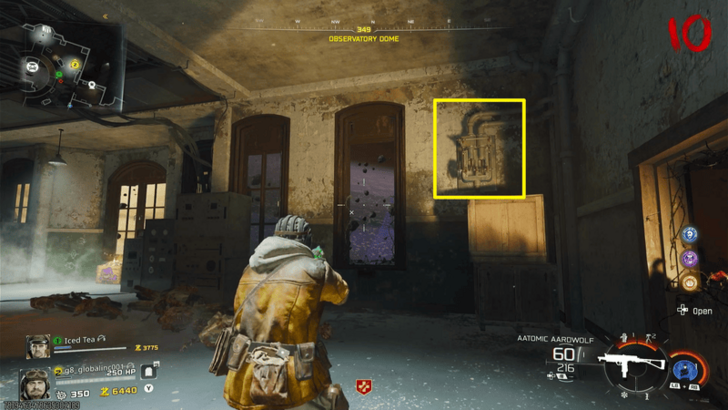
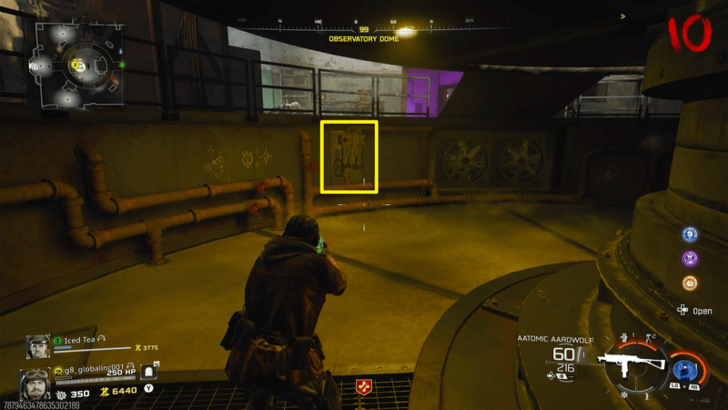
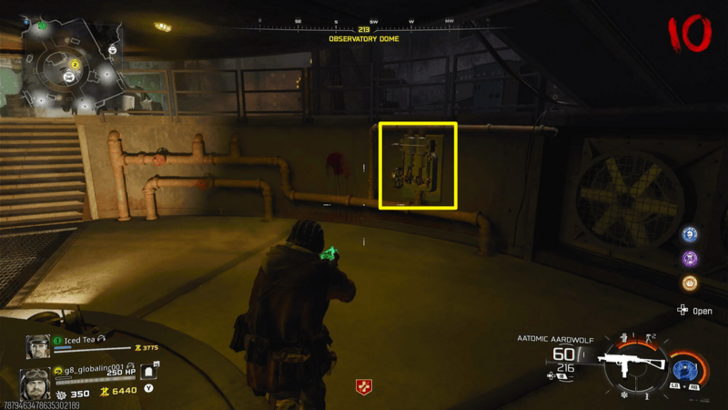
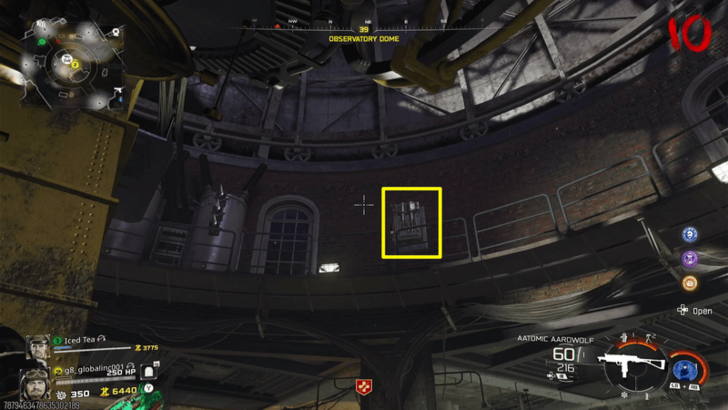
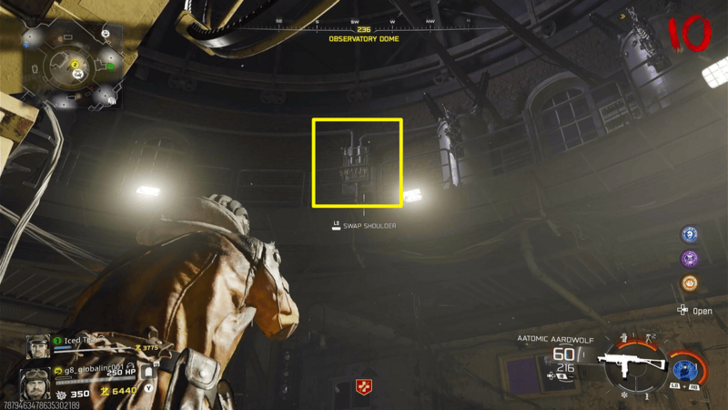
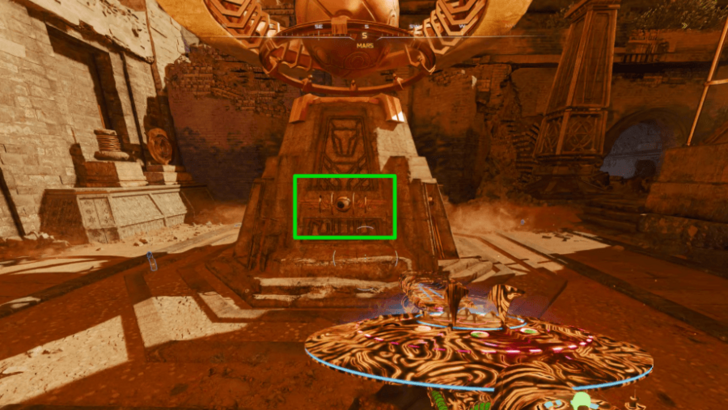
| 2 | Shoot 5 Smoking Valves |
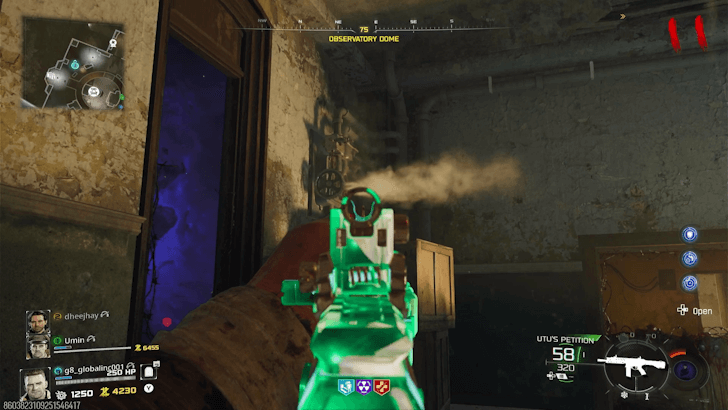 Find and shoot 5 smoking valves in the Observatory Dome. A new valve will start smoking each time you destroy one, and they appear in random order. You must do this quickly, as the sequence will reset if you take too long. The telescope will move to a straight-up position when the sequence is completed successfully. ▼ Smoking Valve Locations |
|
| 3 | Align the Telescope with the Sun |
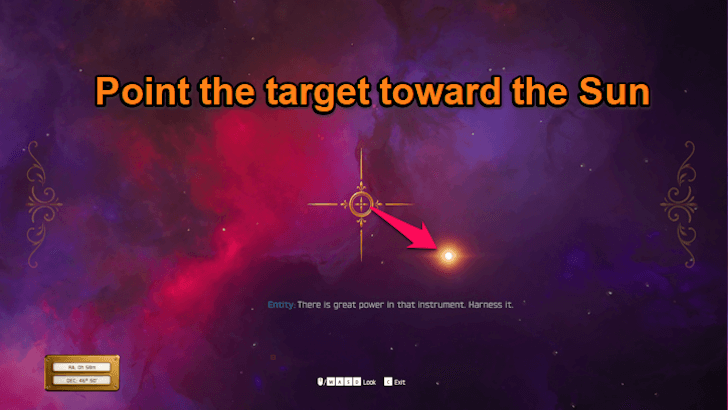 Interact with the Harmonic Oculus to begin manually aligning the telescope. Then, have the telescope point directly at the Sun. |
|
| 4 | Kill Oscar with the Laser |
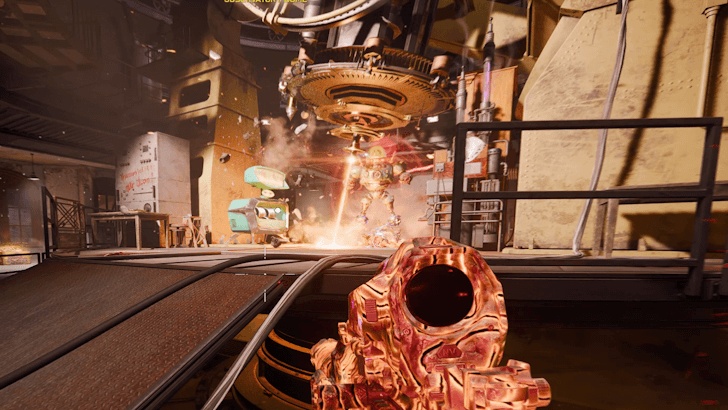 The telescope will emit a steady laser beam directed at the floor. Lure Oscar into its path to destroy it. The laser beam will shut off after about a minute, so make sure you lure Oscar with enough time for both his shield and body to be destroyed. If you fail, proceed to the next round then interact with the piano again. |
|
| 5 | Pick Up the LMG-1 |
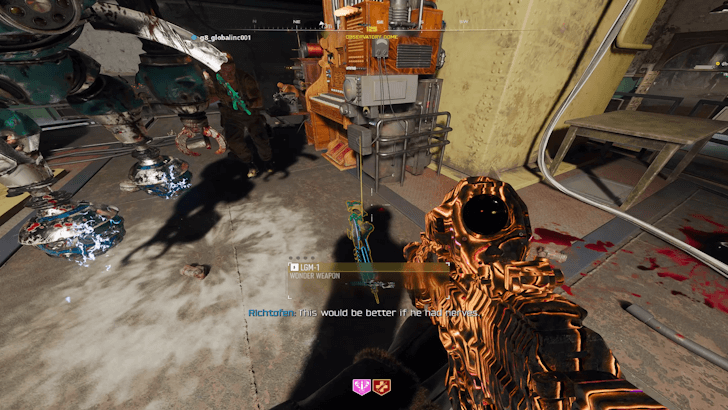 Once Oscar is destroyed, it will drop the LGM-1 Wonder Weapon. |
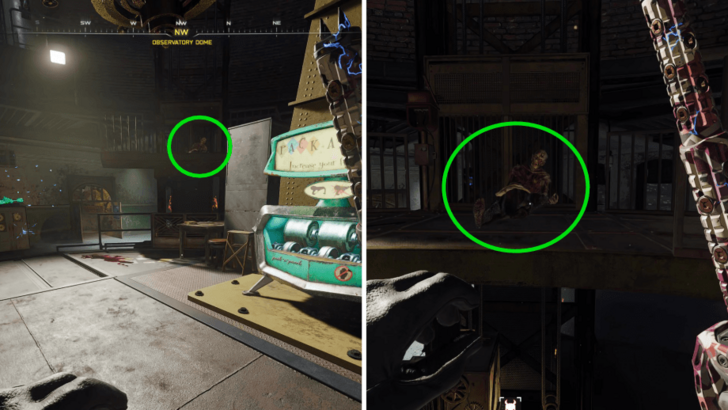
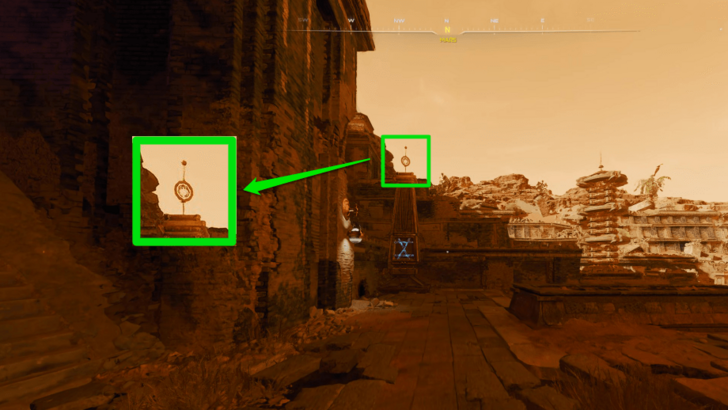
Possible Locations of the 9 Smoking Valves
| Observatory Dome Valves | |
|---|---|
 |
 |
 |
 |
 |
 |
 |
 |
 |
- |
The valves are spread out across the Observatory Dome. Check the walls in the ground floor, including the one near the portal, the area below the platform where the Harmonic Oculus and Pack-a-Punch are located, and near the circular walkway above.
Obtain the Cryo Chamber Key
| 1 | Summon Oscar Again |
|---|---|
 Progress the round again until Oscar reappears on the map to do the next step. You need to encounter Oscar in Search Mode, which is indicated by a yellow light coming from his eyes. To do so, stay away from him until his shield drops, then follow him from behind while maintaining a distance. |
|
| 2 | Listen to Oscar's Recordings |
Oscar will start playing all his recordings while in search mode. Sneak up to him to listen until the name Dr. Thurson comes out. Dr. Thurson will mention 3 random planets from the recording, so make sure to take note of that as you will need it for the code on the next step. ▼ Planets Code |
|
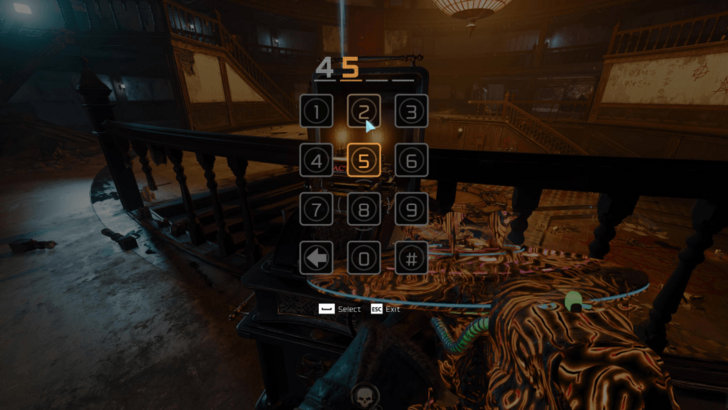
| 3 | Input the Code in the Observatory Dome |
 Input the code to the machine with nixie tubes (bulb with numbers) to summon a broken lift. Make sure to do this correctly as you will have to progress the round if you fail. The code will be the same, meaning you just need to work on the same code if you fail. |
|
| 4 | Take Cryo Chamber Key from the Corpse |
 Climb up the broken lift that was called down beside the PaP machine. Interact with the corpse to get the Cryo Chamber Key. |
Planets Code
| Code | Planet |
|---|---|
| 1 | Mercury |
| 2 | Venus |
| 3 | Earth |
| 4 | Mars |
| 5 | Jupiter |
| 6 | Saturn |
| 7 | Uranus |
| 8 | Neptune |
These are the codes equivalent to the mentioned planets from the recording. Basically, the planets' corresponding numbers are their number order based on their distance from the sun (from closest to furthest). For example, if the recording says Venus, Earth, and Neptune, it means the code is 238.
Get Human Brain from the Cryo Chamber
| 1 | Get the Hacksaw |
|---|---|
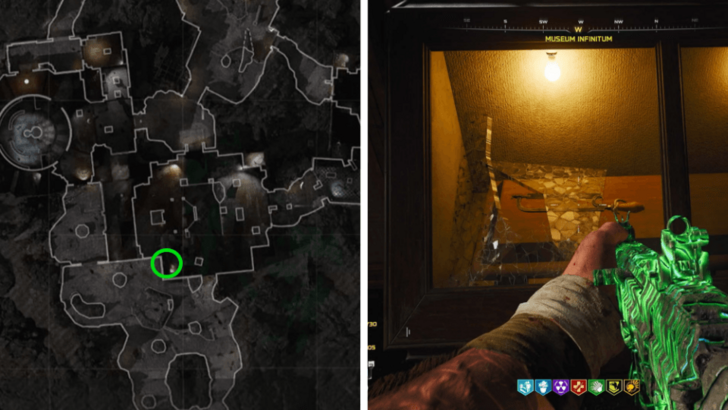 Go back to Museum Infinitum and get the Hacksaw from one of the glass displays. You can find it to the right of the Exfil Machine. |
|
| 2 | Get the Brain |
 Open the Cryo Chamber to reveal a frozen man in the south room of Machina Astralis. Interact with it one more time to open the head and get the brain. |
Activate the Perfusion Machine
| 1 | Replace the Monkey Brain |
|---|---|
 Take the Human Brain to the Luminarium and replace the Monkey Brain with it. It should play an audio cue and the liquid from the brain should turn to yellow. |
|
| 2 | Defend the Brain for 1 Minute |
 Interact with the brain and defend it for 1 minute. Oscar might go to your location, so try to lure him away before starting to easily complete this, especially when playing solo. |
|
| 3 | Place the Brain to the Perfusion Machine |
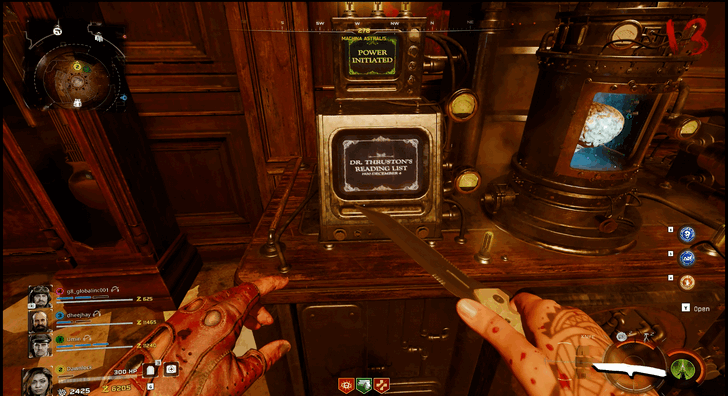
 Once 1 minute is done, carry the brain to the Perfusion Machine at Machina Astralis. Place the brain and interact with it (hold) to activate the machine where you will need to input a code. |
Input Mars's Coordinates on the Machine
| 1 | Get Mars's Coordinates from the Telescope |
|---|---|
 Return to Observatory Dome and use the telescope. Look for Mars in the screen to get the coordinates, which can be found on the lower left side of the screen. The crosshair must exactly cover Mars to get the correct coordinates. Mars might not be viewable immediately as you access the telescope, so you will need to look around further. |
|
| 2 | Input the Coordinates |
 Input the coordinates of Mars to the machine in Machina Astralis. If you only get 3 numbers, the degrees symbol (°) will act as number 0. For example, if the coordinates are 55°, 9, the code will be 5509. |
Obtain the Planet Neptune
| 1 | Take Note of the Book Titles |
|---|---|
 Head to the center of Machina Astralis and read the book titles projected on the machine. Each game will have a random set of books that may even vary in total number, so take note of the book titles that will be displayed on the machine's screen. |
|
| 2 | Find the Books in Arhive of Orbis |
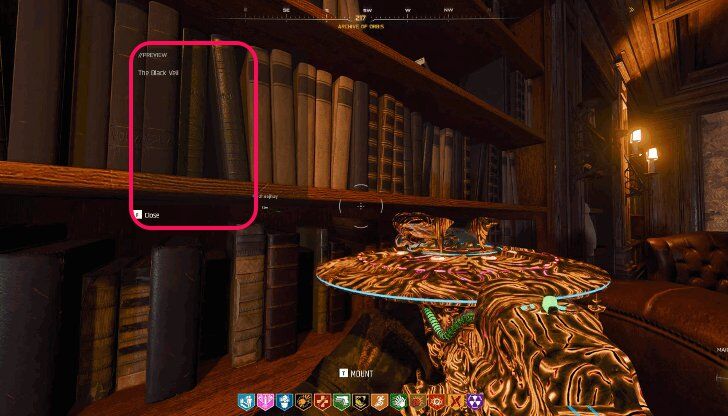 Enter the Archive of Orbis and search the bookshelves to find all the books that flashed on the machine. You can spam interact while near the bookshelves to easily see which book/s are on the bookshelf. Take note of their bookshelf location once you find them. |
|
| 3 | Turn the Statue Depending on No. of Books |
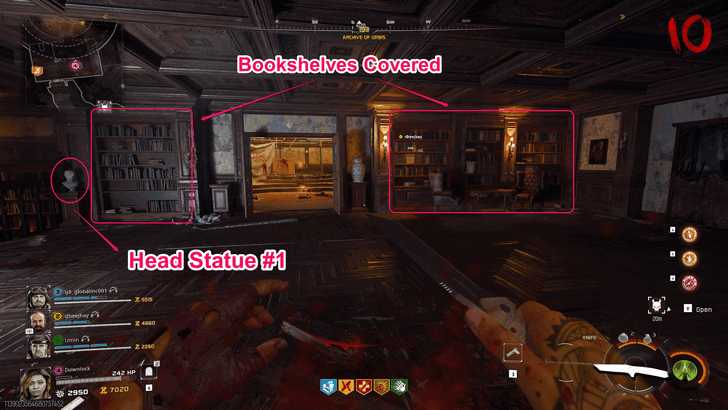 The bookshelves have a corresponding head statue assigned to them. You must turn the statue according to the number of books found on their respective bookshelves. For example, if 3 books are found on the bookshelves assigned to statue #1, you must turn statue #1 3 times. |
|
| 4 | Climb the Ladder and Pick Up Neptune |
After correctly moving the statues, a ladder will drop down. Climb the ladder and interact with Neptune to pick it up. |
|
| 5 | Head Upstairs and Insert Neptune |
Head to the highest floor of Machina Astralis and look for an empty bar. Press interact once you're near it to insert Neptune. |
Move the Planets to the Correct Direction
| 1 | Get Planet Direction in Machina Astralis |
|---|---|
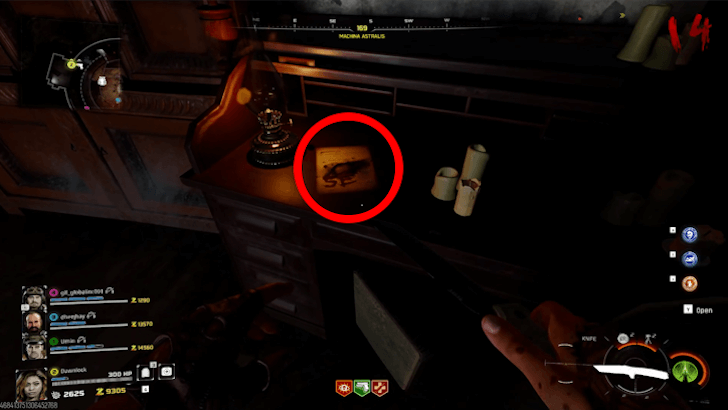 You’ll find the first Planet Direction on the table with a drawer in the eastern corner of Machina Astralis’ ground floor. Take note of the cardinal direction and the planet drawing. They change every run, so do this for each Planet Direction. |
|
| 2 | Get Planet Direction in Archive of Orbis |
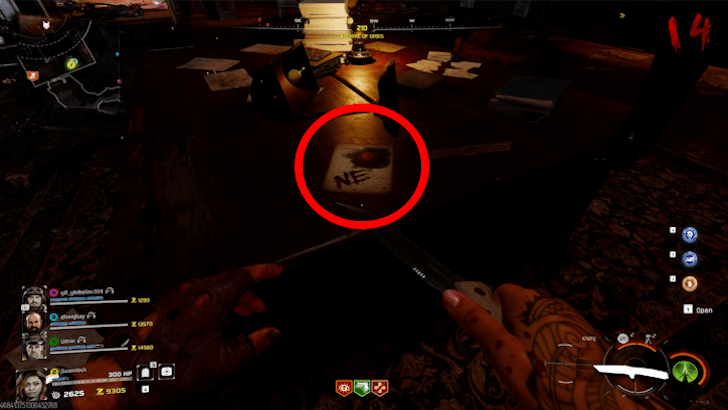 You’ll find the second Planet Direction on the center table in the Archive of Orbis, the western room on Machina Astralis’ ground floor. |
|
| 3 | Get Planet Direction in the Luminarium |
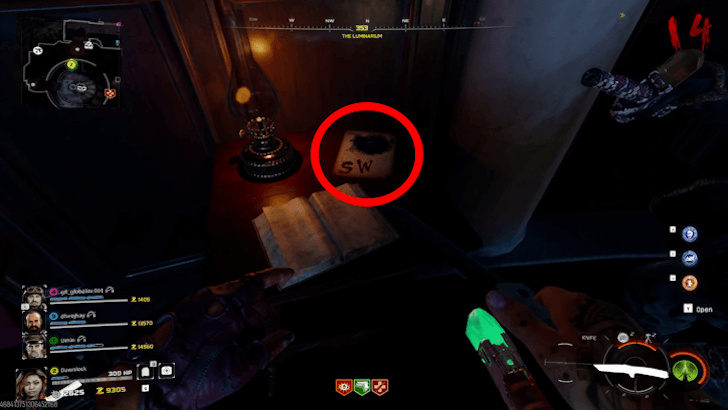 Head to the Luminarium and enter the room with the Electro-Volt Projector trap. The third Planet Direction is on a table with a lamp beside the wall. |
|
| 4 | Shoot Planets to Change Direction |
Return to Machina Astralis. The planets are positioned on the large chandelier in the center of the area, arranged to resemble the solar system. Shoot each planet according to its assigned direction. The directions can be seen engraved on triangles on the chandelier. For example, if you got a paper that had "SE" and a drawing of Saturn, then you have to shoot Saturn to the SE section of the solar system chandelier. |
|
| 5 | Reboot the Portal |
 After aligning all three planets in the correct directions, interact with the Perfusion Machine in the center area to begin rebooting the portal. |
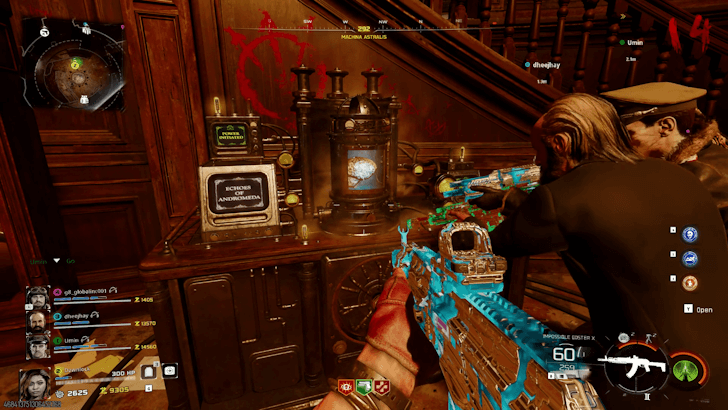
Defend the Portal from Oscar
| 1 | Survive During Portal Reboot |
|---|---|
 Before the portal begins its reboot process, all players will be teleported to Machina Astralis, and Oscar will spawn in the area. You must wait and survive until the reboot is complete. |
|
| 2 | Destroy Drones Heading to the Portal |
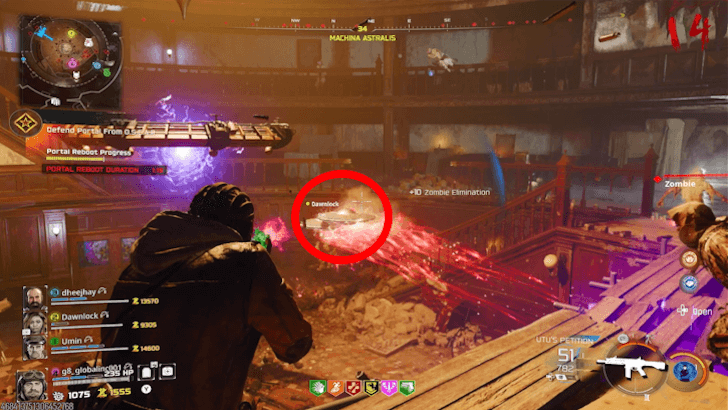 Keep an eye on the area around the portal and eliminate Oscar’s drones. If they reach the portal, the progress will decrease, and you must complete the reboot before the timer runs out. Once the progress completes, the portal will teleport you to Mars. |
Obtain the Flying Eye
| 1 | Shoot 4 Tesla Coil Towers |
|---|---|
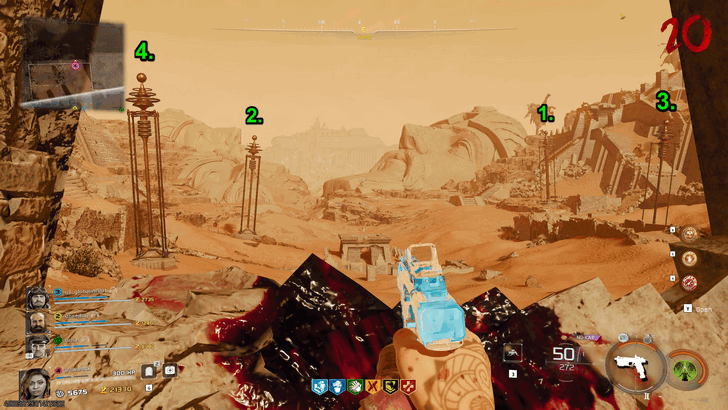 You must shoot the Tesla Towers in a specific order to progress the Easter Egg. Shoot the furthest tower first and shoot the nearest one last. A tower will light up to indicate that you've hit it. |
|
| 2 | Shoot the Tesla Coil Near the Portal |
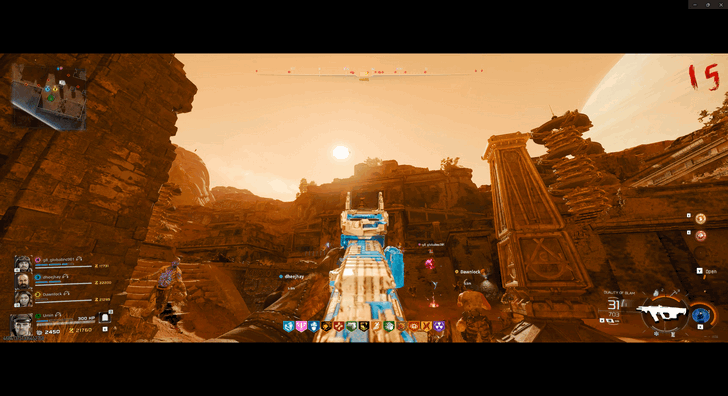 Simply turn around from your location and shoot the tesla coil near the portal. Get ready to chase the Ascendant Eye afterwards. |
|
| 3 | Catch the Ascendant Eye |
| After you shoot the tower near the portal, you must catch the Ascendant Eye by interacting with it while airborne. Look for a flying object that resembles a bird and take advantage of zero gravity while using wall jumps to reach the Ascendant Eye. |
Activate the Pillars Using the LGM-1
| 1 | Put the Flying Eye on to the Machine |
|---|---|
 After catching the Flying Eye, place it on the machine on the right side of the area. It will give power to the pillars with symbols in the area. |
|
| 2 | Shoot the Antenna of the Pillars |
 Once the pillars are activated, shoot the antenna above them using LGM-1 to activate them. You can do this in any order until you activate all 5 pillars. |
|
| 3 | Get the Code from the Organ (Piano) |
Leave Mars and play the piano/organ in the Observatory Dome to see 4 Symbols. These symbols represent each pillar in Mars, so make sure to record or memorize them. There will be a gap in the depiction of the symbols where the screen reverts back to static. This "blank" symbol corresponds to a pillar on mars that has no symbol. |
|
| 4 | Interact with the Pillars in the Correct Order |
Interact with the pillars in the same order as shown in the piano. Again, the "blank" symbol in the piano code corresponds to the pillar with no symbol (the one by the stairs near the brain machine). If, for some reason, the pillar you interacted with was wrong (turns red) even if you're following the code correctly, just move to the next symbol in the sequence. Do this fast as there is a time limit once you activate the first pillar. All the symbols on the pillars will glow in blue if you're successful. |
Pillar Locations
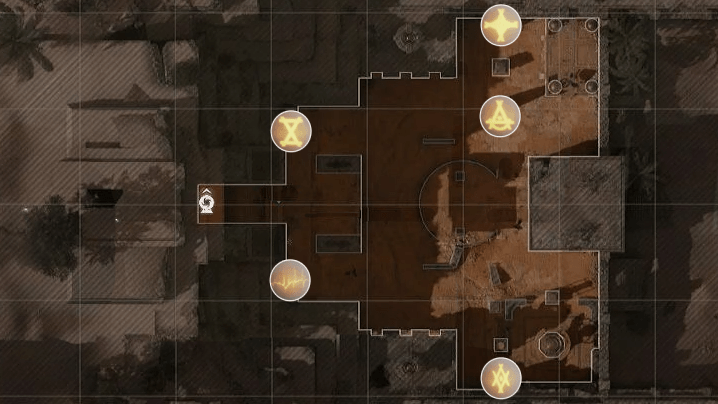 |
|
| 1 |  On the left side of Mars, close to the 4 Floating Items in the area. |
|---|---|
| 2 | 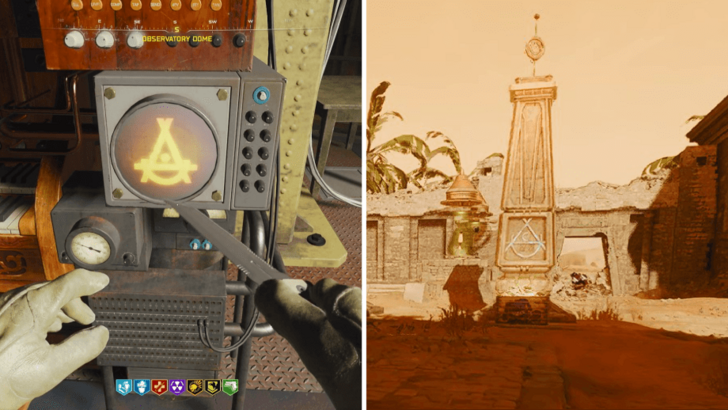 Close to the first pillar. You can find it next to the Ammo Cache. |
| 3 | 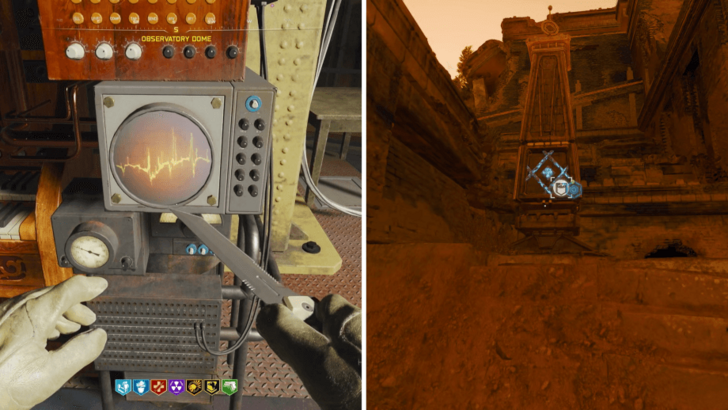 On the left of the machine with the brain, close to the Armor Wall Buy. |
| 4 | 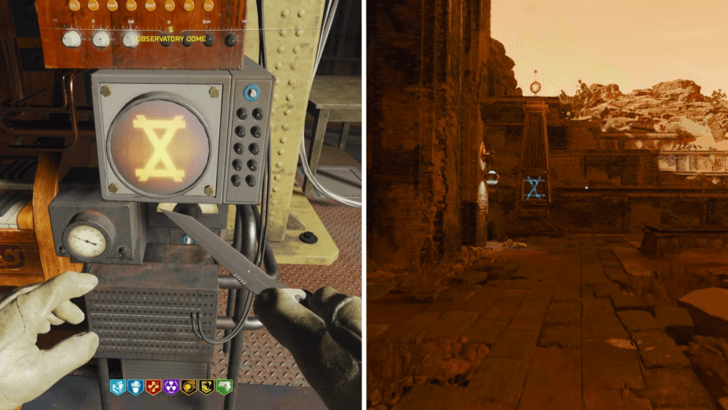 On the opposite side of the third pillar. |
| 5 | 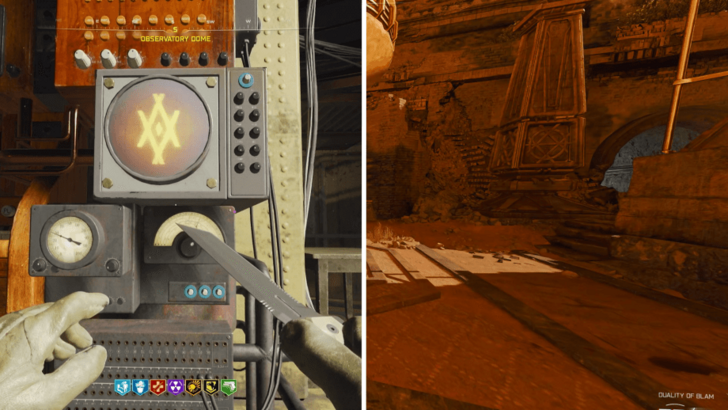 On the right side of Mars, close to the machine where you put the Flying Eye. |
These are the locations of the pillars and their equivalent symbols. They will have the same location and symbol, but the order of the symbols from the Organ changes every match.
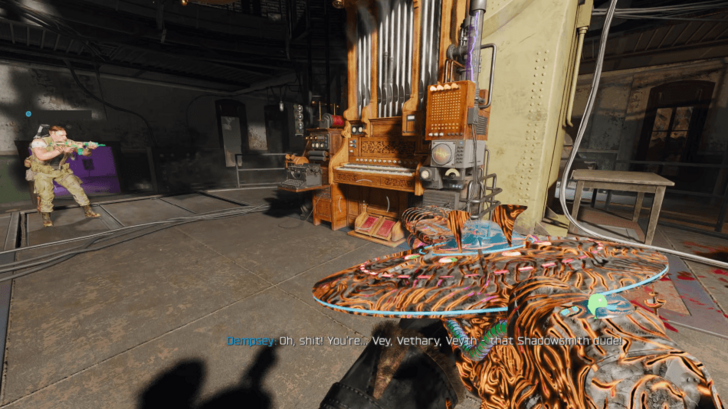
Defeat Caltheris
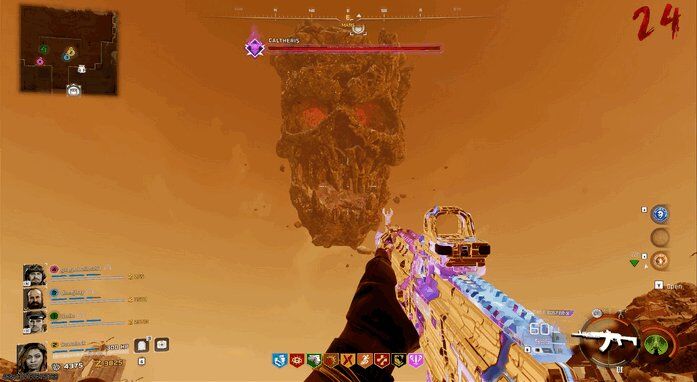
You can now interact with the pillar to start the boss fight against Caltheris. This boss fight consists of multiple phases with its main attacks being homing lasers and AOE projectiles, similar to Veytharion. To damage this boss, you'll mainly rely on killing zombies to charge a gun that will shoot Caltheris.
Astra Malorum Boss: How to Beat Caltheris
Astra Malorum Easter Egg Tips
Helpful Side Easter Eggs
| Side Easter Egg | Steps / Reward |
|---|---|
(Highly Suggested!) |
① Complete the Music Disc Challenges by placing the discs to the Gramophones ② Do the Skulls Easter Egg to get a Random Perk Power-Up. Requires a PaP Weapon to clear it. Rewards: Mystery Perks and a Random Perk |
| Nikolai Easter Egg (Highly Suggested!) |
① Play as Nikolai in the match ② Use Molotov in Abyssal Rim to reveal footprints ③ Interact with the Wooden Goat ④ Interact with the Altar and survive the ravager ambush Reward: Free Legendary Weapon, Equipment, Armor Plate, and Essence |
| Grandfather Clock Easter Egg | ① Melee the 5 Grandfather Clocks around the map Reward: Slow down time and zombies (can be done every round) |
List of Astra Malorum Side Quests
Black Ops 7 (BO7) Related Guides
Zombies Guide
Zombies Easter Eggs
| Main Quest Easter Egg Walkthroughs | |
|---|---|
| Ashes of the Damned Easter Egg | Astra Malorum Easter Egg |
| Paradox Junction Easter Egg | - |
| Paradox Junction Side Easter Eggs | |
| Minigolf Easter Egg Guide | Paradox Junction Music Easter Egg Guide |
| Astra Malorum Side Easter Eggs | |
| Astra Malorum Side Quests | Shiny Trinket Easter Egg |
| Nikolai Easter Egg Guide | How to Get Free Perks in Astra Malorum |
| Free Random Perk: Skulls Easter Egg Guide | Grandfather Clock Easter Egg Guide |
| DG-2 Turret Easter Egg Guide | Astra Malorum Music Easter Egg Guide |
| Lamp Wisp Easter Egg Guide | - |
| Ashes of the Damned Side Easter Eggs | |
| Ashes of the Damned Side Quests | Ashes of the Damned Music Easter Egg |
| Lucidity Easter Egg | Plant Easter Egg Toxic Growth Easter Egg |
| Bear Footprint Easter Egg | RC-XD Easter Egg |
| Ray Gun Mark II | - |
Comment
Author
Astra Malorum Easter Egg Walkthrough
Rankings
- We could not find the message board you were looking for.
Gaming News

![The Liar Princess and the Blind Prince Review [PC] | Lovely to Look at but Tedious to Play](https://img.game8.co/4442586/8d95f5faf05780f1765ce7e0938bd825.jpeg/show)
![Monster Hunter Stories 3 Review [First Impressions] | Simply Rejuvenating](https://img.game8.co/4438641/2a31b7702bd70e78ec8efd24661dacda.jpeg/thumb)

![The Seven Deadly Sins: Origin [First Impressions] | A Promising Start](https://img.game8.co/4440581/584e0bfb87908f12c4eab6e846eb1afd.png/thumb)
Popular Games

Genshin Impact Walkthrough & Guides Wiki
Umamusume: Pretty Derby Walkthrough & Guides Wiki
Pokemon Pokopia Walkthrough & Guides Wiki
Honkai: Star Rail Walkthrough & Guides Wiki
Monster Hunter Stories 3: Twisted Reflection Walkthrough & Guides Wiki
Arknights: Endfield Walkthrough & Guides Wiki
Wuthering Waves Walkthrough & Guides Wiki
Zenless Zone Zero Walkthrough & Guides Wiki
Pokemon TCG Pocket (PTCGP) Strategies & Guides Wiki
Monster Hunter Wilds Walkthrough & Guides Wiki


Recommended Games
Diablo 4: Vessel of Hatred Walkthrough & Guides Wiki
Cyberpunk 2077: Ultimate Edition Walkthrough & Guides Wiki
Fire Emblem Heroes (FEH) Walkthrough & Guides Wiki
Yu-Gi-Oh! Master Duel Walkthrough & Guides Wiki
Super Smash Bros. Ultimate Walkthrough & Guides Wiki
Pokemon Brilliant Diamond and Shining Pearl (BDSP) Walkthrough & Guides Wiki
Elden Ring Shadow of the Erdtree Walkthrough & Guides Wiki
Monster Hunter World Walkthrough & Guides Wiki
The Legend of Zelda: Tears of the Kingdom Walkthrough & Guides Wiki
Persona 3 Reload Walkthrough & Guides Wiki


All rights reserved
©/TM/® 2025 Activision Publishing, Inc.
The copyrights of videos of games used in our content and other intellectual property rights belong to the provider of the game.
The contents we provide on this site were created personally by members of the Game8 editorial department.
We refuse the right to reuse or repost content taken without our permission such as data or images to other sites.