All Cursed Relics and How to Unlock

Relics can be unlocked by doing their trials in Cursed Mode in Call of Duty: Black Ops 7 (BO7). See the list of all the Relics and how to unlock them in this guide!
List of Contents
| Attention | This guide is being regularly updated with walkthroughs and images as the relics are uncovered. |
|---|
 under the page's title to be notified of any updates!
List of All Cursed Relics
Click to jump to a section!
| Grim Relics | ||||
|---|---|---|---|---|
 Lawyer's Pen Lawyer's Pen |
 Dragon Wings Dragon Wings |
 Teddy Bear Teddy Bear |
 Seed Seed |
 TBD TBD |
| Sinister Relics | ||||
 VRIL Sphere VRIL Sphere |
 TBD TBD |
 Focusing Stone Focusing Stone |
 Spider Fang Spider Fang |
 TBD TBD |
| Wicked Relics | ||||
 Bus Bus |
 Blood Vials Blood Vials |
 Dragon Dragon |
 TBD TBD |
 Civil Protector Head Civil Protector Head |
Grim Relics
Grim Relics are available to get once you finish the Ashes of the Damned easter egg, beat Veytharion, and interact with the Mysterious Object in Blackwater Lake. You will need to progress to Round 20 in a Cursed Mode match to get them.
Lawyer's Pen Relic
| 1 | Survive Until Round 20 |
|---|---|
| To unlock the Relic Trial for the Lawyer's Pen Relic, you must wait and survive to Round 20. Try to unlock the Pack-A-Punch on Ol' Tessie to upgrade your guns and get your desired Perks before you reach Round 20. | |
| 2 | Get Molotovs or Napalm Burst |
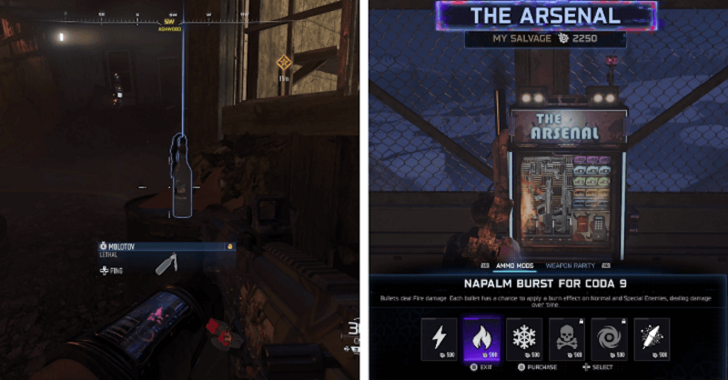 You will need Molotovs or Napalm Burst for this relic. You can either craft it on the Workbench or use the Arsenal Machine to get the Napalm Burst ammo mod. There’s also a Molotov on top of the barrel in the garage in Ashwood. |
|
| 3 | Light Up 3 Candles |
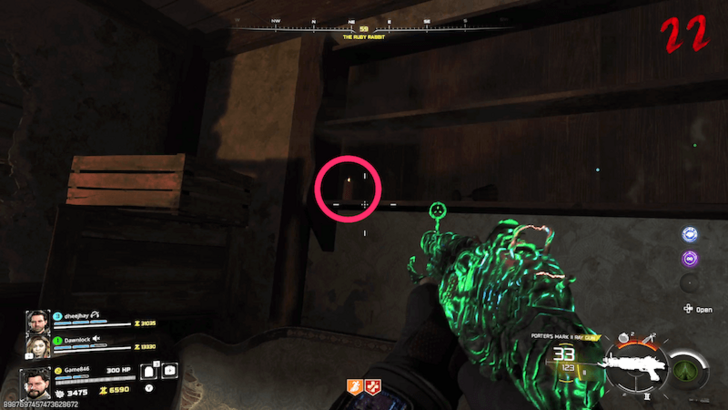 Once you reach Round 20, you must light three candles in any order using a Molotov or a weapon with Napalm Burst. You will hear a sinister laugh to confirm that you’ve lit each candle. The first candle is in Ashwood, on the shelf near the Jugger-Nog machine inside Ruby Rabbit. |
|
| 4 | |
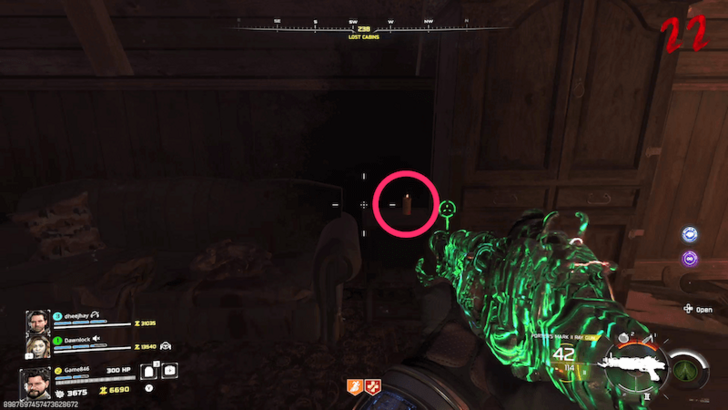 The second candle is in the Lost Cabins, the fog area between Ashwood and Blackwater Lake. The candle is inside the southwest cabin on top of the small cabinet next to the couch. |
|
| 5 | |
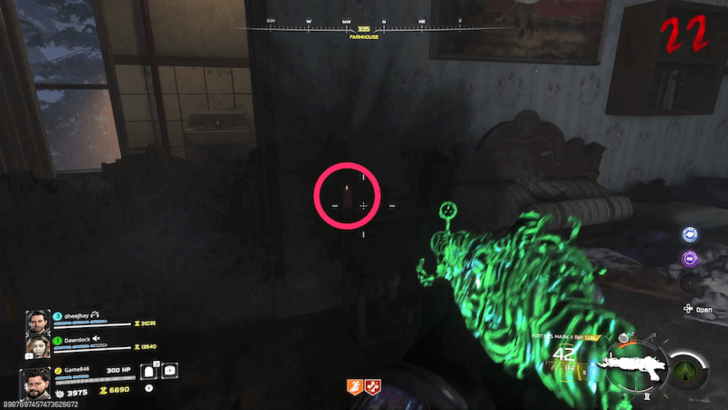 The third candle is in Vandorn Farm, on the second floor of the Farmhouse on the nightstand beside the bed. |
|
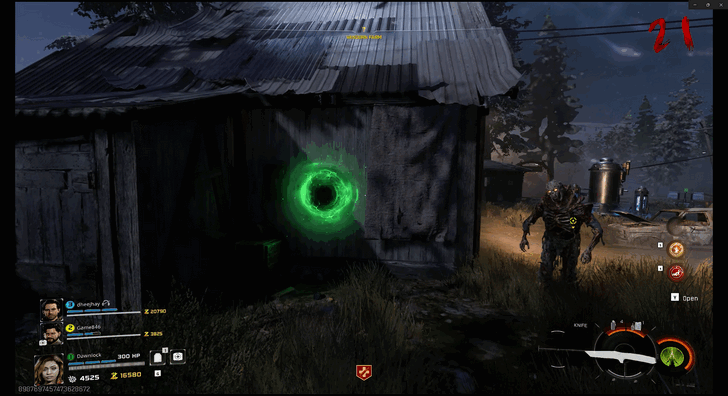
| 6 | Enter the Green Portal to Start the Trial |
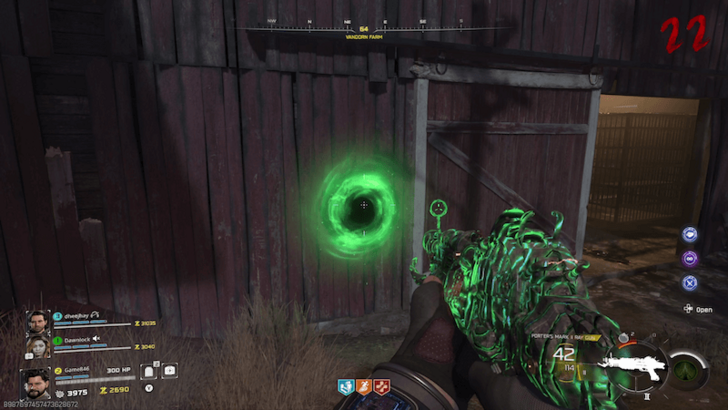 After lighting all three candles, a green portal will appear on the side of the Barn in Vandorn Farm. Make your final preparations, as you’re about to enter a Relic Trial. When you're ready, interact with the green portal to activate the Relic Trial. If you’re in a squad, teammates may need to vote to start it. |
|
| 7 | Survive 4 Waves of Shock Mimics |
 Survive four waves of Shock Mimics to complete the Relic Trial and unlock the Lawyer's Pen Relic! Shoot the Shock Mimic's mouth to deal significant damage, and keep your distance from them to avoid their grab attack. On Waves 2 and 4, you only need to kill the Shock Mimic HVTs with the objective markers. |
Dragon Wings Relic
| 1 | Survive Until Round 20 |
|---|---|
| To begin unlocking the Dragon Wings Relic, progress through the Ashes of the Damned Easter Egg and have the Vandorn Farm power restored. After that, you must survive until Round 20. | |
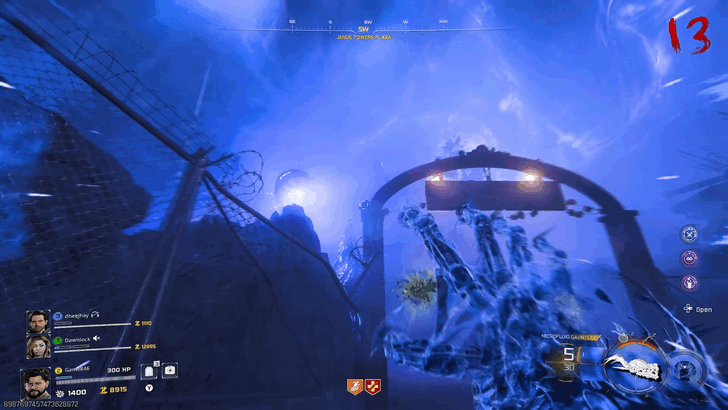
| 2 | Shoot the Purple Orbs While Flying |
Go to Vandorn Farm and use the Jump Pad to Janus Tower Plaza (spawn). During the flight, quickly shoot the three Purple Orbs at the Power Tower on the left, the Rubble on the right, and Janus Tower. You’ll hear an evil laugh when you’ve hit all three. Note that your aim sensitivity will drop significantly while flying, so try to increase them a little bit during this step to complete it. |
|
| 3 | Enter the Green Portal to Start the Trial |
 Go back to Vandorn Farm and look for the Green Portal on the right side of the Farmhouse. Make sure your weapon is upgraded and that you have all necessary Perks before starting the trial. |
|
| 4 | Survive 4 Waves of Zombies |
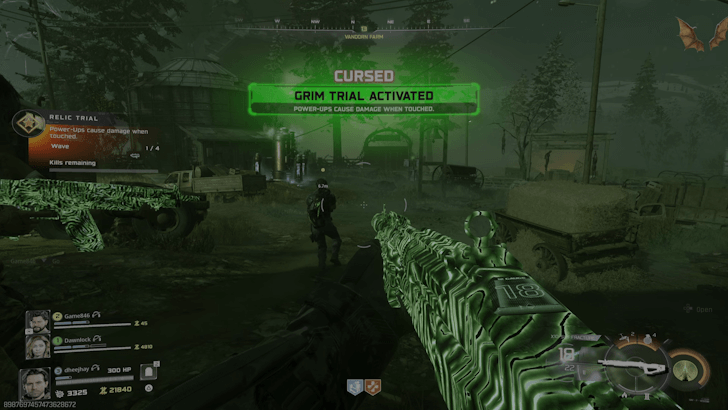 You will need to survive 4 waves of zombies to get the relic. Each wave will require you to finish a task, like defeating HVTs, so complete those to progress the wave. You can use the Saw Trap in front of the barn to kill the regular zombies out of the way and focus on the tougher zombies. Note that there is a special rule during this trial where Power Ups spawn more often, but they don't work and instead deal massive damage on the player. If some remain after the trial, you can use them before they expire and you won't take any damage! |
Teddy Bear Relic
| 1 | Equip Aether Shroud |
|---|---|

The Aether Shroud is required for this relic. You need to reach Account Level 48 to unlock it if you haven't. If you already equipped a different Field Upgrade, you can still change it from the Menu. |
|
| 2 | Get the Necrofluid Gauntlet |
 You will need to get the Necrofluid Gauntlet by following the main easter egg. This Wonder Weapon will be used to grab the Teddy Bears that are normally out of reach. |
|
| 3 | Collect 10 Teddy Bears |
| Use the Aether Shroud to see the Teddy Bears and use the Necrofluid Gauntlet to shoot them. Reload the Gauntlet to ensure that you'll grab the Teddy Bears. The 9 Teddy Bears can be collected as soon as you get the Necrofluid Gauntlet, but the 10th Teddy Bear (Teddy Bear on Exit 115) can only be collected once you reach Round 20. We highly recommend using the Power Keg gobblegum as you'll always need to use the Aether Shroud to see and collect the Teddy Bears. |
|
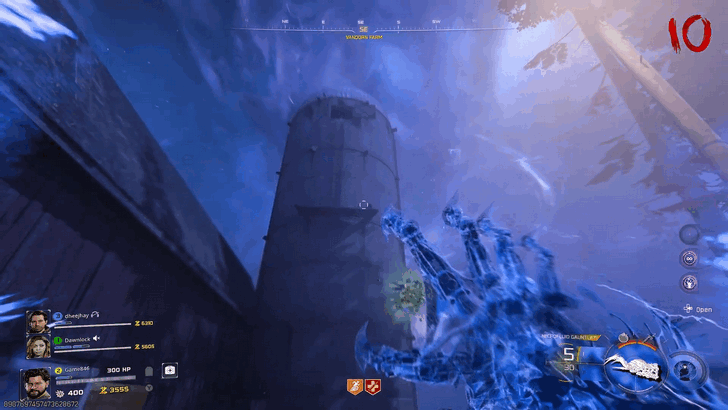 Vandorm Farm - On the middle part of the silo next to the barn. |
|
 Janus Tower Plaza - On the top left of the gate going to Blackwater Lake. |
|
 Blackwater Lake - On the Toilet inside the cabin, which is inside the Zombies' spawn spot near the Speed Cola. |
|
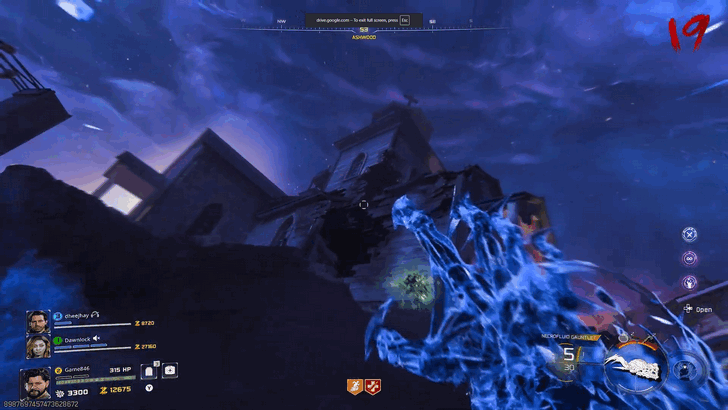 Ashwood- Look for the broken side of the Church. This can be spotted if you stand near the garage. |
|
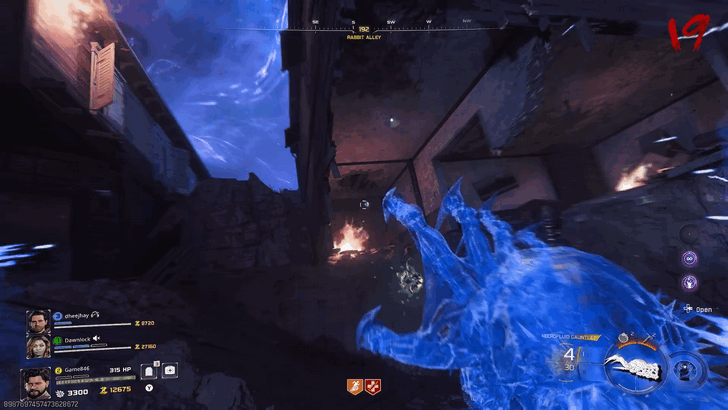 Ashwood - At the corner of the house in Rabbit Alley, near the Exfil and opposite side of the Jump Pad. |
|
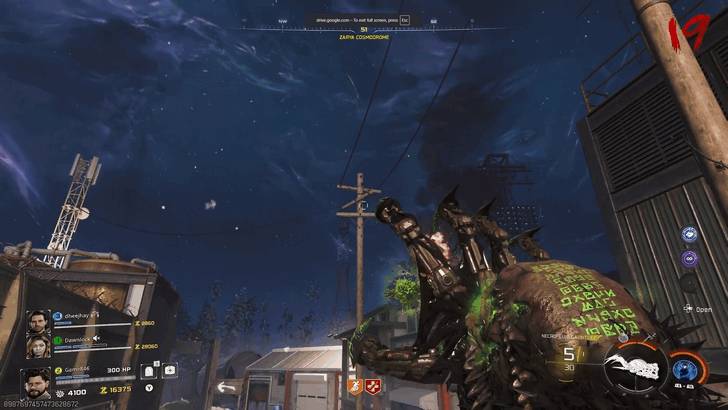
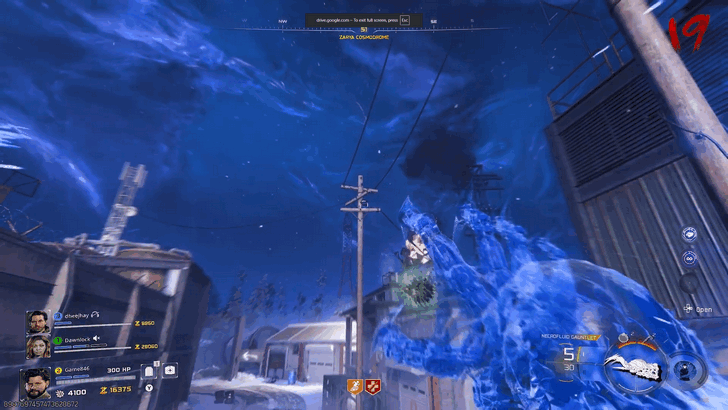 Zarya Cosmodrome - On top of the electricity pole near the entrance to the Flame Trench. |
|
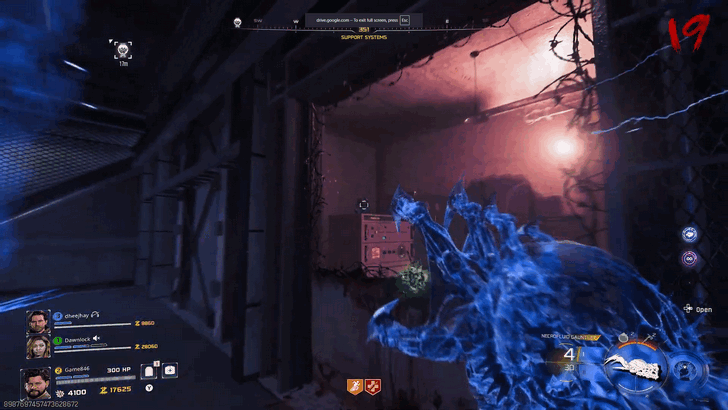 Zarya Cosmodrome - On top of the Machine in the Support Systems inside the Zombie spawn spot. This is found on the lower level where you use Klaus to get the Aether Barrel. |
|
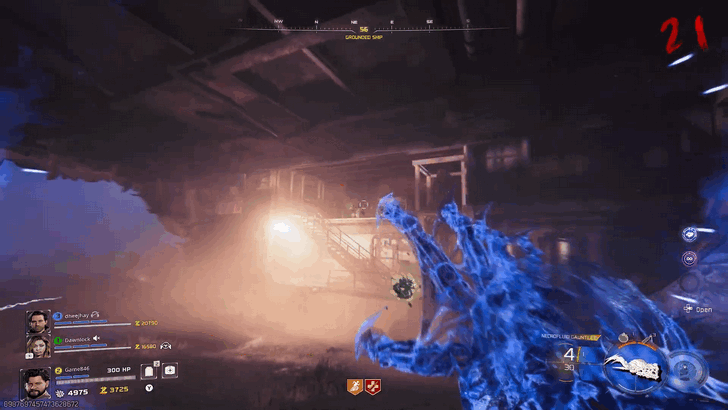 Grounded Ship - In the cave part of the ship where an exposed cabin can be seen. The Teddy Bear can be seen on the cabin's second level. |
|
 Lost Cabins - On the roof of the smallest house that is filled with logs. |
|
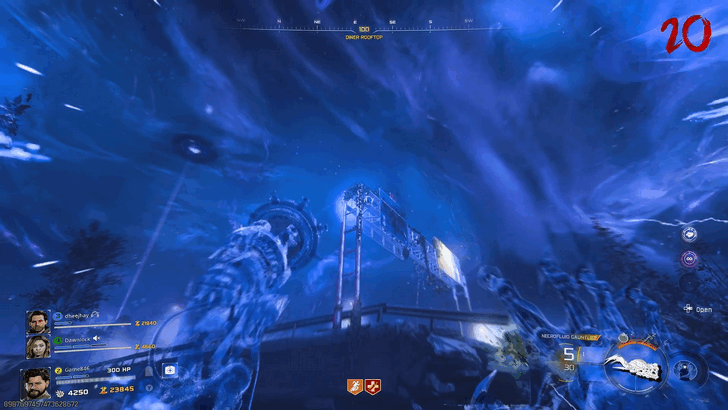 Exit 115 - Go to the Diner's Rooftop and look to the East. This Teddy Bear will only appear once you reach Round 20. |
|
| 4 | Enter the Green Portal and Start the Trial |
 Go to the Vandorm Farm and start the trial through the Green Portal on the wall close to the Exfil. |
|
| 5 | Survive 4 Waves of Zombies |
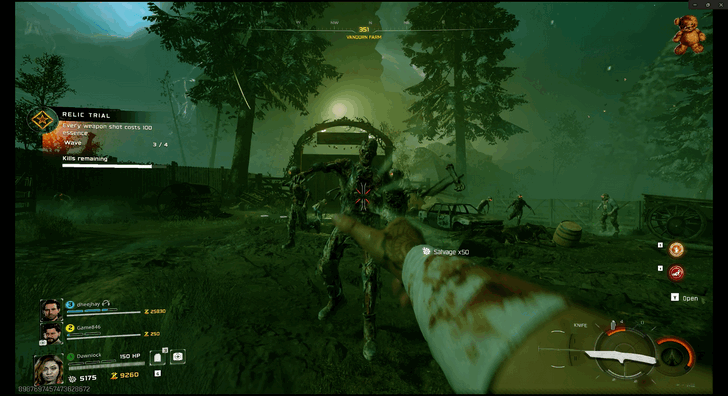 Kill zombies to progress the trial. There is a special rule placed on this trial where each shot will cost 100 Essence. Take note that you'll still be able to shoot even if your essence drops to zero, but this will prevent you from gaining any essence should you continue to shoot. If you want to save your essence, you can prioritize using lethal equipment as these will have a higher drop rate during the trial. We highly recommend using the Combat Axe to consistently kill normal zombies while you save the use of guns for the HVTs on Wave 4. |
Seed Relic
| 1 | Survive Until Round 20 |
|---|---|
| To unlock the method for obtaining the Seed Relic, you must progress through Astra Malorum and survive until Round 20. | |
| 2 | Look for a Grey Pistol |
| Keep an eye out and pick up the grey pistol lying on the ground. It can spawn in different locations each run. Possible areas include the Observatory Dome, The Luminarium, Machina Astralis, and the Archive of Orbis. | |
| 3 | Kill 20 Zombies in a Single Round |
| With the grey pistol equipped, eliminate 20 zombies in a single round. You can track your progress through the Scoreboard or Weapon Stats. Once you reach exactly 20 kills with the pistol, switch to another weapon to finish the round. You will hear an evil laugh once successful. | |
| 4 | Enter the Green Portal to Start the Trial |
| You'll find the green portal in the Observatory Dome, near the ammo cache. Make sure you have the necessary Perks before starting the trial. | |
| 5 | Survive 4 Waves of Zombies |
| You’ll need to survive four waves of zombies to obtain the Seed Relic. The special rule for this trial is that you can only use the provided pistol, which comes Pack-A-Punch. You can upgrade the pistol’s rarity at the Arsenal in the area. |
Sinister Relics
Sinister Relics will start appearing after getting all Grim Relics and equipping them before starting the match. Additionally, you will be able to get the Golden Armor, which automatically recover your armor over time.
All Sinister Relics are available to grab starting Round 40.
VRIL Sphere Relic
| 1 | Survive Until Round 40 |
|---|---|
| To unlock the Relic Trial for the VRIL Sphere Relic, you must survive until Round 40. Make sure you have most Perks and weapons are upgraded to Pack-A-Punch 3 and Legendary Rarity, and that you've purchased the Golden Armor to help you survive tougher enemies in later rounds. |
|
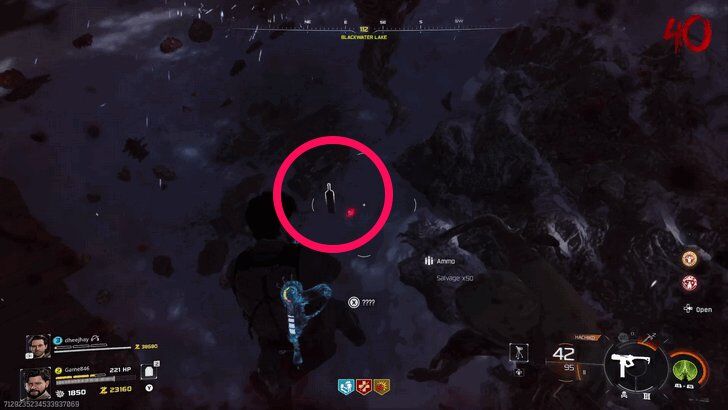
| 2 | Kill a Doppleghast Through a Jump Pad |
| Once you reach Round 40, Doppleghasts will start spawning. Clear the other zombies first and leave one Doppleghast alive. Lure the Doppleghast through any Jump Pad and activate the pad to kill it from the flight. You will hear a sinister laugh to confirm that you've killed the Doppleghast. |
|
| 3 | Enter the Yellow Portal to Start the Trial |
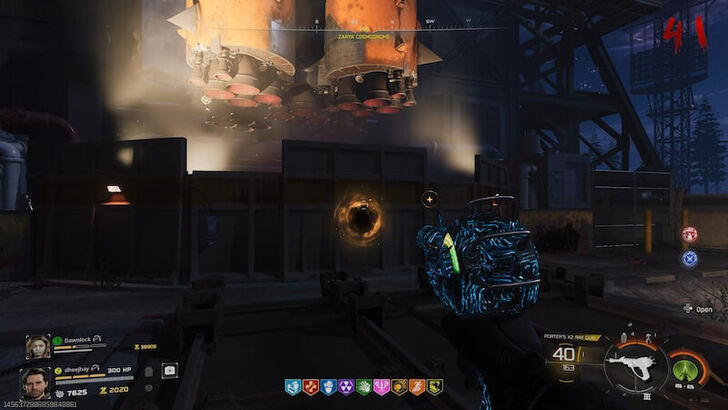 After killing the Doppleghast with a Jump Pad, a yellow portal will appear near the Space Rocket in Zarya Cosmodrome. Make your final preparations, including opening all doors in the POI so you have more room to run during the Relic Trial. When you're ready, interact with the yellow portal to activate the Relic Trial. If you’re in a squad, teammates may need to vote to start it. |
|
| 4 | Survive 5 Waves of Zombies |
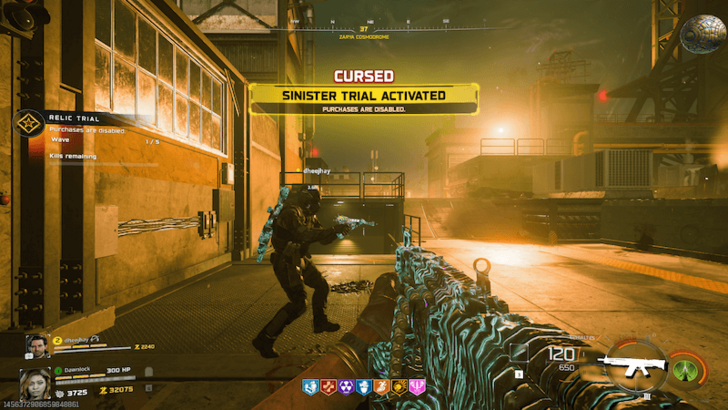 Survive five waves of zombies to complete the Relic Trial and unlock the VRIL Sphere Relic! The special rule for this trial is that you cannot buy anything, meaning all Wall Buys, Ammo Caches, and Perk purchases are disabled. You can get the Vulture Aid perk beforehand to recover ammo from zombies, or use a Cache Back Gobblegum when you're running low on bullets. |
Focusing Stone Relic
| 1 | Survive Until Round 40 |
|---|---|
| To obtain the Focusing Stone Relic, you must survive until round 40. Make sure to upgrade your main weapon to Pack-A-Punch 3 with legendary rarity before you proceed to get the relic. We also recommend getting the Golden Armor to increase your chances of survival. | |
| 2 | Kill a Zursa (Bear) with a Melee Attack |
 When you reach round 40, you must kill a Zursa (Bear) using a melee attack. Damage the bear first with your main gun then last hit it with a melee attack to secure the objective. If you manage to kill the bear with a melee attack, a bottle of wine will drop from it. To make this step easier, we recommend getting the Melee Machiato perk found in Blackwater Lake. |
|
| 3 | Score a Legendary in a Ted Task |
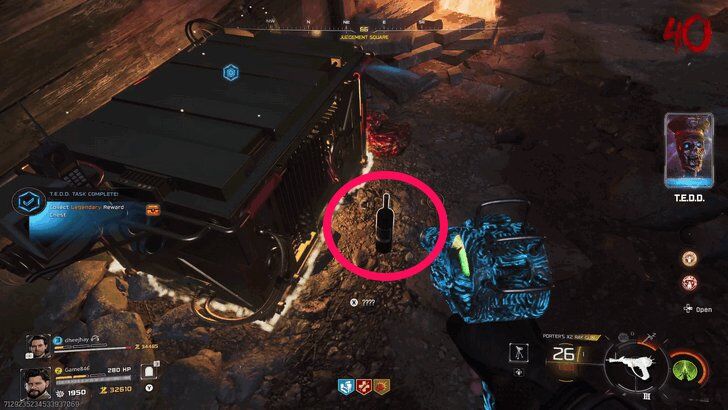 You must achieve a Legendary (yellow) score in any available Ted Task once you reach round 40. A bottle of wine will drop in front of the rewards box if you manage to do this step correctly. |
|
| 4 | Place the Bottles in Blackwater Lake |
Once you have the two bottles, head to Blackwater Lake's cabin. Here, press the interact button to add the two bottles in your possession. After this, pay attention and remember the sequence of how the bottles broke. Shoot the bottles in the same sequence that they were destroyed. |
|
| 5 | Complete the Trial in Zarya Cosmodrome |
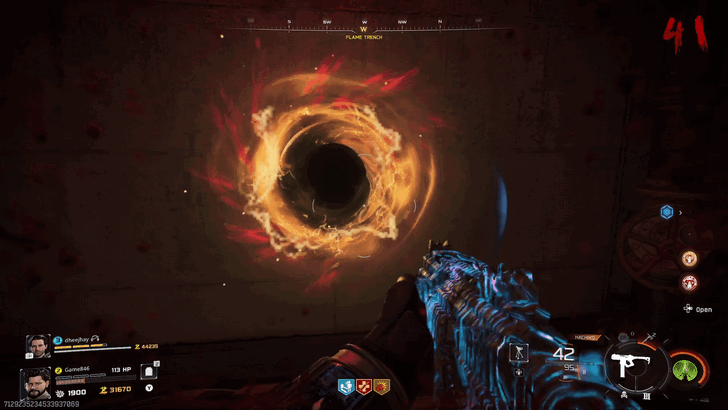 Head to Zarya Cosmodrome and look for the yellow portal in Flame Trench. Before you enter, take note that all of your essence will be gone and you will not be able to gain any during the trial. On top of that, you'll need to survive 5 waves of Zombies to complete the trial. Make sure to spend all of your essence on ammo, upgrades, perks, and door buys before you enter the trial. We also recommend equipping the Reign Drops and Cache Back gobblegums to ensure that you'll have power ups and enough ammo while doing the trial. |
Wicked Relics
You can start earning Wicked Relics once you equip at least two Grim Relics and two Sinister Relics to unlock Tier 2 and reach Round 60. Additionally, you’ll also gain access to the Ultra weapon rarity.
Bus Relic
| 1 | Activate Tier 2 and Survive Until Round 60 |
|---|---|
| To enable the method to unlock the Bus Relic, you must first equip relics that activate Tier 2 when starting Cursed Mode, then survive all the way to Round 60. | |
| 2 | Complete a Round Without Taking Damage |
| To unlock the Bus Relic Trial, you must complete a round without taking any damage. You will hear an evil laugh once successful.
It is recommended to use the Time Out Gobblegum to instantly end the round, or wait for a Ravager round and use the Saw Trap to make it easier to survive without taking damage. Equipment such as Decoys, Kazimir, or Cymbal Monkey can also help you avoid enemies. |
|
| 3 | Enter the Red Portal to Start the Trial |
| Go to Blackwater Lake and look for the Red Portal on the right side of the boathouse where the Armor Wall Buy is located. Before starting the trial, make sure to equip the Brain Rot Ammo Mod, upgrade your weapons, and obtain all necessary Perks. | |
| 4 | Survive 6 Waves of Zombies |
| You will need to survive 6 waves of zombies to obtain the relic. The special rule for this trial is that only zombies affected by Brain Rot can kill other zombies, and any other means of kills will not count.
It is recommended to equip Caustic Fumes and Explosive Augments on your Brain Rot Ammo Mod to deal AOE damage to other zombies, helping you maximize your damage output. ▶︎ How to Research Augments |
Blood Vials Relic
| 1 | Survive Until Round 20 |
|---|---|
| The required interactable item will only appear once you reach round 20 in Tier II Cursed mode. To unlock Tier II, you must equip 2 Grim and 2 Sinister Relics. | |
| 2 | Find 5 Telephones |
| After reaching round 20, a telephone will spawn in a random POI. These telephones will spawn with a 10 round interval, meaning that they'll spawn in rounds 20, 30, 40, 50, and 60. However, there is a small chance that they'll spawn in between the 10 round interval, so make sure to check the telephone's known spawn locations:
・Toolshed in Blackwater Lake ・Lost Cabins in the Fog near Blackwater Lake ・Market Square in Ashwood ・Control Room in Zarya Cosmodrome ・Mcdougal's Service Station in Exit 115 ・Reba's Diner in Exit 115 ・Server Room in Janus Tower ・Farmhouse in Vandorn Farm Alternatively, you can use the Round Off gobblegum to find at least two telephones when you're in an interval round (20, 30, 40, 50, and 60). The telephones will emit a loud sound, so you'll be able to discern if you are in the right place. |
|
| 3 | Hold the Interact Button Near the Telephone |
 Go near the telephone and hold the interact button. The telephone will ring and disappear, then you'll hear a sinister laugh once you interacted with all 5 telephones. |
|
| 4 | Head to Blackwater Lake's Cabins |
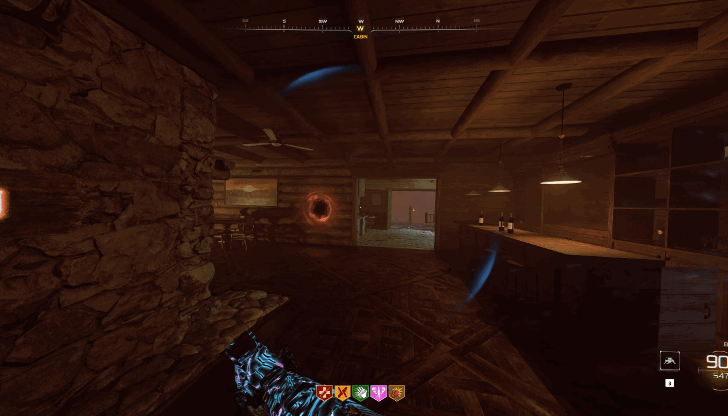 Enter the red portal inside Blackwater Lake's Cabins. The trial will require you to survive 6 waves, and your weapons will only deal half damage - making it harder to kill zombies. We recommend using the Kill Joy gobblegum during this trial to counter the nerf that affects your weapons. |
Dragon Relic
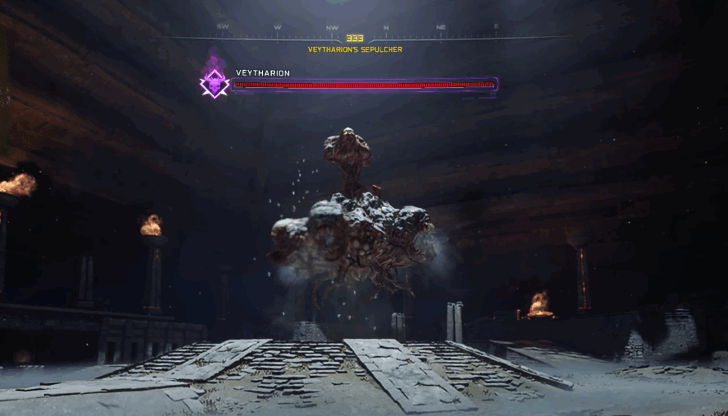
| 1 | Defeat Veytharion at Round 60 |
|---|---|
| To unlock the Relic Trial for the Dragon Relic, you must complete the Ashes of the Damned Easter Egg and defeat Veytharion at Round 60 or above. We recommend completing the Easter Egg as early as you can up to the point of no return, then just grinding your way up and starting the boss fight once you reach Round 60. ▶︎ Ashes of the Damned Easter Egg Walkthrough and Steps |
|
| 2 | Prepare for the Relic Trial |
| Make sure you have most Perks and your weapons upgraded to Pack-A-Punch 3 and Legendary Rarity, and that you’ve purchased the Golden Armor to help you survive tougher enemies in later rounds. You can also try to get a free Ray Gun Mark II by doing its side quest. | |
| 3 | Enter the Red Portal to Start the Trial |
| Once you’ve beaten Veytharion, you will be teleported back to Blackwater Lake. A red portal will appear on the side of the Cabin near the landing pad. Make your final preparations, as you’re about to enter a Relic Trial. When you're ready, interact with the red portal to activate the Relic Trial. If you’re in a squad, teammates may need to vote to start it. |
|
| 4 | Survive 6 Waves of Zombies |
| Survive six waves of zombies to complete the Relic Trial and unlock the Dragon Relic! The special rule for this trial is that zombies can only be damaged by explosives. You can use the Ray Gun and Necrofluid Gauntlet (which you should have from completing the main Easter Egg) to complete the trial with ease, as they deal explosive damage. |
Civil Protector Head Relic
| 1 | Survive Until Round 60 |
|---|---|
| To unlock the method for obtaining the Civil Protector Head Relic, you must progress through Astra Malorum and survive until Round 60. | |
| 2 | Extinguish Candles From Chandeliers |
| Head to Museum Infinitum. You’ll find four chandeliers with lit candles. Use the PHD Flopper perk underneath each chandelier to extinguish the candles. The required order can be random, and if you fail, simply progress to the next round to try again. You will hear an evil laugh once successful. This section will be updated as soon as we get more information. | |
| 3 | Enter Red Portal to Start the Trial |
| You’ll find the red portal at the Crash Site, near the Rampage Inducer and behind the Mystery Box location. Make sure your weapon is upgraded and you have the necessary Perks before starting the trial. | |
| 4 | Survive 6 Waves of Zombies |
| You’ll need to survive six waves of zombies to obtain the Civil Protector Head Relic. The special rule for this trial is that all zombies spawn as sprinters. It’s recommended to use the Kazimir tactical equipment to avoid getting overwhelmed. |
How to Unlock Relics
Complete Ashes of the Damned Main Easter Egg
Relics will only start appearing on Cursed Mode once you finish the Ashes of the Damned main easter egg. It means you have to defeat Veytharion on Ashes of the Damned in Standard Mode.
Ashes of the Damned Easter Egg Walkthrough
Open the Mysterious Object After Defeating Veytharion

After defeating Veytharion, you’ll be teleported back to the docks in Blackwater Lake. On the frozen lake, the Mysterious Object will appear. You must open the Mysterious Object to unlock the Relic Trials in Cursed mode.
If you leave the match without ever opening the Mysterious Object, the Relic Trials will stay locked, and you’ll have to redo the entire Easter Egg to make the Mysterious Object appear again.
Black Ops 7 (BO7) Related Guides

Zombies Guide
Comment
Please update as last relic on Ashes was found yesterday
Author

All Cursed Relics and How to Unlock
Rankings
- We could not find the message board you were looking for.
Gaming News

![Monster Hunter Stories 3 Review [First Impressions] | Simply Rejuvenating](https://img.game8.co/4438641/2a31b7702bd70e78ec8efd24661dacda.jpeg/show)
![Monster Hunter Stories 3 Review [First Impressions] | Simply Rejuvenating](https://img.game8.co/4438641/2a31b7702bd70e78ec8efd24661dacda.jpeg/thumb)

![The Seven Deadly Sins: Origin [First Impressions] | A Promising Start](https://img.game8.co/4440581/584e0bfb87908f12c4eab6e846eb1afd.png/thumb)
Popular Games

Genshin Impact Walkthrough & Guides Wiki
Umamusume: Pretty Derby Walkthrough & Guides Wiki
Pokemon Pokopia Walkthrough & Guides Wiki
Honkai: Star Rail Walkthrough & Guides Wiki
Monster Hunter Stories 3: Twisted Reflection Walkthrough & Guides Wiki
Arknights: Endfield Walkthrough & Guides Wiki
Wuthering Waves Walkthrough & Guides Wiki
Zenless Zone Zero Walkthrough & Guides Wiki
Pokemon TCG Pocket (PTCGP) Strategies & Guides Wiki
Monster Hunter Wilds Walkthrough & Guides Wiki


Recommended Games
Diablo 4: Vessel of Hatred Walkthrough & Guides Wiki
Cyberpunk 2077: Ultimate Edition Walkthrough & Guides Wiki
Fire Emblem Heroes (FEH) Walkthrough & Guides Wiki
Yu-Gi-Oh! Master Duel Walkthrough & Guides Wiki
Super Smash Bros. Ultimate Walkthrough & Guides Wiki
Pokemon Brilliant Diamond and Shining Pearl (BDSP) Walkthrough & Guides Wiki
Elden Ring Shadow of the Erdtree Walkthrough & Guides Wiki
Monster Hunter World Walkthrough & Guides Wiki
The Legend of Zelda: Tears of the Kingdom Walkthrough & Guides Wiki
Persona 3 Reload Walkthrough & Guides Wiki


All rights reserved
©/TM/® 2025 Activision Publishing, Inc.
The copyrights of videos of games used in our content and other intellectual property rights belong to the provider of the game.
The contents we provide on this site were created personally by members of the Game8 editorial department.
We refuse the right to reuse or repost content taken without our permission such as data or images to other sites.
I didn't receive the relic because there's an issue with my account.