Ashes of the Damned Easter Egg Walkthrough and Steps

This is the Ashes of the Damned easter egg walkthrough for Call of Duty: Black Ops 7 (BO7) zombies. Learn all the Ashes of the Damned steps and a full guide for the main quest easter egg.
List of Contents
Ashes of the Damned Easter Egg Walkthrough
Jump to a section!
| Ashes of the Damned Easter Egg Steps | ||||||
|---|---|---|---|---|---|---|
| 1 | Repair the Pickup Truck | |||||
| 2 | Restore Power in Vandorn Farm or Blackwater Lake | |||||
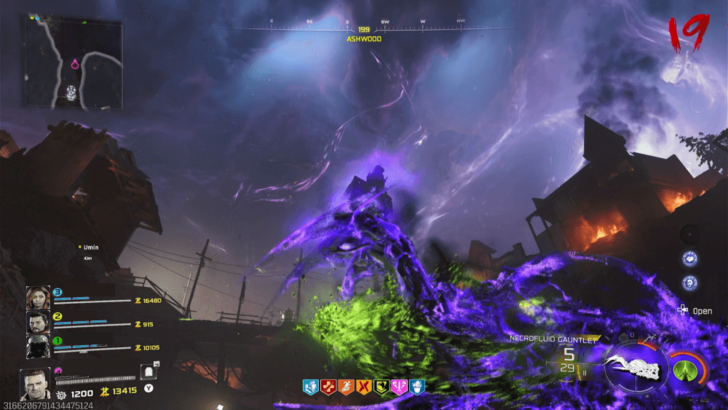
| 3 | Restore Power in Ashwood | |||||
| 4 | Add Pack-a-Punch to Ol' Tessie | |||||
| 5 | ||||||
| 6 | ||||||
| 7 | ||||||
| 8 | ||||||
| 9 | ||||||
| 10 | ||||||
| 11 | Revive Klaus at the Sheriff's Office in Ashwood | |||||
| 12 | Use Klaus to Get Aether Barrel | |||||
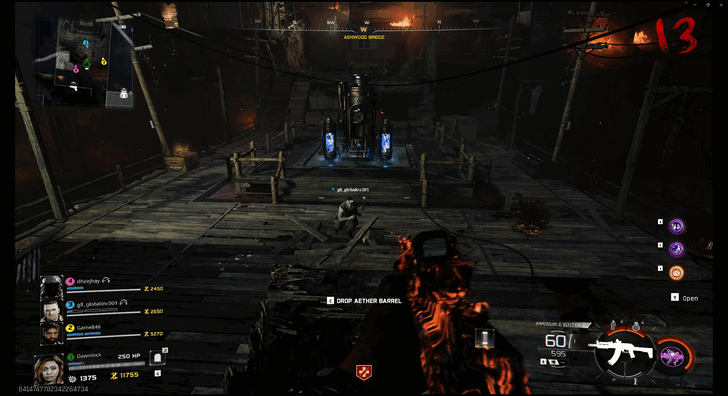
| 13 | Charge the Aether Barrel in Ashwood | |||||
| 14 | Unlock the Necrofuild Gauntlet (Wonder Weapon) | |||||
| 15 | ||||||
| 16 | ||||||
| 17 | Obtain Syringe and Perform Blood Sacrifice (Yuri's Lab Symbols Puzzle) | |||||
| 18 | Collect 3 Keys in the Fog | |||||
| 19 | Install the DG-2 Turret Barrel on the Car | |||||
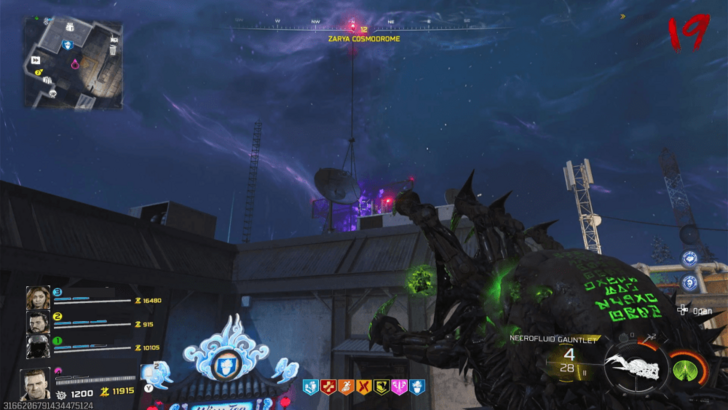
| 20 | Slow Down the Spinning Radio Towers in Zarya | |||||
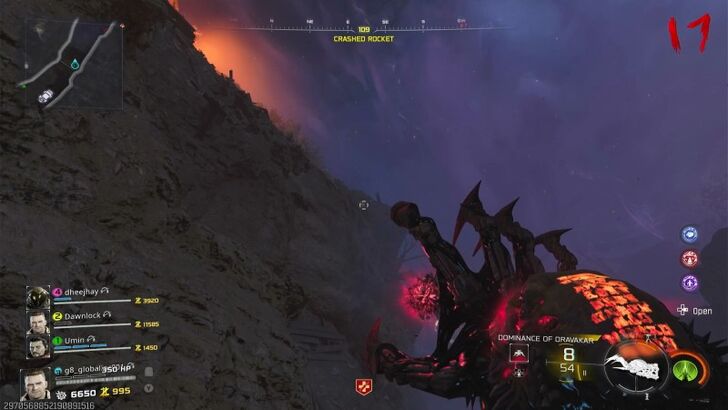
| 21 | Launch the Rocket | |||||
| 22 | Pause the Lightning in Exit 115 | |||||
| 23 | Collect Artifacts at the Farm | |||||
| 24 | Shoot Film Reels at the Lake | |||||
| 25 | Collect Souls in Fog Areas (Point of No Return) | |||||
Repair the Pickup Truck
| 1 | Get Tedd's Head |
|---|---|
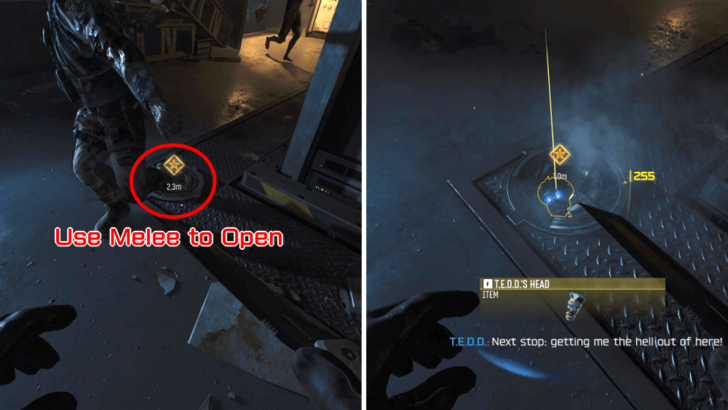 Open the Server Room in the spawn area to access the crate inside. Melee the crate to open it up and get Tedd's Head. |
|
| 2 | Fix Ol' Tessie (Pickup Truck) |
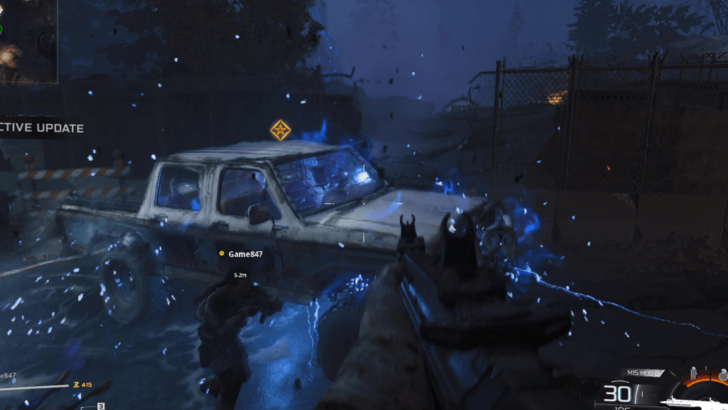 Use Tedd's Head to fix Ol' Tessie, the pickup truck. Use Ol' Tessie to drive around and get to the next areas. |
|
| 3 | Go to Vandorn Farm or Blackwater Lake |
 You can either go to Vandorn Farm or Blackwater Lake after getting Ol' Tessie. There's no major difference in choosing one POI over the other, but note that even after turning on the power for the whole map, you will still have to manually turn on the power in the POI you didn't visit in your first route to Ashwood. |
Restore Power in Vandorn Farm
| 1 | Clear the Infested Power Pump |
|---|---|
 Head to the farm to see the Infested Power Pump in the middle of the area. Destroy the orange blobs within 30 seconds to fix the Power Pump. |
|
| 2 | Pull the Switch to Restore Power |
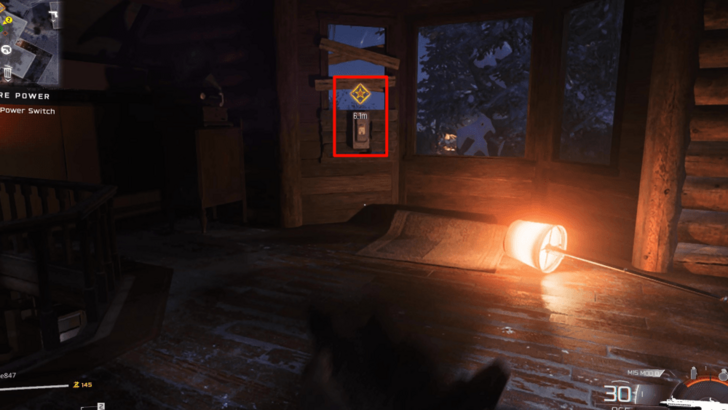 Unlock the Barn and head to the second level for the Power Switch. Activate the switch and drive to Ashwood afterward for the next objective. |
If you're having trouble destroying the spores on solo, you can use a Semtex to destroy a bunch of spores at once. Alternatively, if you have Toxic Growth unlocked, you can perform the Plant Easter Egg to try and upgrade your gun's rarity or Pack-a-Punch level.
Restore Power in Blackwater Lake
| 1 | Clear the Infested Power Pump |
|---|---|
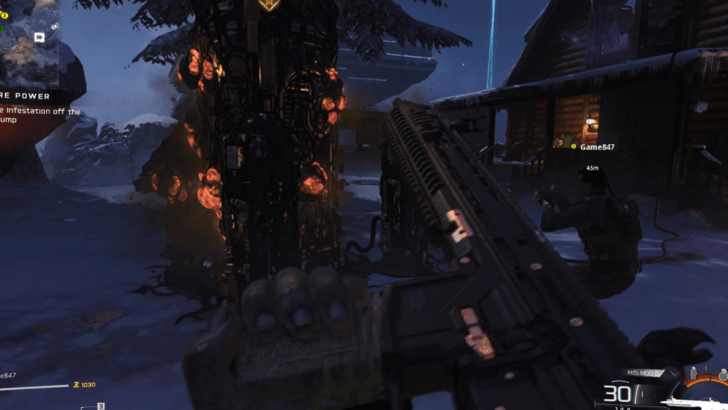 Go to the Infested Power Pump and quickly remove the orange blobs on the Power Pump. You must clear them within 30 seconds or you'll have to start again on the next round. |
|
| 2 | Pull the Switch to Restore Power |
Unlock the Cabin and activate the Power Switch on the second floor near the window. Drive to Ashwood afterward for the next objective. |
Again, for those having trouble destroying the spores on solo, it's worth using a Semtex to destroy a bunch of spores at once. Alternatively, those with Toxic Growth can perform the Plant Easter Egg to try and upgrade your gun's rarity or Pack-a-Punch level.
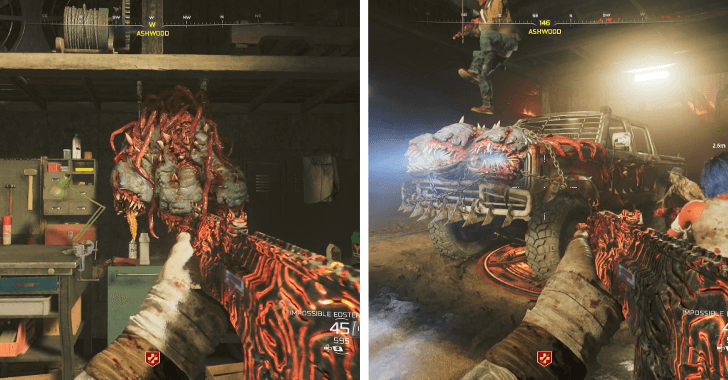
Restore Power in Ashwood
| 1 | Unlock Doors to Reach the Power Pump |
|---|---|
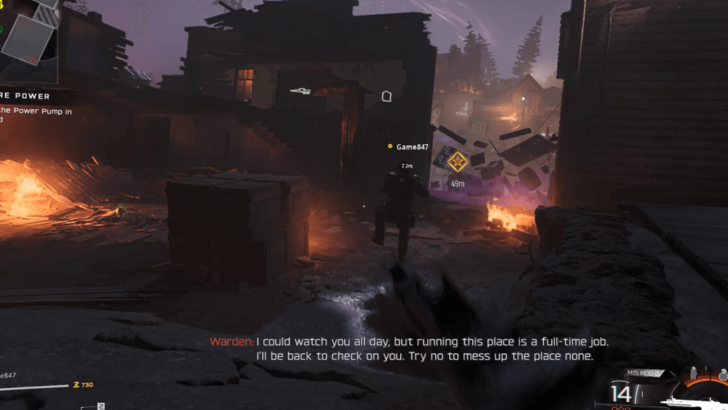 Once you reach Ashwood, head over to the Power Pump on the bridge. You will need to unlock two doors to get there. |
|
| 2 | Clear the Infested Power Pump |
 This part has the same process with the Vandorn Farm and Blackwater Lake Power Pumps. Clear the Power Pump from the infestation within 30 seconds. |
|
| 3 | Activate Power Switch to Restore Power |
 Once the Power Pump is clear from infestation, activate the switch in the same area to restore the power. The next objective after this is to attach a Pack-a-Punch on Ol' Tessie. |
Add a Pack-a-Punch to Tessie
| 1 | Drive Ol' Tessie to the Garage |
|---|---|
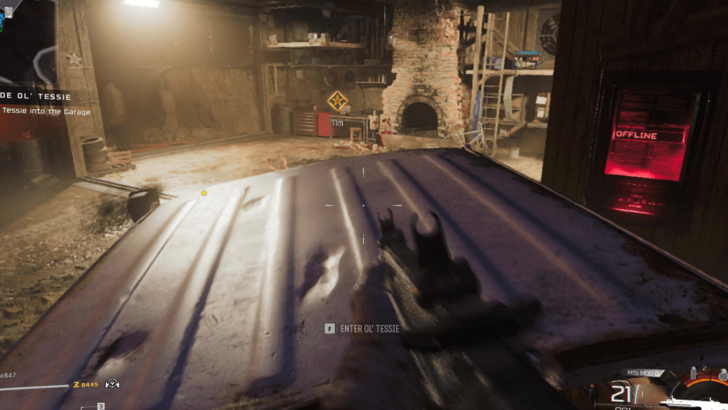 After turning the power on in Ashwood, head back to the truck and put it inside the garage. |
|
| 2 | Attach Pack-a-Punch to Ol' Tessie |
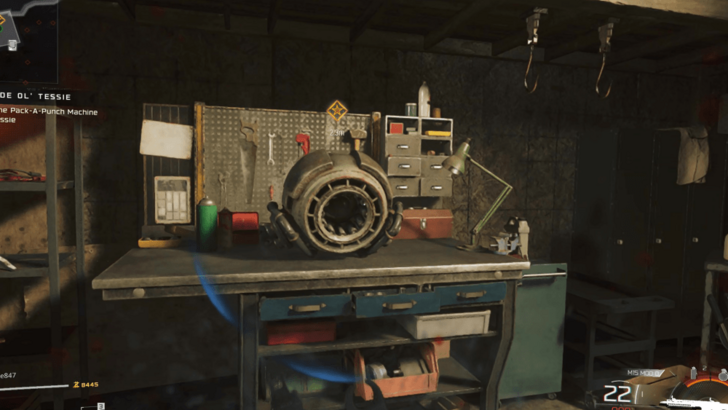 Go to the workbench inside the garage to add the Pack-a-Punch to Ol' Tessie. You can then use the Pack-a-Punch to upgrade your weapons! |
Obtain Widow's Lantern
| 1 | Obtain Jar of Spores |
|---|---|
 Head to the Cabin in Blackwater Lake. In the kitchen, interact with the cans next to the sink to obtain the Jar of Spores. |
|
| 2 | Interact with Dead Horse |
 Go to Vandorn Farm next and interact with the dead horse on the road. Check back with the horse after at least 3 rounds. |
|
| 3 | Get Widow's Lantern |
 After surviving 3 rounds, return to the dead horse and get the Widow’s Lantern. |
Upgrade Vehicle with Abomination Carcass
| 1 | Get Freezer Key in Reba's Diner |
|---|---|
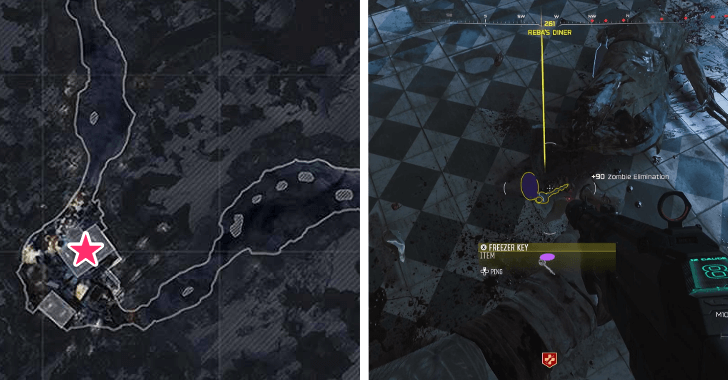 Head to Exit 115 and open the door to Reba's Diner. You must kill a zombie inside the diner called Cook to drop the Freezer Key. The Cook only spawns while you're inside the diner, but they can follow you outside the diner if you head out. |
|
| 2 | Obtain Abomination Carcass |
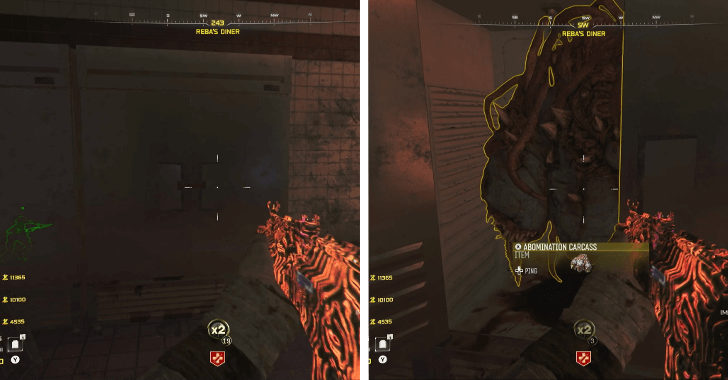 Once you have the key, use it to open the freezer in the upper-right corner of the diner and obtain the Abomination Carcass inside. |
|
| 3 | Drive Back to Garage Ol' Tessie |
 Drive back to Ashwood and bring the Abomination Heads to the garage to upgrade Ol' Tessie. |
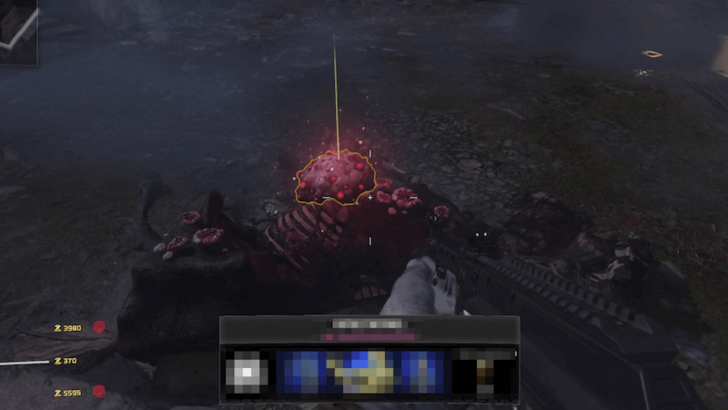
Get Hoard Husk Chunks in the Fog Area
| 1 | Destroy Overgrown Hoard Husk (Purple Plant) |
|---|---|
 After upgrading Ol' Tessie using the Abomination Head, go to any of the fog areas or road in between sites. Look for an Overgrown Hoard Husk (Glowing Purple Plant) in the area. Once you find it, use the Abomination Head beam attack from the truck to destroy it. |
|
| 2 | Grab the Hoard Husk Chunks |
 Once the husk is destroyed, quickly grab the Hoard Husk Chunks on the ground and some Salvage. Do this as quickly as possible to avoid getting overwhelmed by the enemies and die inside the fog area. You can also throw a Decoy to make the fog zombies clear the area. |
Obtain Ravager Eyes
| 1 | Kill Ravagers with the Saw Trap |
|---|---|
 Trigger a Saw Trap during a Ravager Round (usually Round 5 or 6). You can choose between the Saw Trap in Exit 115 or in Vandorn Farm. You'll need 2000 Essence in order to activate it. ▶︎ Saw Trap Locations |
|
| 2 | Pick up the Ravager Eyes |
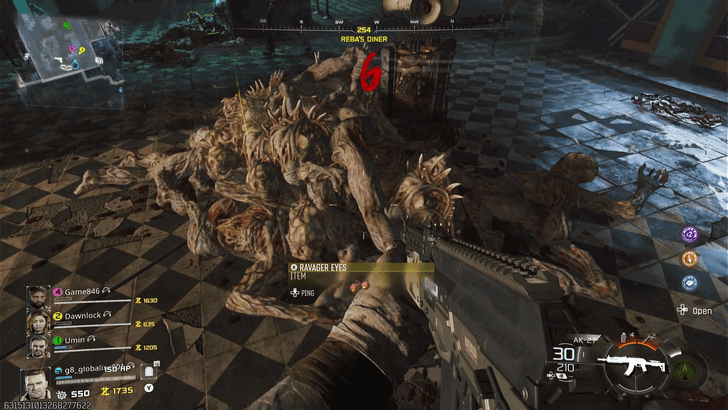 The Saw Trap will last for an entire round. Pick up the Ravager Eyes after. |
Obtain Human Bones
| 1 | Get a Combat Axe |
|---|---|
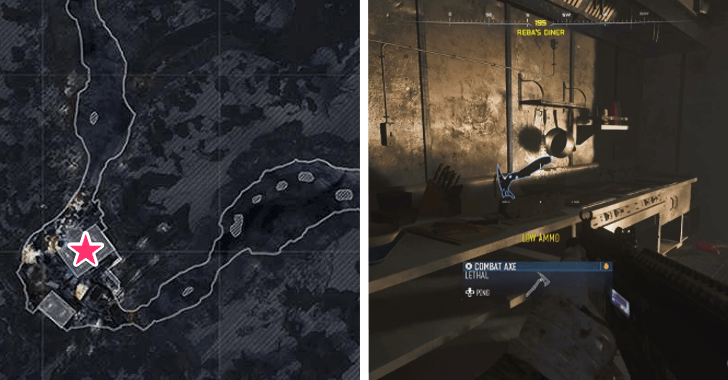 For this quest item, you need a Combat Axe. You can craft one at a Crafting Table if you’re at least Level 54 or find one as loot on the ground. You can get a guaranteed Combat Axe in Reba’s Diner at Exit 115. The axe will be in the kitchen. |
|
| 2 | Throw Axe at Hanging Corpse's Foot |
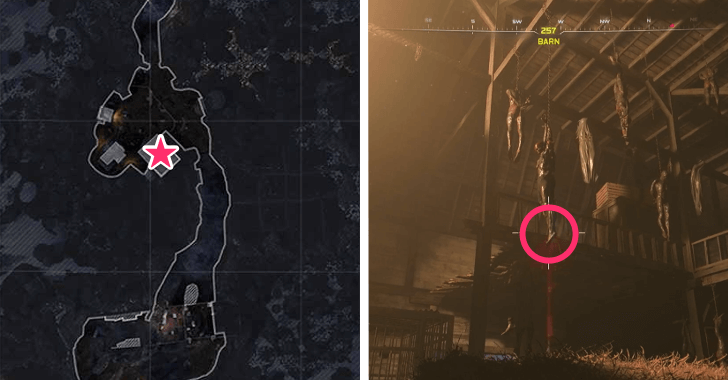 Once you have a Combat Axe, head to the barn in Vandorn Farm and throw the axe at the foot of the hanging corpse in the middle. It's the corpse that's closest to the stack of hay. |
|
| 3 | Burn Foot with Molotov |
 After throwing the Combat Axe, the foot will drop on the ground. Throw a Molotov to burn it and it will turn into Human Bones. Collect it to continue! Tip: You can get a free Molotov by the entrance of the Tessie garage in Ashwood. |
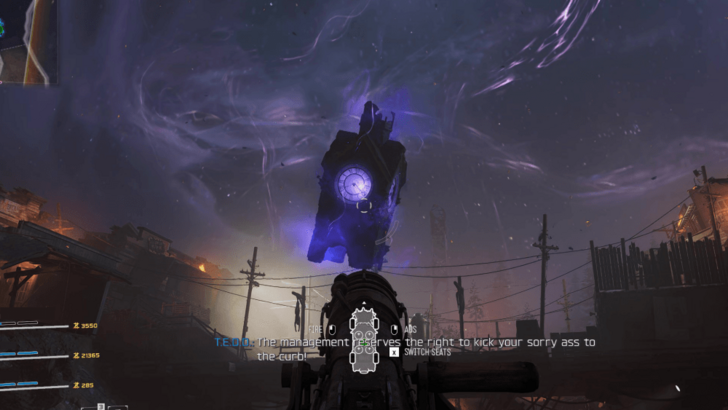
Defeat Uber Klaus at Janus Tower Plaza to Get Stabilizer Chip
| 1 | Summon Uber Klaus at Janus Tower Plaza |
|---|---|
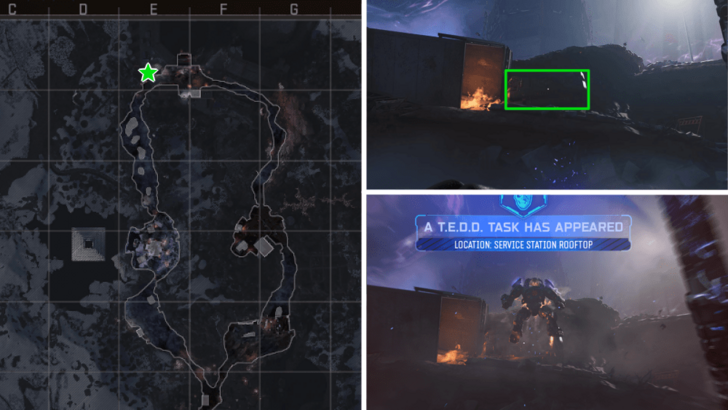 Return to Janus Tower Plaza (spawn area) at Round 8 to summon Uber Klaus. You need to be close to the semi-trailer at the left of the Exfil Machine to summon him. ▶︎ Uber Klaus Location and How to Beat |
|
| 2 | Defeat Uber Klaus |
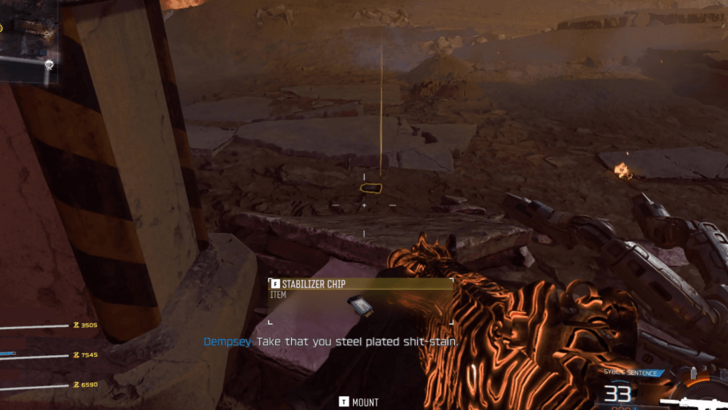 Defeat Uber Klaus, who has a two-phase boss fight. You can finish the first phase quickly by destroying the two discs on his shoulder. On the second phase, aim for his head to inflict mode damage and defeat him quickly. He will eventually drop a Stabilizer Chip after the fight. |
Revive Claus in Sheriff's Office in Ashwood
| 1 | Unlock Sheriff's Office and Install Stabilizer Chip |
|---|---|
 Go to Ashwood and unlock the door to the Sheriff's Office. Install the Stabilizer Chip on the panel near the cell to try to revive Klaus. A prompt saying "Update Requires Restart" should pop up afterward. ▶︎ How to Free Klaus |
|
| 2 | Throw 2 Stun Grenades to Revive Klaus |
 To revive Klaus, throw 2 Stun Grenades back-to-back. You need to make sure he gets hit by both explosions, so find a good angle to throw the grenade. Don't wait too long in between the 2 Stun Grenade hits as Klaus won't get revived. |
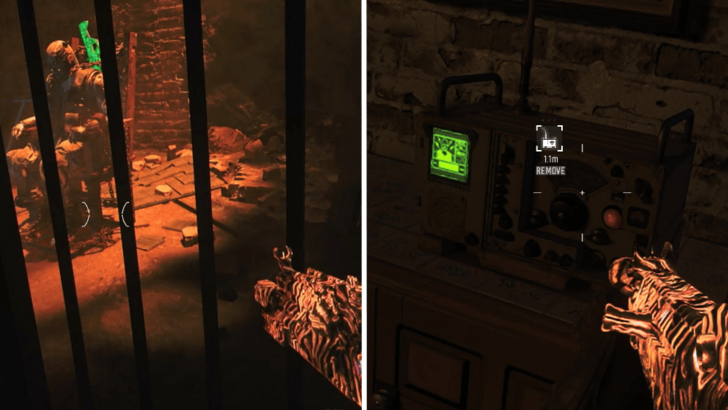
Use Klaus to Get Aether Barrel
| 1 | Head to Support Systems in Zarya Cosmodrome |
|---|---|
 Head to Zarya Cosmodrome and unlock the doors leading to the Support Systems underground. Bring Klaus to the panel where you can see a Aether Barrel. Note that Klaus's HP will decay overtime, so focus on going to Zarya Cosmodrome. He will follow you everywhere and teleport to your location if you get too far. ▶︎ How to Get Klaus Back |
|
| 2 | Ping the Panel for Klaus |
 Ping the panel near the Aether Barrel using the "Go" option (hold the ping button to see). Klaus will then interact with the panel and open up the scanner for the next step. |
|
| 3 | Stay in the Scanner for 1 Minute |
 Stay in the Scanner for 1 minute to unlock the Aether Barrel. You should see the timer on the upper left side of the screen. |
Charge the Aether Barrel in Blackwater Lake, Ashwood, and the Farm
Once you get the Aether Barrel, you need to charge it 3 separate times; at Blackwater Lake, Ashwood, and Vandorn Farm. We recommend doing it in that order, as it's a timed trial (with 1.5 minutes alloted in between charges) and the cellar of the farm is where you'll need to bring it after charging it thrice.
| 1 | Return to Blackwater Lake |
|---|---|
 Bring the Aether Barrel to Blackwater Lake's power pump and interact with it to insert the Aether Barrel. After inserting it, expect a zombie horde that you'll need to hold off while the energy is extracting. |
|
| 2 | Head to Ashwood |
 Pick up the Aether Barrel again and head to Ashwood. Interact with Ashwood's power pump by the bridge and insert the Aether Barrel. |
|
| 3 | Head to Vandorn Farm |
 Pick up the Aether Barrel once more and bring it to Vandorn Farm. Insert the Aether Barrel and wait for it to extract. |
Unlock the Necrofuild Gauntlet
| 1 | Bring the Aether Barrel in the Farm's Cellar |
|---|---|
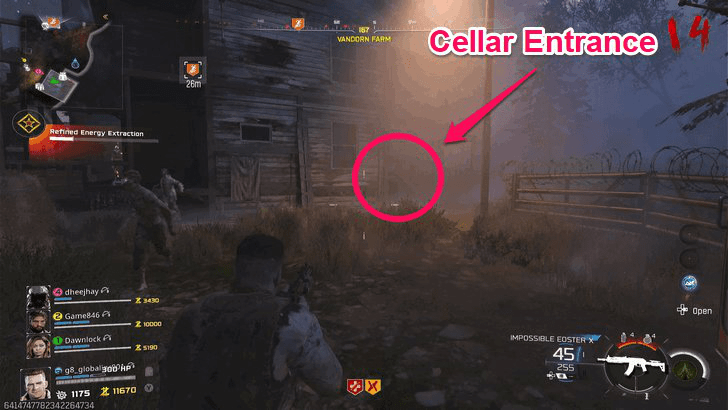 Pick up the Aether Barrel and bring it to the Vandorf Farm's Cellar. |
|
| 2 | Interact with the Cube |
 Once you're in the cellar, interact with the cube while carrying the Aether Barrel. |
|
| 3 | Use the Jump Pad in Janus Tower Plaza |
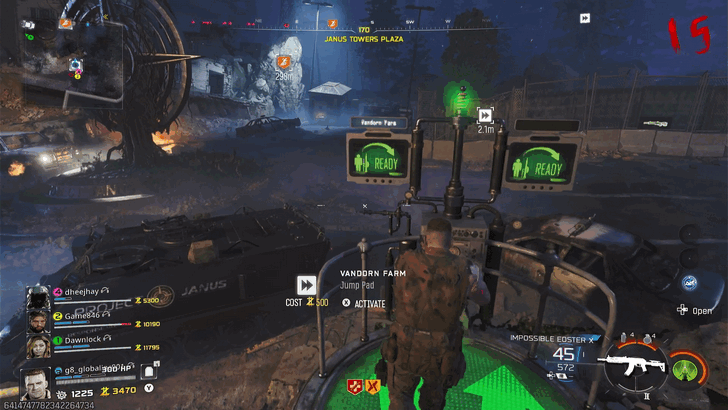 Return to Janus Tower Plaza and use a jump pad heading towards Vandorf Farm. |
|
| 4 | Jump to Vandorf Farm to see the Symbols |
 While you're airborne, keep an eye out for the three symbols on the barn's roof. Remember these symbols as these will be used to interact with the cellar's cube. |
|
| 5 | Input the Symbols on the Cube |
 Head back to the Farm's cellar and input the three symbols on the cube's three sides. The three symbols can be inputted in any order. Once this is done, pick up the Necrofluid Gauntlet. |
|
| 6 | Use the Necrofluid Gauntlet |
 After picking up the Necrofluid Gauntlet, a mini game where you'll be trapped in a circle will start. The main goal here is to shoot the green blobs and reload after shooting them. Do this for all the green blobs and the trap should disappear. ▶︎ Necrofluid Gauntlet Controls |
Obtain the Powder of the Forgotten
| 1 | Get Wisp Tea Perk |
|---|---|
 You will need to get the Wisp Tea Perk first to get the Powder of the Forgotten. You can get it through GobbleGums or its Perk Machine in Zarya Cosmodrome. |
|
| * | Free Wisp Tea Perk at Vandorn Farm |
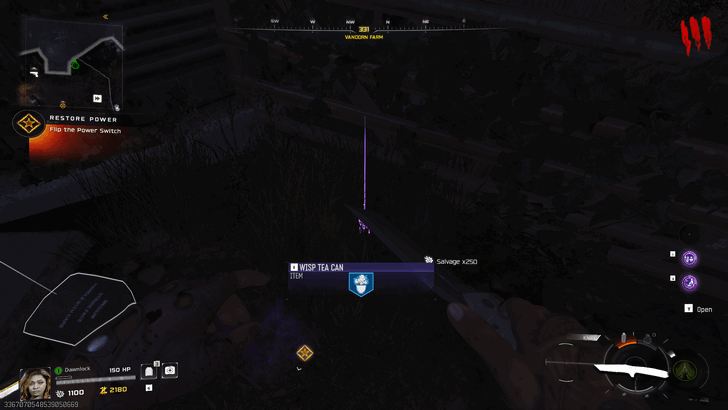 You can get a free Wisp Tea Perk at Vandorm Farm by interacting with the TV on the second floor of the Farmhouse several times and looking for the Ghost Girls. You should be able to do this as soon as you get Ol' Tessie running. ▶︎ How to Get Free Wisp Tea |
|
| 2 | Summon a Wisp and Go to the Tailor Shop |
 Head over to Ashwood's Tailor Shop (across the Double Tap machine) and defeat zombies to summon a Wisp. The chance to summon one is random, and you might have to burn a whole round just to get one. Insidee the Tailor Shop, lead the Wisp into the mirror once you summon it. It will interact with the mirror automatically once you get close and show a cube-like object. ▶︎ How to Activate Wisp Tea |
|
| 3 | Shoot the Mirror Using Necrofluid Gauntlet |
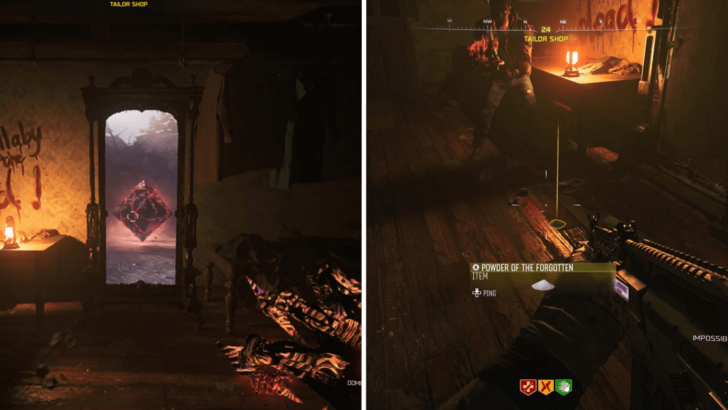 Once the mirror is showing the cube-like object, shoot it using the Necrofluid Gauntlet. It will spawn the Powder of the Forgotten after a few animations. |
Obtain Mysterious Limb
| 1 | Kill a Zursa with the Car Beams |
|---|---|
 Kill a Zursa (bear) using the Ol' Tessie's Abomination Beam. A Zursa will appear once you reach Round 16, or by activating three skulls using the Necrofluid Gauntlet in Zarya Cosmodrome. ▼ How to Spawn Zursa Bear |
|
| 2 | Pick up the Mysterious Limb |
 Pick up the Mysterious Limb after killing a Zursa. |
How to Spawn Zursa Bear: Collect Skulls
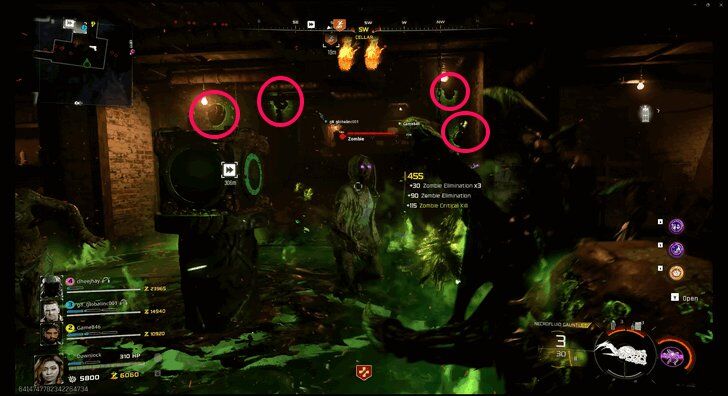
Zursa can be manually spawned at any round by activating three skulls in Zarya Cosmodrome. To activate a skull, you must use the Necrofluid Gauntlet to shoot it until its eyes glow green.
| Zarya Cosmodrome Skulls | |
|---|---|
| 1 | 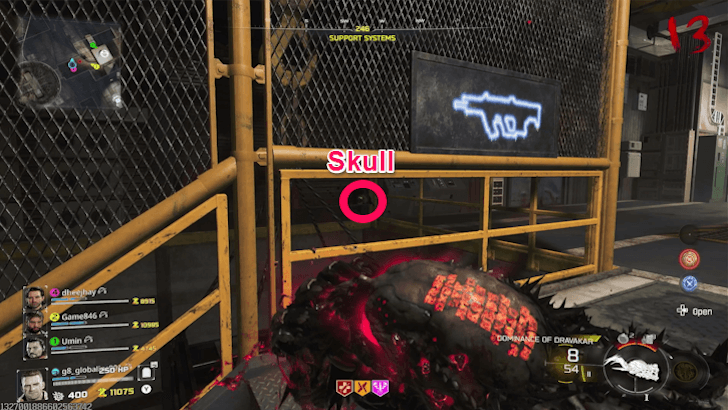 The skull is located behind the yellow metal railings near the DS20 Mirage wall buy, inside the Support Systems area. |
| 2 | 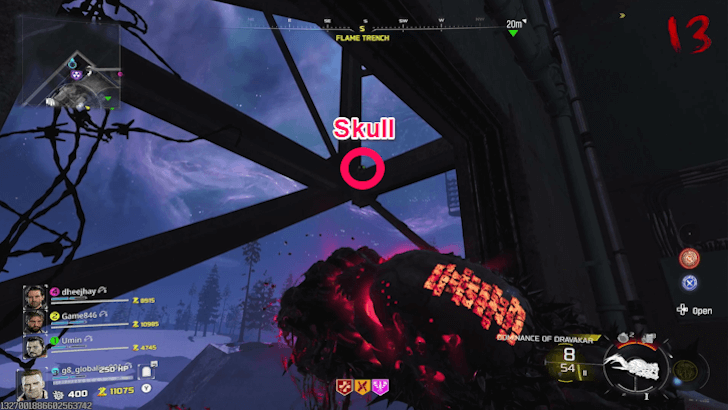 The skull is located in the metal support beams outside the building, visible through the window near the PHD Flopper Perk Machine in the Flame Trench area. |
| 3 | 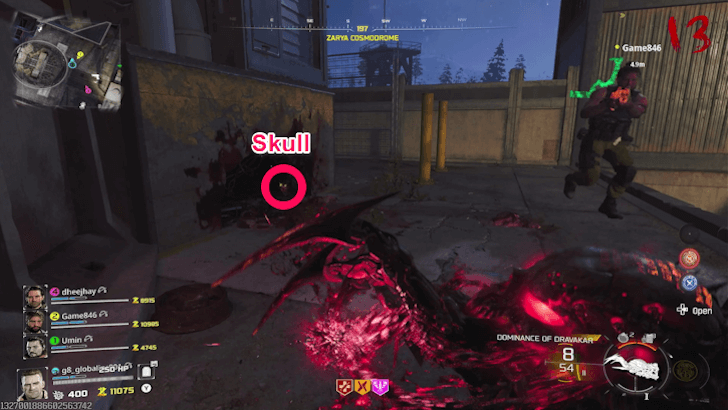 The skull is located inside a rusted metal opening at the base of the rocket. |
Once all three skulls’ eyes are glowing green, you will hear Zursa’s roar, indicating that it has successfully spawned in Zarya Cosmodrome.
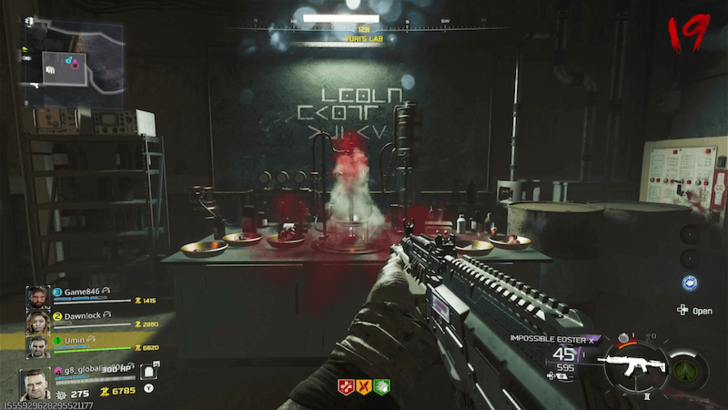
Obtain Syringe and Perform Blood Sacrifice
This blood sacrifice step requires the Widow's Lantern, Hoard Husk Chunks, Ravager Eyes, Human Bones, Powder of the Forgotten, and Mysterious Limbs items from previous steps.
| 1 | Find Syringe in Cosmodrome |
|---|---|
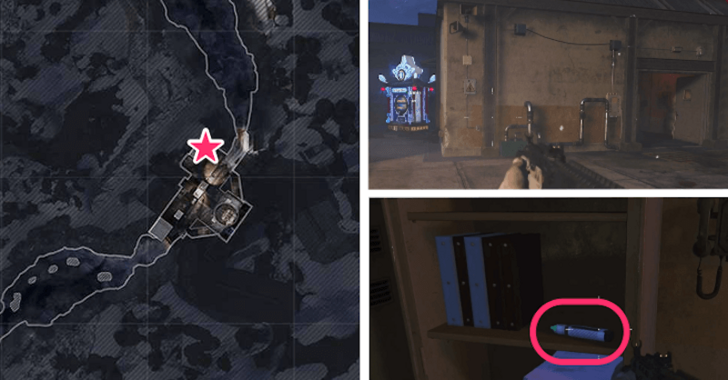 Head to Zarya Cosmodrome and enter the small building north of the area, near the Wisp Tea machine. Get the syringe on the shelf next to the binders. |
|
| 2 | Bring Syringe to Yuri's Lab |
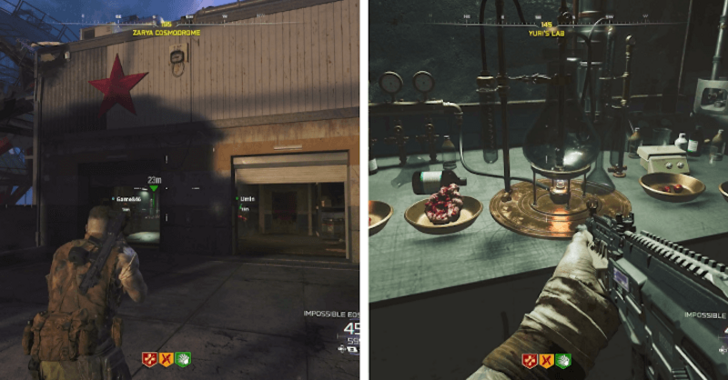 Bring the syringe to Yuri’s Lab, located in the building with the big red star southwest of the cosmodrome. |
|
| 3 | Solve Lab Code Puzzle |
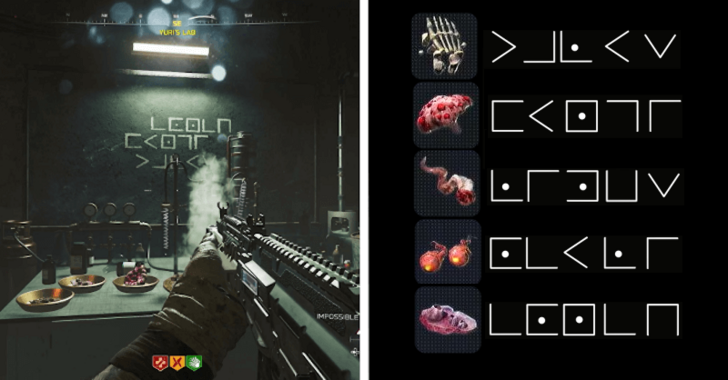 Interact with the powder on the table to reveal three codes on the board. Note that you'll get 3 random lines of symbols each match, but the symbols within the lines are fixed. Each line of code corresponds to one object you need to interact with. Use the reference above to see which code matches each item. ▶︎ Yuri's Lab Serum Symbols Solution |
|
| 4 | Turn Vial to Red |
 Inputting the correct code or interacting with the three objects in the right order will turn the vial red, while inputting the wrong code will turn the vial black. If the vial turns black, you must wait until the next round to try again. |
|
| 5 | Defeat Enemies in Soulbox |
 Once the vial turns red, add blood to start a soulbox event. You’ll be trapped in the room and must kill zombies until the room fills with purple smoke and opens again. Tip: The one adding the blood will have their health reduced to a fraction. Though, they can regain their health by killing zombies with the Necrofluid Gauntlet, so make sure the one with the Necrofluid Gauntlet is the one adding the blood. |
Ashes of the Damned Codes Solver
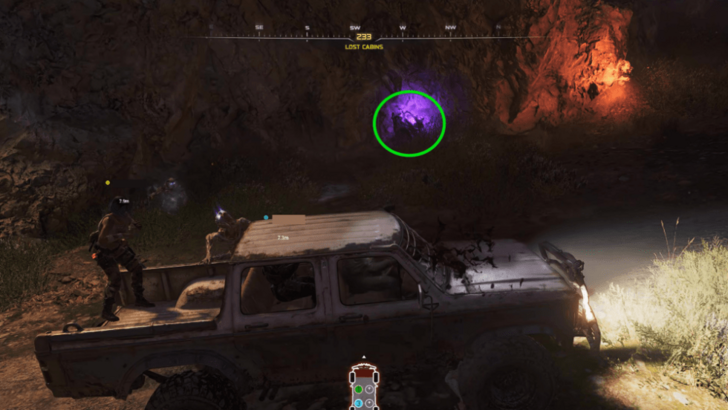
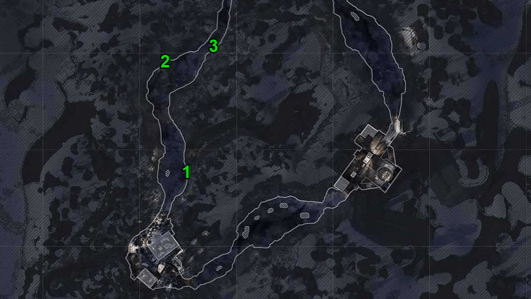
Collect Keys in the Fog
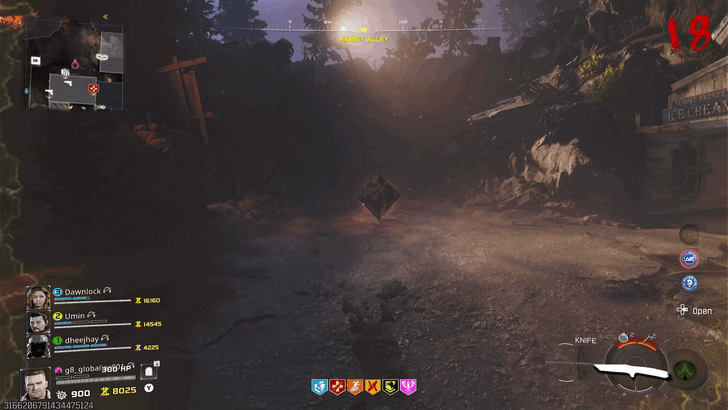
You need to collect 3 keys in the fog areas then bring them to the prism in Rabbit Alley located in Ashwood (the area behind the building with the Pack-a-Punch).
All Key Locations
Key spots are randomized every match. Listed below are the possible key locations for each region.
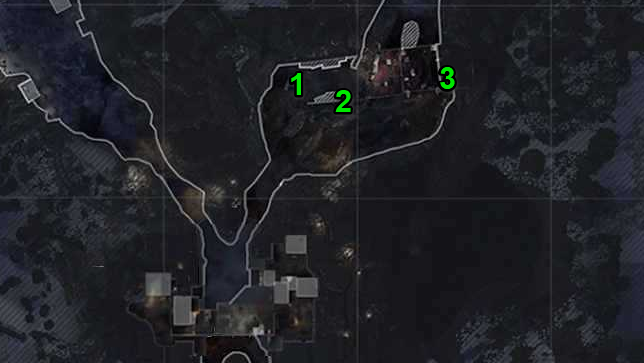
| Crashed Rocket- Yellow-Green Key | |
|---|---|
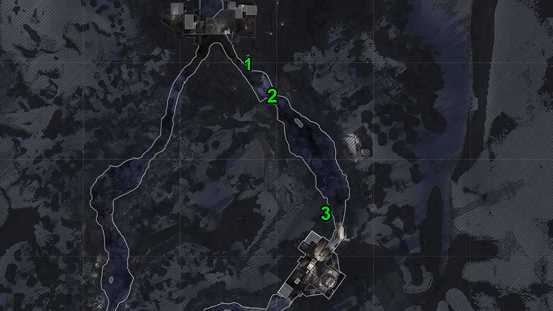 Map Overview |
 Possible Location 1 |
 Possible Location 2 |
 Possible Location 3 |
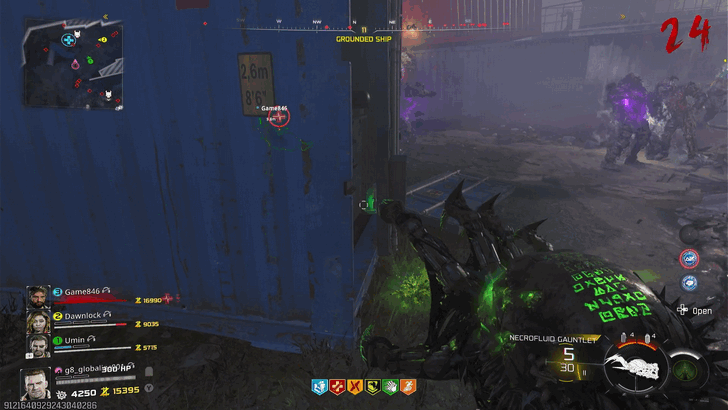
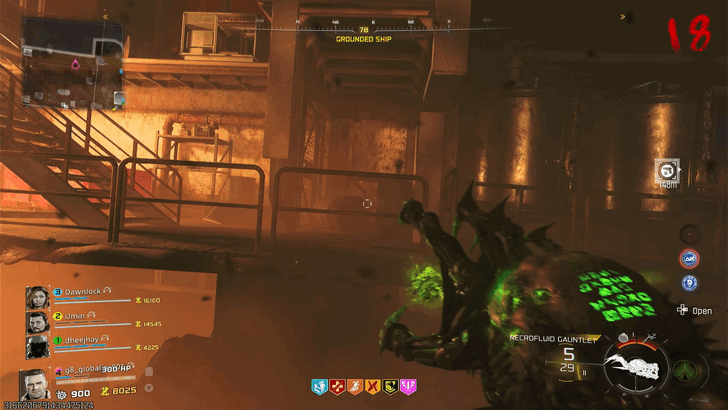
| Grounded Ship - Green Key | |
 Map Overview |
 Possible Location 1 |
 Possible Location 2 |
 Possible Location 3 |
| Orda Graveyard - Red Key | |
 Map Overview |
 Possible Location 1 |
 Possible Location 2 |
 Possible Location 3 |
Picking up each key temporarily grants you a debuff. As a general tip, bringing the car is recommended as it allows you to bypass the nerf that each key gives.
- Nightbird Key (Orda Graveyard) - Melee Only
- Bruin Key (Crashed Rocket) - No health regen
- Terrapin Key (Grounded Ship) - Super slow
All Ashes of the Damned Key Locations
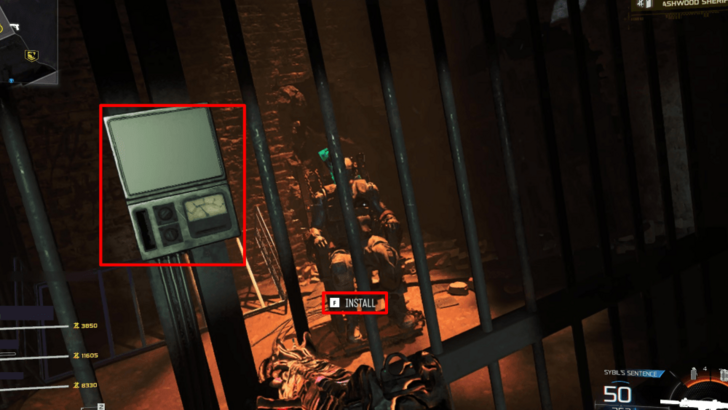
Install the DG-2 Turret Barrel on the Car
| 1 | Collect the Wunderwaffe |
|---|---|
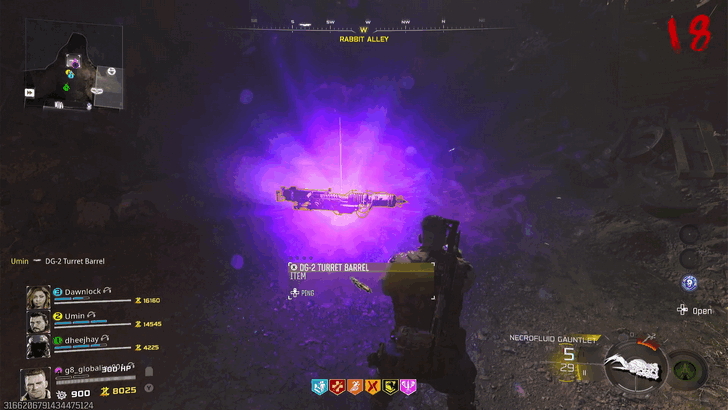 Once you bring all 3 keys to the prism in Ashwood, a cutscene will play out. You will be rewarded with the DG-2 Turret Barrel after. |
|
| 2 | Go to the Garage to Install the Turret |
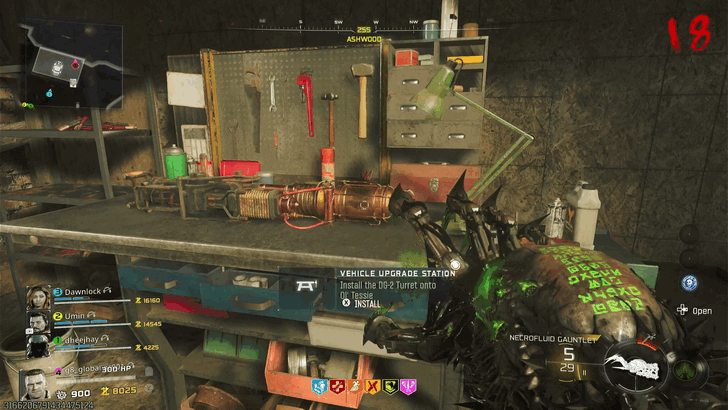 Head down and go to the garage. Install the Turret Barrel on the car to proceed. |
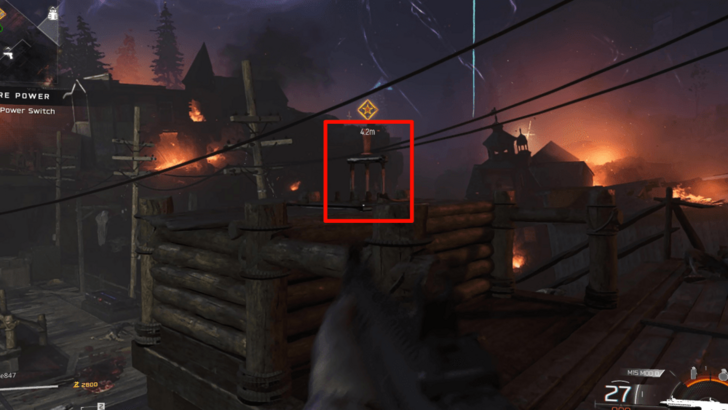
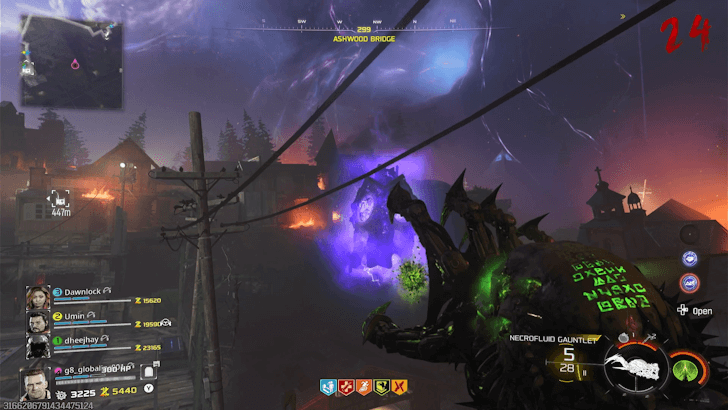
Slow Down the Spinning Radio Towers in Zarya
| 1 | Shoot the Clock with the Wunderwaffe |
|---|---|
 After installing the DG-2 Turret Barrel to Ol' Tessie, use it to shoot the floating Clock Tower above the garage. It should turn on / intensify the purple color after shooting it with the DG-2 Turret Barrel. |
|
| 2 | Shoot the Clock with the Necrofluid Gauntlet |
 Once the clock is powered up with the DG-2 Turret Barrel, shoot it with the Necrofluid Gauntlet and recall to absorb the power. You should shoot it on one of the faces of the clock to proceed. |
|
| 3 | Shoot the First Spinning Radio Tower |
 Go to Zarya Cosmodrome using the Launch Pad to get there quickly. Shoot one of the Spinning Radio Towers using the gauntlet to slow it down. |
|
| 4 | Repeat the Process for the Second Radio Tower |
 Return to Ashwood and repeat the process of obtaining the power from the clock, but make sure to shoot a different face of the clock with the gauntlet. Once done, hit the other tower to slow it down as well, and launch the rocket on the next step. |
Note that you can shoot the 4 faces of the clock to get the purple energy only once per round. If you fail the step and all 4 faces of the clock don't have the purple energy, you'll wait have to wait until the next round.
Launch the Rocket
| 1 | Input the Code in the Control Room |
|---|---|
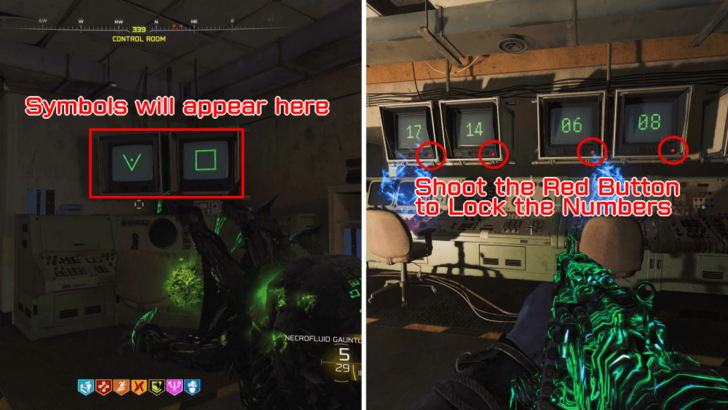 Go inside the Control Room behind the Wisp Tea Perk Machine in Zarya Cosmodrome and input the launch code from the symbols on the machine on the right. Each symbol corresponds to a word, and the word corresponds to a set of numbers. Once you decipher the code, shoot the red button on the 6 monitors once the correct number is showing on the screen. If you put the wrong code, wou will have to restart the whole process from the next round (starting from shooting the clock), so make sure to accurately hit the button! |
How to Decipher the Codes
On the right are the codes that will be flashing on the right-side monitors, 1 pair at a time.
| Right-Side Monitor | Word | Left-Side Monitor Code |
|---|---|---|
 |
ROCKET | 17-14-02-10-04-19 |
 |
ENGINE | 04-13-06-08-13-04 |
 |
LAUNCH | 11-00-20-13-02-07 |
 |
WEAPON | 22-04-00-15-14-13 |
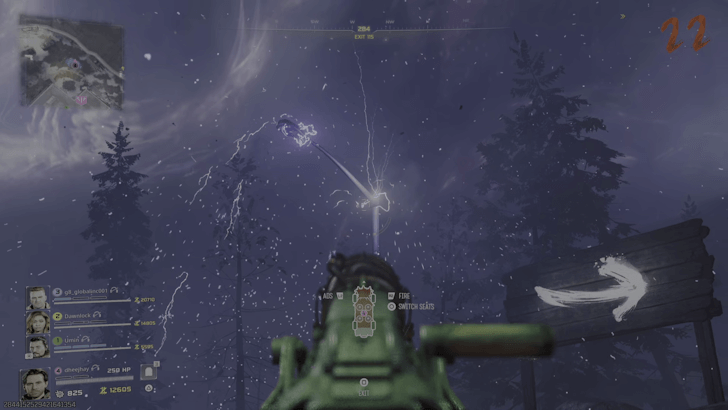
Pause the Lightning in Exit 115
| 1 | Lightning will be Striking in Exit 115 |
|---|---|
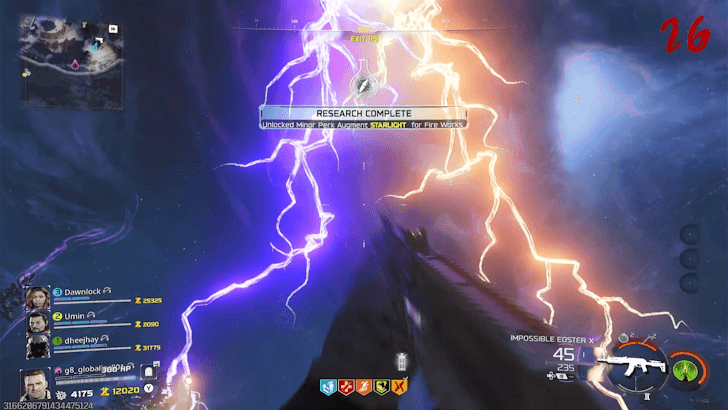 When you go to Exit 115, for every two rounds, there will be colored lightning strikes on the rooftops of Gas Station (red), Service Station (yellow), and Reba's Diner (blue). It's dependent on the round you launched the rocket. Tip: You don't have to go to Exit 115 to check if there's lightning as the lightning is even visible from Ashwood, if it's present that round. You can also trigger the lightning on non-lightning rounds. ▼ How to Trigger the Lightning |
|
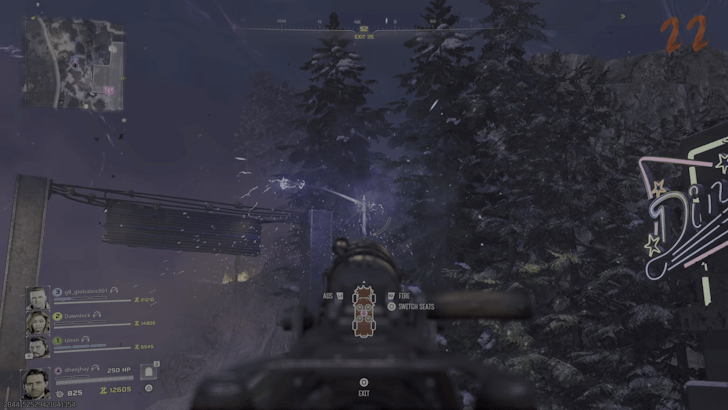
| 2 | Shoot the Clock in Ashwood with the Necrofluid Gauntlet |
 You will need to power up the Necrofluid Gauntlet wonder weapon. Go back to Ashwood and shoot the face of the floating Clock Tower with the Necrofluid Gauntlet to make it glow purple. |
|
| 2 | Shoot the Clock in Exit 115 with the Necrofluid Gauntlet |
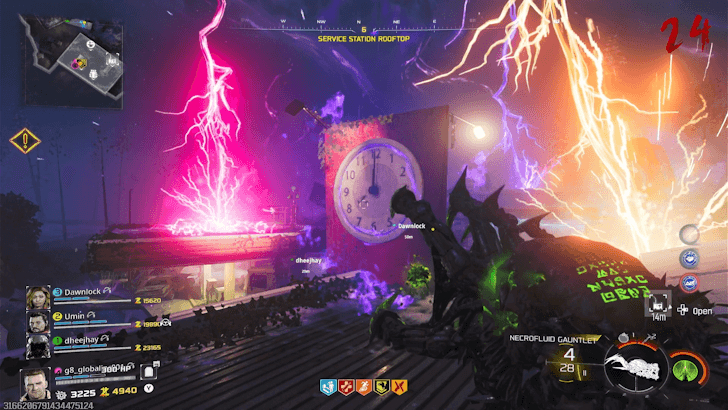 With the Necrofluid Gauntlet glowing purple, go to Exit 115 and shoot the face of the clock on the Service Station Rooftop to turn it purple and pause the lightning. |
|
| 3 | Bring Specific Zombies to Lightning |
| With the lightning paused, you’ll need to bring 3 zombies that are glowing corresponding to the color of the lightning. |
Locations of the 3 Lightning Zombies (Waitress, Engineer, Trucker)
| Zombie | Method |
|---|---|
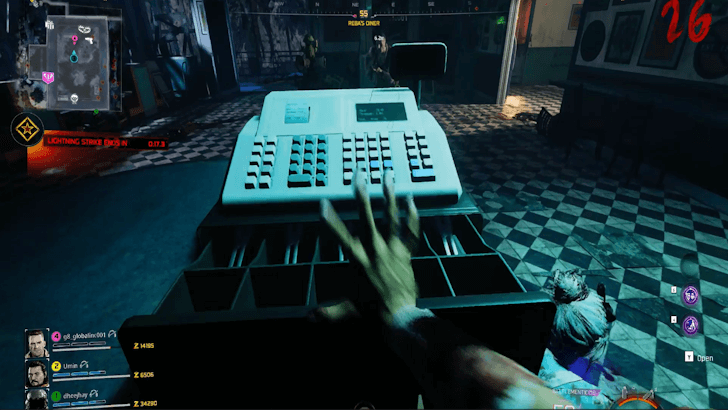 |
1. Get Melee Macchiato from the lake 2. Go to Reba's Diner and melee attack the cash register to open it and summon the Waitress zombie. 3. Lead the Waitress to the diner's rooftop and onto the blue lightning. |
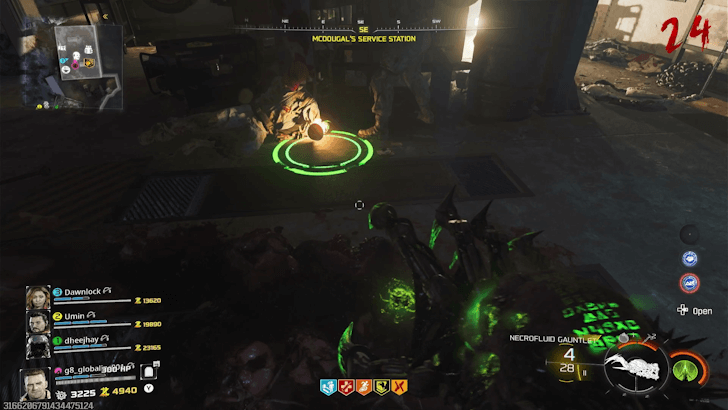 |
1. Spawn Klaus using the calling device in the area and direct him to stomp next to the car in the Service Station, which will summon the Engineer zombie. 2. Lead the Engineer to the Service Station Rooftop and onto the yellow lightning. |
 |
1. Ram the red truck at the back until the door opens using Ol' Tessie to summon the Trucker zombie. 2. Walk near the Trucker zombie to have it follow you to the Gas Station's rooftop and onto the red lightning. |
After waking the zombie up, lure them to the lightning. You have 1 minute to lure them into the lightning. If the timer runs out and you still haven't lured them, you'll have to wait till the next even-numbered round (when the lightning occurs) to complete this step. If you kill the zombies by accident, they'll respawn in the same location in the next round.
It's possible to do them 1 by 1 or all in one round (but the latter will be difficult). We recommend doing all the actions to wake them up in 1 round, then luring them into the lightning two rounds later.
Trigger Lightning Manually
On a round where no lightning is active, you can manually trigger the lightning by shooting the three lampposts that spark with the DG-2 Turret Barrel. These lampposts spark one at a time and in random order, so be sure to check each one.
| Lamppost Locations |
|---|
 Lamppost across from Reba's Diner, next to the Arrow sign |
 Lamppost near the north entrance/exit |
 Lamppost near the southeast entrance/exit |
Once you manage to shoot all three lampposts, the lightning will strike again during the current round.
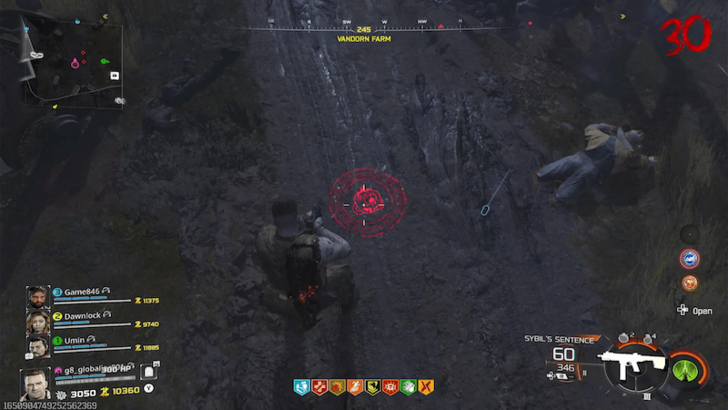
Collect Artifacts at the Farm
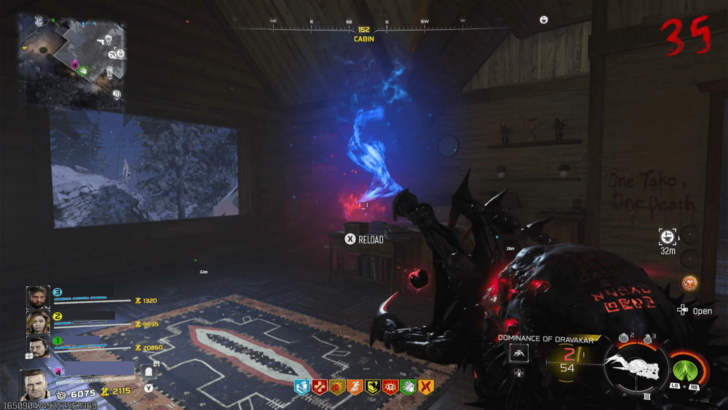
| 1 | Shoot Clock Tower with Necrofluid Gauntlet |
|---|---|
 Head to Ashwood and, again, shoot the floating purple clock tower on the bridge with the Necrofluid Gauntlet to infuse the weapon with purple energy. |
|
| 2 | Check Wall Clock in the Farmhouse |
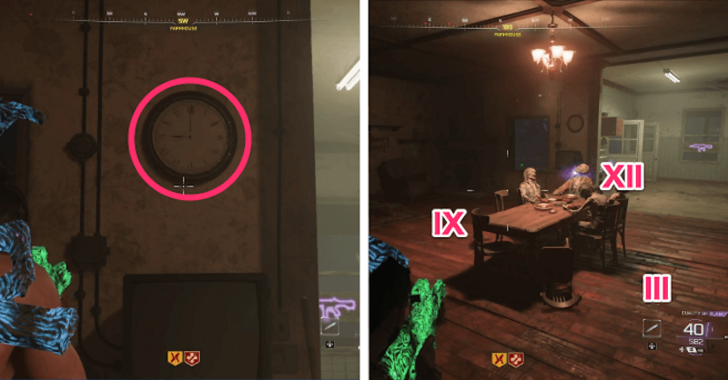 Return to the Farmhouse in Vandorn Farm. On the first floor, check the wall clock. It will show either 3, 9, or 12 o’clock. Stand on the corresponding time etched in Roman numerals on the floor beside the dining table. XII is at the head of the table, III is on the right side, and IX is on the left. |
|
| 3 | Shoot Male Corpse's Skull |
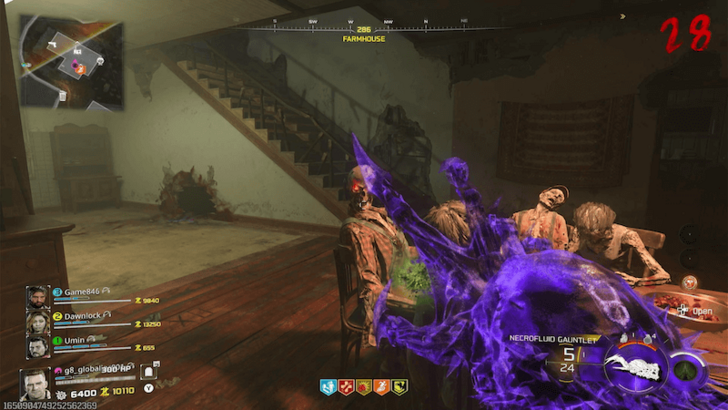 The male corpse’s skull will slowly turn toward you. Once its eyes turn red, shoot it with the Necrofluid Gauntlet to transfer the purple energy. |
|
| 4 | Collect Four Artifacts |
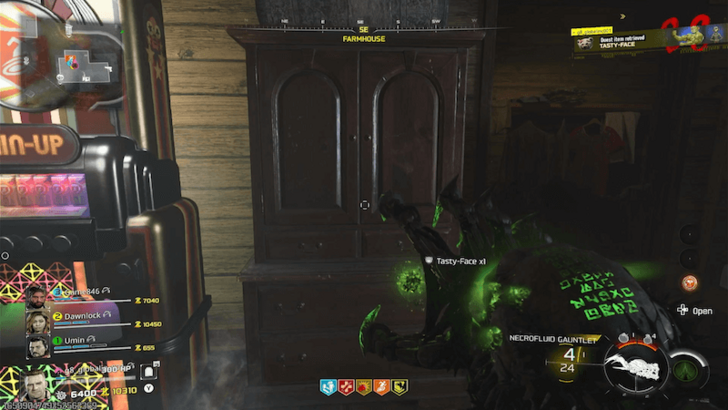 You will then need to collect four artifacts. Start by heading upstairs and interact with the cabinet next to the Stamin-Up machine to get Tasty-Face. |
|
| 5 | |
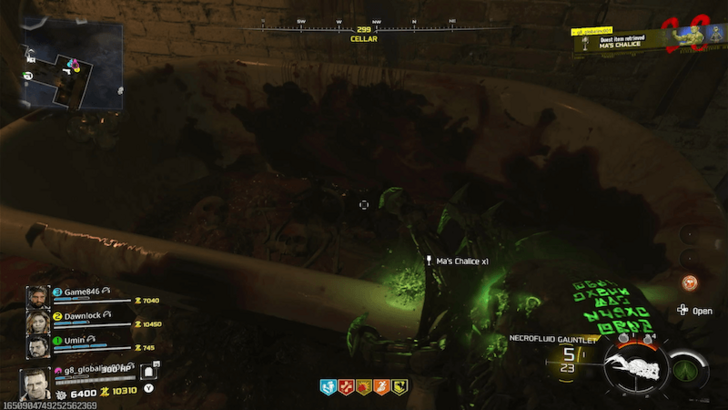 From there, go down to the Cellar and interact with the bathtub near the cube to get Ma’s Chalice. |
|
| 6 | |
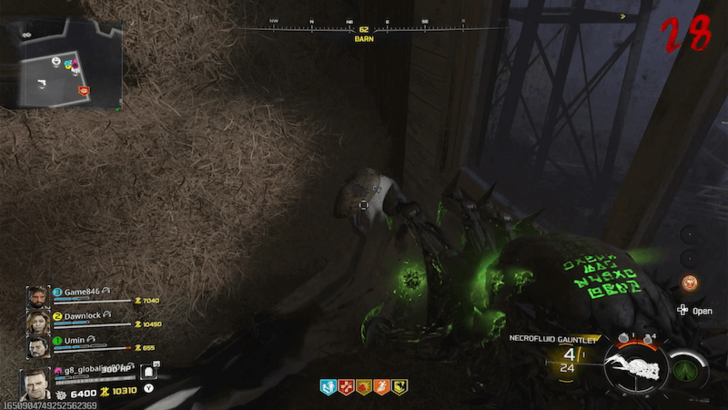 Next, make your way to the second floor of the Barn and interact with the mask below the window to get Junior’s Fun-Face. |
|
| 7 | |
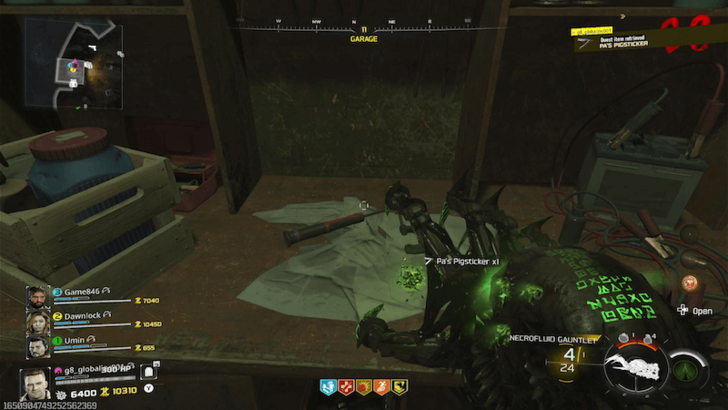 Finally, head to the Garage and interact with the cloth on the table to get Pa’s Pigsticker. |
|
| 8 | Place Artifacts on Red Markers Outside |
 After collecting all four artifacts, red markers will appear on the ground outside. Place the artifacts on the marked areas in any order. |
|
| 9 | Protect Artifacts From Zombies |
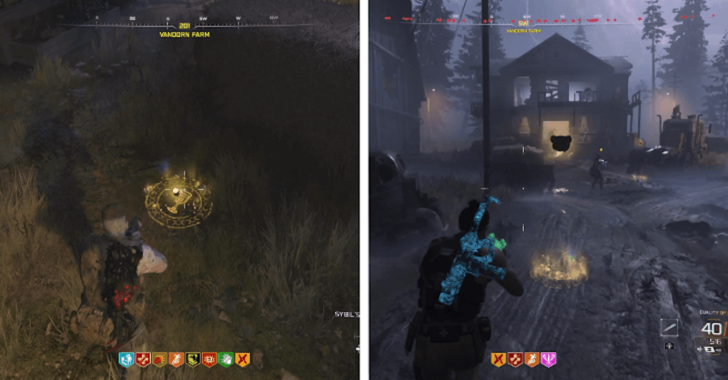 Once placed, interact with any artifact again to start another soulbox event where you must protect all four artifacts for 2 minutes. We recommend stocking up on Decoy Grenades and Cymbal Monkeys to lure zombies away from the artifacts. |
Shoot Film Reels at the Lake
| 1 | Interact with the Blue Light in Blackwood Lake |
|---|---|
 Head over to the Blackwood Lake and interact with the Blue Light behind the house. You should see it near the possible Mystery Box crate. This will turn on the projector. |
|
| 2 | Get the Power of the Clock |
 Return to Ashwood and—once again—hit the floating clock with the DG-2 Turret Barrel. After that, hit the clock again but this time using the Necrofluid Gauntlet to obtain the purple energy. |
|
| 3 | Shoot the Projector with the Necrofluid Gauntlet |
 Once you're glowing purple, shoot the film projector to make it show 4 images. It's the same 4 images in every match and each image will correspond to a film reel location. It will only be in a different order per match. You need to shoot the film reels in the correct order or else you will fail and have to restart the step in the next round. |
Film Locations
| Film | Location |
|---|---|
 |
In the shack with the Armor Plate Wall Buy. |
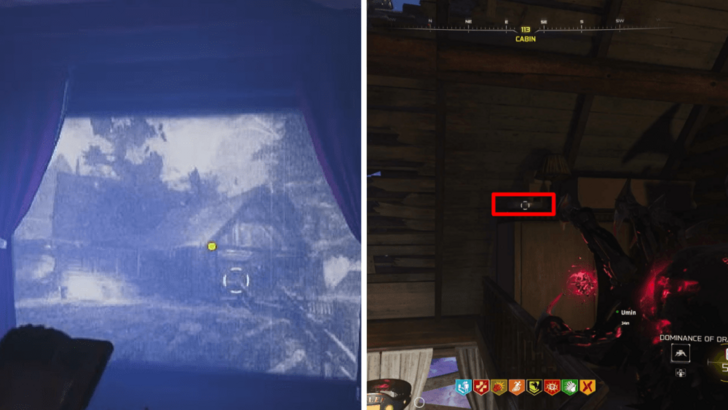 |
Above the Melee Machiato Perk Machine. |
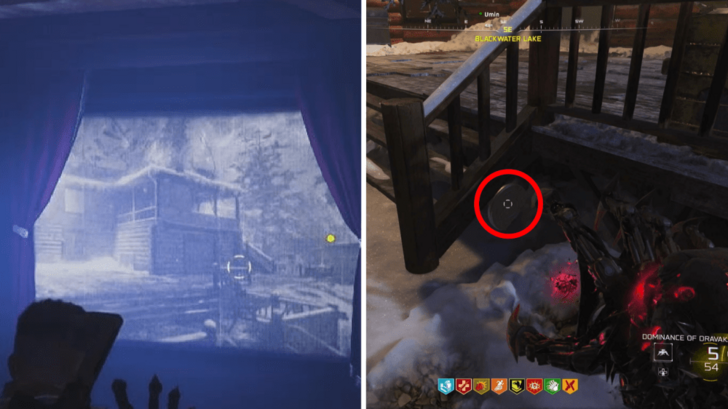 |
Underneath the steps beside the Ammo Cache. |
 |
In the shack with the Crafting Table, on the shelf in the other room |
Again, the locations of these films are fixed, but the order of shooting the film is different each match. You need to follow the order on the projector to ensure that you finish this part.
| 4 | Go Inside the Speed Cola Room |
|---|---|
 Once done with the films, head upstairs and go to the room where you can find the Speed Cola. Interact with the blue energy on a box near the bed. |
|
| 5 | Call Klaus to the Room |
 Pay 2000 Essence to call in Klaus to the room and command him to get the item on the box. He will then go to the lake and trigger a voting system to get to the last step where you fight Veytharion. Note that this is a point of no return, so make sure to prepare the equipment, perks, weapons, and enough essence to refill your ammo. |
Collect Souls in Fog Areas
| 1 | Drive in the Fog to Collect 12 Souls |
|---|---|
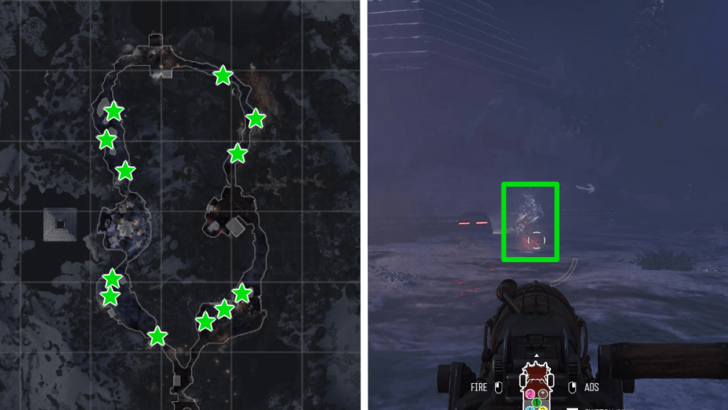 After initiating the "boss fight" through Klaus in Blackwater Lake, you have to drive over 3 souls in each of the 4 fog areas north of Ashwood (12 souls in total). Make sure to wait around 20 seconds for the souls to spawn, which should also have a subtle audio cue from the background and Tedd. Try to be fast and avoid wrecking the car, as you can fail this challenge if you take too long to get those souls. If you're with friends, have one of them shoot the explosive plants before you run over the souls to avoid damaging the vehicle. |
|
| * | Go Clockwise to Get All Souls Easily |
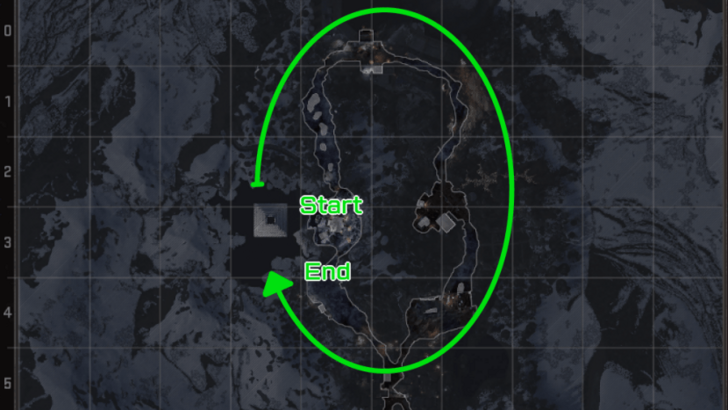 It's best to go north from Blackwater Lake to Janus Tower and continue your way clockwise. The placement of the souls are easier to obtain by following that path. Best path to take from Blackwater Lake: 1. Monolith Forest (Blackwater Lake to Janus Towers Plaza) 2. Collapsed Tower (Janus Towers Plaza to Vandorn Farm) 3. Grounded Ship (Vandorn Farm to Ashwood) 4. Lost Cabins (Ashwood to Blackwater Lake) |
|
| 2 | Fight Veytharion |
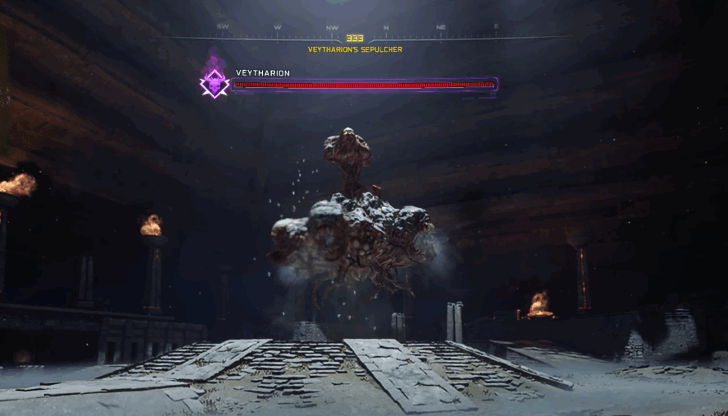 Successfully collecting the 12 souls required immediately teleports you into the boss arena. Make sure that your equipment and essence (for buying ammo) is enough to tackle the final boss, Veytharion. |
Ashes of the Damned Boss Fight Guide: How to Beat Veytharion
Interact With Mysterious Object

After you defeat the Veytharion boss fight, you'll spawn back in Blackwood Lake. A Mysterious Object will be floating above the frozen lake. Interact / open it to unlock the ability to collect relics in Cursed mode!
Ashes of the Damned Easter Egg Tips
Helpful Side Easter Eggs
| Side Easter Egg | Steps / Reward |
|---|---|
(Highly Suggested!) |
① Equip Toxic Growth Field Upgrade (Level 29 Unlock) ② Use Toxic Growth on plant seeds found in most POIs ③ Spray plant seed to make it grow ④ Protect plant until it pops out rewards ⑤ This can be repeated every round as long as there is a Toxic Growth on the plant Rewards (Random): Pack-a-Punch crystals (PaP 1 or 2), Rare or Epic Aether Tools, Mystery Perk, random guns / equipment, salvage, essence |
(Highly Suggested!) |
① Collect the small plant in spawn (Janus Tower Plaza) ② Collect the jar in the barn in Vandorf Farm ③ Collect the egg tray in the kitchen in Exit 115 ④ Interact with the soda machine at the diner in Exit 115 Reward: Free Juggernog |
| ① Interact with static TV in Vandorf Farm ② Follow the two ghost girls until they drop Wisp Tea Reward: Free Wisp Tea, which is needed for the main Easter Egg |
|
| In Case You Didn't Know... | |
| Trigger Lightning in Any Round | Shoot the 3 lampposts that spark in Exit 115 to trigger the lightning that round. |
| Spawn Zursa Bear in Any Round | Shoot the 3 hidden skulls with the Necrofluid Gauntlet to spawn a zursa bear. |
Black Ops 7 (BO7) Related Guides

Zombies Guide
Zombies Easter Eggs
| Main Quest Easter Egg Walkthroughs | |
|---|---|
| Ashes of the Damned Easter Egg | Astra Malorum Easter Egg |
| Paradox Junction Easter Egg | - |
| Paradox Junction Side Easter Eggs | |
| Minigolf Easter Egg Guide | Paradox Junction Music Easter Egg Guide |
| Astra Malorum Side Easter Eggs | |
| Astra Malorum Side Quests | Shiny Trinket Easter Egg |
| Nikolai Easter Egg Guide | How to Get Free Perks in Astra Malorum |
| Free Random Perk: Skulls Easter Egg Guide | Grandfather Clock Easter Egg Guide |
| DG-2 Turret Easter Egg Guide | Astra Malorum Music Easter Egg Guide |
| Lamp Wisp Easter Egg Guide | - |
| Ashes of the Damned Side Easter Eggs | |
| Ashes of the Damned Side Quests | Ashes of the Damned Music Easter Egg |
| Lucidity Easter Egg | Plant Easter Egg Toxic Growth Easter Egg |
| Bear Footprint Easter Egg | RC-XD Easter Egg |
| Ray Gun Mark II | - |
Comment
Please be sure to add images of what the keys look like. And the detail that the keys have specific colors. The keys are important. And took the most time to find in my last run.
Author

Ashes of the Damned Easter Egg Walkthrough and Steps
Rankings
- We could not find the message board you were looking for.
Gaming News


![Monster Hunter Stories 3 Review [First Impressions] | Simply Rejuvenating](https://img.game8.co/4438641/2a31b7702bd70e78ec8efd24661dacda.jpeg/thumb)

![The Seven Deadly Sins: Origin [First Impressions] | A Promising Start](https://img.game8.co/4440581/584e0bfb87908f12c4eab6e846eb1afd.png/thumb)
Popular Games

Genshin Impact Walkthrough & Guides Wiki
Umamusume: Pretty Derby Walkthrough & Guides Wiki
Pokemon Pokopia Walkthrough & Guides Wiki
Honkai: Star Rail Walkthrough & Guides Wiki
Monster Hunter Stories 3: Twisted Reflection Walkthrough & Guides Wiki
Arknights: Endfield Walkthrough & Guides Wiki
Wuthering Waves Walkthrough & Guides Wiki
Zenless Zone Zero Walkthrough & Guides Wiki
Pokemon TCG Pocket (PTCGP) Strategies & Guides Wiki
Monster Hunter Wilds Walkthrough & Guides Wiki


Recommended Games
Diablo 4: Vessel of Hatred Walkthrough & Guides Wiki
Cyberpunk 2077: Ultimate Edition Walkthrough & Guides Wiki
Fire Emblem Heroes (FEH) Walkthrough & Guides Wiki
Yu-Gi-Oh! Master Duel Walkthrough & Guides Wiki
Super Smash Bros. Ultimate Walkthrough & Guides Wiki
Pokemon Brilliant Diamond and Shining Pearl (BDSP) Walkthrough & Guides Wiki
Elden Ring Shadow of the Erdtree Walkthrough & Guides Wiki
Monster Hunter World Walkthrough & Guides Wiki
The Legend of Zelda: Tears of the Kingdom Walkthrough & Guides Wiki
Persona 3 Reload Walkthrough & Guides Wiki


All rights reserved
©/TM/® 2025 Activision Publishing, Inc.
The copyrights of videos of games used in our content and other intellectual property rights belong to the provider of the game.
The contents we provide on this site were created personally by members of the Game8 editorial department.
We refuse the right to reuse or repost content taken without our permission such as data or images to other sites.
For the lightning step at Exit 115 my group had the lightning strikes only on odd numbered rounds for 2 different games.