La Cage au Fou Walkthrough, and How to Lift the Curse
☆ Story Guides: Main Quests | Choices
☆ Gwent Guides: All Cards | Gwent Quests | Player-Vendor Locations
┗ Best Decks: Nilfgaardian Empire | Monsters | Northern Realms | Scoia'tael
This is a guide to the quest titled La Cage au Fou from The Witcher 3: Wild Hunt. Read on for information on objectives and possible rewards, as well as useful tips, strategies for completing the quest, and the solution to lifting the Spotted Wight Curse.
| Previous Quest | Current Quest | Next Quest |
|---|---|---|
| Blood Run | La Cage au Fou | Where Children Toil, Toys Waste Away |
List of Contents
La Cage au Fou Rewards and Basic Information
Basic Information
| Quest Number | 4 |
|---|---|
| Region | Toussaint |
| Quest Location | Mère-Lachaiselongue Cemetery, Trastamara Estate, Tesham Mutna Ruins |
| Previous Quest | Blood Run |
| Next Quest | Where Children Toil, Toys Waste Away |
Rewards
| Gold Reward | None |
|---|---|
| Exp Reward | 1000 |
| Item Reward | None |
La Cage au Fou Main Objectives
| Objectives | |
|---|---|
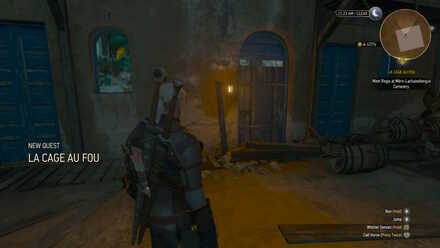
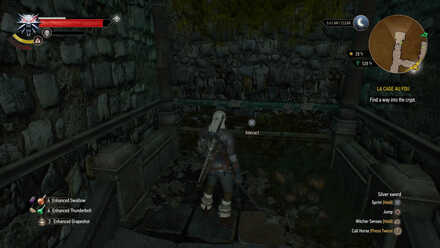
| 1 | Go to the Mère-Lachaiselongue Cemetery. |
| 2 | Find a way into the crypt and speak with Regis. |
Spotted Wight Bestiary (Optional)
| Objectives | |
|---|---|
| 1 | Read about Spotted Wights in your Bestiary. |
Back to Main Path
| Objectives | |
|---|---|
| 3 | Travel to the Spotted Wight's lair and investigate the interior. |
| 4 | Go downstairs, enter the dining room and look into the cauldron. |
| 5 | Look for a hiding spot to observe the cauldron and deal with the Spotted Wight. |
Path 1: Attacking the Wight
| Objectives | |
|---|---|
| 6A | Follow the Spotted Wight to the end of its lair. |
| 7A | Kill the Spotted Wight and loot the saliva glands. |
Path 2: Lifting the Curse
NOTE: This path is not available if you were not able to investigate the two key objects in the Spotted Wight's lair. To see which two key objects to investigate, see the quest's Tips and Strategies below.
| Objectives | |
|---|---|
| 6B | Converse with the Spotted Wight. |
Path 2.1: (Optional)
| Objectives | |
|---|---|
| 7B | Follow the scent of the Spotted Wight brew and bring Marlene to Corvo Bianco. |
Both Paths
| Objectives | |
|---|---|
| 8 | Go back to the Mere-Lachaiselongue Cemetery and speak with Regis. |
| 9 | Follow Regis inside Tesahm Mutna. |
| 10 | Place all 4 of the baits and tell Regis that you are ready to fight. |
| 11 | Survive the fight against multiple monsters. |
How to Lift the Spotted Wight Curse
Investigate the Area
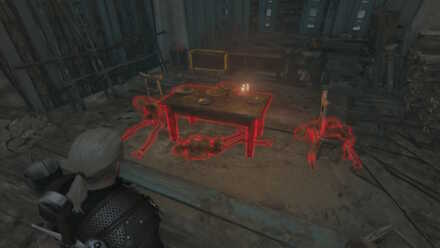
It is very important that you investigate at least these two key objects in order to have the option of lifting the curse on the Spotted Wight.
 |
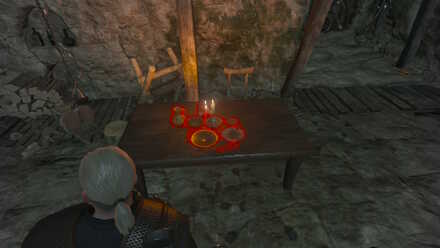 |
The two key objects to examine are:
- The table on the first floor with the three skeletons.
- The utensils that are set on the dining table near the Spotted Wight's cauldron.
Choosing to Lift the Curse
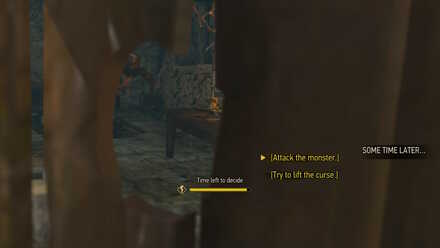
If you were able to investigate the two key objects needed in this situation, you will be given the additional option Try to lift the curse.
The first option will be automatically picked if you have not investigated the two key objects for this situation. This option will make Geralt attack the Spotted Wight and you will be directed to Path 1.
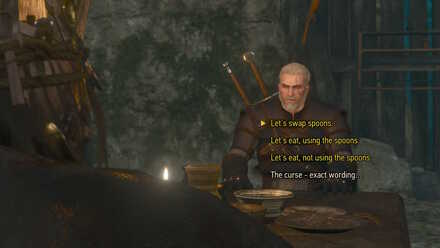
Picking the second option will make Geralt come out of the closet and try to converse with the Spotted Wight in order to lift the curse.
To lift the curse, you must pick the option Let's eat, not using the spoons. out of the three yellow options. If you have picked either of the two other options, then you will fail to lift the curse.
If you fail in lifting the curse, the Spotted Wight will go to the end of its lair and you will be able to progress to the next objective.
Lifting the Curse or not
There are no notable benefits when you lift the curse of the Spotted Wight. The difference between the two outcomes is very small and it will not affect your game in any major way.
If you were able to lift the curse, you will get an additional optional objective to follow the scent of the Wight's Brew. You will discover that Marlene was able to revert back to human form.
After finding Marlene Geralt decides to bring her to Corvo Bianco and let her stay there. Doing all this will add an extra NPC to your home at Corvo Bianco.
If you were unable to lift the curse after trying to do so, you can go back to Regis and give him the Wight's Brew or you can choose to kill the Spotted Wight before going back to Regis.
The only benefit you gain here is getting the Wight Trophy which has the same effect as other monster trophies in the game like the Chort Trophy and the Forktail Trophy. The other unique loot that you gain from the Spotted Wight like the Wight's Ear cannot be used in any alchemical formulas.
La Cage au Fou Tips and Strategies
Fake Illusionary Wall
After dropping under the cemetary and killing the kikimore, you will have to pick between two paths. Pick the left and keep going straight until you hit a wall. This wall is an illusionary wall that can be dispelled with the Eye of Nehaleni. Behind it is a room with the sword, Casus Foederis and some other loot.
Tesham Mutna Set
Steel Sword, Armor and Trousers
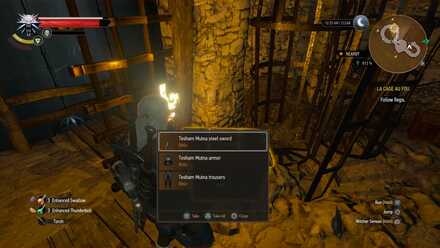
You will find these right after entering Tusham Mutna with Detlaff. It is chest with a scroll on top, straight ahead after walking through the doorway.
Boots and Mask
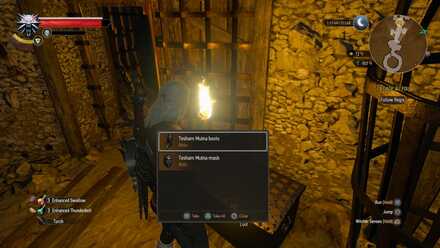
You can find these in the chest right after descending the spiral stairs.
Gloves
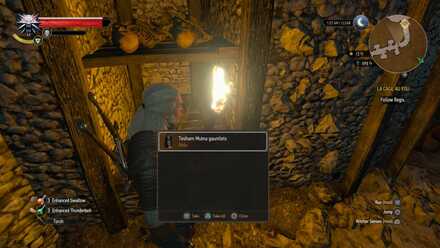
The last piece of the set is located in a small chest beside a skeleton located at the end of the jails.
Combat Strategies
Archespores
- Coat your Silver Sword with Cursed Oil to deal bonus damage to it.
- Cast the Igni Sign to burn them and give yourself a large opening to attack.
- Killing the main Archespore will kill off all the other smaller pods.
| Archespore Weaknesses and Loot |
Kikimore Worker/Kikimore Warrior
NOTE: The Kikimore Warrior will only appear if you burn all the Kikimore eggs after entering the crypt.
- Coat your Silver Sword in Insectoid Oil to deal bonus damage to them.
- Cast the Igni Sign to burn them and give yourself an opening to attack.
| Kikimore Worker Weaknesses and Loot | Kikimore Warrior Weaknesses and Loot |
Barghests
- Coat your Silver Sword with Spectre Oil to deal bonus damage to them.
- Cast the Axii Sign to stun them and give yourself a large opening to attack.
- You can cast the Yrden Sign and fight around it to give yourself a lot of time to dodge their fast attacks.
| Barghest Weaknesses and Loot |
Spotted Wight
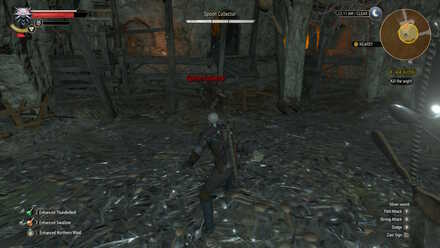
- Coat your Silver Sword in Necrophage Oil to deal bonus damage to them.
- Cast the Igni Sign to burn it and give yourself an opening to attack. You can also cast the Yrden Sign to slow it down and give yourself an easier time fighting it.
- When the Spotted Wight sinks down into the ground, you should move away from the disturbance on the floor or it will pull you down and attack you.
| Spotted Wight Weaknesses and Loot |
Tesham Mutna Battle
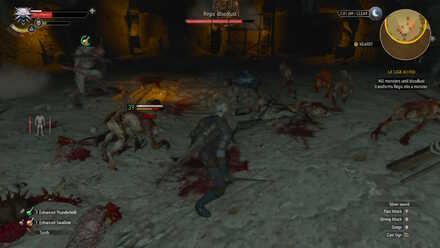
In this battle you will be fighting against Ghouls, Rotfiends, Scurvers, a Fleder, and a Katakan. Below is a list of actions we recommend doing in order to survive this fight.
- Coat your Silver Sword in Necrophage Oil to deal bonus damage to the Necrophages, since the majority of the enemies that you will face are Necrophages.
- Cast Signs like Aard and Axii to stun or control them and give yourself an opening to attack. You can also cast the Yrden Sign and fight in the area surrounding it so you will not have a hard time dealing with multiple enemies.
- Throw bombs like Samum and Northern Wind to stun or freeze multiple enemies to give yourself and opening to attack. You can also throw Grapeshot Bombs to deal with multiple enemies at once.
- In this fight, you are not required to kill the Lesser Vampires like the Fleder and the Katakan in order to progress. We recommend killing all the Necrophages around you and continuously dodging or rolling away from the Lesser Vampires' attacks.
| Ghoul Weaknesses and Loot | Rotfiend Weaknesses and Loot | Scurver Weaknesses and Loot |
| Fleder Weaknesses and Loot | Katakan Weaknesses and Loot | - |
The Witcher 3 Related Links

The Witcher 3 Expansions
| Hearts of Stone | Blood and Wine |
Blood and Wine Main Quests
| No. | Quest Title |
|---|---|
| 1 | Envoys, Wineboys |
| 2 | The Beast of Toussaint |
| 3 | Blood Run |
| 4 | La Cage au Fou |
| 5 | Where Children Toil, Toys Waste Away |
| 6 | Wine is Sacred |
| 7 | The Man from Cintra |
| 8 | Capture the Castle |
| 9 | The Night of Long Fangs |
| 10 | Beyond Hill and Dale... |
| 11 | Blood Simple |
| 12 | What Lies Unseen |
| 13 | Tesham Mutna |
| 14 | Pomp and Strange Circumstance |
| 15 | Burlap is the New Stripe |
| 16 | Be It Ever So Humble... |
Blood and Wine Secondary Quests
| Fists of Fury: Toussaint | Mutual of Beauclair's Wild Kingdom | The Words of the Prophets are Written on Sarcophagi |
| Till Death Do You Part | Using Your Loaf | Vintner's Contract: Chuchote Cave |
| Vintner's Contract: Duchaton Crest | Of Sheers and a Witcher I Sing | Big Feet to Fill: The Third Group |
| Big Feet to Fill | Gwent Quest: Never Fear, Skellige’s Here! (N/A) | No Place Like Home (Blood and Wine) (N/A) |
| Big Feet to Fill: The Second Group (N/A) | Big Feet to Fill: The First Group (N/A) | Amidst the Mill's Grist (N/A) |
| A Knight’s Tales | Raging Wolf | Knight for Hire |
| Extreme Cosplay | Big Feet to Fill: The Fourth Group | The Perks of Being a Jailbird |
| Big Feet to Fill: The Fifth Group | The Warble of a Smitten Knight (35) | Turn and Face the Strange (35) |
| Paperchase (36) | Goodness, Gracious, Great Balls of Granite! (36) | Wine Wars: Vermentino (37) |
| Wine Wars: Coronata (37) | Father Knows Worst (37) | Wine Wars: Belgaard (37 and 39) |
| Vintner's Contract: Rivecalme Storehouse (37) | Gwent Quest: To Everything - Turn, Turn, Tournament! (38) | Vintner's Contract: Dun Tynne Hillside (40) |
| Wine Wars: Consorting (40) | Master Master Master Master! (40) | Wine Wars: The Deus in the Machina (42) |
| The Hunger Game (42) | Vintner's Contract: Cleaning Those Hard-to-Reach Places (43) | There Can Be Only One (43) |
| A Portrait of the Witcher as an Old Man (43) | Duck, Duck, Goosed! (47) |
Blood and Wine Treasure Hunts
| The Last Exploits of Selina's Gang (37) | Coin Doesn't Stink (37) | Don't Take Candy from a Stranger (37) |
| The Inconstant Gardener (37) | The Black Widow (37) | Around the World in... Eight Days (40) |
| Waiting for Goe and Doh (40) | Scavenger Hunt: Grandmaster Wolven Gear (40) | Scavenger Hunt: Grandmaster Ursine Gear (40) |
| Scavenger Hunt: Grandmaster Manticore Gear (40) | Scavenger Hunt: Grandmaster Griffin Gear (40) | Scavenger Hunt: Grandmaster Feline Gear (40) |
| Applied Escapology (40) | Spoontaneous Profits! (42) | But Other Than That, How Did You Enjoy the Play? (43) |
| What Was This About Again? (43) | The Curse of Carnarvon (46) | The Suffering of Young Francois (47) |
| The Toussaint Prison Experiment (47) | Filibert Always Pays His Debts (48) |
Blood and Wine Contracts
| Big Game Hunter (37) | Contract: Bovine Blues (38) | Equine Phantoms (44) |
| Feet as Cold as Ice (45) | Contract: The Tufo Monster (48) |
Comment
Author

La Cage au Fou Walkthrough, and How to Lift the Curse
Rankings
- We could not find the message board you were looking for.
Gaming News

![Star Savior Review [First Impressions] | Engaging, Entertaining, and Expensive](https://img.game8.co/4447603/8f500e9bf666bdb8adb1af478e9dfdbd.png/show)


Popular Games

Genshin Impact Walkthrough & Guides Wiki
Umamusume: Pretty Derby Walkthrough & Guides Wiki
Crimson Desert Walkthrough & Guides Wiki
Monster Hunter Stories 3: Twisted Reflection Walkthrough & Guides Wiki
Honkai: Star Rail Walkthrough & Guides Wiki
Pokemon Pokopia Walkthrough & Guides Wiki
The Seven Deadly Sins: Origin Walkthrough & Guides Wiki
Wuthering Waves Walkthrough & Guides Wiki
Zenless Zone Zero Walkthrough & Guides Wiki
Arknights: Endfield Walkthrough & Guides Wiki


Recommended Games
Fire Emblem Heroes (FEH) Walkthrough & Guides Wiki
Diablo 4: Vessel of Hatred Walkthrough & Guides Wiki
Cyberpunk 2077: Ultimate Edition Walkthrough & Guides Wiki
Yu-Gi-Oh! Master Duel Walkthrough & Guides Wiki
Super Smash Bros. Ultimate Walkthrough & Guides Wiki
Pokemon Brilliant Diamond and Shining Pearl (BDSP) Walkthrough & Guides Wiki
Elden Ring Shadow of the Erdtree Walkthrough & Guides Wiki
Monster Hunter World Walkthrough & Guides Wiki
The Legend of Zelda: Tears of the Kingdom Walkthrough & Guides Wiki
Persona 3 Reload Walkthrough & Guides Wiki


All rights reserved
The Witcher® is a trademark of CD PROJEKT S. A. The Witcher game © CD PROJEKT S. A. All rights reserved. The Witcher game is based on the prose of Andrzej Sapkowski. All other copyrights and trademarks are the property of their respective owners.
The copyrights of videos of games used in our content and other intellectual property rights belong to the provider of the game.
The contents we provide on this site were created personally by members of the Game8 editorial department.
We refuse the right to reuse or repost content taken without our permission such as data or images to other sites.