This survey will take about 1 minute.
Your answers will help us to improve our website.
FF12
Giruvegan - Walkthrough

This is the story walkthrough page for the location Giruvegan in the game Final Fantasy XII The Zodiac Age (FF12, FFXII, FFXII Zodiac Age). Read on for more information about objectives, items, and bosses within this section.
| Previous Chapter | Next Chapter |
|---|---|
| Balfonheim Port ~ Feywood |
Ridorana Cataract ~ Pharos 2nd |
List of Contents
Giruvegan Story Walkthrough
| 1 | There are quite a few boss battles in this city; make sure to save before entering. |
|---|---|
| 2 | After the opening cutscene, you will enter into a boss battle with Daedalus. |
| 3 | Keep at him and he will fall. Once he's defeated, use the Way Stone to enter the city structure. |
| 4 | Take the enemies one at a time to avoid being overwhelmed. |
| 5 | Touch the gate stones Avrio, Cthes, Paron, and Parelthon to make your way through the area. Your hint will be the Mythril stone golems guarding them. |
| 6 | A cutscene will happen once you find the invisible pathway, a sign that you're on the correct route. |
| 7 | Save your game at the available save crystal, then prepare to fight another boss, the Tyrant. |
| 8 | You can also choose to save again after defeating the Tyrant. Otherwise, move on to the Great Crystal within Giruvegan. |
The Fallen Guardian, Daedalus
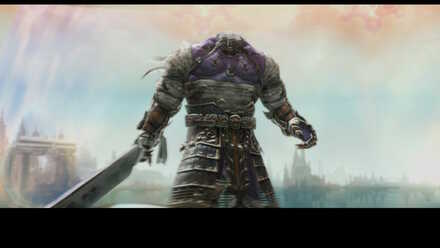
The first boss you'll come across as you enter Giruvegan is Daedalus. Not to be mistaken for the father of Icarus in Greek mythology, defeating Daedalus makes for a pretty straightforward battle. For more details about the guardian of the gates to Giruvegan, visit the link below.
The Guardian Golems

Giruvegan's gates are controlled by different gate stones from Avrio to Parelthon. Each of these gate stones--with the exception of gate Avrio--are guarded by guardian golems. This will also be your cue that you are near one of these gate stones or a pathway going to the next area.
The Tyrant, Dragon of the Crystal

The Tyrant is just one of the many dragon opponents you'll face off against in Final Fantasy XII. This particular dragon, though, only serves as an appetizer of sorts for an even bigger boss battle up ahead. Uncover the Tyrant's stats and various other details through the link below.
The Great Crystal Special Section
 Enlarge
| 1 | The Great Crystal map can be confusing if you don't know where to go. The key is to take a look at the map names. |
|---|---|
| 2 | In A Prama Vikaari, from Vaan's perspective, take exit right. It will be easy to figure things out from this area as the next paths have one exit at most. |
| 3 | Use Way Stone VII at Dha Vikaari Bhrum to get to A Vikaari Kabonii |
| 4 | Take the left path at A Vikaari Kabonii to connect to Sthaana Cancer. |
| 5 | Activate the stone waypoint found at Sthaana, then double back to A Vikaari. |
| 6 | When you return to A Vikaari, take the furthest exit from the entrance this time. The next area will only have one exit. |
| 7 | You'll end up at Dah Vikaari Trahk. Take the Way Stone V to proceed. |
| 8 | Take the left pathway at A Bikaari Bhrum. The next area will only have one exit. |
| 9 | Activate the Aries Stone at Sthaana Aries then make your way back to A Bikaari again. |
| 10 | Take the closest exit once you're back at A Bikaari Bhrum. |
| 11 | You'll end up at Trahk Pis Praa. Take the left-most exit. |
| 12 | When you emerge at the Sthaana Pisces area, activate the Pisces Stone, then head to the Dha Vikaari Jula exit. |
| 13 | Once you emerge in Dha Vikaari Jula, take the Way Stone III to the Crystal Core area. |
| 14 | Save at the save crystal in the Crystal Core and prepare...you'll battle a boss once more. |
The Esper Shemhazai
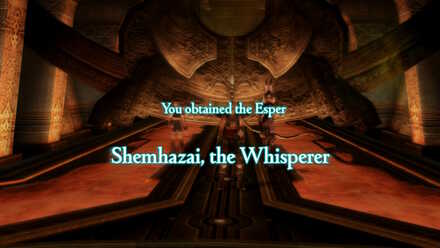
Another significant fact about the Great Crystal is that it's home to another Esper, the Whisperer Shemhazai. This boss is no pushover, but will be easy to defeat with the right set of skills and equipment. Find out more about Shemhazai by following the link below.
Giruvegan II Story Walkthrough
| 1 | Once you've saved, take the exit to the next area. Shemhazai will be your opponent. |
|---|---|
| 2 | Make your way out of the Great Crystal in Giruvegan. |
| 3 | Once you can move on your own again after the cutscene, take the Tellurian Way Stone to return to the entrance to Giruvegan. |
| 4 | Use the save cyrstal to teleport back to Balfonheim, where you'll prepare to head over to Ridorana. |
Final Fantasy XII Related Links
| Previous Chapter | Next Chapter |
|---|---|
| Balfonheim Port ~ Feywood |
Ridorana Cataract ~ Pharos 2nd |
Author

Giruvegan - Walkthrough
Please participate in our site
improvement survey
03/2026
improvement survey
03/2026
Would you assist in
improving Game8's site?
improving Game8's site?

×
We are listening to our users' valuable opinions and discussing how to act on them.
The information collected through this survey will be used for the purpose of improving our services. In addition, the information will only be disclosed a part of a statistic in a format that will not allow identification of personal information.
Begin Survey
Not Now
×
Please rate each item regarding Game8.co's Advertisements.
Amount of Ads
Very Dissatisfied
Somewhat Dissatisfied
Fine
Somewhat Satisfied
Highly Satisfied
Placement of Ads
Timing of Ad Display
Ad Loading Speed
Safeness of Ads
Content of Ads
×
Please rate each item regarding Game8.co's Quality of Articles.
Amount of information
Very Dissatisfied
Somewhat Dissatisfied
Fine
Somewhat Satisfied
Highly Satisfied
Frequency of updates
Speed of new information
Accuracy of articles
Understandibility of articles
Readability of sentences
×
Please rate each item regarding Game8.co's Usability of the Site.
Ease of finding information
Very Dissatisfied
Somewhat Dissatisfied
Fine
Somewhat Satisfied
Highly Satisfied
Loading Speed
Use of Color
Font Size
Visibility of Images
Easy to Understand Layout
×
Please rate each item regarding Game8.co's Message Boards, Comments.
Ease of Writing
Very Dissatisfied
Somewhat Dissatisfied
Fine
Somewhat Satisfied
Highly Satisfied
Readability
Ease in Finding Information
Comment Quality
Comment Quantity
Admin Response
×
Please rate each item regarding Game8.co's Site's new design.
Please rate our site's new design
Very Dissatisfied
Somewhat Dissatisfied
Fine
Somewhat Satisfied
Highly Satisfied
Do you think that the website's design change makes the site easier to use?
Has the new design made it easier for you to find information on the site?
Has the new design improved the overall visual appeal of the site?
How would you rate your overall satisfaction with the new design of the site?
×
How likely are you to recommend Game8 to someone you know?
Very Unlikely
0
1
2
3
4
5
6
7
8
9
10
Very Likely
If you have other opinions regarding potential improvement to the website, please share them with us. We would appreciate your honest opinion.
Note: This is a free response section, so you can proceed without entering anything.
Note: Please be sure not to enter any kind of personal information into your response.
Note: Please be sure not to enter any kind of personal information into your response.
×
Thank You
×
Thank you for participating in our survey! Your answers will help us to improve the quality of our website and services.
We hope you continue to make use of Game8.
We hope you continue to make use of Game8.
Close
Rankings
- We could not find the message board you were looking for.
Gaming News

![Marathon Review [First Impressions] | Playing The Long Game](https://img.game8.co/4435736/b9b1ec1e9219416dfc2599f85295d6ef.png/thumb)


Popular Games

Genshin Impact Walkthrough & Guides Wiki
Honkai: Star Rail Walkthrough & Guides Wiki
Umamusume: Pretty Derby Walkthrough & Guides Wiki
Pokemon Pokopia Walkthrough & Guides Wiki
Resident Evil Requiem (RE9) Walkthrough & Guides Wiki
Monster Hunter Wilds Walkthrough & Guides Wiki
Wuthering Waves Walkthrough & Guides Wiki
Arknights: Endfield Walkthrough & Guides Wiki
Pokemon FireRed and LeafGreen (FRLG) Walkthrough & Guides Wiki
Pokemon TCG Pocket (PTCGP) Strategies & Guides Wiki


Recommended Games
Fire Emblem Heroes (FEH) Walkthrough & Guides Wiki
Diablo 4: Vessel of Hatred Walkthrough & Guides Wiki
Yu-Gi-Oh! Master Duel Walkthrough & Guides Wiki
Super Smash Bros. Ultimate Walkthrough & Guides Wiki
Pokemon Brilliant Diamond and Shining Pearl (BDSP) Walkthrough & Guides Wiki
Elden Ring Shadow of the Erdtree Walkthrough & Guides Wiki
Monster Hunter World Walkthrough & Guides Wiki
The Legend of Zelda: Tears of the Kingdom Walkthrough & Guides Wiki
Persona 3 Reload Walkthrough & Guides Wiki
Cyberpunk 2077: Ultimate Edition Walkthrough & Guides Wiki


All rights reserved
2006, 2017 SQUARE ENIX CO., LTD. All Rights Reserved.
The copyrights of videos of games used in our content and other intellectual property rights belong to the provider of the game.
The contents we provide on this site were created personally by members of the Game8 editorial department.
We refuse the right to reuse or repost content taken without our permission such as data or images to other sites.