 Ragetail
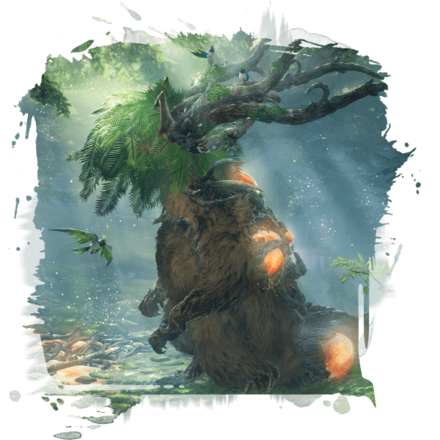 Sapscourge
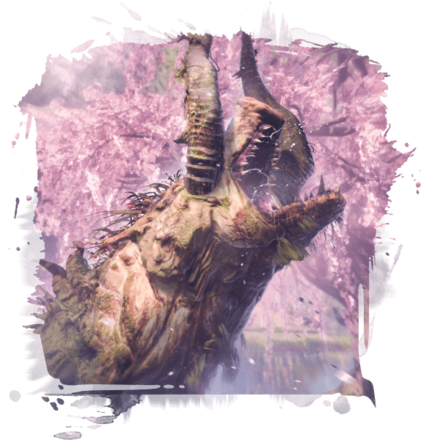 Kingtusk
 Spineglider
 Dreadclaw
 Gritdog
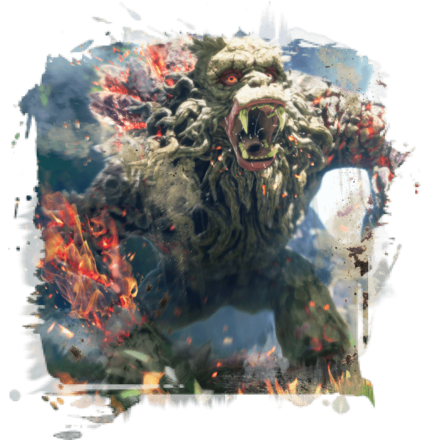 Lavaback
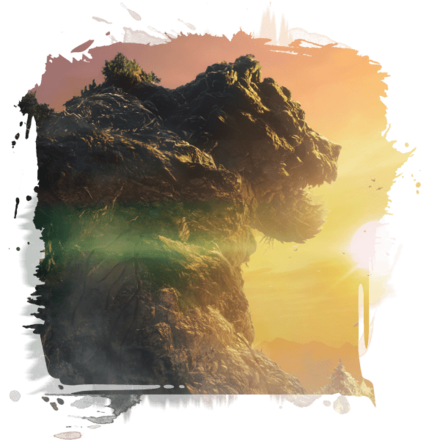 Earthbreaker
 Sporetail
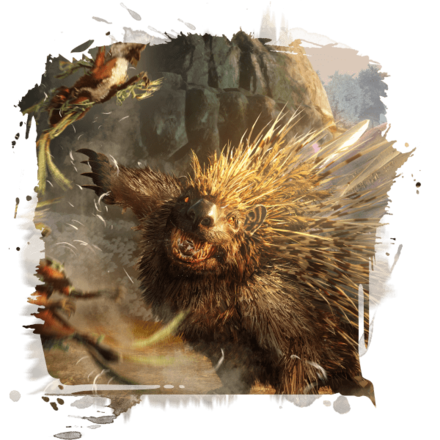 Goldshard
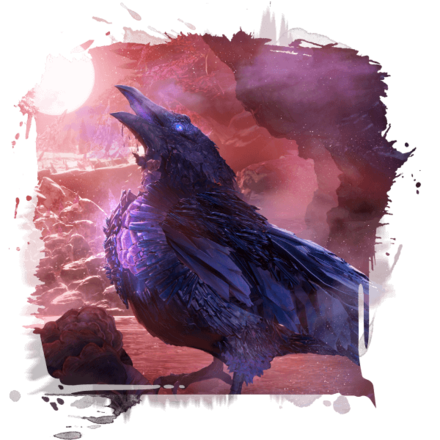 Fumebeak
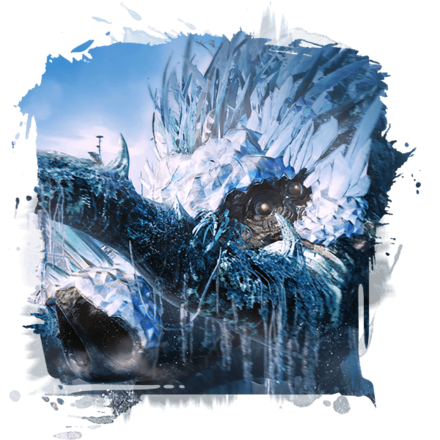 Icetusk
 Cobalt Lavaback
 Deathstalker
 Ripclaw
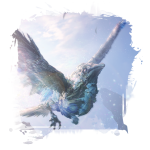 Pearlbeak
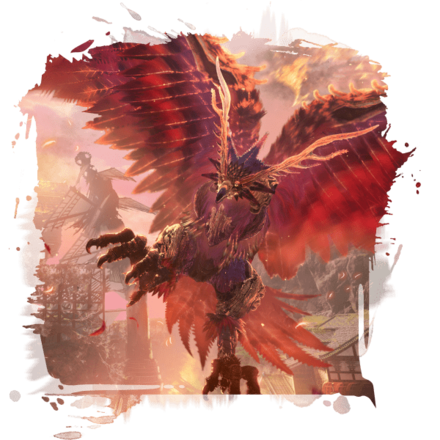 Amaterasu
 Onyxshard
 Venomglider
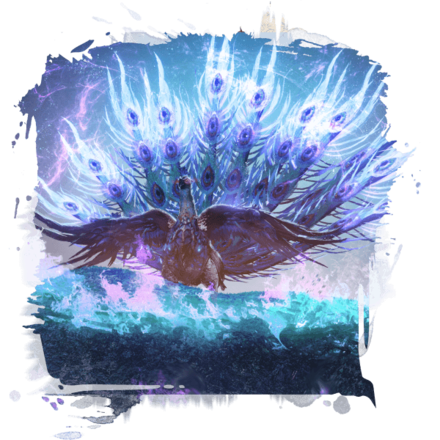 Emberplume
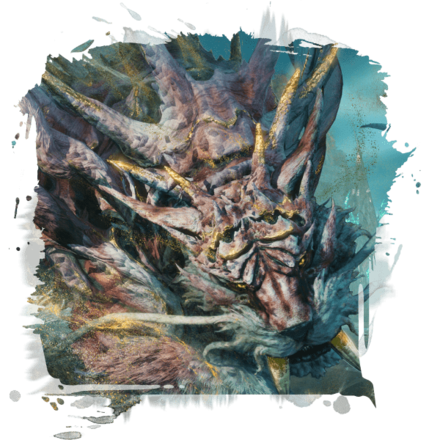 Golden Tempest
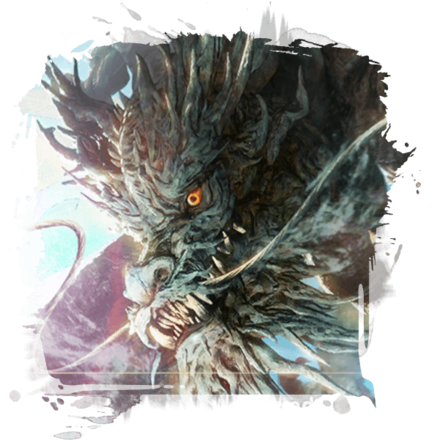 Celestial Dragon
This survey will take about 1 minute.
Your answers will help us to improve our website.
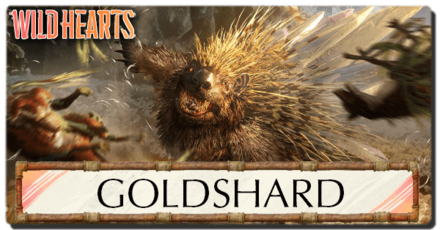
Wild Hearts
Goldshard: Weaknesses and Drops
★ Version 1.0.5 is out now!
★ Check our Kemono Weakness Chart before hunting!
★ Our Best Weapons Tier List is updated as of March 2023!
★ We're working on the Best Builds for every weapon!
┗Best Karakuri Staff Builds | Best Claw Blade Builds
★ Check our Items List to learn how to get whatever you need!
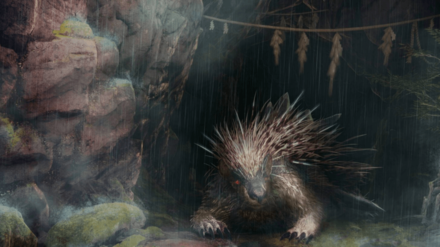
The Goldshard is a Giant Kemono (Monster) in Wild Hearts. Check out our guide for the Goldshard, including its weaknesses, habitats, drops, attack patterns, and the best tips and strategies for how to beat it!
| Goldshard Variant Guides | |
|---|---|
 Goldshard Goldshard |
 Onyxshard Onyxshard |
List of Contents
Goldshard Overview
| Goldshard | |||
|---|---|---|---|
 |
|||
| Attribute | |||
| Physical Weakness | Elemental Weakness | ||
| Strategy | |||
| You either need to predict when the goldshard is going to shoot its spines so you can take evasive action, or you need to take cover behind karakuri shields. The kemono's spine regrowth is rapid, however, so you must switch shrewdly between offense and defense. When enraged, its spines change color, and each strike will come with greater power. You'll need increasingly skillful evasive and defensive maneuvers, so consider possible strategies ahead of time. | |||
Goldshard Weakness and Resistance
Goldshard Part Softness
| Part | Effectiveness |
|---|---|
| Head | ★★★★★ |
| Front Legs | ★★★ |
| Body | ★ |
| Hind Legs | ★★★ |
| Tail | ★★★ |
Goldshard Physical Effectiveness
| ★★★ | ★★★★ | ★★★★ |
Goldshard Attribute Effectiveness
| ★★★★ | X | ★★ | ★★★★ | X |
Goldshard Ailment Effectiveness
| ★★★ | ★ | ★★★ | ★★★ | ★★★ |
Goldshard Materials and Drops
| Item | How to Get |
|---|---|
| Goldshard Claw | Obtained after breaking Goldshard's claw. |
| Goldshard Incisor | Obtained after breaking Goldshard's fangs. |
| Goldshard Spine | Obtained after breaking Goldshard's back.. |
| Goldshard Tail | Obtained after breaking Goldshard's tail. |
| Rare Goldshard Caculus | Rare drop from hunting a Goldshard. |
| Small Harvest Crystal | Dropped by kemonos inhabiting Akikuri Canyon. |
| Veteran Kemono Blood | Obtained by defeating a Sporetail or Goldshard. |
| Veteran Teardrops | Obtained by defeating a Sporetail or Goldshard. |
Goldshard Location
Goldshard Known Habitats
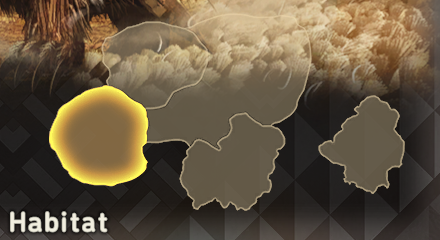
You can find the Goldshard in Akikure Canyon, often roaming around the Silvergrass Plains or inside the crystalline Winter Solstice Cavern.
How to Beat Goldshard
| Goldshard Tips and Strategies |
|---|
|
|
Avoid Using Fire and Earth-Based Weapons
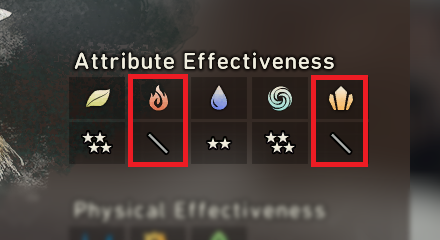
The Fire and Earth attributes are not effective on the Goldshard, so we recommend avoiding using weapons with these elements. If your primary weapon currently wields one of these elements, consider rolling it back and upgrading to a node with Wood, Wind, or no elemental attributes instead.
Target the Goldshard's Head and Tail

The Goldshard's weakest part is its head, so prioritize dealing damage to this area as often as possible, especially after knocking it down.
In addition, if staying close to its head is too risky, we recommend targeting its tail instead since it's softer than its body and larger than its legs.
Watch for Spine Attacks When It Turns
When the Goldshard turns around and positions its back toward you, it signals the start of one of its spine-based attacks. Prepare to dodge away from the incoming spines or take cover using a Bulwark Karakuri when these attacks occur.
Utilize the Shield Wall Karakuri
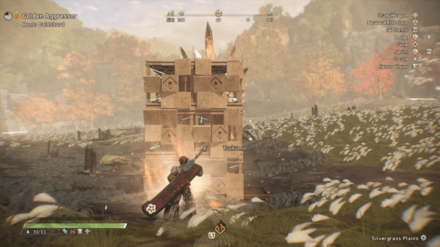
The Goldshard has a handful of moves that charge rapidly toward the hunter and deal heavy damage on hit. To deal with these attacks, we recommend using the Shield Wall Karakuri, which awakens during this encounter.
The Shield Wall Karakuri costs less than Bulwark Karakuri and takes less time to build, making it perfect for dealing with the kemono's linear charging attacks.
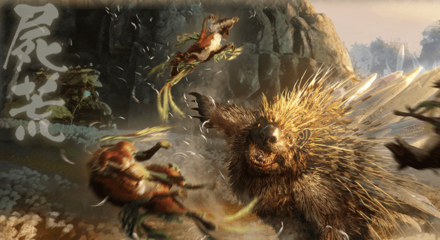
Goldshard Attacks and Moves
| Name | Description |
|---|---|
| Goldshard Bite | The Goldshard performs a quick advancing bite toward the hunter. |
| Goldshard Charge | The Goldshard rapidly runs toward the hunter to tackle them with its massive body. |
| Spinning Hop | The Goldshard hops forward while spinning around, releasing a volley of spines behind it as it lands. |
| Tail Slam | The Goldshard quickly lifts its tail and forcefully slams it down to knock away hunters that stick too close. |
| Laying Spine Thrust | The Goldshard lies down before thrusting its spine-covered back toward the hunter. |
| Swipe and Slam Combo | The Goldshard performs two alternating paw slams before slamming its body down and launching a cluster of spines. |
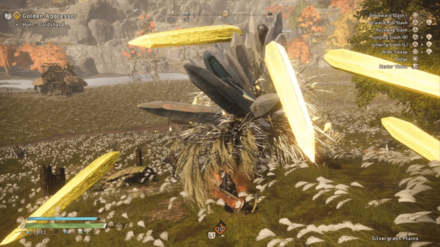
| Spine Volley Attacks | The Goldshard launches massive golden spines from its back to impale and crush the hunter. |
| Rolling Attacks | The Goldshard rolls toward the hunter to crush them with its massive body and spine-covered back. |
| Furious Spine Quake | When the Goldshard becomes enraged, it can cause massive spines to erupt from the ground around it. |
Goldshard Bite
| Goldshard Bite Attack Information |
|---|
| Goldshard Bite: The Goldshard performs a quick advancing bite toward the hunter, dealing moderate damage while knocking them backward. To deal with this attack, dodge away from the kemono's head as it bites down to avoid getting hit. |
Goldshard Charge
| Goldshard Charge Attack Information |
|---|
| Goldshard Charge: The Goldshard roars at the hunter before rapidly running toward them to tackle them with its massive body, knocking them back and dealing moderate damage on hit. Watch for the attack's unique windup and reposition out of the kemono's path with a dodge or Spring Karakuri. |
Spinning Hop
| Spinning Hop Attack Information |
|---|
| Spinning Hop: The Goldshard stomps its front paws before hopping forward and spinning around, releasing a volley of spines behind it as it lands. This move has a subtle tell and comes out quite fast, so stay alert whenever it occurs and quickly evade out of the Goldshard's path to avoid getting hit. |
Tail Slam
| Tail Slam Attack Information |
|---|
| Tail Slam: When hunters stick too close behind the Goldshard, it can lift its tail and slam it down to send them flying away, dealing moderate damage on hit. Stay alert for this attack whenever you deal continuous damage to its tail. |
Laying Spine Thrust
| Laying Spine Thrust Attack Information |
|---|
| Laying Spine Thrust: The Goldshard lies down on the ground, positioning its back toward the hunter and thrusting its massive spines toward them. This attack has a short effective range, so reposition out of its path with a dodge or Spring Karakuri, then counterattack while the kemono leaves itself open. Mighty Goldshard may do this attack two consecutive times. |
Swipe and Slam Combo
| Swipe and Slam Combo Attack Information |
|---|
| Swipe and Slam Combo: The Goldshard performs two alternating paw slams before slamming its body down and launching a cluster of spines in front of it. To deal with this attack, dodge each paw swipe as it comes out, then quickly sprint and evade away from the Goldshard's head to avoid the incoming slam and spines. |
Spine Volley Attacks
| Spine Volley Attack Variations |
|---|
| Forward Spine Volley: The Goldshard lets out a short roar before sending up to two volleys of golden spines toward the hunter, dealing moderate damage on contact. The spines cover a wide range in front of the kemono, so we recommend using a Spring Karakuri or a well-timed dodge to avoid getting hurt. |
| Backward Spine Volley: The Goldshard turns around before launching a cluster of spines on top of the hunter. Stay alert when the Goldshard turns its back toward you and quickly evade out of the spines' path to avoid getting hit. |
Rolling Attacks
| Rolling Attack Variations |
|---|
| Goldshard Rollout: The Goldshard stands on its hind legs before rapidly rolling toward the hunter to crush them with its spine-covered back, dealing moderate damage on hit. This move takes a linear path, so evade or reposition with a Spring Karakuri out of the kemono's way to avoid the attack. |
| Rapid Goldshard Rollout: While enraged, the Goldshard can spin in place, storing energy before rapidly launching itself toward the hunter, dealing massive damage on contact. To deal with this attack, we recommend dodging or using a Spring Karakuri just as it launches toward you or utilizing a Shield Wall Karakuri to stop the kemono in its tracks. |
Furious Spine Quake
| Furious Spine Quake Attack Information |
|---|
| Furious Spine Quake: When the Goldshard becomes enraged, it charges up with massive spines before flipping over and landing on its back, causing the spines to erupt from the ground around it. Quickly evade backward or use a Spring Karakuri to reposition away from the kemono while it performs this attack. |
Wild Hearts Related Guides

All Kemono in Wild Hearts
Author

Goldshard: Weaknesses and Drops
Please participate in our site
improvement survey
03/2026
improvement survey
03/2026
Would you assist in
improving Game8's site?
improving Game8's site?

×
We are listening to our users' valuable opinions and discussing how to act on them.
The information collected through this survey will be used for the purpose of improving our services. In addition, the information will only be disclosed a part of a statistic in a format that will not allow identification of personal information.
Begin Survey
Not Now
×
Please rate each item regarding Game8.co's Advertisements.
Amount of Ads
Very Dissatisfied
Somewhat Dissatisfied
Fine
Somewhat Satisfied
Highly Satisfied
Placement of Ads
Timing of Ad Display
Ad Loading Speed
Safeness of Ads
Content of Ads
×
Please rate each item regarding Game8.co's Quality of Articles.
Amount of information
Very Dissatisfied
Somewhat Dissatisfied
Fine
Somewhat Satisfied
Highly Satisfied
Frequency of updates
Speed of new information
Accuracy of articles
Understandibility of articles
Readability of sentences
×
Please rate each item regarding Game8.co's Usability of the Site.
Ease of finding information
Very Dissatisfied
Somewhat Dissatisfied
Fine
Somewhat Satisfied
Highly Satisfied
Loading Speed
Use of Color
Font Size
Visibility of Images
Easy to Understand Layout
×
Please rate each item regarding Game8.co's Message Boards, Comments.
Ease of Writing
Very Dissatisfied
Somewhat Dissatisfied
Fine
Somewhat Satisfied
Highly Satisfied
Readability
Ease in Finding Information
Comment Quality
Comment Quantity
Admin Response
×
Please rate each item regarding Game8.co's Site's new design.
Please rate our site's new design
Very Dissatisfied
Somewhat Dissatisfied
Fine
Somewhat Satisfied
Highly Satisfied
Do you think that the website's design change makes the site easier to use?
Has the new design made it easier for you to find information on the site?
Has the new design improved the overall visual appeal of the site?
How would you rate your overall satisfaction with the new design of the site?
×
How likely are you to recommend Game8 to someone you know?
Very Unlikely
0
1
2
3
4
5
6
7
8
9
10
Very Likely
If you have other opinions regarding potential improvement to the website, please share them with us. We would appreciate your honest opinion.
Note: This is a free response section, so you can proceed without entering anything.
Note: Please be sure not to enter any kind of personal information into your response.
Note: Please be sure not to enter any kind of personal information into your response.
×
Thank You
×
Thank you for participating in our survey! Your answers will help us to improve the quality of our website and services.
We hope you continue to make use of Game8.
We hope you continue to make use of Game8.
Close
Rankings
- We could not find the message board you were looking for.
Gaming News


![Monster Hunter Stories 3 Review [First Impressions] | Simply Rejuvenating](https://img.game8.co/4438641/2a31b7702bd70e78ec8efd24661dacda.jpeg/thumb)
Popular Games

Genshin Impact Walkthrough & Guides Wiki
Honkai: Star Rail Walkthrough & Guides Wiki
Umamusume: Pretty Derby Walkthrough & Guides Wiki
Pokemon Pokopia Walkthrough & Guides Wiki
Resident Evil Requiem (RE9) Walkthrough & Guides Wiki
Monster Hunter Wilds Walkthrough & Guides Wiki
Wuthering Waves Walkthrough & Guides Wiki
Arknights: Endfield Walkthrough & Guides Wiki
Pokemon FireRed and LeafGreen (FRLG) Walkthrough & Guides Wiki
Pokemon TCG Pocket (PTCGP) Strategies & Guides Wiki


Recommended Games
Diablo 4: Vessel of Hatred Walkthrough & Guides Wiki
Cyberpunk 2077: Ultimate Edition Walkthrough & Guides Wiki
Fire Emblem Heroes (FEH) Walkthrough & Guides Wiki
Yu-Gi-Oh! Master Duel Walkthrough & Guides Wiki
Super Smash Bros. Ultimate Walkthrough & Guides Wiki
Pokemon Brilliant Diamond and Shining Pearl (BDSP) Walkthrough & Guides Wiki
Elden Ring Shadow of the Erdtree Walkthrough & Guides Wiki
Monster Hunter World Walkthrough & Guides Wiki
The Legend of Zelda: Tears of the Kingdom Walkthrough & Guides Wiki
Persona 3 Reload Walkthrough & Guides Wiki


All rights reserved
© 2023 Electronic Arts Inc.
The copyrights of videos of games used in our content and other intellectual property rights belong to the provider of the game.
The contents we provide on this site were created personally by members of the Game8 editorial department.
We refuse the right to reuse or repost content taken without our permission such as data or images to other sites.