All Treasure Chest Locations
Hey, Stylists! We regret to inform everyone that we will no longer be updating Infinity Nikki as of Version 1.6. The Friend Code Sharing board will still be kept open, but keep in mind that most guides past Version 1.5 are not up-to-date. Thank you for your support!
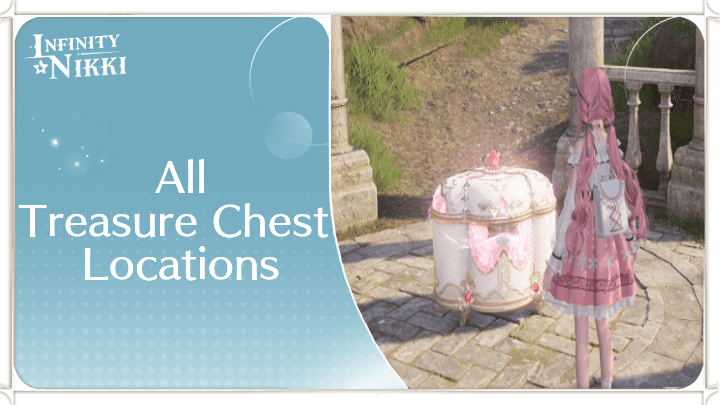
Treasure Chests are boxes scattered around the world of Miraland in Infinity Nikki. See all treasure chest locations, their contents, and how to get them here!
| Other Collectible Guides | ||
|---|---|---|
Treasure Chest Interactive Map
Version 1.0 Treasure Chest Map
| When available, you can click the dropdown menu on top of the map to change region! |
Interactive Map Key
| All Collectibles in Infinity Nikki | |
|---|---|
 Dew of Firework Dew of Firework |
|
 Whim Bubble Whim Bubble |
 Serenity Dewdrop Serenity Dewdrop |
How to Use the Infinity Nikki Interactive Map
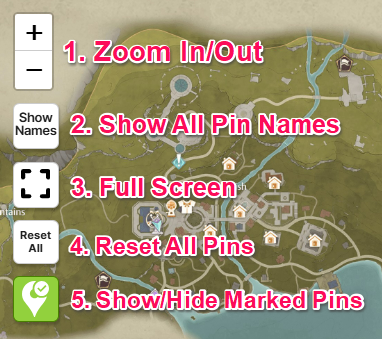 | |
| ① | Zoom In/Out Zoom in or out on specific points in the map. |
|---|---|
| ② | 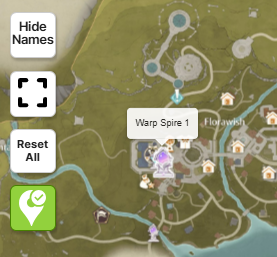 Show All Pin Names Display the titles of all pins located on the map. |
| ③ | Full Screen View the map in full screen mode. |
| ④ |  Reset All Pins Clears all marked pins on the map. |
| * | 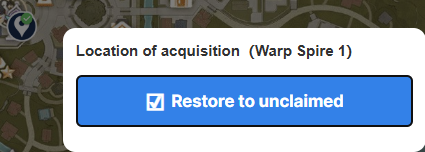 How to Mark Pins Click on a pin then check "Mark as Acquired" to mark the collectible as claimed. |
| ⑤ | Show/Hide Marked Pins Show or hide your marked pins on the map. |
Treasure Chest Locations
How to Get Treasure Chest
There are seven (7) unique areas that will have Treasure Chest scattered in their vicinity for you to collect.
- Memorial Mountains
- Florawish
- Breezy Meadows
- Stoneville
- Abandoned District
- Wishing Woods
- Firework Isles
Memorial Mountains Treasure Chests
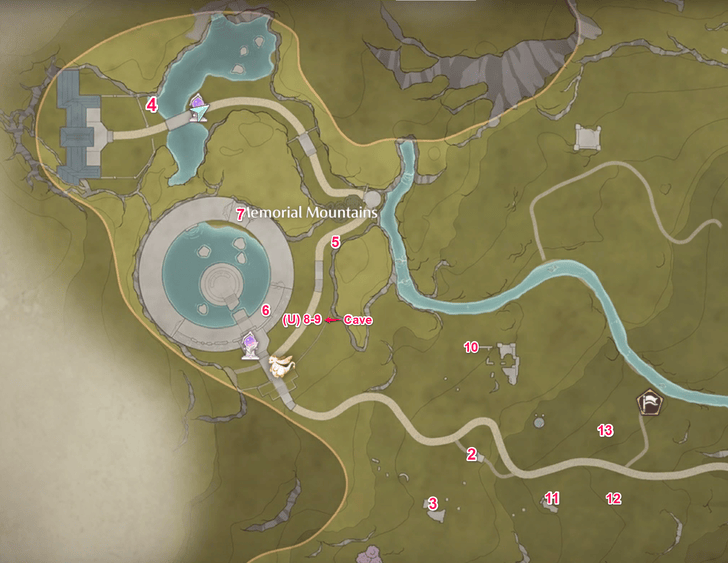 Open Image in New Tab |
There are a total of 13 Treasure Chests in the Memorial Mountains. All their locations are noted below:
| No. | Image | How to Get |
|---|---|---|
| 1 | 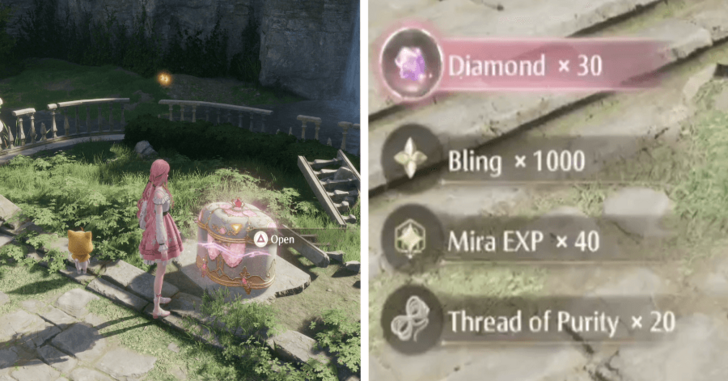 |
Found in the Unknown Ruins. Part of the Tutorial Quest. No map needed. |
| 2 | 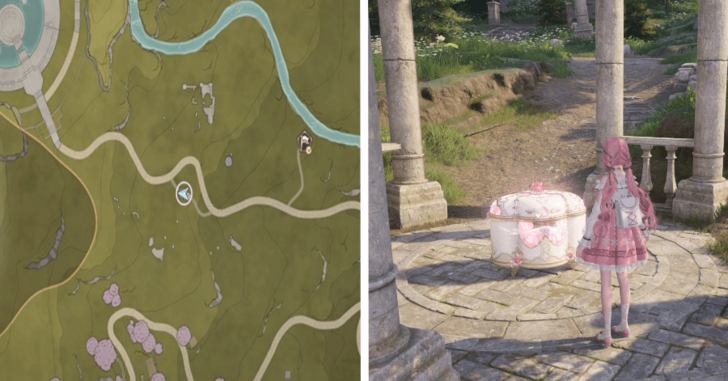 |
Below a tall gazebo-like structure. (Rewards the 3-Star Headwear Sketch Blossom's Wish) |
| 3 | 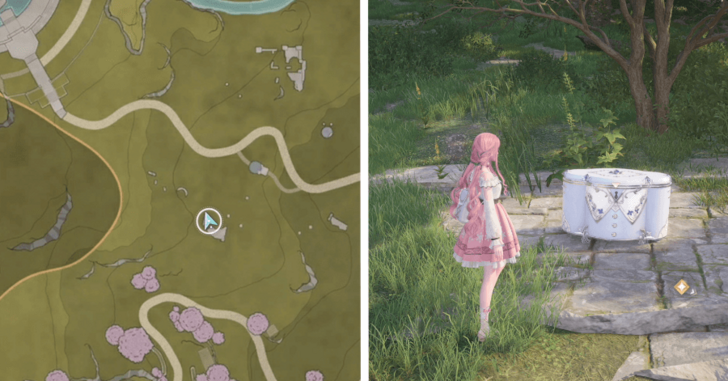 |
Head South from 2. Defeat all enemies guarding the chest to open it. |
| 4 | 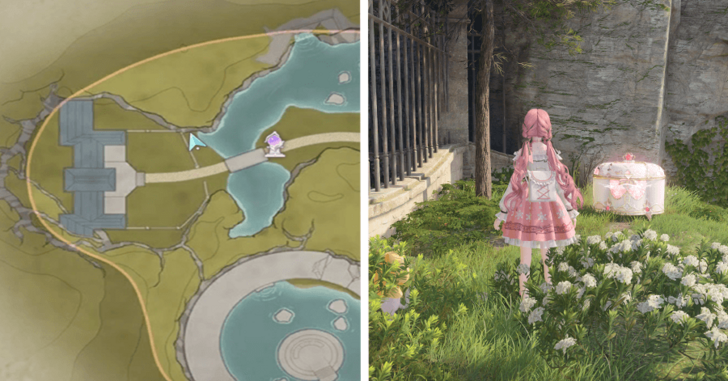 |
After meeting Dada. Turn Left before interacting with the Warp Spire. (Rewards the 3-Star Dress Sketch Fragrant Reverie) |
| 5 | 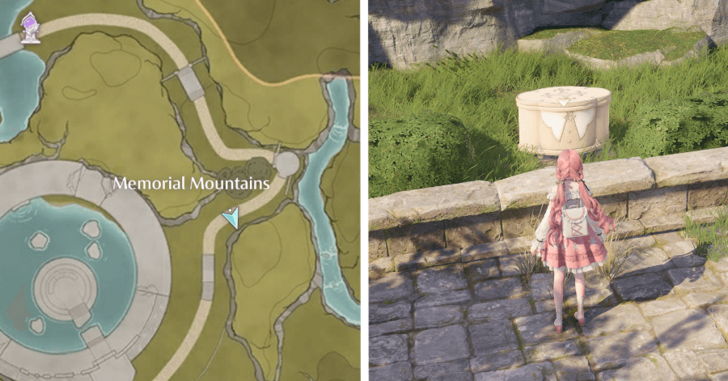 |
Fast Travel back to the 1st Warp Spire and follow the path. This is to the left, opposite the shrubs. |
| 6 | 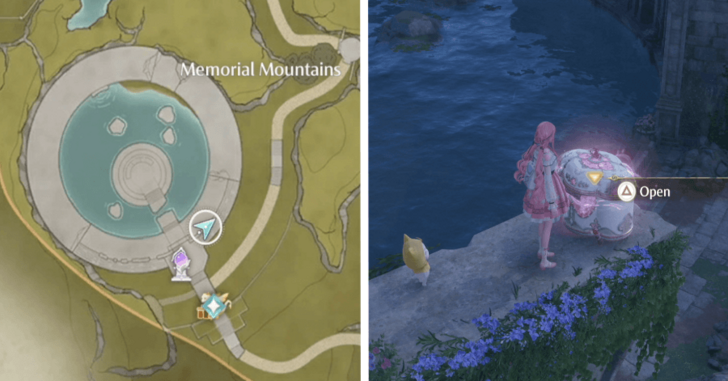 |
Climb the pillars and just follow the platforms upward. (Rewards the 3-Star Bottoms Sketch Swift Leap) |
| 7 | 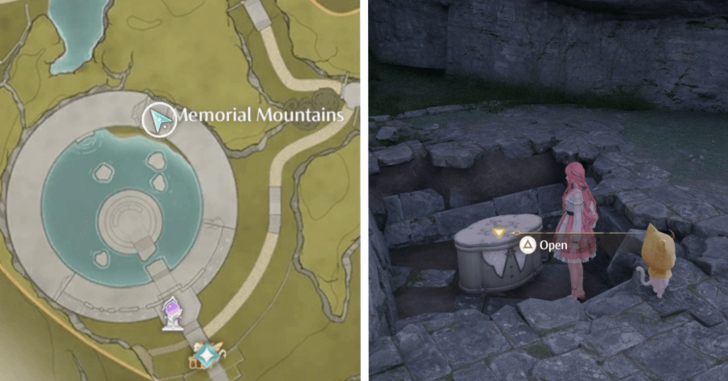 |
North of Kilo the Cadenceborn, hidden below a plunge-breakable platform. |
| 8 | 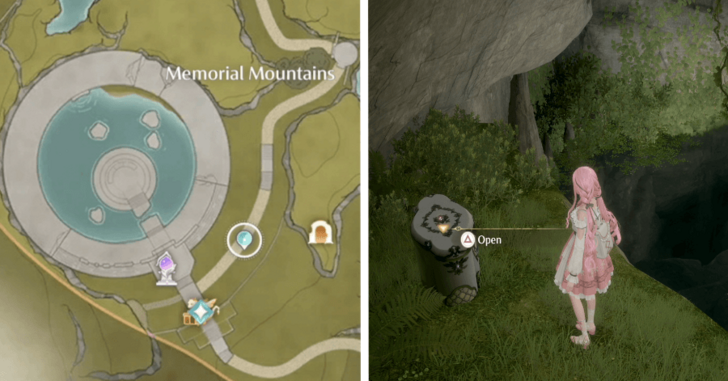 |
Inside the cave near Kilo the Cadenceborn. Found on top of a ledge to the left of the main path. |
| 9 | 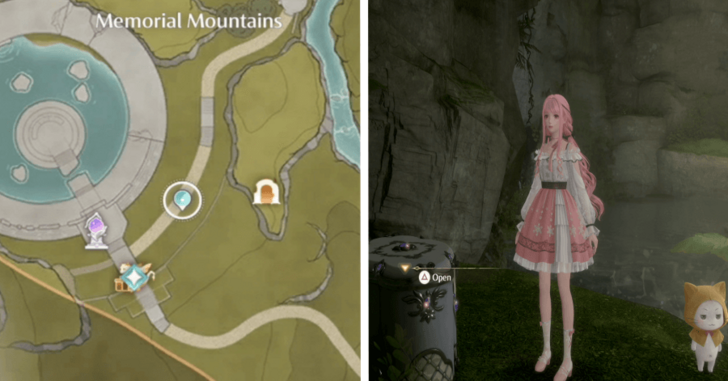 |
Found behind the waterfall inside the cave. |
| 10 | 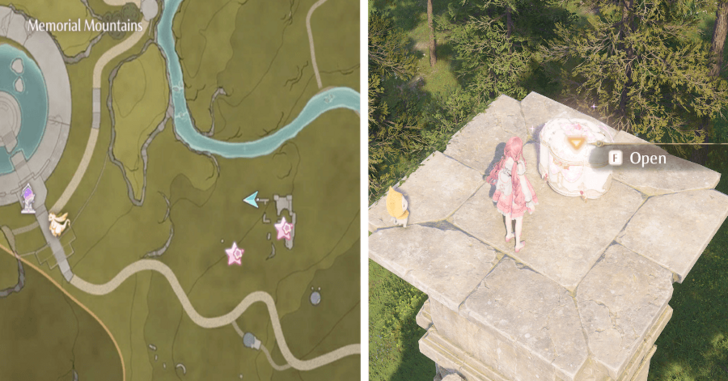 |
Head to the top of a pillar beside where you found the chest with a Whimstar in it. (Rewards the 3-Star Shoes sketch Traveler's Shoes) |
| 11 | 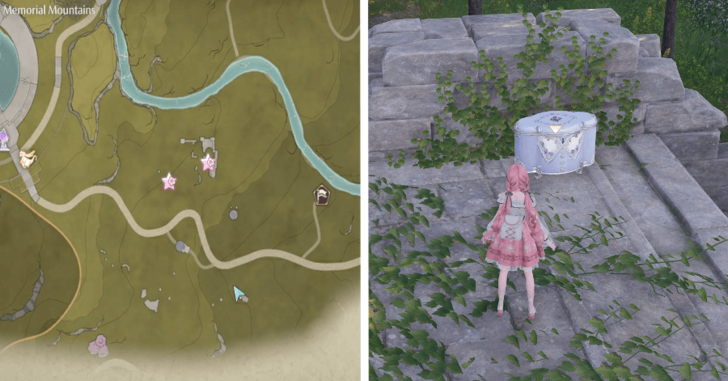 |
Head down the map from 2 and defeat all of the Esselings in the area. |
| 12 | 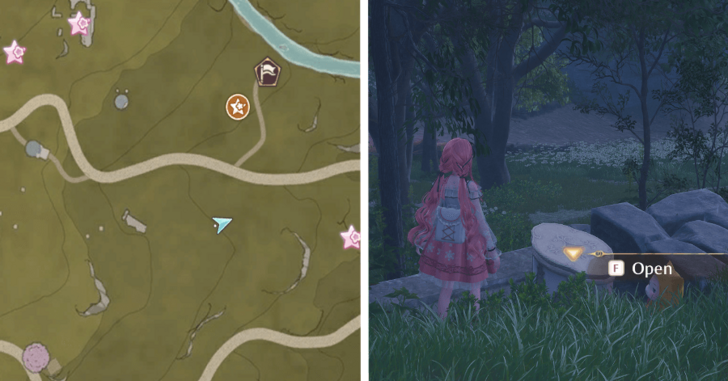 |
Continue heading down from 11 until you see a small ruined wall. |
| 13 | 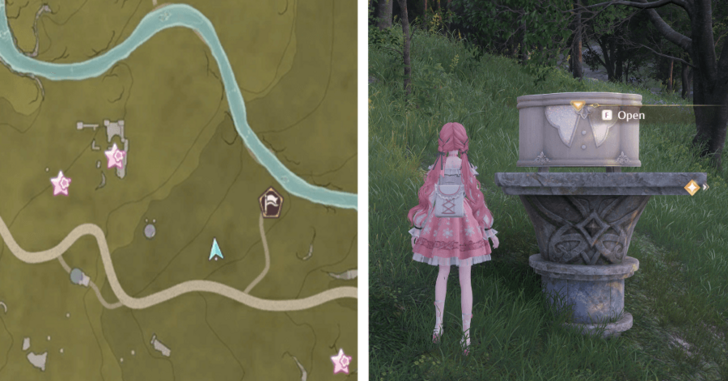 |
Head North from 12. It's on top of a stone pedestal. |
Florawish Treasure Chests
| No. | Image | How to Get |
|---|---|---|
| 1 | 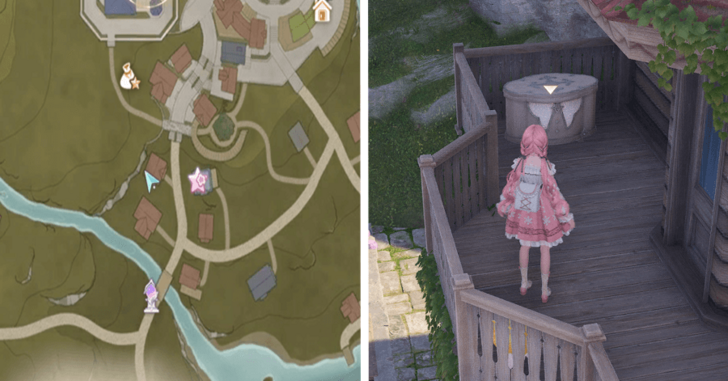 |
On the balcony of the house in front of the Solarium. |
| 2 | 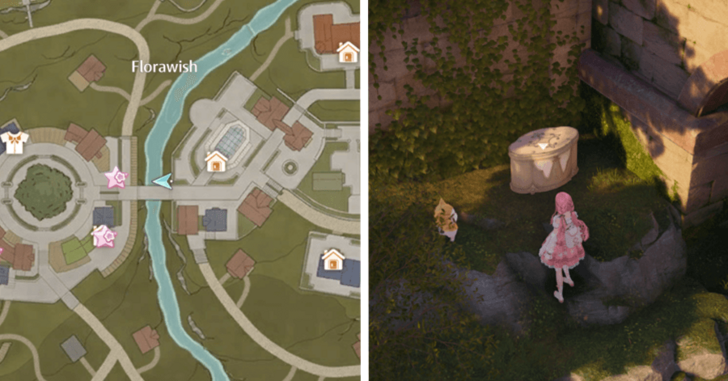 |
Beside the bridge. Go down. |
| 3 | 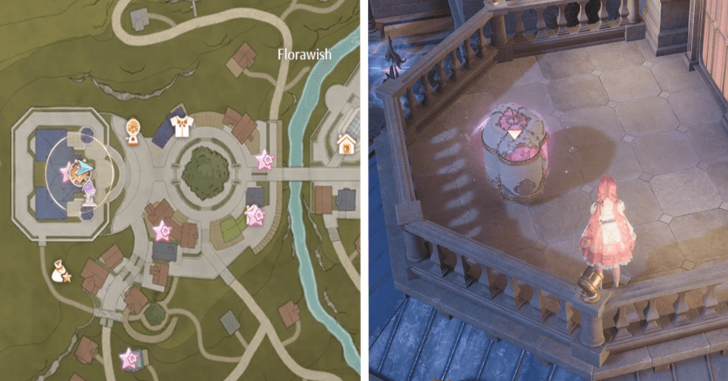 |
On the balcony of the Stylist's Guild. |
| 4 | 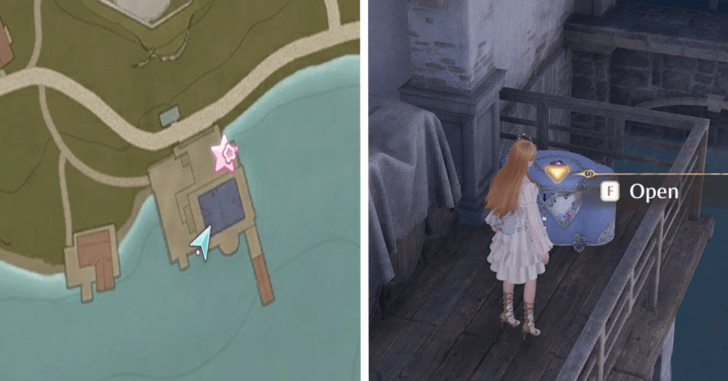 |
On the dock South of Mayor's Residence. Behind the barrels. |
| 5 |  |
On the dock, South of Mayor's Residence, in between the boats. (Rewards the 3-Star Bottoms sketch Patchwork Pants) |
| 6 | 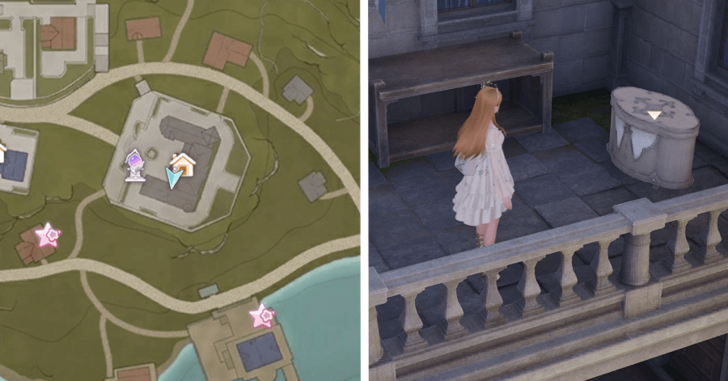 |
Balcony of the Mayor's Residence. |
| 7 |  |
On the garden area of the house north of Mayor's Residence. |
| 8 | 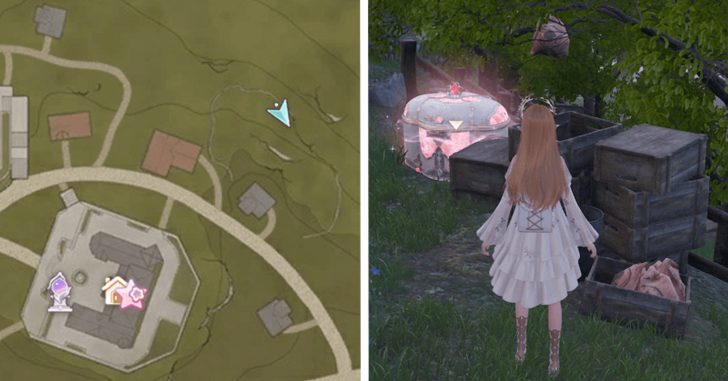 |
Northeast from the Mayor's Residence, on top of the hill. (Rewards the 4-Star Hand Accessory sketch Fingerless Gloves) |
| 9 | 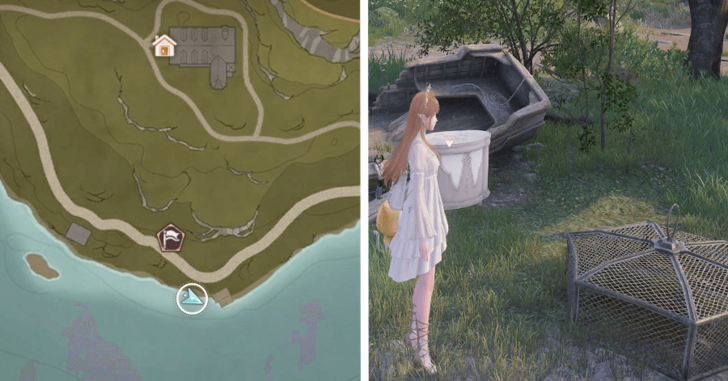 |
Next to the broken boat, near the lake, South of the Sanctum of the Observant. |
| 10 | 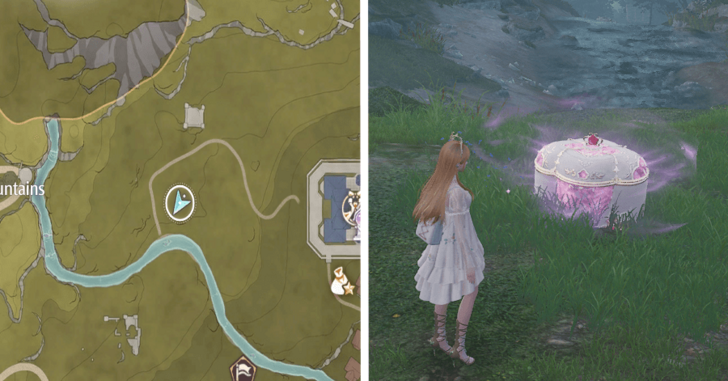 |
On the hill behind the Stylist's Guild. Contains a Whimstar. |
| 11 | 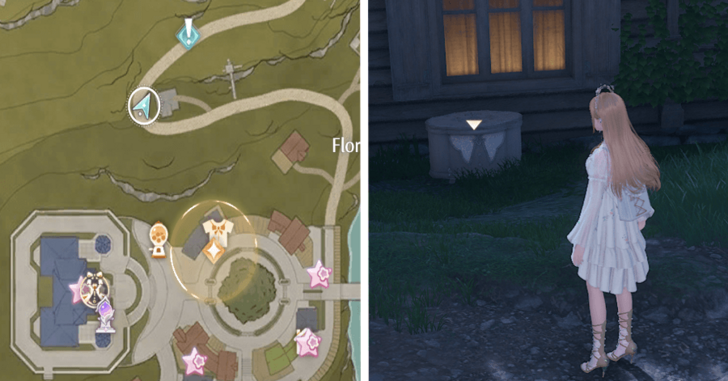 |
On the side of Nonoy's home. |
| 12 |  |
On the side of the Dream Warehouse Tower. |
| 13 | 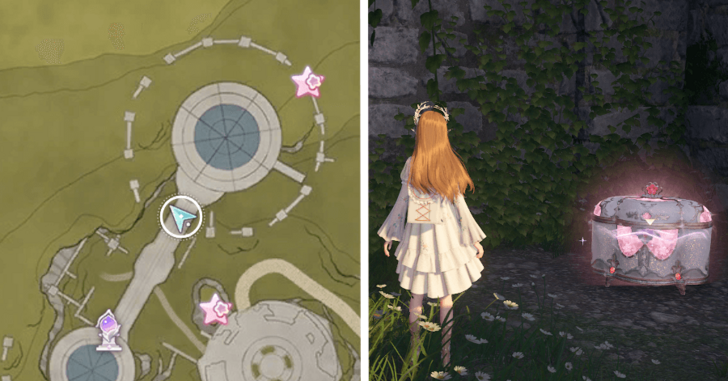 |
Below the bridge, in front of the Dream Warehouse Tower. (Rewards the 4-Star Top sketch Ceremony Guest) |
| 14 | 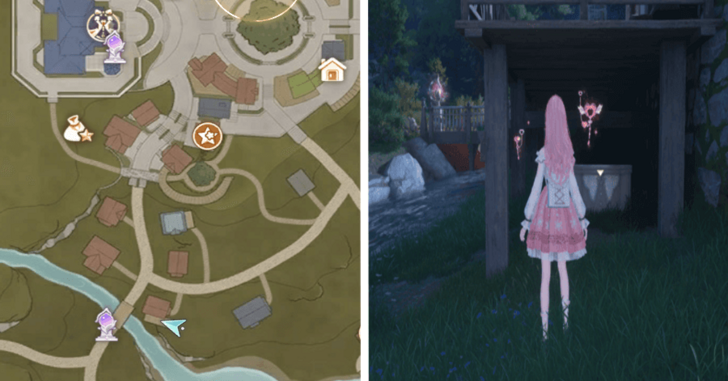 |
Underneath the rafters of this house to the right upon entering Florawish. |
| 15 | 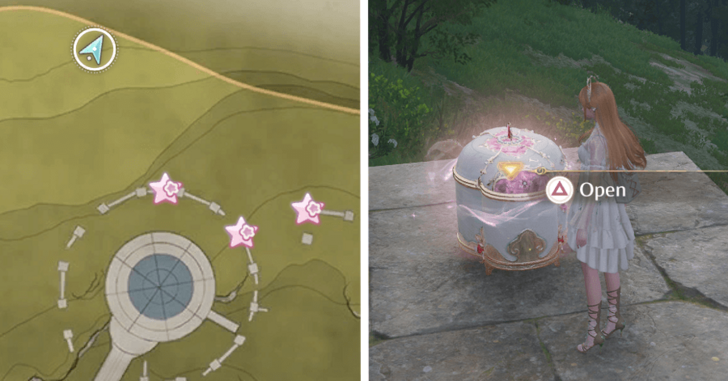 |
On the hill North of the Dream Warehouse Tower. |
| 16 | 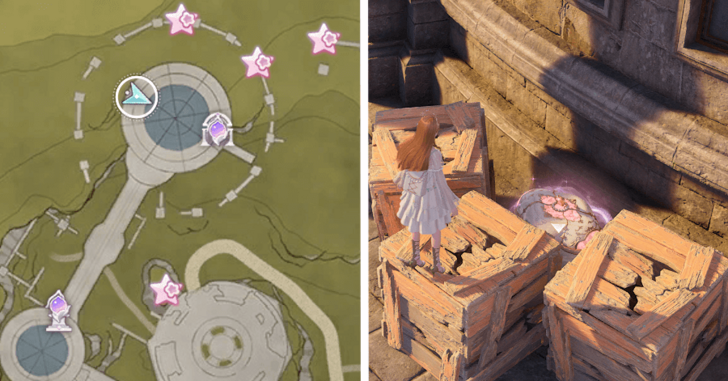 |
On the Dream Warehouse Rooftop, hidden behind the boxes. |
| 17 | 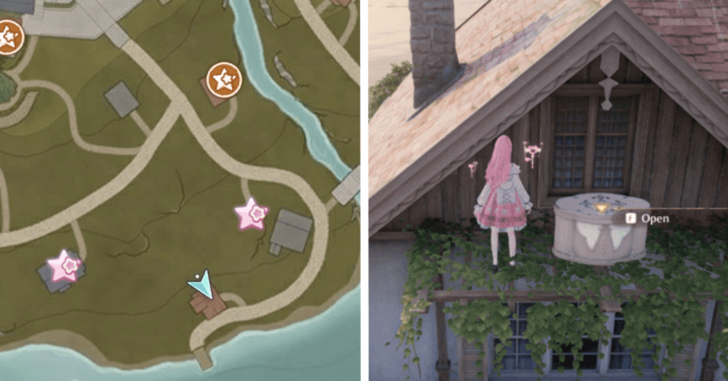 |
Head East from 14. Go around to the balcony of this house near the shore. |
| 18 | 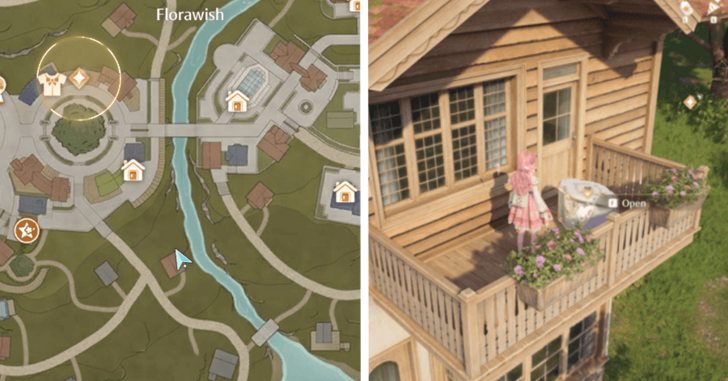 |
Head North from 17 until you see this house upstream. |
| 19 | 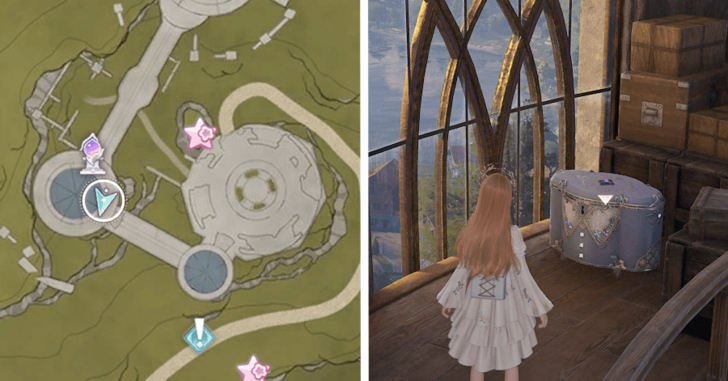 |
Inside the middle Dream House Tower. |
| 20 | 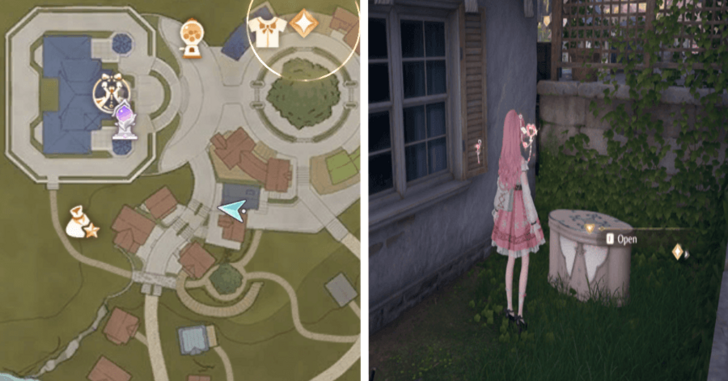 |
Go Southeast from 3 and follow the small path from the main road. It will be in a small alley between two houses. |
| 21 |  |
Turn around and follow the wide main road Northeast. On top of the statue at the Bibcoon's Chuckle Club. |
| 22 | 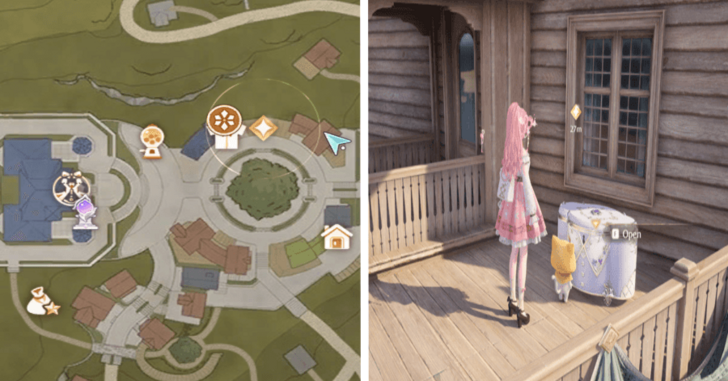 |
Head North and go to the balcony of the building after crossing the bridge. |
| 23 | 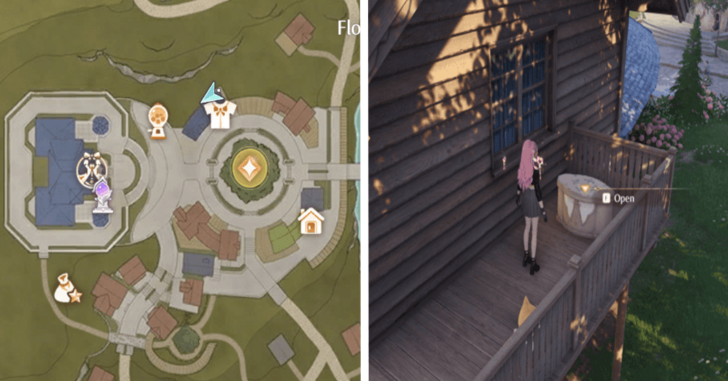 |
From 22, head West to Marques Boutique. Head up the stairs and turn left. |
| 24 | 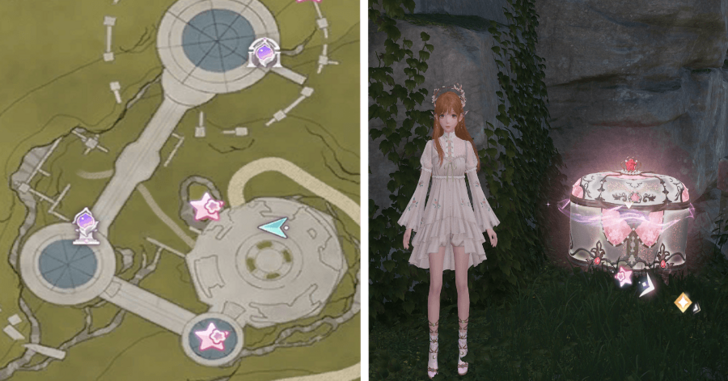 |
On the underground library on the Dream Warehouse Tower. (Rewards the 3-Star Gloves sketch Sincere Greetings) |
| 25 | 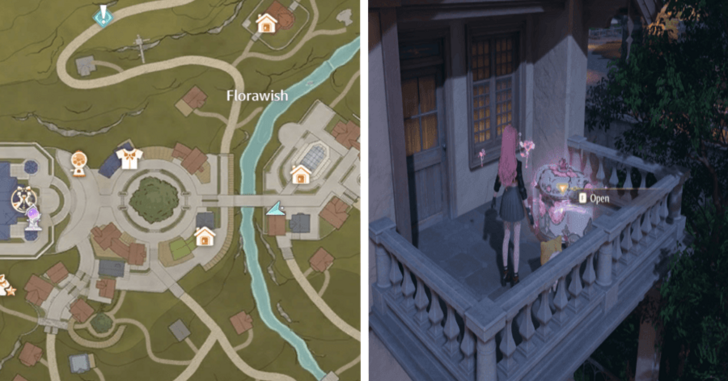 |
Cross the bridge and go to the building to the right. Climb up to the balcony. (Rewards the 3-Star Accessory sketch Orange Sun) |
| 26 |  |
Head back down from 25 and go to the small corner beside the house. |
| 27 |  |
On the top of the mountain. On a broken ruins. (Rewards the 3-Star Outerwear sketch Academy Tribute) |
| 28 | 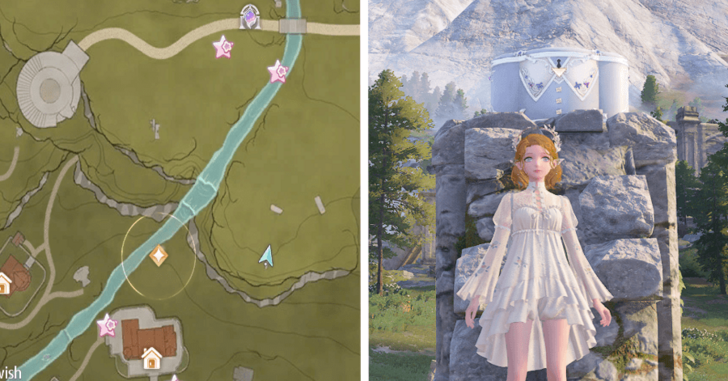 |
On top of the mountain, northeast of the Daisy Inn. |
| 29 | 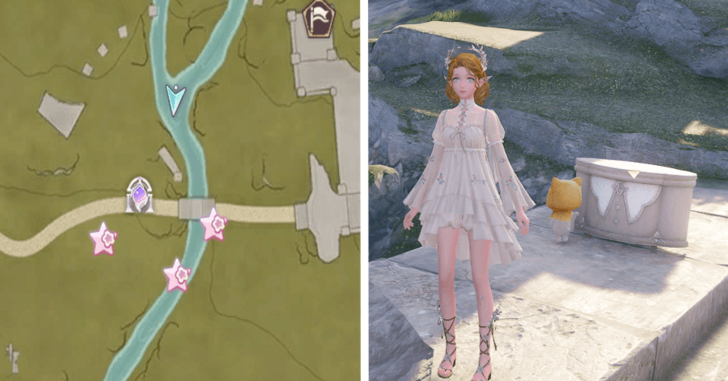 |
On the middle on the river, on top of the broken pillar. Northeast of the Secret Base Warp Spire. |
| 30 | 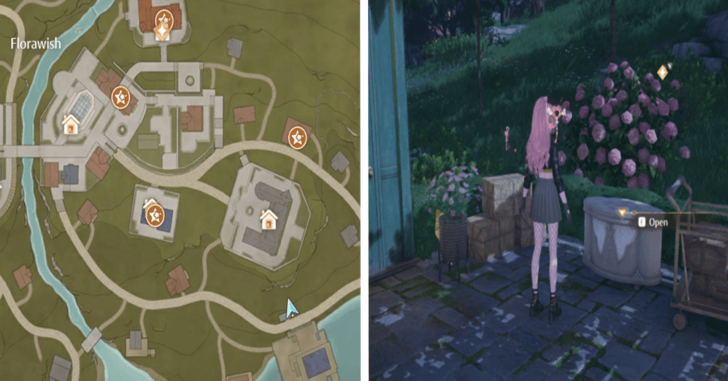 |
By the newsstand behind the lakehouse. |
| 31 |  |
From the bridge on top of the Well of Fortune Warp Spire, follow the current and enter the cave behind the waterfall. |
| 32 | 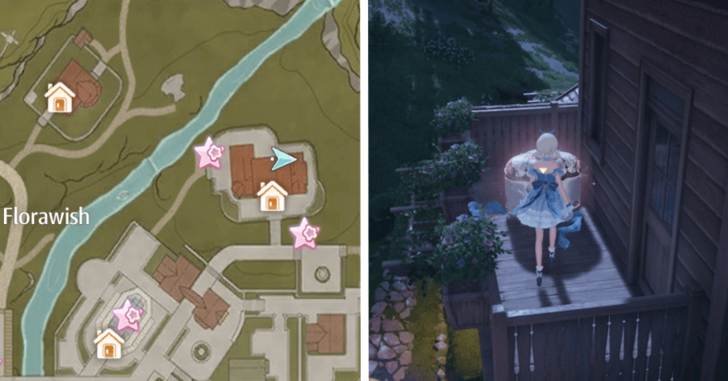 |
On the balcony on the back of the Daisy Inn. (Rewards the 3-Star Top sketch Refreshing Greenery) |
| 33 | 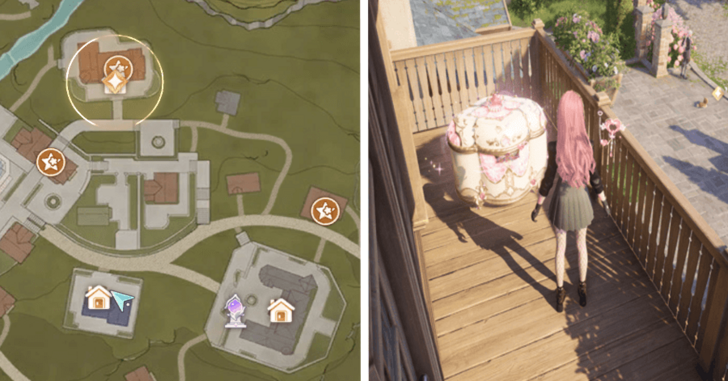 |
From 30, head Northwest to the Florawish Guard HQ. Climb to the balcony. |
| 34 | 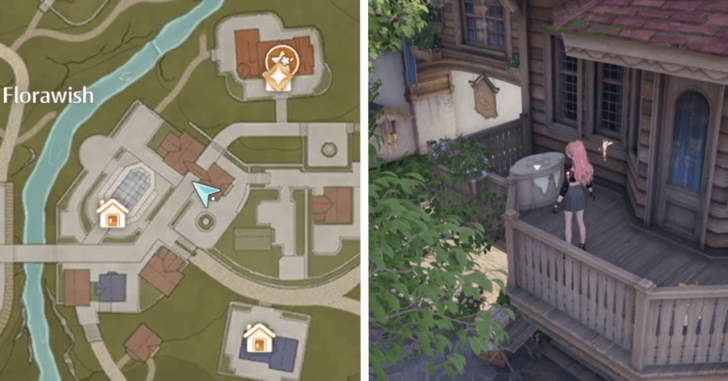 |
From 33, follow the main road from the HQ entrance and find a way up the balcony on the building with an archway. |
| 35 | 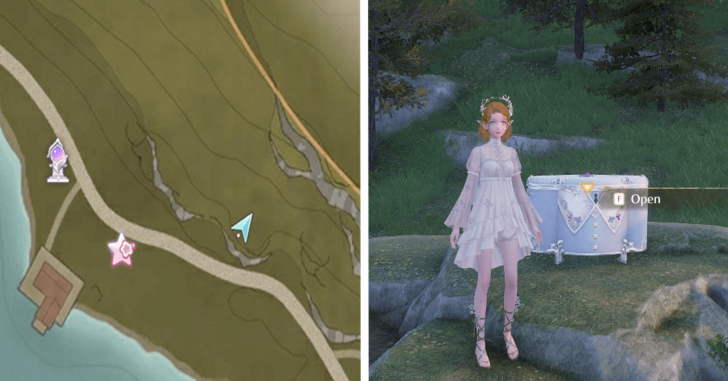 |
East of the Stitch Street Warp Spire. |
| 36 | 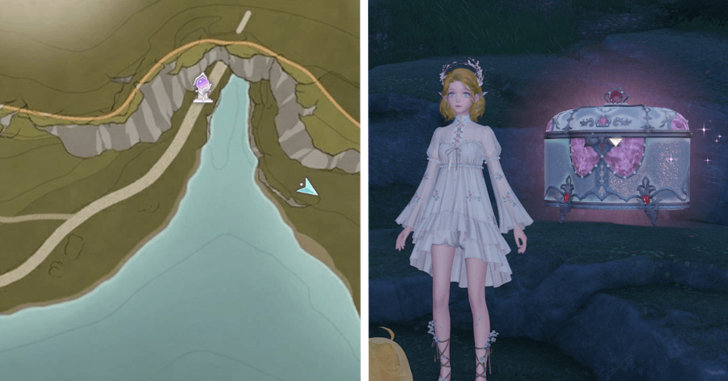 |
Across the lake from the Wish Pass Office Warp Spire. |
| 37 |  |
Southeast from the Wish Pass Office Warp Spire. (Rewards the 3-Star Earring sketch Droopy Banner) |
| 38 | 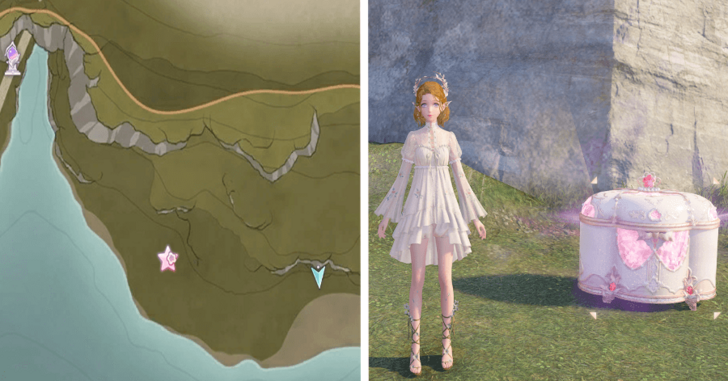 |
Southeast from the Wish Pass Office Warp Spire. A little East from the Chest 38. Contains Whimstar. Before you can acquire the whimstar, you have to fight of the esslings. |
| 39 | 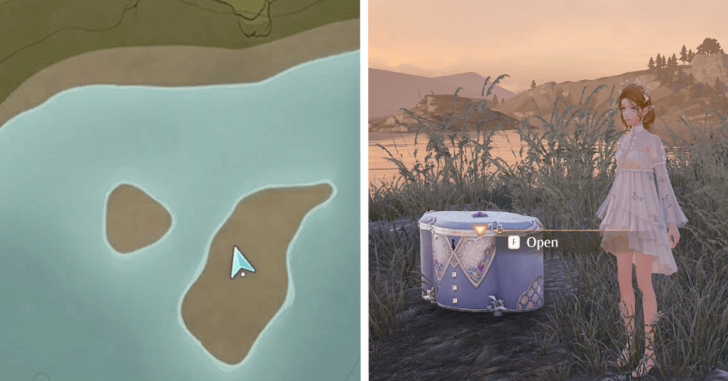 |
On the island East from the Wish Pass Office Warp Spire. |
| 40 | 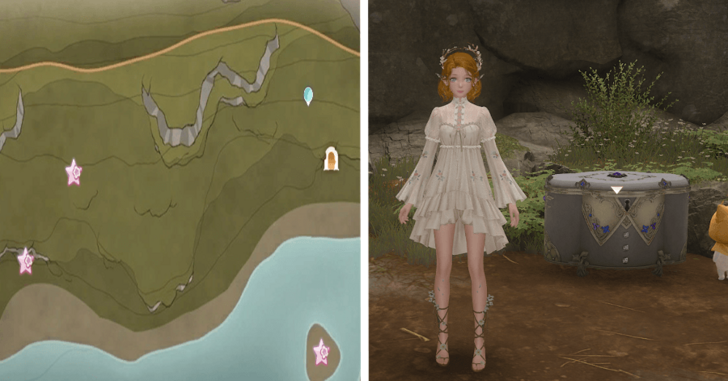 |
Enter Forest's Edge Cavern, East of the Wish Pass Office Warp Spire, North of the island where Chest 40 is located. |
| 41 | 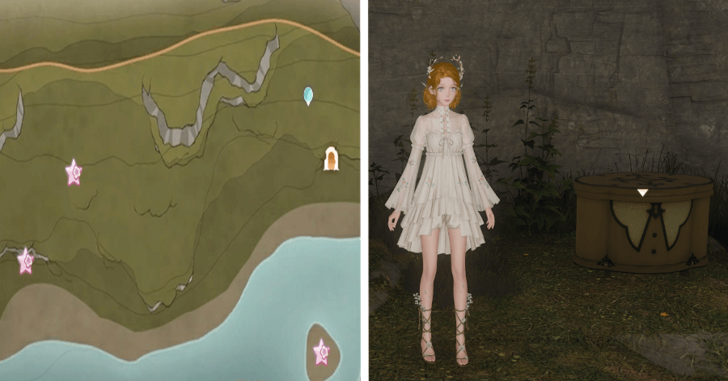 |
Enter Forest's Edge Cavern, east of the Wish Pass Office Warp Spire. After defeating the Esslings and obtaining the chest 41, bounce on the bird trampoline to the right, then drop down to the right where you'll see another bird trampoline below. Walk forward, and you should see two more bird trampolines. Jump over the trampoline on the right and you should see this chest. |
| 42 | 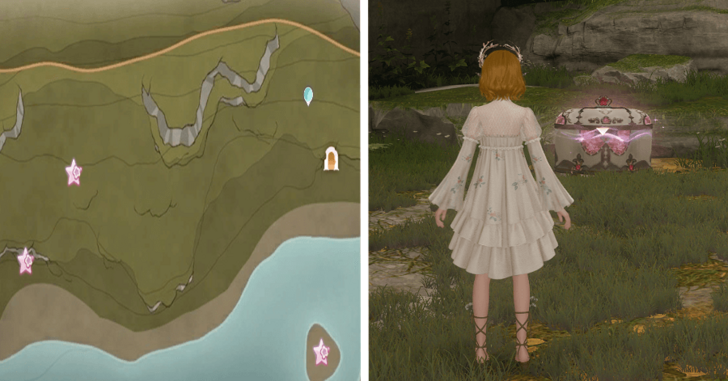 |
North of the Chest 42, you should be able to locate this chest surrounded by Esselings. |
| 43 | 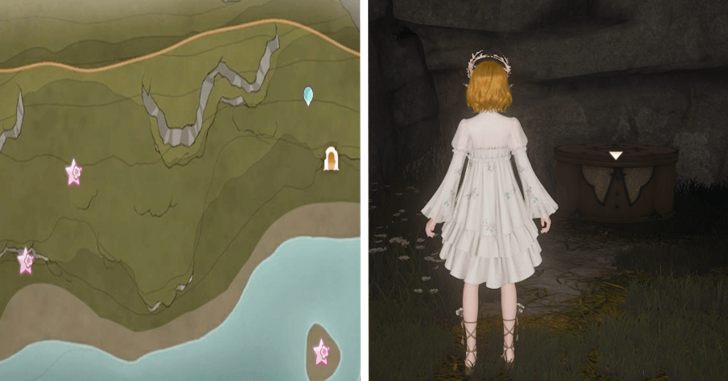 |
Go inside the cave to the right of the chest 41. |
| 44 | 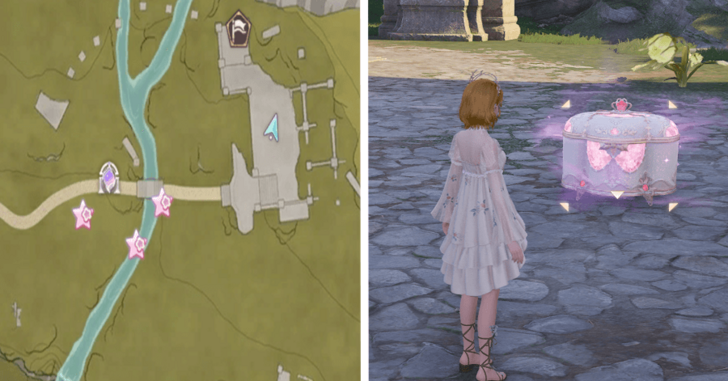 |
East of Secret Base and Well of Fortune Warp Spire. Best if you teleport on Secret Base as Well of Fortune is underground. You have to fight off esslings to obtain a Whimstar. |
| 45 | 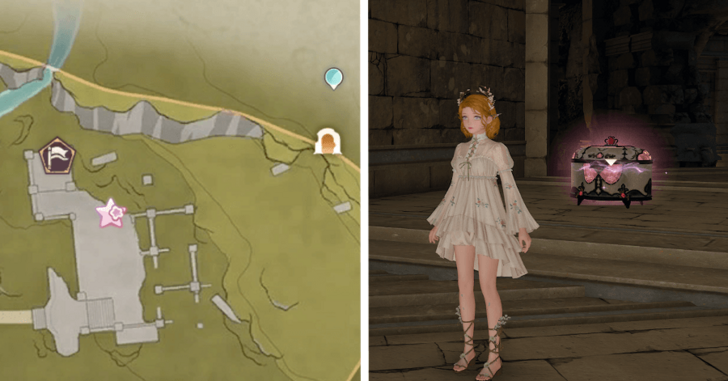 |
To Obtain this chest, enter the cavern on the Northeast of the Well of Fortune Warp Spire, upper right corner of Florawish. Follow the cavern clockwise. |
| 46 | 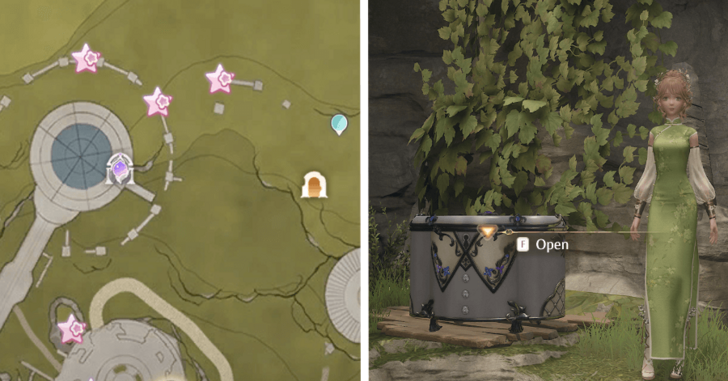 |
In the cavern in between the Dream Warehouse Rooftop Warp Spire and Secret Base Warp Spire. |
Breezy Meadows Treasure Chests
| No. | Image | How to Get |
|---|---|---|
| 1 | 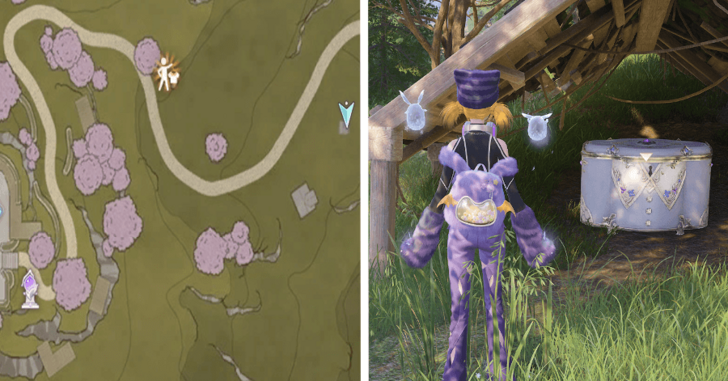 |
Head West towards the Cicia Art Academy Field Base from the Leisureely Anglers Warp Spire. Go left off of the main path until you see this shed. |
| 2 | 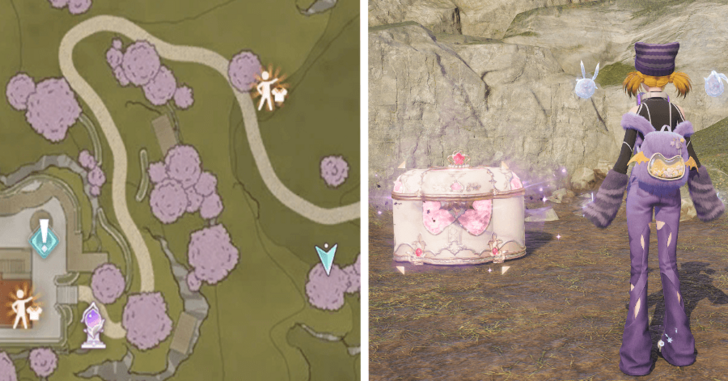 |
Continue West and use Momo's View. Track the chest and defeat the Esselings to obtain a Whimstar. |
| 3 | 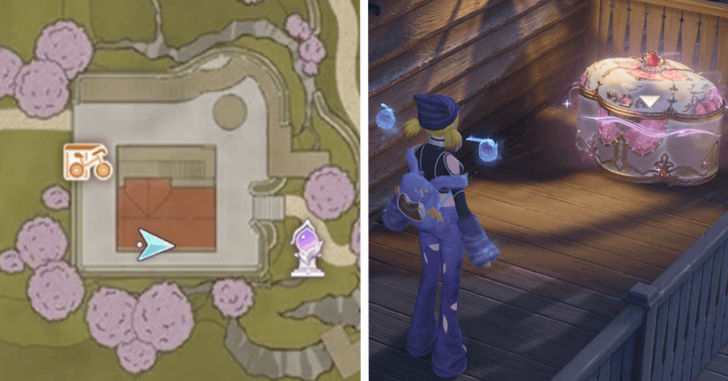 |
At the Cicia Art Academy Field Base, go to the right side of the building and head up the balcony. (Rewards the 3-Star Top sketch Cutie Dragon) |
| 4 | 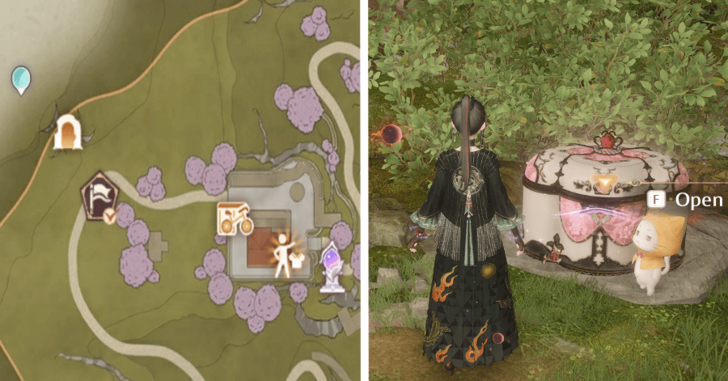 |
Inside the Field Base Cavern. Go through the newly opened path after pushing a boulder from somewhere high inside the cave. Grab the Whimstar, too. (Rewards the Fragrance Material Forest Whisper) |
| 5 | 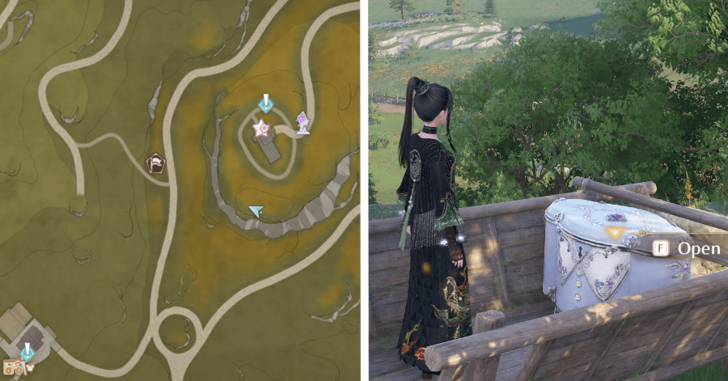 |
Head Southeast from the Cicia Art Academy Field Base until you see the Bug Catcher's Cabin. Go behind it and look for a wheelbarrow. |
| 6 | 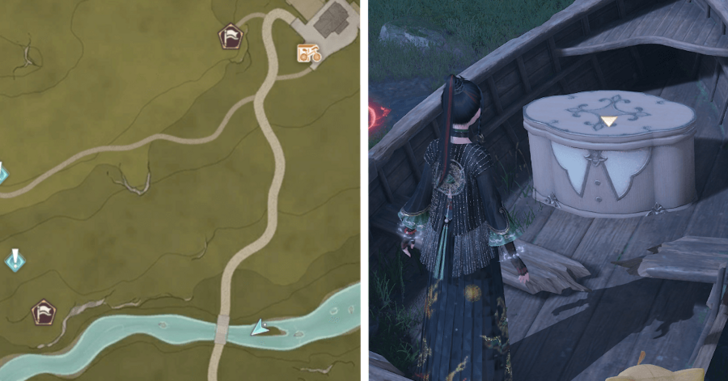 |
Head South from the Meadow Activity Support Center until you see some broken carts by the river. |
| 7 | 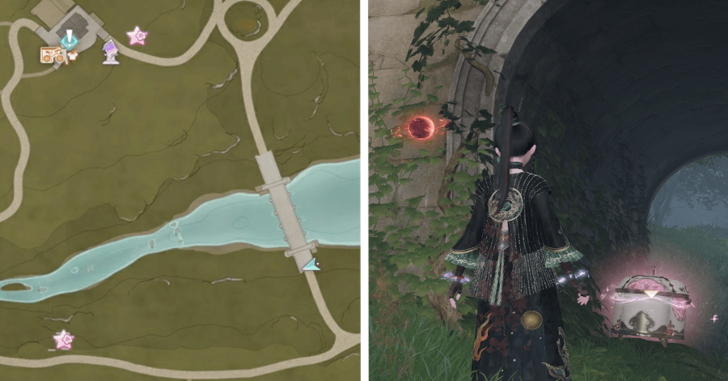 |
Go East from 6, towards the large bridge. Go under one of its arches to the right. (Rewards the 3-Star Bottoms sketch Foliage Musings) |
| 8 | 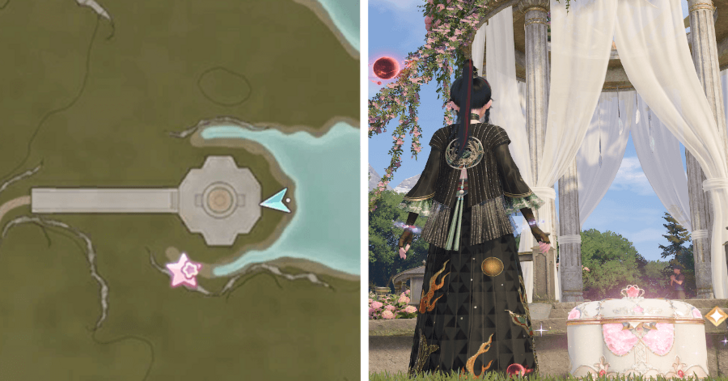 |
Once you reach the Swan Gazebo, head to the lakeside. (Rewards the 3-Star Dress sketch Starry Vigil) |
| 9 | 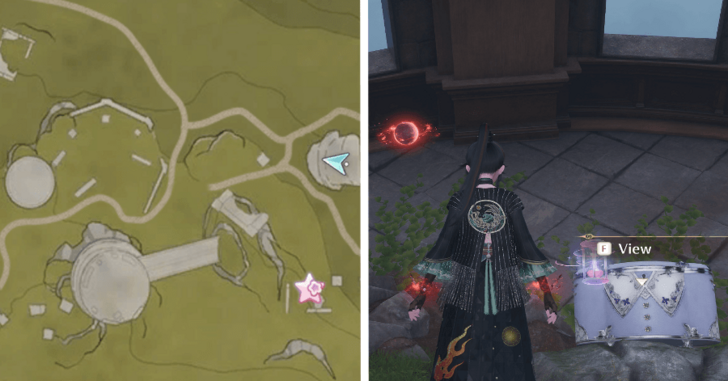 |
Head slightly Northwest from the Relic Hill Warp Spire until you see this fallen tower ruin. Go in through the window arches to get the chest. |
| 10 | 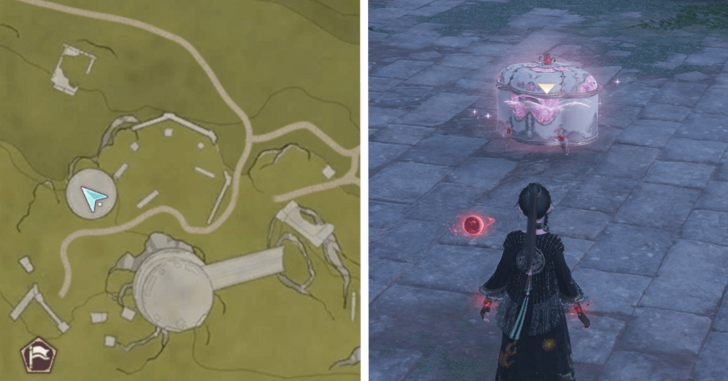 |
Go West from 9 and climb the top of the ruined tower. (Rewards the 3-Star Head Accessory Shaky Branch) |
| 11 | 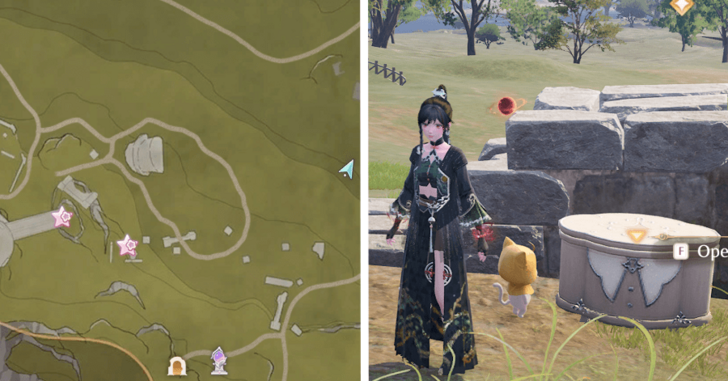 |
From the Relic Hill Warp Spire, follow the road while going Northeast. Go to a broken wall just off of the path. |
| 12 | 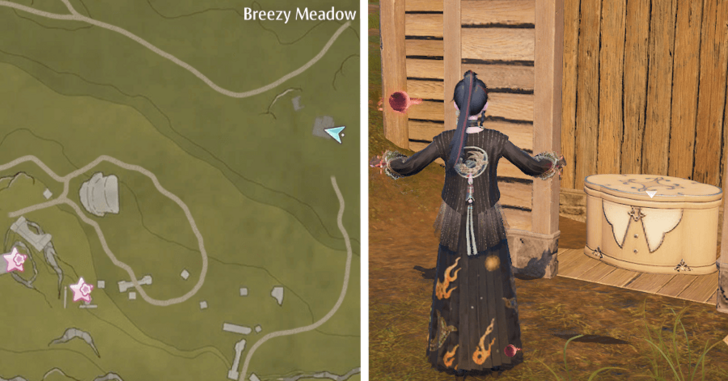 |
From 11, you'll see a small shed. Go to it and break the box in front of the door. |
| 13 | 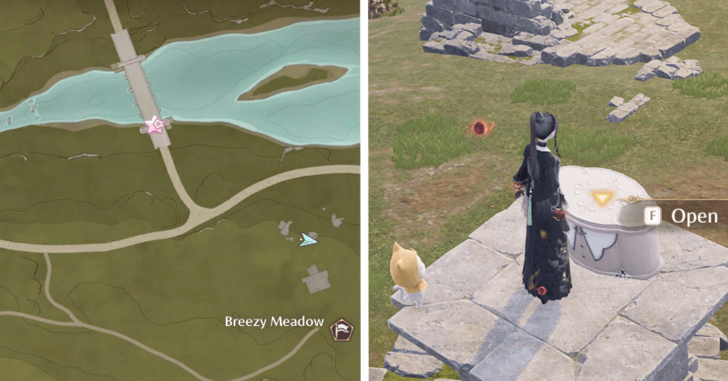 |
North from 12, on the center pillar from these small ruins before the river. |
| 14 | 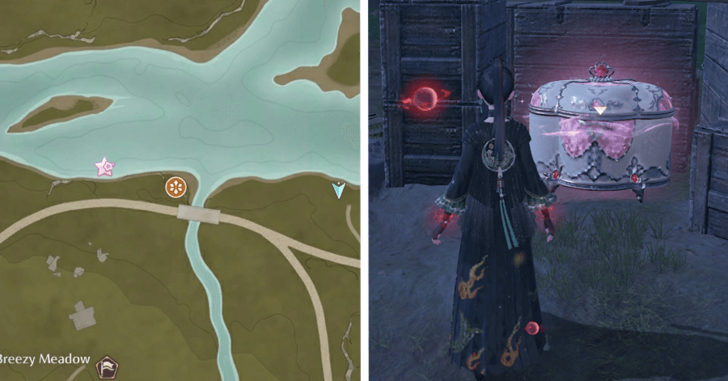 |
Head East from 13 and go along the shore. Behind a crate with some boxes. (Rewards the 3-Star Necklace sketch Budding Sprout) |
| 15 | 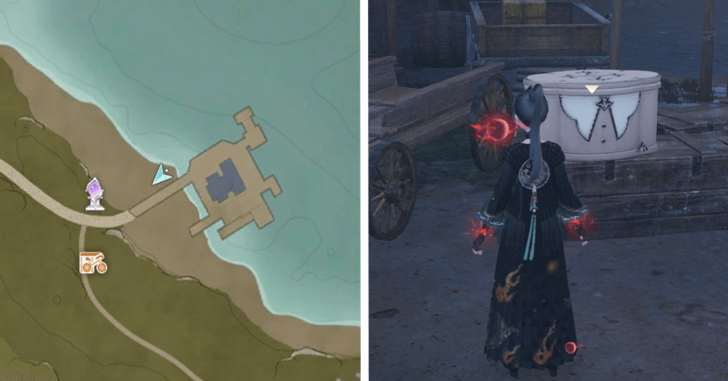 |
Go down the left side of the pier at Meadow Wharf. |
| 16 | 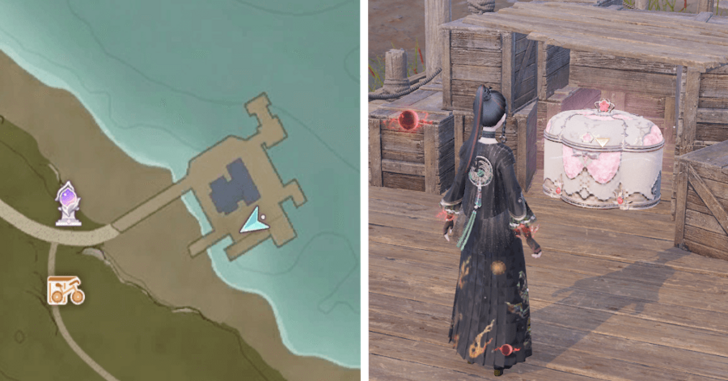 |
Right side of the Meadow Wharf shack. |
| 17 | 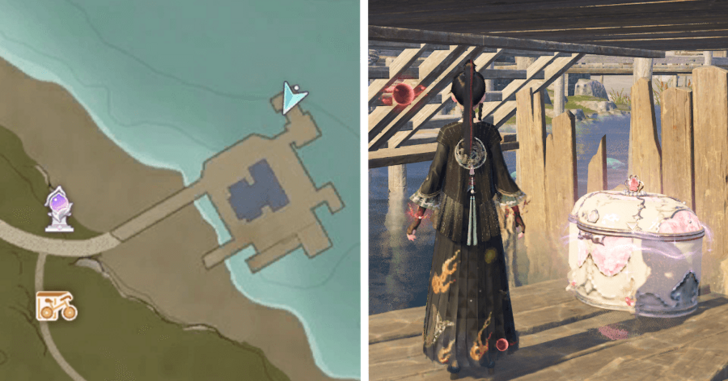 |
Head underneath left-most pier. (Rewards the 3-Star Dress sketch Confession Lace) |
| 18 | 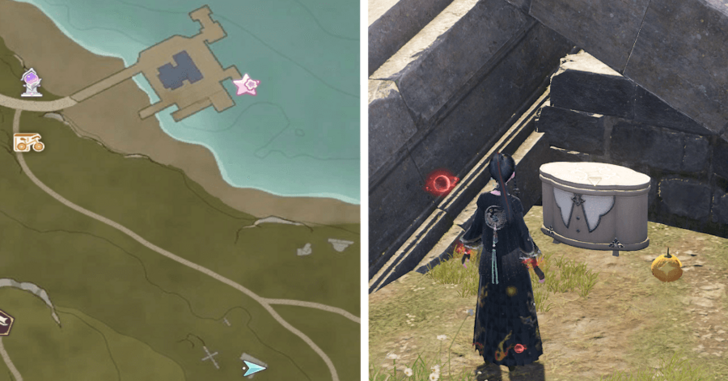 |
Head Southeast from the Meadow Wharf Warp Spire until you see this L-shaped ruin. It's behind a breakable crate. |
| 19 | 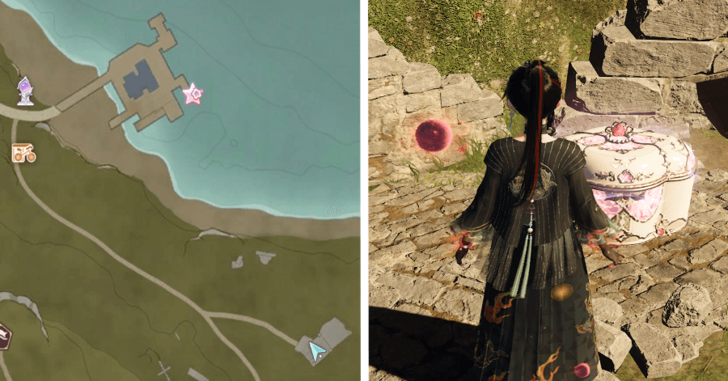 |
Go East from 18 and defeat all the Esselings on the ruined building. Go in front to see a crack in the wall. |
| 20 | 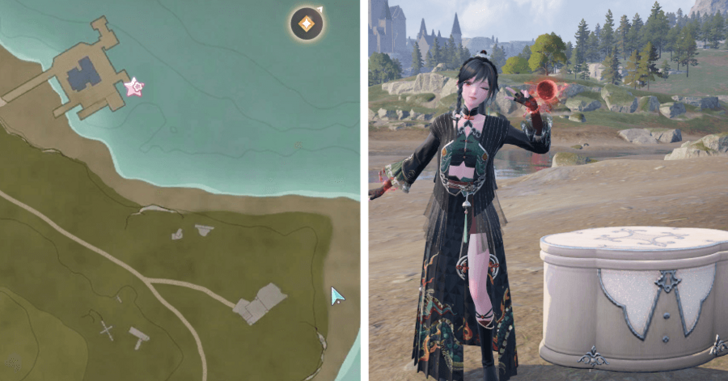 |
Go North, towards the shore from 19. Defeat the Esselings guarding it to unlock. |
| 21 | 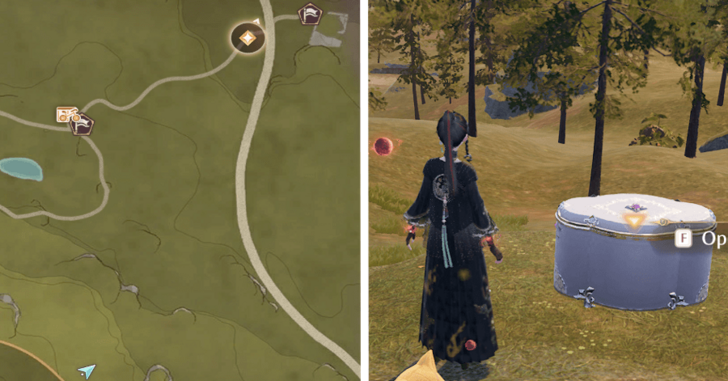 |
Head Southwest from the Queen's Palace Ruins Entrance Warpspire until you see a small forest clearing with some Esselings you'll need to defeat. |
| 22 | 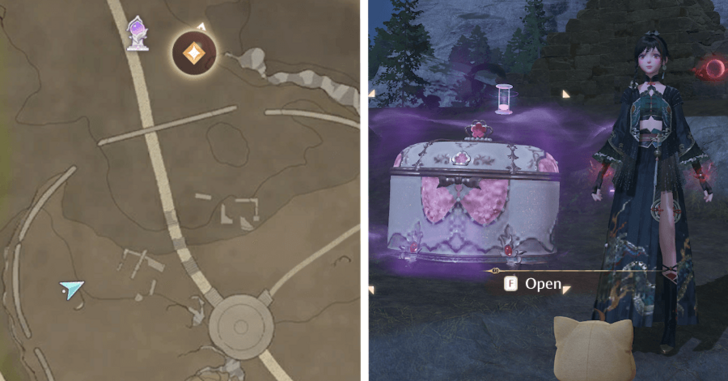 |
Follow the main road from the Queen's Palace Ruins Entrance Warp Spire then head Southwest towards a breach along the palace walls. This is a Whimstar Chest. Defeat the Esselings that will appear to claim. |
| 23 | 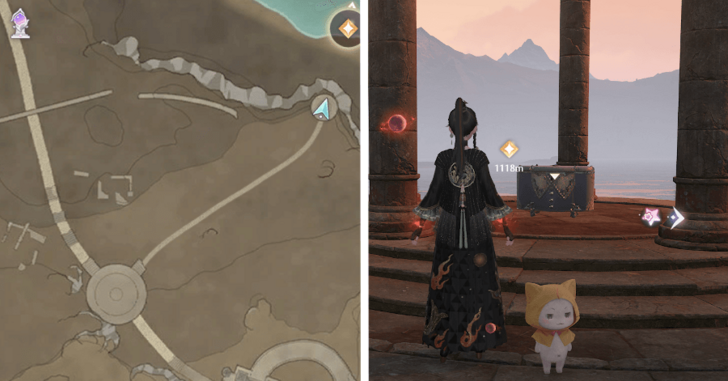 |
Head Northeast from 22 towards the cliffside. |
| 24 | 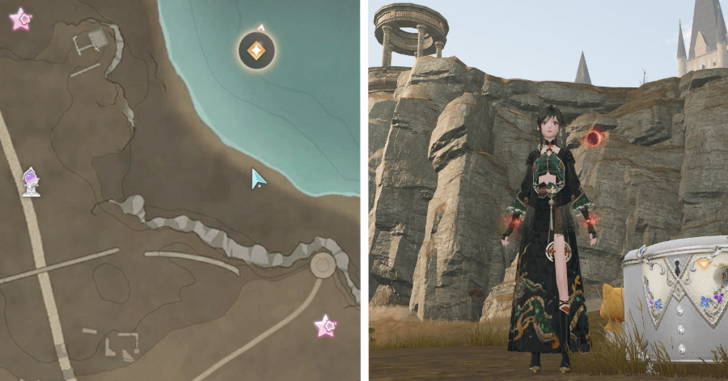 |
Go down from 23, you can see it from atop the cliffside near the beach shore. Defeat the Esseling guards. |
| 25 | 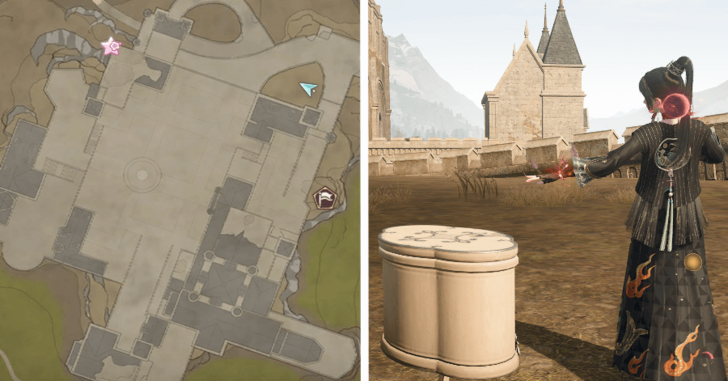 |
Follow the main path from the entrance Warp Spire and head up the castle. You'll see a clearing during the part of the path that spirals upwards. Clear all Esselings to access the chest. |
| 26 |  |
Continue upwards on the main path from 25 and turn left at the Queen's Palace Ruins Front Yard Warp Spire and into a crack in the wall. |
| 27 | 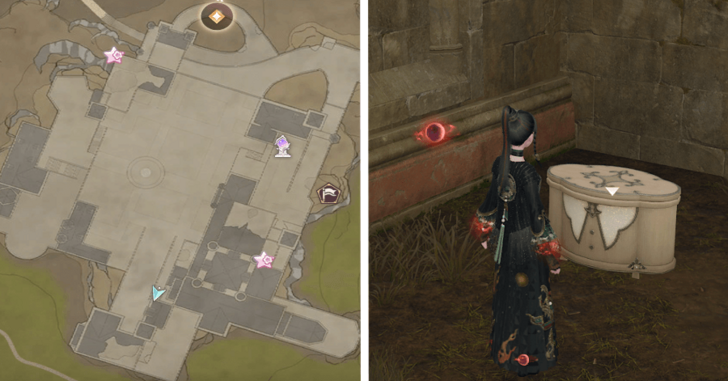 |
From 26, head into the courtyard and head South until you see a small elevated path. |
| 28 | 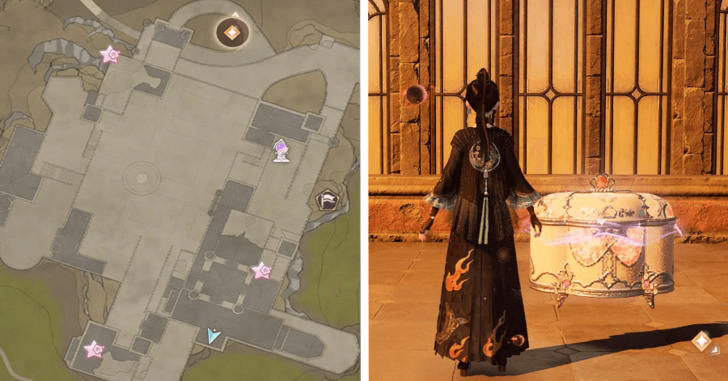 |
From 27, jump on the trampoline and head to the upper level. Jump on another trampoline inside and defeat the Esselings guarding the chest. (Rewards the 3-Star Bottoms sketch Spinning Mood) |
| 29 | 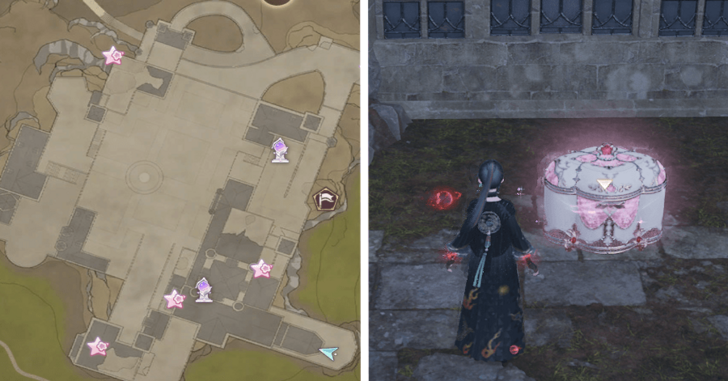 |
From the Queen's Place Ruins High Tower Warp Spire, find a way to go to the East Balcony. Defeat the Esselings to unlock. |
| 30 | 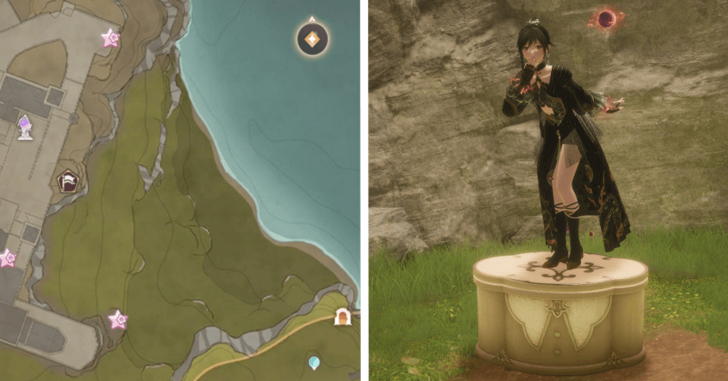 |
Lakeside Cliff Cavern. Once inside, turn right before entering the main tunnel. |
| 31 | 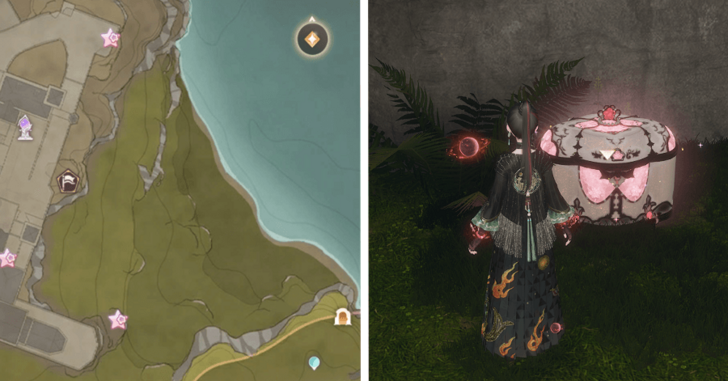 |
Lakeside Cliff Cavern. Defeat the Esselings after entering the main cavern and go to the elevated area. |
| 32 | 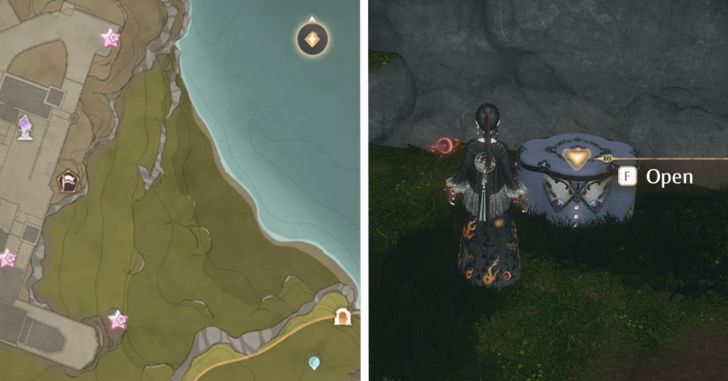 |
Follow the path further in from 31. Jump on the water lilies and follow their trail going forward. |
| 33 | 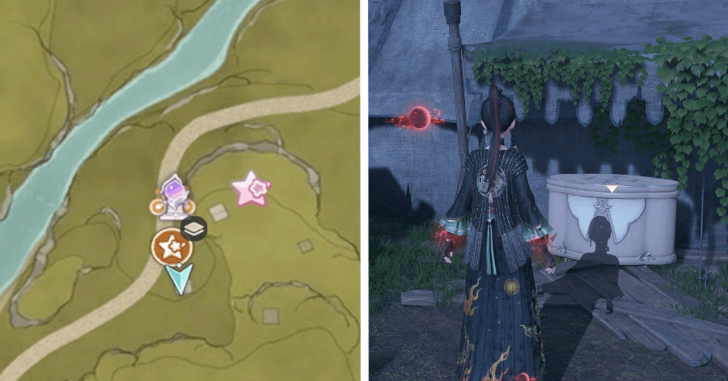 |
From the Abandoned Fanatic Wisher Camp Outpost Warp Spire, go South and look at the tent. |
| 34 | 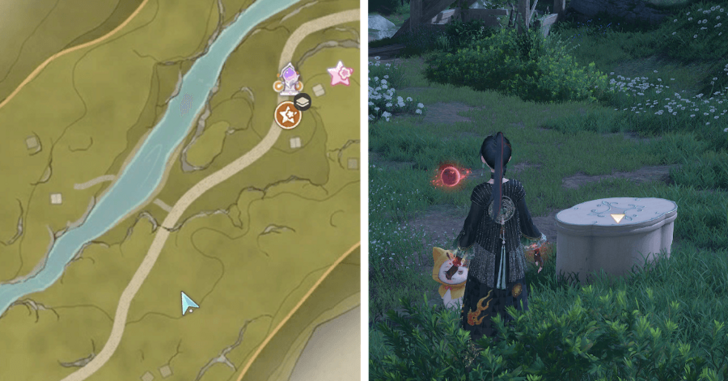 |
From 33, follow the main road into the camp and look for this area with logs. Defeat all the Esselings guarding the chest. |
| 35 | 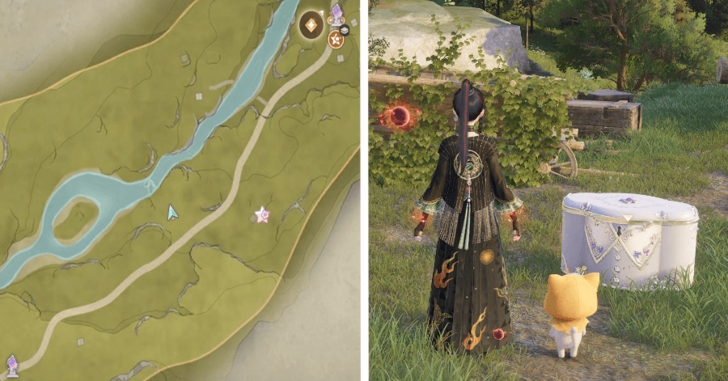 |
Head Southwest a bit from 34 until you see a small clearing with some Esselings to clear out. |
| 36 | 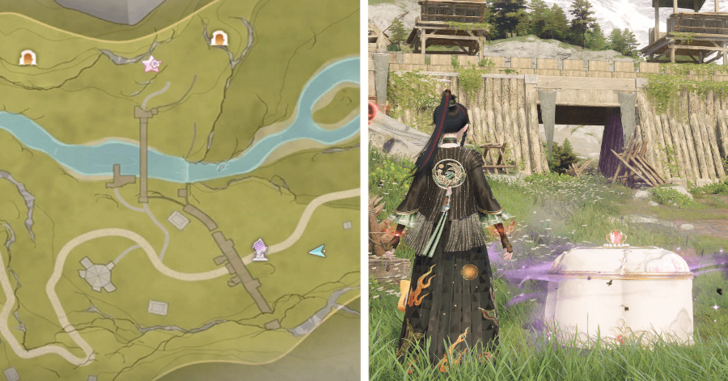 |
A Whimstar Chest. Follow the main road from 35, just before the Abandoned Fanatic Wisher Camp Warp Spire. Defeat the Esselings that will appear to claim the Whimstar. |
| 37 | 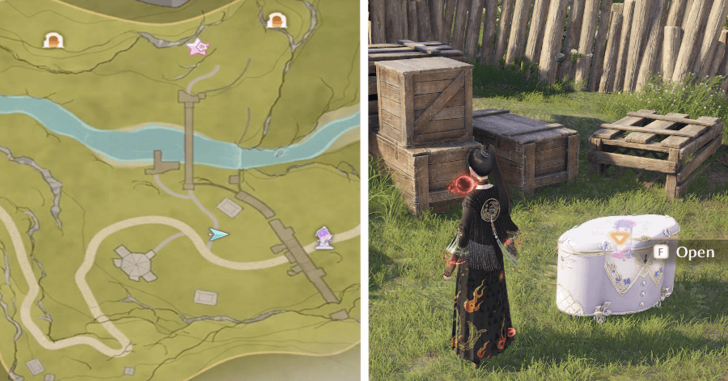 |
Go through the camp gate and take a small path to the right. Purify some Esselings guarding the chest. |
| 38 | 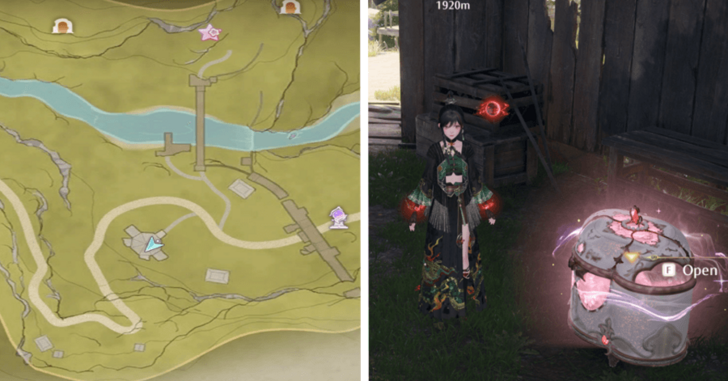 |
Go West from 37 and head inside the large tent. (Rewards the 3-Star Top sketch Distant Gaze) |
| 39 | 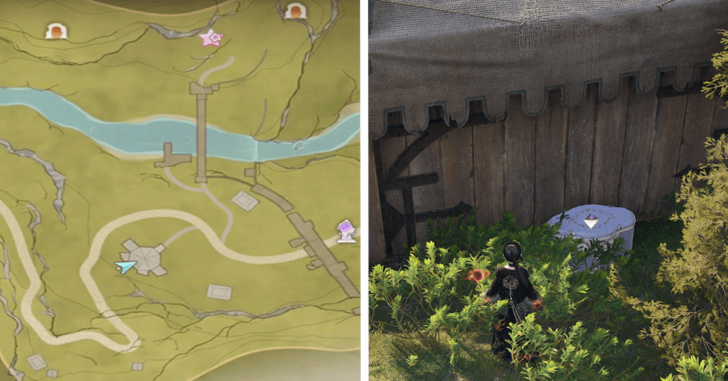 |
Go outside then go behind the large tent. |
| 40 |  |
Go inside the camp and climb up onto the ramparts. Go to the left side. |
| 41 | 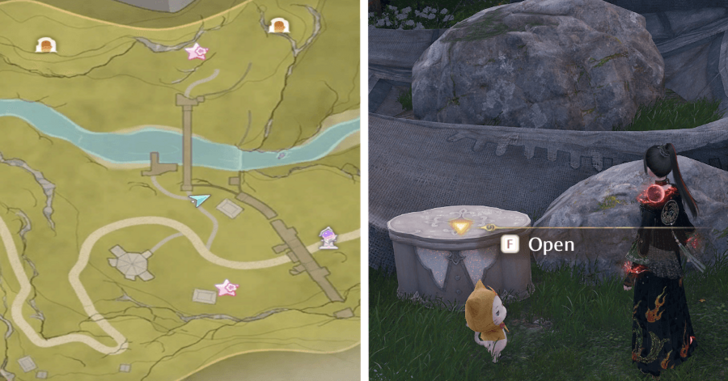 |
From 40, follow the wall Westwards. This chest is in front of some boulders near a tent. |
| 42 | 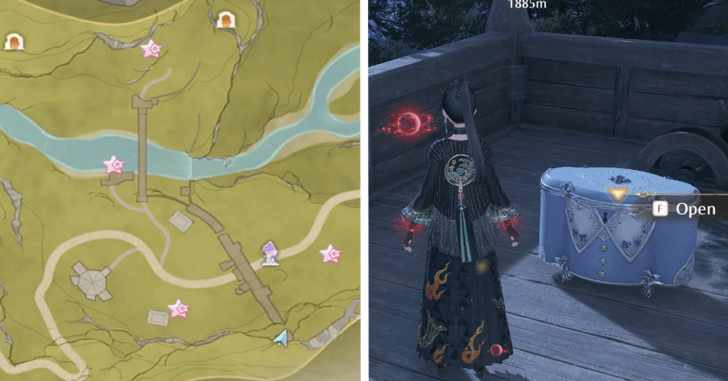 |
From 40, follow the path Eastwards until you see broken platforms you can climb near the cliff. |
| 43 | 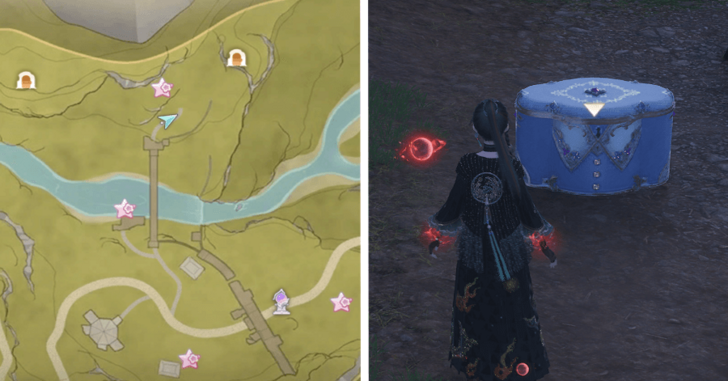 |
Cross the bridge, near where you found chest 41. Follow the path upwards until you see a group of Esseling's. Defeat them to unlock the chest. |
| 44 | 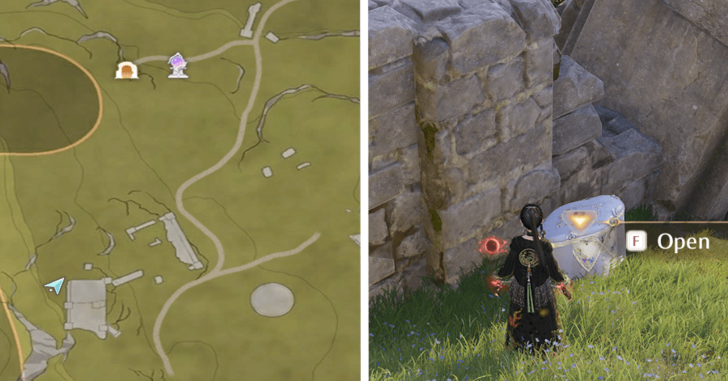 |
Head South from the Relic Hill Warp Spire until you come across some large, open ruins. This is behind a wall somewhere near the back. |
| 45 | 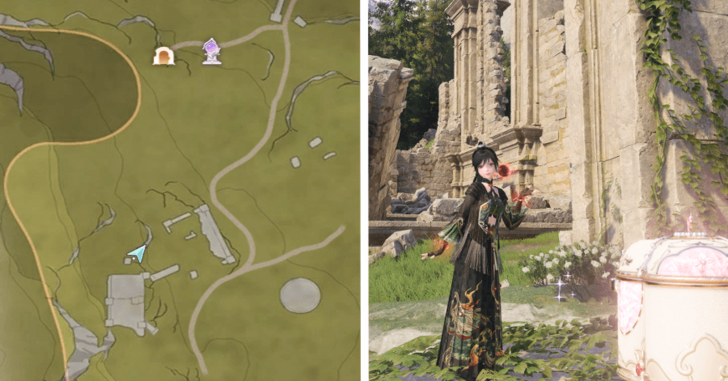 |
Head North from 44 until you see a large group of Esselings. Defeat all of them to unlock the chest. (Rewards the 3-Star Top sketch Mark of Life) |
| 46 | 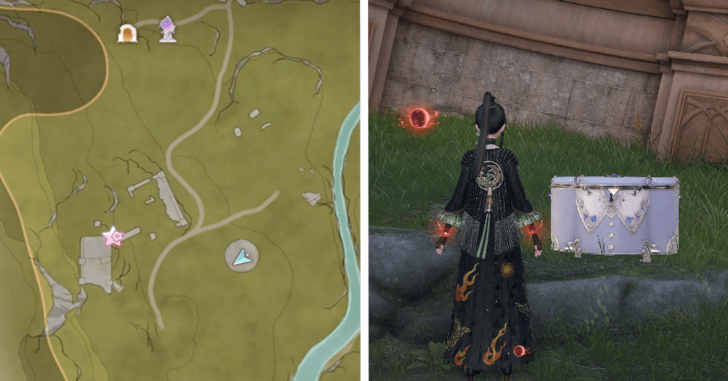 |
Head East from 45 until you see a sunken ruined tower. Go inside. |
| 47 | 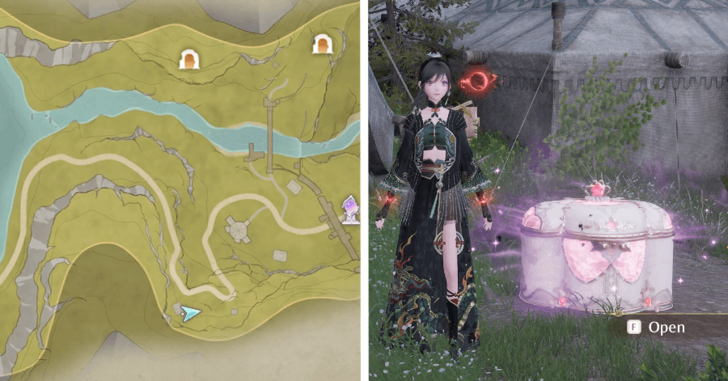 |
Follow the path from the Abandoned Fanatic Wisher Camp Warp Spire up the mountain. Another Whimstar chest filled with enemies you have to first defeat. |
| 48 | 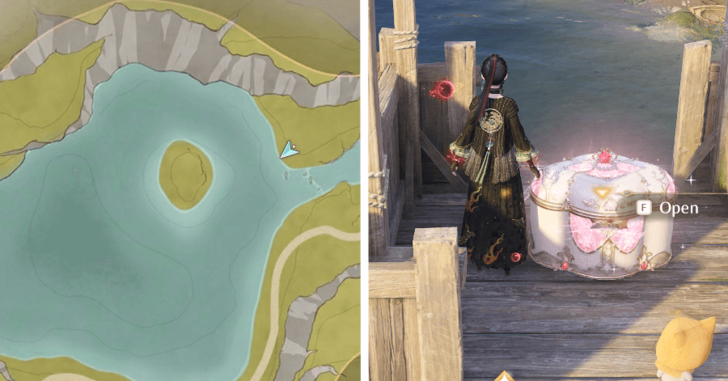 |
On a tower just before entering the lake area. Unlocks the 3-star Socks Sketch Enchanting Darkcloud. |
| 49 | 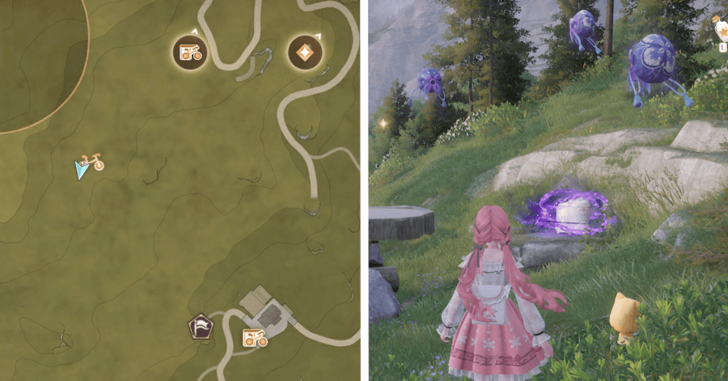 |
Southwest from the Cicia Art Academy Field Best Warp Spire. Right beside a catapult, and is guarded by Esselings; defeat them all to be able to get the chest. |
| 50 | 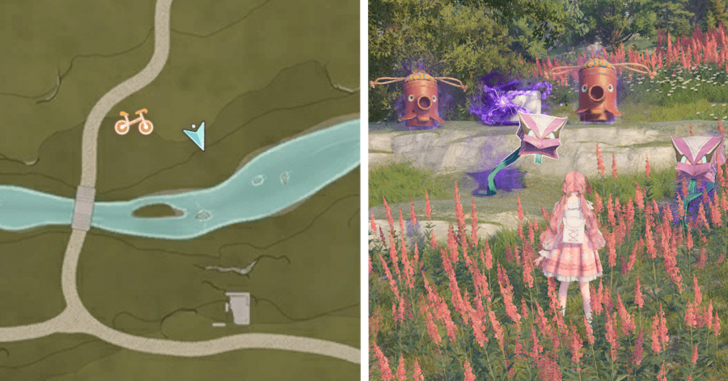 |
Right by the riverside, south from a nearby Whimcycle Rental. Guarded by Esselings; defeat them all to be able to get the chest. |
| 51 | 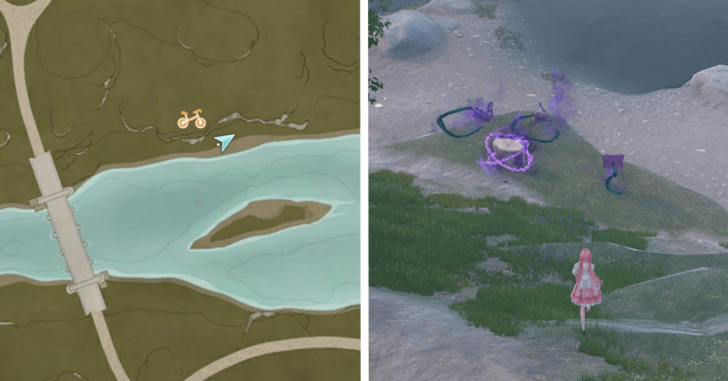 |
By the riverside, east from Chest #50. Guarded by Esselings; defeat them all to be able to get the chest. |
| 52 | 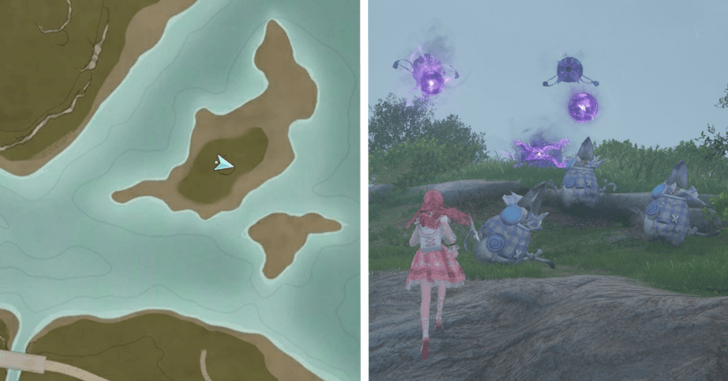 |
Found at an isolated patch of land further east from Chest #52. Guarded by Esselings; defeat them all to be able to get the chest. |
| 53 | 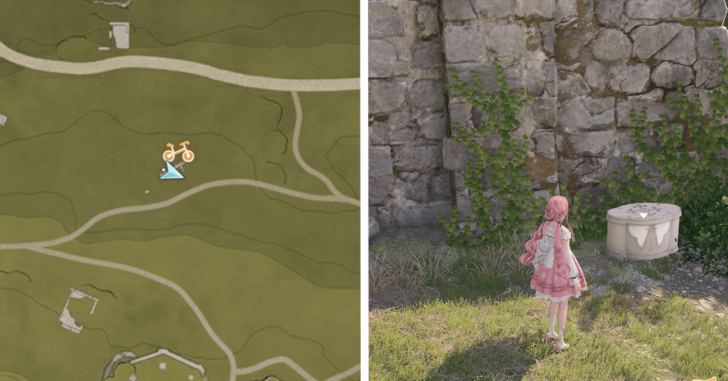 |
Behind some isolated wall ruins at the lower half of the Meadows. |
| 54 |  |
In some small ruins southwest from Chest #53. |
| 55 | 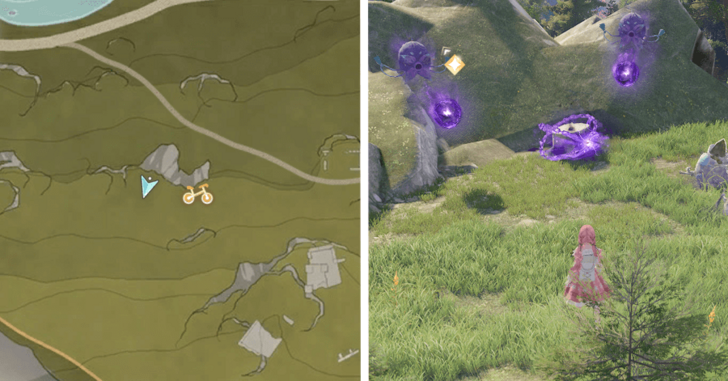 |
At the edge of a mini-cliff. Guarded by Esselings; defeat them all to be able to get the chest. |
| 56 | 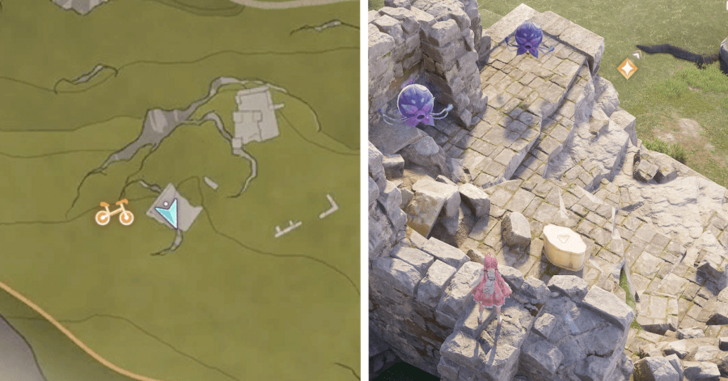 |
In the middle of some ruins at a higher location south from Chest #55. Guarded by Esselings, but can be opened without having to defeat them. |
| 57 | 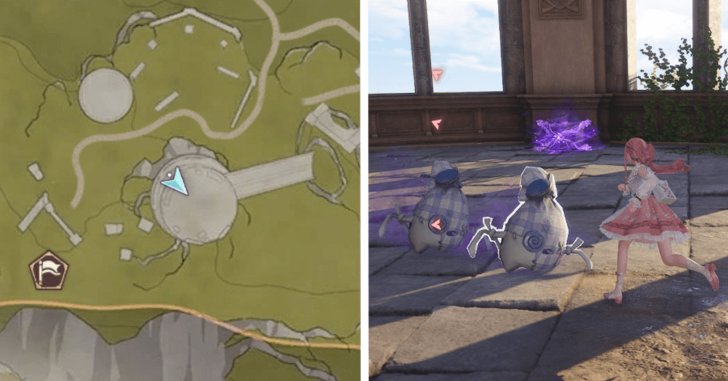 | Inside the leaning tower ruin, east from Chest #56. Guarded by Esselings; defeat them all to be able to get the chest. |
| 58 | 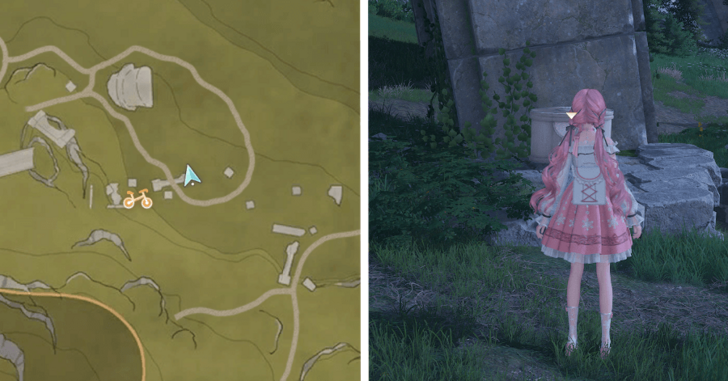 |
East from Chest #87, underneath a broken gateway's pillar that a road passes through. |
| 59 | 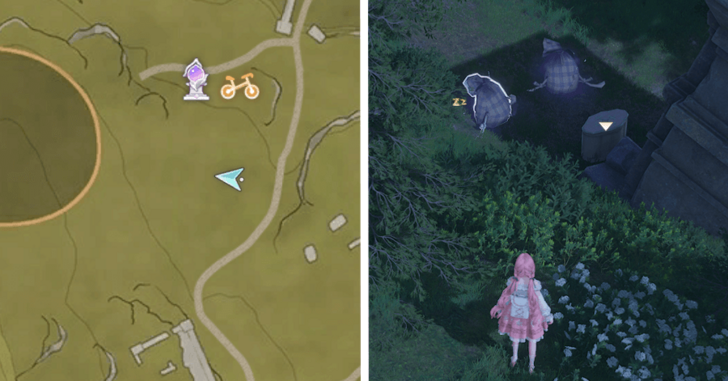 |
Underneath a small, broken pillar south from the Relic Hill Warp Spire. Guarded by Esselings, but can be opened without defeating them. |
| 60 | 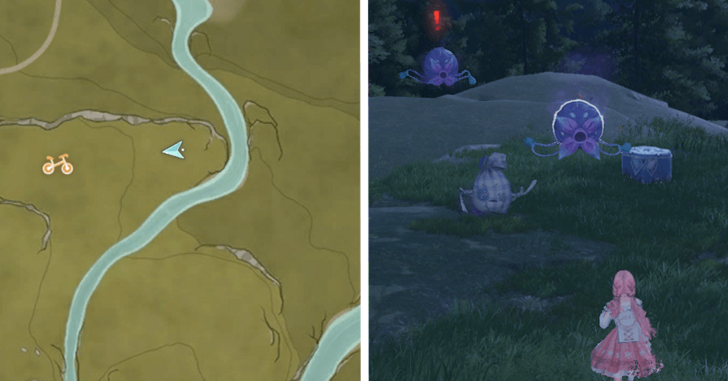 |
Near the edge of a cliffside west from the Relic Hill Warp Spire. Guarded by Esselings, but can be opened without defeating them. |
| 61 | 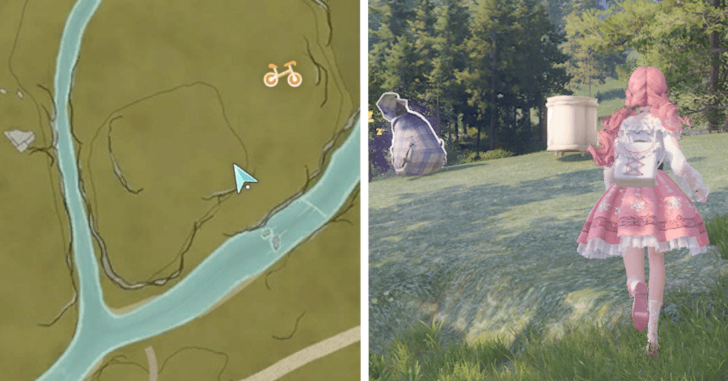 |
At the right side of the river fork. Guarded by Esselings, but can be opened without defeating them. |
| 62 |  |
In a small shed at the side of a house. Right across the river east from Chest #61. |
| 63 | 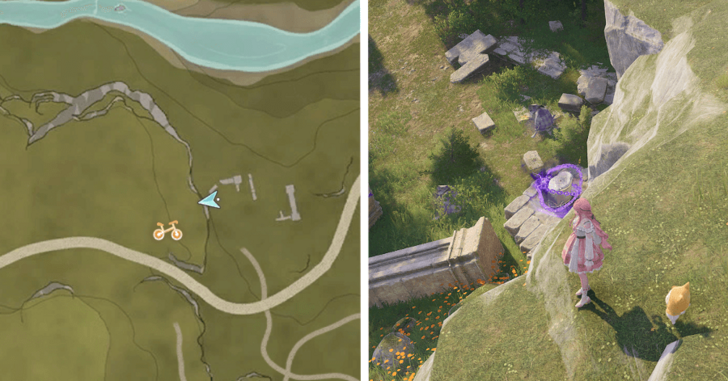 |
Found under a cliff, in some ruins west from Chest #62. Defeat all nearby Esselings to open this chest. |
| 64 | 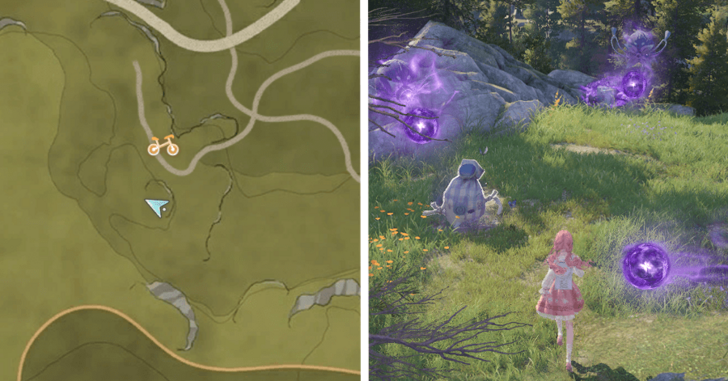 |
Found in the woods south of Chest #93. Like the previous one, defeat all nearby Esselings to open this chest. |
| 65 | 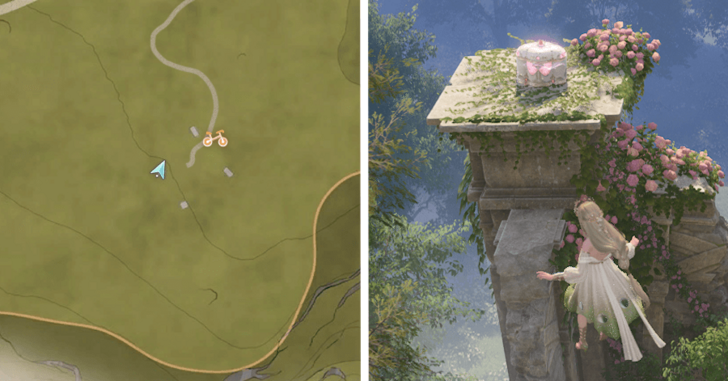 |
Near the Bullquet location, where at its westernmost pillar. Use a nearby catapult to launch yourself high enough to hover down to the top of the pillar. Contains the 4-star Headband Accessory Sketch Gala Crytstal. |
| 66 |  |
By the riverside ruins, notably with a catapult. Defeat all nearby Esselings to open this chest. |
| 67 | 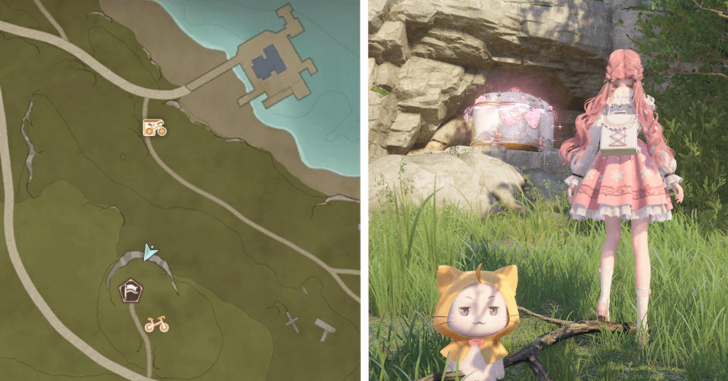 |
Found in the lower ground side of the hill where the Kikball: Pit-a-Pat minigame is found. Found the 3-star Shoes Sketch Emerald Whirl. |
| 68 | 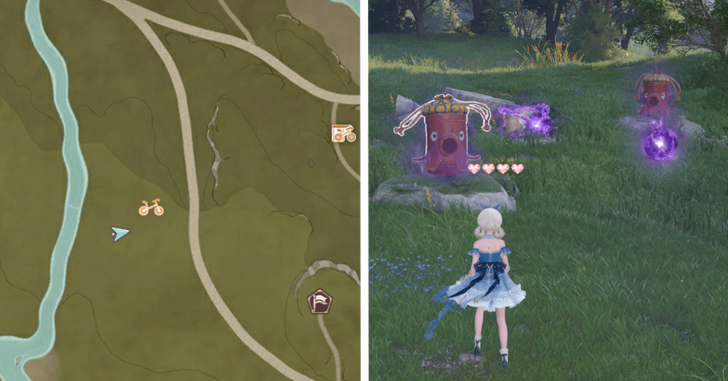 |
Found in the small forest west from Chest #67. Clear the area of all Esselings to unlock the Chest. |
| 69 | 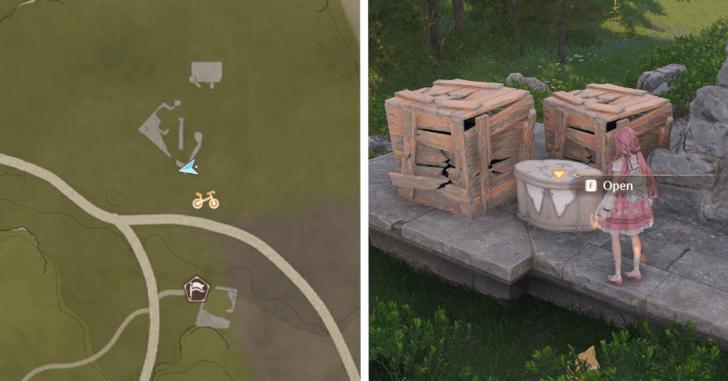 |
Tier 1 Chest found at a ruins at the road leading to Queen's Palace Ruins. |
| 70 | 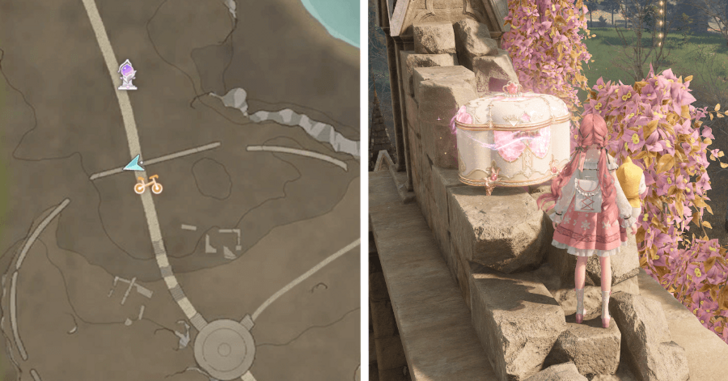 |
Found at the top of the broken gate leading towards Queen's Palace Ruins, south of the nearby Warp Spire. |
| 71 | 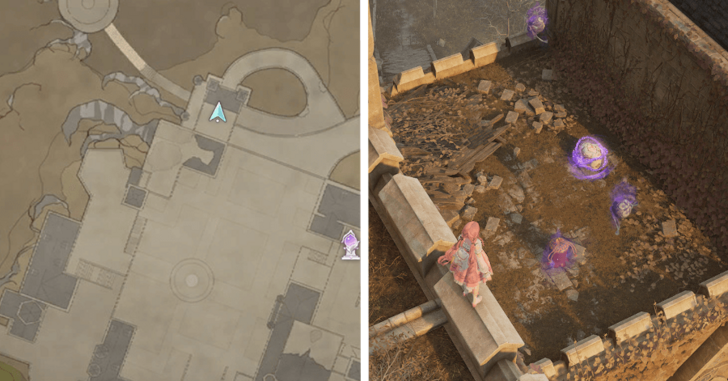 |
Queen's Palace Ruins, on top of one of the gates. Guarded by Esselings; defeat the mall to unlock the chest. Unlocks the 3-star Top Sketch Fleeting Oath. |
| 72 | 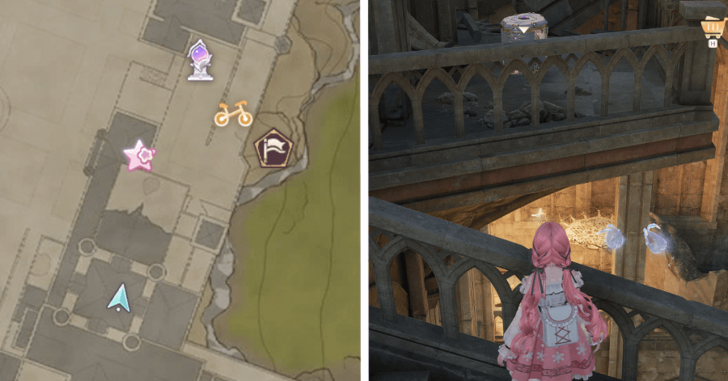 |
Inside the Queen's Palace Ruins High Tower, just below the Warp Spire. Nikki will have to navigate the broken stars and make use of a Trampoline Net to get to this and the Warp Spire. |
| 73 | 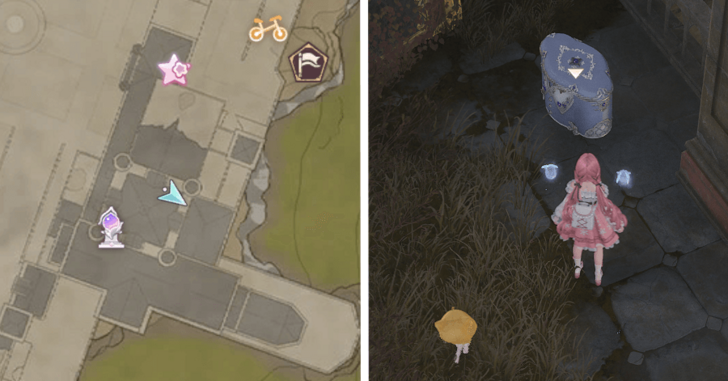 |
Further up the stairs after the Queen's Palace Ruins High Tower Warp Spire. |
| 74 | 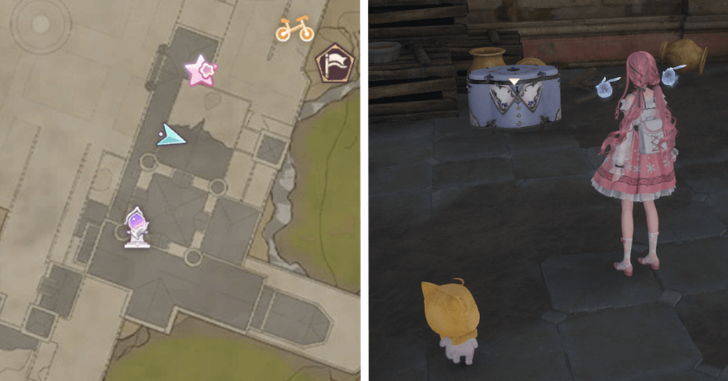 |
Found inside a hidden room south of the Queen's Palace Ruins Front Yard that can be accessed through a hole in the ground. |
| 75 | 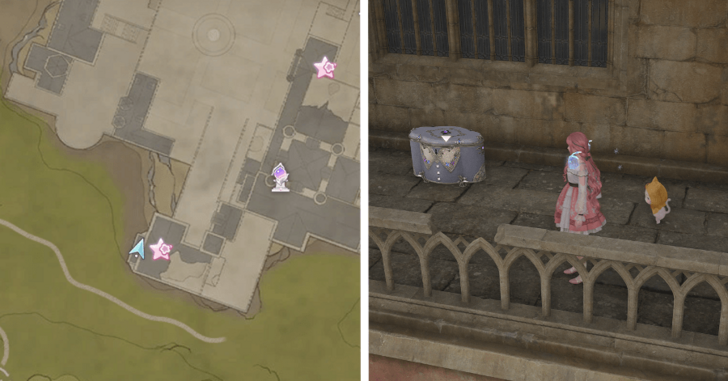 |
Found at a balcony south of the Queen's Palace Ruins. You'll have to jump and hover down to it from a higher level from the side of the castle. |
| 76 |  |
Near the gates to the Heartcraft Kingdom Outpost. The chest is behind some unbreakable crates besides the house west from the gate. |
| 77 |  |
Beside the road leading to the Heartcraft Kingdom Outpost. Guarded by Esselings; defeat them all to get to this chest. |
| 78 | 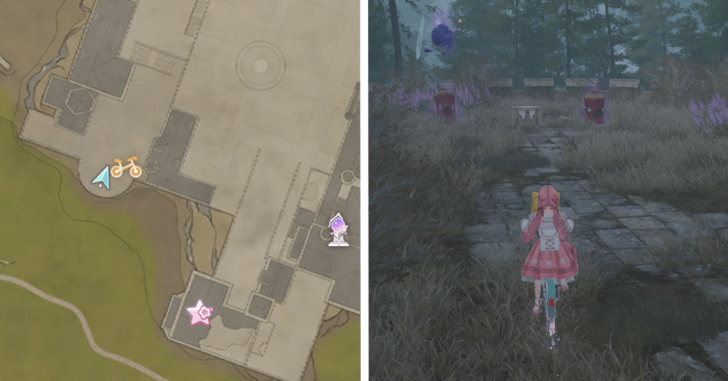 |
At the western part of the Queen's Palace Ruins, at a balcony. Surrounded by Esselings, but there is no need to defeat them to get to this Chest. |
| 79 | 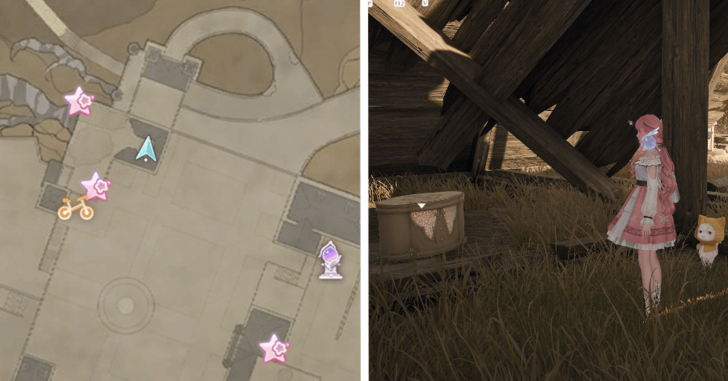 |
In a nothern section of the Queen's Palace Ruins, where the second floor has a nearby Whimstar outside. There is a corner where the roof is still intact; the Chest is under the shade. |
| 80 | 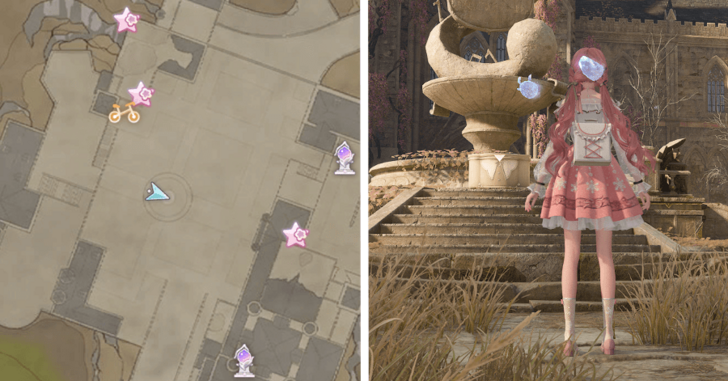 |
Dead center in the courtyard of the Queen's Palace Ruins, under the violin fountain. |
| 81 |  |
Found on top of a watchtower, west from the gate of the Abandoned Fanatic Wisher Camp's Warp Spire and gate construct. |
| 82 | 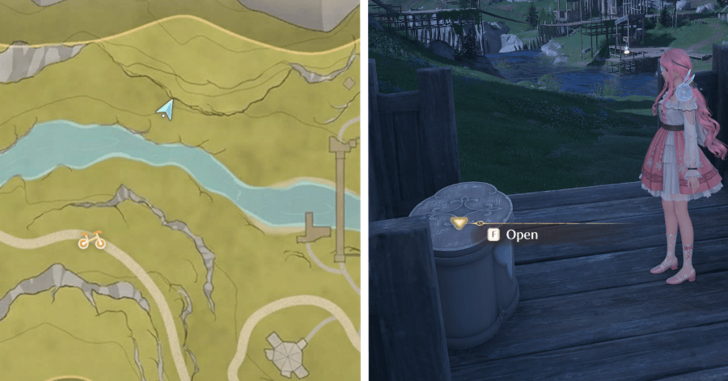 |
On top of a broken watchtower northeast from the Abandoned Fanatic Wisher Camp's Warp Spire, and across the river. |
| 83 | 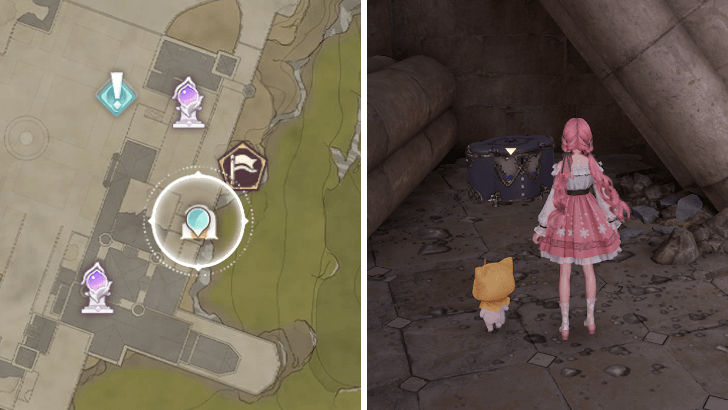 |
Palace Ruins Cavern. On top of a stone platform east of the first rotating pillar at the bottom floor. |
| 84 | 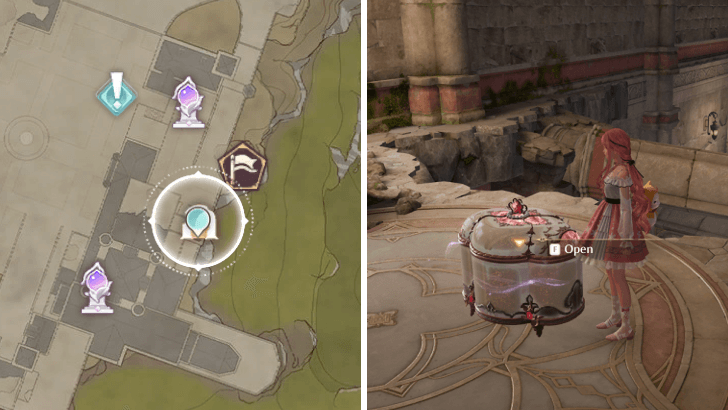 |
Palace Ruins Cavern. Climb up the rotating pillars in the secret room at the bottom floor to reach the chest at the second floor. |
| 85 | 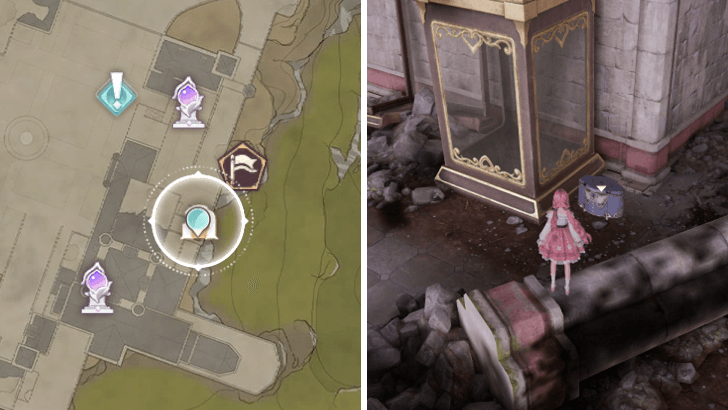 |
Palace Ruins Cavern. In between a glass case and a fallen pillar at the second floor. |
Stoneville Treasure Chests
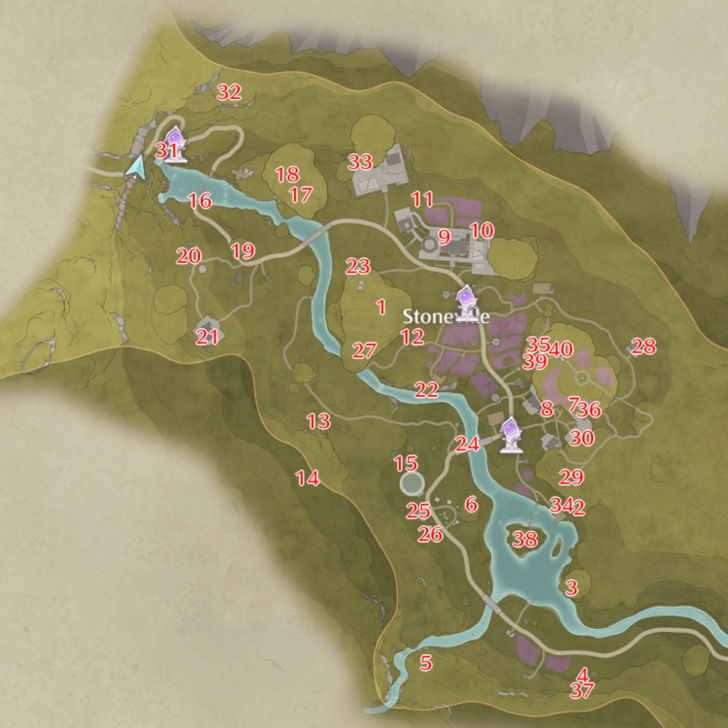 Open Image in New Tab |
| No. | Image | How to Get |
|---|---|---|
| 1 | 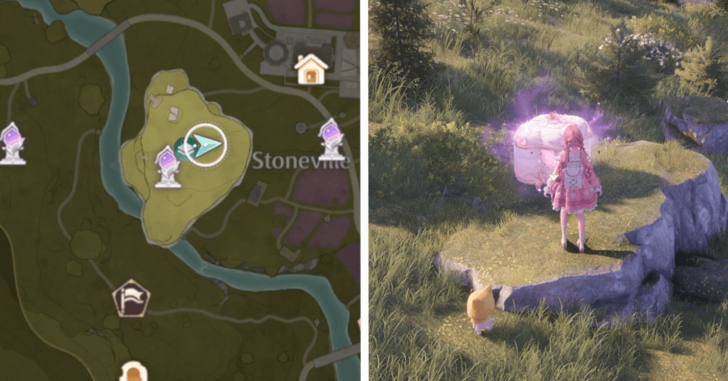 |
Chest that contains Whimstar. Defeat enemies to get the Whimstar reward. |
| 2 | 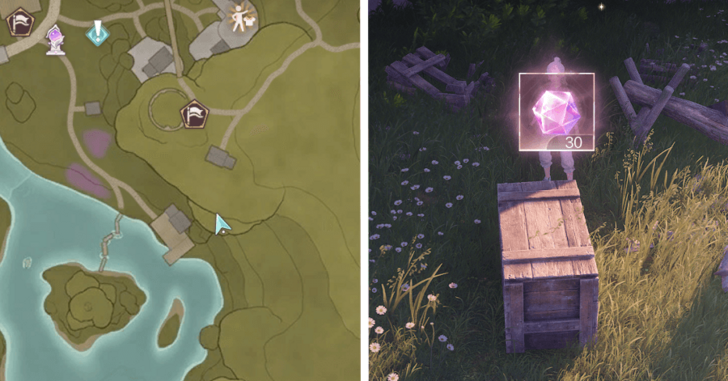 |
Found at a cliff overlooking Stoneville. Unlocks the 3-star Shoes Sketch Into Midnight. |
| 3 | 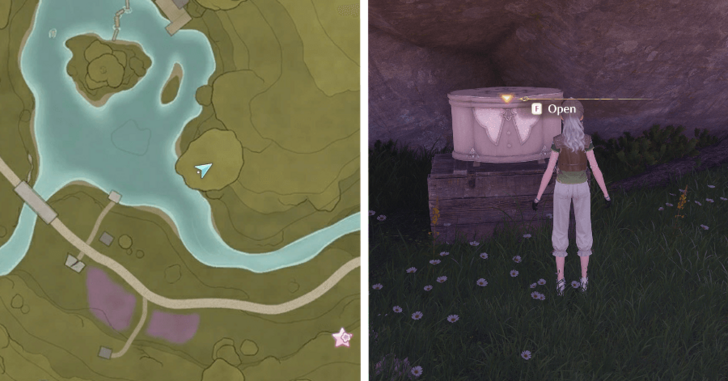 |
Found under a plateau near the catapult in Stoneville. |
| 4 | 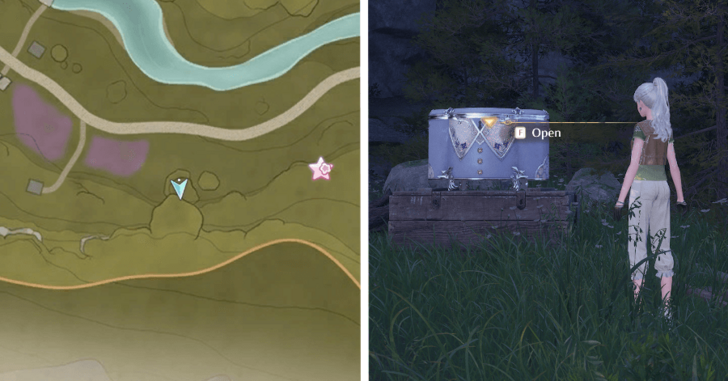 |
Found in a stone platform. Can be easily accessed by jumping and hovering. |
| 5 |  |
Found besides the waterfall south of Stoneville. Guarded by Esselings; defeat them to be able to open the chest. |
| 6 | 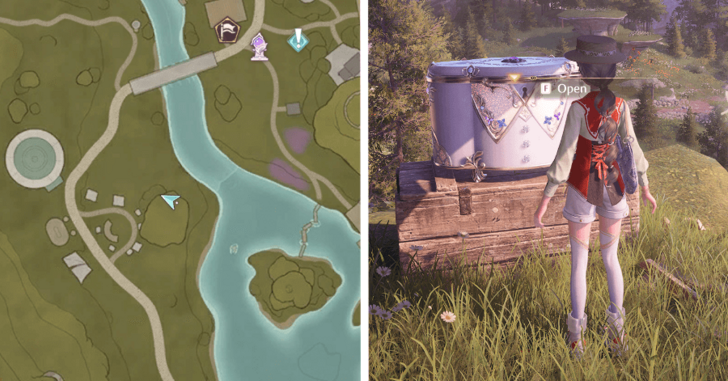 |
Found in a rock formation near Stoneville itself. Right beside a Trampoline net. |
| 7 | 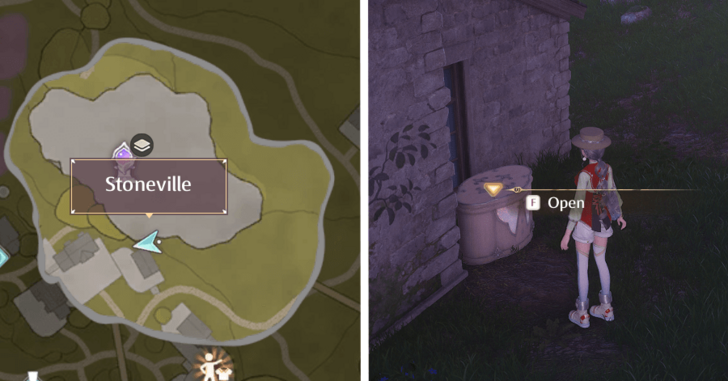 |
Behind a house in Stoneville, just under a cliff where the Flamecrest Stonetree is. |
| 8 | 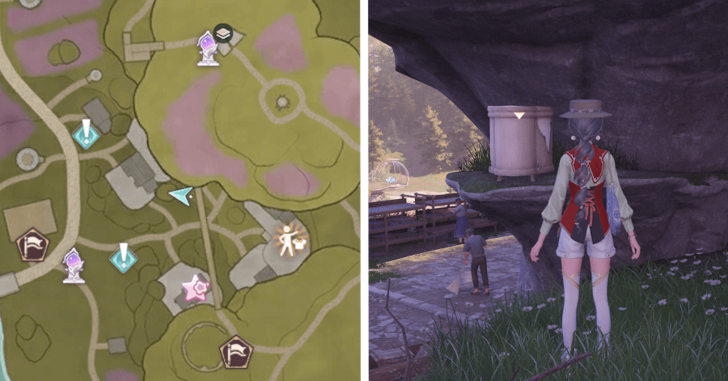 |
Nearby the previous Tier 1 Chest, just under a rock formation in Stoneville. |
| 9 | 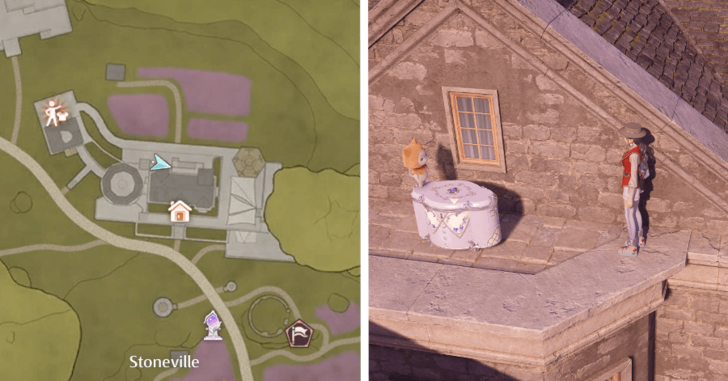 |
On top of the roof of Dye Workshop in Stoneville. |
| 10 | 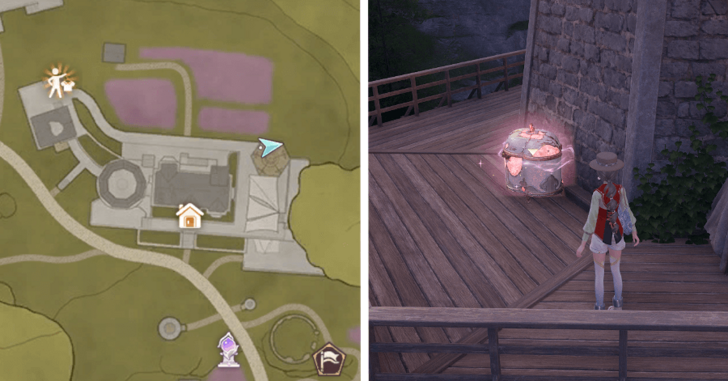 |
Found in the windmill right beside Dye Workshop. Tan Youyou is right nearby. Unlocks the 3-star Socks Sketch White Whirlwind. |
| 11 | 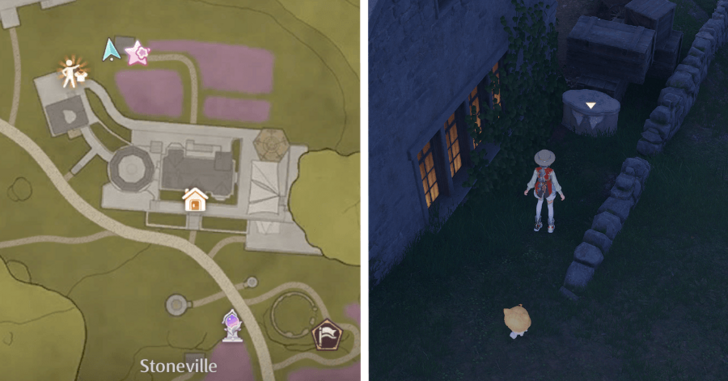 |
Found beside a house right behind Dye Workshop. Can be found behind some indestructible crates. |
| 12 | 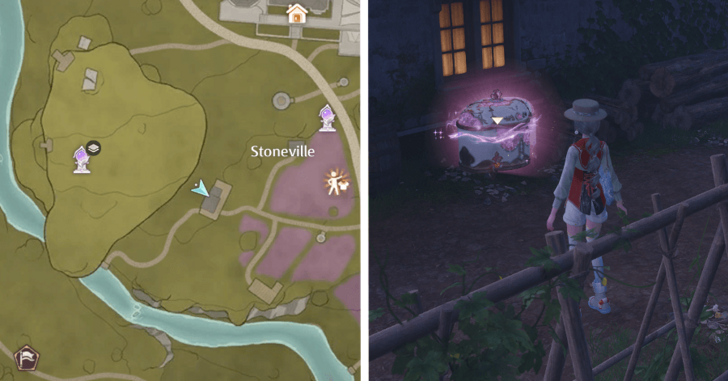 |
Found behind a chest, south from Dye Workshop and Lavenfringe Fields. Unlocks the 3-star Gloves Sketch Humble Helper. |
| 13 | 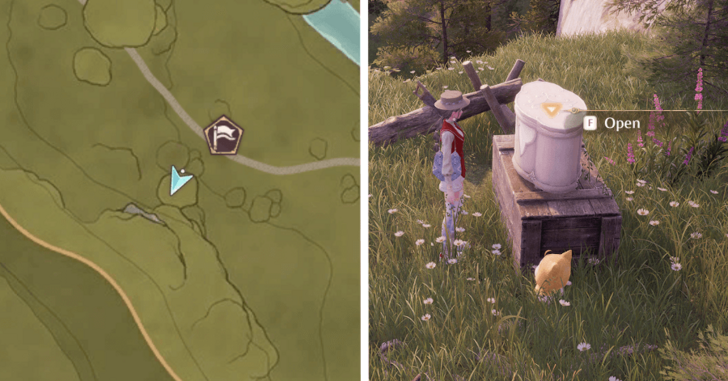 |
At a higher place than the Hoop Hopper Mingame in Stoneville. |
| 14 | 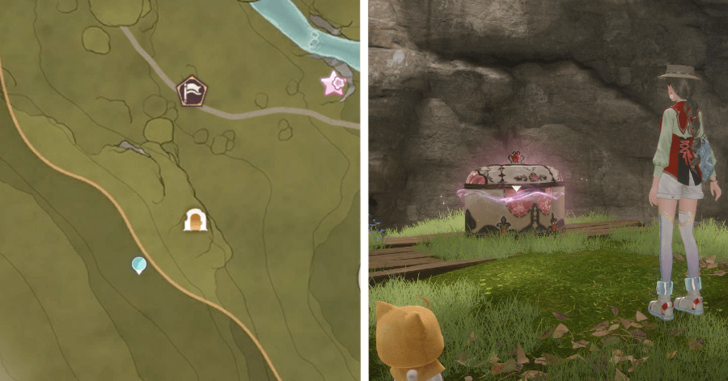 |
Found deep inside the Stoneville Outskirts Cavern. Previous rooms before this have lots of Esselings, so be careful. Unlocks the Viney Infusion material. |
| 15 | 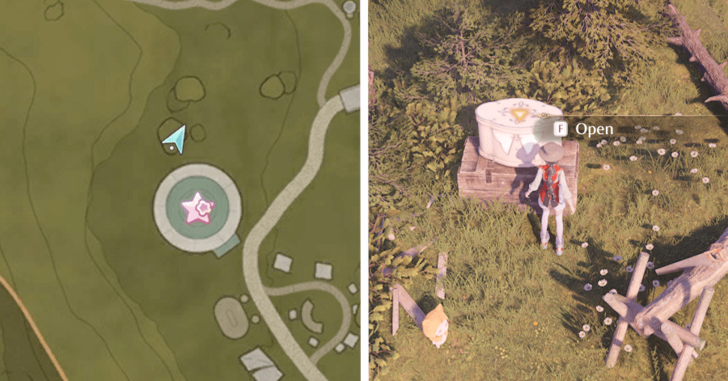 |
Found near the giant tent in Stoneville. Can be reached by jumping and hovering. |
| 16 | 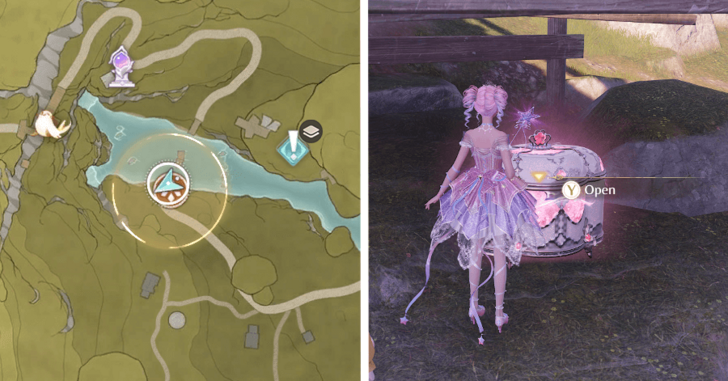 |
Located southwest from Rockfall Valley Warp Spire, just below the broken wooden bridge. |
| 17 | 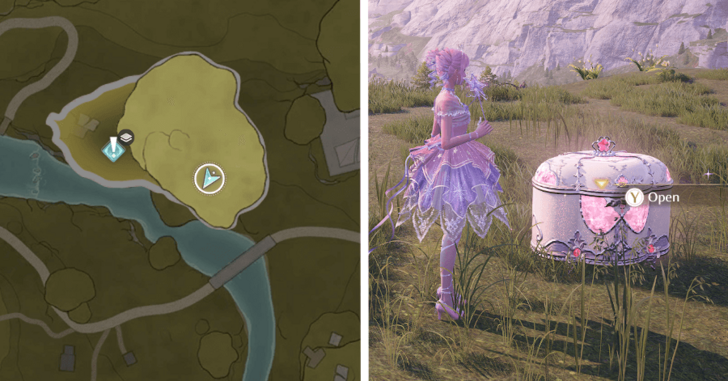 |
Chest located atop a stonetree north of Gliding Training Stonetree. Defeat the enemies to access the chest. |
| 18 | 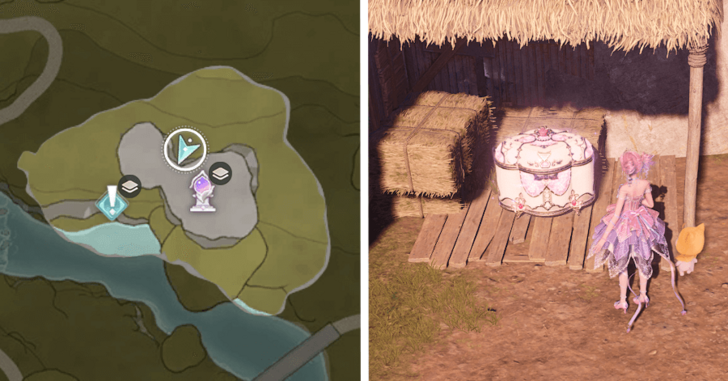 |
Chest located below the stonetree north of Gliding Training Stonetree, just below a tiny hut. |
| 19 | 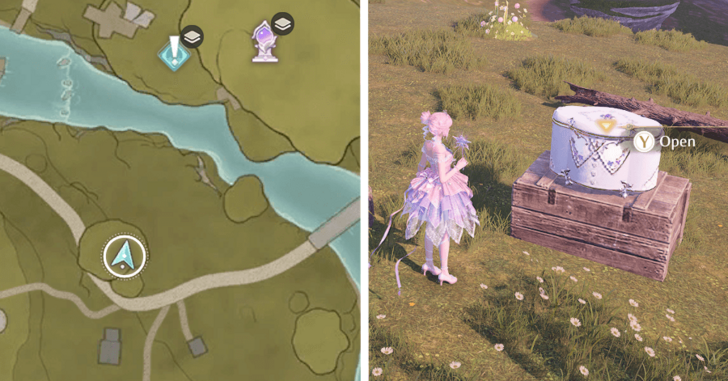 |
Located on a small stonetree, which is southwest from the Gliding Training Stonetree. |
| 20 |  |
Chest located south from Rockfall Valley Warp Spire, just beside the house where the boxes are stacked beside it. |
| 21 | 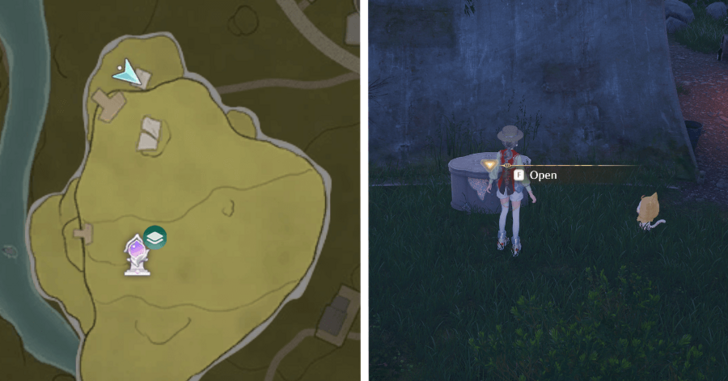 |
Chest located west from the Gliding Training Stonetree, surrounded by boxes beside a house. |
| 22 | 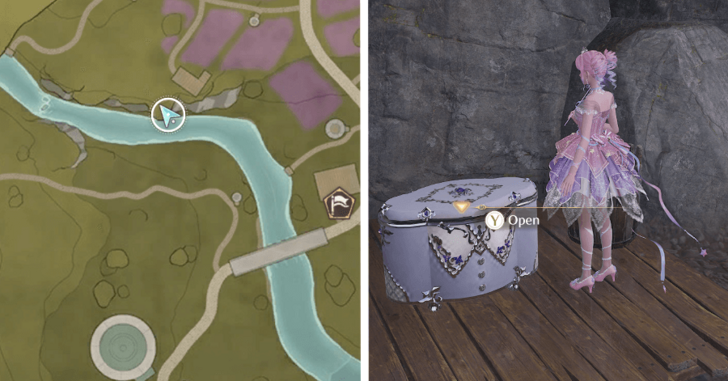 |
Chest located south from Lavenfringe Fields, below the cliff that faces south of the river. |
| 23 | 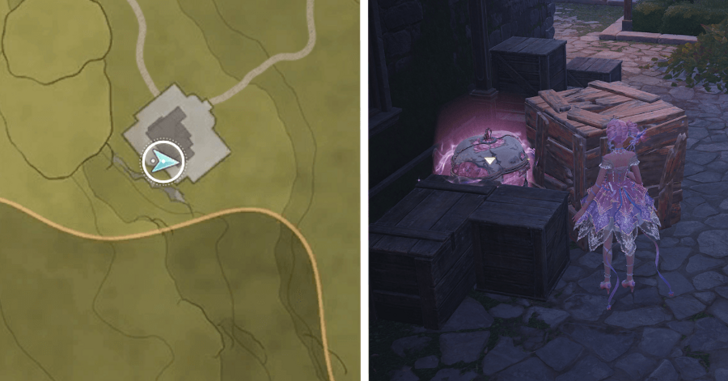 |
North from Treasure chest #1, at the Gliding Training Stonetree. Found at a lower platform. |
| 24 | 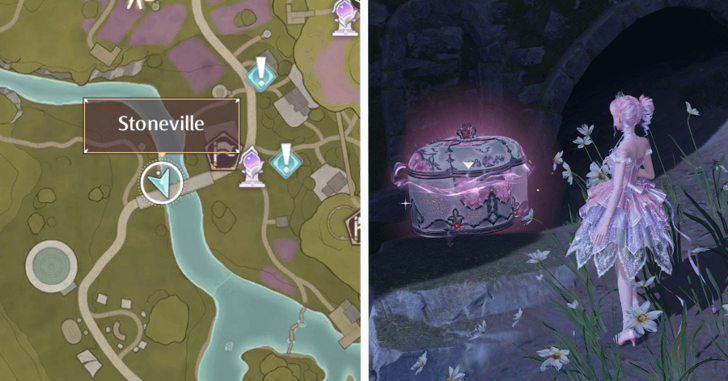 |
Head west from the Village Fork Warp Spire, and search for the chest just under the bridge. Unlocks the 3-star Earring Sketch Surprise Box. |
| 25 | 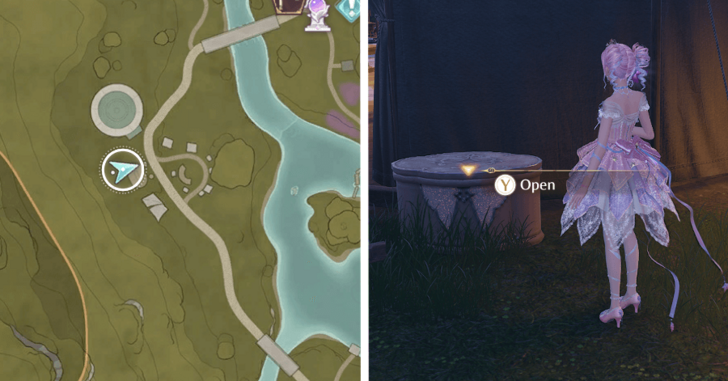 |
Head southwest from the Village Fork Warp Spire, and search for the chest near the large tent managed by Noemi. |
| 26 | 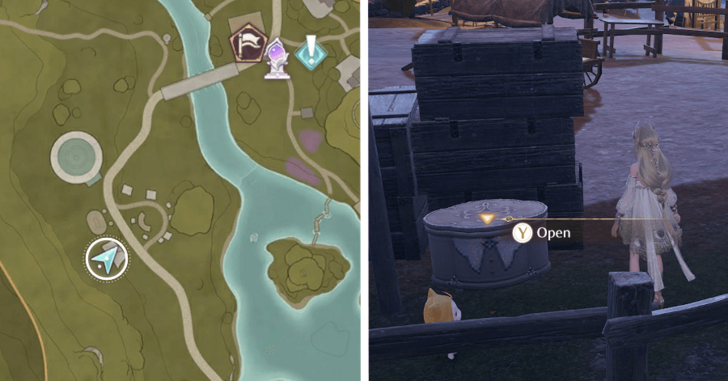 |
Head southwest from the Village Fork Warp Spire, and search for the chest beside the stacked boxes located nearby the large tent managed by Noemi.. |
| 27 |  |
Found at the ground under the Gliding Training Stonetree. Guarded by Esselings; defeat them all to be able to open this Chest. |
| 28 | 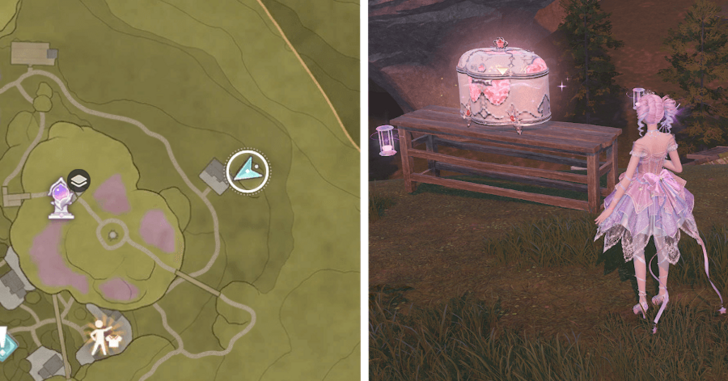 |
Head east from the Flamecrest Stonetree Warp Spire, and proceed towards the small stonetree. The chest will be located on top of a wooden bench. |
| 29 | 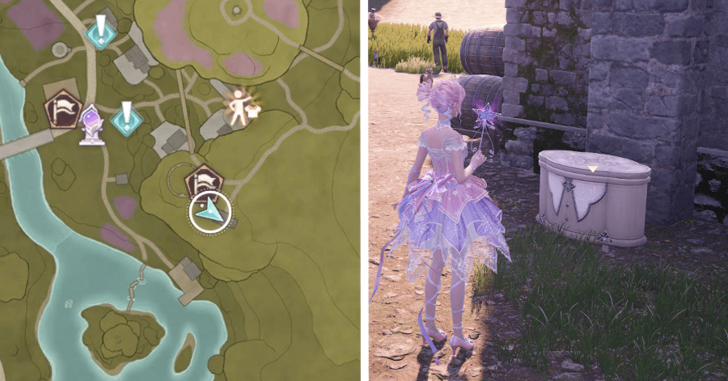 |
Head south from the Flamecrest Stonetree Warp Spire, and proceed to the other side of the bridge until you see a stone house. The chest is located near a stack of barrels. |
| 30 | 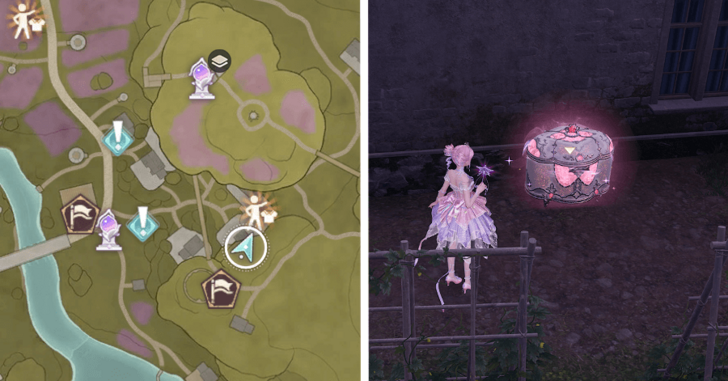 |
Head south from the Flamecrest Stonetree Warp Spire, and head below the stonetree until you encounter a stylist named Jayden. Check the nearby stone house, and destroy the stack of wooden boxes beside it to reveal a treasure chest. Unlocks the 3-star Outerwear Sketch Striped Celebration. |
| 31 | 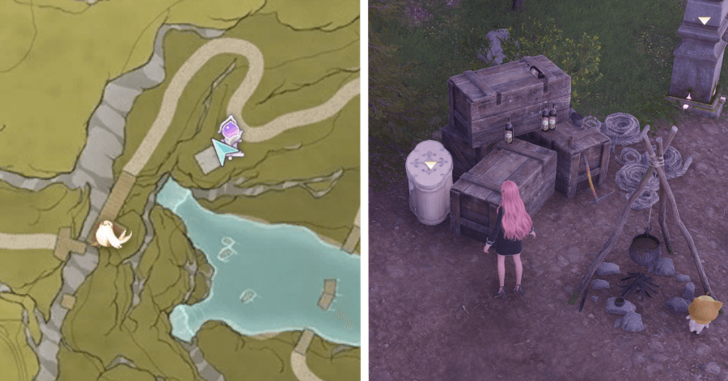 |
Right beside the Rockfall Valley Warp Spire, hidden beside some unbreakable crates in the campsite. Can be easily missed if not looking carefully. |
| 32 | 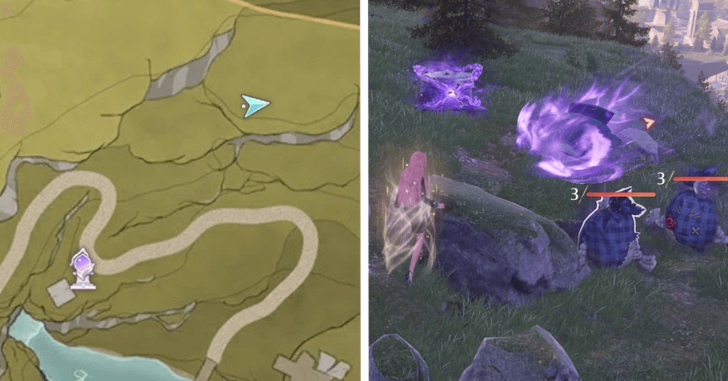 |
Found north up from the Rockfall Valley Warp Spire. Guarded by multiple Esselings; defeat them all to be able to open the chest. |
| 33 | 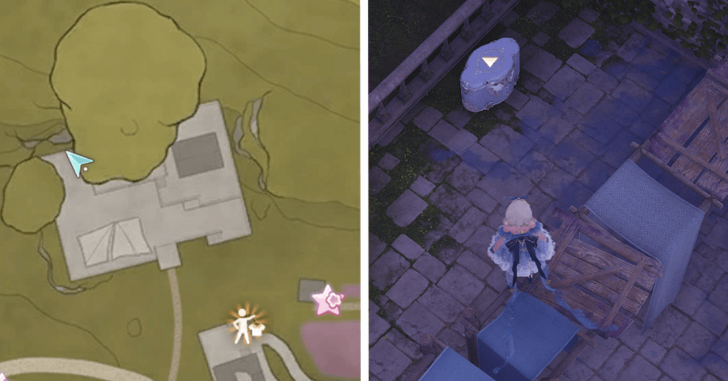 |
Found in the area where lots of fabrics are draped, northwest of Lavenfringe Fields. |
| 34 | 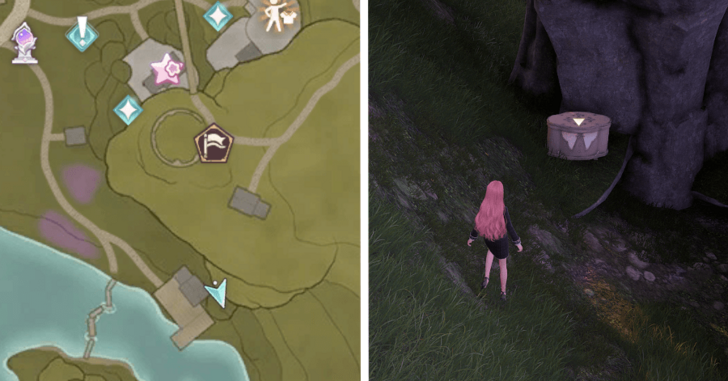 |
Southeast from the Village Fork Warp Spire, behind the house that is right beside the lake overlooking the island. |
| 35 | 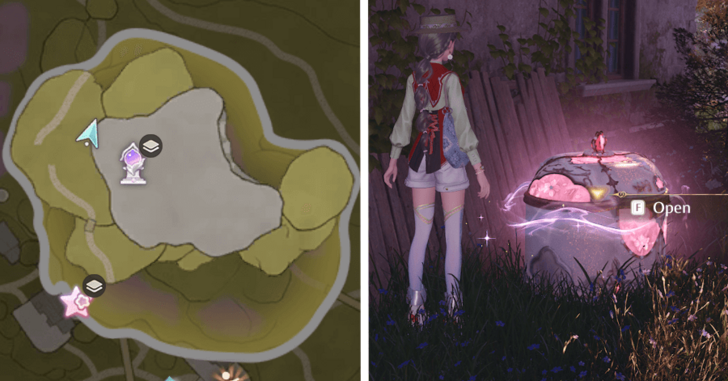 |
Found behind the house at Flamecrest Stonetree 2F. Unlocks the 3-star Accessory Sketch Unnamed Medal. |
| 36 | 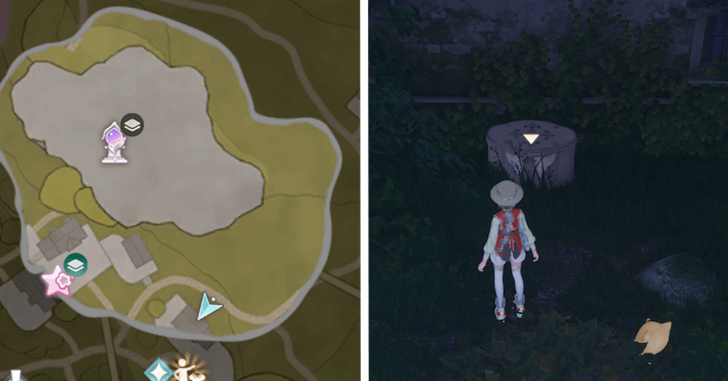 |
Found behind a house south of Flamecrest Stonetree 1F. |
| 37 | 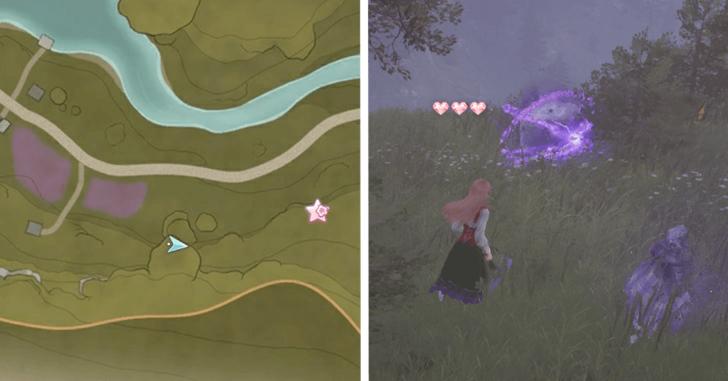 |
Found on the southern outskirts of Stoneville, west from the Entrance Warp Spire. Found at the higher cliffside, guarded by Esselings; defeat them all first to be able to open it. |
| 38 | 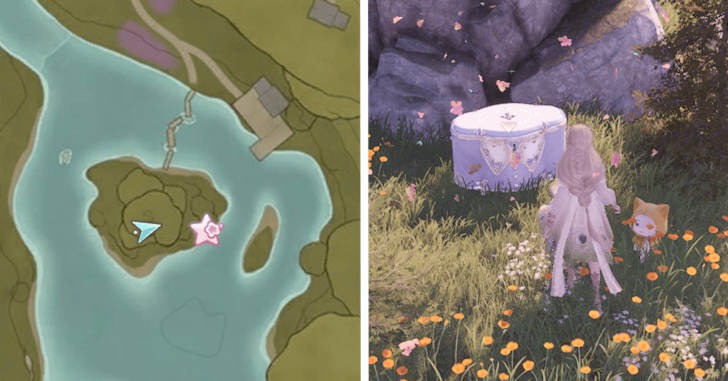 |
Right under the bird statue at Stoneville's center island. Unearth the chest from the pile of flowers with a plunging attack to be able to get to this chest. |
| 39 | 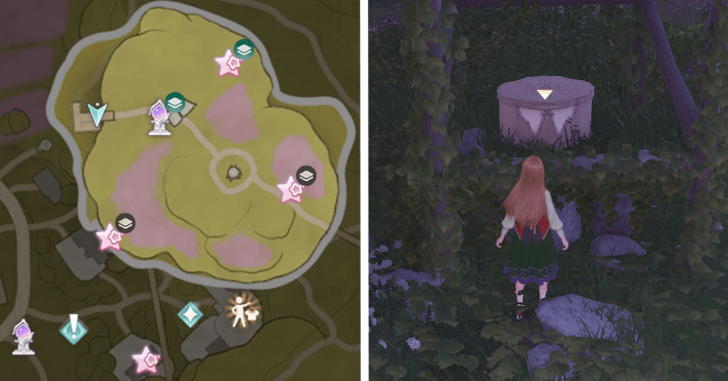 |
Found under the scaffolding that leads to 3F of Flamecrest Stonetree in Stoneville. |
| 40 | 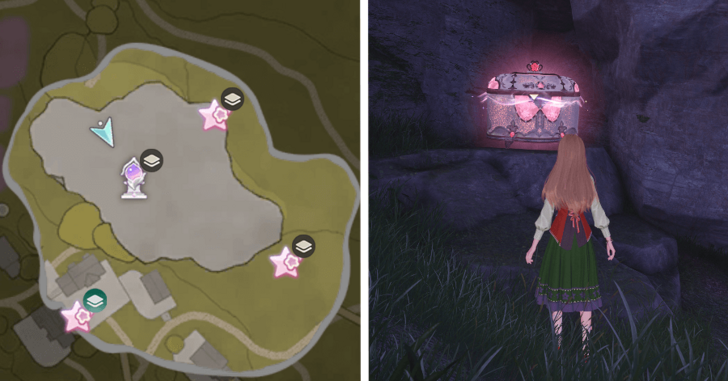 |
Found in a cave at 1F Flamecrest Stonetree. This area also triggers the random quest The Secret Under the Stonetree. Unlocks the 3-star Choker Sketch Night's Soul. |
Abandoned District Treasure Chests
| No. | Image | How to Get |
|---|---|---|
| 1 | 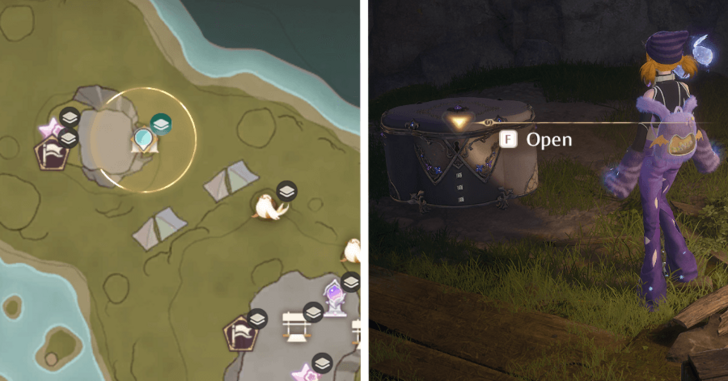 |
Inside the Mirth Market Cavern, in the middle rock spire. |
| 2 | 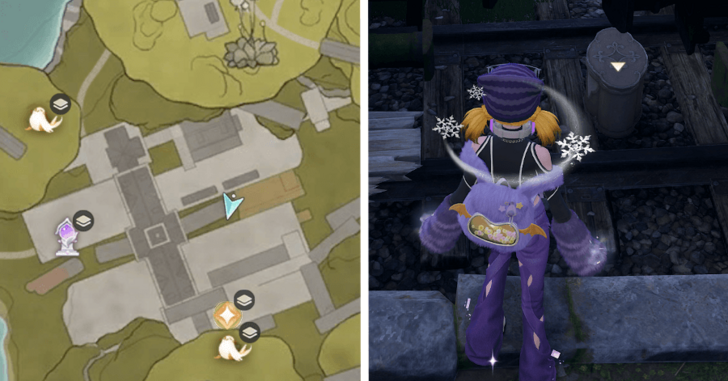 |
Middle of the Choo-Choo Station, between two train cars. |
| 3 | 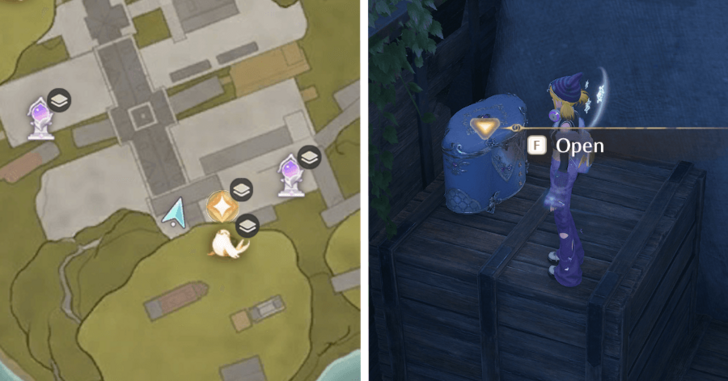 |
Head Southwest from Treasure Chest #2; the chest will be in a corner behind the station gate. |
| 4 | 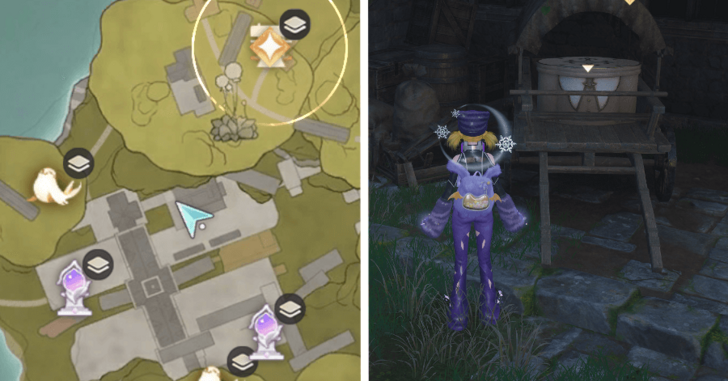 |
Cross to the other side of the station from Treasure Chest #3, and look at a small carriage to the right of the stairs. |
| 5 | 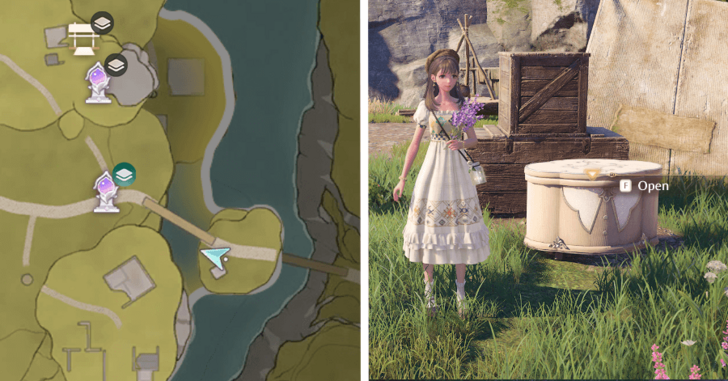 |
Beside the tent on the Golden Fields island closest to Stoneville. |
| 6 |  |
On top of a haystack, beside the windmill in Golden Fields. |
| 7 | 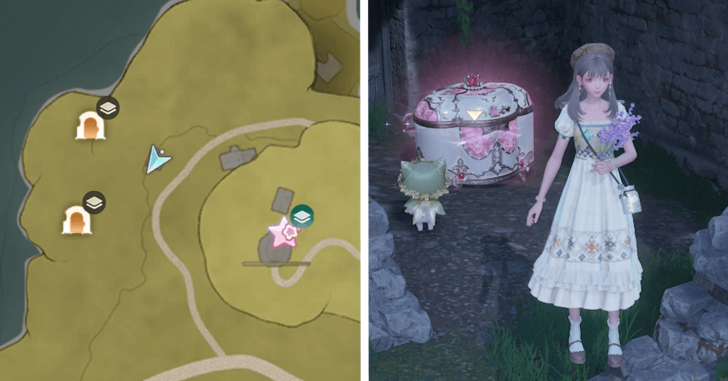 |
In Golden Fields, inside the ruined house |
| 8 |  |
In Golden Fields, on top of one of the stonetree with mini-windblowers. |
| 9 | 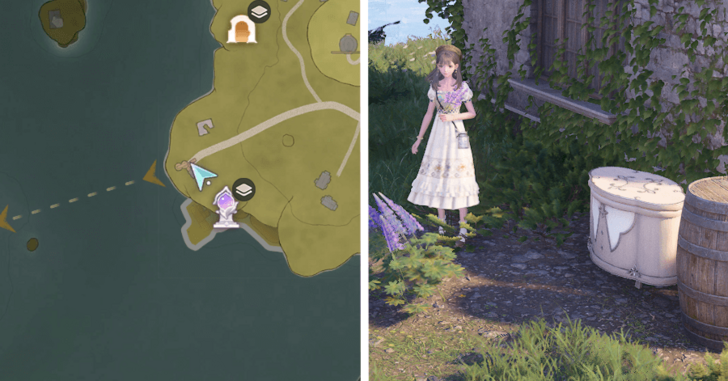 |
Southern part of Golden Fields, beside the house. |
| 10 | 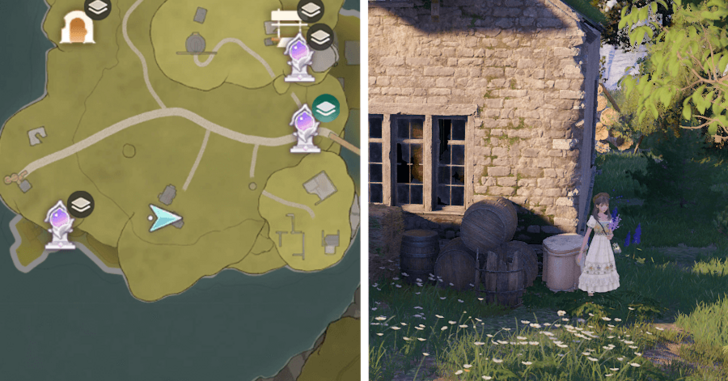 |
In between the houses in Golden Fields. |
| 11 | 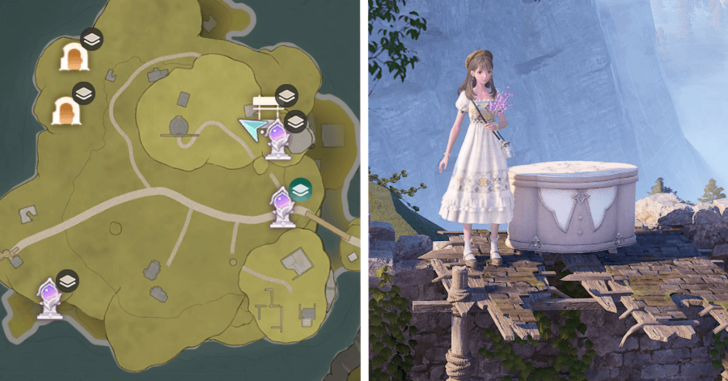 |
On top of the roof of the ruined house in Golden Fields. |
| 12 | 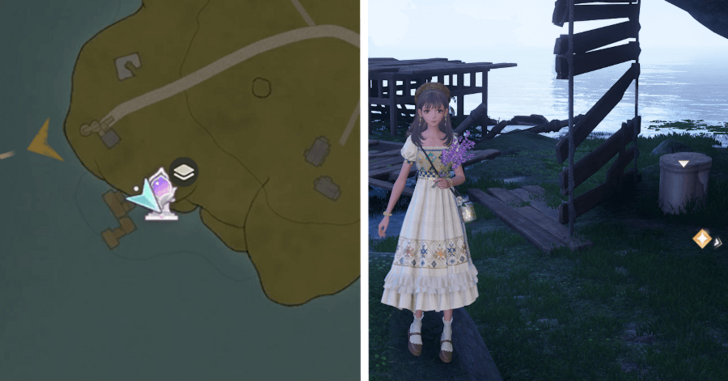 |
Behind the broken bridge, below the Golden Fields Old Dock Warp Spire. |
| 13 | 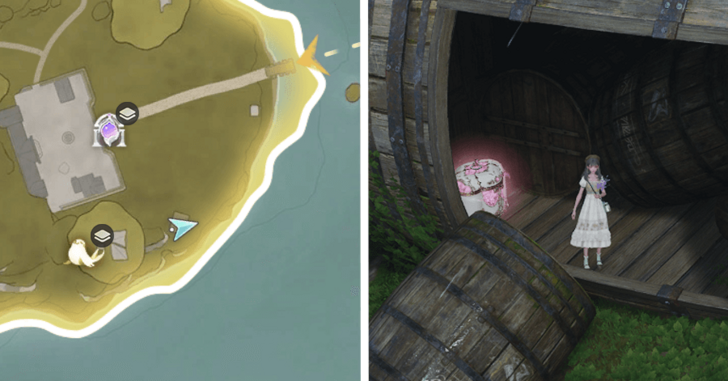 |
Inside the large barrel, south of Beside the Ripple Wine Cellar Warp Spire |
| 14 | 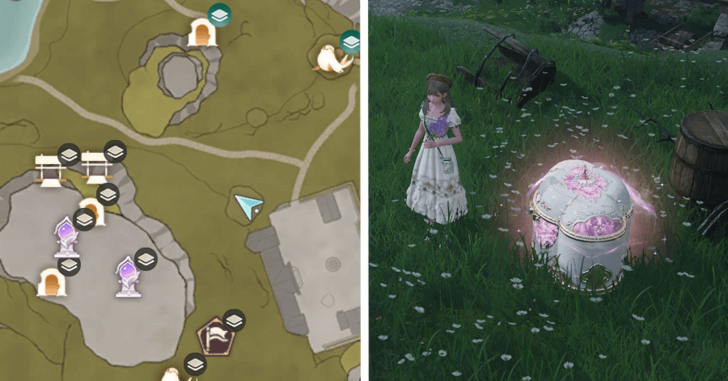 |
On a stonetree next to the Wine Cellar. |
| 15 | 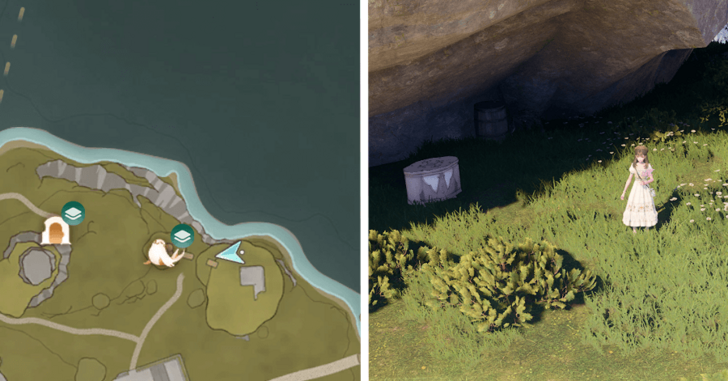 |
Behind the large barrel at higher ground at Ripple Wine Cellar. |
| 16 | 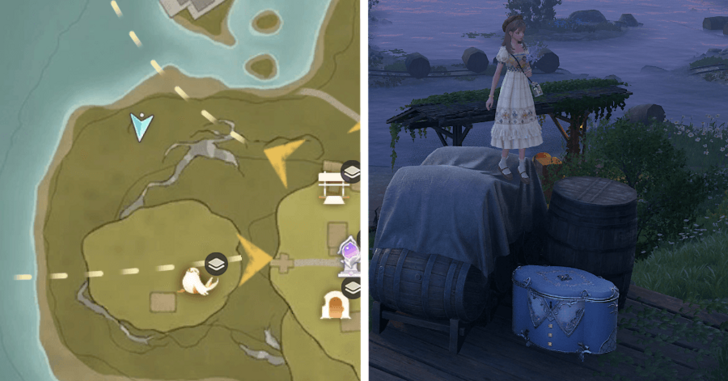 |
On the back part of the Ripple Wine Cellar island. Near the train station. |
| 17 |  |
On the mid level of a stonetree near the wine cellar at Ripple Wine Cellar. |
| 18 | 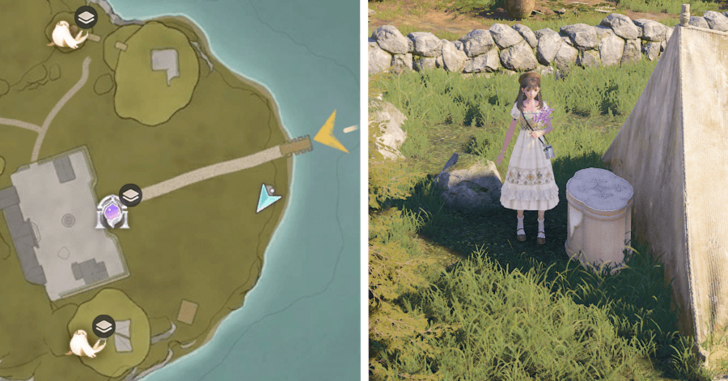 |
Next to the tent near the docks of Ripple Wine Cellar. |
| 19 | 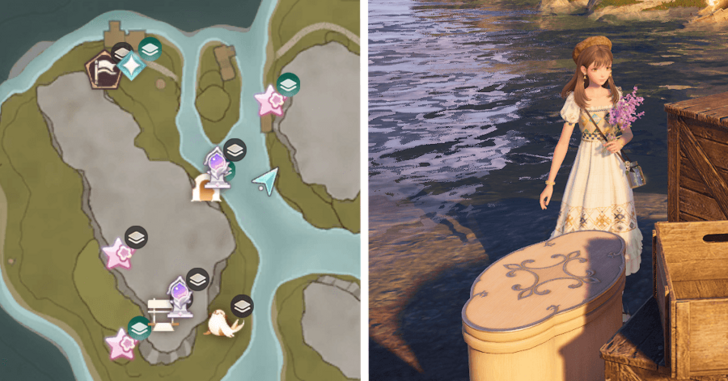 |
On the very bottom of the northeastern island of Windrider Mill, in front of the mural. |
| 20 | 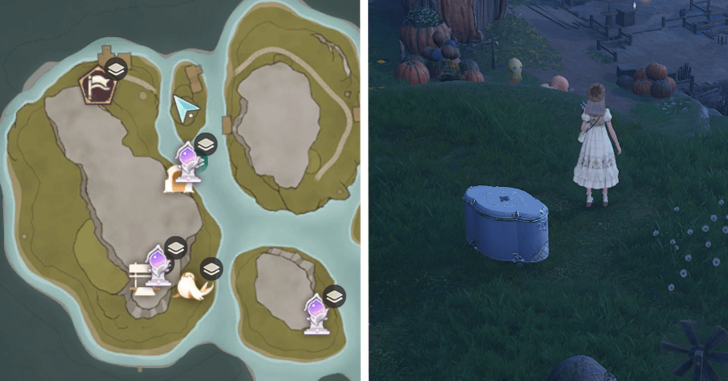 |
On top of a stonetree, near the dock in Windrider Mill's northern center island. |
| 21 | 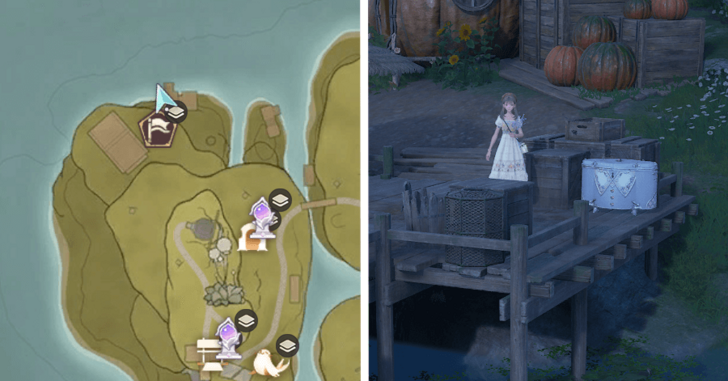 |
On the dock, near the pumpkin house in northern Windrider Mill. |
| 22 | 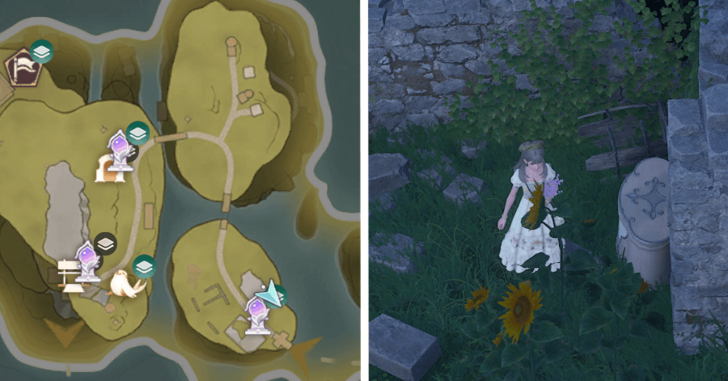 |
Behind the ruins next to the Windrider Mill Entrance Warp Spire in Windrider Mill. |
| 23 | 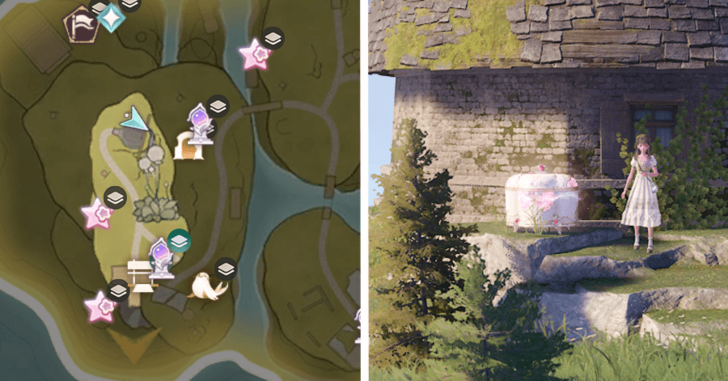 |
Behind the large windmill in Windrider Mill. |
| 24 | 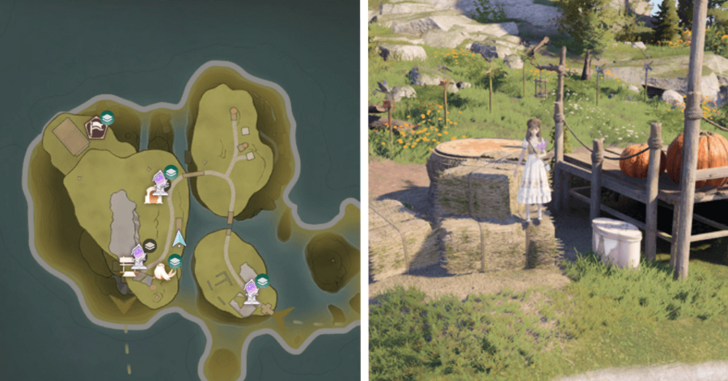 |
Beside the wooden platform and behind the hay in Windrider Mill. |
| 25 | 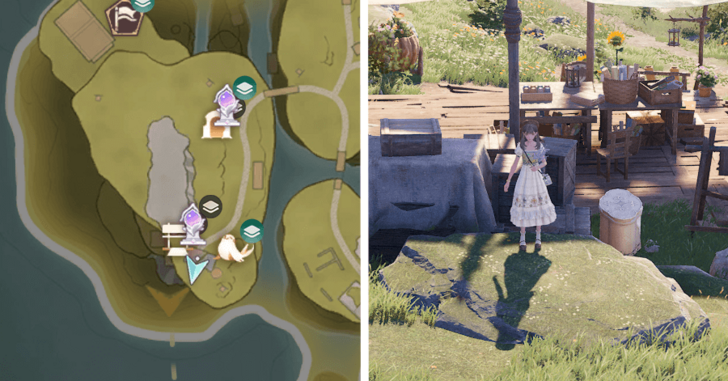 |
Under the sunshade canopy in Windrider Mill. |
| 26 | 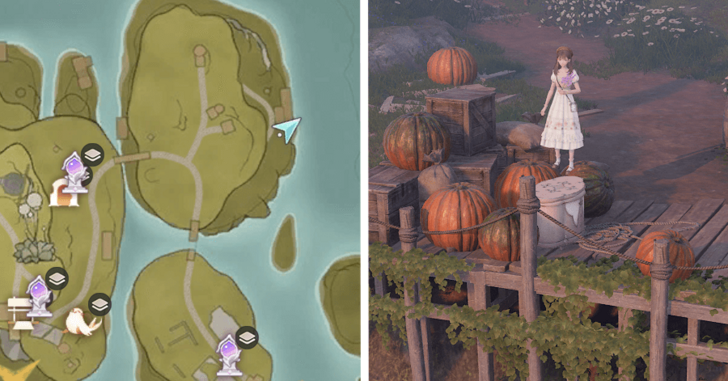 |
On the dock in Windrider Mill, surrounded by pumpkins and boxes. |
| 27 | 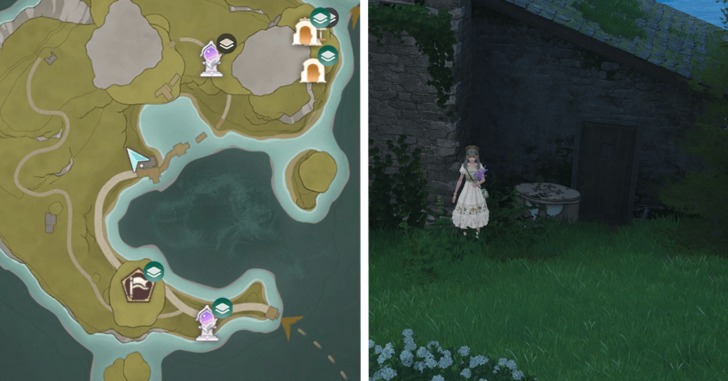 |
In Stellar Fishing Grounds, at the back of a house. |
| 28 | 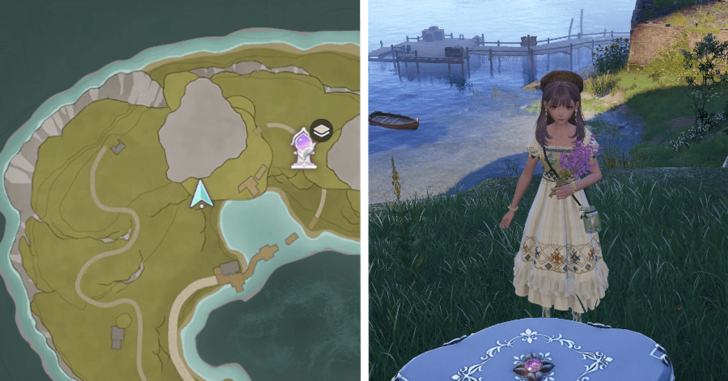 |
On the hill on the back of the house in Stellar Fishing Grounds. |
| 29 | 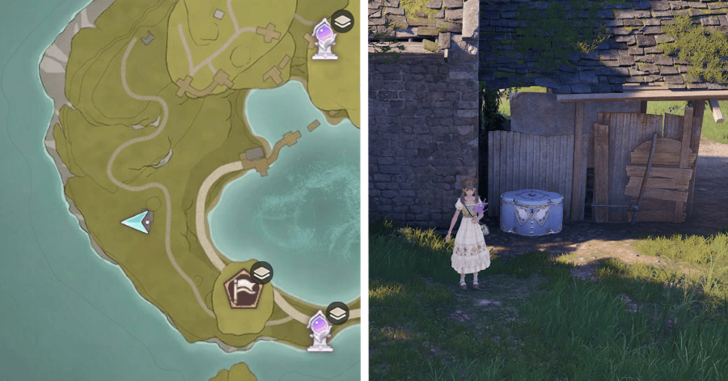 |
On the back of the house in Stellar Fishing Grounds. |
| 30 | 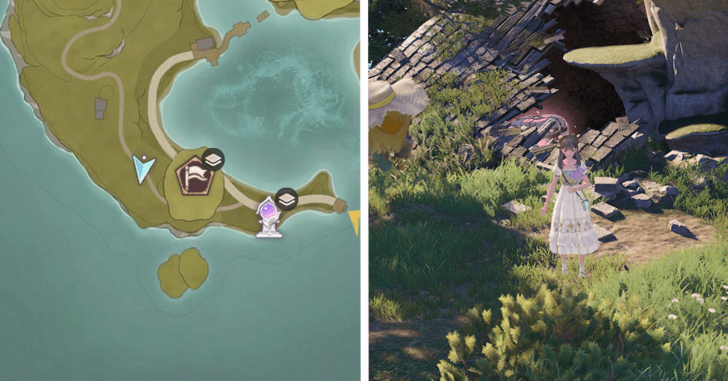 |
In Stellar Fishing Grounds, under the ruined house next to a small stonetree. |
| 31 | 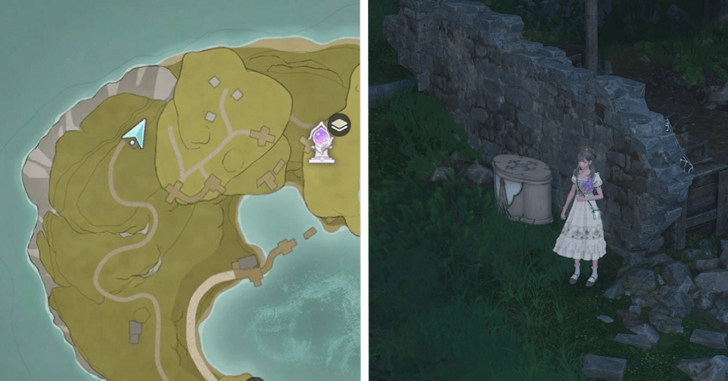 |
In Stellar Fishing Grounds, next to the ruined shed. |
| 32 | 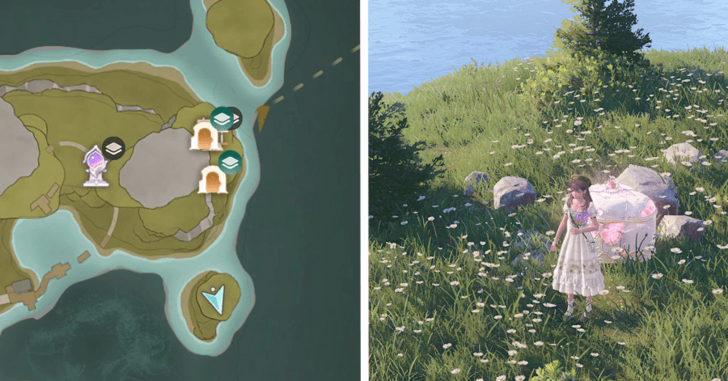 |
On top of the stonetree island in Stellar Fishing Grounds. |
| 33 | 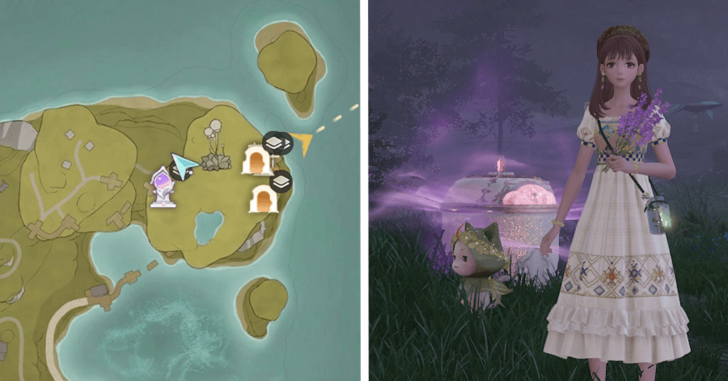 |
On the hill in front of the broken bridge in Stellar Fishing Grounds |
| 34 | 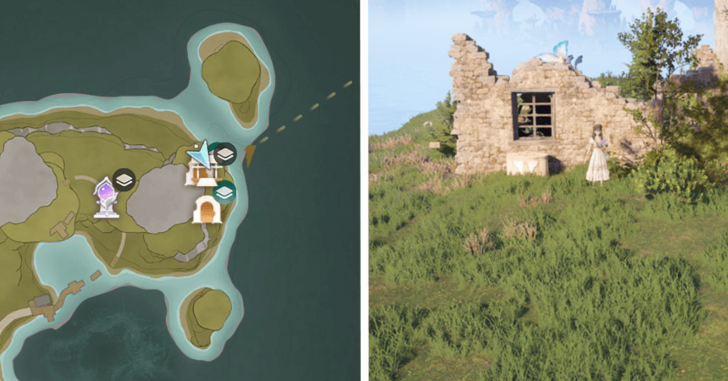 |
Found in Stellar Fishing Grounds, next to the ruined house, middle level of the stonetree island. |
| 35 | 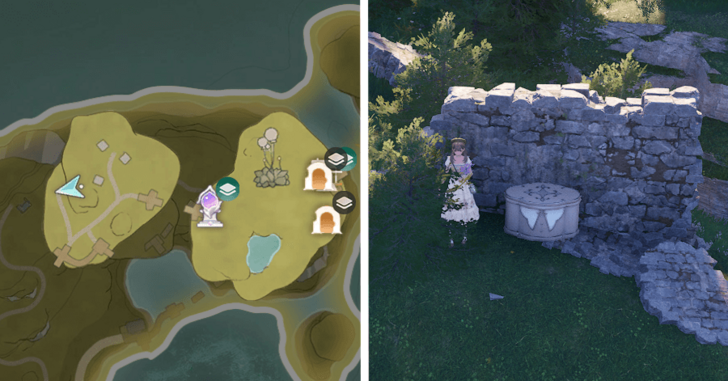 |
Stellar Fishing Grounds, next to a wall behind the tent area. |
| 36 | 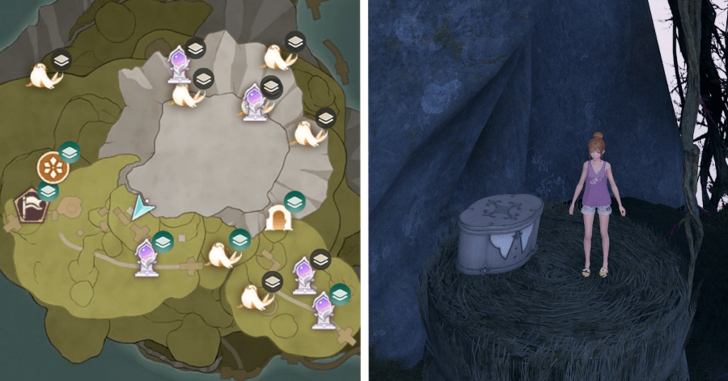 |
On top of a haystack, behind the watch tower nortth of the Volunteer Corps Watchtower Warp Spire. |
| 37 | 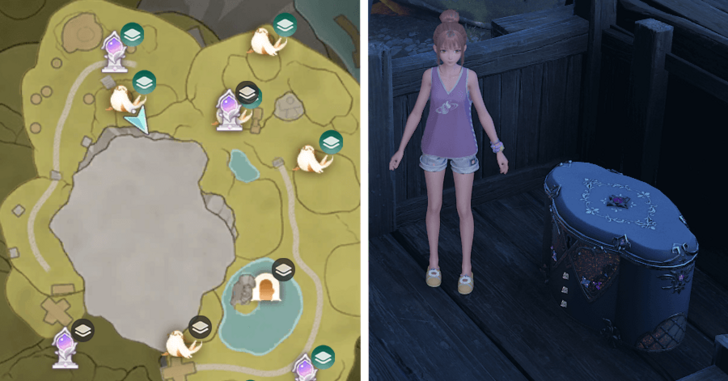 |
Atop of a watchtower south from the Volunteer Corps Jail Warp Spire. |
| 38 | 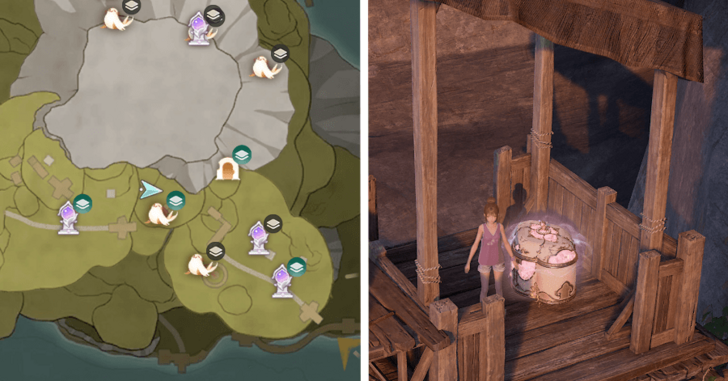 |
On a watchtower east from the Volunteer Corps Watchtower Warp Spire. Unocks the 3-star Eartring Sketch Flashing Alert. |
| 39 | 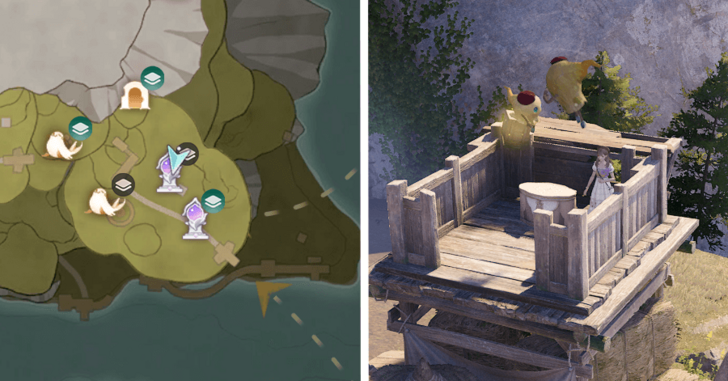 |
Sitting on top of a watchtower, close to the Volunteer Corps Camp Cavern. |
| 40 | 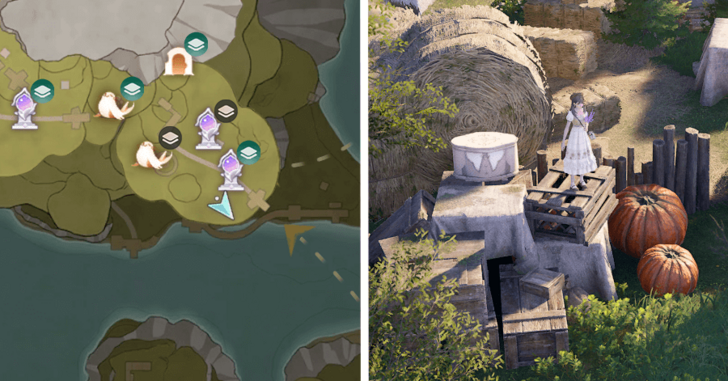 |
Behind the haystacks on a southern island in Stonecrown. |
| 41 | 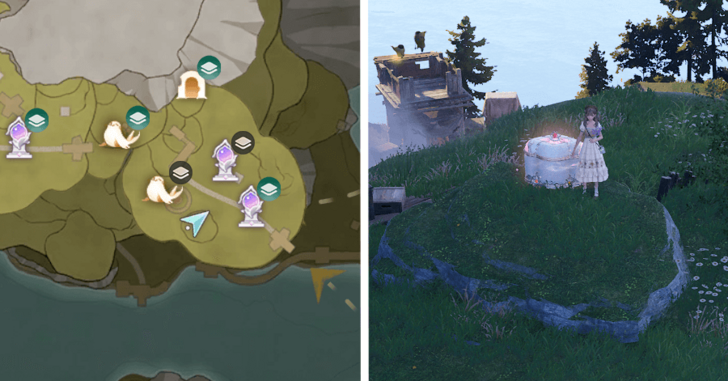 |
On top of a stonetree, near the Market of Mirth Warp Spire. |
| 42 | 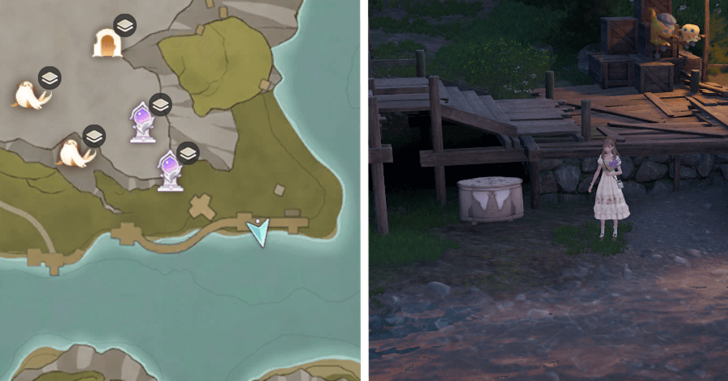 |
Next to the dock south of Stonecrown Island. |
| 43 | 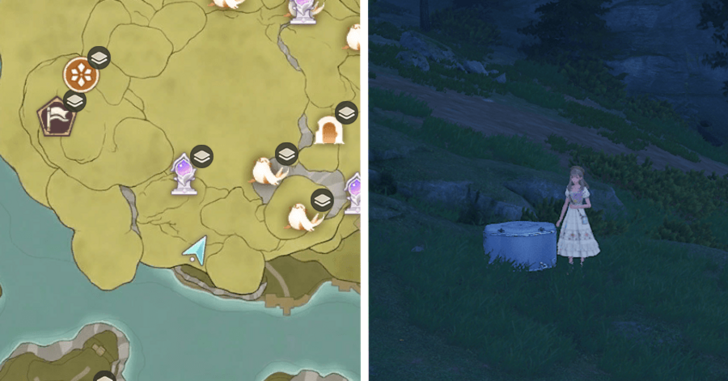 |
On the hill south of the Volunteer Corps Warp Spire. You have to fight off Esselings to open the chest. |
| 44 | 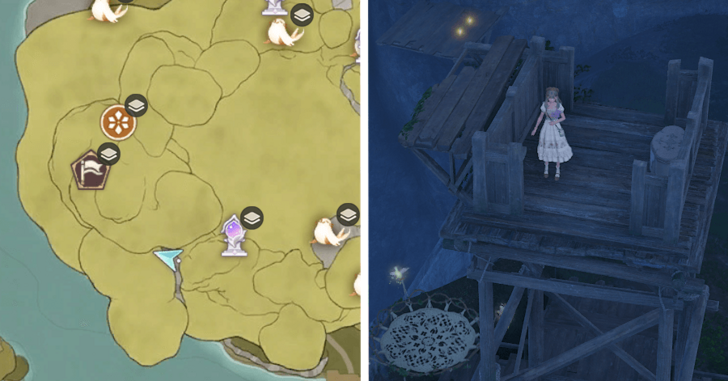 |
On top of a watch tower west from the Volunteer Corps Warp Spire. |
| 45 | 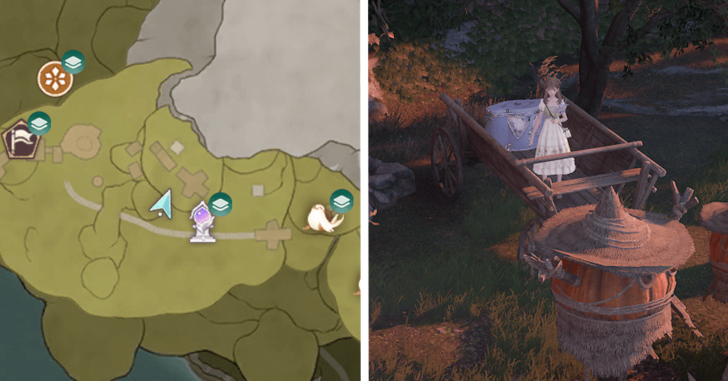 |
Sitting on a wooden wagon near the Volunteer Corps Warp Spire. |
| 46 | 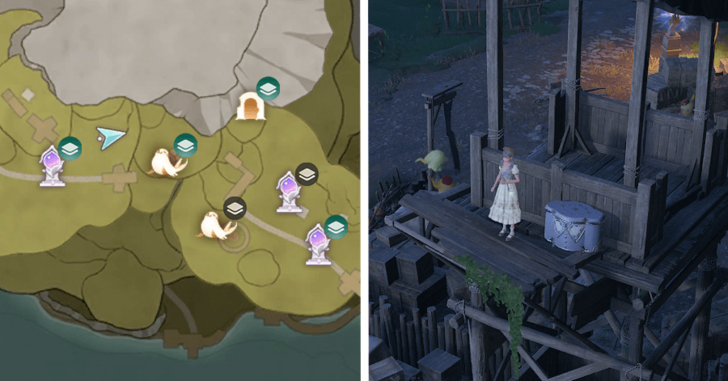 |
Sitting on a watchtower near the Volunteer Corps Warp Spire. |
| 47 | 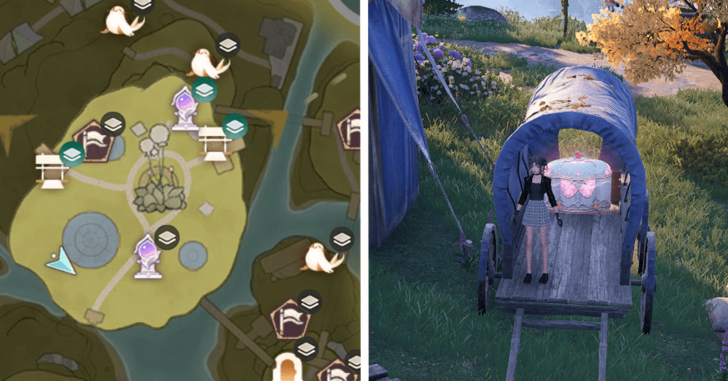 |
Inside a wagon behind the large tent near the Handsom Lads Circus in Market of Mirth. |
| 48 | 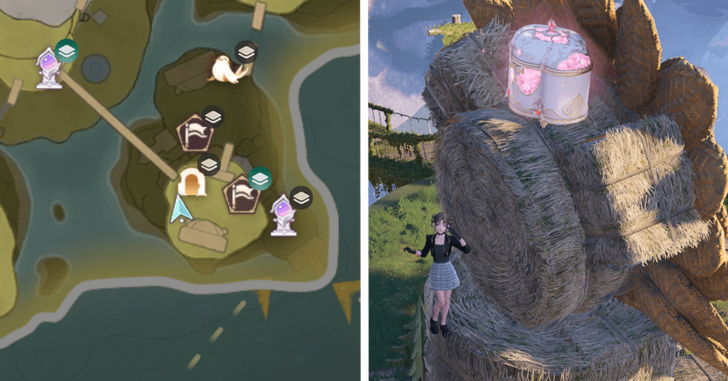 |
Behind the sunflower hay at the Market of Mirth. |
| 49 | 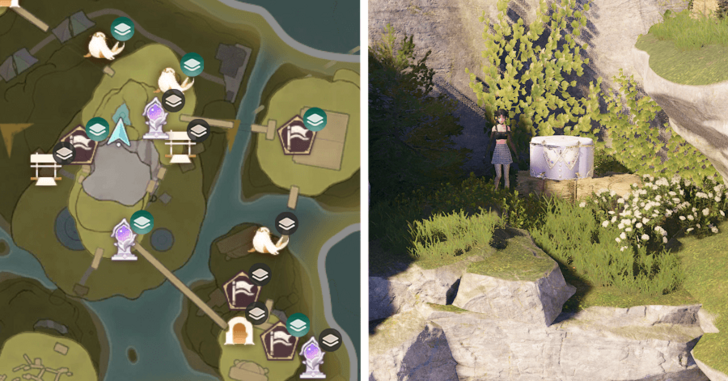 |
On top of a pond at the Market of Mirth 2F. |
| 50 | 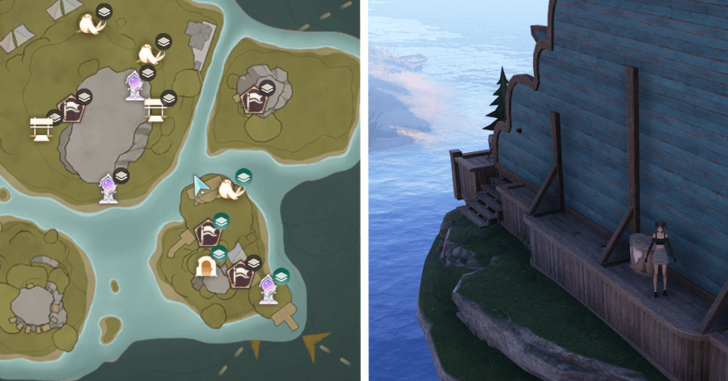 |
Behind the wooden platform at the southwestern stonetree at Market of Mirth |
| 51 | 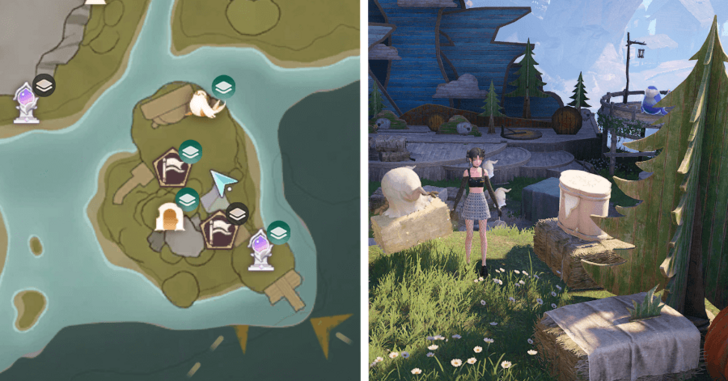 |
On one of the stonetree at Market of Mirth, in front of the wooden platform. |
| 52 | 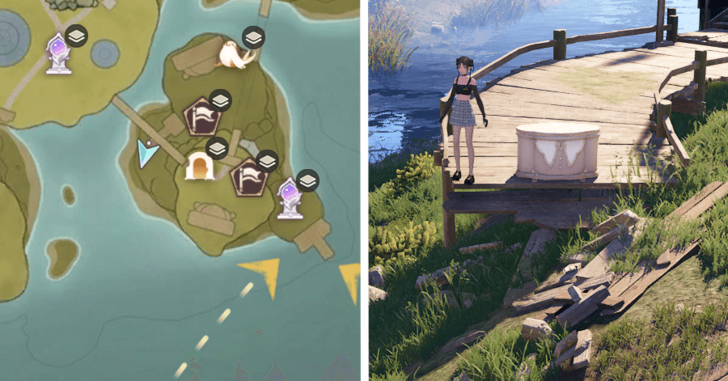 |
At the end of the broken dock, at the southwestern stonetree at Market of Mirth. |
| 53 |  |
Behind the bunny-shaped haystack near the maze, at the southern stonetree at Market of Mirth. |
| 54 | 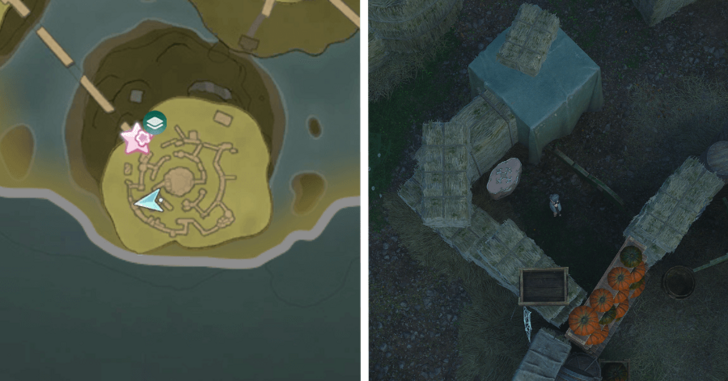 |
Inside the maze at the southern stonetree at Market of Mirth, near the center. |
| 55 | 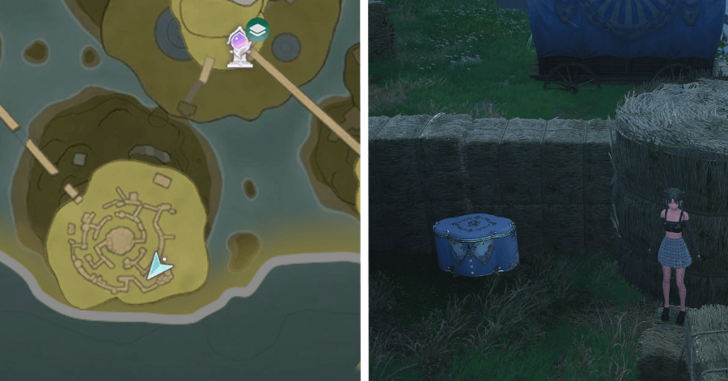 |
Plunge into the boxes near the wagon at the southern stonetree at Market of Mirth. |
| 56 |  |
A branch above the bottom level of the stonetree island southeast of Market of Mirth, behind the thorny vines. |
| 57 |  |
Inside the Market of Mirth Cavern Cave. |
| 58 | 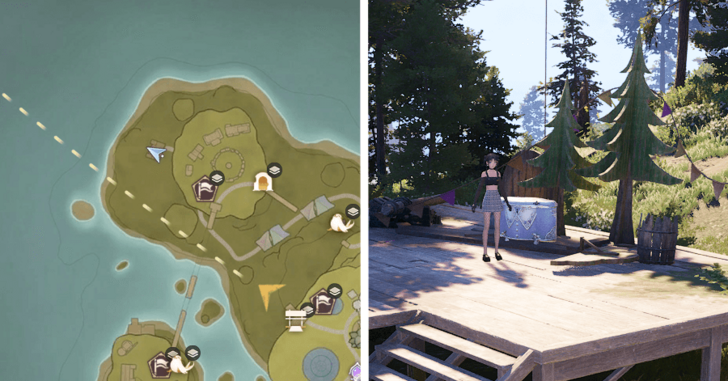 |
On a wooden platform at Market of Mirth 1F. You have to fight Esselings before opening this chest. |
| 59 | 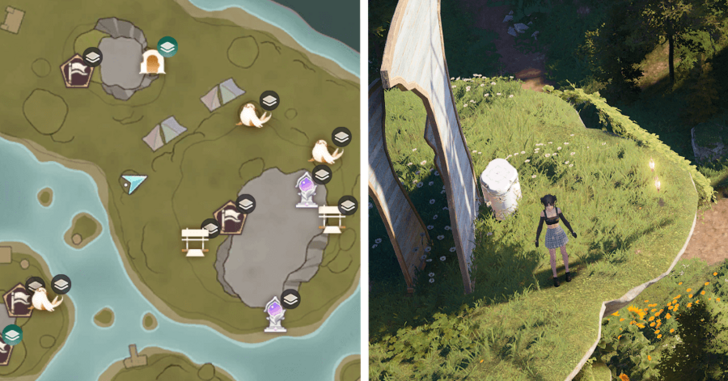 |
On top of a stonetree near the sunshade canopy at Market of Mirth 1F. |
| 60 | 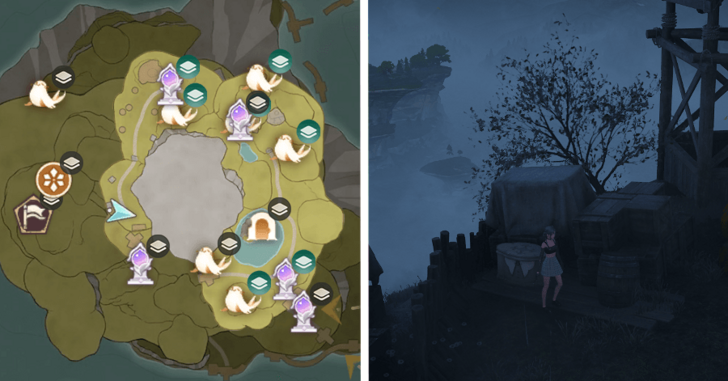 |
Next to the boxes and the watchtower, south of the Volunteer Corps Jail Warp Spire in Stonecrown. |
| 61 | 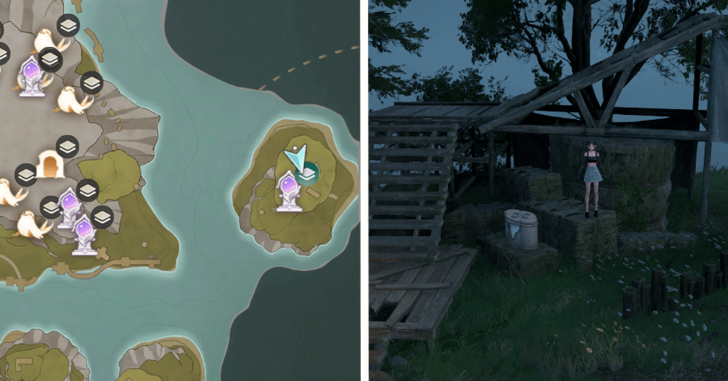 |
Highest point of a stonetree next to the shed with stairs, close to the Waterspot Observatory Warp Spire. |
| 62 | 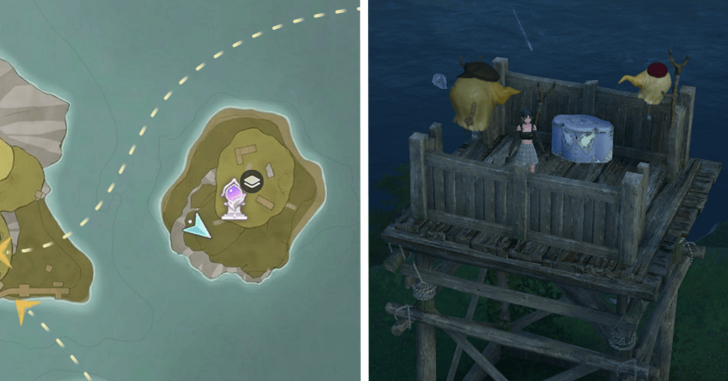 |
Sitting on a watchtower lowest level of the island, near the Waterspout Observatory Warp Spire. |
| 63 |  |
Behind the ruined wall near the Beside the Golden Fields Warp Spire. |
| 64 |  |
From the entrance inside the Golden Fields Cavern, go down to see this chest |
| 65 | 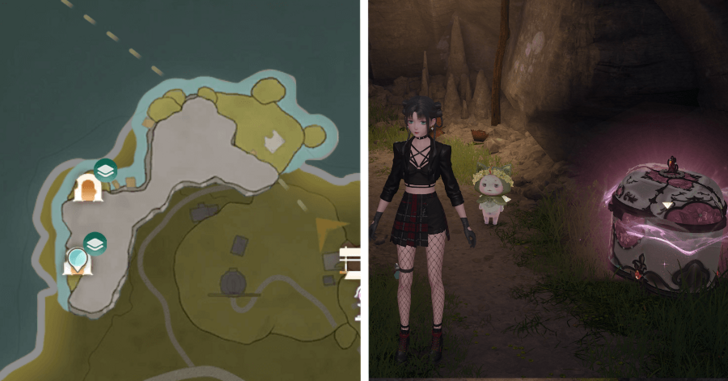 |
Go further down the Golden Fields Cavern until you see the cave near the lake. |
| 66 | 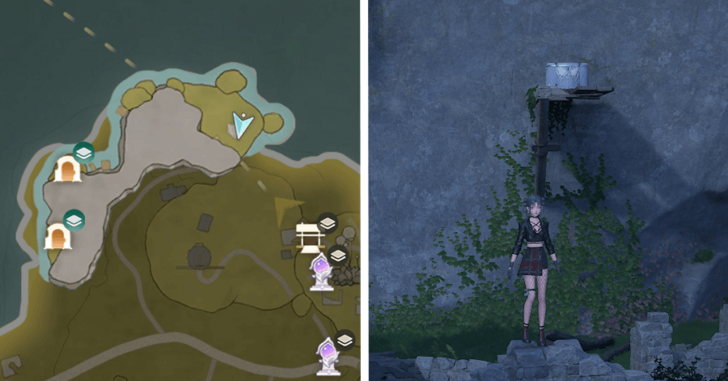 |
On the lowest level of the Golden Fields island, this chest is sitting in a wooden platform. |
| 67 | 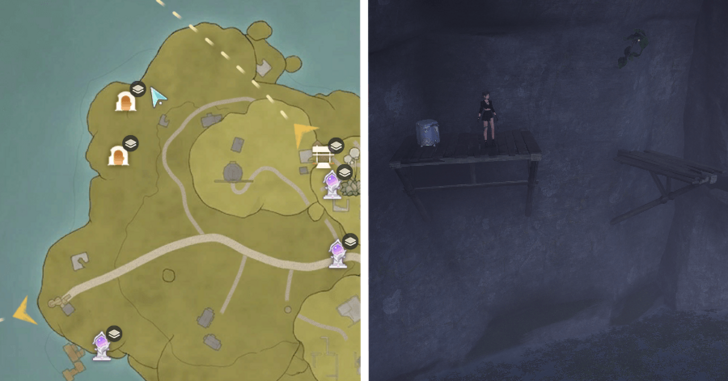 |
On a wooden platform on the side of the stonetree island, near the Golden Fields Cavern entrance. |
| 68 | 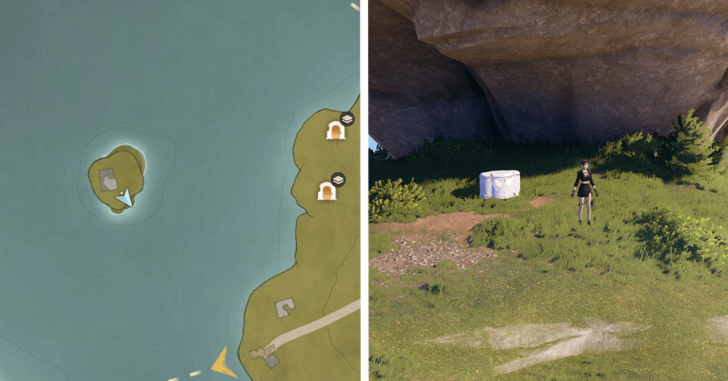 |
On the middle level of the stonetree island, found west from the Golden Fields Cavern. |
| 69 |  |
At the Wine Cellar island, next to the barrels and haystacks. |
| 70 | 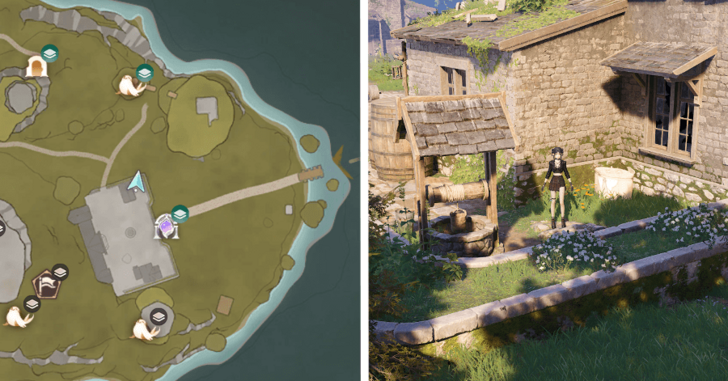 |
In between the well and the broken window, at the Wine Cellar. |
| 71 | 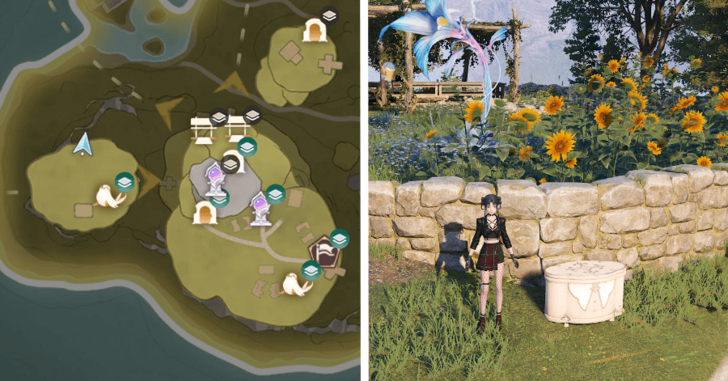 |
Behind the brick fence near the Stonedew flora, west from the Barrel Home Warp Spire |
| 72 | 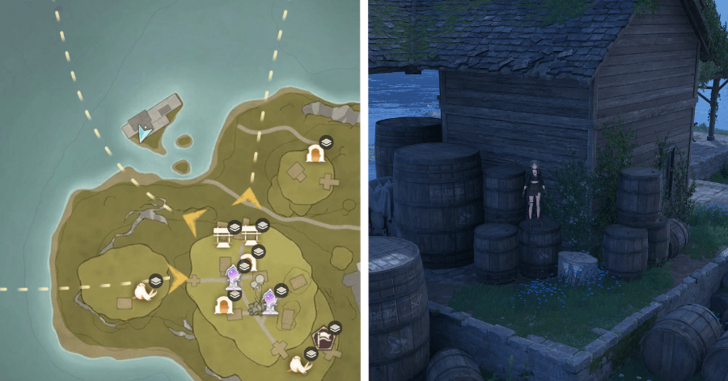 |
In the train station northwest of the Ripple Wine Cellar island, surrounded by barrels. |
| 73 | 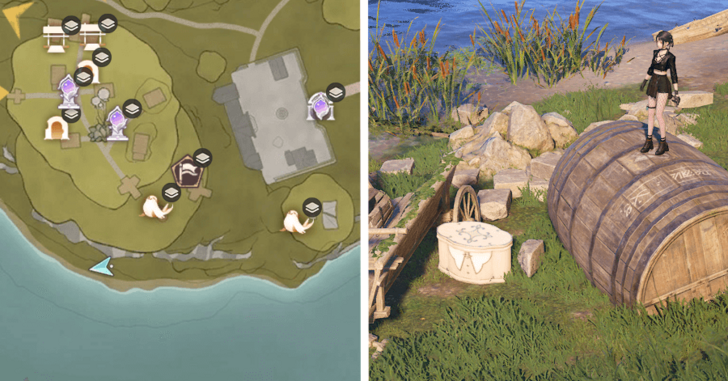 |
In between the wooden wagon and the large barrel, at the southern portion of the Ripple Wine Cellar island. |
| 74 | 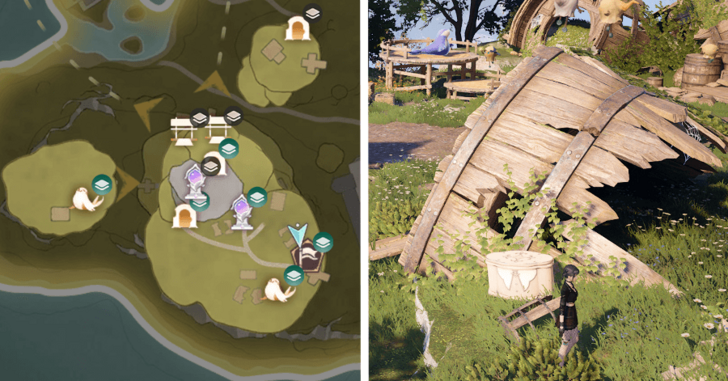 |
In front of the challenge booth, southeast from the Barrel Grove Warp Spire. |
| 75 | 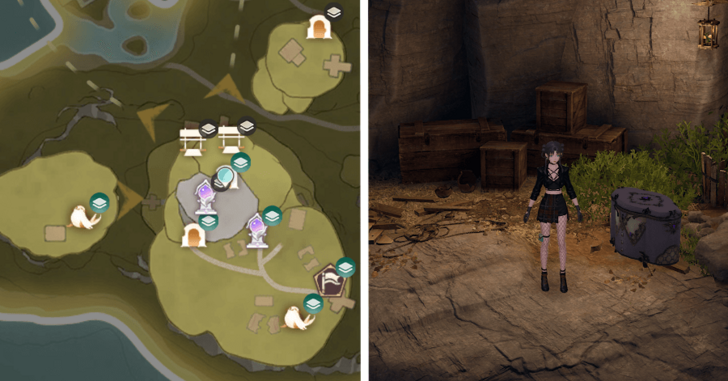 |
Inside the Ripple Estate Cliffside Cavern, go upwards. |
| 76 |  |
Inside the Eastern Roadside Cavern in Ripple Wine Cellar, near the cave lake. |
| 77 | 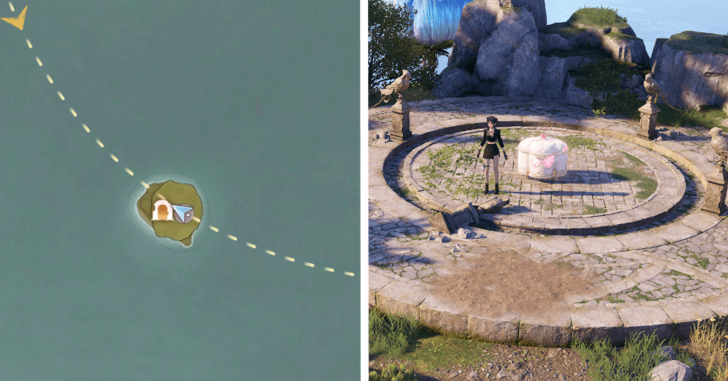 |
On top of the stonetree, in the middle of the statues. Found on the island between Windrider Mill and Ripple Wine Cellar. |
| 78 | 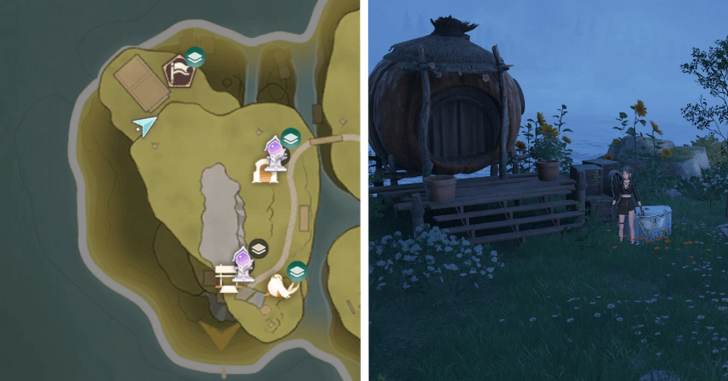 |
In front of the pumpkin house in Windrider Mill, under the pile of leaves that can be cleared with a plunging attack. |
| 79 | 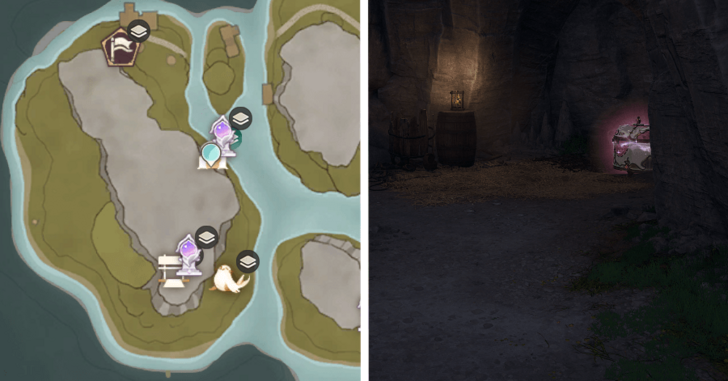 |
Inside the Windrider Mill Cavern, continue west until you see a cave. |
| 80 | 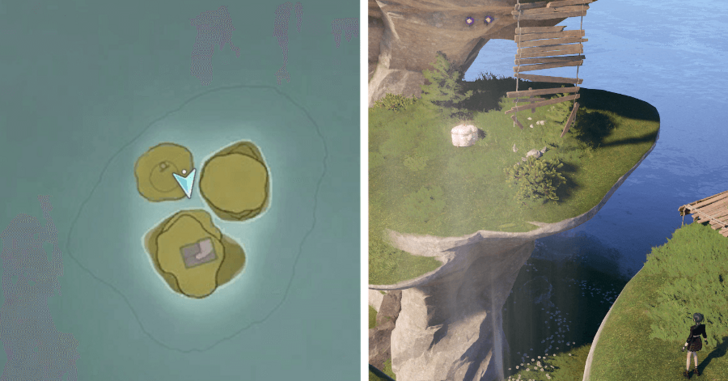 |
Middle level of the stonetree northwest from Windrider Mill, in between the broken bridge. Defeat all Esselings to be able to open this chest. |
| 81 | 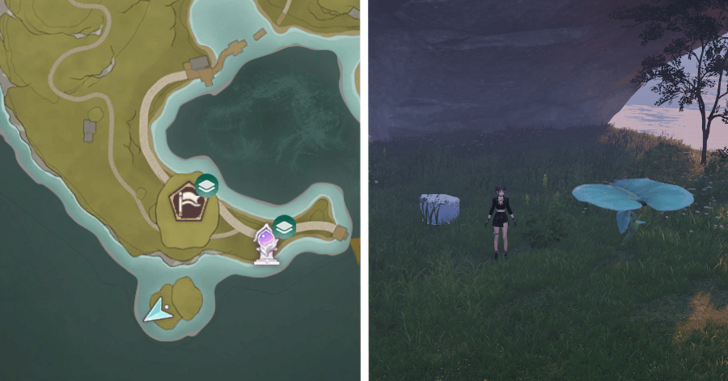 |
Under the pile of leaves near the leaf trampoline, found in Stellar Fishing Grounds. |
| 82 | 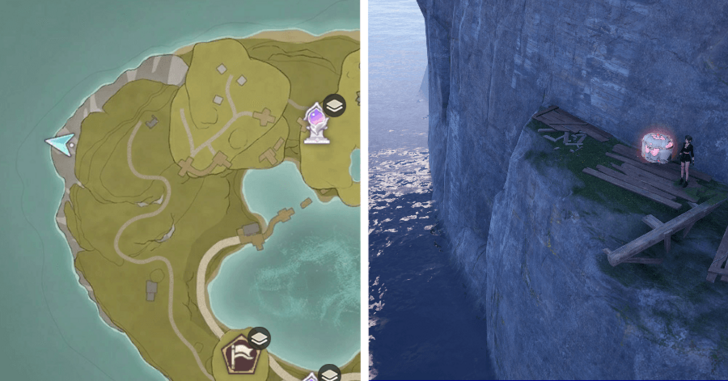 |
On the cliff, found at the west side of Stellar Fishing Grounds. |
| 83 | 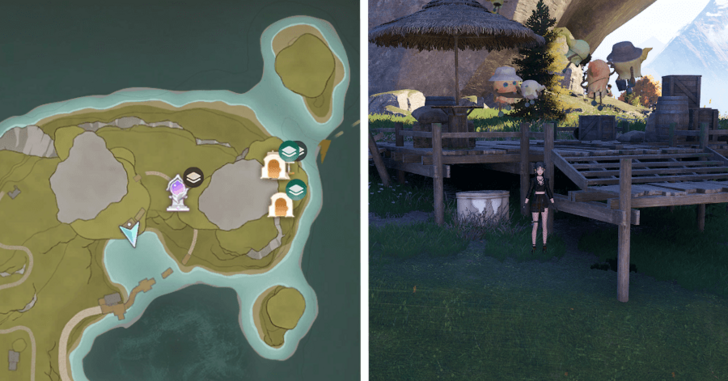 |
Near the cliff at the center of Stellar Fishing Grounds, next to the deck. |
| 84 | 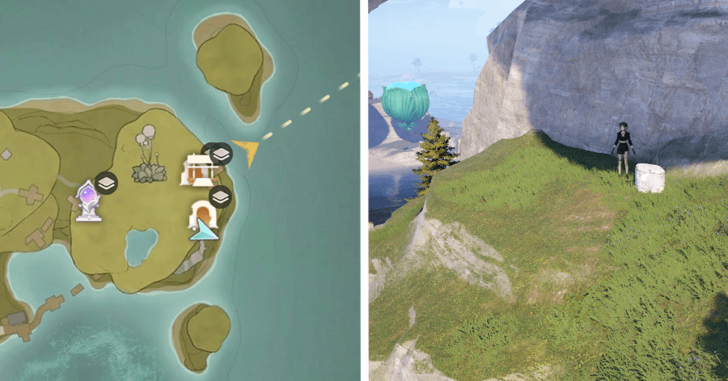 |
Lower level of the stonetree island close to the Stellar Fishing Grounds Cavern. You have to fight off Esselings to unlock this chest. |
| 85 |  |
Lower level of the stonetree island north of Stellar Fishing Grounds, sitting on the broken deck. |
| 86 | 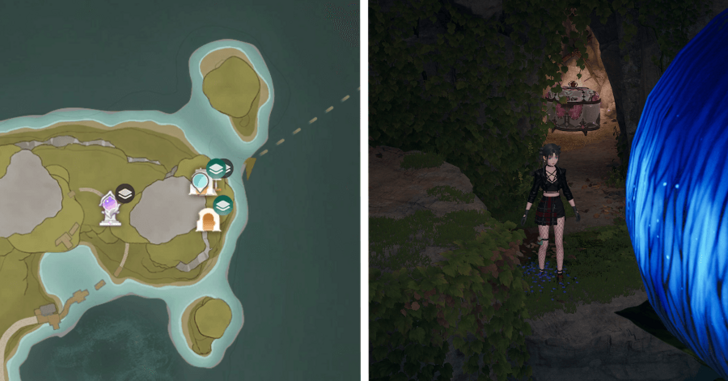 |
Inside the Stellar Fishing Ground Cavern, at a lower level, near the flower. |
| 87 | 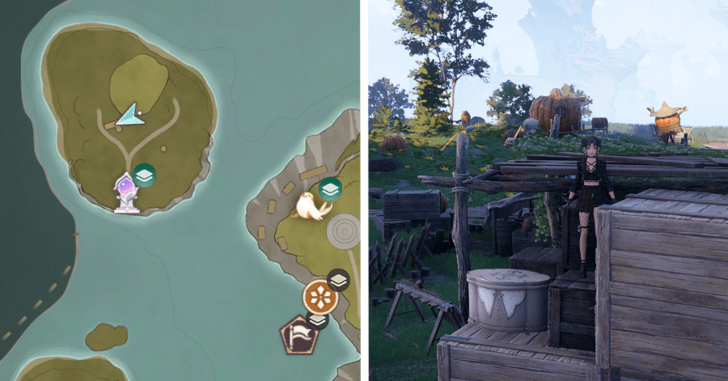 |
Behind a wooden shed, north of the Thuddy Squash Workshop Warp Spire. |
| 88 | 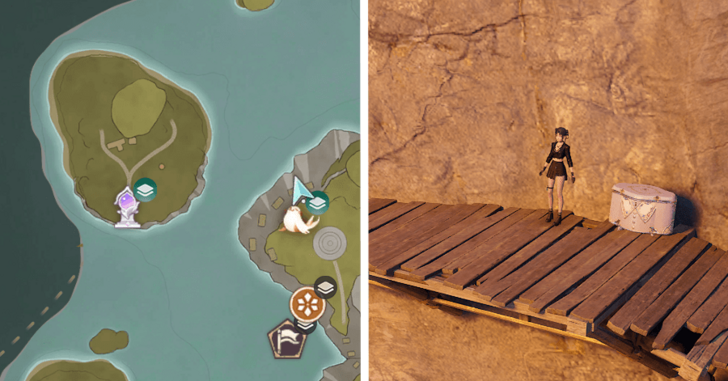 |
On a wooden platform on the side of the main island in Stonecrown. |
| 89 |  |
Sitting on top of the boxes on the lower level of an isolated stonetree in Stonecrown. |
| 90 | 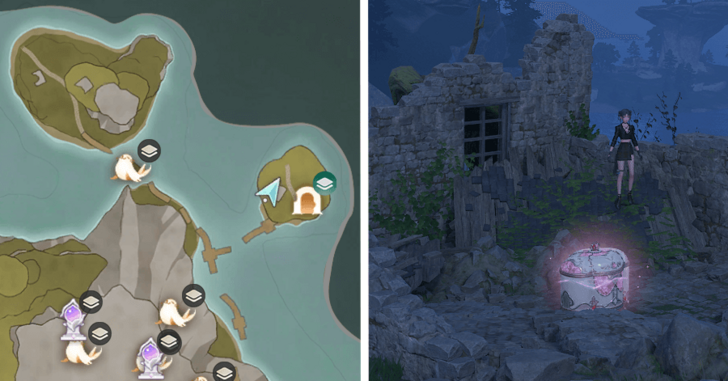 |
On top of a stonetree, in a ruined house near the Stonecrown Cavern. You have to fight off Esselings to unlock this chest. |
| 91 | 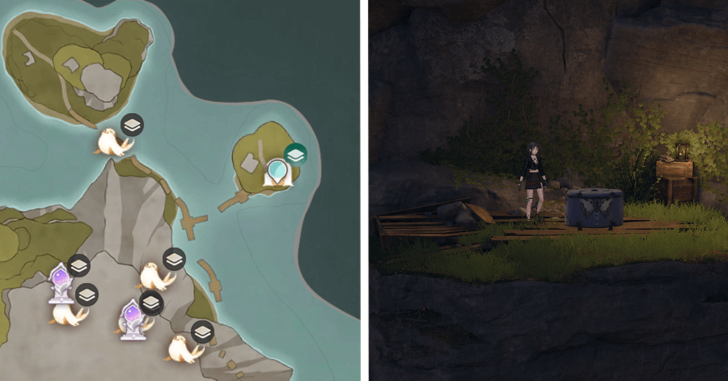 |
On the very top part inside Stonecrown Cavern. |
| 92 | 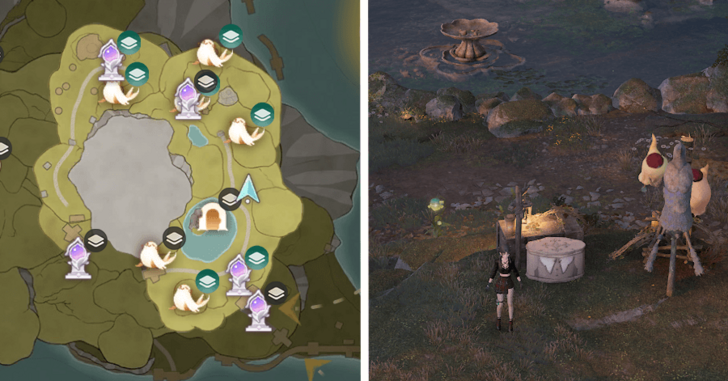 |
Next to a bird statue north of the Wishing Well Warp Spire. |
| 93 | 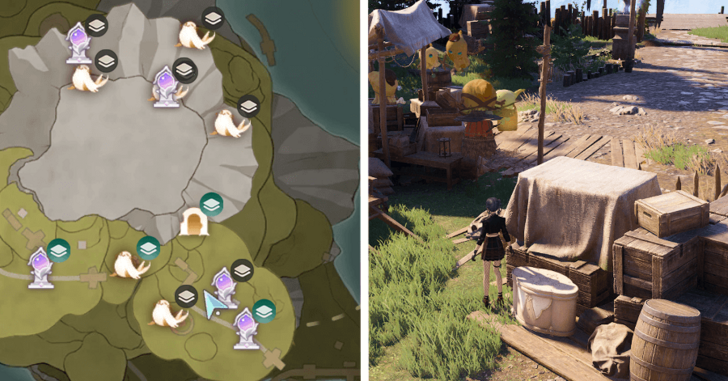 |
Near the merchant, behind the boxes |
| 94 | 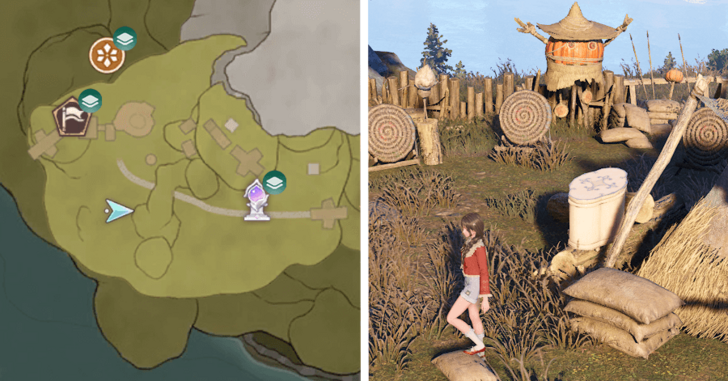 |
Next to a tent, near the stone archway in the starting area of Stonecrown. |
| 95 | 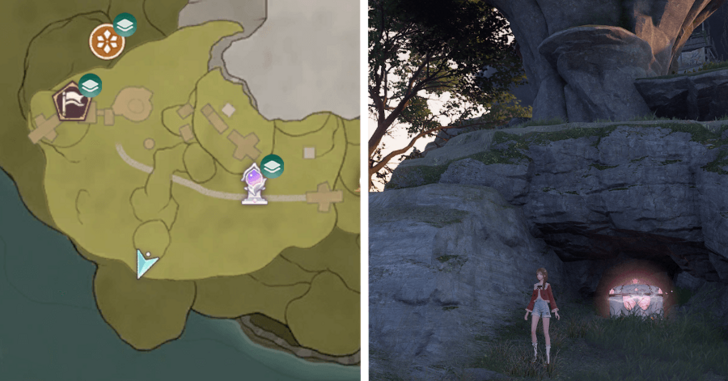 |
In a cave under the stonetree in Stonecrown. |
| 96 |  |
Sitting on the watchtower at the southwestern island of Stonecrown 2F. |
| 97 | 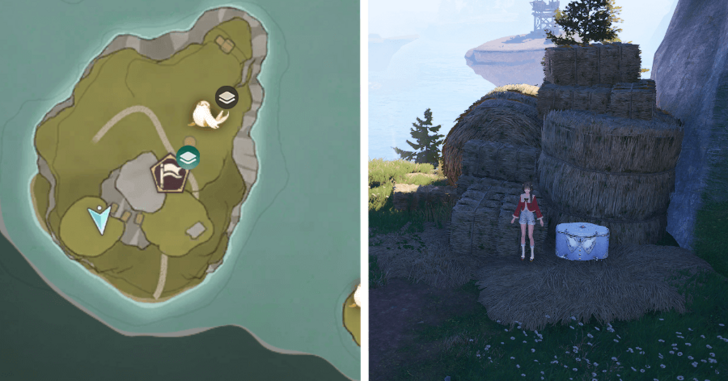 |
Plunge into the boxes next to the haystacks to obtain this chest at the southwestern island of Stonecrown. |
| 98 | 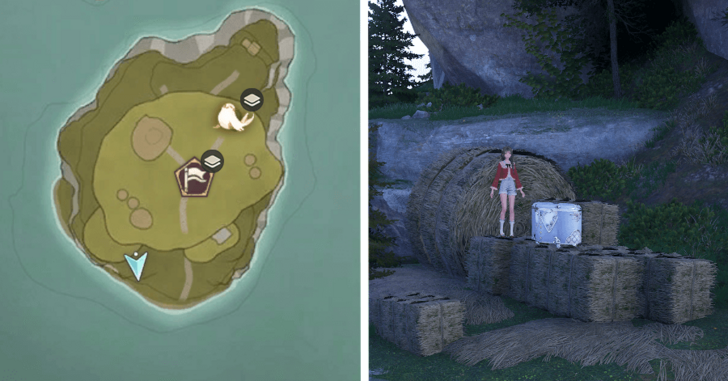 |
Sitting on a bunch of haystacks on the lowest level of the stonetree island, at the southwestern island of Stonecrown. |
| 99 | 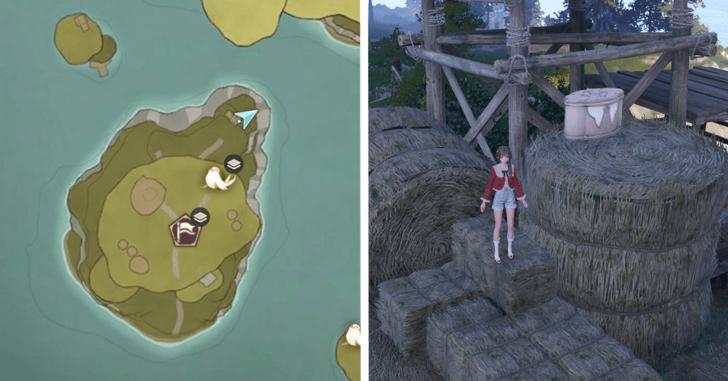 |
Sitting on top of bunch of haystacks next to the watchtower, at the southwestern island of Stonecrown. |
| 100 | 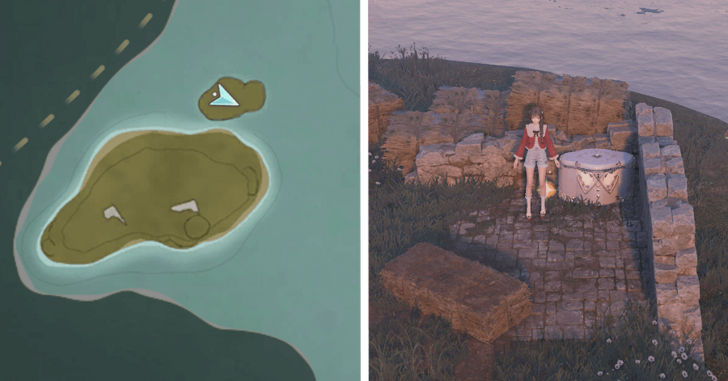 |
On a ruined house near haystacks, at the smaller island south of the Thuddy Squash Workshop Warp Spire in Stonecrown. |
| 101 | 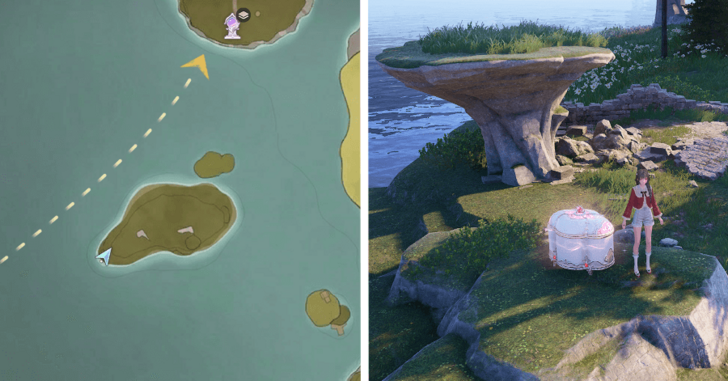 |
Next to the small stonetree, found on the island south of the Thuddy Squash Workshop Warp Spire in Stonecrown. |
| 102 | 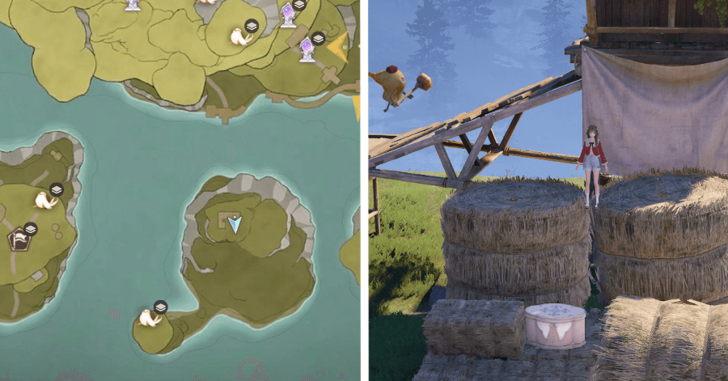 |
Sitting on a bunch of haystacks next to a deck, south of Stonecrown. |
| 103 | 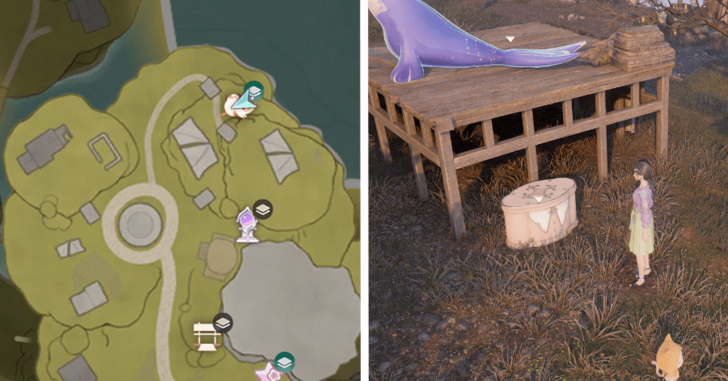 |
Right next to the Catapult Seal at Prosperville. |
| 104 |  |
At Prosperville 1F, at the very bottom of the stonetree. Guarded by Esselings, clear them to be able to open the chest. |
| 105 | 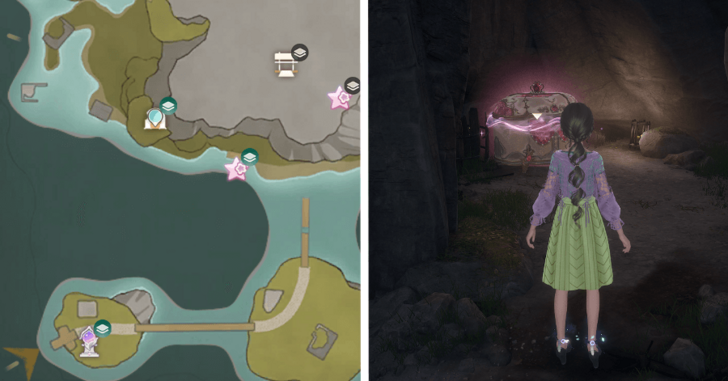 |
Hidden inside the Prosperville Cavern. There is an Esseling blocking the way towards this Chest. |
| 106 |  |
At the northern island in Prosperville. Found at the base of the stonetree island. |
| 107 | 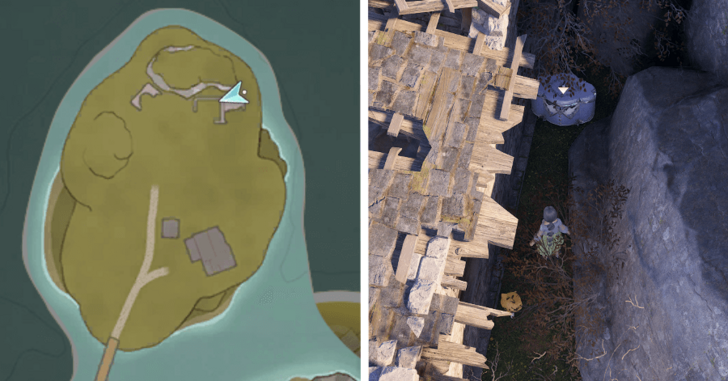 |
Behind a broken house at the northern island in Prosperville. |
| 108 | 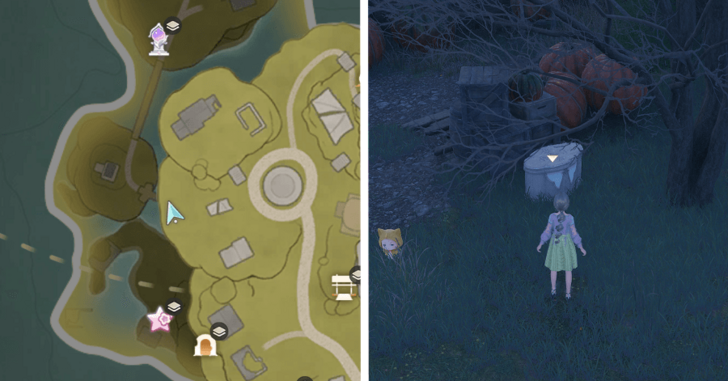 |
Prosperville 2F, found behind some crates and pumpkins. |
| 109 |  |
Inside of a broken house at Prosperville 2F, northeast from the Prosperville Entrance Warp Spire. |
| 110 |  |
Found in between a worn down building and a platform. Make use of the Choo-Choo Station Stonetree Top Warp Spire, then drop down to the northern cliff overlooking the train station. Unlocks the 3-star Shoes Sketch Windchaser. |
| 111 | 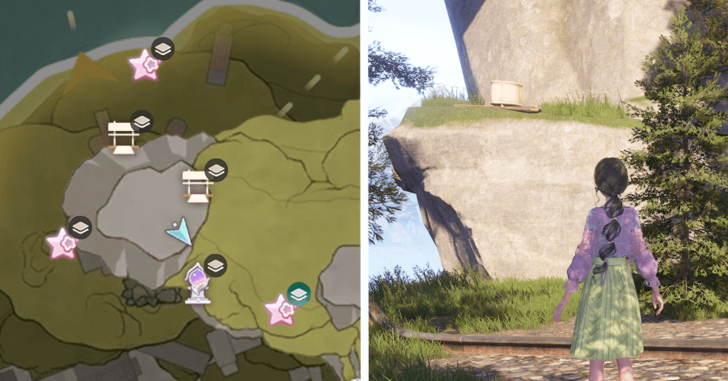 |
Choo-Choo Station 2F, at a lower location north from the Stonetree Top Warp Spire. At the edge of a cliff where railroad tracks are cut off, the Chest is at a higher edge. |
| 112 | 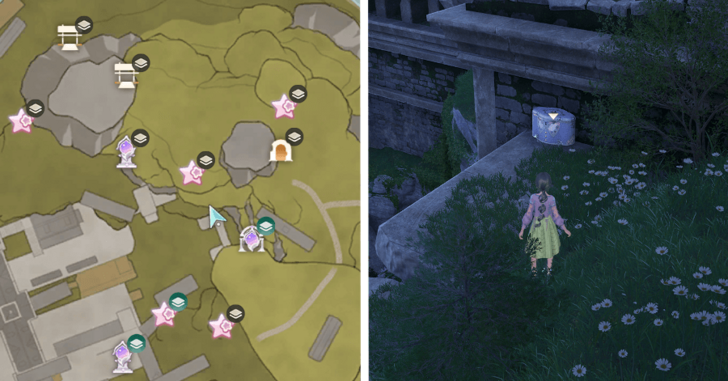 |
Choo-Choo Station, at the top of the Ghost Train dungeon entrance. |
| 113 |  |
Choo-Choo Station 1F, at the western section of the island. It's right beside a Curio Domain. |
| 114 | 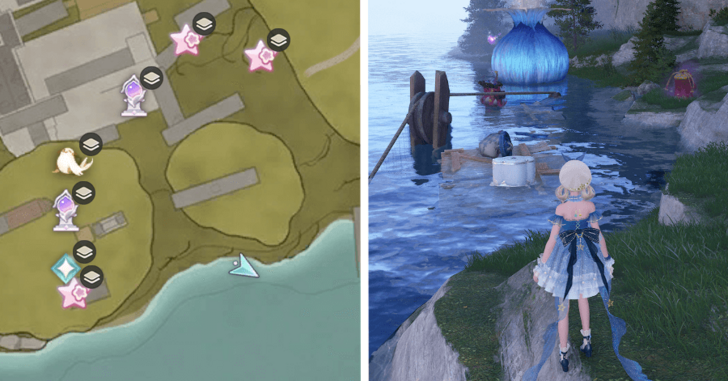 |
Choo-Choo Station 1F, southeast from the Shipping Center Warp Spire. In the middle of floatsam in the water. Surrounded by Esselings, but no need to defeat them. |
| 115 | 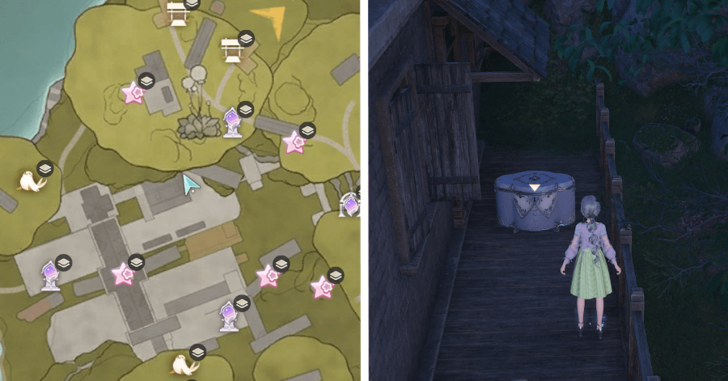 |
Choo-Choo Station, besides the house in the Shipping Center. |
Wishing Woods Treasure Chests
| No. | Image | How to Get |
|---|---|---|
| 1 | 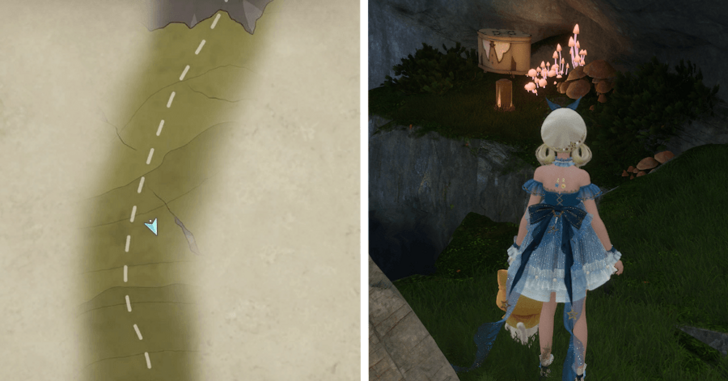 |
Along the path of the Interview Tunnel. Found on the side, isolated by some stone platforms. Jump and hover to get to the chest. |
| 2 | 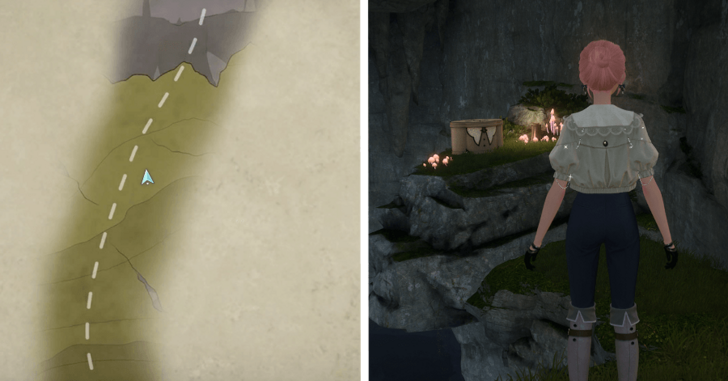 |
Along the path of the Interview Tunnel. Jump and hover to get to the chest. |
| 3 |  |
Along the path of the Interview Tunnel. Blocked behind three Esselings, with one on each stone platform before the chest. It is safer to defeat the Esselings first before claiming the Chest. |
| 4 | 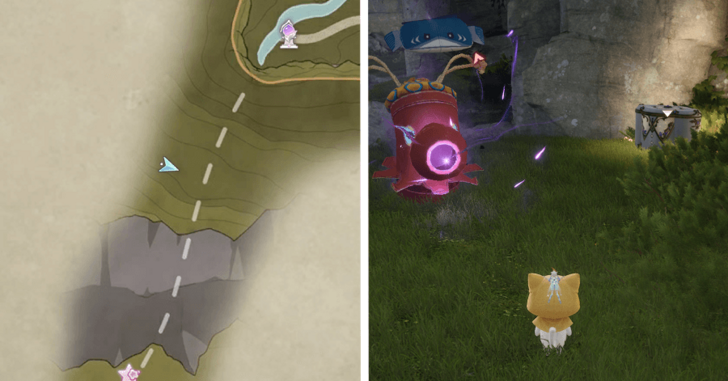 |
Along the path of the Interview Tunnel. Guarded by 4 Esselings, but can be claimed without defeating them. |
| 5 | 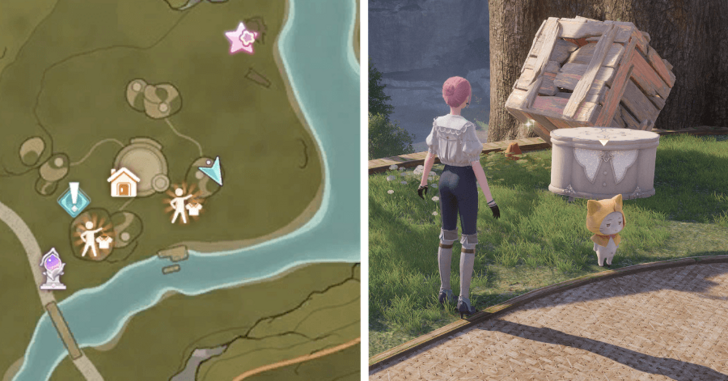 |
East of the Wish Inspection Center. |
| 6 | 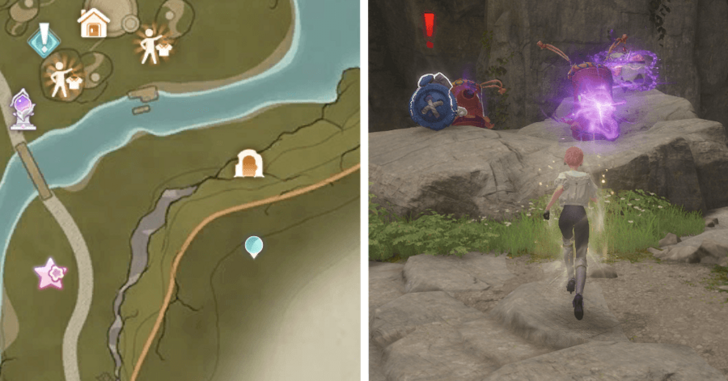 |
Found within the Wish Inspection Cavern. Defeat all the Esselings guarding the chest to be able to open the chest. Contains the Herbal Aroma material. |
| 7 | 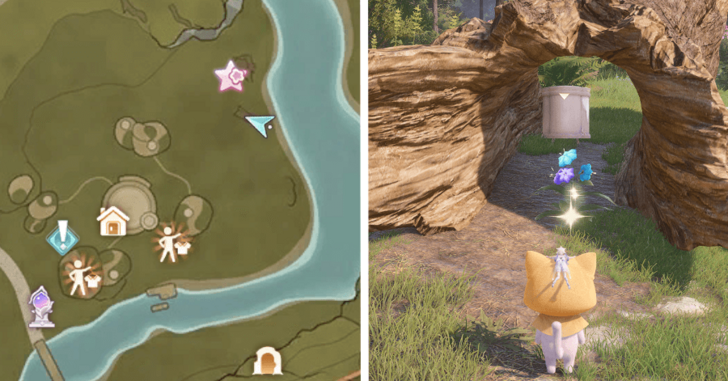 |
Found under a fallen hollow tree trunk northeast of the Wish Inspection Center. |
| 8 | 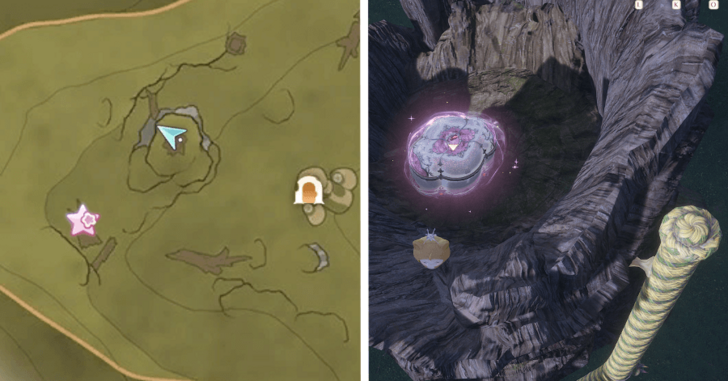 |
Found on top of the tree trunk near the Research Institute Cavern. Contains the 3-star Backpiece Sketch Sleepless Aria. |
| 9 | 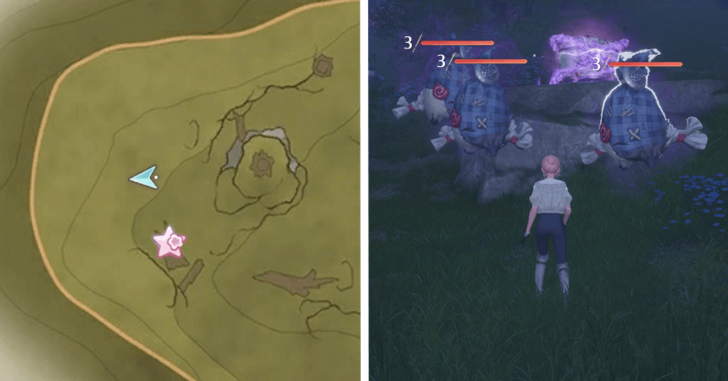 |
Guarded by multiple Esselings. Defeat them to unlock the Treasure chest. Contains the 3-star Sock Sketch White Mist. |
| 10 | 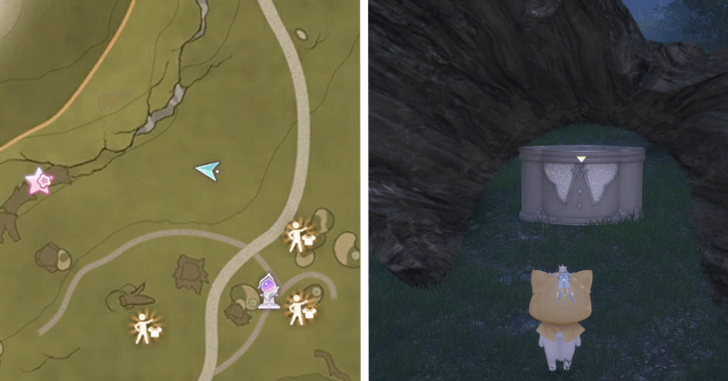 |
Found under a partial hollow tree trunk. |
| 11 | 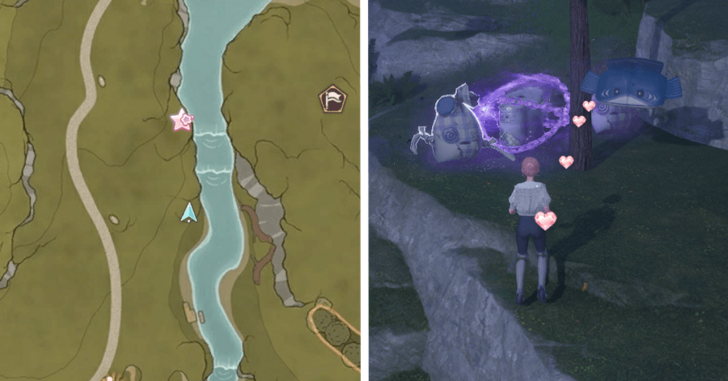 |
Guarded by multiple Esselings. Defeat them to unlock the Treasure chest. |
| 12 | 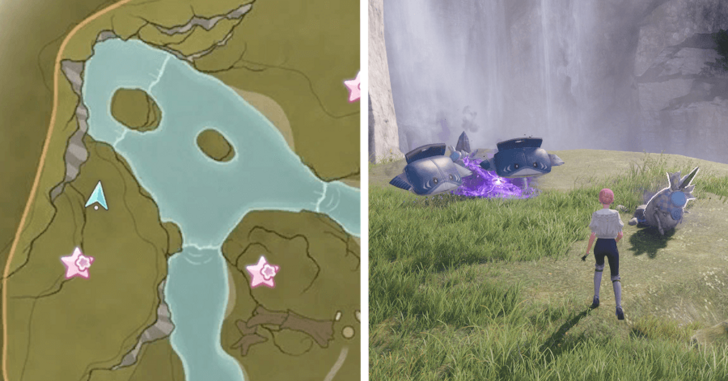 |
South of the waterfalls. Guarded by multiple Esselings. Defeat them to unlock the Treasure chest. |
| 13 | 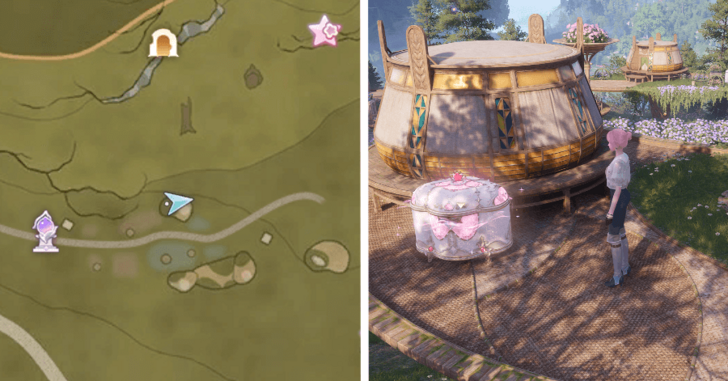 |
Unguarded near the Farm Entrance, on top of one of the platforms. Unlockes the 3-star Hairstyle Sketch Silken Strands. |
| 14 |  |
Guarded by Esselings. Defeat them all to be able to open the chest. |
| 15 |  |
Found high up a building around Bizarre Wish Hills. Use Momo via Starlet Burst to climb up a nearby pole that is riddled with spikes. |
| 16 | 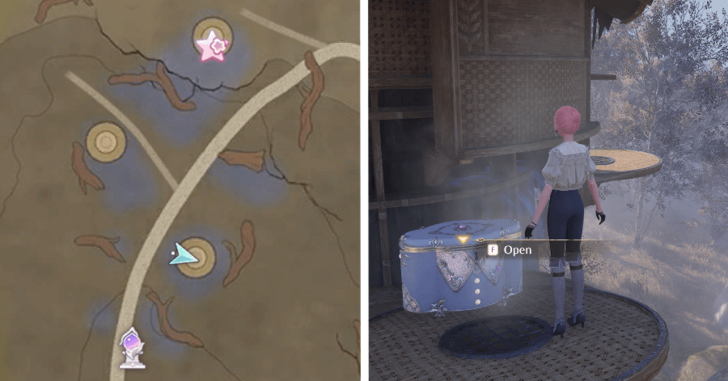 |
found on a platform of a building in Bizarre Wish Hills. |
| 17 | 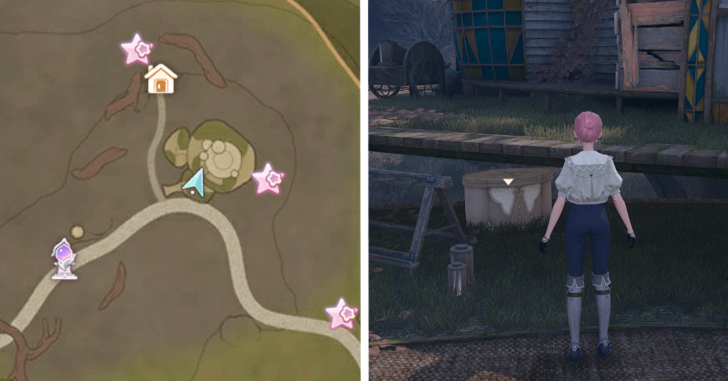 |
Found sandwiched between two platforms. Shrink with Starlet Burst to get to the chest properly. |
| 18 | 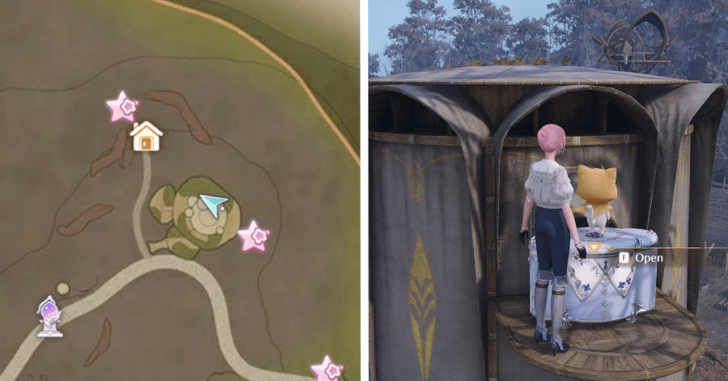 |
Clouse to Chest #17, at a higher platform. Jump up towards it to get to it. |
| 19 |  |
Found west of the Desperation Orb Warehouse. Defeat all nearby Esselings to be able to open the chest. |
| 20 | 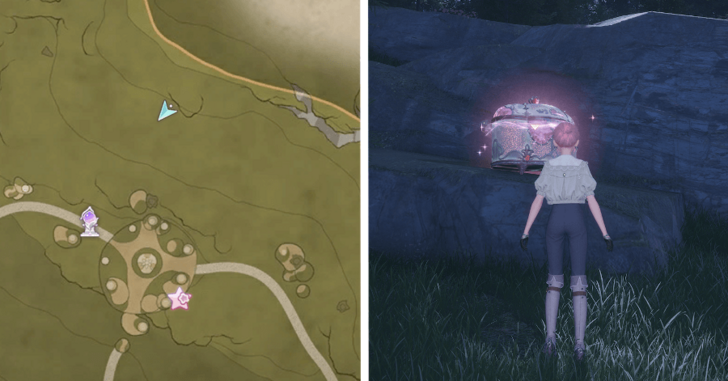 |
North of Wish Celebration Center. Guarded by Esselings; defeat them all to be able to open the chest. Unlocks the 3-star Hairstyle Sketch Gentle Curves. |
| 21 | 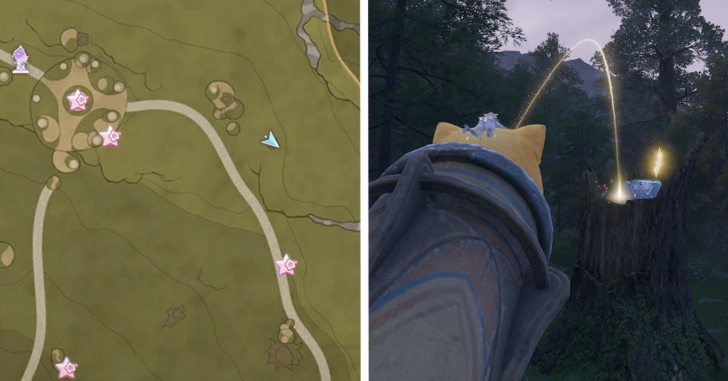 |
On top of a tall tree trunk west from the Wish Celebration Center. Shrink into Momo with Starlet Burst and use a Confetti Cannon nearby to get to it easily. |
| 22 | 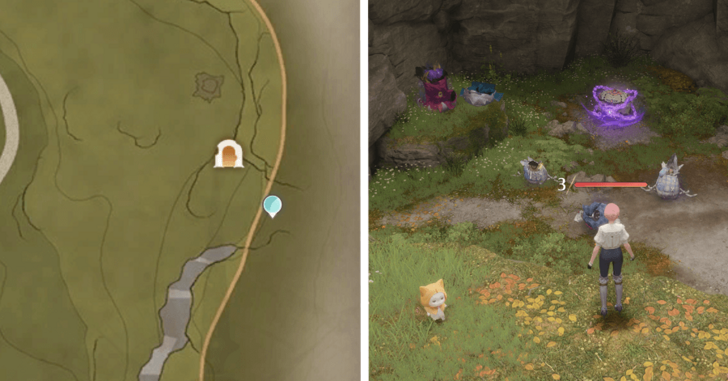 |
Deep inside the Deep Aurosa Valley Cavern. Guarded by Esselings; defeat them all to open the Chest. Unlocks the Midsummer Breeze material. |
| 23 |  |
Found inside Deep Aurosa Valley Cavern. No need to defeat the Esselings to open the chest. |
| 24 | 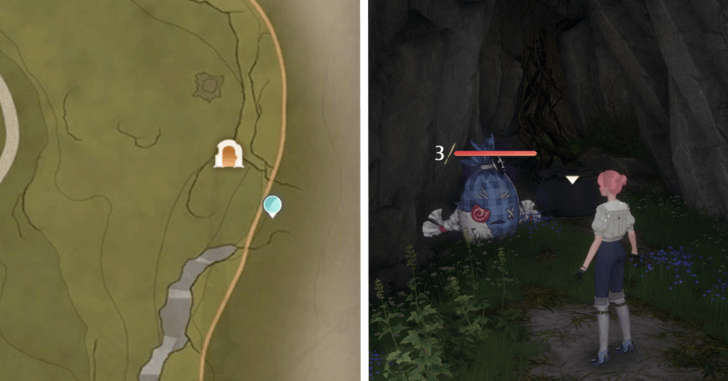 |
Found inside Deep Aurosa Valley Cavern. Defeating the Esselings around it is optional to open the chest. |
| 25 | 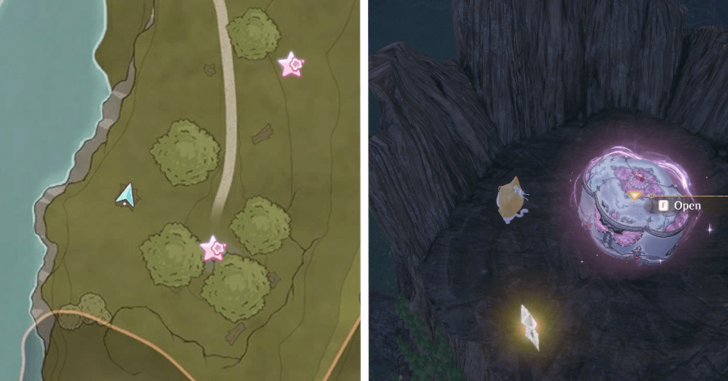 |
On top of a tree trunk south from the Land of Starfall Warp Spire. Unlocks the 3-star Bracelet Sketch Calibration Time. |
| 26 | 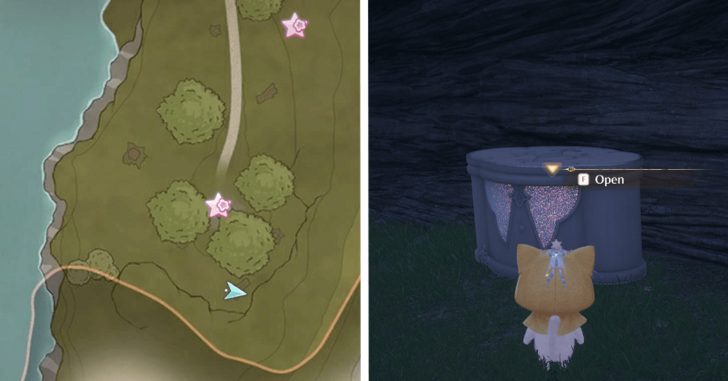 |
Found inside a hollow trunk on the ground in the Land of Starfall. Shrink into Momo with Starlet Burst to be able to open this Chest. |
| 27 |  |
Found southwest of the Ascetic Camp. Guiarded by Esselings; defeat them all to unlock the Chest. |
| 28 | 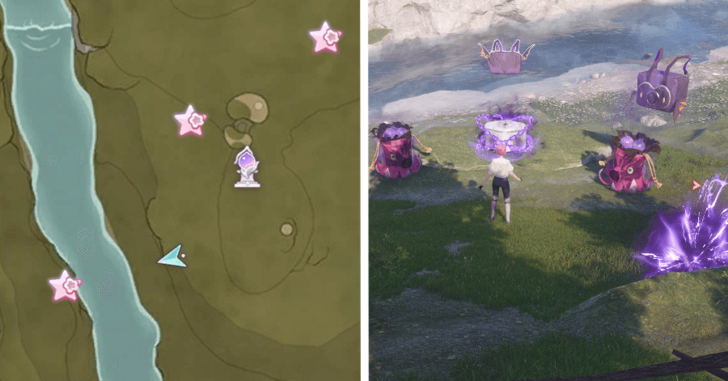 |
Found southeast of the Ascetic Camp. Also guarded by Esselings; defeat them all to unlock the Chest. |
| 29 |  |
North of the Grand Millewish Tree. Guarded by Esselings; defeat them all to unlock the Chest. |
| 30 | 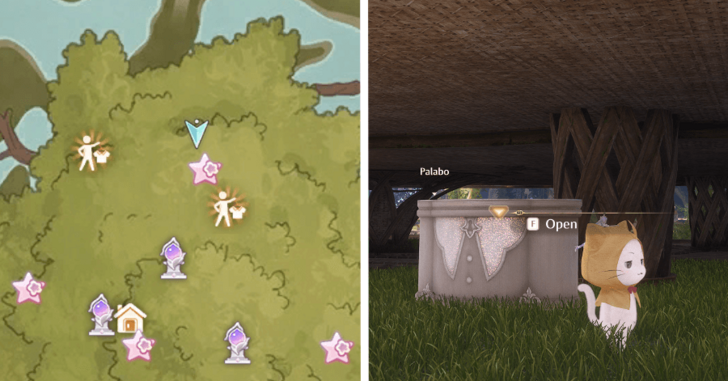 |
Under the Grand Millewish Tree, sandwiched between platforms at the Residential Area. Can only be reached by shrinking in size with Starlet Burst. |
| 31 | 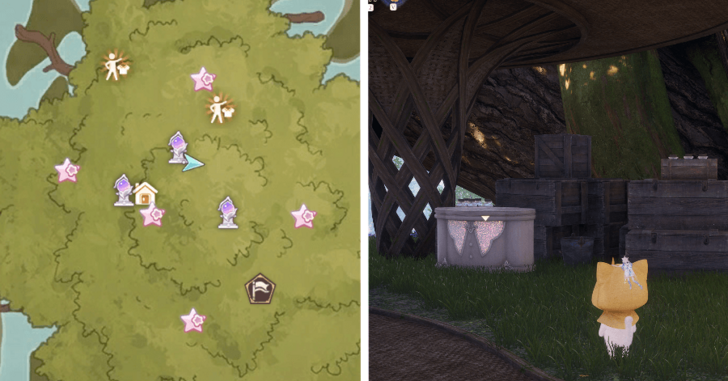 |
Under the Grand Millewish Tree, nearby a pole that Momo can climb up on. Very close to the Residential Area Warp Spire. |
| 32 | 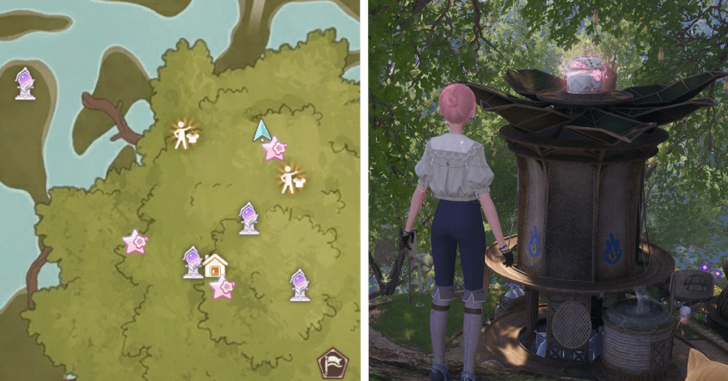 |
Under the Grand Millewish Tree, on top of a building in the Residential Area. Make use of a nearby tree branch to match the height, then jump and float towards the Chest. Unlocks the 3-star Face Decoration Sketch Simple Lines. |
| 33 | 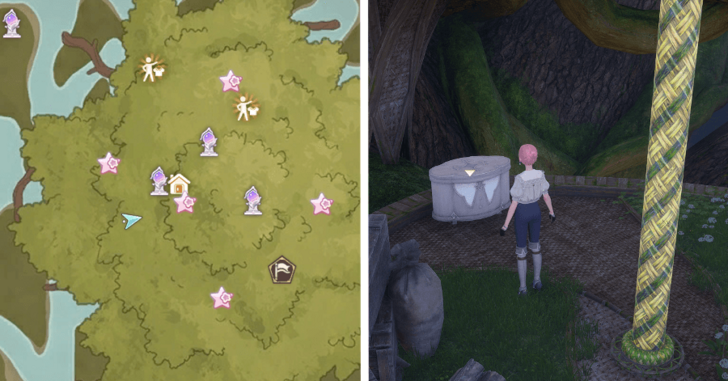 |
Found at a lower platform near the Temple of Wishes, under the Grand Millewish Tree. |
| 34 |  |
On top of a building at the west side of the Grand Millewish Tree. |
| 35 | 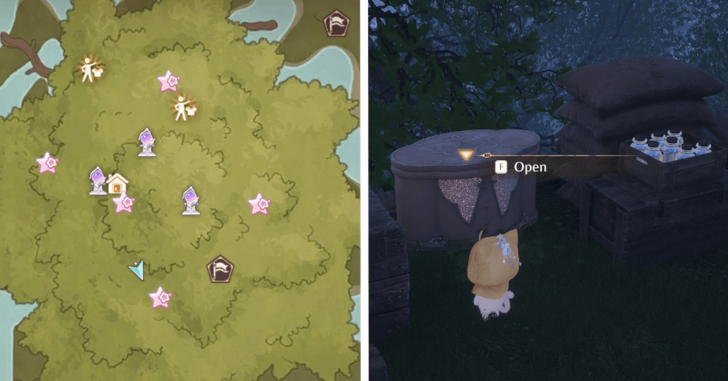 |
On a lower platform at the west side of the Grand Millewish Tree. |
| 36 |  |
Found in the first area of the Deep Swordsmith Ruins Cavern. Defeat all guarding Esselings to be able to open this Chest. |
| 37 | 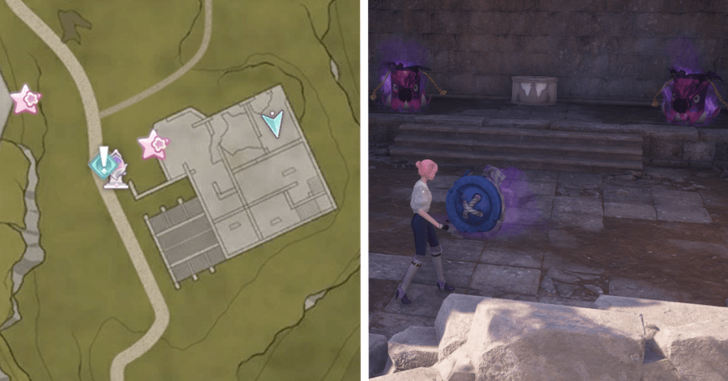 |
Inside one of the castle ruins walls around the Swordsmith Ruins. There is no need to defeat all guarding Esselings to be able to open this Chest. |
| 38 | 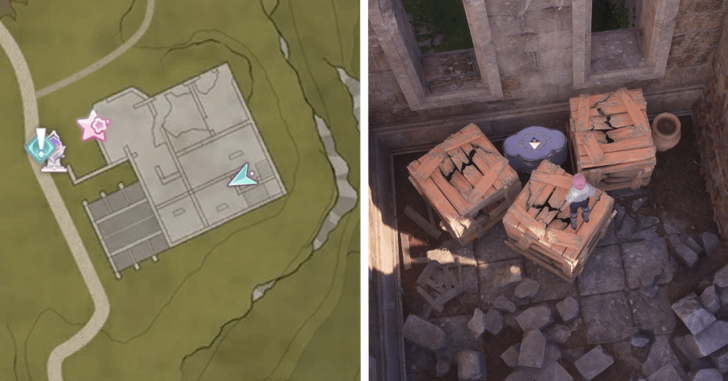 |
Found in the second floor of the Ruins of the Guardians. Hidden behind breakable crates. |
| 39 | 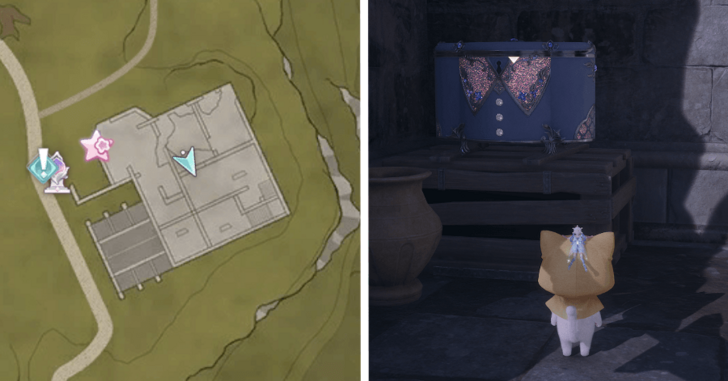 |
Found in the second floor of the Ruins of the Guardians. Hidden in a room blocked by crates, guarded by two Guardians. Go inside, and get past a third Guardian. |
| 40 | 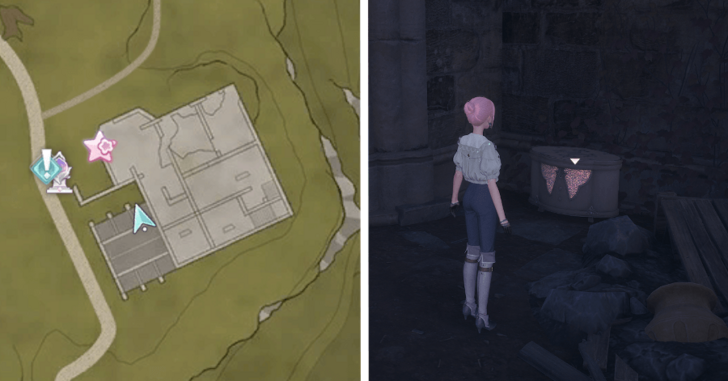 |
Found in one area in the first floor of Ruins of the Guardians. |
| 41 | 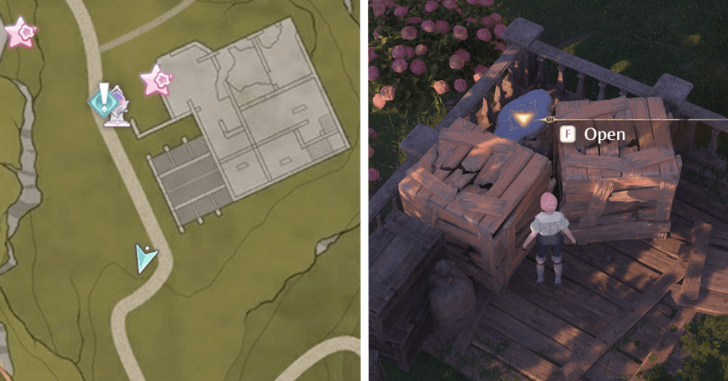 |
Outside of the Ruins of the Guardians. Blocked from sight by a couple of crates. |
| 42 | 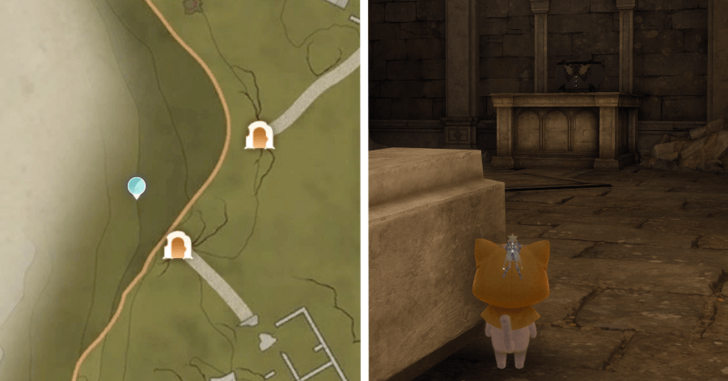 |
Found inside the Outer Swordsmith Ruins Cavern. You'll have to pass through two Guardians to make it to the Chest. |
| 43 | 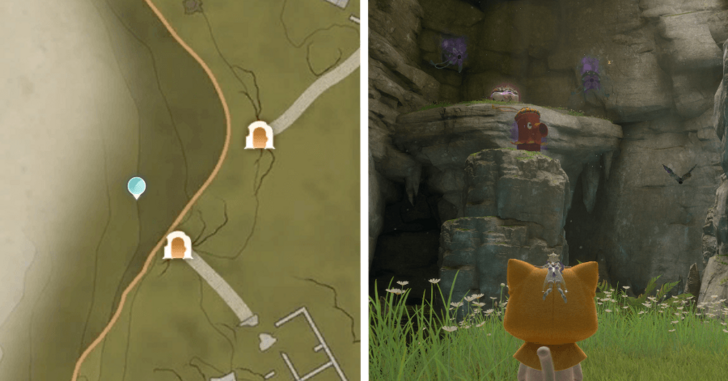 |
Found inside the Outer Swordsmith Ruins Cavern. Entering a pipe leads to a secret area where the chest is, guarded by Esselings. No need to defeat them to unlock the Chest, but it certainly makes it safer. |
| 44 | 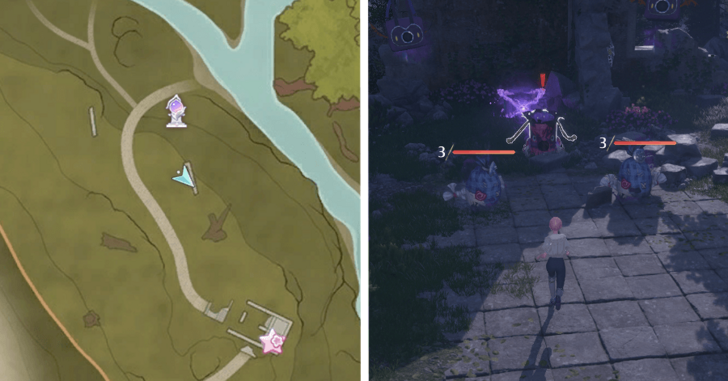 |
Right at the outskirts of the Swordsmith Ruins. Defeat the Esselings guarding it to unlock the Chest. |
| 45 | 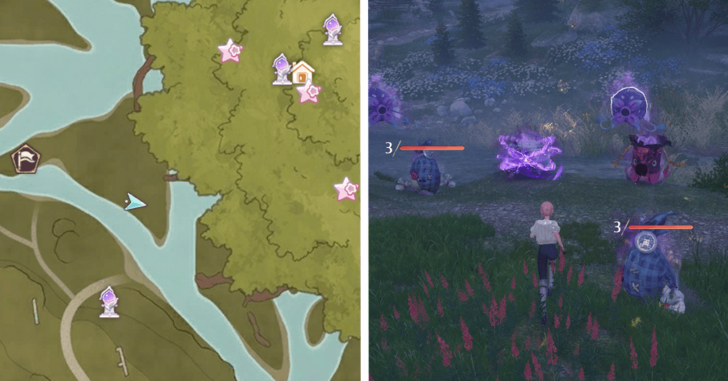 |
Found in the outskirts of the Grand Millewish Tree. Defeat the Esselings guarding it to unlock the Chest. |
| 46 |  |
Southwest across Timi's Beauty Lab, across the river. Defeat the Esselings guarding it to unlock the Chest. |
| 47 | 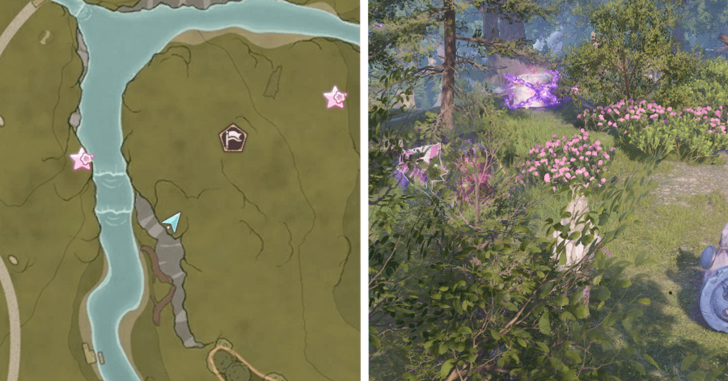 |
Found southeast from the Momo's Dodge and Dash minigame. Defeat the Esselings guarding it to unlock the Chest. Unlocks the 3-star Hair Accessory Sketch Binary Beads. |
| 48 |  |
Near the Wishcraft Lab, under a tree trunk. The opening entrance is too small, so shrink down with Starlet Burst. Unlocks the 3-star Outerwear Sketch Elegant Burgundy. |
| 49 | 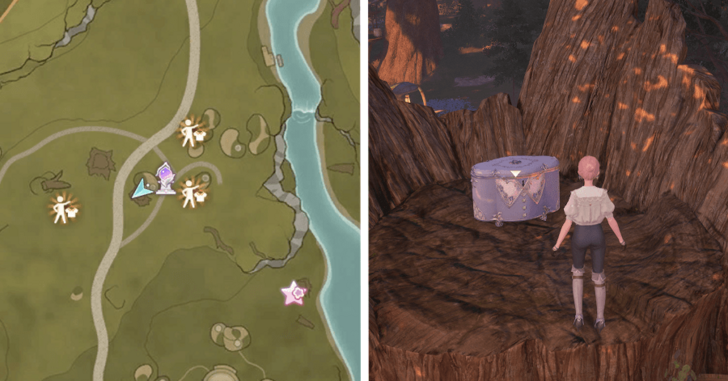 |
On top of a tree trunk besides a building near the Wishcraft Lab. |
| 50 | 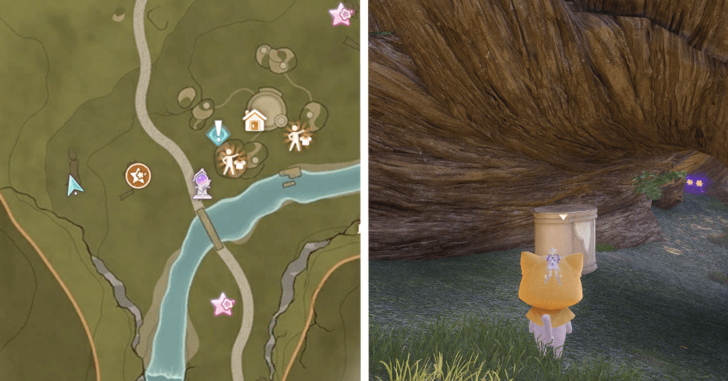 |
Found under a fallen hollow trunk west of the Wish Inspection Center Warp Spire. |
| 51 | 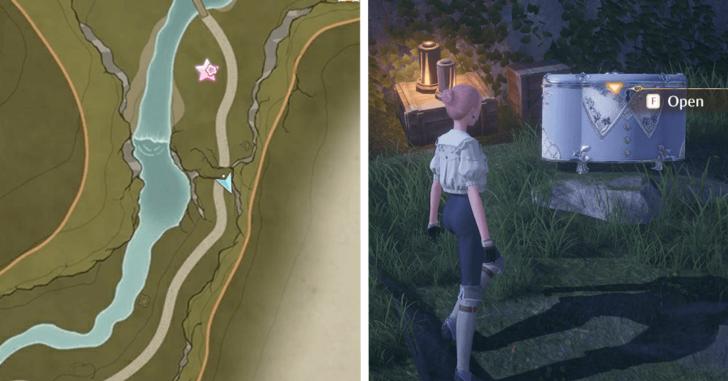 |
Found south of the Wish Inspection Center, above the place where the wagon was stuck as part of the story. |
| 52 | 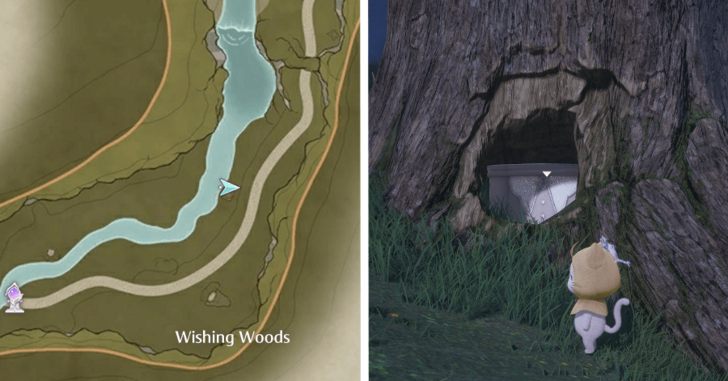 |
Found in a hole inside a tree stump northwest of the Elderwood Riverbank Warp Spire. |
| 53 | 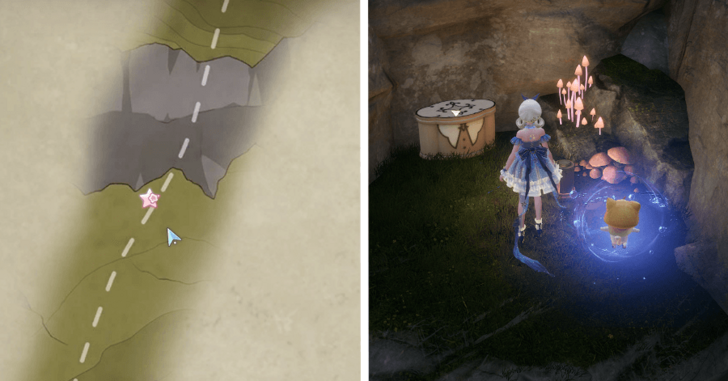 |
In the Interview Tunnel at the side, isolated. Jump and hover across rock formations to get to this chest. |
| 54 | 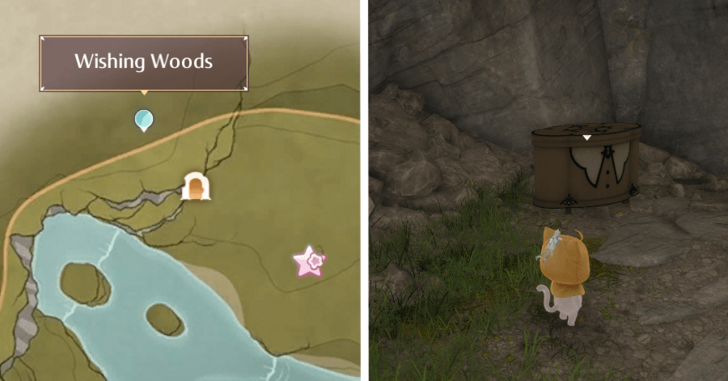 |
Found inside the Waterfall Cavern. Just before the multiple ropes going deeper into the cave. |
| 55 | 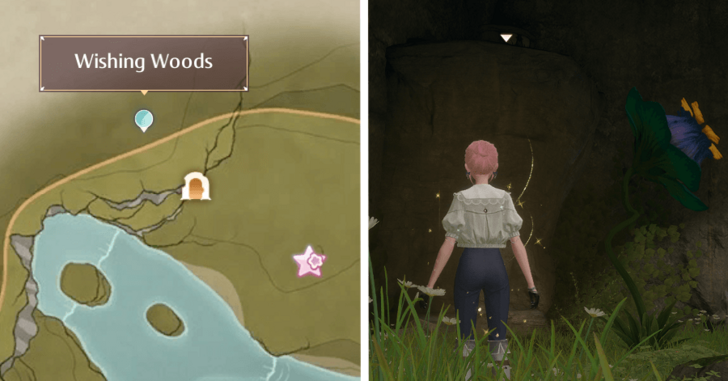 |
Found inside the Waterfall Cavern. Go along the path following the previous one, and it is hidden in the shadow. |
| 56 | 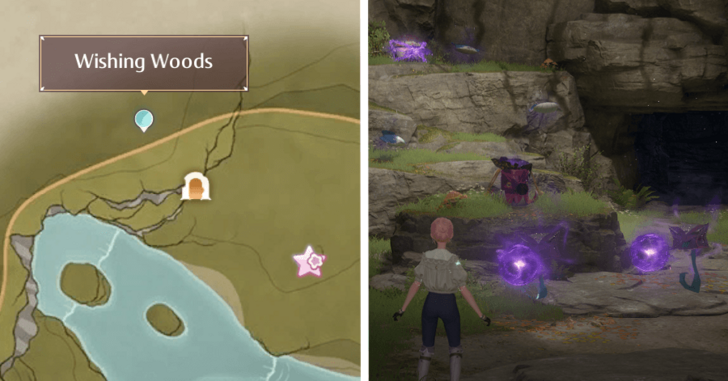 |
Found inside the Waterfall Cavern. Guarded by a lot of Esselings; defeat them all to be able to open it. |
| 57 | 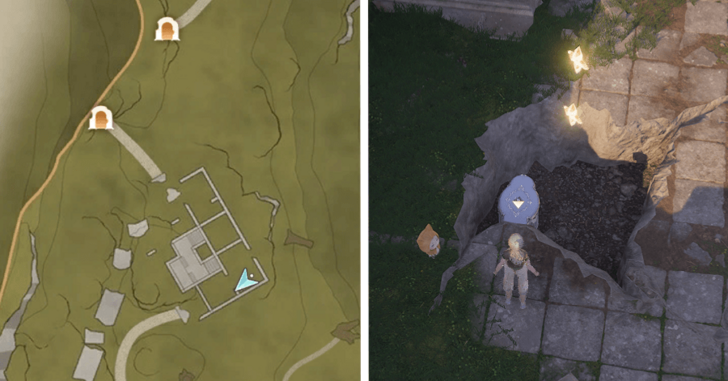 |
Found under a breakable wooden floorboard inside the Swordsmith Ruins. Use a plunging attack to break it. |
| 58 | 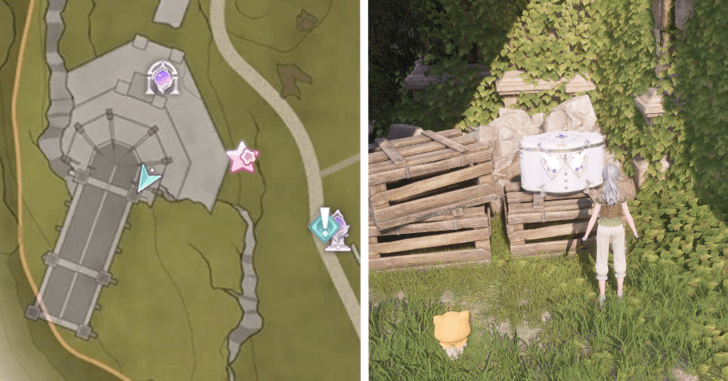 |
Found at the top of the castle that leads to the Swordsmith Ruins Dungeon. Can be reached by jumping onto a Trampoline Net as Momo via Starlet Burst. |
| 59 | 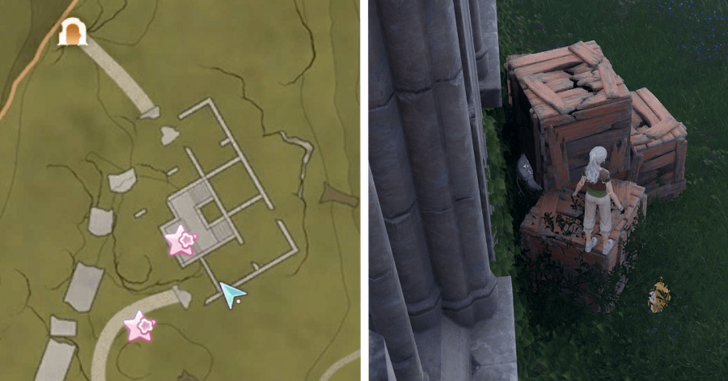 |
Found besides the Swordsmith Ruins, hidden behind a couple of crates. Use a plunging attack to break them to get to the Chest. |
| 60 | 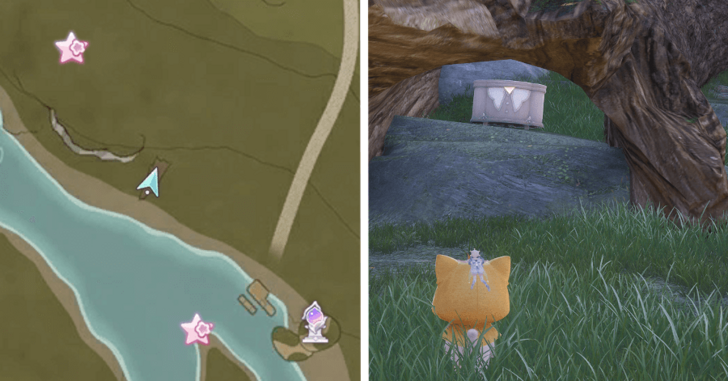 |
Found inside a hollow tree trunk. Shrink with Starlet Burst to get to this Treasure Chest. |
| 61 | 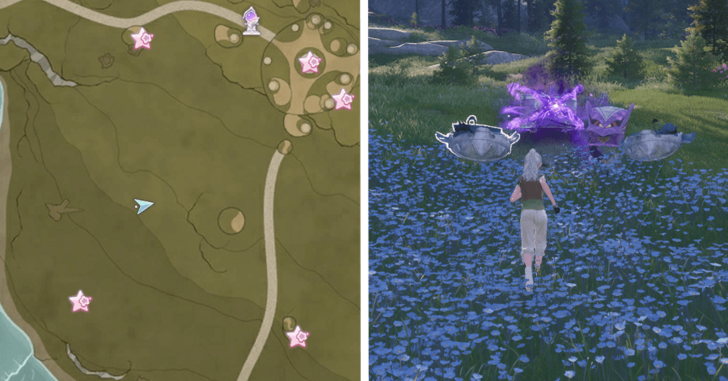 |
Found southwest from the Wish Celebration Center Wish Spire. Defeat all the guarding Esselings to be able to open the Chest. |
Firework Isles Treasure Chests
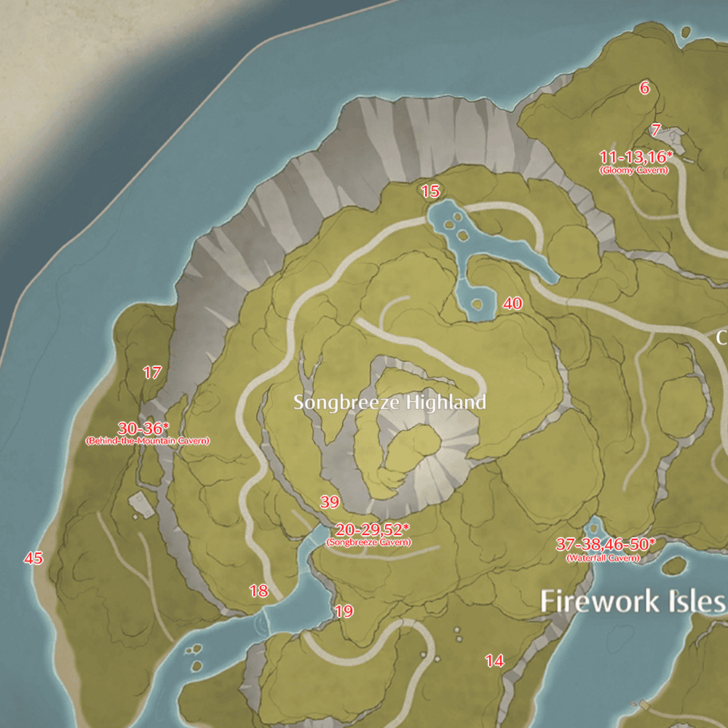 Open Image in New Tab |
 Open Image in New Tab |
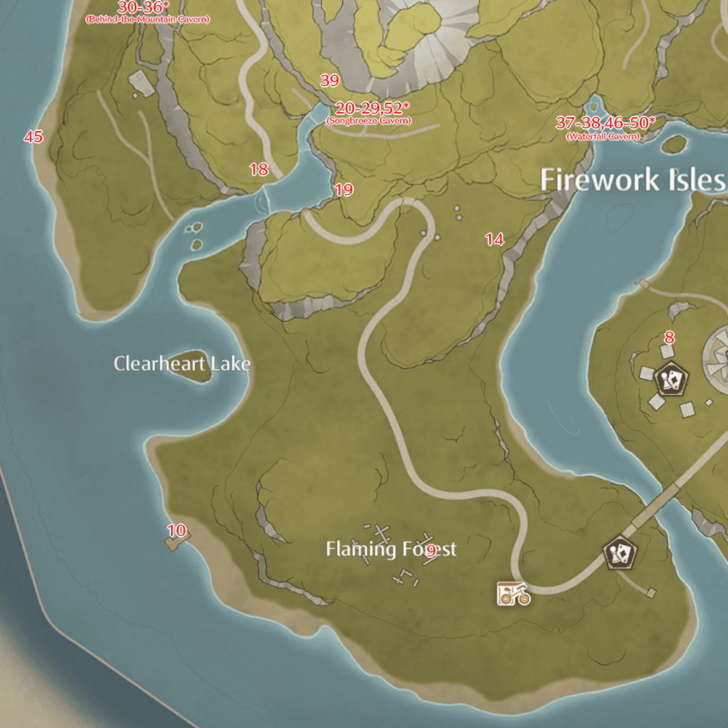 Open Image in New Tab |
 Open Image in New Tab |
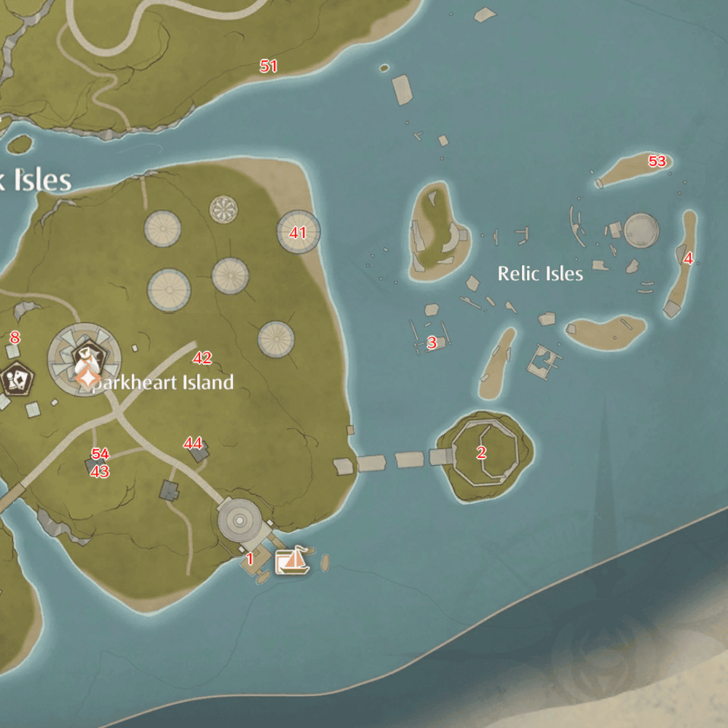
Chests marked with an asterisk are found underground or in caves.
| No. | Image | How to Get |
|---|---|---|
| 1 | 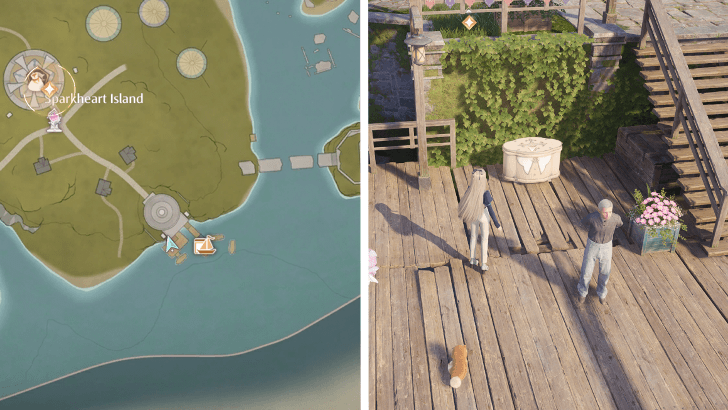 |
At the dock where you arrive with David, head to its western side to find a chest beside the stairs. |
| 2 | 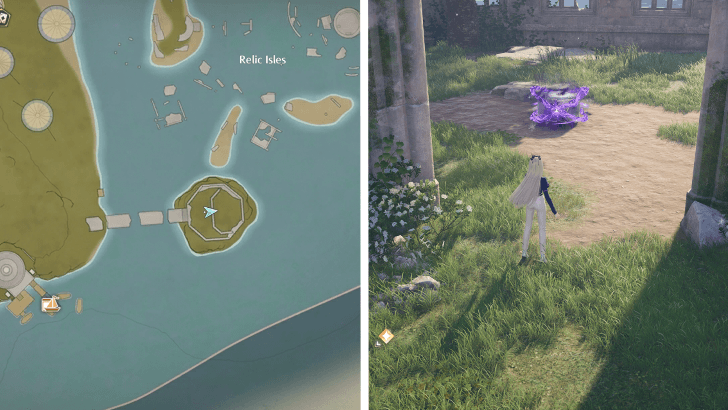 |
Follow the broken bridge east of the Sparkheart Island dock to find a chest guarded by esselings in the ruins. |
| 3 |  |
Head to the southwest ruins in the waters of the Relic Isles to find a chest locked behind esselings. |
| 4 | 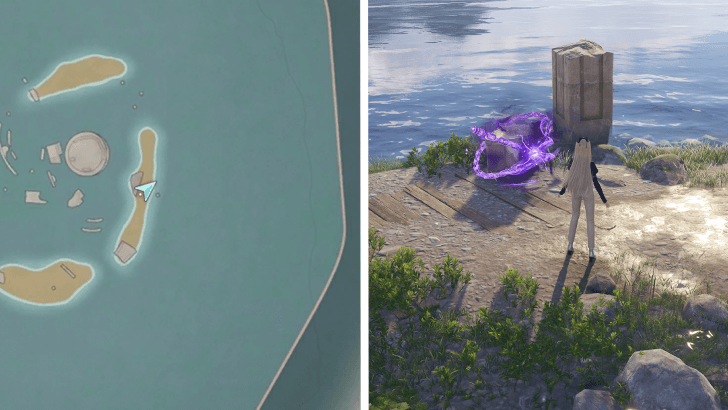 |
There is a chest guarded by esselings on the easternmost island of the Relic Isles. |
| 5 | 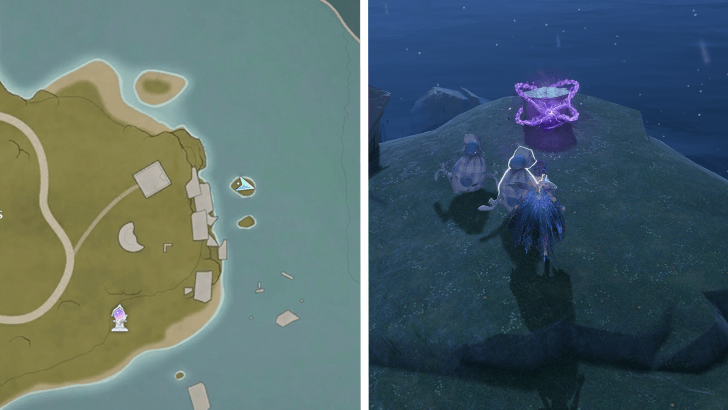 |
A small island on the eastern part of the Crescent Shoal has a chest locked away behind esselings. |
| 6 | 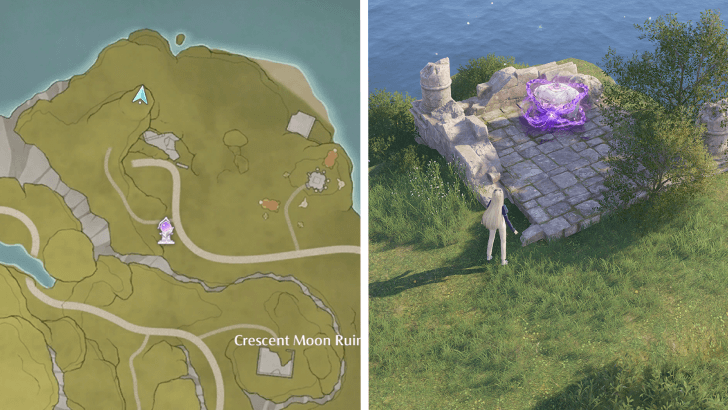 |
At the northern part of Firework Island, there is a chest on a cliff guarded by esselings. |
| 7 | 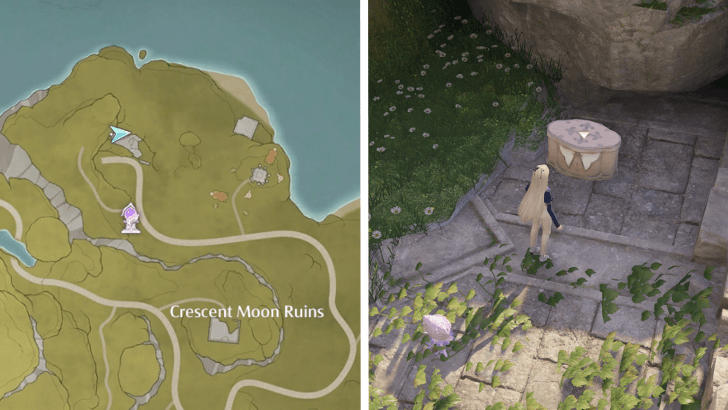 |
There is a chest to the east the Gloomy Cavern's entrance, near a crumbling wall. |
| 8 | 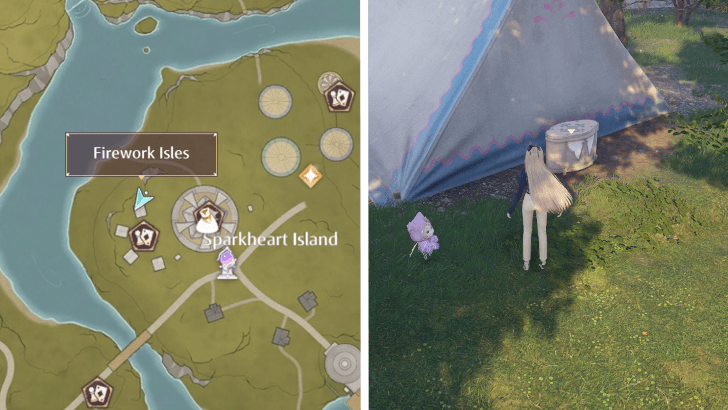 |
There is a chest behind the northernmost tent at the Fireworks Dance Party. |
| 9 | 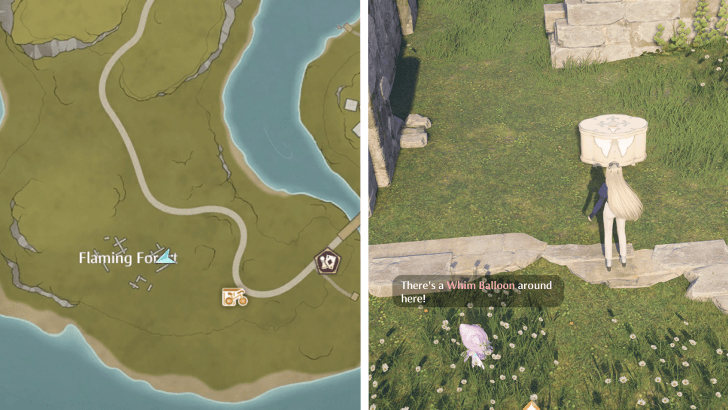 |
There is a chest in the ruined buildings located in the Flaming Forest. |
| 10 | 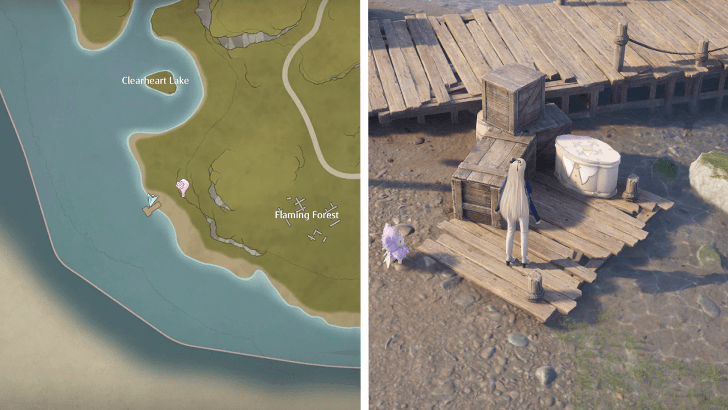 |
A chest can be found at the small pier by the southwestern shores of Firework Island, directly west of the Flaming Forest. |
| 11 to 13 |  |
There are three chests inside the Gloomy Cavern Cave. Unlock the cave by lighting the three fireworks around the island shown on the stone near the entrance of the cave. |
| 14 | 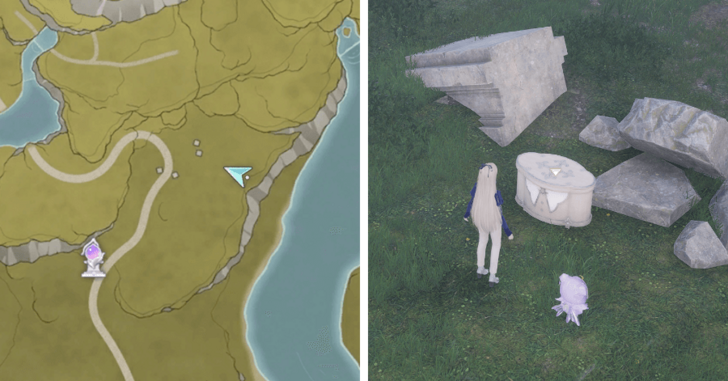 |
Northeast of the Songbreeze Highland Foothills Warp Spire is a chest by the cliffside. |
| 15 | 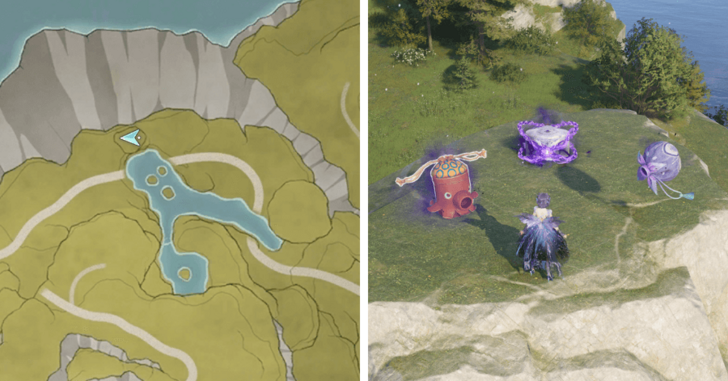 |
Near a lake at the northern part of the island, there is a chest guarded by esselings on top of a large rock. |
| 16 | 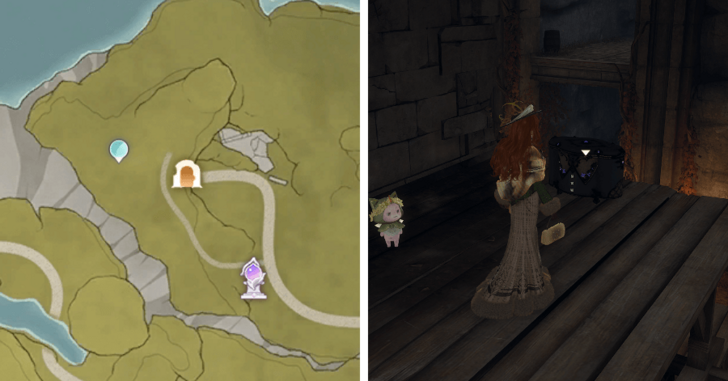 |
Inside the Gloomy Cavern, turn left to find this chest located on top of a scaffold. |
| 17 | 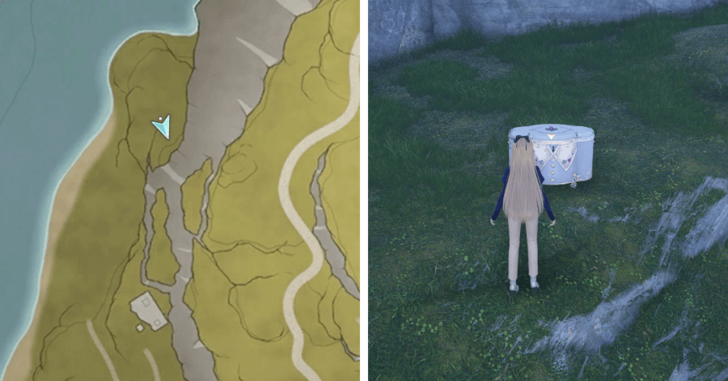 |
By the foothills near the northwestern shores of the island is a chest guarded by esselings. |
| 18 | 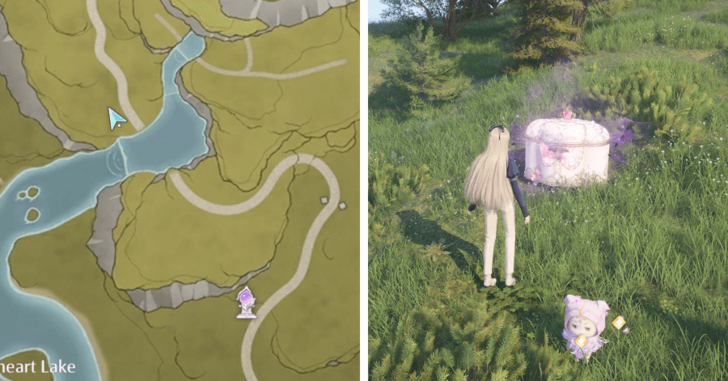 |
Near the waterfall west of the Songbreeze Highland, there is a chest that spawns esselings when opened. |
| 19 | 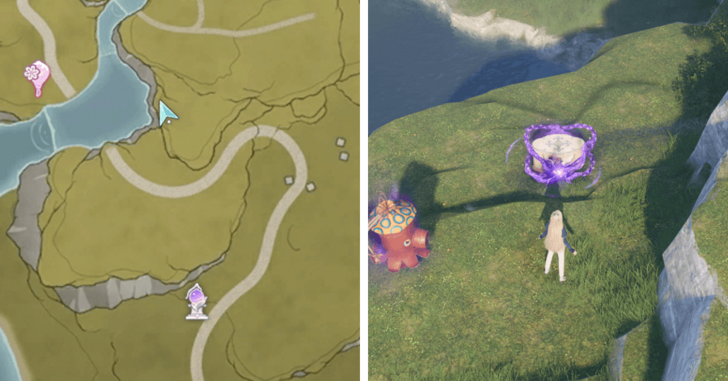 |
On the cliff above the lake and waterfall in the southwestern portion of the Songbreeze Highlands is a chest guarded by esselings. |
| 20 | 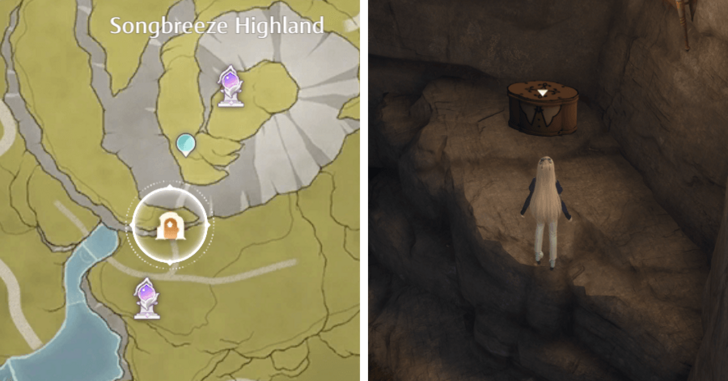 |
There is a chest in the cavern for the Budding Medley quest, located near the esselings found in the portion of the cave that is west of the locked concave door that is similar to the Gloomy Cavern's entrance. |
| 21 to 27 | 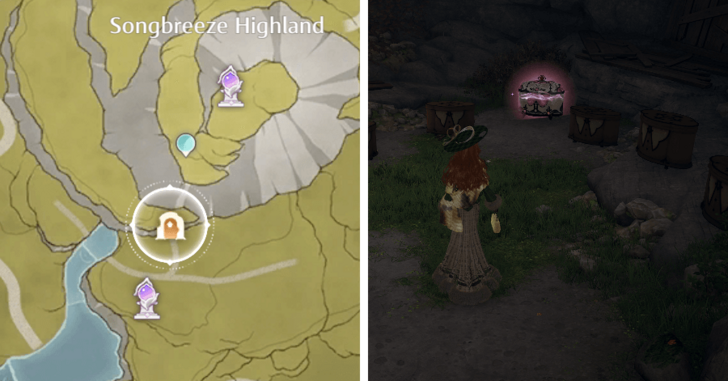 |
There are seven chests inside the vault of the Songbreeze Cavern. Unlock the vault by lighting three fireworks on the island, shown on the stone near the entrance of the vault. |
| 28 | 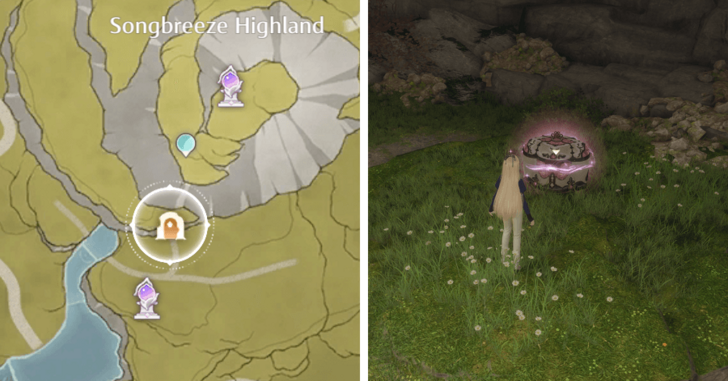 |
Another chest in the Budding Medley cavern in Songbreeze is guarded by a Grudge Bag. To find it, head west of the locked vault door, then follow the rocks upwards until the path splits between rocks going up, and a stone bridge. Take the latter path to find the chest. Contains the sketch for the Budding Medley Fragrance. |
| 29 |  |
Turn southwest from where Grudge Bag is located to claim this chest. |
| 30 to 34 | 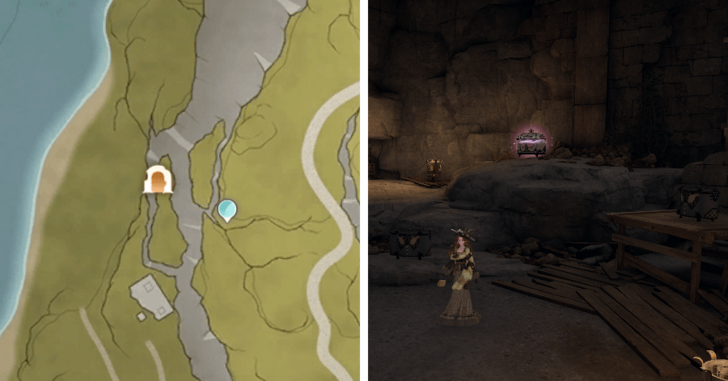 |
There are five chests inside the vault in Behind the Mountain Cavern. Unlock the vault by lighting the three fireworks shown on the stone near the entrance of the vault. |
| 35 |  |
Inside the Behind-the-Mountain Cavern, surrounded by esslings. Contains the sketch for the Grace of Leaves Fragrance. |
| 36 | 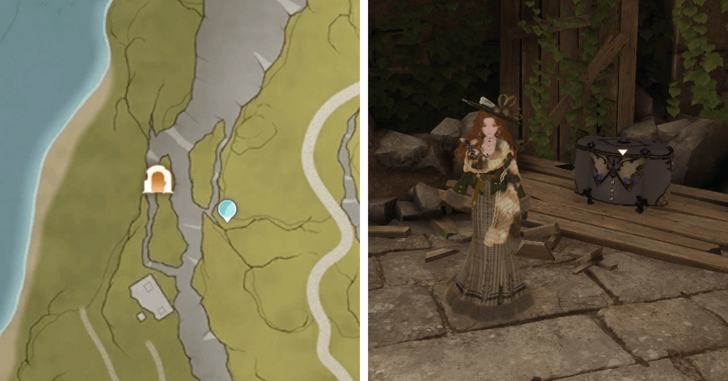 |
Inside the Behind-the-Mountain Cavern. On top of the ruins near the vault. Jump up to the columns to reach this chest. |
| 37 | 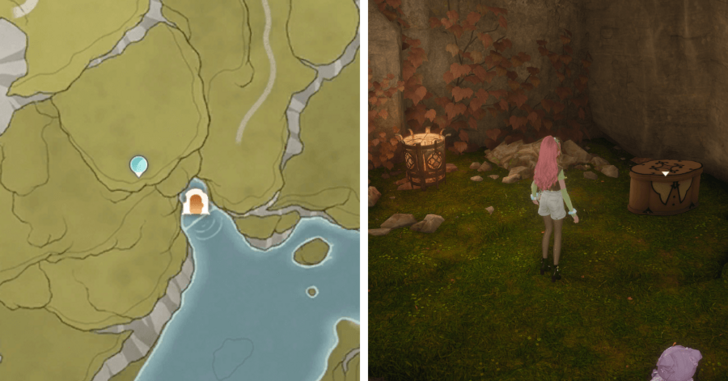 |
Inside the Waterfall Cavern. |
| 38 | 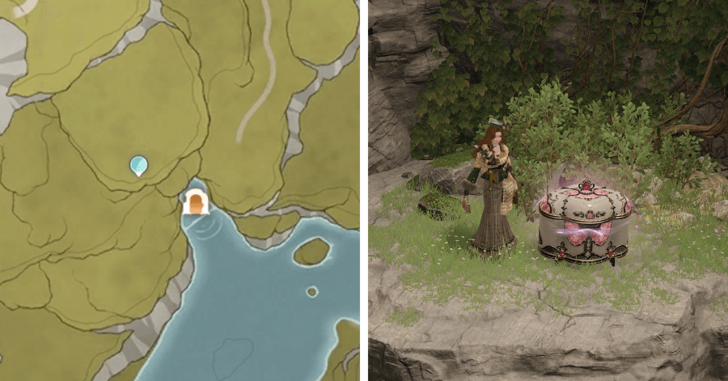 |
Inside the Waterfall Cavern surrounded by esslings. |
| 39 | 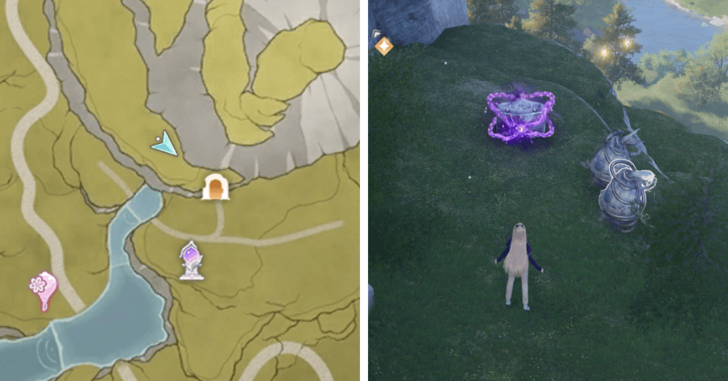 |
On the mountainside north of the Songbreeze Highland Hillside Warp Spire, there is a chest locked behind esselings. |
| 40 | 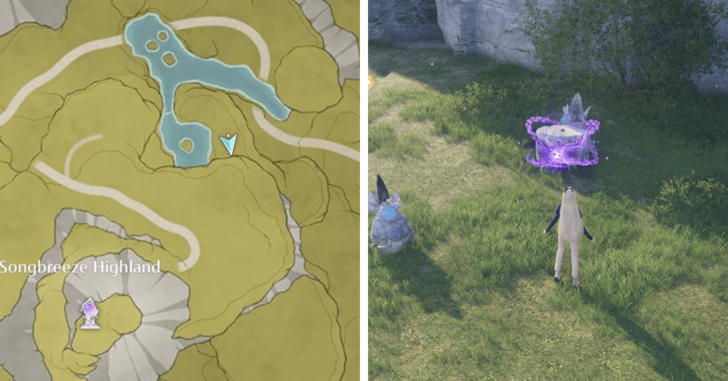 |
Close to the pond at the northern part of the Songbreeze Highlands is a chest guarded by esselings. |
| 41 |  |
In the northeastern-most hot air balloon's basket is a chest. To reach it, look for a bouncy leaf on the ground close to the northwestern-most hot air balloon, then make use of the trampolines in the air to get between the other hot air balloons. |
| 42 | 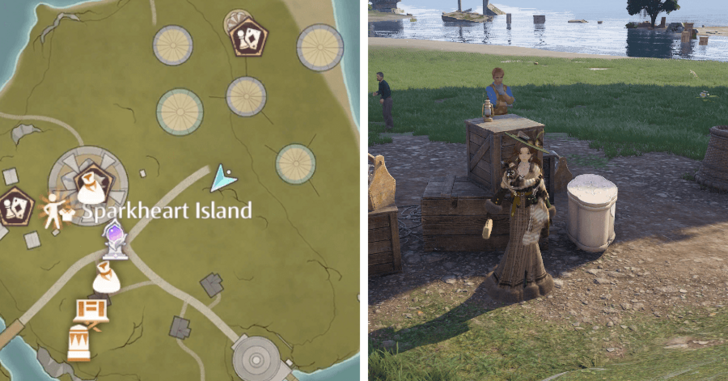 |
Near the lamp post in front of the hot air balloons. |
| 43 | 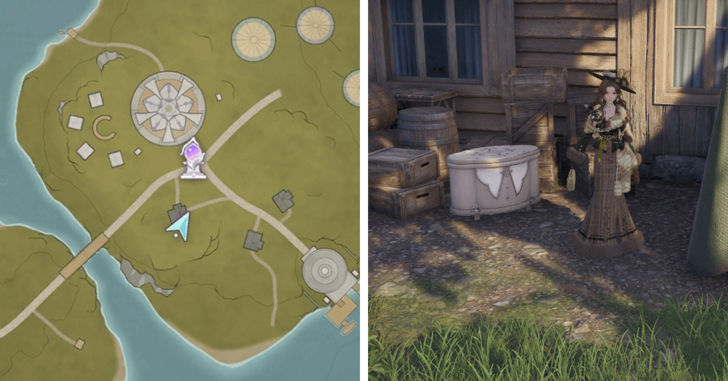 |
Located near the firework crafting station on the side of the house. |
| 44 | 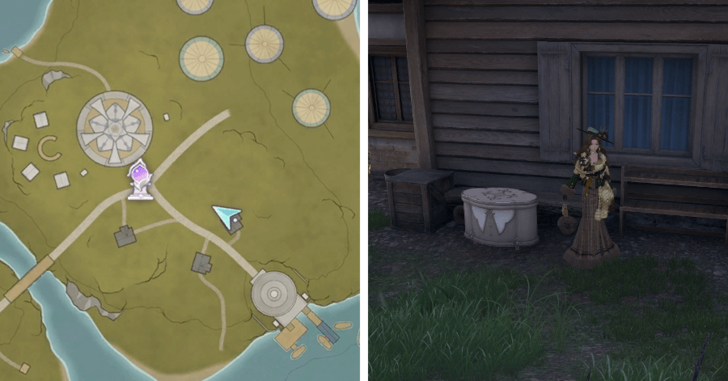 |
On the back of the house on the right near the dock. |
| 45 | 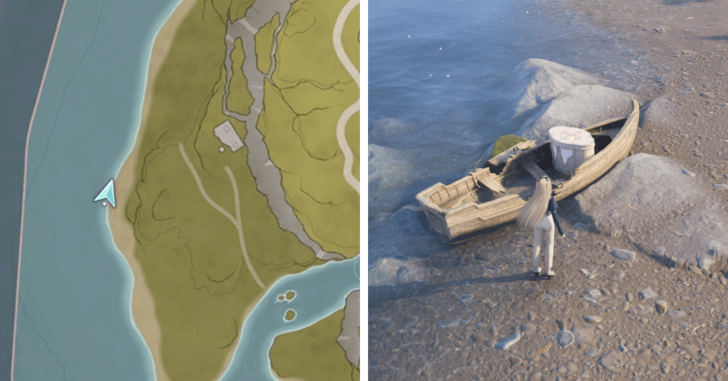 |
There is a chest in a boat by the westernmost shores of the island. |
| 46 to 50 |  |
There are five chests inside the vault of the Waterfall Cave, unlocked by lighting up the three fireworks shown on the stone to the left of the vault door's entrance. |
| 51 | 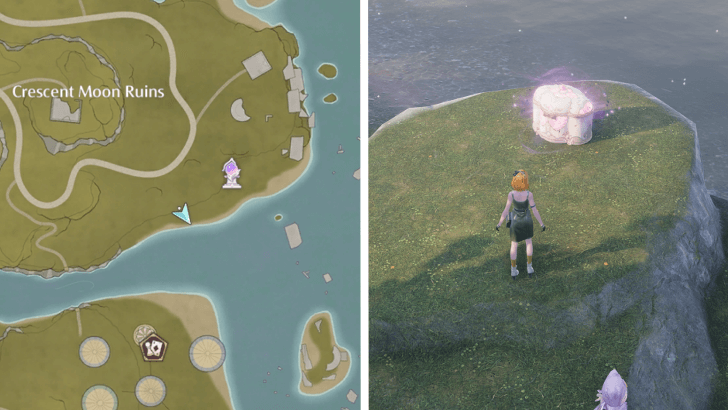 |
Southwest of the Crescent Shoal Warp Spire, there's a chest with esselings inside of it. Defeating them rewards a Whimballoon. |
| 52 | 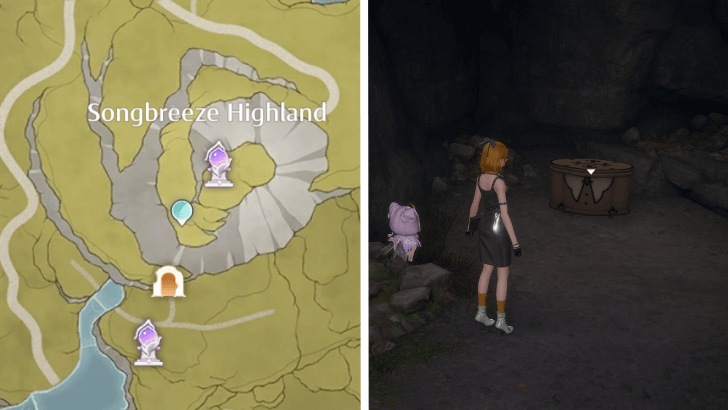 |
In the Songbreeze Highland Cave, use the rocks in the room with the vault door to reach the opening in the upper-left of the room. From here, drop down and continue west to find a chest. |
| 53 | 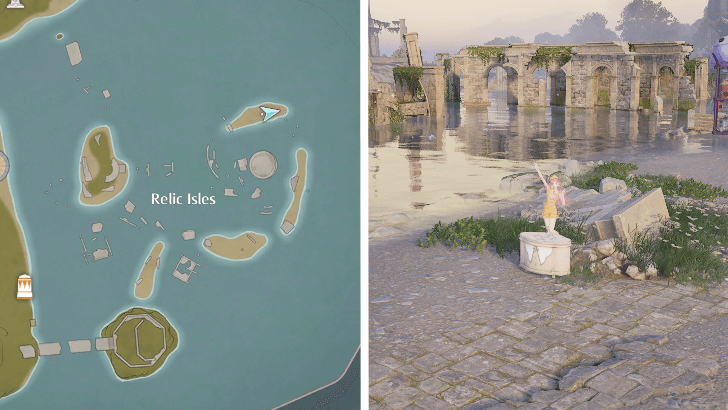 |
The chest is located on the north-east island in Relic Isles. |
| 54 | 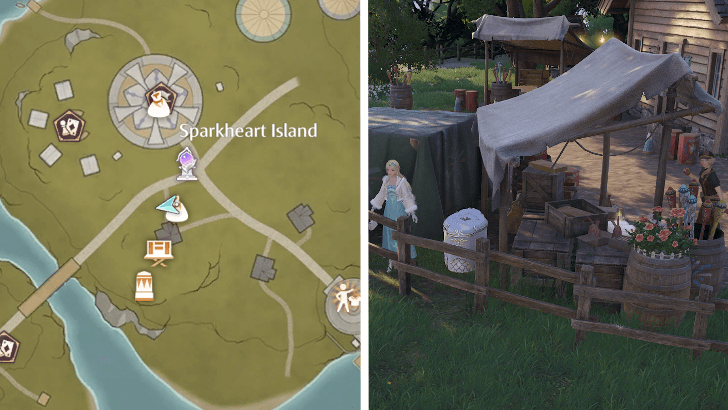 |
In the area south of Sparkheart Island, the chest can be found between a pile of crates and a fence, by the same house as Chest #43. |
| 55 | 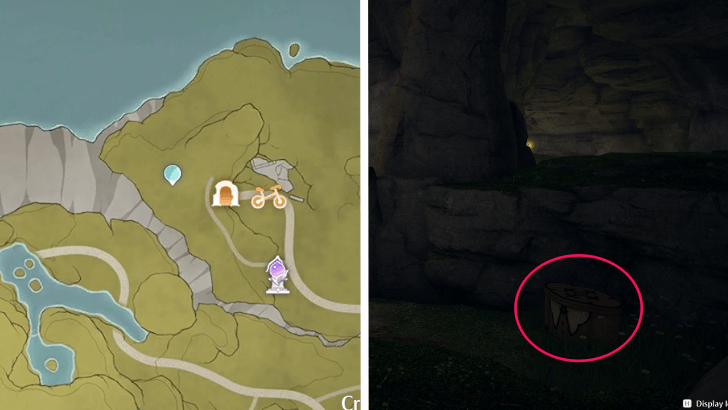 |
Inside the Gloomy Cave, defeat the Esselings on a wooden structure first, then go to this corner to find a chest hidden behind a stone pillar. |
| 56 |  |
On the hot air balloon shaped like ship, in front of the Style Shaped Balloons Midway Warp Spire. Defeat the esselings inside the chest for a Whim Balloon. |
| 57 | 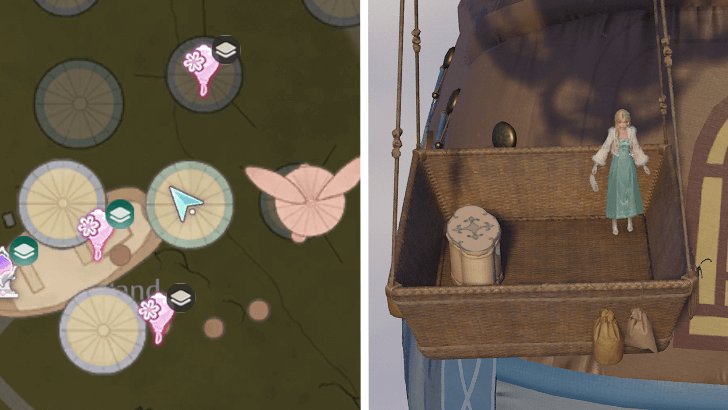 |
On a hot air balloon behind the one that shaped like ship. |
| 58 | 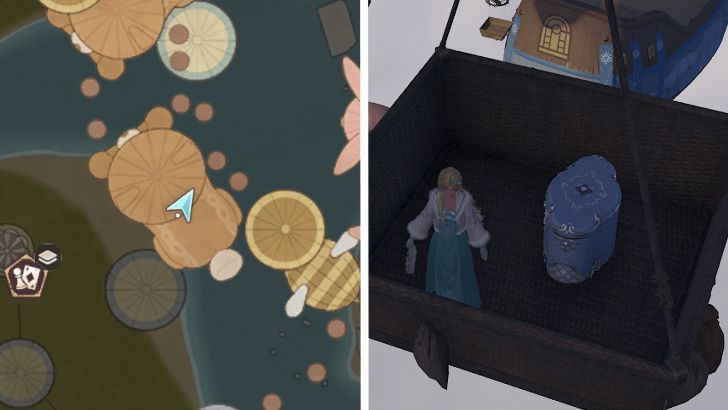 |
On the gondola of the floof-shaped hot air balloon, northeast of the one shaped like ship. |
| 59 | 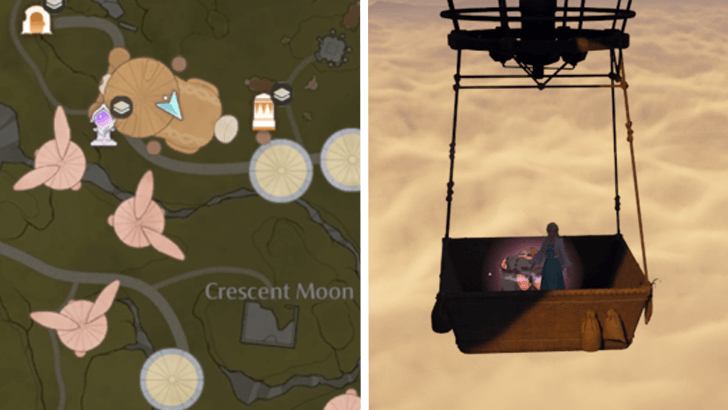 |
On the gondola of the floof-shaped hot air balloon, north of the Styleshaped Balloons Summit Warp Spire. |
| 60 | 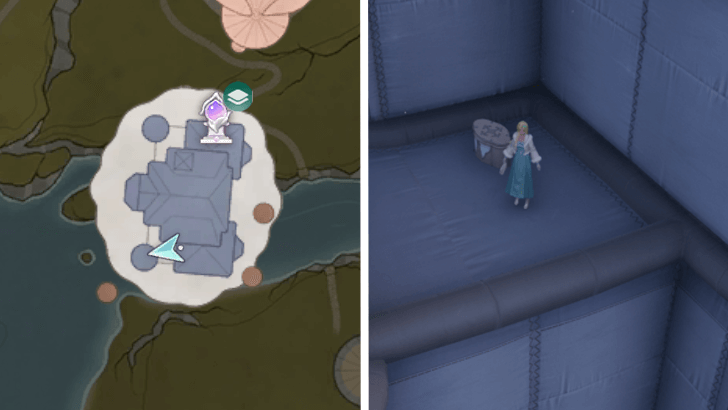 |
Just below the roof of the building-shaped hot air balloon. |
| 61 | 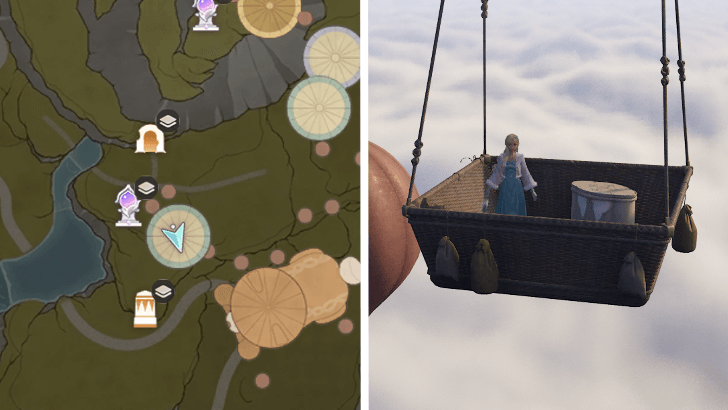 |
On the gondola of a hot air balloon south of the Fireworks Peak Warp Spire on the map. |
| 62 |  |
On top of the hot air balloon southwest of the Styleshaped Balloons Midway Warp Spire. |
How to Use Treasure Chests
Open to Get Unique Loot
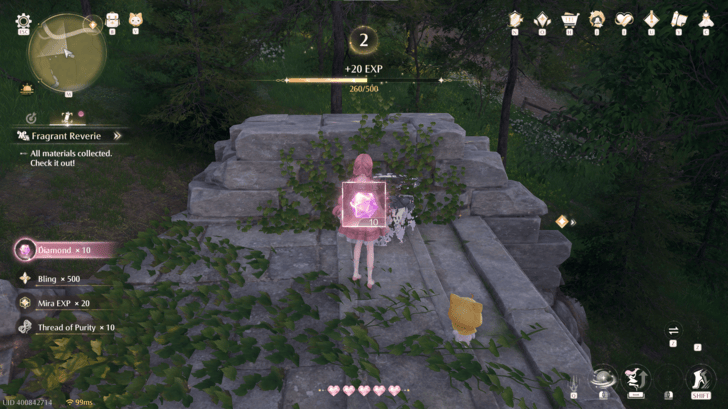
Treasure chests will always give you Diamonds, which you need to buy rare items. Chests also give you resources to craft outfits, upgrade clothing pieces, or power up Nikki's abilities.
Chests May Contain Whimstars
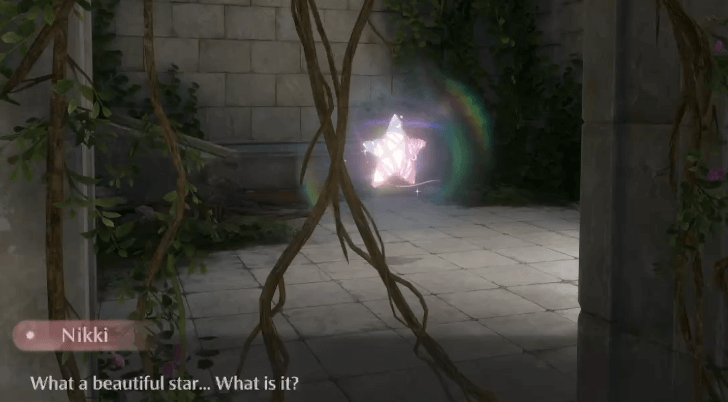
Some chests can have Whimstars inside. When Momo prompts that there's a Whimstar nearby, use his vision to track it. Complete whatever challenge is needed to unlock Whimstar chests!
Treasure Chest Trophy Unlock
Miracle Treasure Hunter Trophy
|
|
Miracle Treasure Hunter |
|---|---|
| Open 100 chests |
Players can obtain the Silver trophy, Miracle Treasure Hunter by opening 100 chests.
Treasure chests are spread throughout Miraland so use our interactive map to track them all down!
Trophy Guide and Achievements List
Infinity Nikki Related Guides

Interactive Map and Exploration Guide
All Collectible Guides
| Exploration Guides | |
|---|---|
 Dew of Firework Dew of Firework |
|
 Whim Bubble Whim Bubble |
 Serenity Dewdrop Serenity Dewdrop |
Collectibles by Location
| Memorial Mountains | Florawish | Breezy Meadow |
| Stoneville | Abandoned District | Wishing Woods |
100% Exploration Guides
| Memorial Mountains | Florawish |
| Breezy Meadow | Stoneville |
| Abandoned District | Wishing Woods |
| Firework Isles | Serenity Island |
Dungeon Guides
| All Special Dungeons | |
|---|---|
| Well of Fortune | Dream Warehouse |
| Ripple Wine Cellar | Ghost Train |
| Timis's Beauty Lab | Swordsmith Ruins |
| Queen's Palace Ruins: Inner Court | |
Comment
in breezy meadow in the abandoned fanatic whiser camp is a camsite cavern inside there are 3 chests
Author
All Treasure Chest Locations
improvement survey
03/2026
improving Game8's site?

Your answers will help us to improve our website.
Note: Please be sure not to enter any kind of personal information into your response.

We hope you continue to make use of Game8.
Rankings
- We could not find the message board you were looking for.
Gaming News
Popular Games

Genshin Impact Walkthrough & Guides Wiki

Honkai: Star Rail Walkthrough & Guides Wiki

Umamusume: Pretty Derby Walkthrough & Guides Wiki

Pokemon Pokopia Walkthrough & Guides Wiki

Resident Evil Requiem (RE9) Walkthrough & Guides Wiki

Monster Hunter Wilds Walkthrough & Guides Wiki

Wuthering Waves Walkthrough & Guides Wiki

Arknights: Endfield Walkthrough & Guides Wiki

Pokemon FireRed and LeafGreen (FRLG) Walkthrough & Guides Wiki

Pokemon TCG Pocket (PTCGP) Strategies & Guides Wiki
Recommended Games

Fire Emblem Heroes (FEH) Walkthrough & Guides Wiki

Diablo 4: Vessel of Hatred Walkthrough & Guides Wiki

Yu-Gi-Oh! Master Duel Walkthrough & Guides Wiki

Super Smash Bros. Ultimate Walkthrough & Guides Wiki

Pokemon Brilliant Diamond and Shining Pearl (BDSP) Walkthrough & Guides Wiki

Elden Ring Shadow of the Erdtree Walkthrough & Guides Wiki

Monster Hunter World Walkthrough & Guides Wiki

The Legend of Zelda: Tears of the Kingdom Walkthrough & Guides Wiki

Persona 3 Reload Walkthrough & Guides Wiki

Cyberpunk 2077: Ultimate Edition Walkthrough & Guides Wiki
All rights reserved
© Infold Games ALL RIGHTS RESERVED
The copyrights of videos of games used in our content and other intellectual property rights belong to the provider of the game.
The contents we provide on this site were created personally by members of the Game8 editorial department.
We refuse the right to reuse or repost content taken without our permission such as data or images to other sites.





![Slay the Spire 2 Review [Early Access] | Still the Deckbuilder to Beat](https://img.game8.co/4433115/44e19e1fb0b4755466b9e516ec7ffb1e.png/thumb)

![Resident Evil Village Review [Switch 2] | Almost Flawless Port](https://img.game8.co/4432790/e1859f64830960ce4248d898f8cd38d9.jpeg/thumb)


there are 4 chests, one of them with a whimstar