All Dew of Inspiration Locations
Hey, Stylists! We regret to inform everyone that we will no longer be updating Infinity Nikki as of Version 1.6. The Friend Code Sharing board will still be kept open, but keep in mind that most guides past Version 1.5 are not up-to-date. Thank you for your support!
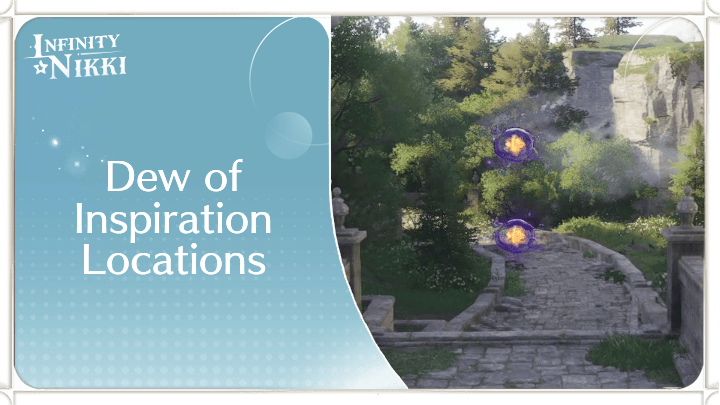
Dew of Inspiration are collectable items used to exchange items from Kilo the Cadenceborn in Infinity Nikki. See all Dew locations and how to get them here!
| Other Collectible Guides | ||
|---|---|---|
Dews of Inspiration Interactive Map
Version 1.3 Dews of Inspiration Map
| When available, you can click the dropdown menu on top of the map to change region! |
Interactive Map Key
| All Collectibles in Infinity Nikki | |
|---|---|
 Dew of Firework Dew of Firework |
|
 Whim Bubble Whim Bubble |
 Serenity Dewdrop Serenity Dewdrop |
How to Use the Infinity Nikki Interactive Map
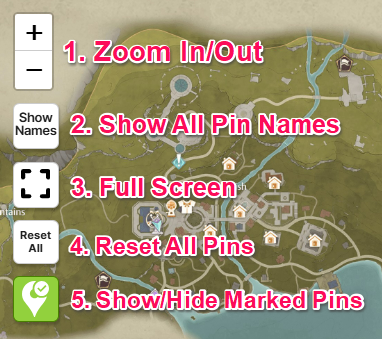 | |
| ① | Zoom In/Out Zoom in or out on specific points in the map. |
|---|---|
| ② | 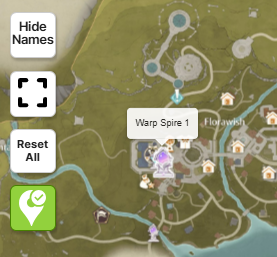 Show All Pin Names Display the titles of all pins located on the map. |
| ③ | Full Screen View the map in full screen mode. |
| ④ |  Reset All Pins Clears all marked pins on the map. |
| * | 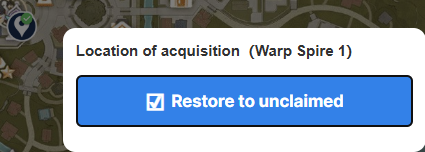 How to Mark Pins Click on a pin then check "Mark as Acquired" to mark the collectible as claimed. |
| ⑤ | Show/Hide Marked Pins Show or hide your marked pins on the map. |
Dews of Inspiration Locations
How to Get Dews of Inspiration
There are six (6) unique areas that will have Dews of Inspiration scattered in their vicinity for you to collect. Aside from that, there are also Dews of Firework, which are Firework Isles equivalent of Dews of Inspiration.
Memorial Mountains Dews of Inspiration
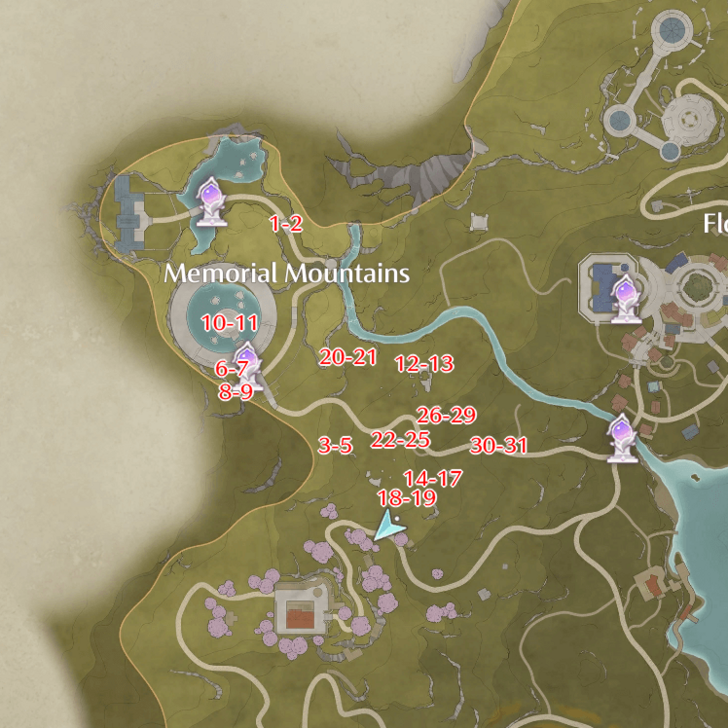 Open Image in New Tab |
There are a total of 31 Dews in Memorial Mountains. All their locations are noted below:
| No. | Image | How to Get |
|---|---|---|
| 1-2 | 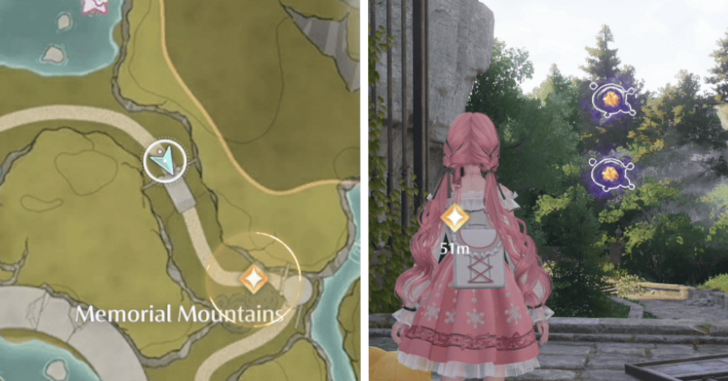 |
Follow the road and the main quest in Memorial Mountains |
| 3-5 | 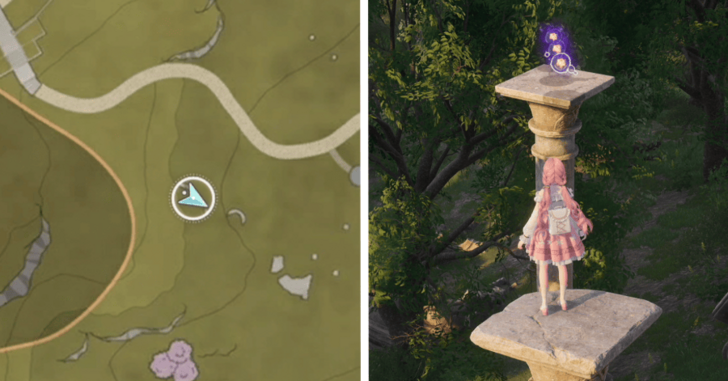 |
On top of a pillar guarded by enemies below |
| 6-7 | 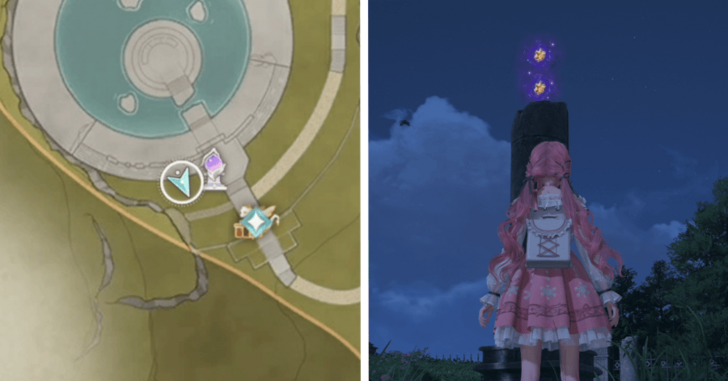 |
On a broken pillar near Kilo the Cadenceborn |
| 8-9 |  |
Out in the open near Kilo the Cadenceborn |
| 10-11 |  |
On the center platform in the middle of the water near Kilo the Cadenceborn |
| 12-13 | 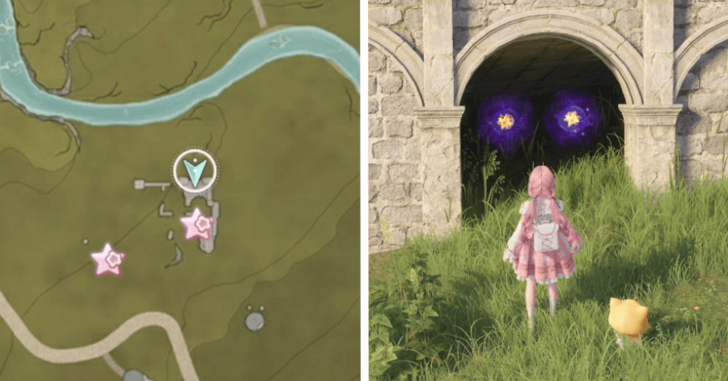 |
Underneath a structure near a Whimstar chest |
| 14-17 | 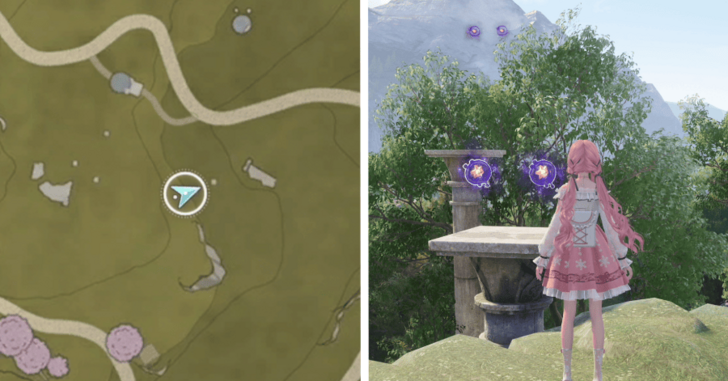 |
Found on top of pillars. Use jump attacks to purify |
| 18-19 |  |
Found on top of a pillar. Use the nearby catapult to glide and purify the dews while gliding |
| 20-21 | 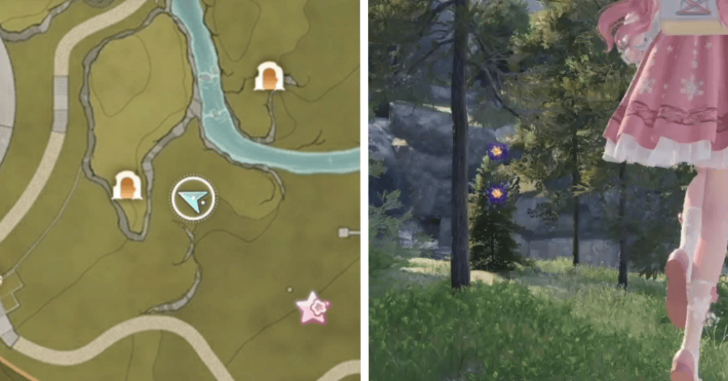 |
West of the cave entrance near Kilo the Cadenceborn |
| 22-25 | 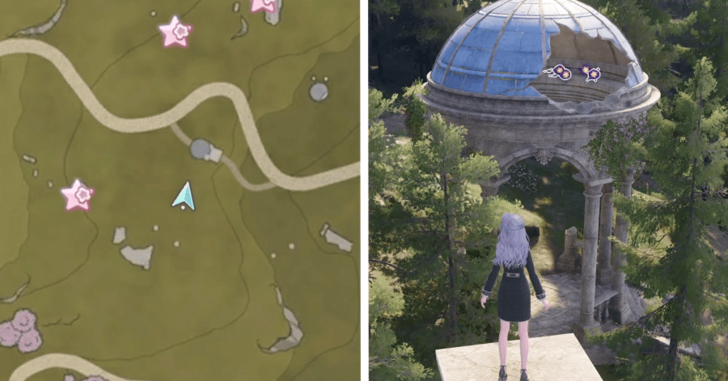 |
In the broken roof of the gazebo, need to glide from the nearby pillar to reach |
| 26-29 | 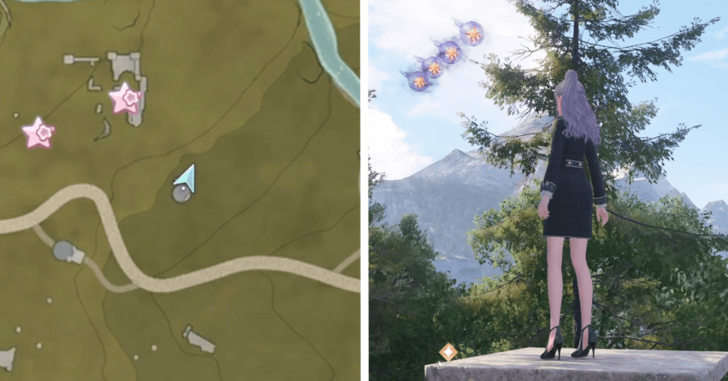 |
Above a pillar near a sunken gazebo |
| 30-31 | 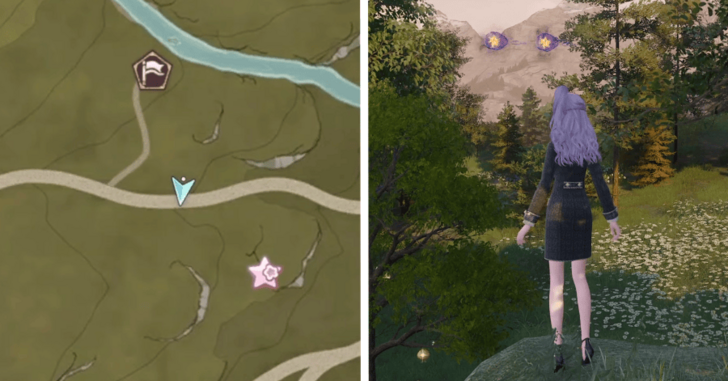 |
Above the road that borders Memorial Mountains and Breezy Meadow |
Florawish Dews of Inspiration
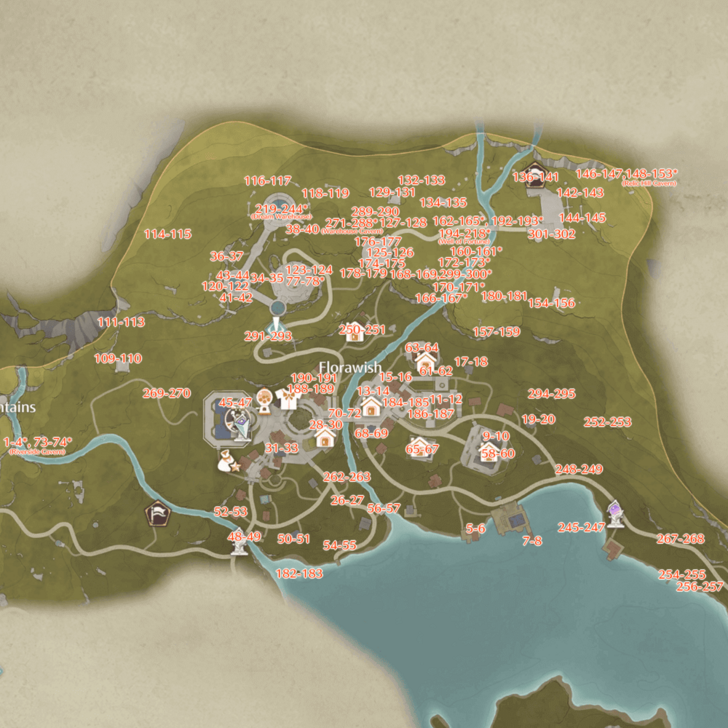 Open Image in New Tab |
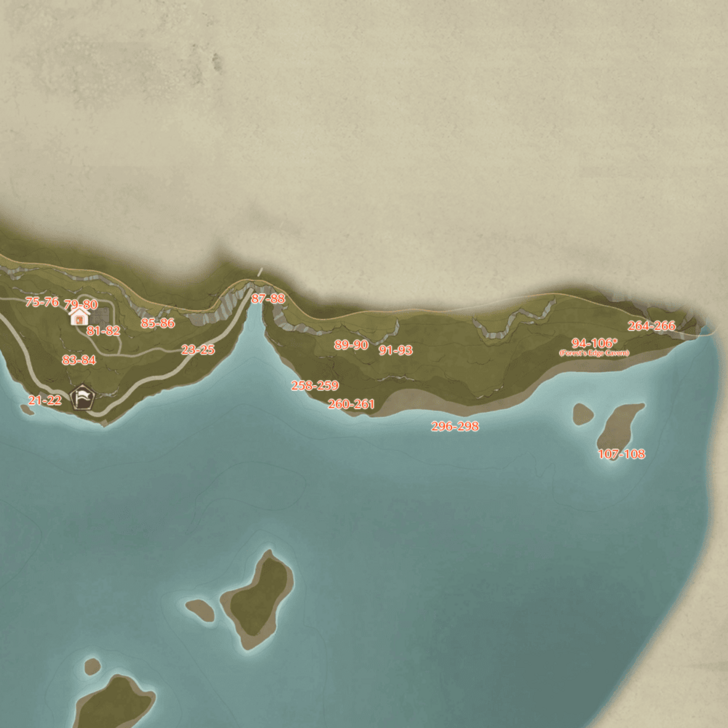 Open Image in New Tab |
Dews marked with an asterisk are found underground or in caves.
There are a total of 302 Dews in Florawish. All their locations are noted below:
| No. | Image | How to Get |
|---|---|---|
| 1-2 | 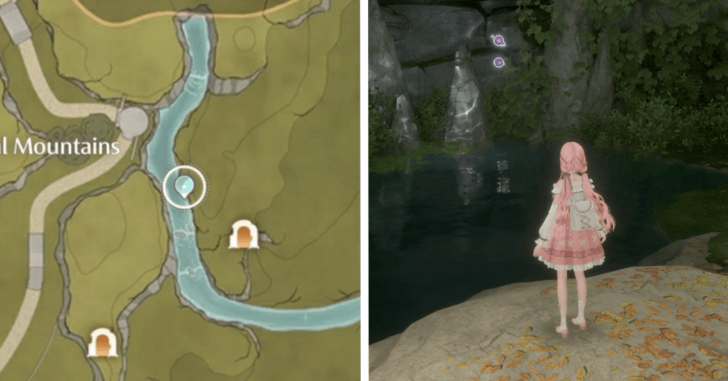 |
Riverside Cavern, in a small cove next to the waterfall |
| 3-4 | 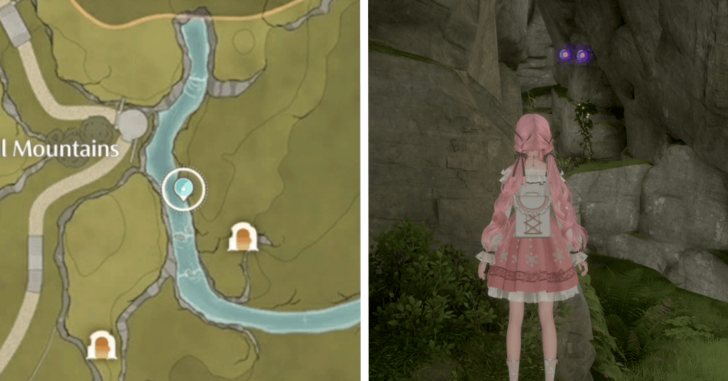 |
Riverside Cavern, need to do aerial attacks to purify |
| 5-6 | 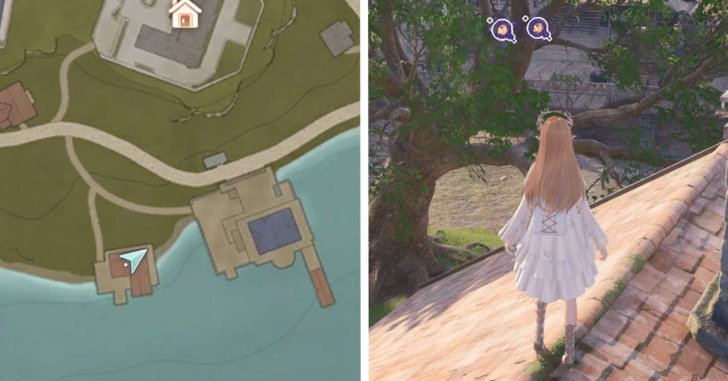 |
On top of the dock southwest of the Mayor's residence |
| 7-8 | 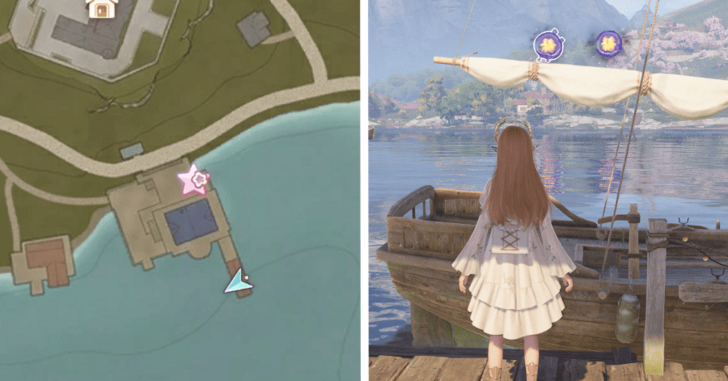 |
On the boat parked on the dock, south of Mayor's Residence |
| 9-10 |  |
North entrance of the Mayor's Residence |
| 11-12 |  |
On the roof of the house south of the Daisy Inn |
| 13-14 | 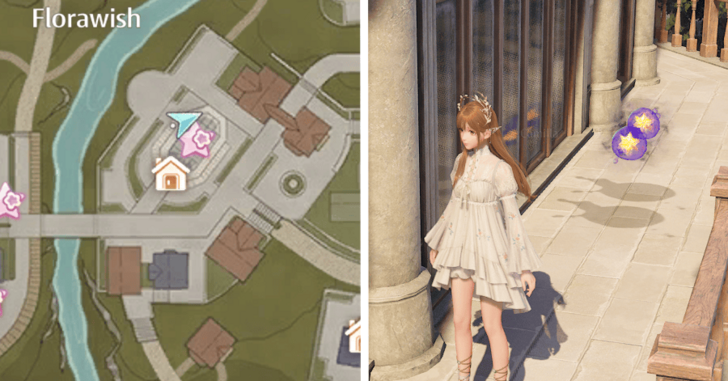 |
Ray and Wing's Balcony |
| 15-16 | 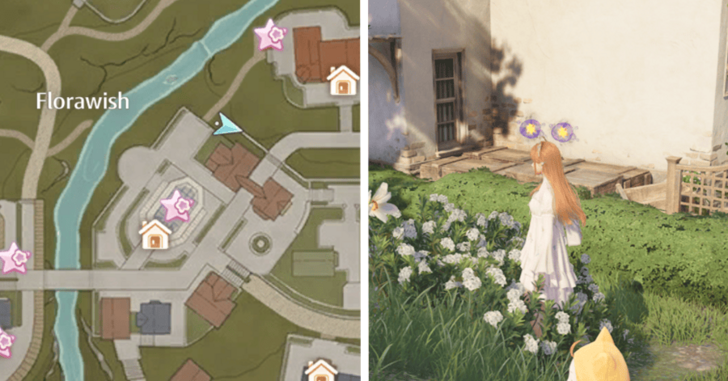 |
On the side of the house in between Daisy Inn and Ray and WIng's Balcony |
| 17-18 | 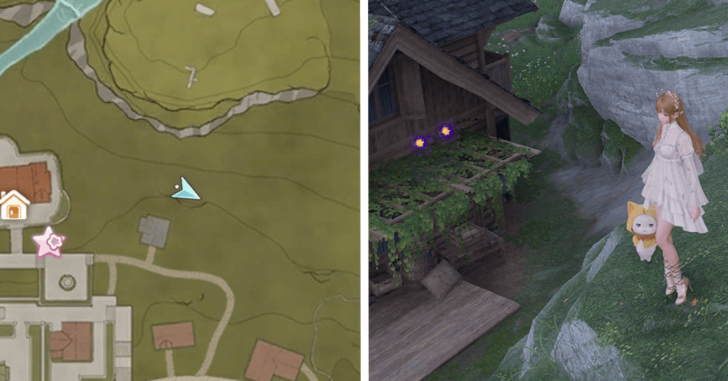 |
House on the east of Daisy Inn |
| 19-20 | 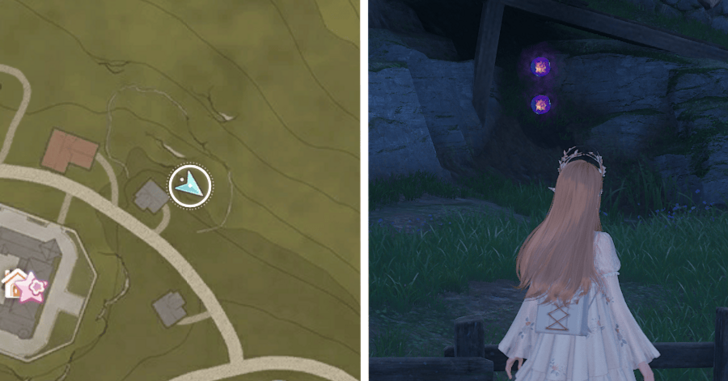 |
House behind the Mayor's Residence |
| 21-22 | 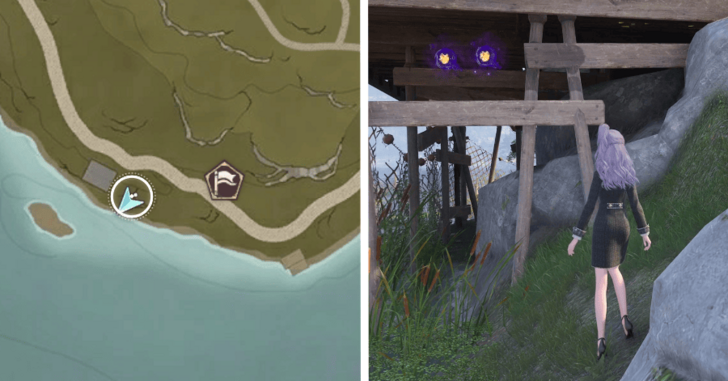 |
Below the house on the lake, south of the Sanctum of the Observant |
| 23-25 | 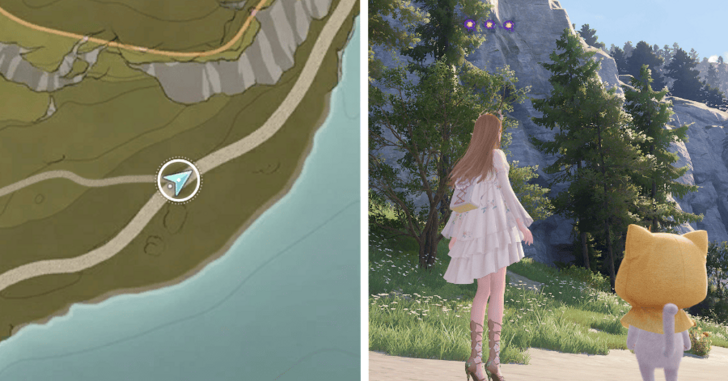 |
Floating south east of the Sanctum of the Observant |
| 26-27 | 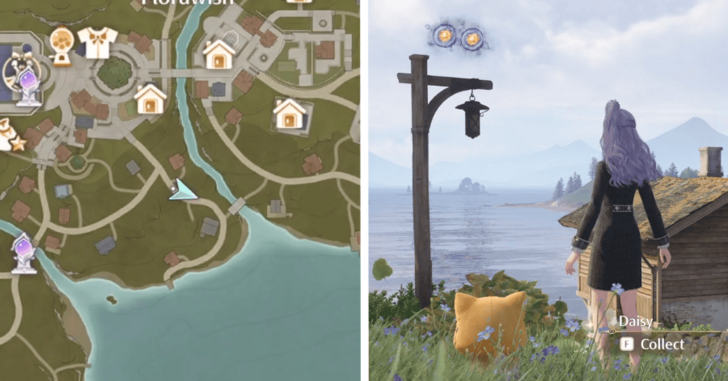 |
On a lamp post on the south side of town |
| 28-30 | 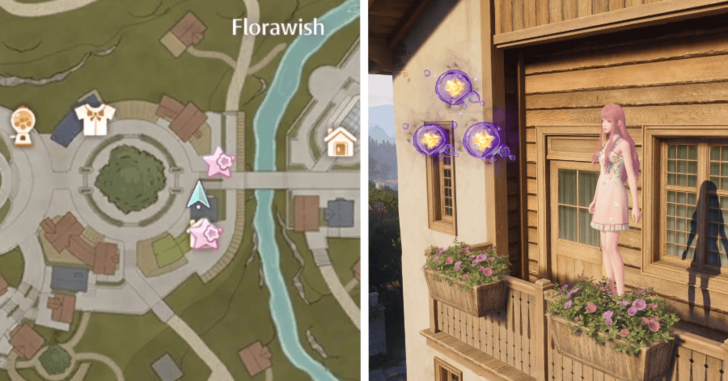 |
On the balcony of one of the apartments to east of the big tree, accessed by floating down from the roof |
| 31-33 | 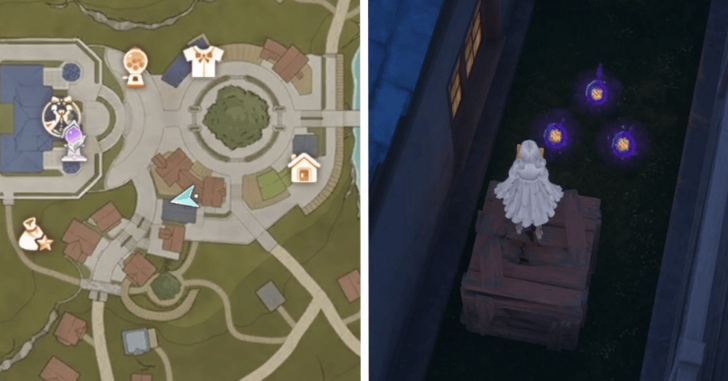 |
Hidden behind some boxes in the middle of town |
| 34-35 |  |
Under the dream warehouse tower |
| 36-37 | 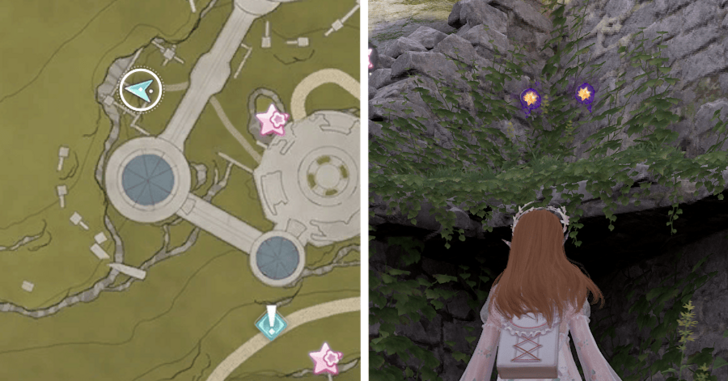 |
Lower part of the Dream Warehouse Tower |
| 38-40 | 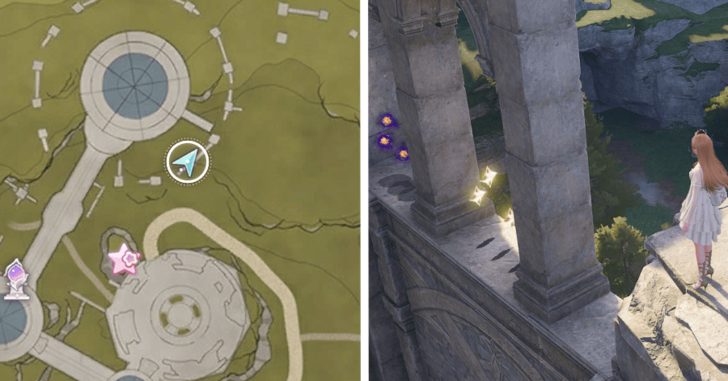 |
On the broken pillars around the Dream Warehouse Tower |
| 41-42 | 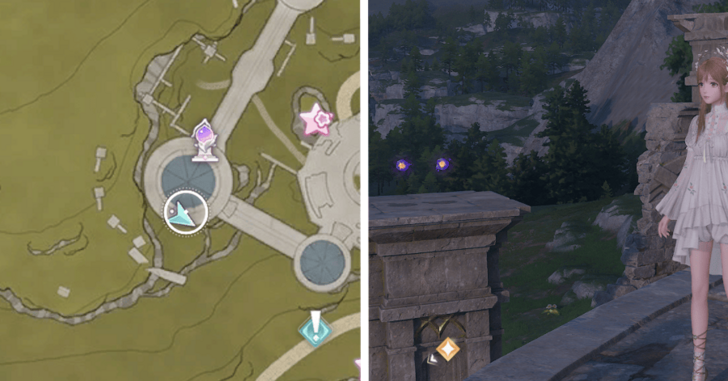 |
On the pillar behind the middle dream warehouse tower |
| 43-44 | 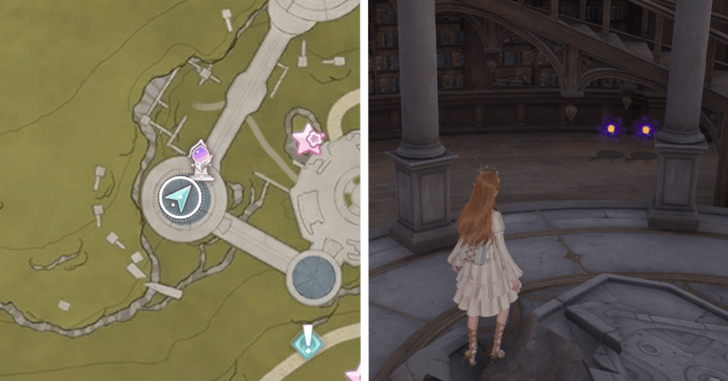 |
On the first floor of the middle Dream Warehouse Tower |
| 45-47 | 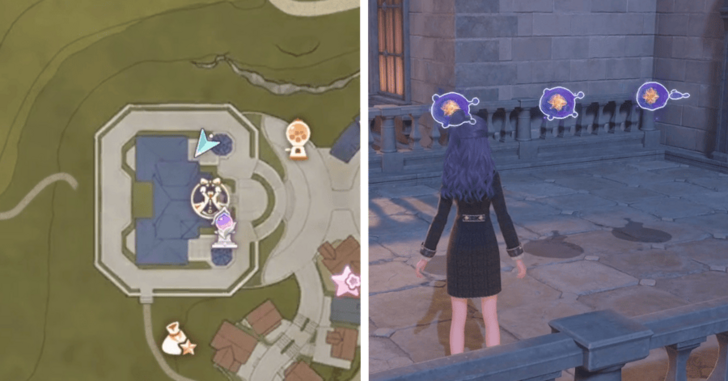 |
North balcony of the Stylist's Guild |
| 48-49 | 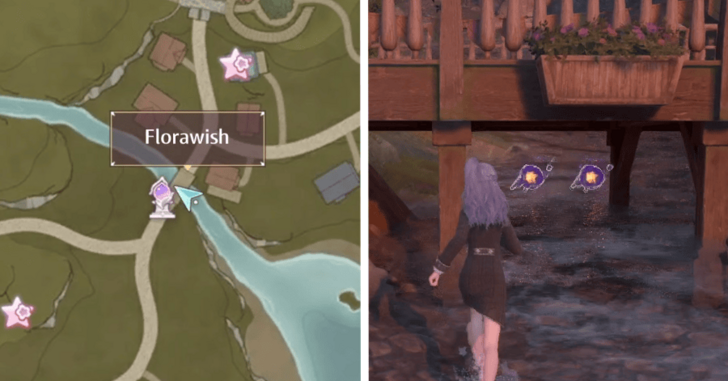 |
Below the bridge southwest of the big tree |
| 50-51 |  |
Beneath a house near the water |
| 52-53 | 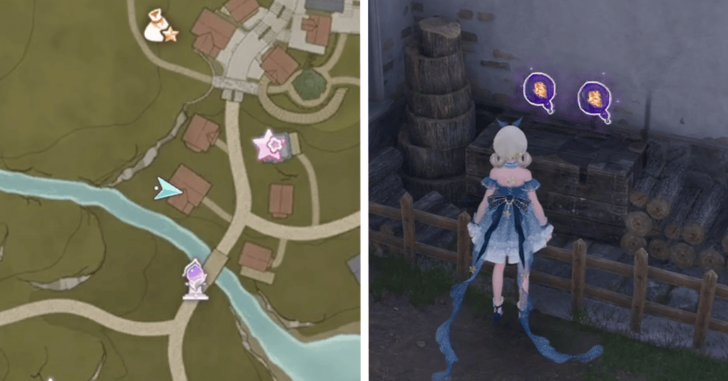 |
Behind a house near the Florawish Lane waypoint |
| 54-55 | 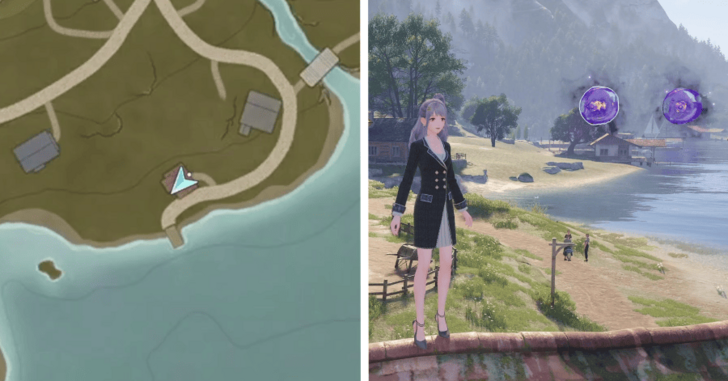 |
On top of a house near a small pier |
| 56-57 | 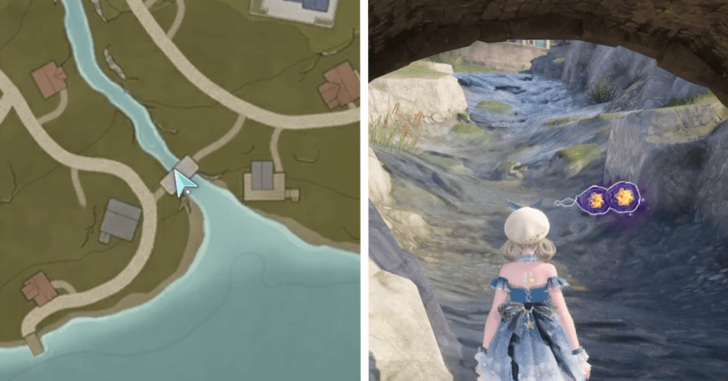 |
Under the bridge southeast of the big tree |
| 58-60 | 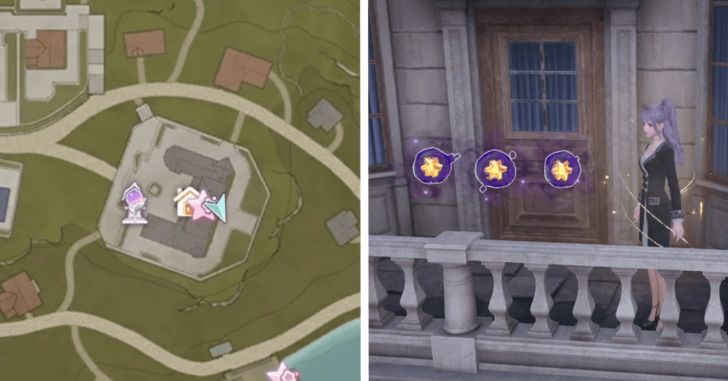 |
Rear balcony of the Mayor's Residence |
| 61-62 | 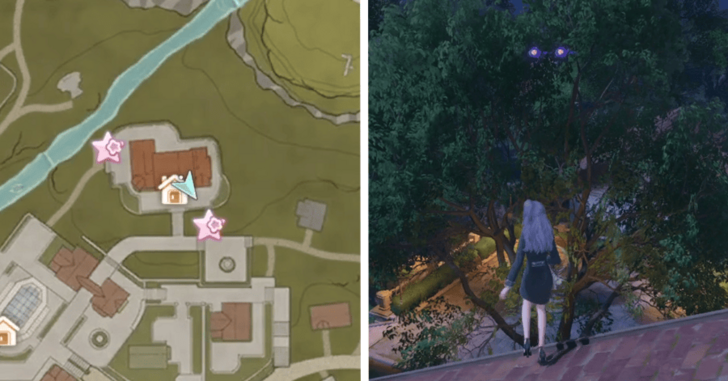 |
In the air across the rooftop of Daisy Inn, requires you to float and purify to collect |
| 63-64 | 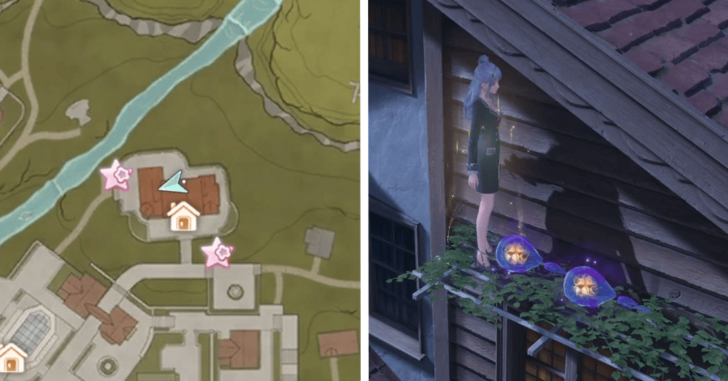 |
Above one of the windows on the backside of Daisy Inn |
| 65-67 | 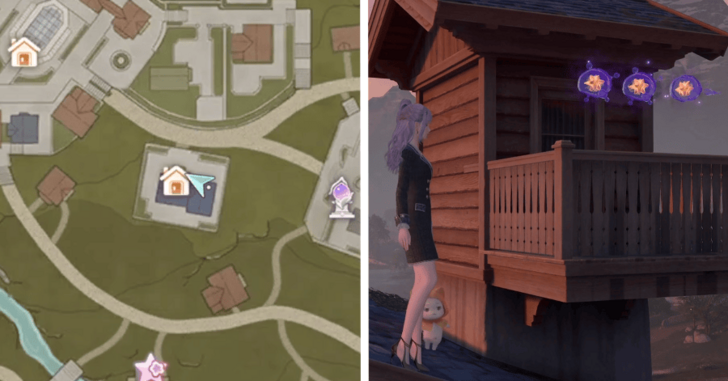 |
On top of the Kingdom Guards' Office |
| 68-69 | 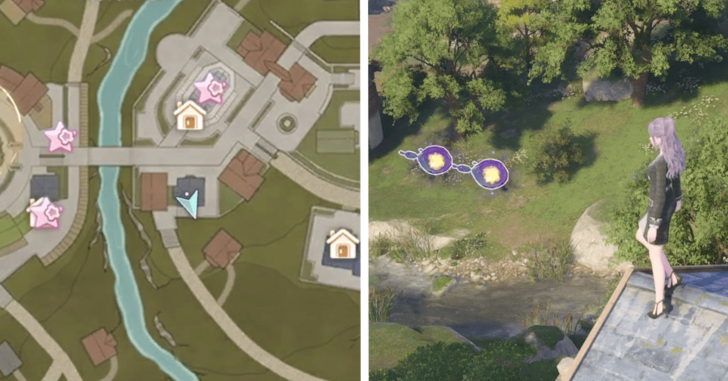 |
On top of the house south of Ray and Wing's |
| 70-72 | 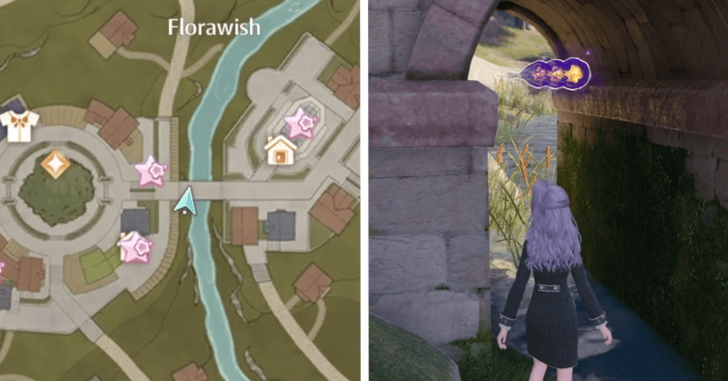 |
Under the bridge east of the big tree |
| 73-74 | 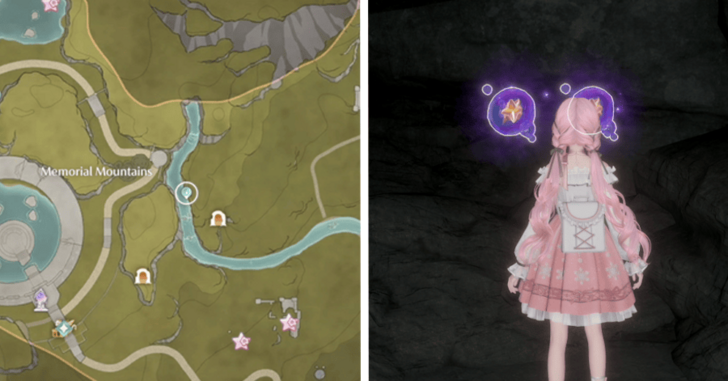 |
Riverside Cavern, found in a short path that forks from the main path close to the Memorial Mountains entrance |
| 75-76 | 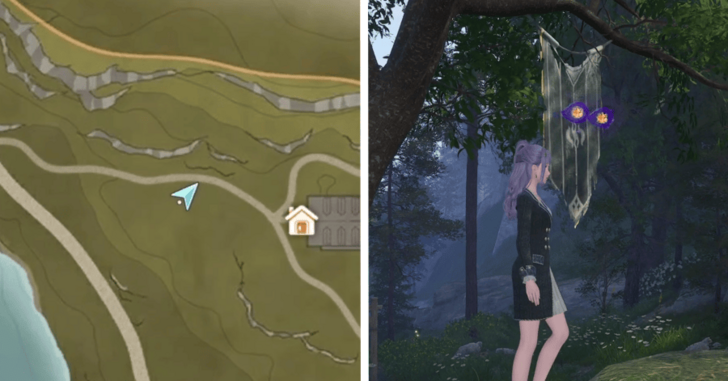 |
Behind a banner west of the Sanctum of the Observant |
| 77-78 | 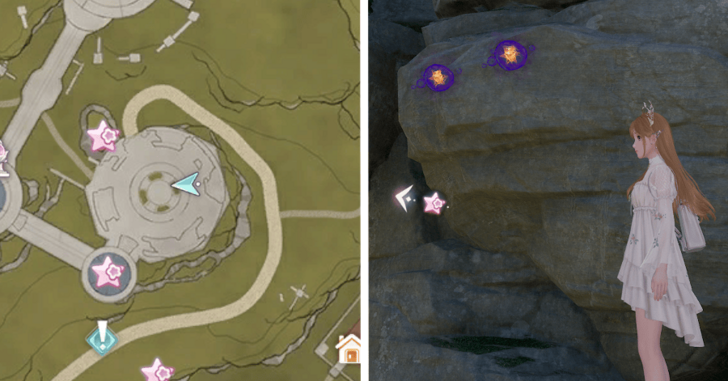 |
By plunging in the underground library of the Dream Warehouse Tower |
| 79-80 |  |
Backside of the Sanctum of the Observant |
| 81-82 | 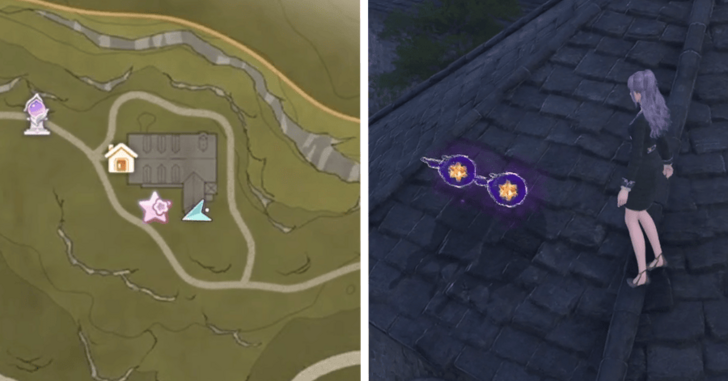 |
Roof of the Sanctum of the Observant |
| 83-84 |  |
In the air south of the Sanctum of the Observant, accessed by jumping on the big leaf |
| 85-86 | 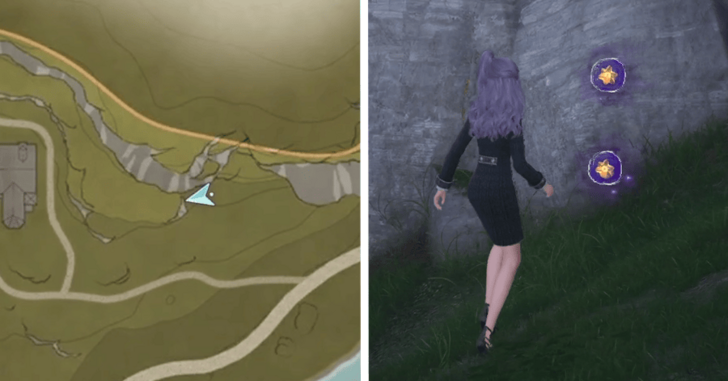 |
Behind a ledge east of the Sanctum of the Observant |
| 87-88 | 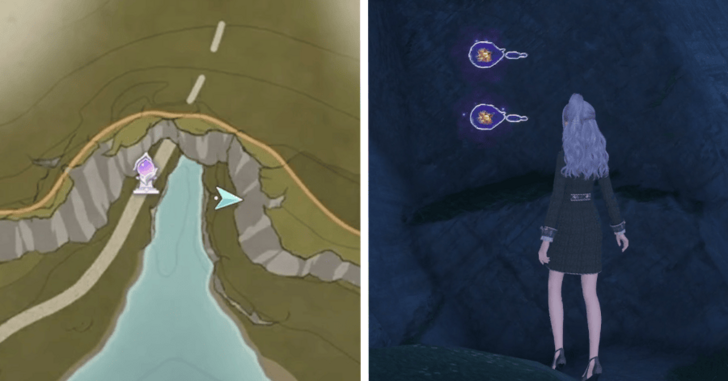 |
Across the Wish Pass Office Waypoint |
| 89-90 | 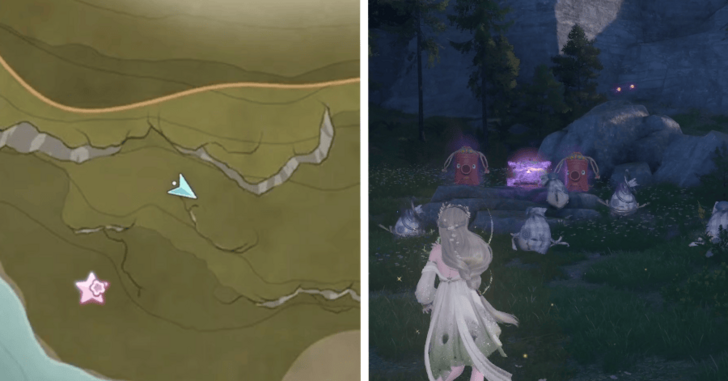 |
Behind a chest guarded by enemies |
| 91-93 | 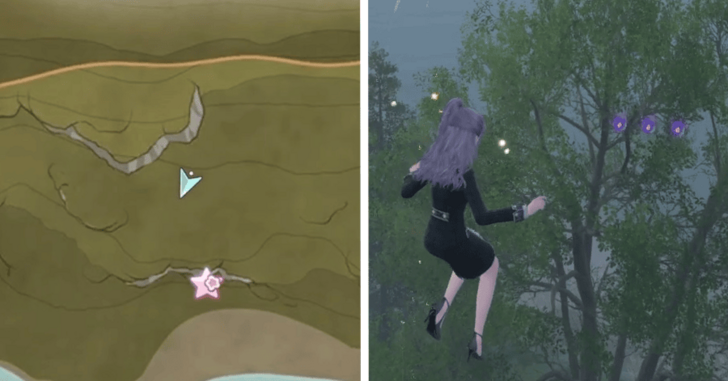 |
North of a trapped Whimstar chest, requires you to purify while midair |
| 94-97 |  |
Forest's Edge Cavern, accessed via the path opposite of the one towards the Whimstar |
| 98-99 | 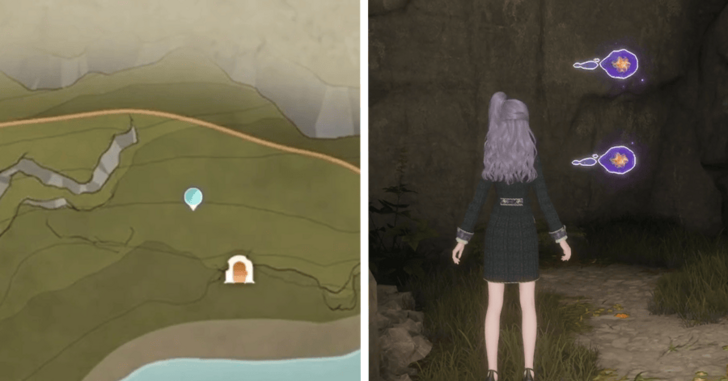 |
Forest's Edge Cavern, to the left of the ledge that you jump over to go deeper in |
| 100-101 | 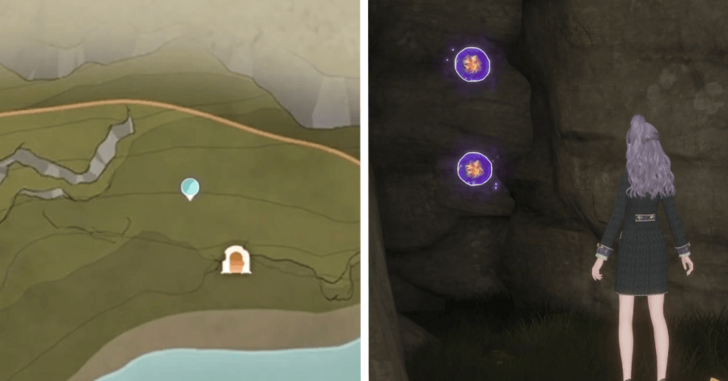 |
Forest's Edge Cavern, near the trampoline that sends you back out of the cave |
| 102-104 | 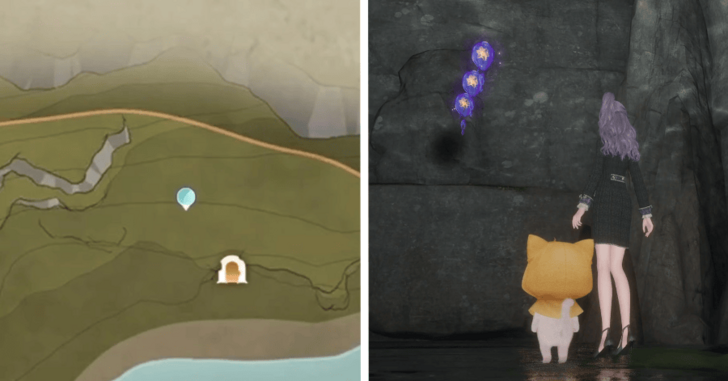 |
Forest's Edge Cavern, at the end of the river |
| 105-106 | 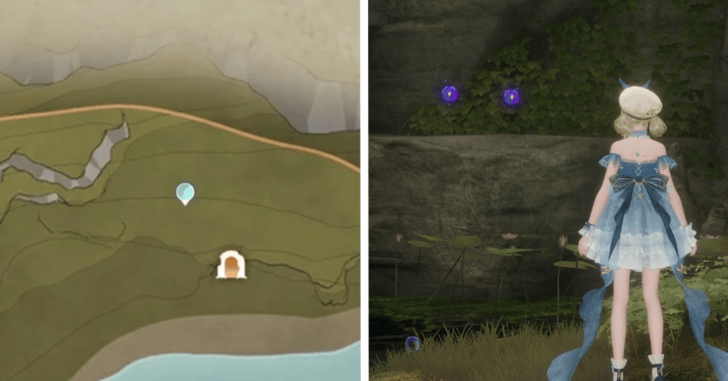 |
Forest's Edge Cavern, right below the area where the Whimstar is |
| 107-108 |  |
On a small island outside of Forest's Edge Cavern |
| 109-110 | 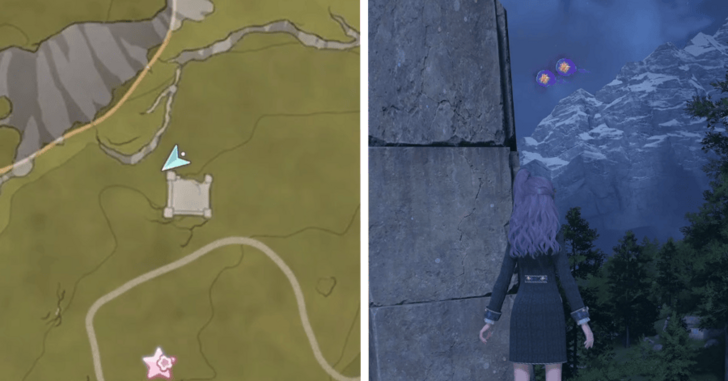 |
Along a pillar located west of Florawish |
| 111-113 | 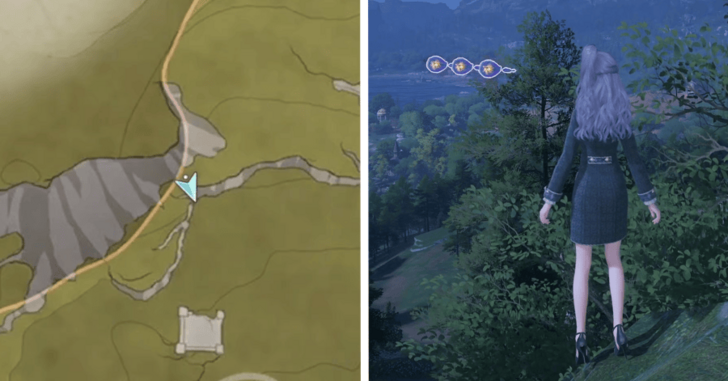 |
Off a high ledge northwest of Florawish |
| 114-115 | 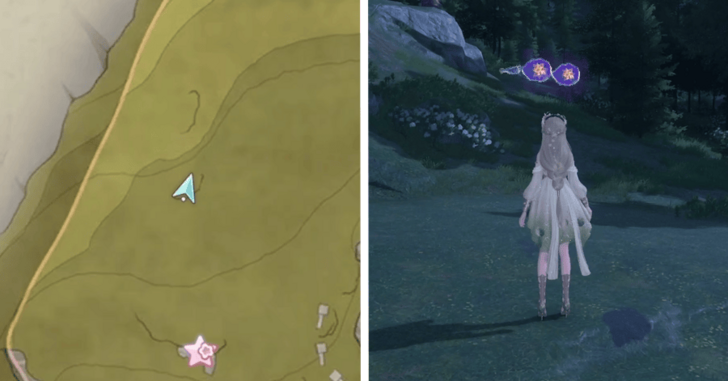 |
On a small ledge northwest of the Dream Warehouse |
| 116-117 | 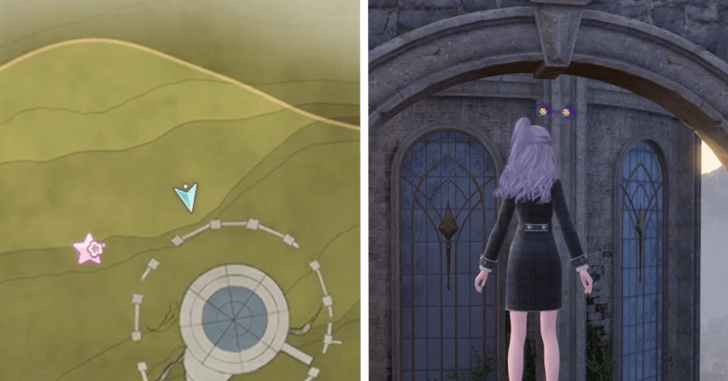 |
Beneath one of the archways on the outer ring of the Dream Warehouse |
| 118-119 | 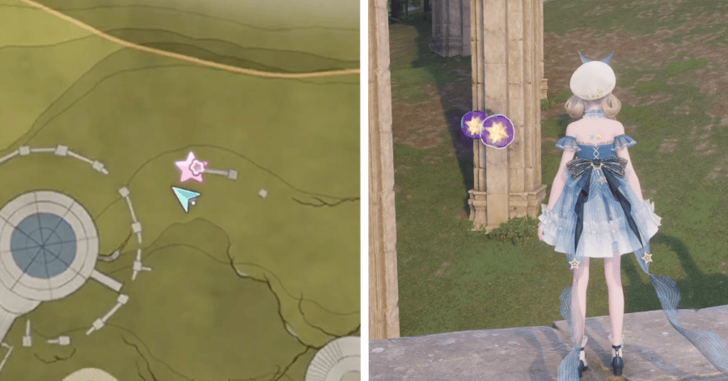 |
On the pillar next to the Curio northwest of the Dream Warehouse |
| 120-122 |  |
On top of the middle Dream Warehouse tower |
| 123-124 | 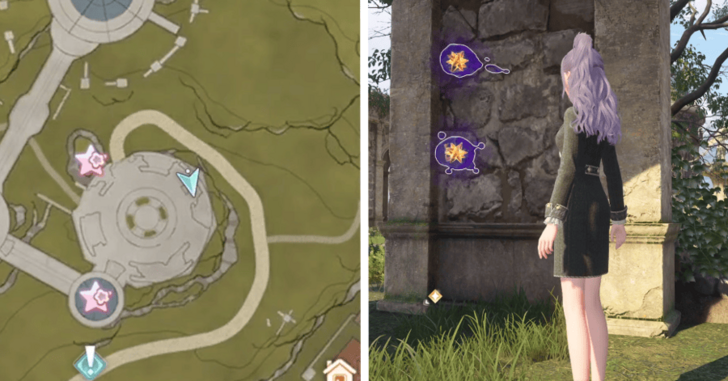 |
Behind one of the walls in the Dream Warehouse courtyard |
| 125-126 | 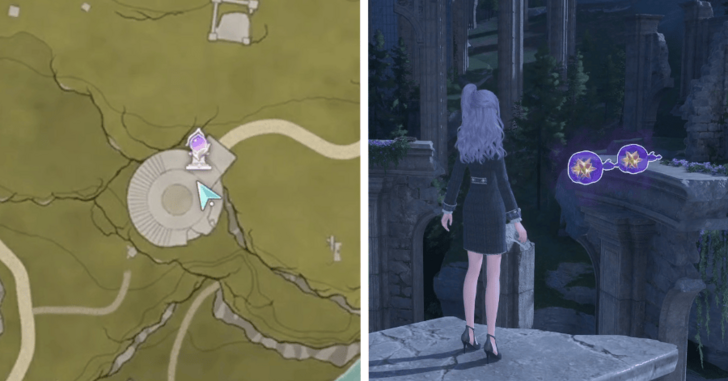 |
Above the Secret Base |
| 127-128 | 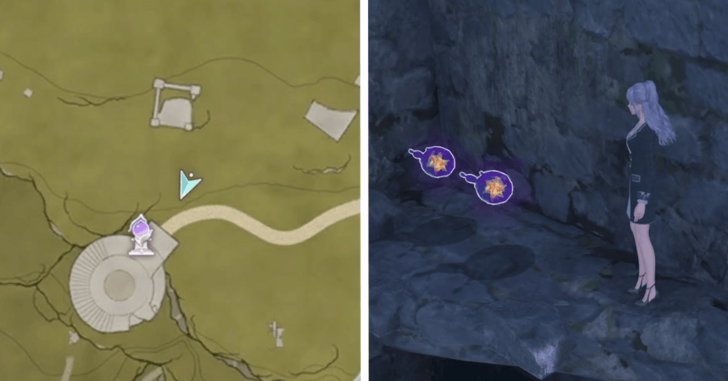 |
In some ruins just outside the Secret Base |
| 129-131 | 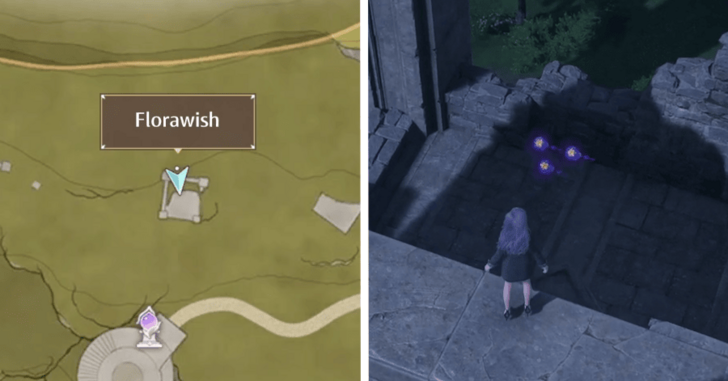 |
In the middle of some ruins north of the Secret Base |
| 132-133 |  |
Next to a curved wall nearby the square ruins |
| 134-135 | 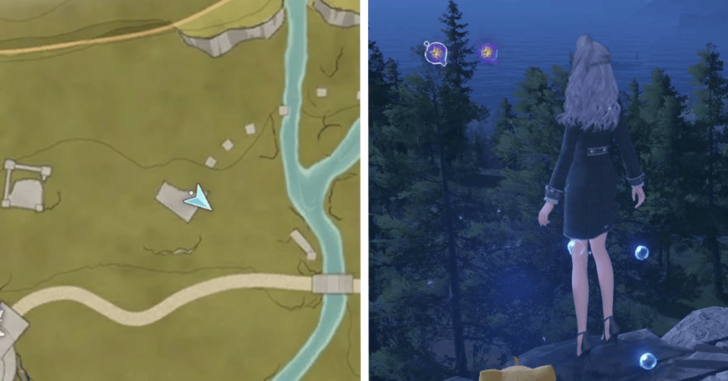 |
At the end of a series of pillars |
| 136-138 | 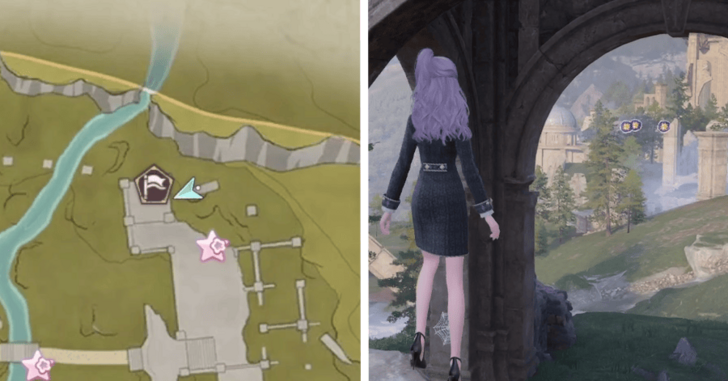 |
Below the platform of the Hoop Hopper mini-game |
| 139-141 |  |
Just off the pillar across Hoop Hopper |
| 142-143 | 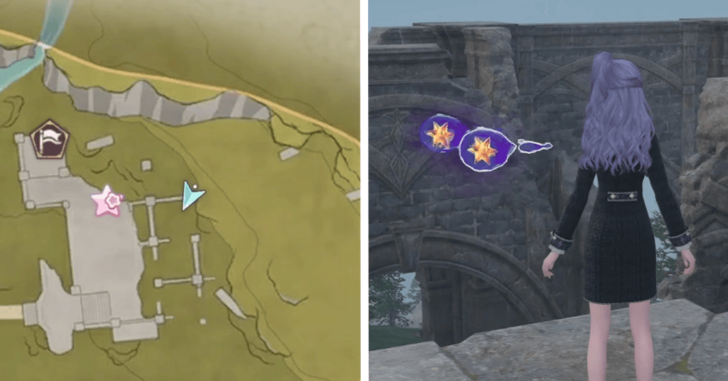 |
On top of the ruined archways after the two catapult jumps |
| 144-145 | 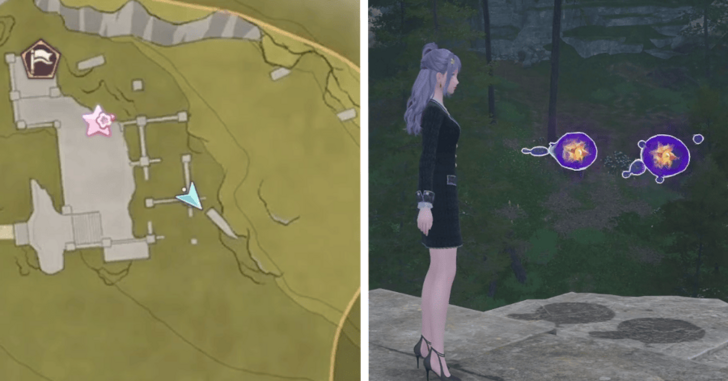 |
On top of the southern set of archways after the same catapult jumps |
| 146-147 | 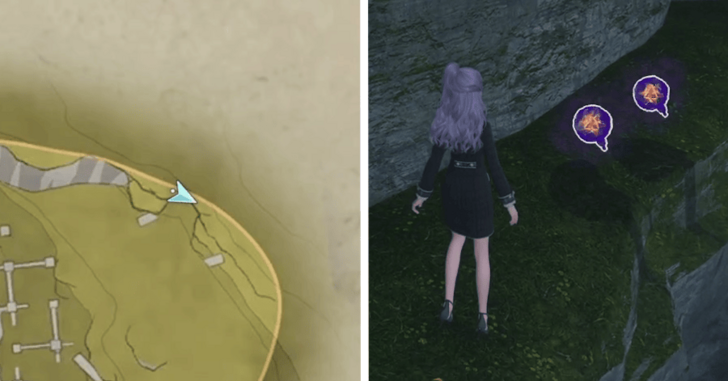 |
Above the Relic Hill Cavern entrance |
| 148-149 | 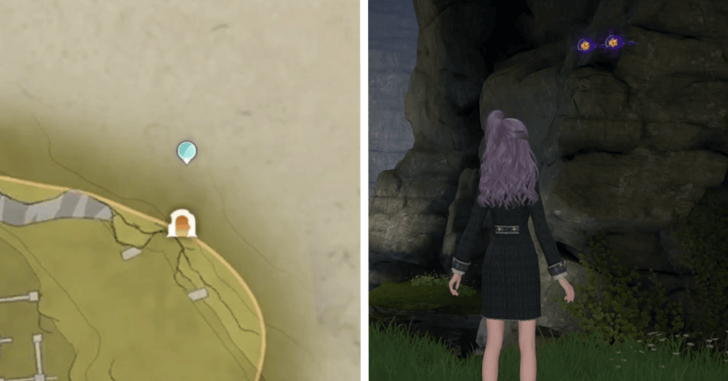 |
Relic Hill Cavern, requires midair attack |
| 150-151 | 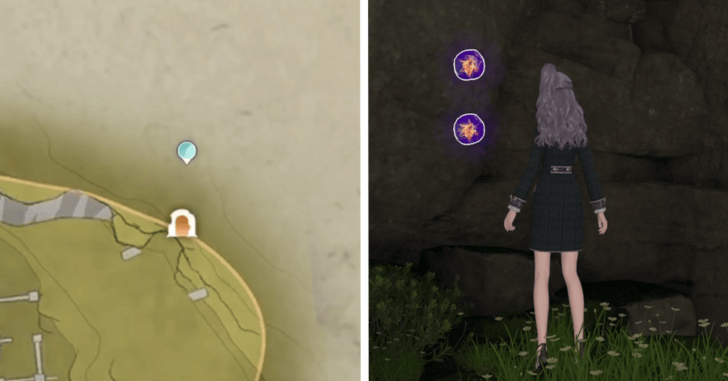 |
Relic Hill Cavern, on the elevated area near the Whimstar |
| 152-153 | 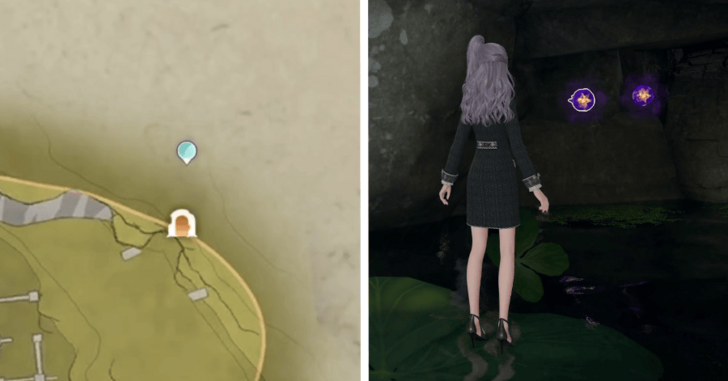 |
Relic Hill Cavern, along the river that leads to a chest |
| 154-156 | 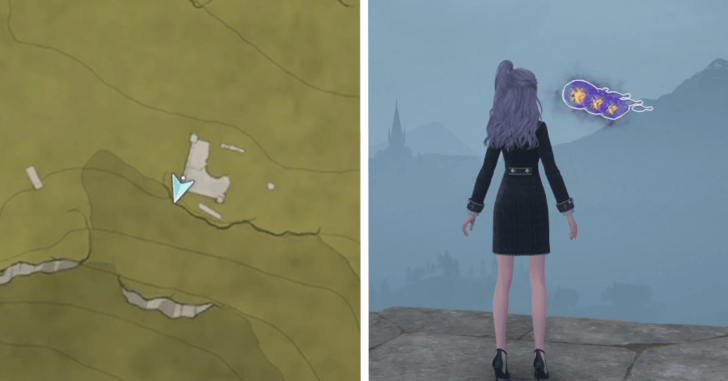 |
Atop the ruins on the northern cliff |
| 157-159 | 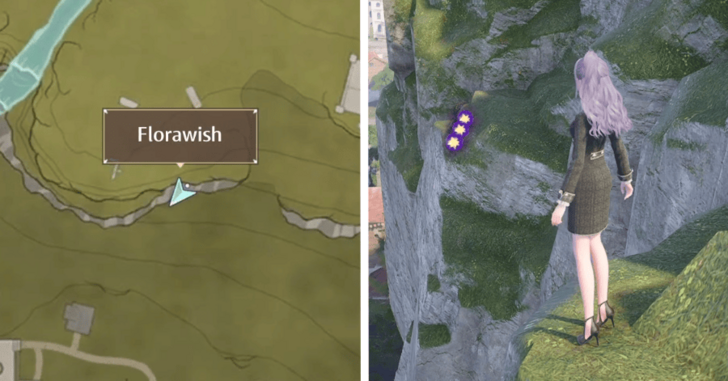 |
Along the eastside of the large northern cliffs |
| 160-161 | 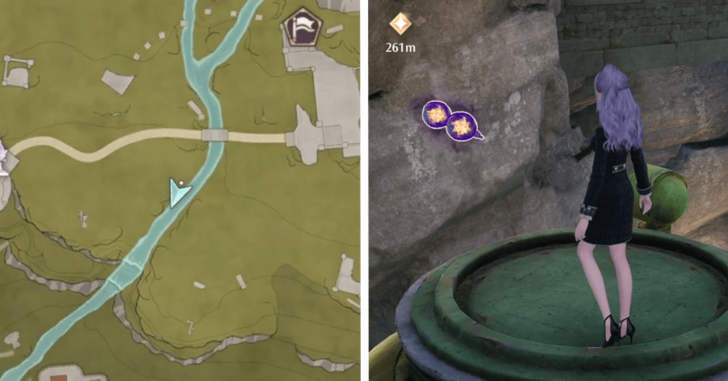 |
On top one of the tanks outside the Well of Fortune |
| 162-163 | 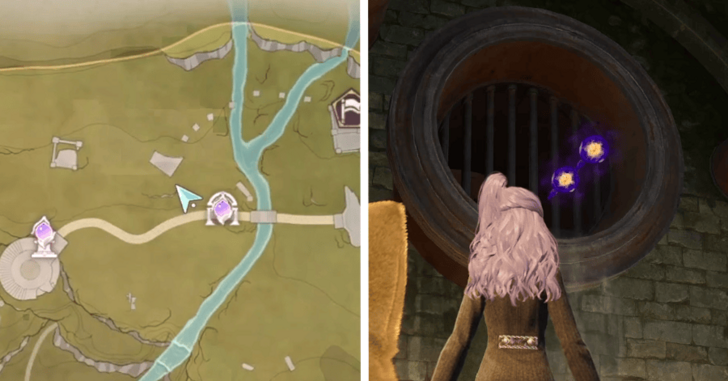 |
Coming out one of the pipes outside the Well of Fortune |
| 164-165 | 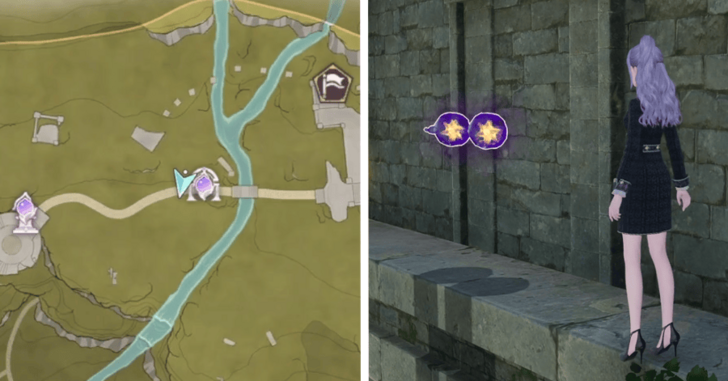 |
Along one of the walls outside the Well of Fortune |
| 166-167 | 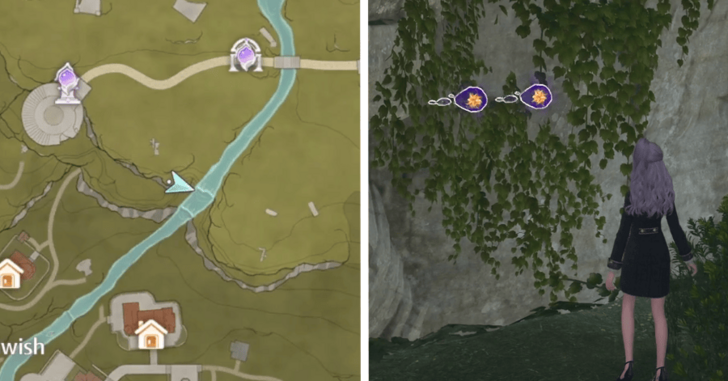 |
Behind the waterfall, on the second floor leading to the Well of Fortune |
| 168-169 | 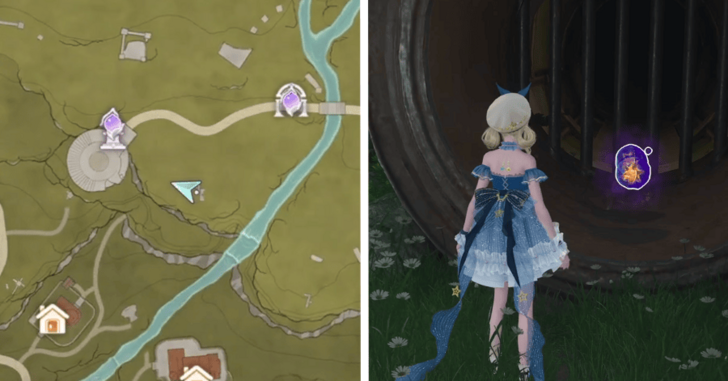 |
Inside the pipe below the staircase on the second floor |
| 170-171 |  |
Right behind the waterfall on the third floor |
| 172-173 | 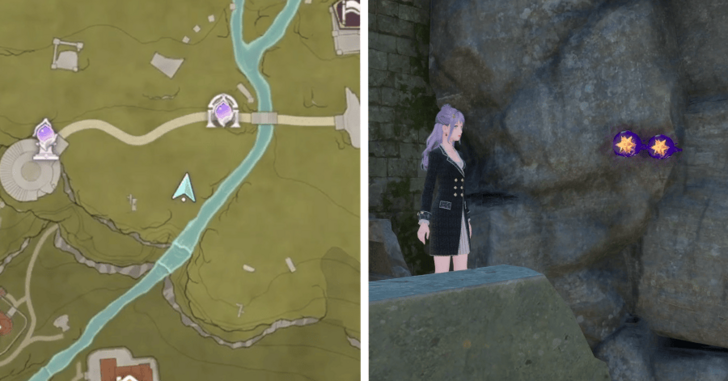 |
Second floor of the area before the Well of Fortune, towards waterfall entrance |
| 174-175 |  |
Outer ledges of the Secret Base |
| 176-177 | 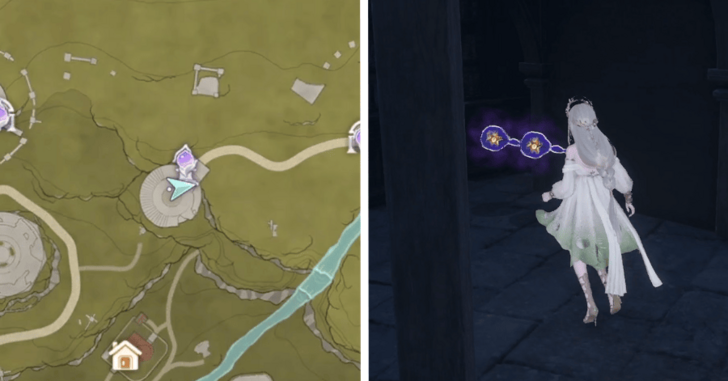 |
Underneath the staircase on the bottom floor of the Secret Base |
| 178-179 | 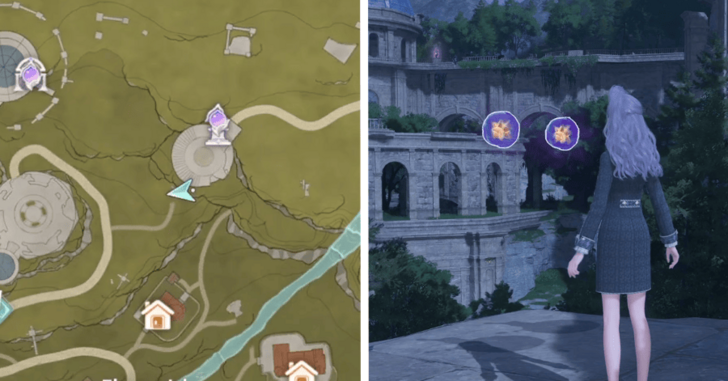 |
On a pillar outside the Secret Base |
| 180-181 | 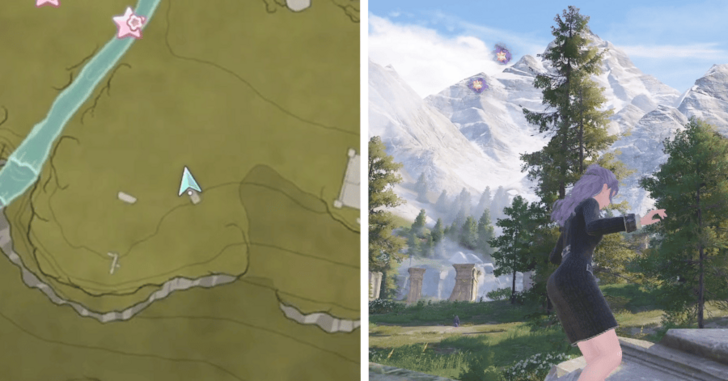 |
In the air near the northern cliffs |
| 182-183 | 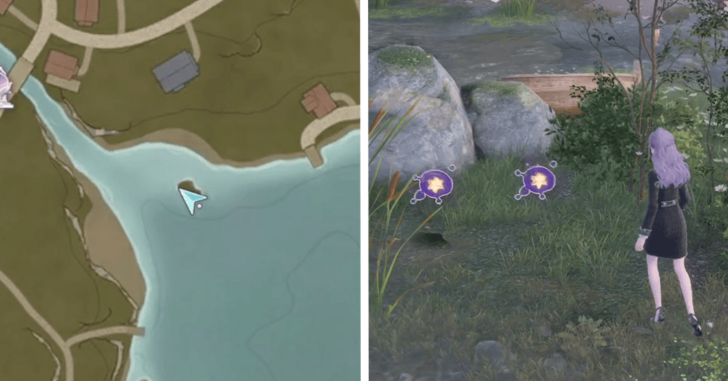 |
Tiny island with a shipwrecked boat |
| 184-185 | 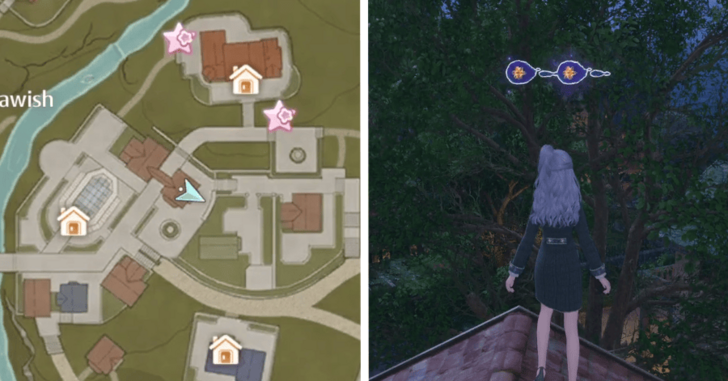 |
Above a house east of Ray and Wing's |
| 186-187 | 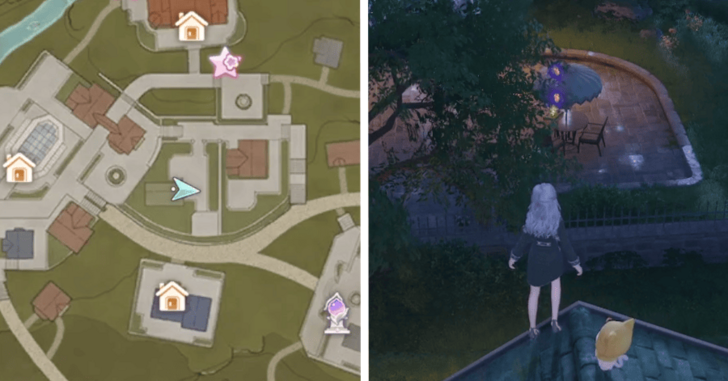 |
Next to a tree north of the Kingdom Guards' Office |
| 188-189 | 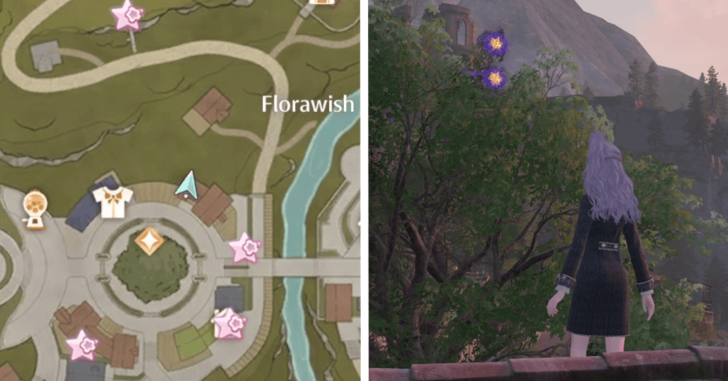 |
Midair just northeast of the big tree |
| 190-191 | 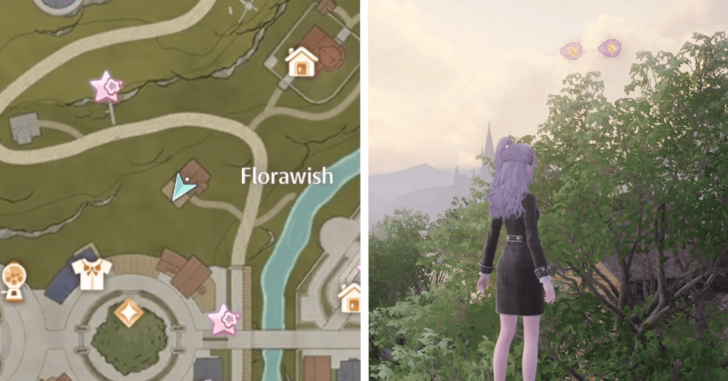 |
On the other side of the tree where the previous set of Dews were |
| 192-193 | 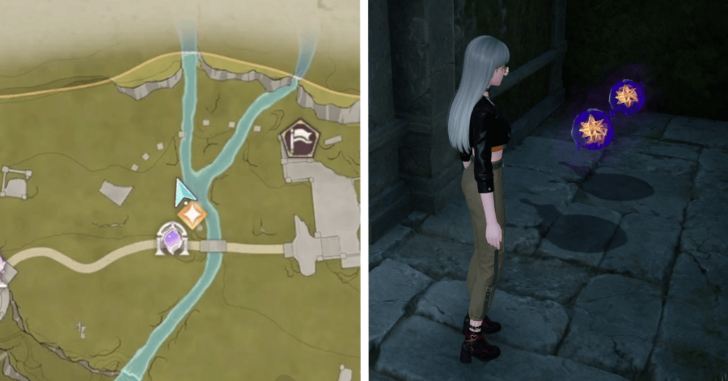 |
Just before dropping down to the Well of Fortune |
| 194-196 |  |
Well of Fortune, area to the right of the first electrical box |
| 197-198 | 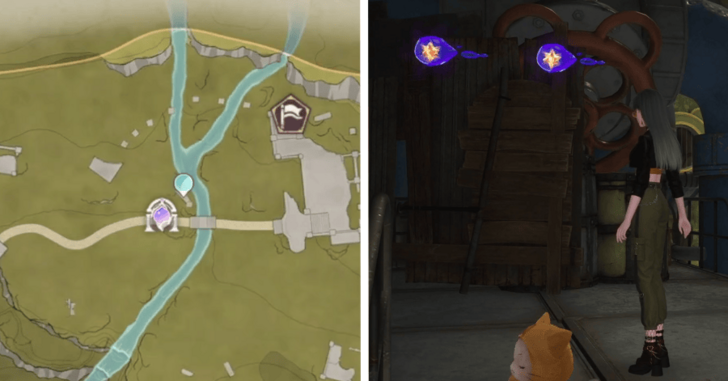 |
Well of Fortune, at the end of the walkway above the waterway |
| 199-200 | 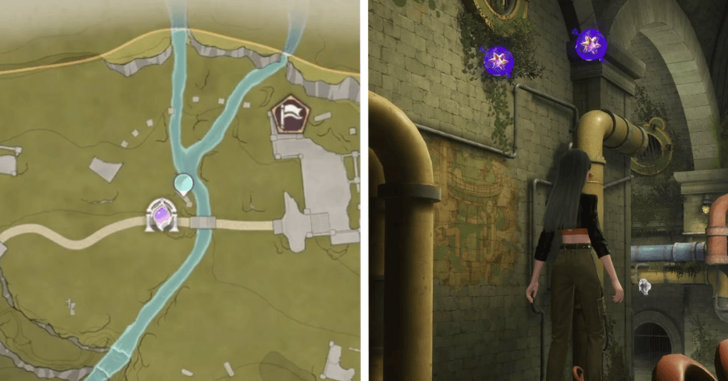 |
Well of Fortune, pipes to the right of the big frog |
| 201-202 | 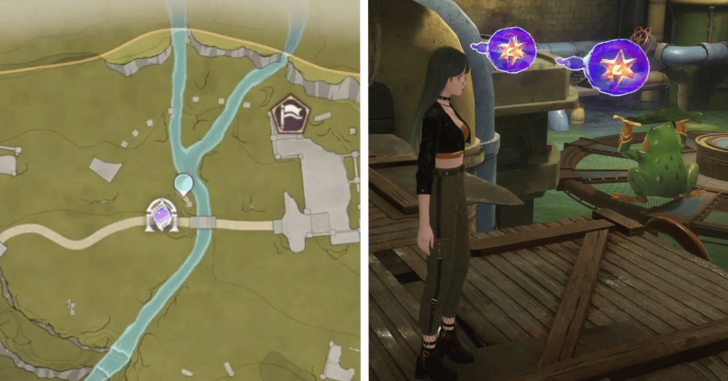 |
Well of Fortune, talk to the big frog to reach the Dews behind him |
| 203-204 | 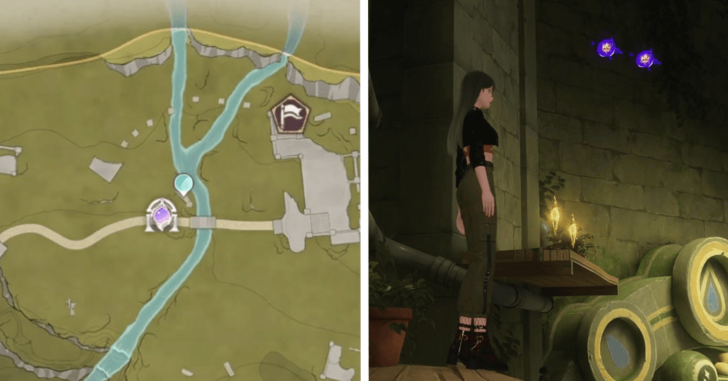 |
Well of Fortune, in the room after the big frog |
| 205-207 | 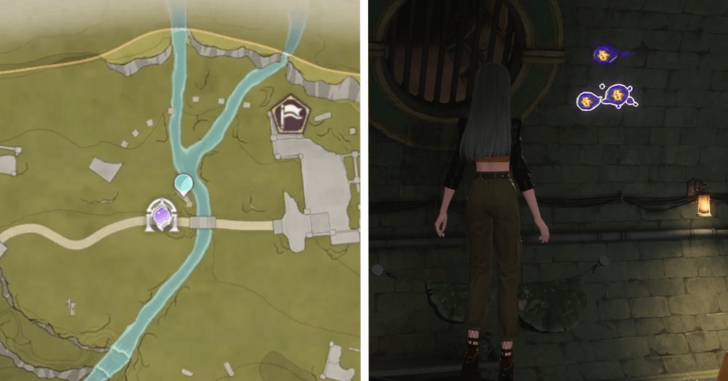 |
Well of Fortune, room opposite of the area with a large tank |
| 208-209 | 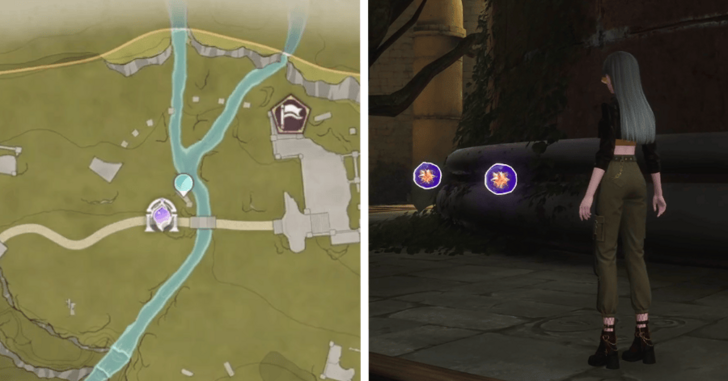 |
Well of Fortune, behind the large tank |
| 210-212 | 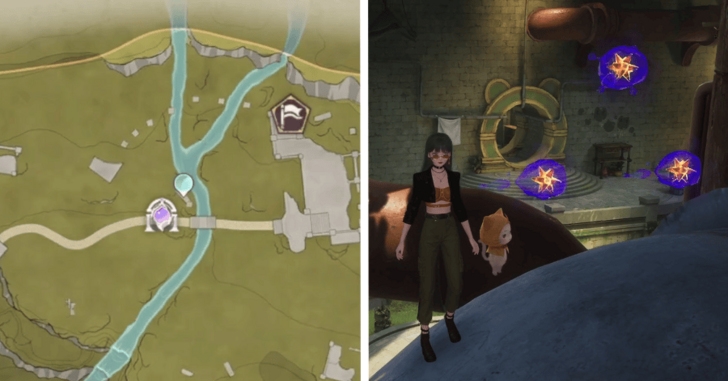 |
Well of Fortune, on one of the pipes past a Whimstar |
| 213-214 | 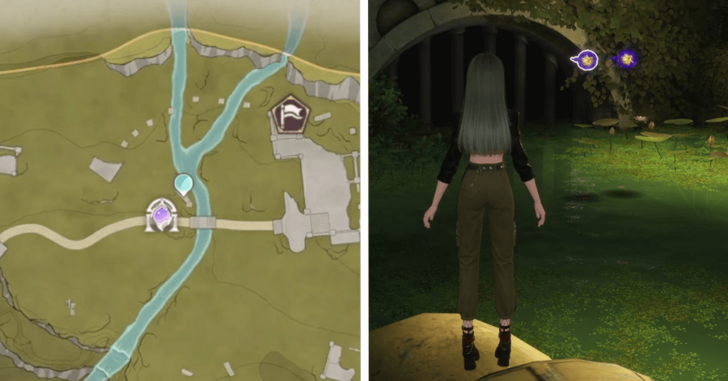 |
Well of Fortune, in the transitional area after the large tank room |
| 215-216 |  |
Well of Fortune, along the Winding Waterway |
| 217-218 | 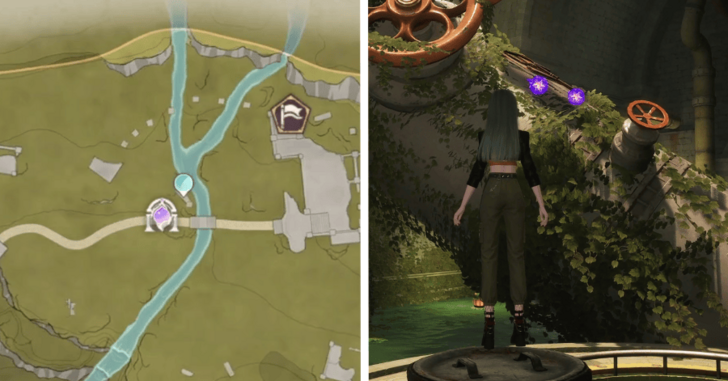 |
Well of Fortune, hop off to the left while the large lily pad is moving |
| 219-220 | 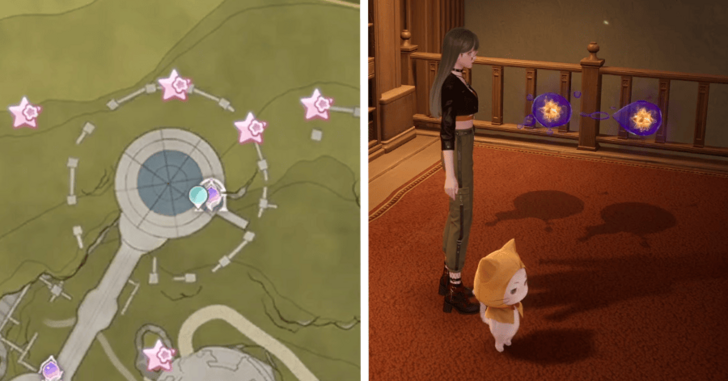 |
Dream Warehouse, to the right of the entrance |
| 221-222 | 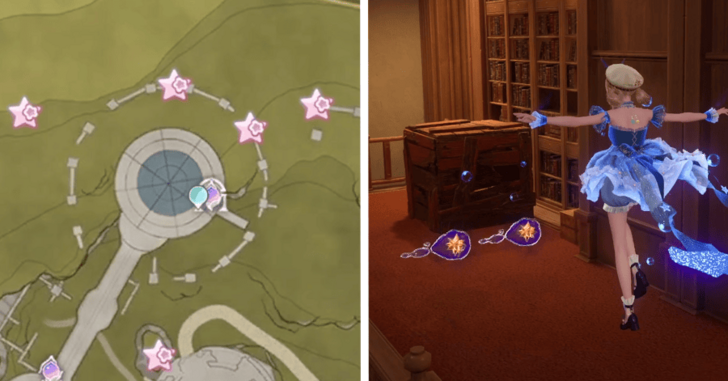 |
Dream Warehouse, to the left of the entrance |
| 223-224 | 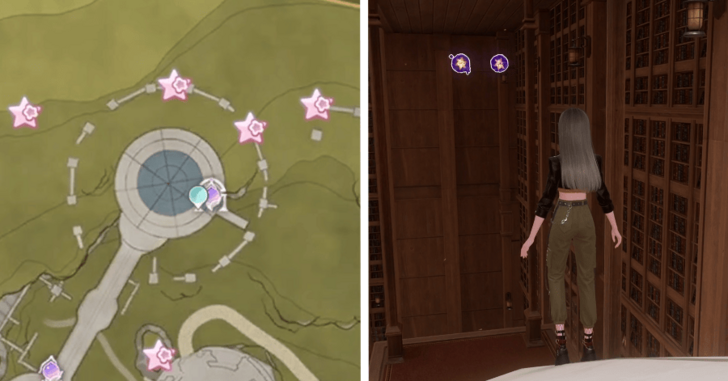 |
Dream Warehouse, below the floor that leads to the next area |
| 225-226 | 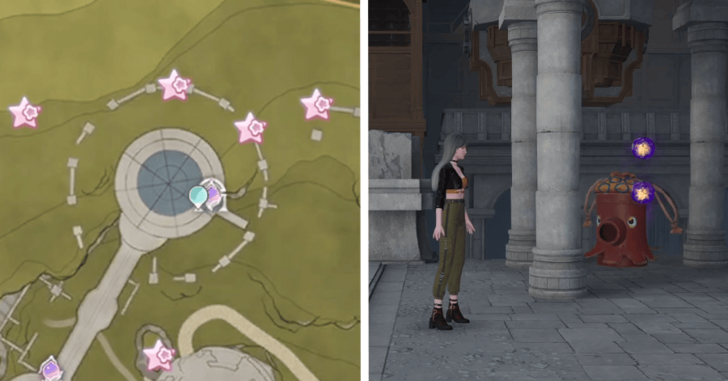 |
Dream Warehouse, near the start of the Reception Room Back Window |
| 227-228 | 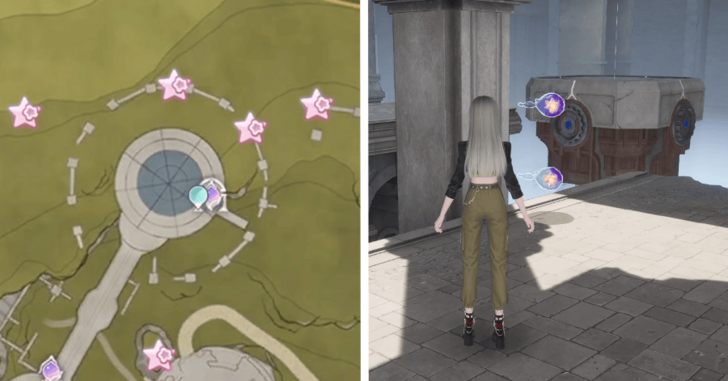 |
Dream Warehouse, below a crane blocked by an enemy |
| 229-230 | 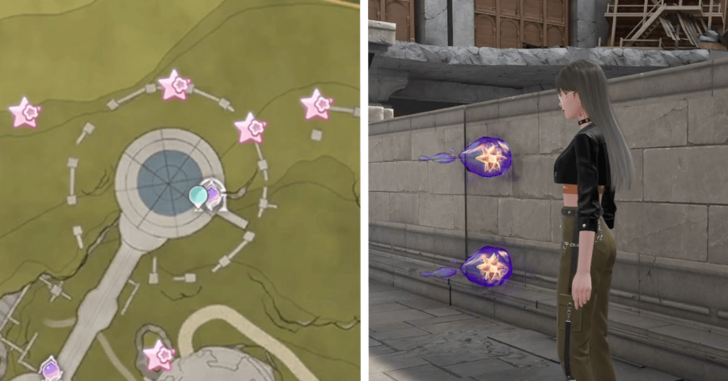 |
Dream Warehouse, below the Whimstar at the top of a tower |
| 231-232 | 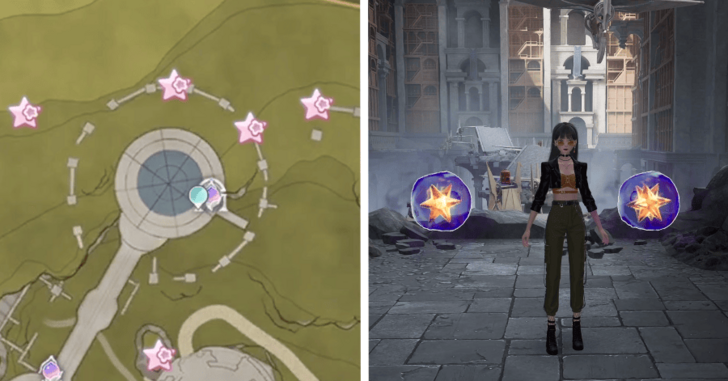 |
Dream Warehouse, inside the platform with a massive crack in the center |
| 233-234 |  |
Dream Warehouse, behind a collapsed walkway |
| 235-236 | 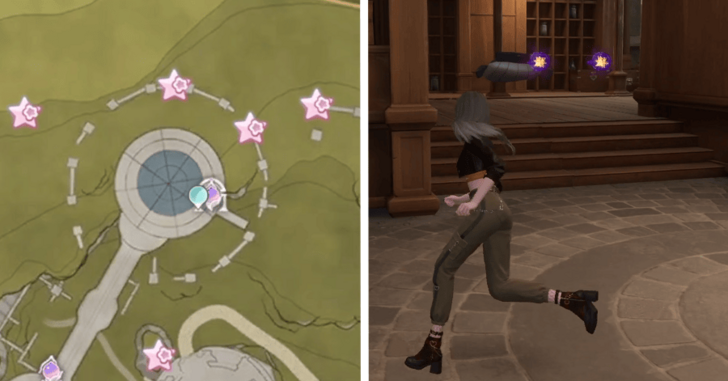 |
Dream Warehouse, bottom floor of the crane jump room |
| 237-238 | 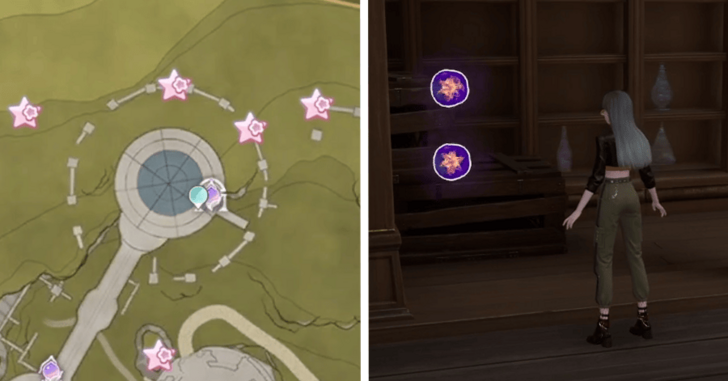 |
Dream Warehouse, second floor of the crane jump room |
| 239-240 | 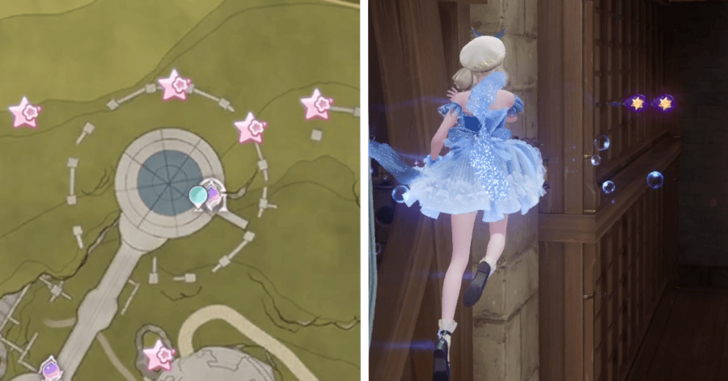 |
Dream Warehouse, midair attack in the crane jump room |
| 241-242 | 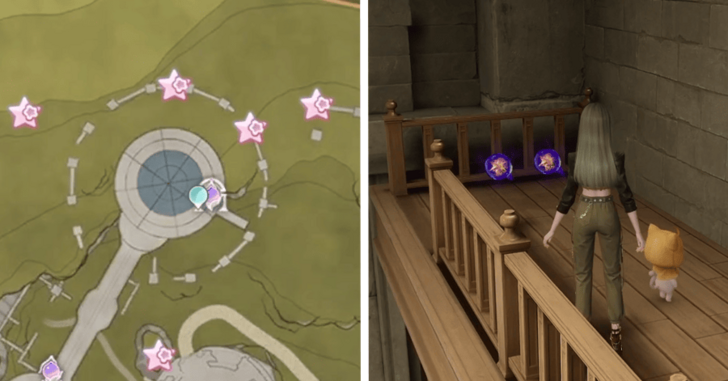 |
Dream Warehouse, on one side of the origami chandelier room |
| 243-244 | 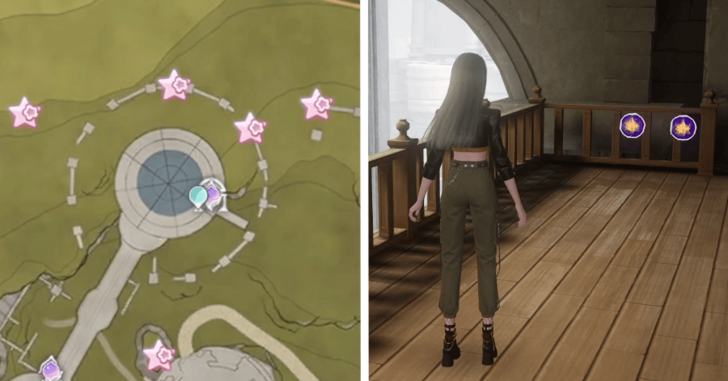 |
Dream Warehouse, other side of the origami chandelier room |
| 245-247 | 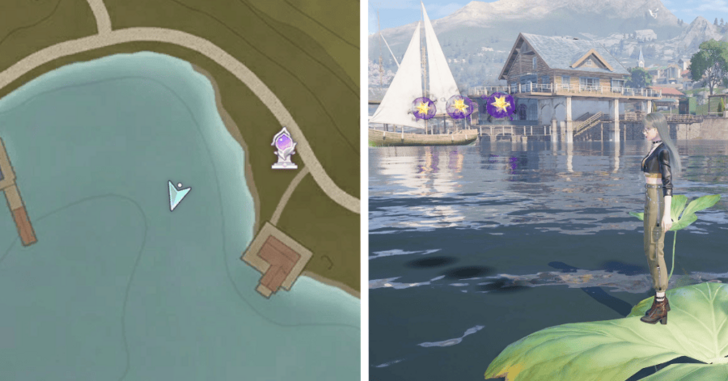 |
On the lake, jump over the lilypad to acquire these Dews |
| 248-249 | 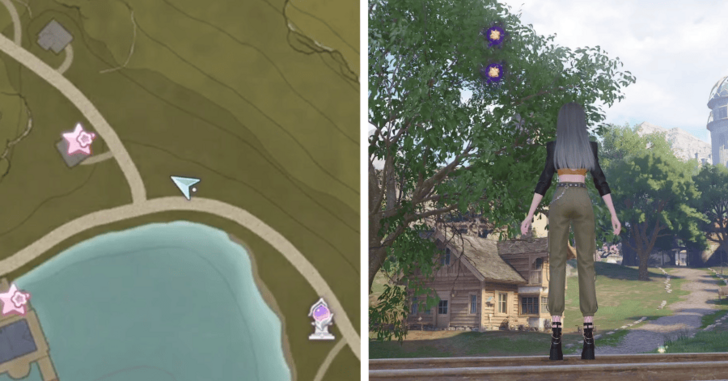 |
Near the intersection close to the Stitch Street Waypoint |
| 250-251 | 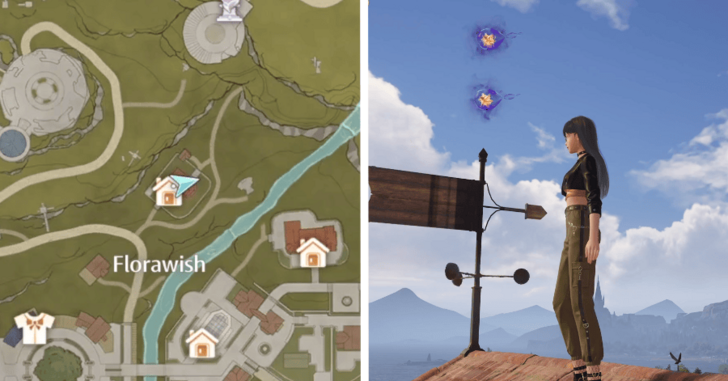 |
On top of Nonoy's House |
| 252-253 | 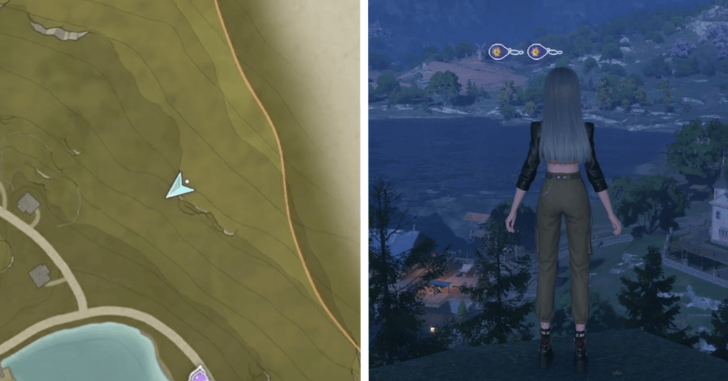 |
Off a cliff to the east overlooking the town |
| 254-255 | 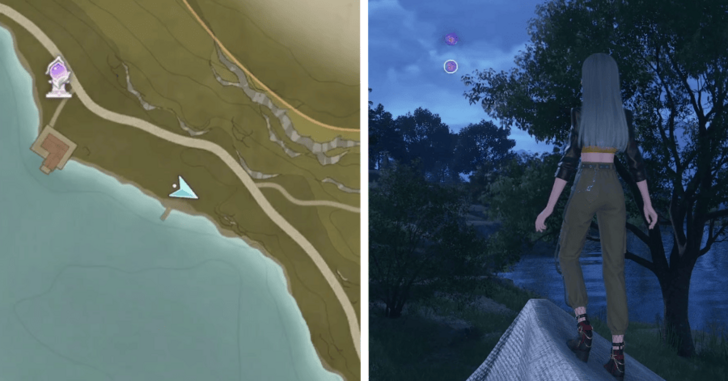 |
Near a small pier along Stitch Street |
| 256-257 | 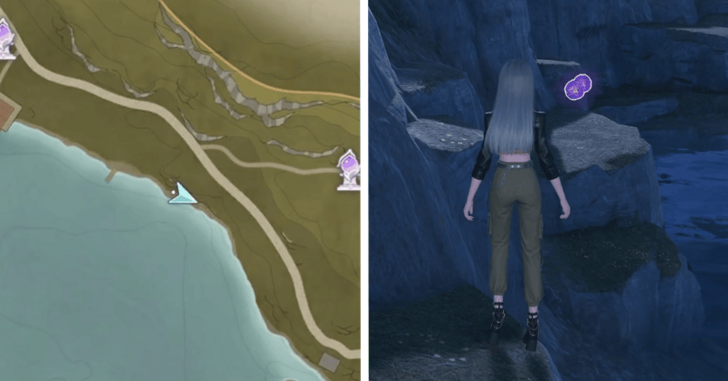 |
By the water close to the previous set of Dews |
| 258-259 | 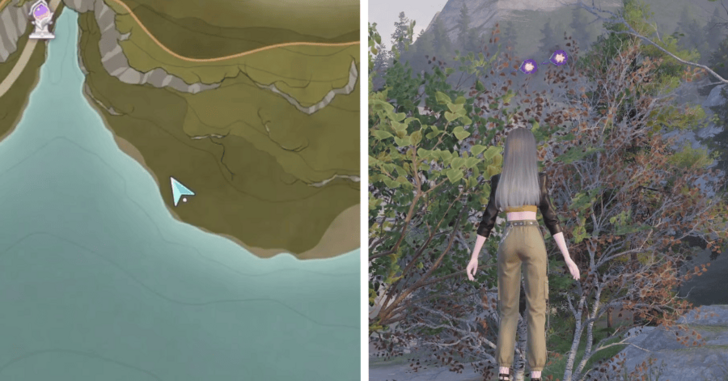 |
Near the water southeast of the Wish Pass Office Waypoint |
| 260-261 | 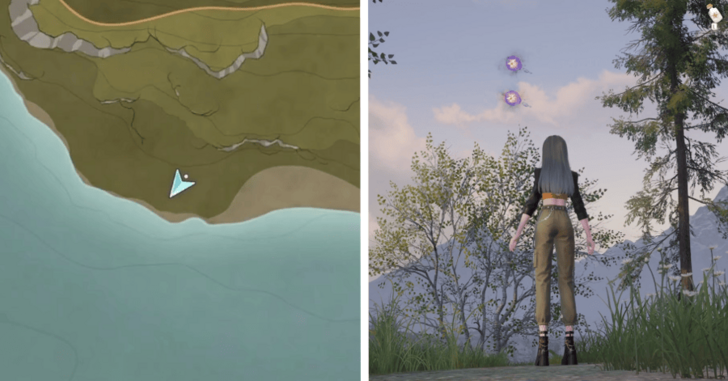 |
Just east of the previous set of Dews |
| 262-263 |  |
On top of a small house southeast of the big tree |
| 264-266 |  |
Along the wall east of the Forest's Edge Cavern |
| 267-268 | 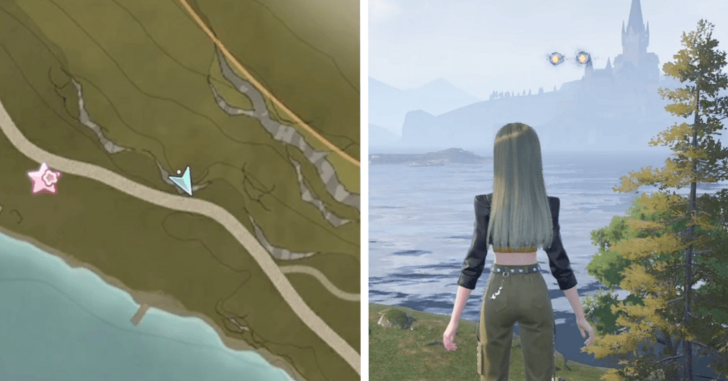 |
Above Stitch Street |
| 269-270 | 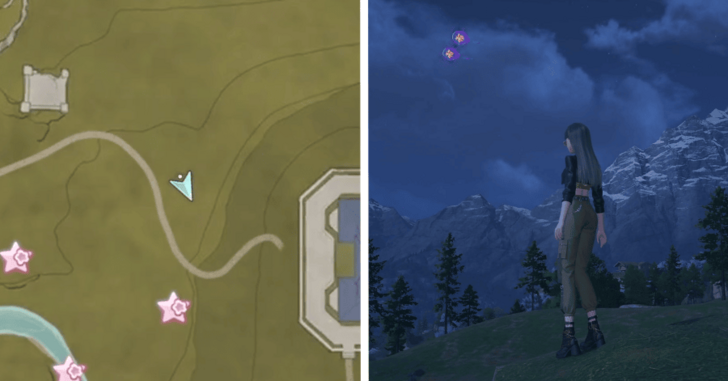 |
Above the road east of the Stylist's Guild |
| 271-272 | 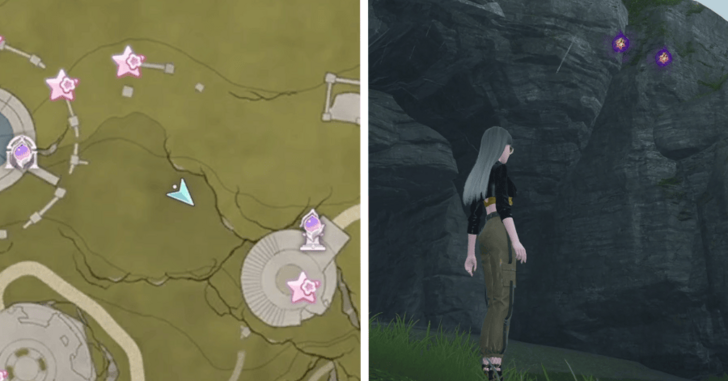 |
Outside the Warehouse Cavern |
| 273-274 |  |
Warehouse Cavern, in a hole in the wall |
| 275-276 | 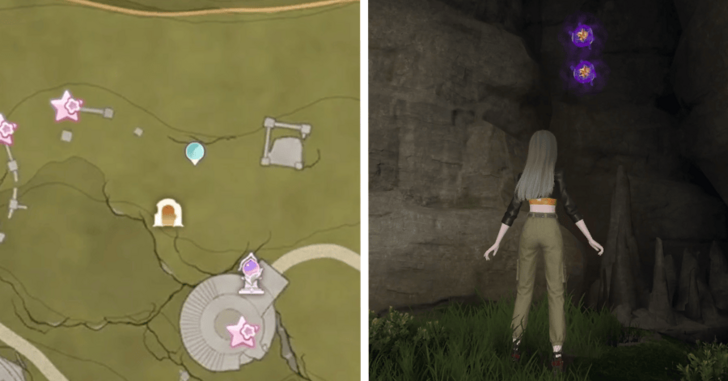 |
Warehouse Cavern, behind a pillar near a chest |
| 277-278 | 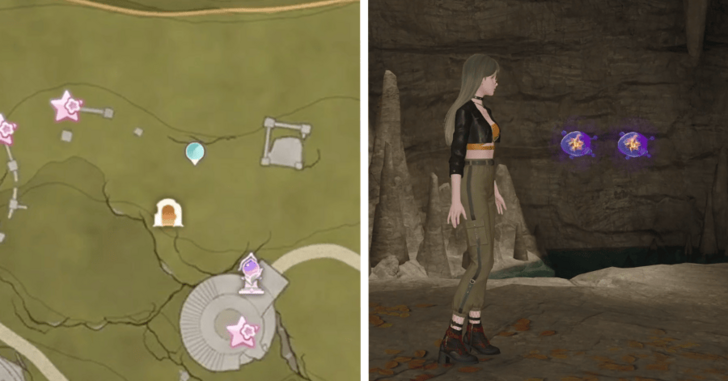 |
Warehouse Cavern, below a drop down behind some enemies |
| 279-280 | 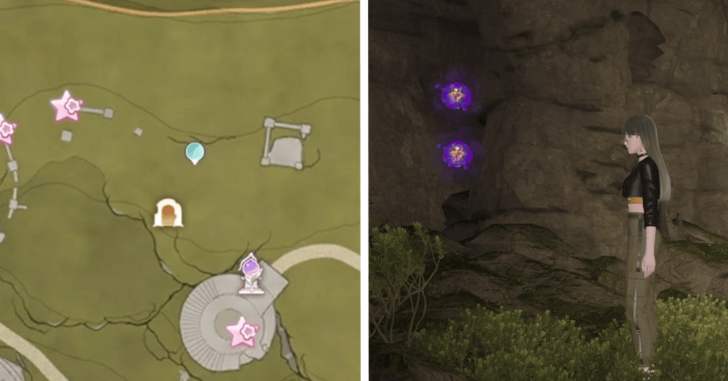 |
Warehouse Cavern, beside the Emerald Pond |
| 281-282 | 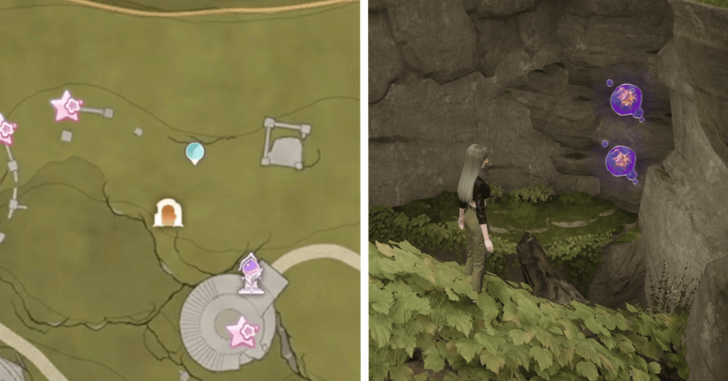 |
Warehouse Cavern, on a log wedged between the upper and lower floors |
| 283-284 | 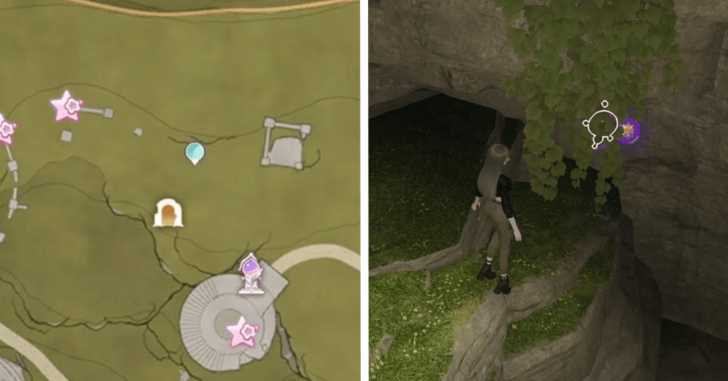 |
Warehouse Cavern, near the Whimstar |
| 285-286 | 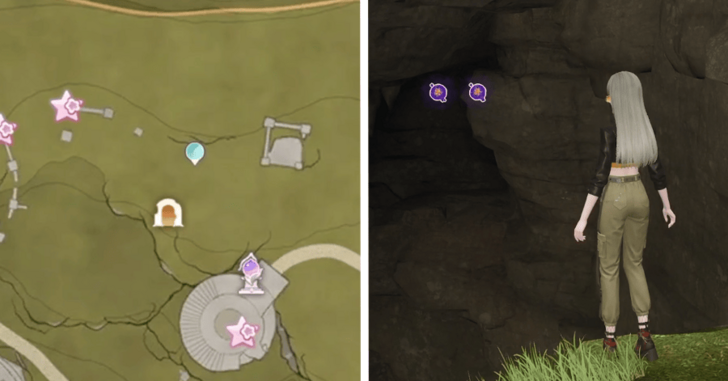 |
Warehouse Cavern, midair on the upper level |
| 287-288 | 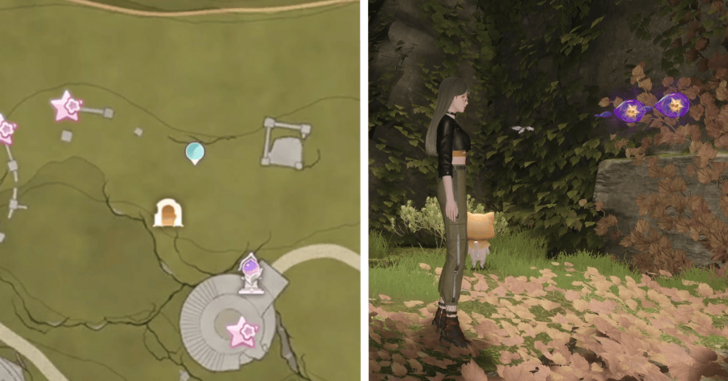 |
Warehouse Cavern, just past the exit hole that drops back down to the lower level |
| 289-290 | 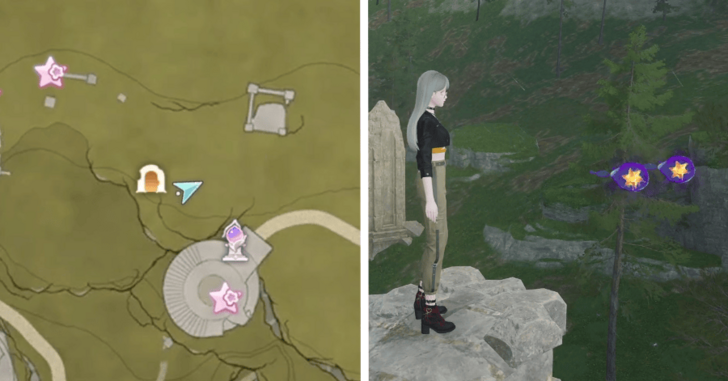 |
On a ruined wall near the Secret Base |
| 291-293 | 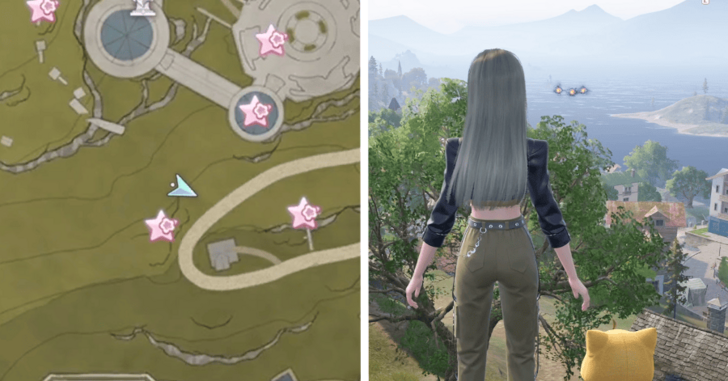 |
Above a tree along the path to the Dream Warehouse |
| 294-295 | 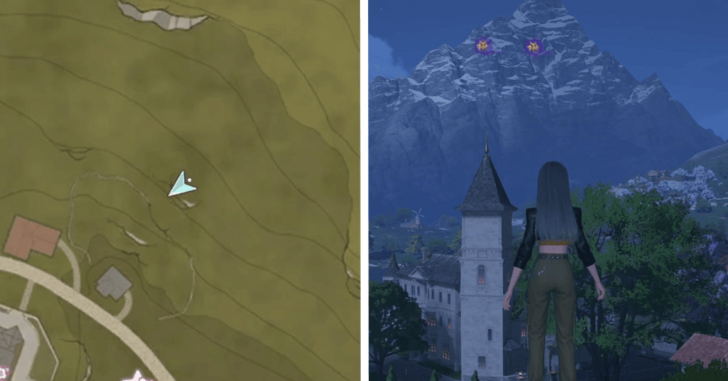 |
Off a ledge northeast of the orchard |
| 296-298 | 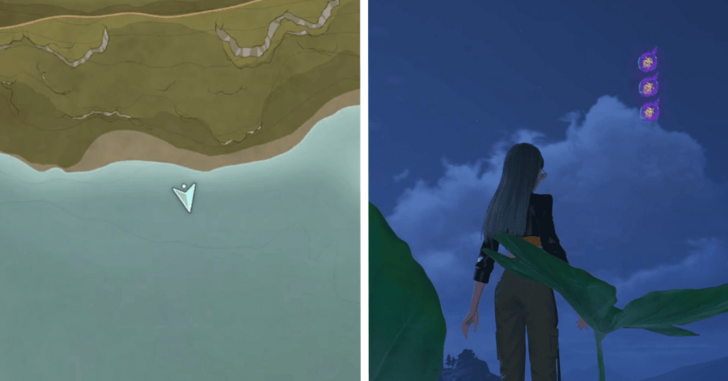 |
Above a lily pad on the eastern beach |
| 299-300 | 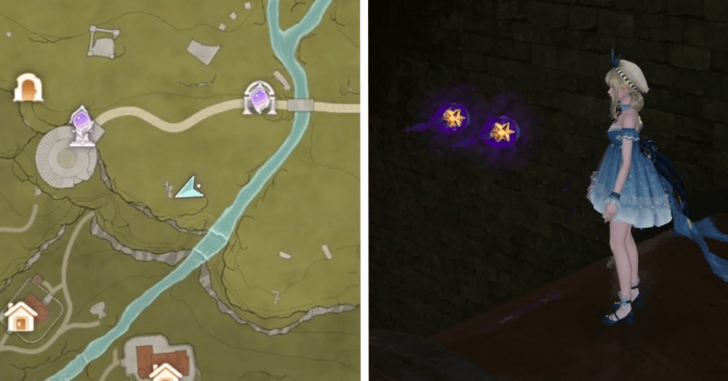 |
Next to a pipe on the third floor before the Well of Fortune |
| 301-302 | 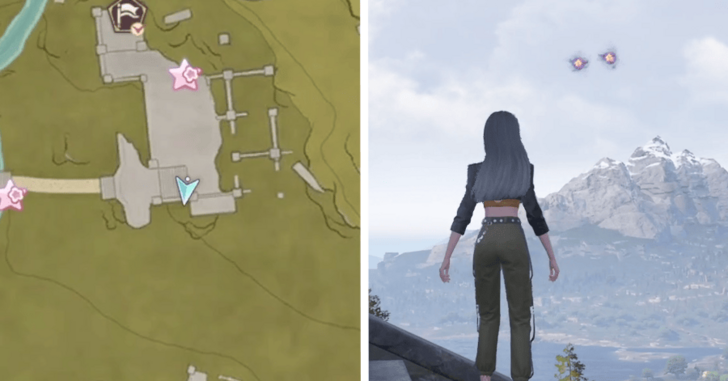 |
Below the archway south of the two catapults |
Breezy Meadows Dews of Inspiration
 Open Image in New Tab |
 Open Image in New Tab |
 Open Image in New Tab |
Dews marked with an asterisk are found underground or in caves.
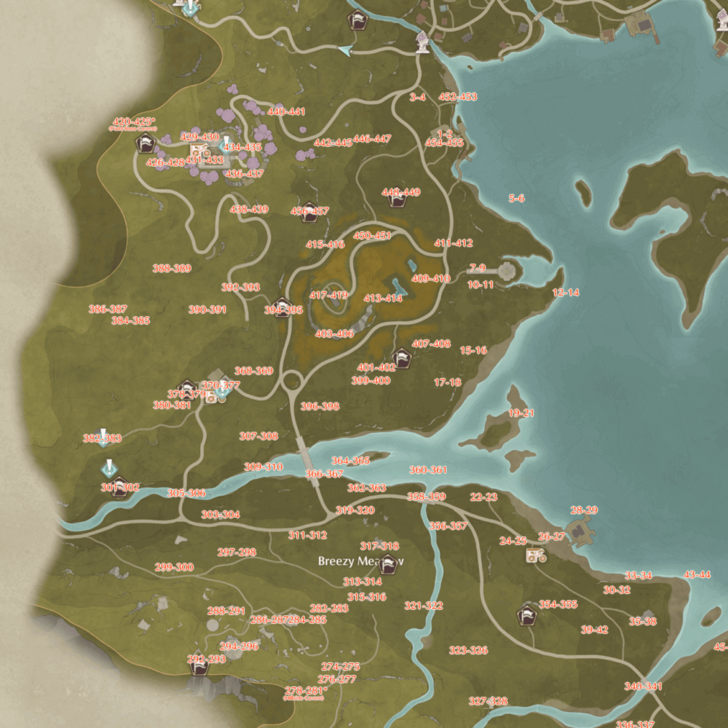
There are a total of 502 Dews in Breezy Meadows. All their locations are noted below:
| No. | Image | How to Get |
|---|---|---|
| 1-2 |  |
Windowsill of the Leisureely Anglers Florawish Branch |
| 3-4 | 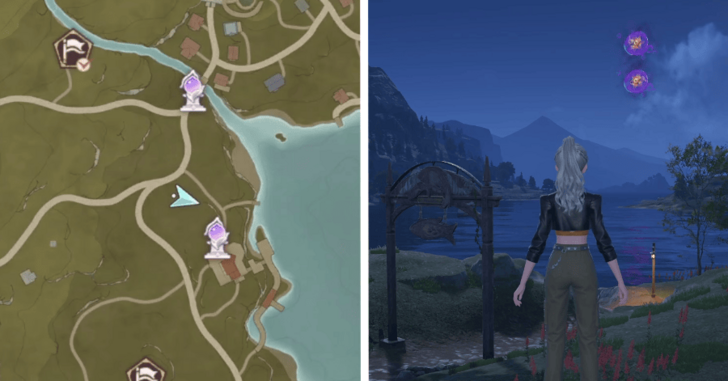 |
In the air near the sign for the Leisureely Anglers Florawish Branch |
| 5-6 | 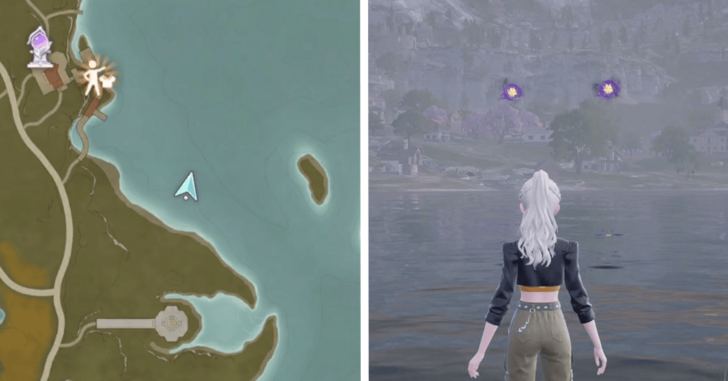 |
On the water near the Leisureely Anglers Florawish Branch |
| 7-9 | 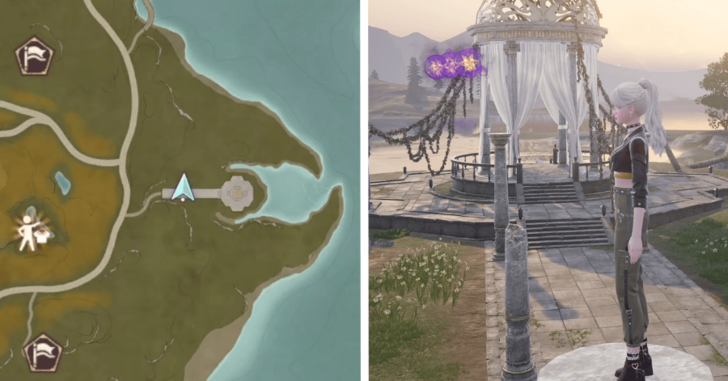 |
Above the pillars on the path leading to the gazebo |
| 10-11 | 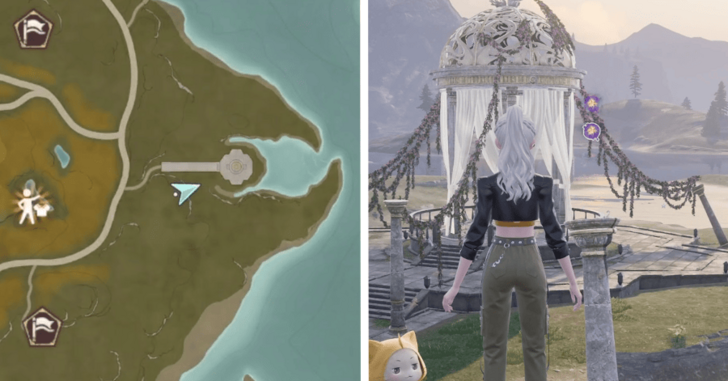 |
Above a slanted pillar just south of the last set of Dews |
| 12-14 | 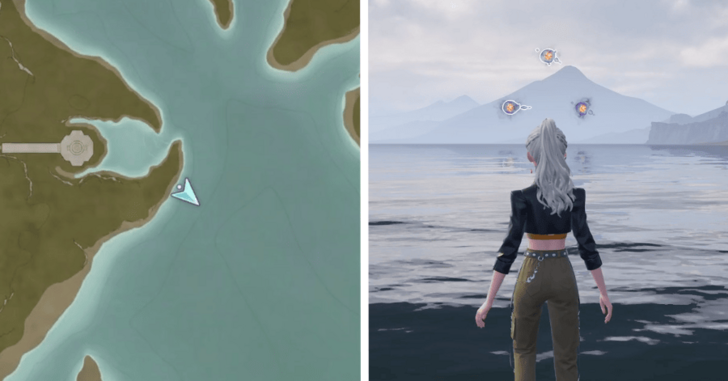 |
On the water east of the gazebo |
| 15-16 | 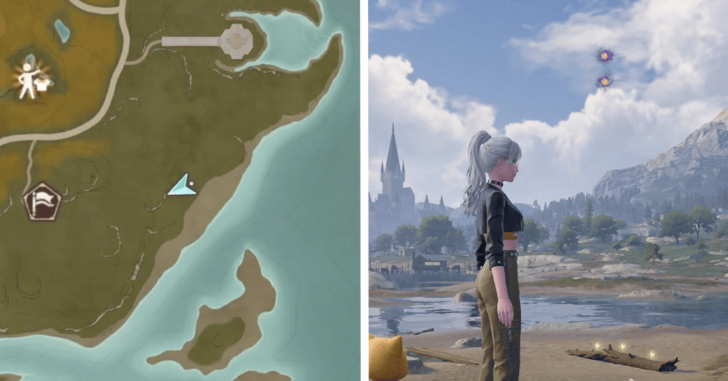 |
Above the beach south of the gazebo |
| 17-18 | 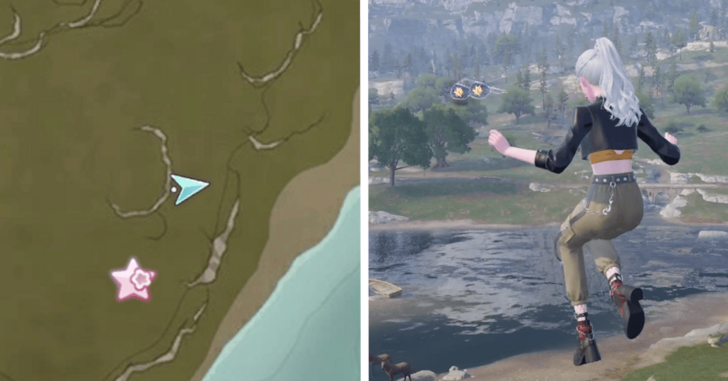 |
Above a bouncy leaf next to a Curio |
| 19-21 | 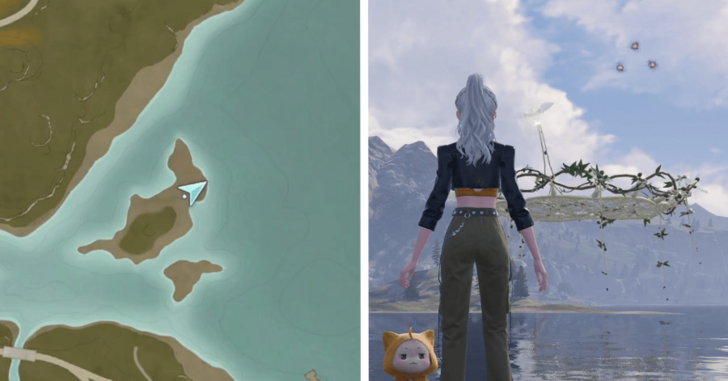 |
Above the water on an island |
| 22-23 | 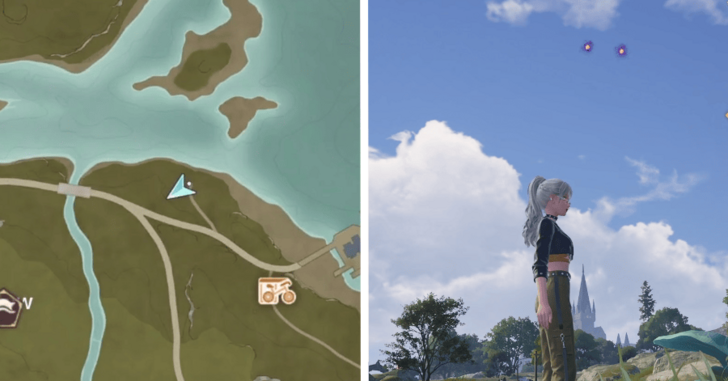 |
Above a bouncy leaf south of the last set of Dews |
| 24-25 | 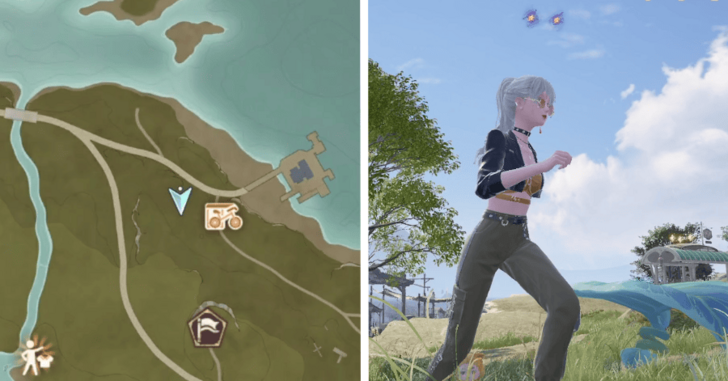 |
Above a bouncy leaf near the Meadow Wharf bike rental |
| 26-27 | 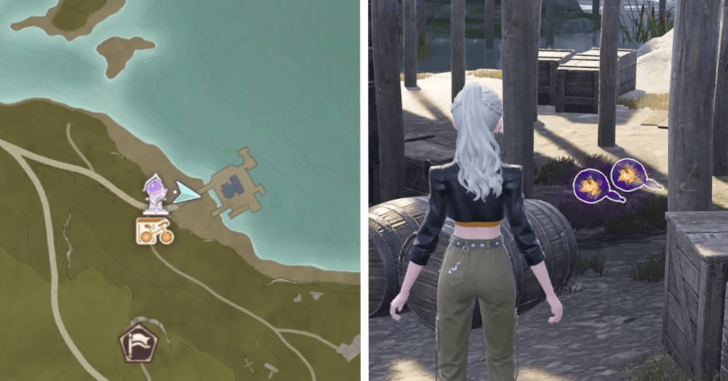 |
Underneath Meadow Wharf's walkway |
| 28-29 | 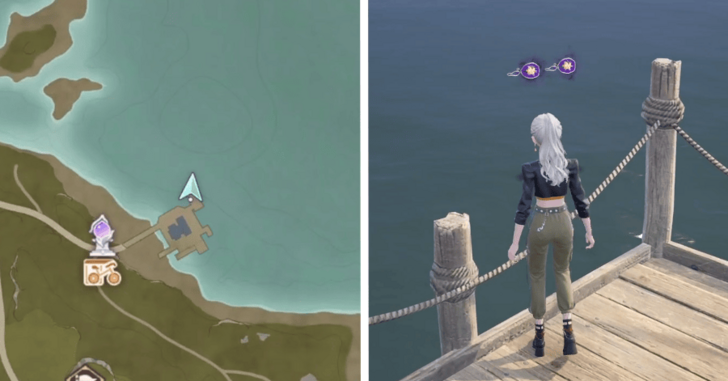 |
On the water at the end of Meadow Wharf |
| 30-32 | 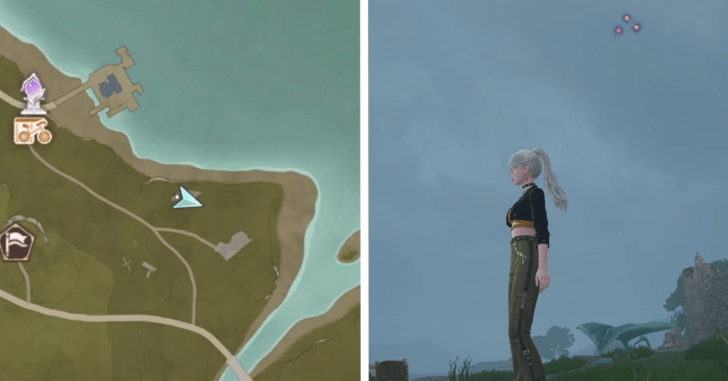 |
Above a bouncy leaf surrounded by small ruins |
| 33-34 | 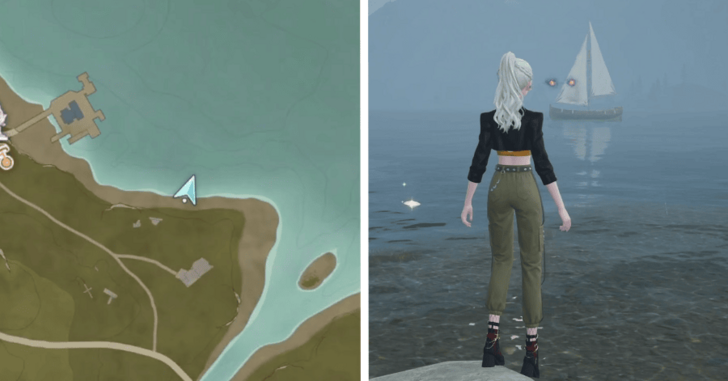 |
On the water east of the Meadow Wharf |
| 35-36 | 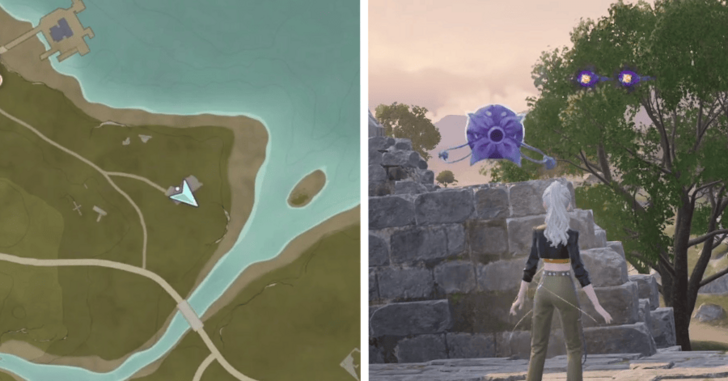 |
Above some ruins with a bunch of enemies |
| 37-38 | 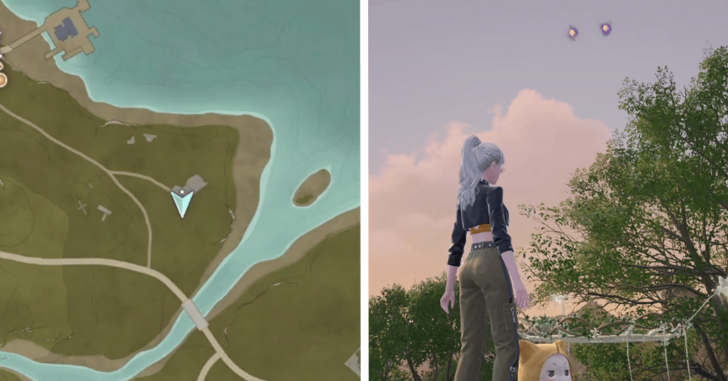 |
Above a tree right beside the previous set of Dews |
| 39-40 | 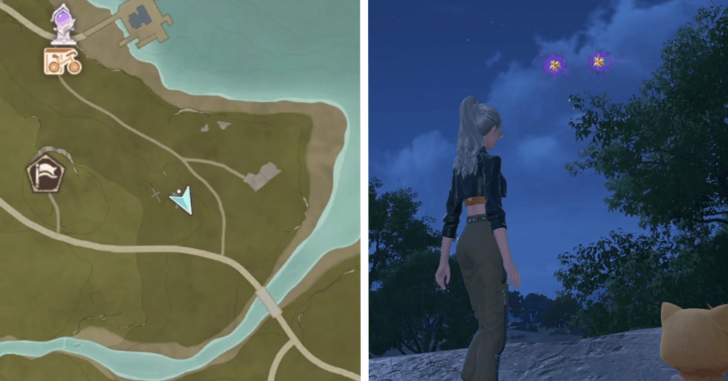 |
Above a collapsed pillar west of the ruins |
| 41-42 |  |
Above a ruined wall right next to the pillar |
| 43-44 |  |
On the water east of the small ruins |
| 45-46 | 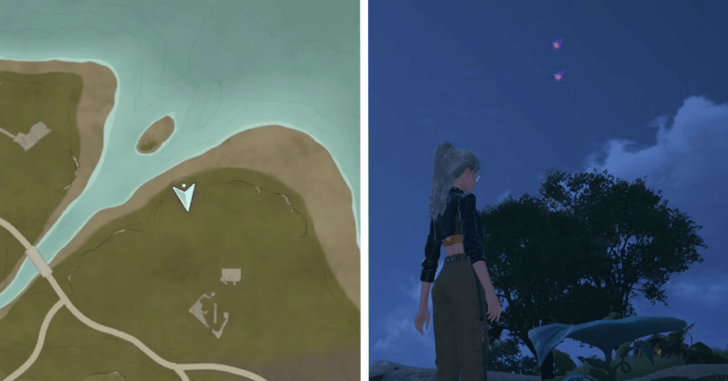 |
Above a bouncy leaf |
| 47-48 | 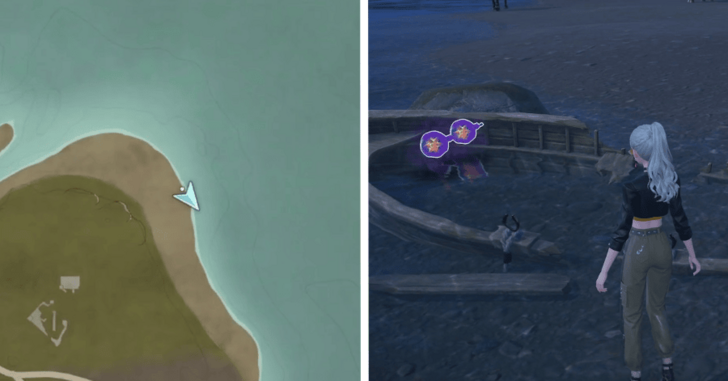 |
In a small shipwrecked boat on the beach |
| 49-50 |  |
Over a ledge near the Queen's Palace waypoint |
| 51-52 | 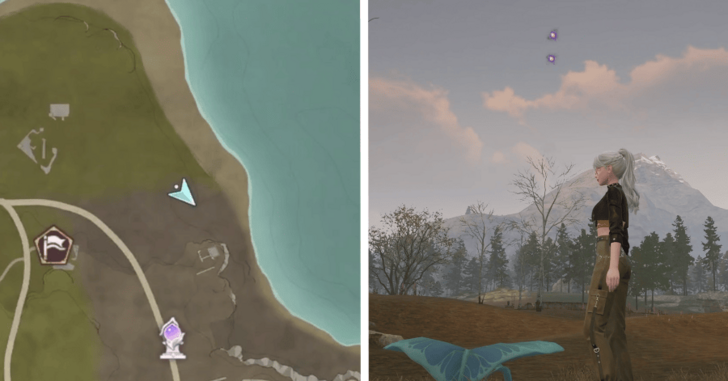 |
Above a bouncy leaf near the Queen's Palace waypoint |
| 53-54 | 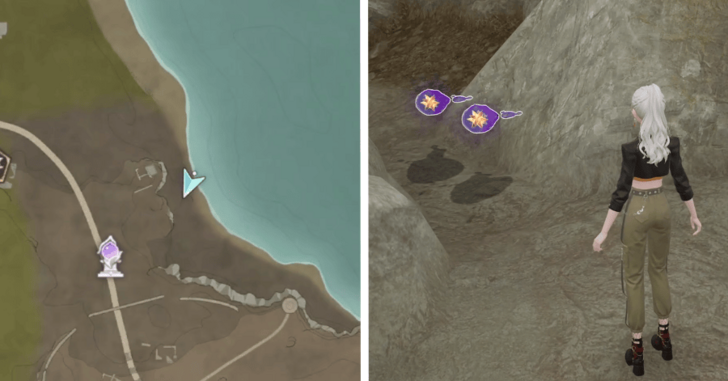 |
Between some rocks on the beach near the Queen's Palace waypoint |
| 55-56 | 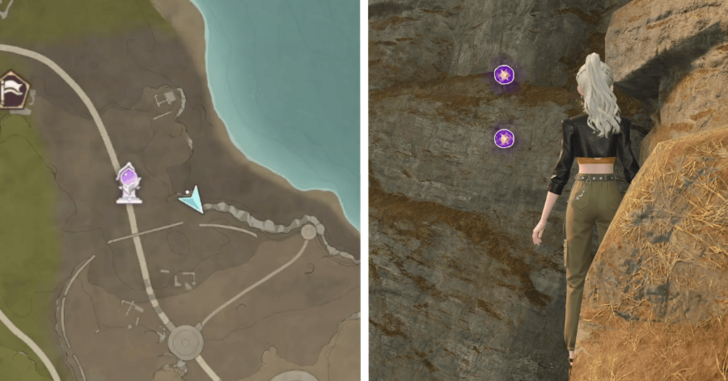 |
Along the cliff near the Queen's Palace waypoint |
| 57-58 | 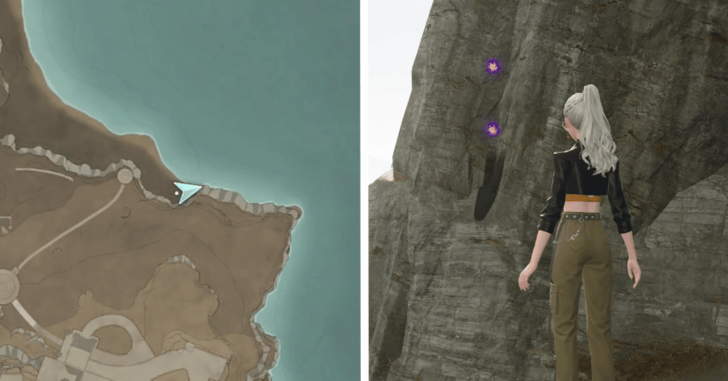 |
At the end of the beach near a Curio |
| 59-60 | 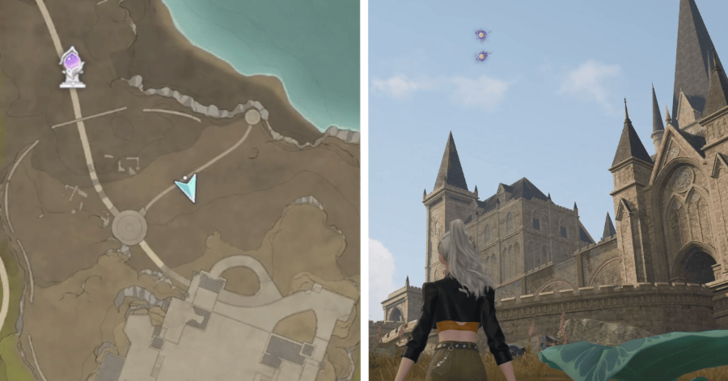 |
Above a bouncy leaf on the outer part of the palace |
| 61-63 | 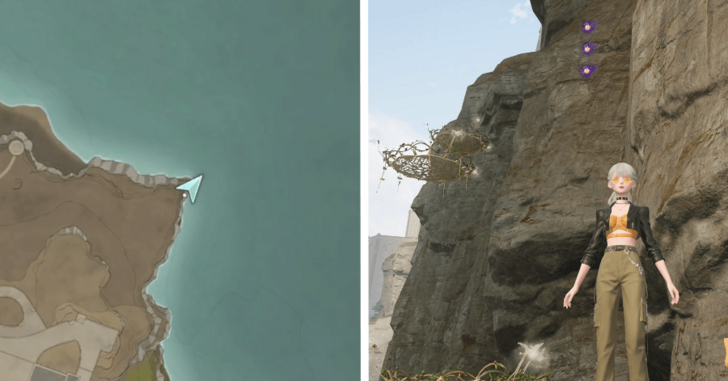 |
Off the cliff to the northeast of the palace |
| 64-65 |  |
On the ground outside the Queen's Palace |
| 66-67 | 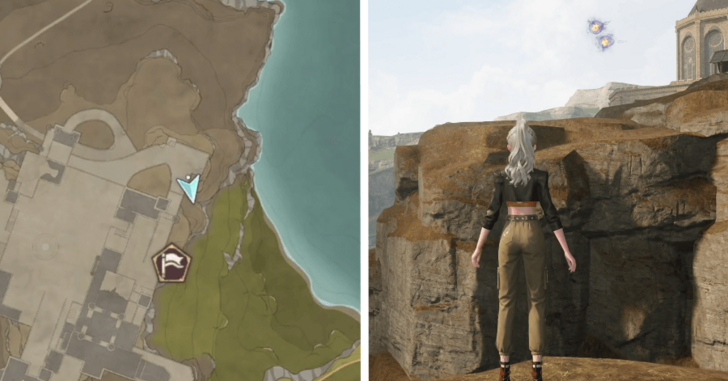 |
On the outer wall near the Hoop Hopper mini-game |
| 68-69 | 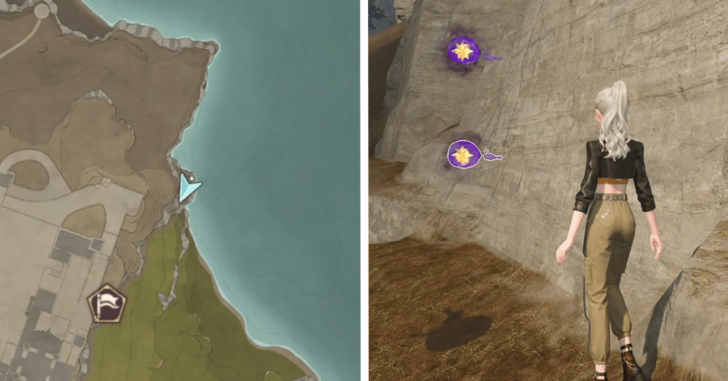 |
Along the cliff just east of the palace |
| 70-72 | 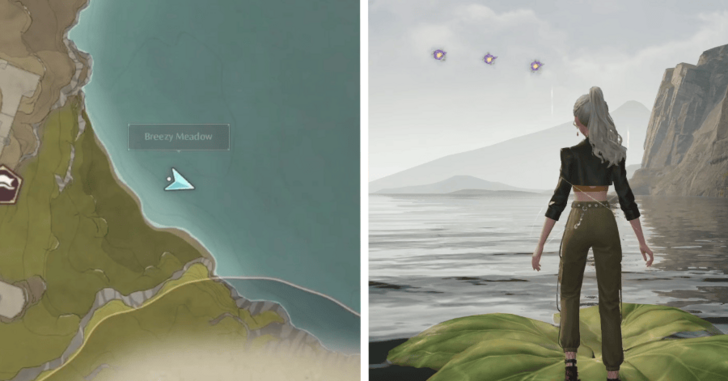 |
Above the water north of the Lakeside Cliff Cavern |
| 73-75 | 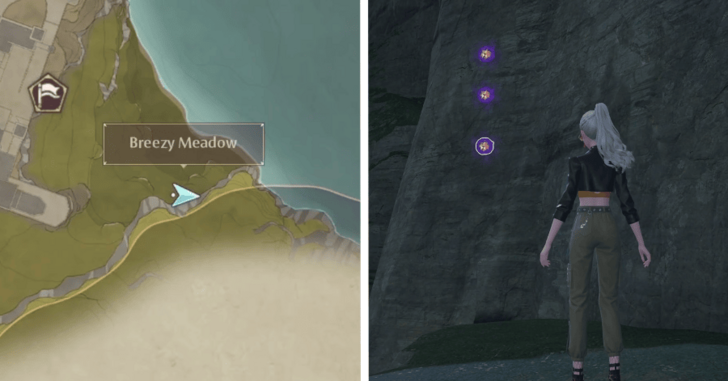 |
Along the southern cliff wall behind some enemies |
| 76-77 | 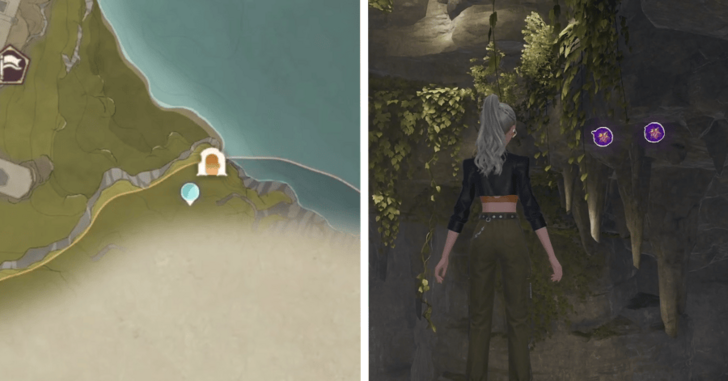 |
Lakeside Cliff Cavern, along the ceiling |
| 78-79 | 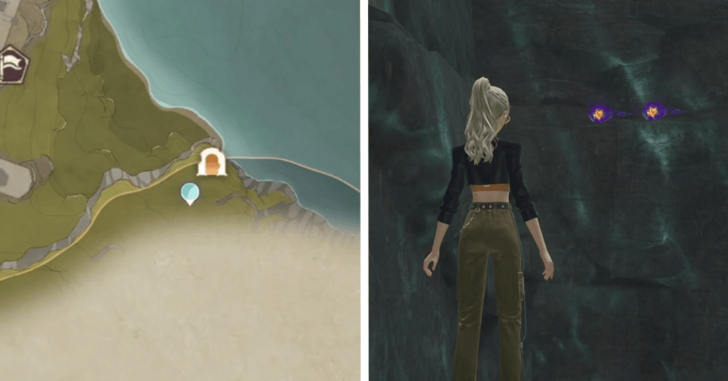 |
Lakeside Cliff Cavern, around a corner in the river area |
| 80-81 | 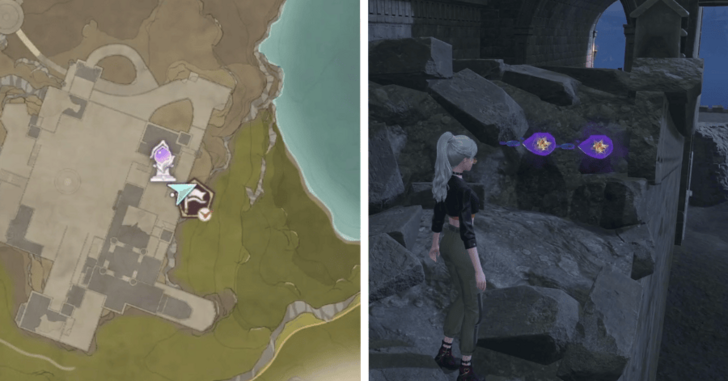 |
In the ruined floor right next to Hoop Hopper |
| 82-83 | 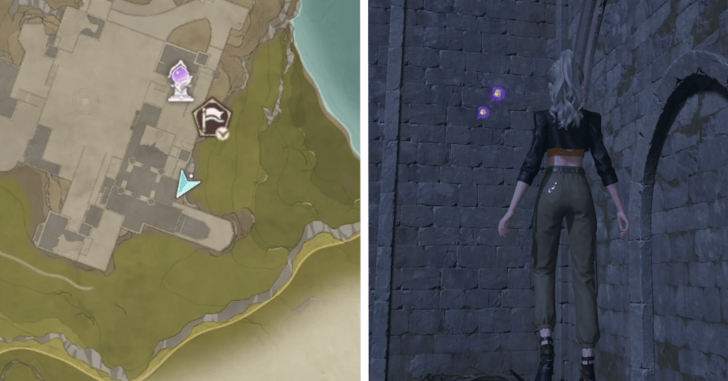 |
In a corner of the outer wall |
| 84-85 | 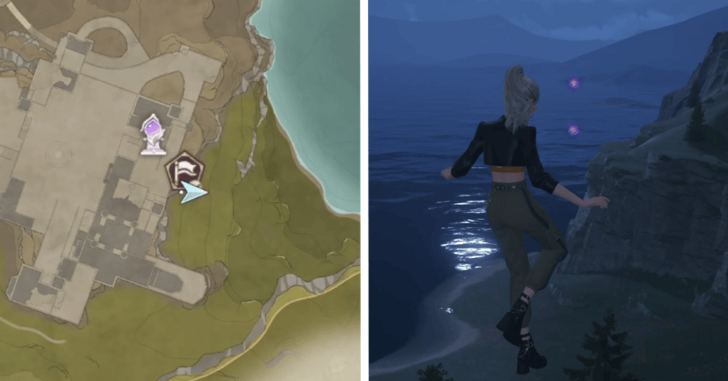 |
Above a bouncy plant below Hoop Hopper |
| 86-87 | 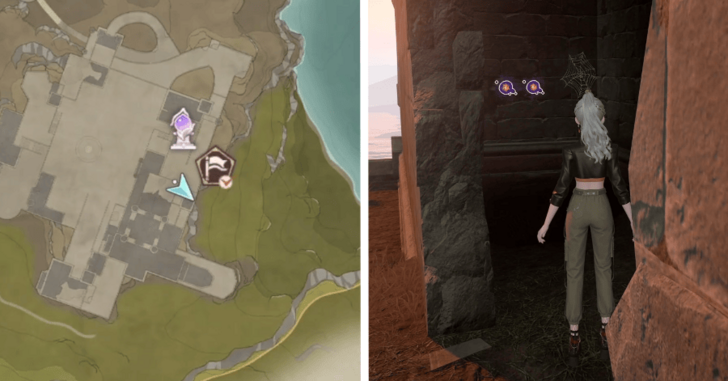 |
Inside the palace walls next to a bouncy plant |
| 88-89 | 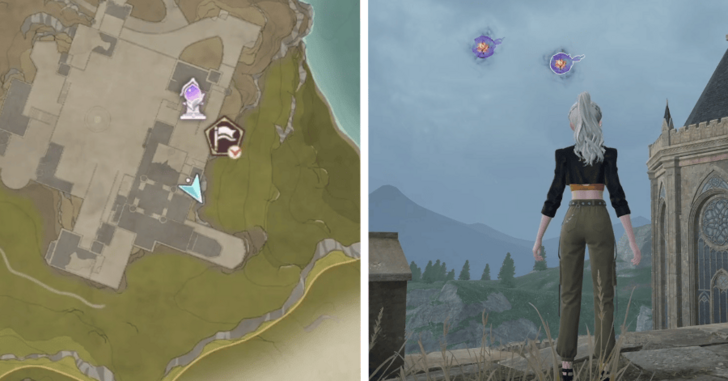 |
Outside the palace above a bouncy plant and near some purple chains |
| 90-91 | 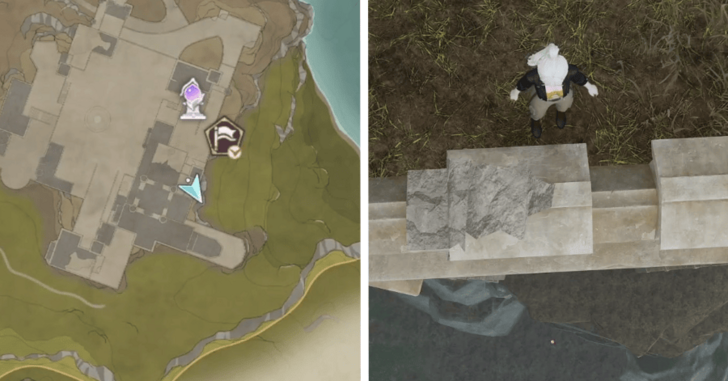 |
By the southeast palace wall, easier to get by floating down instead of attacking from below |
| 92-93 | 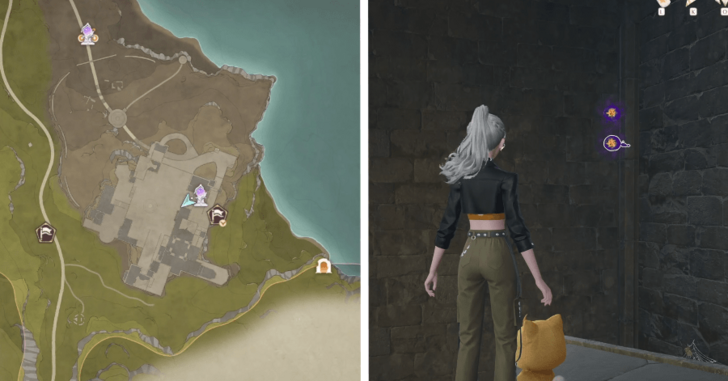 |
Through a hole near the Queen's Palace Ruins Front Yard Waypoint. |
| 94-95 |  |
On the roof next to the area above the last set of Dews. |
| 96-98 | 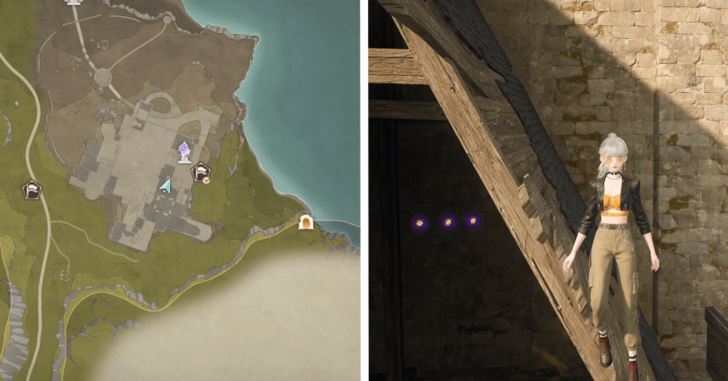 |
Under one of the destroyed roofs in the Queen's Palace. |
| 99-101 | 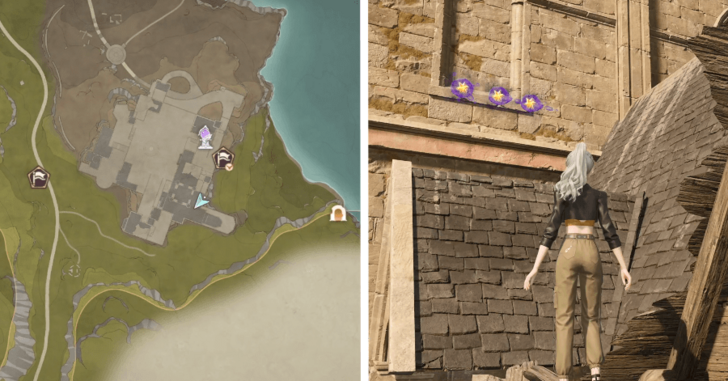 |
On the roof past the last set of Dews. |
| 102-104 |  |
On the roof next to the destroyed roof. |
| 105-106 | 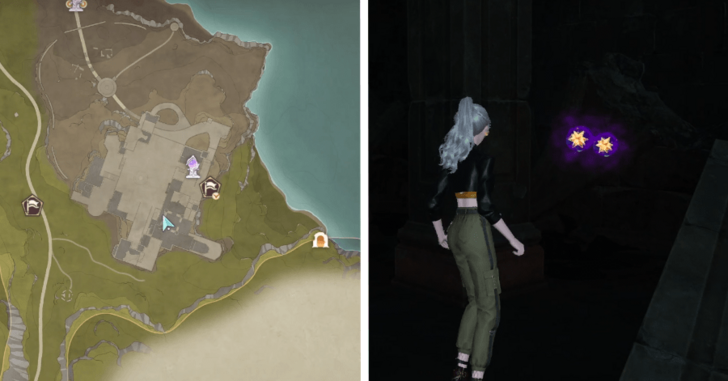 |
On the bottom floor of the Queen's Palace Ruins High Tower. |
| 107-108 | 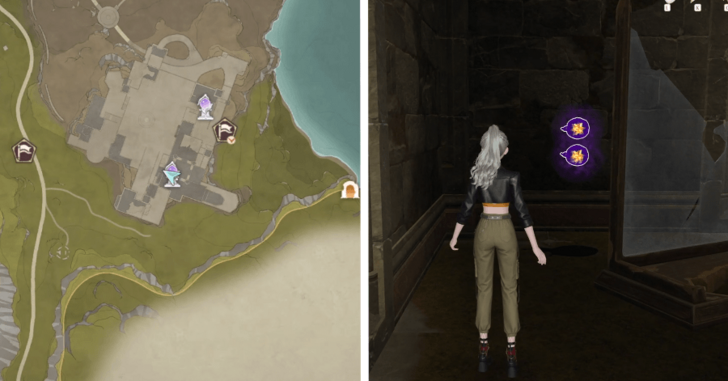 |
At the top of the Queen's Palace Ruins High Tower. |
| 109-110 | 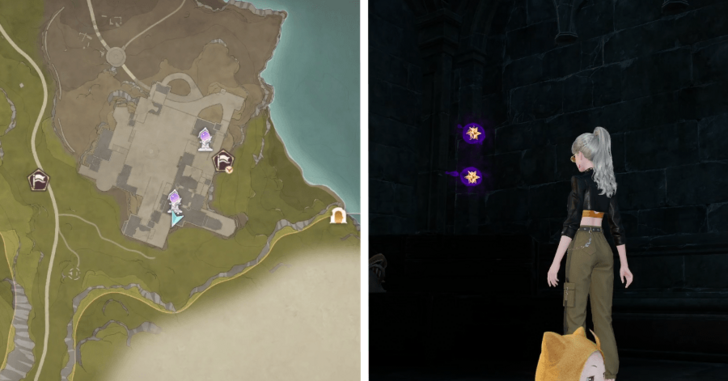 |
In a room filled with monsters. |
| 111-112 |  |
On the second floor of the monster room. |
| 113-115 | 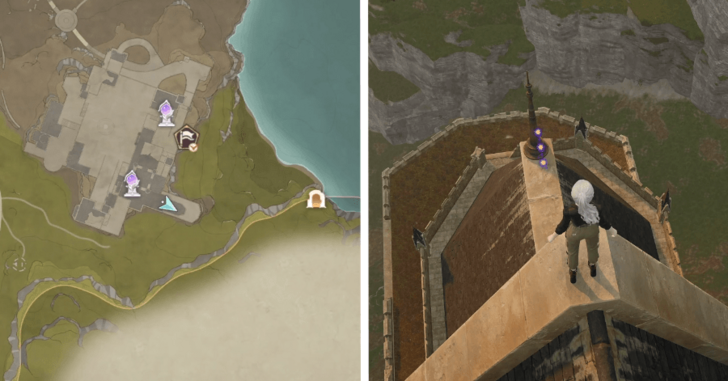 |
On the southeastern roof of the palace. |
| 116-117 | 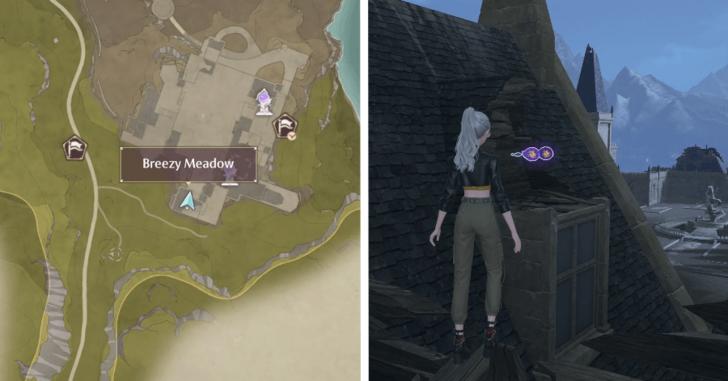 |
On the southern roof of the palace. |
| 118-119 | 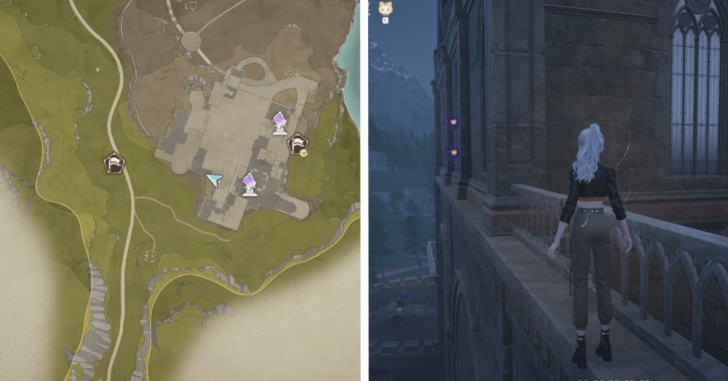 |
Along the wall of the southwestern building. |
| 120-121 | 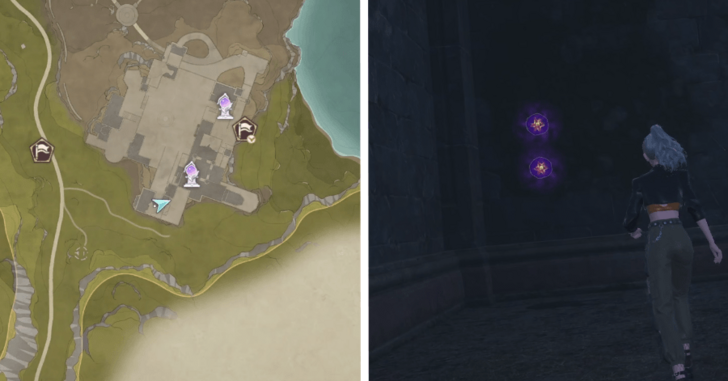 |
Inside the southern building. |
| 122-124 | 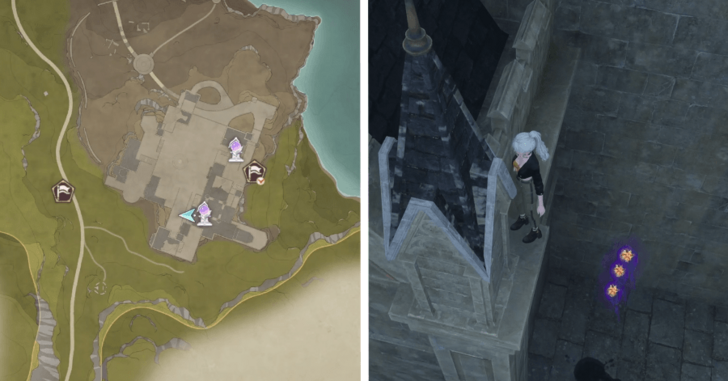 |
Underneath a balcony with a Whimstar. |
| 125-126 | 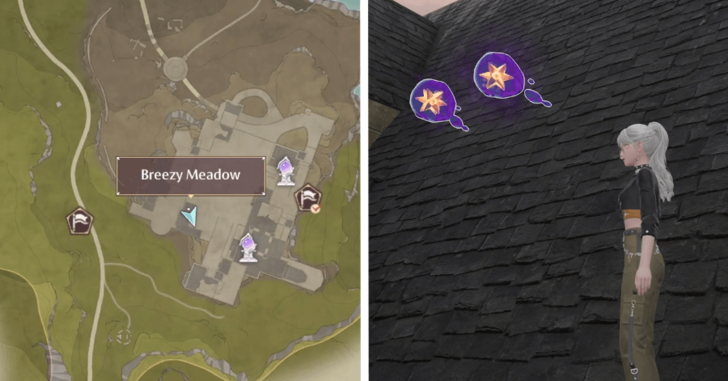 |
On the southwestern building's roof. |
| 127-129 | 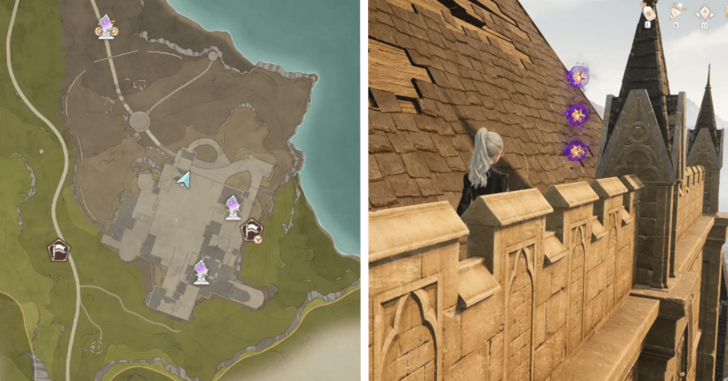 |
On the northern building's roof. |
| 130-131 | 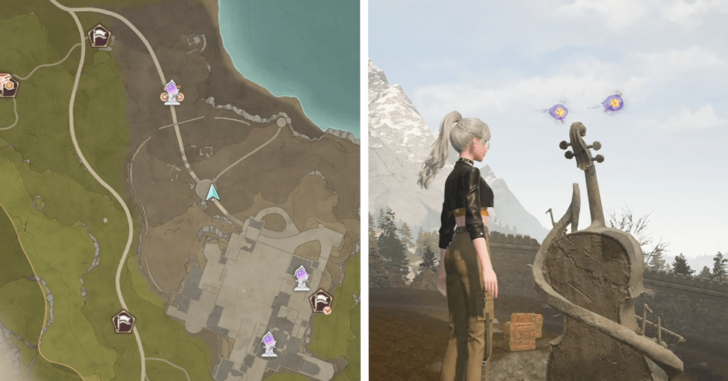 |
On top of the cello on the outer part of the palace. |
| 132-134 | 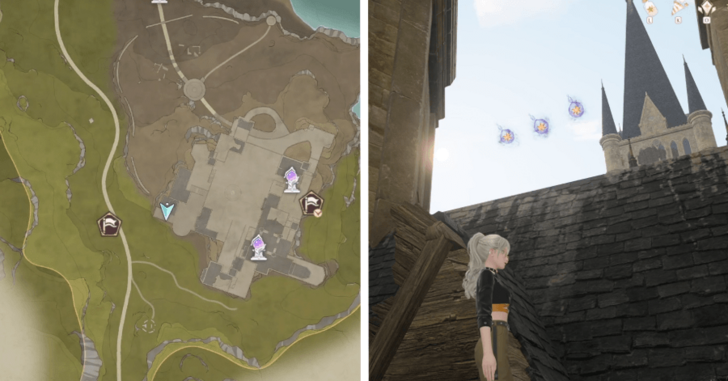 |
On the roof of the western building. |
| 135-136 | 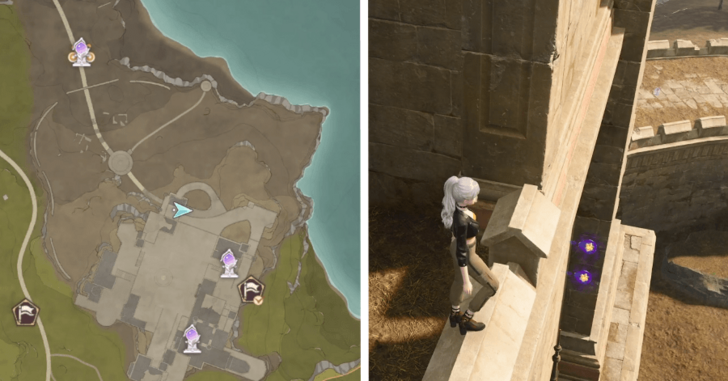 |
Along the wall of the northern building. |
| 137-138 | 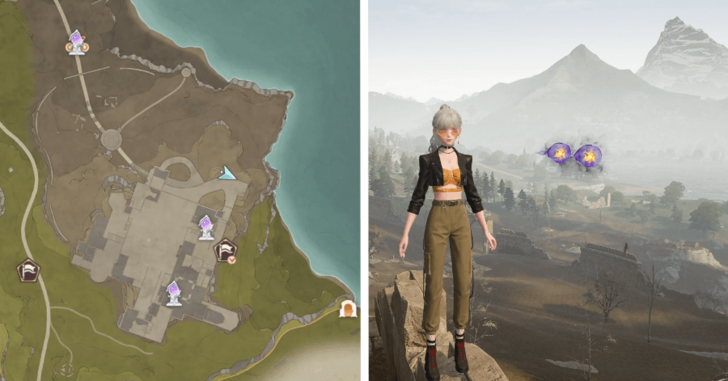 |
Above a ruined tower in the northeast. |
| 139-140 |  |
Above some small broken walls in the outer area of the palace. |
| 141-142 | 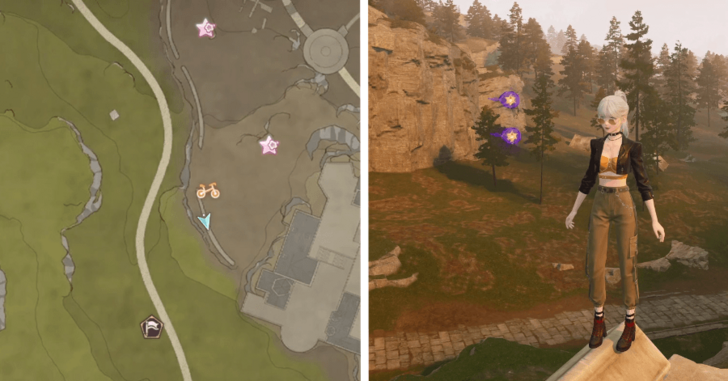 |
Above the large western outer wall. |
| 143-144 |  |
Above a bouncy leaf to the south of the palace. |
| 145-146 | 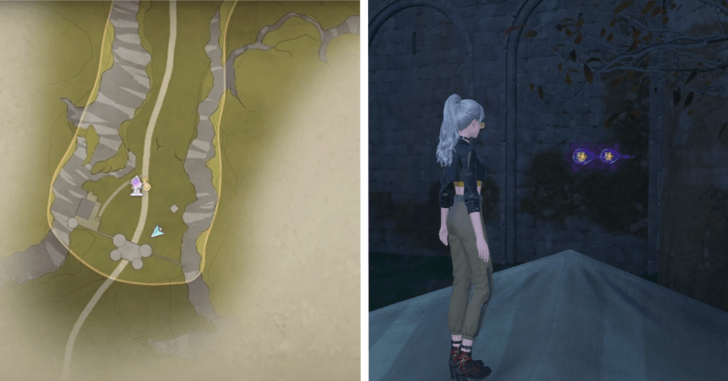 |
Along the gate's wall in the Heartcraft Kingdom Outpost. |
| 147-149 | 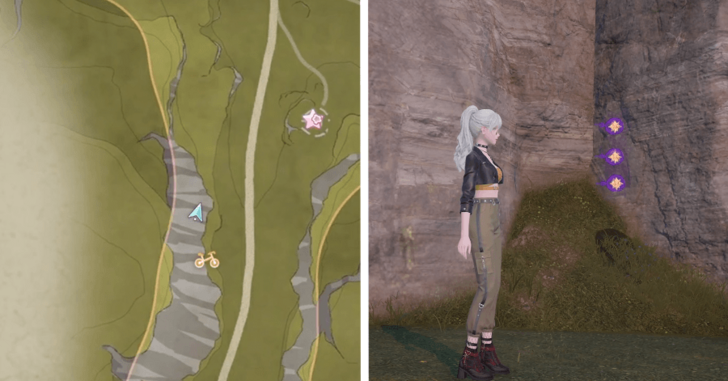 |
Along the cliff wall on the road towards the Heartcraft Kingdom Outpost. |
| 150-151 | 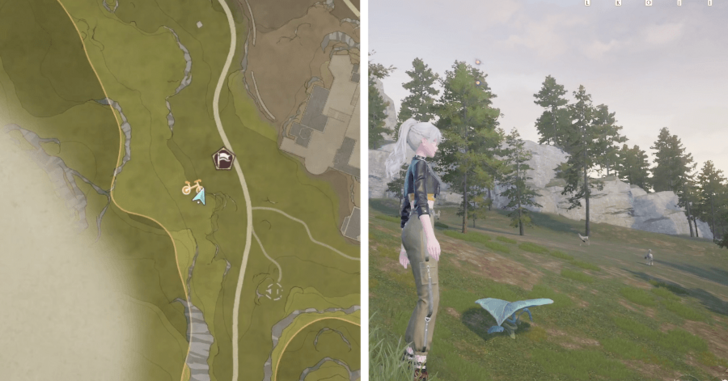 |
Above a bouncy leaf near the cycling race mini-game southwest of the palace. |
| 152-153 | 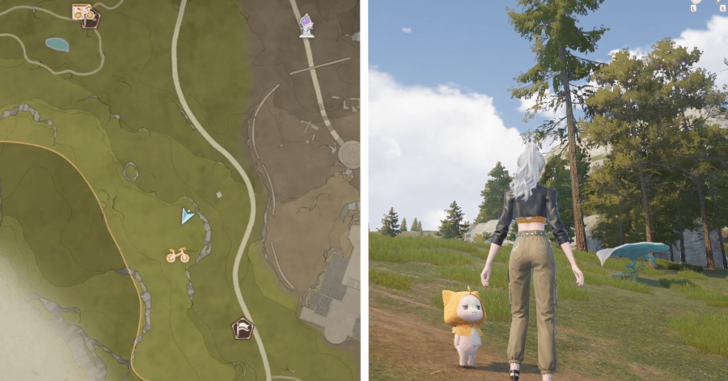 |
Above a bouncy leaf to the west of the palace. |
| 154-155 | 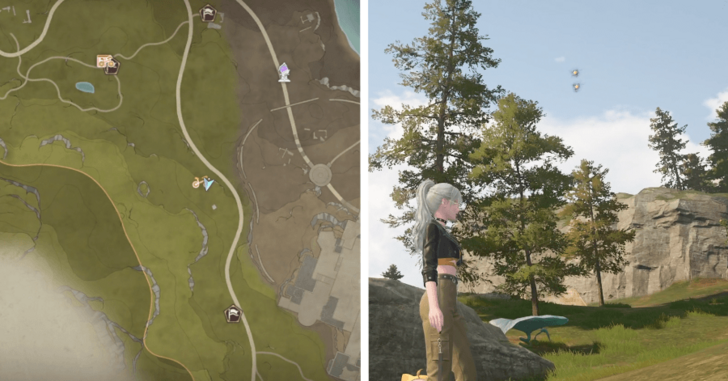 |
Above a bouncy leaf north of the last set of Dews. |
| 156-159 | 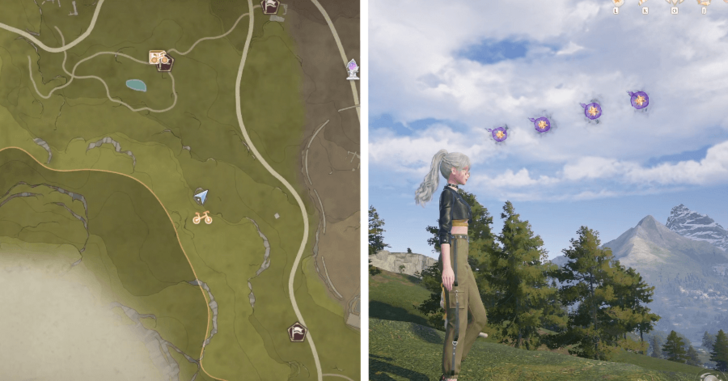 |
On top of a boulder outside of the Forest Cavern. |
| 160-161 | 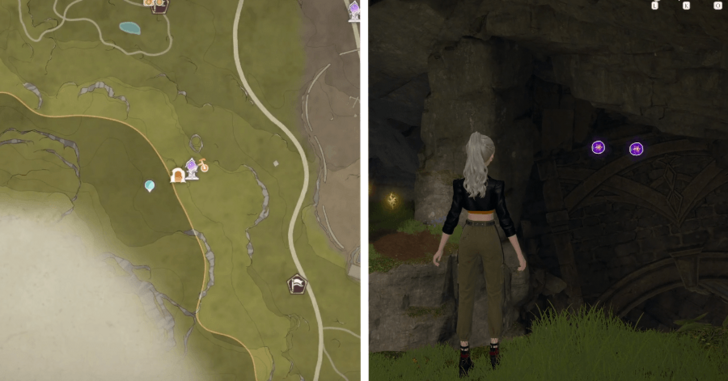 |
Forest Cavern, beside the entrance for the room with the Whimstar. |
| 162-163 | 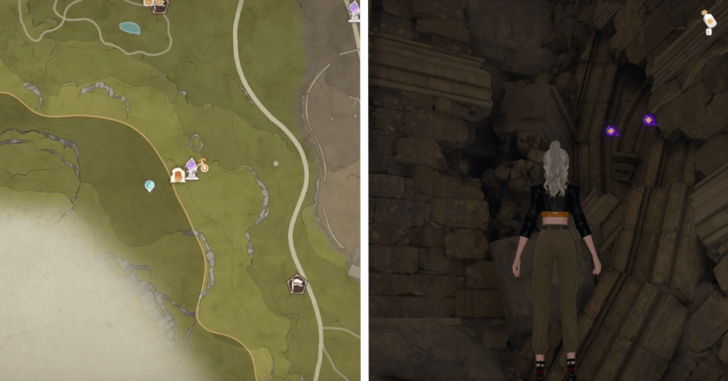 |
Forest Cavern, in the same room as the Whimstar. |
| 164-165 | 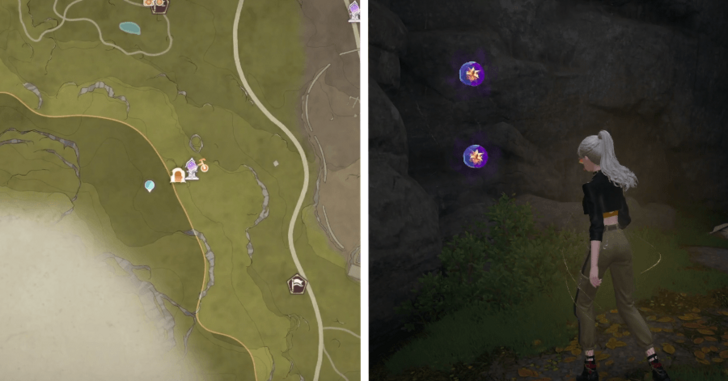 |
Forest Cavern, on the way back out past the Whimstar. |
| 166-167 | 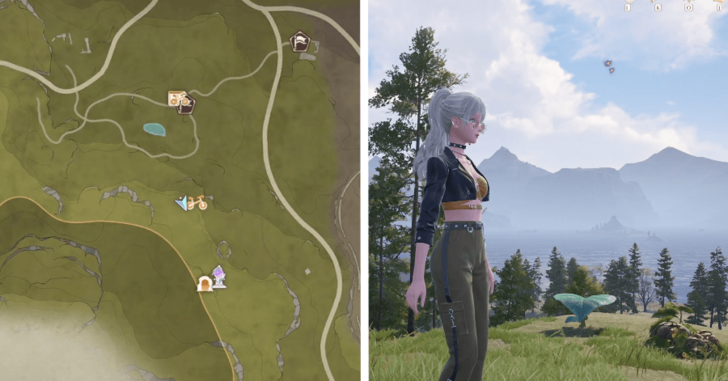 |
Above a bouncy leaf north of the Forest Cavern. |
| 168-169 | 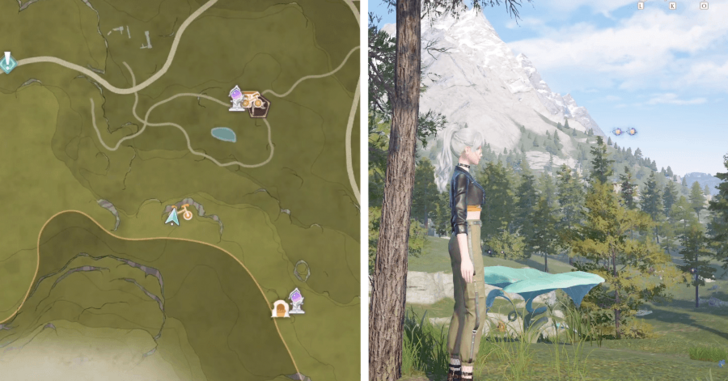 |
Above a bouncy leaf south of the Lakeside Hill Lane waypoint. |
| 170-171 | 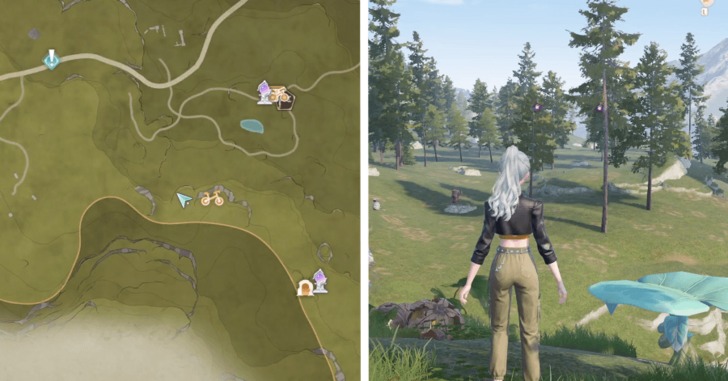 |
In between the previous and next sets of Dews. |
| 172-173 |  |
On a ledge nearby the last two sets of Dews. |
| 174-175 | 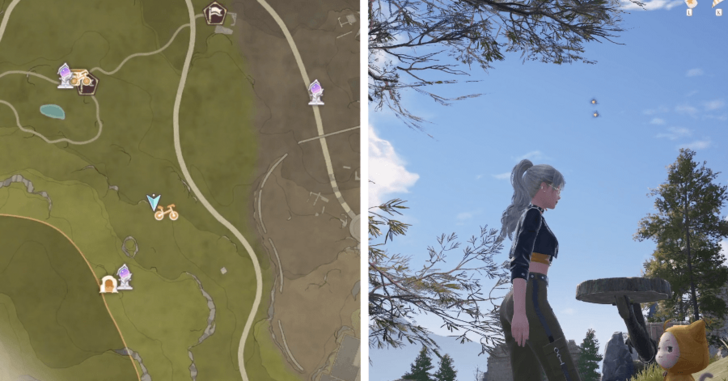 |
Above a catapult northeast of the Forest Cavern. |
| 176-178 | 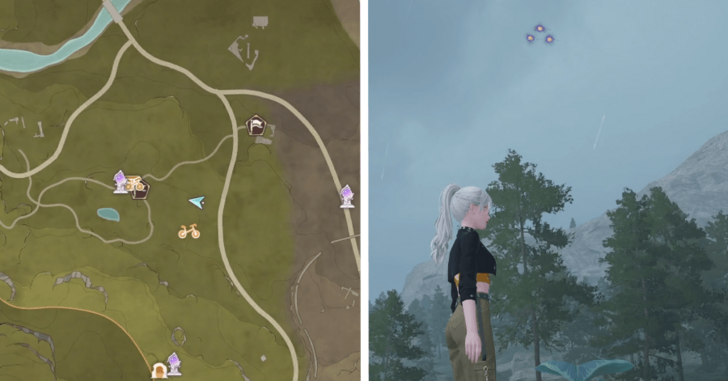 |
Above a bouncy leaf east of the Lakeside Hill Lane waypoint. |
| 179-180 | 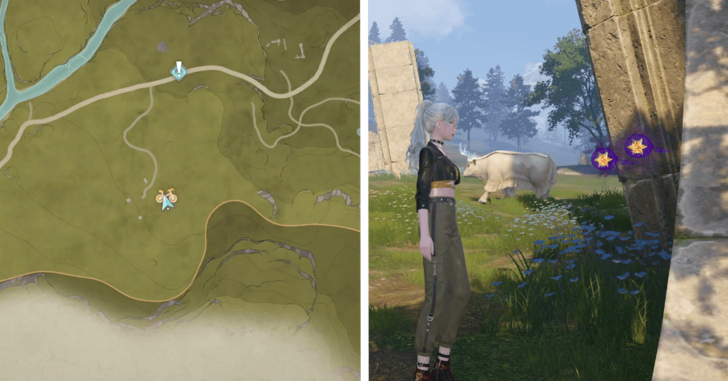 |
Behind a pillar in the Bullquet Habitat. |
| 181-183 | 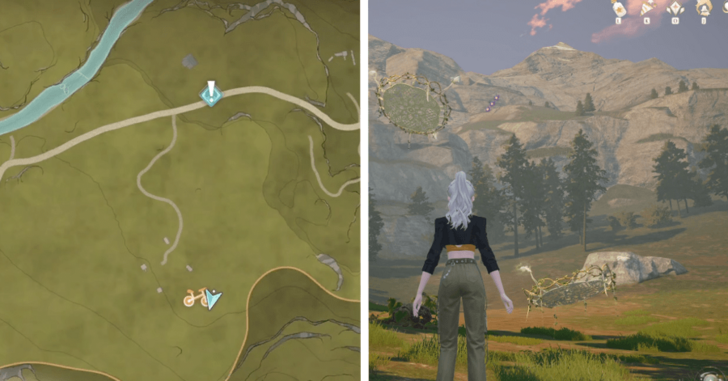 |
Above some trampoline jumps near the Bullquet Habitat. |
| 184-187 | 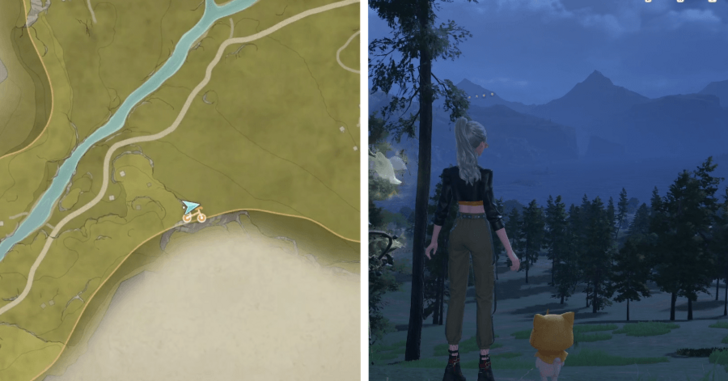 |
Above some trampoline jumps southwest of the Bullquet Habitat. |
| 188-190 | 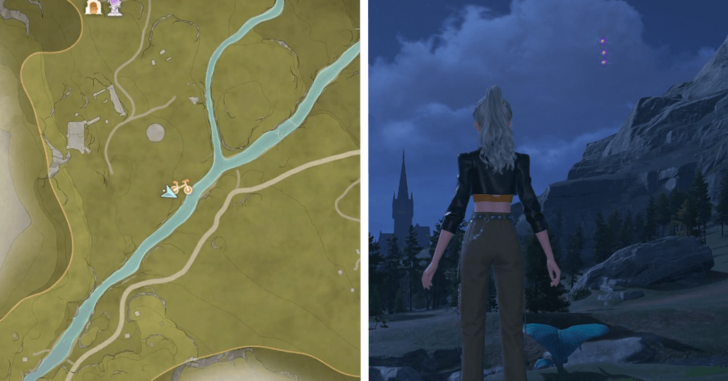 |
Above a leaf jump along the river. |
| 191-192 | 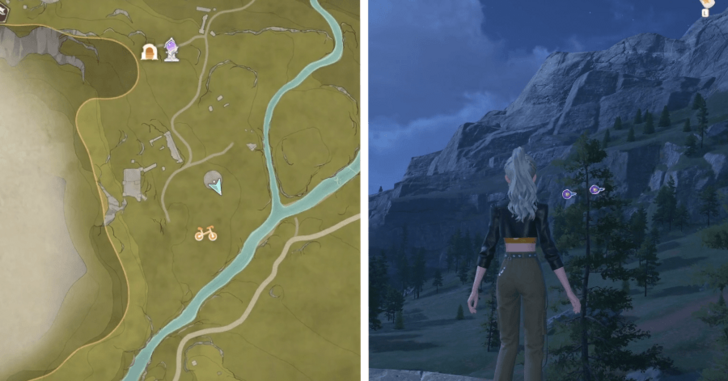 |
Off a circular piece of ruin north of the last set of Dews. |
| 193-194 | 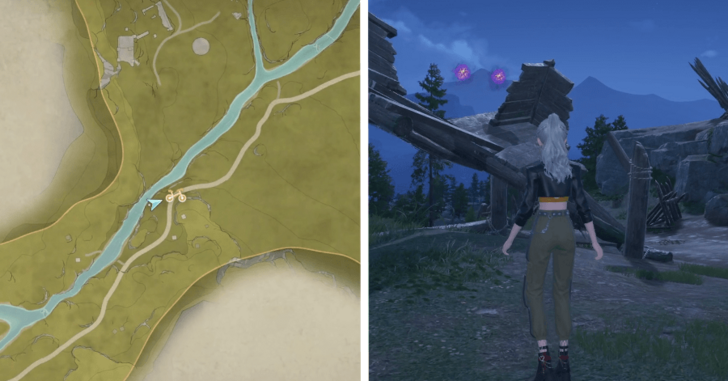 |
Beside the Abandoned Fanatic Wisher Camp Outpost waypoint. |
| 195-196 | 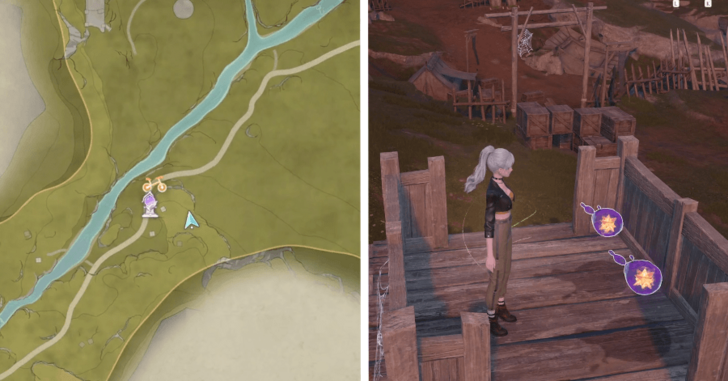 |
In a watchtower at the Abandoned Fanatic Wisher Camp Outpost entrance. |
| 197-198 | 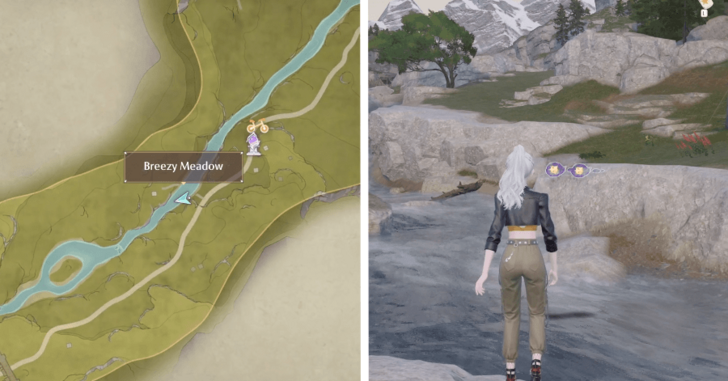 |
On the river in the Abandoned Fanatic Wisher Camp Outpost. |
| 199-200 |  |
Above a hill west of the Abandoned Fanatic Wisher Camp Outpost waypoint. |
| 201-203 | 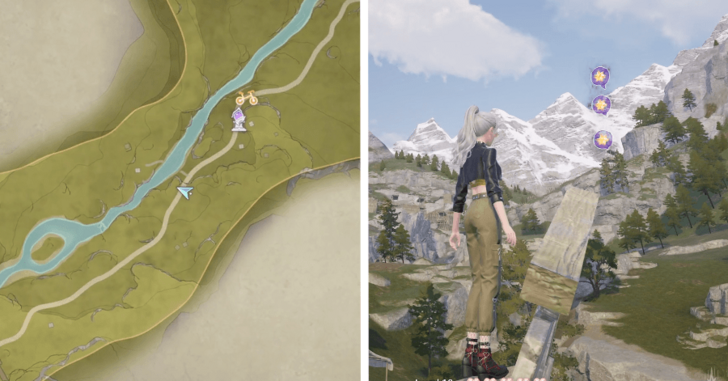 |
Above the road leading to the camp itself. |
| 204-207 | 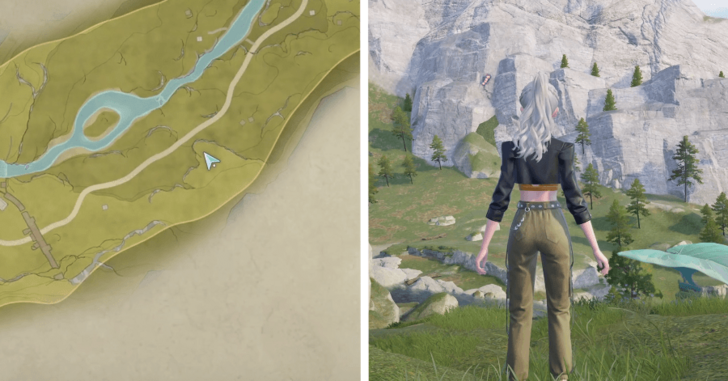 |
Above the road accessed by a bouncy leaf. |
| 208-209 | 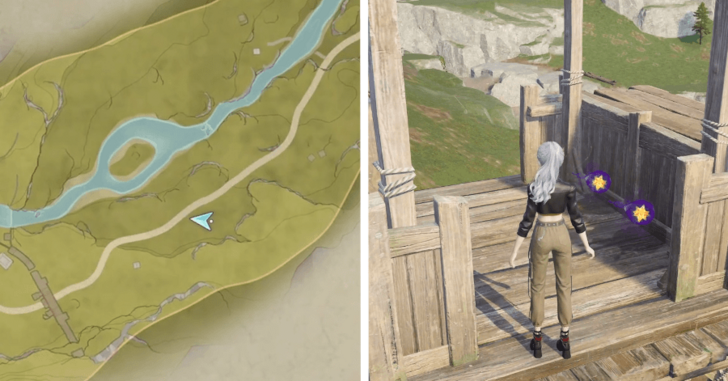 |
In a watchtower nearby a Curio. |
| 210-211 | 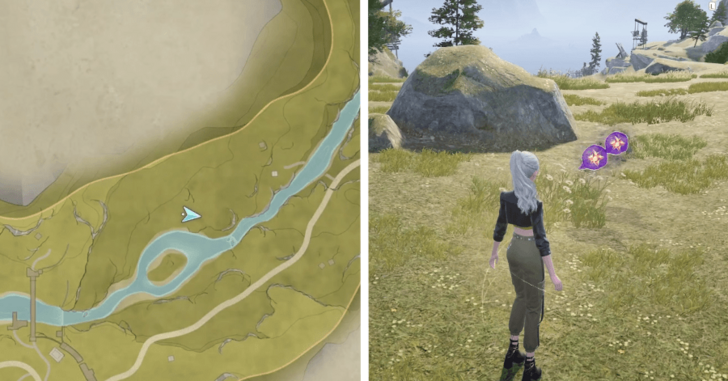 |
In a field across the river. |
| 212-213 | 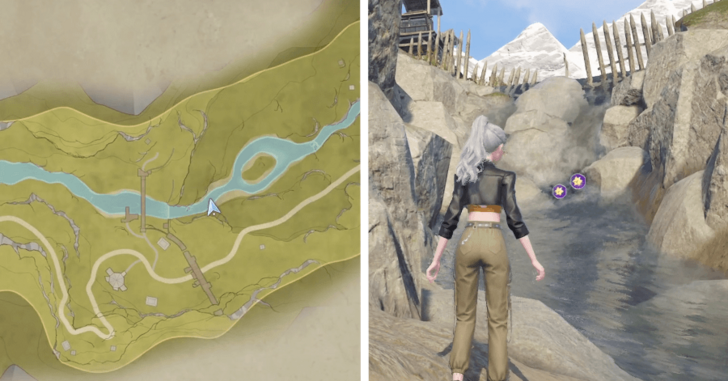 |
On the river before the small waterfall. |
| 214-215 | 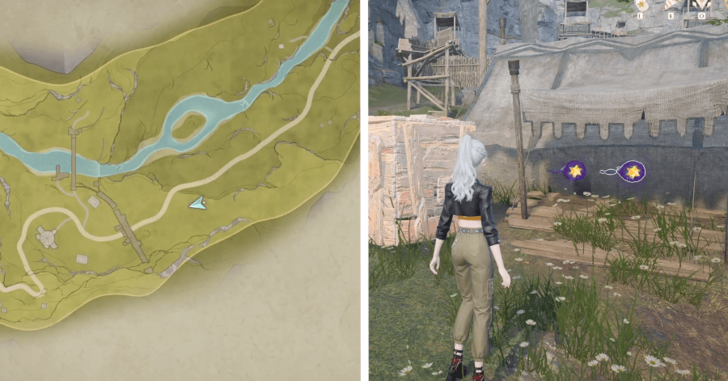 |
Beside a tent before the Abandoned Fanatic Wisher Camp. |
| 216-217 | 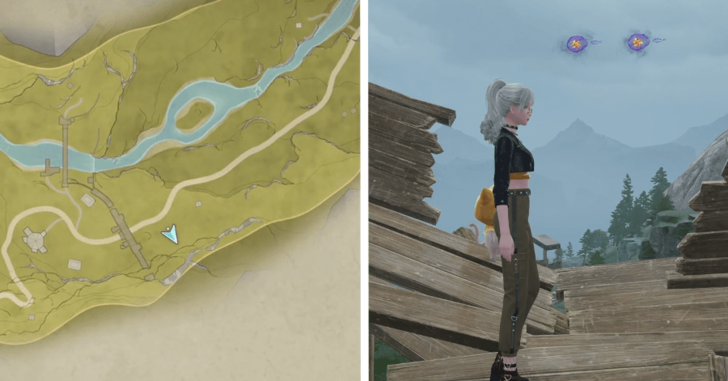 |
Above a broken watchtower before the Abandoned Fanatic Wisher Camp. |
| 218-219 | 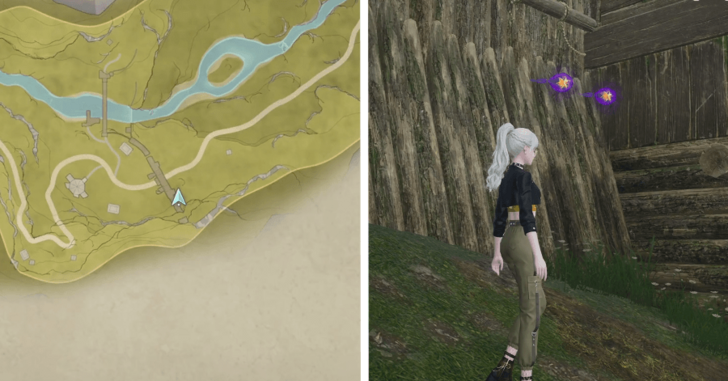 |
On the outer wall of the Abandoned Fanatic Wisher Camp. |
| 220-221 |  |
Below a platform on the camp's entrance. |
| 222-223 | 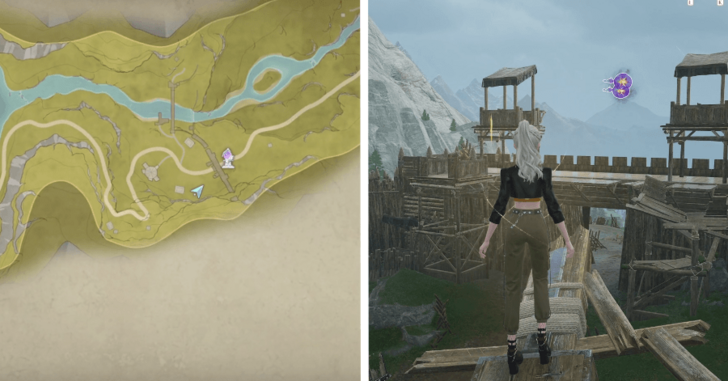 |
Above a broken catapult at the camp entrance. |
| 224-225 |  |
Above another broken catapult on the other side of the entrance. |
| 226-228 | 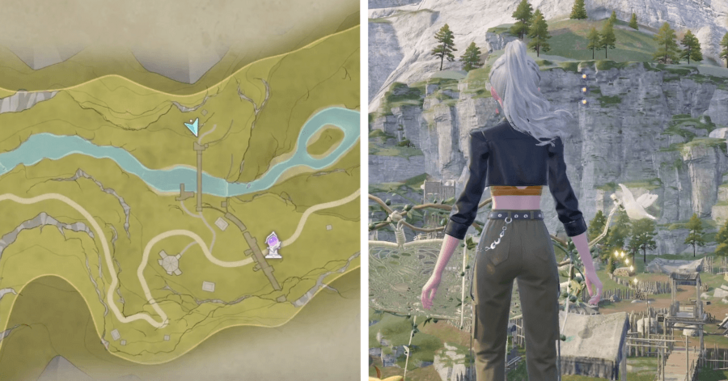 |
Accessed by a trampoline jump on the north side of the camp. |
| 229-231 | 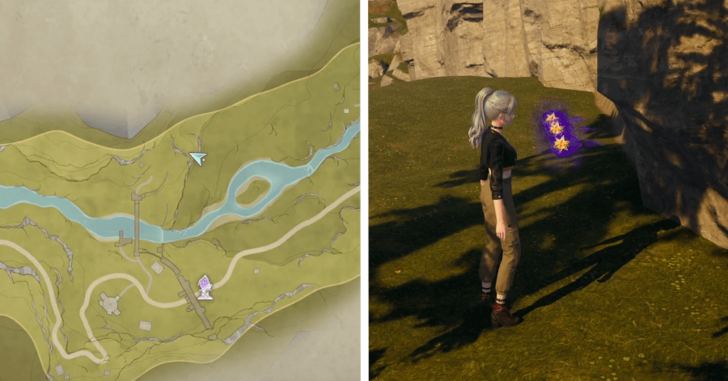 |
Along the cliff on the northside of the camp. |
| 232-233 | 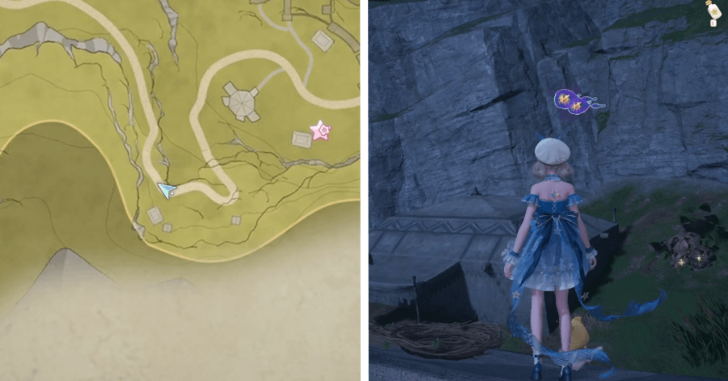 |
Above a watchtower on the southside of the camp. |
| 234-235 | 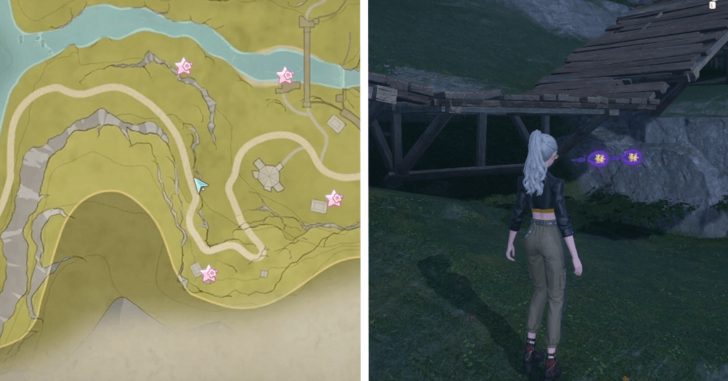 |
Below the path headed west. |
| 236-239 | 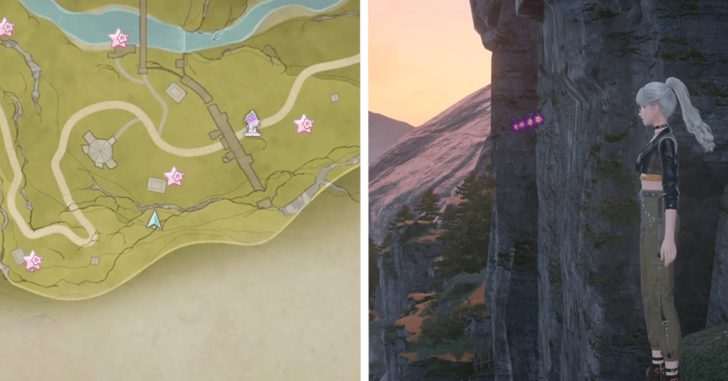 |
Along the cliff wall on the southside of the camp. |
| 240-243 | 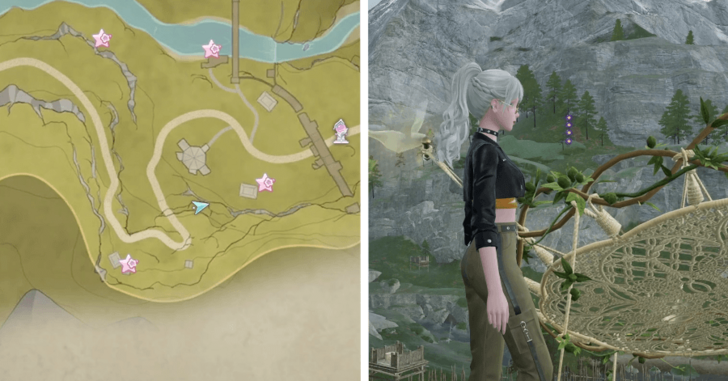 |
Accessed via a trampoline jump on the southside of the camp. |
| 244-245 | 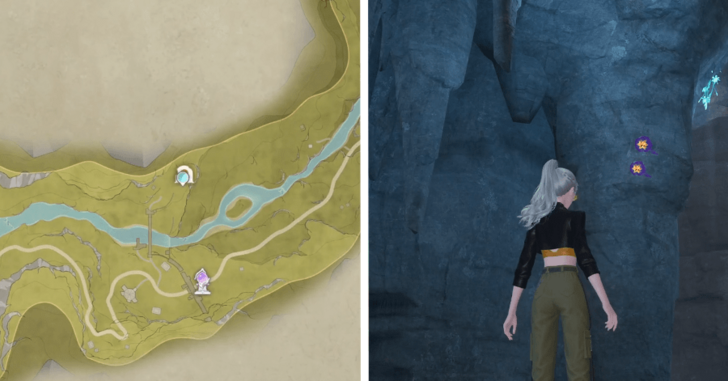 |
Campsite Cavern, as soon as you drop down to the main area, behind some enemies to the right. |
| 246-247 | 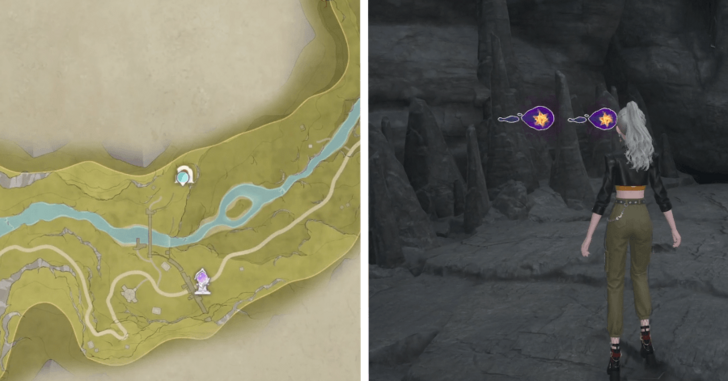 |
Campsite Cavern, on one end of the photo prompt. |
| 248-249 |  |
Campsite Cavern, across the water from the photo prompt. |
| 250-251 | 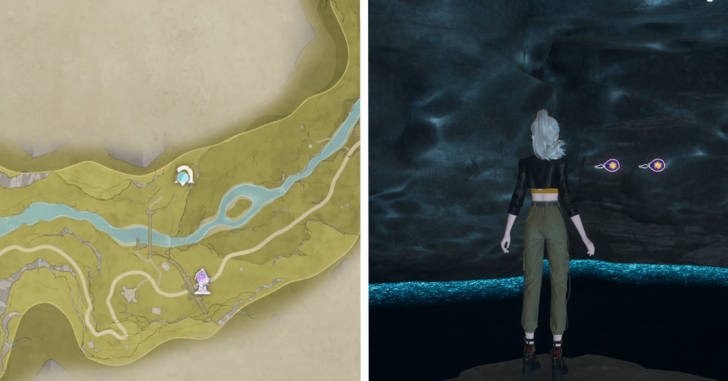 |
Campsite Cavern, around the corner past the photo prompt. |
| 252-253 | 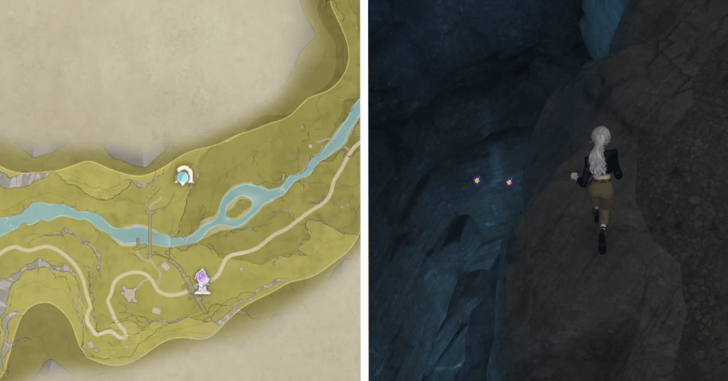 |
Campsite Cavern, above the path past the photo prompt, easier to get from above. |
| 254-255 | 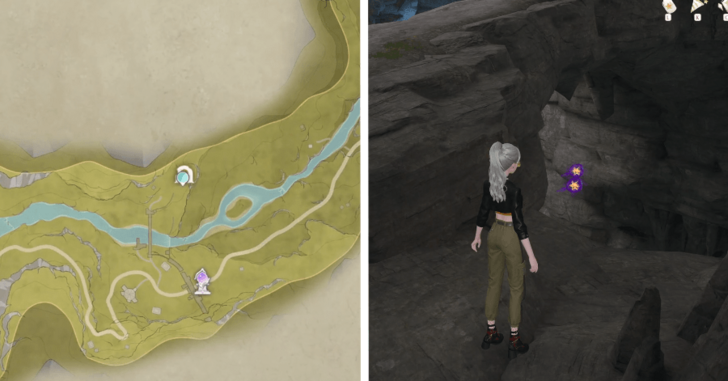 |
Campsite Cavern, along the path that leads to the jump to reach the central chest. |
| 256-258 | 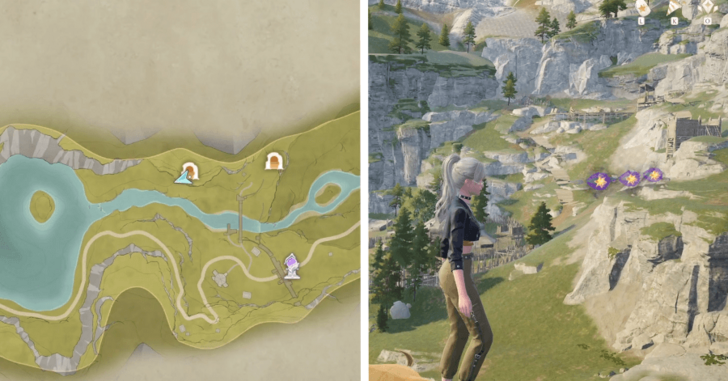 |
Right outside the Campsite Cavern exit. |
| 259-260 | 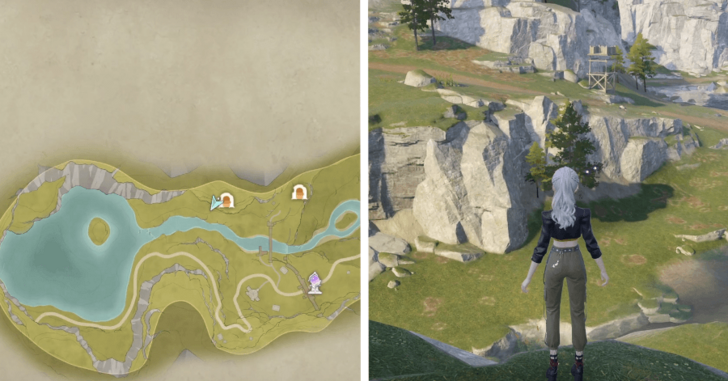 |
Above the river near the Campsite Cavern exit. |
| 261-263 |  |
Above the water near the small island. |
| 264-265 | 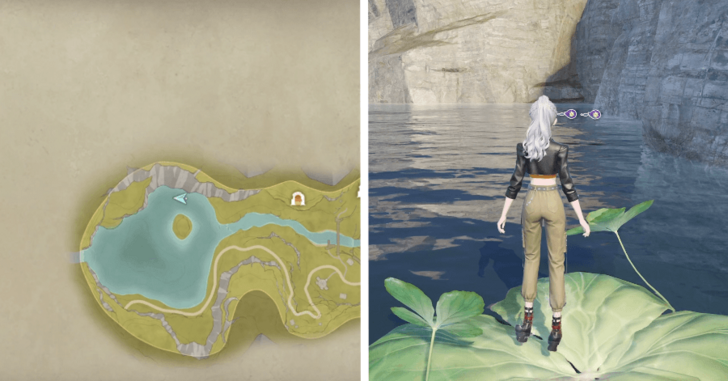 |
Across some lily pads on the northern side of the lake. |
| 266-267 | 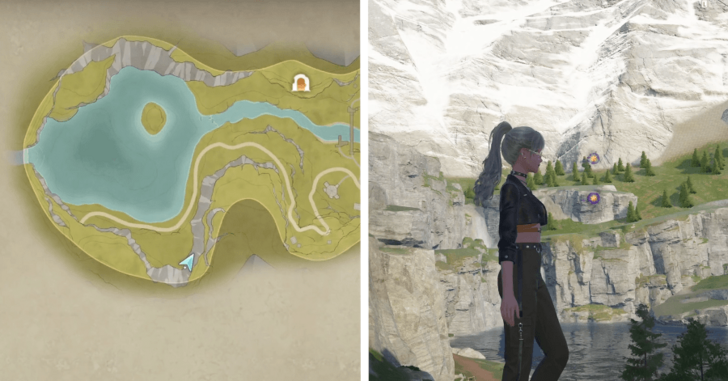 |
Above the Whimink south of the lake. |
| 268-269 | 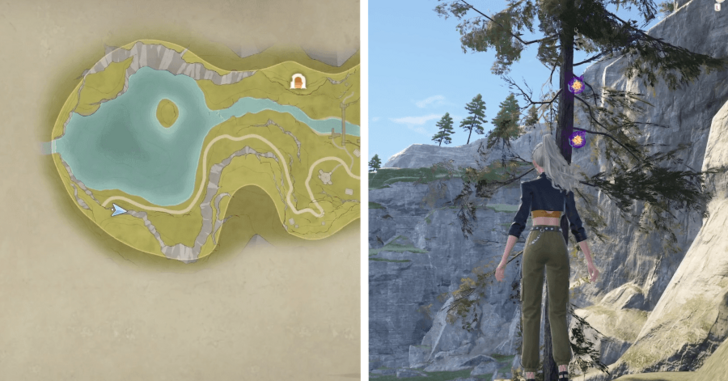 |
Near the gate at the end of the path. |
| 270-271 |  |
Across some lily pads on the westside of the lake. |
| 272-273 |  |
Behind a stack of boxes. |
| 274-275 |  |
On top of some ruined archways. |
| 276-277 | 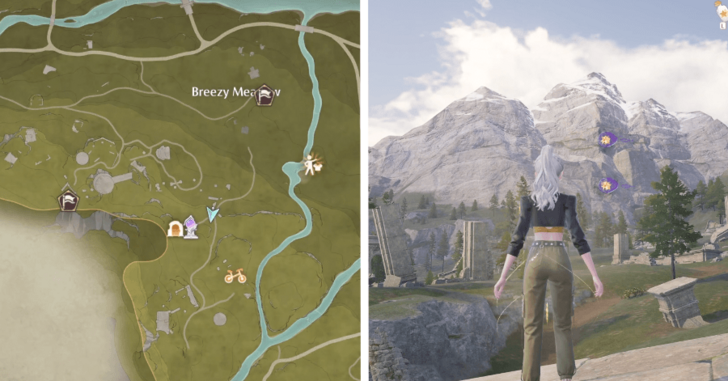 |
On the other side of the previous set of Dews. |
| 278-279 | 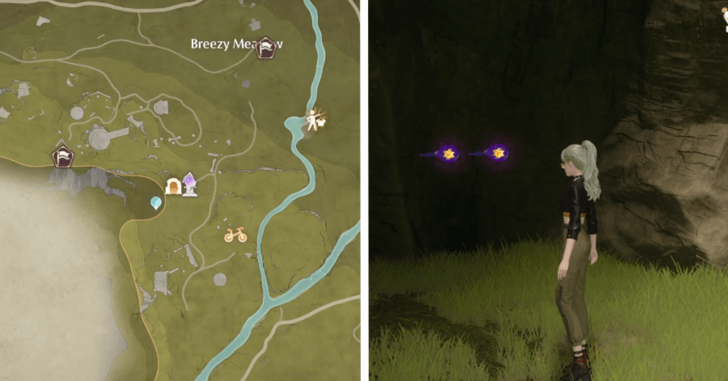 |
Hillside Cavern, on the platform before the Whimstar. |
| 280-281 | 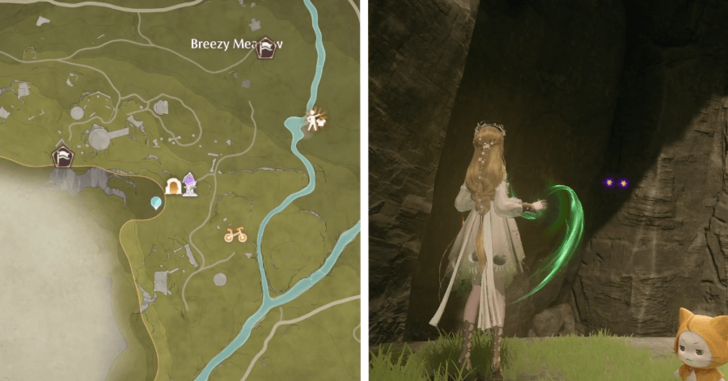 |
Hillside Cavern, in the air to the right of previous set of Dews. |
| 282-283 | 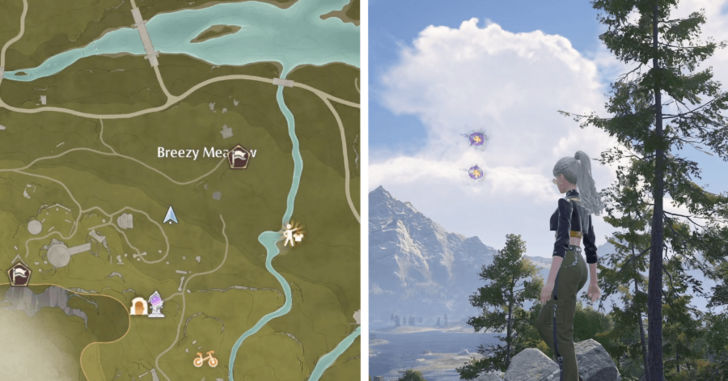 |
Above a ruined wall. |
| 284-285 | 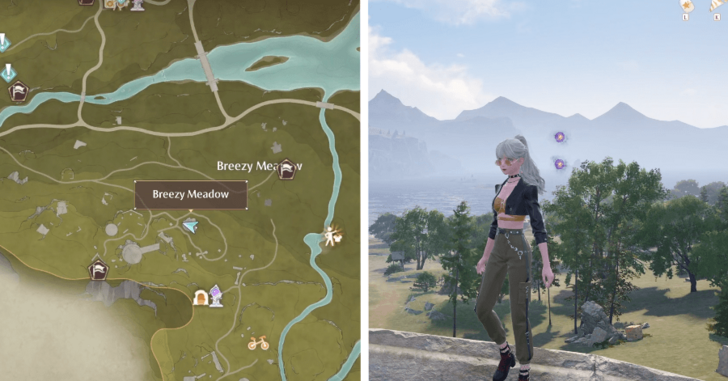 |
Above a circular ruin. |
| 286-287 | 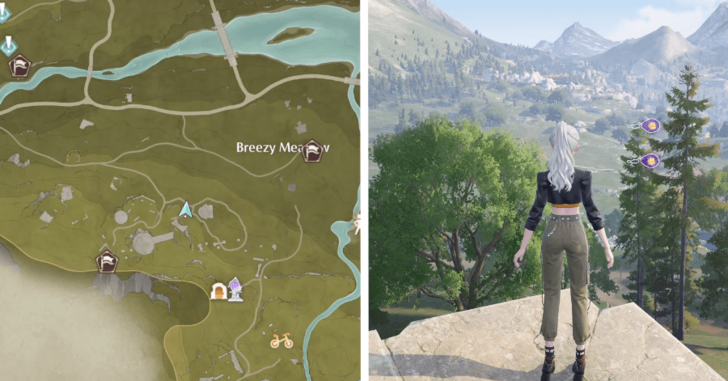 |
Beside a leaning pillar. |
| 288-291 | 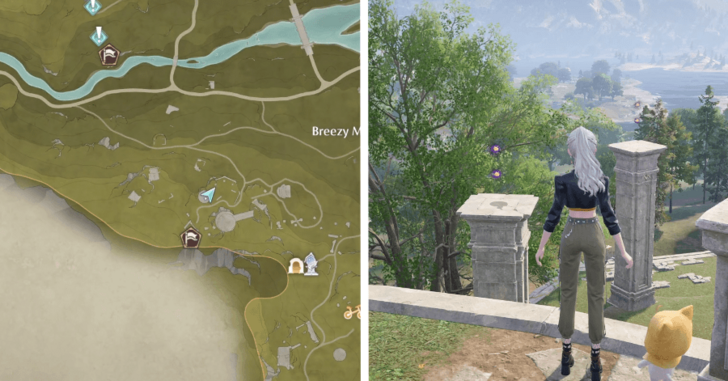 |
On top of two different pillars. |
| 292-293 | 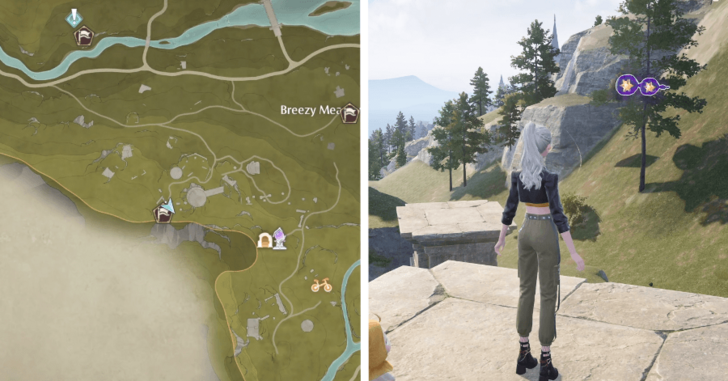 |
Above a pillar at the end of a ruined archway. |
| 294-296 | 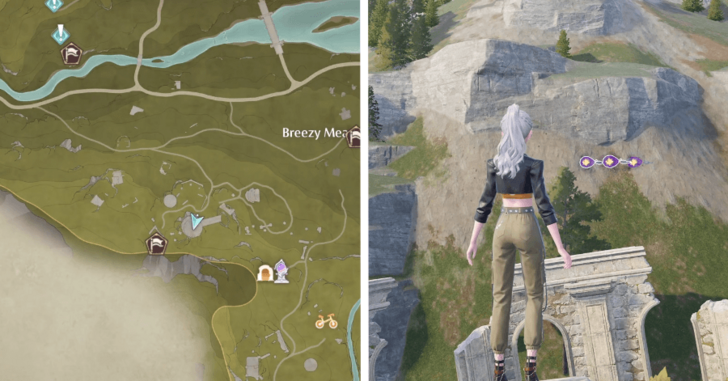 |
Above the leaning ruined tower. |
| 297-298 | 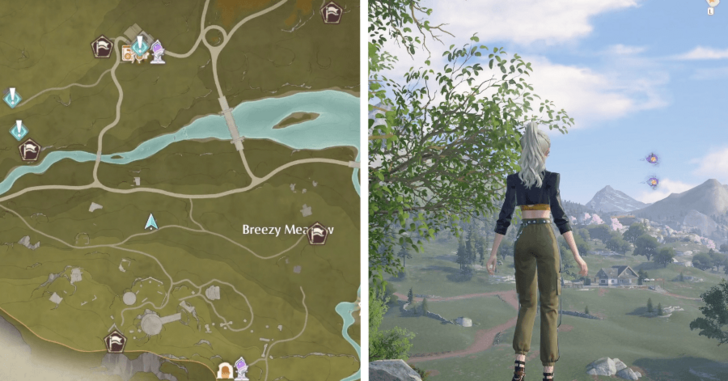 |
Above a ruined wall. |
| 299-300 |  |
Above a different ruined wall. |
| 301-302 |  |
Above the Hoop Hopper mini-game. |
| 303-304 | 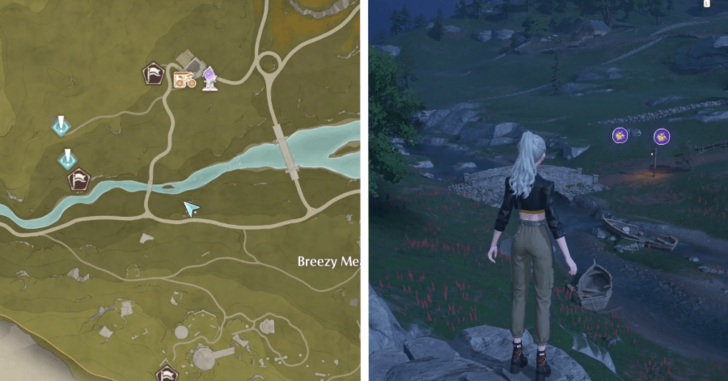 |
Above a Whimstar hidden by a breakable floor. |
| 305-306 |  |
Under the bridge south of the Meadow Activity Support Center. |
| 307-308 | 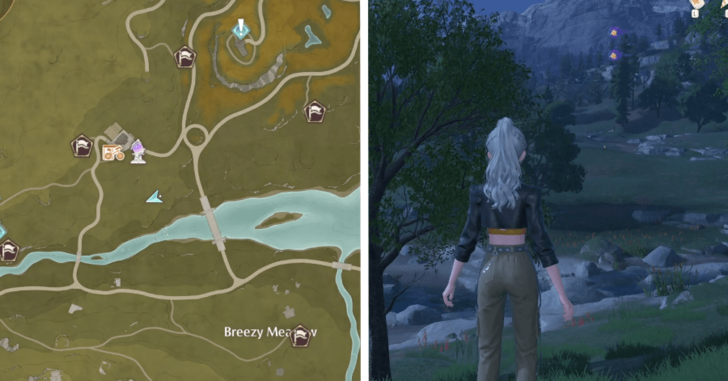 |
In between some trees along the river. |
| 309-310 | 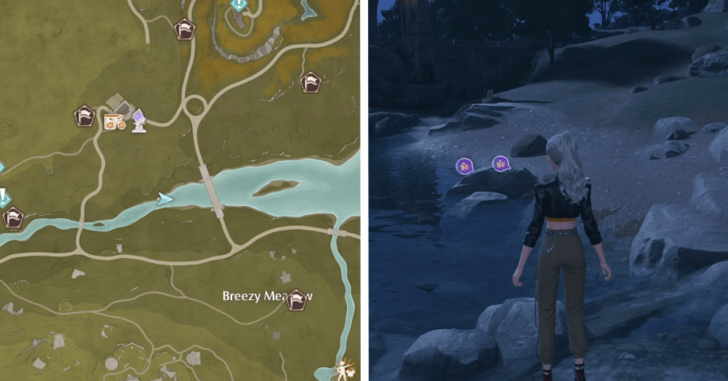 |
On the river before the medium sized bridge |
| 311-312 | 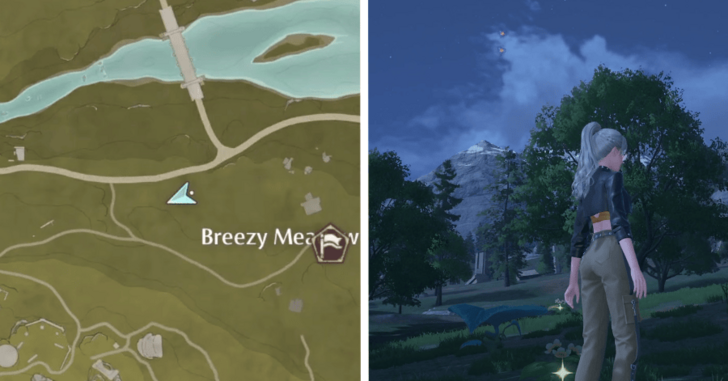 |
Above a bouncy leaf south of the medium sized bridge |
| 313-314 | 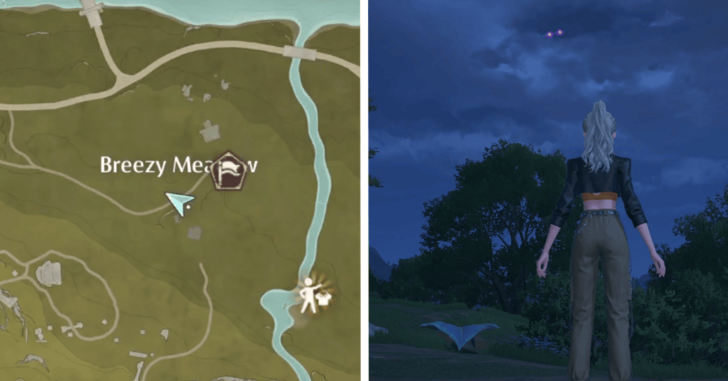 |
Above a bouncy leaf right below the Breezy Meadow map label |
| 315-316 | 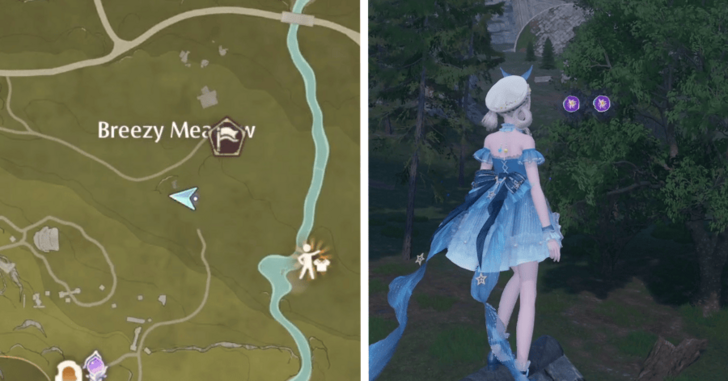 |
On top of a house southwest of the Hoop Hopper mini-game |
| 317-318 |  |
Above some ruins north of the Hoop Hopper mini-game |
| 319-320 | 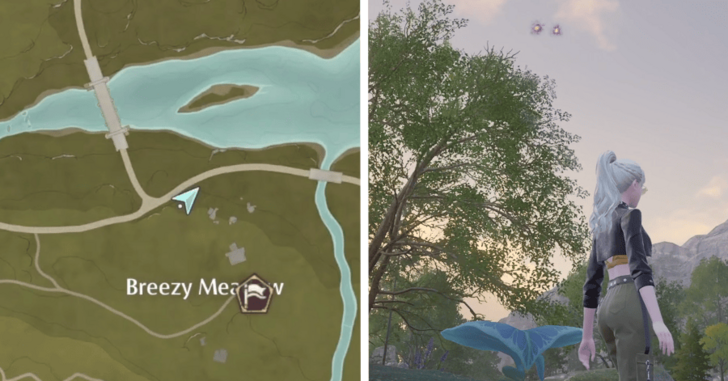 |
Above a bouncy leaf by the junction south of the medium sized bridge |
| 321-322 | 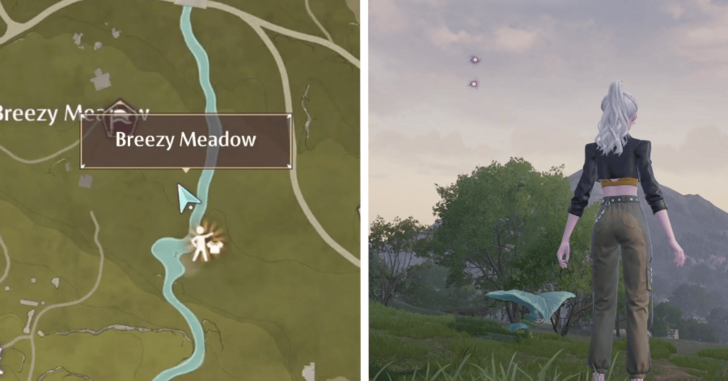 |
Above a bouncy leaf by the river near the Shimmer Pond |
| 323-324 | 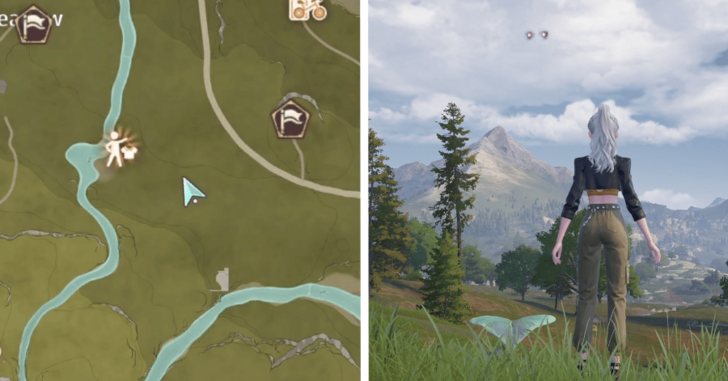 |
Above a bouncy leaf guarded by enemies |
| 325-326 | 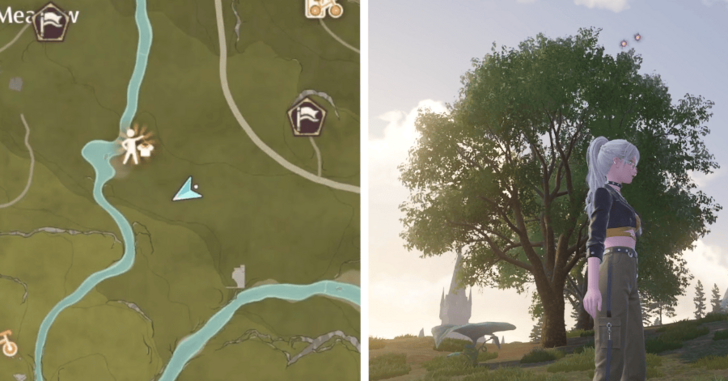 |
Above a bouncy leaf right next to the one guarded by enemies |
| 327-328 | 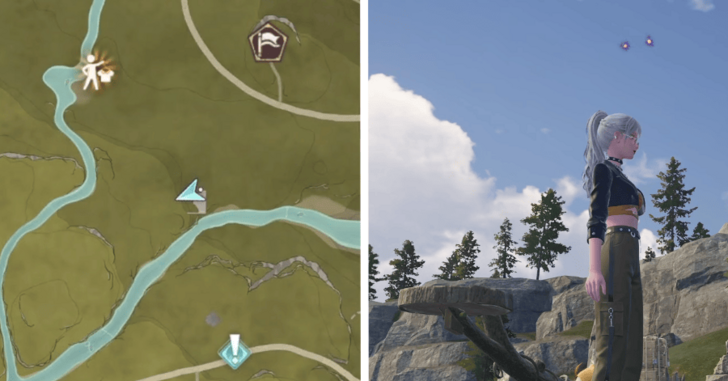 |
Above a catapult in some ruins along the river |
| 329-330 | 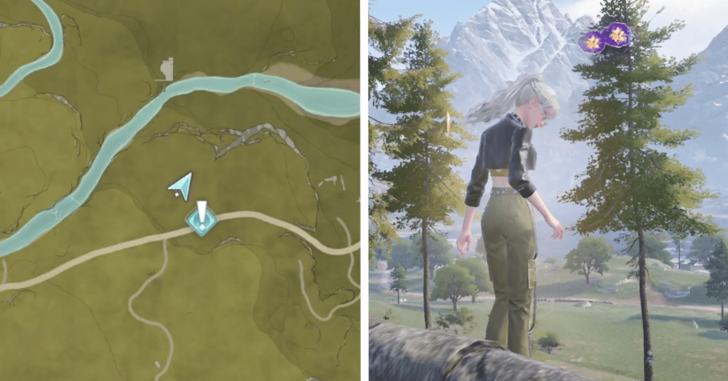 |
On top of Luni's house |
| 331-332 |  |
Off a ledge near Luni's house |
| 333-335 | 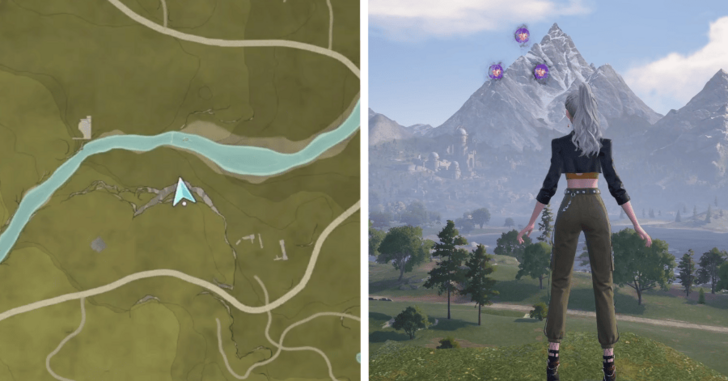 |
Off a cliff behind some enemies |
| 336-337 | 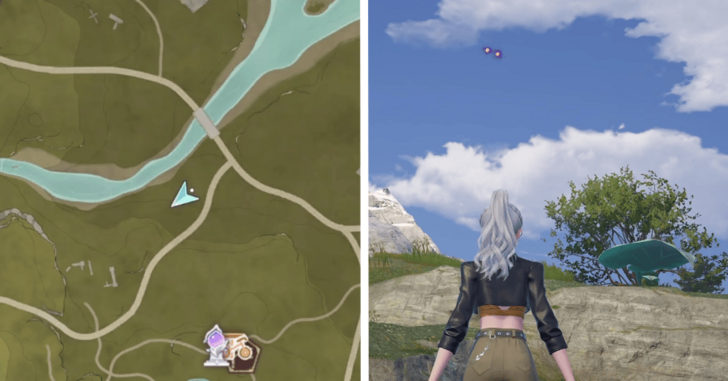 |
Above a bouncy leaf next to a river |
| 338-339 | 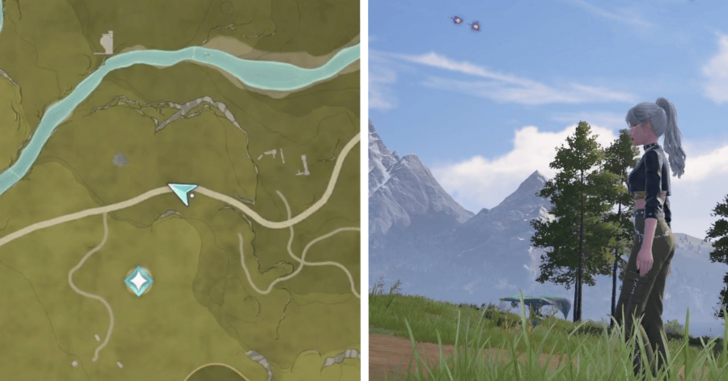 |
Above a bouncy leaf along the road connected to Luni's house |
| 340-341 |  |
Behind some rocks underneath a bridge |
| 342-343 | 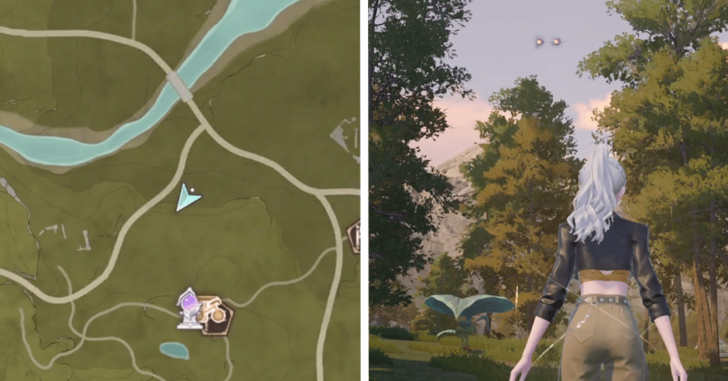 |
Above a bouncy leaf amongst some trees |
| 344-346 | 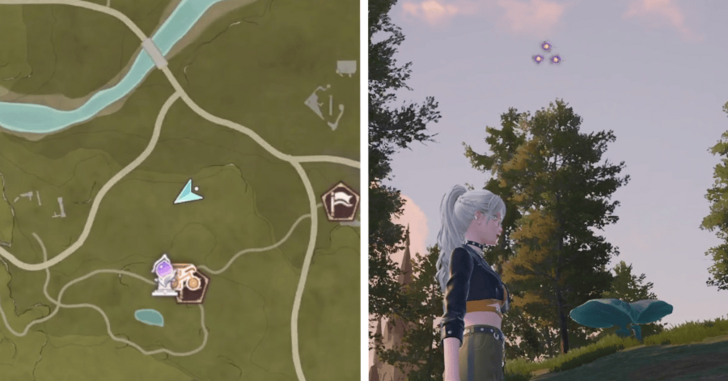 |
Above a bouncy leaf guarded by some enemies |
| 347-349 | 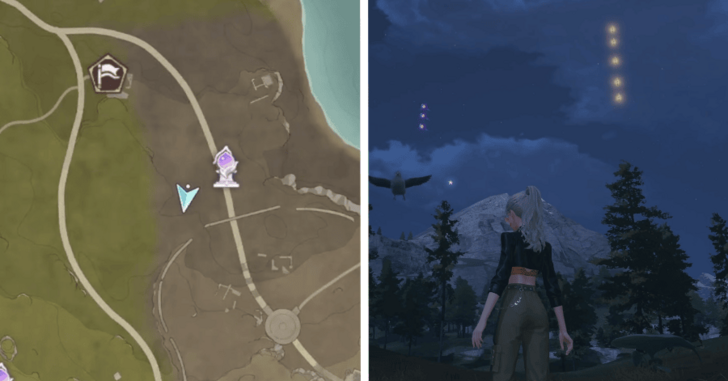 |
Above a bouncy leaf guarded by some enemies |
| 350-351 | 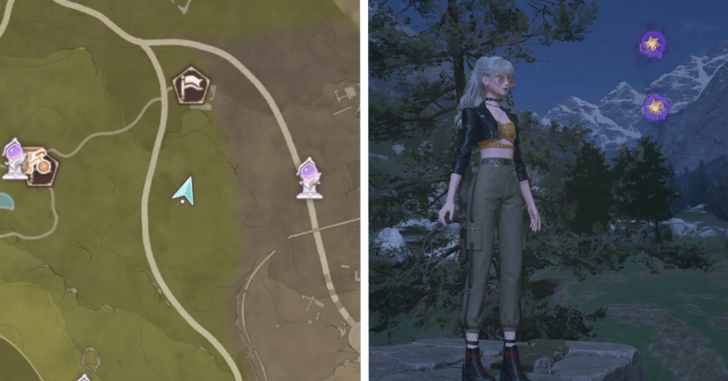 |
Above some ruins between the Lakeside Hill and Palace Entrance waypoints |
| 352-353 | 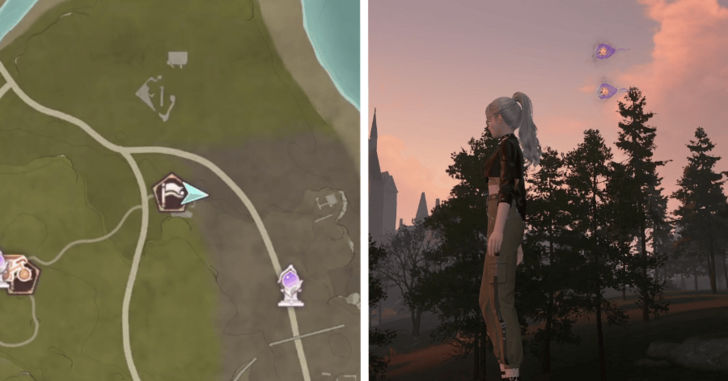 |
Above some ruins next to the Dodge and Dash mini-game |
| 354-355 | 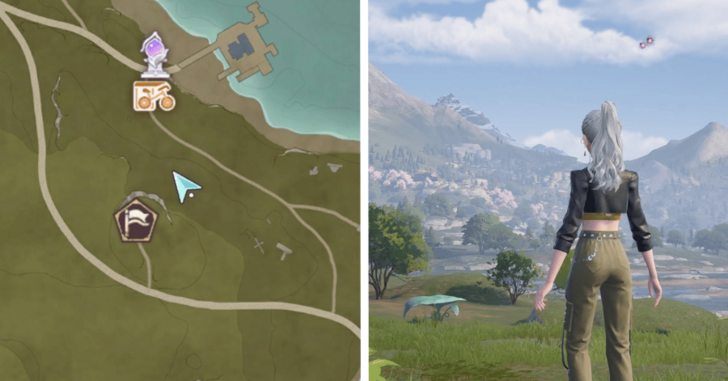 |
Above a bouncy leaf near the Kikball mini-game |
| 356-357 | 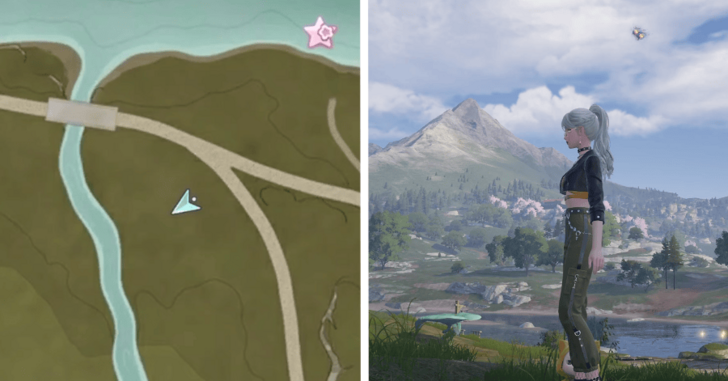 |
Above a bouncy leaf by a fork past the bridge |
| 358-359 | 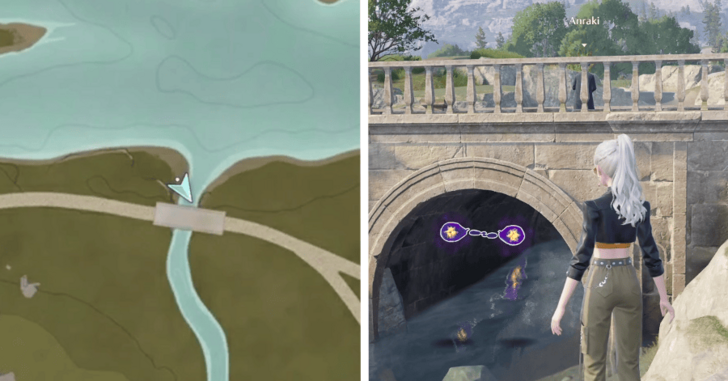 |
Beneath a small bridge |
| 360-361 | 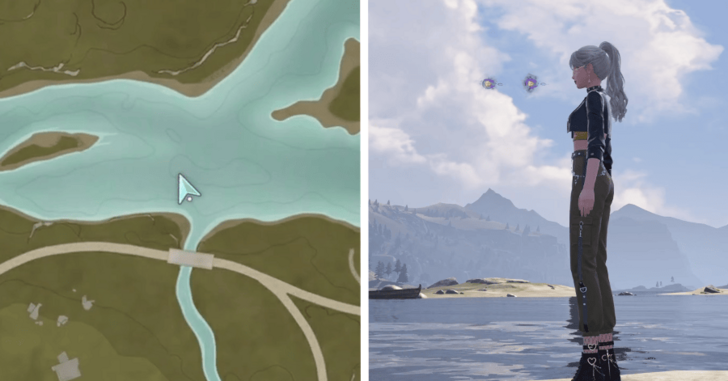 |
Above the end of a river, between two islands |
| 362-363 | 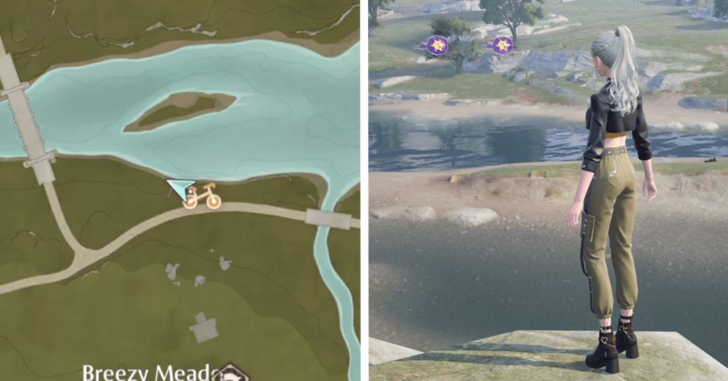 |
Along the edge of the river past the medium sized bridge |
| 364-365 |  |
Above a trampoline jump on an island in the middle of the river |
| 366-367 | 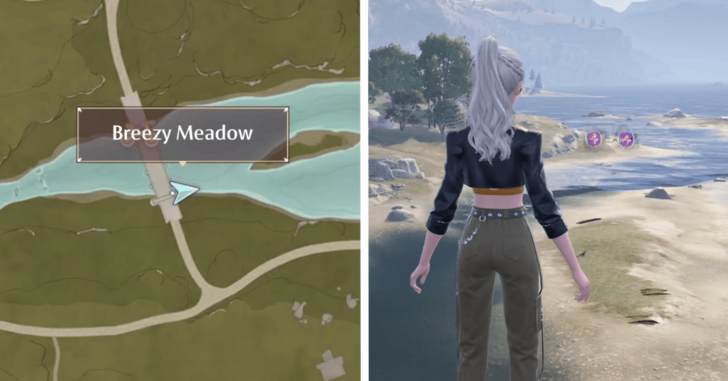 |
Off the southside of the medium sized bridge |
| 368-369 | 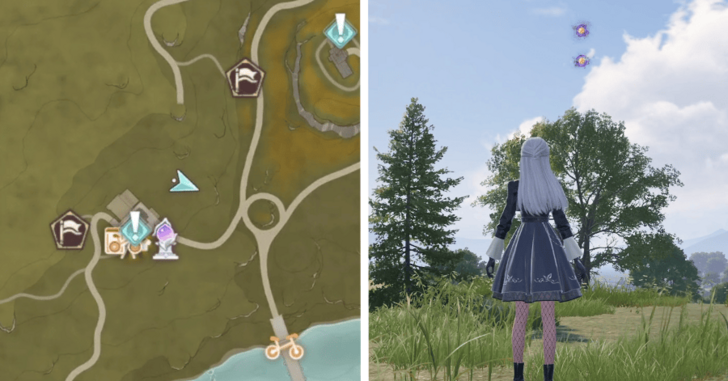 |
North of the Meadow Activity Support Center waypoint |
| 370-371 | 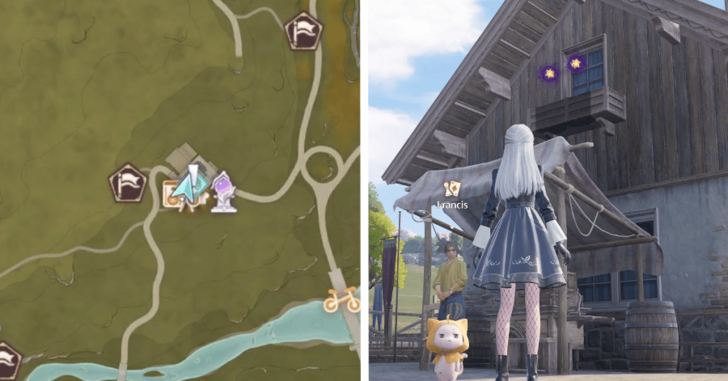 |
On a windowsill in the Meadow Activity Support Center |
| 372-375 |  |
Above the balloon jumps |
| 376-377 | 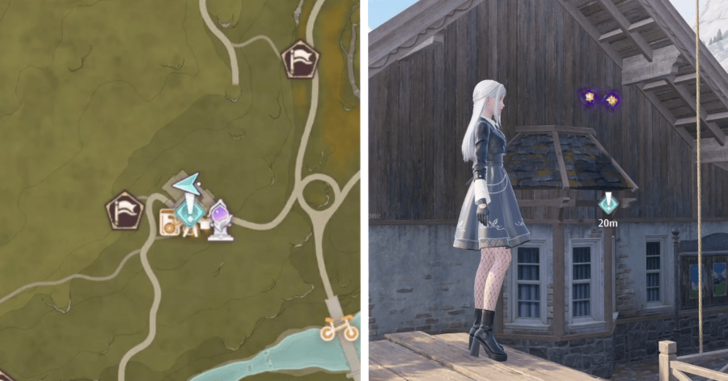 |
At the back of the Meadow Activity Support Center |
| 378-379 | 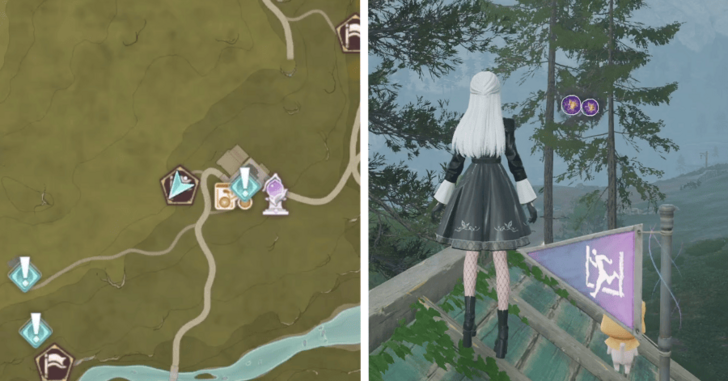 |
Above the Dodge and Dash mini-game |
| 380-381 | 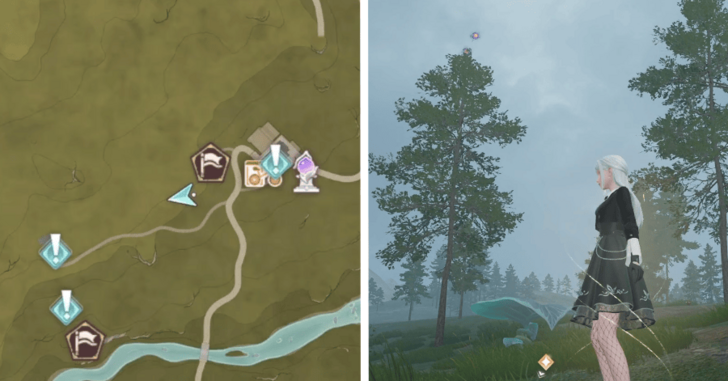 |
Above a bouncy leaf just past the Dodge and Dash mini-game |
| 382-383 | 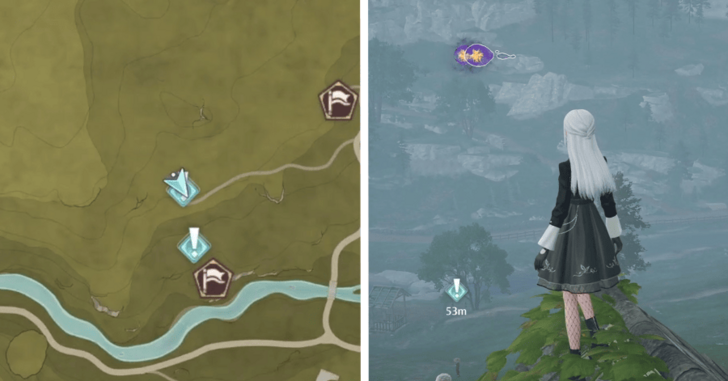 |
Above the sheep ranch's house |
| 384-385 | 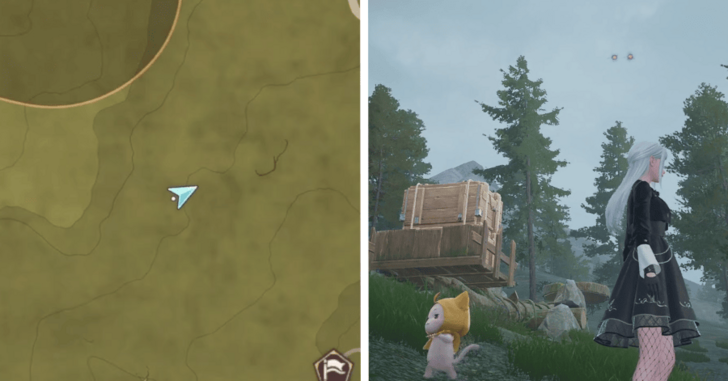 |
Above a catapult jump |
| 386-387 | 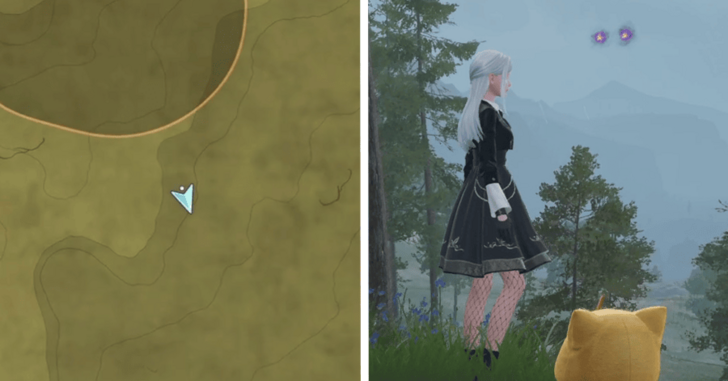 |
Above a ledge next to the catapult jump |
| 388-389 | 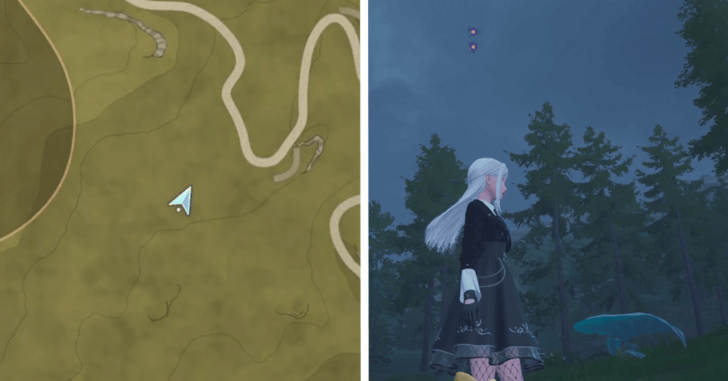 |
Above a bouncy leaf in the middle of nowhere |
| 390-391 | 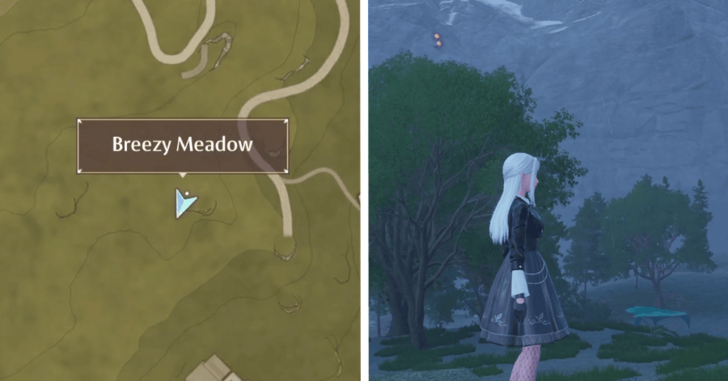 |
Above a tree southeast of the previous set of Dews |
| 392-393 | 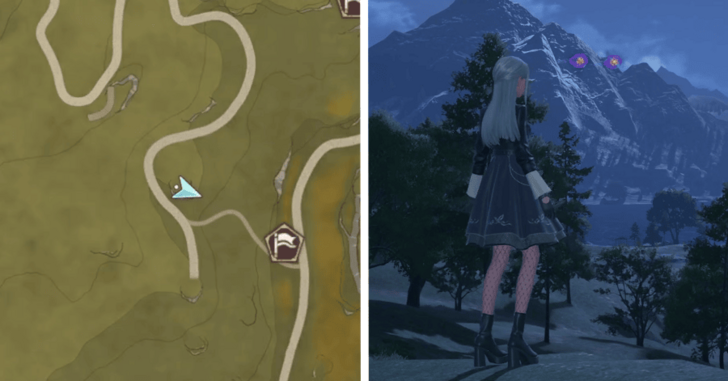 |
Above a ledge along the road |
| 394-395 | 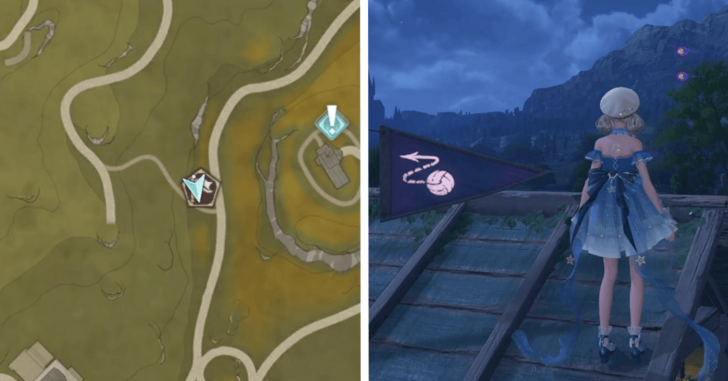 |
In the air beside the Kikball mini-game |
| 396-398 | 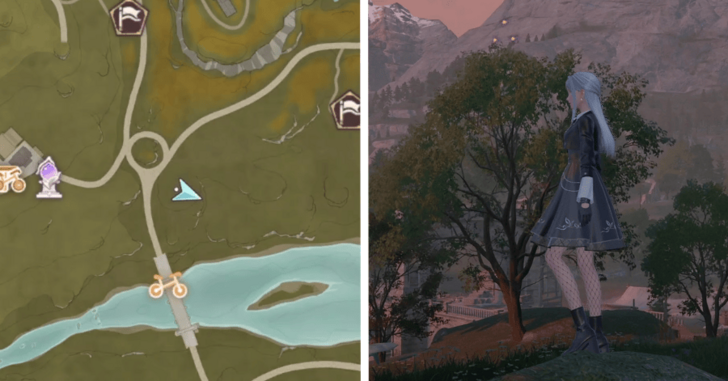 |
Above a tree near the medium sized bridge |
| 399-400 |  |
Above a tree southwest of the Kikball mini-game |
| 401-402 | 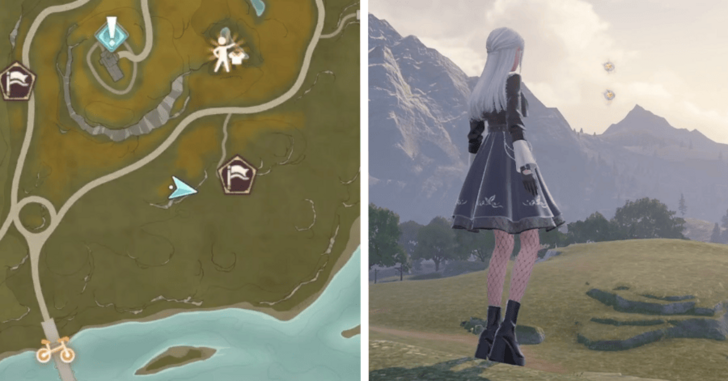 |
Above a ledge west of the Kikball mini-game |
| 403-406 | 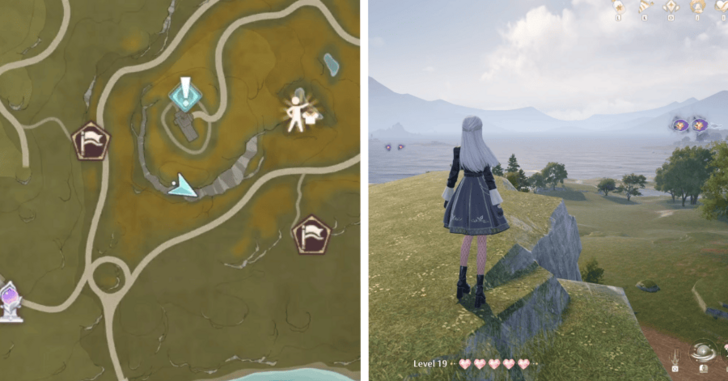 |
Off a cliff south of the Bug Catcher's Cabin |
| 407-408 | 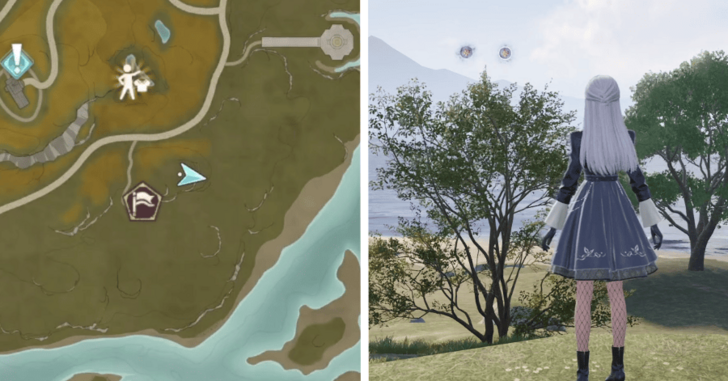 |
Above a tree northeast of the Kikball mini-game |
| 409-410 | 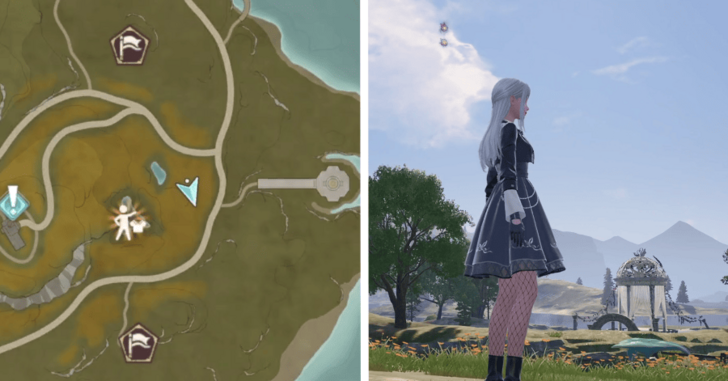 |
Above a bouncy leaf across the road from the gazebo |
| 411-412 | 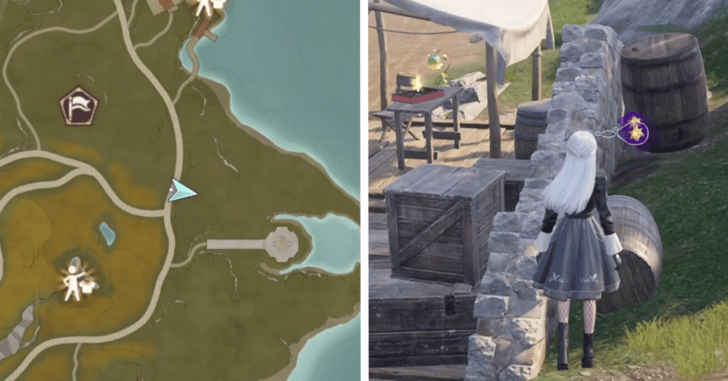 |
Behind a stall along the road |
| 413-414 | 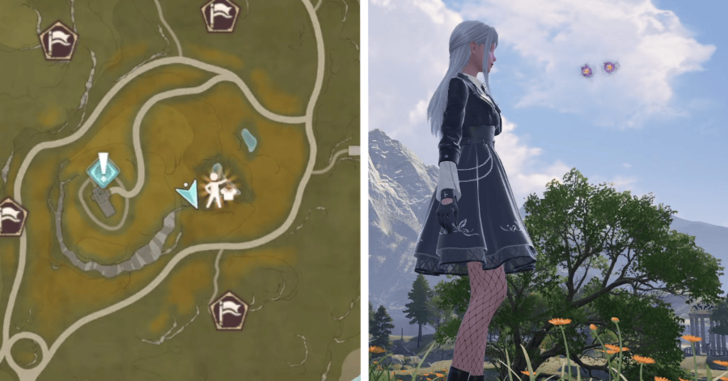 |
Above the tree by the pond |
| 415-416 | 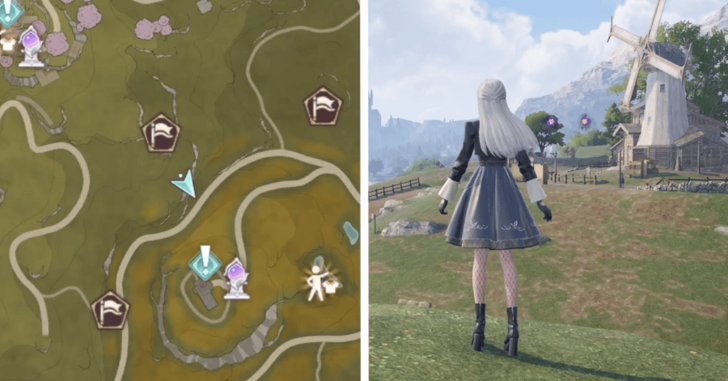 |
Off a cliff overlooking the Bug Catcher's Cabin |
| 417-419 | 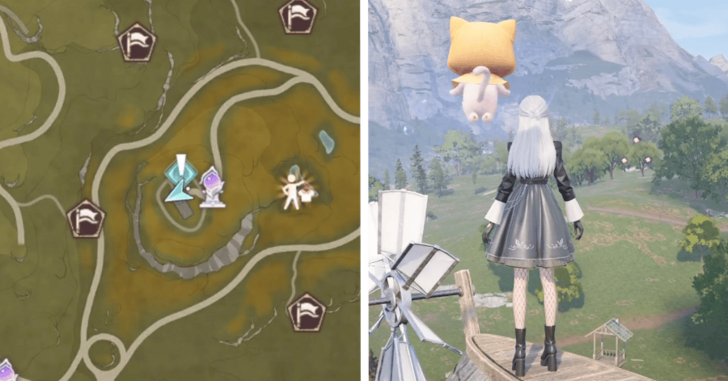 |
Off the cabin's windmill |
| 420-421 | 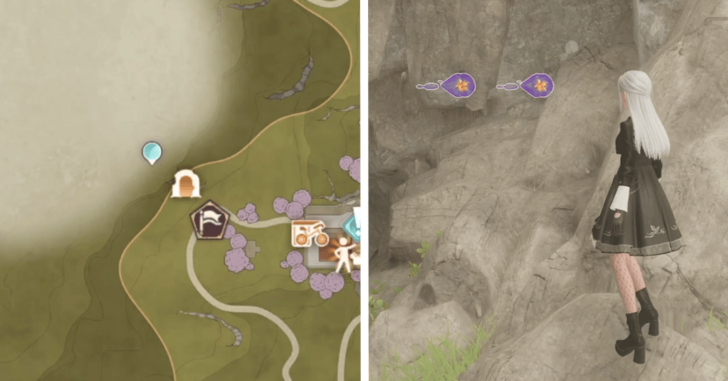 |
Field Base Cavern, beside some boulders you need to push to access the Whimstar |
| 422-423 | 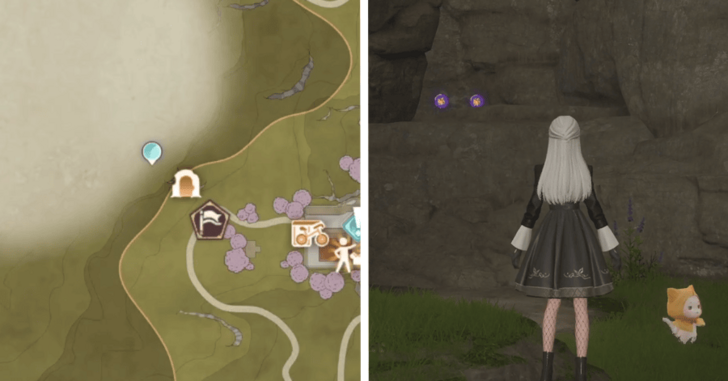 |
Field Base Cavern, through the arch on the bottom level |
| 424-425 | 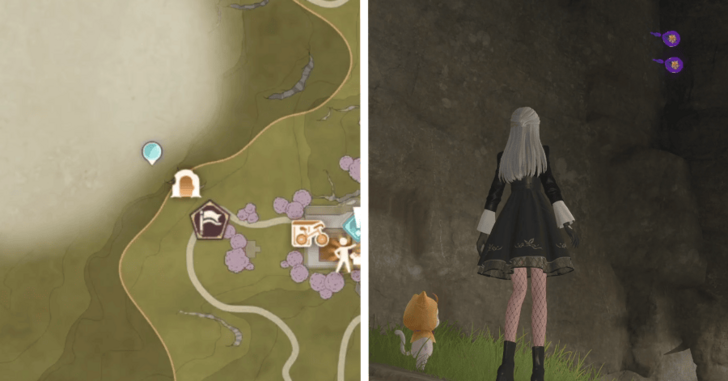 |
Field Base Cavern, above some jumps on the second level |
| 426-428 | 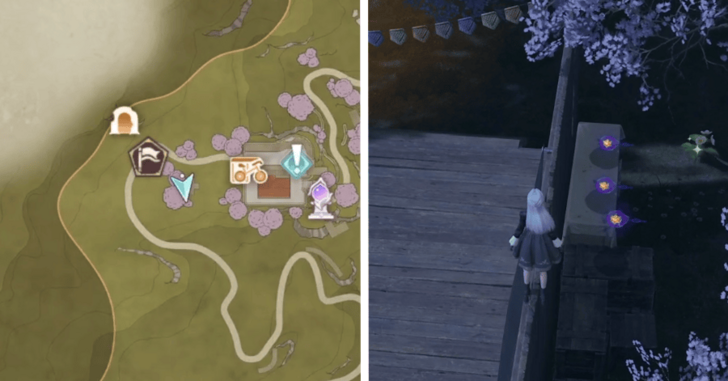 |
Behind the Art Academy Field Base stage |
| 429-430 | 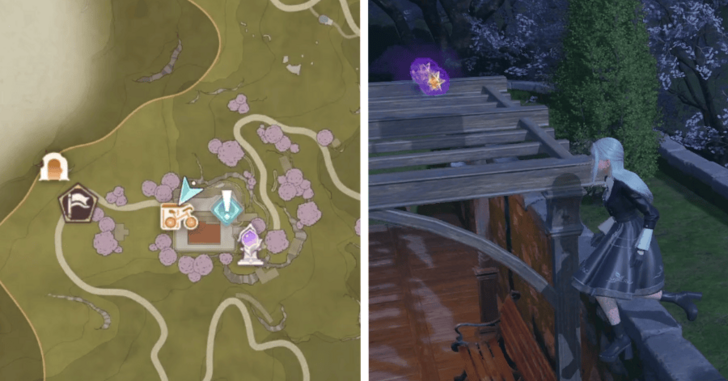 |
On the canopy above a bench |
| 431-433 | 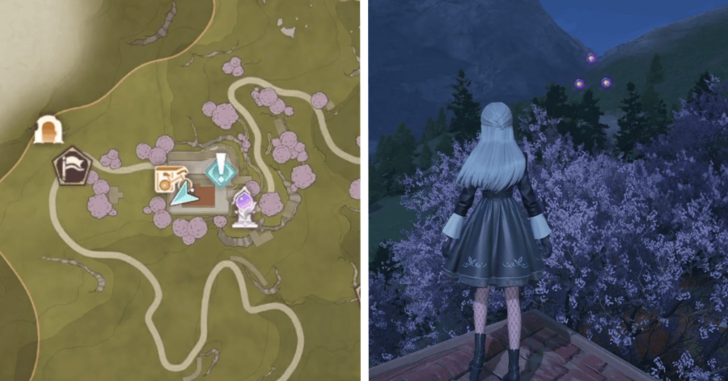 |
In the air behind the Art Academy Field Base |
| 434-435 |  |
Off the Art Academy Field Base's porch |
| 436-437 | 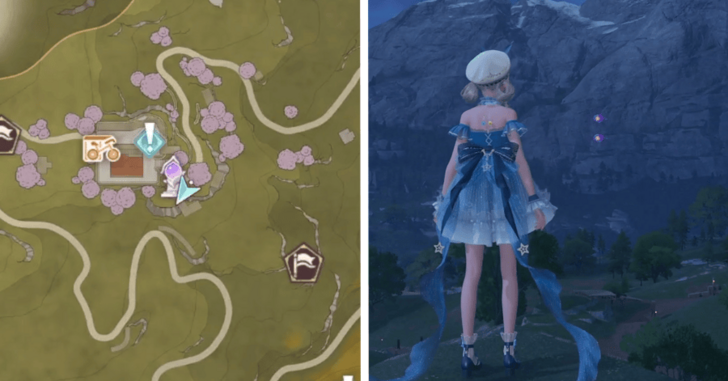 |
Off the cliff just southeast of the base |
| 438-439 |  |
In the air south of the Art Academy Field Base waypoint |
| 440-441 | 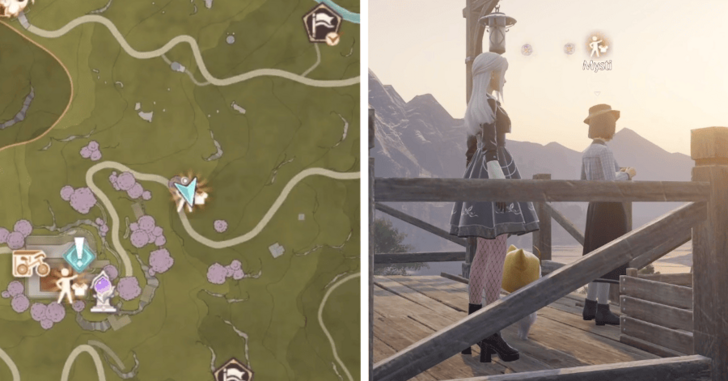 |
Above the lookout where Mysti is |
| 442-443 | 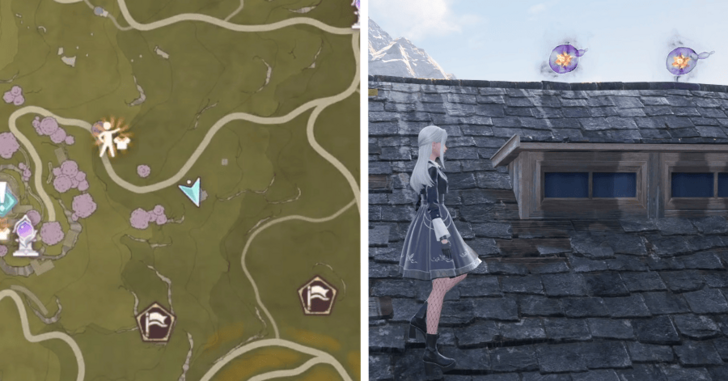 |
On top of a house east of the Art Academy Field Base |
| 444-445 | 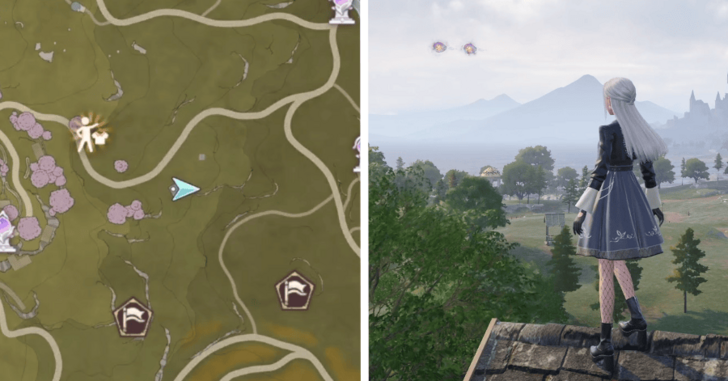 |
In the air past the house east of the Art Academy Field Base |
| 446-447 | 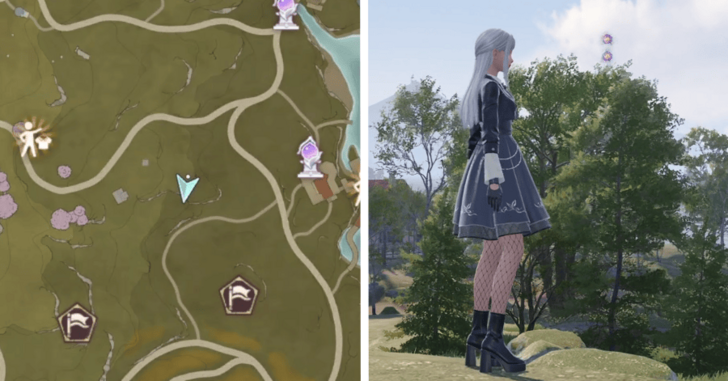 |
Above some trees west of Leisureely Anglers |
| 448-449 | 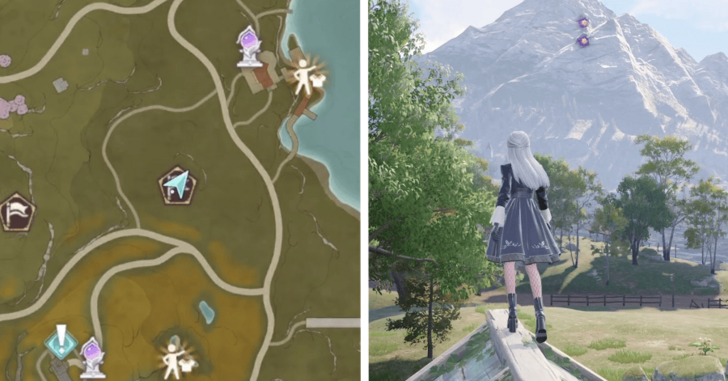 |
Above the Kikball mini-game |
| 450-451 | 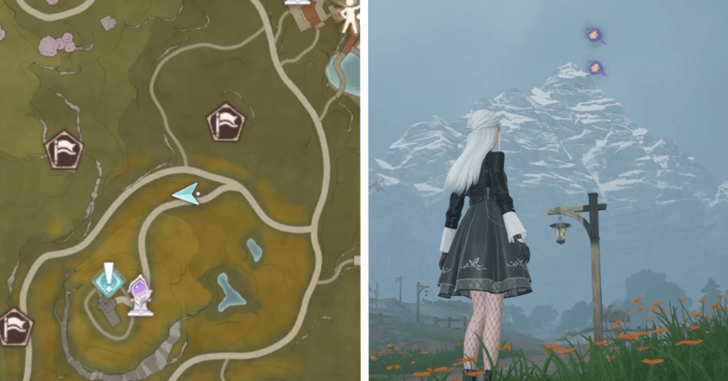 |
Above a lamp post on the road to the Bug Catcher's Cabin |
| 452-453 | 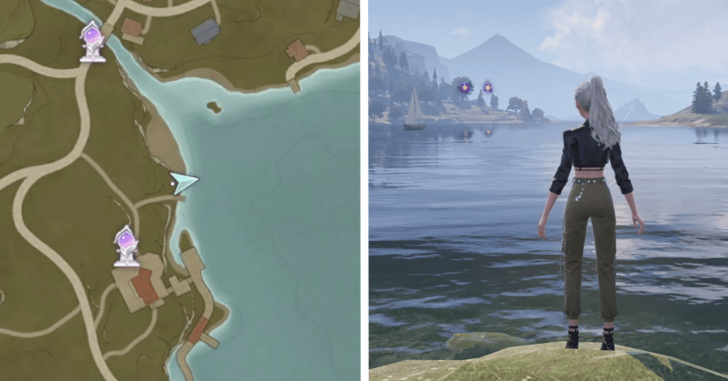 |
On the water north of The Lesiureely Anglers Florawish Branch |
| 454-455 | 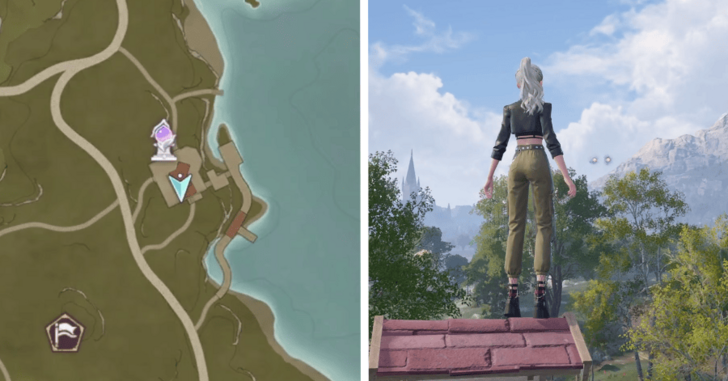 |
In the air south of Leisureely Anglers, purify by jumping off the building's chimney |
| 456-457 | 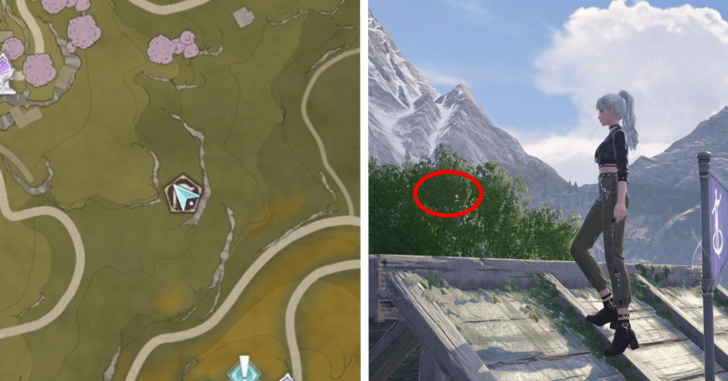 |
Hidden inside the tree north of the Hoop Hopper mini-game |
| 458-460 | 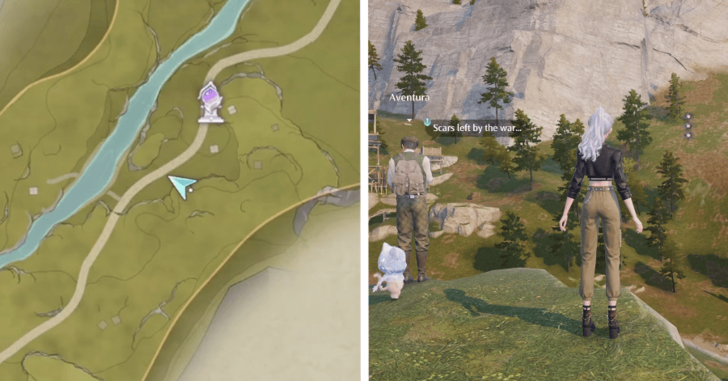 |
In the air above the Abandoned Fanatic Wisher Camp Outpost path, purify by jumping off the ledge where Aventura is |
| 461-462 |  |
Above a bouncy leaf nearby 3 other sets of Dews |
| 463-464 | 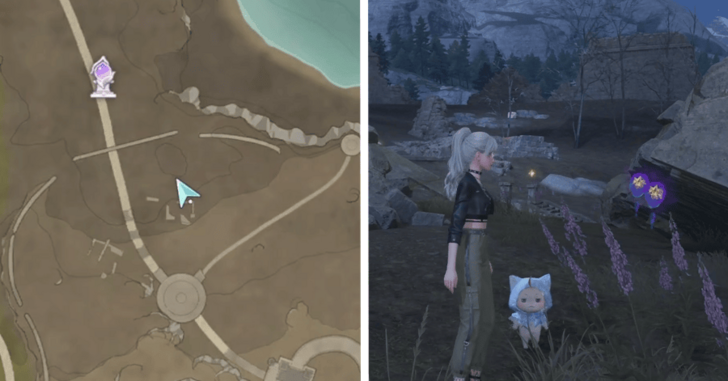 |
Underneath a ruined wall near some small ruins with a box in the middle |
| 465-467 | 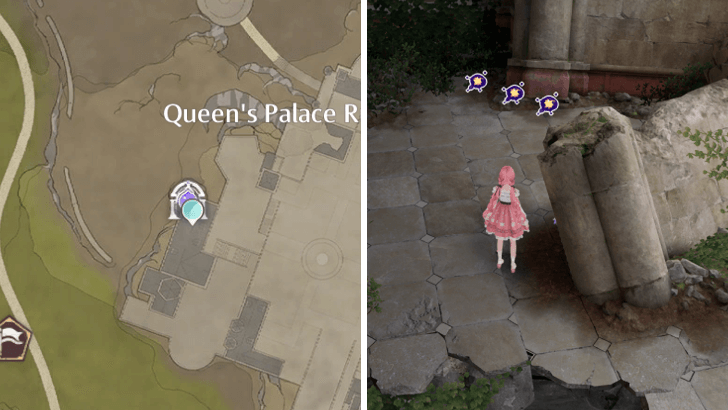 |
Queen's Palace Ruins: Inner Court. Behind the broken wall at the right side of the Broken Hallway area |
| 468-470 | 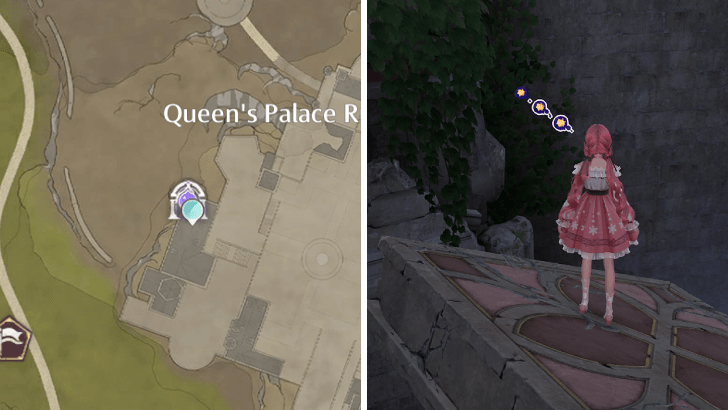 |
Queen's Palace Ruins: Inner Court. Behind the first unstable platform after it falls in the area after the Broken Hallway |
| 471-472 | 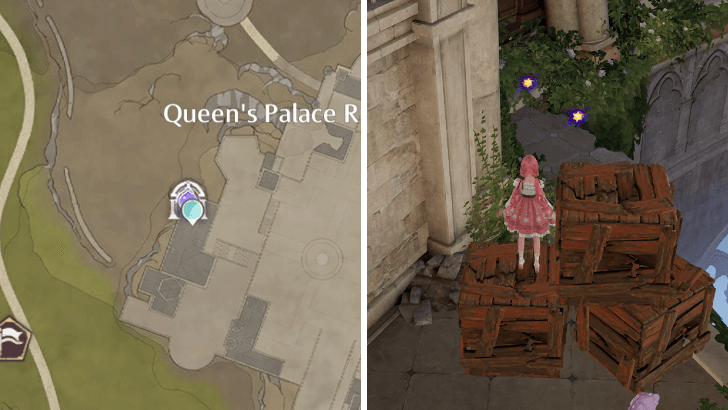 |
Queen's Palace Ruins: Inner Court. Behind a pile of boxes on the right side of the stairs leading to the Palace Old Courtyard |
| 473-475 | 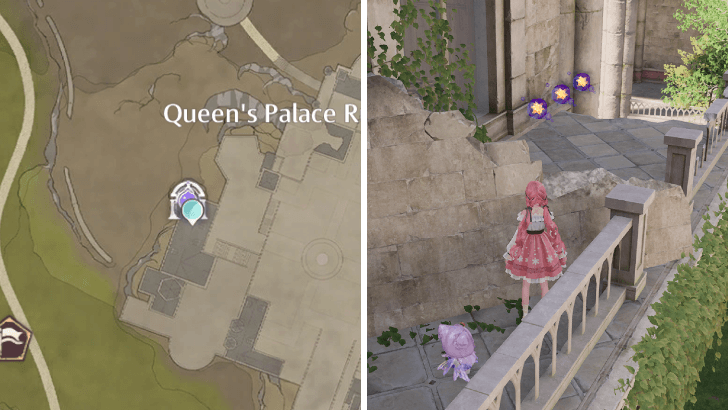 |
Queen's Palace Ruins: Inner Court. At the balcony on the right side of the building in the Palace Old Courtyard |
| 476-477 | 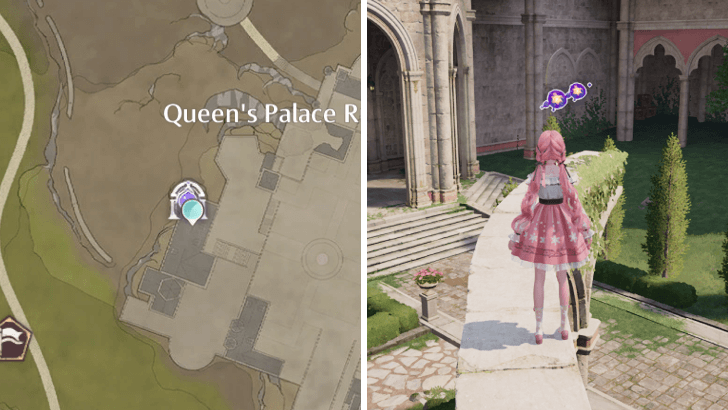 |
Queen's Palace Ruins: Inner Court. Along the top of the pillars around the large violin statue |
| 478-479 |  |
Queen's Palace Ruins: Inner Court. On a stone platform underneath the exit door from the courtyard |
| 480-481 | 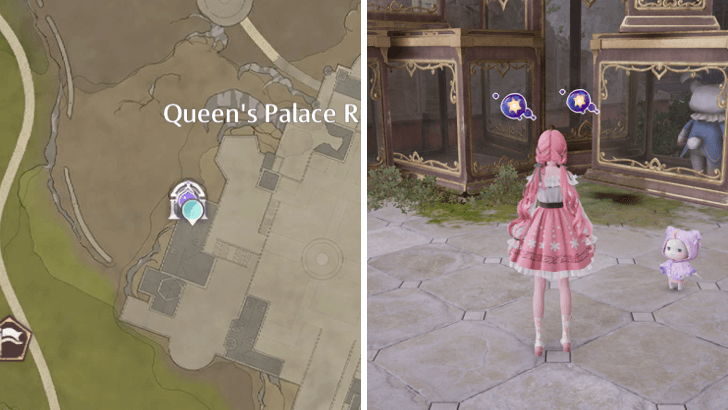 |
Queen's Palace Ruins: Inner Court. Behind some glass cases in the Doll Gallery |
| 482-484 | 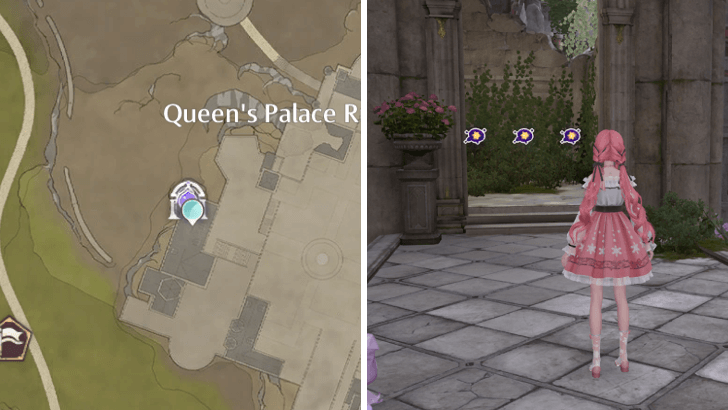 |
Queen's Palace Ruins: Inner Court. At the area underneath the bear guard in the middle of the path of glass cases |
| 485-486 | 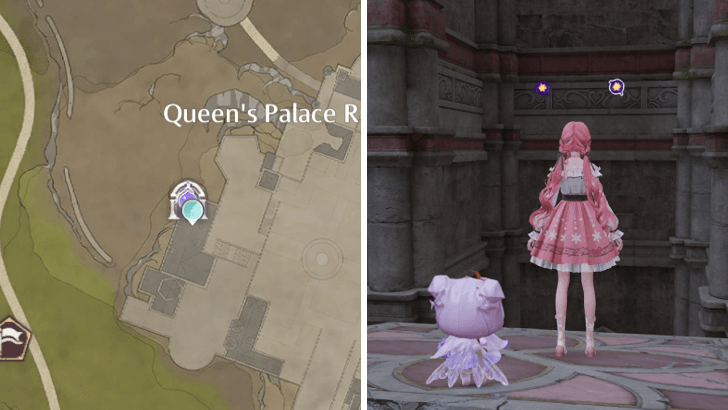 |
Queen's Palace Ruins: Inner Court. Floating past the unstable platform on the leftmost side of the Whimstar in the Doll Gallery |
| 487-489 |  |
Queen's Palace Ruins: Inner Court. In a secret room on the right side of the Whimstar in the Doll Gallery |
| 490-491 | 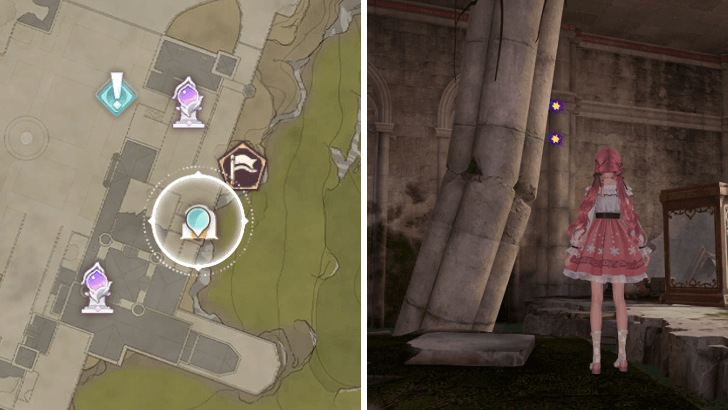 |
Palace Ruins Cavern. Floating by a cracked pillar near a large glass case at the flooded bottom floor |
| 492-493 |  |
Palace Ruins Cavern. Behind some debris in the secret room behind the glass cases leading to the second floor |
| 494-495 | 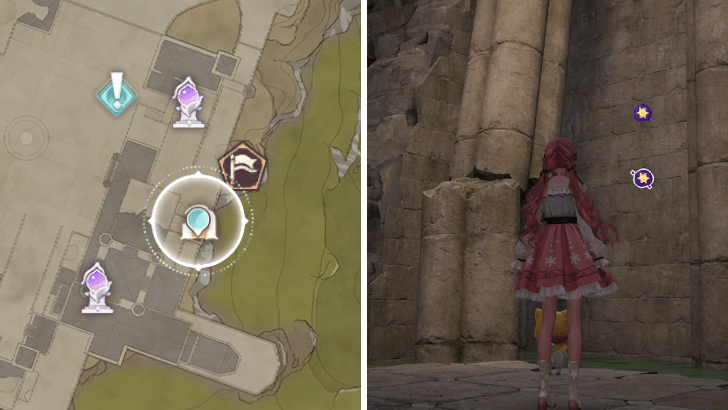 |
Palace Ruins Cavern. Floating next to a broken pillar near the door in the secret room behind the glass cases leading to the second floor |
| 496-497 | 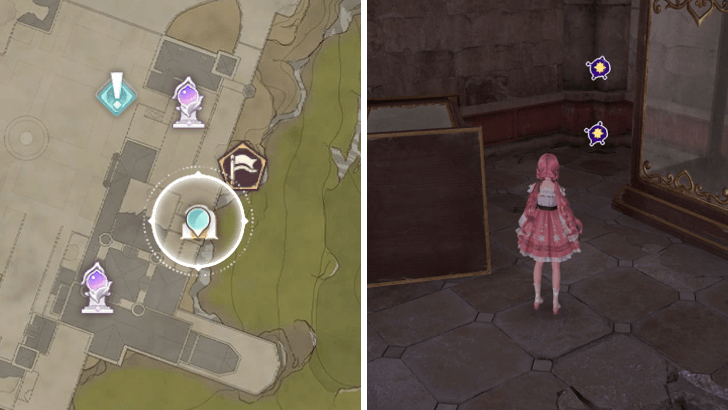 |
Palace Ruins Cavern. Behind some glass cases in a corner area of the second floor |
| 498-500 | 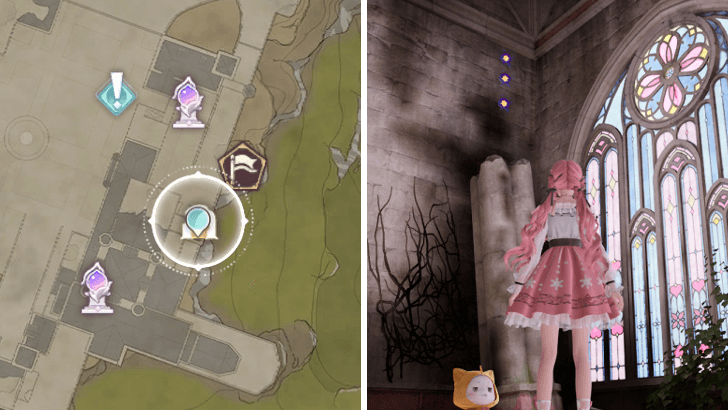 |
Palace Ruins Cavern. Floating above a broken pillar near a window on the second floor |
| 501-502 | 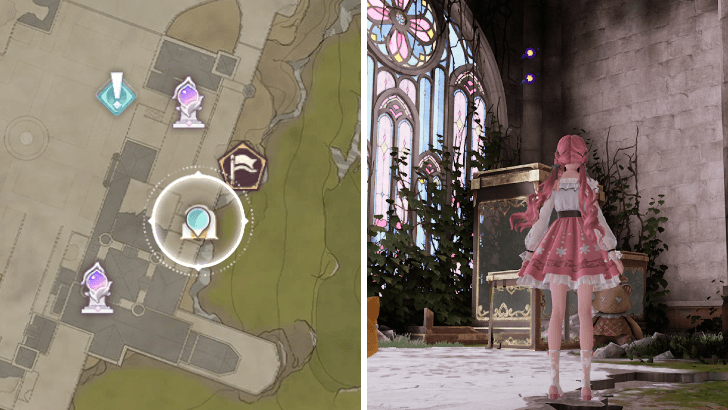 |
Palace Ruins Cavern. Floating above a glass case near a window at the second floor. |
Stoneville Dews of Inspiration
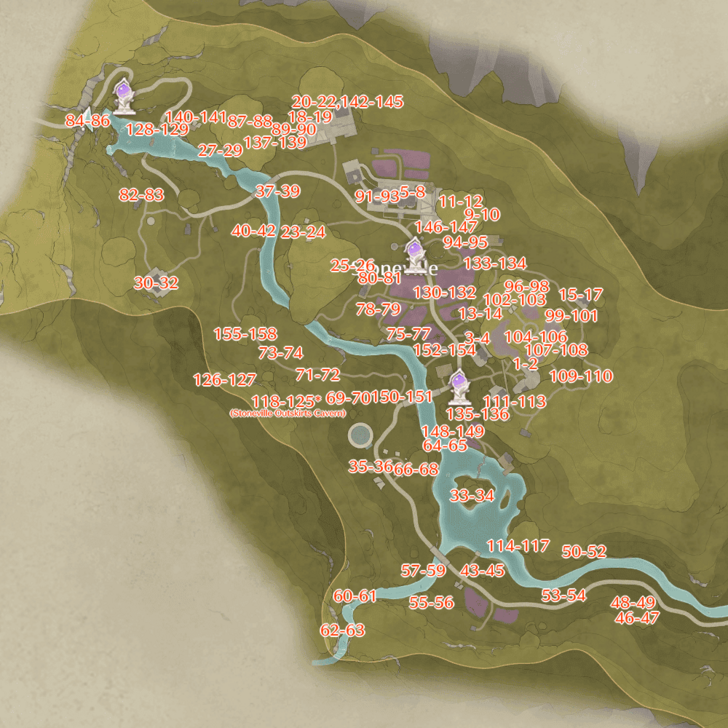 Open Image in New Tab |
Dews marked with an asterisk are found underground or in caves.
There are a total of 158 Dews in Stoneville. All their locations are noted below:
| No. | Image | How to Get |
|---|---|---|
| 1-2 | 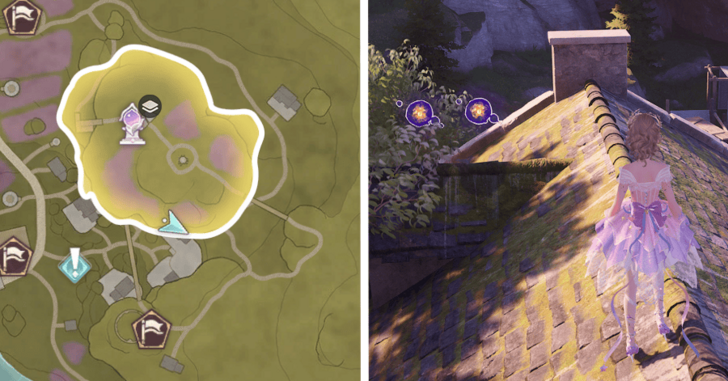 |
On the roof of the house next to the drying cloth station |
| 3-4 | 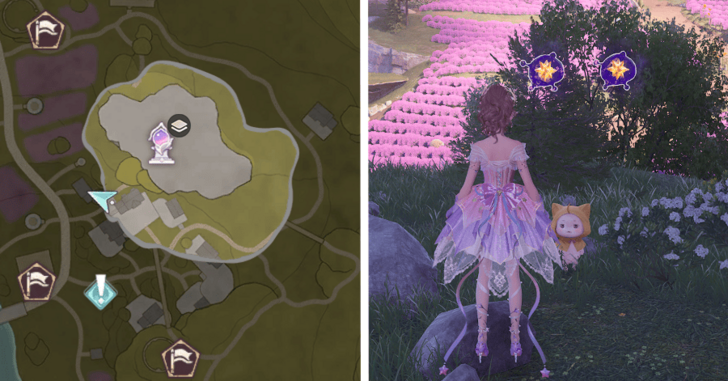 |
On the stone overlooking the lavender fields |
| 5-8 | 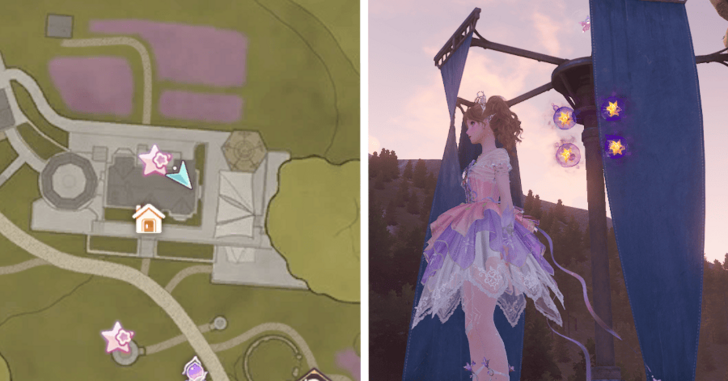 |
On top of the Dye Workshop |
| 9-10 | 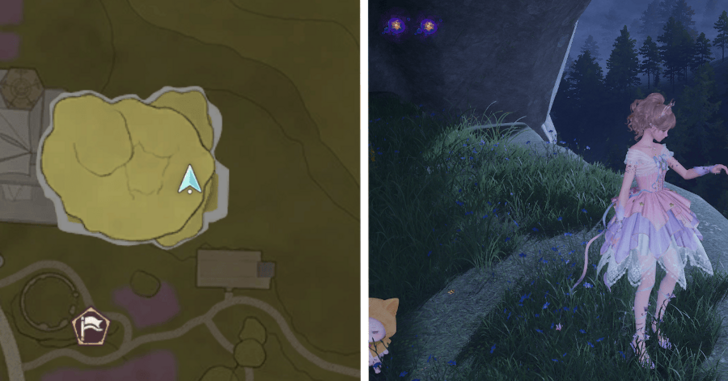 |
On the stone one level above the nest of the Sky Monarch |
| 11-12 | 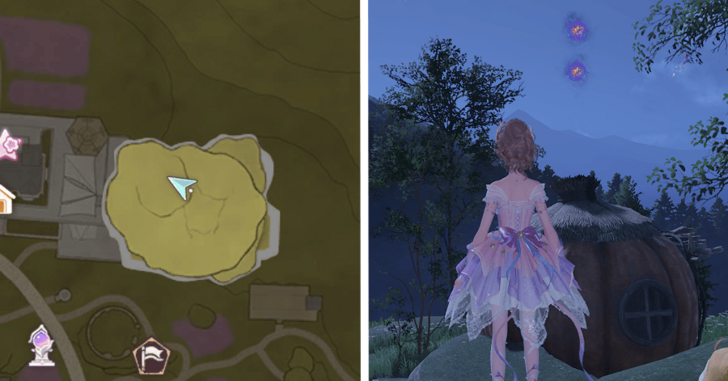 |
On the very top level of the stone. Above the pumpkin house |
| 13-14 | 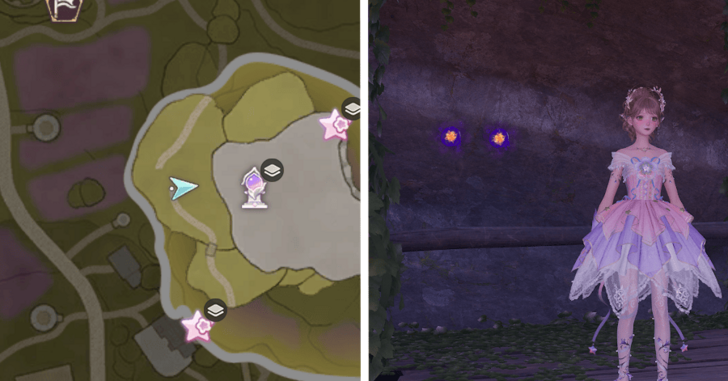 |
On the scaffolding west of the Flamecrest Stonetree Warp Spire |
| 15-17 |  |
Roof of the house east of the of the Flamecrest Stonetree Warp Spire |
| 18-19 | 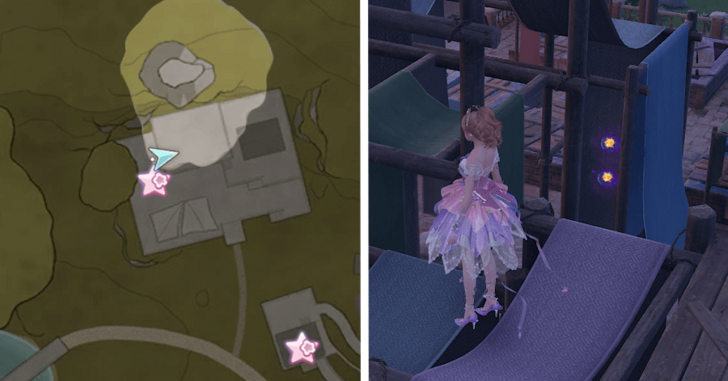 |
Hidden in the drying racks |
| 20-22 |  |
On the roof of one of the sheds |
| 23-24 | 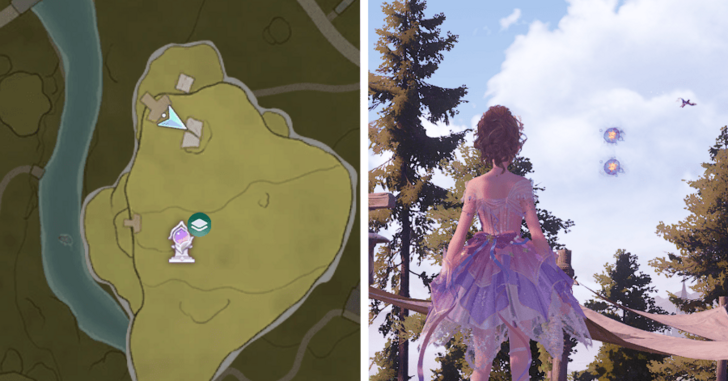 |
North of Gliding Training Stonetree Warp Spire |
| 25-26 | 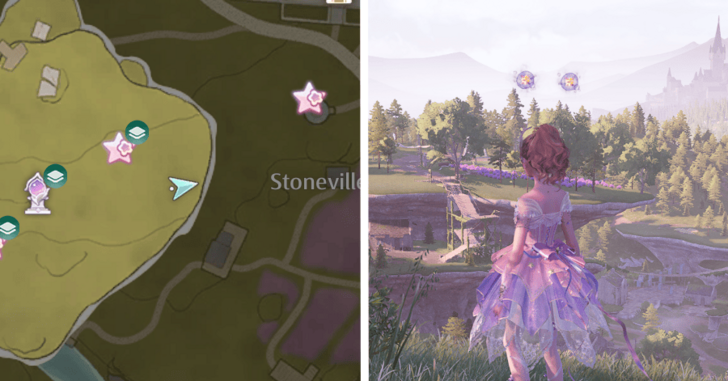 |
East of Gliding Training Stonetree Warp Spire |
| 27-29 | 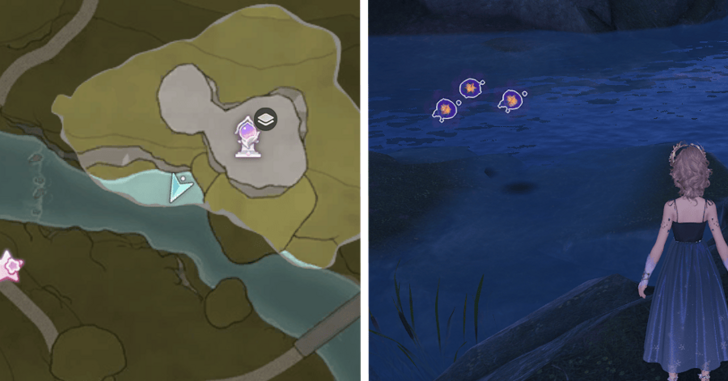 |
On the lake below Dye Workshop Stonetree Warp Spire |
| 30-32 |  |
On the roof of Cicchetto Manor |
| 33-34 |  |
South of Village Fork Warp Spire |
| 35-36 | 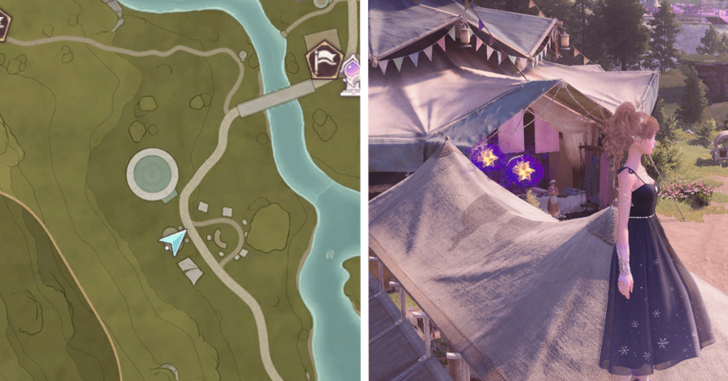 |
On top of the tent bar in the market. Southwest of Village Fork Warp Spire |
| 37-39 | 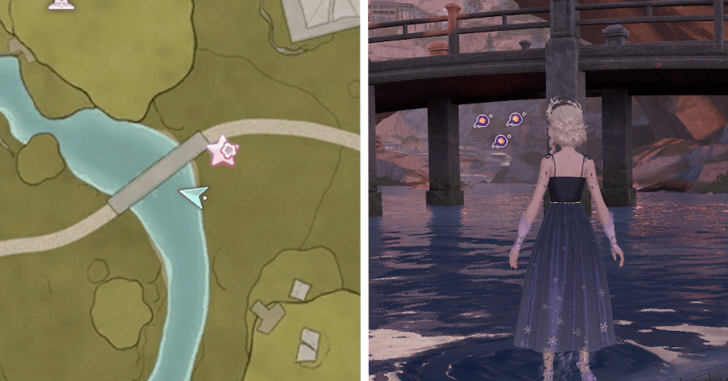 |
Under the bridge south of Dye Workshop Stonetree Warp Spire |
| 40-42 | 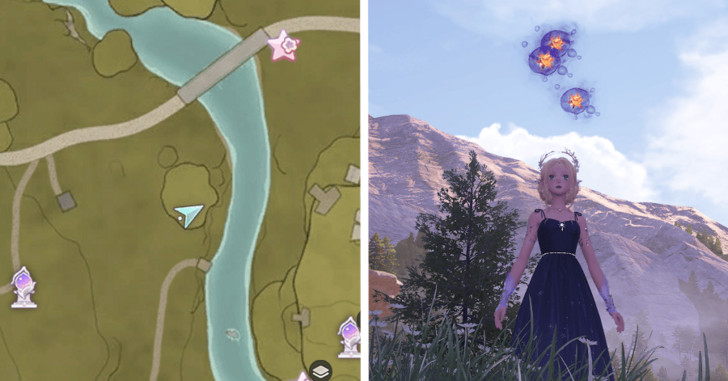 |
Northwest of the Gliding Training Stonetree Warp Spire |
| 43-45 | 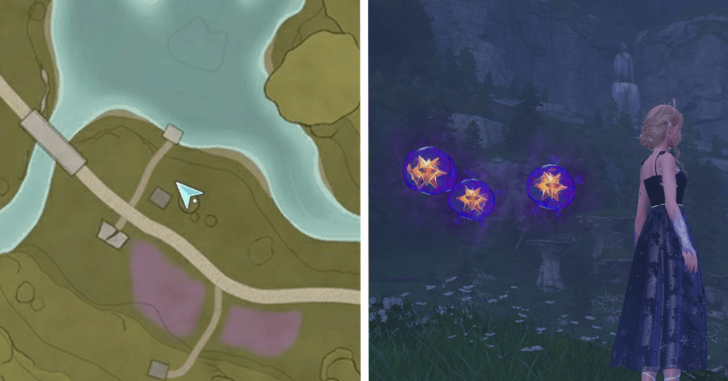 |
On one of the tiny stonetree near the falls |
| 46-47 | 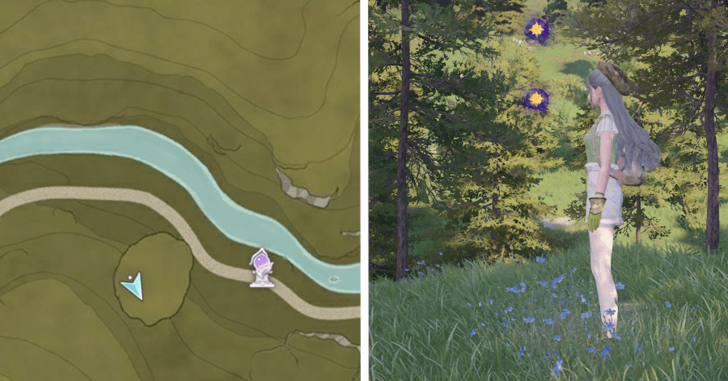 |
On top of the small stonetree near the Stoneville Entrance Warp Spire. |
| 48-49 | 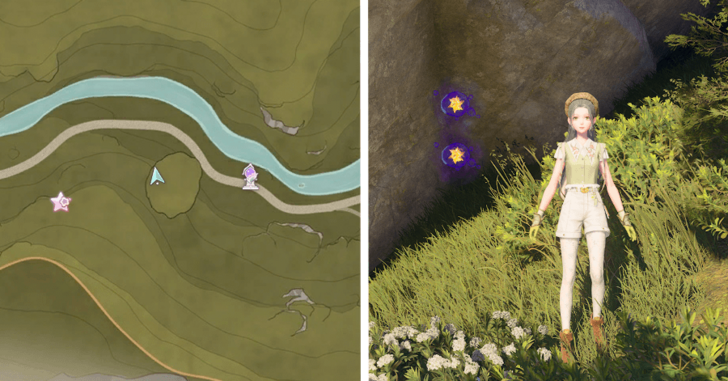 |
Below the small stonetree near the Stoneville Entrance Warp Spire. |
| 50-52 | 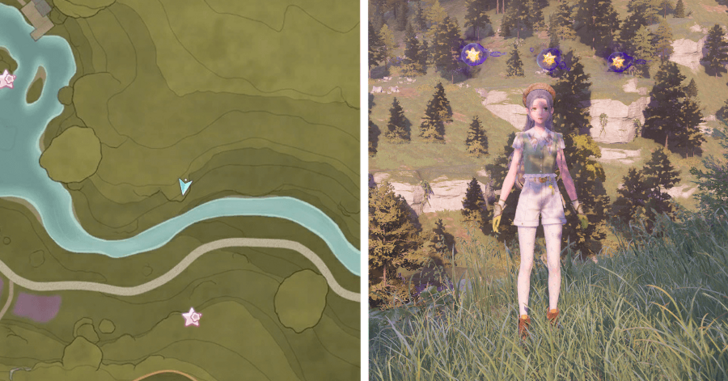 |
On the small stonetree northwest of Stoneville Entrance Warp Spire. |
| 53-54 | 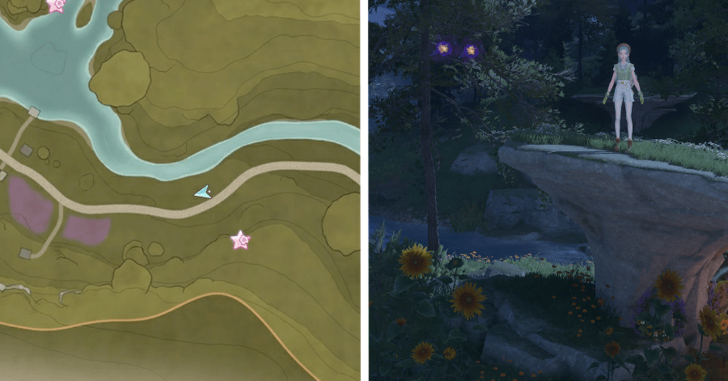 |
On a small stonetree in between the river and the pathway. |
| 55-56 | 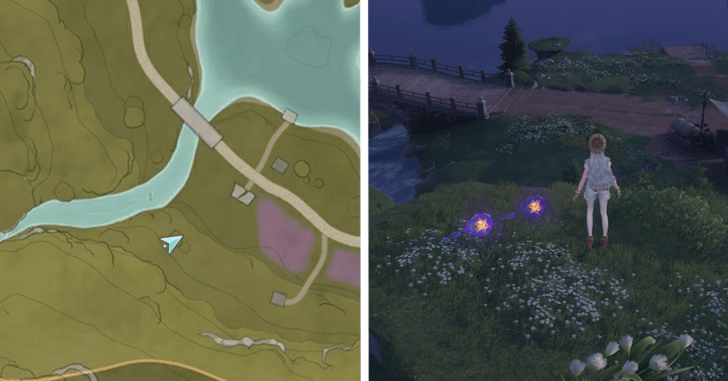 |
On top of a stonetree overlooking Sandro's shop and the bridge. |
| 57-59 | 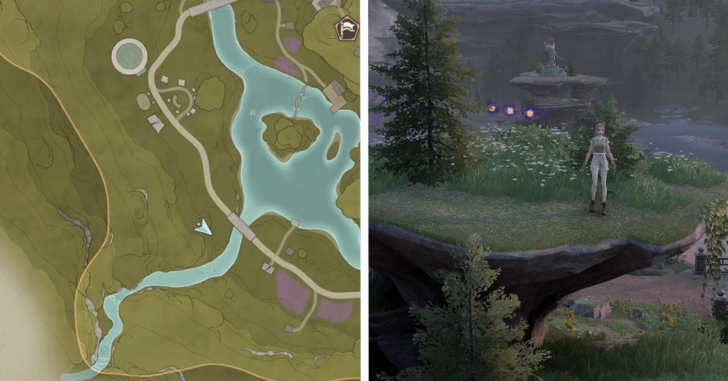 |
On top of a stonetree next to the bridge. |
| 60-61 | 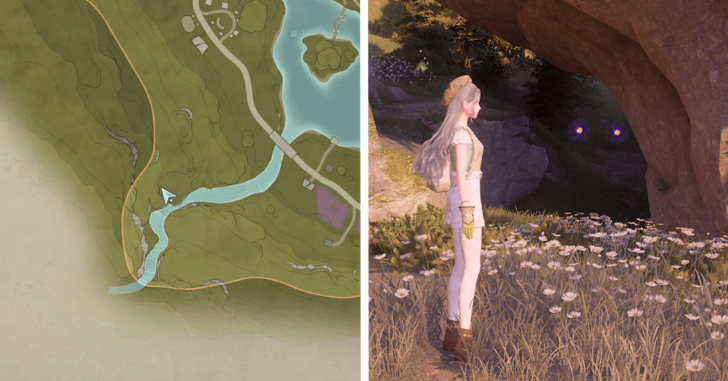 |
Under the stonetree next to the lower falls. |
| 62-63 | 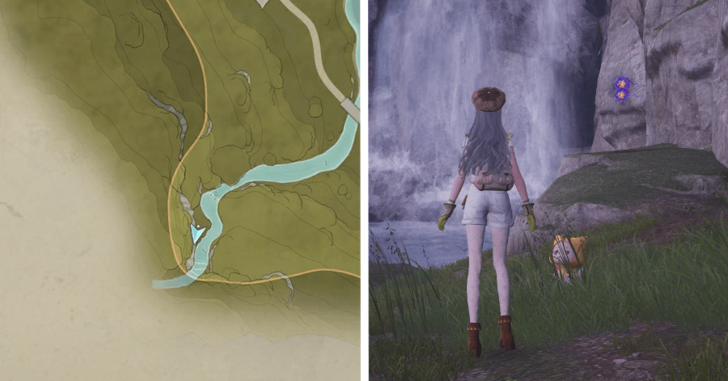 |
On the right side of the higher falls. |
| 64-65 | 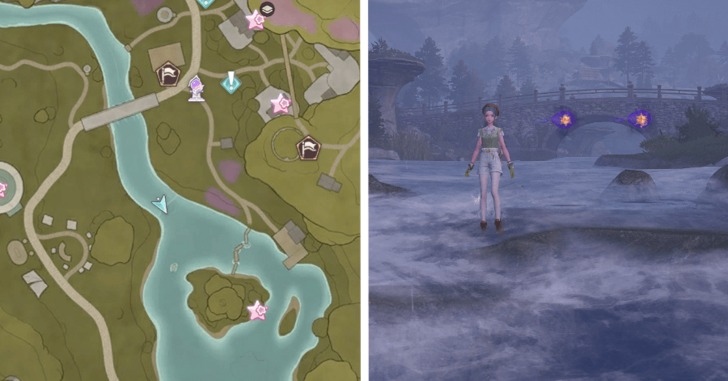 |
In the middle of the lake near the bridge. |
| 66-68 | 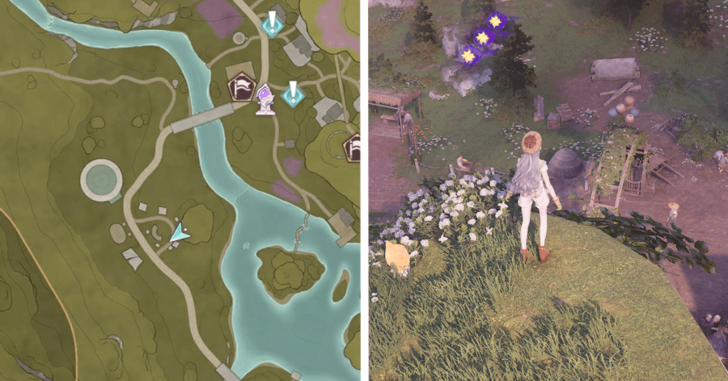 |
On top of the entrance of the Stoneville Market. |
| 69-70 | 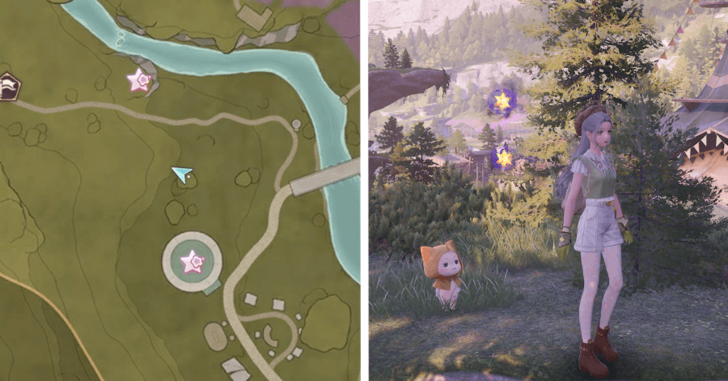 |
On top of the stonetree on the back of the circus tent. |
| 71-72 | 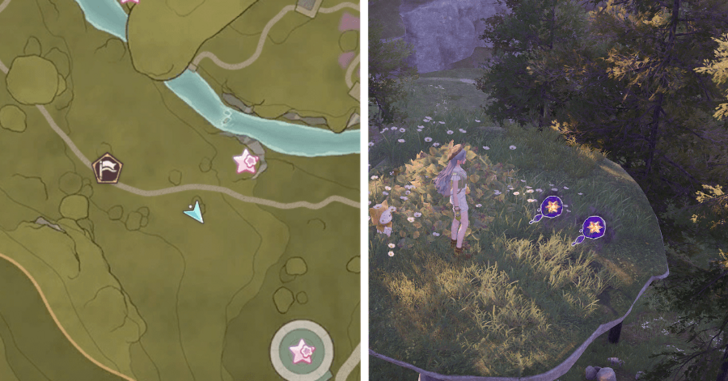 |
On the forest, east of the Hoop-Hopper challenge, on top of the stonetree. |
| 73-74 | 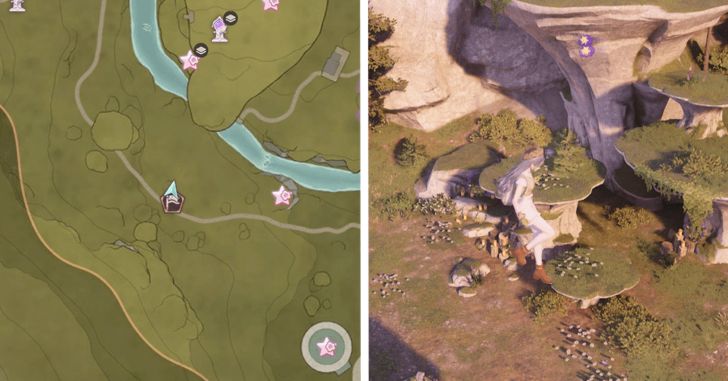 |
On top of the Hoop Hopper Challenge Booth. |
| 75-77 | 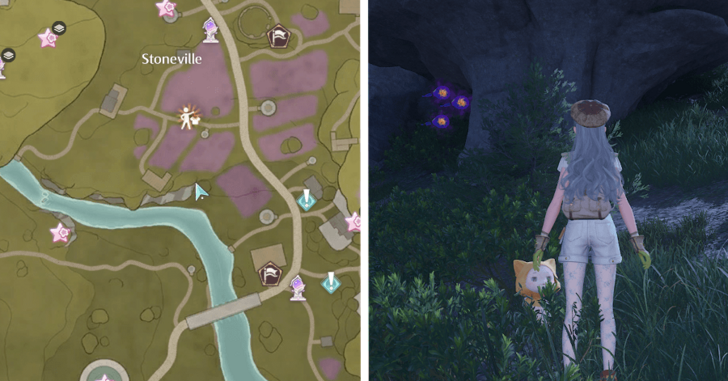 |
Below the stonetree next to the lavender fields. |
| 78-79 | 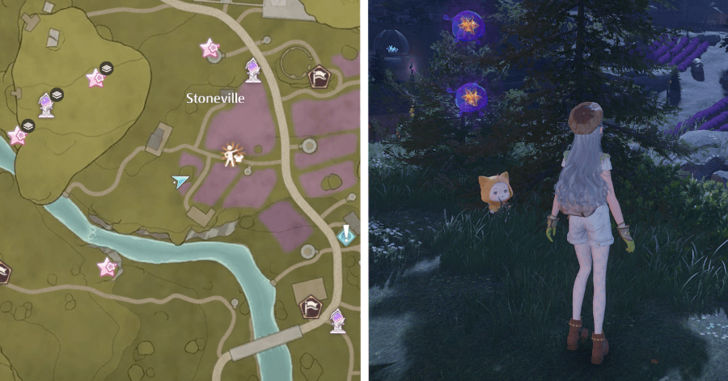 |
On top of a stonetree overlooking the lavender fields. |
| 80-81 | 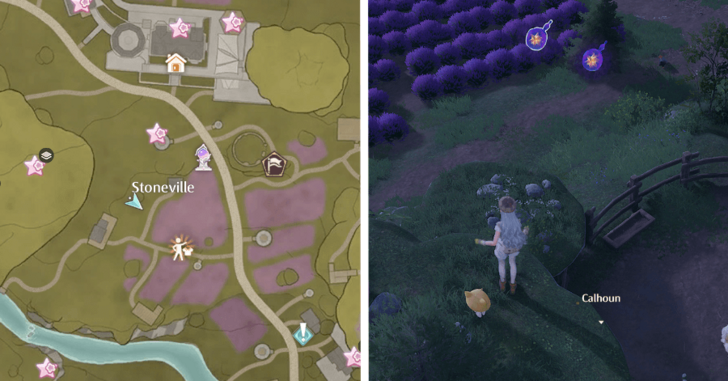 |
On top of a stonetree, parallel to the previous dews, next to the sheep pen. |
| 82-83 | 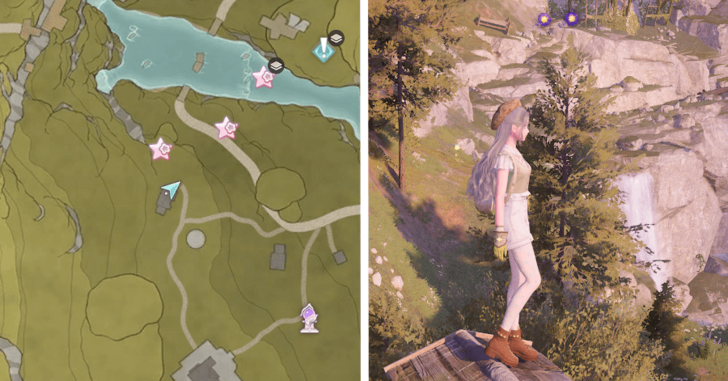 |
Behind the broken house, as you need to climb over the chimney to see them. |
| 84-86 |  |
Below the scaffolding between Stoneville and Abandoned District. |
| 87-88 |  |
Below a stonetree and Dye Workshop Stonetree Warp Spire. |
| 89-90 | 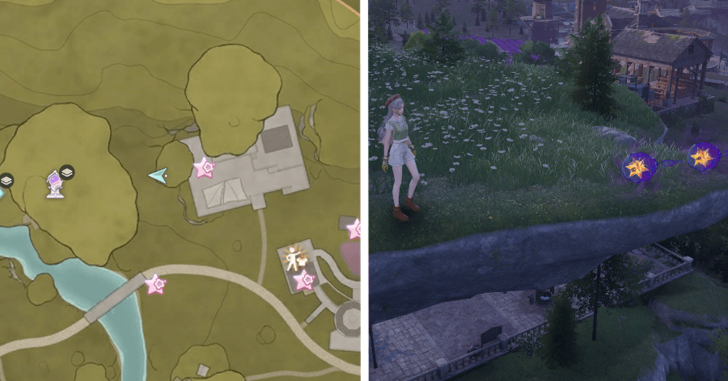 |
On top of ta stonetree next to the drying racks. |
| 91-93 | 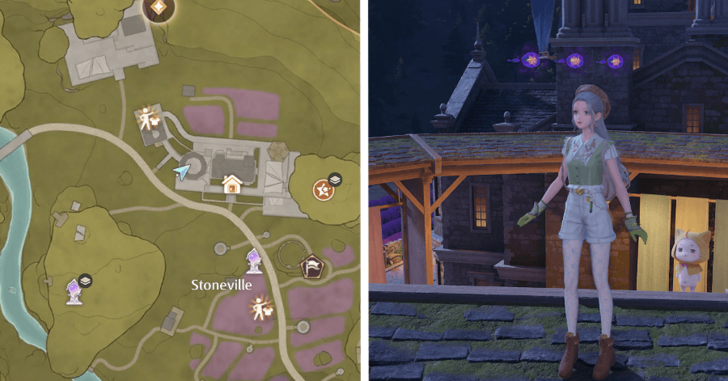 |
In the middle of the circular shed, next to the Dye Workshop. |
| 94-95 | 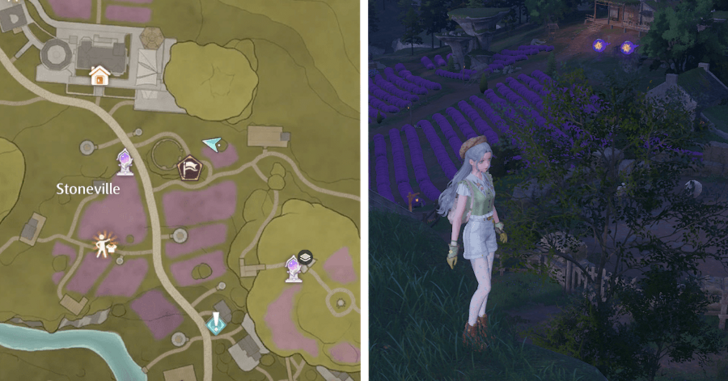 |
In between the stonetree and the sheep pen. |
| 96-98 | 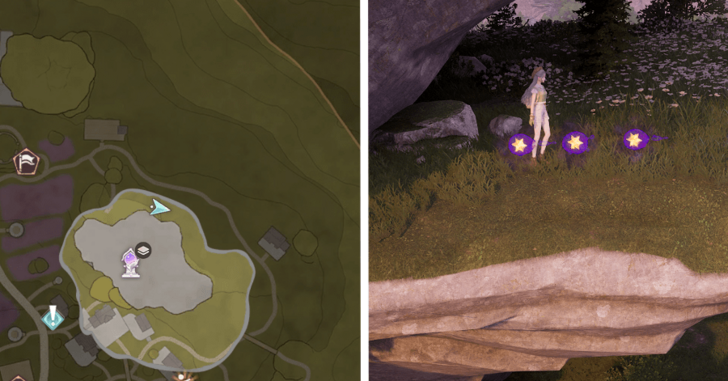 |
North of the Flamecrest Stonetree Warp Spire, located on a floor. |
| 99-101 | 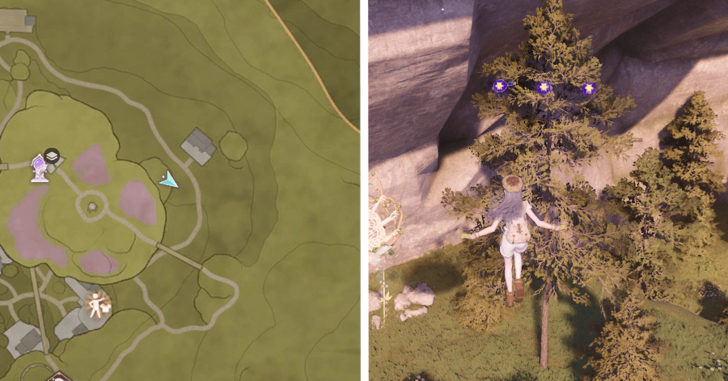 |
East of the Flamecrest Stonetree Warp Spire, located on a floor lower. |
| 102-103 | 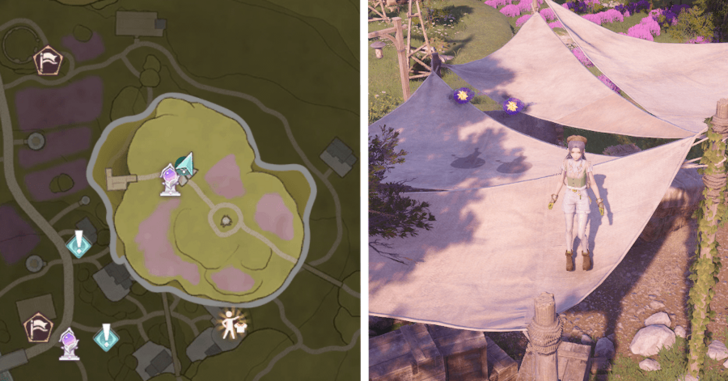 |
On top of the sunshade canopy next to the Flamecrest Stonetree Warp Spire. |
| 104-106 | 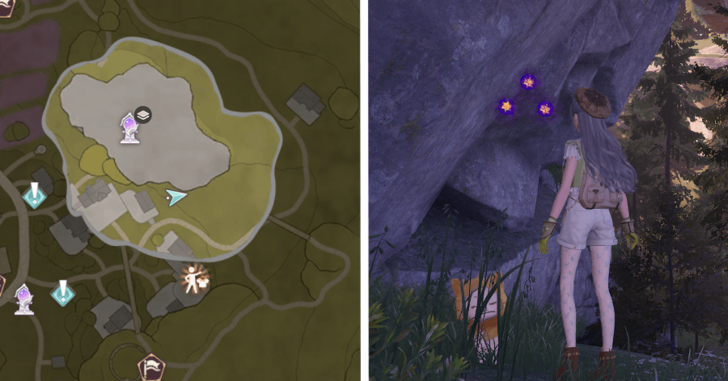 |
Southeast of the Flamecrest Stonetree Warp Spire, located a few floors lower. |
| 107-108 | 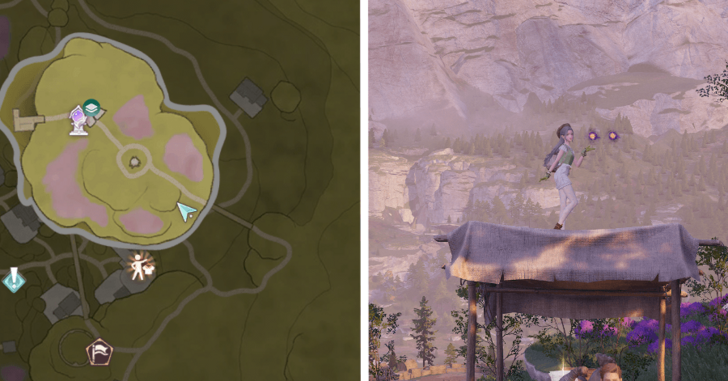 |
Southeast of the Flamecrest Stonetree Warp Spire, same floor. |
| 109-110 | 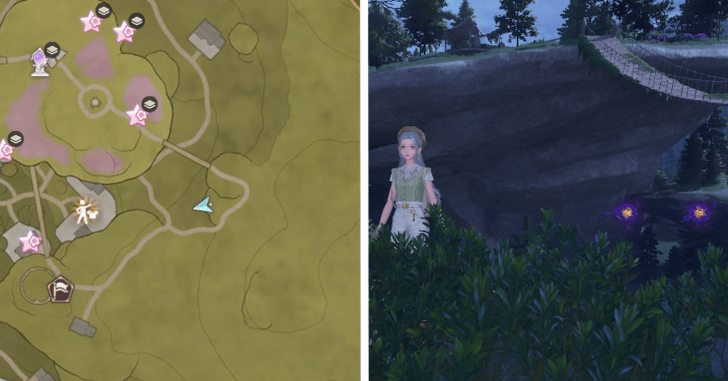 |
Below the bridge. Southeast of the Flamecrest Stonetree Warp Spire. |
| 111-113 | 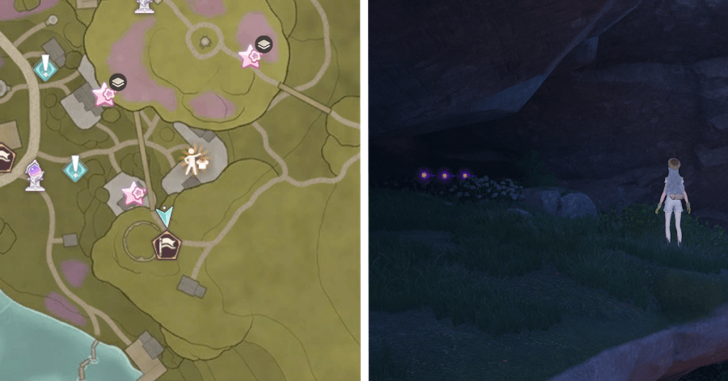 |
Under the bridge. |
| 114-117 | 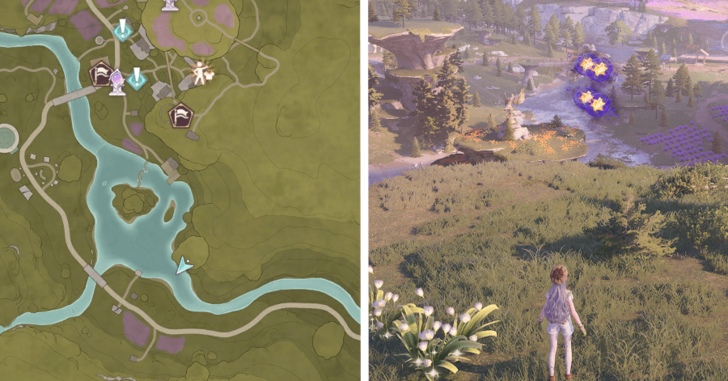 |
Behind the Stoneville bird statue. |
| 118-119 | 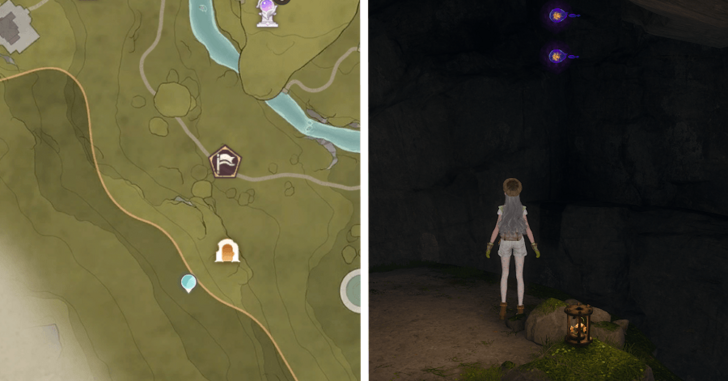 |
Inside the Stoneville Outskirts Cavern. |
| 120-121 | 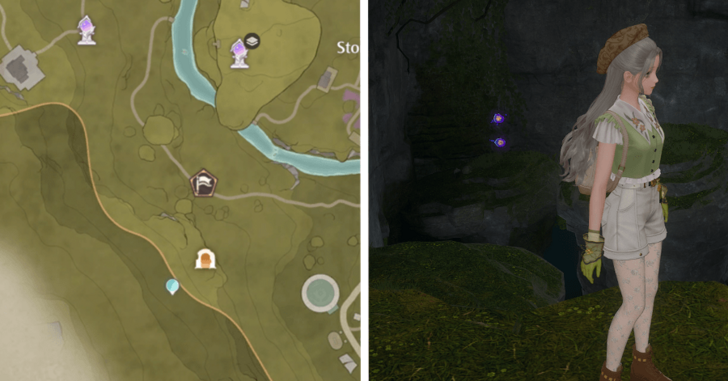 |
Inside the Stoneville Outskirts Cavern. |
| 122-123 | 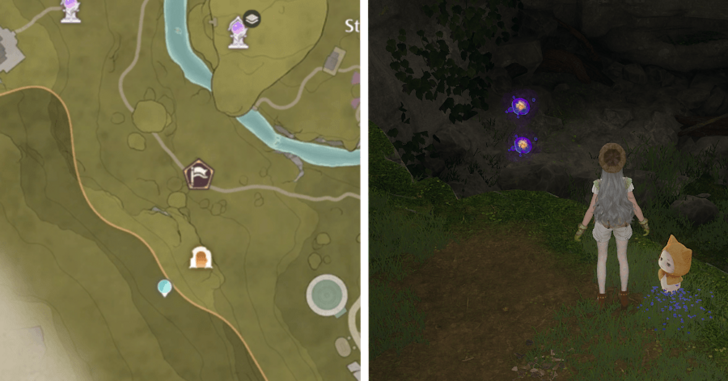 |
Inside the Stoneville Outskirts Cavern, past the bridge with brown vines. |
| 124-125 | 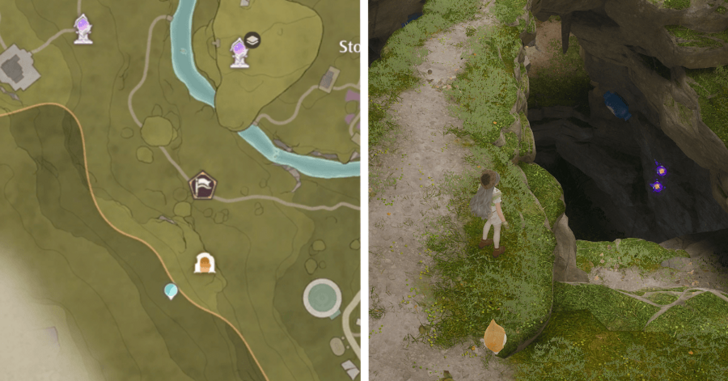 |
Inside the Stoneville Outskirts Cavern the room after the Dews 118-119. |
| 126-127 | 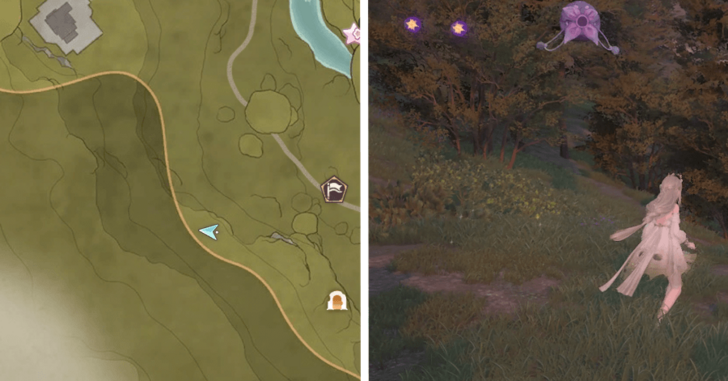 |
Uphill, northwest of the Stoneville Outskirts Cavern. |
| 128-129 | 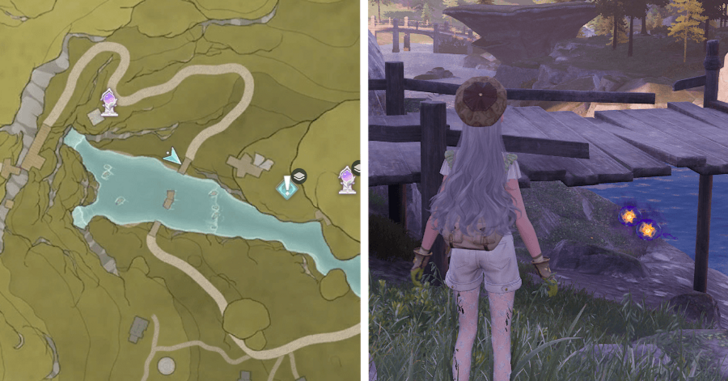 |
Under the broken bridge east of Rockfall Valley Warp Spire. |
| 130-132 | 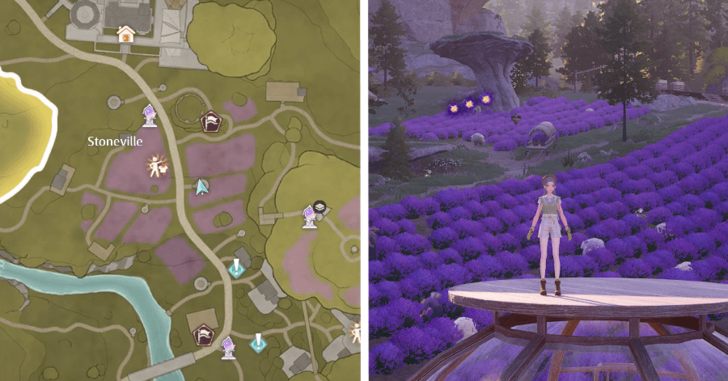 |
On top of the largest green house in the middle of the field. |
| 133-134 | 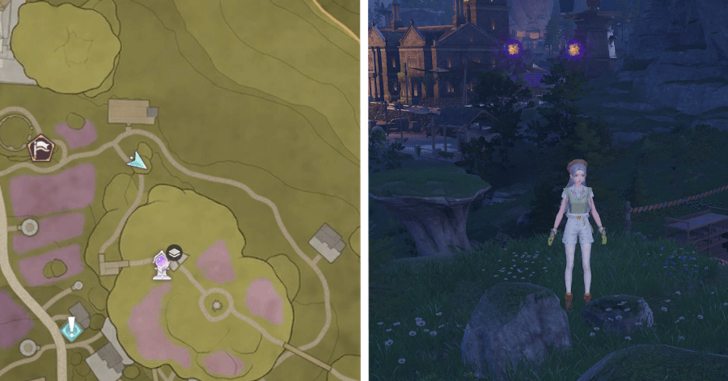 |
East of Lavenfringe Fields, near the small house with a lot of boxed flowers. It's located on top of a stonetree. |
| 135-136 | 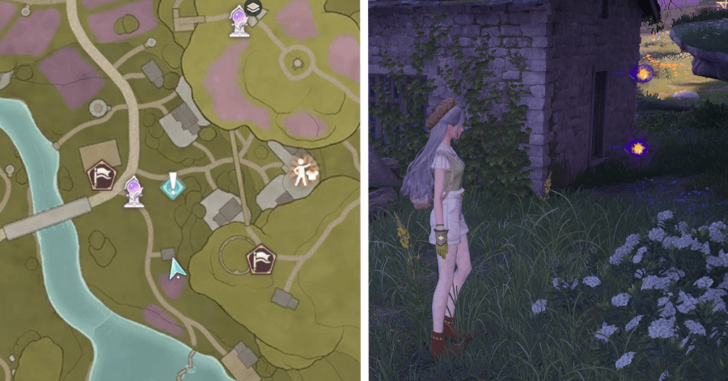 |
South of Village Fork Warp Spire, behind the small cottage. |
| 137-139 | 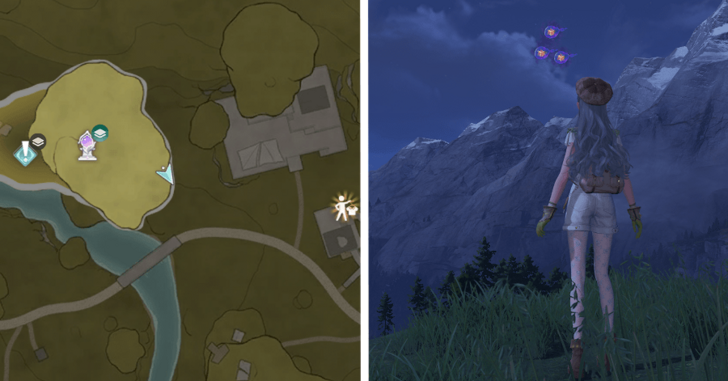 |
Southeast of the Dye Workshop Stonetree Warp Spire. |
| 140-141 | 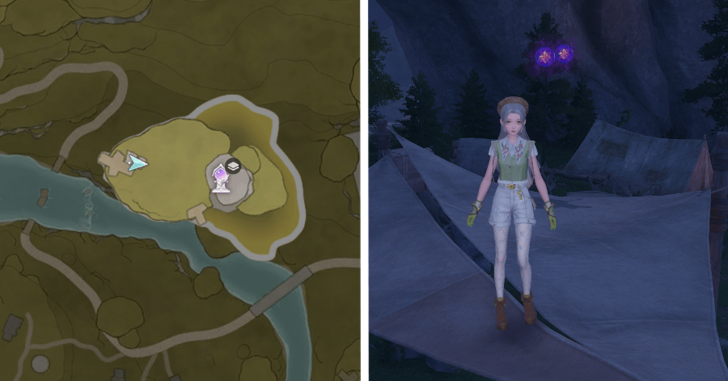 |
Above the sunshade canopy, lower floor, west of Dye Workshop Stonetree Warp Spire. |
| 142-145 | 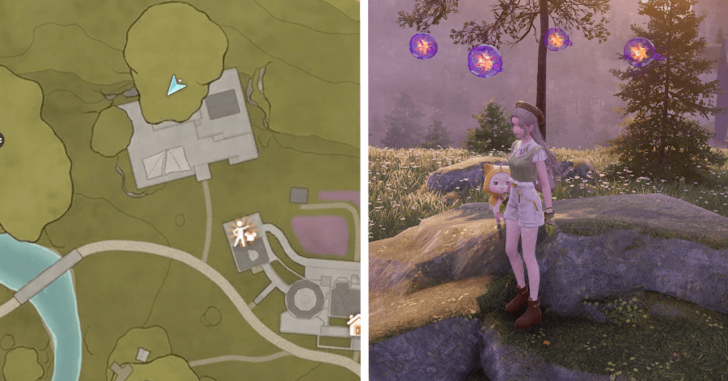 |
On top of the stonetree, northeast of the Dye Workshop Stonetree Warp Spire. |
| 146-147 | 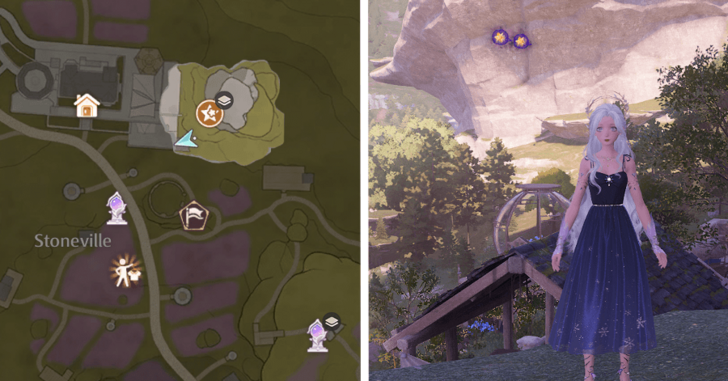 |
On the roof of the shed near the Dye Workshop. |
| 148-149 | 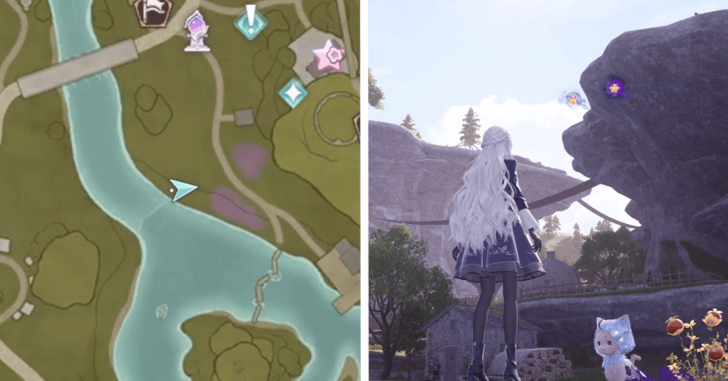 |
On a tiny stone tree just south of the Village Fork waypoint |
| 150-151 |  |
Off a tiny stone tree overlooking the bridge connecting the market and the village |
| 152-154 | 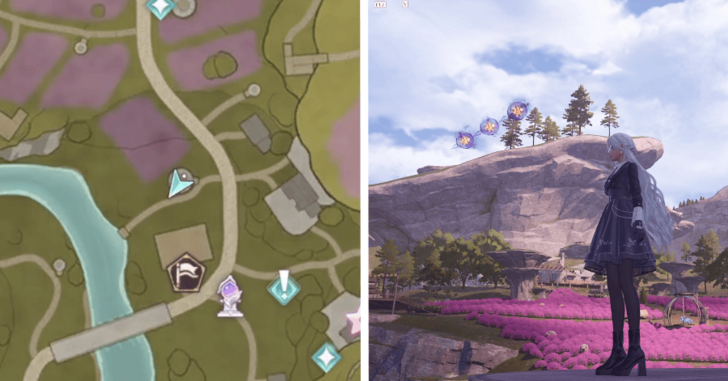 |
On top of a glass dome north of the Florapom Downpour mini-game |
| 155-158 | 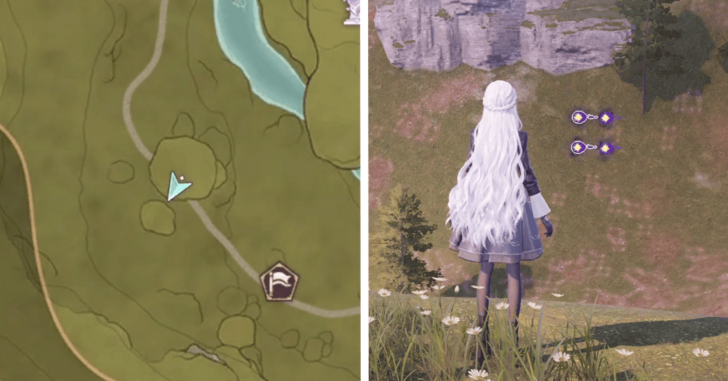 |
Off a stone tree behind a bunch of enemies |
Abandoned District Dews of Inspiration
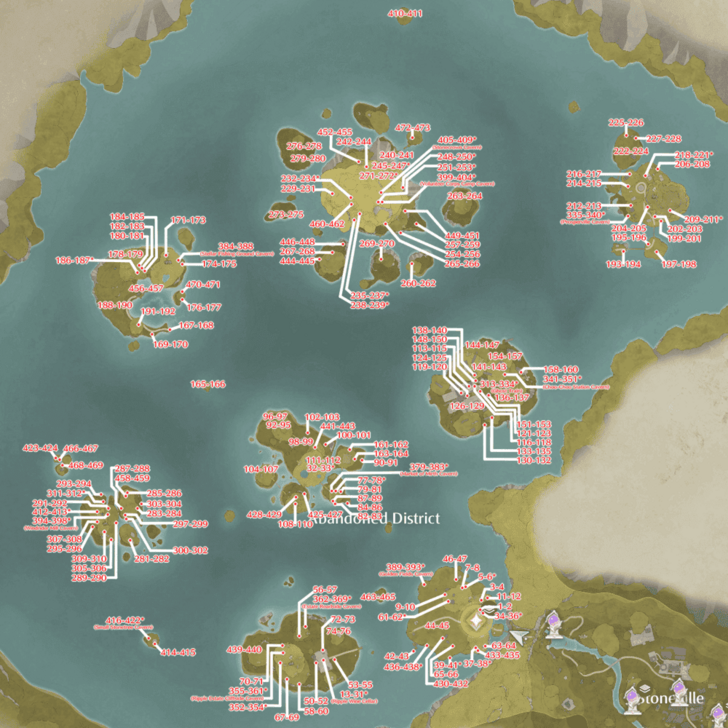 Open Image in New Tab |
Dews marked with an asterisk are found underground or in caves.
There are a total of 504 Dews in Abandoned District. All their locations are noted below:
| No. | Image | How to Get |
|---|---|---|
| 1-2 | 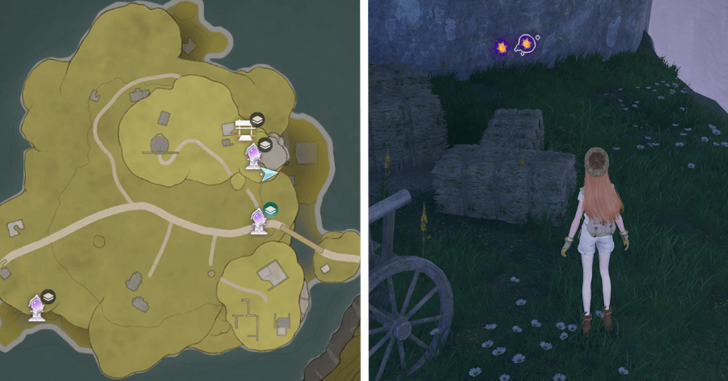 |
Lower level of a stonetree, behind the Beside the Golden Fields Warp Spire. |
| 3-4 | 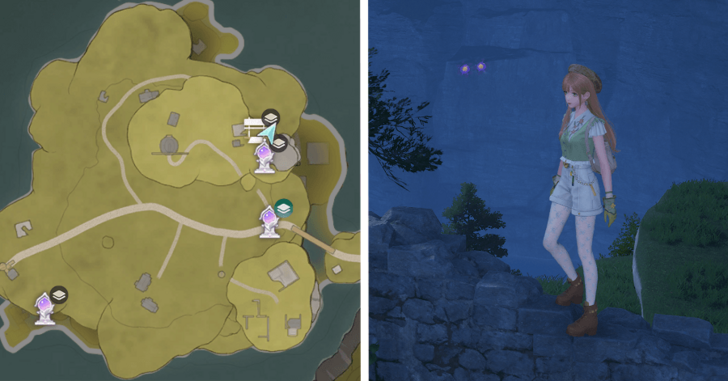 |
Floating near the edge of the lower level of stonetree, Behind the broken house. |
| 5-6 | 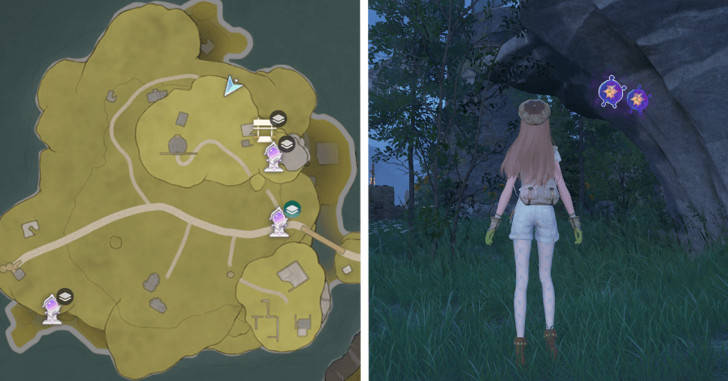 |
Under a mini stonetree, near the windmill. |
| 7-8 | 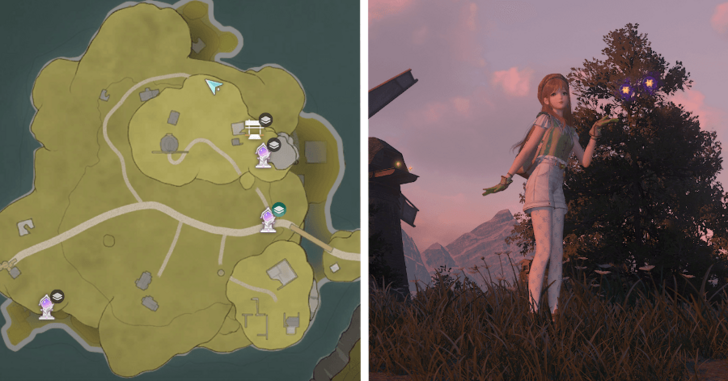 |
On top of a mini stonetree near the windmill. |
| 9-10 | 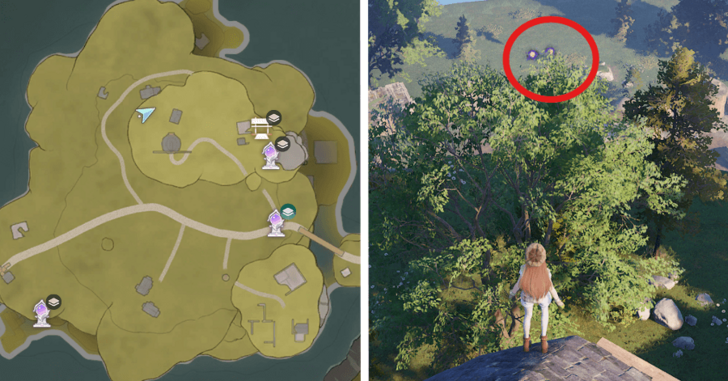 |
Behind the Windmill. You have to jump from the roof of the house to obtain these dews. |
| 11-12 | 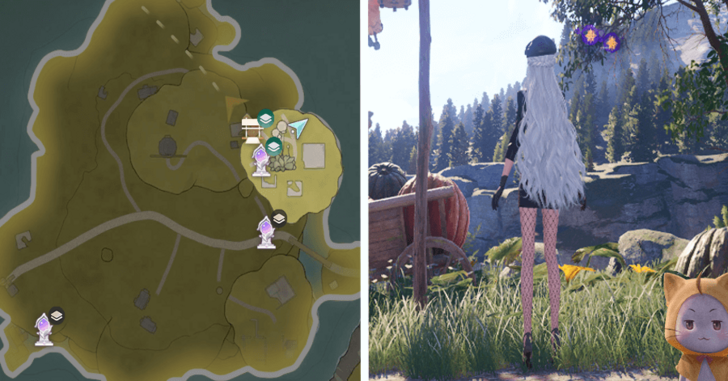 |
Top level of the stonetree. Northeast of the Gold Fields Stonetree Top Warp Spire. |
| 13-14 | 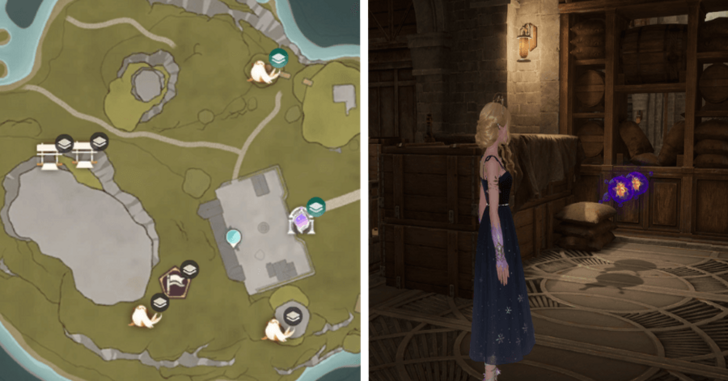 |
Behind the crates and barrels on the Transport Part section. |
| 15-16 | 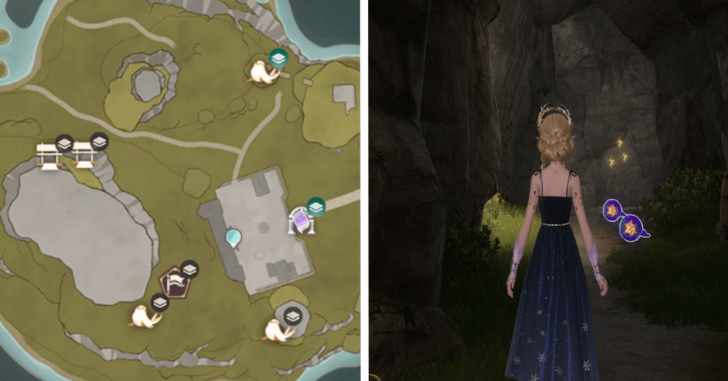 |
To obtain these dews enter the cave in front of the transport part section. |
| 17-18 | 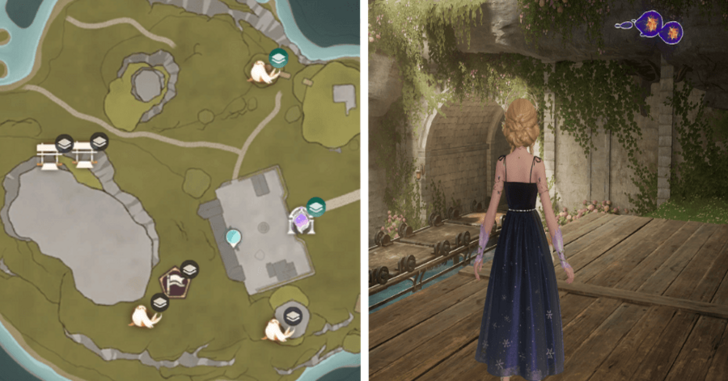 |
On the wooden dock, near the second minecart. |
| 19-21 | 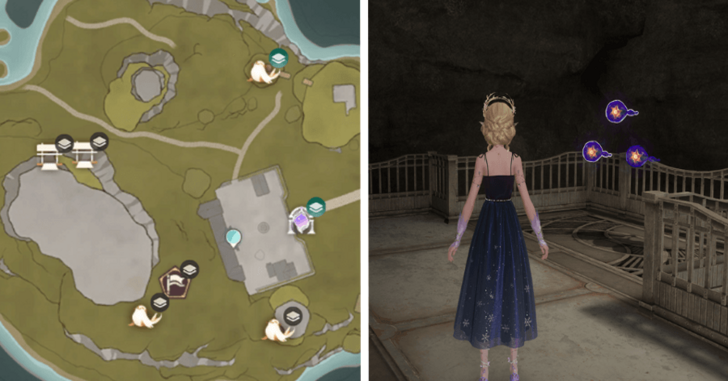 |
On the Reserve Vault Section, there is a barrel on the cave to the left jump over there to locate these dews. |
| 22-24 | 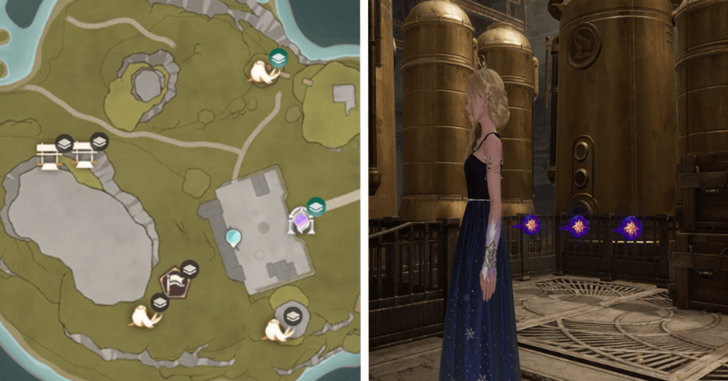 |
Behind the metal tanks. Jump over the moving barrels in the east to locate these dews. |
| 25-27 | 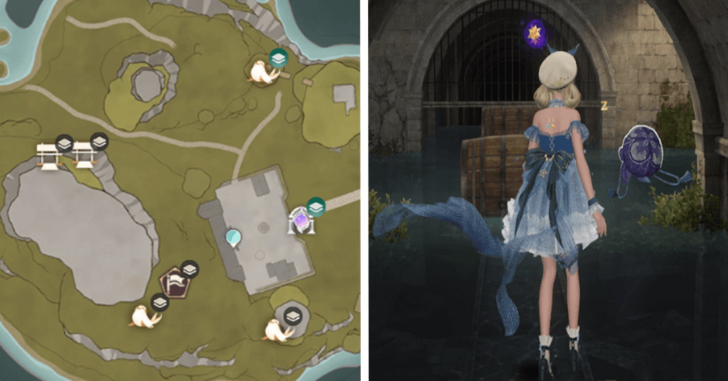 |
Follow the barrels in the sewers to locate these dews. |
| 28-29 | 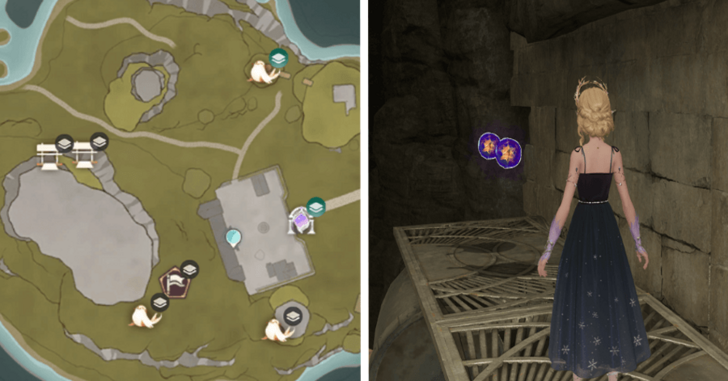 |
From the barrels, jump over to the floor and walk up until you found the railings from where you came earlier. |
| 30-31 |  |
Jump over to the huge barrels to locate these dews. |
| 32-33 |  |
North of the Market of Mirth Summit Path Warp Spire. On the wooden dock above. |
| 34-36 | 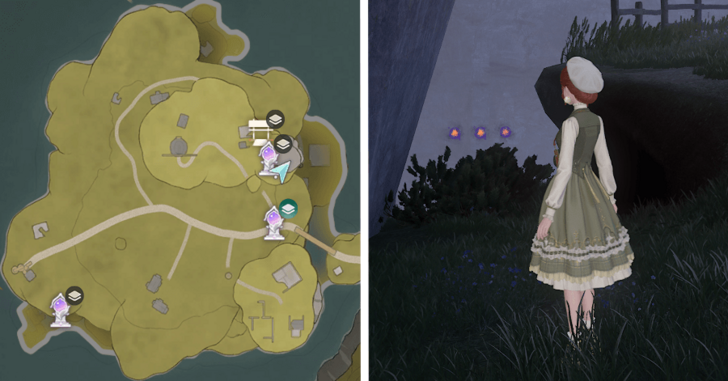 |
In between two stonetrees. North of the Beside the Golden Fields Warp Spire. |
| 37-38 |  |
On top of a curio domain. A floor lower. South of the Beside the Golden Fields Warp Spire. |
| 39-41 | 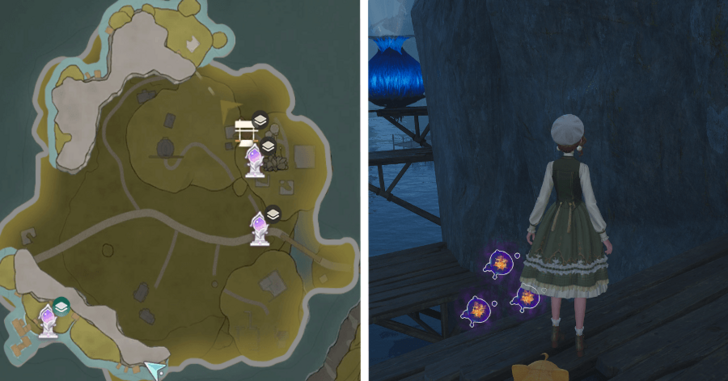 |
On the wooden stairs on the side of the island behind the big blue flower. |
| 42-43 | 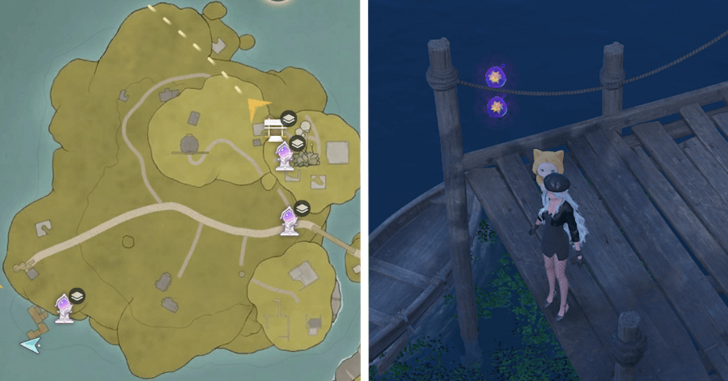 |
Southwest of the Golden Fields Old Dock Warp Spire, below the dock, next to a boat. |
| 44-45 |  |
In between a stonetree and a haystack. |
| 46-47 | 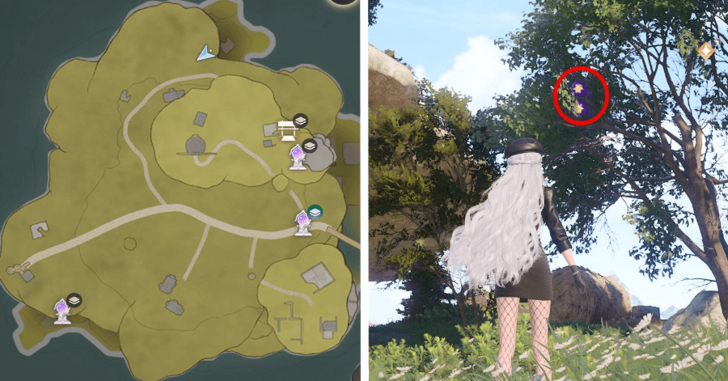 |
On top of a tree, near a few haystacks. |
| 48-49 | 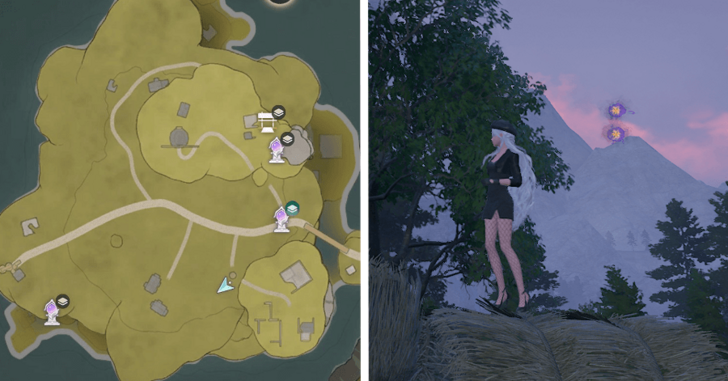 |
Southwest from the Beside the Golden Fields Warp Spire. Near a bunch full of haystack. |
| 50-52 |  |
On the roof of the Wine Cellar. |
| 53-55 | 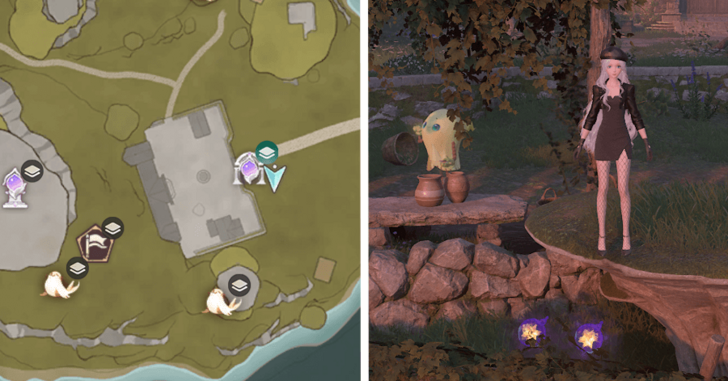 |
In the vineyard just in front of the Beside the Ripple Wine Cellar Warp Spire, under a small stonetree. |
| 56-57 | 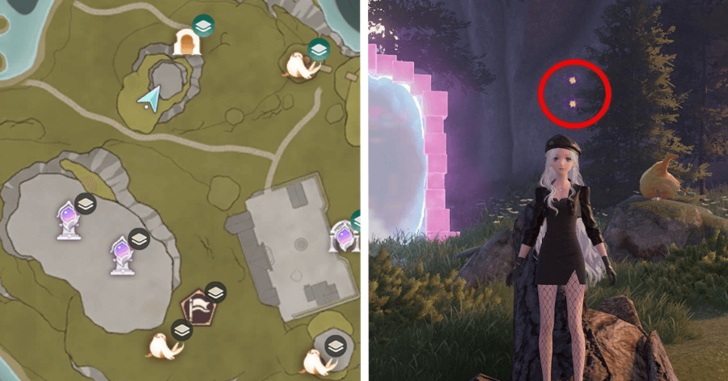 |
Behind the Domain Curio, second floor of a stonetree. |
| 58-60 | 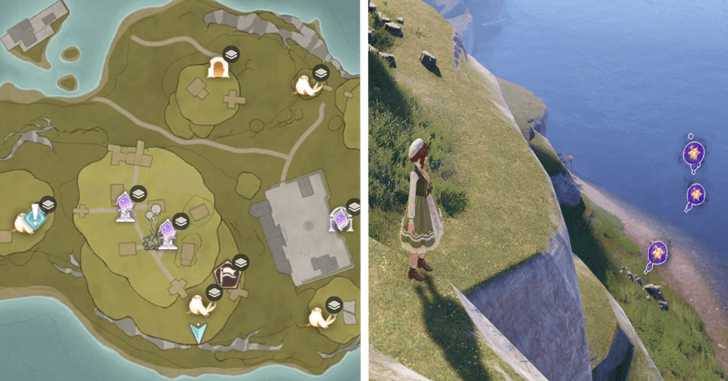 |
South of Barrel Grove Warp Spire, lower level, near the big barrels. |
| 61-62 | 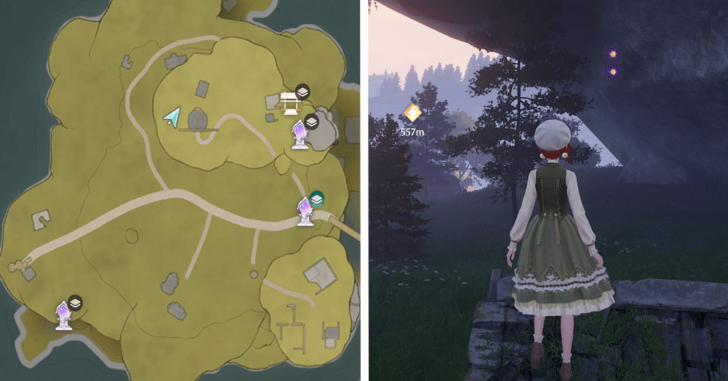 |
Floor below the windmill. |
| 63-64 | 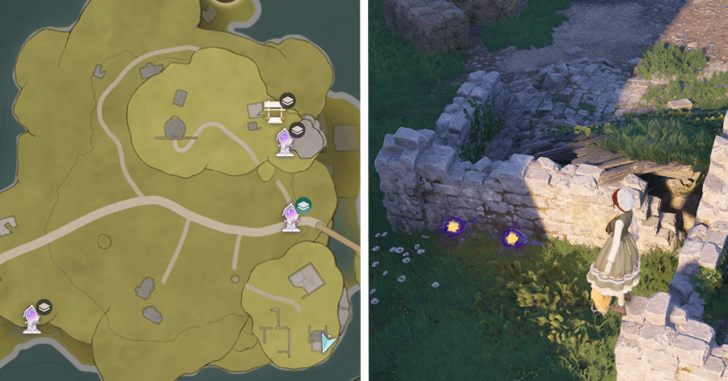 |
Behind the broken house. |
| 65-66 | 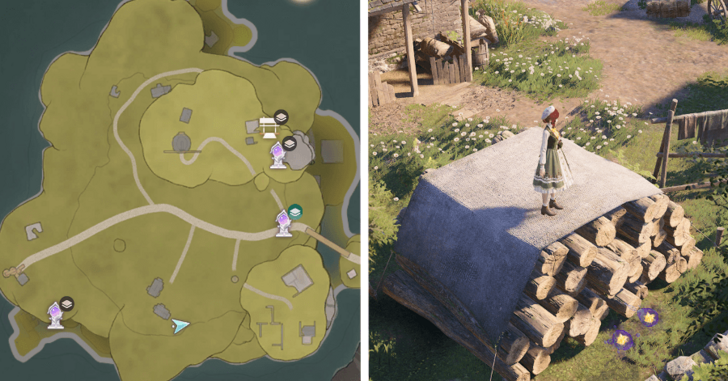 |
Near the two withered house. Behind the logs. |
| 67-69 | 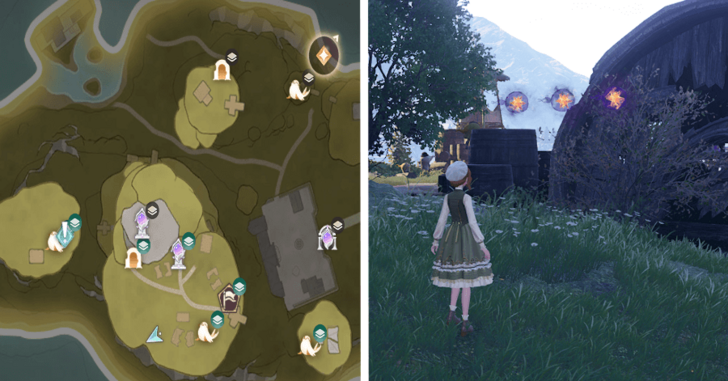 |
Behind the broken barrel house in front of the Catapult Seal. |
| 70-71 | 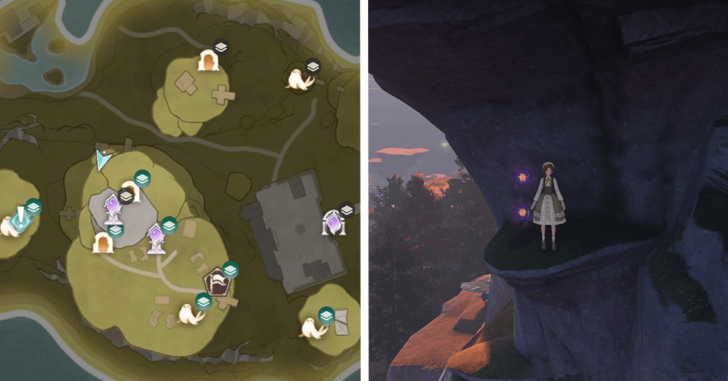 |
In front of the leaf trampoline. |
| 72-73 |  |
On the roof of the small house in front of the Wine Cellar. |
| 74-76 | 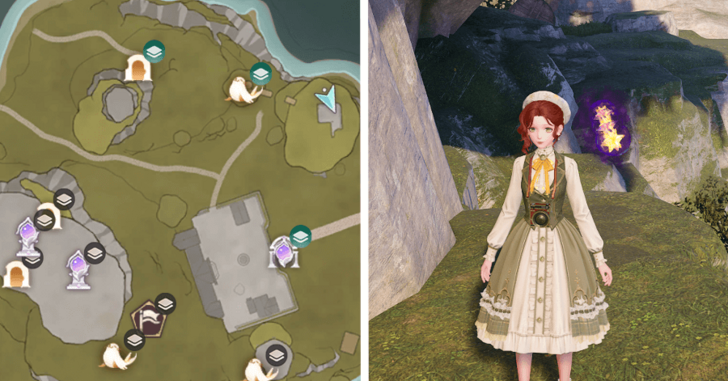 |
East from the broken wooden bridge, on a cliff. |
| 77-78 | 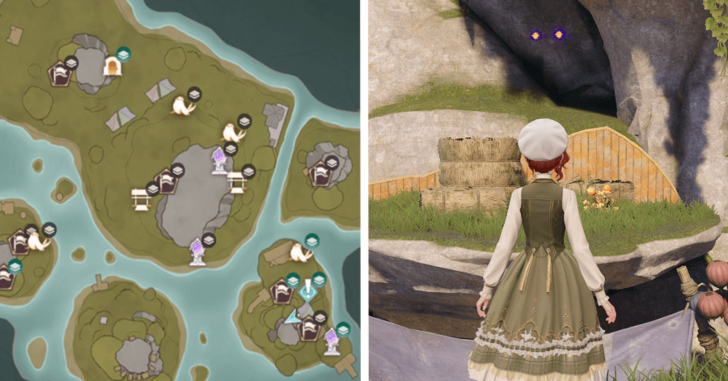 |
Beside the sunshade canopy, below the mini stonetree. |
| 79-81 | 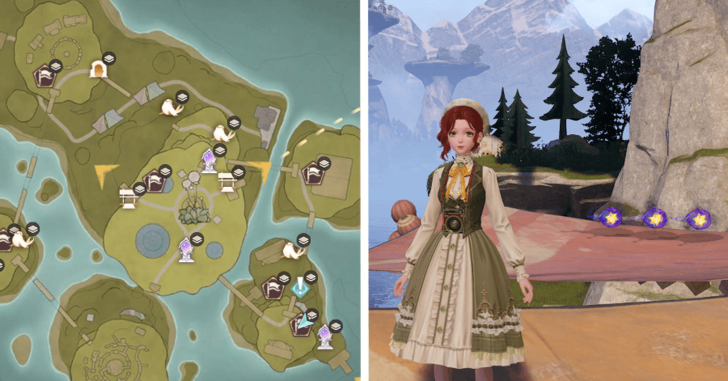 |
Above the sunshade canopy. |
| 82-83 | 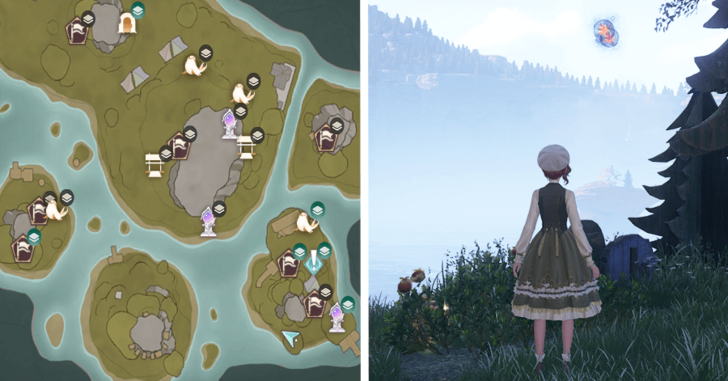 |
On top of the stonetree next to the prop tree. |
| 84-86 | 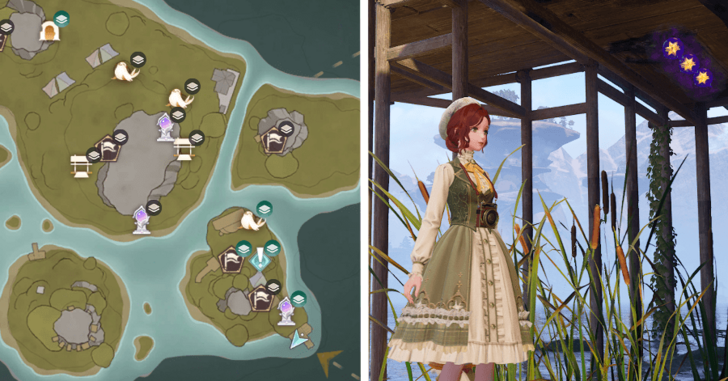 |
North of the Market of Mirth Warp Spire. Under the dock. |
| 87-89 | 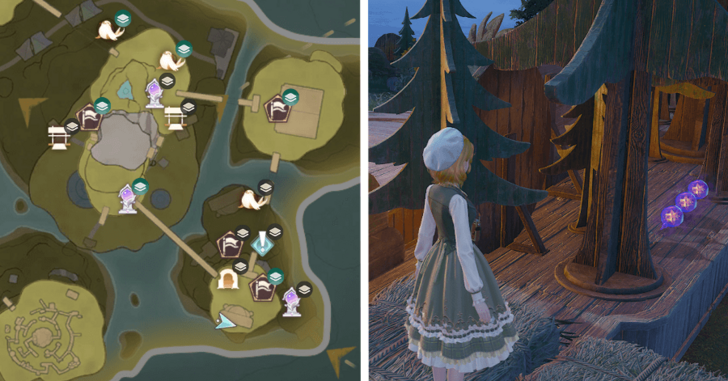 |
Behind the set. Highest level of this stonetree. |
| 90-91 | 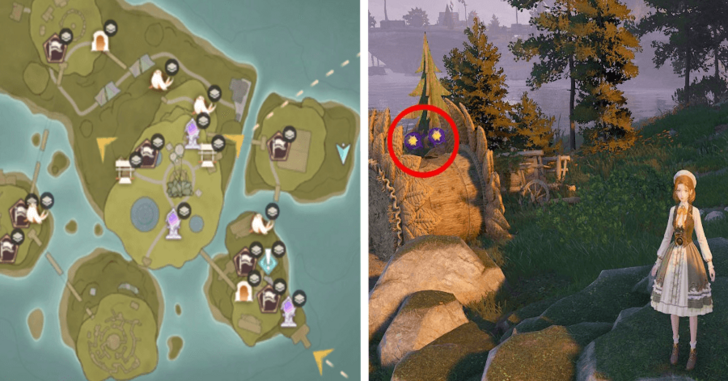 |
Near the lake. Sitting on the sunflower-adorned haystack, in front of the Curio Domain. |
| 92-95 |  |
Just below the cliff of the lower level of the stonetree. |
| 96-97 |  |
In between the bouncy balloons hanging in the air. |
| 98-99 | 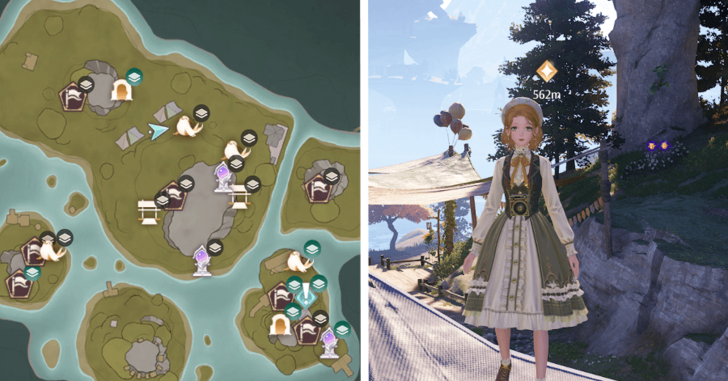 |
In between the sunshade canopy. |
| 100-101 | 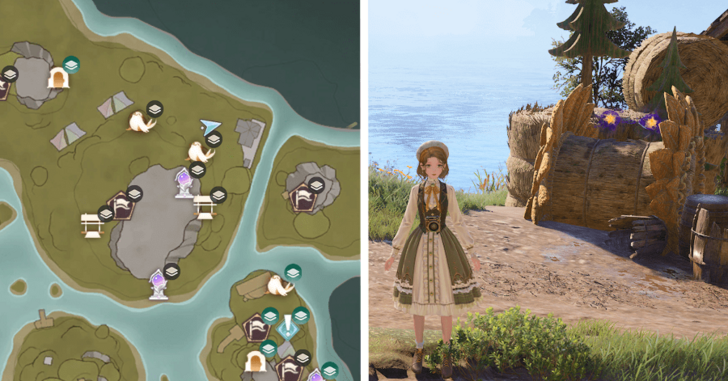 |
Sitting on the sunflower-adorned haystack. |
| 102-103 | 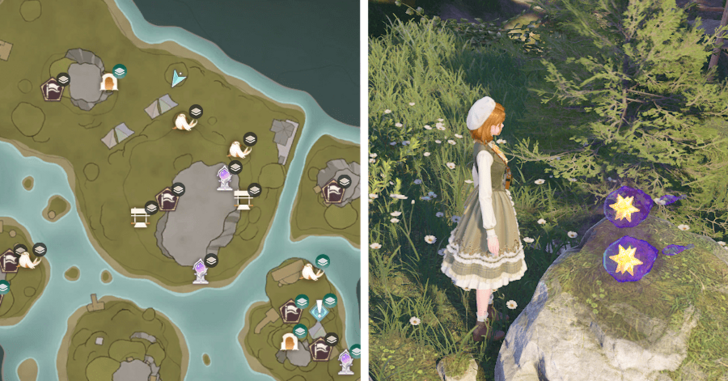 |
On a rock on top of a stonetree near the sunshade canopy. |
| 104-107 | 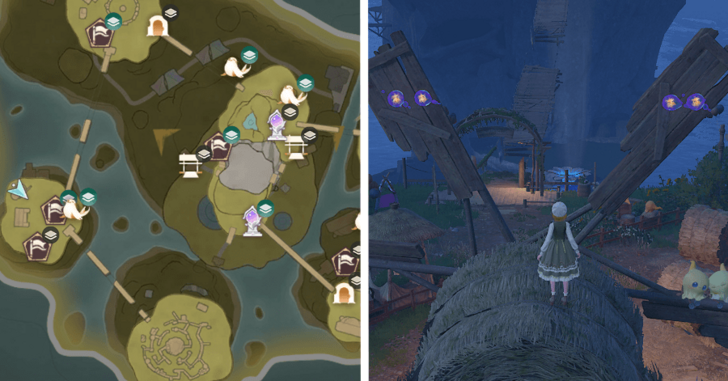 |
On a stonetree, on top the windmill. |
| 108-110 | 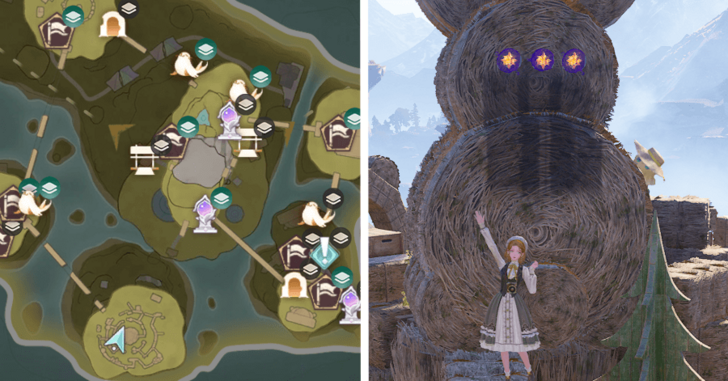 |
In the middle of the haystack maze. |
| 111-112 | 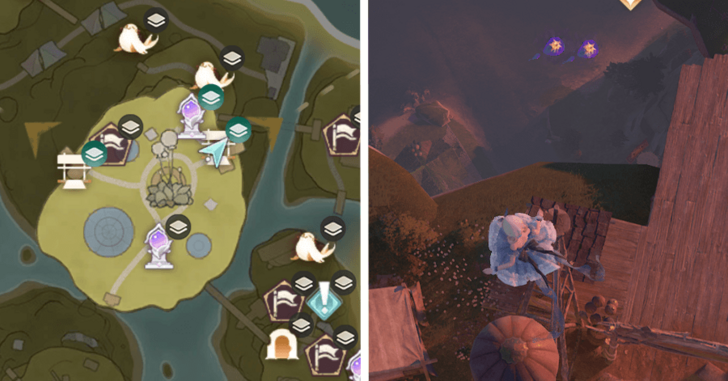 |
Floating near the edge of the stonetree, ump into the trampoline balloon to obtain these. |
| 113-115 | 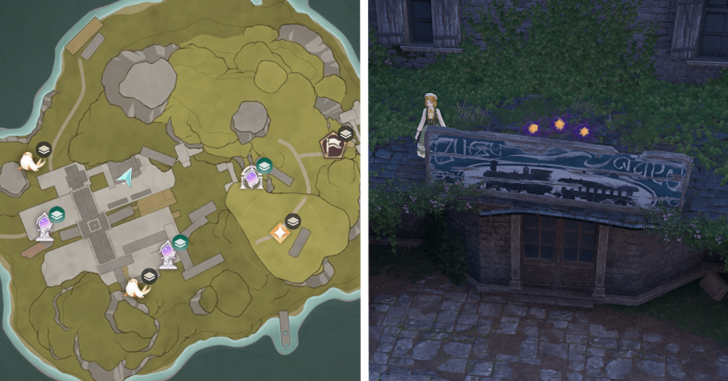 |
Behind the wooden signage on the roof on one of the houses, in front of the waiting platform. |
| 116-118 | 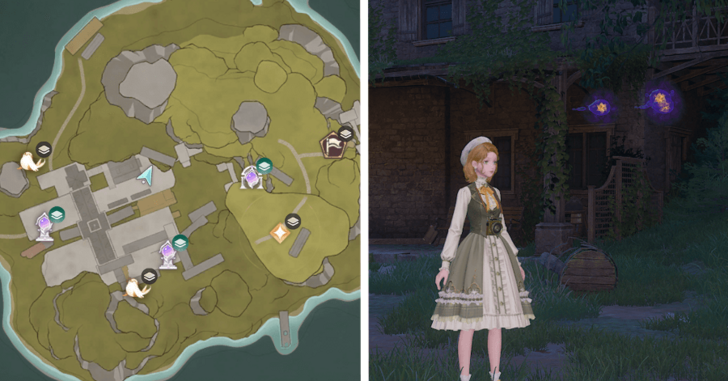 |
Under the tree, next to the house with board sinage and in front of the waiting platform. |
| 119-120 | 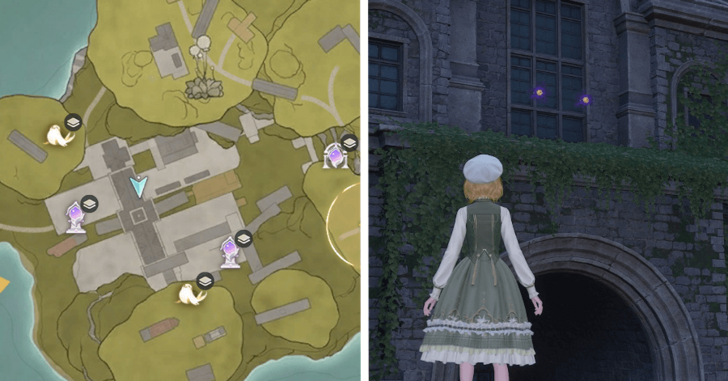 |
In front of the huge window of the station. Overlooking the waiting platform. |
| 121-123 | 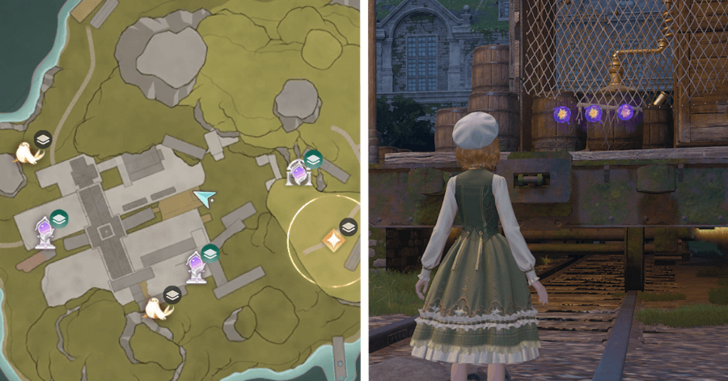 |
Behind the broken down train. |
| 124-125 | 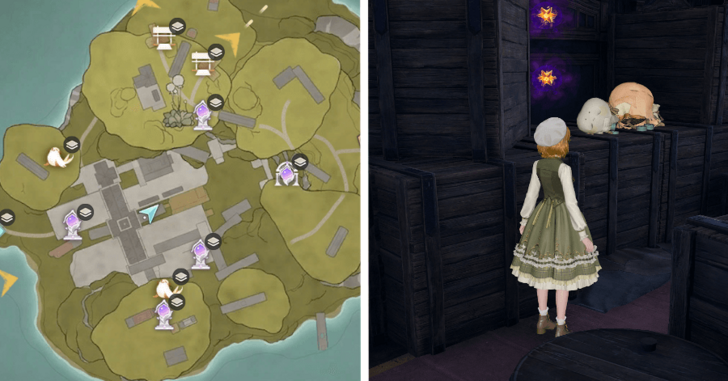 |
Inside the broken train. |
| 126-129 | 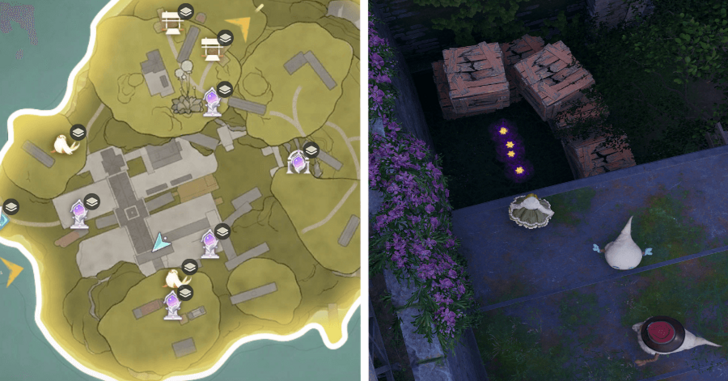 |
Near the locked entrance of the station. |
| 130-132 |  |
Floating in the air, near the hanging wooden planks. |
| 133-135 | 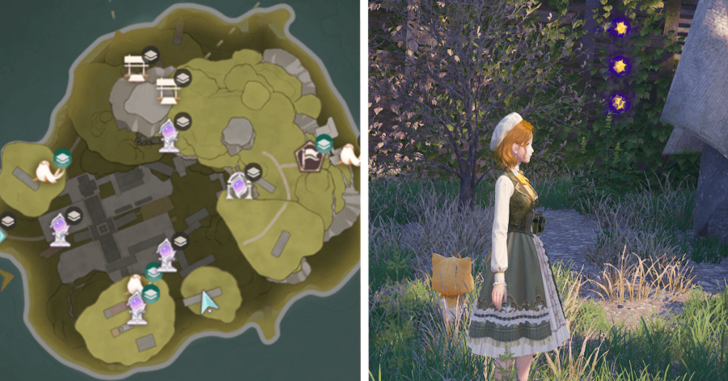 |
Behind the broken train. A level higher in the stonetree. |
| 136-137 | 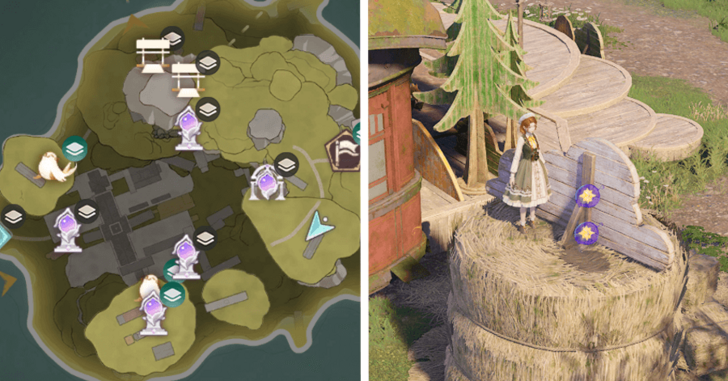 |
Behind a small wooden prop clouds on top of a haystack beside the train. |
| 138-140 | 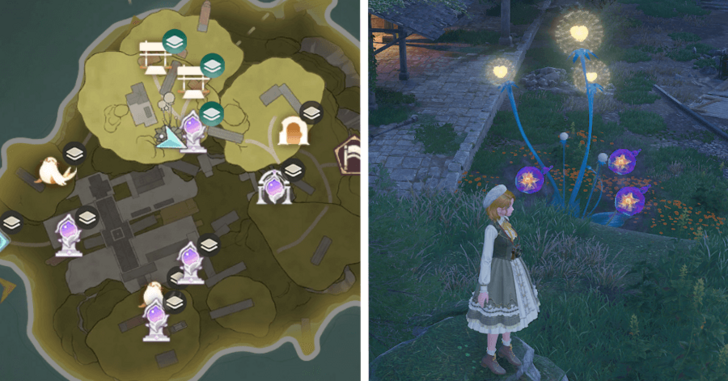 |
West of the Choo-Choo Station Stonetree Top Warp Spire. On top of a small stonetree. |
| 141-143 |  |
East of the Choo-Choo Station Stonetree Top Warp Spire Under a stonetree next to a falling train. |
| 144-147 | 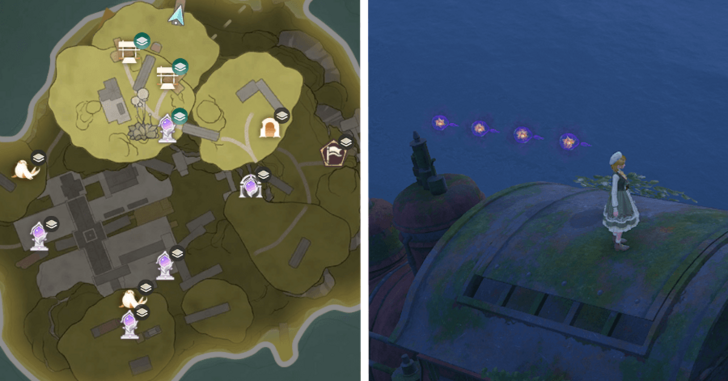 |
On top of the falling engine of a train. |
| 148-150 | 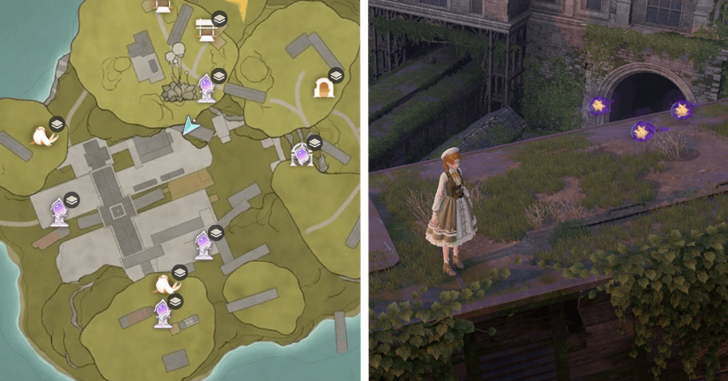 |
North of the Choo-Choo Station Shipping Center. On top of a floating train. |
| 151-153 |  |
Northeast of the Choo-Choo Station Shipping Center, behind the stacked up trains. |
| 154-157 | 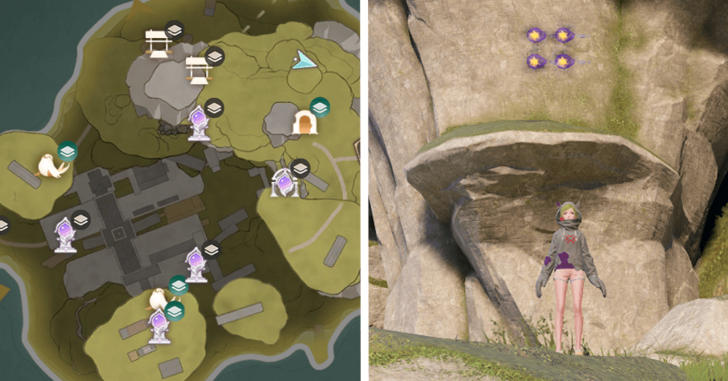 |
A floor below Choo-Choo Station Stonetree Top Warp Spire. Below the stonetree. |
| 158-160 | 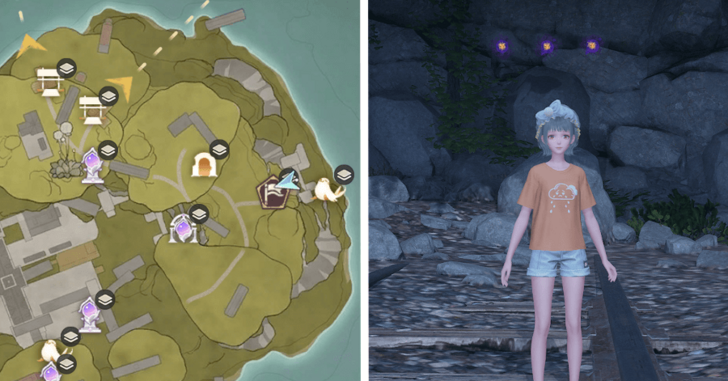 |
On the very back of an island. Near the lake. |
| 161-162 | 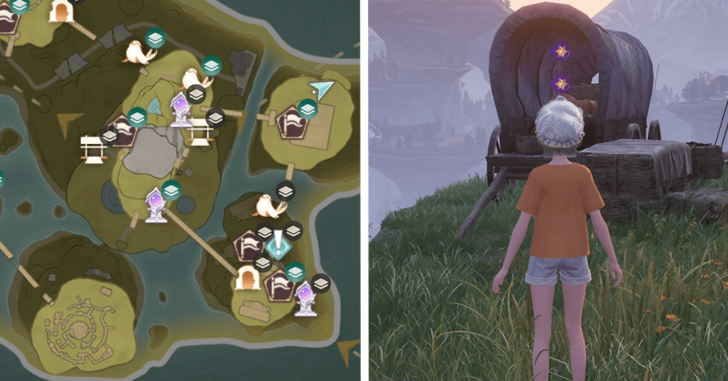 |
Inside the wagon near the edge of the cliff. |
| 163-164 | 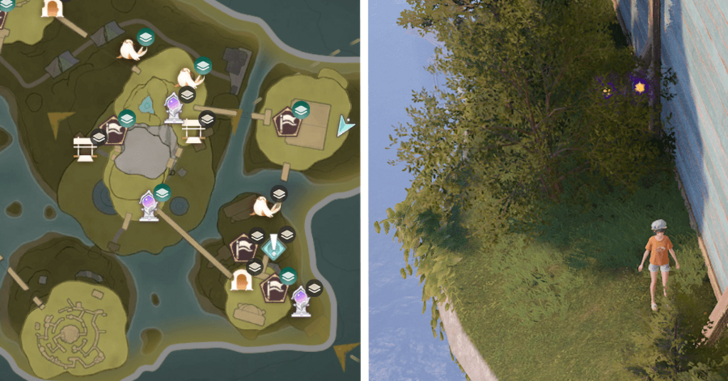 |
Behind the props near the edge of the cliff. |
| 165-166 | 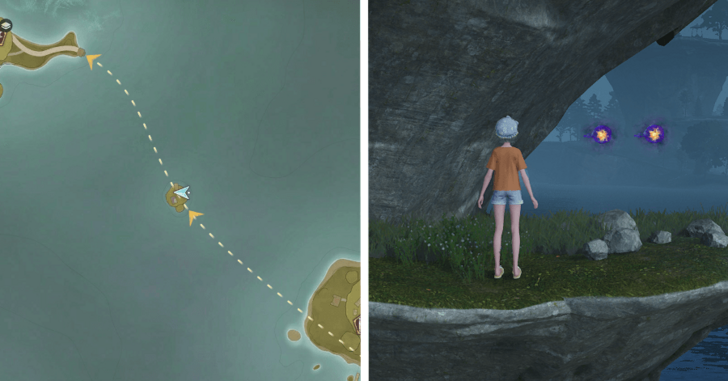 |
A level lower to from the house. |
| 167-168 | 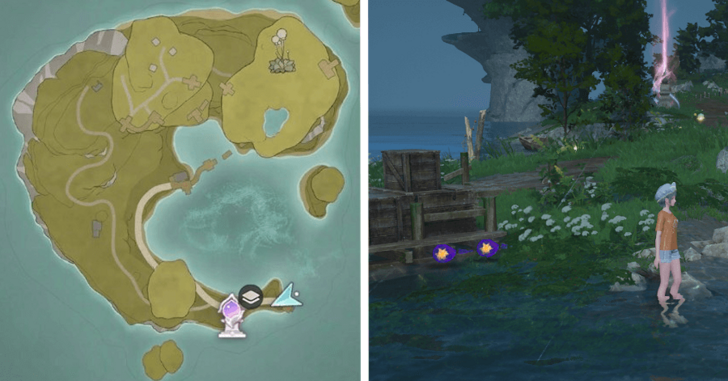 |
East of the Stellar Fishing Ground Trail Warp. On the side of the dock. |
| 169-170 |  |
Next to the Stellar Fishing Ground Trail Warp Spire. |
| 171-173 | 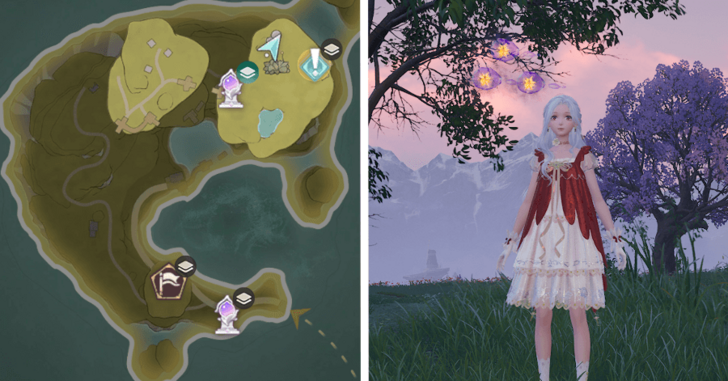 |
Northeast from the Stellar Fishing Ground Peak Warp Spire, next to the tree. |
| 174-175 | 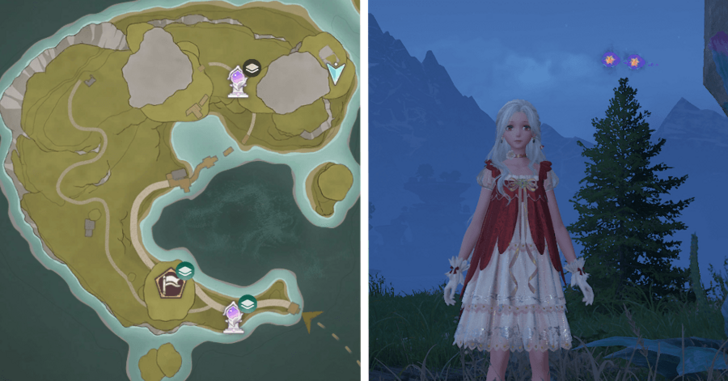 |
A level lower on the stonetree. |
| 176-177 | 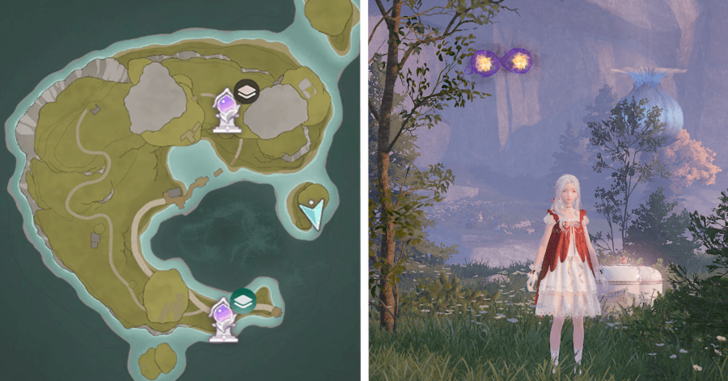 |
On the small island, in between the chest and the tree. |
| 178-179 | 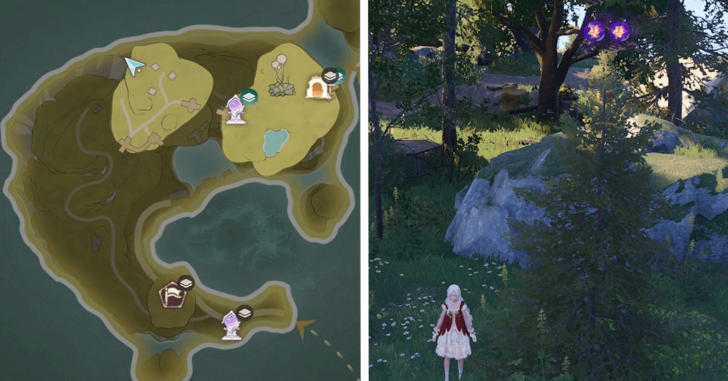 |
Behind the tents. |
| 180-181 | 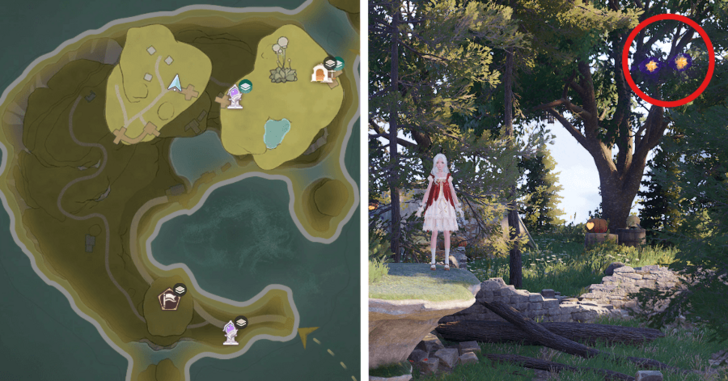 |
In front of the tent, jump up to the stonetree to locate these. |
| 182-183 | 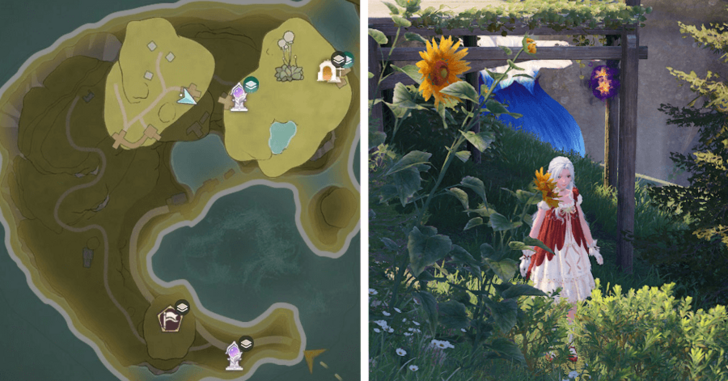 |
In front of the small stonetree. under the dock, near the sunflowers. |
| 184-185 | 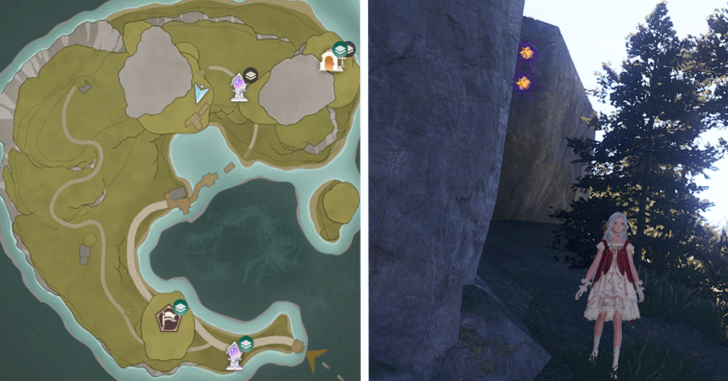 |
A few levels lower in the stonetree island, overlooking the dock below. |
| 186-187 | 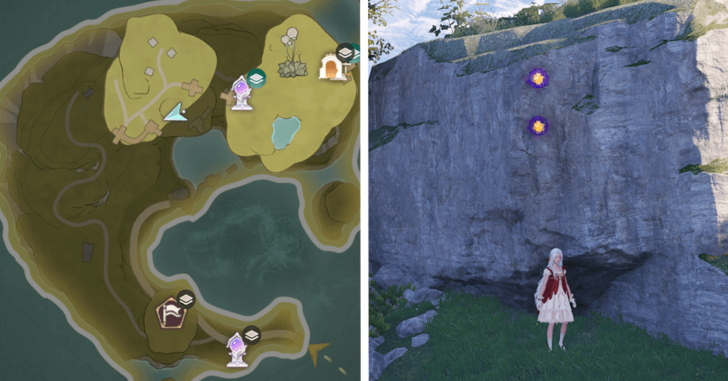 |
Near the cliff, behind the rock which is in between the two docks. |
| 188-190 | 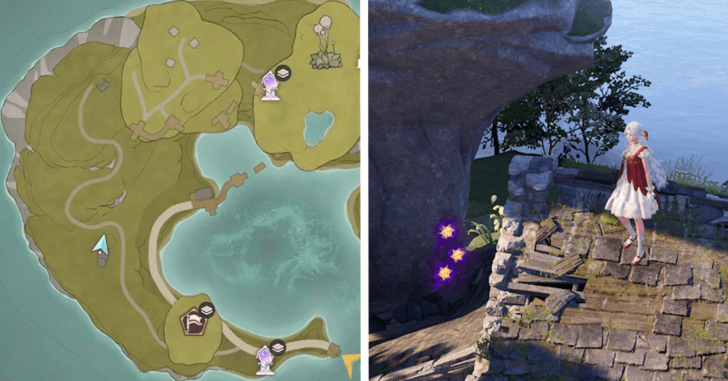 |
In between the small stonetree and abandoned house. |
| 191-192 | 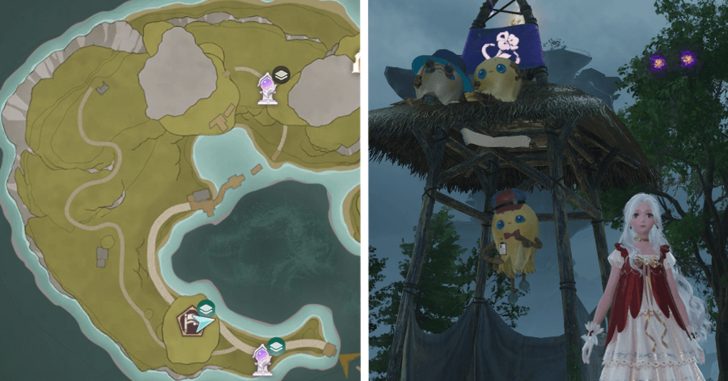 |
Behind the Gliding: Ring Pass Challenge Booth. |
| 193-194 | 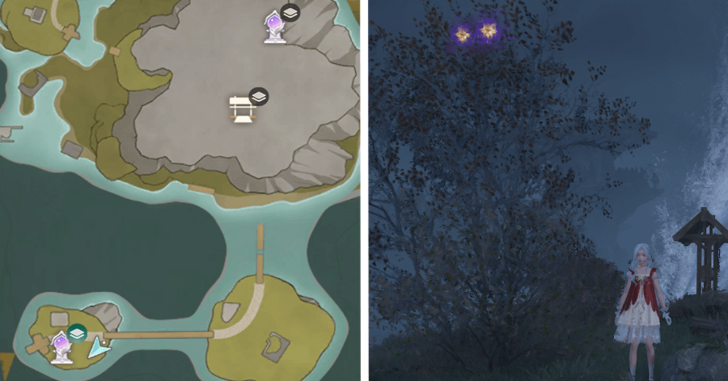 |
Behind the Prosperville Entrance Warp Spire and in front of the hanging bridge. |
| 195-196 | 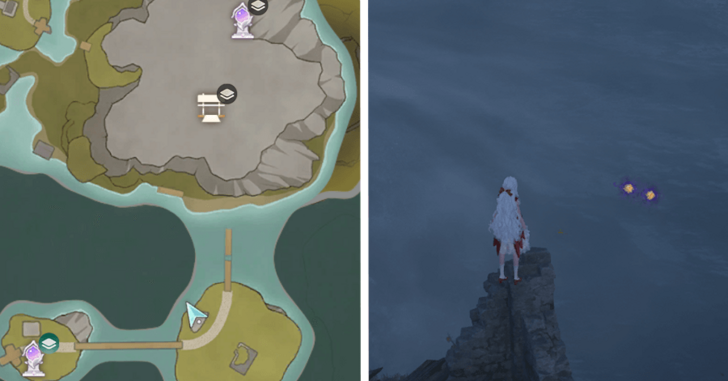 |
Near the cliff and the broken down house. |
| 197-198 | 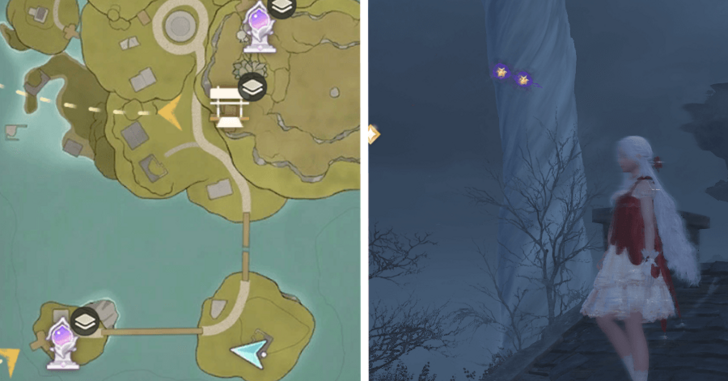 |
On top of the roof of the abandoned house. |
| 199-201 | 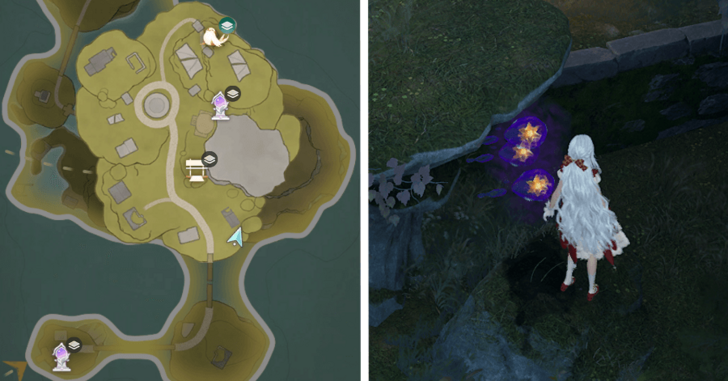 |
In between two stonetrees next to the house. |
| 202-203 | 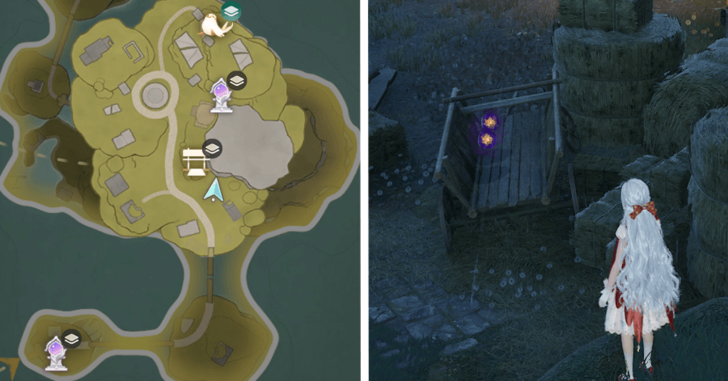 |
In the middle of the haystack, on the wheel borrow. |
| 204-205 | 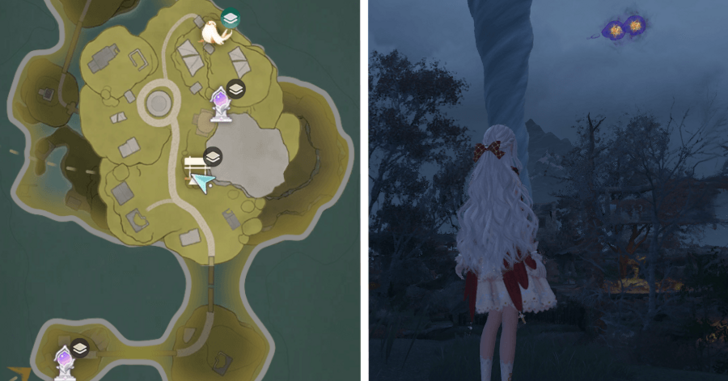 |
Near the archway sign, above the stonetree. |
| 206-208 |  |
Behind the Catapult Seal. |
| 209-211 | 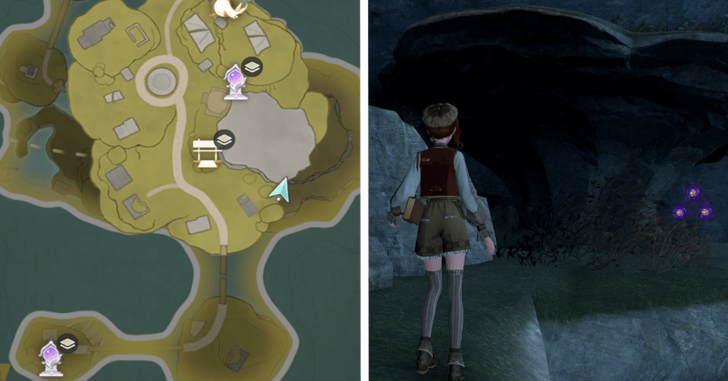 |
Next to a cliff, underneath a small stonetree. |
| 212-213 | 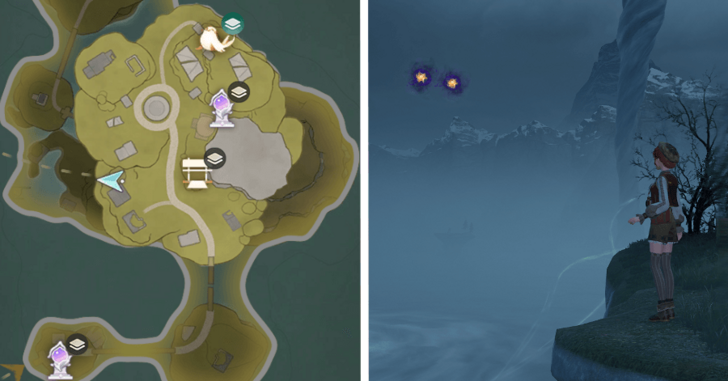 |
Hop on a stonetree in between two brokenhouses to locate these dews. |
| 214-215 | 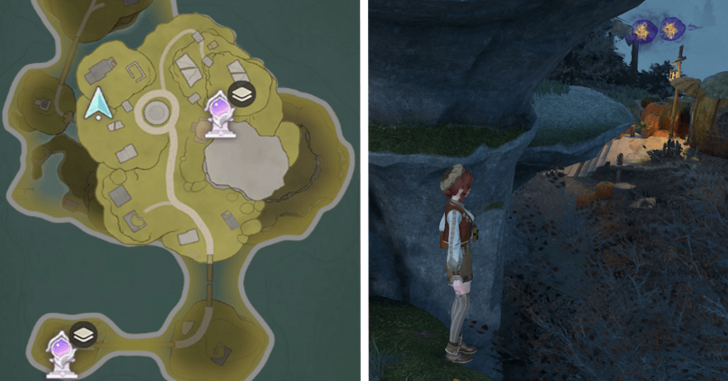 |
Near the pumpkin house, behind the stonetree. |
| 216-217 |  |
Behind the abandoned house, next to a woodpile. |
| 218-221 | 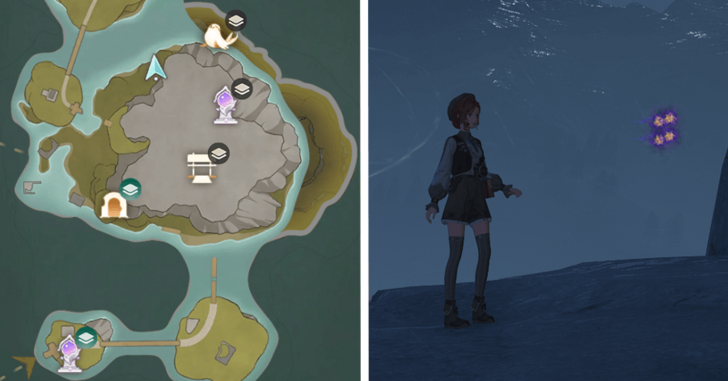 |
Lowest level of the island, across a Stonetree island. |
| 222-224 |  |
On the branches of a dead tree near the house with a huge bear-shaped figure made of a pumpkin and barrels on its roof. |
| 225-226 | 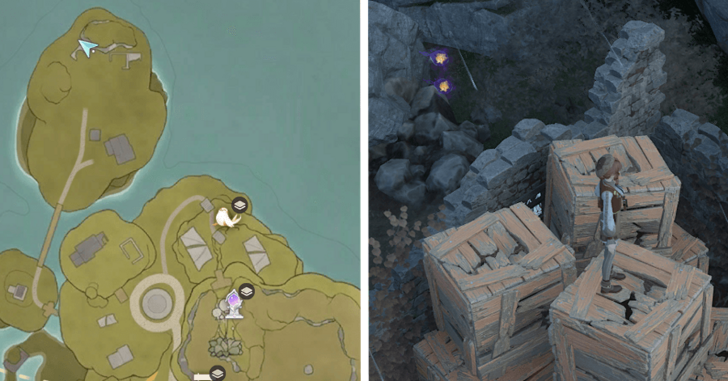 |
Next to a ruined house full of boxes. |
| 227-228 | 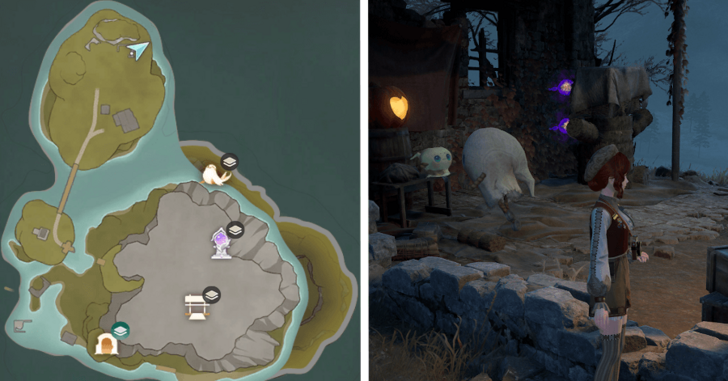 |
Inside a shed, behind a bear-shaped haystack. |
| 229-231 | 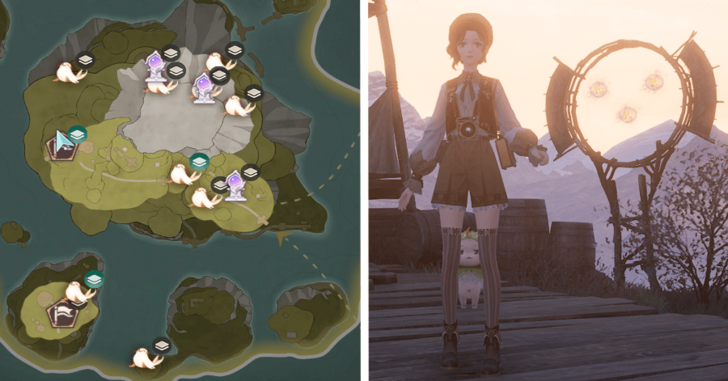 |
Inside a ring behind the Gliding: Ring Pass Challenge Booth |
| 232-234 | 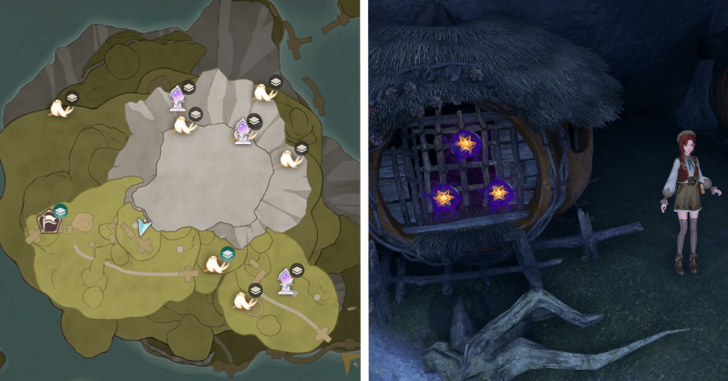 |
In front of one of the pumpkin house in the middle of the stonetree island. You can obtain these des by gliding down the very top of the stonetree. |
| 235-237 | 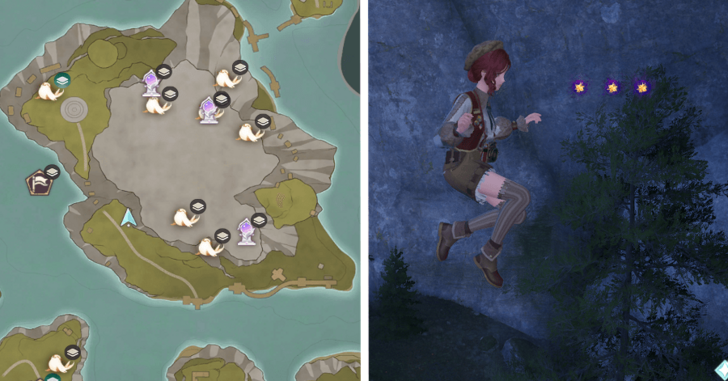 |
On top of a tree, lower level of the stonetree island. Jump unto the leaf trampoline to obtain these dews. |
| 238-239 | 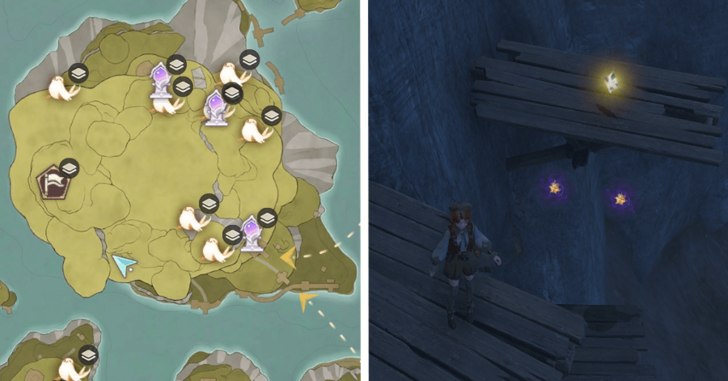 |
On the lower level of the stonetree island , near the sea. located under the wooden stairs. |
| 240-241 | 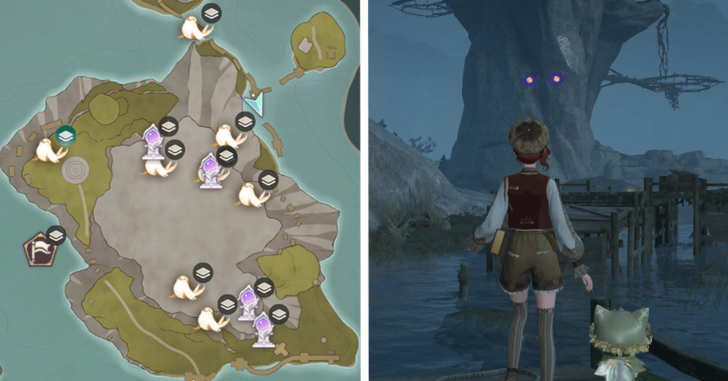 |
Lowest level of the stonetree, on a broken dock. |
| 242-244 | 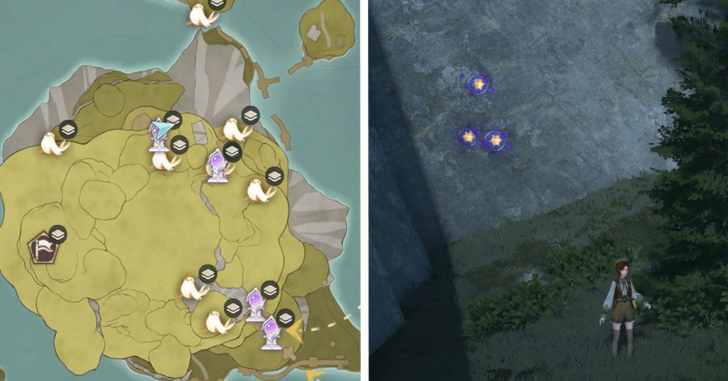 |
Middle level of the stonetree island, near the curio domain. |
| 245-247 | 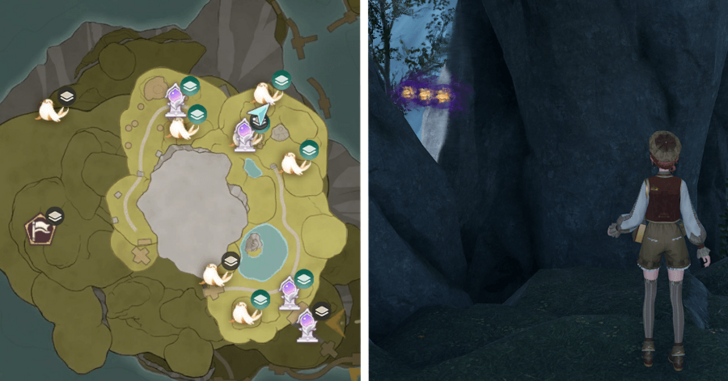 |
East of the Volunteer Corps Jail, in between the stonetrees and underneath the Catapult Seal King. |
| 248-250 | 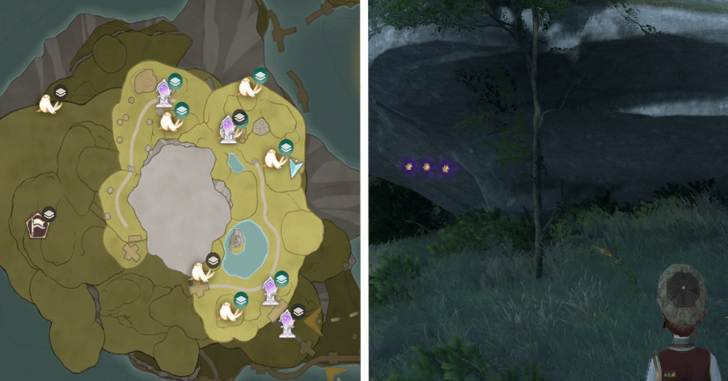 |
Under the Catapult Seal southwest from the Catapult Seal King. |
| 251-253 | 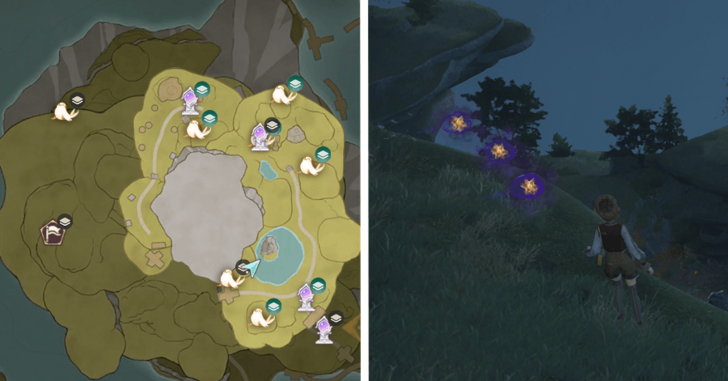 |
In front of the Wishing Well Warp Spire. On a cliff overlooking the bird statue in the middle of a pond. Use a Catapult Seal to get on this cliff. |
| 254-256 | 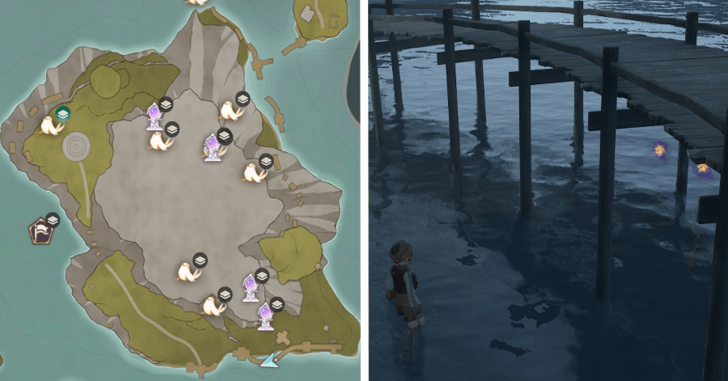 |
Under the long wooden bridge ion the lowest level of the stonetree island. |
| 257-259 | 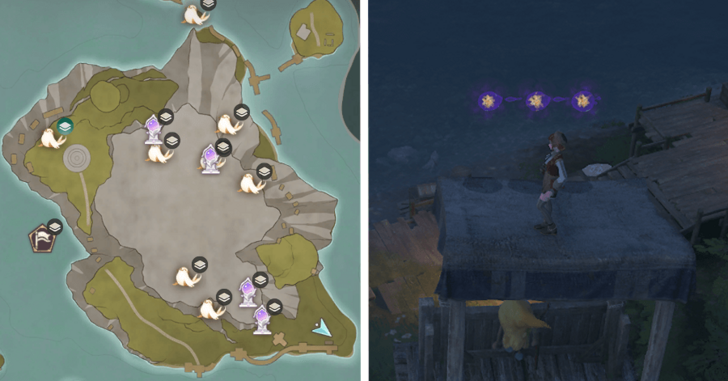 |
On the lowest level of the stonetree island, on top of a watch tower. near the wooden dock. Jump from a highest point of the stonetree island to obtain these dews. |
| 260-262 | 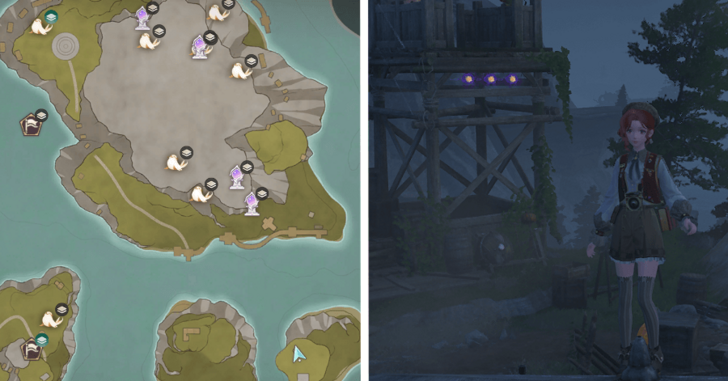 |
Top of the stonetree island. Next to a watch tower. |
| 263-264 |  |
On the highest level of the stonetree island. Under the wooden shed with stairs. |
| 265-266 | 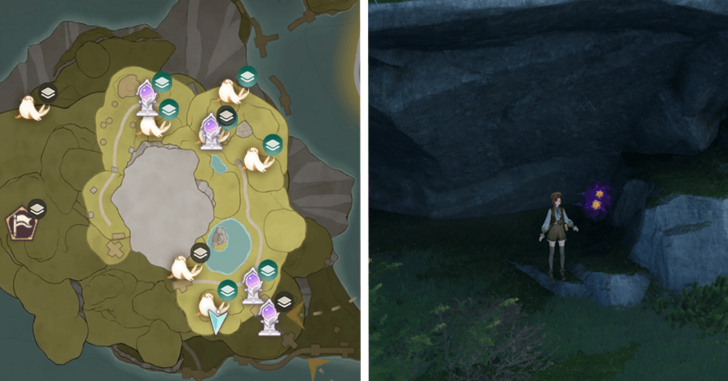 |
Under the Catapult Seal, southwest of the Wishing Well Warp Spire. |
| 267-268 | 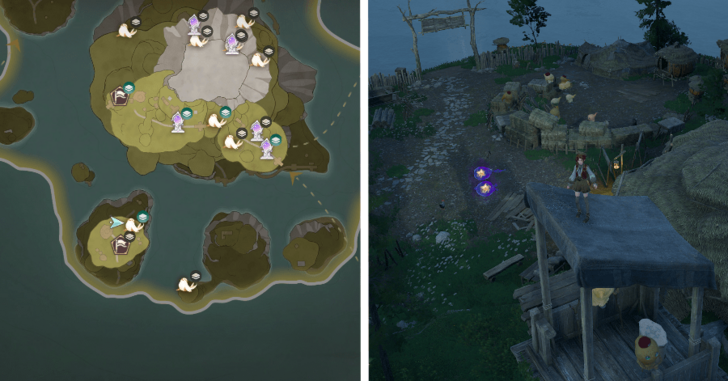 |
On top of a wooden watchtower. |
| 269-270 | 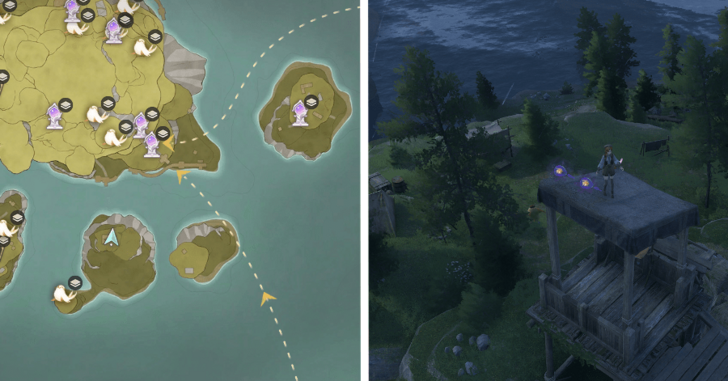 |
On top of a wooden watchtower. |
| 271-272 | 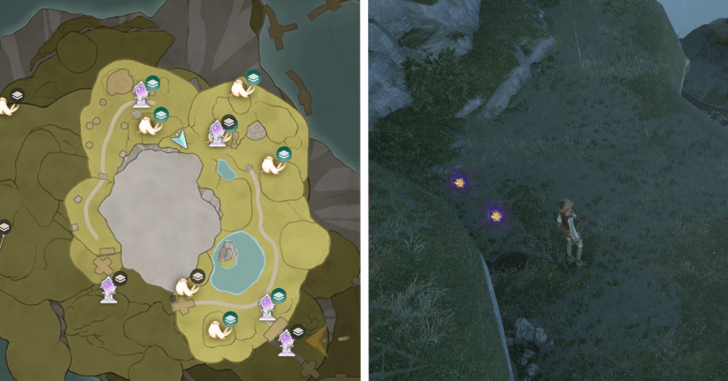 |
From the Volunteer Corps Jail Warp Spire, jump over the Seal Catapult in front to locate these dews. |
| 273-275 | 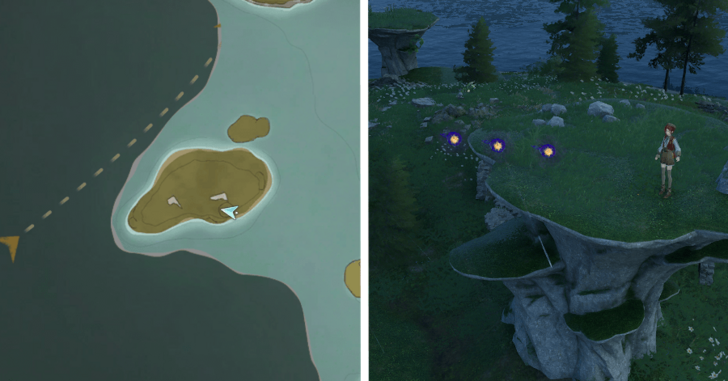 |
On the highest point of the stonetree. |
| 276-278 | 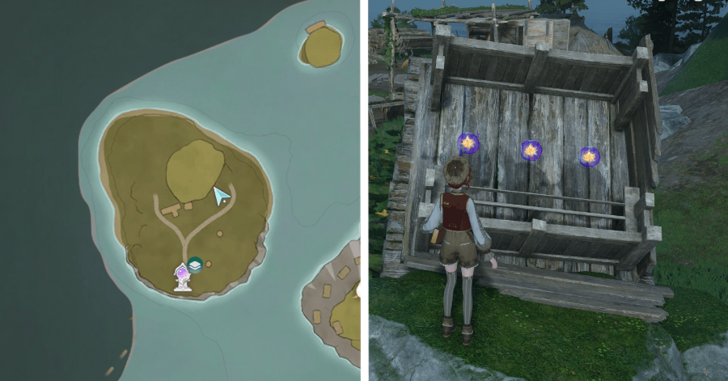 |
On the broken down watch tower. |
| 279-280 | 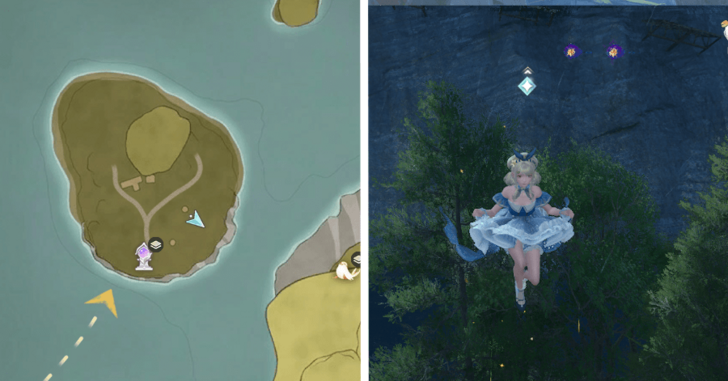 |
On top of a tree, behind one of the pumpkin house with bird trampoline next to it. |
| 281-282 | 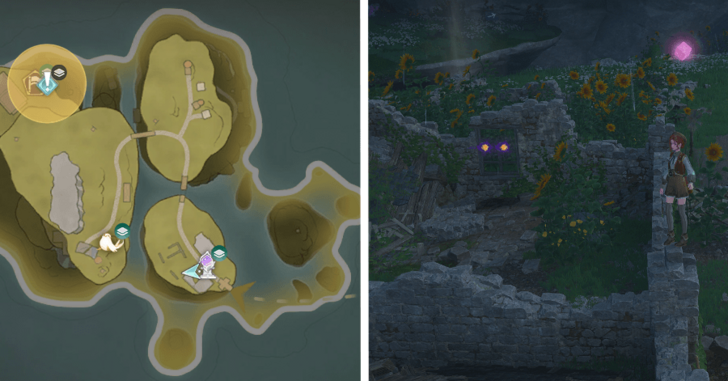 |
On a ruined house next to the Windrider Mill Entrance Warp Spire. |
| 283-284 | 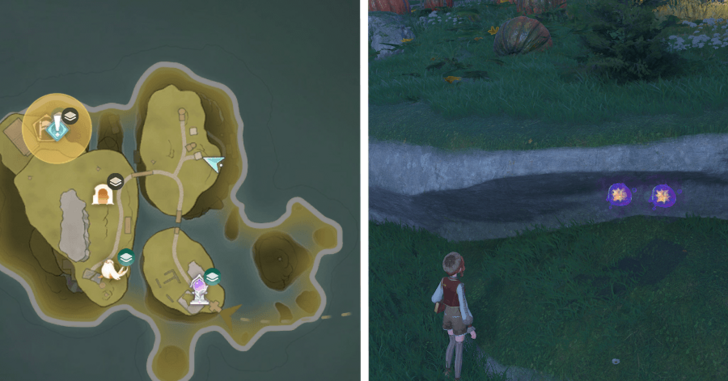 |
Behind the pumpkin patches. |
| 285-286 | 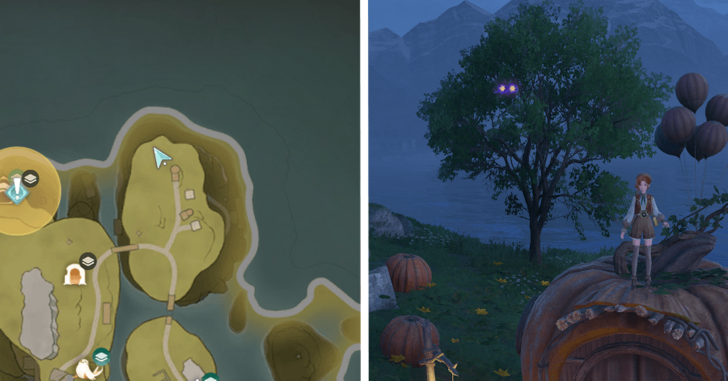 |
On top of a tree, behind the pumpkin house with a balloon on top. |
| 287-288 |  |
On top of the small wooden wind turbine. |
| 289-290 | 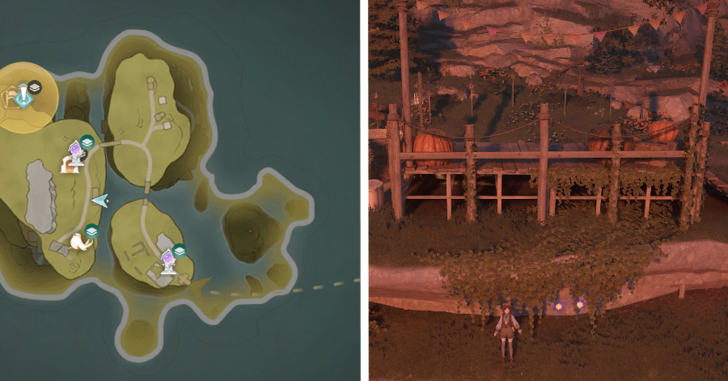 |
On the edge of a cliff behind a small wooden platform. |
| 291-292 | 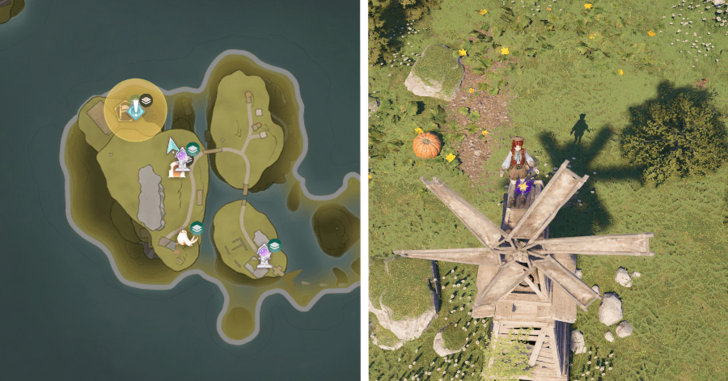 |
On top of the small wooden wind turbine. |
| 293-294 | 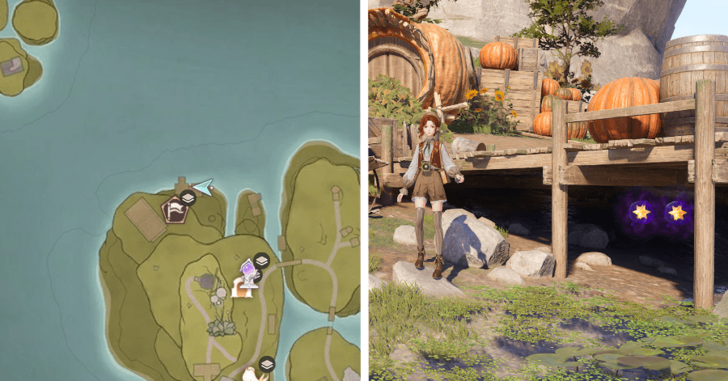 |
Under the dock, lowest level of the stonetree island. |
| 295-296 | 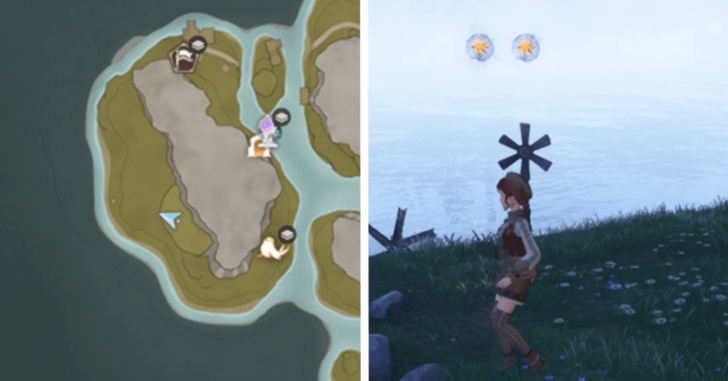 |
On top of a pinwheel on the back of the lower level of the island. |
| 297-299 | 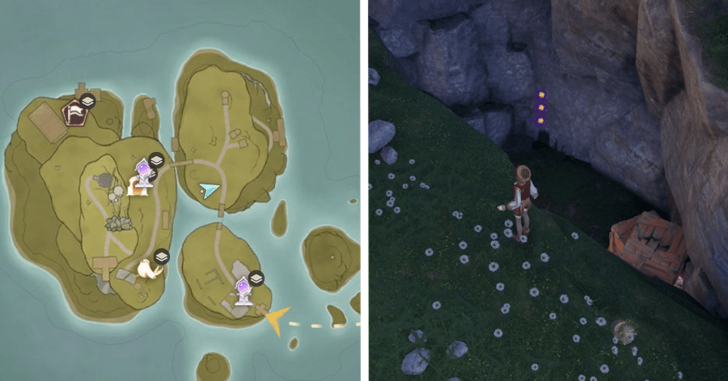 |
Under a cave near the windmill mural. |
| 300-302 | 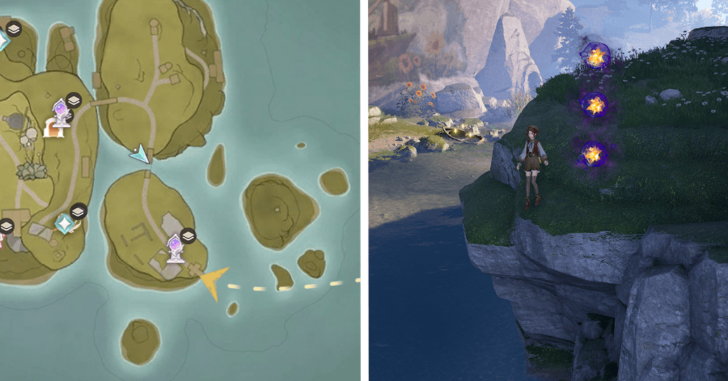 |
Near the windmill mural and next to a cave. |
| 303-304 | 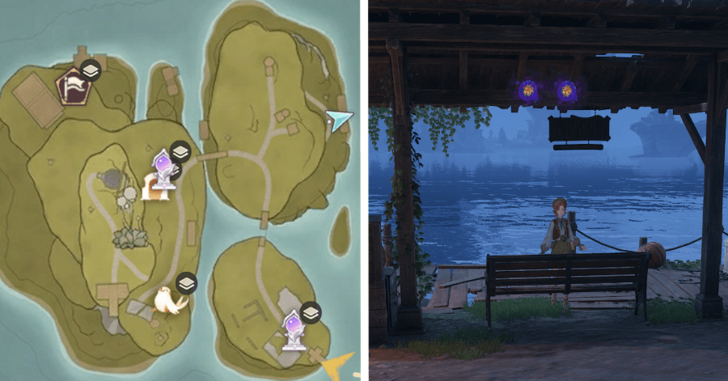 |
Under the shed, lowest level of the stonetree island. |
| 305-306 | 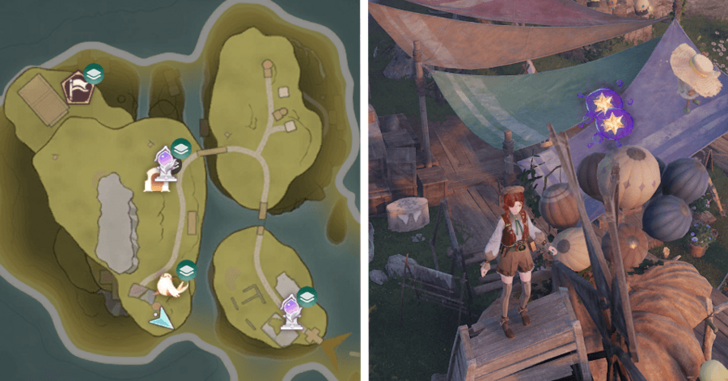 |
On top of a wooden wind turbine near the sunshade canopy. |
| 307-308 | 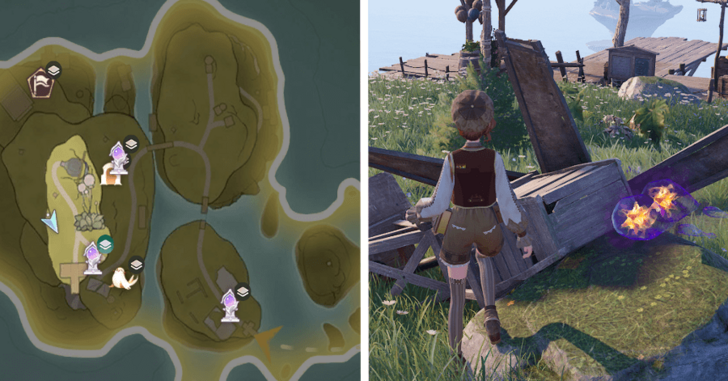 |
On top of the broken down wooden wind turbine, highest level of the stonetree island |
| 309-310 | 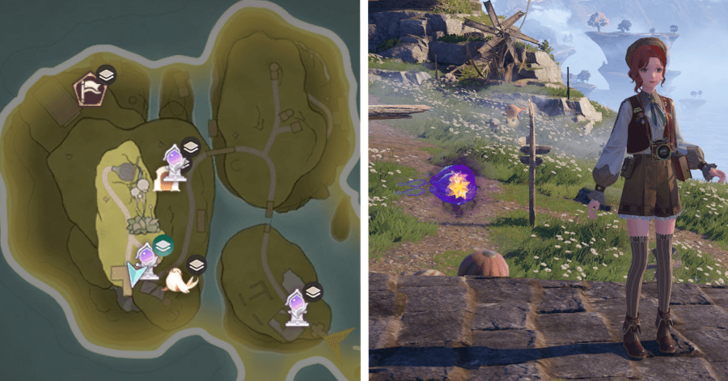 |
On top of the balloons near the Windrider Mill Top Warp Spire. |
| 311-312 | 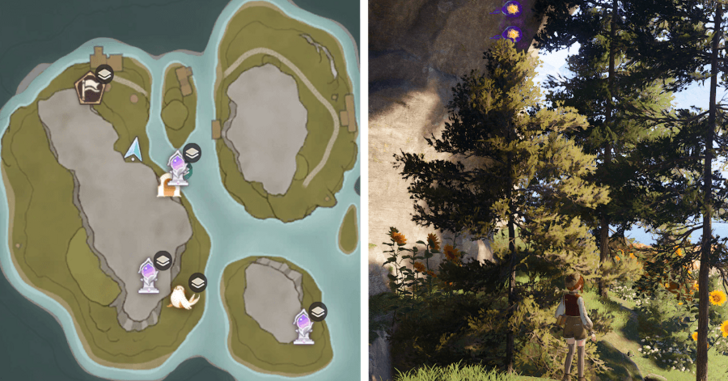 |
On top of a tree near the dock on the lowest level of the stonetree island. |
| 313-314 | 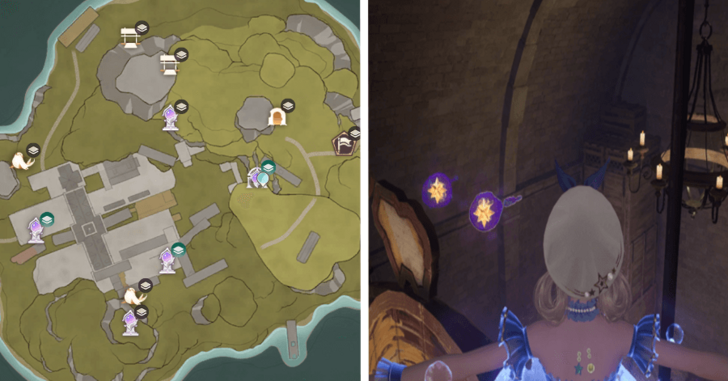 |
Choo-choo train, On top of the archway sign near on the entrance. |
| 315-316 | 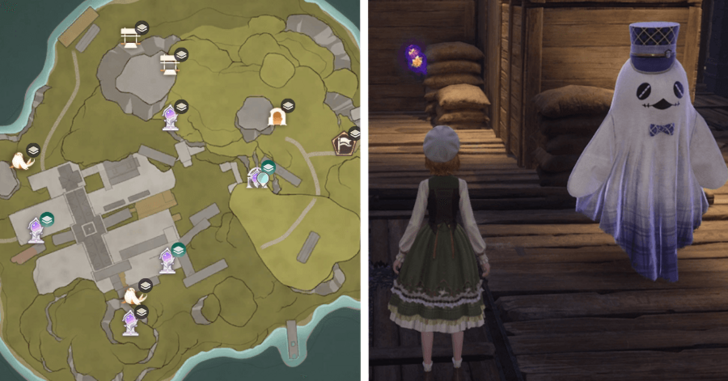 |
Choo-choo train, On the back part of the train behind the boxes. |
| 317-318 | 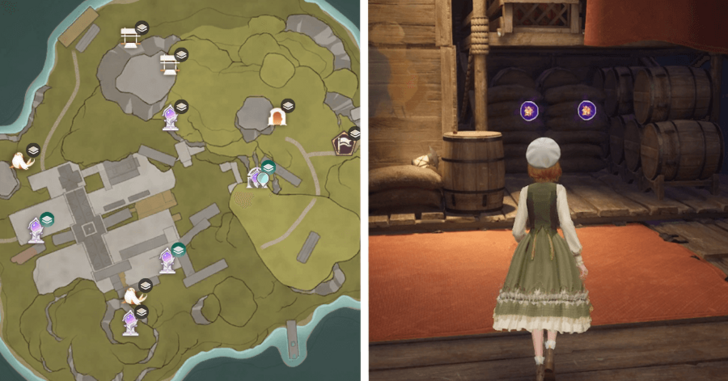 |
Choo-choo train, on the very back of the train, under the boxes, near Boldy-Going Nana. |
| 319-320 | 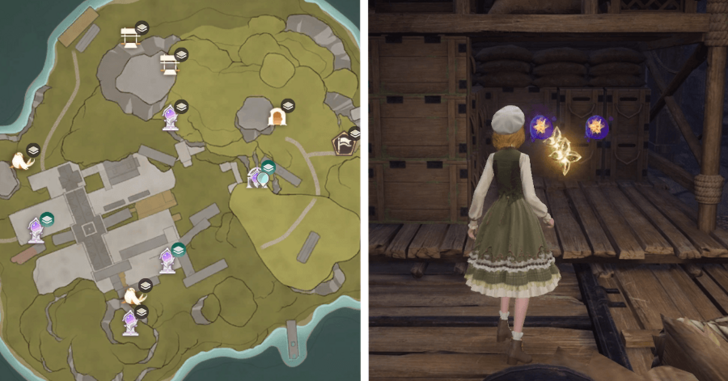 |
Choo-choo train, behind the boxes in front of the Heavy Duty Flatbed Warp. |
| 321-322 | 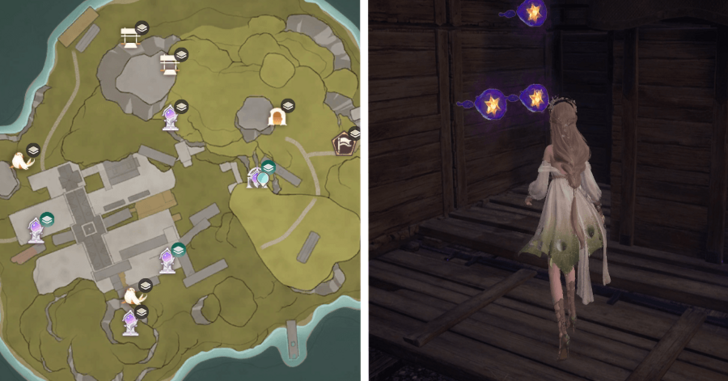 |
Choo-choo train, behind the box where a yellow pop up shows up. |
| 323-324 | 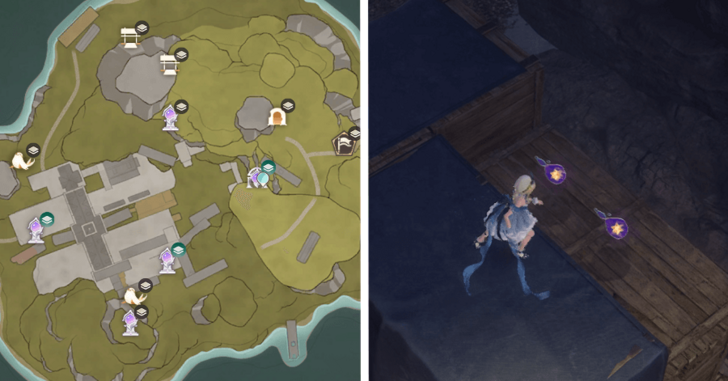 |
Behind the first coach of the Choo-Choo train. |
| 325-326 | 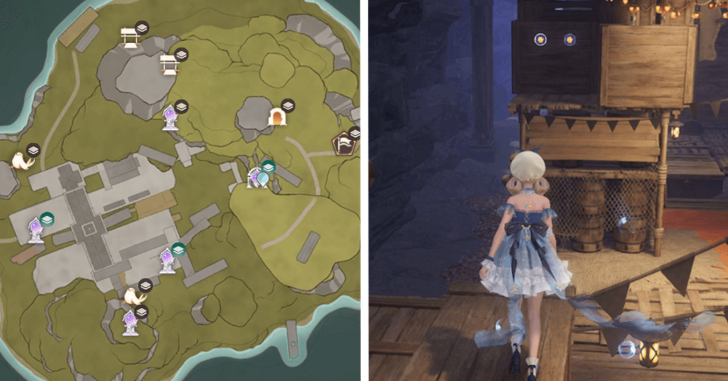 |
Behind the boxes with a wooden platform in between./td> |
| 327-328 | 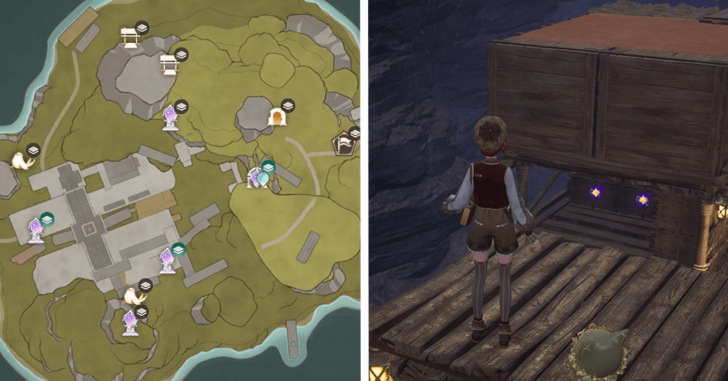 |
They're located between boxes in the area. |
| 329-330 | 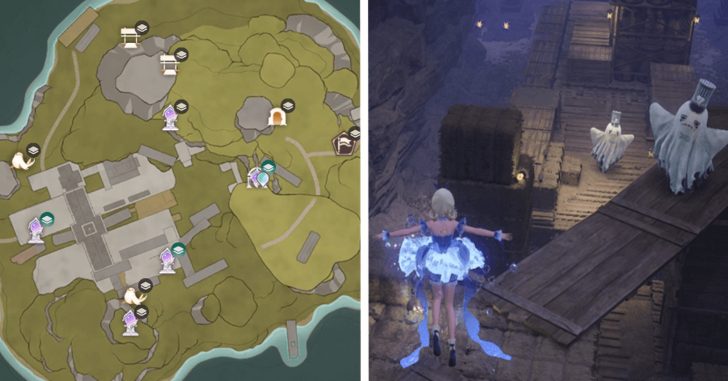 |
On top of the haystacks. |
| 331-332 | 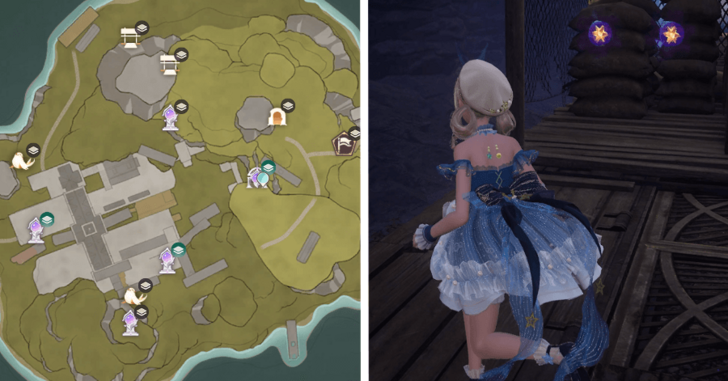 |
Under the boxes with barrels and sacks. |
| 333-334 | 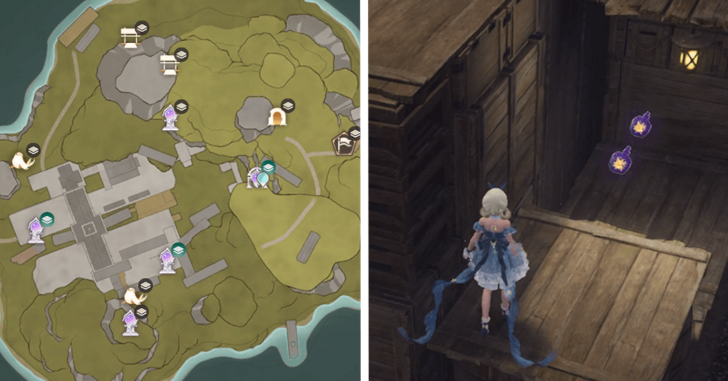 |
Check the huge stacks of boxes before jumping to the Passenger Car section. |
| 335-337 | 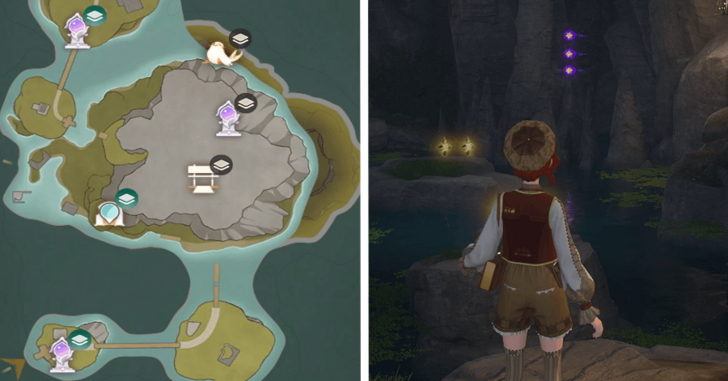 |
Prosperville Cavern - First thing to see upon entering the cavern. |
| 338-340 | 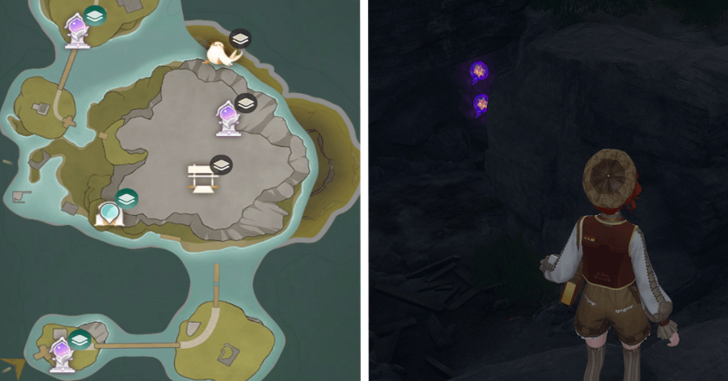 |
Prosperville Cavern - Underneath the rocks. |
| 341-343 | 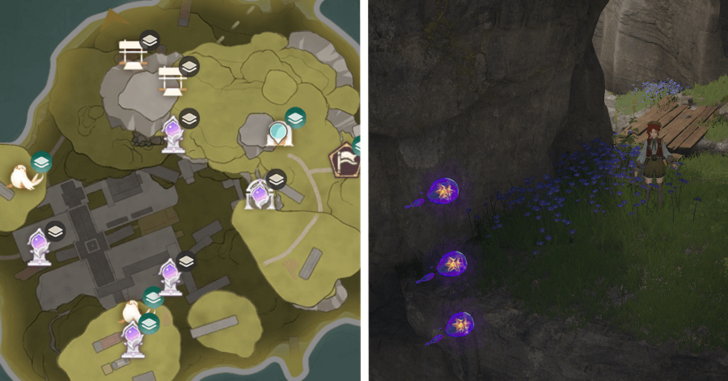 |
Choo-Choo Station Cavern, near the broken wooden plank. |
| 344-345 | 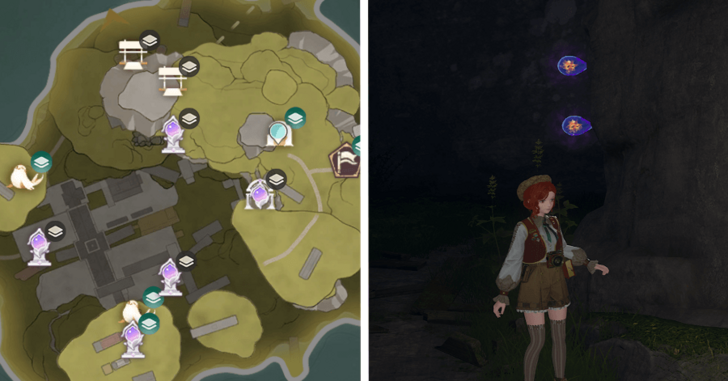 |
On a cave next to the waterfalls. |
| 346-347 | 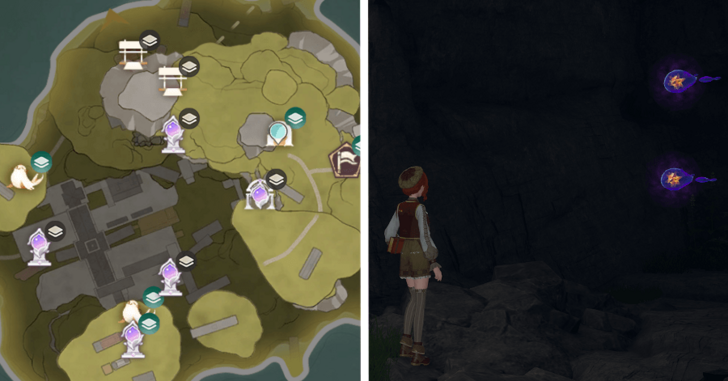 |
In another cave, in front of the waterfalls. |
| 348-349 | 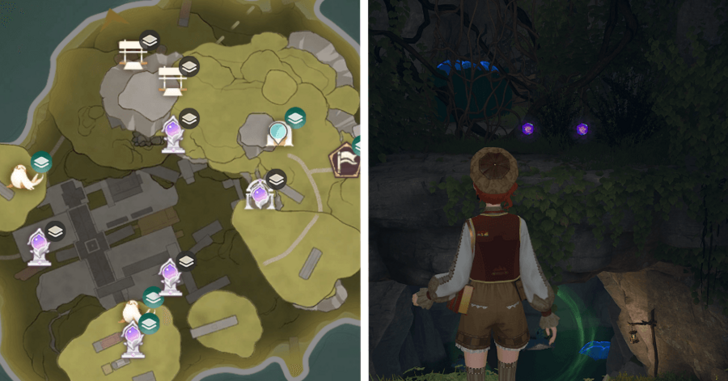 |
Head towards the lower part of the cave. |
| 350-351 | 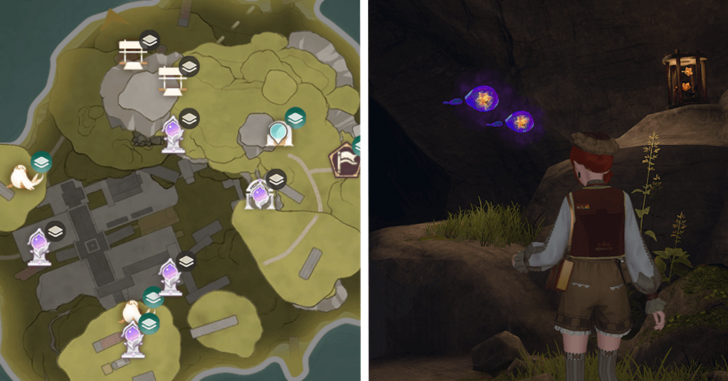 |
Go left after claiming the whimstars to obtain these dews. |
| 352-355 | 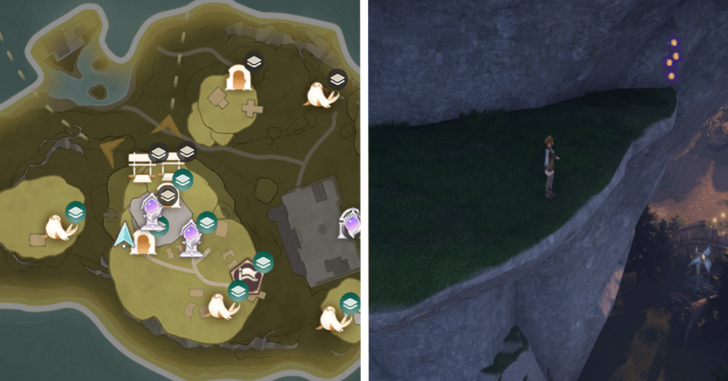 |
One lower level from the Barrel Home. |
| 356-357 |  |
Ripple Estate Cliffside Cavern - On top of the Stone Dew flower. |
| 358-359 | 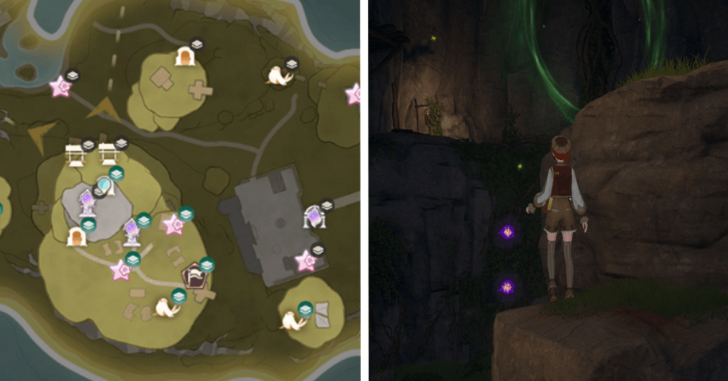 |
Ripple Estate Cliffside Cavern - Above the dews 355-356. |
| 360-362 | 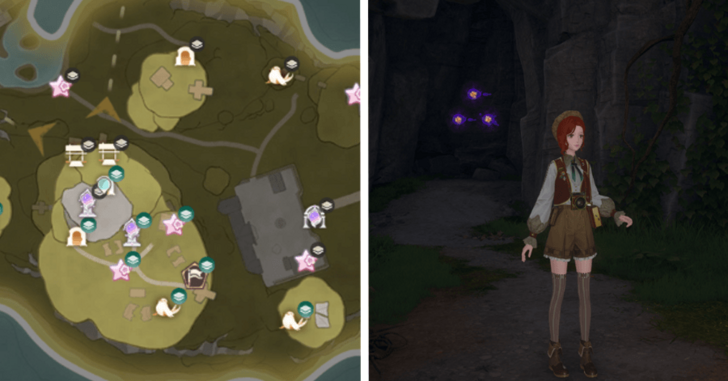 |
Ripple Estate Cliffside Cavern - On the very top of the cavern. |
| 363-364 | 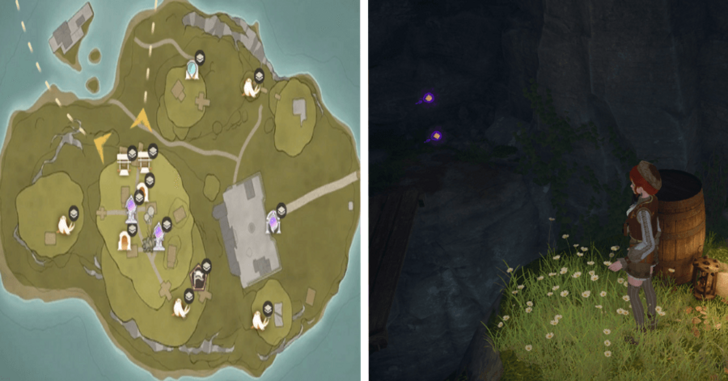 |
Estate Roadside Cavern - Near the Entrance. |
| 365-366 | 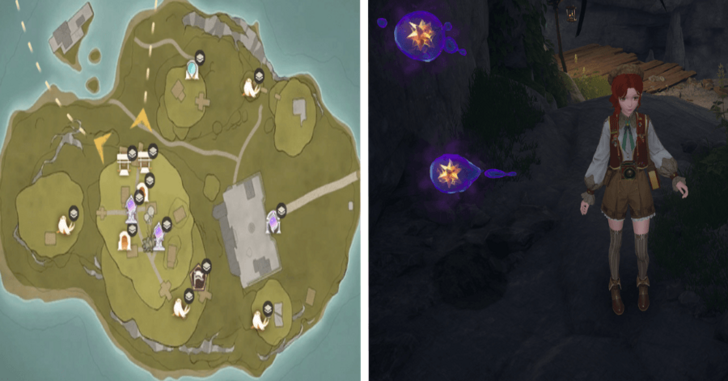 |
Estate Roadside Cavern - Behind the lake with broken wooden bridge. |
| 367-368 | 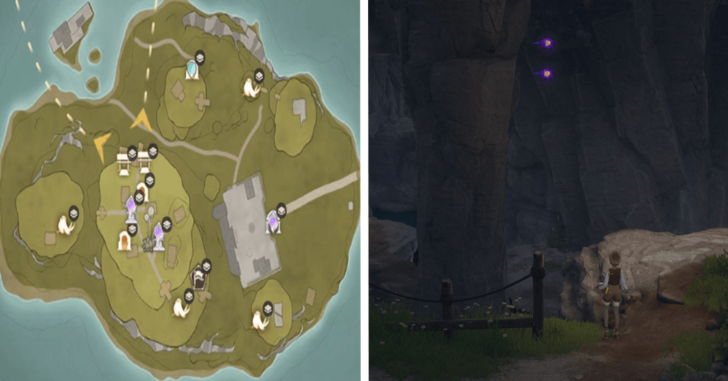 |
Estate Roadside Cavern - On top of the lake. |
| 369-370 | 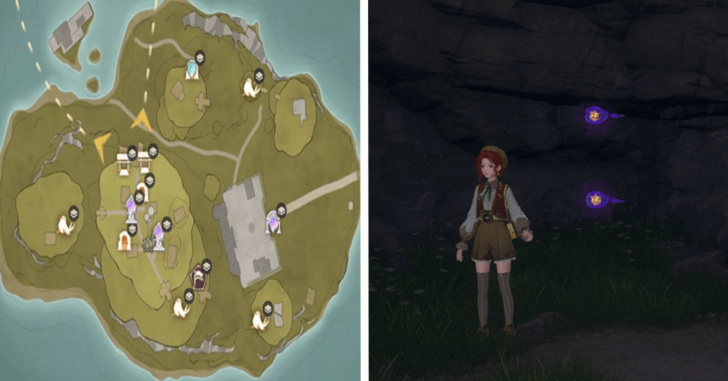 |
Estate Roadside Cavern -Near the lake. |
| 371-372 | 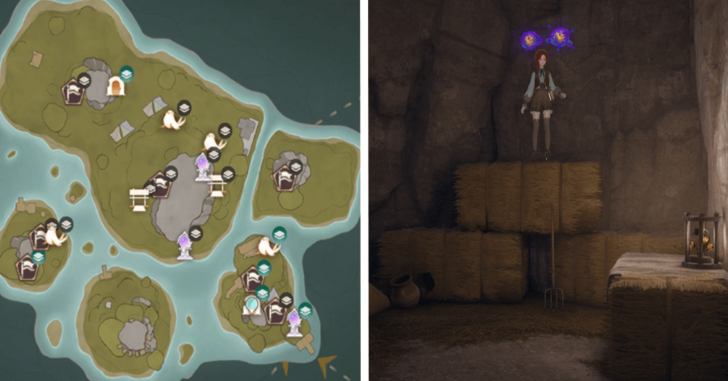 |
Market of Mirth Entrance Cavern - Near the entrance, jump down to the hole. |
| 373-374 | 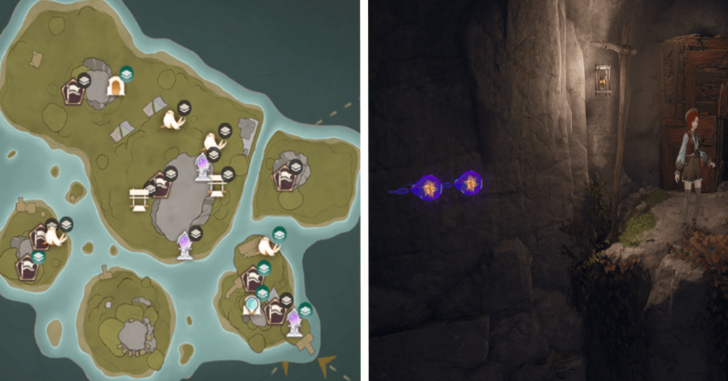 |
Market of Mirth Entrance Cavern - Above the entrance. |
| 375-377 | 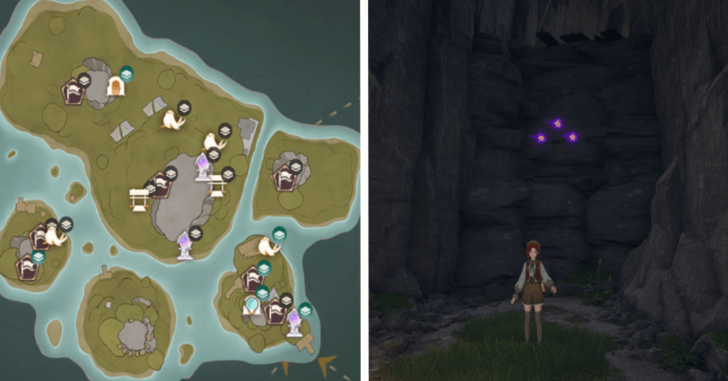 |
Market of Mirth Entrance Cavern - Break the boxes near the entrance to enter this area and obtain these dews. |
| 378-379 | 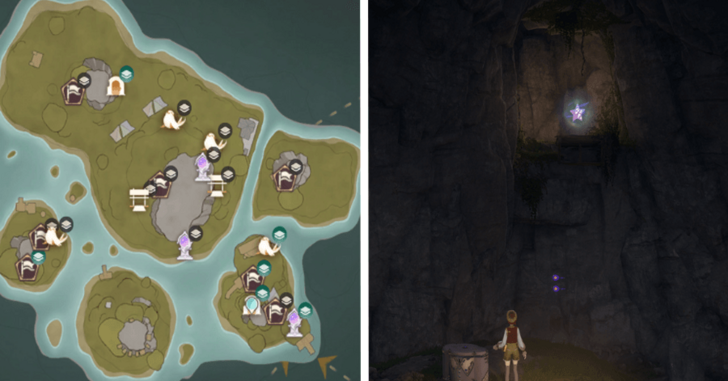 |
Market of Mirth Cavern Near the stone in the middle of the lake |
| 380-382 | 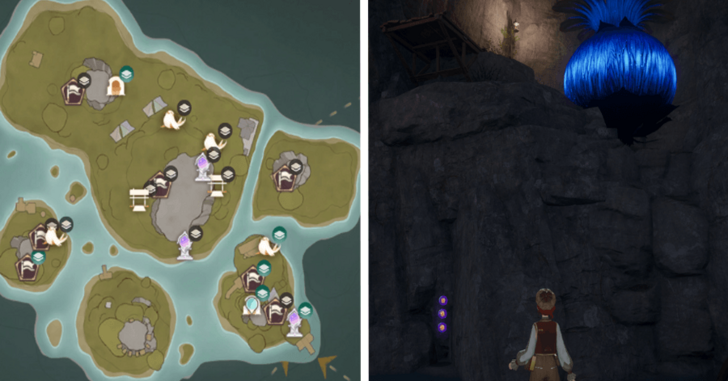 |
Market of Mirth Cavern - Below the broken bridge. |
| 383-384 | 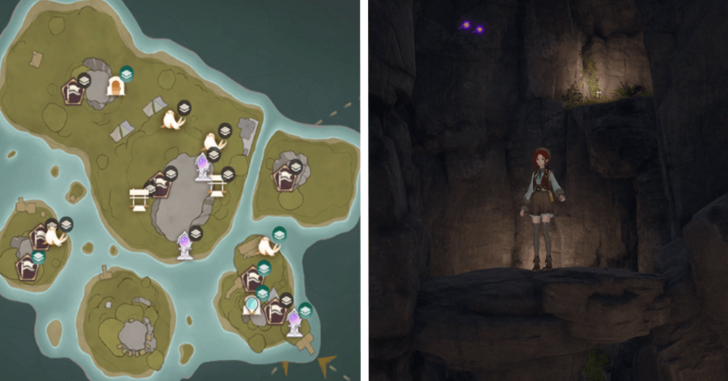 |
Market of Mirth Cavern - Near the broken bridge. |
| 385-386 | 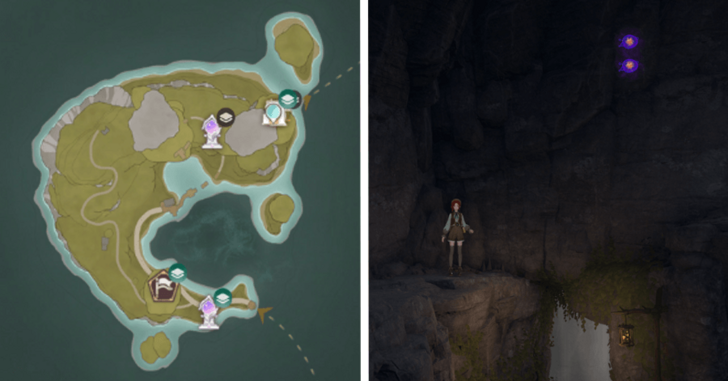 |
Stellar Fishing Ground Cavern - The archway in front of the entrance. |
| 387-389 | 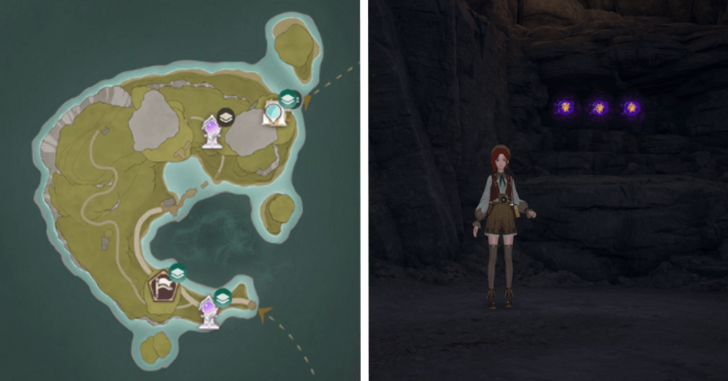 |
Stellar Fishing Ground Cavern - From the archway turn right to locate these dews. |
| 390-391 | 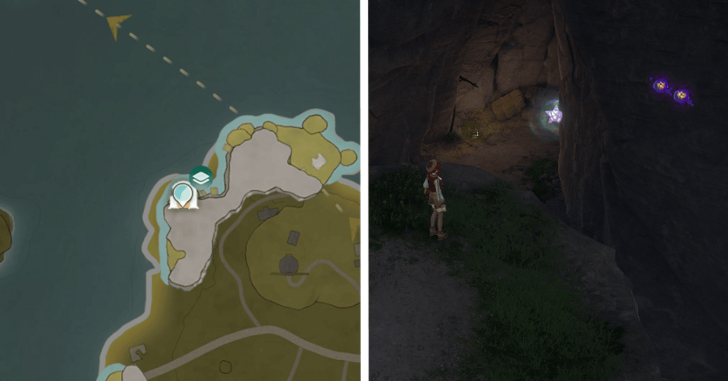 |
Golden Fields Cavern, walk north from the entrance of the cavern |
| 392-394 | 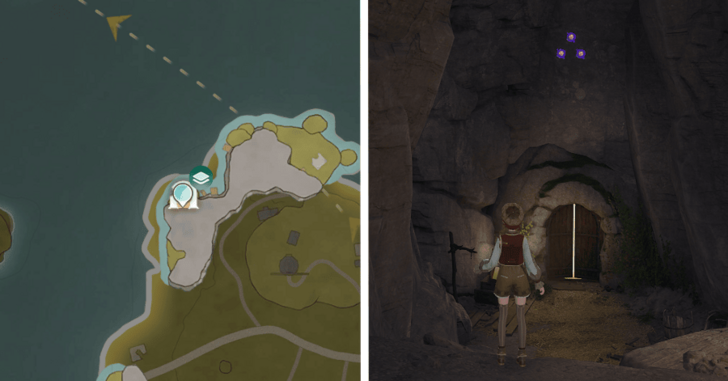 |
Golden Fields Cavern, on top of the entrance of the cavern |
| 395-396 |  |
Windrider Mill Cavern, near the entrance of the cavern |
| 397-398 | 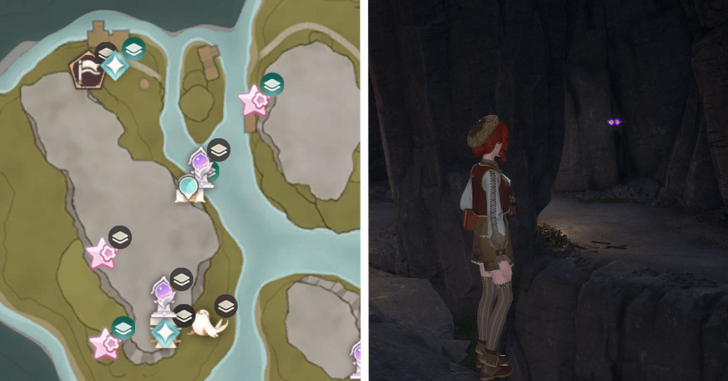 |
Windrider Mill Cavern, west of the entrance |
| 399-400 | 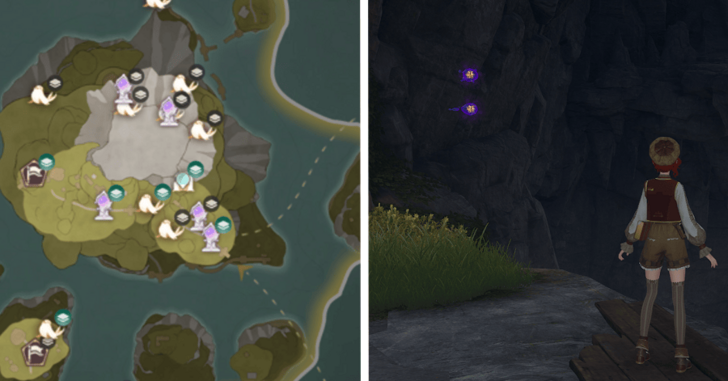 |
Volunteer Corps Camp Cavern, floating near the stone bridge above |
| 401-402 | 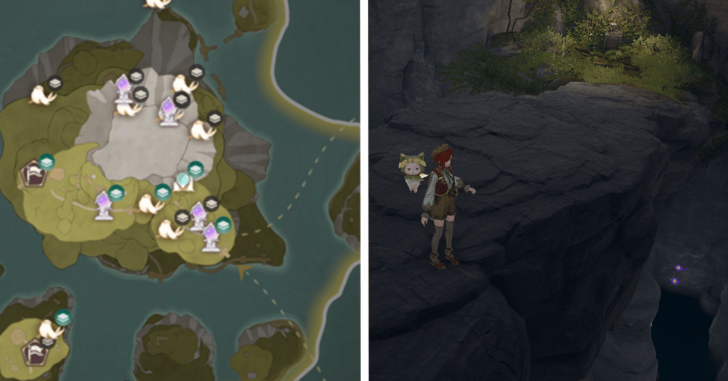 |
Volunteer Corps Camp Cavern, in between the foot of both stone bridge |
| 403-404 | 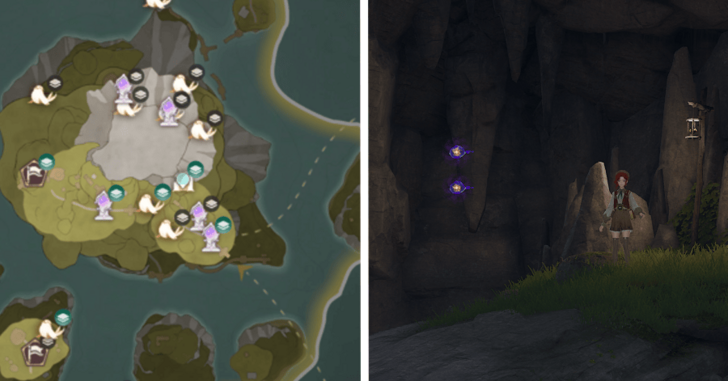 |
Volunteer Corps Camp Cavern, north part of the Y shaped bridge |
| 405-406 | 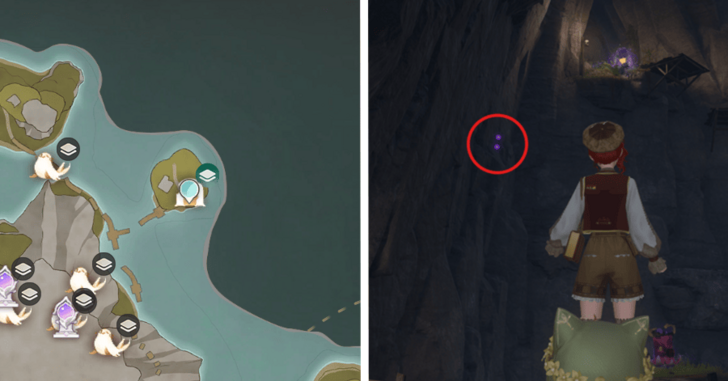 |
Stonecrown Cavern, near the wooden stairs |
| 407-409 | 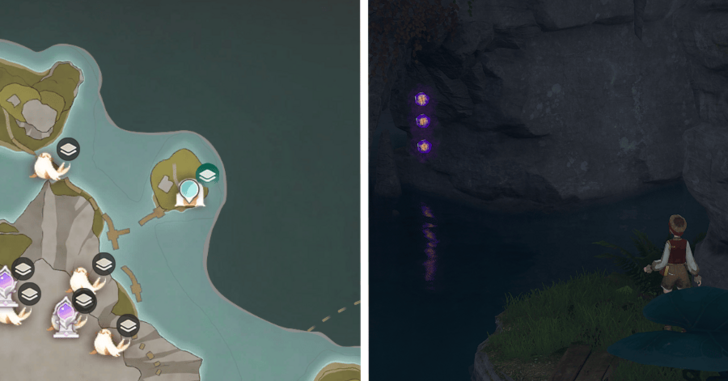 |
Stonecrown Cavern, under the bridge |
| 410-411 | 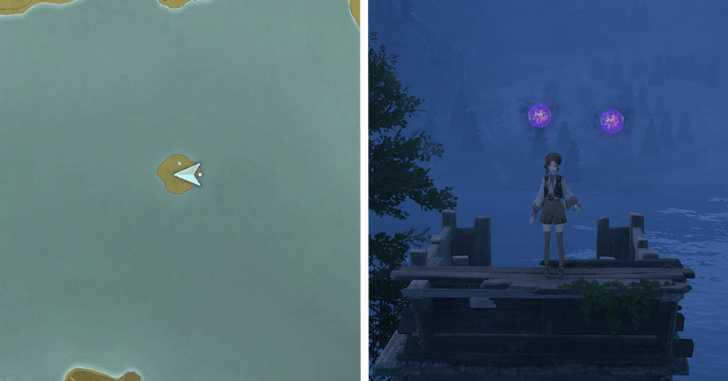 |
On top of the watchtower, enter the Stonecrown Cavern and look for the other door that leads to this small island |
| 412-413 | 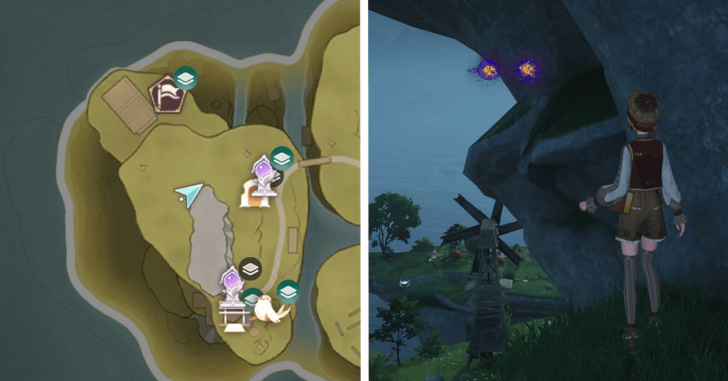 |
On one of the stonetree branches |
| 414-415 | 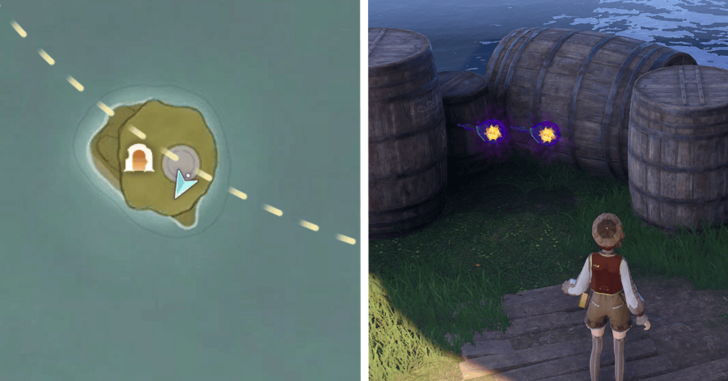 |
Hiding behind some barrels below the highest point of the stonetree island |
| 416-417 | 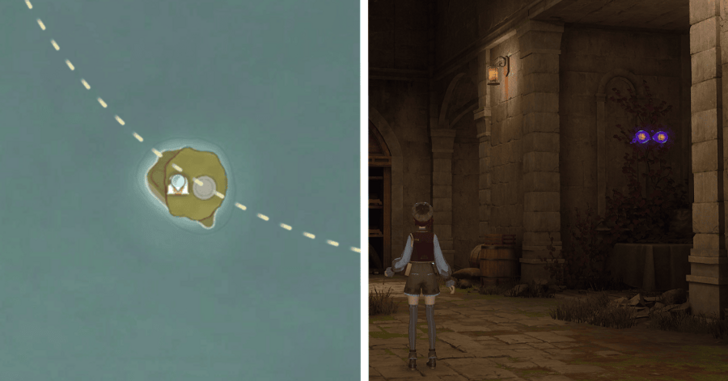 |
Small Stonetree Cavern, turn right once you see a chair in the middle of the room and the Dews should be next to a shelf to the left |
| 418-420 | 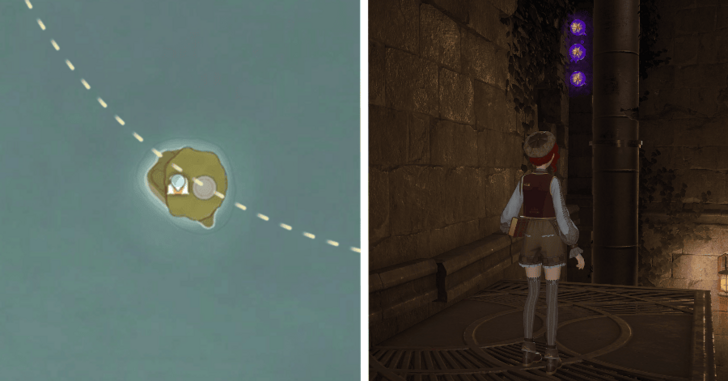 |
Small Stonetree Cavern, behind the metal pipe on the back of the room |
| 421-422 | 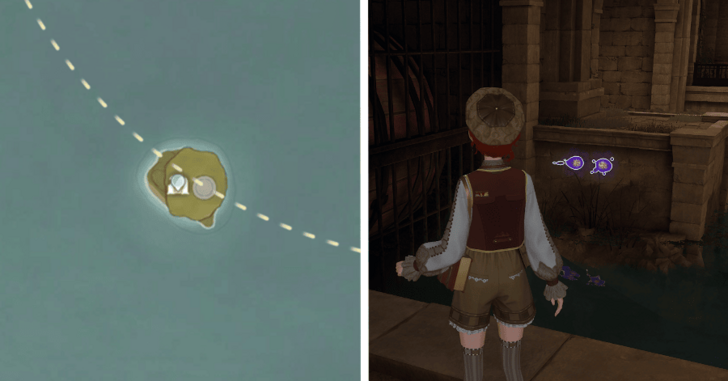 |
Small Stonetree Cavern, right side of Tipsy Tom next to the caged barrels |
| 423-424 | 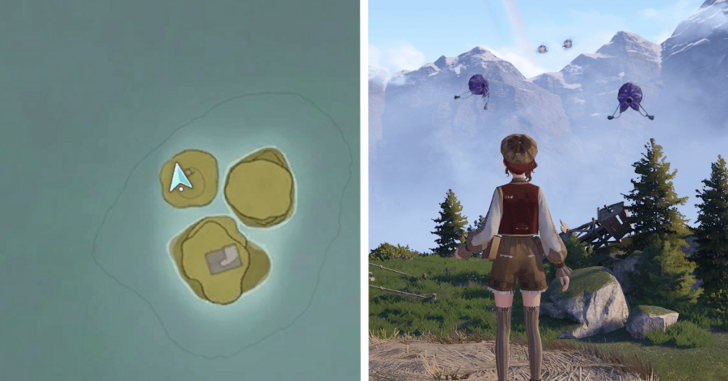 |
On top of the broken windmill |
| 425-427 | 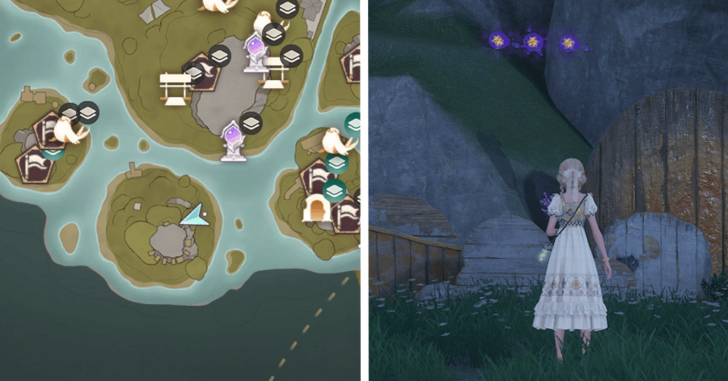 |
Below the broken bridge |
| 428-429 | 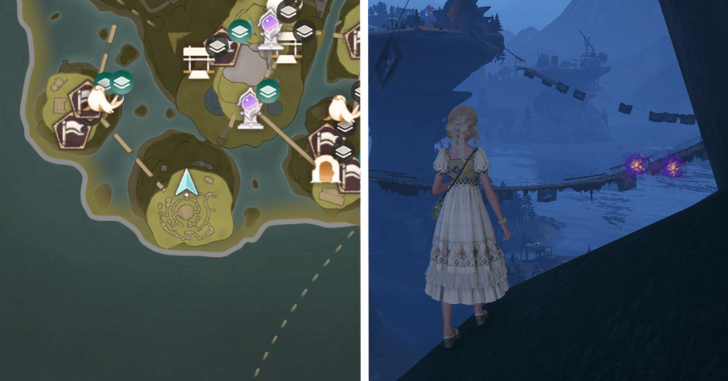 |
A level above the 425-427 dews, still below the broken bridge |
| 430-432 | 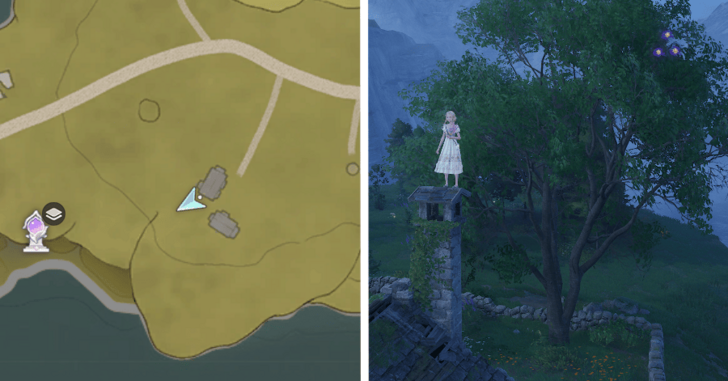 |
On the trees in between the two houses, jump up to the chimney to purify these dews |
| 433-435 | 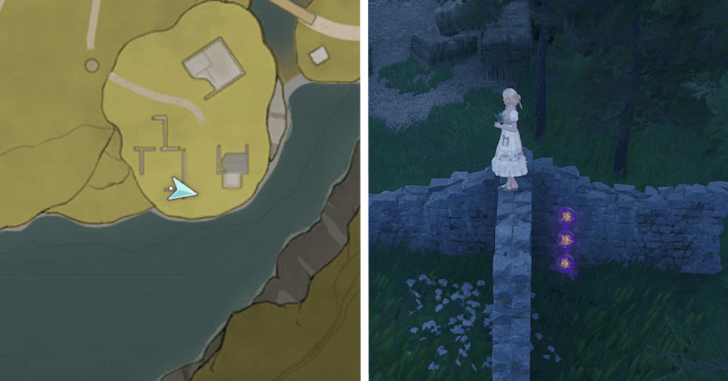 |
Behind one of the ruined walls |
| 436-438 |  |
Near the dock |
| 439-440 | 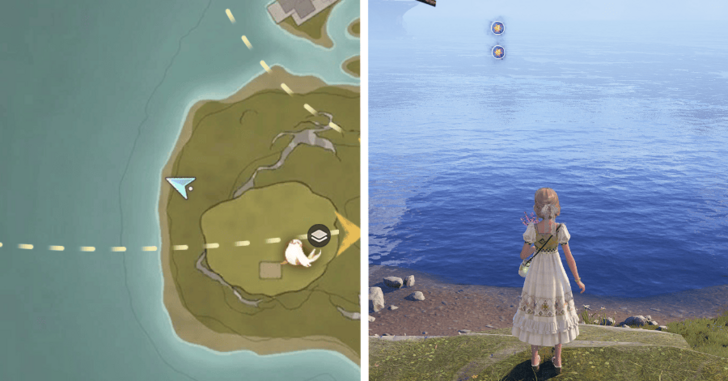 |
On the lowest level of the stonetree island |
| 441-443 | 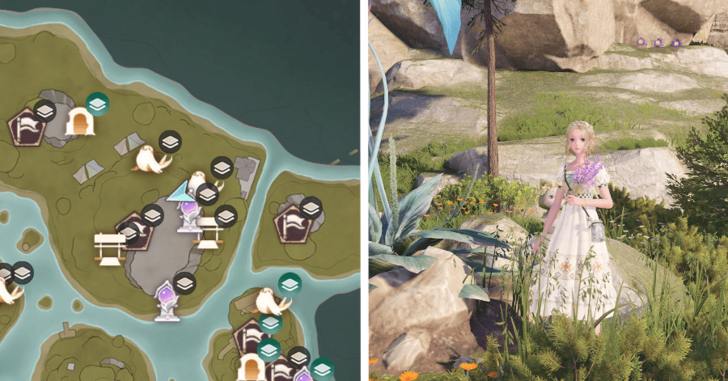 |
Behind the stonedew flora on the lower level of the stonetree island |
| 444-445 | 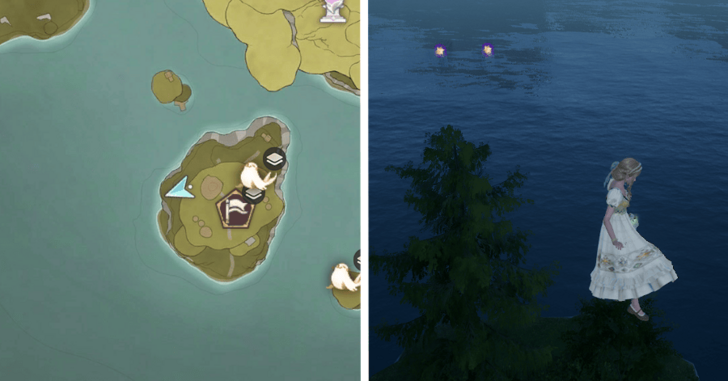 |
On top of a tree near the leaf trampoline |
| 446-448 |  |
On top of a watch tower |
| 449-451 | 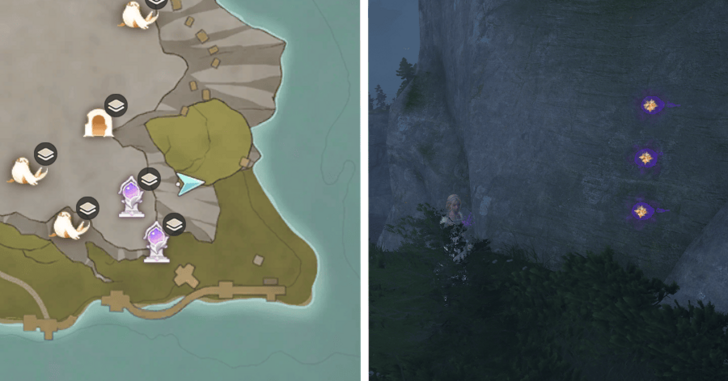 |
On the lower level of the stonetree |
| 452-455 | 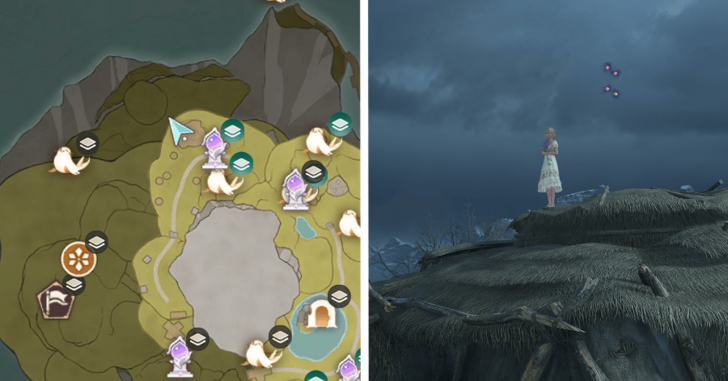 |
On top of the large hut |
| 456-457 | 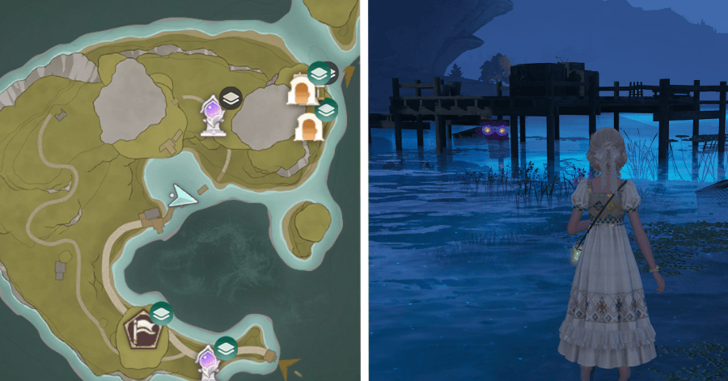 |
Under the dock |
| 458-459 | 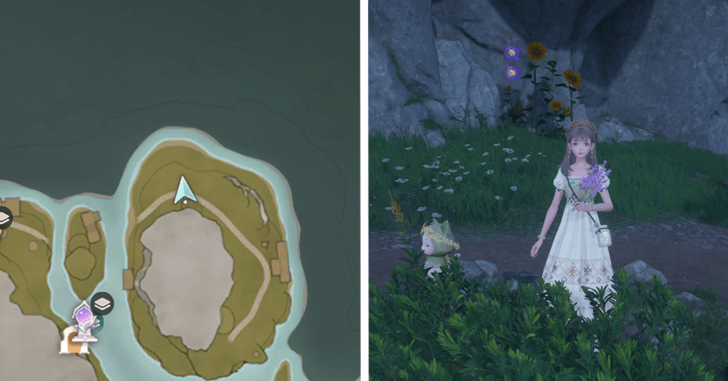 |
Behind the sunflowers |
| 460-462 | 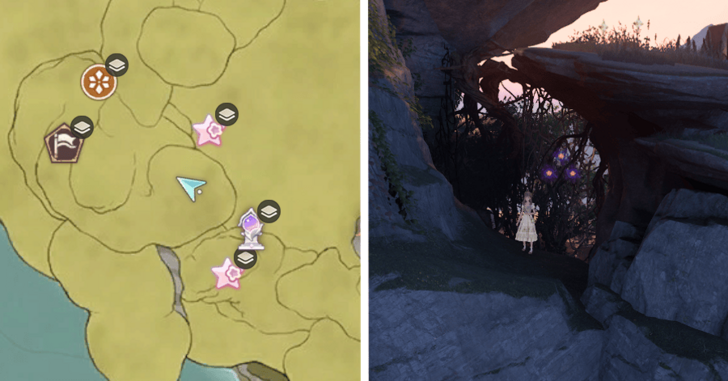 |
In between the stonetrees |
| 463-465 | 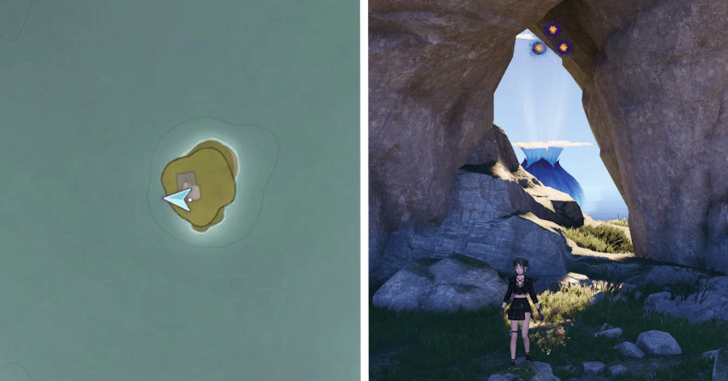 |
In between the stonetrees |
| 466-467 | 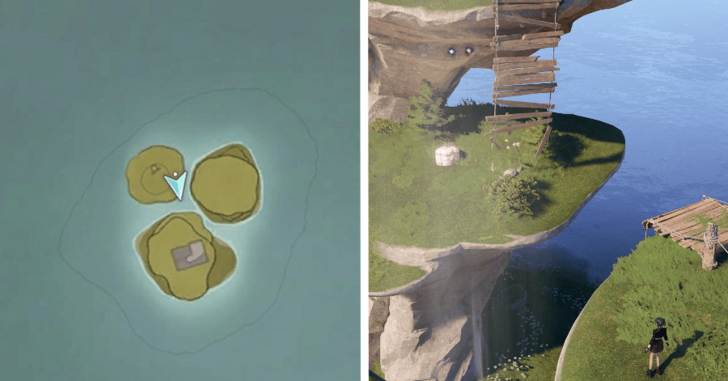 |
Middle level of the stonetree, in between the broken bridge |
| 468-469 | 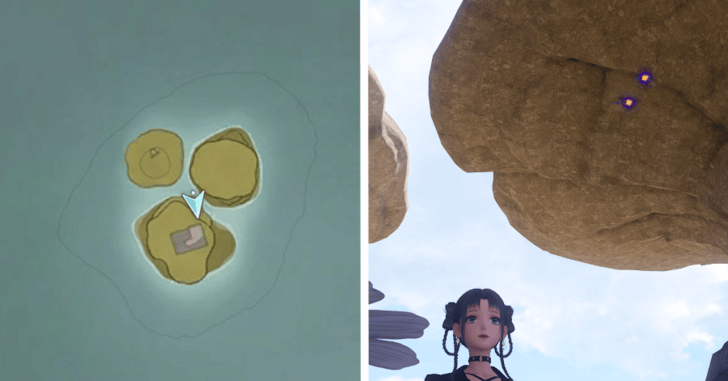 |
Under one of the stonetrees |
| 470-471 | 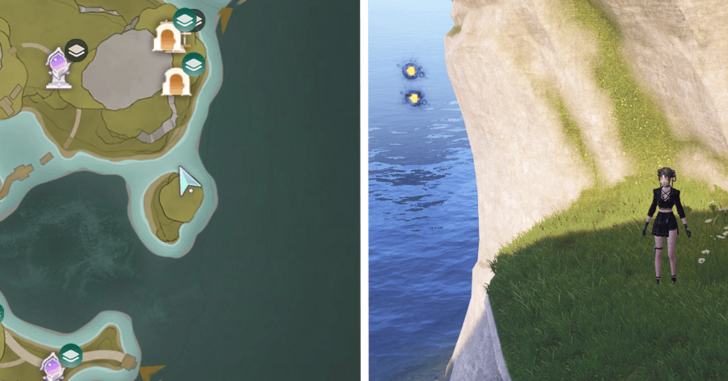 |
Middle part of the stonetree |
| 472-473 | 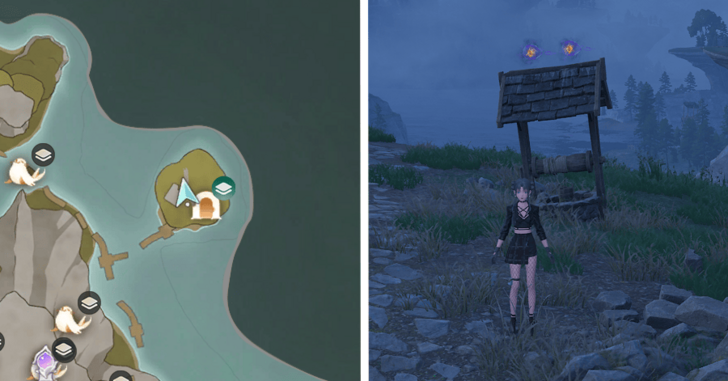 |
On top of the well |
| 474-476 | 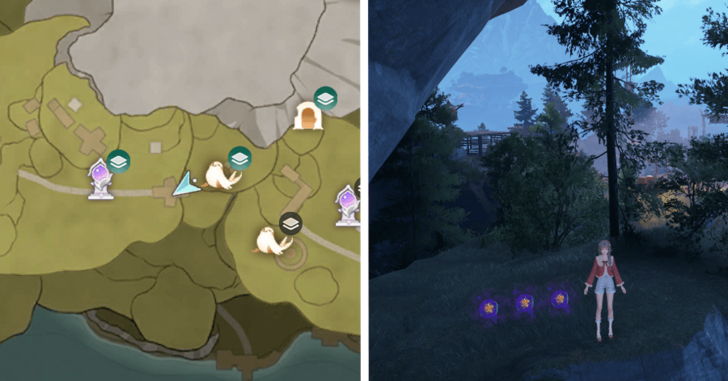 |
West of Volunteer Corps Watchtower Warp Spire |
| 477-478 | 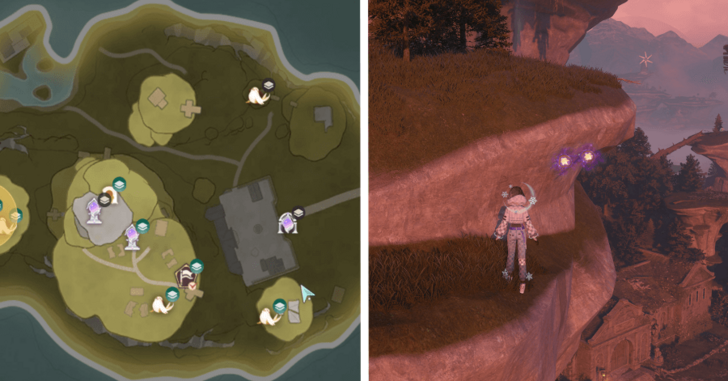 |
Head South from Dews 53-54, then go up the smaller stonetree. Behind a small ledge |
| 479-480 | 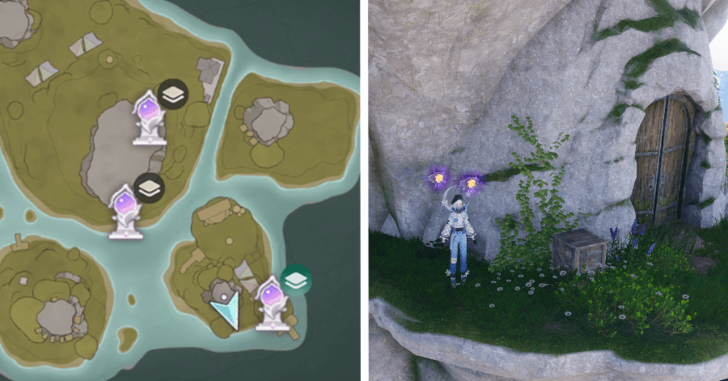 |
Beside the Market of Mirth Cavern Entrance, upwards from the Market of Mirth Warp Spire |
| 481-482 | 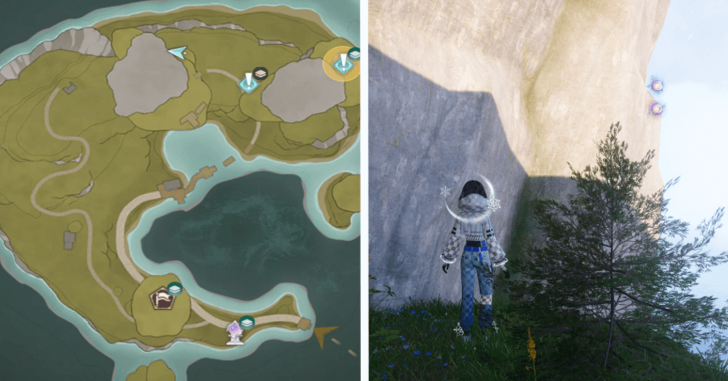 |
Go North from Dews 180-181 and drop down to a ledge just underneath the primray stonetree platform |
| 483-484 | 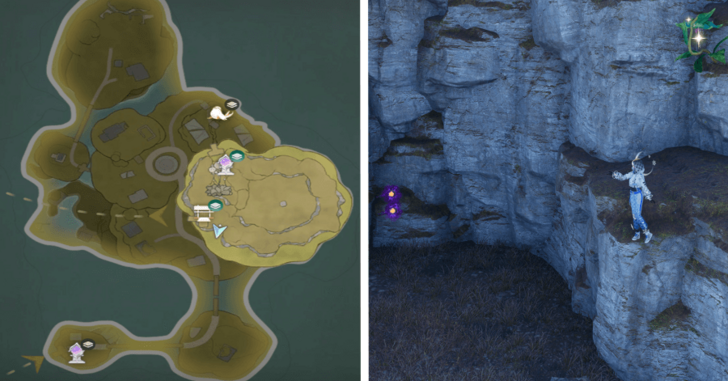 |
Head Nortwest from Dews 199-201. These are near a ledge with Wisteriasols |
| 485-487 | 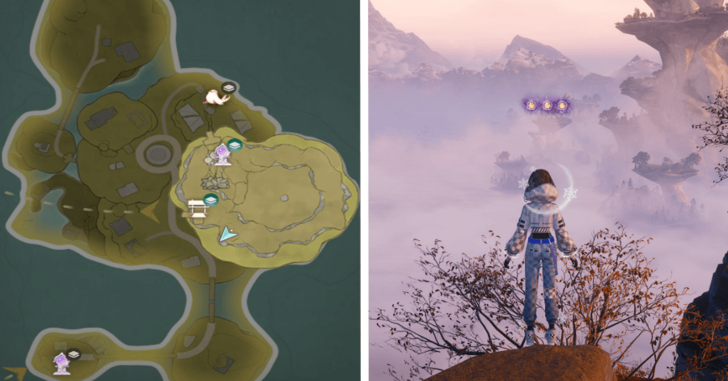 |
Head to the top of the stonetree, above a tree with brown leaves |
| 488-489 | 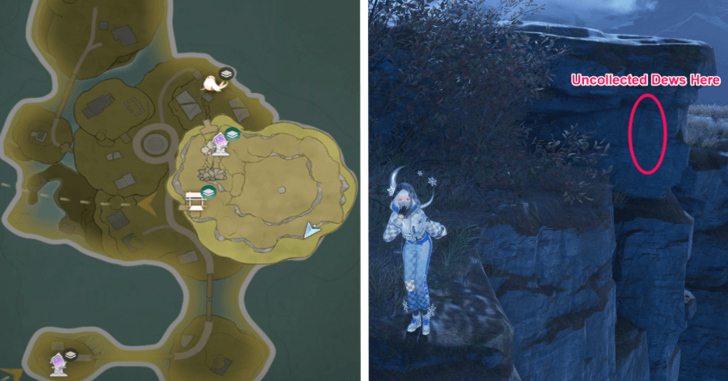 |
Go East from Dews 485-487, it'll be beside a small cliff ledge |
| 490-491 | 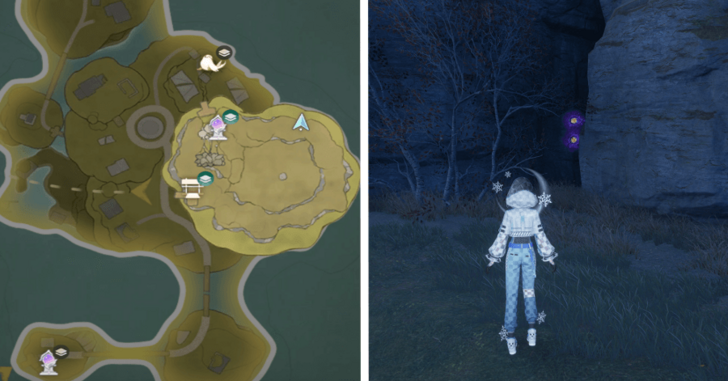 |
Continue North from 488-489, then drop to a lower level. These are within a small crevice in the cliffside |
| 492-495 |  |
Ride the current upwards to a higher crane from Dews 130-132 |
| 496-498 | 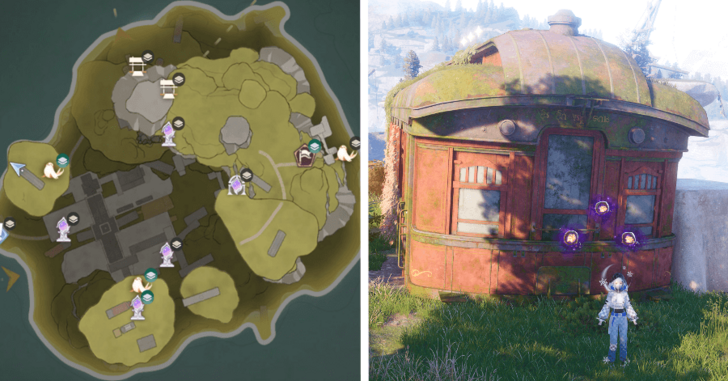 |
Travel up from the Choo Choo Station Old Platform Warp Spire and head to the front of the old train car |
| 499-500 |  |
Continue Northeast from 496-498 and head to the topmost stonetree. These are just above the cliff edge |
| 501-504 | 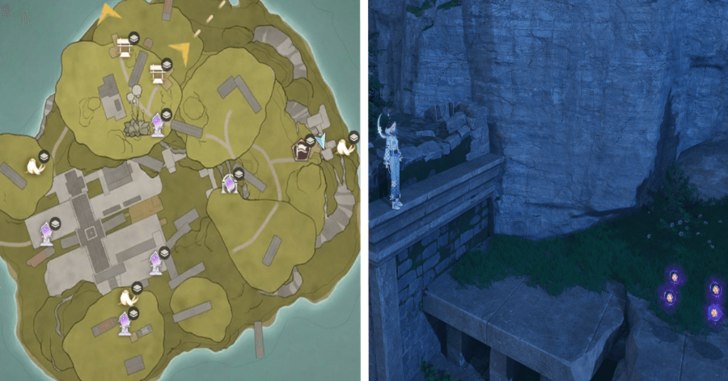 |
From Dews 158-160, find a way to the top of the tunnel entrance |
Wishing Woods Dews of Inspiration
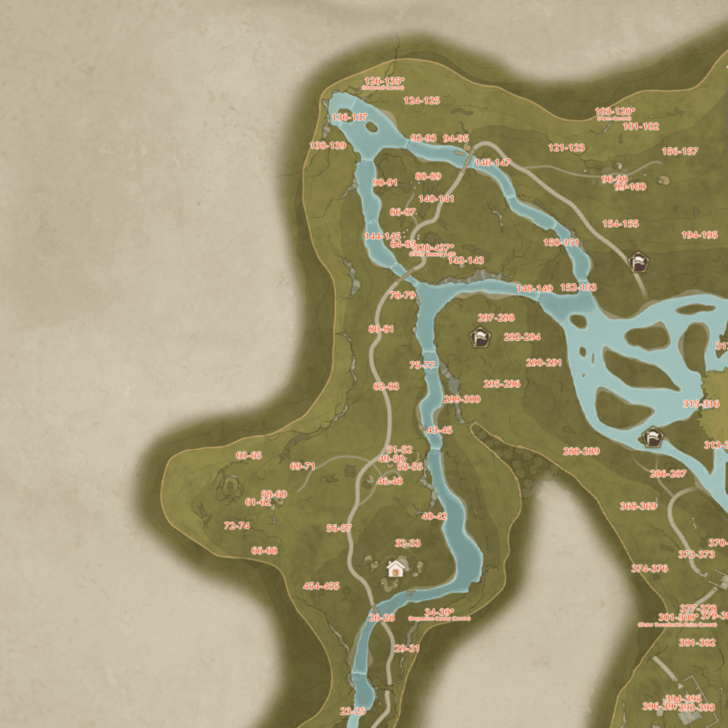 Open Image in New Tab |
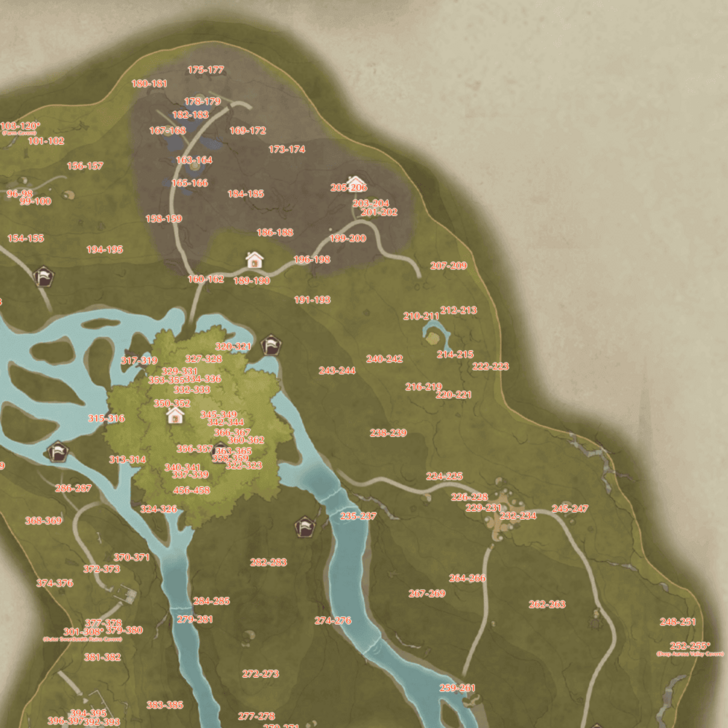 Open Image in New Tab |
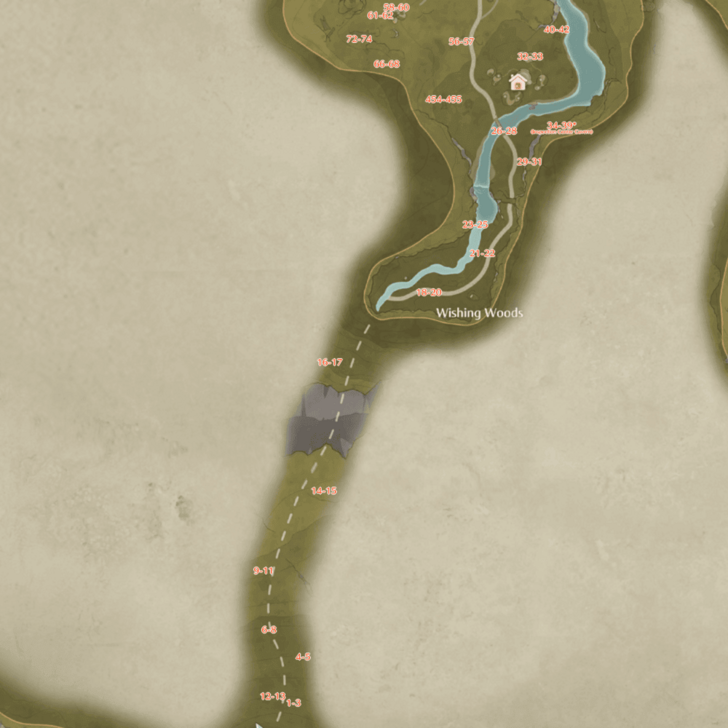 Open Image in New Tab |
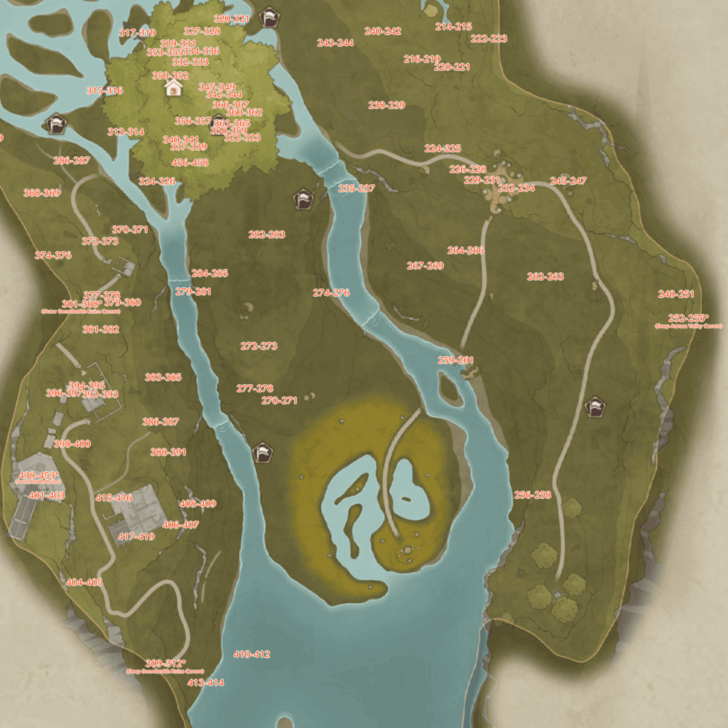 Open Image in New Tab |
Dews marked with an asterisk are found underground or in caves.
There are a total of 458 Dews in Wishing Woods. All their locations are noted below:
| No. | Image | How to Get |
|---|---|---|
| 1-3 | 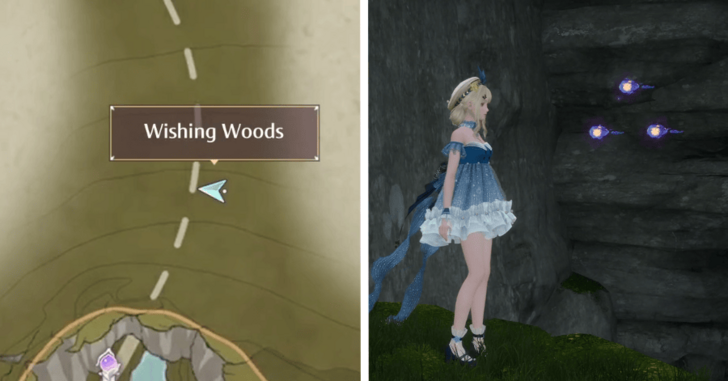 |
Inside the cave connecting Florawish and Wishing Woods |
| 4-5 | 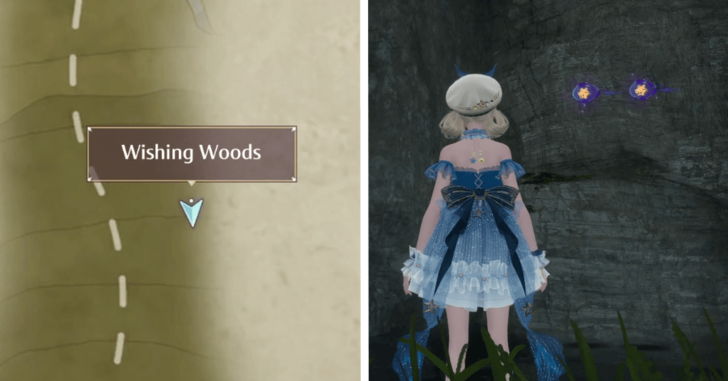 |
Inside the cave around a corner past the first set of Dews |
| 6-8 | 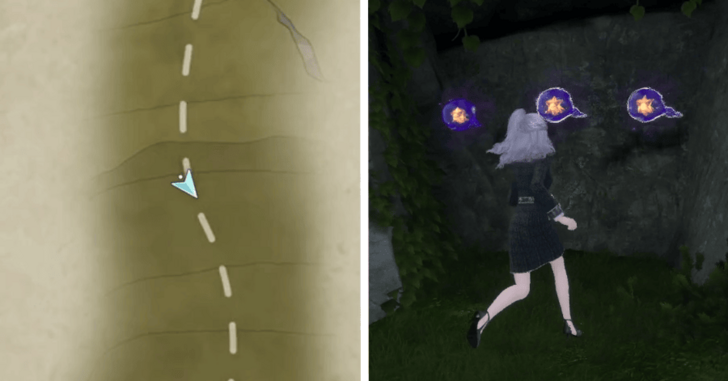 |
Inside the cave below the path |
| 9-11 | 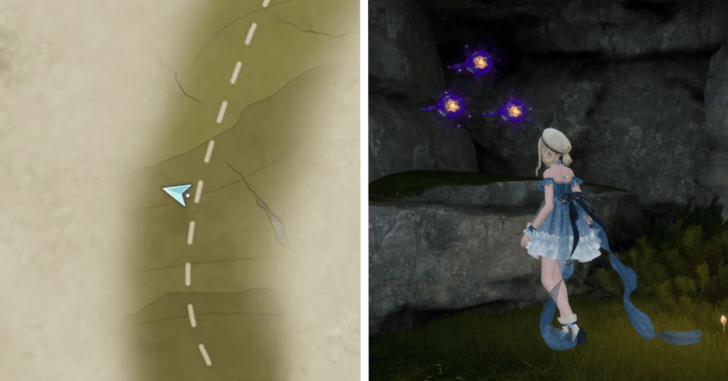 |
Inside the cave at the end of some platform jumps |
| 12-13 | 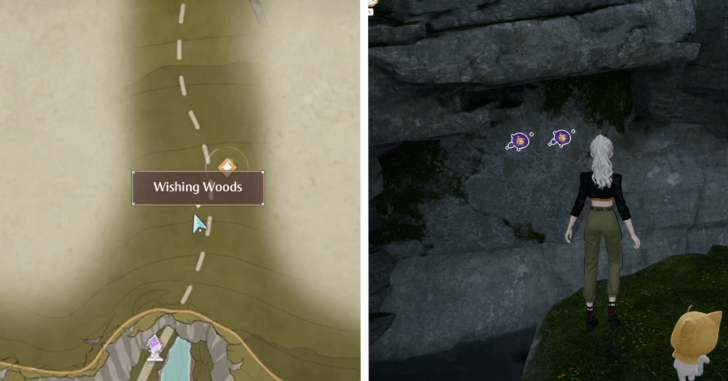 |
Below the path near the cave's entrance. |
| 14-15 |  |
To the right past the small holes where you need to use the shrink dress. |
| 16-17 |  |
Behind some enemies on the way to the cave's exit. |
| 18-20 | 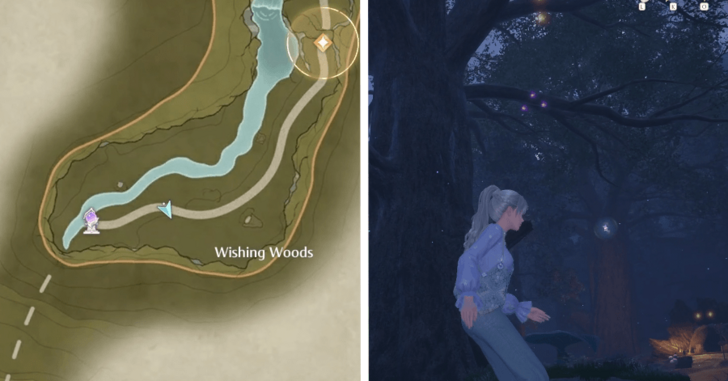 |
Above a bouncy leaf near a Whimstar. |
| 21-22 | 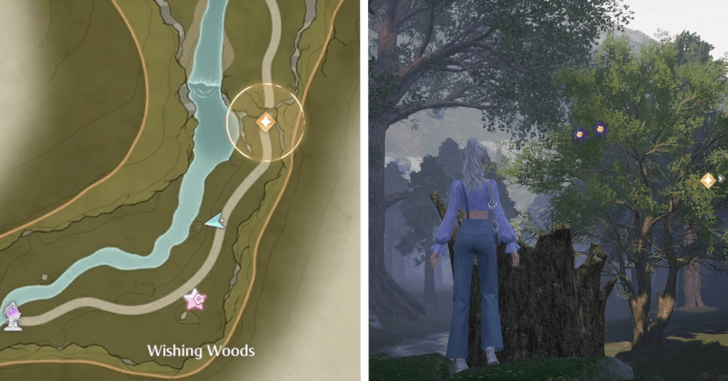 |
Above the river next to a broken tree log. |
| 23-25 | 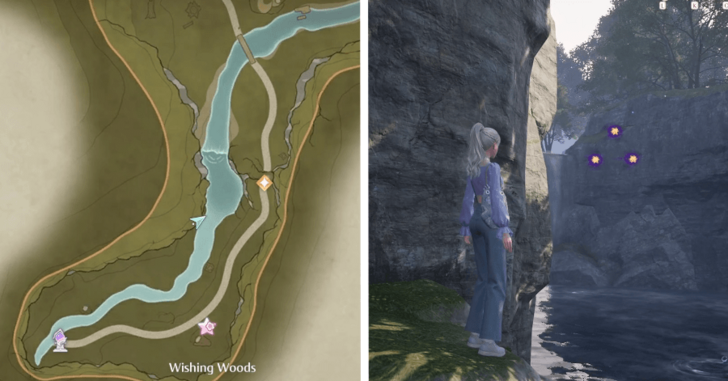 |
Along a cliff wall next to a fishing spot. |
| 26-28 | 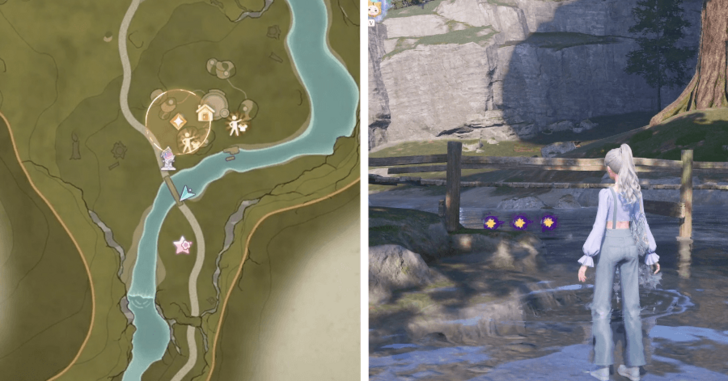 |
Below the bridge leading to the Wish Inspection Centre. |
| 29-31 |  |
Off a cliff overlooking the Wish Inspection Centre. |
| 32-33 | 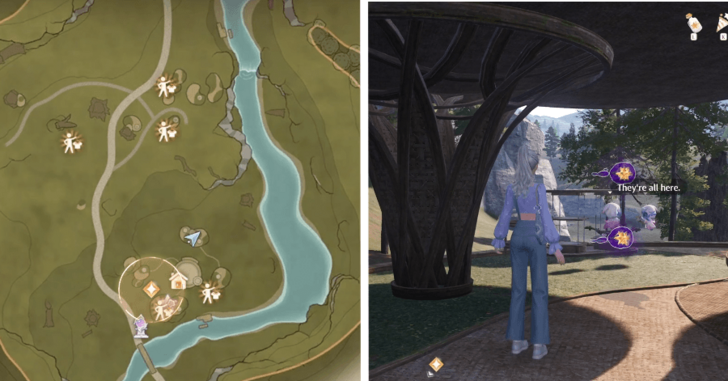 |
On a platform north of the Wish Auditing Station. |
| 34-35 | 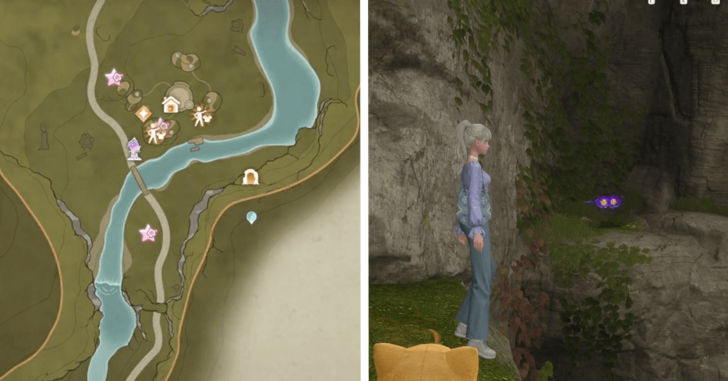 |
Inspection Center Cavern, on one of the platforms in the room with a lot of enemies. |
| 36-37 | 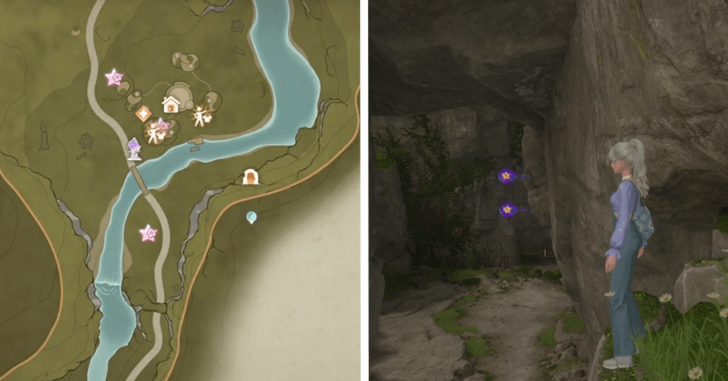 |
Inspection Center Cavern, in the entrance to the room with enemies. |
| 38-39 | 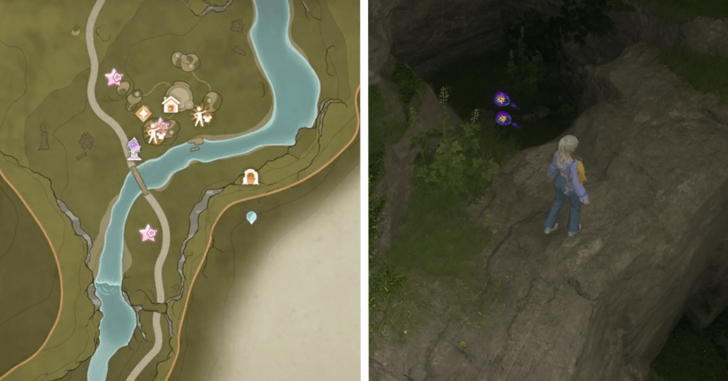 |
Inspection Center Cavern, to the left before dropping down to a bunch of enemies. |
| 40-42 | 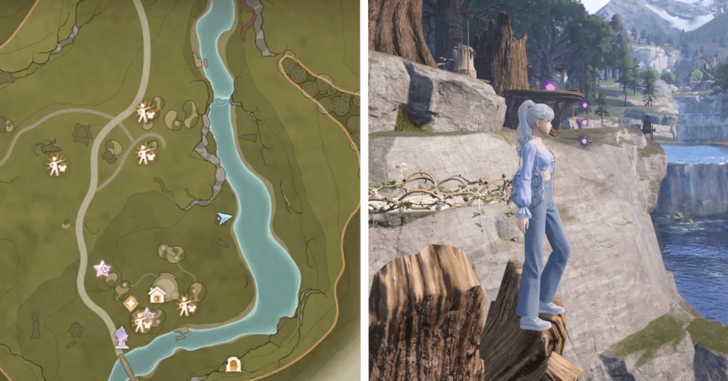 |
Next to some trampoline jumps that lead to a Whimstar. |
| 43-45 | 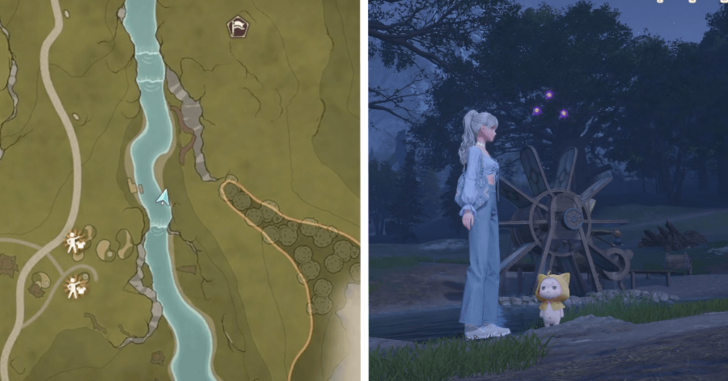 |
On top of a waterwheel. |
| 46-48 | 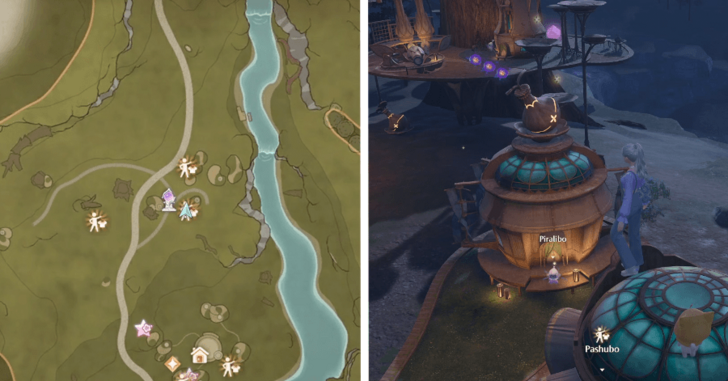 |
Above the hut where Piralibo is. |
| 49-50 | 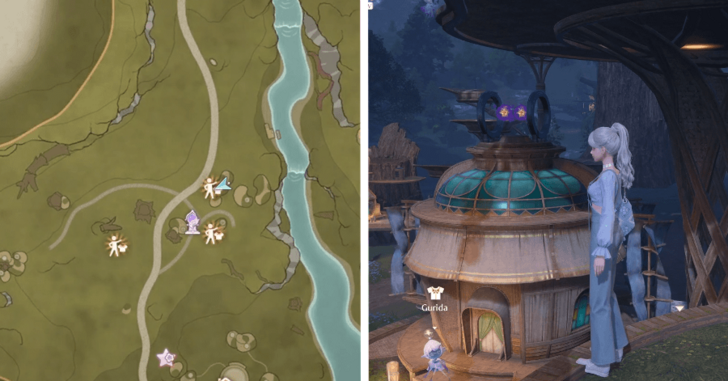 |
Above the hut where Gurida is. |
| 51-52 | 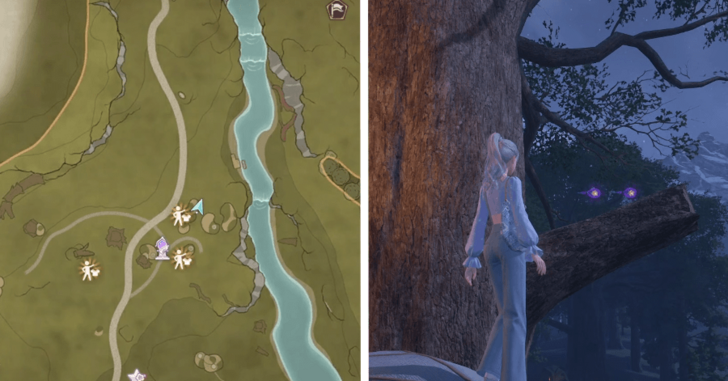 |
On a tree branch north of the Wishcraft Lab. |
| 53-55 |  |
Above the Curio on the east side of the lab. |
| 56-57 | 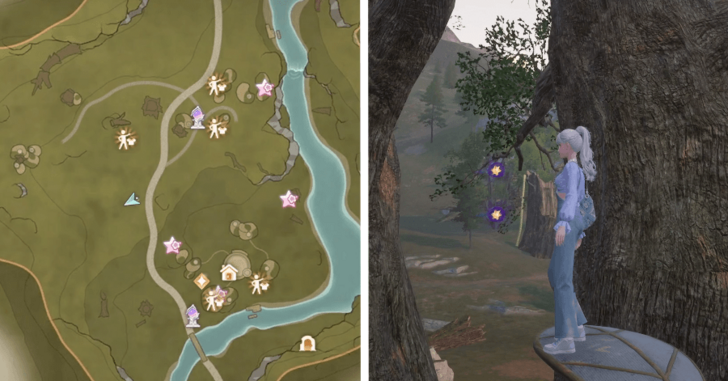 |
Between a tree next to the path. |
| 58-60 | 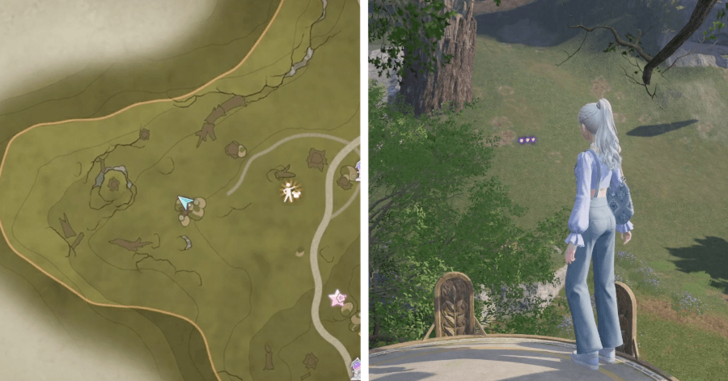 |
In the air west from the Wishcraft Lab. |
| 61-62 | 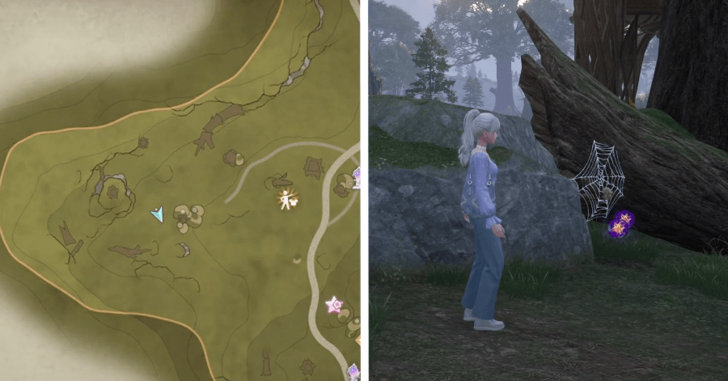 |
Between a log and a rock. |
| 63-65 | 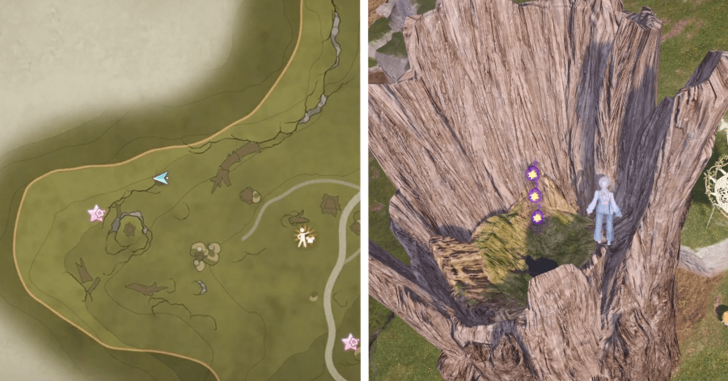 |
In a tree log accessed by a tree jump. |
| 66-68 | 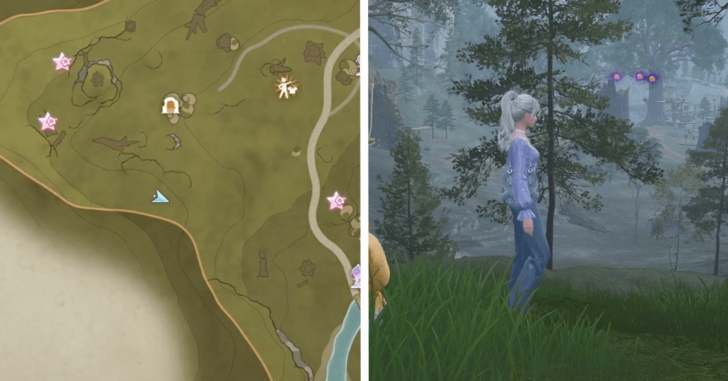 |
Amongst some trees south of the Research Institute Cavern. |
| 69-71 | 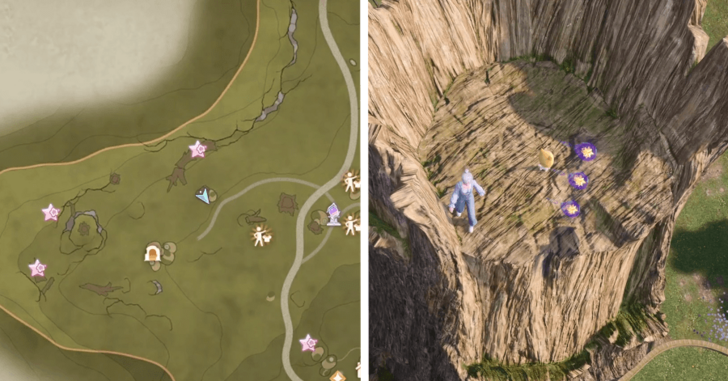 |
In a tree log northeast from the Research Institute Cavern. |
| 72-74 | 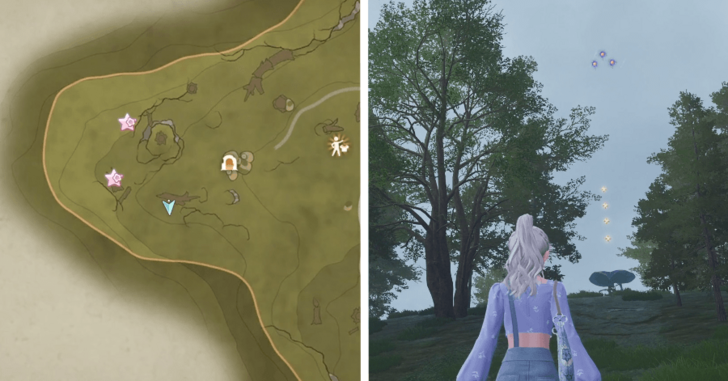 |
Above a bouncy leaf with 4 Blings. |
| 75-77 | 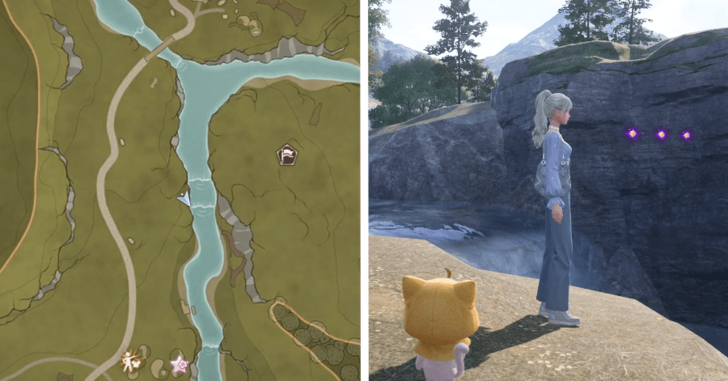 |
Above a river and between two small waterfalls. |
| 78-79 | 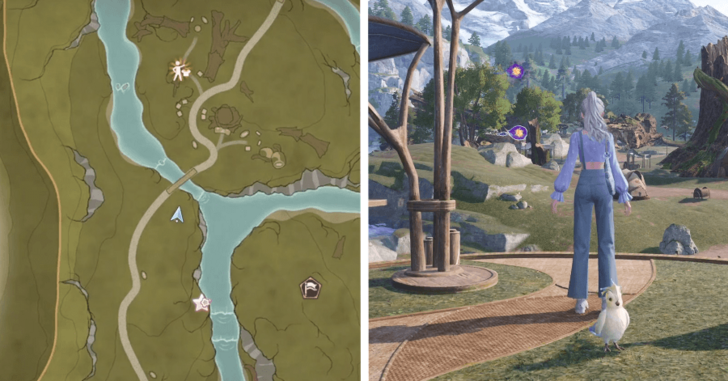 |
On a platform overlooking Timis' Beauty Lab. |
| 80-81 | 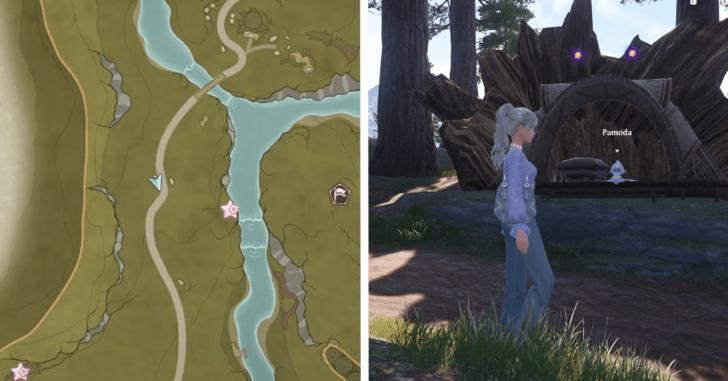 |
Along the road above Pamoda. |
| 82-83 | 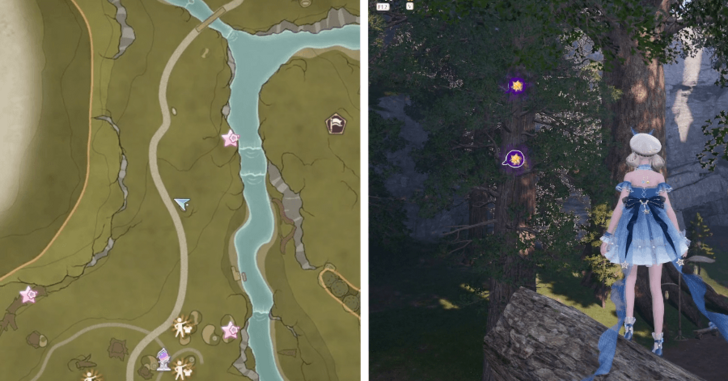 |
Above the road, accessed by jumping on a tree branch. |
| 84-85 | 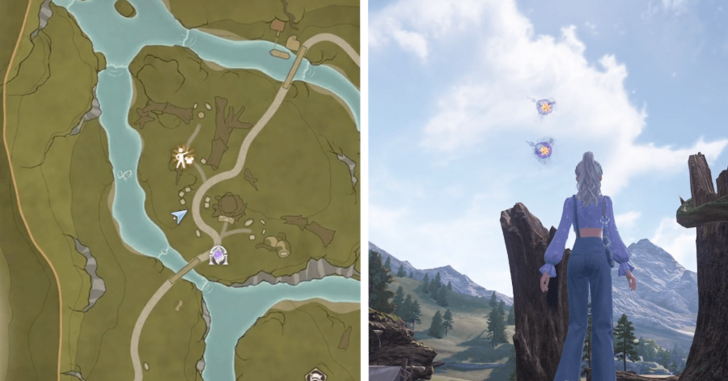 |
Above a broken tree in Timis' Lab area. |
| 86-87 | 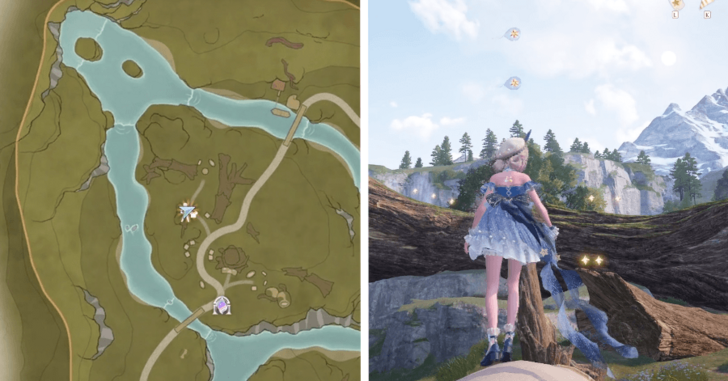 |
Above another broken tree north of the other one. |
| 88-89 | 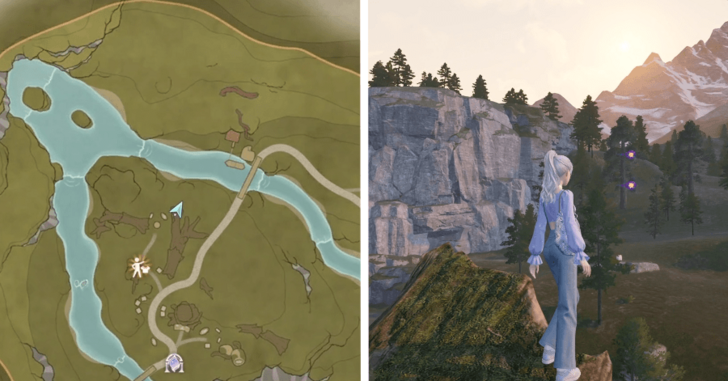 |
Off the large fallen tree north of the lab. |
| 90-91 | 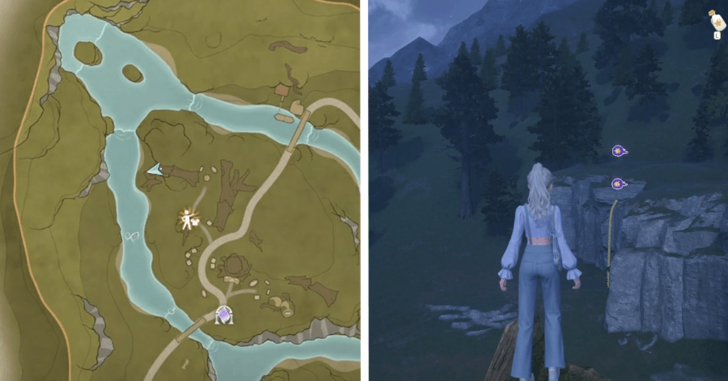 |
Off the other fallen tree to the northwest. |
| 92-93 | 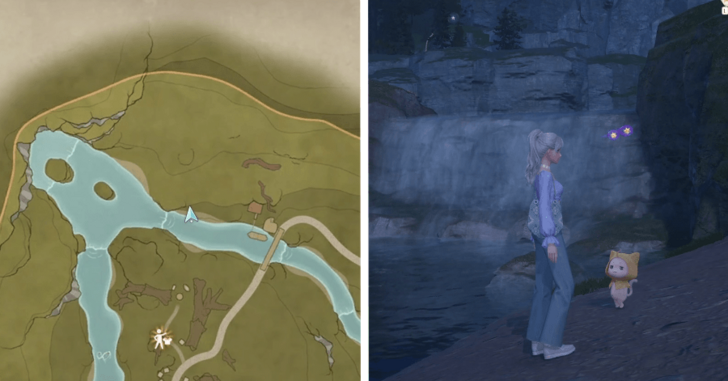 |
Next to a small waterfall. |
| 94-95 | 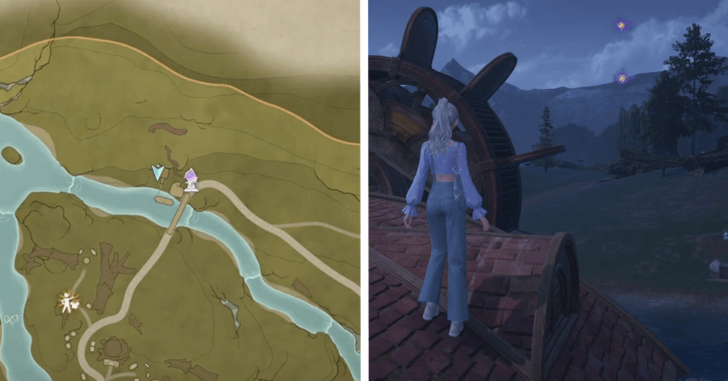 |
Right beside a waterwheel. |
| 96-98 | 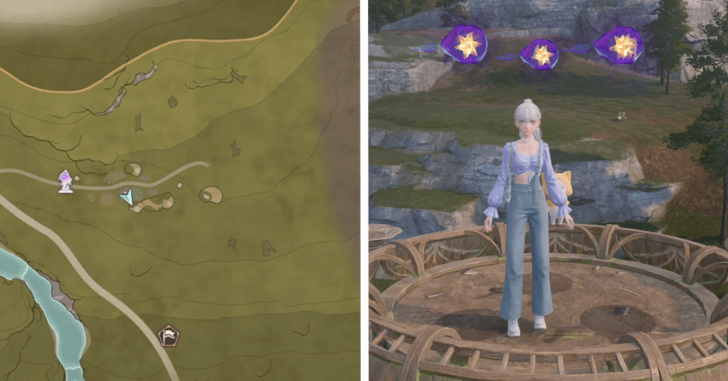 |
On the platform overlooking the farm. |
| 99-100 | 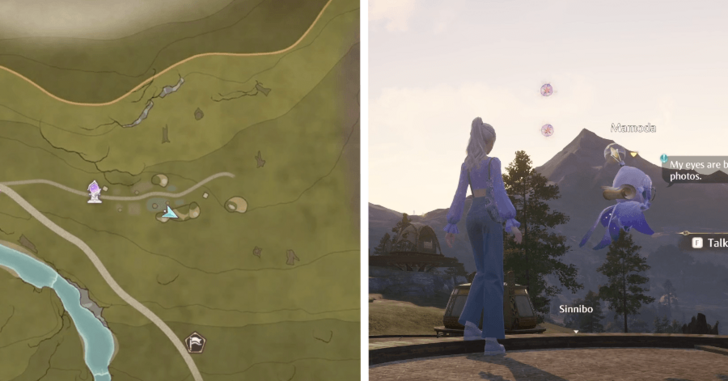 |
Above the flower box puzzle. |
| 101-102 |  |
Above a stump right outside the Farm Cavern. |
| 103-104 | 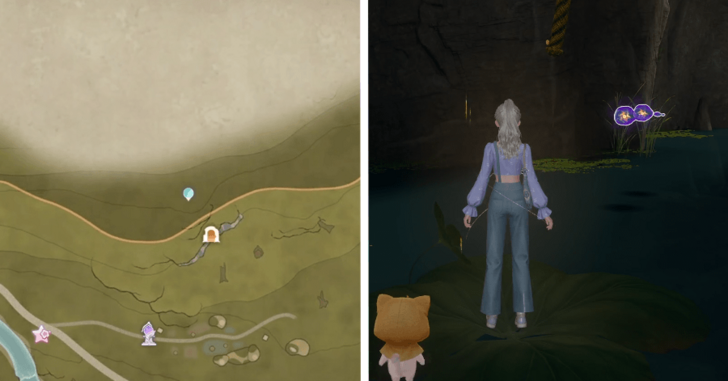 |
Farm Cavern, on the small river. |
| 105-108 |  |
Farm Cavern, at the top of a series of rope jumps. |
| 109-110 | 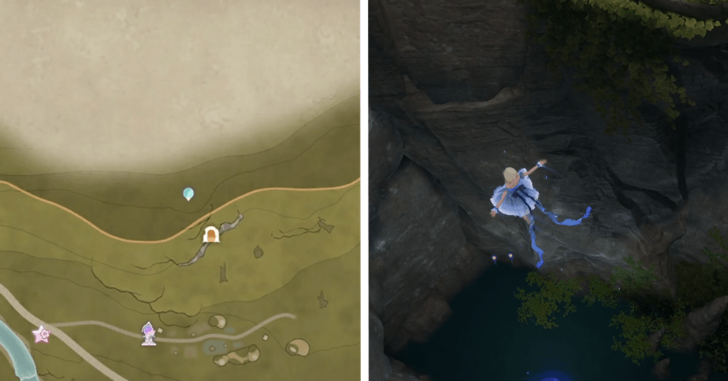 |
Farm Cavern, at the bottom of a vertical shaft. |
| 111-112 | 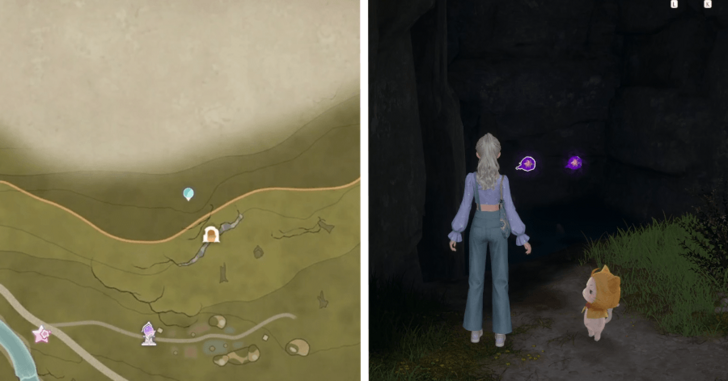 |
Farm Cavern, in the area after the vertical shaft. |
| 113-115 | 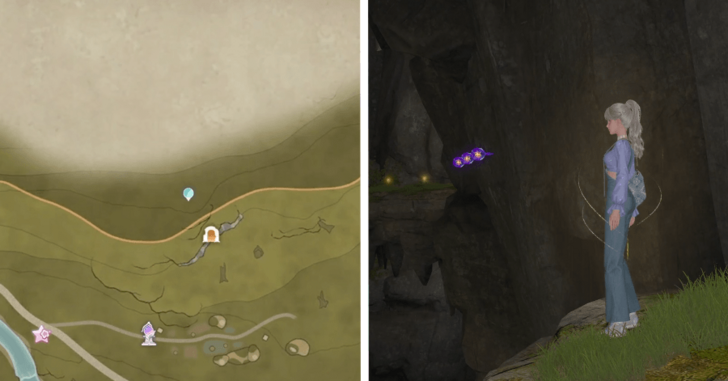 |
Farm Cavern, between trampoline jumps that lead to the Whimstar. |
| 116-117 |  |
Farm Cavern, on the way towards the exit. |
| 118-120 |  |
Farm Cavern, behind the tree and pink chest. |
| 121-123 | 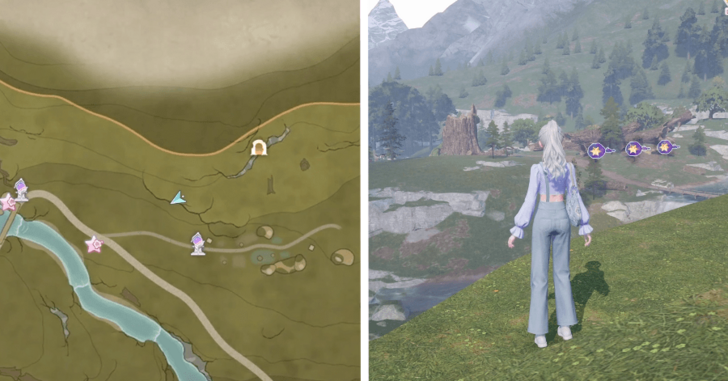 |
Off a cliff near the farm. |
| 124-125 | 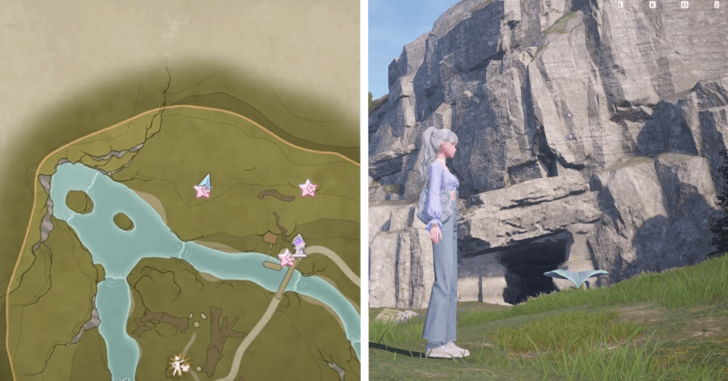 |
Above a bouncy leaf just outside the Waterfall Cavern. |
| 126-127 | 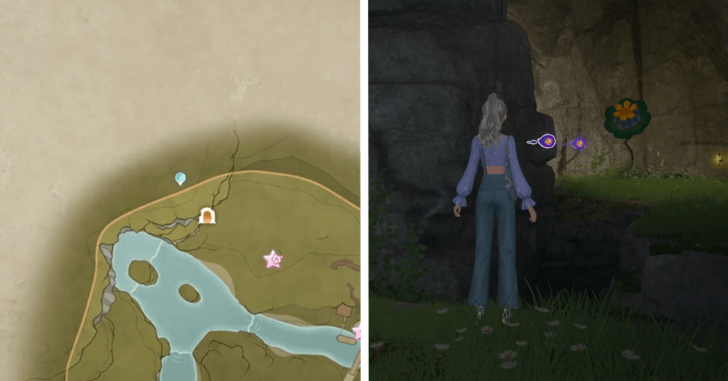 |
Waterfall Cavern, behind the pillar in the initial room. |
| 128-130 | 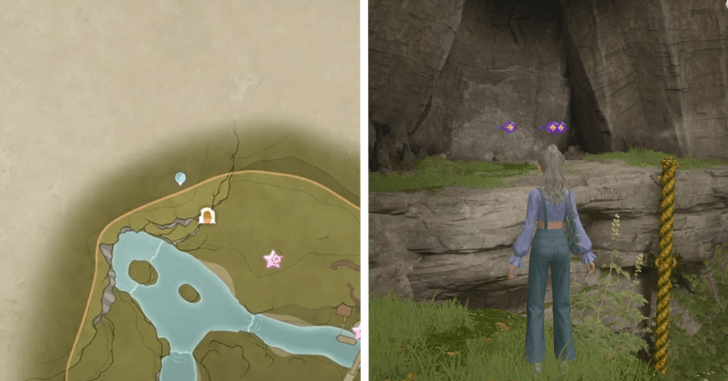 |
Waterfall Cavern, above a rope climb in the initial room. |
| 131-132 | 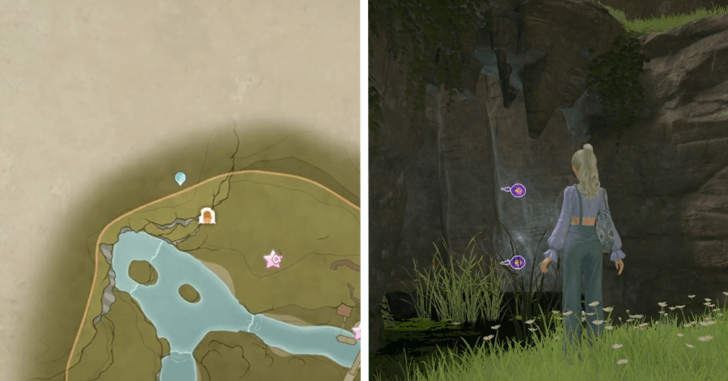 |
Waterfall Cavern, below the path up in the waterfall room. |
| 133-135 | 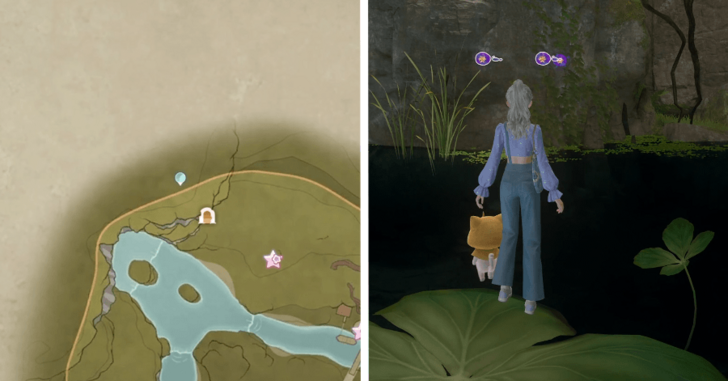 |
Waterfall Cavern, around the corner behind the Dews below the path. |
| 136-137 | 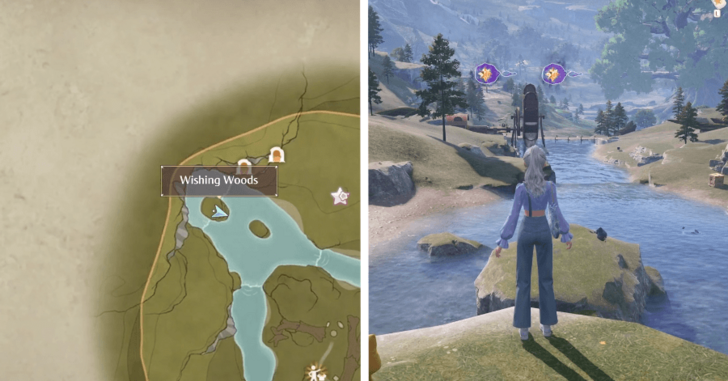 |
On the small island in front of the waterfall. |
| 138-139 | 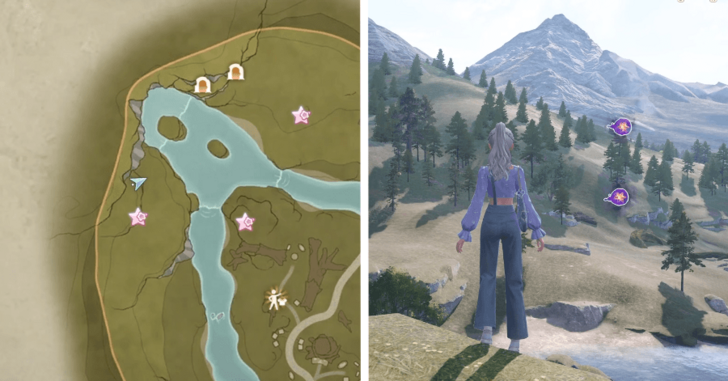 |
Off a cliff overseeing the river. |
| 140-141 | 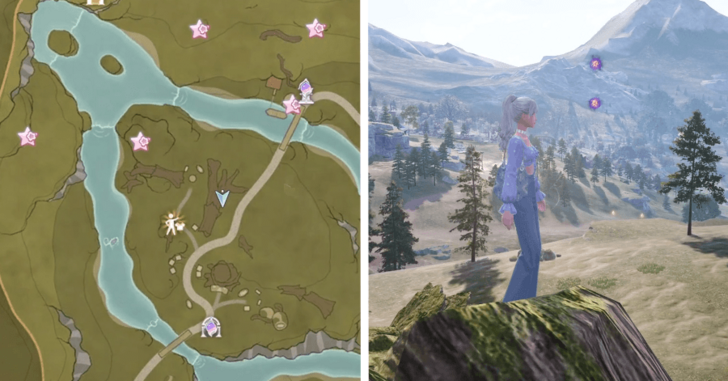 |
Above the path going to the waterwheel. |
| 142-143 | 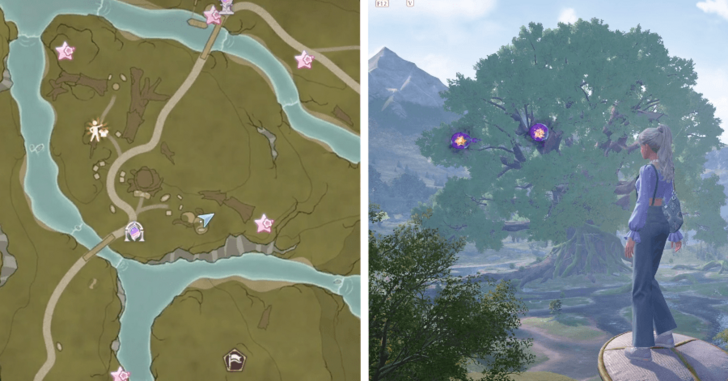 |
Above a stall overlooking the grand tree. |
| 144-145 | 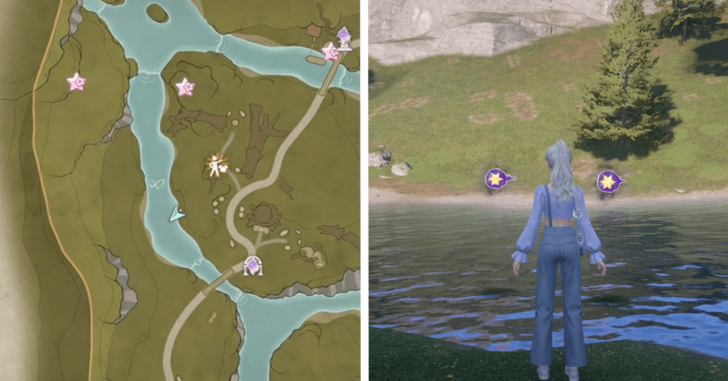 |
On the river to the west of the lab. |
| 146-147 | 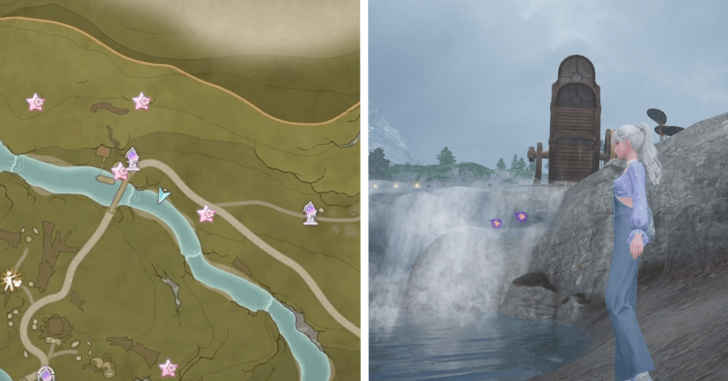 |
In front of the waterfall next to the waterwheel. |
| 148-149 | 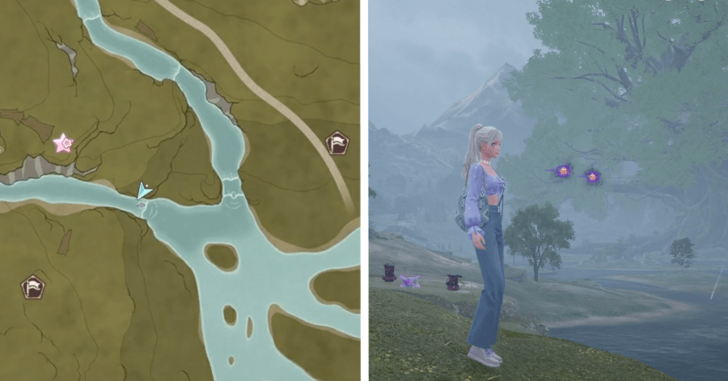 |
Along the river on the southeast part of Timis' Lab's island. |
| 150-151 | 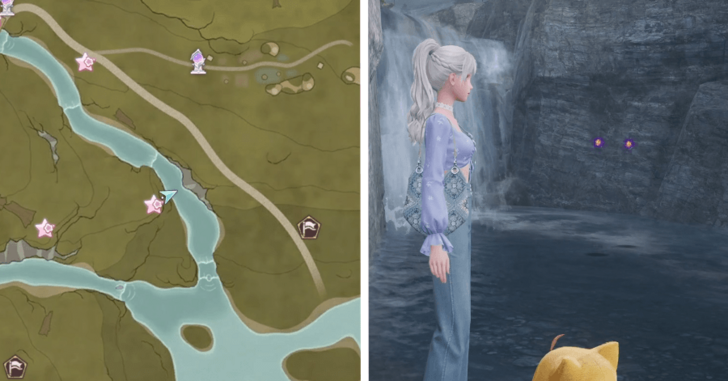 |
In front of a waterfall nearby a Whimink. |
| 152-153 |  |
In front of a waterfall at the southeastern tip of Timis' Lab's island. |
| 154-155 | 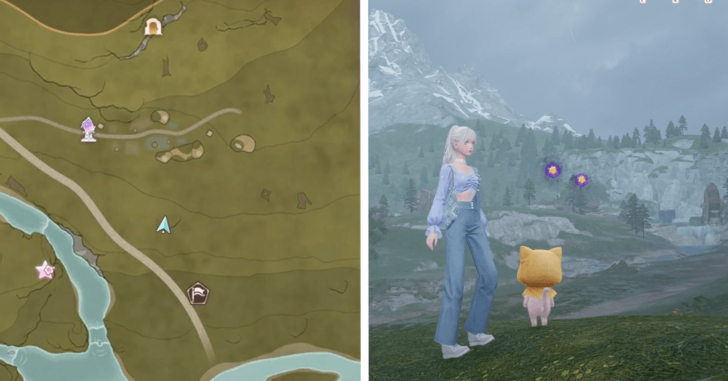 |
Off a ledge south of the farm. |
| 156-157 | 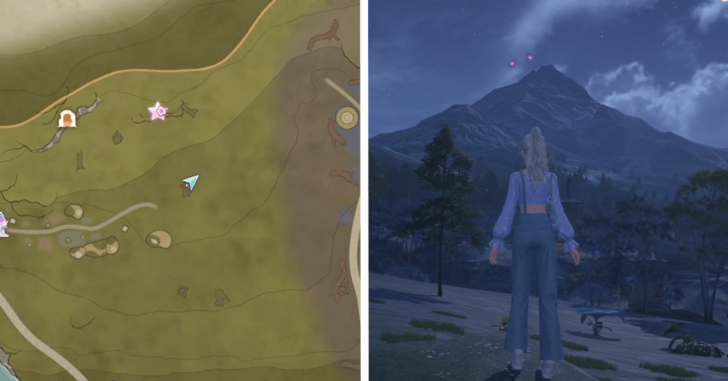 |
Above a bouncy leaf east of the farm. |
| 158-159 | 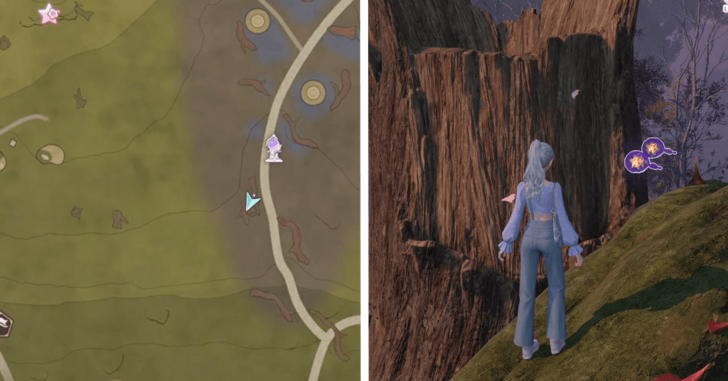 |
On a vine next to a stump. |
| 160-162 | 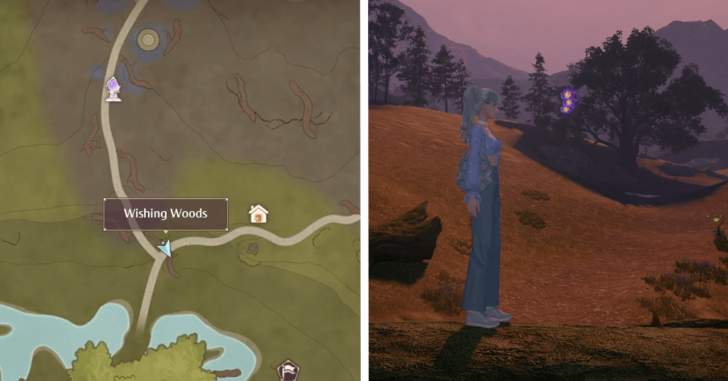 |
Above the path next to an arching vine. |
| 163-164 | 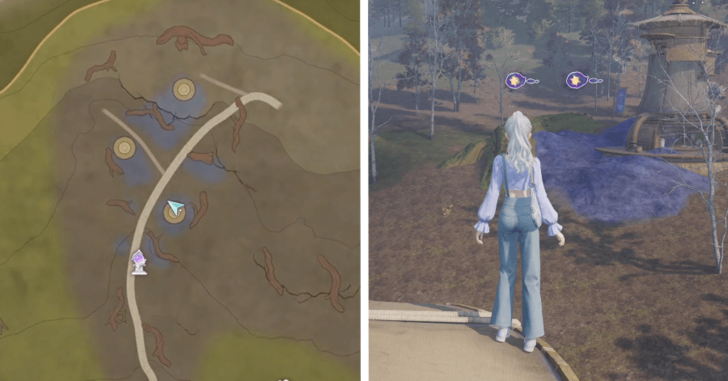 |
At the top of the bottom tower. |
| 165-166 | 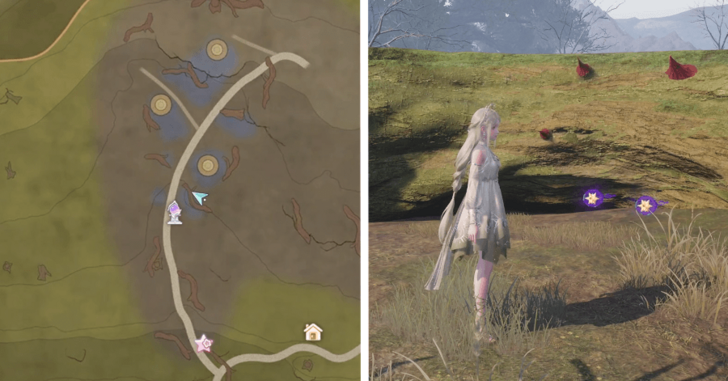 |
Next to a vine near the bottom tower. |
| 167-168 | 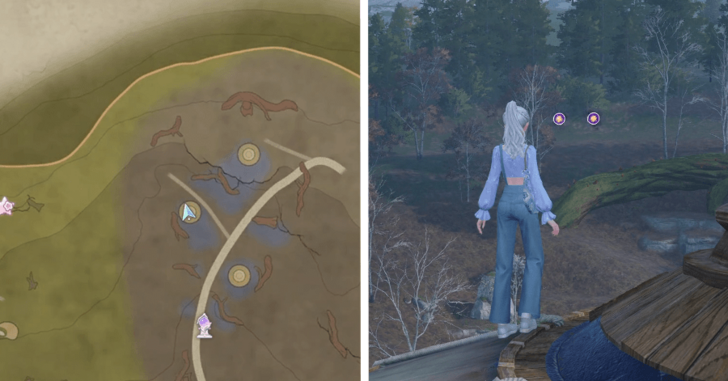 |
At the top of the middle tower. |
| 169-172 | 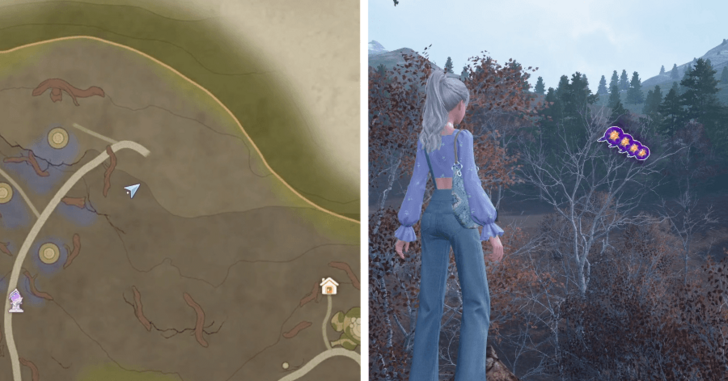 |
At the top of a tree to the east of the towers. |
| 173-174 | 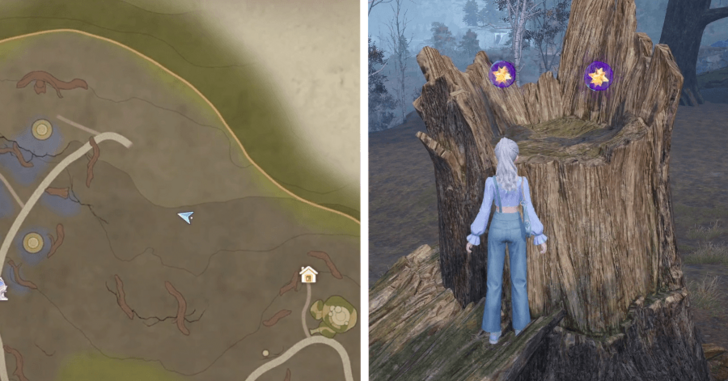 |
In a stump in the middle of some Momo eating flowers. |
| 175-177 | 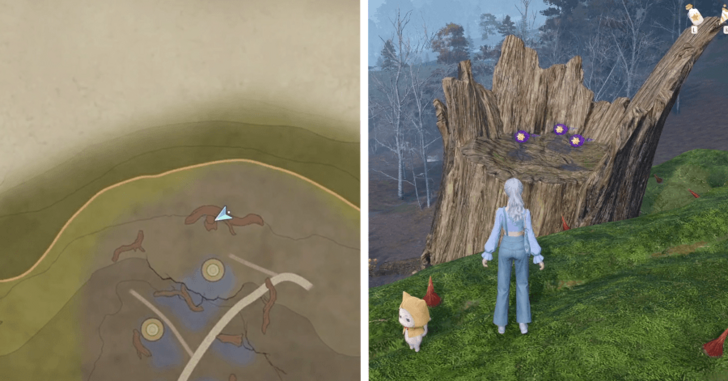 |
In a large stump north of the top tower. |
| 178-179 | 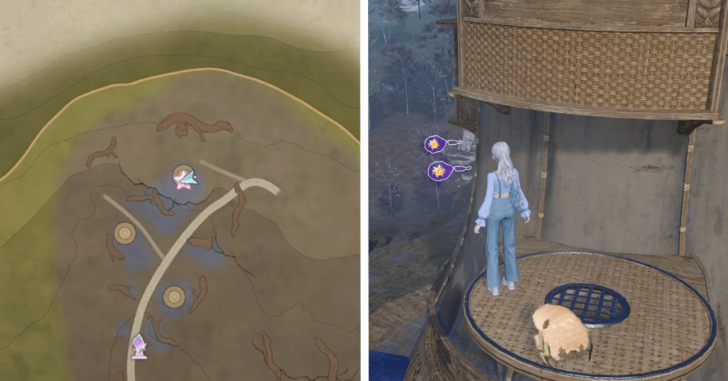 |
Along the side of the top tower. |
| 180-181 | 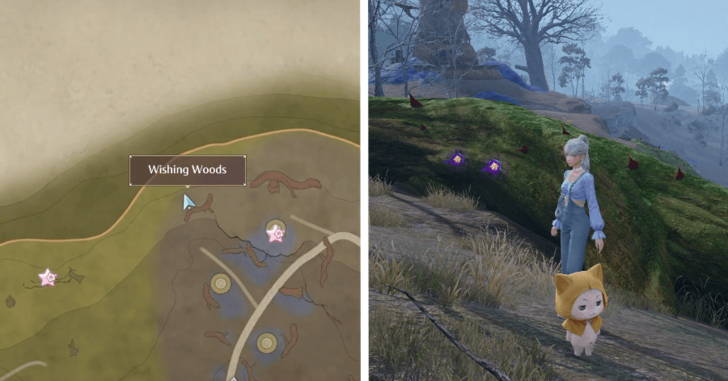 |
Behind a vine northwest of the towers. |
| 182-183 | 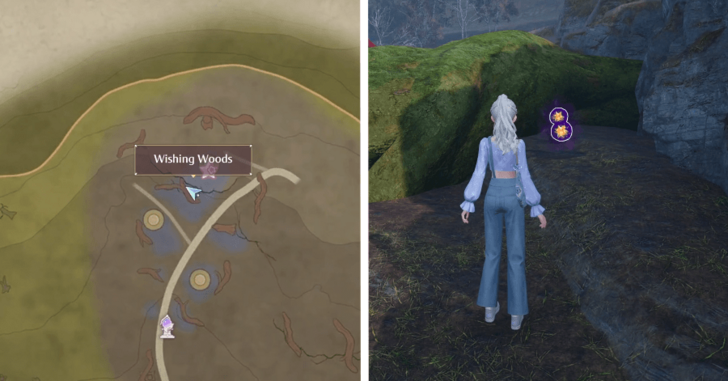 |
Behind a vine between the top and middle towers. |
| 184-185 | 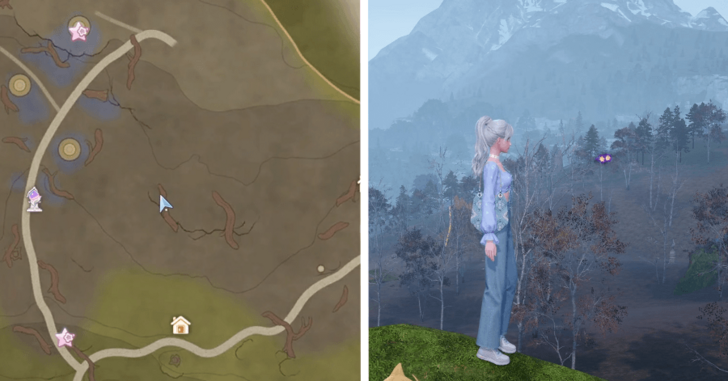 |
Off a vine in the middle of the corrupted area. |
| 186-188 | 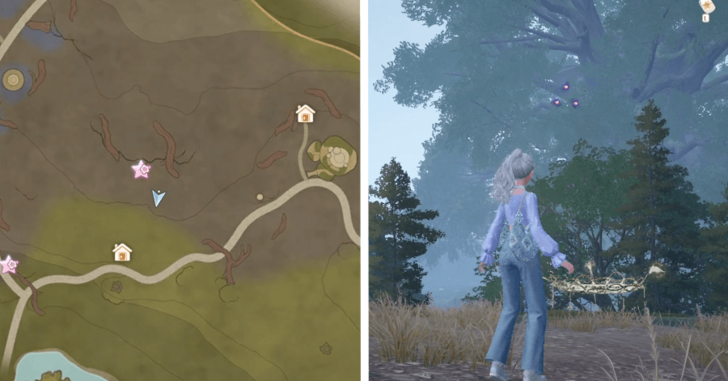 |
Above a trampoline jump facing the grand tree. |
| 189-190 | 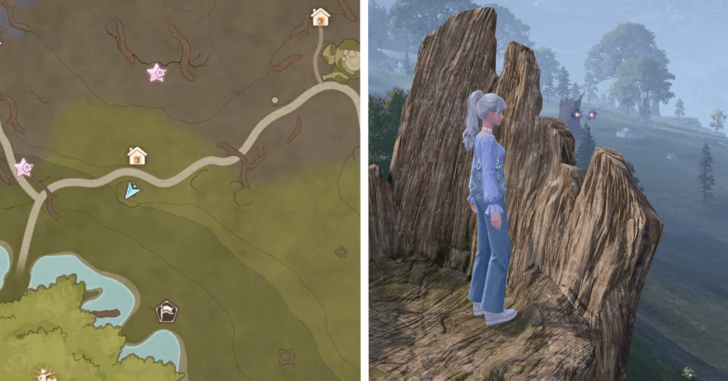 |
In the air next to a stump. |
| 191-193 | 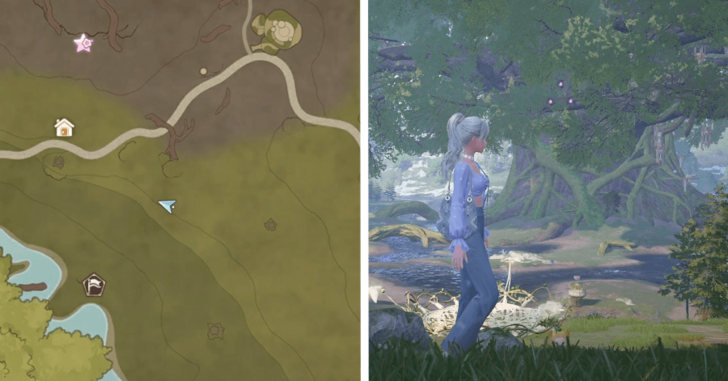 |
Above another trampoline jump that's closer to the tree. |
| 194-195 | 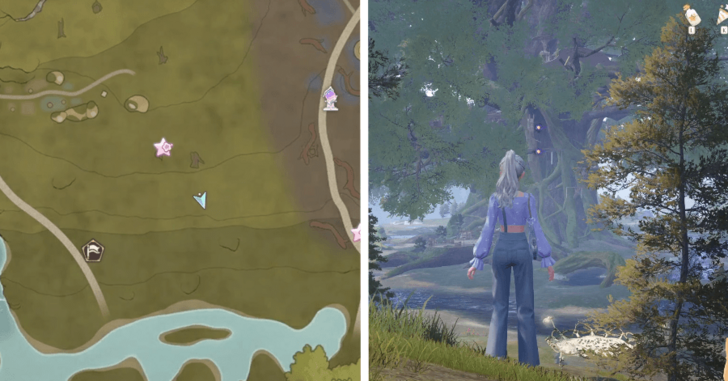 |
Above a trampoline jump southeast from the farm. |
| 196-198 | 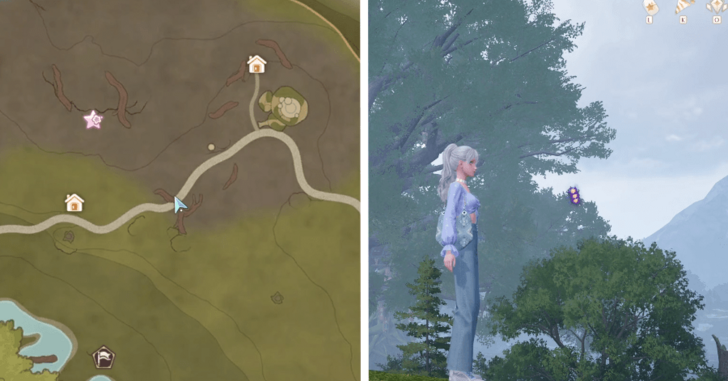 |
Above the path near an arching vine. |
| 199-200 | 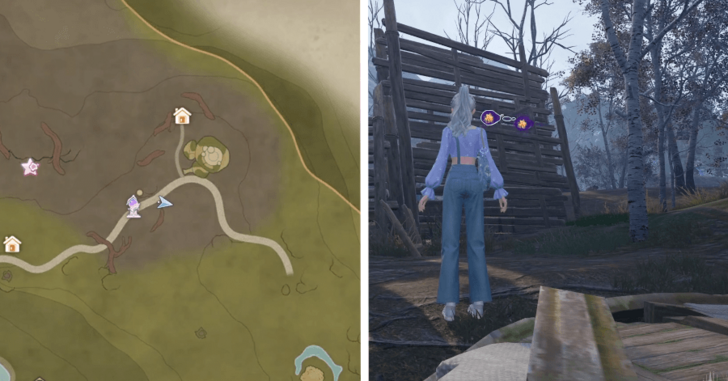 |
In front of a wall near the Desperation Orb Warehouse waypoint. |
| 201-202 | 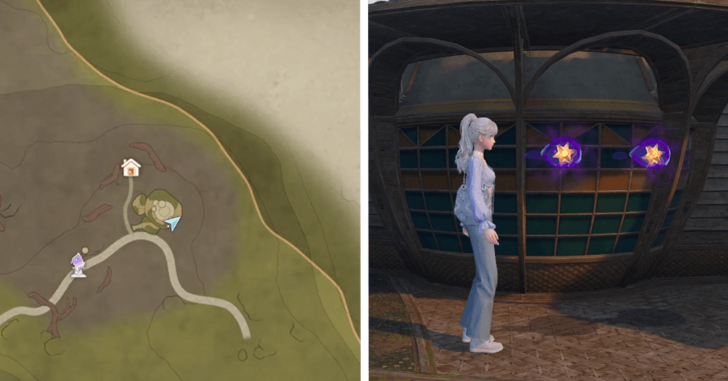 |
Beside the Desperation Orb Warehouse. |
| 203-204 | 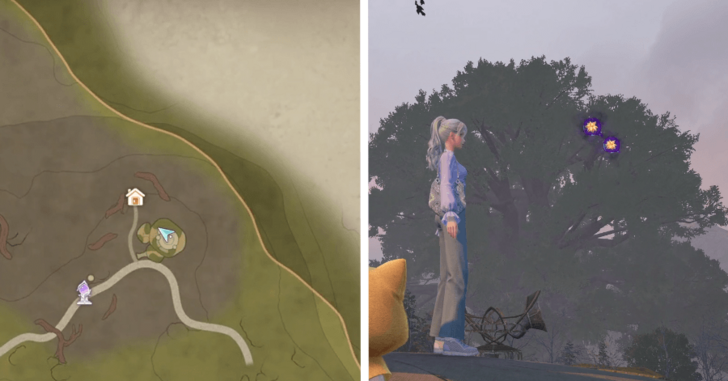 |
On top of the Desperation Orb Warehouse. |
| 205-206 | 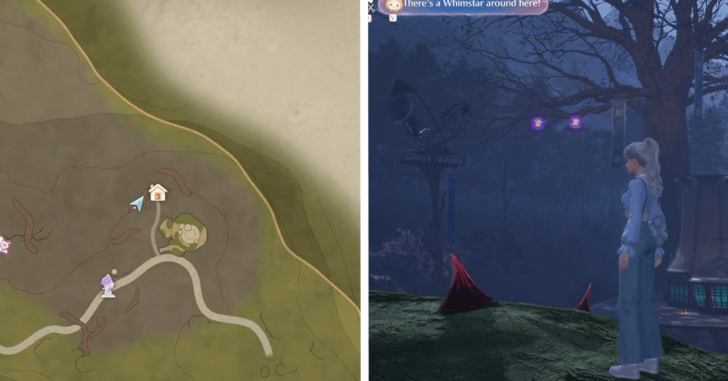 |
Above the Desperation Orb Warehouse Cavern entrance. |
| 207-209 |  |
Above a trampoline jump east of Desperation Orb Warehouse waypoint. |
| 210-211 |  |
In the air next to a large tree. |
| 212-213 | 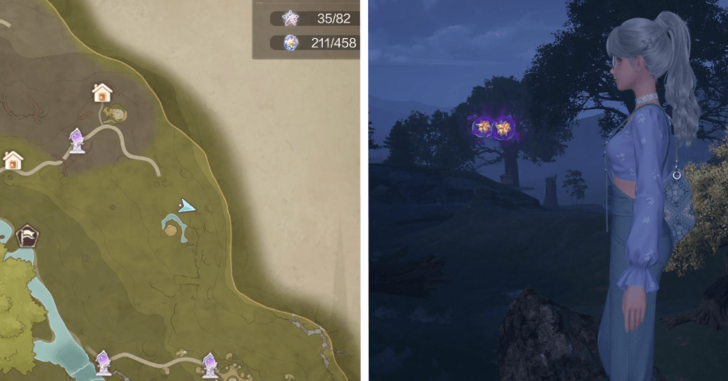 |
In the air next to a different tree. |
| 214-215 | 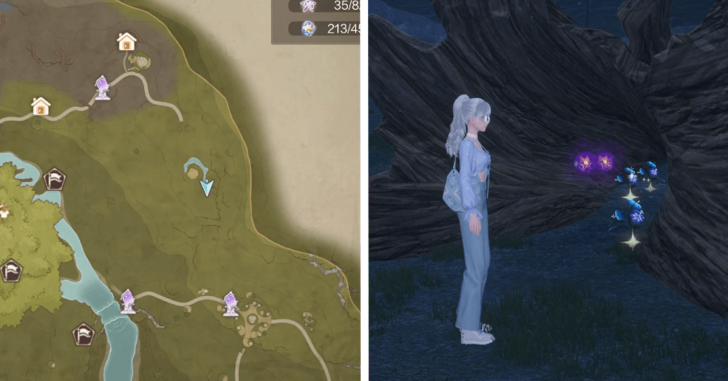 |
Inside a hollow log. |
| 216-219 | 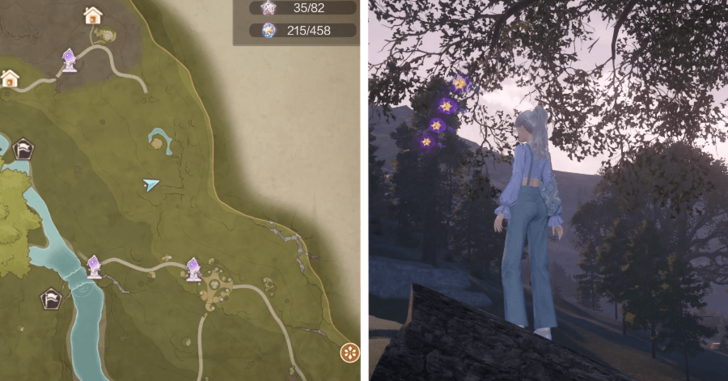 |
In the air next to a tree with a Momo rope climb. |
| 220-221 | 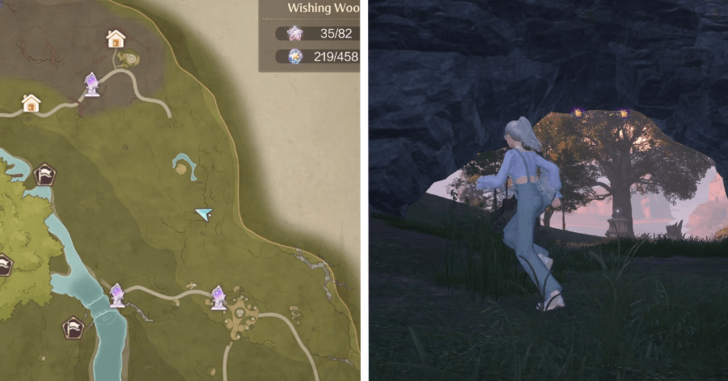 |
Under a stone arch. |
| 222-223 | 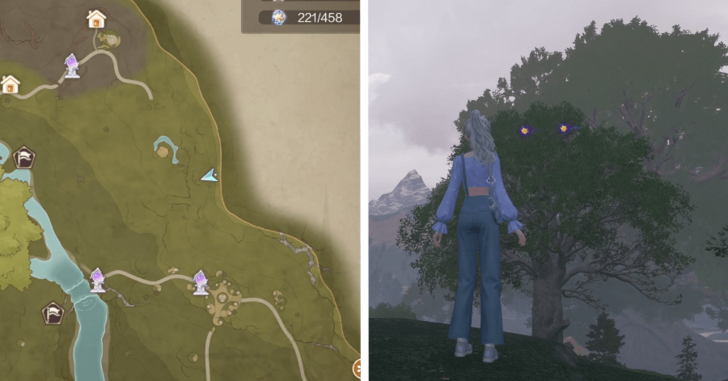 |
Off a ledge overlooking the grand tree. |
| 224-225 | 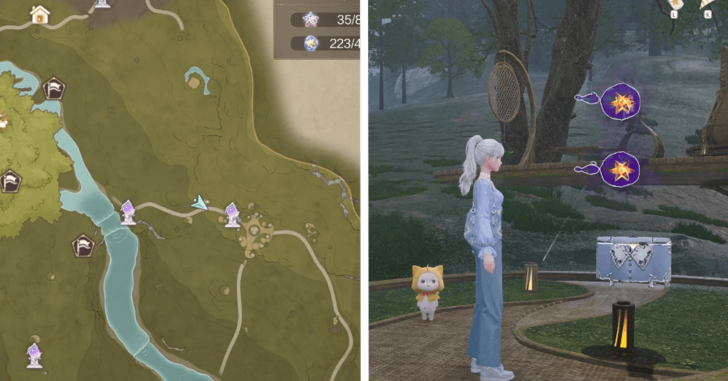 |
On a platform right in front of a blue chest. |
| 226-228 | 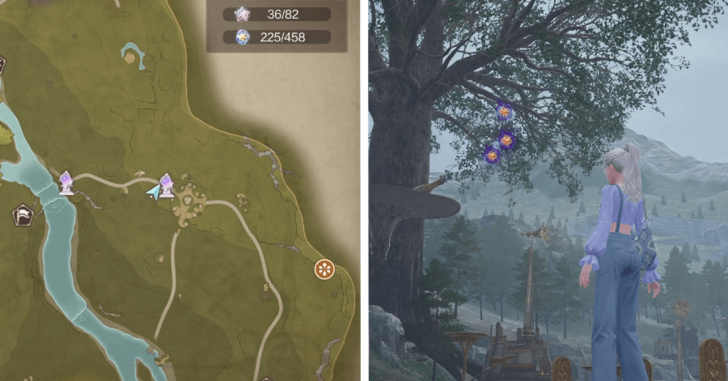 |
Above a hut next to the Wish Celebration Center waypoint. |
| 229-231 | 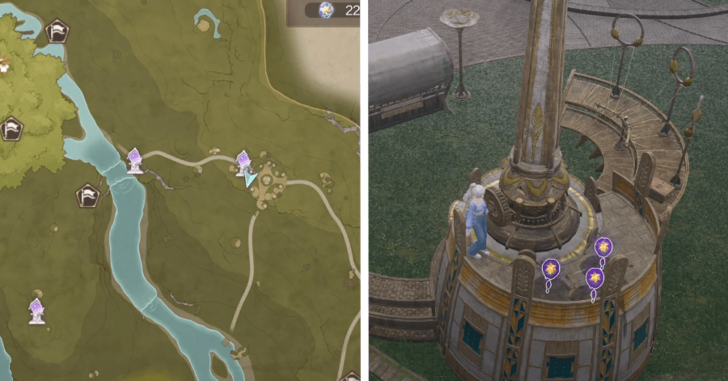 |
On a hut hidden behind some tiny walls. |
| 232-234 | 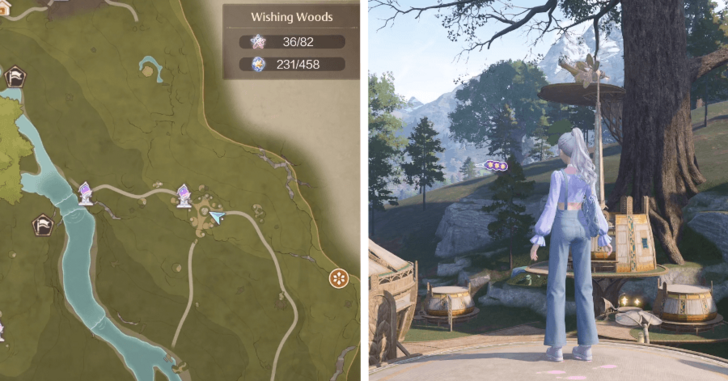 |
Above the central path. |
| 235-237 | 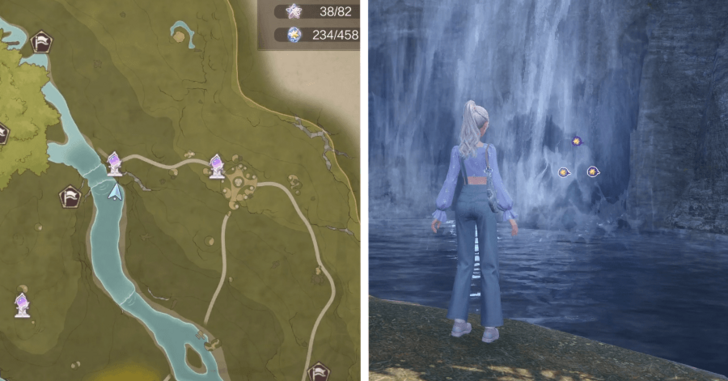 |
In front of the waterfall by the Flower Valley Waterfall waypoint. |
| 238-239 | 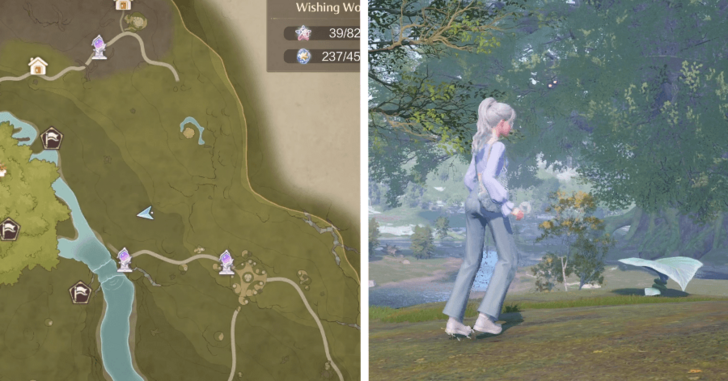 |
Above a bouncy leaf north of the Flower Valley Waterfall waypoint. |
| 240-242 |  |
Above a trampoline jump guarded by some enemies. |
| 243-244 |  |
In the air off a stump with a Whimstar. |
| 245-247 |  |
On a stump east of the Wish Celebration Center. |
| 248-251 | 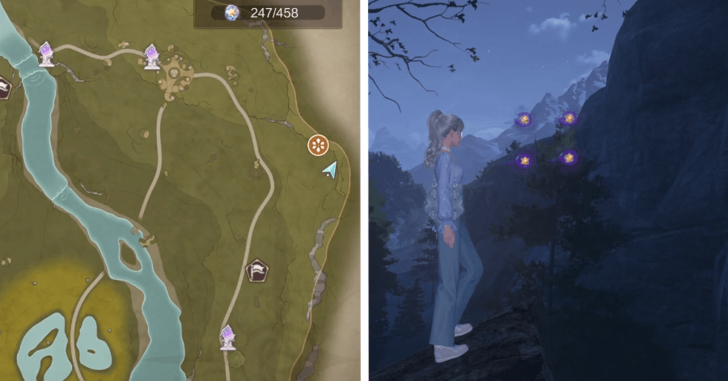 |
In the air near the Deep Aurosa Valley Cavern. |
| 252-253 | 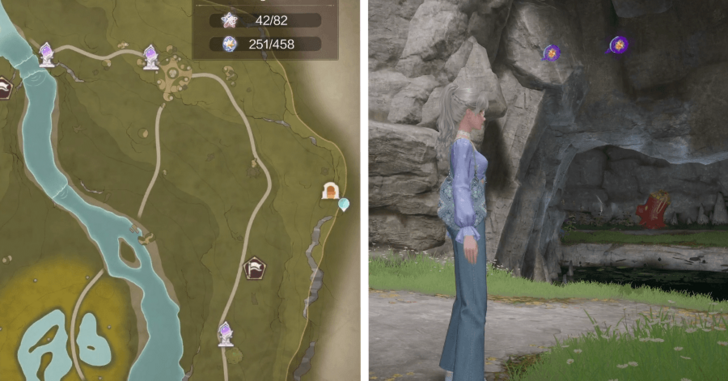 |
Deep Aurosa Valley Cavern, in a secret area accessed by a breakable floor and small hole that requires shrinking. |
| 254-255 | 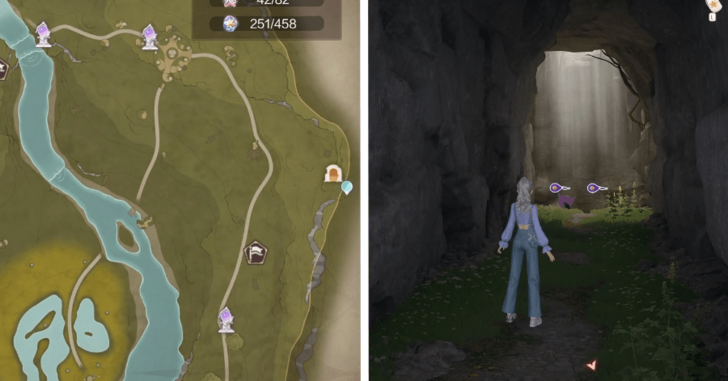 |
Deep Aurosa Valley Cavern, at the entrance of a tunnel just past a rope where the breakable floor is. |
| 256-258 | 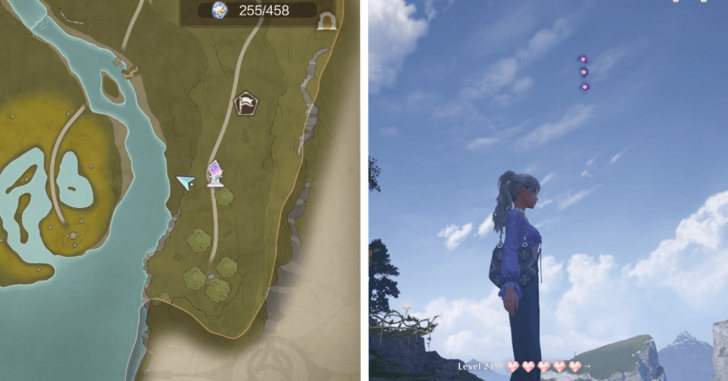 |
Above a trampoline jump west of the Land of Starfall waypoint. |
| 259-261 | 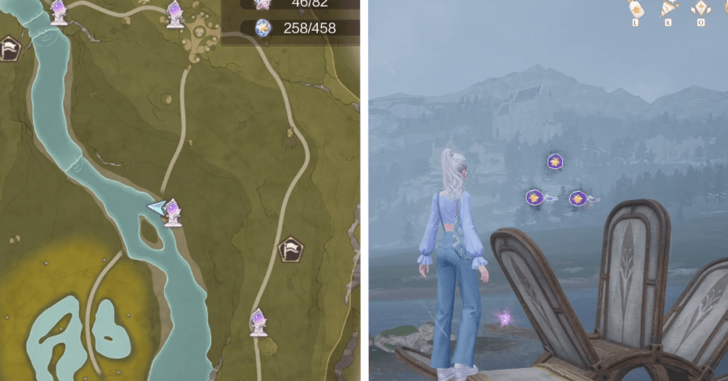 |
Above the Aurosa Valley waterwheel. |
| 262-263 | 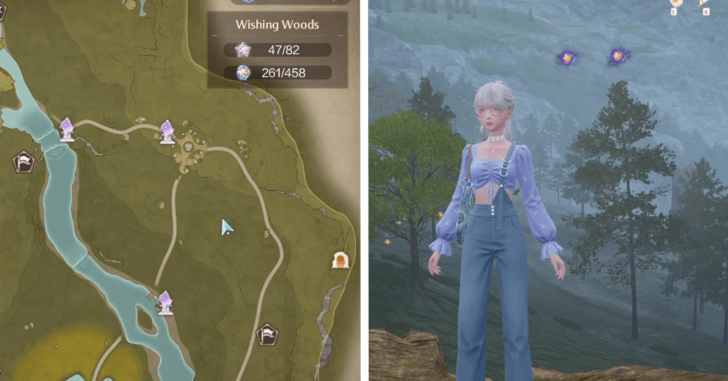 |
Off a stump southeast of the Wish Celebration Center. |
| 264-266 | 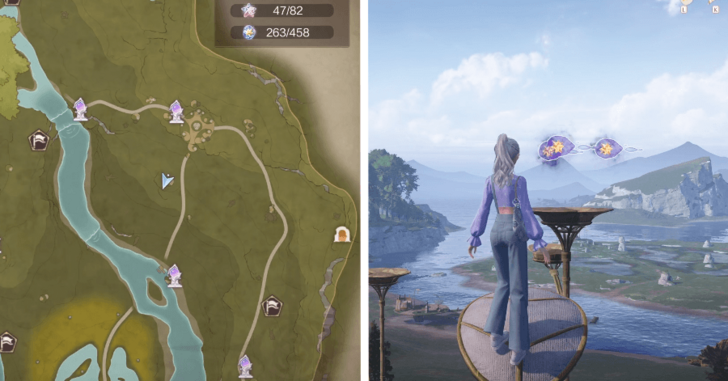 |
Above a platform south of the Wish Celebration Center . |
| 267-269 | 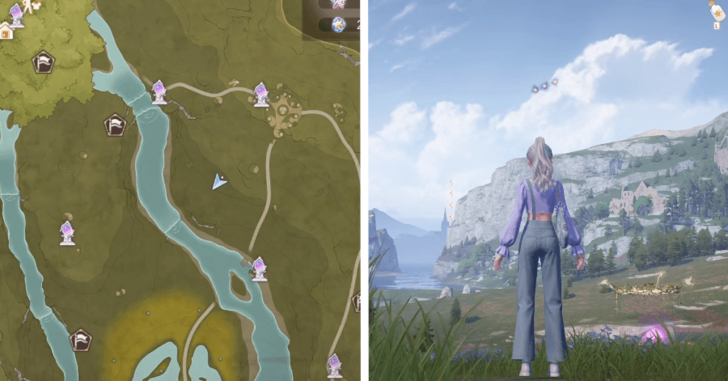 |
Above a trampoline jump near a Curio. |
| 270-271 | 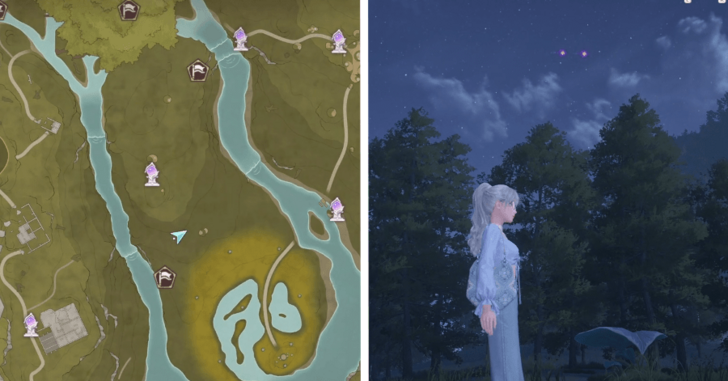 |
Above a bouncy leaf guarded by an enemy. |
| 272-273 | 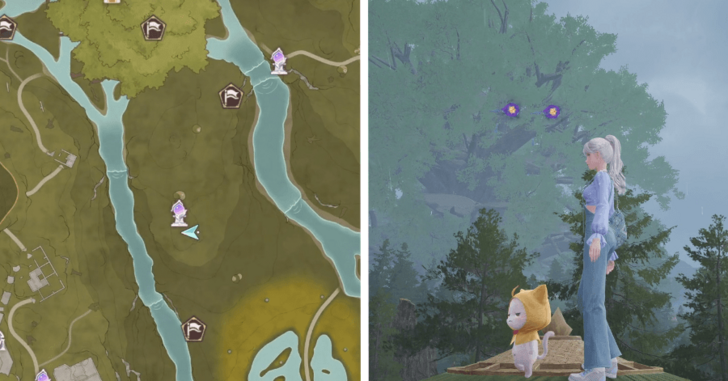 |
Above a rope climb near the Ascetic Camp waypoint. |
| 274-276 | 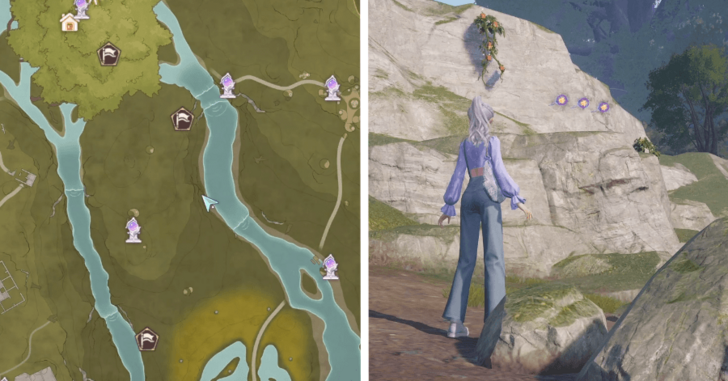 |
On a ledge by the river. |
| 277-278 | 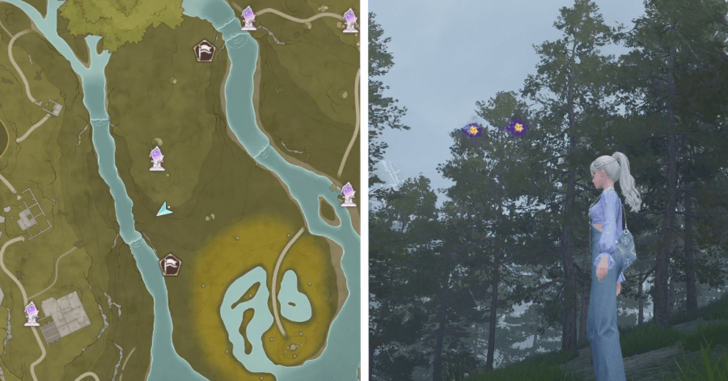 |
In the air south of the Ascetic Camp waypoint. |
| 279-281 | 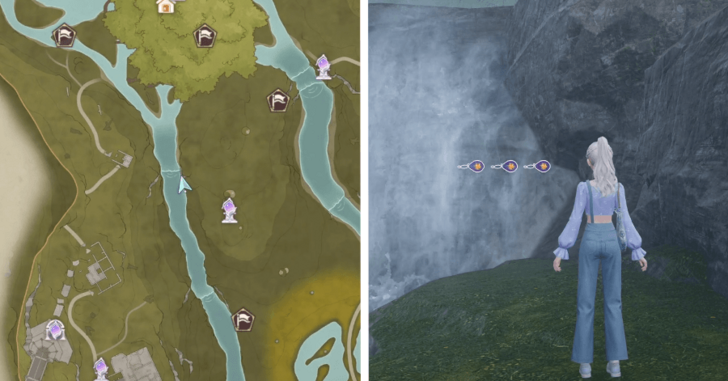 |
In front of the waterfall northwest of the Ascetic Camp waypoint. |
| 282-283 | 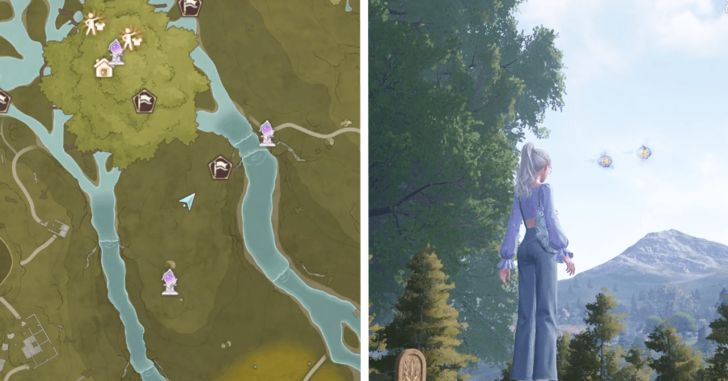 |
On top of a hut on a platform. |
| 284-285 | 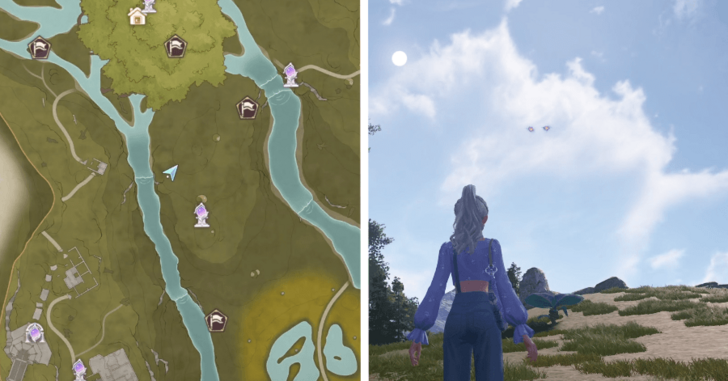 |
Above a bouncy leaf guarded by some enemies. |
| 286-287 | 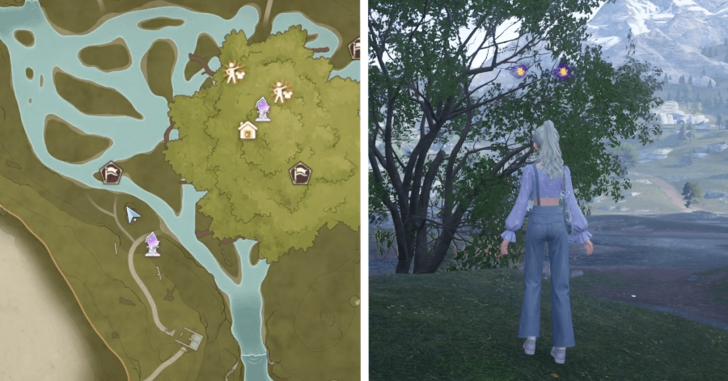 |
Over a ledge northwest of the Swordsmith Ruins Entrance waypoint. |
| 288-289 | 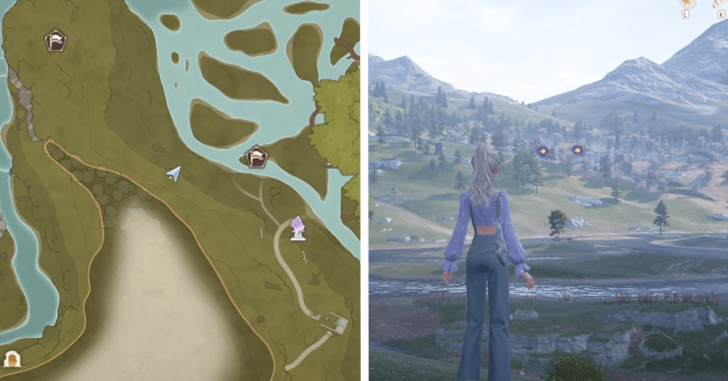 |
Off a ledge overlooking the many streams before the grand tree. |
| 290-291 | 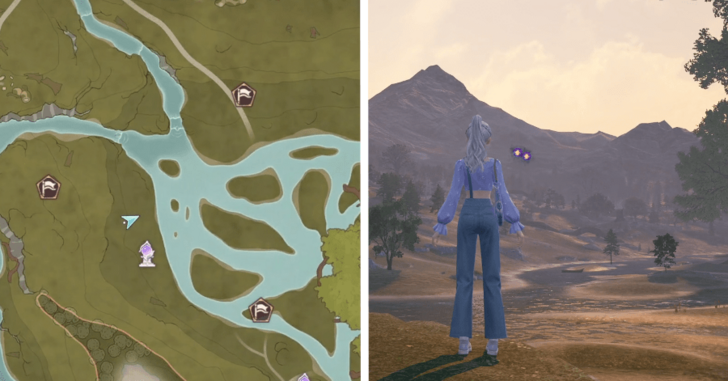 |
Off a ledge north of the Shoal Slope waypoint. |
| 292-294 | 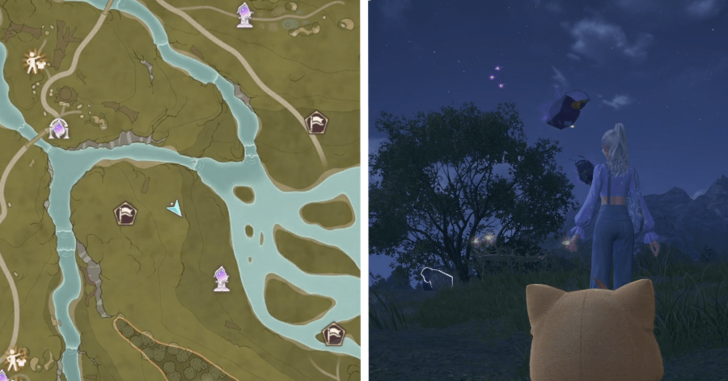 |
Above a trampoline jump guarded by some enemies. |
| 295-296 | 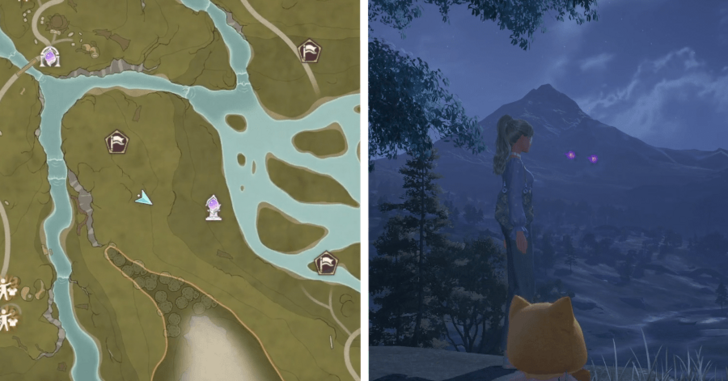 |
In the air right next to a Chronos Tree. |
| 297-298 | 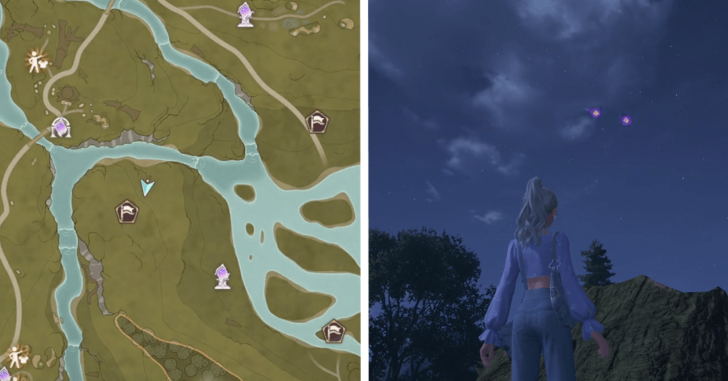 |
Above a large hollow log, easier to get by jumping off the nearby mini-game. |
| 299-300 | 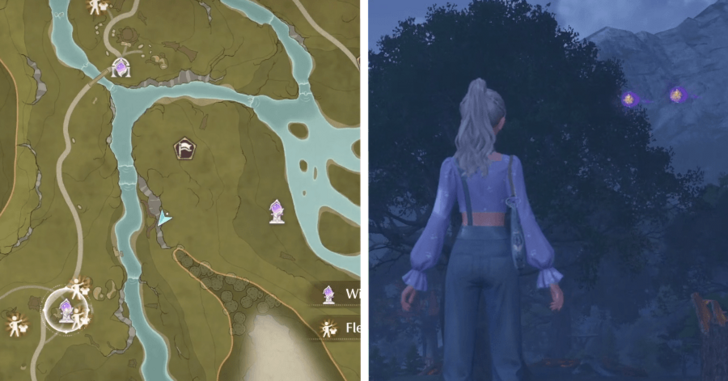 |
Off a cliff overlooking the Wishcraft Lab. |
| 301-302 |  |
Outer Swordsmith Ruins Cavern, behind an arch on the second floor. |
| 303-304 | 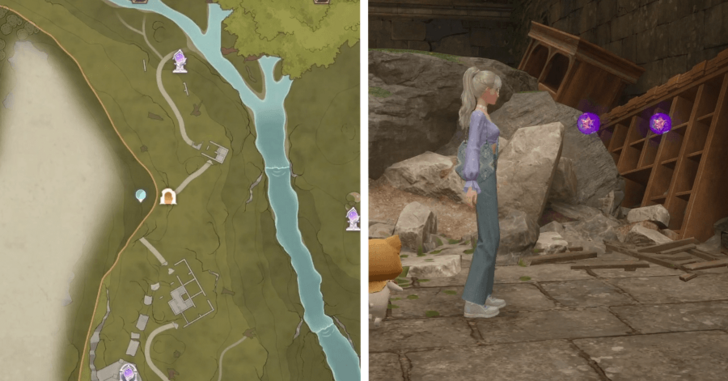 |
Outer Swordsmith Ruins Cavern, behind some rubble on the lower floor. |
| 305-306 | 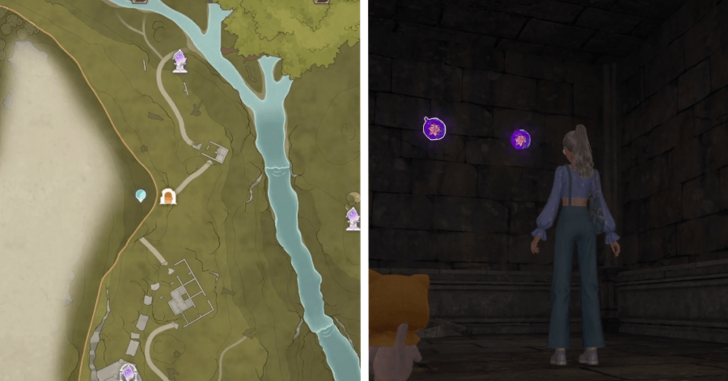 |
Outer Swordsmith Ruins Cavern, in a room next to the Dews behind the rubble. |
| 307-308 |  |
Outer Swordsmith Ruins Cavern, in a room accessed by shrinking and going through a pipe on the second floor. |
| 309-310 | 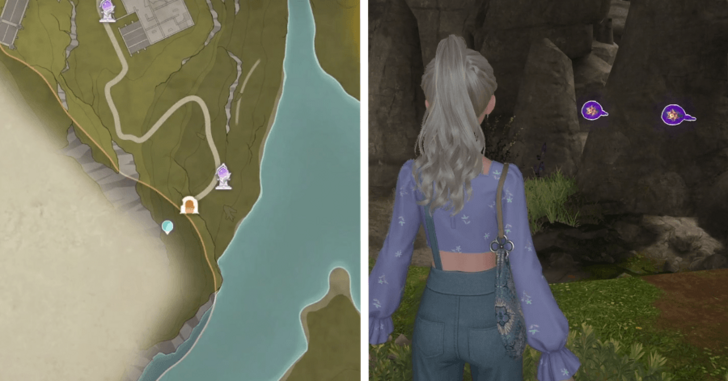 |
Deep Swordsmith Ruins Cavern, at the bottom near the start of the rope jumps. |
| 311-312 | 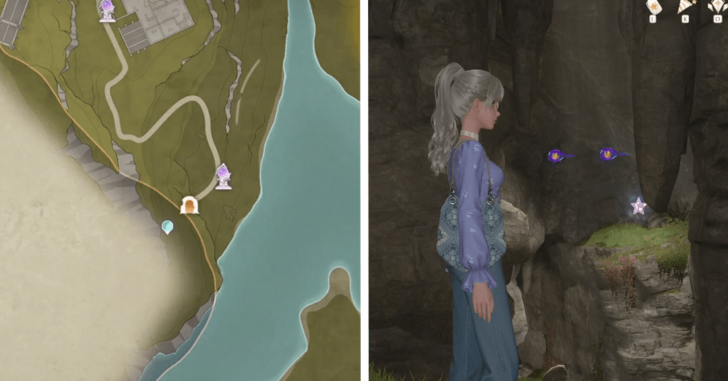 |
Deep Swordsmith Ruins Cavern, in the air midway through the rope jumps. |
| 313-314 | 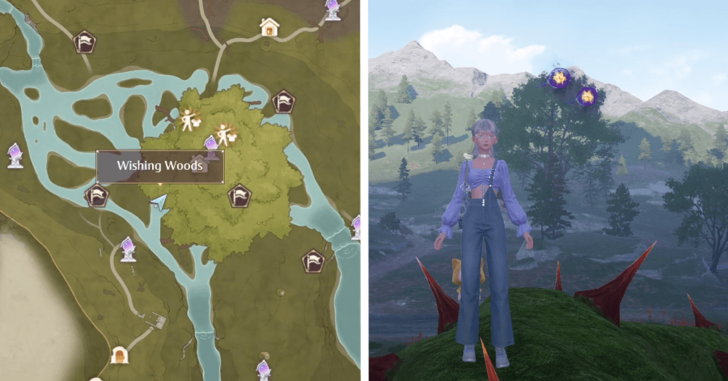 |
On a vine below the grand tree. |
| 315-316 | 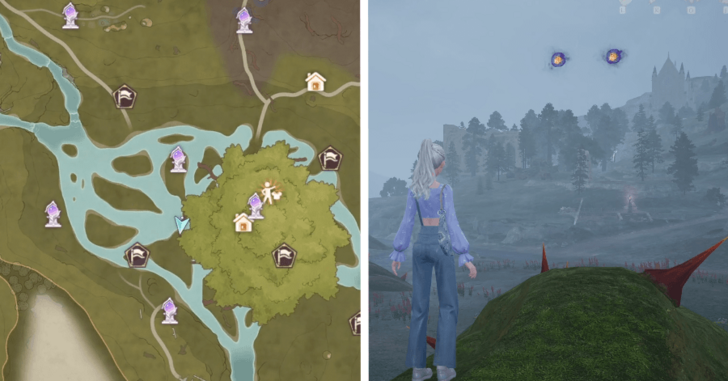 |
On a vine below the grand tree. |
| 317-319 | 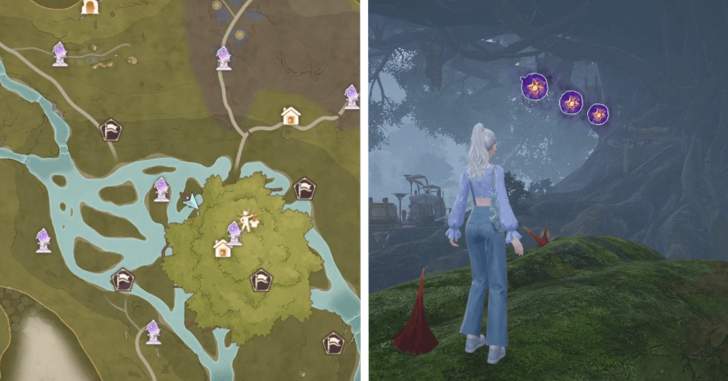 |
On a vine below the grand tree. |
| 320-321 | 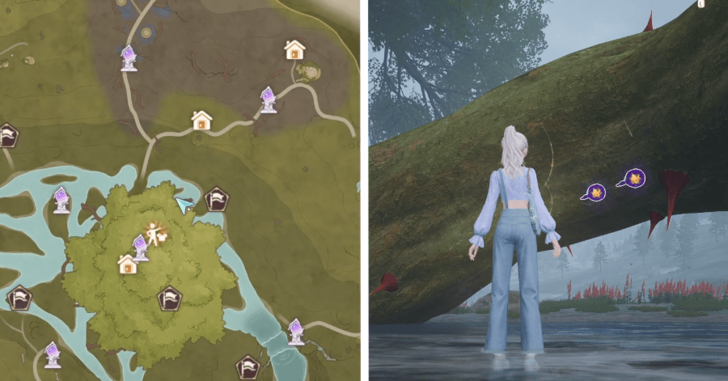 |
Underneath a vine below the grand tree. |
| 322-323 | 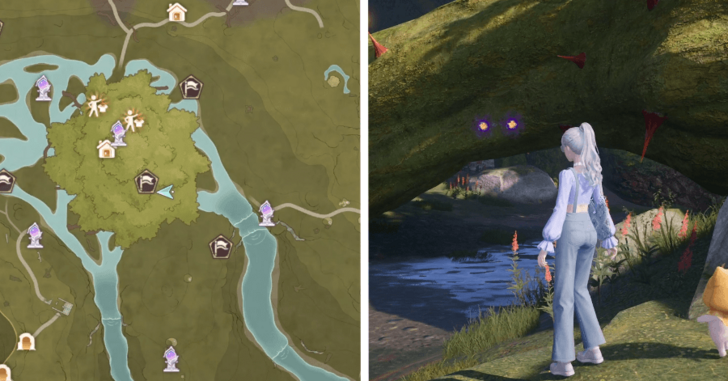 |
Underneath a vine below the grand tree. |
| 324-326 | 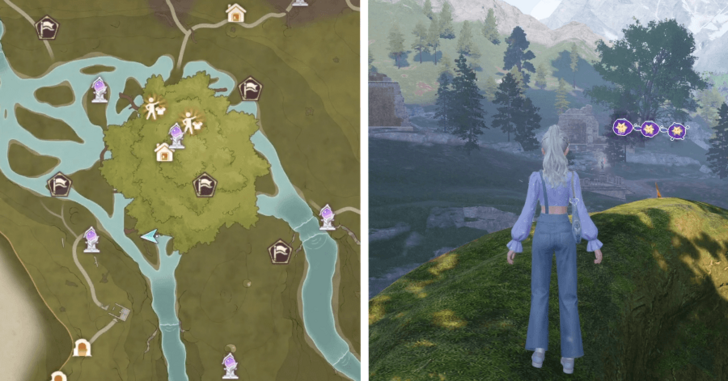 |
On a vine below the grand tree. |
| 327-328 | 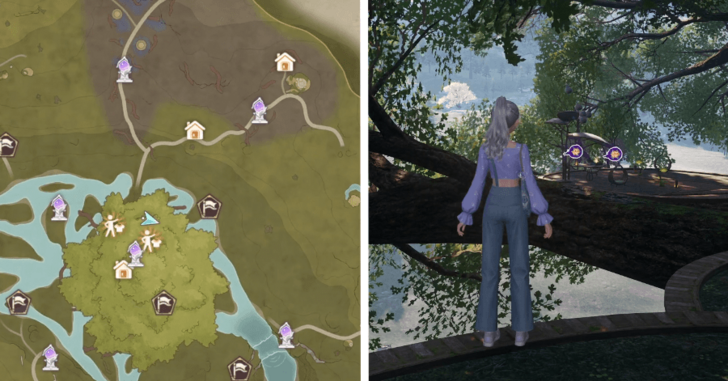 |
On one of the branches on the grand tree. |
| 329-331 |  |
On one of the branches on the grand tree. |
| 332-333 | 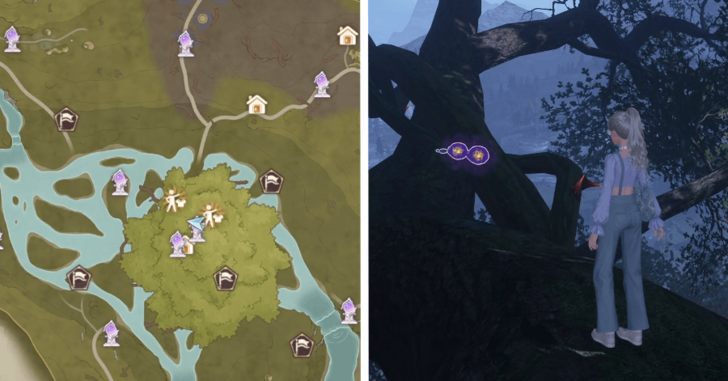 |
On one of the branches on the grand tree. |
| 334-336 | 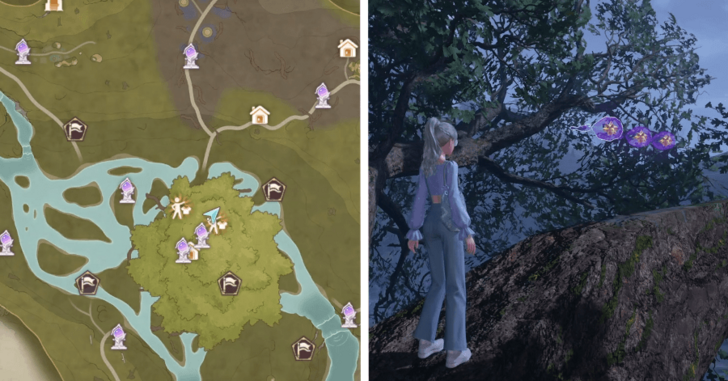 |
On one of the branches on the grand tree. |
| 337-339 | 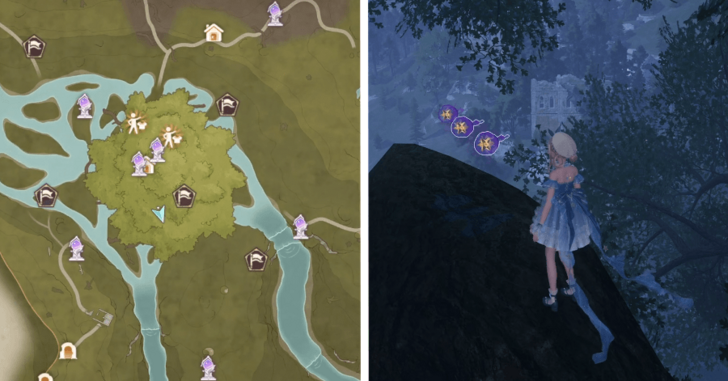 |
On one of the branches on the grand tree. |
| 340-341 | 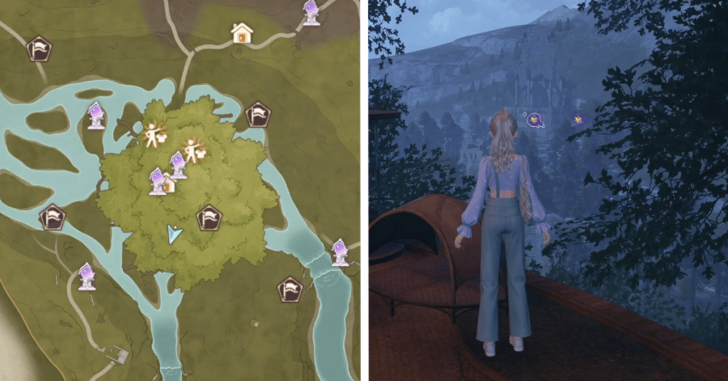 |
Off one of the platforms in the grand tree. |
| 342-344 | 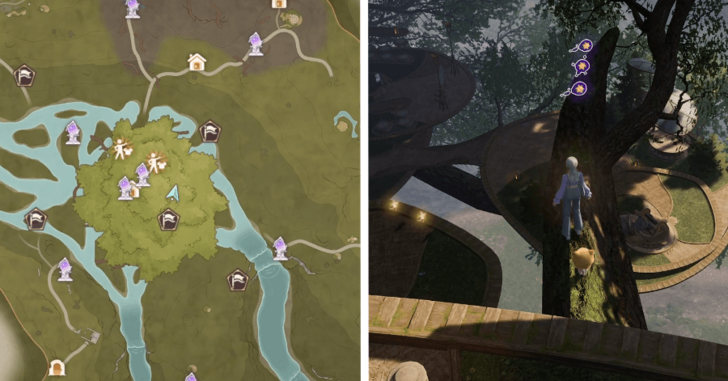 |
On one of the branches on the grand tree. |
| 345-347 | 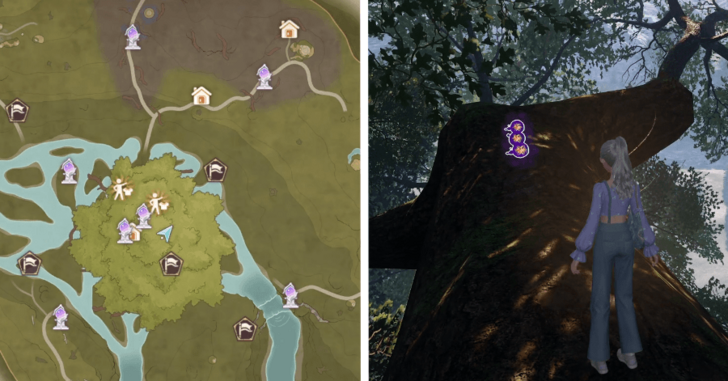 |
On one of the branches on the grand tree. |
| 348-349 | 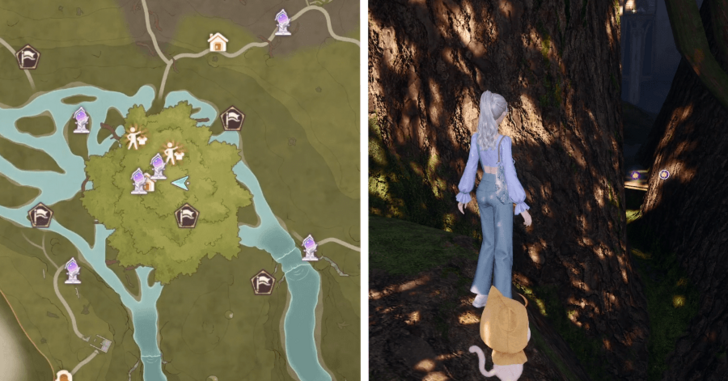 |
In a gap behind the Temple of Wishes. |
| 350-352 | 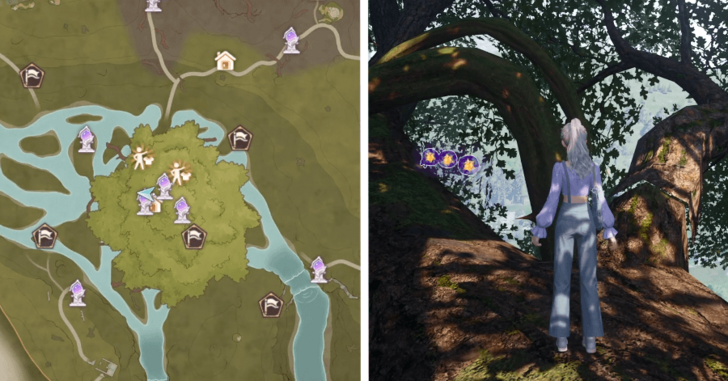 |
On one of the branches on the grand tree. |
| 353-355 | 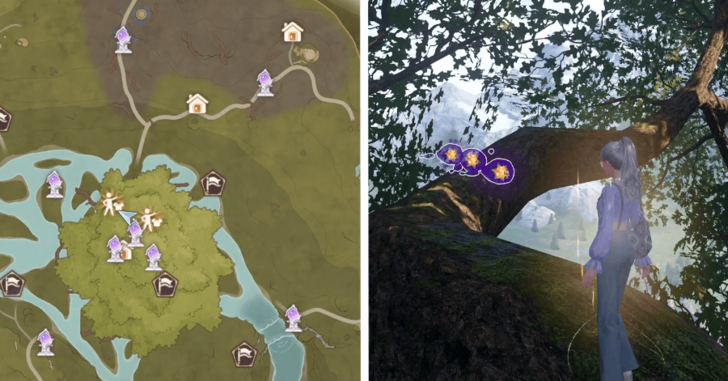 |
On one of the branches on the grand tree. |
| 356-357 | 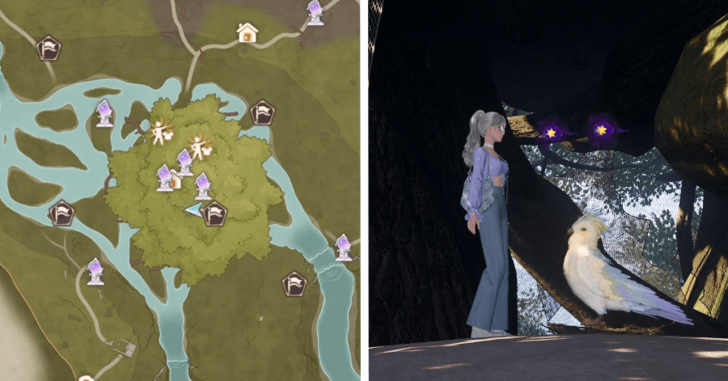 |
On top of a hut on the top floors of the grand tree. |
| 358-359 |  |
On one of the branches on the grand tree. |
| 360-362 | 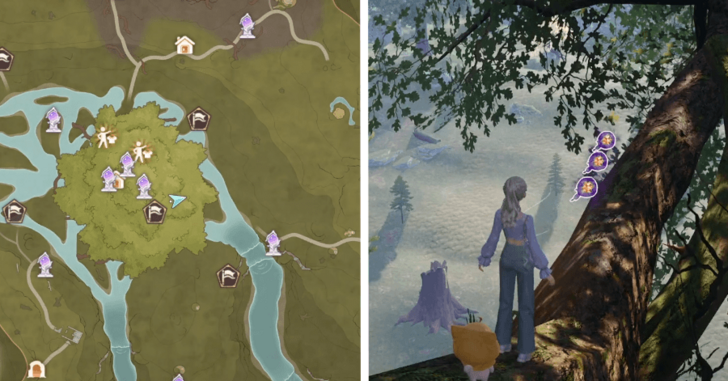 |
On one of the branches on the grand tree. |
| 363-365 | 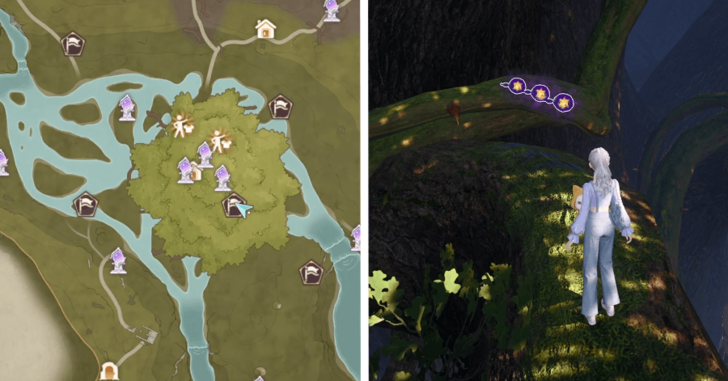 |
On one of the branches on the grand tree. |
| 366-367 | 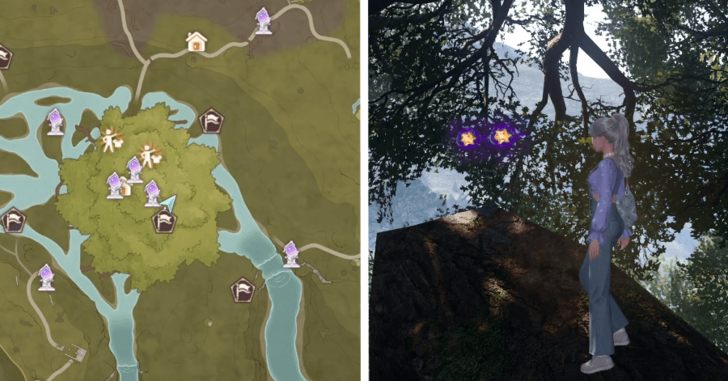 |
On one of the branches on the grand tree. |
| 368-369 | 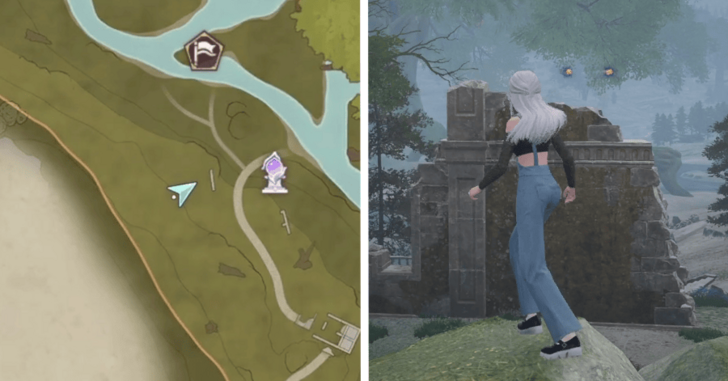 |
On top of a ruined wall |
| 370-371 | 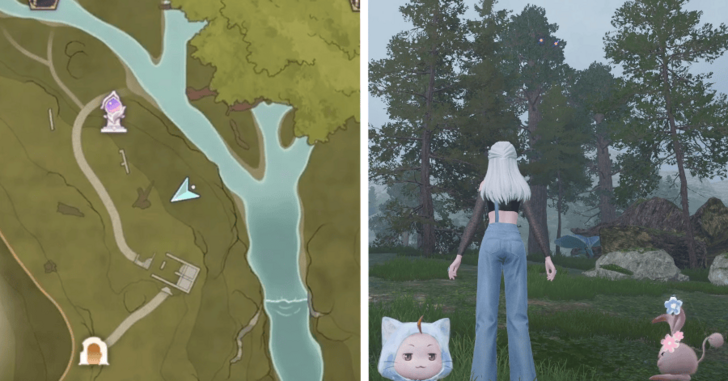 |
Above a bouncy leaf right next to a hollow log |
| 372-373 | 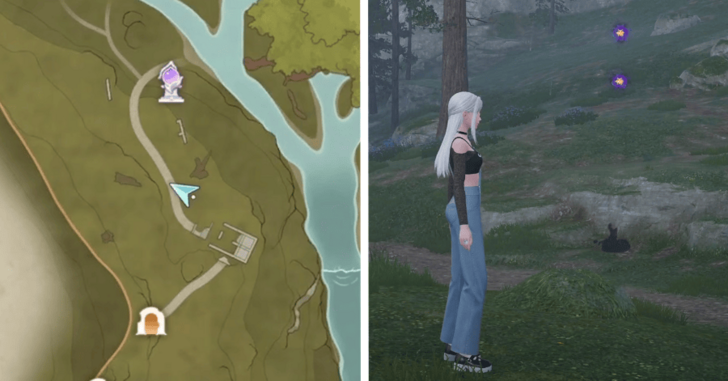 |
On the path leading to the cave |
| 374-376 | 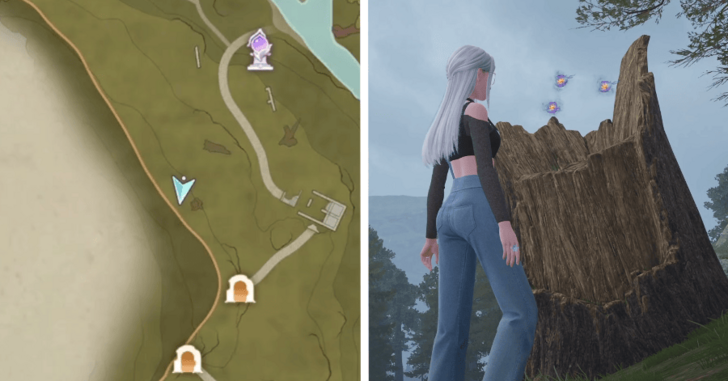 |
Right on top of a stump |
| 377-378 |  |
In front of the north entrance to the Outer Swordsmith Ruins Cavern |
| 379-380 |  |
On a small ledge overlooking the Ascetic Camp |
| 381-382 | 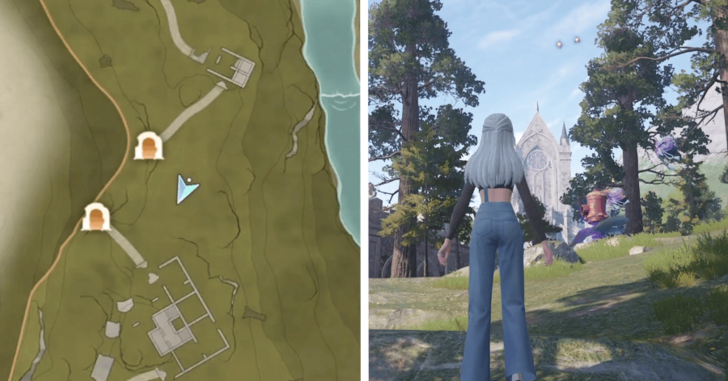 |
Above a bouncy leaf guarded by some enemies |
| 383-385 | 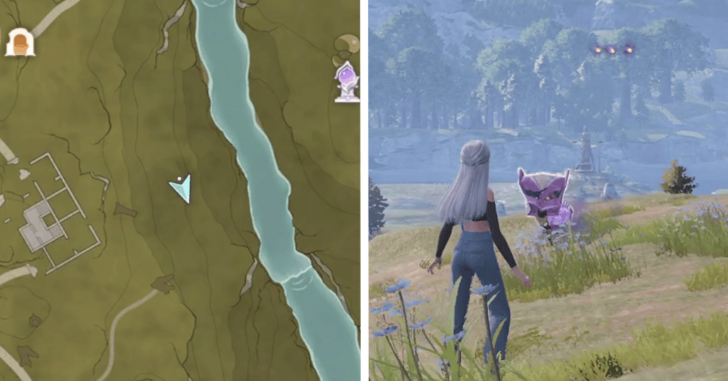 |
On a ledge guarded by some enemies |
| 386-387 | 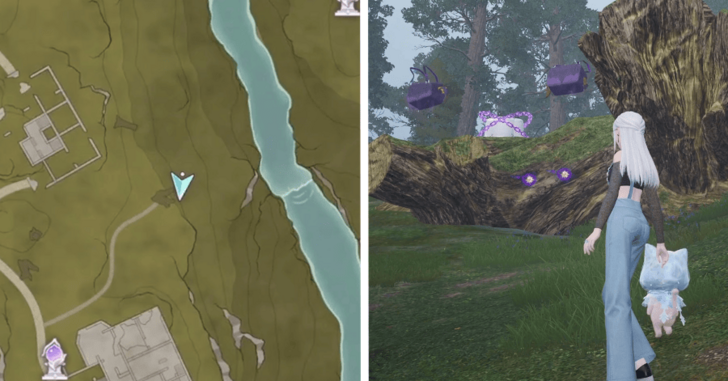 |
Behind a log with a blue chest guarded by enemies |
| 388-391 | 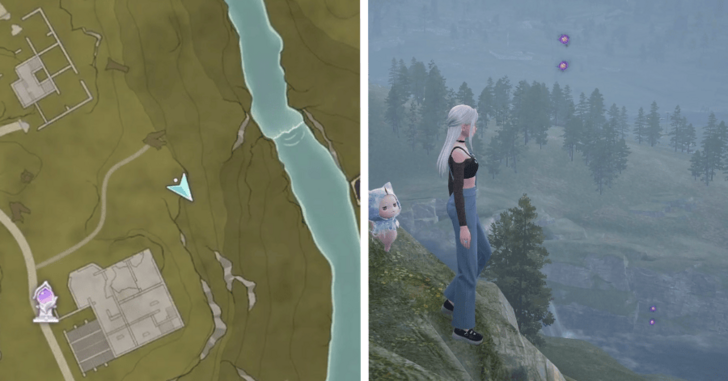 |
Two sets of Dews off of some cliffs towards the end of the river |
| 392-393 | 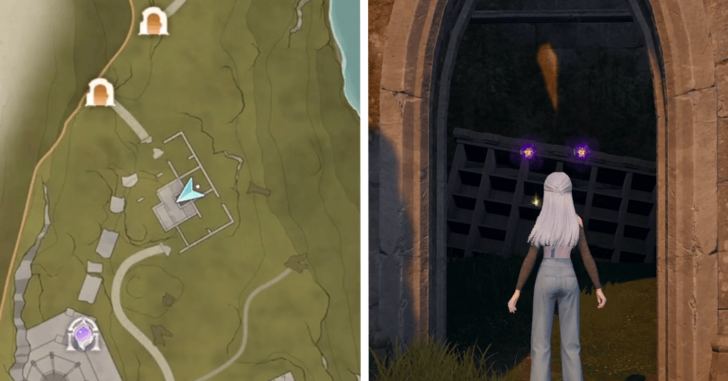 |
In a room in the medium sized ruins in the middle |
| 394-395 |  |
Behind a tiny wall right outside the medium sized ruins |
| 396-397 | 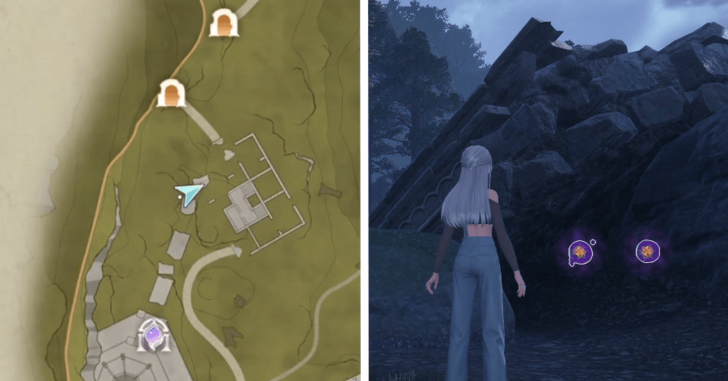 |
Underneath a broken piece of the walkway |
| 398-400 | 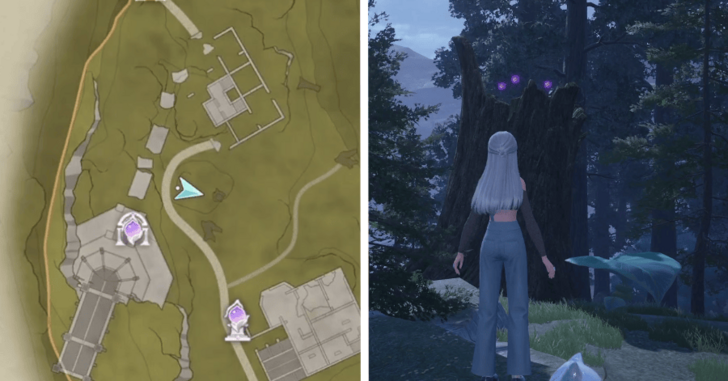 |
On a stump accessed by a bouncy leaf |
| 401-403 | 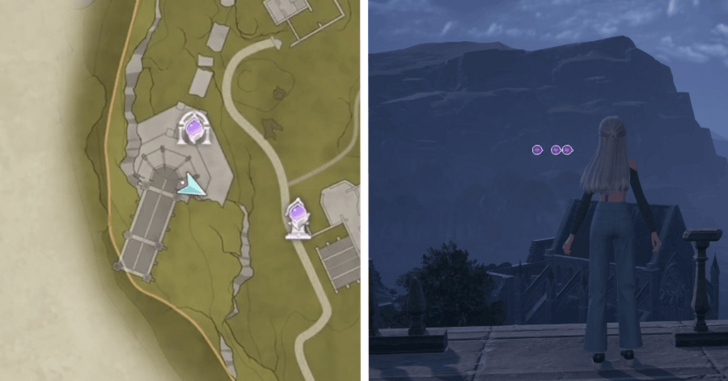 |
Off the roof of the Swordsmith Ruins, accessed by a trampoline jump to the west |
| 404-405 | 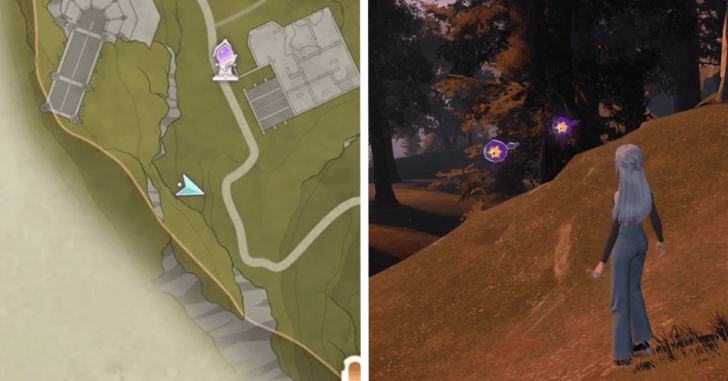 |
On a ledge southwest of the large ruins at the bottom |
| 406-407 | 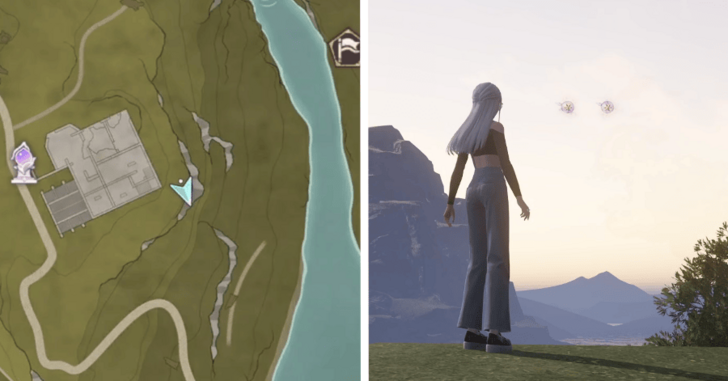 |
Off a cliff behind the large ruins at the bottom |
| 408-409 | 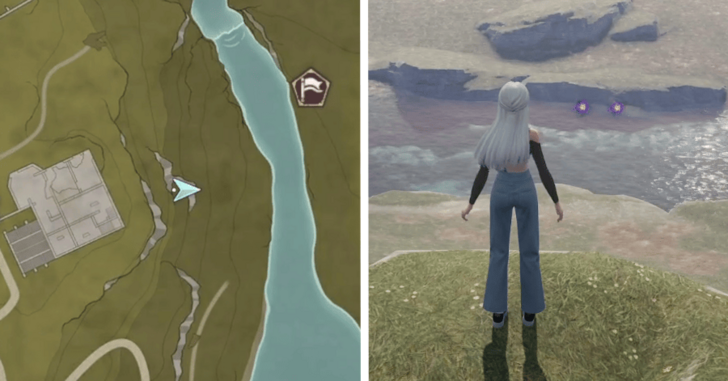 |
In the air, collected by jumping off the nearby cliff |
| 410-412 | 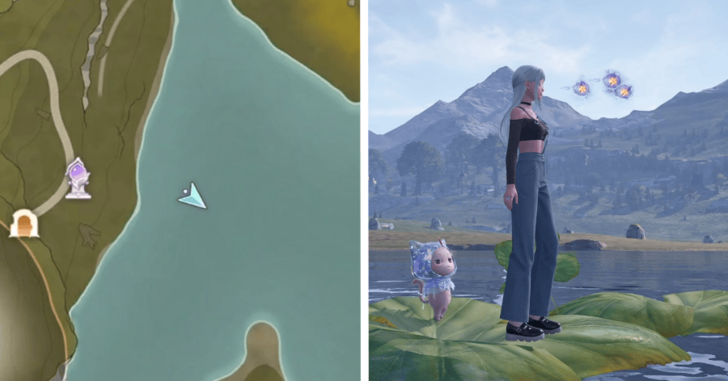 |
On the water east of the Secluded Cave |
| 413-414 | 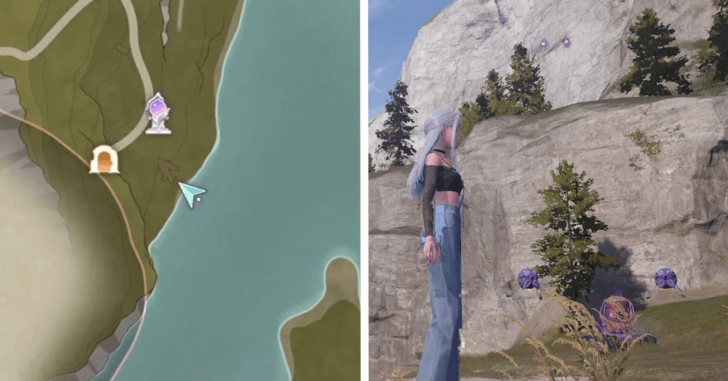 |
Above a bouncy leaf guarded by some enemies on the southern most tip |
| 415-416 | 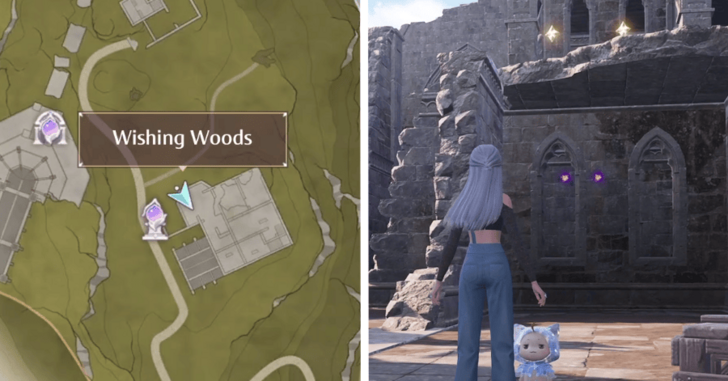 |
Behind a wall in the ruin where the 360 degree rotating guardian is |
| 417-419 | 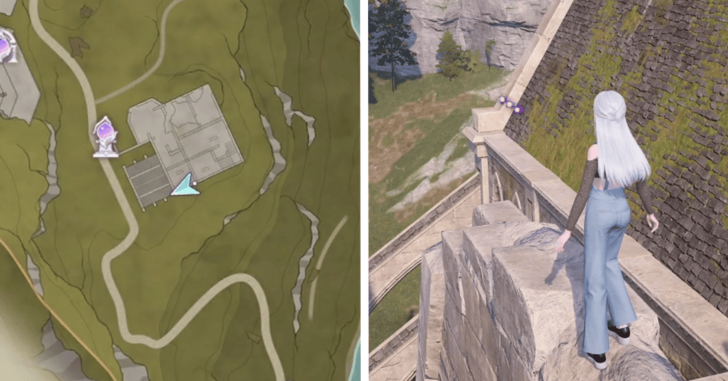 |
On the roof of the large ruins, requires jumping on the broken walls |
| 420-421 |  |
Timis' Beauty Lab, in a small room below a breakable floor at the beginning |
| 422-423 | 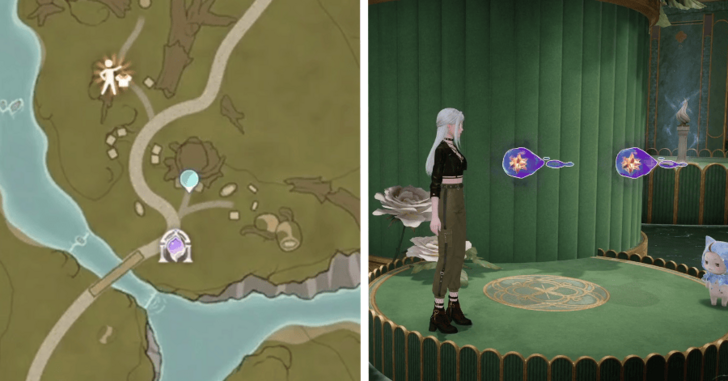 |
Timis' Beauty Lab, on a small platform behind the large perfume bottle |
| 424-425 | 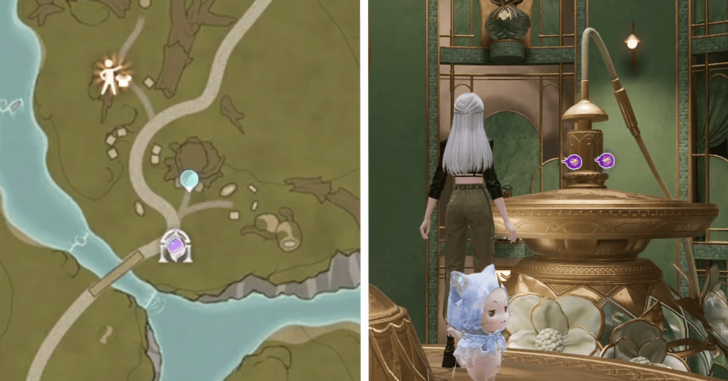 |
Timis' Beauty Lab, on top of the large perfume bottle |
| 426-427 |  |
Timis' Beauty Lab, down a hole right before leaving the green room |
| 428-430 | 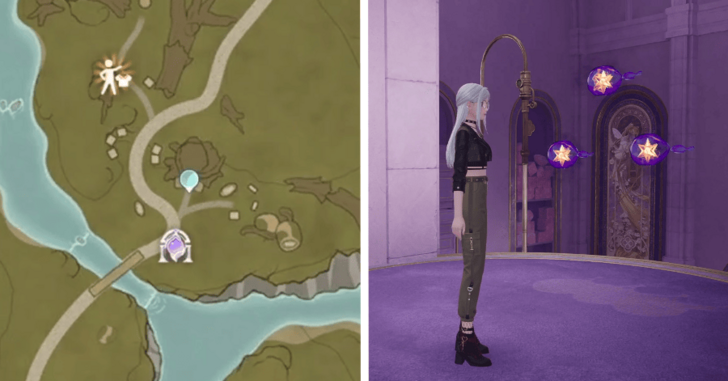 |
Timis' Beauty Lab, on a platform above the press just before going to the upper area |
| 431-433 | 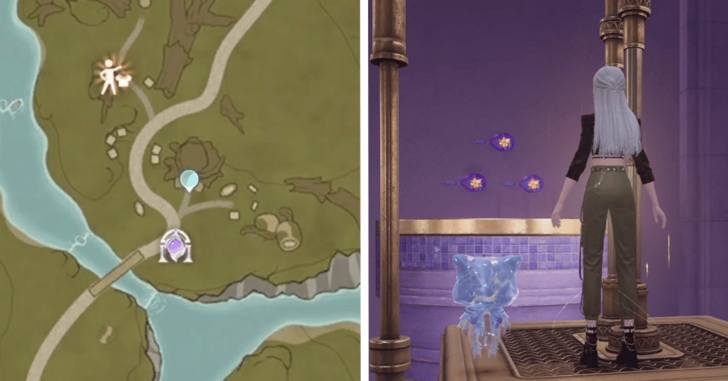 |
Timis' Beauty Lab, above a square press on the way to the Whimstar in the purple room |
| 434-435 | 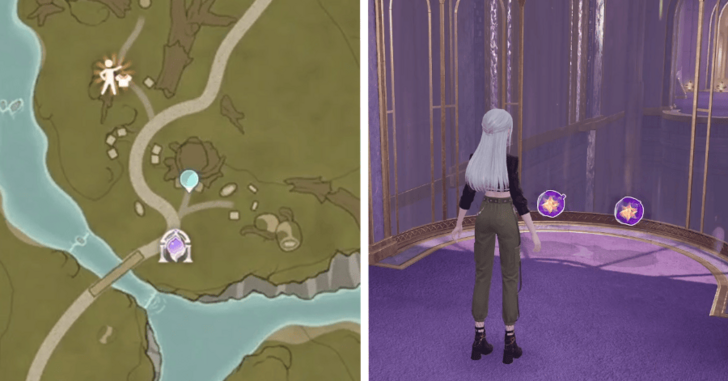 |
Timis' Beauty Lab, right before jumping up to the purple room's Whimstar |
| 436-437 | 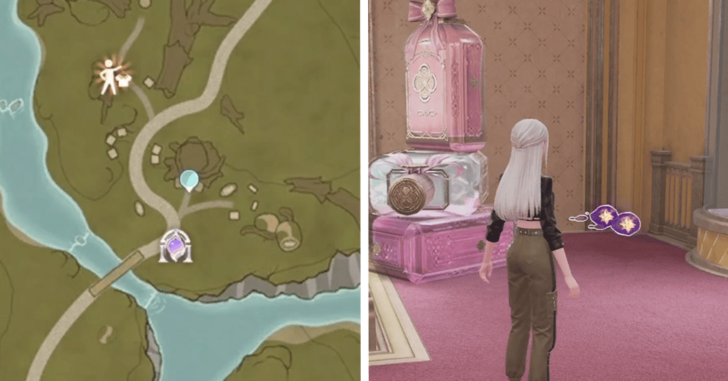 |
Timis' Beauty Lab, to the left of the entrance for the slide that takes you to the final room |
| 438-439 | 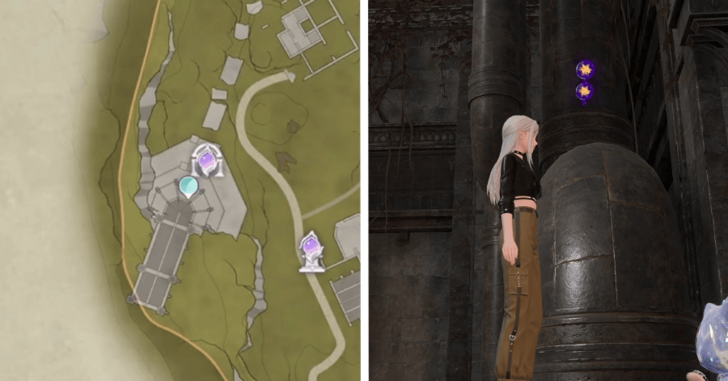 |
Swordsmith Ruins, on a pipe above the first fan boost |
| 440-441 | 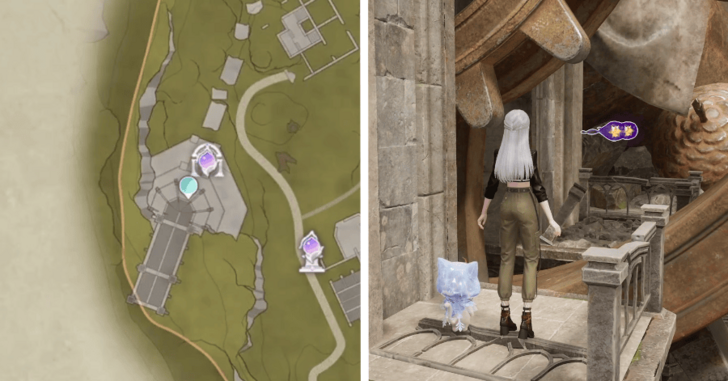 |
Swordsmith Ruins, behind a large gear above the fan next to the Sword Courtyard respawn point |
| 442-443 | 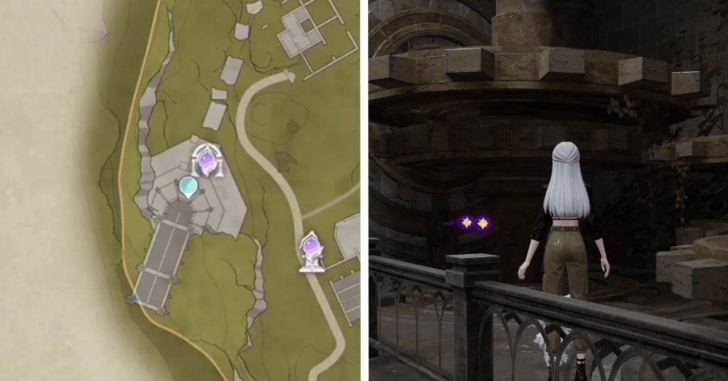 |
Swordsmith Ruins, below a gear platform that leads up to the next major area |
| 444-446 | 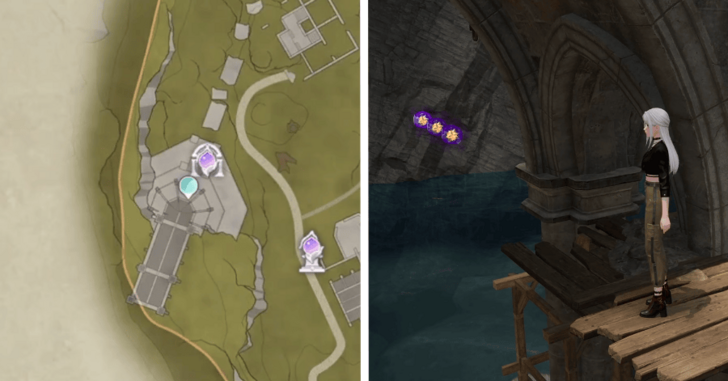 |
Swordsmith Ruins, below the bridge on the way to the Ventilation Tunnel |
| 447-448 |  |
Swordsmith Ruins, on a tall rock formation next to the Ventilation Tunnel respawn point |
| 449-451 | 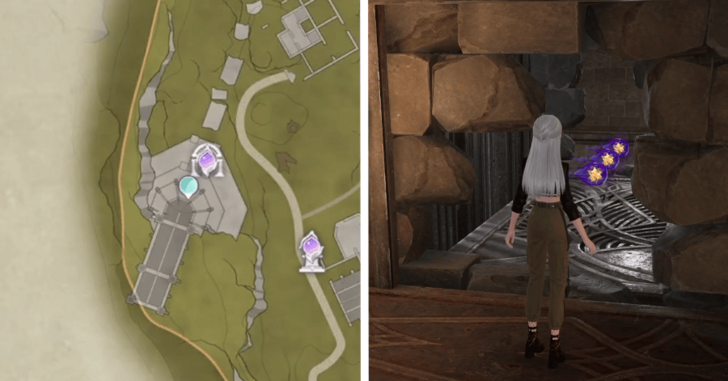 |
Swordsmith Ruins, in a secret room through the pipe below the Sacred Corridor respawn point |
| 452-453 | 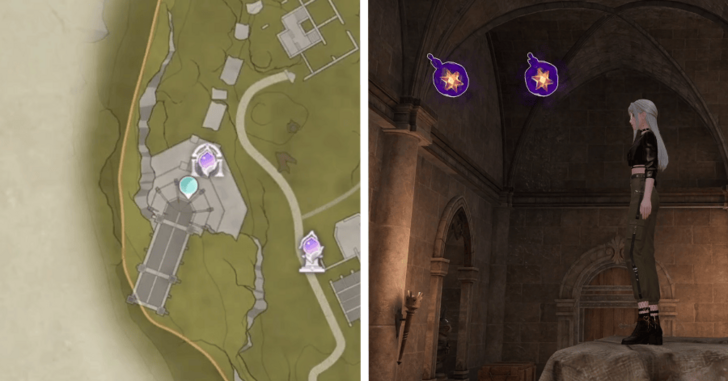 |
Swordsmith Ruins, above the path through the Sacred Corridor |
| 454-455 | 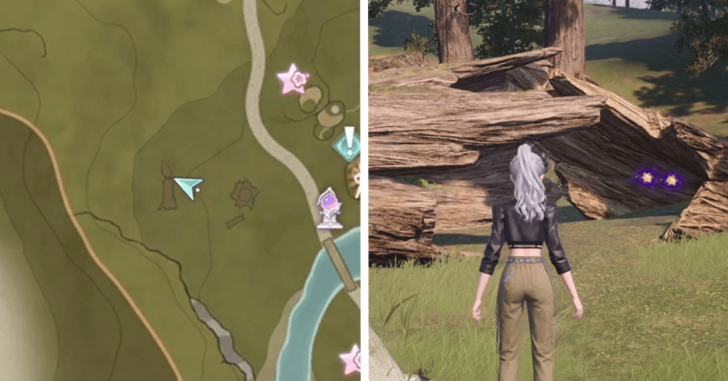 |
Inside a hollow log just west of the In Front of the Wish Inspection Center waypoint |
| 456-458 | 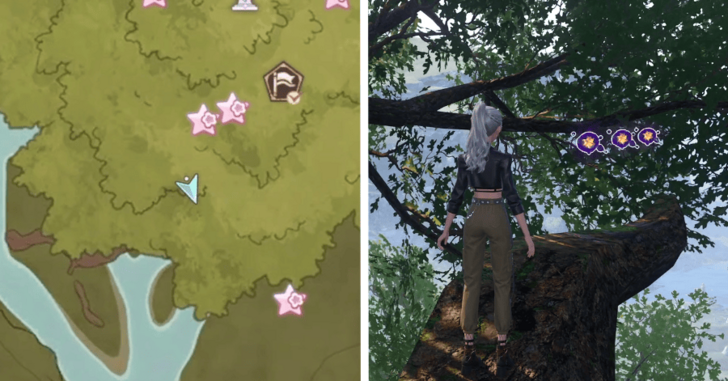 |
On a branch at the top of the grand tree, requires you to complete the Major Treetop Renovation! side quest which is unlocked after completing Chapter 8 |
How to Use Dew of Inspiration
Exchange Items from Kilo the Cadenceborn
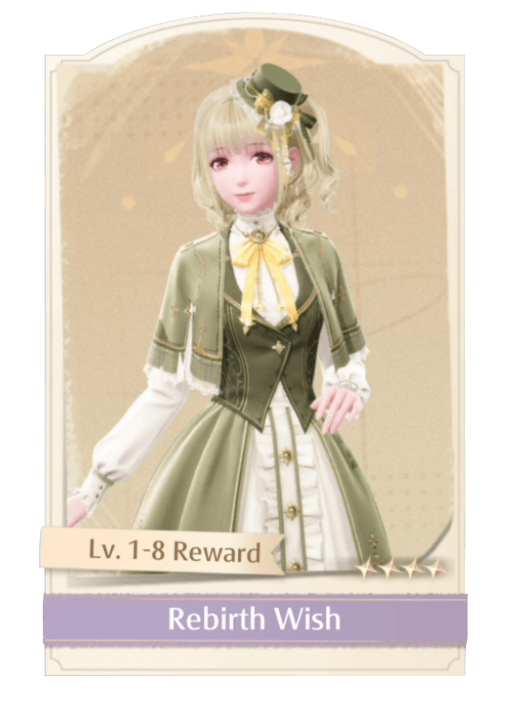 Lv. 1-8 Lv. 1-8 |
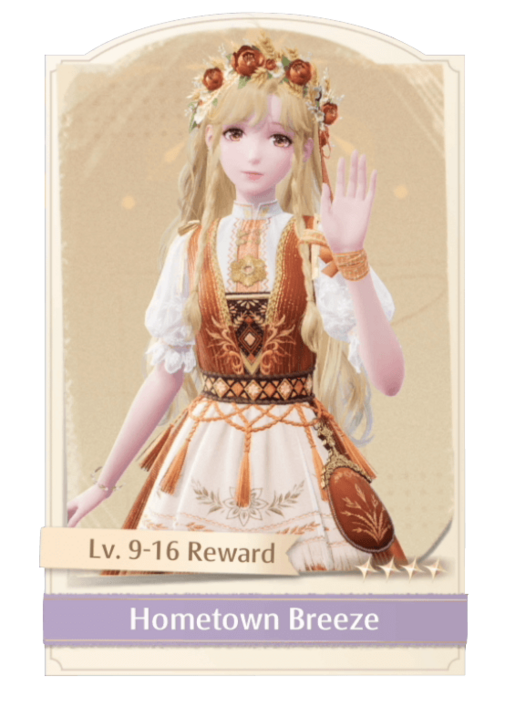 Lv. 9-16 Lv. 9-16 |
 Lv. 17-24 Lv. 17-24 |
You can give Dews of Inspiration to Kilo the Cadenceborn beside the statue in the Old Florawish Memorial for a multitude of rewards. You can get Diamonds, Bling, Resonite Crystals, and Outfits by submitting Dews. You can even get three sets by reaching certain levels!
To unlock Kilo, you'll need to complete the Hello, Cadenceborn! Quest first.
All Kilo the Cadenceborn Dew Rewards
Dew of Inspiration Trophy Unlock
Master of Inspiration Trophy
|
|
Master of Inspiration |
|---|---|
| Reach Level 24 at Kilo the Cadenceborn |
Players can obtain the Gold trophy, Master of Inspiration by reaching Level 24 at Kilo the Cadenceborn. Dews of Inspiration are spread throughout Miraland so use our interactive map to track them down!
Trophy Guide and Achievements List
Collect Dews by Purifying Them
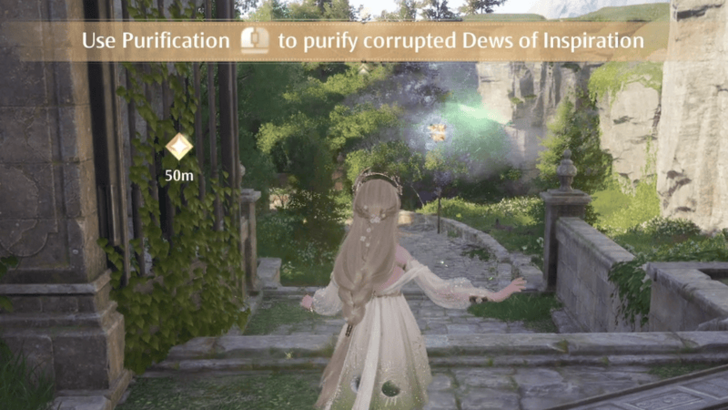
To collect Dews of Inspiration, you'll simply need to purify them. Once they've been purified, they will automatically be harvested by Nikki.
How Many Dews of Inspiration are There in Infinity Nikki?
There are a total of 1926 Dews of Inspiration in Infinity Nikki as of the release version!
Infinity Nikki Related Guides

Interactive Map and Exploration Guide
All Collectible Guides
| Exploration Guides | |
|---|---|
 Dew of Firework Dew of Firework |
|
 Whim Bubble Whim Bubble |
 Serenity Dewdrop Serenity Dewdrop |
Collectibles by Location
| Memorial Mountains | Florawish | Breezy Meadow |
| Stoneville | Abandoned District | Wishing Woods |
100% Exploration Guides
| Memorial Mountains | Florawish |
| Breezy Meadow | Stoneville |
| Abandoned District | Wishing Woods |
| Firework Isles | Serenity Island |
Dungeon Guides
| All Special Dungeons | |
|---|---|
| Well of Fortune | Dream Warehouse |
| Ripple Wine Cellar | Ghost Train |
| Timis's Beauty Lab | Swordsmith Ruins |
| Queen's Palace Ruins: Inner Court | |
Comment
This guide is horrible. The numbers don't correlate to the Pearpal map and trying to find anything in the grand tree is impossible.
Author
All Dew of Inspiration Locations
improvement survey
03/2026
improving Game8's site?

Your answers will help us to improve our website.
Note: Please be sure not to enter any kind of personal information into your response.

We hope you continue to make use of Game8.
Rankings
- We could not find the message board you were looking for.
Gaming News
Popular Games

Genshin Impact Walkthrough & Guides Wiki

Honkai: Star Rail Walkthrough & Guides Wiki

Umamusume: Pretty Derby Walkthrough & Guides Wiki

Pokemon Pokopia Walkthrough & Guides Wiki

Resident Evil Requiem (RE9) Walkthrough & Guides Wiki

Monster Hunter Wilds Walkthrough & Guides Wiki

Wuthering Waves Walkthrough & Guides Wiki

Arknights: Endfield Walkthrough & Guides Wiki

Pokemon FireRed and LeafGreen (FRLG) Walkthrough & Guides Wiki

Pokemon TCG Pocket (PTCGP) Strategies & Guides Wiki
Recommended Games

Diablo 4: Vessel of Hatred Walkthrough & Guides Wiki

Fire Emblem Heroes (FEH) Walkthrough & Guides Wiki

Yu-Gi-Oh! Master Duel Walkthrough & Guides Wiki

Super Smash Bros. Ultimate Walkthrough & Guides Wiki

Pokemon Brilliant Diamond and Shining Pearl (BDSP) Walkthrough & Guides Wiki

Elden Ring Shadow of the Erdtree Walkthrough & Guides Wiki

Monster Hunter World Walkthrough & Guides Wiki

The Legend of Zelda: Tears of the Kingdom Walkthrough & Guides Wiki

Persona 3 Reload Walkthrough & Guides Wiki

Cyberpunk 2077: Ultimate Edition Walkthrough & Guides Wiki
All rights reserved
© Infold Games ALL RIGHTS RESERVED
The copyrights of videos of games used in our content and other intellectual property rights belong to the provider of the game.
The contents we provide on this site were created personally by members of the Game8 editorial department.
We refuse the right to reuse or repost content taken without our permission such as data or images to other sites.


![Everwind Review [Early Access] | The Shaky First Step to A Very Long Journey](https://img.game8.co/4440226/ab079b1153298a042633dd1ef51e878e.png/thumb)

![Monster Hunter Stories 3 Review [First Impressions] | Simply Rejuvenating](https://img.game8.co/4438641/2a31b7702bd70e78ec8efd24661dacda.jpeg/thumb)


