The Battle of Kaer Morhen Walkthrough Defense Choices and Best Choices
☆ Story Guides: Main Quests | Choices
☆ Gwent Guides: All Cards | Gwent Quests | Player-Vendor Locations
┗ Best Decks: Nilfgaardian Empire | Monsters | Northern Realms | Scoia'tael
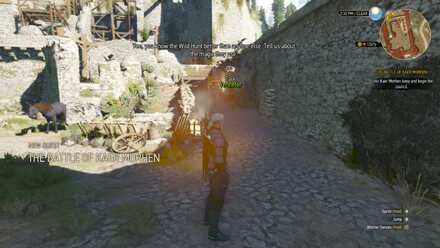
This is a guide to the quest titled The Battle of Kaer Morhen from The Witcher 3: Wild Hunt. Read on for information on objectives and possible rewards, best choices for defense, as well as useful tips and strategies for completing the quest.
| Previous Quest | Current Quest | Next Quest |
|---|---|---|
| - | The Battle of Kaer Morhen | - |
List of Contents
The Battle of Kaer Morhen Rewards and Basic Information
Basic Information
| Quest Number | 44 |
|---|---|
| Region | Kaer Morhen |
| Quest Location | Kaer Morhen |
| Previous Quest | - |
| Next Quest | - |
Rewards
| Gold Reward | None |
|---|---|
| Exp Reward | 1000 |
| Item Reward | Rose of Shaerrawed (If you chose to repair the Armory) x 1 |
| Item Reward 2 | Superior Swallow Potion (If you chose to focus on the lab.) x 1 |
The Battle of Kaer Morhen Main Objectives
| Objectives | |
|---|---|
| 1 | Follow Triss and Yennefer towards the main hall of Kaer Morhen. |
| 2 | Exhaust all dialogue options and plan how to defend the fortress with the others. |
| 3 | Throw Dimeritium Bombs or cast the Yrden Sign to close the portals and defeat the Wild Hunt around it. |
| 4 | As Ciri, help defend Triss from the Wild Hunt. |
| 5 | Rush back to Kaer Morhen and close the main gates. |
| 6 | Help defeat the Wild Hunt while slowly retreating toward Triss. |
| 7 | As Ciri, defeat the Wild Hunt to open the gates to the inner courtyard. |
| 8 | Assist in defeating multiple waves of the Wild Hunt. |
The Battle of Kaer Morhen Defense Choices and Best Choices
Objective 2 Choice: Fortress defenses
Workshop Choice
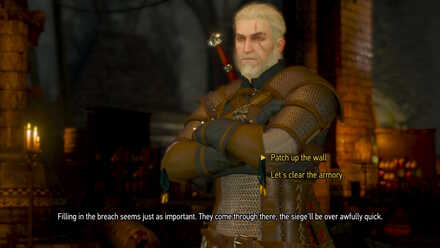
When you choose the option Patch up the wall., the amount of Wild Hunt that you need to fight during Objective 8 will be reduced by 1 wave.
The option Let's clear the armory. will give you the Relic Silver Sword Rose of Shaerawed before going out to face the Wild Hunt.
Laboratory Choice
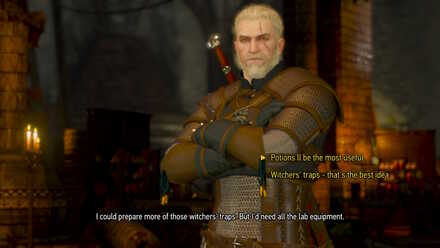
Choosing the option Potions'll be the most useful. will give you a Superior Swallow recipe and a Fortified Rafard’s Decoction recipe if you have finished the Secondary quest Following the Thread.
The option Witchers' traps - that's the best idea. will make the whole fortress get littered with Witchers' traps making it easier to maneuver during the heavy battles.
Best Choices for the Fortress Defense
For the Workshop Choice, you should always pick the Patch up the wall. option to reduce the number of enemies that you will face during the battle. You should only pick the other option if you made no effort in equipping better swords for yourself.
For the Laboratory Choice, you should always pick the Witchers' traps - that's the best idea. option to have multiple traps inside the fortress. Having multiple traps inside the fortress will help you move around during the battle and also help you so you will not get surrounded by multiple enemies.
The other option for the Laboratory Choice will just give you upgraded potions which you can just loot from chests scattered throughout the game.
The Battle of Kaer Morhen Tips and Strategies
Combat Strategies
Wild Hunt
- Coat your Silver Sword in Elementa Oil to deal bonus damage to them.
- When attacking, stop the combo at 2 strikes. Most of them will parry the 3rd attack in your combo and will shove you away making you stagger.
| The Wild Hunt Weaknesses and Loot |
Hounds of the Wild Hunt
- Coat your SIlver Sword in Elementa Oil to deal bonus damage to them.
- Throw Dimeritium Bombs at them to block an ability they use which causes them to become invulnerable for a moment.
- Casting the Igni Sign on them is very effective. They are very prone to burning, and this will give you a huge opening to attack.
| Hound of the Wild Hunt Weaknesses and Loot |
Ciri's New Move
Ciri has a new move that helps her a lot in battle. Pressing R1 on the PS4 or R on the Switch will call down a meteor to her position, dealing heavy damage and staggering the enemy.
The Witcher 3 Related Links
Witcher 3 Questlines
| Prologue | |||||
| Act 1 | Act 2 | Act 3 | |||
| DLC | |||||
|---|---|---|---|---|---|
| Hearts of Stone | Blood and Wine | ||||
All Act 2 Quests
| Quest Title | Location | Sugg. Level |
|---|---|---|
| Ugly Baby | Crow's Perch, Royal Palace, Kaer Morhen | 19 |
| Disturbance | Kaer Morhen | - |
| To Bait a Forktail... | Kaer Morhen | 19 |
| The Final Trial | Kaer Morhen | 19 |
| No Place Like Home | Kaer Morhen | 19 |
| Va Fail, Elaine | Kaer Morhen | 19 |
| The Isle of Mists | Skellige | 22 |
| Brothers In Arms: Velen | Velen | 22 |
| Brothers In Arms: Novigrad | Novigrad | 22 |
| Brothers In Arms: Skellige | Skellige | 22 |
| Brothers In Arms: Nilfgaard | Royal Palace | 22 |
| The Battle of Kaer Morhen | Kaer Morhen | 24 |
| Blood on the Battlefield | Kaer Morhen | 20 |
Comment
Author
The Battle of Kaer Morhen Walkthrough Defense Choices and Best Choices
Rankings
- We could not find the message board you were looking for.
Gaming News

![Star Savior Review [First Impressions] | Engaging, Entertaining, and Expensive](https://img.game8.co/4447603/8f500e9bf666bdb8adb1af478e9dfdbd.png/show)


Popular Games

Genshin Impact Walkthrough & Guides Wiki
Umamusume: Pretty Derby Walkthrough & Guides Wiki
Crimson Desert Walkthrough & Guides Wiki
Monster Hunter Stories 3: Twisted Reflection Walkthrough & Guides Wiki
Honkai: Star Rail Walkthrough & Guides Wiki
Pokemon Pokopia Walkthrough & Guides Wiki
The Seven Deadly Sins: Origin Walkthrough & Guides Wiki
Wuthering Waves Walkthrough & Guides Wiki
Zenless Zone Zero Walkthrough & Guides Wiki
Arknights: Endfield Walkthrough & Guides Wiki


Recommended Games
Fire Emblem Heroes (FEH) Walkthrough & Guides Wiki
Diablo 4: Vessel of Hatred Walkthrough & Guides Wiki
Cyberpunk 2077: Ultimate Edition Walkthrough & Guides Wiki
Yu-Gi-Oh! Master Duel Walkthrough & Guides Wiki
Super Smash Bros. Ultimate Walkthrough & Guides Wiki
Pokemon Brilliant Diamond and Shining Pearl (BDSP) Walkthrough & Guides Wiki
Elden Ring Shadow of the Erdtree Walkthrough & Guides Wiki
Monster Hunter World Walkthrough & Guides Wiki
The Legend of Zelda: Tears of the Kingdom Walkthrough & Guides Wiki
Persona 3 Reload Walkthrough & Guides Wiki


All rights reserved
The Witcher® is a trademark of CD PROJEKT S. A. The Witcher game © CD PROJEKT S. A. All rights reserved. The Witcher game is based on the prose of Andrzej Sapkowski. All other copyrights and trademarks are the property of their respective owners.
The copyrights of videos of games used in our content and other intellectual property rights belong to the provider of the game.
The contents we provide on this site were created personally by members of the Game8 editorial department.
We refuse the right to reuse or repost content taken without our permission such as data or images to other sites.