All Chest Locations
This is a list of all the available treasure chests in FANTASY LIFE i: The Girl Who Steals Time. See a list of all treasure chests in the game, their rewards, and their locations in every region.
List of Contents
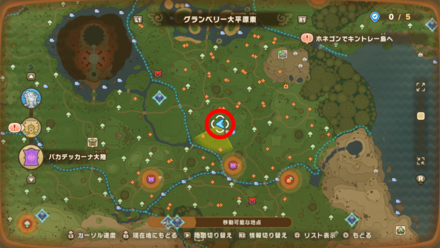
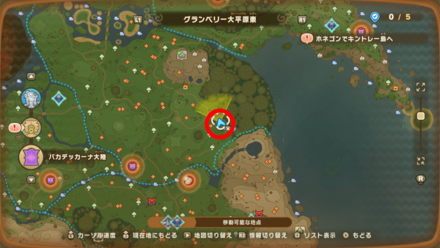
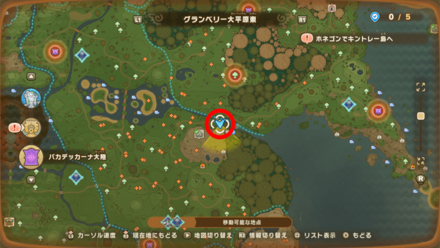
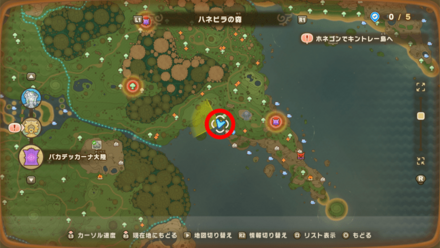
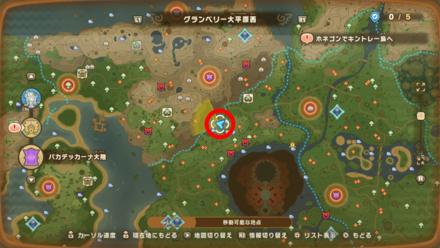
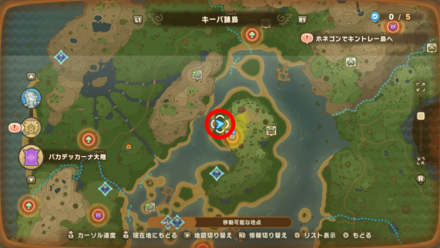
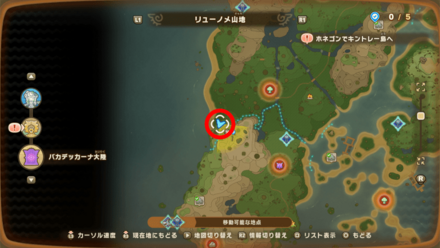
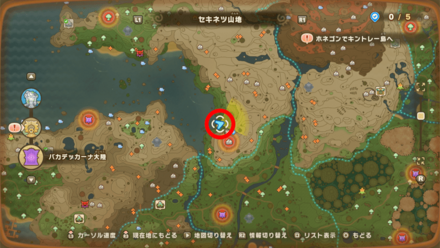
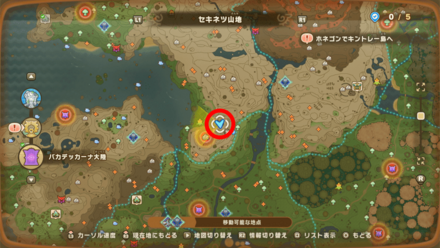
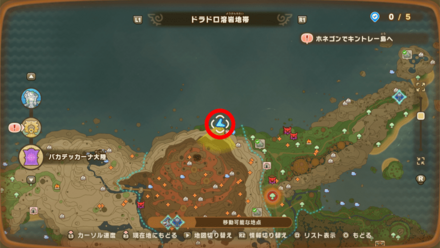
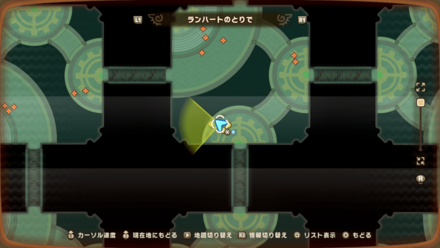
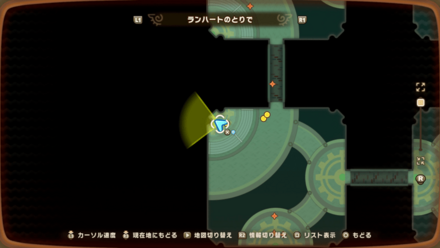
Treasure Chest Map Location
All Available Treasure Chests on the Map
Register a free Game8 account to save your map progress when using the map page on the same browser, even when your cache is cleared.
| Icon | How to Use |
|---|---|
 | Show Names This button reveals the Name of every icon currently shown. |
 | Show Pins This button will toggle between showing and hiding all the pins that you have already marked as acquired. |
 | Fullscreen This button will change the map display to fill the screen. |
 | Search Mode Toggle This button will display a search bar which you can use to search for an individual pin by its name. |
 | Icon Mode Toggle In Search Mode, this button will toggle you back to Icon Mode, removing the search bar and displaying the icons again. |
 | All Pins This button is shown along with the Icons on the right when there are over 6 types of pins. Click it for a full selection of all available pin types. |
 | Counter Tracks the number of pins you have of a certain type. The pin type shown is set to the page and currently cannot be changed; however, all pin type counters can be viewed by clicking the checklist icon on the right side. |
| View All Counters This icon is found on the right side of the Counter. When a map has more than one pin type, click this icon to see Counters for all pin types. |
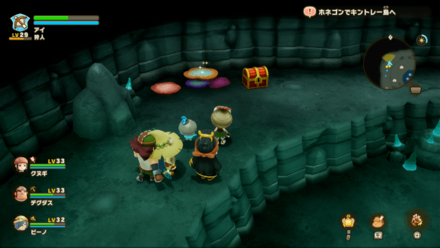
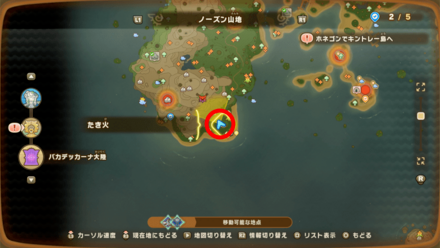
All Treasure Chests and Rewards
Note: Click on the Checkbox to mark lobsters that you have already obtained!
| Map Image | World Image | |
|---|---|---|
| 1 |
 |
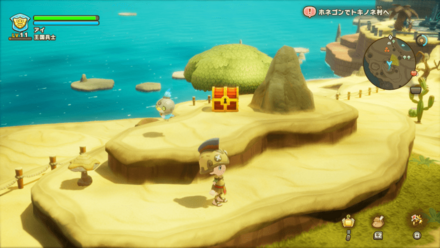 |
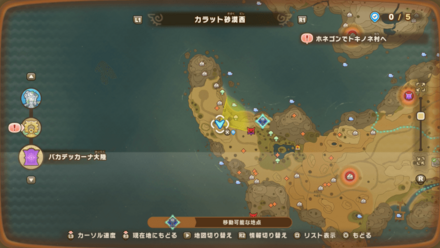
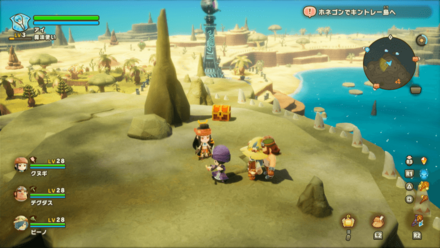
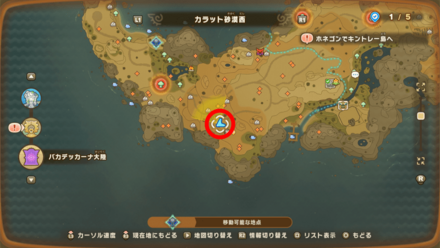
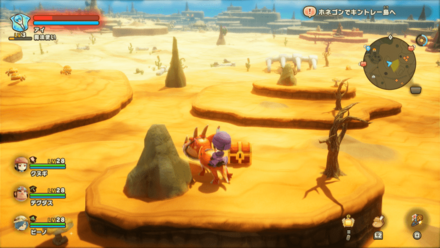
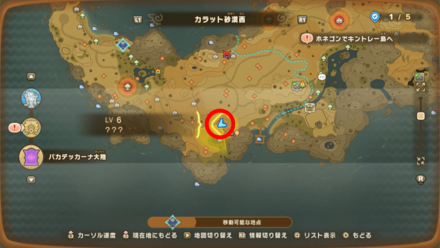
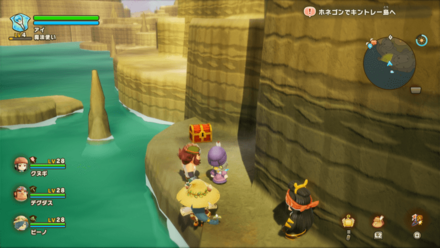
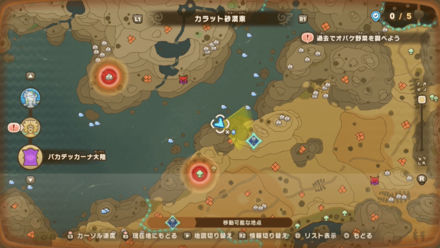
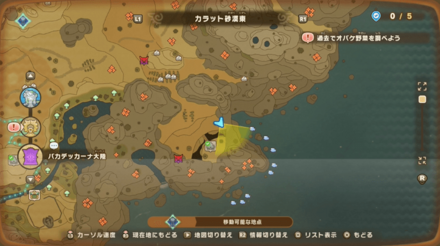
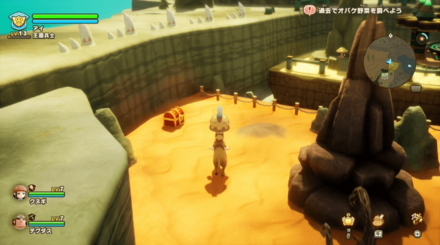
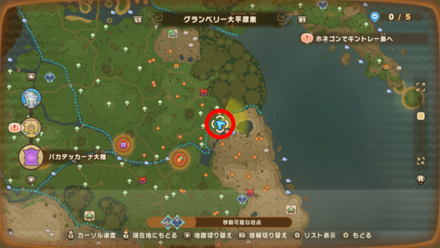
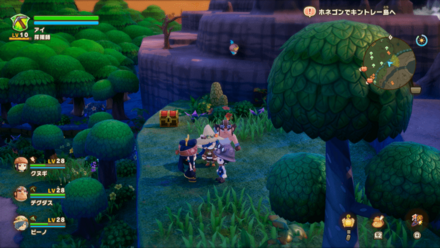
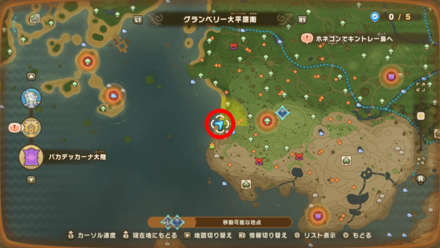
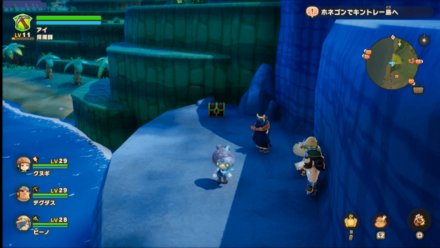
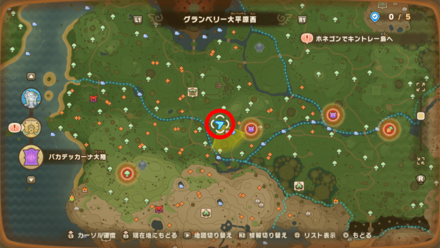
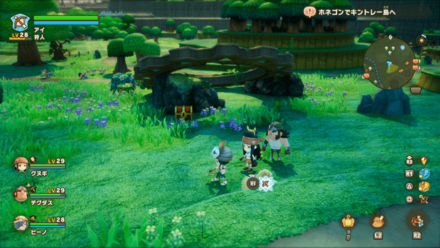
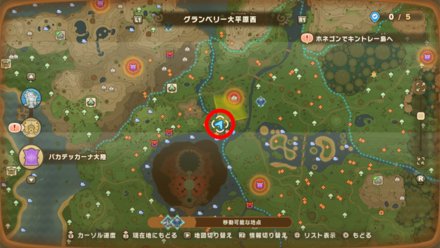
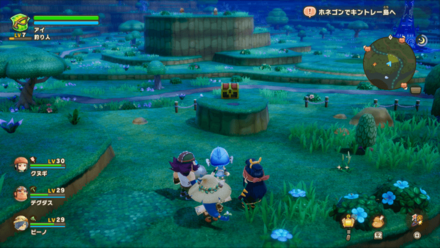
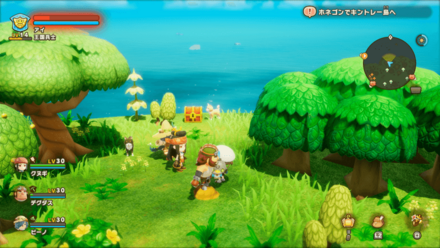
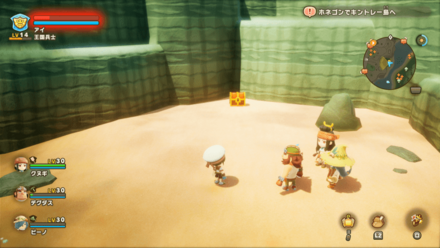
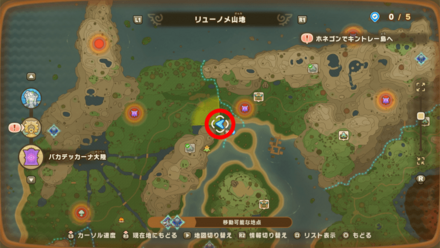
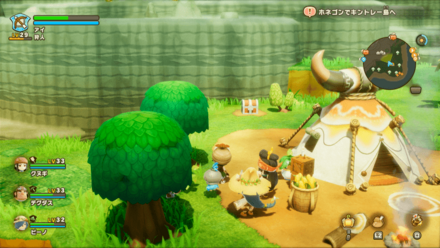
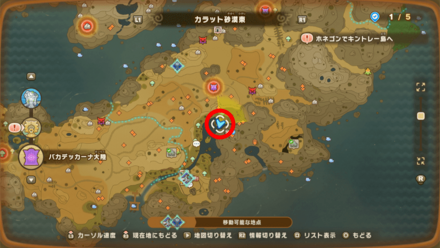
| Chest 1: West Dryridge Desert
Reward: HP Potion x3 |
||
| 2 |
 |
 |
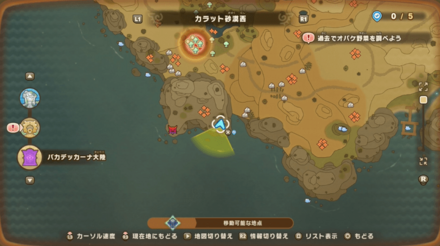
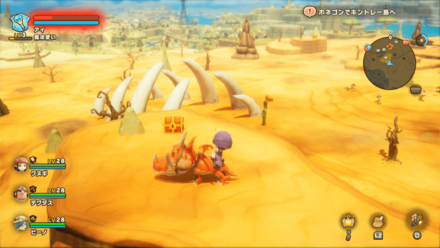
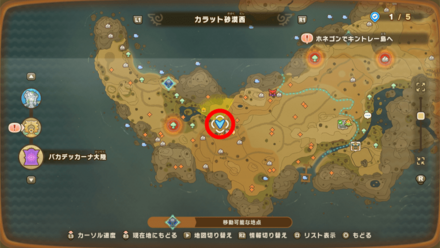
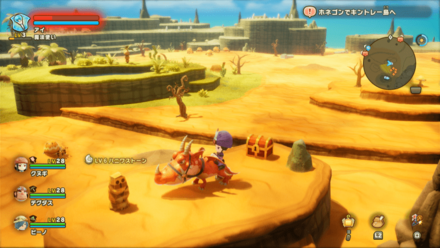
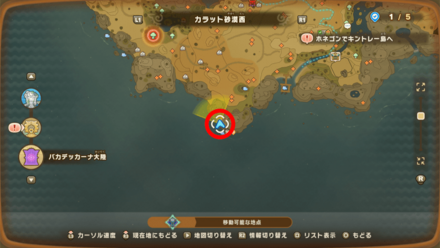
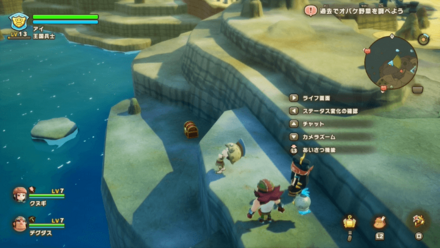
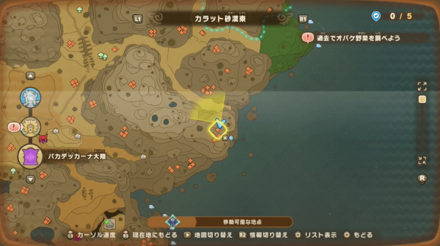
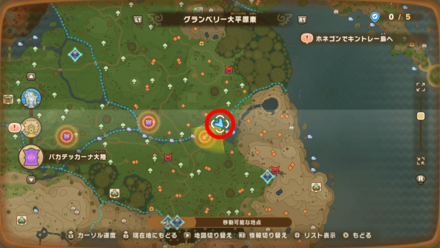
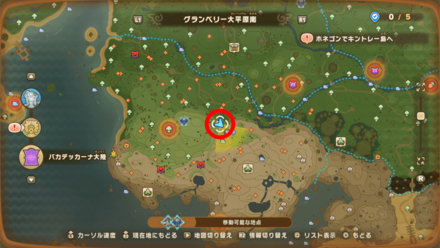
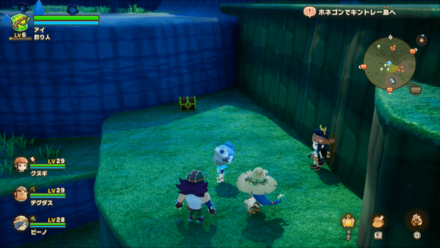
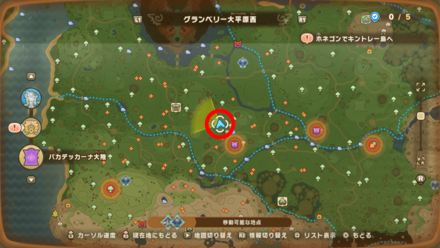
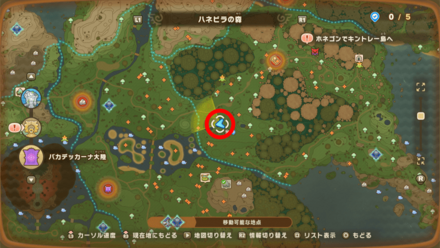
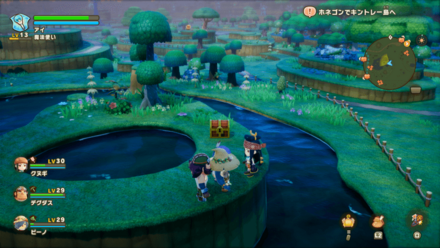
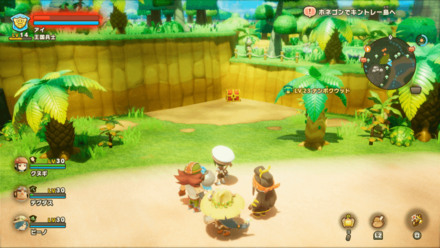
| Chest 2: West Dryridge Desert
Reward: Earth Shard x1 |
||
| 3 |
 |
 |
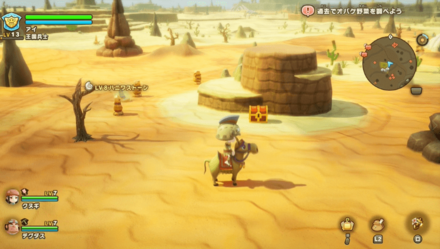
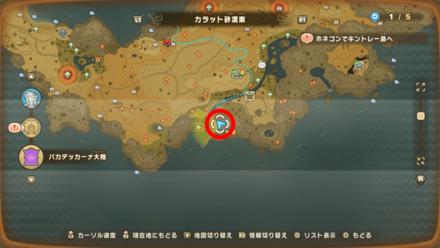
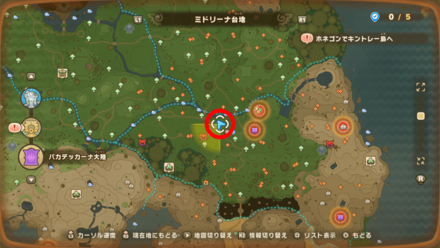
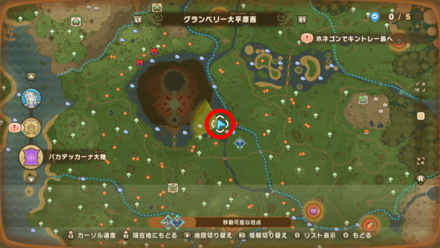
| Chest 3: West Dryridge Desert
Reward: Lifeforce Cluster ×3 |
||
| 4 |
 |
 |
| Chest 4: West Dryridge Desert
Reward: Sandstone ×3 |
||
| 5 |
 |
 |
| Chest 5: West Dryridge Desert
Reward: Oak Bow x1 |
||
| 6 |
 |
 |
| Chest 6: West Dryridge Desert
Reward: Haniwa Stone ×3 |
||
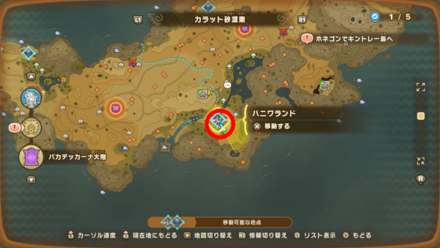
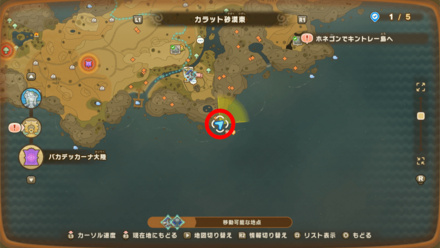
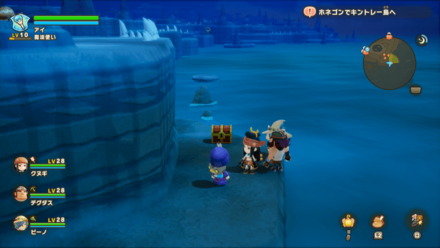
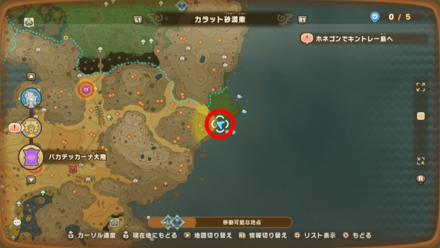
| 7 |
 |
 |
| Chest 7: West Dryridge Desert
Reward: Medium Bomb x3 |
||
| 8 |
 |
 |
| Chest 8: West Dryridge Desert
Reward: Moon Cluster ×3 |
||
| 9 |
 |
 |
| Chest 9: East Dryridge Desert
Reward: Fossil Shard ×1 |
||
| 10 |
 |
 |
| Chest 10: East Dryridge Desert
Reward: Fossilshroom ×3 |
||
| 11 |
 |
 |
| Chest 11: East Dryridge Desert
Reward: SP Potion x3 |
||
| 12 |
 |
 |
| Chest 12: East Dryridge Desert
Reward: Star Cluster ×3 |
||
| 13 |
 |
 |
| Chest 13: East Dryridge Desert
Reward: Bronze Needle ×1 |
||
| 14 |
 |
 |
| Chest 14: East Dryridge Desert
Reward: Haniwa Jewel ×1 |
||
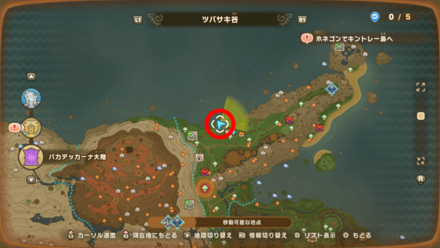
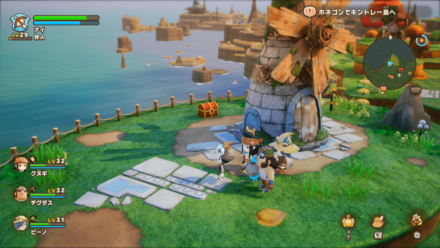
| 15 |
 |
 |
| Chest 15: East Dryridge Desert
Reward: Golem Sticker ×1 |
||
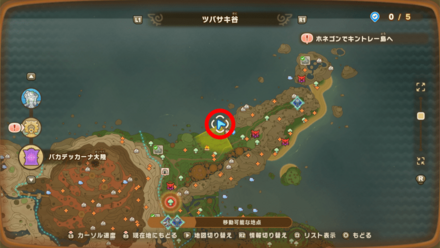
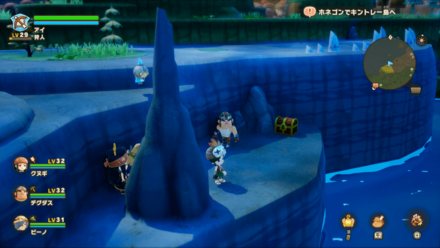
| 16 |
 |
 |
| Chest 16: East Dryridge Desert
Reward: Long Sky Blue Cape ×1 |
||
| 17 |
 |
 |
| Chest 17: Viridia Plateau
Reward: Ultima Alcheweed ×3 |
||
| 18 |
 |
 |
| Chest 18: Viridia Plateau
Reward: Power Aid ×3 |
||
| 19 |
 |
 |
| Chest 19: East Greatgut Plains
Reward: Milk ×3 |
||
| 20 |
 |
 |
| Chest 20: East Greatgut Plains
Reward: Bronze Hoe ×1 |
||
| 21 |
 |
 |
| Chest 21: Viridia Plateau
Reward: Green Gel ×3 |
||
| 22 |
 |
 |
| Chest 22: Viridia Plateau
Reward: Detoxifier ×3 |
||
| 23 |
 |
 |
| Chest 23: Viridia Plateau
Reward: Radishy Leaves x3 |
||
| 24 |
 |
 |
| Chest 24: South Greatgut Plains
Reward: Yellow Stone ×3 |
||
| 25 |
 |
 |
| Chest 25: South Greatgut Plains
Reward: Resistance Aid ×3 |
||
| 26 |
 |
 |
| Chest 26: South Greatgut Plains
Reward: Little Tail ×3 |
||
| 27 |
 |
 |
| Chest 27: South Greatgut Plains
Reward: White Woolie Sticker ×1 |
||
| 28 |
 |
 |
| Chest 28: South Greatgut Plains
Reward: Spider Sticker ×1 |
||
| 29 |
 |
 |
| Chest 29: South Greatgut Plains
Reward: Extra Creamy Milk ×3 |
||
| 30 |
 |
 |
| Chest 30: South Greatgut Plains
Reward: Bronze Pickaxe ×1 |
||
| 31 |
 |
 |
| Chest 31: West Greatgut Plains
Reward: Prairie Honey ×3 |
||
| 32 |
 |
 |
| Chest 32: West Greatgut Plains
Reward: Rushdelion ×3 |
||
| 33 |
 |
 |
| Chest 33: West Greatgut Plains
Reward: Uber-Rich Milk ×3 |
||
| 34 |
 |
 |
| Chest 34: East Greatgut Plains
Reward: Calmaryllis ×3 |
||
| 35 |
 |
 |
| Chest 35: East Greatgut Plains
Reward: Magic Aid ×3 |
||
| 36 |
 |
 |
| Chest 36: East Greatgut Plains
Reward: Hay Trough ×1 |
||
| 37 |
 |
 |
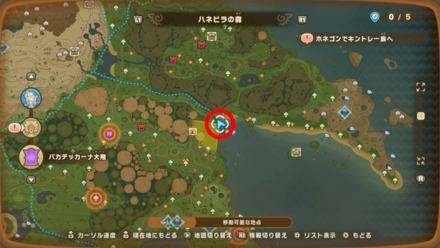
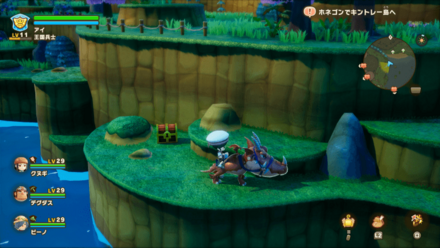
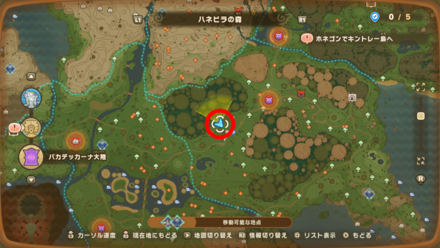
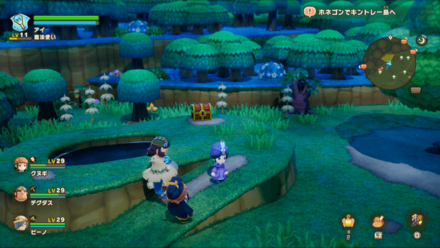
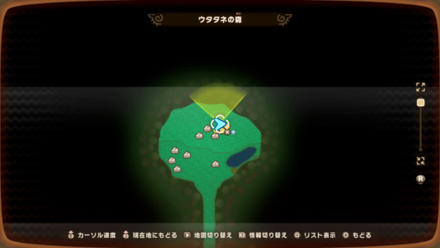
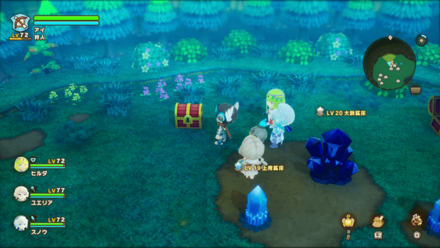
| Chest 37: Pettlewing Woods
Reward: De-Paralyzer ×3 |
||
| 38 |
 |
 |
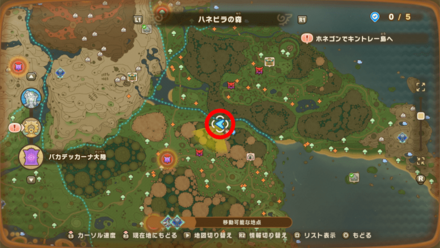
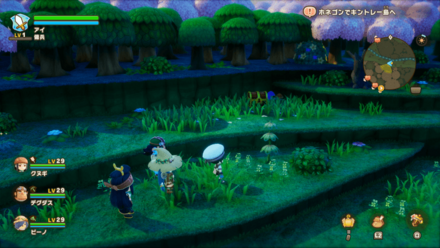
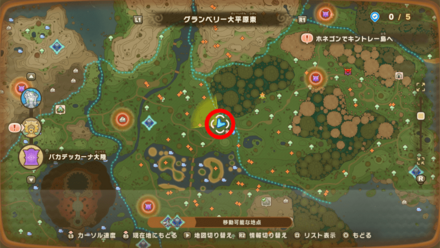
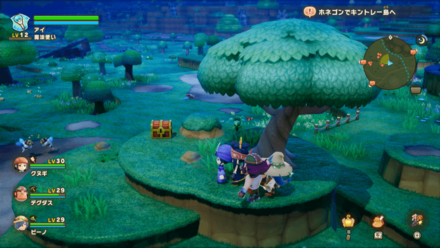
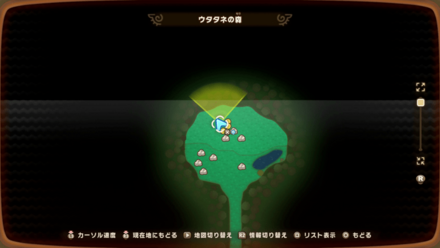
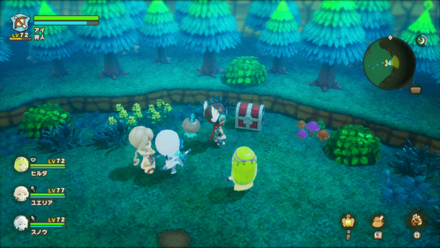
| Chest 38: Pettlewing Woods
Reward: Oak Tree Sticker ×1 |
||
| 39 |
 |
 |
| Chest 39: Pettlewing Woods
Reward: Fortune's Fluff ×3 |
||
| 40 |
 |
 |
| Chest 40: Pettlewing Woods
Reward: Oak Staff ×1 |
||
| 41 |
 |
 |
| Chest 41: Pettlewing Woods
Reward: Vitabloom ×3 |
||
| 42 |
 |
 |
| Chest 42: Pettlewing Woods
Reward: Truffle ×3 |
||
| 43 |
 |
 |
| Chest 43: Pettlewing Woods
Reward: Fairy Applique ×1 |
||
| 44 |
 |
 |
| Chest 44: Pettlewing Woods
Reward: Snake Scales ×3 |
||
| 45 |
 |
 |
| Chest 45: Moltana Wastes
Reward: Burn-Be-Gone ×3 |
||
| 46 |
 |
 |
| Chest 46: Pettlewing Woods
Reward: Blue Stone ×3 |
||
| 47 |
 |
 |
| Chest 47: Pettlewing Woods
Reward: Oak Axe ×1 |
||
| 48 |
 |
 |
| Chest 48: East Greatgut Plains
Reward: Animal Hide ×3 |
||
| 49 |
 |
 |
| Chest 49: East Greatgut Plains
Reward: SP Potion ×1 |
||
| 50 |
 |
 |
| Chest 50: East Greatgut Plains
Reward: Big Tail ×3 |
||
| 51 |
 |
 |
| Chest 51: West Greatgut Plains
Reward: Antique Abacus ×1 |
||
| 52 |
 |
 |
| Chest 52: Pettlewing Woods
Reward: Black Woolie Sticker ×1 |
||
| 53 |
 |
 |
| Chest 53: Crickneck Canyon
Reward: Animal Hide ×3 |
||
| 54 |
 |
 |
| Chest 54: West Greatgut Plains
Reward: Bronze Claymore ×1 |
||
| 55 |
 |
 |
| Chest 55: West Greatgut Plains
Reward: Fire Log ×3 |
||
| 56 |
 |
 |
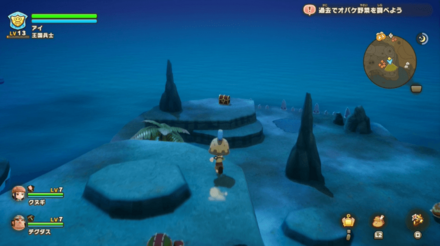
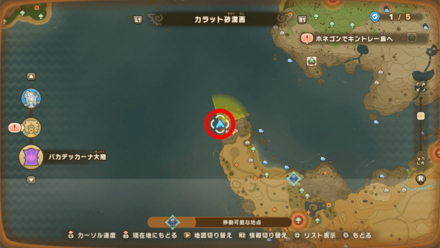
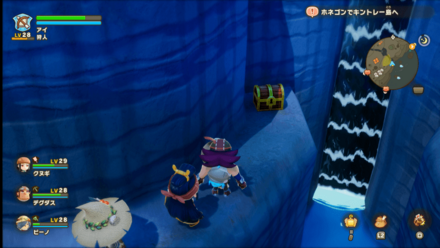
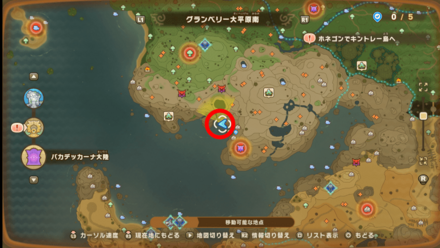
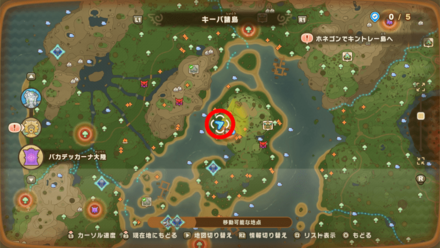
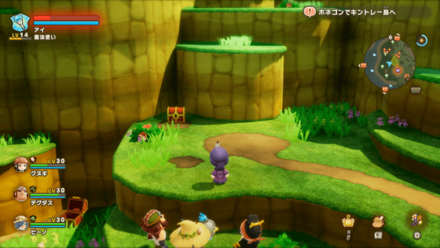
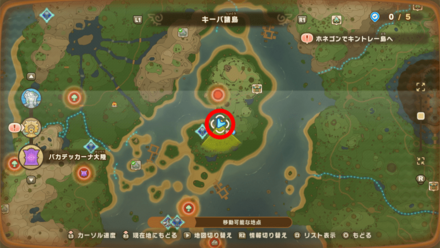
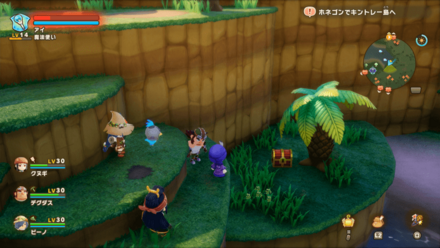
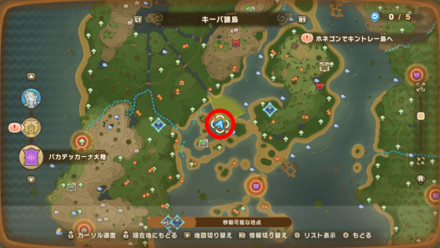
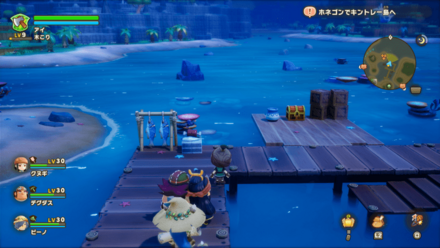
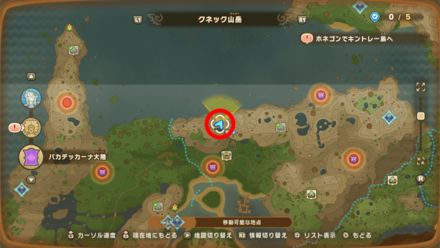
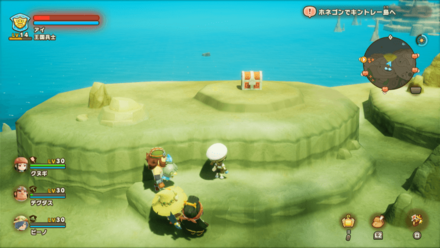
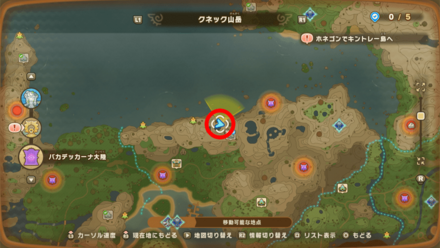
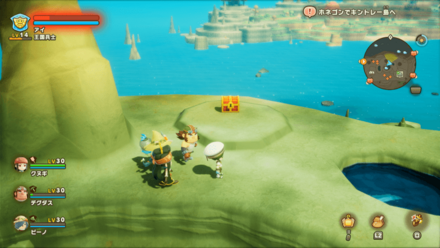
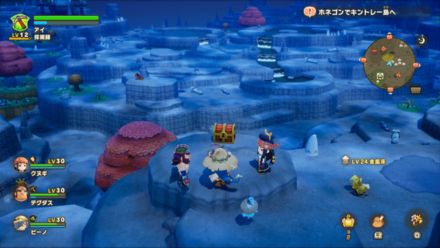
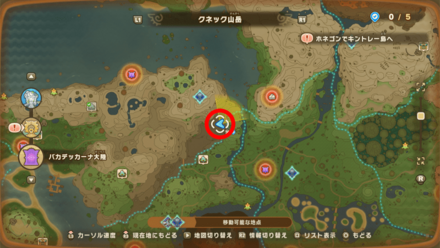
| Chest 56: Fangshore Isles
Reward: Ancient Coral ×3 |
||
| 57 |
 |
 |
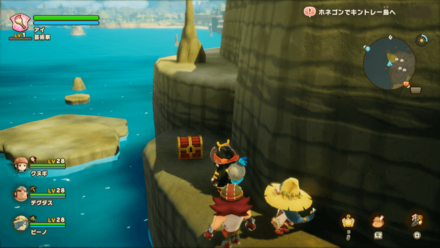
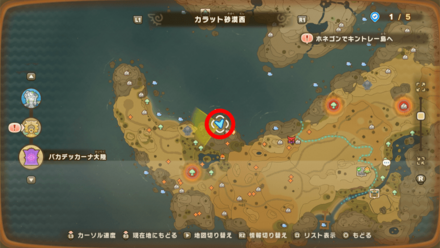
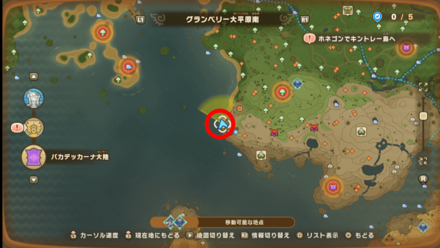
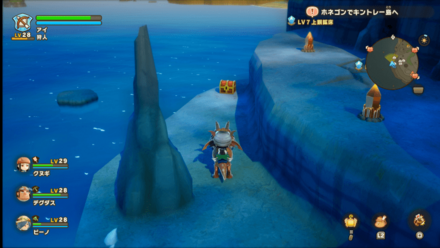
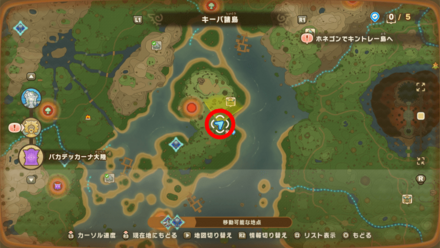
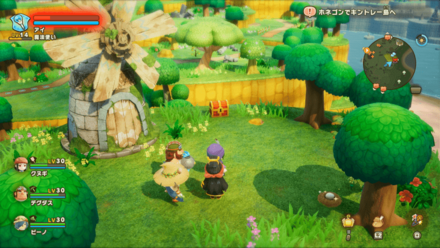
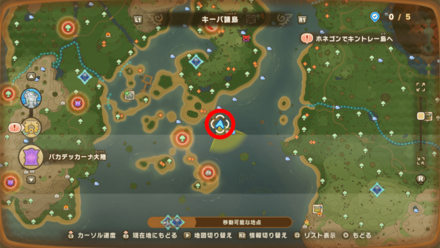
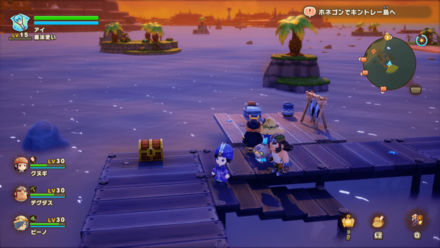
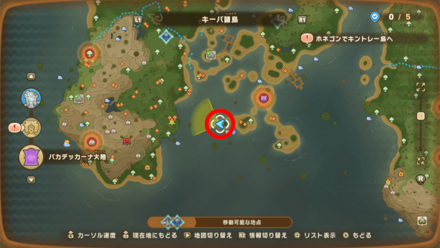
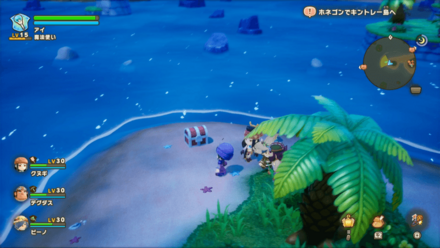
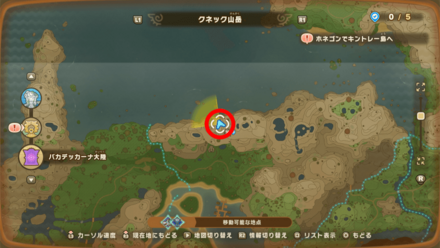
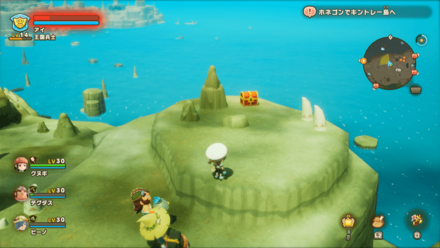
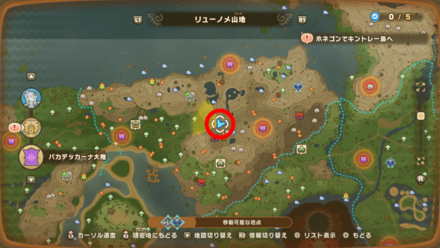
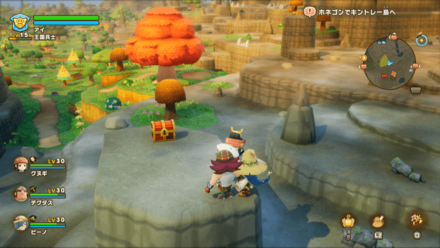
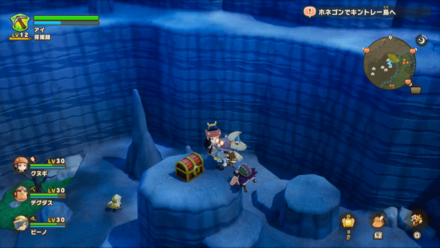
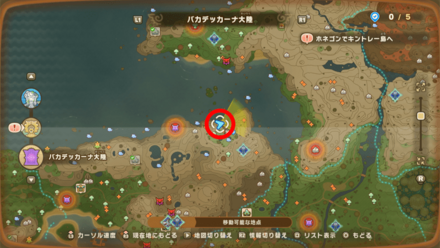
| Chest 57: Fangshore Isles
Reward: Remote Island Honey ×3 |
||
| 58 |
 |
 |
| Chest 58: Fangshore Isles
Reward: Oak Rod ×1 |
||
| 59 |
 |
 |
| Chest 59: Fangshore Isles
Reward: Glittering Coral ×3 |
||
| 60 |
 |
 |
| Chest 60: Fangshore Isles
Reward: Water Log ×3 |
||
| 61 |
 |
 |
| Chest 61: Fangshore Isles
Reward: Amethyst ×1 |
||
| 62 |
 |
 |
| Chest 62: Fangshore Isles
Reward: Durable Shell ×3 |
||
| 63 |
 |
 |
| Chest 63: Fangshore Isles
Reward: Fish Scales ×3 |
||
| 64 |
 |
 |
| Chest 64: Fangshore Isles
Reward: Sack of Copper ×1 |
||
| 65 |
 |
 |
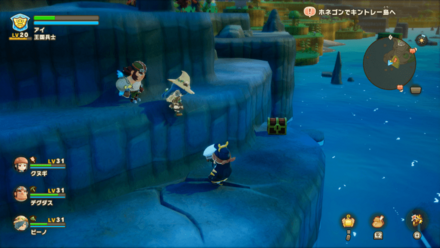
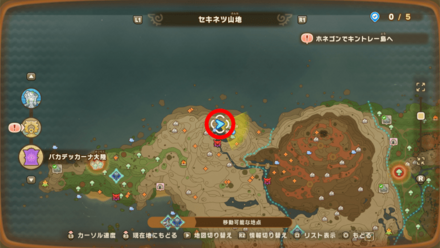
| Chest 65: Drakesnout Range
Reward: Stunning Coral ×3 |
||
| 66 |
 |
 |
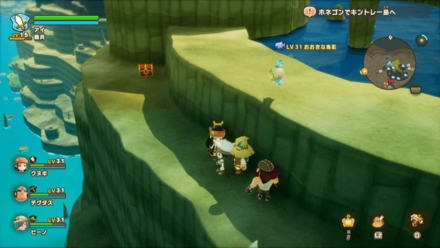
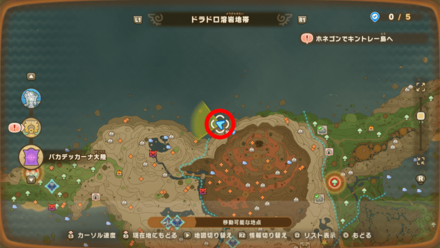
| Chest 66: Drakesnout Range
Reward: Blue Gel ×3 |
||
| 67 |
 |
 |
| Chest 67: Drakesnout Range
Reward: Pretty Coral ×3 |
||
| 68 |
 |
 |
| Chest 68: Drakesnout Range
Reward: Anti-Freeze ×3 |
||
| 69 |
 |
 |
| Chest 69: Drakesnout Range
Reward: Turtle Shell ×3 |
||
| 70 |
 |
 |
| Chest 70: Drakeseye Valley
Reward: Standing Torch With Flag ×1 |
||
| 71 |
 |
 |
| Chest 71: Drakeseye Valley
Reward: Life Cure ×3 |
||
| 72 |
 |
 |
| Chest 72: Drakeseye Valley
Reward: Yellow Gel ×3 |
||
| 73 |
 |
 |
| Chest 73: Drakeseye Valley
Reward: Water Shard ×1 |
||
| 74 |
 |
 |
| Chest 74: Drakeseye Valley
Reward: Hard Claws ×3 |
||
| 75 |
 |
 |
| Chest 75: Drakeseye Valley
Reward: Demonic Powder ×3 |
||
| 76 |
 |
 |
| Chest 76: Drakeseye Valley
Reward: Purple Stone ×3 |
||
| 77 |
 |
 |
| Chest 77: Crickneck Canyon
Reward: Life Cure ×1 |
||
| 78 |
 |
 |
| Chest 78: Crickneck Canyon
Reward: Kitchen Utensils ×1 |
||
| 79 |
 |
 |
| Chest 79: Crickneck Canyon
Reward: Bronze Hammer ×1 |
||
| 80 |
 |
 |
| Chest 80: Crickneck Canyon
Reward: Resistance Spray ×3 |
||
| 81 |
 |
 |
| Chest 81: Crickneck Canyon
Reward: HP Potion ×1 |
||
| 82 |
 |
 |
| Chest 82: Crickneck Canyon
Reward: Animal Claws ×3 |
||
| 83 |
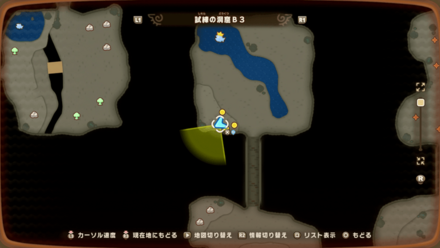
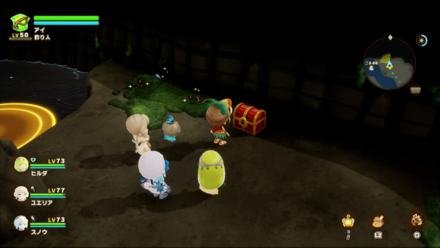
 |
 |
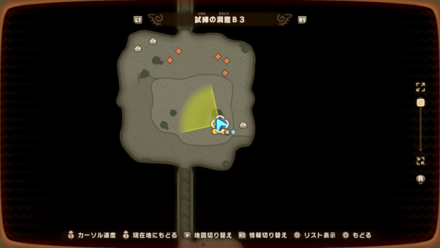
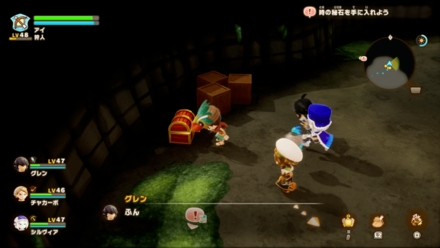
| Chest 83: Crickneck Canyon
Reward: Glossy Feather ×3 |
||
| 84 |
 |
 |
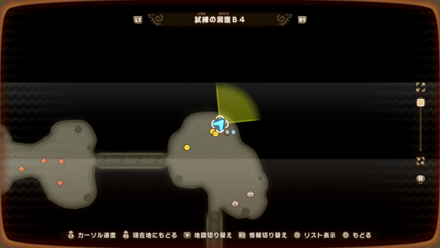
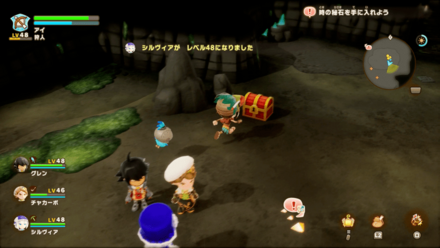
| Chest 84: Crickneck Canyon
Reward: Magic Powder ×3 |
||
| 85 |
 |
 |
| Chest 85: Crickneck Canyon
Reward: Trip Applique ×1 |
||
| 86 |
 |
 |
| Chest 86: Scorchrock Mountain
Reward: Python Scales ×3 |
||
| 87 |
 |
 |
| Chest 87: Scorchrock Mountain
Reward: Spiritual Powder ×3 |
||
| 88 |
 |
 |
| Chest 88: Scorchrock Mountain
Reward: Deadly Claws ×3 |
||
| 89 |
 |
 |
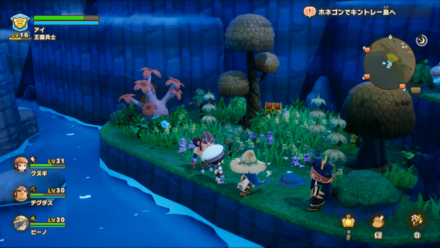
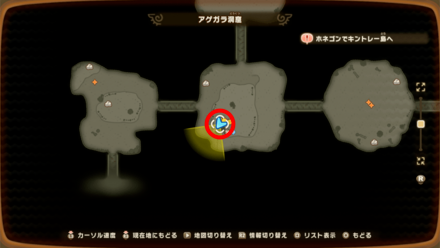
| Chest 89: Agekara Cave
Reward: Crate ×1 |
||
| 90 |
 |
 |
| Chest 90: Agekara Cave
Reward: Combustible Powder ×3 |
||
| 91 |
 |
 |
| Chest 91: Agekara Cave
Reward: Fire Shard ×1 |
||
| 92 |
 |
 |
| Chest 92: Agekara Cave
Reward: Yakitori ×1 |
||
| 93 |
 |
 |
| Chest 93: Scorchrock Mountain
Reward: Coal-Black Feather ×3 |
||
| 94 |
 |
 |
| Chest 94: Scorchrock Mountain
Reward: Power Spray ×3 |
||
| 95 |
 |
 |
| Chest 95: Scorchrock Mountain
Reward: Oak Brush ×1 |
||
| 96 |
 |
 |
| Chest 96: Scorchrock Mountain
Reward: Earth Log ×3 |
||
| 97 |
 |
 |
| Chest 97: Moltana Wastes
Reward: Dark Honey ×3 |
||
| 98 |
 |
 |
| Chest 98: Moltana Wastes
Reward: Dragon Sticker x1 |
||
| 99 |
 |
 |
| Chest 99: Scorchrock Mountain
Reward: Monster Tail ×3 |
||
| 100 |
 |
 |
| Chest 100: Moltana Wastes
Reward: Bronze Sword ×1 |
||
| 101 |
 |
 |
| Chest 101: Moltana Wastes
Reward: Life Cure ×3 |
||
| 102 |
 |
 |
| Chest 102: Moltana Wastes
Reward: Red Serpent Scales ×3 |
||
| 103 |
 |
 |
| Chest 103: Moltana Wastes
Reward: Monster Hide ×3 |
||
| 104 |
 |
 |
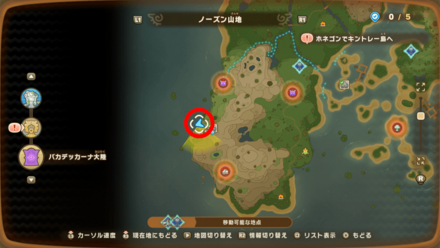
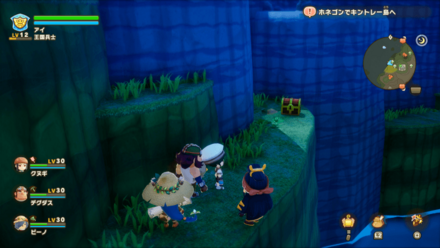
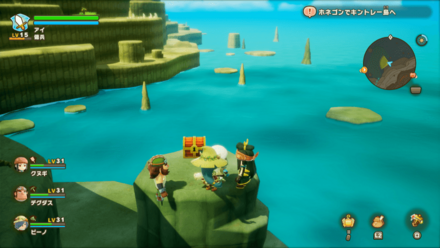
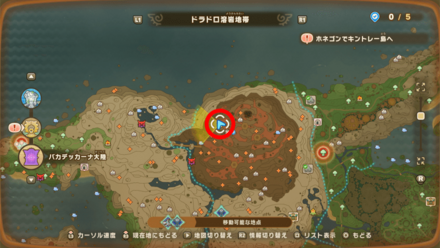
| Chest 104: Wingtip Valley
Reward: Sharp Claws ×3 |
||
| 105 |
 |
 |
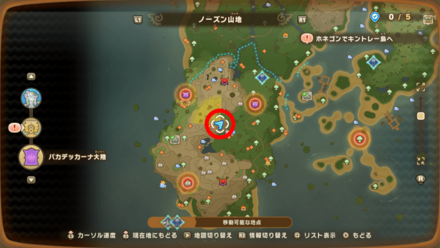
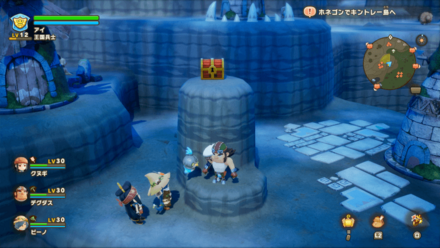
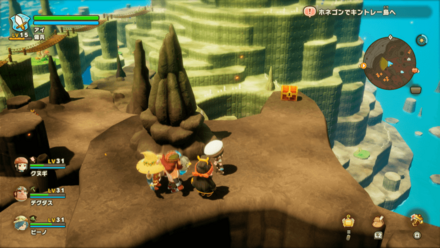
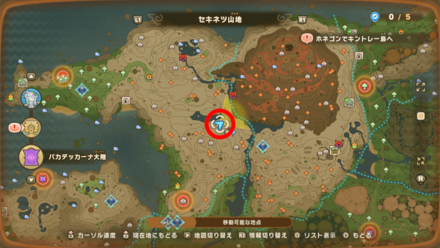
| Chest 105: Wingtip Valley
Reward: Aquamarine ×1 |
||
| 106 |
 |
 |
| Chest 106: Wingtip Valley
Reward: Wind Shard ×1 |
||
| 107 |
 |
 |
| Chest 107: Wingtip Valley
Reward: Gigaga Truffle ×3 |
||
| 108 |
 |
 |
| Chest 108: Wingtip Valley
Reward: Good Mysteria Masonry ×3 |
||
| 109 |
 |
 |
| Chest 109: Wingtip Valley
Reward: Sack of Copper ×1 |
||
| 110 |
 |
 |
| Chest 110: Wingtip Valley
Reward: SP Potion ×3 |
||
| 111 |
 |
 |
| Chest 111: Wingtip Valley
Reward: Resistance Spray ×3 |
||
| 112 |
 |
 |
| Chest 112: Pettlewing Woods
Reward: SP Potion ×1 |
||
| 113 |
 |
 |
| Chest 113: Viridia Plateau
Reward: Evening Glory ×3 |
||
| 114 |
 |
 |
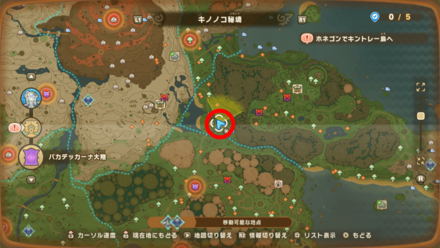
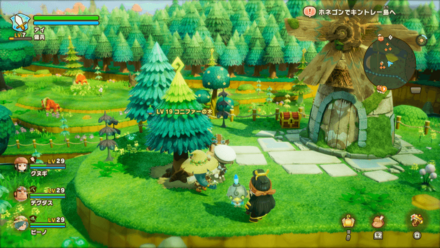
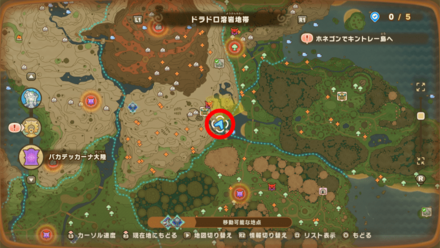
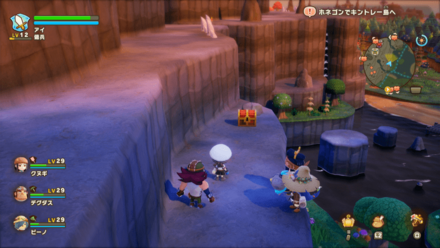
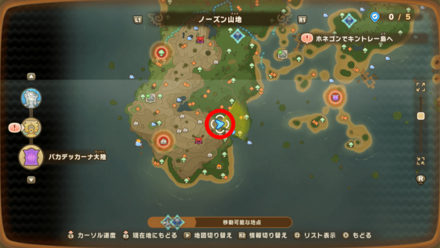
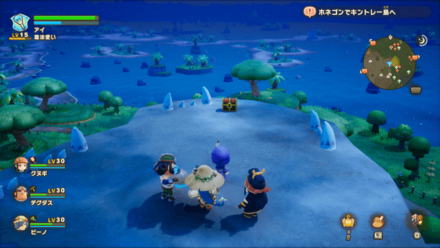
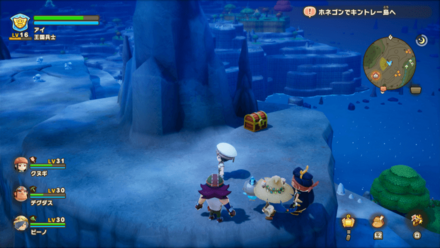
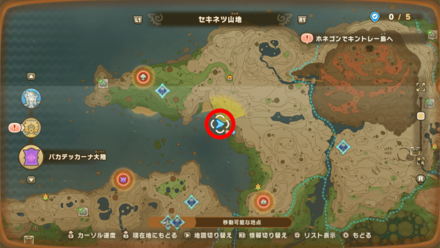
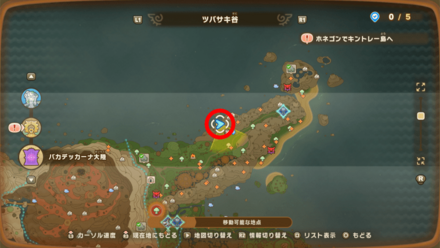
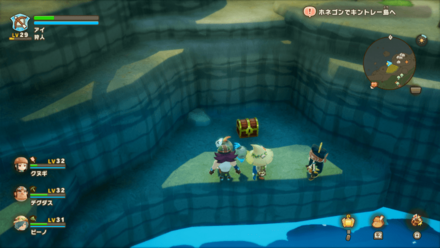
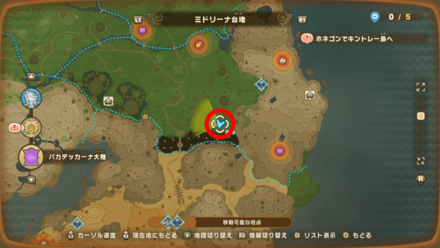
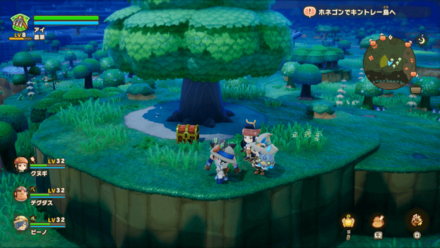
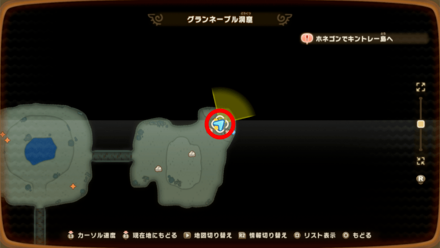
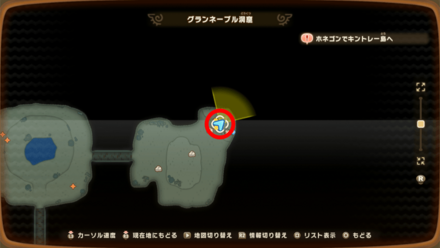
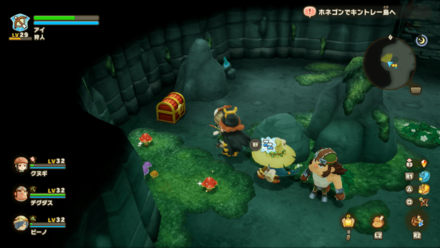
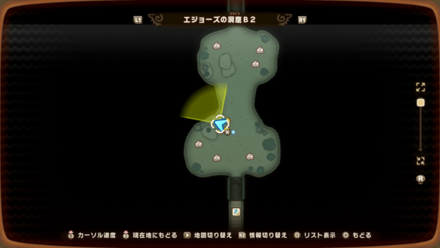
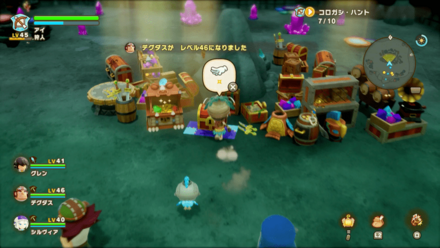
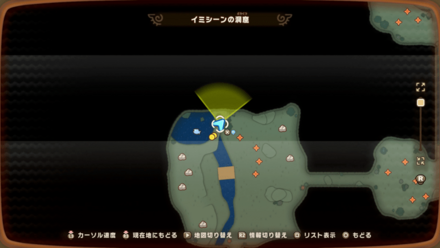
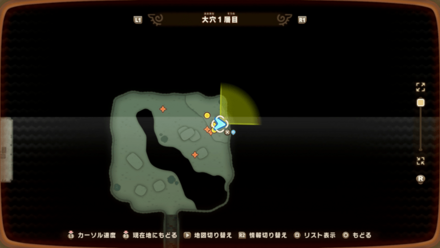
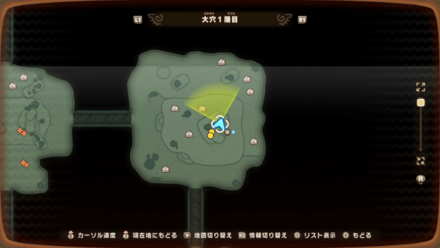
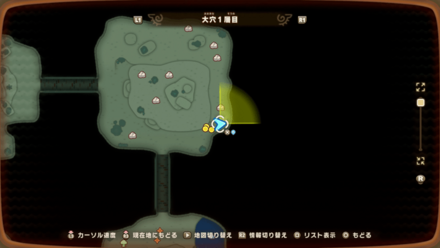
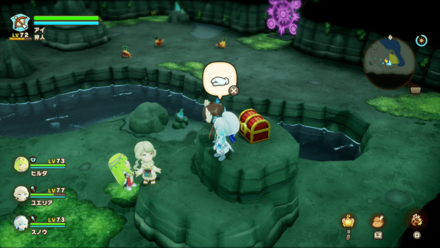
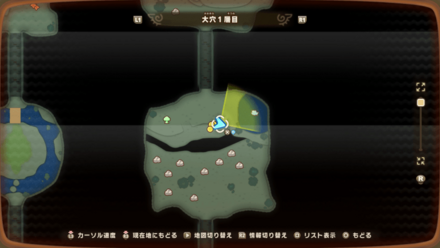
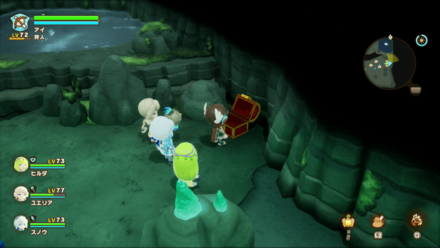
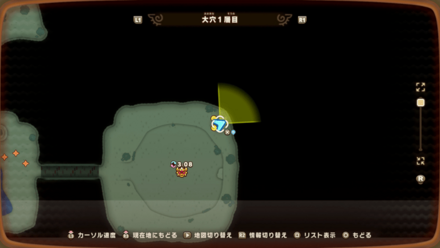
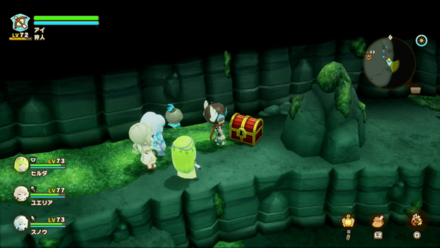
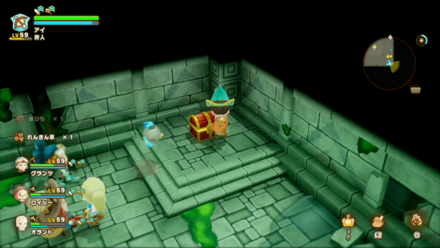
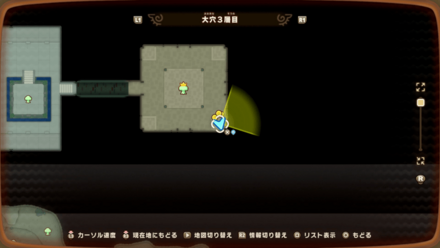
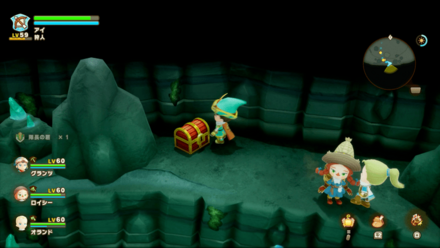
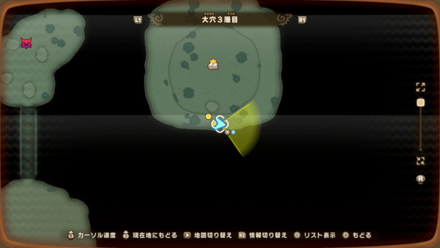
| Chest 114: Great Nayvel Cave
Reward: Topaz ×1 |
||
| 115 |
 |
 |
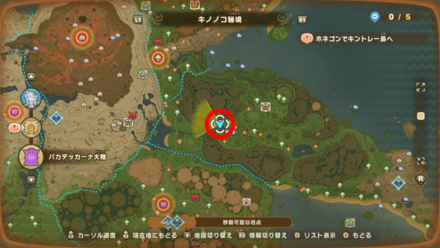
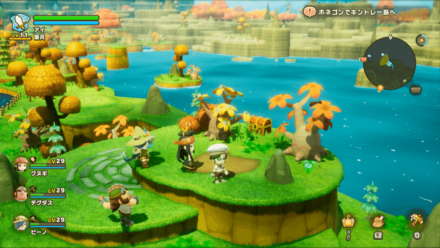
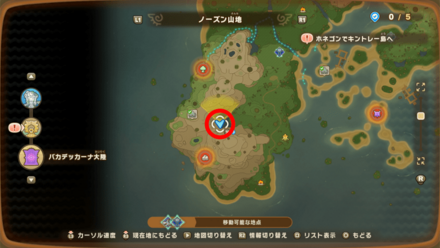
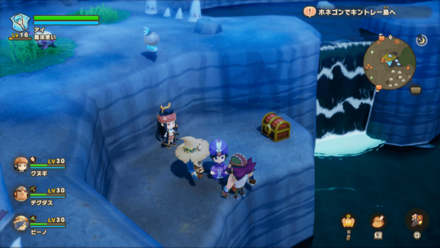
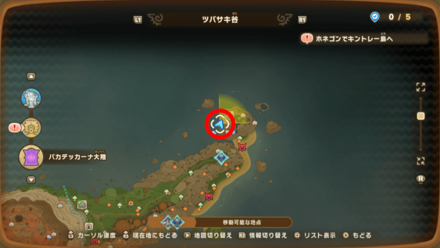
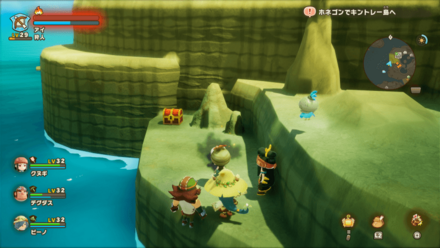
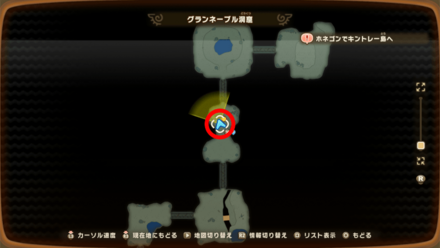
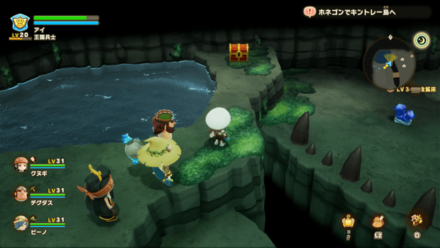
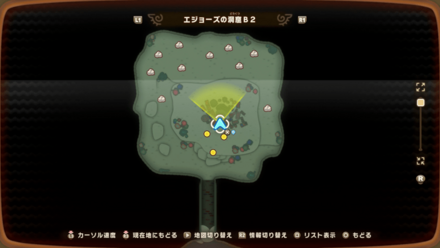
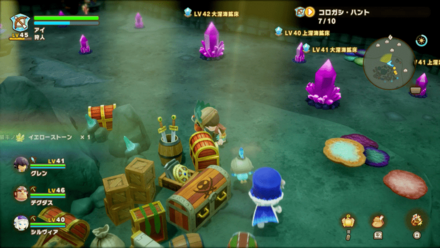
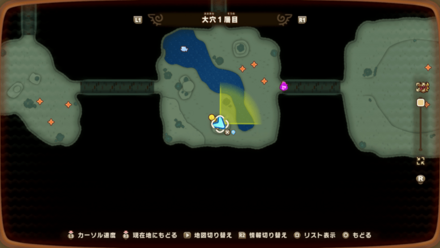
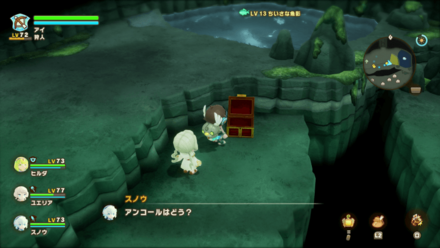
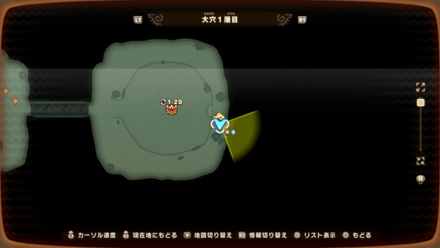
| Chest 115: Great Nayvel Cave
Reward: Quality Minty Ore ×3 |
||
| 116 |
 |
 |
| Chest 116: Wyrmtail Cave
Reward: Sun Cluster ×3 |
||
| 117 |
 |
 |
| Chest 117: Wyrm Maw Cave
Reward: Animal Fang ×3 |
||
| 118 |
 |
 |
| Chest 118: Wyrm Maw Cave
Reward: Thick Fang ×3 |
||
| 119 |
 |
 |
| Chest 119: Wyrm Maw Cave
Reward: Strong Fang ×3 |
||
| 120 |
 |
 |
| Chest 120: Drakesnout Range
Reward: Sack of Copper ×1 |
||
| 121 |
 |
 |
| Chest 121: East Dryridge Desert
Reward: Desert Lumber ×3 |
||
| 122 |
 |
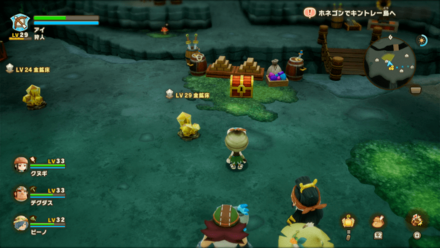 |
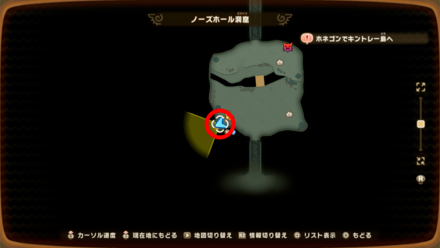
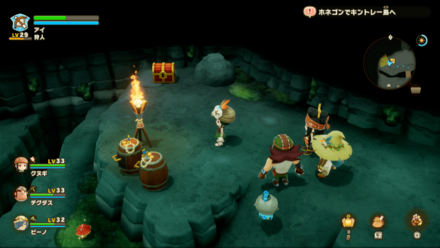
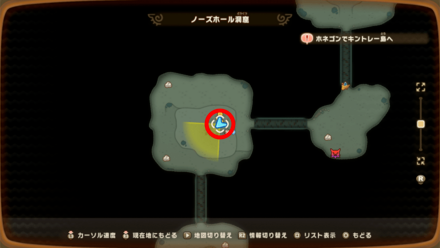
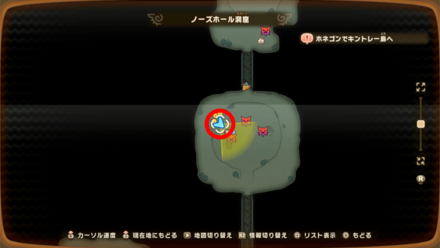
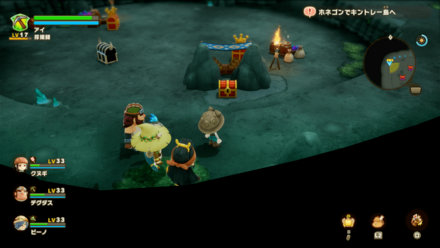
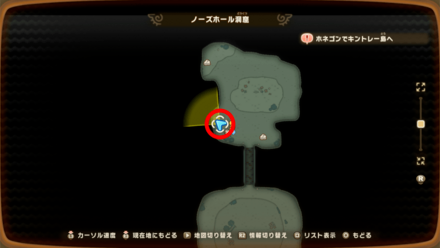
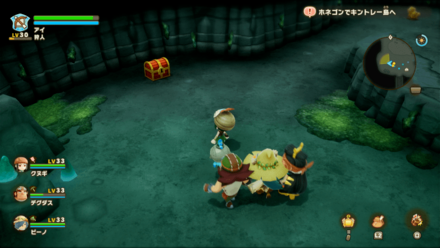
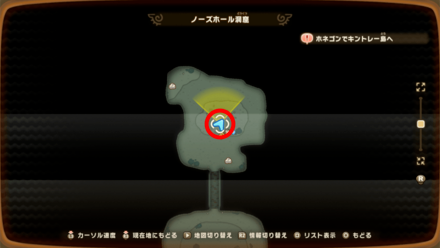
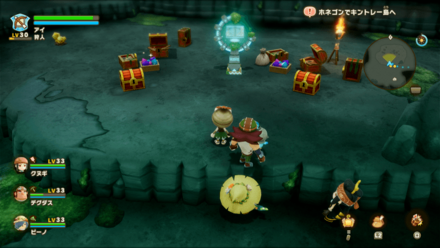
| Chest 122: Nostruul Cave
Reward: Suspicious Object x3 |
||
| 123 |
 |
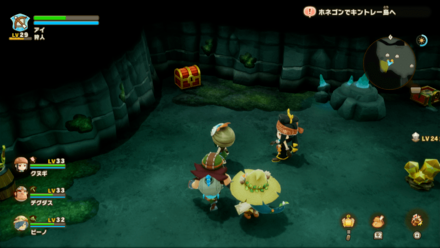 |
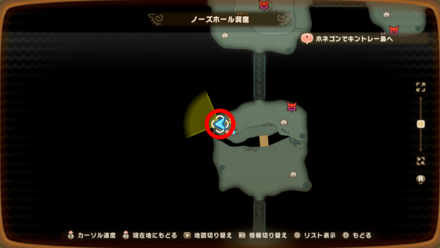
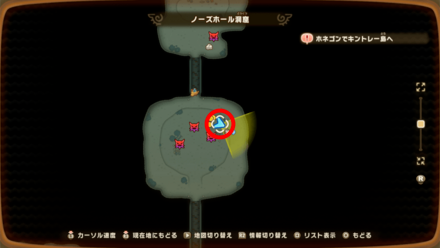
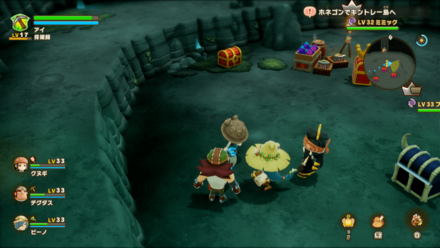
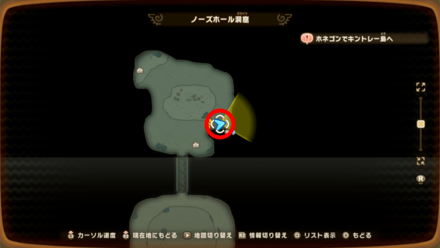
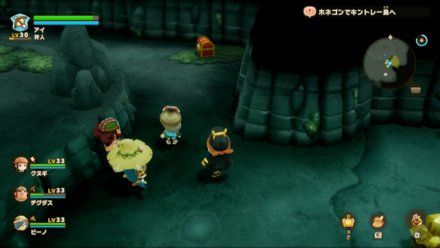
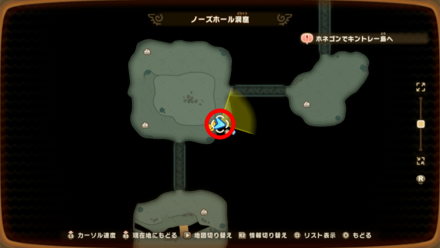
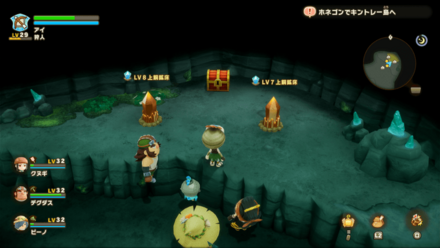
| Chest 123: Nostruul Cave
Reward: Goldweed ×3 |
||
| 124 |
 |
 |
| Chest 124: Nostruul Cave
Reward: Golden Droppings ×3 |
||
| 125 |
 |
 |
| Chest 125: Nostruul Cave
Reward: Emerald ×1 |
||
| 126 |
 |
 |
| Chest 126: Nostruul Cave
Reward: Sack of Silver ×1 |
||
| 127 |
 |
 |
| Chest 127: Nostruul Cave
Reward: Curious Object ×3 |
||
| 128 |
 |
 |
| Chest 128: Nostruul Cave
Reward: Sack of Gold ×1 |
||
| 129 |
 |
 |
| Chest 129: Nostruul Cave
Reward: Weird Object ×3 |
||
| 130 |
 |
 |
| Chest 130: Nostruul Cave
Reward: Sapphire ×1 |
||
| 131 |
 |
 |
| Chest 131: Nostruul Cave
Reward: Ruby ×1 |
||
| 132 |
 |
 |
| Chest 132: Nostruul Cave
Reward: Golden String×3 |
||
| 133 |
 |
 |
| Chest 133: Nostruul Cave
Reward: Mysterious Object×3 |
||
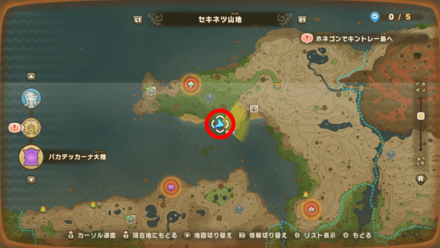
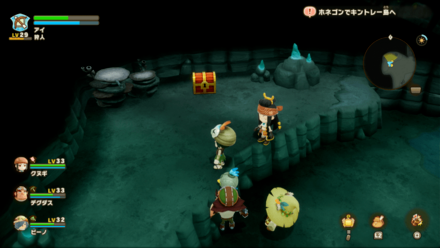
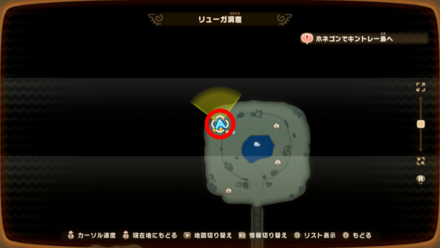
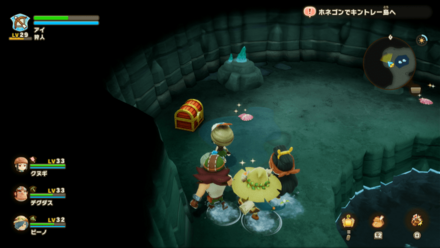
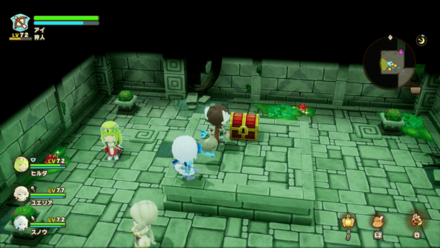
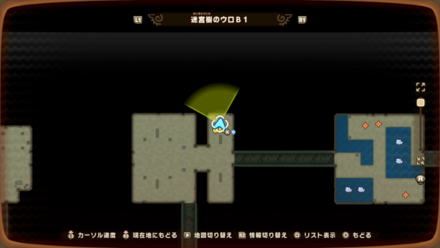
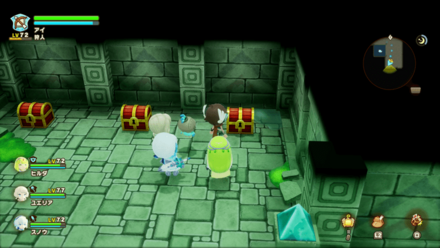
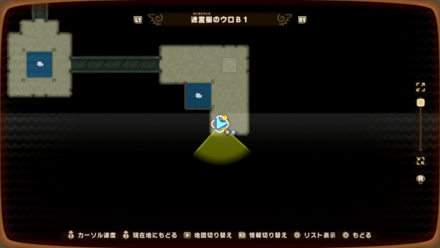
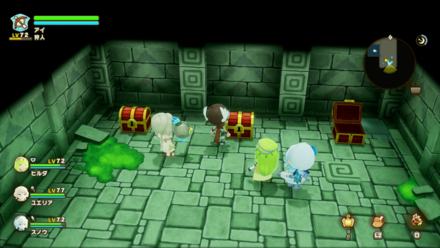
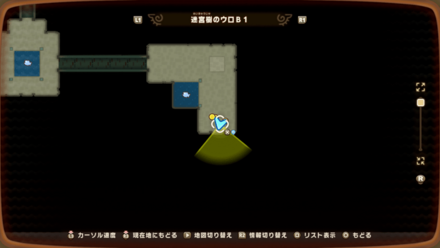
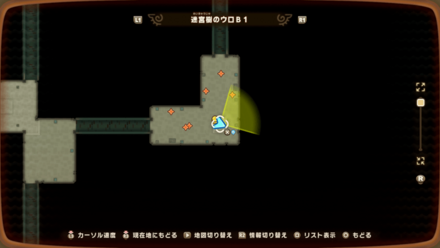
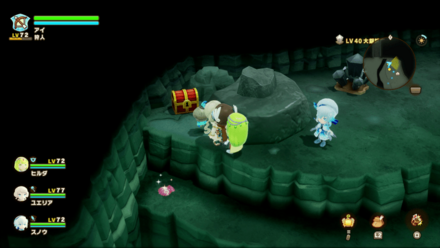
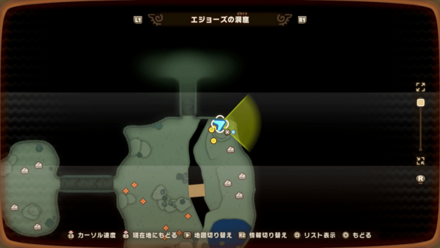
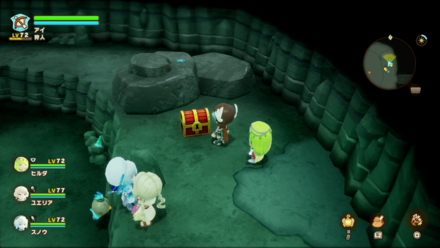
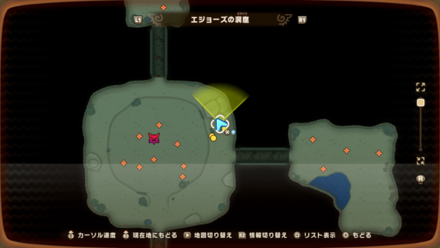
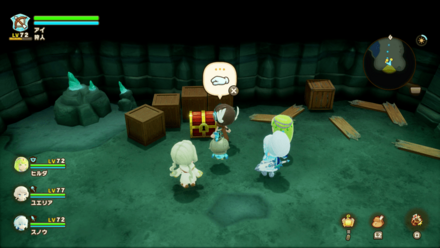
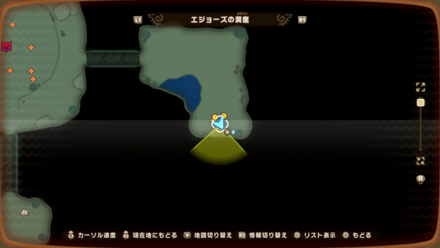
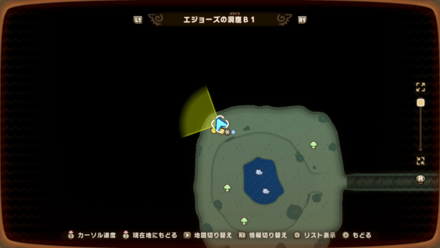
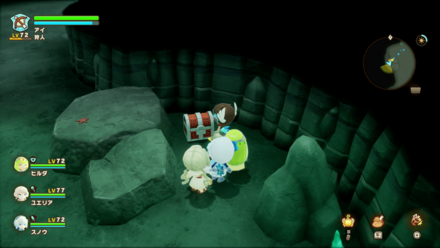
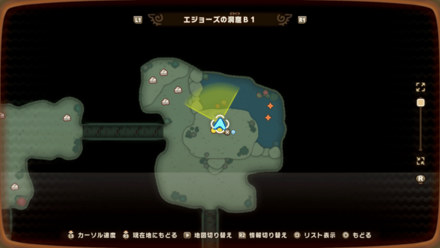
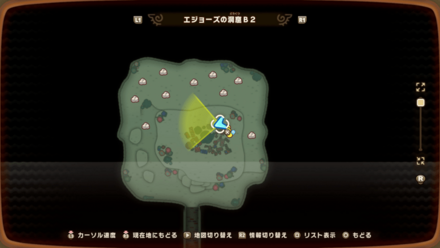
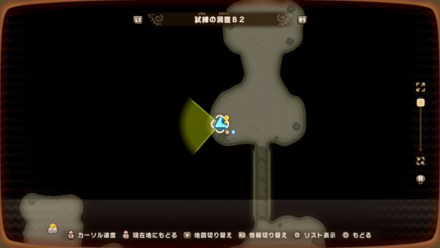
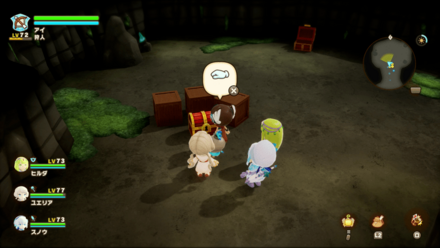
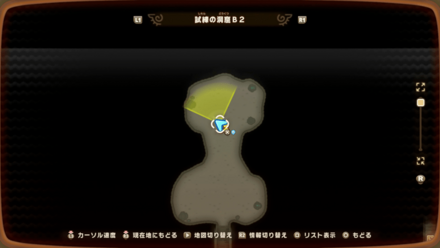
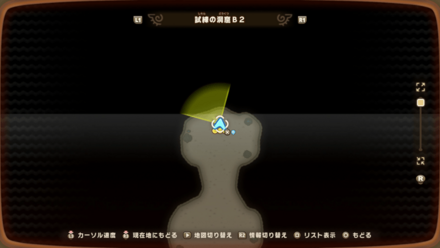
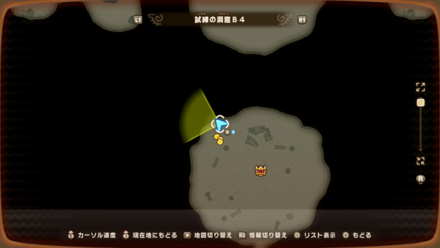
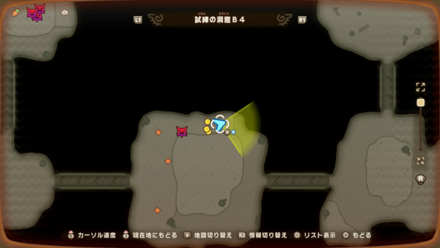
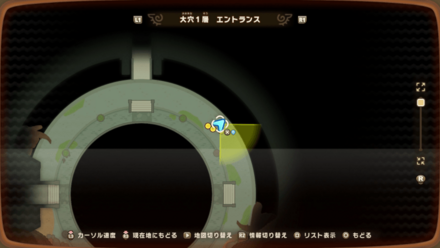
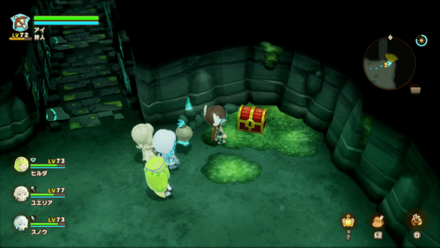
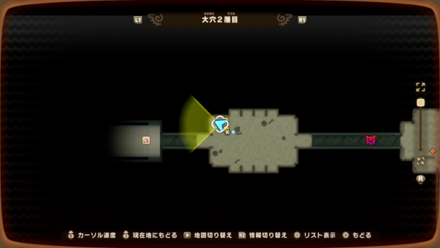
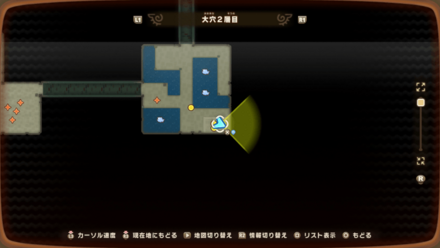
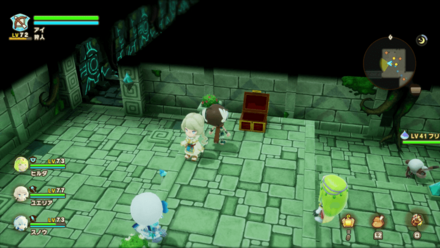
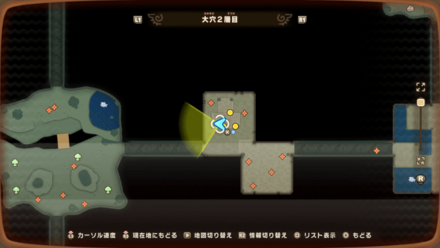
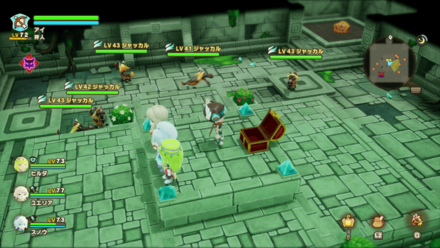
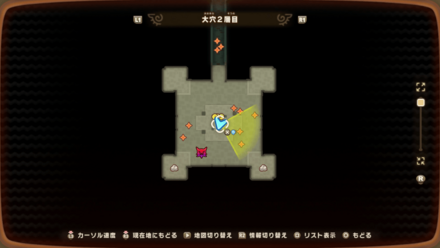
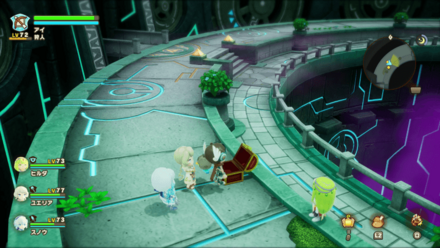
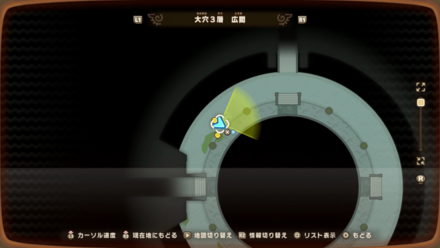
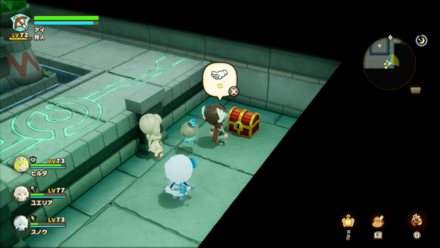
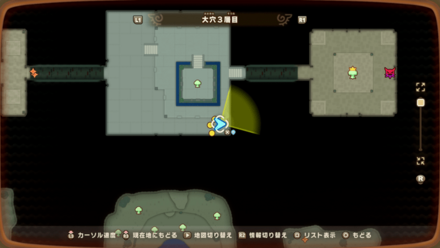
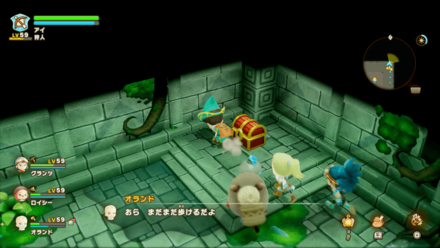
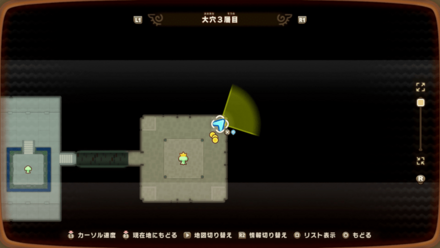
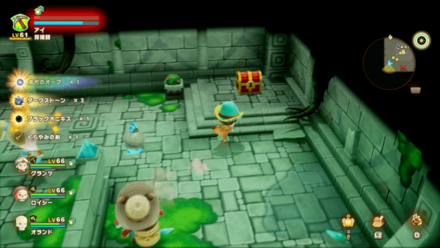
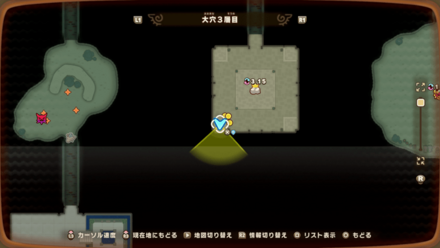
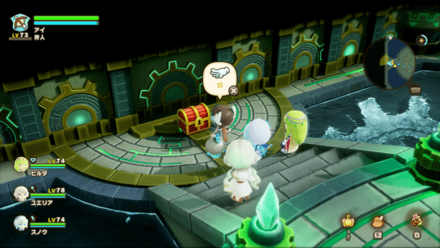
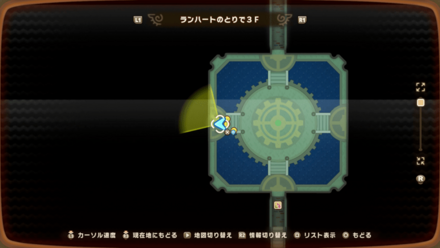
All Dungeon and Past Timeline Treasure Chests
Note: Click on the Checkbox to mark lobsters that you have already obtained!
| Map Image | World Image | |
|---|---|---|
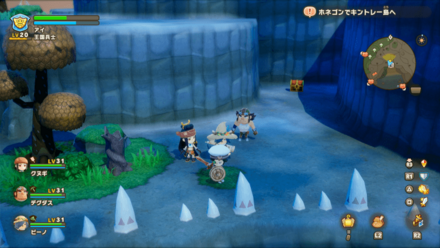
| 1 |
|
|
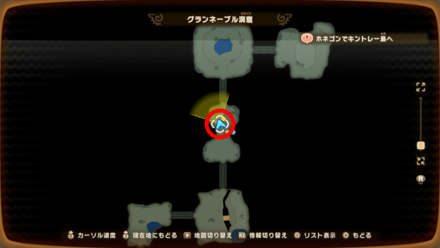
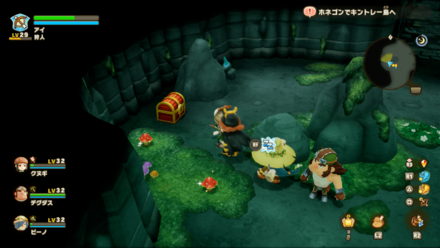
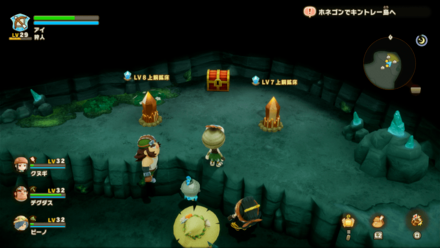
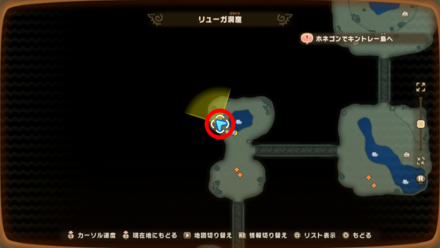
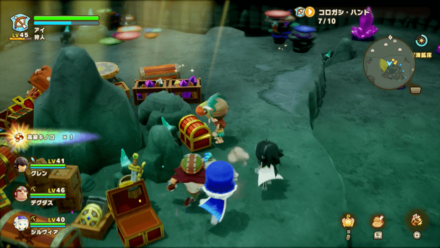
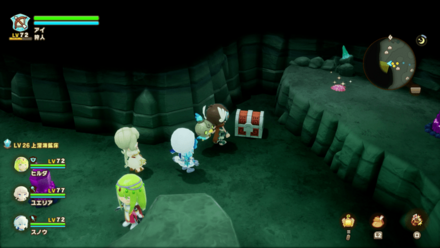
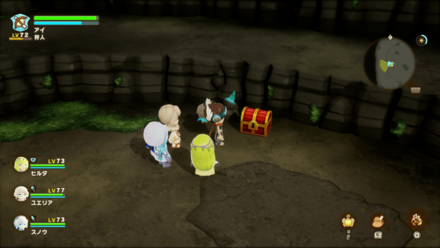
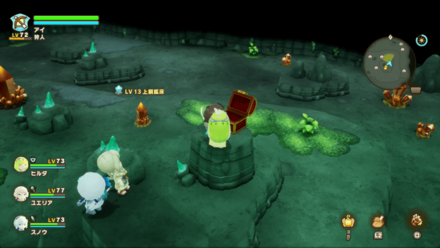
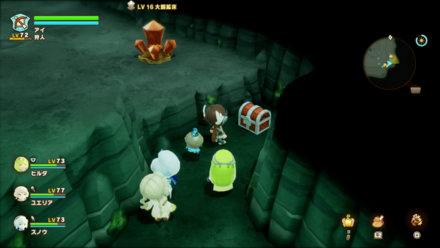
| Great Nayvel Cave 1
Reward: Quality Minty Ore |
||
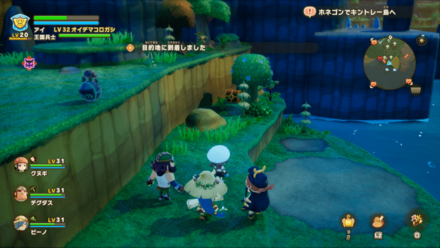
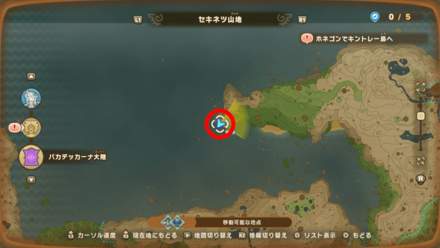
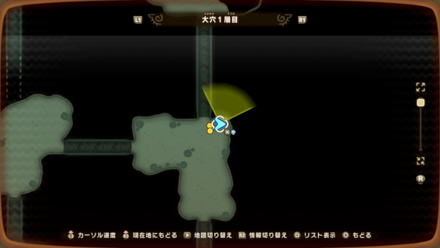
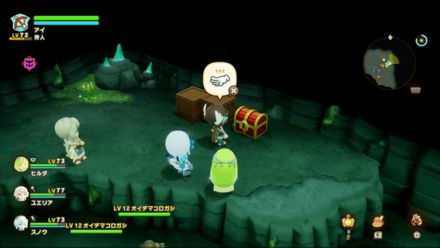
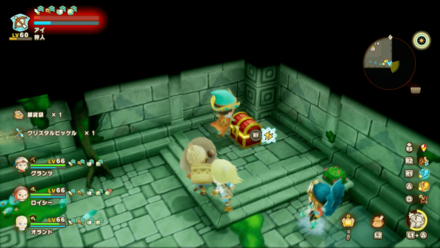
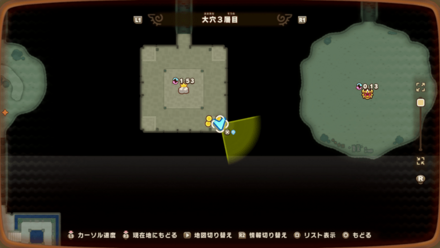
| 2 |
|
|
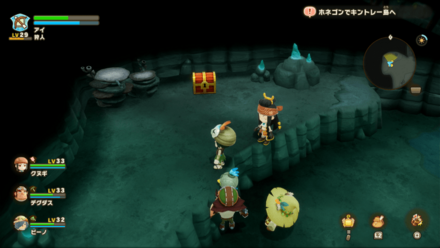
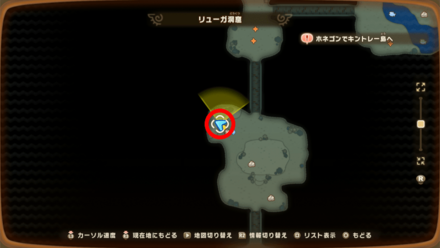
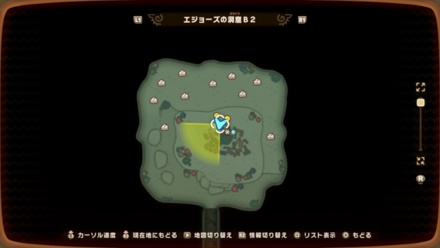
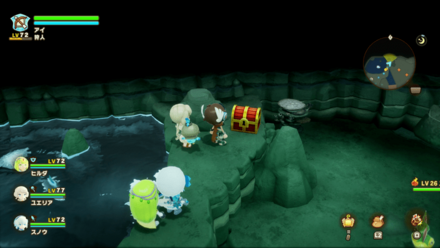
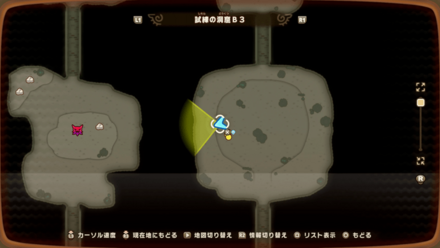
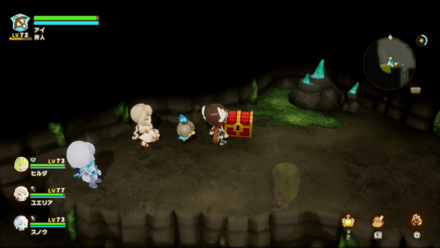
| Great Nayvel Cave 2
Reward: Topaz |
||
| 3 |
|
|
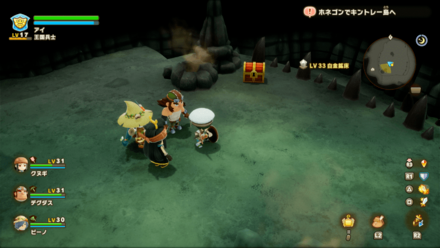
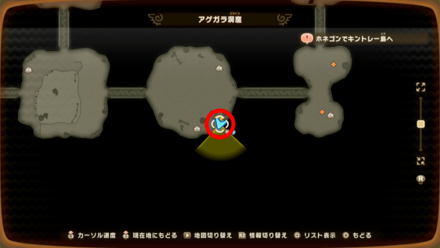
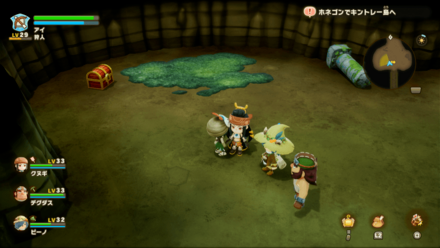
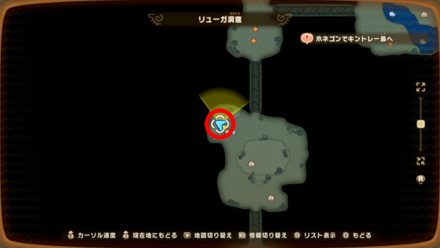
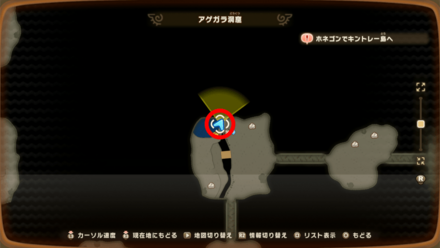
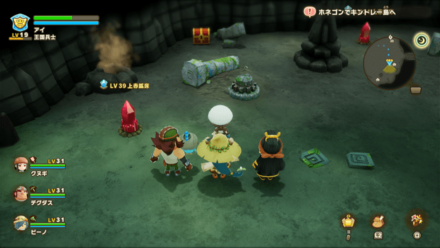
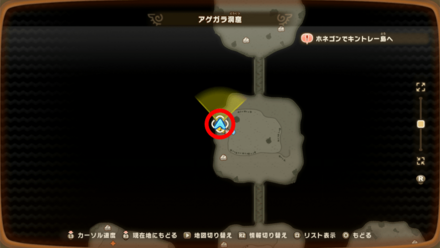
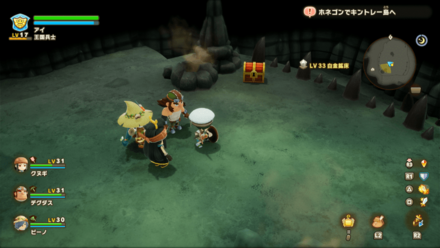
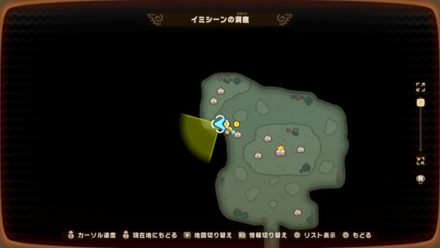
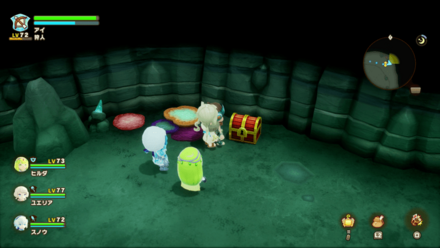
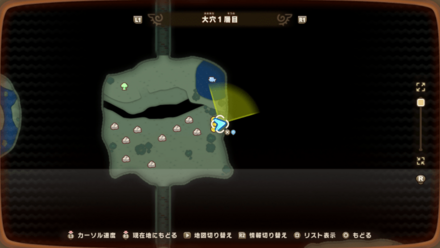
| Agekara Cave 1
Reward: Tasty Yakitori Recipe |
||
| 4 |
|
|
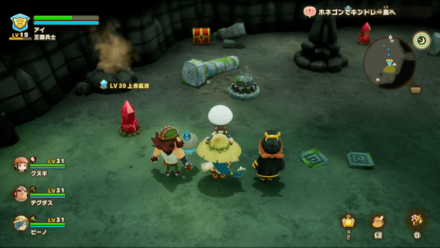
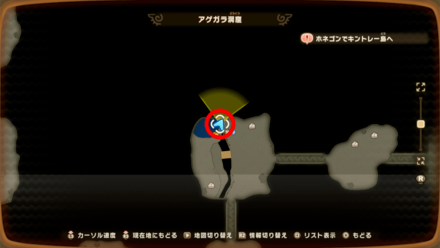
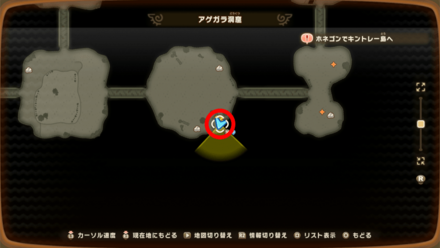
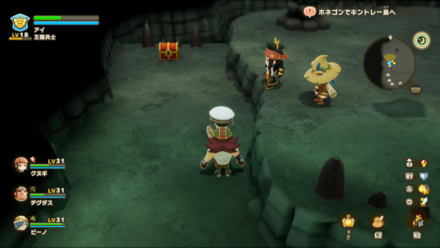
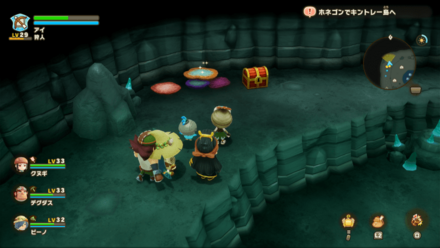
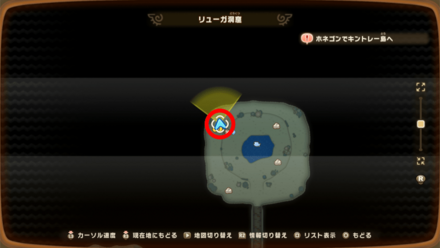
| Agekara Cave 2
Reward: Fire Shard |
||
| 5 |
|
|
| Agekara Cave 3
Reward: Combustible Powder |
||
| 6 |
|

|
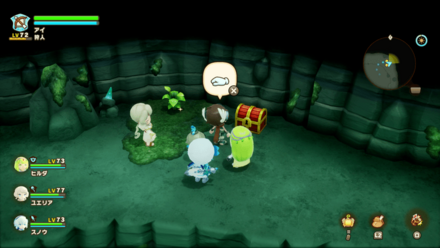
| Agekara Cave 4
Reward: Crate Recipe |
||
| 7 |
|
|
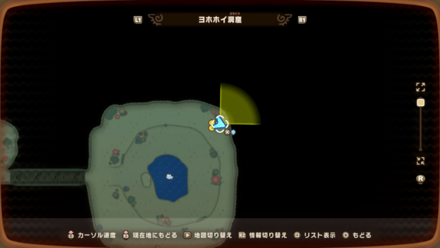
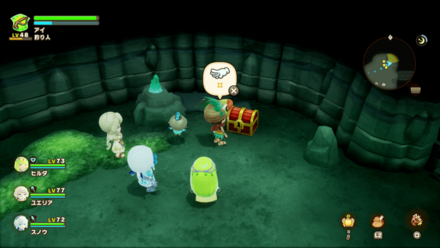
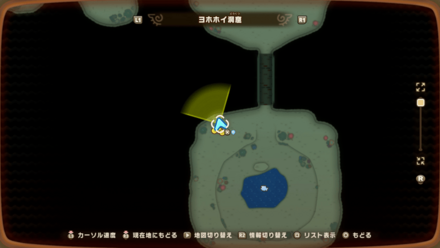
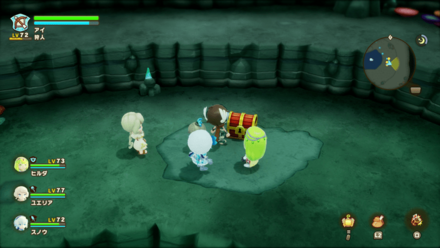
| Yohoho Cavern 1
Reward: Monster Hide |
||
| 8 |
|
|
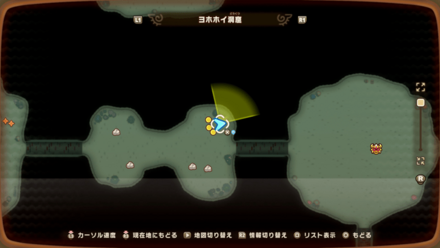
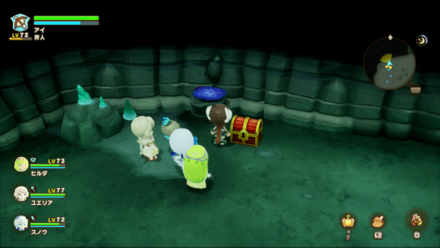
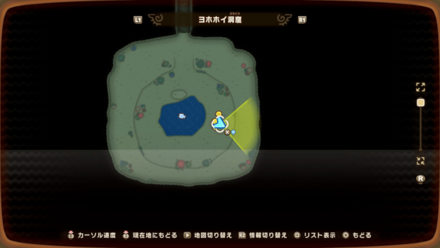
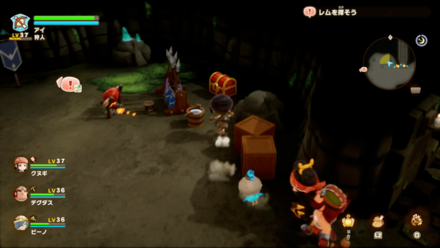
| Yohoho Cavern 2
Reward: Thick Fang |
||
| 9 |
|
|
| Yohoho Cavern 3
Reward: Animal Fang |
||
| 10 |

|
|
| Eternia Village 1
Reward: HP Potion |
||
| 11 |

|
|
| Eternia Village 2
Reward: SP Potion |
||
| 12 |
|
|
| Eternia Village 3
Reward: Woven Straw Fabric |
||
| 13 |
|
|
| Eternia Village 4
Reward: Sack of Copper |
||
| 14 |
|
|
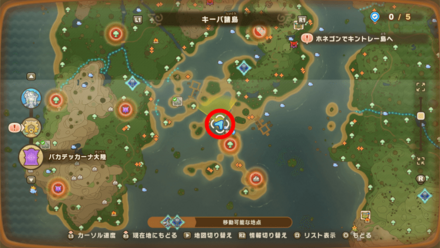
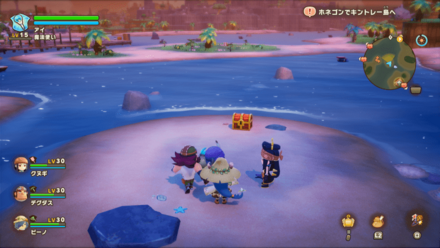
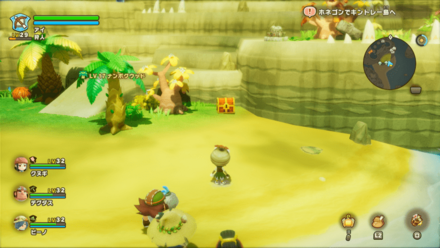
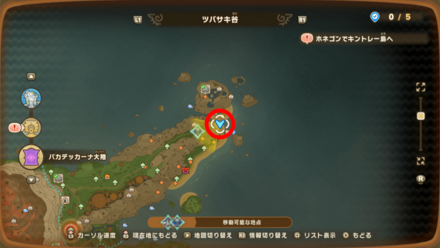
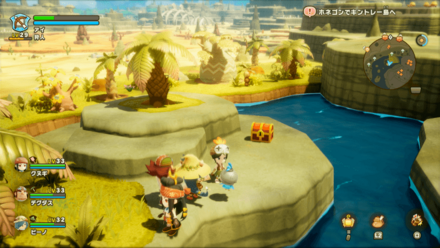
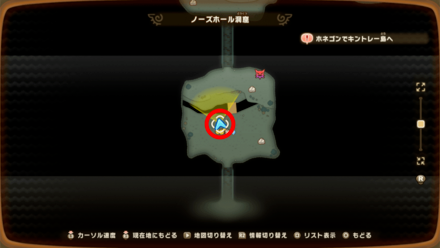
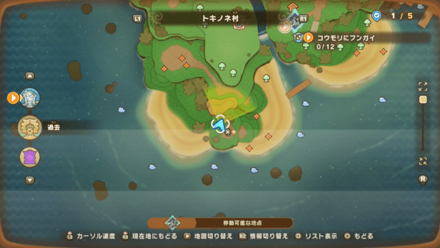
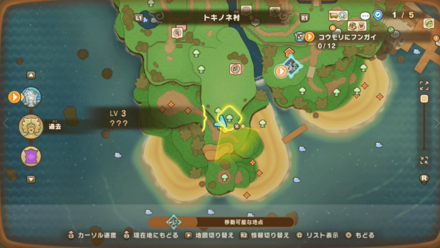
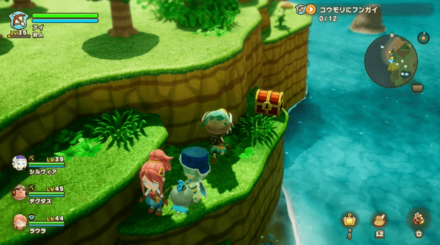
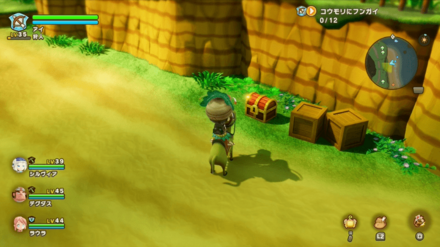
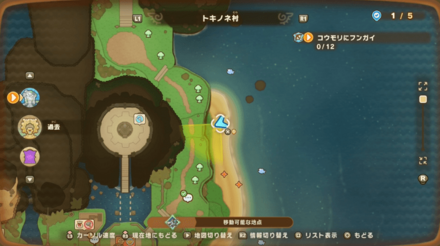
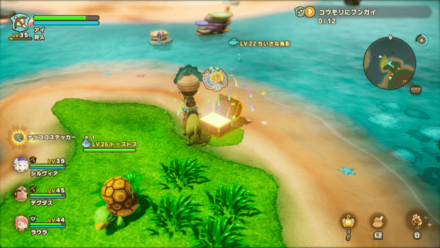
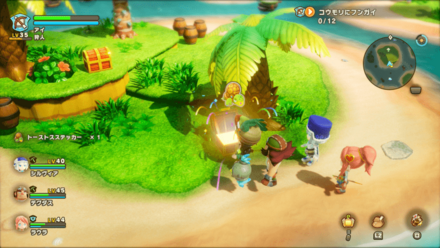
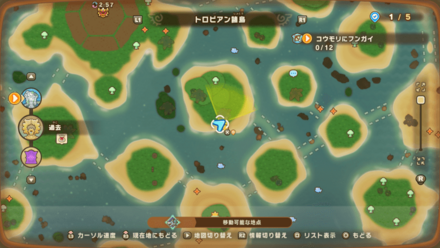
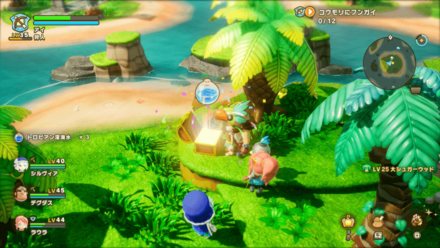
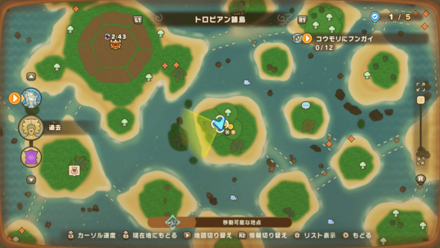
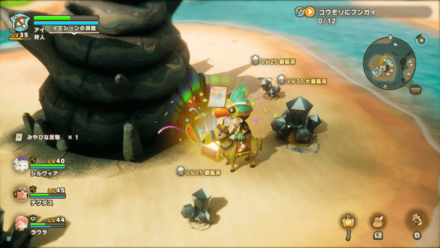
| Tropical Isles 1
Reward: Hagram Applique |
||
| 15 |

|
|
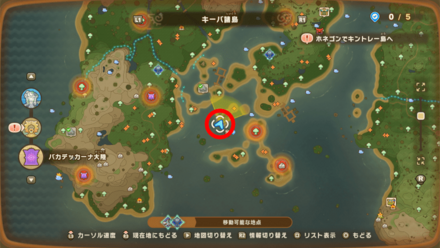
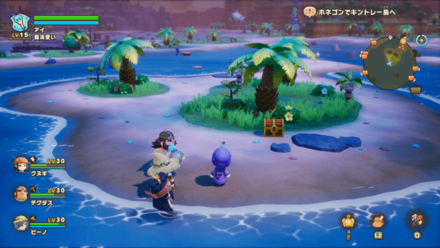
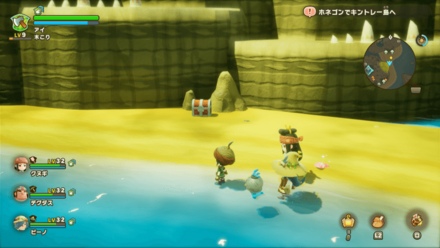
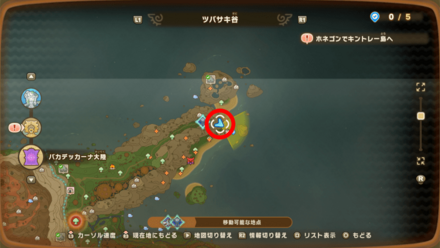
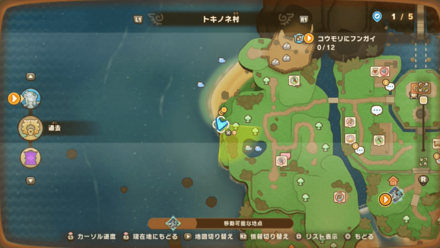
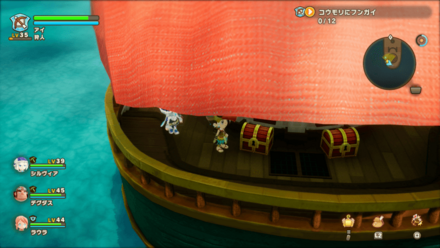
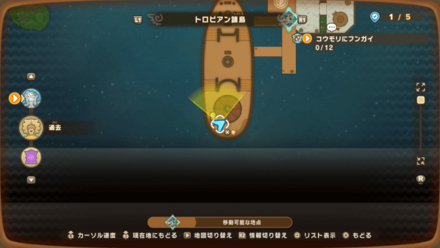
| Tropical Isles 2
Reward: Mimic Sticker |
||
| 16 |
|

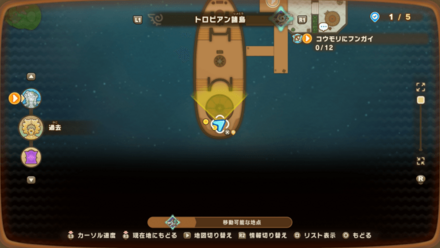
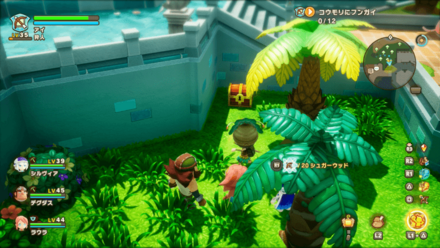
|
| Tropical Isles 3
Reward: Sugar Lumber |
||
| 17 |
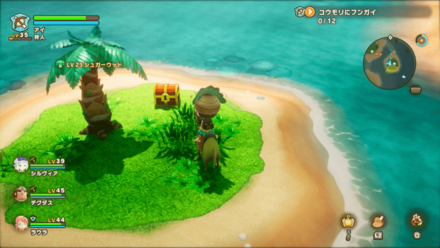
|
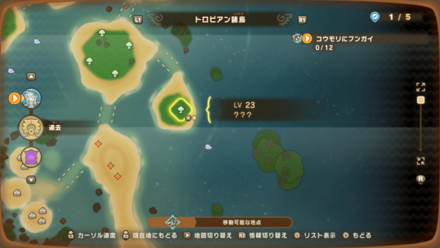
|
| Tropical Isles 4
Reward: Sunny Cotton |
||
| 18 |
|

|
| Tropical Isles 5
Reward: Tunoco Sticker |
||
| 19 |
|
|
| Tropical Isles 6
Reward: Tortortoise Sticker |
||
| 20 |
|
|
| Tropical Isles 7
Reward: Tropical Deep Sea Water |
||
| 21 |
|
|
| Tropical Isles 8
Reward: Elegant Cloth |
||
| 22 |

|
|
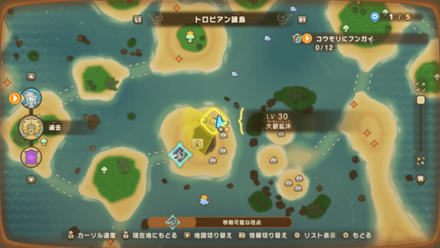
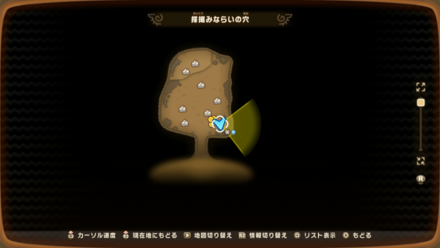
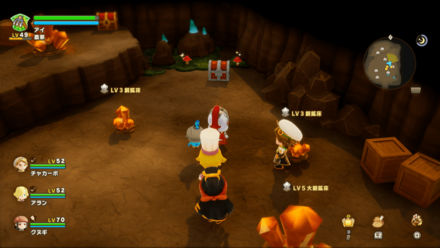
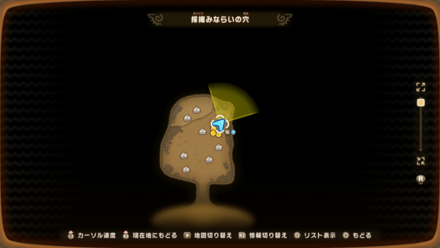
| Novice Miner's Pit 1
Reward: Mysteria Masonry |
||
| 23 |
|
|
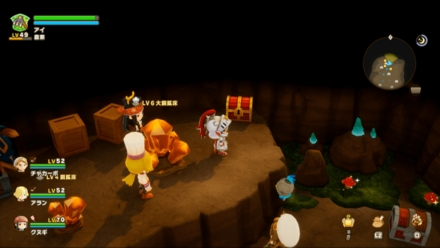
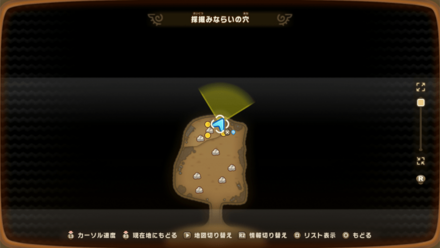
| Novice Miner's Pit 2
Reward: HP Potion |
||
| 24 |
|
|
| Novice Miner's Pit 3
Reward: SP Potion |
||
| 25 |

|

|
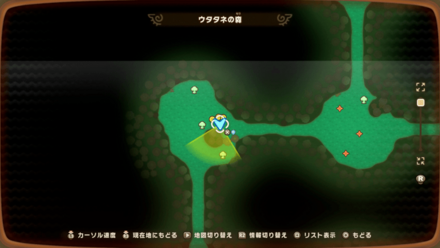
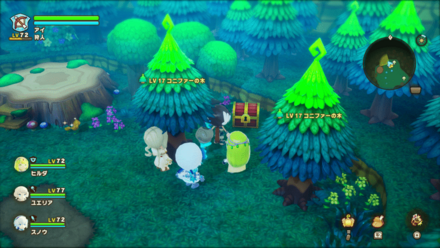
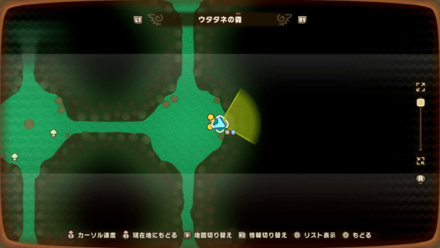
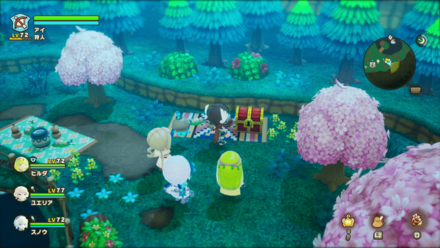
| Pettlewing Forest 1
Reward: Cherry Honey |
||
| 26 |
|
|
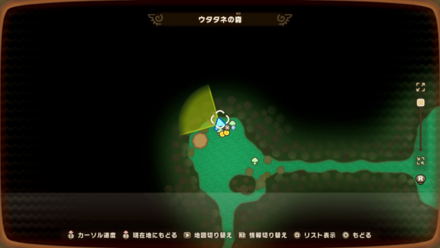
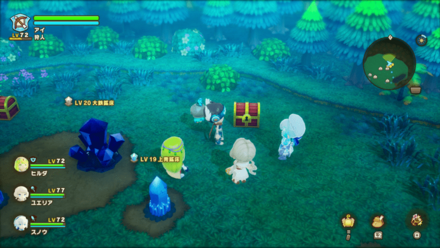
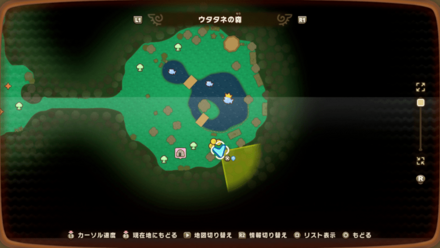
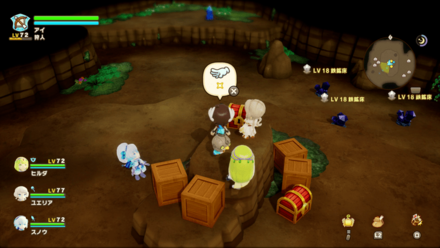
| Pettlewing Forest 2
Reward: Plum Blossom Fireworks |
||
| 27 |
|
|
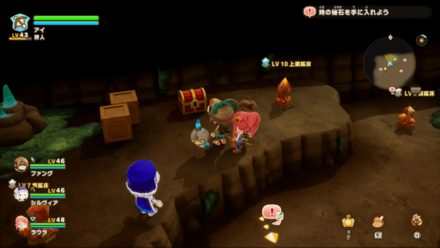
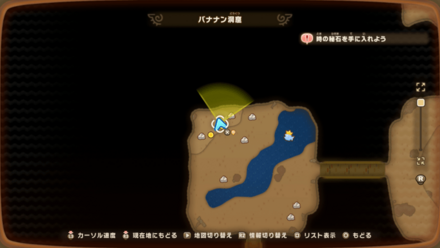
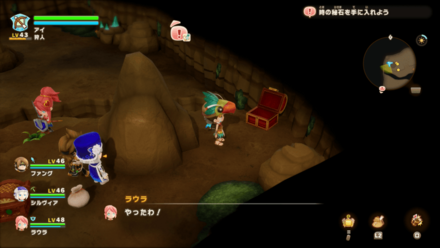
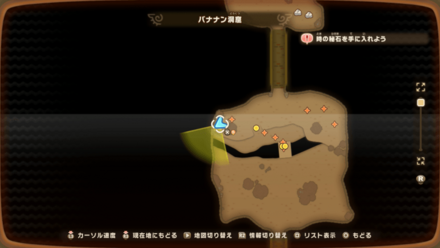
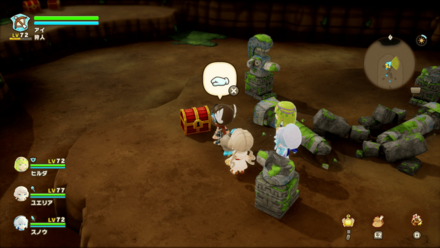
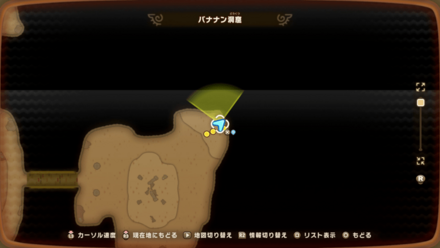
| Banaan Cave 1
Reward: HP Potion |
||
| 28 |
|
|
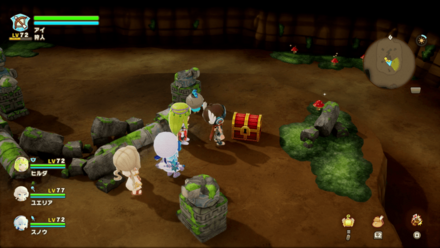
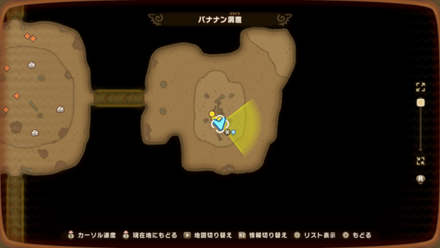
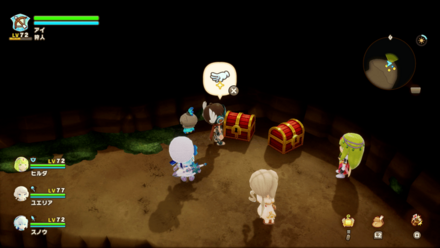
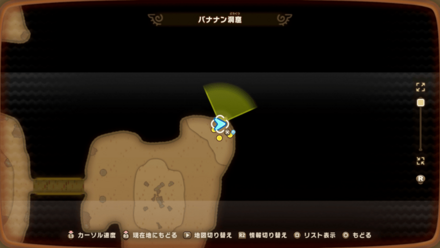
| Banaan Cave 2
Reward: SP Potion |
||
| 29 |
|
|
| Banaan Cave 3
Reward: Stack of Firewood Recipe |
||
| 30 |
|

|
| Banaan Cave 4
Reward: SP Potion |
||
| 31 |

|
|
| Banaan Cave 5
Reward: Poison Bomb |
||
| 32 |
|
|
| Banaan Cave 6
Reward: Fireworks |
||
| 33 |
|
|
| Warren Willow Hollow 1
Reward: Mini Bomb |
||
| 34 |
|
|
| Warren Willow Hollow 2
Reward: Life Cure |
||
| 35 |
|
|
| Warren Willow Hollow 3
Reward: Wheelbarrow Recipe |
||
| 36 |
|
|
| Warren Willow Hollow 4
Reward: SP Potion |
||
| 37 |
|
|
| Warren Willow Hollow 5
Reward: Ancient Emerald |
||
| 38 |
|
|
| Warren Willow Hollow 6
Reward: |
||
| 39 |

|
|
| Warren Willow Hollow 7
Reward: Ultima Alcheweed |
||
| 40 |
|
|
| Warren Willow Hollow 8
Reward: Elixir |
||
| 41 |
|
|
| Warren Willow Hollow 9
Reward: Magic Ingot |
||
| 42 |
|
|
| Warren Willow Hollow 10
Reward: Spraylixir |
||
| 43 |
|
|
| Warren Willow Hollow 11
Reward: Shadow Carrot Seed |
||
| 44 |
|
|
| Quetzal Nest 1
Reward: |
||
| 45 |
|
|
| Lulab Forest 1
Reward: Castele Apple |
||
| 46 |
|
|
| Lulab Forest 2
Reward: Pine Lumber |
||
| 47 |
|
|
| Lulab Forest 3
Reward: Flare Cashmere |
||
| 48 |
|
|
| Lulab Forest 4
Reward: Skelegon Applique |
||
| 49 |
|
|
| Lulab Forest 5
Reward: Sack of Copper |
||
| 50 |
|
|
| Lulab Forest 6
Reward: Cherry Lumber |
||
| 51 |
|
|
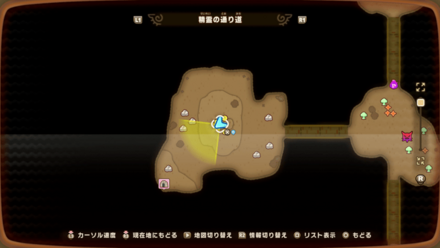
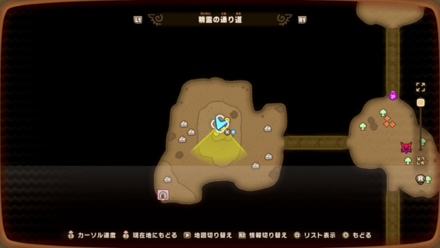
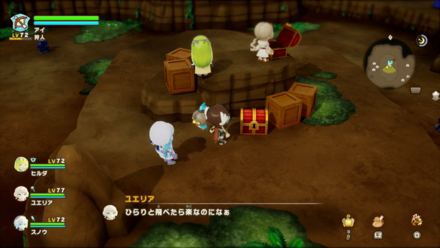
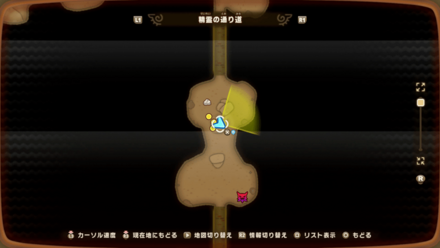
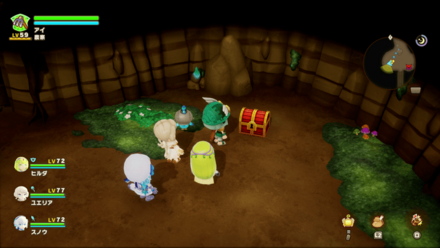
| Spirit Road 1
Reward: Radish Seeds |
||
| 52 |
|
|
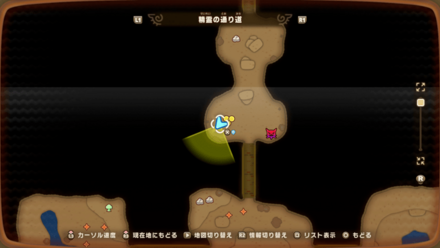
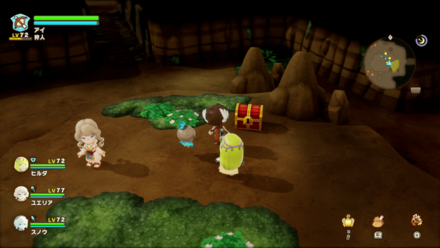
| Spirit Road 2
Reward: Cashmere |
||
| 53 |
|
|
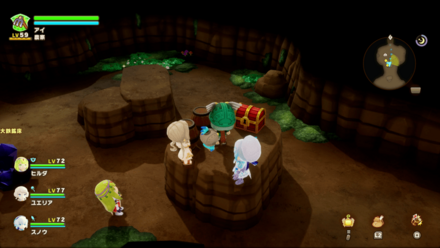
| Spirit Road 3
Reward: Cabbage Seeds |
||
| 54 |
|
|
| Spirit Road 4
Reward: Silk |
||
| 55 |
|

|
| Spirit Road 5
Reward: Pumpkin Seeds |
||
| 56 |
|
|
| Spirit Road 6
Reward: Linen |
||
| 57 |
|
|
| Spirit Road 7
Reward: Iron Ingot |
||
| 58 |
|
|
| Profunda Cave 1
Reward: Yellow Paint |
||
| 59 |
|
|
| Profunda Cave 2
Reward: Red Paint |
||
| 60 |
|
|
| Profunda Cave 3
Reward: Blue Paint |
||
| 61 |
|
|
| Profunda Cave 4
Reward: Black Paint |
||
| 62 |
|

|
| Profunda Cave 5
Reward: Sack of Secrets |
||
| 63 |
|
|
| Profunda Cave 6
Reward: White Paint |
||
| 64 |
|
|
| Profunda Cave 7
Reward: Sack of Silver |
||
| 65 |
|
|
| Profunda Cave 8
Reward: Rainbow Paint |
||
| 66 |
|
|
| Profunda Cave 9
Reward: Top-Class Mushroom |
||
| 67 |
|
|
| Profunda Cave 10
Reward: Sack of Secrets |
||
| 68 |
|
|
| Profunda Cave 1
Reward: Marine Ingot |
||
| 69 |
|
|
| Profunda Cave 2
Reward: Sack of Gold |
||
| 70 |
|
|
| Yohoho Cavern 1
Reward: Silver Ingot |
||
| 71 |
|
|
| Yohoho Cavern 2
Reward: Silver Ingot |
||
| 72 |
|
|
| Yohoho Cavern 3
Reward: Frozen Remedy |
||
| 73 |
|
|
| Yohoho Cavern 4
Reward: Burning Remedy |
||
| 74 |
|
|
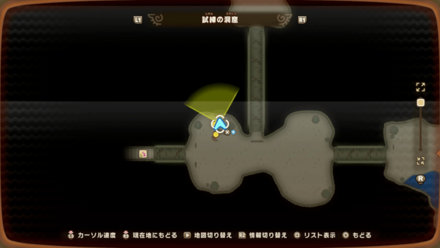
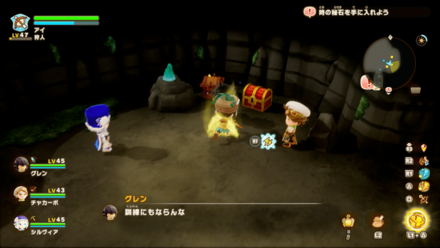
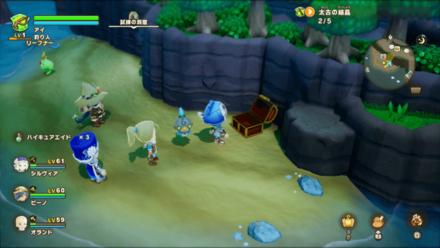
| Cave of Trials 1
Reward: Healing Powder |
||
| 75 |
|
|
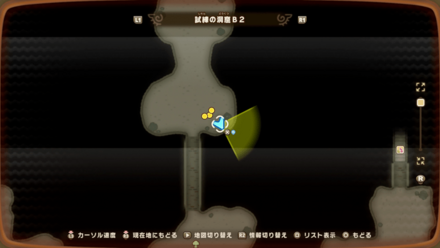
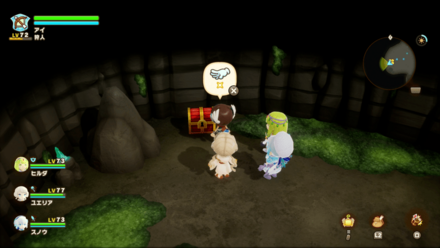
| Cave of Trials 2
Reward: Resistance Aid |
||
| 76 |
|
|
| Cave of Trials 3
Reward: Power Aid |
||
| 77 |
|
|
| Cave of Trials 4
Reward: Daredevil Aid |
||
| 78 |
|
|
| Cave of Trials 5
Reward: Trial Cavedew |
||
| 79 |
|
|
| Cave of Trials 6
Reward: Charge Up Aid |
||
| 80 |
|
|
| Cave of Trials 7
Reward: Magic Aid |
||
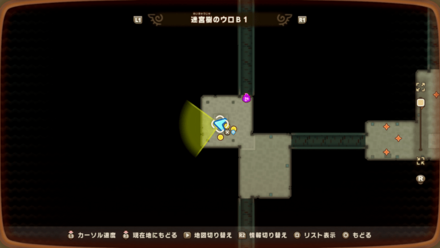
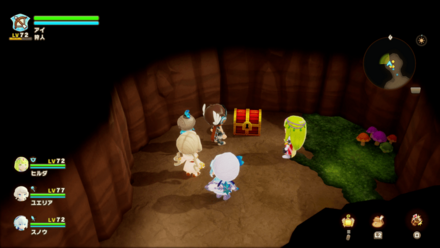
| 81 |
|
|
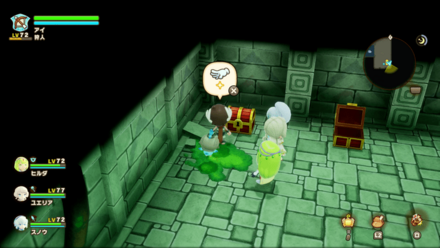
| Cave of Trials 8
Reward: Sealing Potion |
||
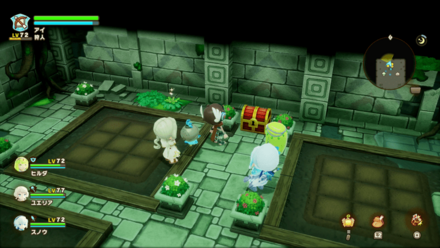
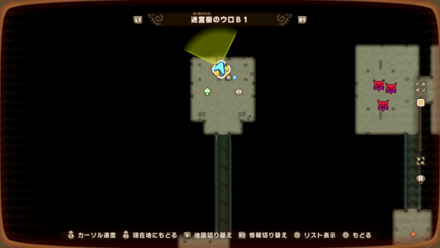
| 82 |
|
|
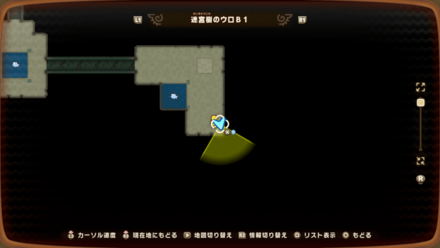
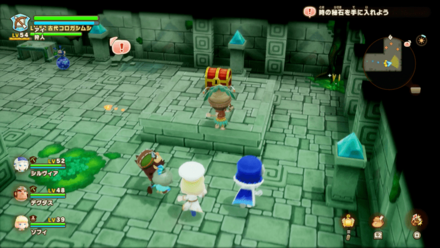
| Cave of Trials 9
Reward: Crit Aid |
||
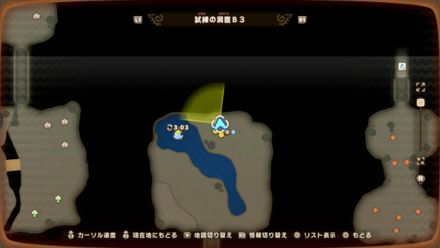
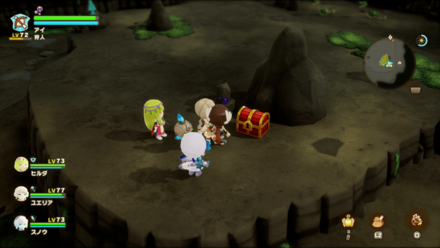
| 83 |
|
|
| Cave of Trials 10
Reward: Frozen Remedy |
||
| 84 |
|

|
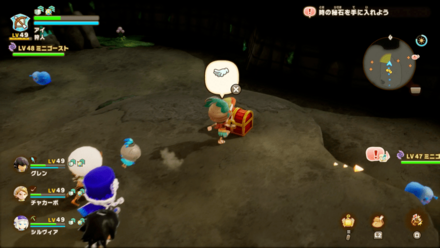
| Cave of Trials 11
Reward: Gold Ingot |
||
| 85 |
|

|
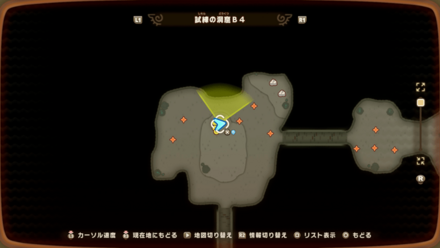
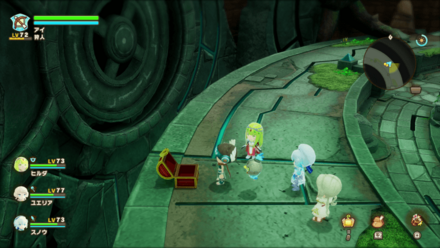
| Cave of Trials 12
Reward: Stardust Linen |
||
| 86 |
|
|
| Cave of Trials 13
Reward: Adorable Eyepatch |
||
| 87 |
|
|
| Cave of Trials 14
Reward: Burning Remedy |
||
| 88 |
|
|
| Cave of Trials 15
Reward: Skytree Lumber |
||
| 89 |
|
|
| Depths 1
Reward: HP Potion |
||
| 90 |
|
|
| Depths 2
Reward: Poison Antidote |
||
| 91 |
|
|
| Depths 3
Reward: Trip Applique |
||
| 92 |
|
|
| Depths 4
Reward: Hi-SP Potion |
||
| 93 |
|
|
| Depths 5
Reward: Dandelion Cotton |
||
| 94 |
|
|
| Depths 6
Reward: Paralysis Antidote |
||
| 95 |
|
|
| Depths 7
Reward: Life Cure |
||
| 96 |
|
|
| Depths 8
Reward: Apple Applique |
||
| 97 |
|
|
| Depths 9
Reward: Sword Pattern Rug Recipe |
||
| 98 |
|
|
| Depths 10
Reward: Thick Novel Recipe |
||
| 99 |

|
|
| Depths 11
Reward: Hi-HP Potion |
||
| 100 |
|
|
| Depths 12
Reward: Starry Lumber |
||
| 101 |

|
|
| Depths 13
Reward: Paralysis Bomb |
||
| 102 |
|
|
| Depths 14
Reward: Ancient Robot Oil |
||
| 103 |

|
|
| Depths 15
Reward: Hagram Parts |
||
| 104 |
|
|
| Depths 16
Reward: Platinum Ingot |
||
| 105 |
|
|
| Depths 17
Reward: Magma Ingot |
||
| 106 |
|
|
| Depths 18
Reward: Hi-SP Potion |
||
| 107 |
|
|
| Depths 19
Reward: Life Cure |
||
| 108 |
|
|
| Depths 20
Reward: Energy Powder |
||
| 109 |
|
|
| Depths 21
Reward: Darkwood Lumber |
||
| 110 |
|
|
| Depths 22
Reward: King's Wool |
||
| 111 |
|
|
| Depths 23
Reward: Pink Silk |
||
| 112 |
|
|
| Depths 24
Reward: Great Bomb |
||
| 113 |
|
|
| Depths 25
Reward: Berserk Potion |
||
| 114 |
|
|
| Depths 26
Reward: Panacea |
||
| 115 |
|
|
| Depths 27
Reward: Heal-All |
||
| 116 |
|
|
| Depths 28
Reward: Ancient Robot Parts |
||
| 117 |
|
|
| Depths 29
Reward: Hi-SP Potion |
||
| 118 |
|
|
| Depths 30
Reward: Hi-HP Potion |
||
| 119 |
|
|
| Depths 31
Reward: Marine Silk |
||
| 120 |
|
|
| Fort Gardhart 1
Reward: Hero Applique |
||
| 121 |
|
|
| Fort Gardhart 2
Reward: Princess Applique |
||
| 122 |
|
|
| Fort Gardhart 3
Reward: Inferno Gauntlets Recipe |
||
| 123 |
|
|
| Fort Gardhart 4
Reward: Inferno Leggings Recipe |
||
| 124 |
|

|
| Fort Gardhart 5
Reward: Inferno Cuirass Recipe |
||
| 125 |

|
|
| Fort Gardhart 6
Reward: Inferno Boots Recipe |
||
| 126 |
|
|
| Fort Gardhart 7
Reward: Maxheal Dust |
||
| 127 |
|
|
| Fort Gardhart 8
Reward: Inferno Helm Recipe |
||
| 128 |
|
|
| Fort Gardhart 9
Reward: Hi-Energy Powder |
||
| 129 |
|

|
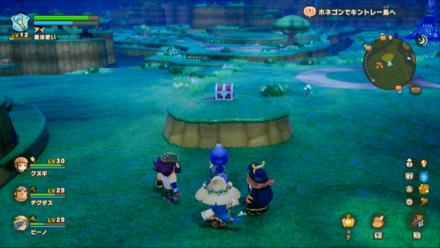
| Kintley Island 1
Reward: Hi-HP Potion |
||
Treasure Chests Overview
Random Treasure Chest Variations
| Blue Treasure Chest | ||
|---|---|---|
 Blue Chest |
 Overworld Sample (Available) |
 Overworld Sample (Unavailable) |
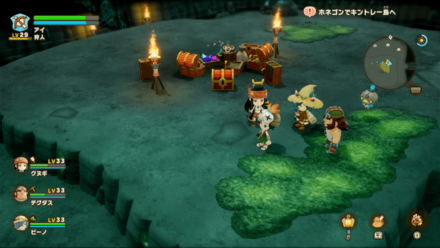
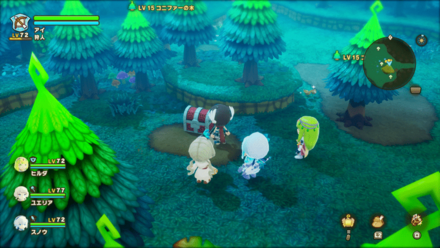
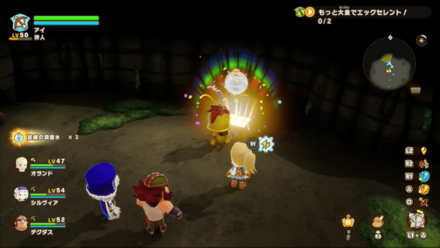
| Green Treasure Chest | ||
 Green Chest |
 Overworld Sample (Available) |
 Overworld Sample (Unavailable) |
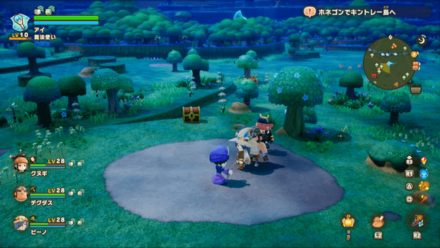
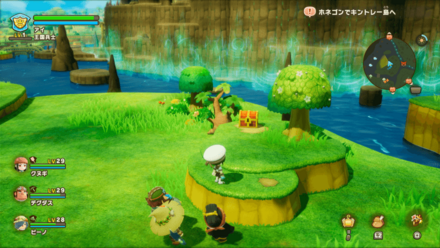
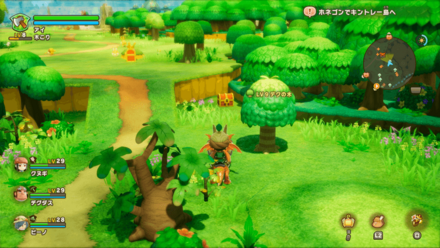
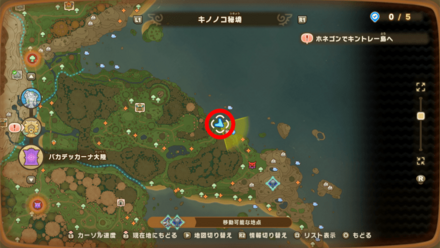
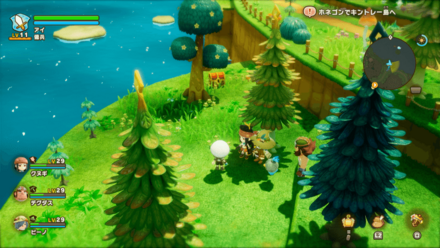
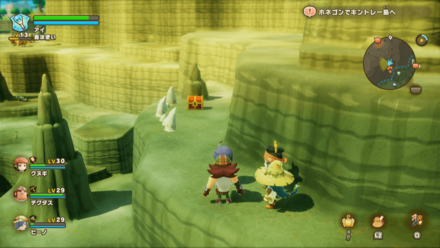
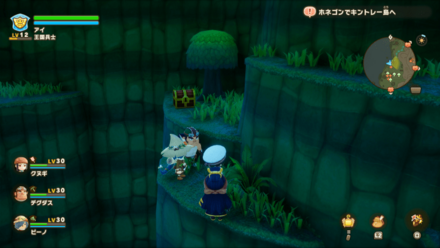
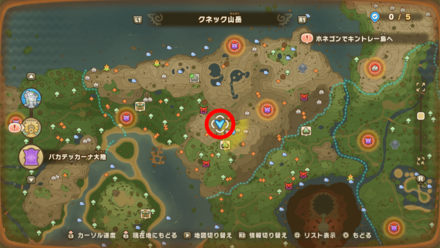
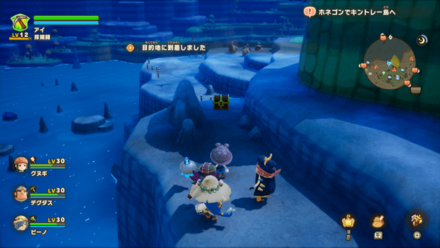
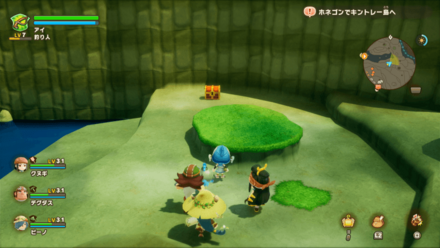
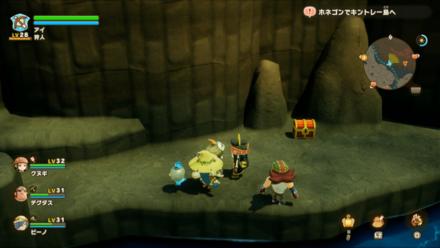
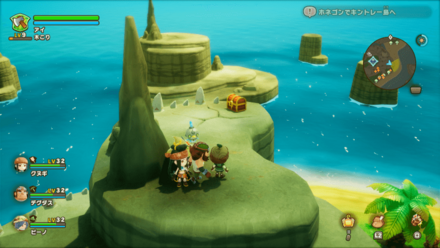
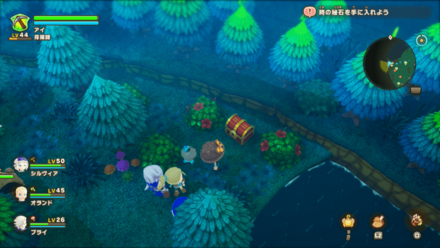
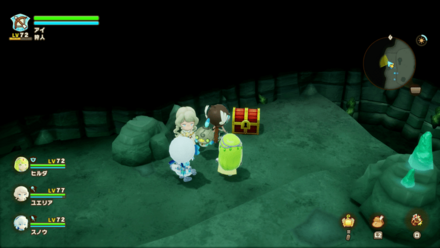
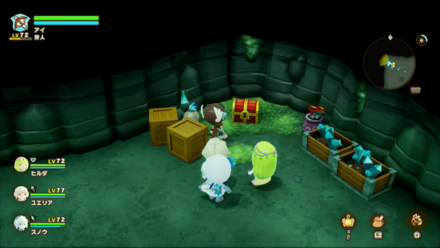
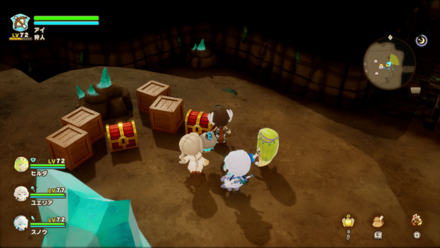
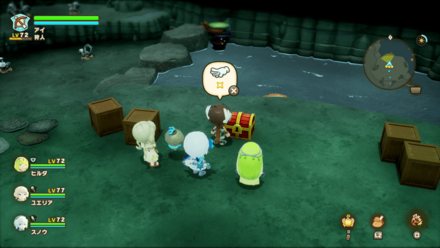
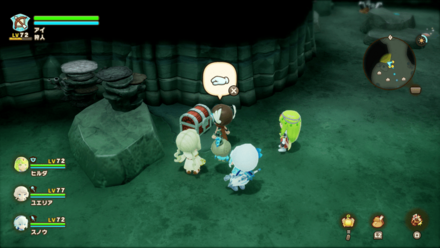
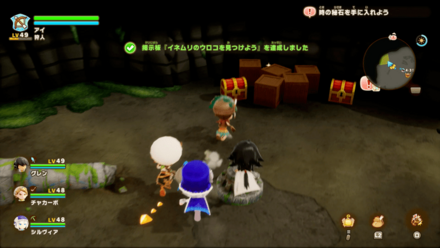
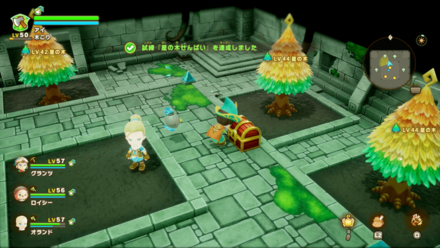
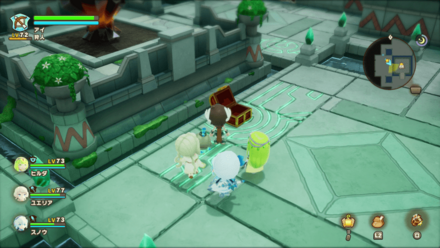
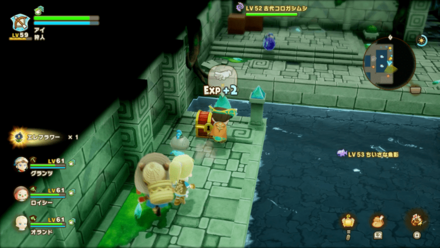
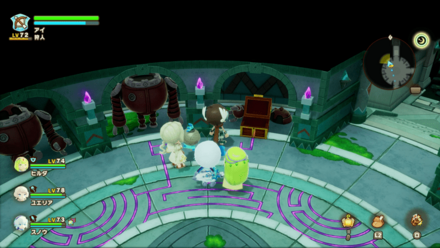
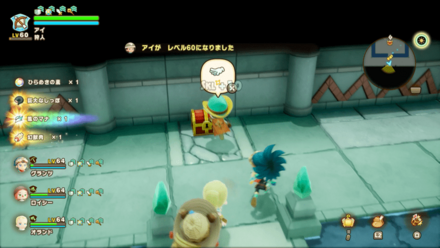
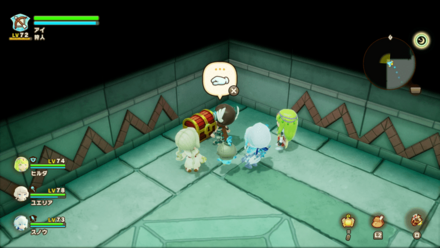
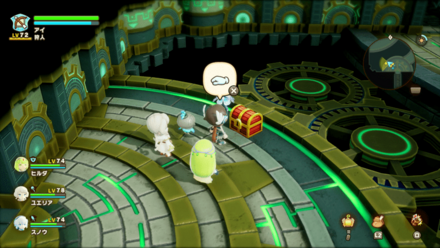
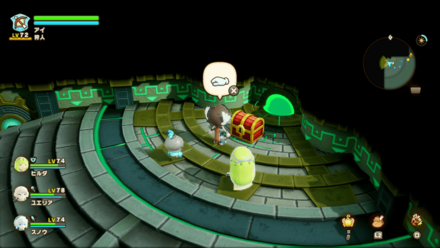
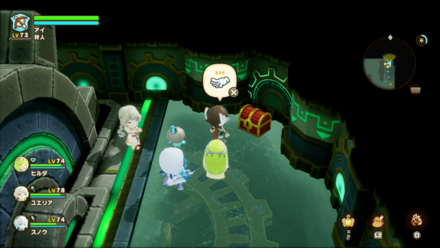
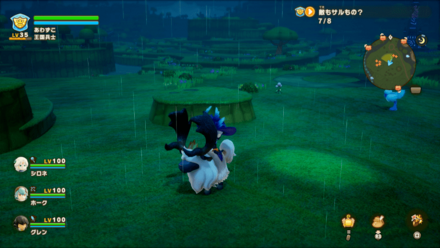
There are various types of treasures chests that can be found on Ginormosia when progressing the game. For Blue Chests, they will usually have restorative items such as Potions and Life Cures.
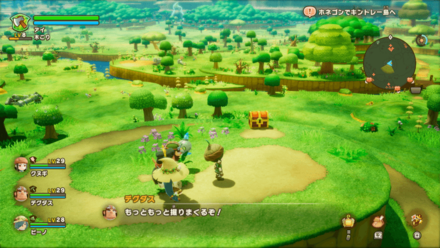
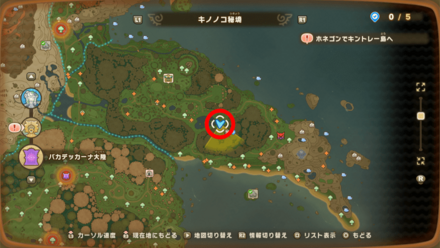
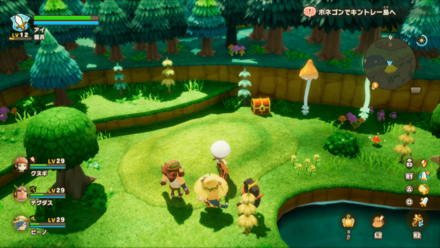
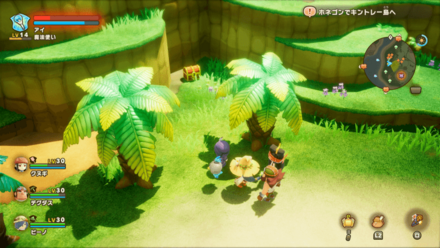
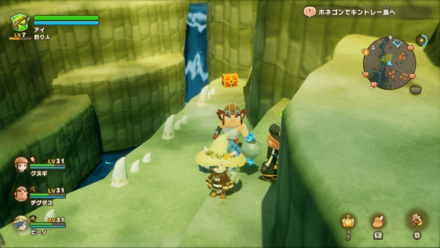
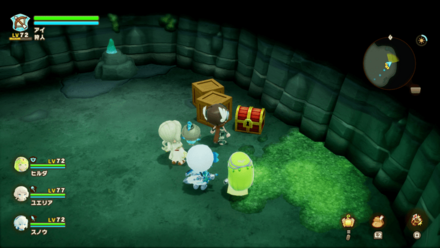
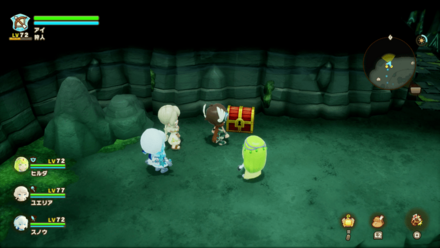
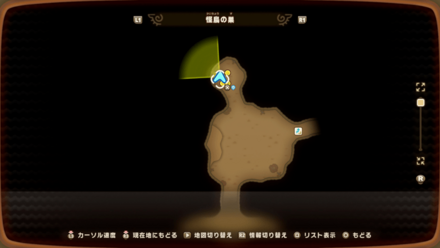
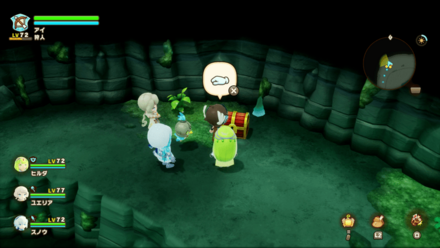
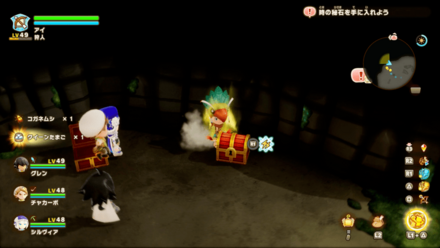
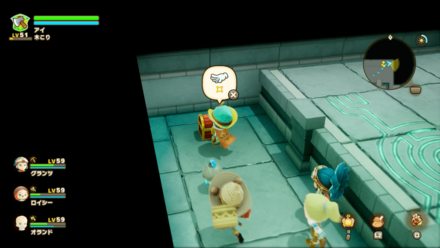
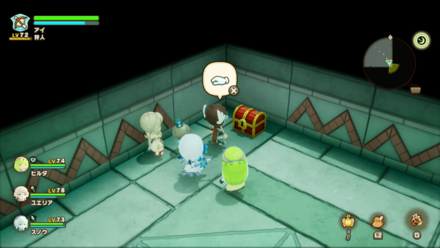
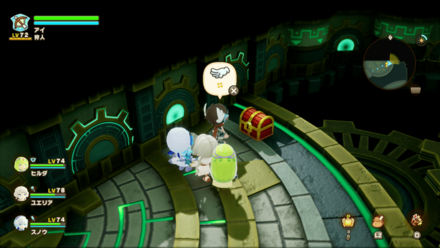
For Green Chests, you will be able to find Strangelings inside them. Buddies come from Strangelings, so it is best to seek out these green chests to increase your Buddies in the game.
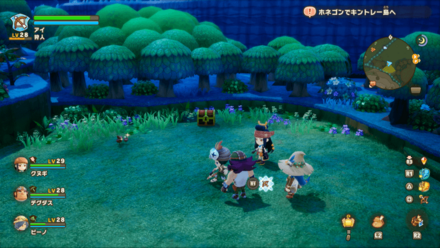
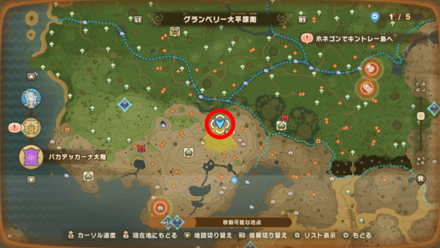
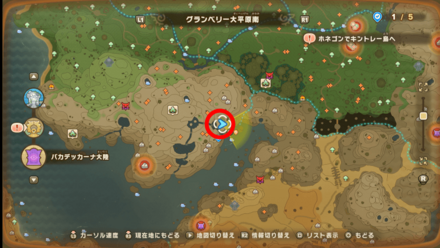
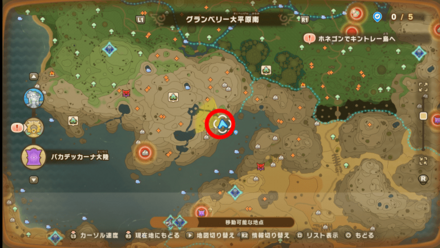
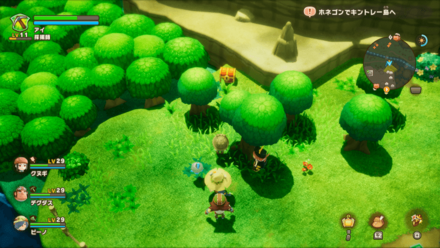
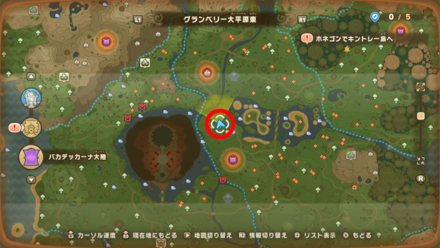
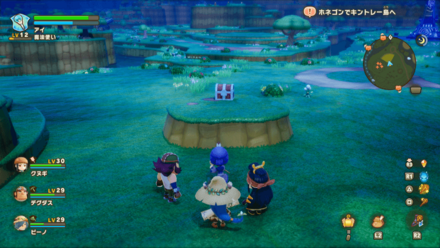
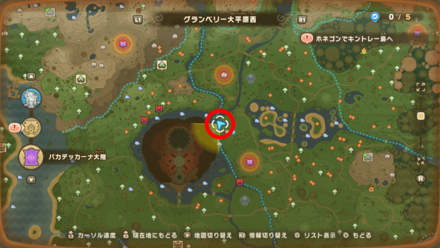
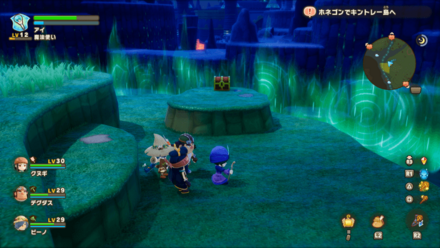
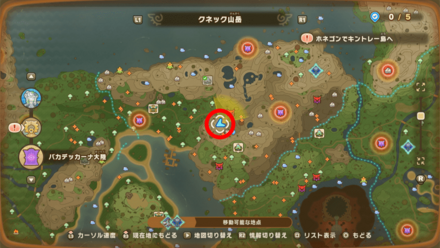
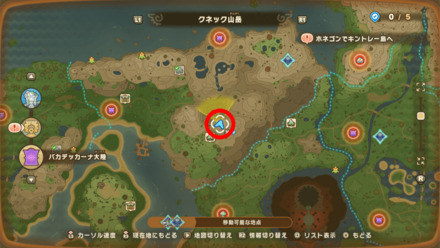
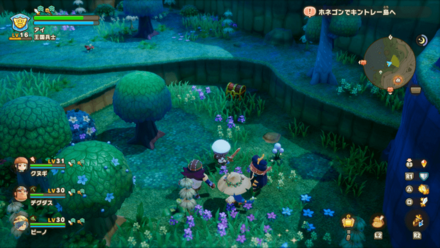
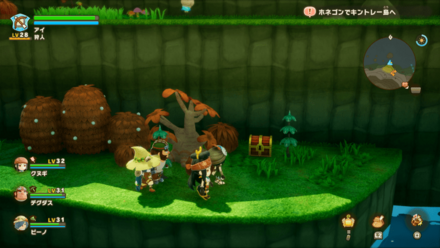
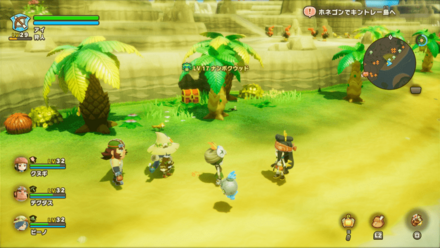
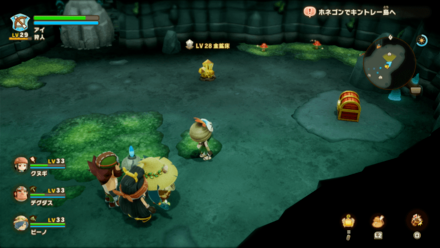
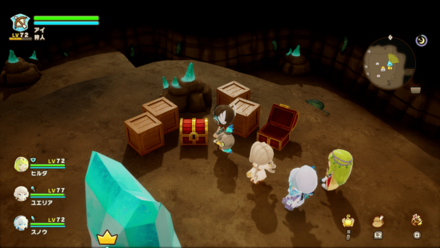
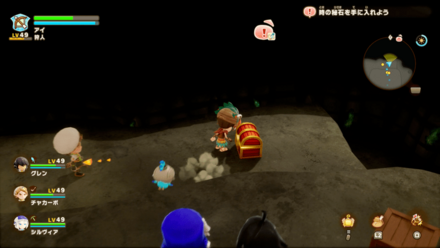
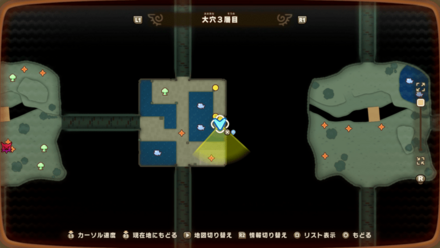
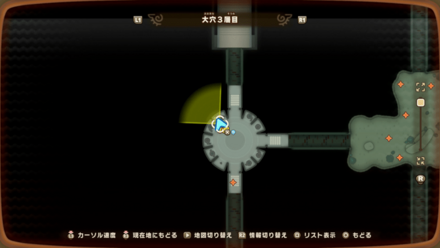
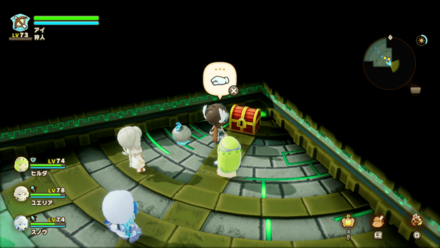
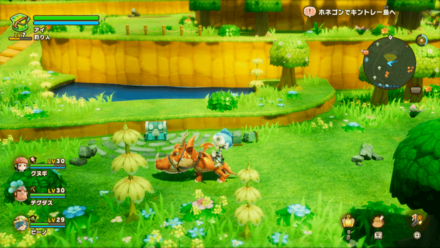
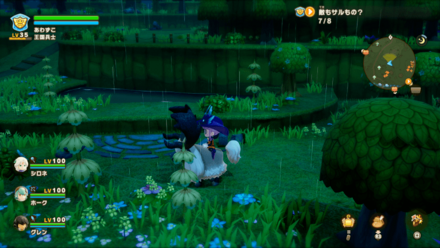
Increasing Region Rank Will Spawn More Treasure Chests
| Default Rank | Increased Rank |
|---|---|
 |
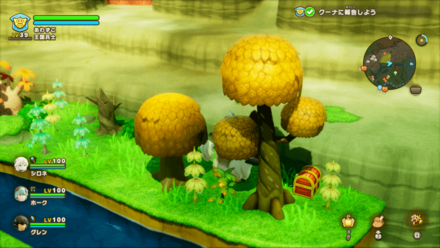 |
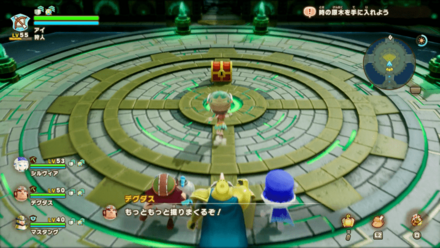
Increasing the region rank from the towers you've visited can help spawn more treasure chests in the area. Some specific treasure chests will only spawn after you've increased the region rank.
Additionally, once you've unlocked treasure chests from increasing the region rank, these treasure chests will continue to appear even when you lower the region rank.
FANTASY LIFE i: The Girl Who Steals Time (FLi) Related Guides

FANTASY LIFE i: The Girl Who Steals Time Wiki
Guides by Category
 Walkthrough
 Lives
Lives Tips and Tricks
 Quests
 Strangelings
 Buddies
 Interactive Map
 Shrines
 Life Challenges
 Characters
 Weapons
 Life Tools
 Armor
Armor Materials
 Gathering Spots
 Bosses
 Monsters
 Furniture and Decor
 News and Updates
 Message Boards
Recommended Guides
 Gift Codes and Passwords
 Best Life to Start With
 All Tower Locations
 All Leafe Locations
 All Legendary Recipe Locations
 Best Lives Tier List
 List of All Mounts
 Trophy Guide
 Daily Activities Guide
 Best Buddies Tier List
 House Decoration Guide
 All Chest Locations
Comment
Author
FANTASY LIFE i: The Girl Who Steals Time Walkthrough & Guides Wiki
All Chest Locations
Rankings
- We could not find the message board you were looking for.
Gaming News


![Nova Roma Review [Early Access] | Newer, Better, and More Confusing](https://img.game8.co/4455512/2cbf8926e9a1c72a3ff056088f801ef4.png/thumb)
Popular Games

Genshin Impact Walkthrough & Guides Wiki
Umamusume: Pretty Derby Walkthrough & Guides Wiki
Crimson Desert Walkthrough & Guides Wiki
Monster Hunter Stories 3: Twisted Reflection Walkthrough & Guides Wiki
Honkai: Star Rail Walkthrough & Guides Wiki
Pokemon Pokopia Walkthrough & Guides Wiki
The Seven Deadly Sins: Origin Walkthrough & Guides Wiki
Wuthering Waves Walkthrough & Guides Wiki
Zenless Zone Zero Walkthrough & Guides Wiki
Arknights: Endfield Walkthrough & Guides Wiki


Recommended Games
Fire Emblem Heroes (FEH) Walkthrough & Guides Wiki
Diablo 4: Vessel of Hatred Walkthrough & Guides Wiki
Cyberpunk 2077: Ultimate Edition Walkthrough & Guides Wiki
Yu-Gi-Oh! Master Duel Walkthrough & Guides Wiki
Super Smash Bros. Ultimate Walkthrough & Guides Wiki
Pokemon Brilliant Diamond and Shining Pearl (BDSP) Walkthrough & Guides Wiki
Elden Ring Shadow of the Erdtree Walkthrough & Guides Wiki
Monster Hunter World Walkthrough & Guides Wiki
The Legend of Zelda: Tears of the Kingdom Walkthrough & Guides Wiki
Persona 3 Reload Walkthrough & Guides Wiki


All rights reserved
©LEVEL5 Inc.
The copyrights of videos of games used in our content and other intellectual property rights belong to the provider of the game.
The contents we provide on this site were created personally by members of the Game8 editorial department.
We refuse the right to reuse or repost content taken without our permission such as data or images to other sites.