A Trip to Alivel Mall Waddle Dee Locations and Missions Walkthrough

This is a walkthrough for the A Trip to Alivel Mall stage in Kirby and the Forgotten Land. Read on to learn how to clear all A Trip to Alivel Mall stage missions, see Waddle Dee, Figure, and Doughnut locations, Enemy Information, and more!
| Previous Stage | Next Stage |
|---|---|
| Rocky Rollin' Road | The Brawl at the Mall |
List of Contents
A Trip to Alivel Mall Walkthrough Video
A Trip to Alivel Mall Missions and Abilities
Missions List
| Mission | Waddle Dees |
|---|---|
| 3 | |
| 4 | |
| 1 | |
| 1 | |
| 1 |
Waddle Dee Locations for All Missions
Copy Abilities
 Needle Needle
|
 Bomb Bomb
|
 Cutter Cutter
|
 Ice Ice
|
 Fire Fire
|
A Trip to Alivel Mall Mission Completion Order
This stage will make you go through at least seven areas. Follow the table below to clear each mission in order.
Area 1
| Area 1 Missions | ||
|---|---|---|
| 1 | 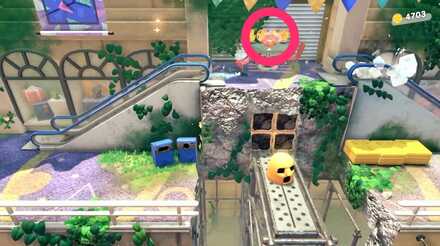 |
Eat the first doughnut |
| 2 | 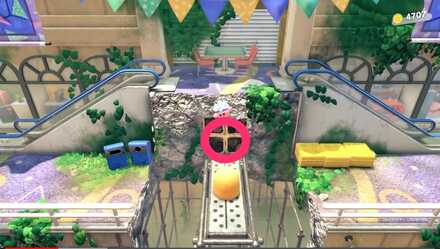 |
Grab the 1st figure |
| 3 | 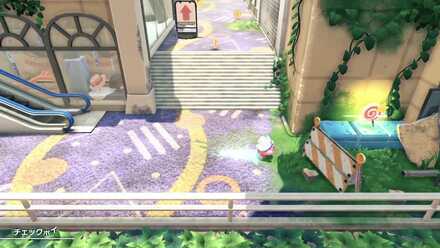 |
Eat the Invincible Candy |
| 4 |  |
Rescue the 1st hidden Waddle Dee |
Area 2
| Area 2 Missions | ||
|---|---|---|
| 5 | 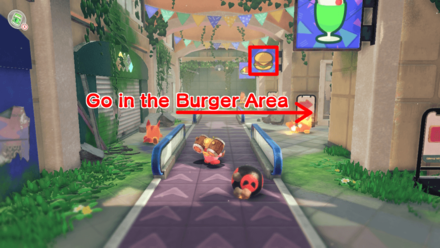 |
Go through the path with the burger sign to avoid getting lost |
Area 3
| Area 3 Missions | ||
|---|---|---|
| 6 | 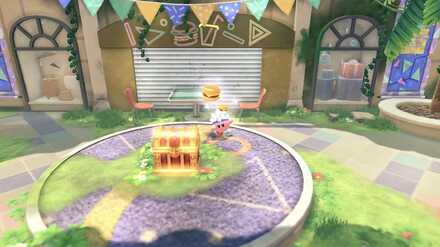 |
Rescue the 2nd hidden Waddle Dee |
Area 4
| Area 4 Missions | ||
|---|---|---|
| 7 | 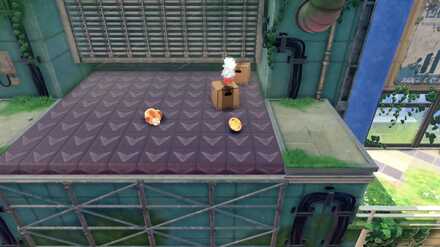 |
Grab the 2nd figure |
| 8 | 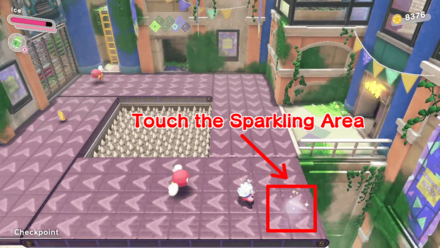 |
Eat the second doughnut |
| 9 | 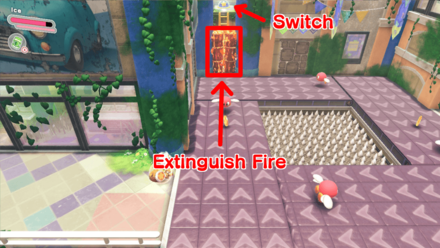 |
Rescue the third Waddle Dee |
Area 5
| Area 5 Missions | ||
|---|---|---|
| 10 | 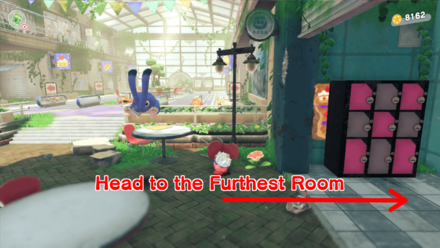 |
Grab the 3rd figure |
| 11 | [ |
Go through the far left path with the cake sign across the ice cream sign |
Area 6
| Area 6 Missions | ||
|---|---|---|
| 12 | 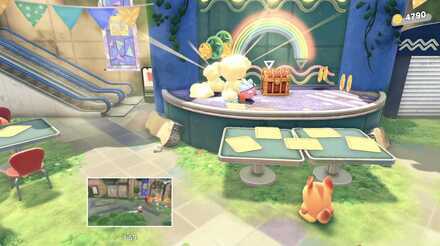 |
Rescue the fourth Waddle Dee |
| 13 | 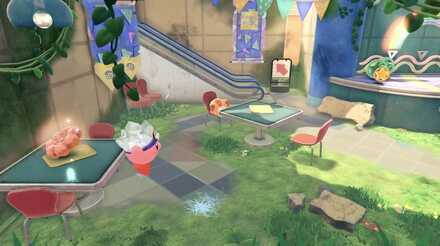 |
Eat the third doughnut |
Area 7
| Area 7 Missions | ||
|---|---|---|
| 14 | 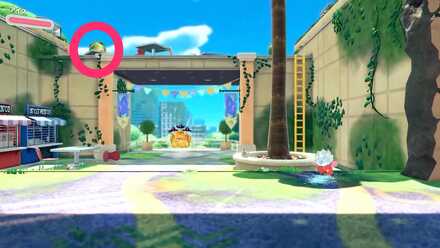 |
Eat the fourth doughnut |
A Trip to Alivel Mall Hidden Waddle Dee Locations
1: On the Right Ledge Above the Invincible Candy

The ledge right above the Invincible Candy is the location of the first hidden Waddle Dee. Destroying the bomb block in the following area reveals a ladder that allows you to climb up to reach it.
2: The Treasure Chest in the Hamburger Area
 |
 |
Using Mouthful Mode on the first locker of this stage reveals the proper path to take in the following area. Enter the area with the hamburger sign to find the chest with the hidden Waddle Dee. Be careful: If you make a mistake, you will have to start the level from the beginning to rescue it.
3: The Opening in the Conveyer Belt Area
 |
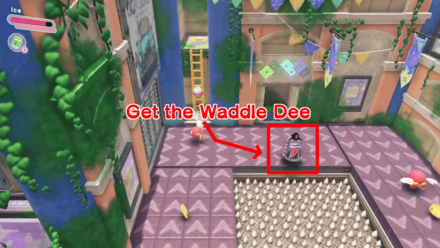 |
You need the Ice Copy Ability to find this hidden Waddle Dee. Destroy the burning pillars with the Ice Ability to reveal a switch. After you press it, the blocks in the middle will disappear, and the hidden Waddle Dee will appear.
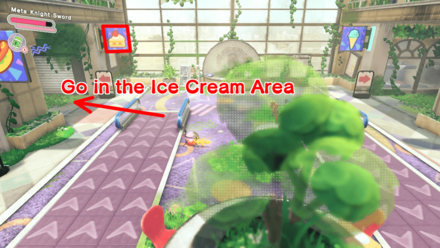
4: In the Cake Area Across from the Ice Cream Area
 |
 |
You will come across an area with two cake signs on the left. If you enter the cake area that is opposite the ice cream area (the last area on the left), you will find the hidden Waddle Dee. If you choose the wrong area, you will have to restart the stage to rescue the hidden Waddle Dee.
A Trip to Alivel Mall Doughnut Locations
1: The Table Above the Escalator

The first doughnut is located on a table between two sets of escalators.
2:The Inner Section of the Conveyor Belt
 |
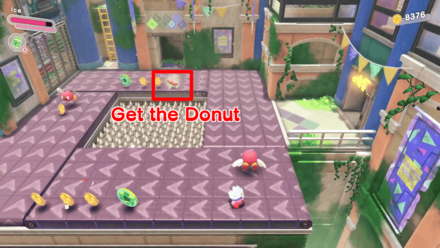 |
There is a sparkling area on the right edge of the conveyor belt closest to the screen. Touching that spot causes a doughnut to appear on the innermost part of the conveyor belt.
3: In the Cake Area with the Hidden Waddle Dee
 |
 |
The cake area that contains the hidden Waddle Dee (across from the ice cream area) is the same location as a doughnut. It is located on a table.
4: On the High Ledge right Before the Goal Area

Before you rescue the final Waddle Dees, head right and climb up the ladder to reach the final donut.
A Trip to Alivel Mall Invincible Candy Location
In the Right Corner in the First Area

You will see the Invincible Candy in the right corner after you pass the set of ascending and descending escalators. Many bombs will be thrown at you in the following area, so pick this item up before moving forward!
How to Not Get Lost in A Trip to Alivel Mall
| 1 | Follow the Hamburger Sign |
|---|---|
| 2 | Head to the Cake Area Across from the Ice Cream Area |
1: Take the Path with the Hamburger Sign

There are three areas in the mall: Hamburger, Ice Cream, and Cake. Enter the room that has the Hamburger Sign next to it to stay on the right path.
2: Enter the Cake Area That is Across from the Ice Cream Area

The room with Cake Sign that is the opposite of the Ice Cream sign is the correct path to take. The doughnuts needed for mission 3 are located in this area as well.
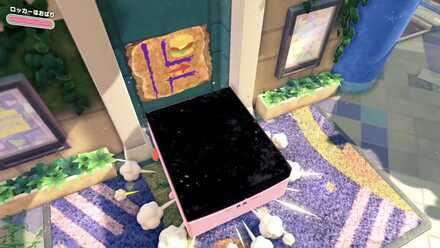
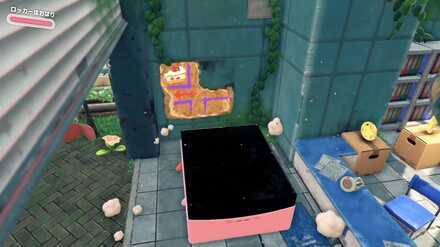
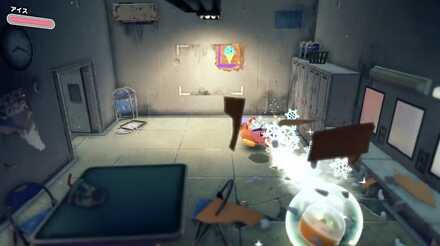
Use Storage Mouth to Find Hints for the right Path
 |
 |
 |
- |
If you are unsure, you can use Mouthful Mode whenever you find a locker to uncover a map that reveals the correct path to take. There are a total of 3 hidden maps.
A Trip to Alivel Mall Figure Locations
1: The Area Between the Set of Escalators

Destroy the blocks located between the ascending and descending escalators to find the first Figure.
2: Inside the Boxes on the Conveyor Belt

Destroying the boxes on the conveyor belt will get you another Figure. Make sure to grab the Figure from the boxes before they fall off, or you will have to restart the level to get it.
3: In the box after using Storage Mouth
 |
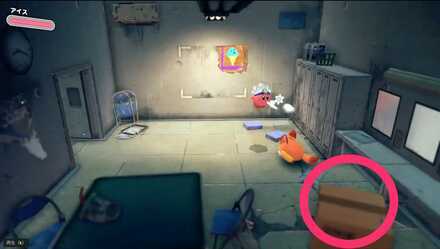 |
The third Figure can be found in a wooden crate located in the hidden room accessed via using Storage Mouth.
Kirby and the Forgotten Land Related Guides

Natural Plains Walkthrough and Stage List
| List of Stages | |
|---|---|
 Point of Arrival Point of Arrival
|
 Downtown Grassland Downtown Grassland
|
 Through the Tunnel Through the Tunnel
|
 Rocky Rollin' Road Rocky Rollin' Road
|
 A Trip to Alivel Mall A Trip to Alivel Mall
|
 The Brawl at the Mall The Brawl at the Mall
|
Comment
Author
A Trip to Alivel Mall Waddle Dee Locations and Missions Walkthrough
improvement survey
03/2026
improving Game8's site?

Your answers will help us to improve our website.
Note: Please be sure not to enter any kind of personal information into your response.

We hope you continue to make use of Game8.
Rankings
- We could not find the message board you were looking for.
Gaming News
Popular Games

Genshin Impact Walkthrough & Guides Wiki

Honkai: Star Rail Walkthrough & Guides Wiki

Umamusume: Pretty Derby Walkthrough & Guides Wiki

Pokemon Pokopia Walkthrough & Guides Wiki

Resident Evil Requiem (RE9) Walkthrough & Guides Wiki

Monster Hunter Wilds Walkthrough & Guides Wiki

Wuthering Waves Walkthrough & Guides Wiki

Arknights: Endfield Walkthrough & Guides Wiki

Pokemon FireRed and LeafGreen (FRLG) Walkthrough & Guides Wiki

Pokemon TCG Pocket (PTCGP) Strategies & Guides Wiki
Recommended Games

Fire Emblem Heroes (FEH) Walkthrough & Guides Wiki

Diablo 4: Vessel of Hatred Walkthrough & Guides Wiki

Yu-Gi-Oh! Master Duel Walkthrough & Guides Wiki

Super Smash Bros. Ultimate Walkthrough & Guides Wiki

Pokemon Brilliant Diamond and Shining Pearl (BDSP) Walkthrough & Guides Wiki

Elden Ring Shadow of the Erdtree Walkthrough & Guides Wiki

Monster Hunter World Walkthrough & Guides Wiki

The Legend of Zelda: Tears of the Kingdom Walkthrough & Guides Wiki

Persona 3 Reload Walkthrough & Guides Wiki

Cyberpunk 2077: Ultimate Edition Walkthrough & Guides Wiki
All rights reserved
© HAL Laboratory, Inc. / Nintendo
The copyrights of videos of games used in our content and other intellectual property rights belong to the provider of the game.
The contents we provide on this site were created personally by members of the Game8 editorial department.
We refuse the right to reuse or repost content taken without our permission such as data or images to other sites.





![Slay the Spire 2 Review [Early Access] | Still the Deckbuilder to Beat](https://img.game8.co/4433115/44e19e1fb0b4755466b9e516ec7ffb1e.png/thumb)

![Resident Evil Village Review [Switch 2] | Almost Flawless Port](https://img.game8.co/4432790/e1859f64830960ce4248d898f8cd38d9.jpeg/thumb)


