All Gold Locations
☆ Doom: The Dark Ages is live now!
★ Collectibles | Secrets | Walkthrough
┗ Resources | Codex | Toy
★ Trophies | Beginner's Guide | Enemies
☆ Skins: Twitch Drops | Prince St. Pizza
★ FAQs: Co-op | DLC | Specs | Glory Kills
This is a list of all Gold and their locations in Doom: The Dark Ages. Read on and check out the full list of Gold locations per chapter, how to get them, how many Golds are there, and how to use Gold in this guide!
All Gold Locations
All Gold in All Chapters
※ Select the search criteria below then press the Search button to filter the resources. Resources with a red asterisk are secrets.
| Resources | Chapter and How to Get |
|---|---|
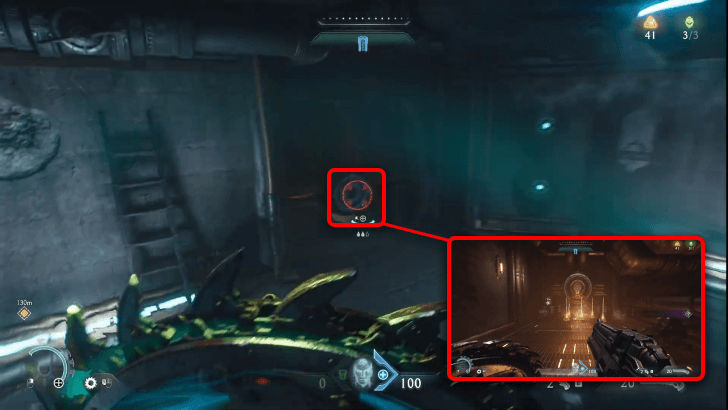 Gold Cache 1 |
Chapter 2 -
Hebeth
This gold cache is accessed by breaking the metal doorway on the way to the Research Lab. |
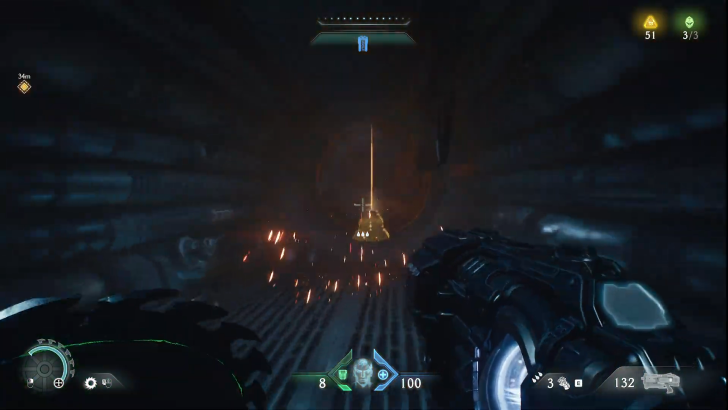 Gold Cache 2 |
Chapter 2 -
Hebeth
Parry the green projectiles while inside the vent to access the gold cache hiding behind the blaster. |
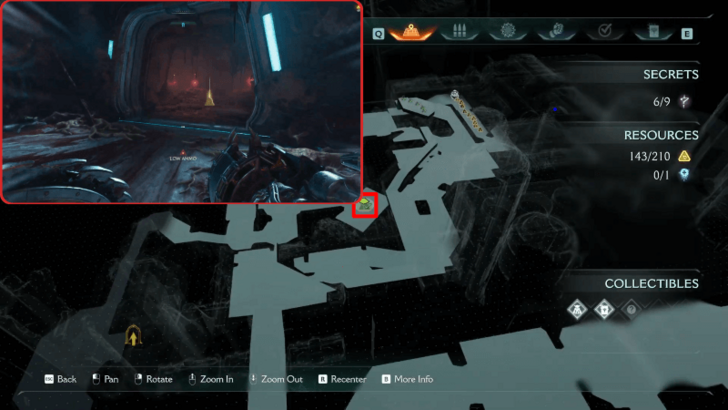 Gold Cache 3 |
Chapter 2 -
Hebeth
Grab the gold cache in the blocked doorway after the fight. |
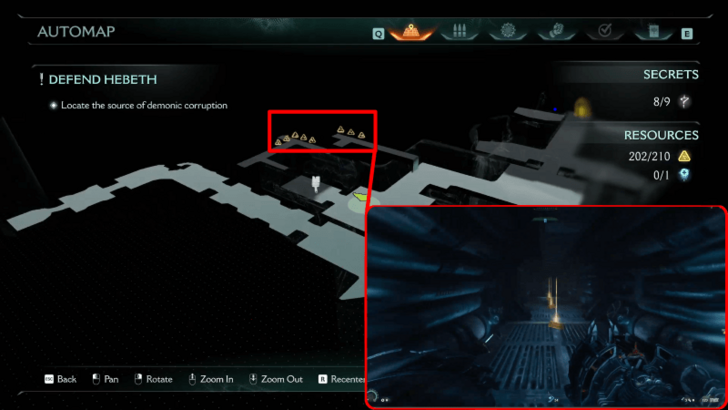 Gold Cache 4 |
Chapter 2 -
Hebeth
Jump up the boxes to get to the metal vent, and follow along the path until you reach the end. You'll encounter more gold as you proceed. |
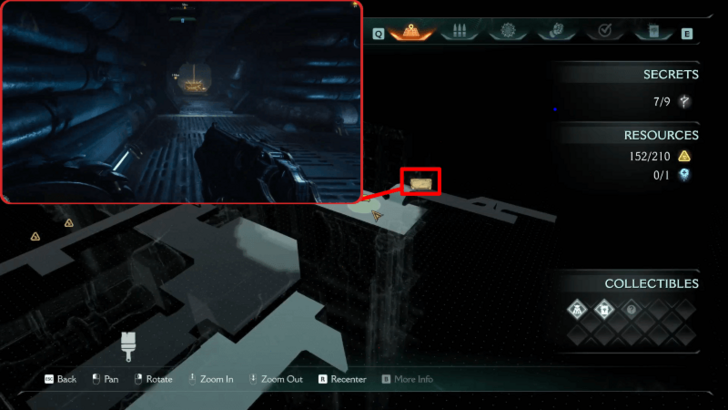 Gold Chest 1 |
Chapter 2 -
Hebeth
The hidden path is hidden against the meaty tendrils tracing along the walls. Go through it to access the gold chest. |
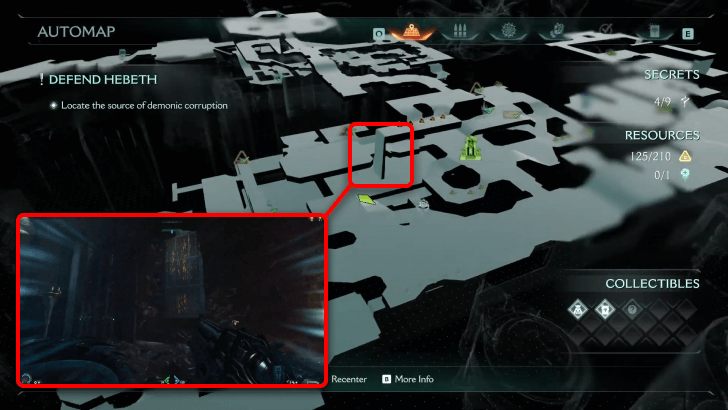 Gold Trail 1 |
Chapter 2 -
Hebeth
Above the warded gate blocking the cultists, there is wall that can be climbed on that will lead to a gold trail. |
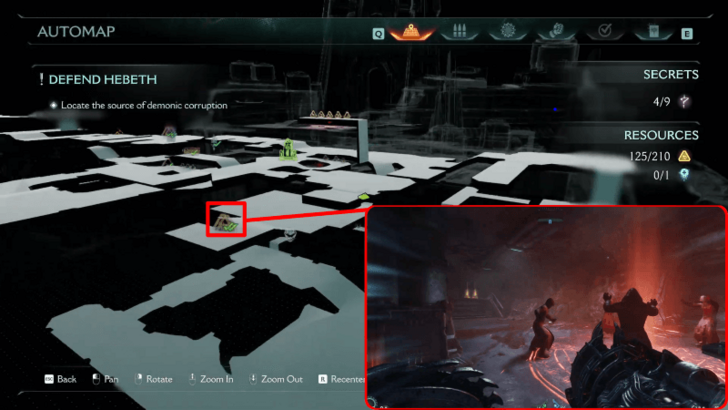 Gold Trail 2 |
Chapter 2 -
Hebeth
The ward blocking the cultists ward is now gone, so you'll be able to pick up gold as well as an armor refill in their area. |
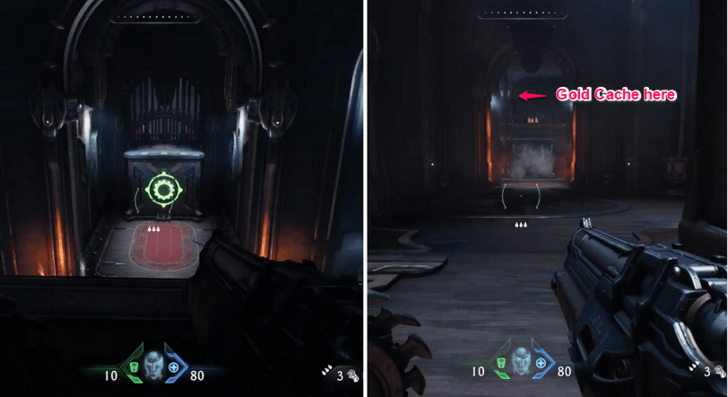 * Gold Chest 1 |
Chapter 4 -
Sentinel Barracks
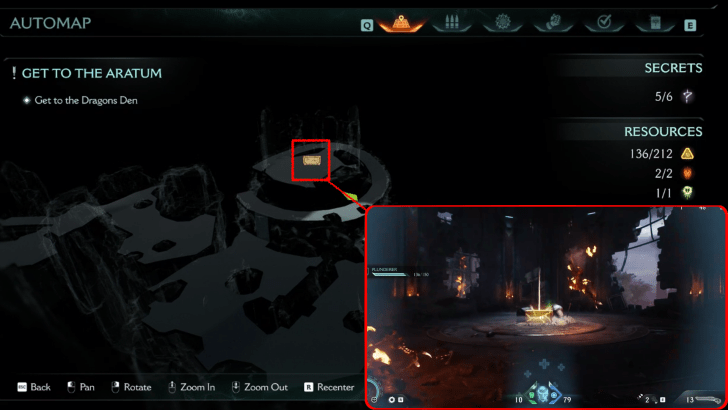
Access this secret area by shield charging the metal crate and climbing the platform above. Melee the gold chest found on the left side of the mini gold trail. |
 * Gold Chest 2 |
Chapter 4 -
Sentinel Barracks
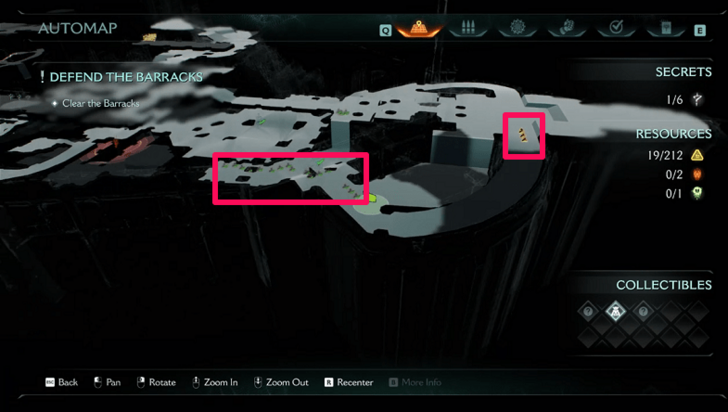
Found at the top of the broken tower by going to the right. This gold chest is guarded by 2 Nightmare Imp Stalkers. |
 Gold Trail 1 |
Chapter 4 -
Sentinel Barracks
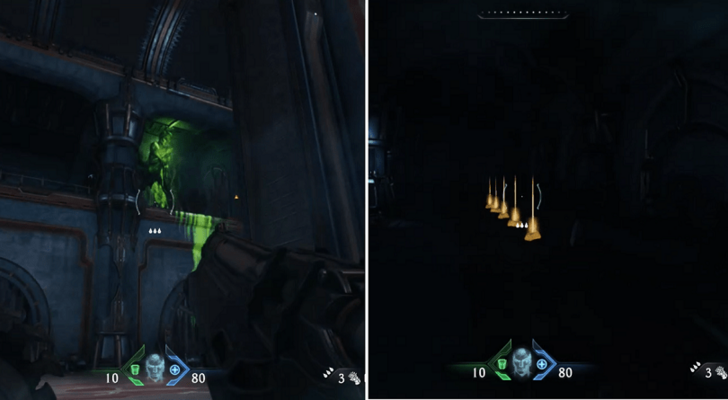
Found near the Hell Knight Toy at the right wing of the barracks. |
 Gold Trail 2 |
Chapter 4 -
Sentinel Barracks
Go to the left side of the lift area and shield recall jump to the platform to find this gold trail. |
 Gold Trail 3 |
Chapter 4 -
Sentinel Barracks
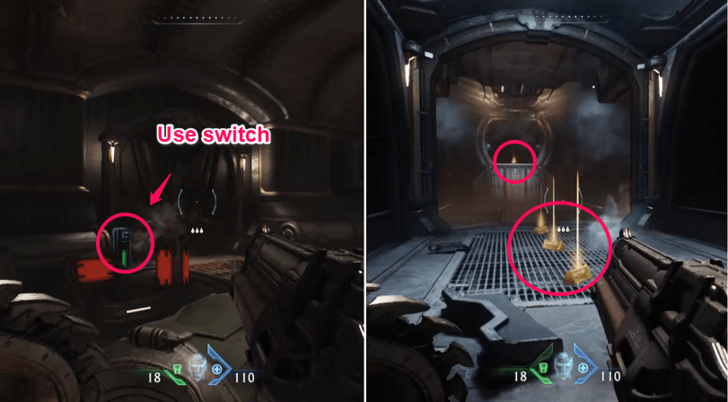
Found near the first Life Sigil. Access this area by using the door switch and following all the gold trail. |
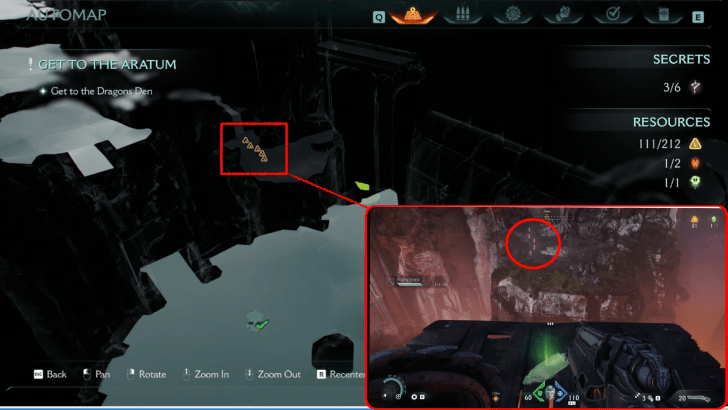 Gold Trail 4 |
Chapter 4 -
Sentinel Barracks
Found near the second Life Sigil. Access this area by jumping over the wide gap from the Mancubus Leader area and following the trail of gold. |
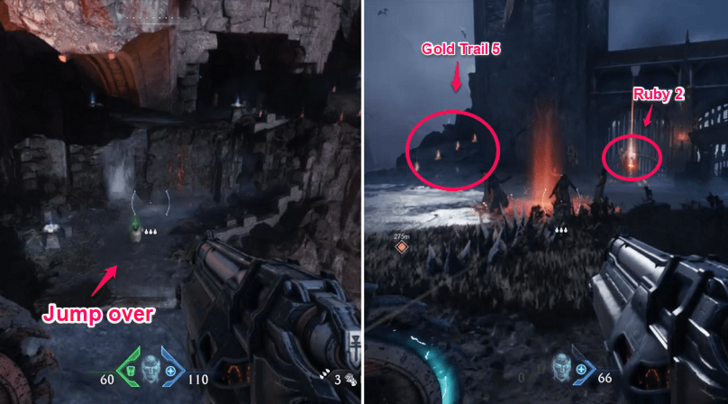 Gold Trail 5 |
Chapter 4 -
Sentinel Barracks
After jumping down the broken bridge, turn around and you will see an area far back. Access this fifth secret area by jumping and go through enemies and fireballs, picking up gold trails and the secondy ruby found near Hell Cultists. These can be found after defeating the Mancubus Leader. |
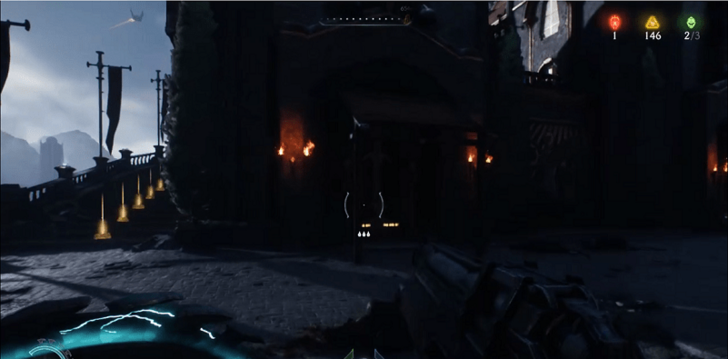 Gold Trail 6 |
Chapter 4 -
Sentinel Barracks
Found near the Nightmare Accelerator Skin. Follow the trail going up the stairs towards several refugees near the weapon skin. |
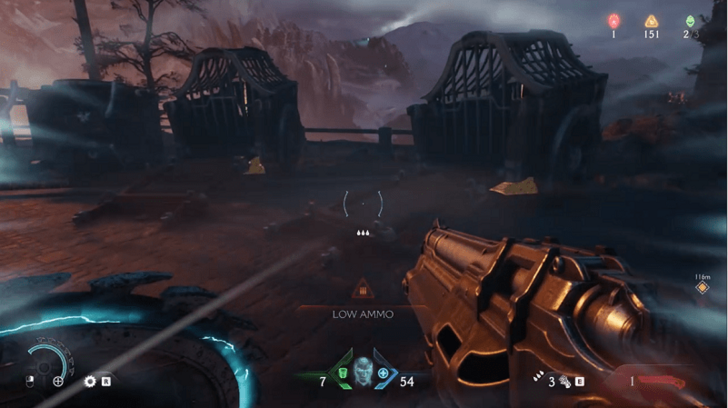 Gold Trail 7 |
Chapter 4 -
Sentinel Barracks
Hidden under wooden carriages at the last area before fighting the Vagary Champion. |
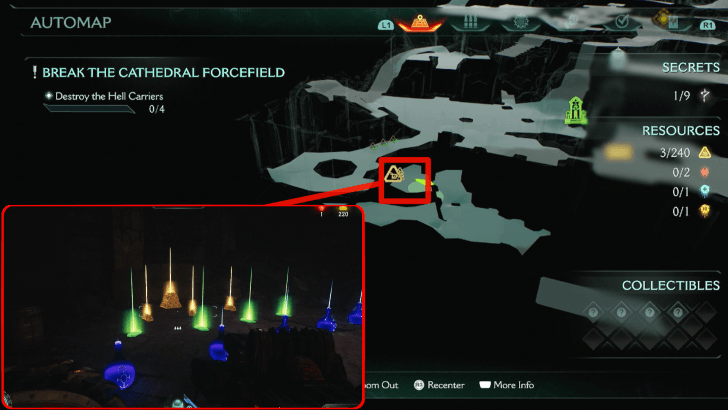 * Gold Cache 1 (x8) |
Chapter 5 -
The Holy City of Aratum
Can be found after jumping down the secret area after following Gold Trail 1. |
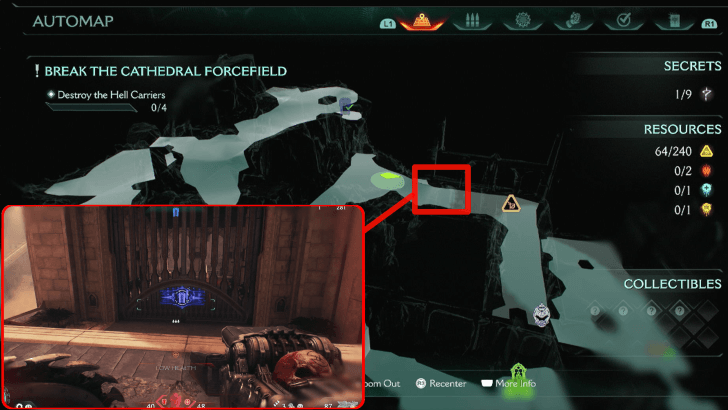 * Gold Cache 2 (x8) |
Chapter 5 -
The Holy City of Aratum
Upon obtaining the Blue Keycard, jump down from the cliff to immediately reach a blue gate. Proceed inside to get this Gold Cache. |
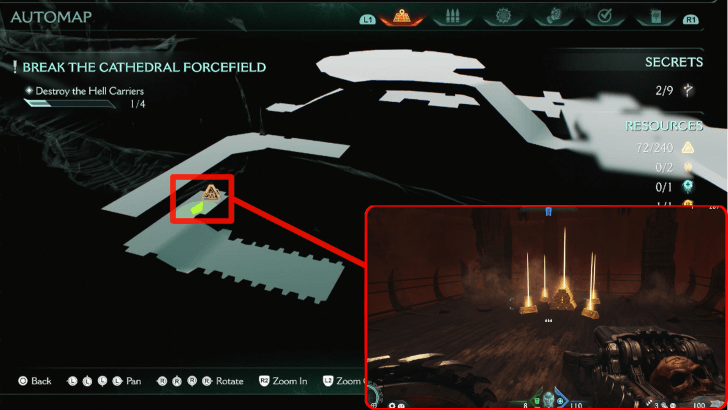 Gold Cache 3 (x12) |
Chapter 5 -
The Holy City of Aratum
This can be found at the bottom of Hell Carrier 2 during the second objective. |
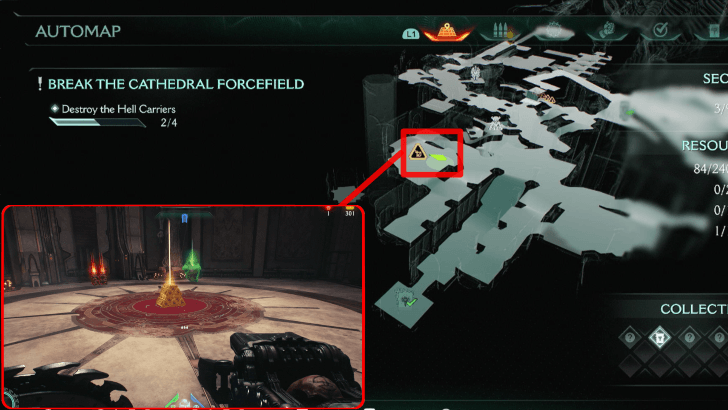 Gold Cache 4 (x8) |
Chapter 5 -
The Holy City of Aratum
It is in the same area as The Holy City of Aratum Codex, to the left. This can be found in Hell Carrier 3 during the second objective. |
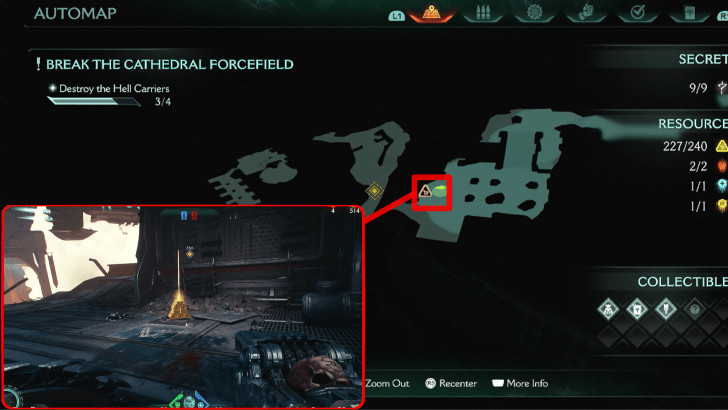 Gold Cache 5 (x8) |
Chapter 5 -
The Holy City of Aratum
Follow the path down Hell Carrier 4. Defeat all enemies along the way to unlock this Gold Cache. This can be obtained during the second objective. |
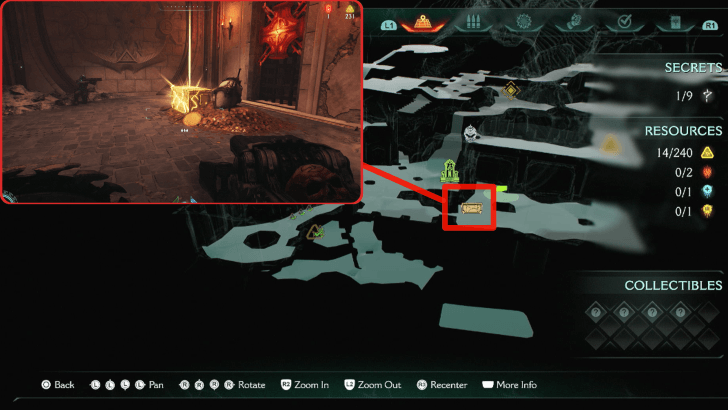 Gold Chest 1 (x50) |
Chapter 5 -
The Holy City of Aratum
In the same secret area as Gold Trail 1, go past the Hell Cultists and enter the pool. Swim to the other side, go up. The area you come up in has this Gold Chet nearby. This can be found in Hell Carrier 1 during the second objective. |
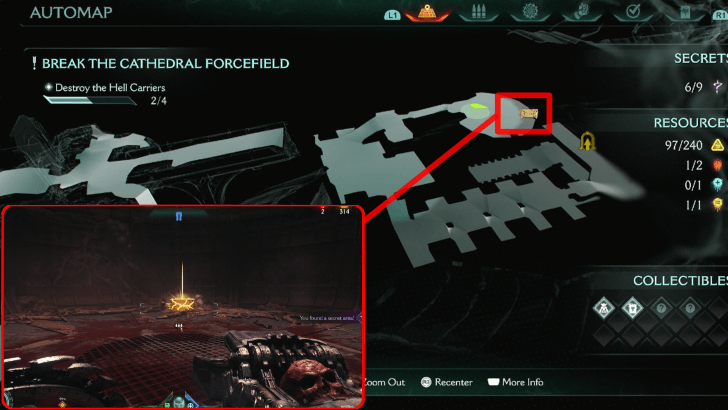 * Gold Chest 2 (x50) |
Chapter 5 -
The Holy City of Aratum
After leaping into the second area of Hell Carrier 3, Shield Charge through the breakable wall on the left. This can be obtained during the second objective. |
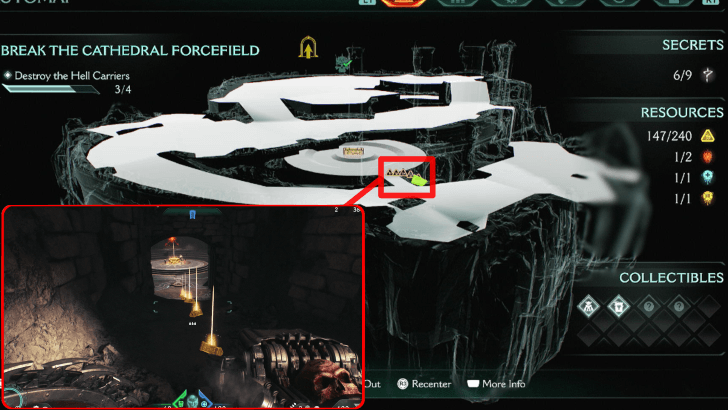 * Gold Chest 3 (x50) |
Chapter 5 -
The Holy City of Aratum
In the same area as Demonic Essence - Health, go below the area. Make sure to pass through the Gold Trail first because the other end is locked. This Gold Trail leads to a Gold Chest in the middle. |
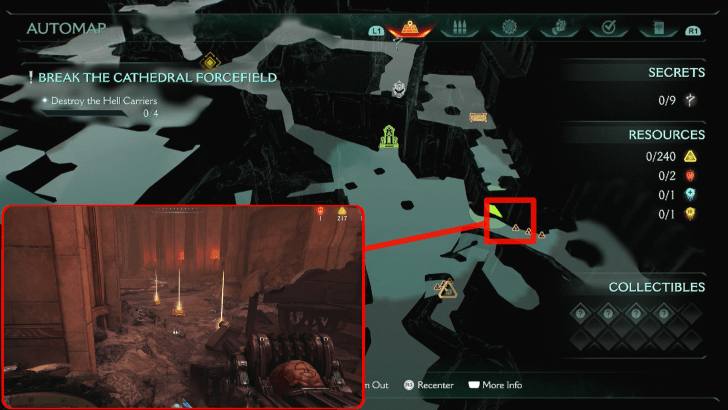 Gold Trail 1 (x3) |
Chapter 5 -
The Holy City of Aratum
Can be found in the courtyard of Hell Carrier 1. Follow the path further and jump down to enter a secret area. |
 * Gold Trail 2 (x3) |
Chapter 5 -
The Holy City of Aratum
Can be found after jumping down the secret area after following Gold Trail 1. |
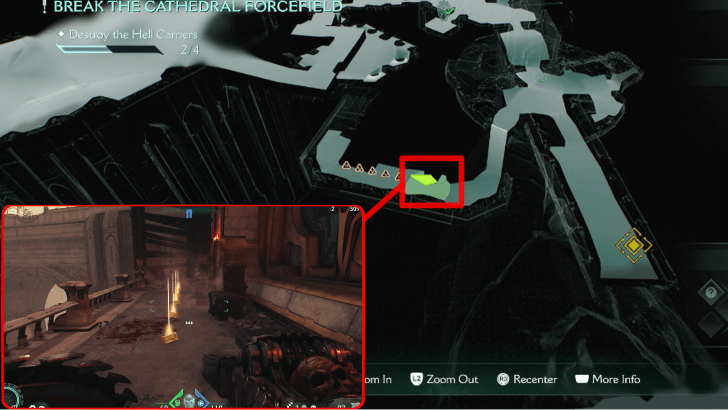 * Gold Trail 3 (x5) |
Chapter 5 -
The Holy City of Aratum
From the room with Ruby 1, drop off to the right of the bridge ahead. Following this trail will lead you to a secret area. This can be found in Hell Carrier 3 during the second objective. |
 * Gold Trail 4 (x5) |
Chapter 5 -
The Holy City of Aratum
In the same area as Demonic Essence - Health, go below the area. Make sure to pass through the Gold Trail first because the other end is locked. This Gold Trail leads to a Gold Chest in the middle. |
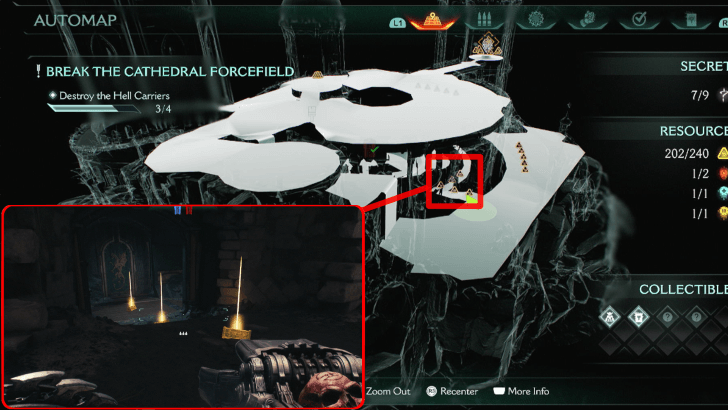 * Gold Trail 5 (x5) |
Chapter 5 -
The Holy City of Aratum
In this Secret Landing Spot, you can drop off the edges of the main circular area. |
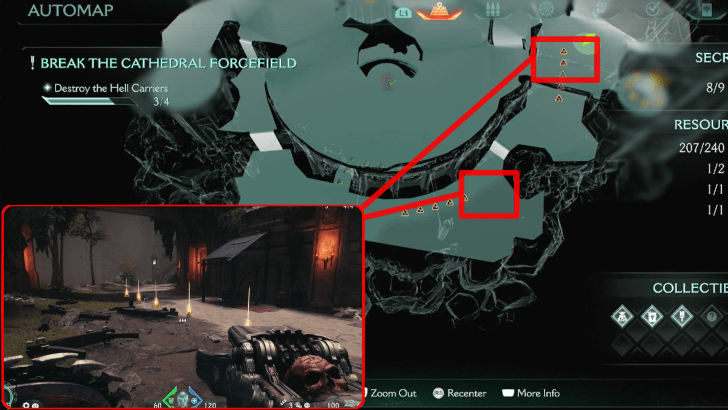 Gold Trail 6 (x10) |
Chapter 5 -
The Holy City of Aratum
Follow the path for the Weapon Skin in the same Secret Landing Spot. This leads you to two Gold Trails adjacent to each other. |
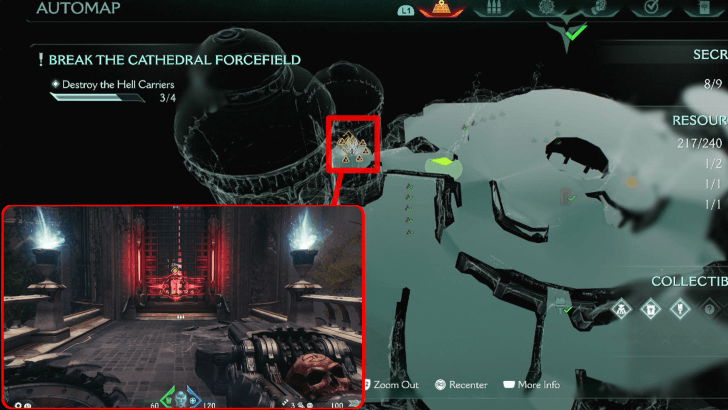 Gold Trail 7 (x6) |
Chapter 5 -
The Holy City of Aratum
Use the Red Keycard in the locked area right above Gold Trail 6. It can be found in the same Secret Landing Spot during the second objective. |
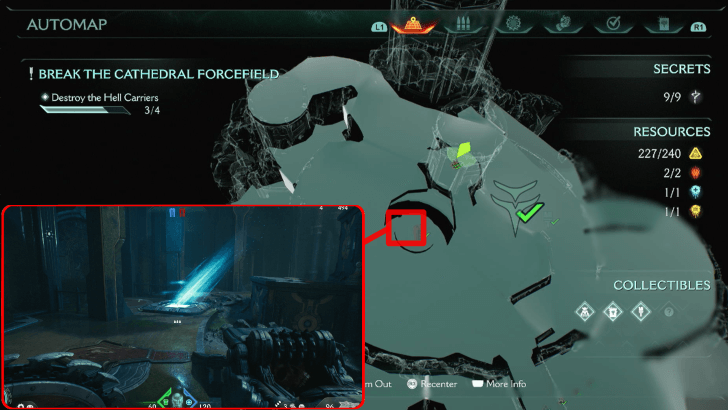 Gold Trail 8 (x4) |
Chapter 5 -
The Holy City of Aratum
In the area where you got theRed Keycard, use the blue boost pad to jump straight into this locked room. It can be found in the same Secret Landing Spot during the second objective. |
 Gold Trail 9 (x5) |
Chapter 5 -
The Holy City of Aratum
This can be found at the end of Hell Carrier 4. It also leads to the [Deag Loric Codex]. This can be obtained during the second objective.(eval):1: unterminated string meets end of file ... leads to the [Deag Loric Codex ... ^ (eval):1: syntax error, unexpected end-of-input, expecting ')' ... leads to the [Deag Loric Codex ... ^ |
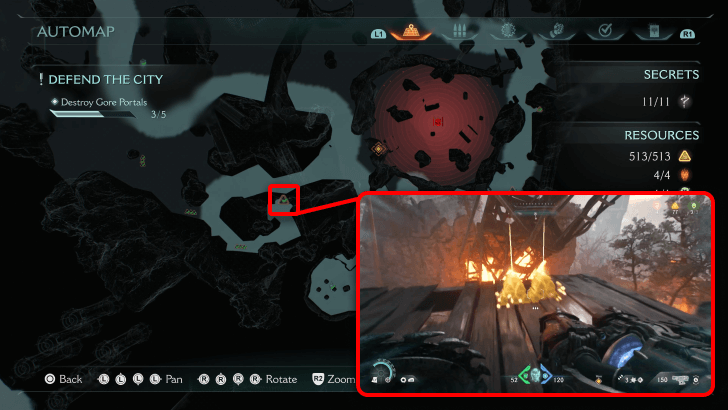 Gold Cache 1 (x16) |
Chapter 6 -
Siege - Part 1
Follow the path to the forest and defeat the enemies to remove the barrier around it. |
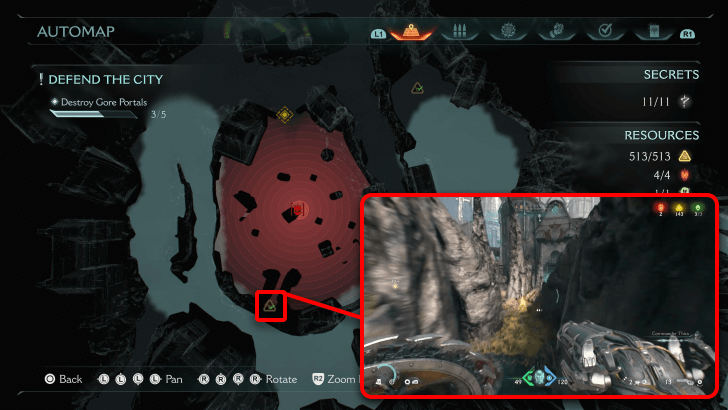 Gold Cache 10 (x8) |
Chapter 6 -
Siege - Part 1
Near the Gore Portal on the far side of the map. |
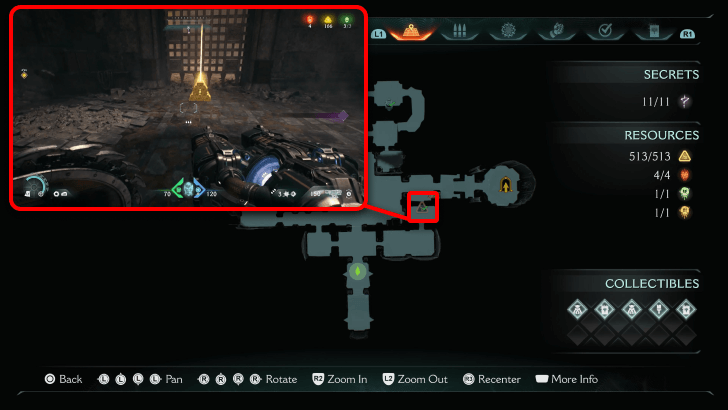 * Gold Cache 11 (x8) |
Chapter 6 -
Siege - Part 1
In the portal where you get the Chainshot, there is a blue-marked wall nearby which you can smash through to find a secret Gold Cache. |
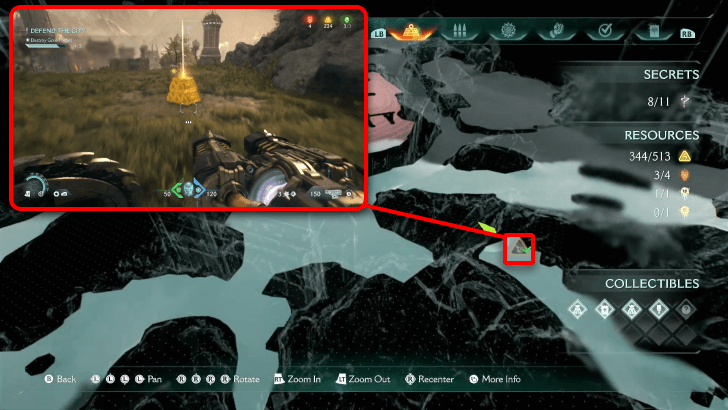 Gold Cache 12 (x8) |
Chapter 6 -
Siege - Part 1
Found after exiting one of the isolated portal areas, before jumping off a cliff. |
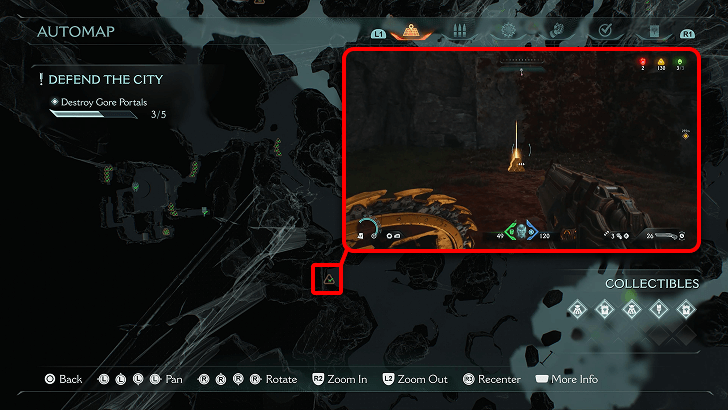 Gold Cache 13 (x8) |
Chapter 6 -
Siege - Part 1
Situated nearby a Life Sigil, it is located by the base of a cliff holding an Artillery. |
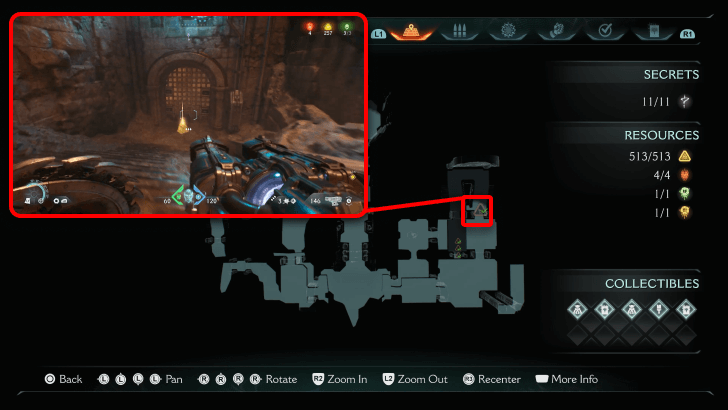 * Gold Cache 2 (x8) |
Chapter 6 -
Siege - Part 1
In the area where you jump through a portal to access, there is a gold cache hiding behind a locked gate. Break the metal lock holding up the metal box, then Shield Recall Jump to the higher platform across you. Shield Charging the wooden bridge will raise the gate beside the other platform, so hop down to the platform to get up on the unlocked area. Make your way across the bridge and down the stairs, and that's how you get to the gold cache. |
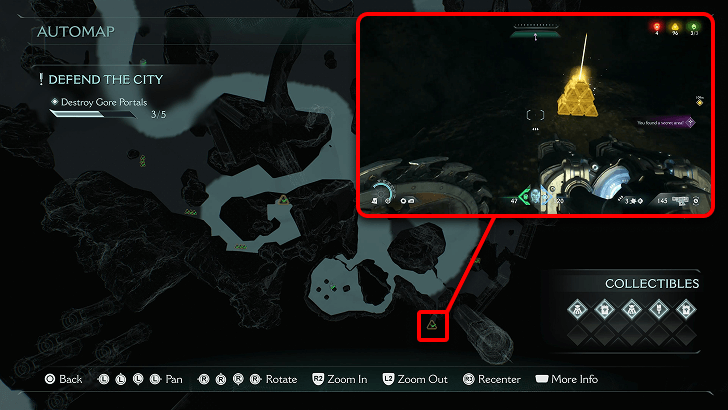 * Gold Cache 3 (x8) |
Chapter 6 -
Siege - Part 1
Nearby one of the objectives is a hidden nook in the mountain, with a wooden barricade. Breaking it with a Shield Charge will reveal a gold cache. |
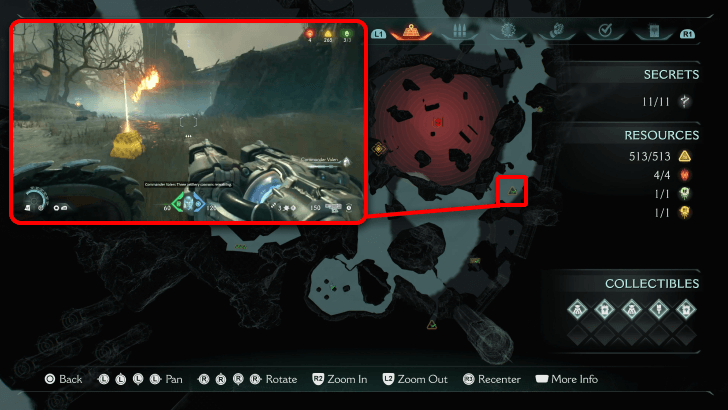 Gold Cache 4 (x8) |
Chapter 6 -
Siege - Part 1
A cache of gold dropped after destroying an Artillery. |
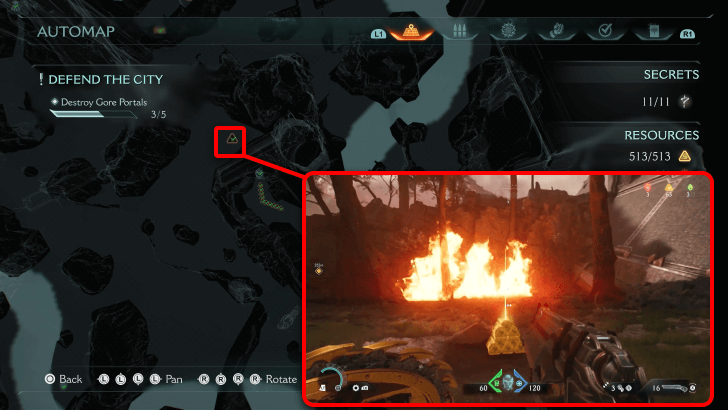 Gold Cache 5 (x8) |
Chapter 6 -
Siege - Part 1
A cache of gold dropped after destroying an Artillery. |
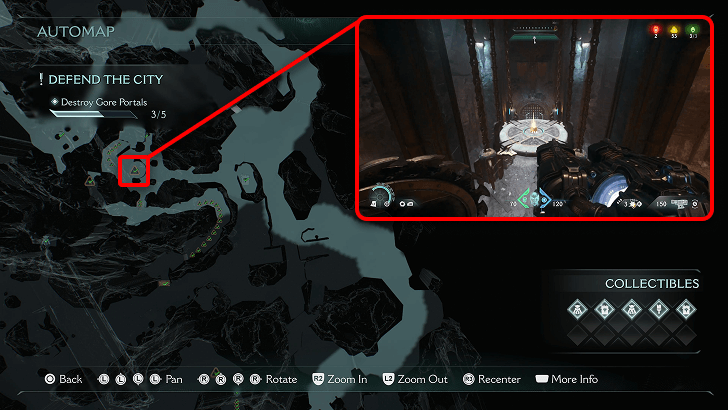 Gold Cache 6 (x8) |
Chapter 6 -
Siege - Part 1
Found on the central platform inside the central mountain. |
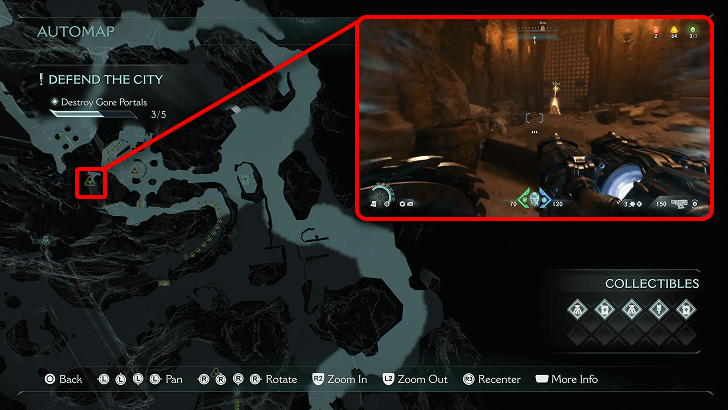 Gold Cache 7 (x8) |
Chapter 6 -
Siege - Part 1
Found before exiting the central mountain's cave. |
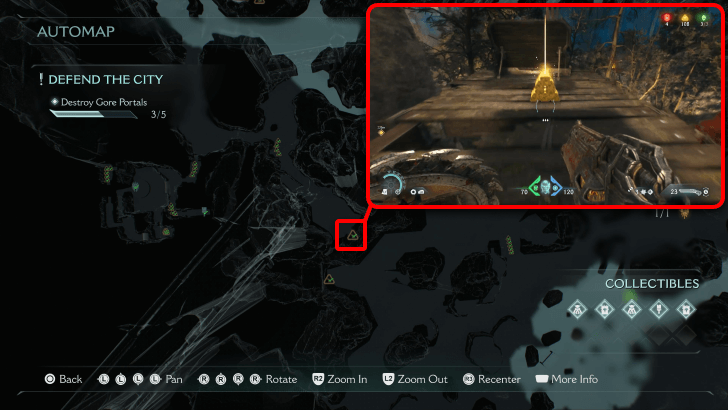 Gold Cache 8 (x8) |
Chapter 6 -
Siege - Part 1
A cache of gold dropped after destroying an Artillery. |
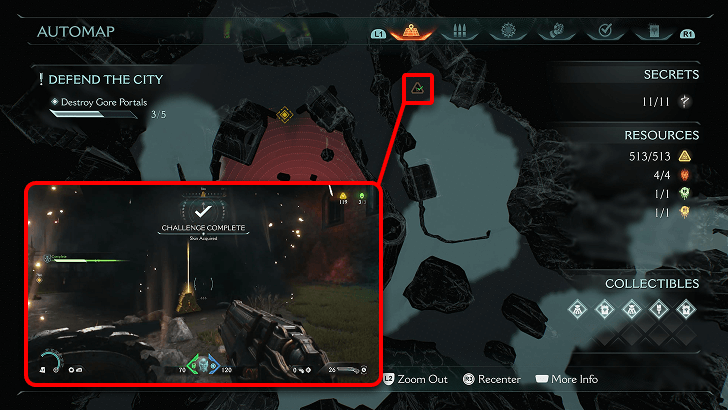 Gold Cache 9 (x8) |
Chapter 6 -
Siege - Part 1
A cache of gold dropped after destroying an Artillery. |
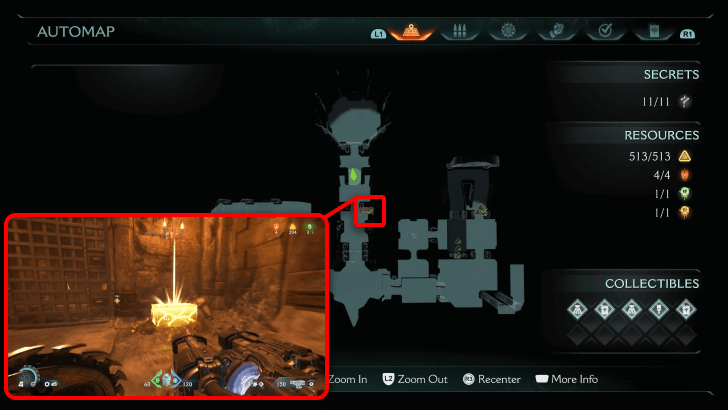 Gold Chest 1 (x50) |
Chapter 6 -
Siege - Part 1
Found inside one of the isolated portal areas, right before encountering the Hell Cultists. |
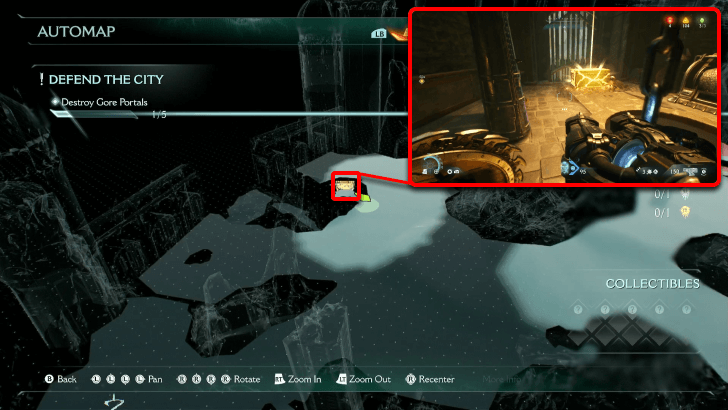 * Gold Chest 2 (x50) |
Chapter 6 -
Siege - Part 1
Behind a locked gate of a tower is a gold chest. To access it, walk around the shallow waters right up to the banner hanging up a pole. Underneath the banner is a chasm that will lead deep underground. Swim around the fireballs being shot, and when you swim back up at the end of the area, you'll be inside the tower. |
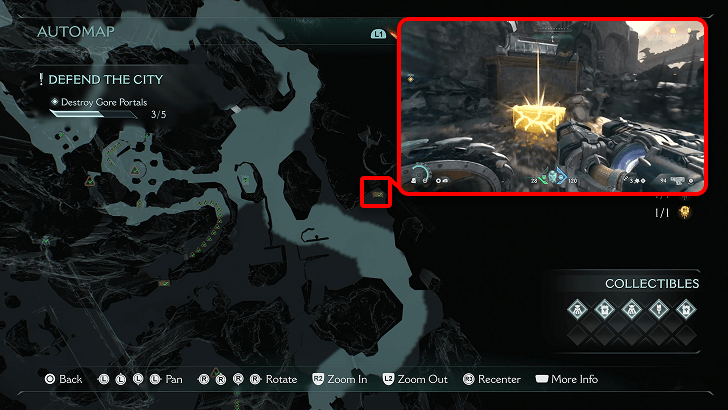 Gold Chest 3 (x50) |
Chapter 6 -
Siege - Part 1
On the far side of the map, a little bit farther from the Siege - Part 1 Codex. |
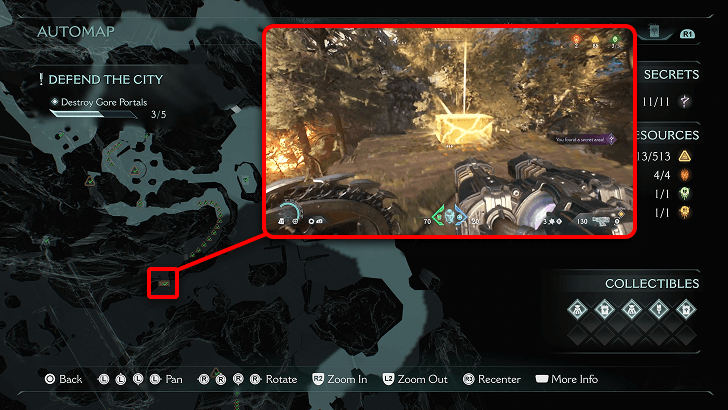 * Gold Chest 4 (x50) |
Chapter 6 -
Siege - Part 1
Up on a wooden plank, after exiting the central mountain. A the Gold Trail leads up to it, and on the opposite is the Kreed Maykr Codex. |
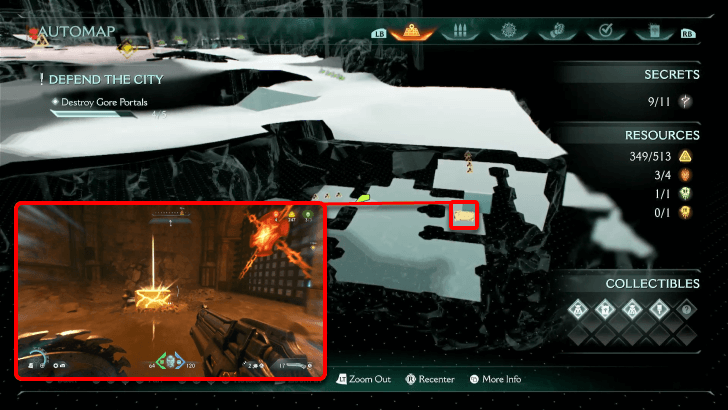 * Gold Chest 5 (x50) |
Chapter 6 -
Siege - Part 1
Nearby one of the Sentinel Shrines is a portal that will lead to a secret area. Throw your Shield at the gate to unlock it, then Shield Charge the stone barrier to be able to access the metal box. Shield Charge the metal box to push it against a climbable wall so you'll be able to get up the platform. Beside the lever is a wooden barrier that can be Shield Charged, and when you jump down you'll find the gold chest. |
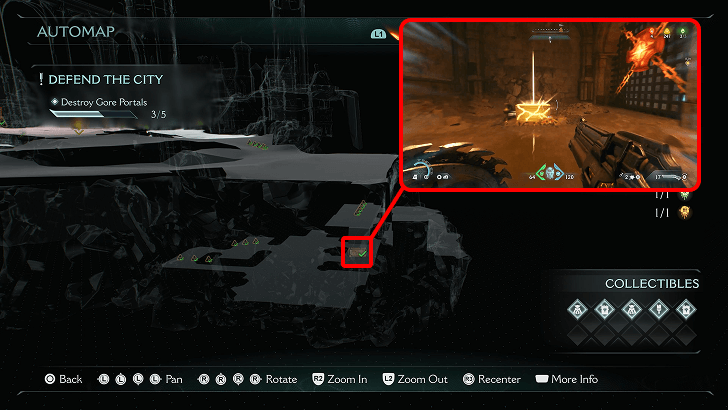 Gold Chest 6 (x50) |
Chapter 6 -
Siege - Part 1
Found inside one of the isolated portal areas, right before encountering the Hell Cultists. |
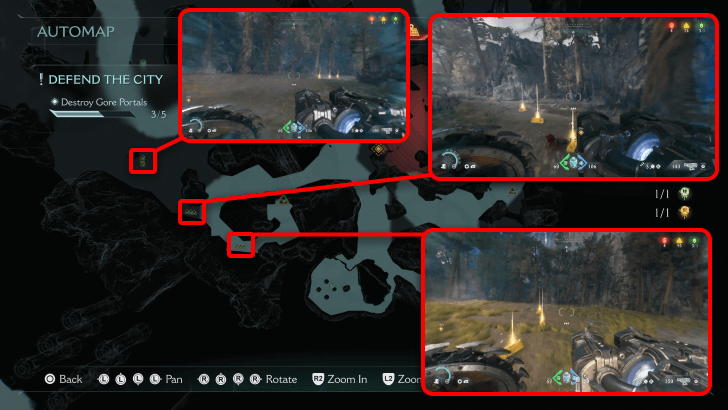 Gold Trail 1 (x9) |
Chapter 6 -
Siege - Part 1
There is an intermittent trail of gold leading to an Artillery near Gore Portal 2. |
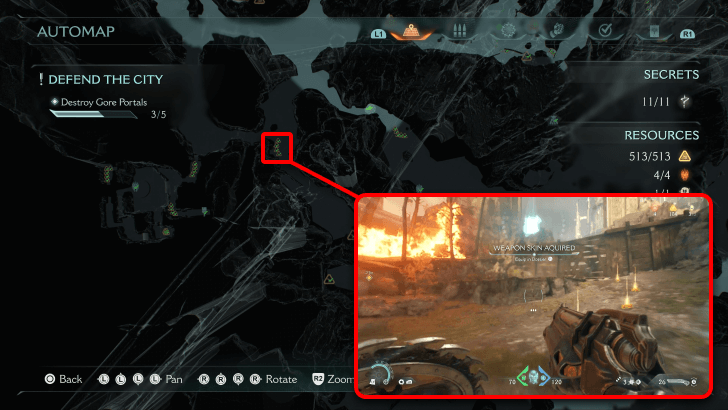 Gold Trail 10 (x4) |
Chapter 6 -
Siege - Part 1
Trail of gold going up a cliff, leading to an Artillery. |
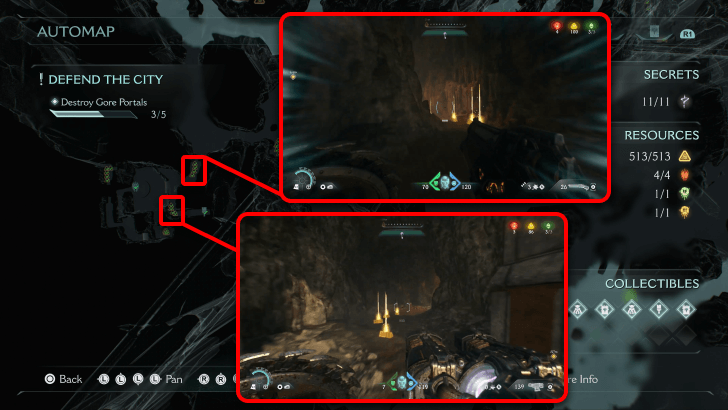 Gold Trail 11 (x8) |
Chapter 6 -
Siege - Part 1
Trail of gold leading to a weapon skin in a hidden nook inside the mountain. |
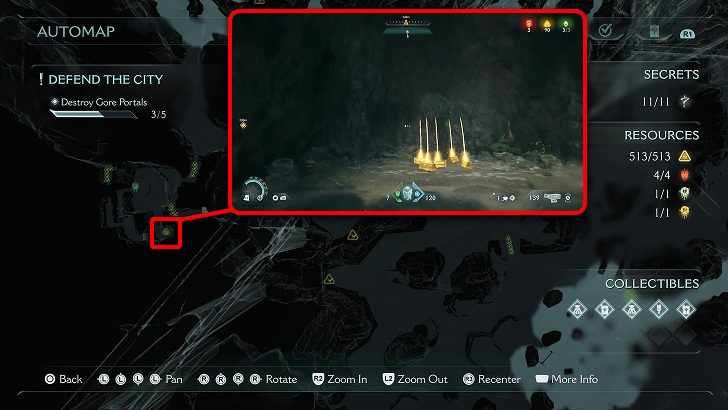 Gold Trail 12 (x5) |
Chapter 6 -
Siege - Part 1
Can be seen after resurfacing from underwater on a small rocky platform. |
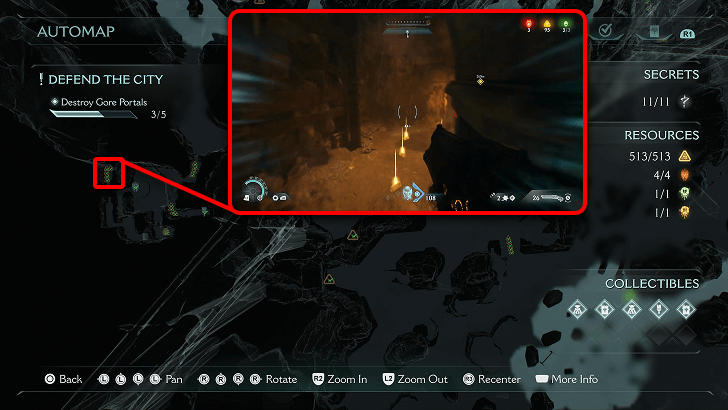 Gold Trail 13 (x5) |
Chapter 6 -
Siege - Part 1
Trail of gold after exiting a cave on the far side of the map, containing a Ruby. |
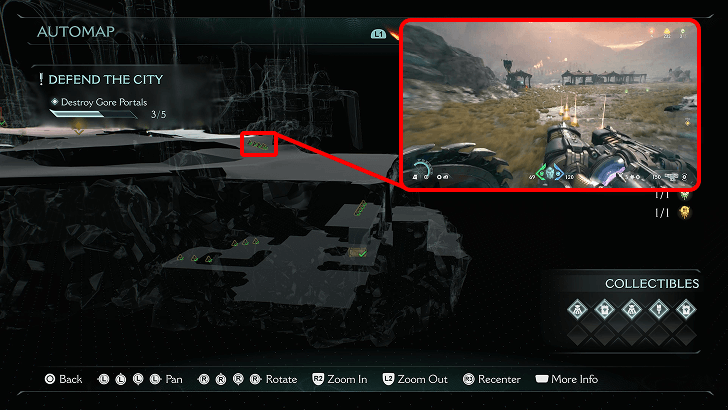 Gold Trail 14 (x5) |
Chapter 6 -
Siege - Part 1
Trail of gold that leads up to a Secret Area of the map. |
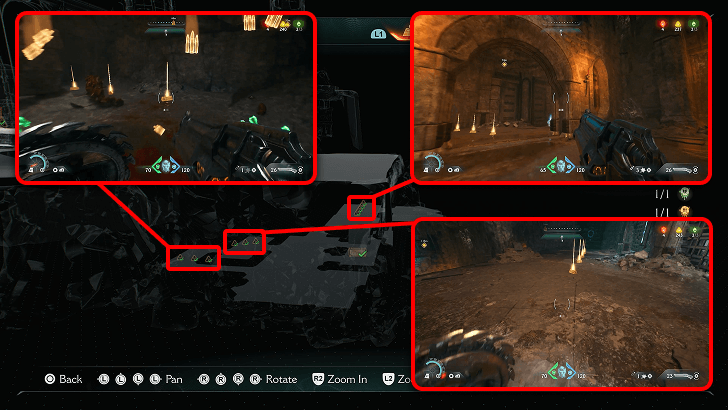 Gold Trail 15 (x10) |
Chapter 6 -
Siege - Part 1
All the gold found in the secret area in the far side of the map. |
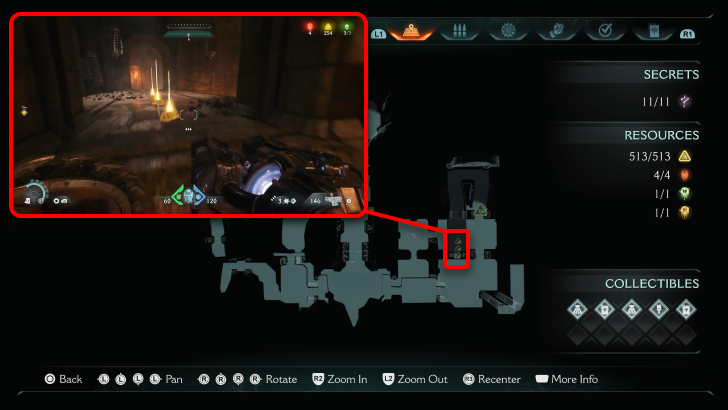 Gold Trail 2 (x3) |
Chapter 6 -
Siege - Part 1
On the bridge path on the way to one of the levers inside an isolated portal area. |
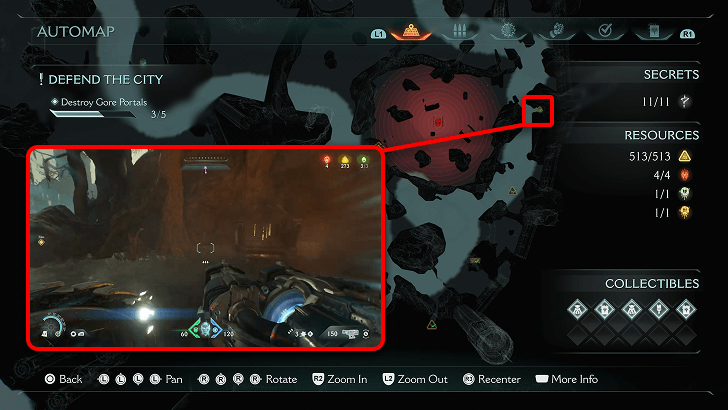 Gold Trail 3 (x5) |
Chapter 6 -
Siege - Part 1
On the far side of the map, leading up to an Artillery. |
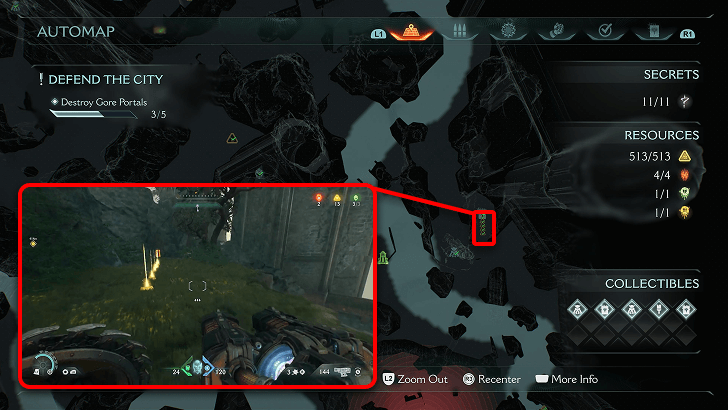 Gold Trail 4 (x5) |
Chapter 6 -
Siege - Part 1
Trail of gold leading to the Siege - Part 1 Codex, nearby the Mancubus Toy. |
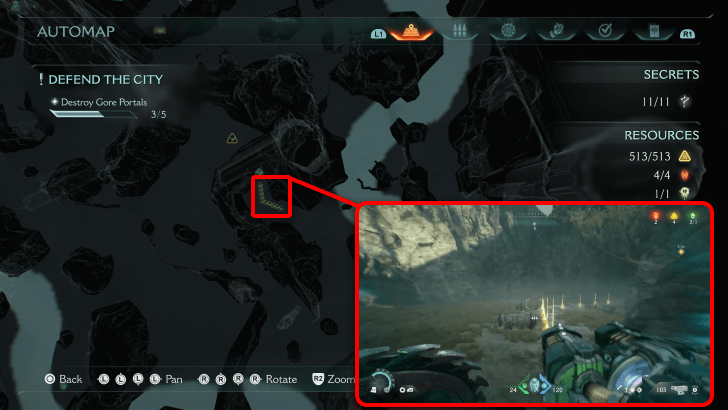 Gold Trail 5 (x10) |
Chapter 6 -
Siege - Part 1
In a small alcove, leading up to a Life Sigil. |
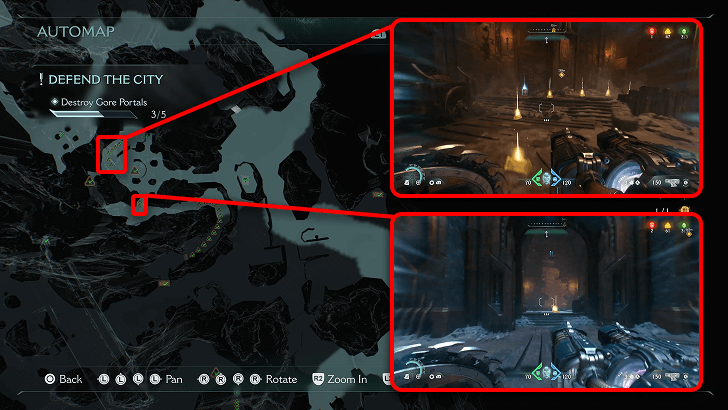 Gold Trail 6 (x9) |
Chapter 6 -
Siege - Part 1
Trail of gold leading up to a Secret Area and a lever. |
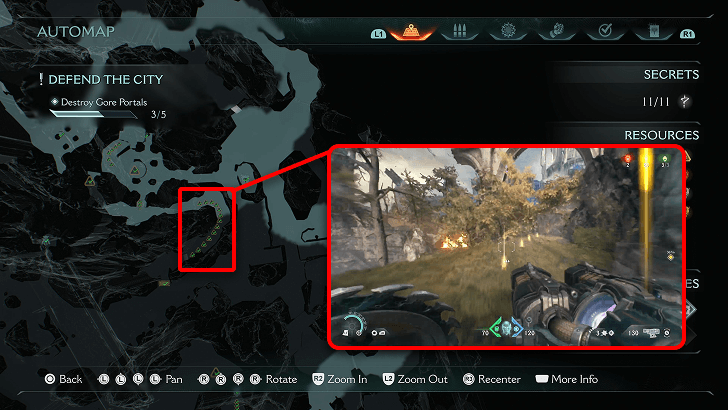 Gold Trail 7 (x13) |
Chapter 6 -
Siege - Part 1
Trail of gold after exiting the central mountain's cave, leading up to a gold chest up on a cliff. |
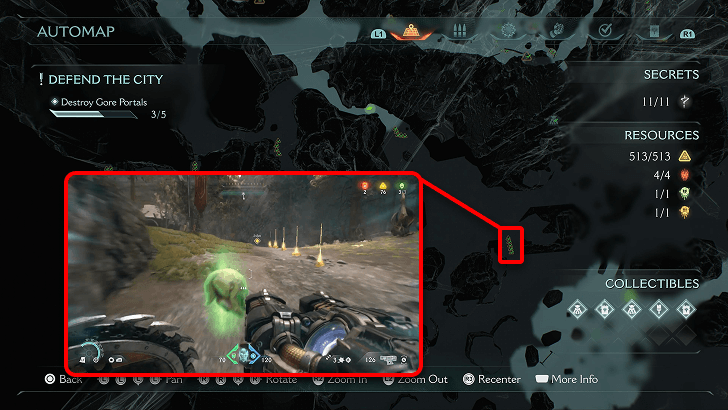 Gold Trail 8 (x5) |
Chapter 6 -
Siege - Part 1
Near the first Gore Portal, on the bank of the river. |
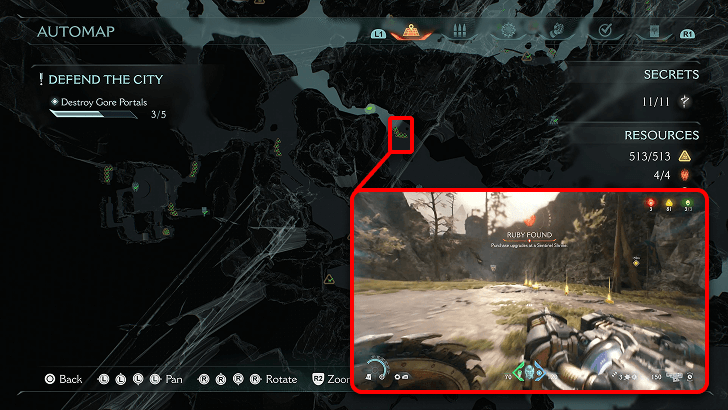 Gold Trail 9 (x5) |
Chapter 6 -
Siege - Part 1
Placed below a stone structure, nearby Ruby 2. |
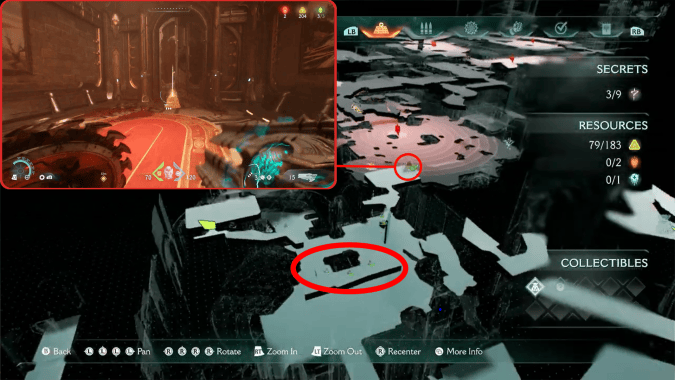 Gold Cache 1 (x8) |
Chapter 7 -
Siege - Part 2
On the second floor of the church, find the cache ina a room with demons, then find the trail next door in the hallway with platforms containing the entrance to the secret area with the Pinky Rider Toy. |
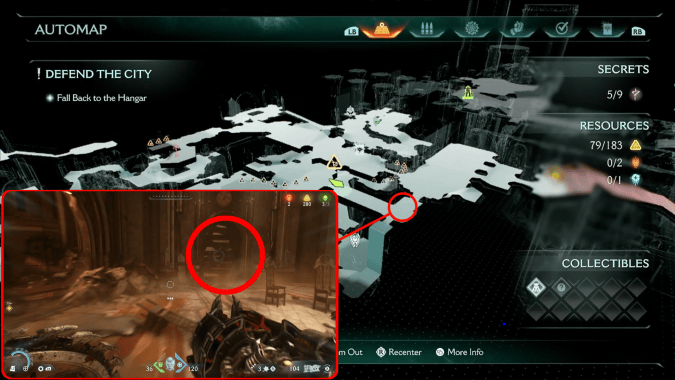 * Gold Cache 2 (x8) |
Chapter 7 -
Siege - Part 2
In the hallway with chairs, you'll find a blue-marked door on one wall. Continue ahead and grab the Gold Cache (x8) on the right, then turn left to find the Gold Trail (x7) and a jump pad; you'll also find the Secret Key across the gap from the jump pad. |
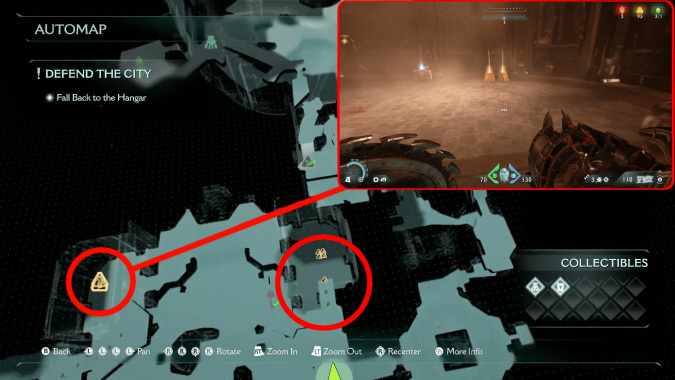 Gold Cache 3 (x16) |
Chapter 7 -
Siege - Part 2
Right after obtaining the Secret Key, go into the door and to the left to get the 3 gold, then fall down to obtain 4 gold. Go across to the near corner of the courtyard to find 16 more gold. |
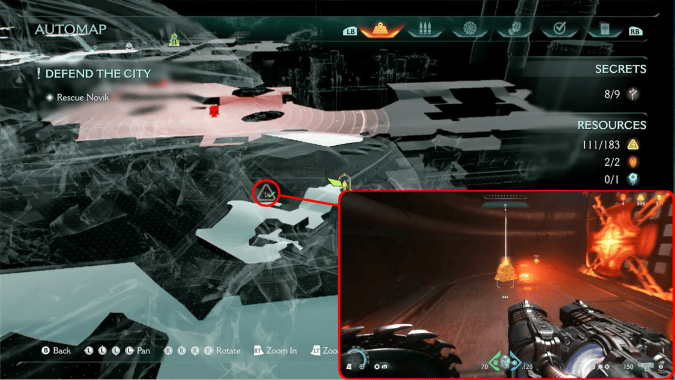 Gold Cache 4 (x8) |
Chapter 7 -
Siege - Part 2
On the ship, right before you jump out the exit to the next area. |
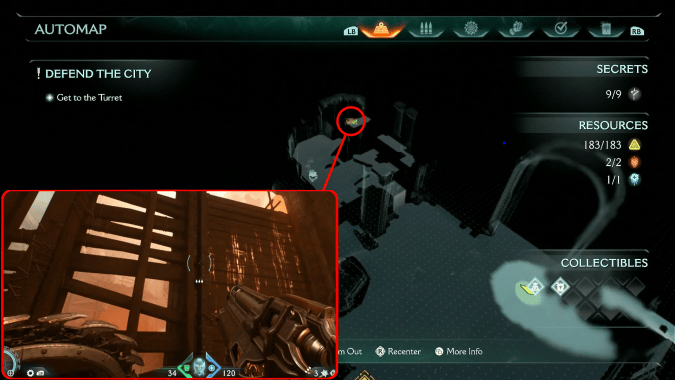 * Gold Chest 1 (x50) |
Chapter 7 -
Siege - Part 2
In the same area as Life Sigil 1, find an opening leading to a box you can climb up. Continue climbing up two more walls to find the Gold Cache. |
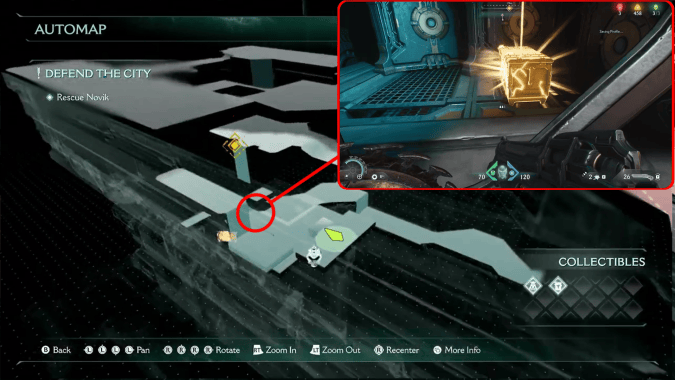 Gold Chest 2 (x50) |
Chapter 7 -
Siege - Part 2
Follow the same steps as Life Sigil 3, and after the wall is lowered, it will reveal a new gap in the wall containing a Gold Chest |
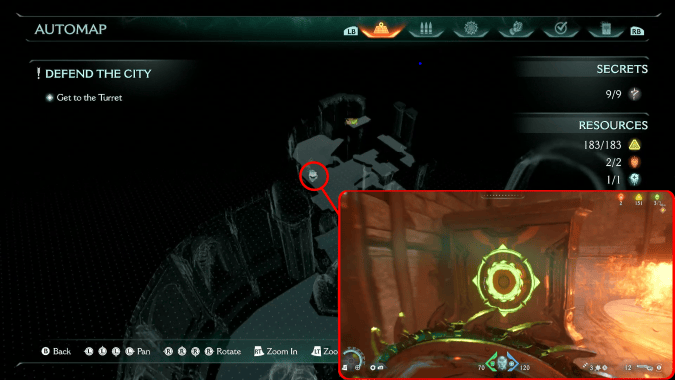 * Gold Trail 1 (x3) |
Chapter 7 -
Siege - Part 2
In the same secret room as Life Sigil 1. This is obtained during the second objective. |
 Gold Trail 2 (x10) |
Chapter 7 -
Siege - Part 2
On the second floor of the church, find the cache ina a room with demons, then find the trail next door in the hallway with platforms containing the entrance to the secret area with the Pinky Rider Toy. |
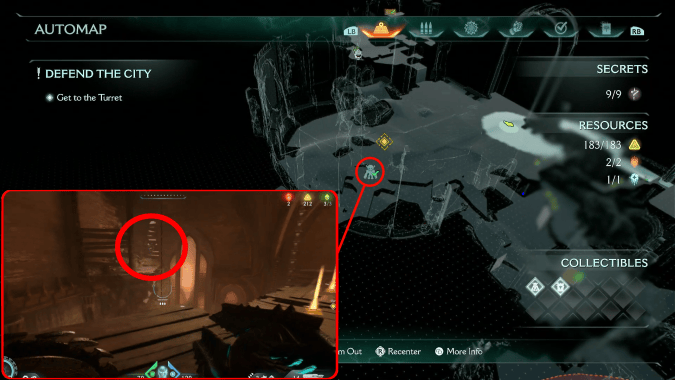 * Gold Trail 3 (x8) |
Chapter 7 -
Siege - Part 2
Right before the Pinky Rider Toy; follow the same steps as described in that section to find it. |
 * Gold Trail 4 (x7) |
Chapter 7 -
Siege - Part 2
In the hallway with chairs, you'll find a blue-marked door on one wall. Continue ahead and grab the Gold Cache (x8) on the right, then turn left to find the Gold Trail (x7) and a jump pad; you'll also find the Secret Key across the gap from the jump pad. |
 Gold Trail 5 (x7) |
Chapter 7 -
Siege - Part 2
Right after obtaining the Secret Key, go into the door and to the left to get the 3 gold, then fall down to obtain 4 gold. Go across to the near corner of the courtyard to find 16 more gold. |
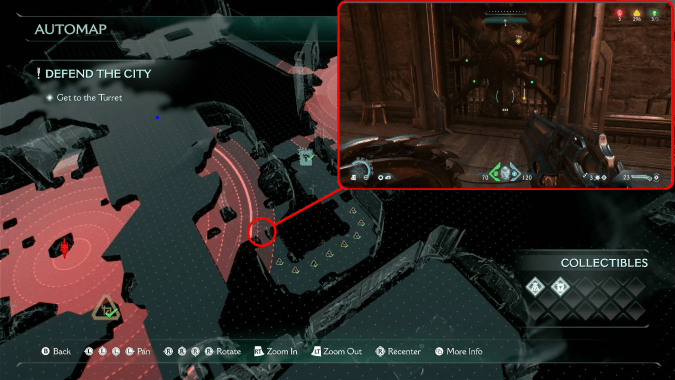 Gold Trail 6 (x8) |
Chapter 7 -
Siege - Part 2
In the room leading to the Siege Part 2 Codex. |
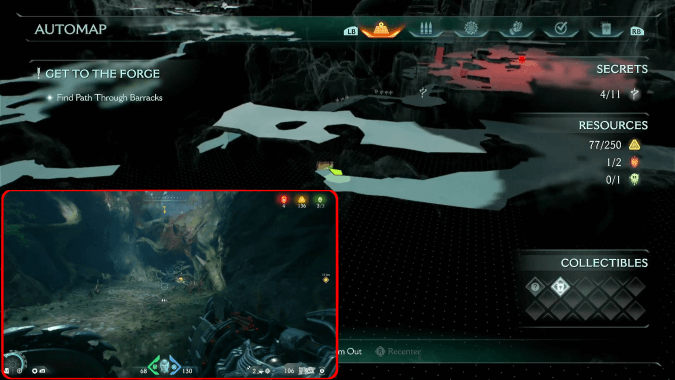 * Gold Cache 1 |
Chapter 8 -
Abyssal Forest
It can be accessed through a secret area by breaking through a wall with a shield charge. |
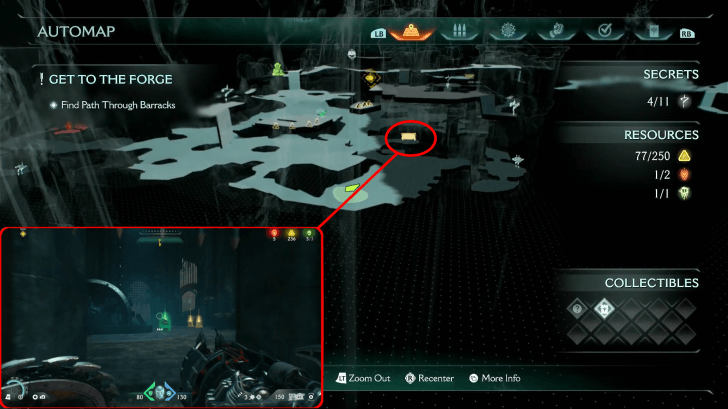 * Gold Cache 2 |
Chapter 8 -
Abyssal Forest
Accessible through a hidden room, which can be accessed by using a shield throw on a broken wall, located just outside the room, near the wall on the upper left side. |
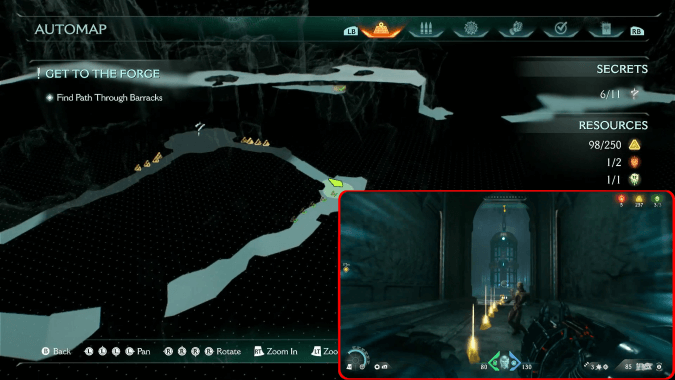 * Gold Cache 3 |
Chapter 8 -
Abyssal Forest
In the open area with the Pinky Rider, drop down into this hole , and keep heading left to access the secret area. |
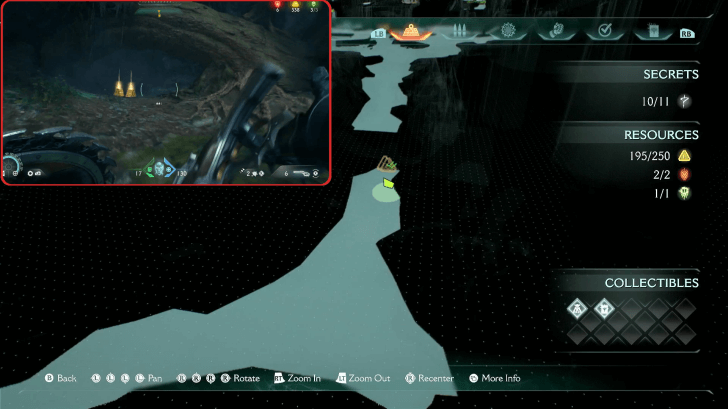 * Gold Cache 4 |
Chapter 8 -
Abyssal Forest
After obtaining the Grenade Launcher, there will be a secret area accessible by using the shield throw on the mechanism on the left wall. Head there to find the gold cache containing 50 gold. |
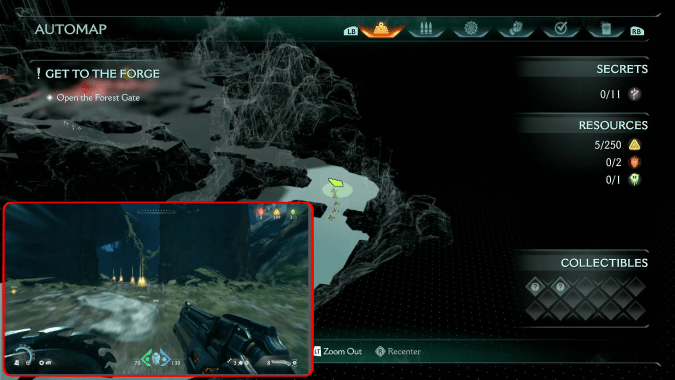 Gold Trail 1 |
Chapter 8 -
Abyssal Forest
Stick to the right path at the beginning of the level, and you'll see the first gold trail. |
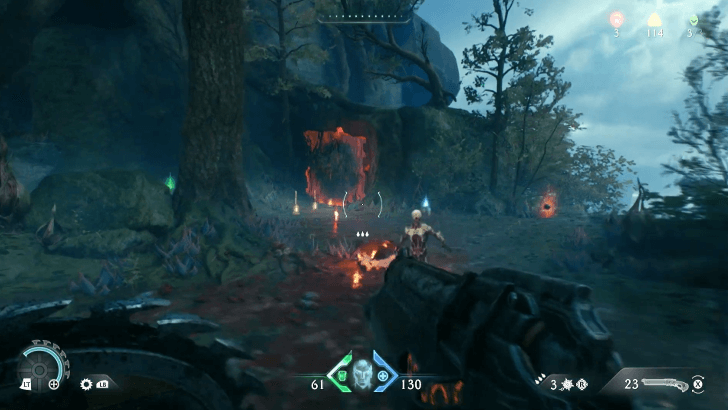 Gold Trail 2 |
Chapter 8 -
Abyssal Forest
Found directly across the yellow gate, guarded by a serpent-like demon. |
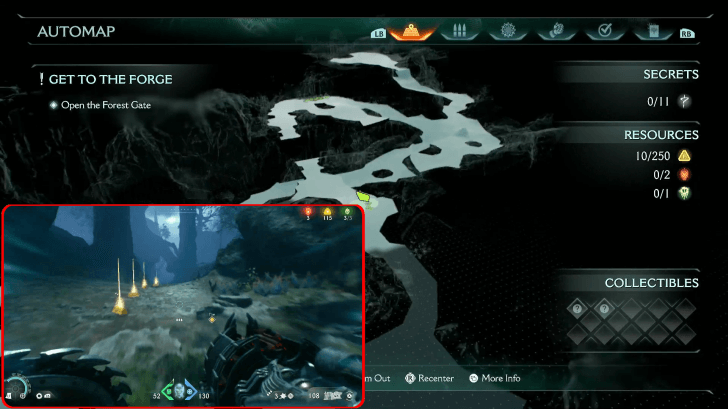 Gold Trail 3 |
Chapter 8 -
Abyssal Forest
It can be found in the upper area just above the yellow key, opposite the direction of the first life sigil. |
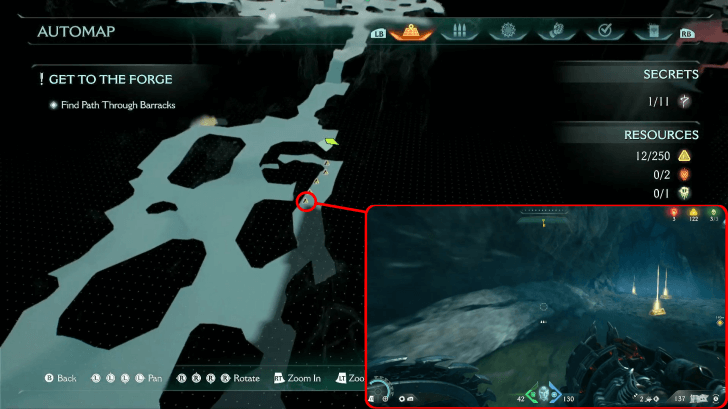 Gold Trail 4 |
Chapter 8 -
Abyssal Forest
Accessible by jumping down from the ledge on the left, just past the first ruby. |
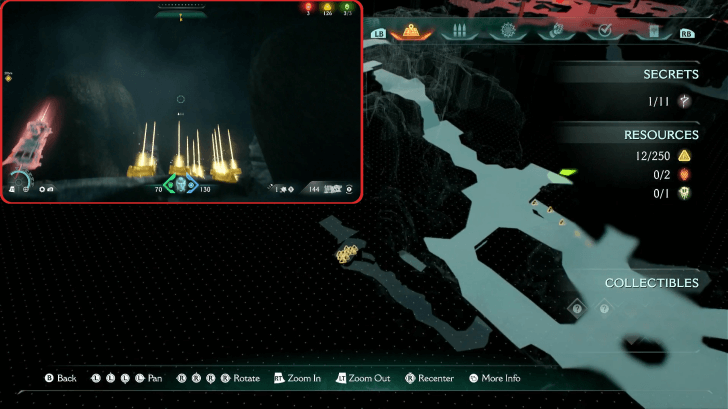 * Gold Trail 5 |
Chapter 8 -
Abyssal Forest
Continue to descend the path from where you obtained the 4th Gold Trail. Head to the bottom and swim forward to the end of the path. Climb the wall, and you'll find the 5th Gold Trail Location. |
 * Gold Trail 6 and 7 |
Chapter 8 -
Abyssal Forest
You can access it using a shield charge on the wall in the open area where you first encounter the Pinky Rider. Then, jump across the chasm to reach the secret location. |
 * Gold Trail 8 |
Chapter 8 -
Abyssal Forest
Found in a secret area just across the mine entrance elevator. |
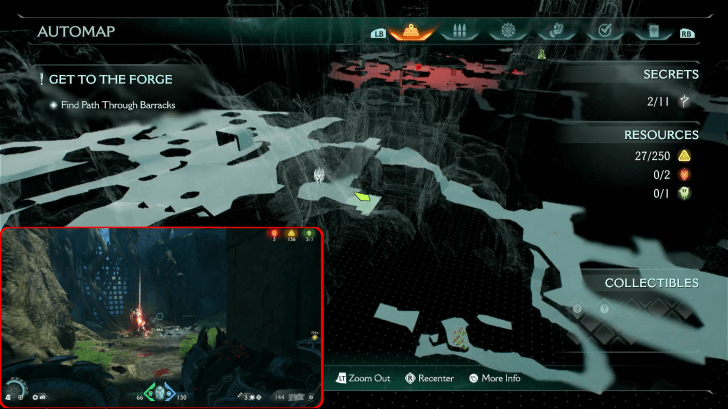 * Ruby 1 |
Chapter 8 -
Abyssal Forest
After getting the 5th gold trail, go to the end of the path and climb up with the blue jump booster. Defeat the lone enemy in the area and you can reach the ruby. |
 Ruby 2 |
Chapter 8 -
Abyssal Forest
Obtainable by finishing the Ghostbuster Mission Challenge, which requires you to parry revenant projectiles. |
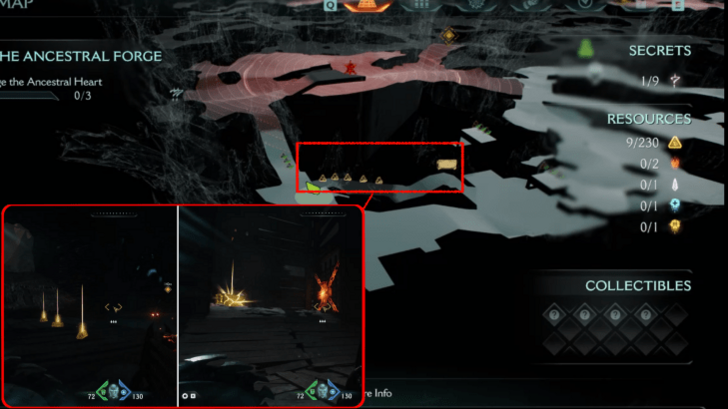 Gold Cache 1 |
Chapter 9 -
Ancestral Forge
This secret area is found just below the first trail of gold and first Life Sigil. After picking up the trail of gold, enter the downward path to the right to find the first cache. |
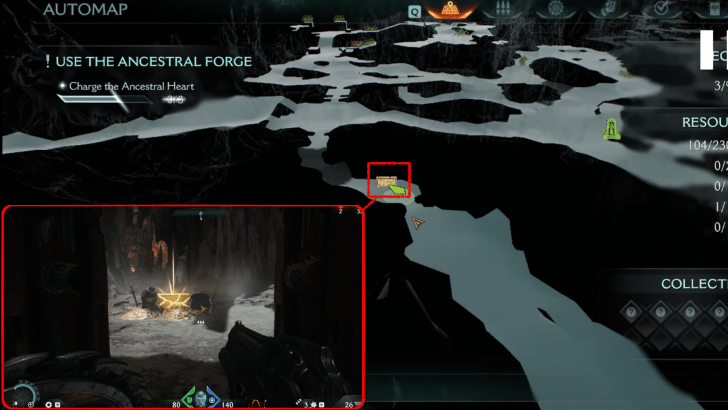 Gold Cache 2 |
Chapter 9 -
Ancestral Forge
This secret area is found inside a gate opened by the Purple Key. This area is near the third wolf statue. |
 * Gold Chest 1 |
Chapter 9 -
Ancestral Forge
This secret area is found just below the first trail of gold and first Life Sigil. After picking up the trail of gold, enter the downward path to the right to find the first chest. |
 * Gold Chest 2 |
Chapter 9 -
Ancestral Forge
This secret area is found inside a gate opened by the Purple Key. This area is near the third wolf statue. |
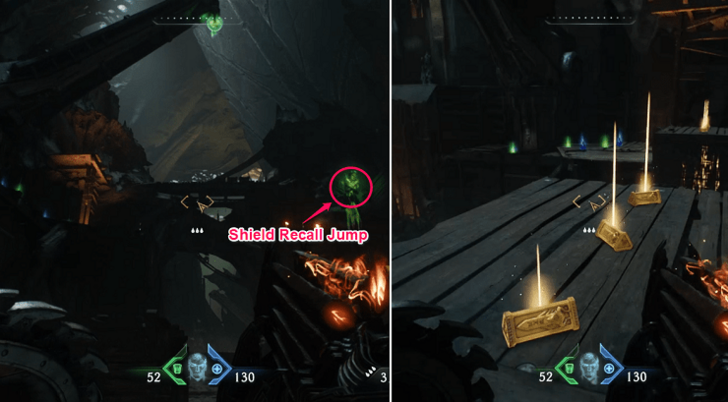 Gold Trail 1 |
Chapter 9 -
Ancestral Forge
Found near the first Life Sigil. Shield recall jump over the platform and collect the trail of gold. |
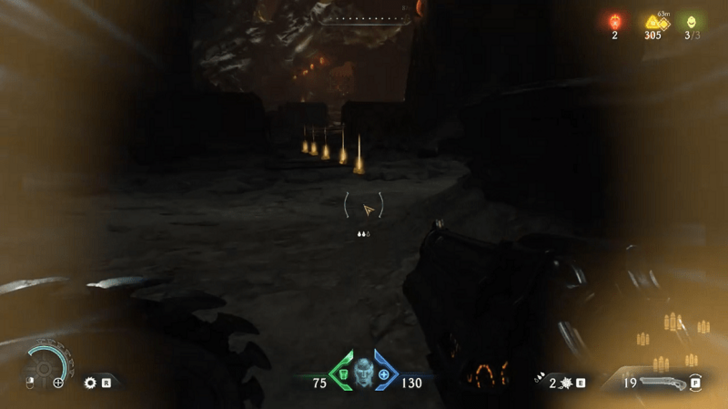 Gold Trail 2 |
Chapter 9 -
Ancestral Forge
Found near the entrance to the Wraithstone and first wolf statue. |
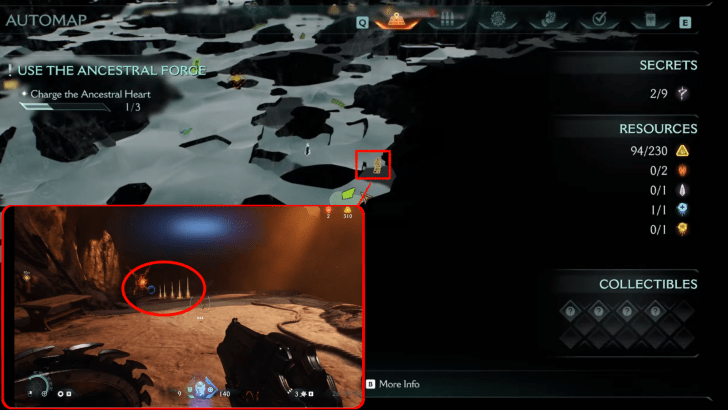 Gold Trail 3 |
Chapter 9 -
Ancestral Forge
Found beside a Soul Sphere behind a breakable gate near the eastern enemy camp. |
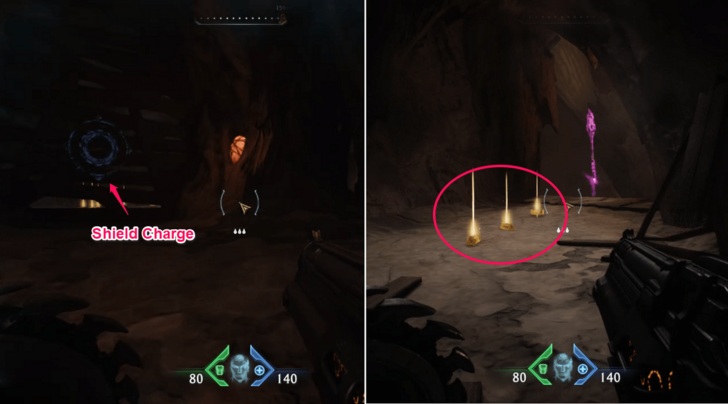 Gold Trail 4 |
Chapter 9 -
Ancestral Forge
Found behind a wooden barrier beside the Purple Key that is found near the eastern enemy camp. |
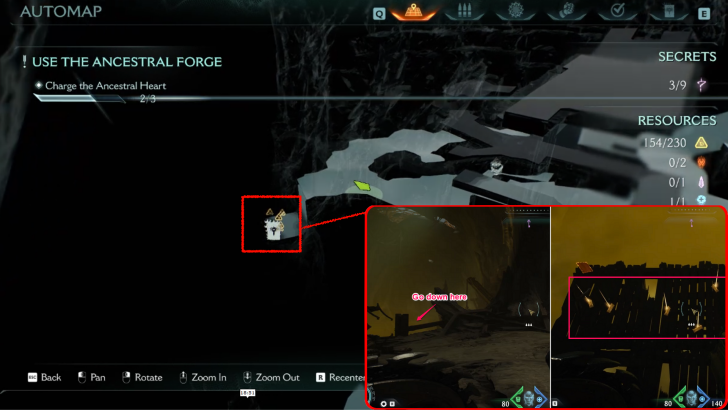 Gold Trail 5 |
Chapter 9 -
Ancestral Forge
Found beside the Ancestral Forge Codex near the upper west enemy camp. |
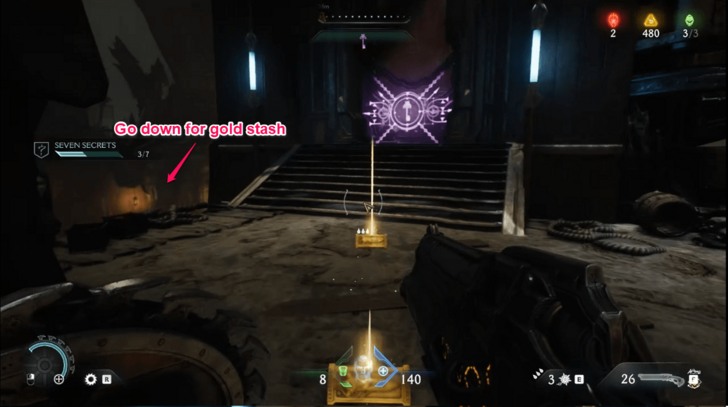 Gold Trail 6 |
Chapter 9 -
Ancestral Forge
Found near the locked gate near the Ancestral Heart switch in the upper west enemy camp. Go down the left side to find a large gold stash. |
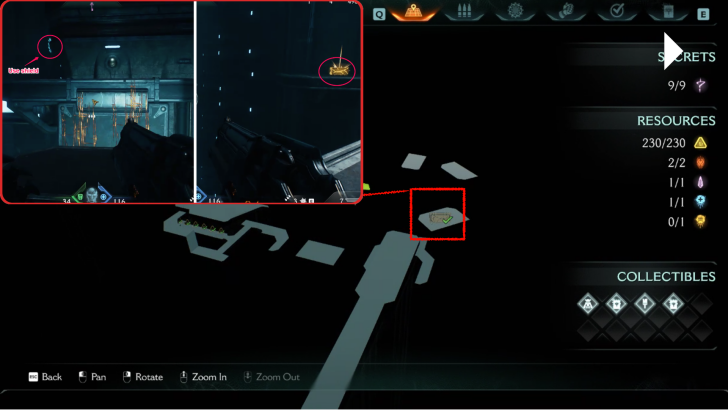 * Gold Trail 7 |
Chapter 9 -
Ancestral Forge
Access this secret area by turning around once you reach the elevated platforms area. Reach the gold stash by stepping below the energy node before using shield throw to lift the platform. |
 * Gold Trail 8 |
Chapter 9 -
Ancestral Forge
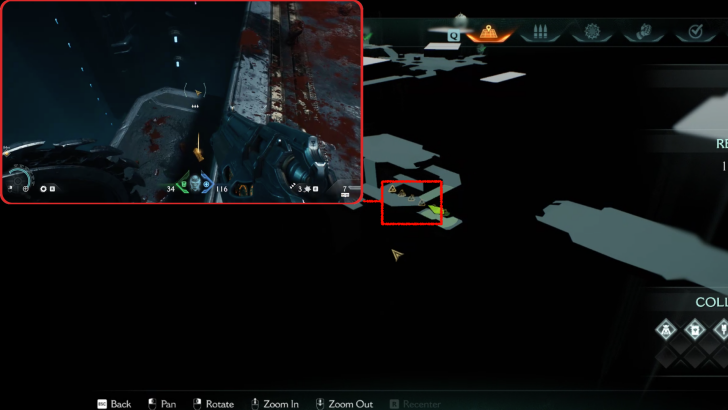
Access this secret area by going below the plaform with Lost Souls and Nightmare Imp Stalker. Collect the gold and exit through the breakable metal gate. |
 Gold Cache 1 |
Chapter 10 -
The Forsaken Plains
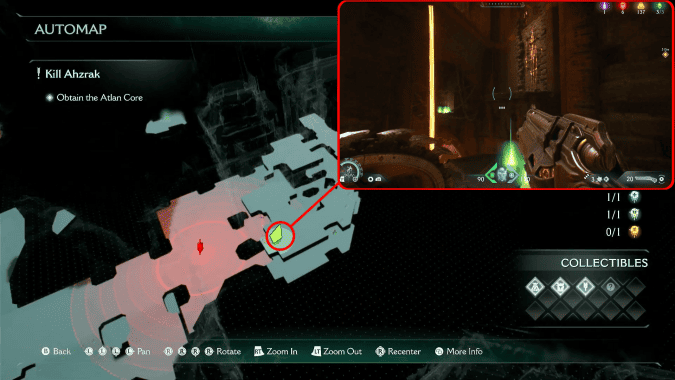
On the Secret Key tower, before you drop down to obtain the secret key, jump to the left to obtain a Gold Cache. |
 Gold Cache 2 |
Chapter 10 -
The Forsaken Plains
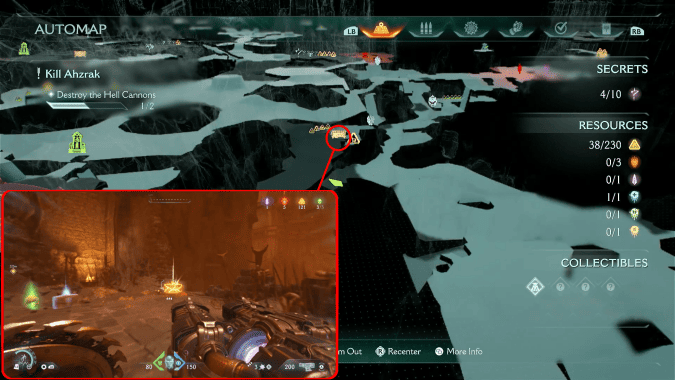
After destroying the Hell Cannon on the left, head straight until you reach a ruined archway with a jump pad. Head left to break the Gold Cache and obtain 50 Gold. |
 Gold Cache 3 |
Chapter 10 -
The Forsaken Plains
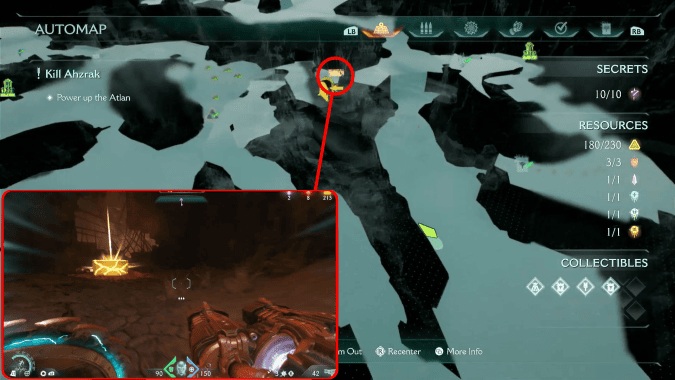
Climb the Atlan and drop down behind it. Continue following the objective marker until you reach the Gold Cache. |
 * Gold Chest 1 (x50) |
Chapter 10 -
The Forsaken Plains
On the Secret Key tower, before you drop down to obtain the secret key, jump to the left to obtain a Gold Cache. |
 Gold Chest 2 (x50) |
Chapter 10 -
The Forsaken Plains
After destroying the Hell Cannon on the left, head straight until you reach a ruined archway with a jump pad. Head left to break the Gold Cache and obtain 50 Gold. |
 Gold Chest 3 (x50) |
Chapter 10 -
The Forsaken Plains
Climb the Atlan and drop down behind it. Continue following the objective marker until you reach the Gold Cache. |
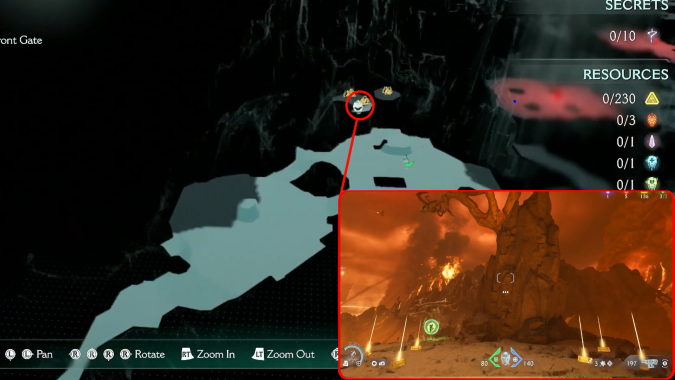 Gold Trail 1 (x9) |
Chapter 10 -
The Forsaken Plains
Before you reach the gate in the first objective, there is a cliff on the right with three Gold Trails. Use shield recall jump on the nearby cliff to obtain the first Gold Trail, then jump to the cliff with the remaining two Gold Trails. |
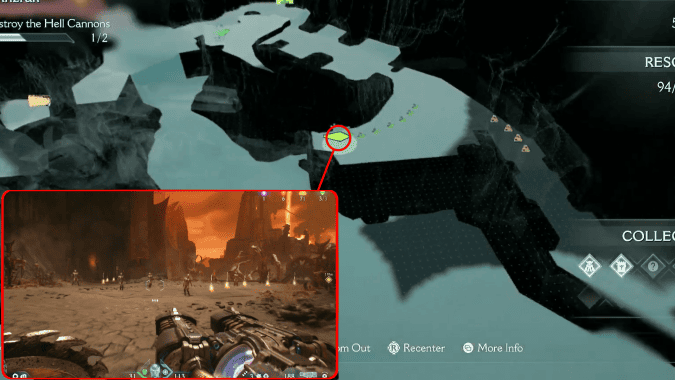 Gold Trail 2 (x10) |
Chapter 10 -
The Forsaken Plains
From the rightmost sentinel shrine of the map, head right until you reach the Atlan hand. |
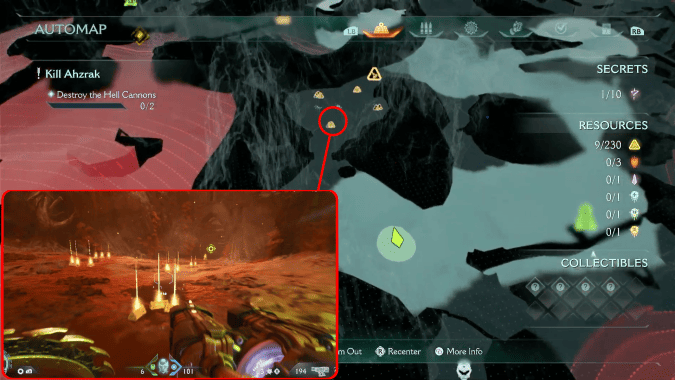 Gold Trail 3 (x26) |
Chapter 10 -
The Forsaken Plains
Drop down from the cliff where you obtained the Cycler Nightmare Skin and turn left towards the area with Tentacles. There you'll find 6 Gold Trails. |
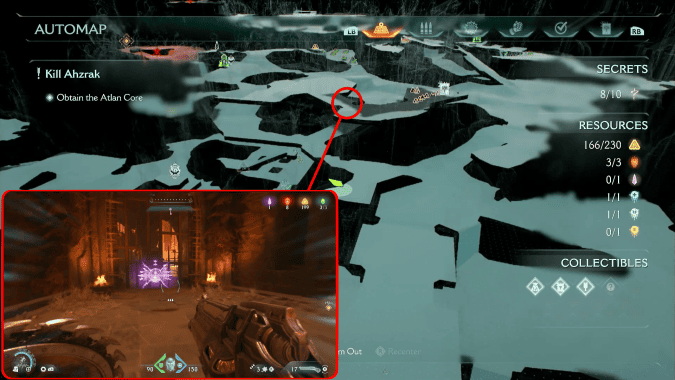 Gold Trail 4 (x11) |
Chapter 10 -
The Forsaken Plains
Facing the Atlan, take the path to the left and use the stairs to get to the next level. Open the locked gate with the Secret Key to access the Gold Trail and Codex. |
 Gold Trail 5 (x6) |
Chapter 10 -
The Forsaken Plains
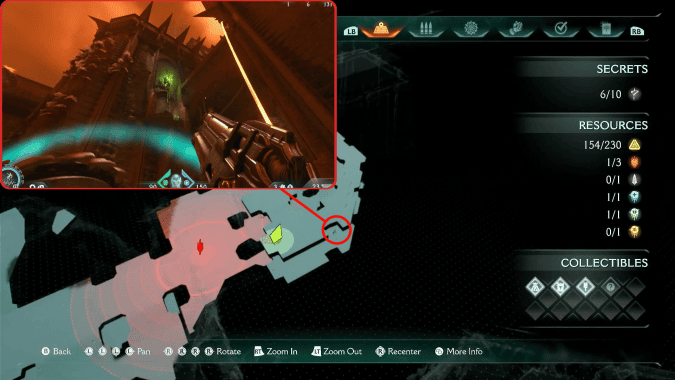
On your way to obtain the Secret Key, you'll pass through a Trail of Gold right after you use a shield recall jump on the tower. |
 Gold Trail 6 (x6) |
Chapter 10 -
The Forsaken Plains
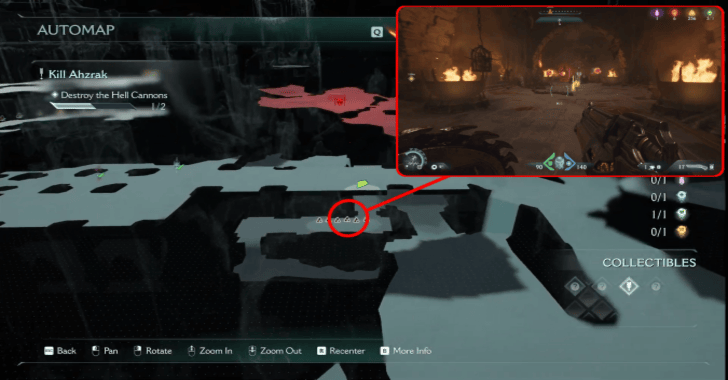
On the bridge before you reach the Secret Key tower, drop down on the left and follow the underpassage of the bridge, then make another drop on the right until you reach a broken window that leads to the Gold Trail. |
 Gold Trail 7 (x12) |
Chapter 10 -
The Forsaken Plains
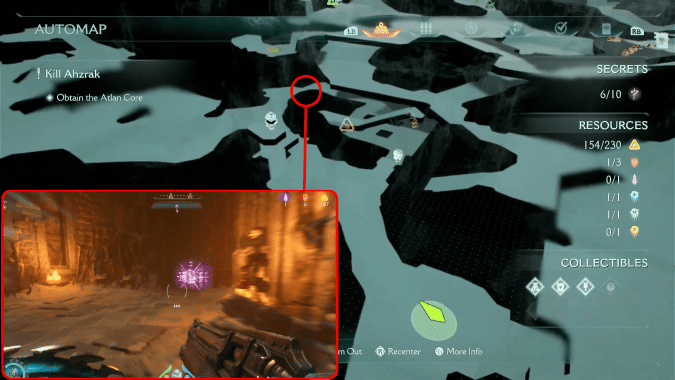
After destroying the Hell Cannon on the left, head straight until you reach a ruined archway with a jump pad. Head right to open the locked door with the Secret Key to obtain the Gold and Ruby. |
 Gold Cache 1 (x50) |
Chapter 11 -
Hellbreaker
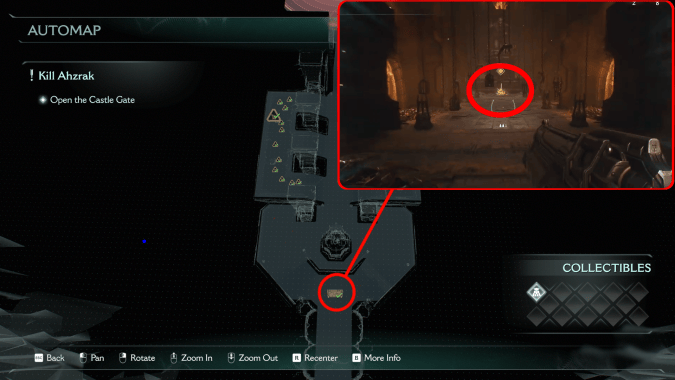
Progress until you complete the second objective to Open the Castle Gates. You'll find this Gold Cache right in the middle of the main hall of the castle. |
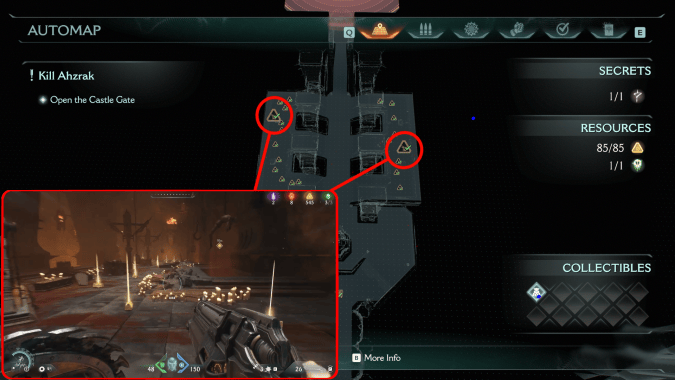 Gold Trail 1 and 2 (x35) |
Chapter 11 -
Hellbreaker
From the Gold Cache, go to the left and right side of the room and jump up the walls to find Gold Trails. |
 Gold Cache 1 |
Chapter 12 -
Sentinel Command Station
Right after exiting the vents at the start of the chapter, continue straight until you find an opening on the wall to your right. You'll find a Codex entry and a bunch of Gold in this hole in the wall. |
 * Gold Cache 2 |
Chapter 12 -
Sentinel Command Station
After finding the previous Gold Trail, you'll find this cache at the end of the same room on top of the flat train cart. |
 * Gold Cache 3 |
Chapter 12 -
Sentinel Command Station
After using the elevator and crossing the gap with the Mancubus on the other side, do not proceed to the next hallway yet. Instead, drop down the broken floor at the end to reach a secret area with a Ruby and a Gold cache. |
 Gold Cache 5 |
Chapter 12 -
Sentinel Command Station
There's a breakable wall below the very first yellow door you unlock, which leads to a secret area including this Gold cache. |
 Gold Chest 1 |
Chapter 12 -
Sentinel Command Station
After obtaining the Demonic Essence Health and clearing the next room full of zombies, this chest will be in the next room along with the lever that continues the chapter. |
 * Gold Chest 2 |
Chapter 12 -
Sentinel Command Station
Open the first locked yellow gate after obtaining the Yellow Keycard, then sprint through the gap without jumping to reach this secret area with a Gold chest. A jump pad is available at the bottom in case you missed the jump. |
 Gold Trail 1 (x5) |
Chapter 12 -
Sentinel Command Station
Right after exiting the vents at the start of the chapter, continue straight until you find an opening on the wall to your right. You'll find a Codex entry and a bunch of Gold in this hole in the wall. |
 * Gold Trail 2 (x14) |
Chapter 12 -
Sentinel Command Station
After dropping down to the command room, you'll notice a secret item behind a locked gate to your left. Find the breakable wall near the hologram at the center of the room. This opens up to a secret area with this Gold trail in it. |
 Gold Trail 3 (x8) |
Chapter 12 -
Sentinel Command Station
After activating the first lever in this room, it will open a path to the room with the Sentinel Shrine and this trail of Gold. |
 Gold Trail 4 (x6) |
Chapter 12 -
Sentinel Command Station
After climbing and entering the vent near the first Sentinel Shrine, turn right instead of heading to the turrets shooting through the vents. |
 Gold Trail 5 and Cache 4 |
Chapter 12 -
Sentinel Command Station
Found in the same room where the Yellow Keycard is. |
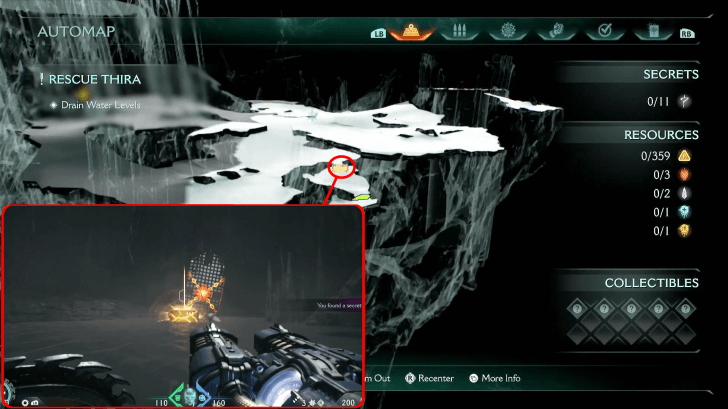 Gold Cache 1 (x50) |
Chapter 14 -
Spire of Nerathul
Drop down the ledge after beating the Komodo Champion to access this secret area. |
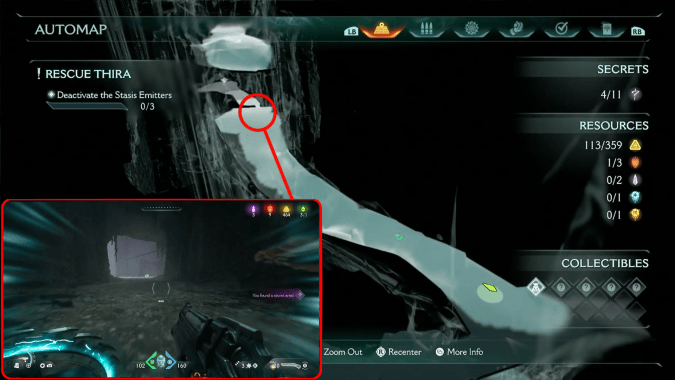 * Gold Cache 2 (x50) |
Chapter 14 -
Spire of Nerathul
Shoot the glowing red orb to break the wall blocking the path. Drop down the ledge, and you will be able to go to the lower levels where the gold cache is located. |
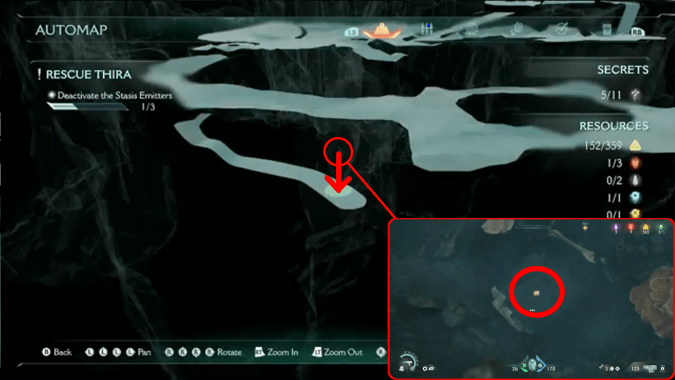 Gold Cache 3 (x8) |
Chapter 14 -
Spire of Nerathul
In the water, swim straight down to the bottom to find it. |
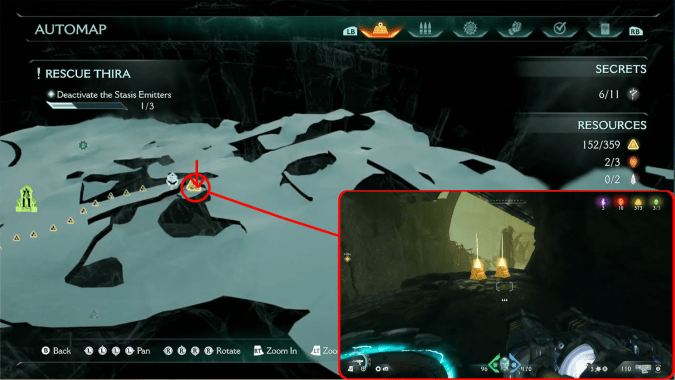 Gold Cache 4 (x16) |
Chapter 14 -
Spire of Nerathul
Drop off the cliff to find it on a ledge above the water. |
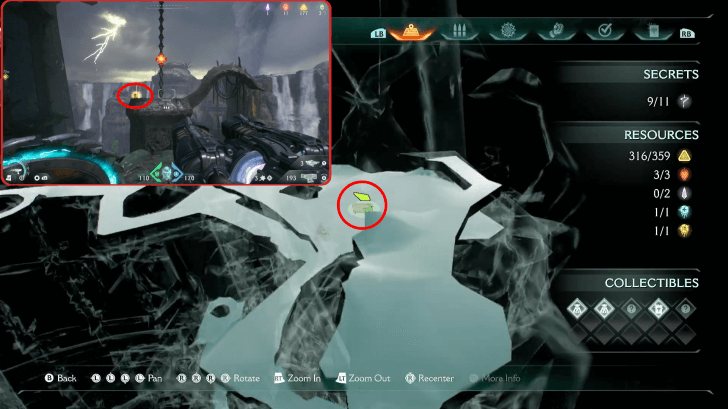 Gold Cache 6 (x50) |
Chapter 14 -
Spire of Nerathul
Use shield throw on the red mechanism to lower the platform, and you should be able to access it afterwards. |
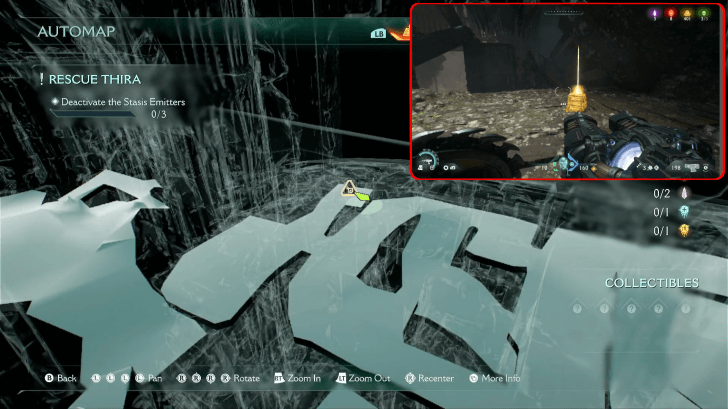 Gold Trail 1 (x8) |
Chapter 14 -
Spire of Nerathul
Use Shield Throw to ascend to the ledge to access the gold trail. |
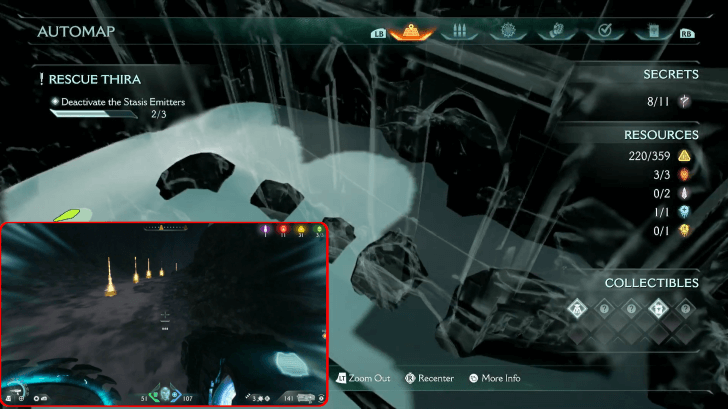 Gold Trail 10 (x5) |
Chapter 14 -
Spire of Nerathul
The gold trail can be found underneath the pillars near the demonic statue, but it's recommended to clear the area first of demons before heading to this area. |
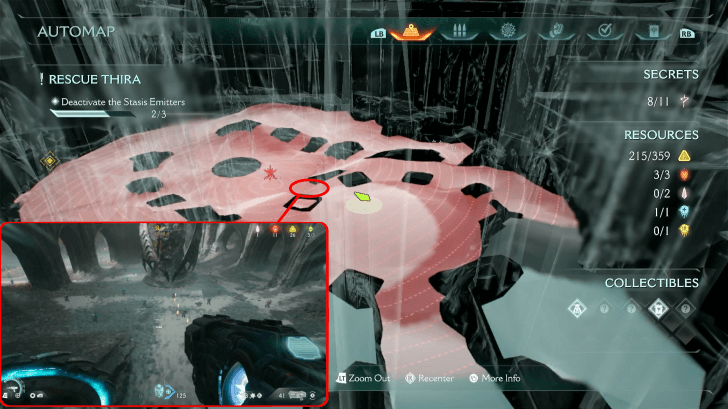 Gold Trail 11, 12, 13, 14 (x17) |
Chapter 14 -
Spire of Nerathul
Head up the left stairs after disembarking the Serrat. Keep following the path, and you should be able to grab all the gold trails. |
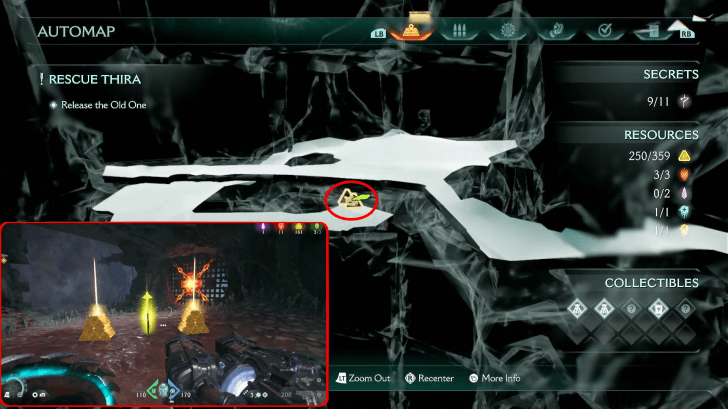 Gold Trail 15 (x16) |
Chapter 14 -
Spire of Nerathul
Drop off the tree branch to access the area. |
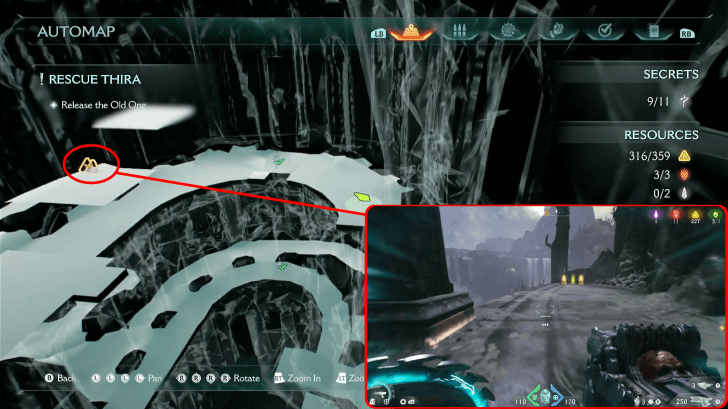 Gold Trail 16 (x16) |
Chapter 14 -
Spire of Nerathul
Head to the outer area in the room with multiple jump boosts after defeating the Revenant. |
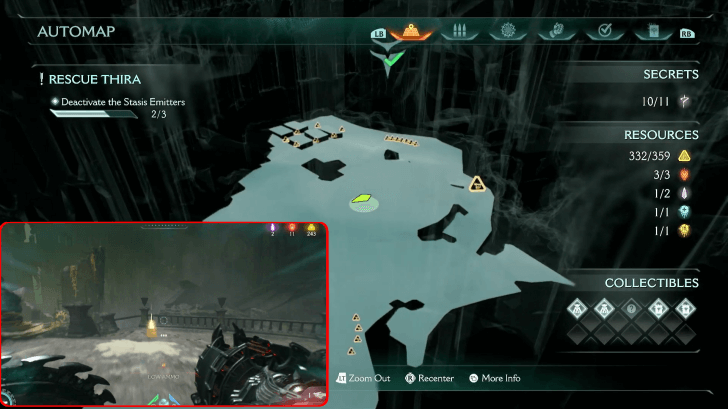 Gold Trail 17, 18, 19, 20 (x22) |
Chapter 14 -
Spire of Nerathul
Accessible in an area that can be reached by riding to the area with Serrat. |
 Gold Trail 2 (x16) |
Chapter 14 -
Spire of Nerathul
Continue down a long stone bridge to find a Gold Cache (x16) and a Life Sigil. When you reach it, you will be attacked by a Komodo Champion. |
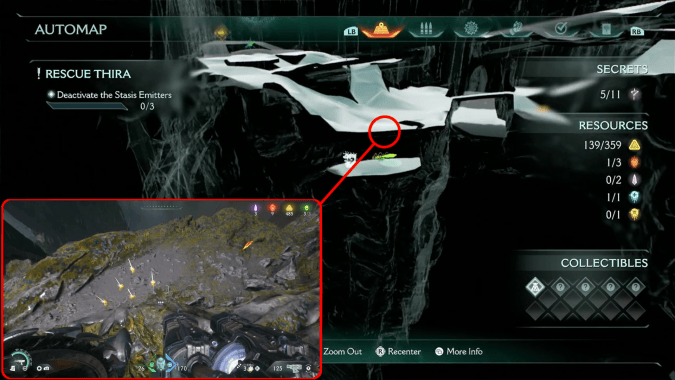 Gold Trail 3 (x5) |
Chapter 14 -
Spire of Nerathul
At the edge of the cliff where you can look up and see a Green Statue, look down off the side of the cliff to see an area you can fall to, containing the Spire of Nerathul Codex and Gold Trail 2 (x5). |
 Gold Trail 4 (x5) |
Chapter 14 -
Spire of Nerathul
Across a river from the Spire of Nerathul Codex and Gold Trail 2; cross the bridge to find it. |
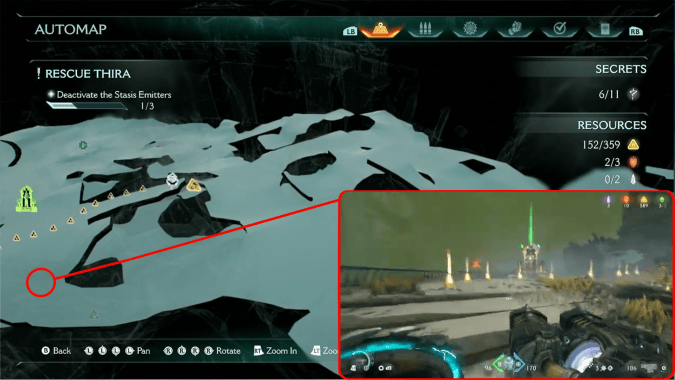 Gold Trail 5 (x11) |
Chapter 14 -
Spire of Nerathul
Climb up the spiral pathway to the top to find an area with a Gold Trail and a Life Sigil, but watch out for enemies. |
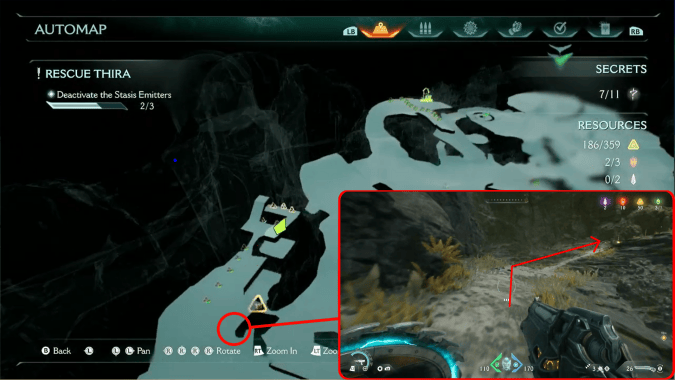 Gold Trail 6 (x18) |
Chapter 14 -
Spire of Nerathul
When you find a Gold Cache blocked behind a gate, go around and to the left up the slope collecting the Gold Trail, then drop in to find the Gold Cache. |
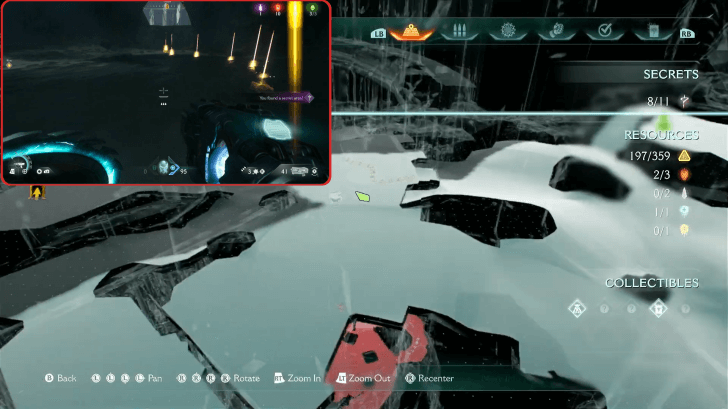 * Gold Trail 7 (x13) |
Chapter 14 -
Spire of Nerathul
Located underneath the structure close to the Cyberdemon, encountered shortly after reaching the Sentinel Shrine. |
 Gold Trail 8 (x5) |
Chapter 14 -
Spire of Nerathul
The gold trail can be found after the fight with the Cyberdemon in the enclosed structure, located on the left stairs. |
 Gold Trail 9 (x5) |
Chapter 14 -
Spire of Nerathul
Located just in front of the big demonic statue. |
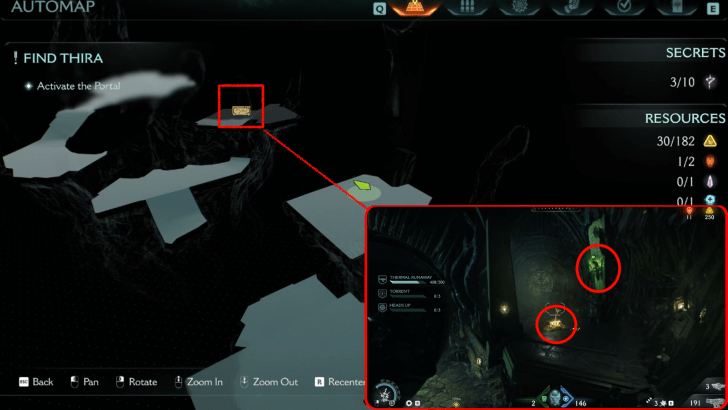 Gold Chest 1 |
Chapter 15 -
City of Ry'uul
This secret area is found by using shield recall jump from the area where you first encounter an Acolyte. Use the shield to reach the higher platform. |
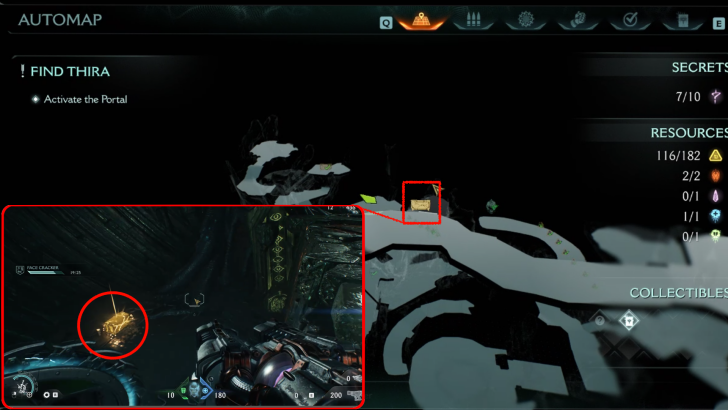 Gold Chest 2 |
Chapter 15 -
City of Ry'uul
This secret area is found beside a narrow platform with an Armored Mancubus and a Whiplash. Defeat the enemies before going down to the right and collecting the chest. |
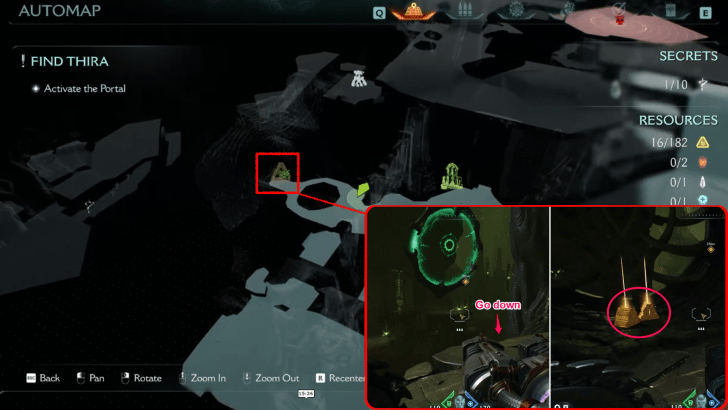 Gold Trail 1 |
Chapter 15 -
City of Ry'uul
Before going through the first shield charge ring, go down the platform and shield charge a wooden barrier before shield recall jumping and using a lift towards a secret area. This gold trail is near a purple device. |
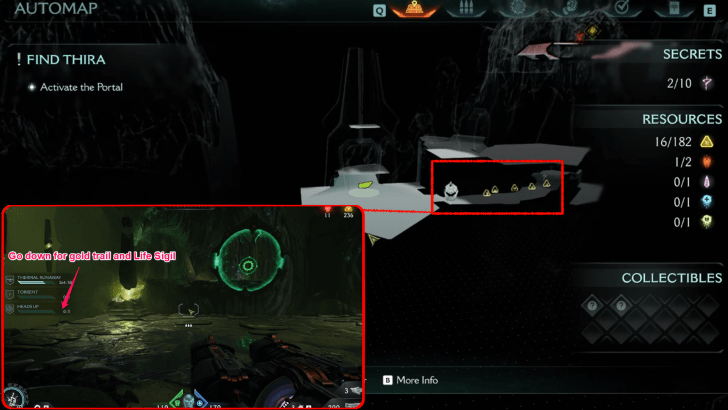 Gold Trail 2 |
Chapter 15 -
City of Ry'uul
This secret area is found by going down a platform to the left before shield charging through the 2nd green ring. Follow the trail of gold and defeat Tentacles to reach the first Life Sigil. |
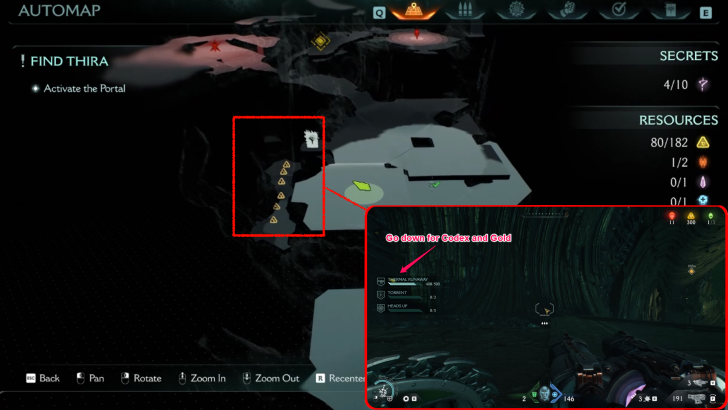 Gold Trail 3 |
Chapter 15 -
City of Ry'uul
Access this secret area below the area where you first encounter an Acolyte. Go down a platform and follow the trail of gold] until you reach the City of Ry'uul Codex.(eval):1: unterminated string meets end of file ...rm and follow the trail of gold ... ^ (eval):1: syntax error, unexpected end-of-input, expecting ')' ...rm and follow the trail of gold ... ^ |
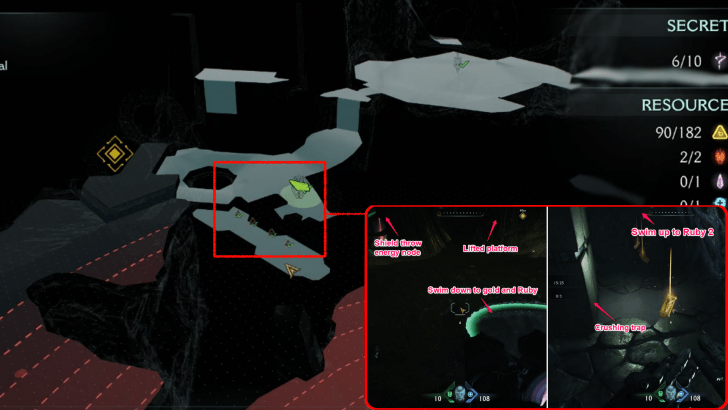 Gold Trail 4 |
Chapter 15 -
City of Ry'uul
Access this secret area by shield throwing the energy node to lift the platform in front. Swim through the water under it and follow the trail of gold while avoiding the crushing traps until you surface and acquire the second Ruby. |
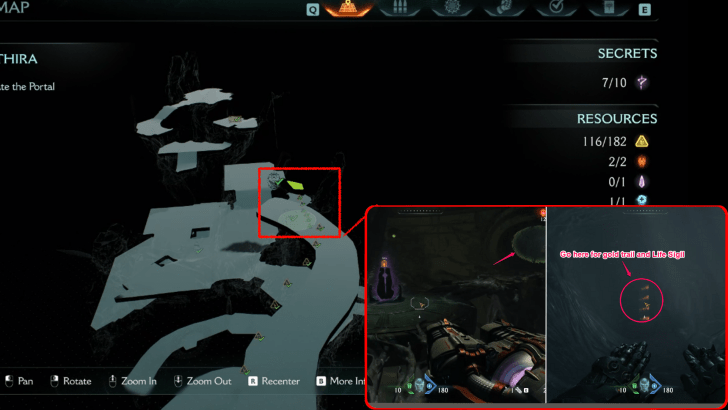 Gold Trail 5 |
Chapter 15 -
City of Ry'uul
Move past the purple device and go to the right to access this secret area. Carefully swim through the fireball path until you reach a trail of gold and a second Life Sigil. |
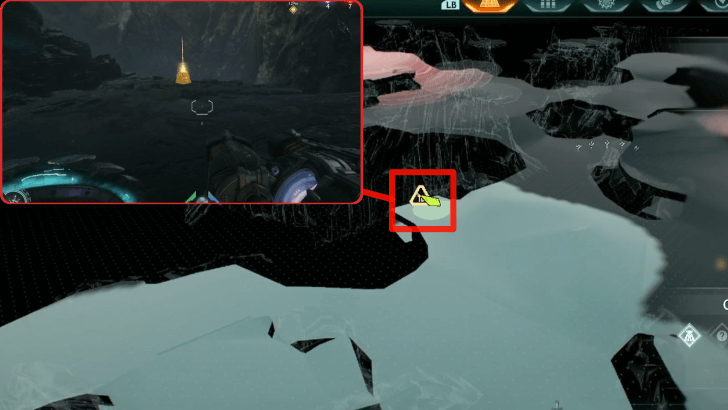 Gold Cache 1 |
Chapter 16 -
The Kar'Thul Marshes
You can find this to the left of the Hell Knight Toy, at the edge of a cliff. |
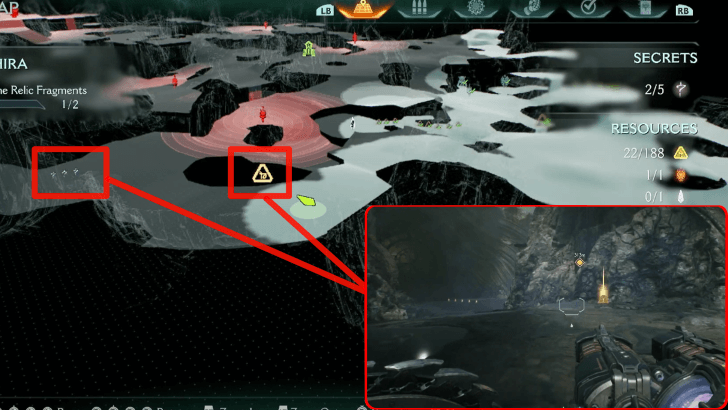 Gold Cache 2 and Gold Trail 3 |
Chapter 16 -
The Kar'Thul Marshes
Right after obtaining the Relic Fragment near the Demonic Essence: Armor, turn around, go straight, and turn left. |
 Gold Cache 3 |
Chapter 16 -
The Kar'Thul Marshes
From Gold Chest 1, turn left, go straight ahead, and jump down the ledge. You will see the Gold Cache on the right. |
 Gold Cache 4 |
Chapter 16 -
The Kar'Thul Marshes
This can be found right below the mound Gold Trail 5 is on. To unlock the area, go to the opposite side of the mound and throw your shield at the mechanism to open the door. |
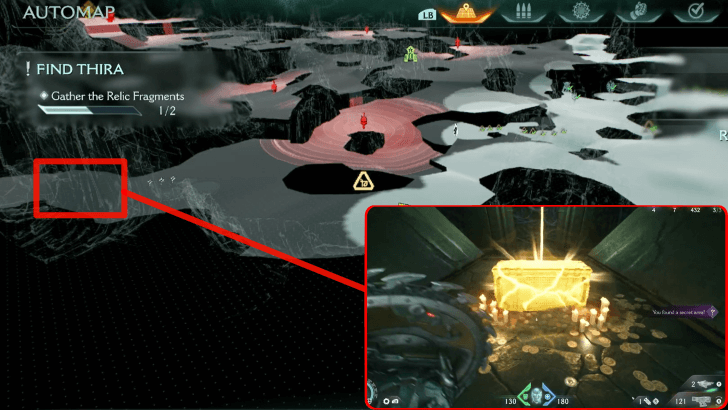 Gold Chest 1 |
Chapter 16 -
The Kar'Thul Marshes
Directly in front of Gold Trail 3 is a rotating room puzzle. Solve this and reach the Gold Cache at the end of the room. |
 Gold Chest 2 |
Chapter 16 -
The Kar'Thul Marshes
A big black and green gate can be found next to Gold Trail 6 & Gold Caches 5. Enter this gate and at the end of a long, winding tunnel is the Gold Chest. |
 Gold Trail 1 |
Chapter 16 -
The Kar'Thul Marshes
Upon spawning, head immediately to the left and turn left the first corner you see. Jump off the cliff, the Gold Trail is immediately below you. |
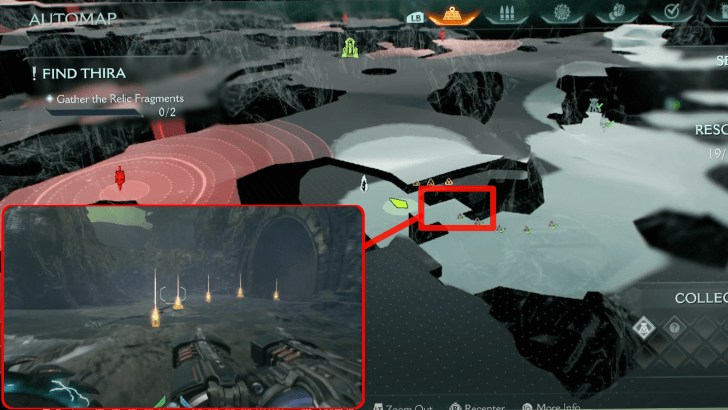 Gold Trail 2 |
Chapter 16 -
The Kar'Thul Marshes
From Gold Cache 1, turn around and turn left. You will immediately see this Gold Trail. There will be 5 at first, jump down the hidden area and turn right for the remaining 3 Gold. |
 Gold Trail 4 |
Chapter 16 -
The Kar'Thul Marshes
From Gold Cache 3, go straight ahead into a wide area full of enemies. After defeating the enemies, turn right and climb a short wall. |
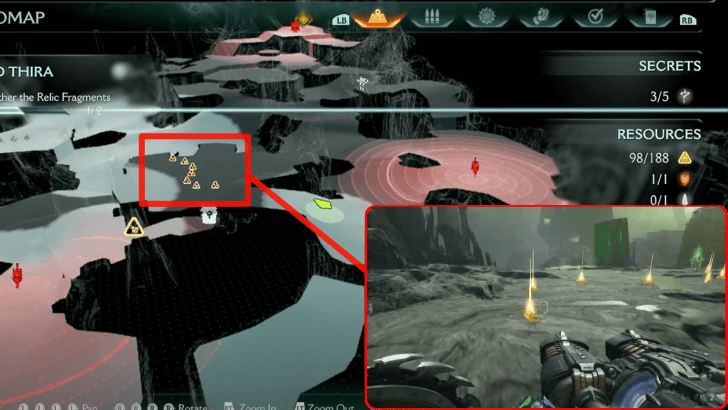 Gold Trail 5 |
Chapter 16 -
The Kar'Thul Marshes
From Gold Trail 4, continue onwards and into a wide area full of enemies. From there, turn right and up a small mound. |
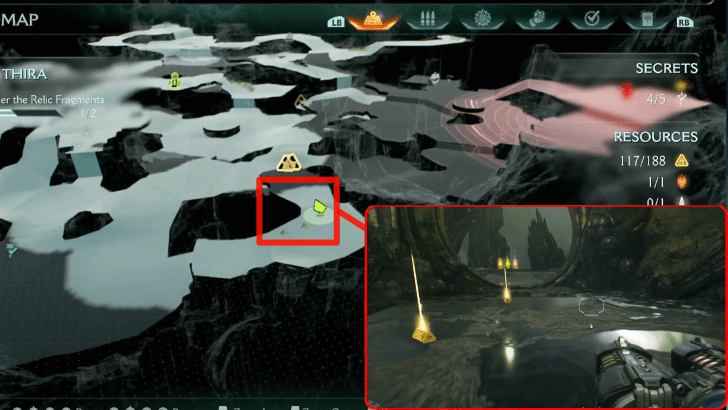 Gold Trail 6 and Gold Cache 5 |
Chapter 16 -
The Kar'Thul Marshes
This can be found right below the mound Gold Trail 5 is on. To unlock the area, go to the opposite side of the mound and throw your shield at the mechanism to open the door. |
 Gold Trail 7 |
Chapter 16 -
The Kar'Thul Marshes
After obtaining the Relic Fragment near Demonic Essence: Ammo, turn around and go along the right side of the map until you reach this Gold Trail. |
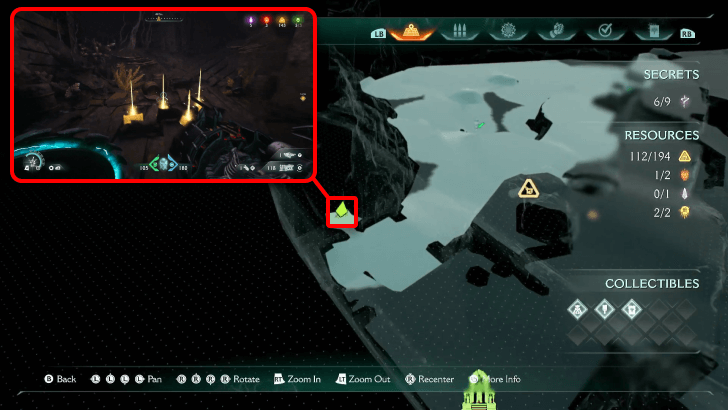 Gold 1 |
Chapter 17 -
Temple of Lomarith
Nearby where the Weapon Skin can be found, head straight ahead where a ship is, and turn towards the right. There are four gold bars hiding behind some wooden barrels and chests there. |
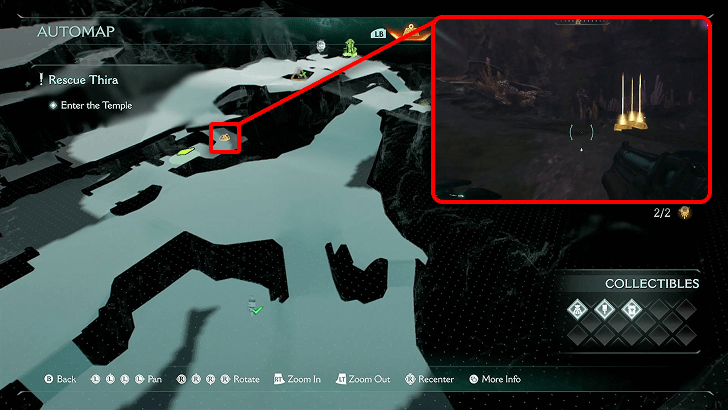 Gold 2 |
Chapter 17 -
Temple of Lomarith
Below in the underbelly of the ship with a Sentinel Shrine and Ruby 2, there is a blue barricade that can be Shield Charged to reveal three gold bars. |
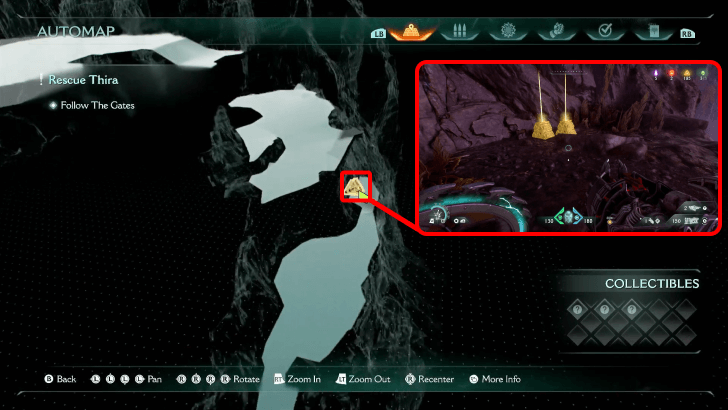 Gold Cache 1 |
Chapter 17 -
Temple of Lomarith
This is found next to the starting area. Drop down to the platform below, and grab the gold caches. |
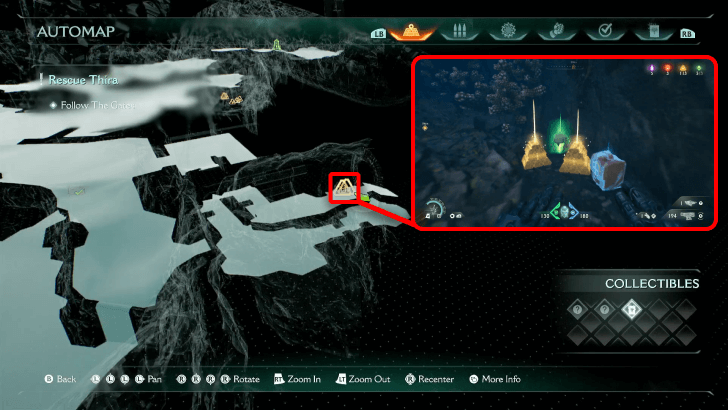 Gold Cache 2 |
Chapter 17 -
Temple of Lomarith
You'll find this around the dilapidated ship with two portals. Take the portal and towards the side, hiding behind seaweed, there are two gold caches that can be picked up. |
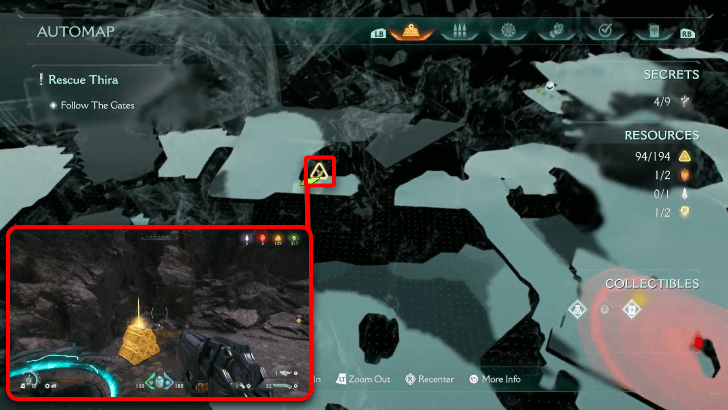 Gold Cache 3 |
Chapter 17 -
Temple of Lomarith
Around where the Cacodemon Hybrid Toy was found, Shield Charge the green barricade to proceed to the new area. Instead of continuing through the ship, bank towards the right, and the gold cache will be waiting there. |
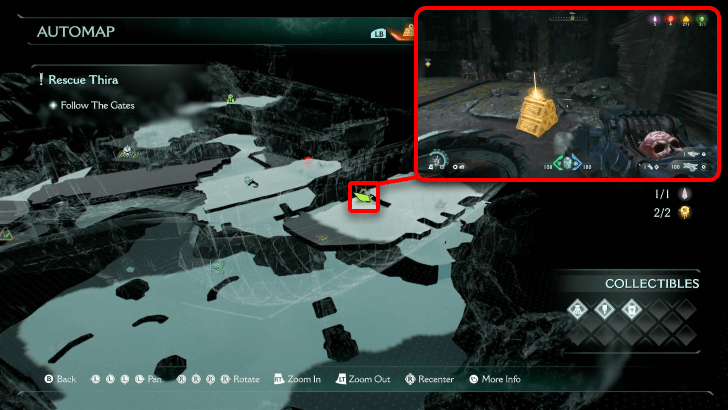 Gold Cache 4 |
Chapter 17 -
Temple of Lomarith
Take the jump booster to take you up to the ship. Your suit will tell you there are gravitic anomalies detected, and as you proceed through the ship, before taking the next booster, turn around the corner to pick up the gold cache. |
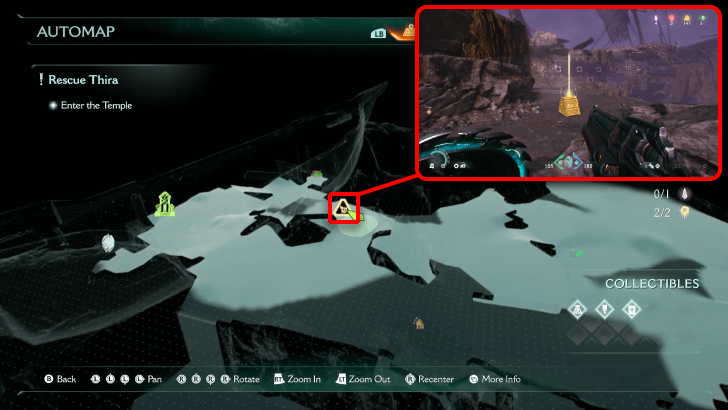 Gold Cache 5 |
Chapter 17 -
Temple of Lomarith
Nearby the Sentinel Shrine and Ruby 2, there is a gold cache outside the area in plain sight. |
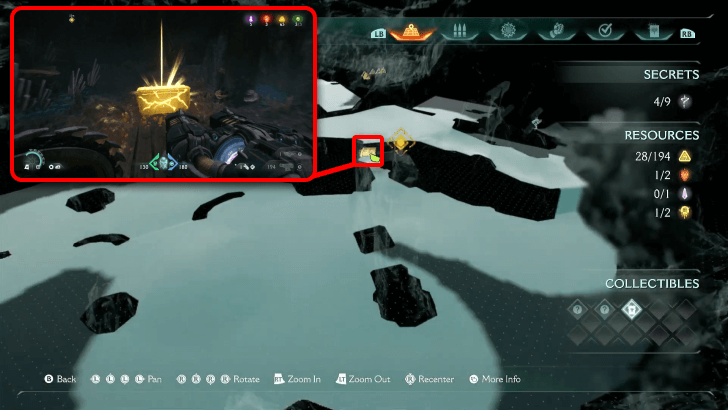 Gold Chest 1 |
Chapter 17 -
Temple of Lomarith
Around the area of the first Leader fight, there is an alcove hidden behind a blue barricade . Shield Charge it to reveal a gold chest. |
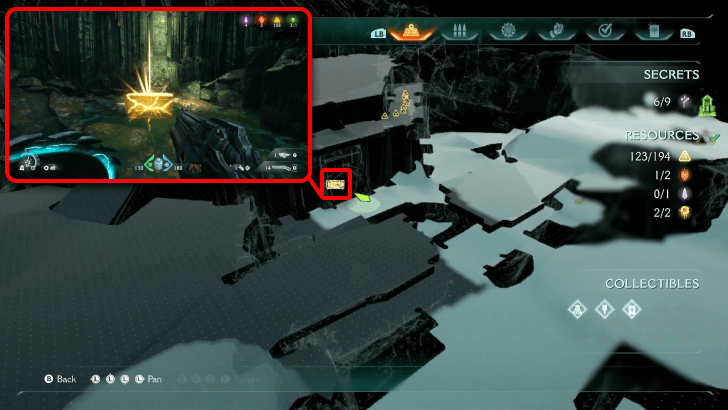 Gold Chest 2 |
Chapter 17 -
Temple of Lomarith
Nearby underneath where the Sentinel Shrine and Ruby 2, there is a gold chest waiting in an alcove in the base of the temple. |
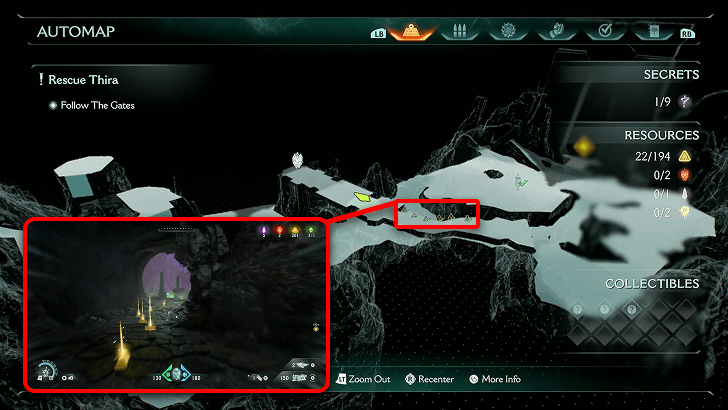 Gold Trail 1 |
Chapter 17 -
Temple of Lomarith
As you go through the beach in the starting area, there is a Shield Recall Jump you can make that will lead you to a gold trail and Ruby 1. |
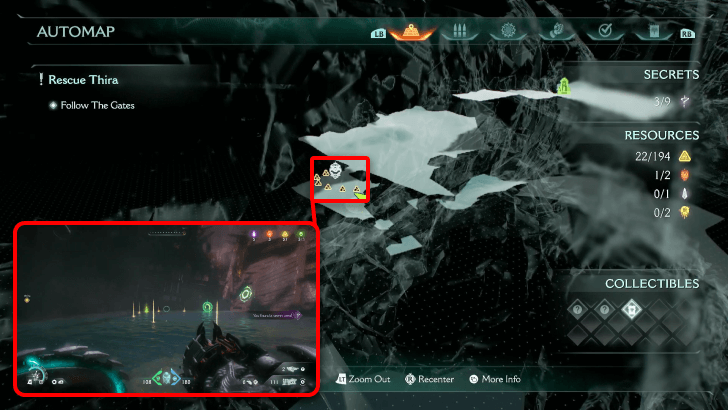 Gold Trail 2 |
Chapter 17 -
Temple of Lomarith
Past the first Sentinel Shrine, there is a large area in a broken ship. Parts of the cave is submerged in water, so head towards the far end to find a submerged area to swim in. Towards the side is a short passageway that will exit out where Life Sigil 1 is, as well as Gold Trail 2. |
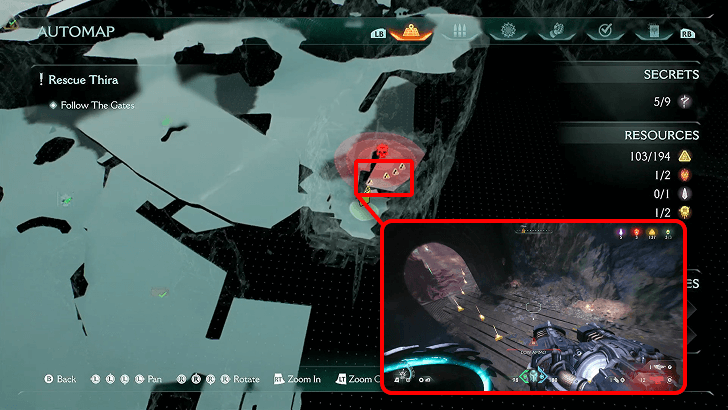 Gold Trail 3 |
Chapter 17 -
Temple of Lomarith
Proceed through the ship, and take the booster. Defeat the demons in the area, then break through the blue barricade at the far end of the ship. You'll land in a secret area and right on top of the gold trail here. |
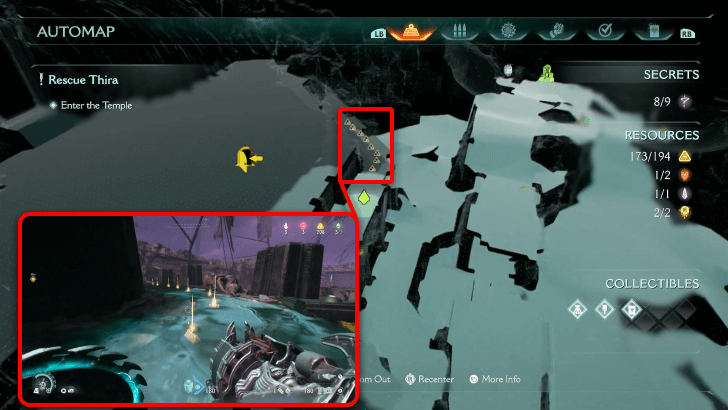 Gold Trail 4 |
Chapter 17 -
Temple of Lomarith
Before proceeding to the top of the temple, there is a gold trail towards the side. |
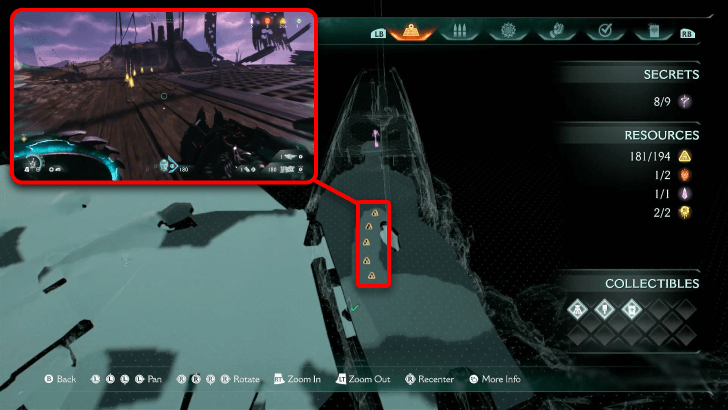 Gold Trail 5 |
Chapter 17 -
Temple of Lomarith
Near the entry of the temple, there is a ship holding some goodies towards the side. Pick up the gold trail on the deck and the Purple Key in a room at the end of the area. |
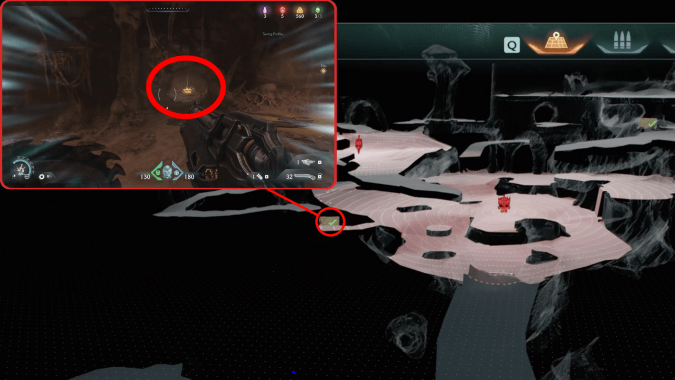 Gold Chest 1 |
Chapter 18 -
Belly of the Beast
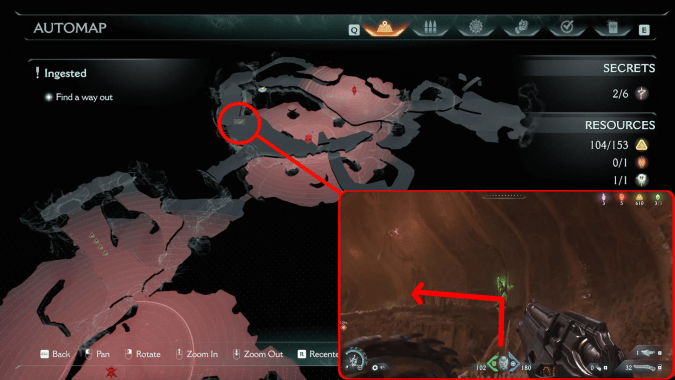
Access this secret area by destroying the first green organ after defeating the Acolyte Leader. Turn around and find a newly opened door directly behind you containing the Gold Chest. |
 Gold Chest 2 |
Chapter 18 -
Belly of the Beast
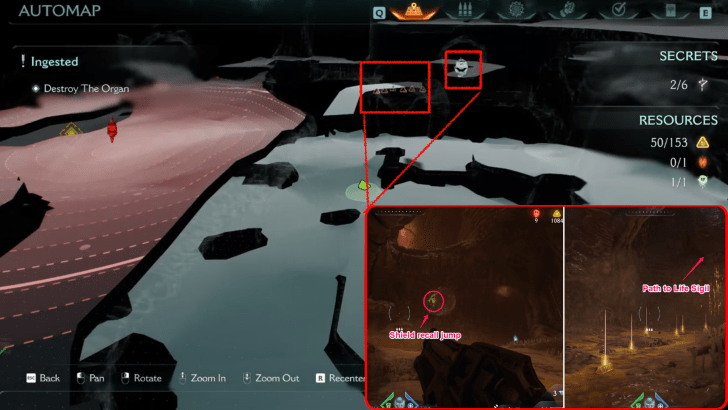
Access this secret area after destroying the second green organ. From there, turn left and look up to find a green statue. Use your shield to launch up and find the Gold Chest. |
 Gold Trail 1 |
Chapter 18 -
Belly of the Beast
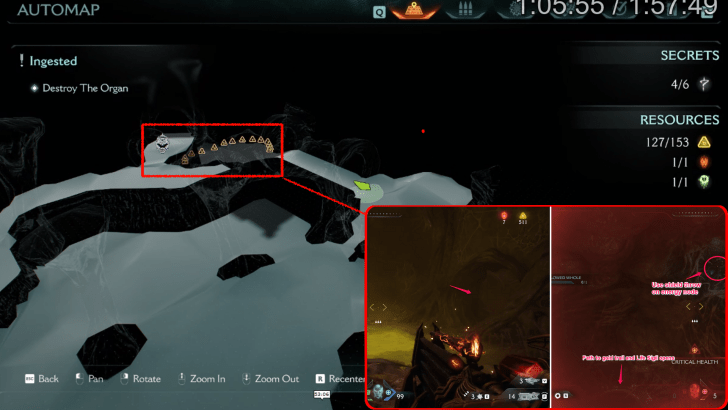
This secret area can be accessed after destryong the first green organ. Shield recall jump to the statue in front and follow the trail of gold towards the first Life Sigil. |
 Gold Trail 2 |
Chapter 18 -
Belly of the Beast
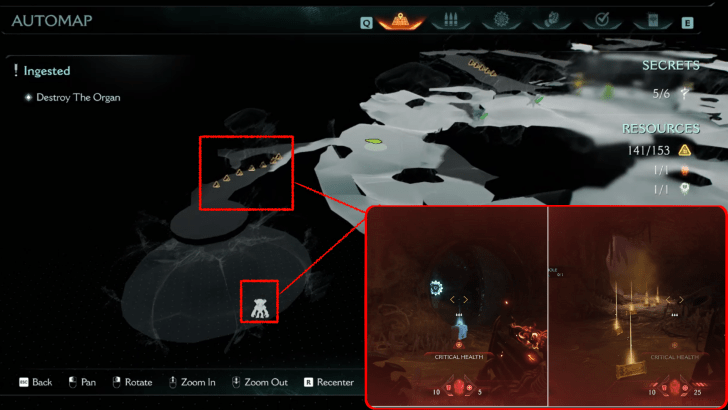
This secret area is found after destroying the third green organ. Shield throw on the energy node above to stop the biting traps. Follow the trail of gold to reach the second Life Sigil. |
 Gold Trail 3 |
Chapter 18 -
Belly of the Beast
This secret area is found near the end of the chapter after destroying the third green organ. Throw your shield on an energy node and pickup a trail of gold before going down a pit to challenge a gauntlet of empowered enemies to unlock the Komodo Toy. |
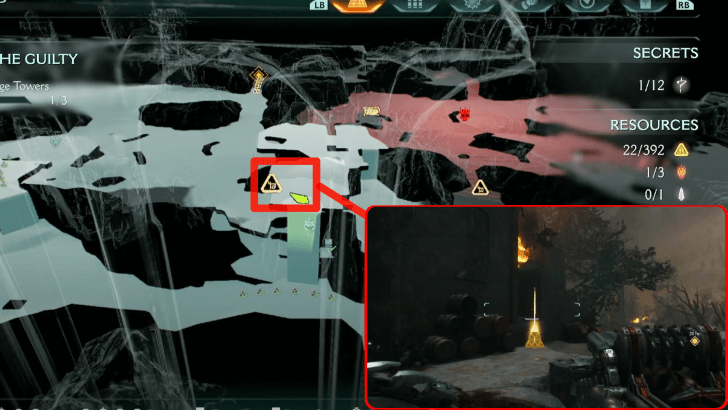 Gold Cache 1 |
Chapter 20 -
Resurrection
Can be found by climbing the wall beside Gold Trail 4. |
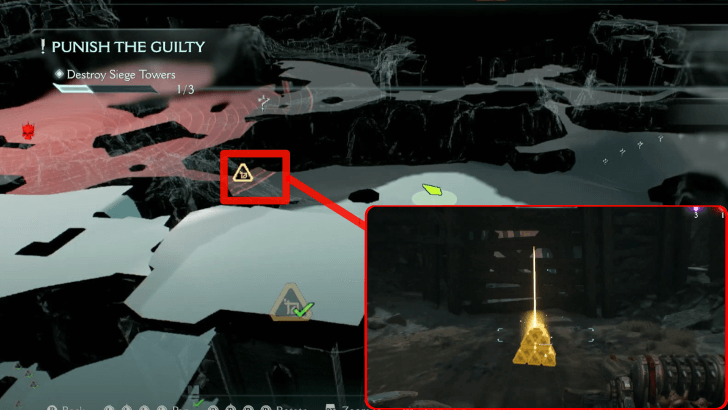 Gold Cache 2 |
Chapter 20 -
Resurrection
After jumping down the tower from Gold Cache 1, turn left. |
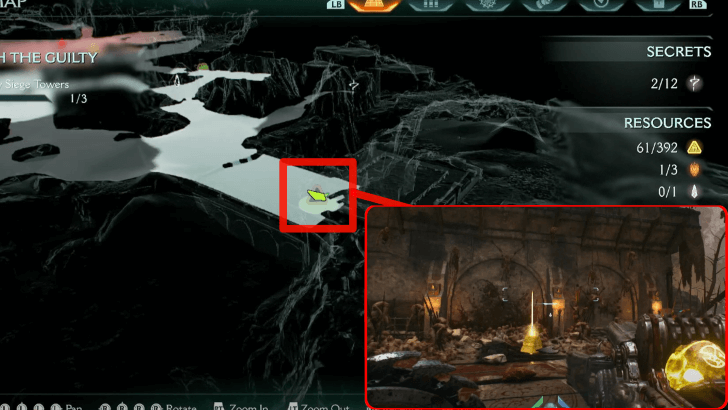 Gold Cache 3 |
Chapter 20 -
Resurrection
This Gold Cache can be found right across the Wraithstone, revealed after destroying the cannon covering it. |
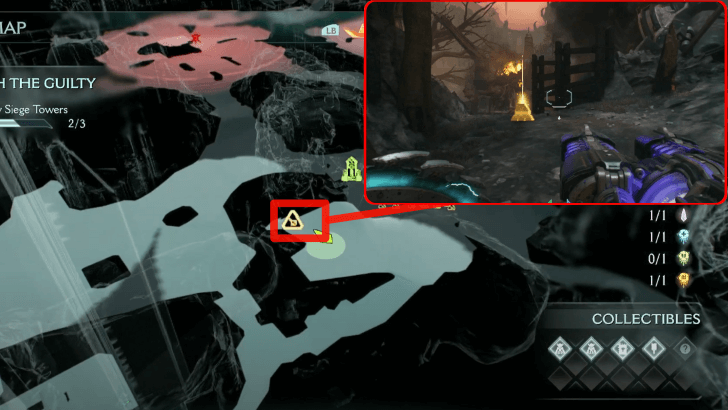 Gold Cache 5 |
Chapter 20 -
Resurrection
In the area where you get the Demonic Essence: Ammo, there is a wall on the right side that you can climb to reach elevated ground. |
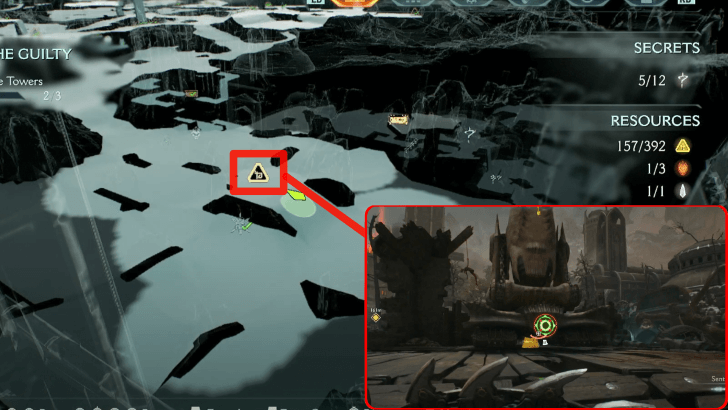 Gold Cache 6 |
Chapter 20 -
Resurrection
From Gold Trail 10, head to the path on the left. Kill the enemies in the area and proceed to the cannon. Shield Charge the Cannon to destroy it and get this Gold Cache. |
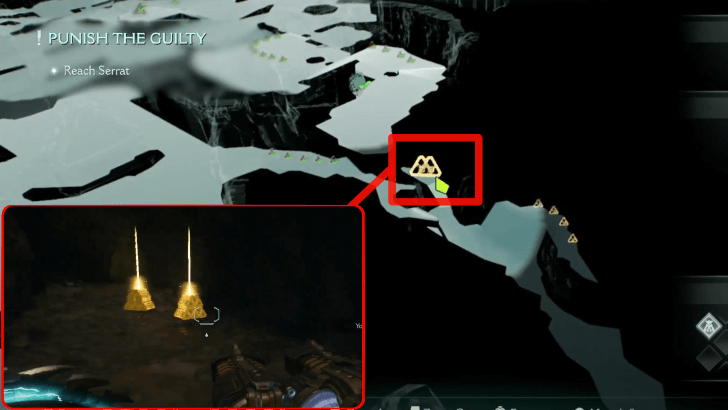 Gold Cache 7 |
Chapter 20 -
Resurrection
Follow the path from Gold Trail 17, go down the cave, and turn left. Shield Charge through the breakable wall to unlock these Gold Caches. |
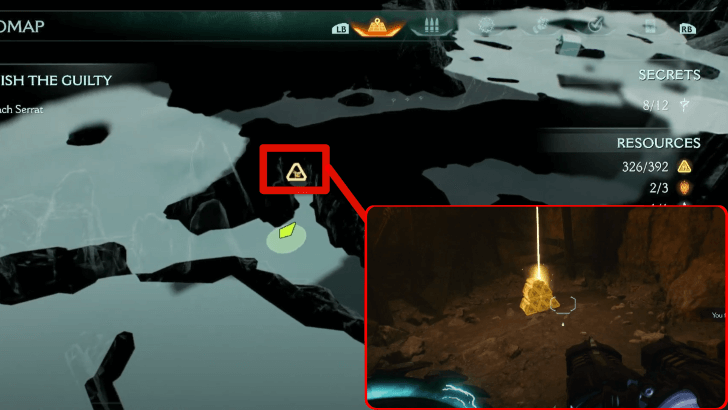 Gold Cache 8 |
Chapter 20 -
Resurrection
After defeating enemies to get Gold Chest 3, head down the path on the right and Shield Charge through the breakable wall. |
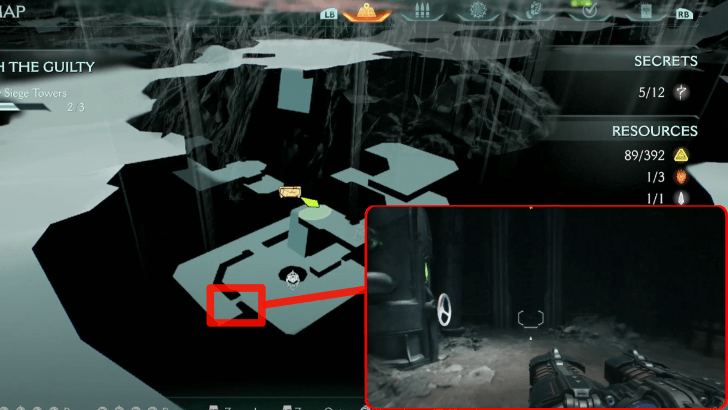 Gold Chest 1 |
Chapter 20 -
Resurrection
In the area where you get the Maykyr Drone Toy, fill the room with water by activating a valve behind one of two the doors. Use your Shield to activate the door mechanism. Follow the path leading upwards to get this Gold Chest. |
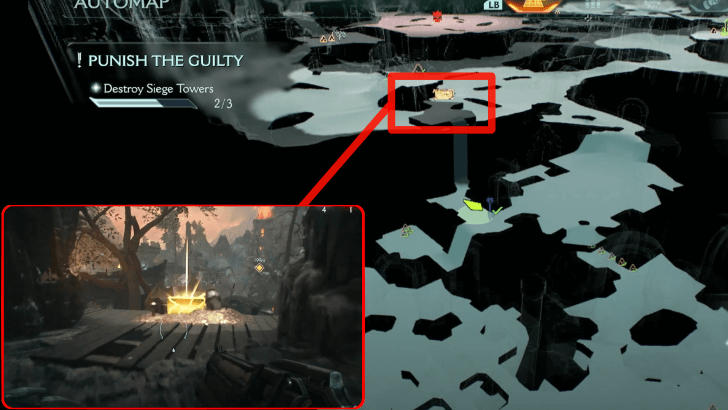 Gold Chest 2 |
Chapter 20 -
Resurrection
After getting the Blue Secret Key, go left and climb the wall on the right. This leads you straight to the Gold Chest. |
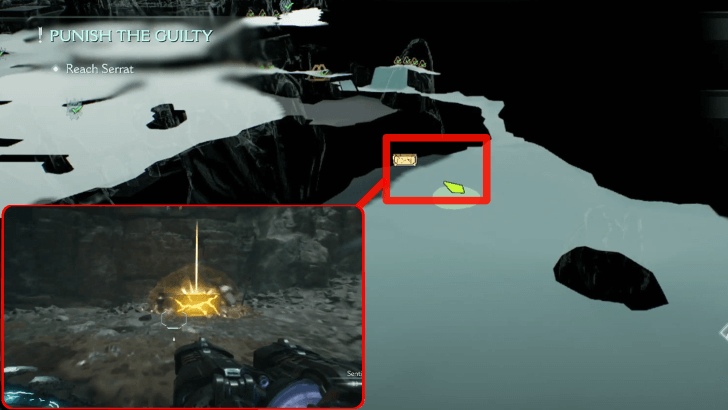 Gold Chest 3 |
Chapter 20 -
Resurrection
Continue down the cave path in Gold Trail 18, defeat all enemies within the area to unlock this Gold Chest. |
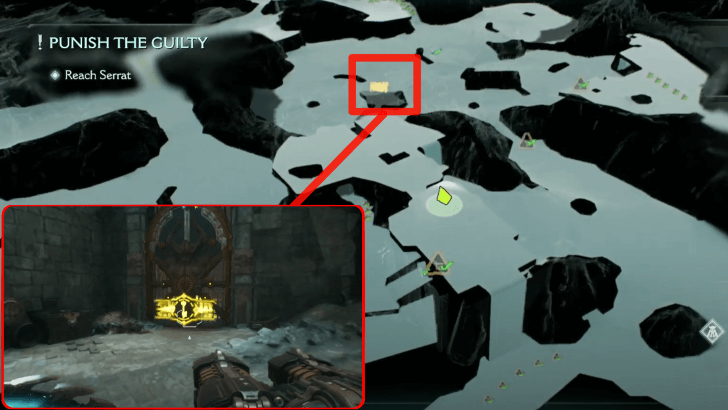 Gold Chest 4 |
Chapter 20 -
Resurrection
Climb back up the wall where you found Gold Cache 1. Proceed further into the structure and use the Secret Yellow Key to open the lock. |
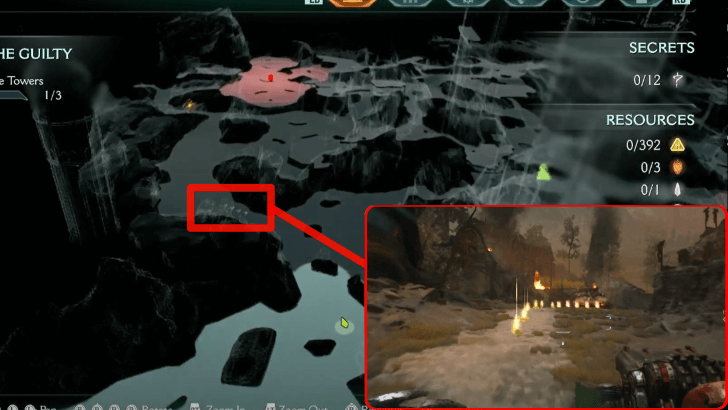 Gold Trail 1 |
Chapter 20 -
Resurrection
From Demonic Essence: Health, head left and continue onwards. You will encounter many enemies along the way. |
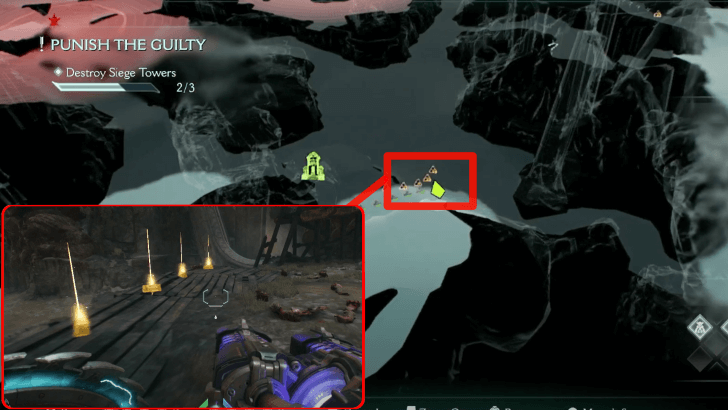 Gold Trail 10 |
Chapter 20 -
Resurrection
This Gold Trail can be found right next to Gold Cache 5. The first 6 gold can be found near the edge of the mound and the remaining 5 can be found by jumping down. |
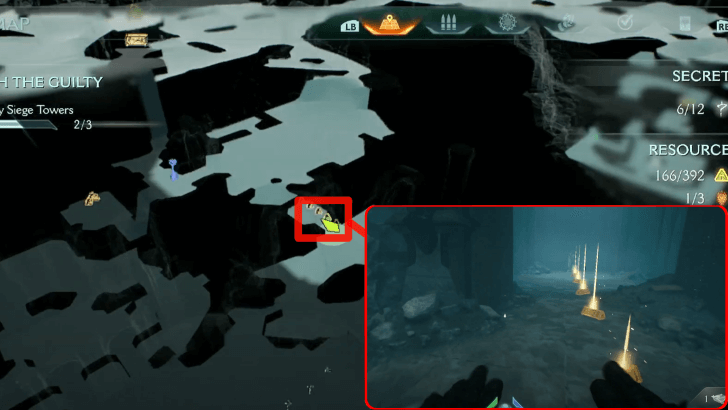 Gold Trail 11 |
Chapter 20 -
Resurrection
From Gold Cache 6, go to the right side of the area and enter the path leading to the secret area. This Gold Trail is found underwater, and activating the switch this trail leads to will open a Shield mechanism. |
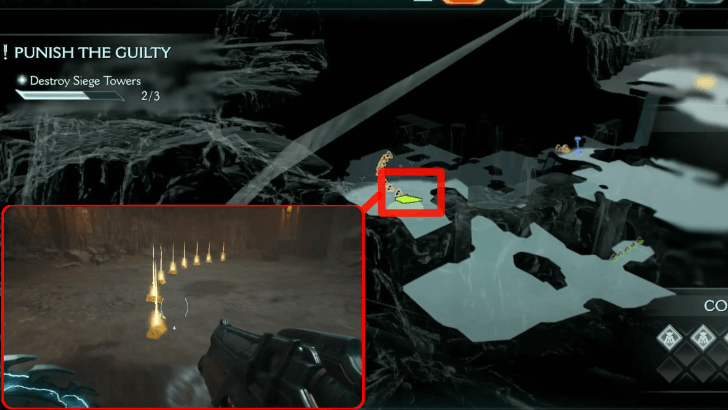 Gold Trail 12 |
Chapter 20 -
Resurrection
From Gold Trail 11, activate the Shield Mechanism you just unlocked to open the gate in front of you. Swim down and cross to the other room. |
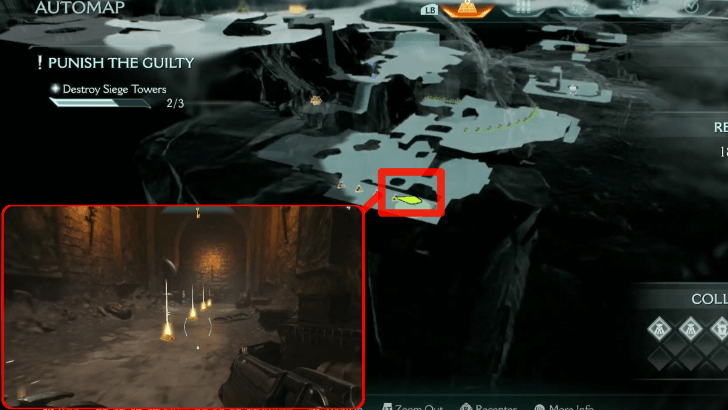 Gold Trail 13 |
Chapter 20 -
Resurrection
Follow the path ahead of Gold Trail 12 and jump down. Shield Charge though the breakable walls to reach this trail. This also leads to a switch that will flood the area with water. There are many projectiles flying overhead, so be careful! |
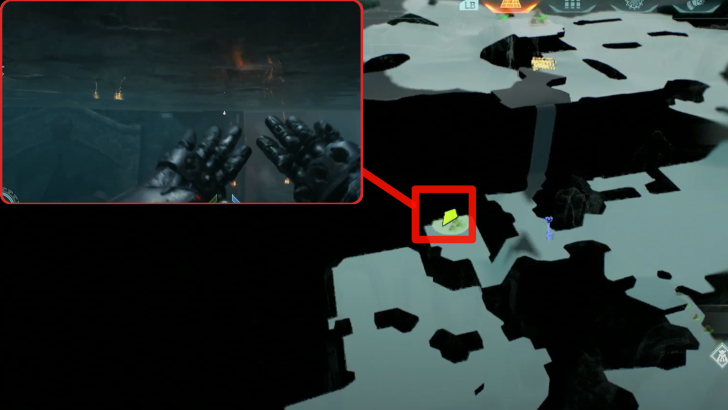 Gold Trail 14 |
Chapter 20 -
Resurrection
Once the switch from Gold Trail 13 has been activated, go out to the main room and swim towards the platform containing this Gold Trail. |
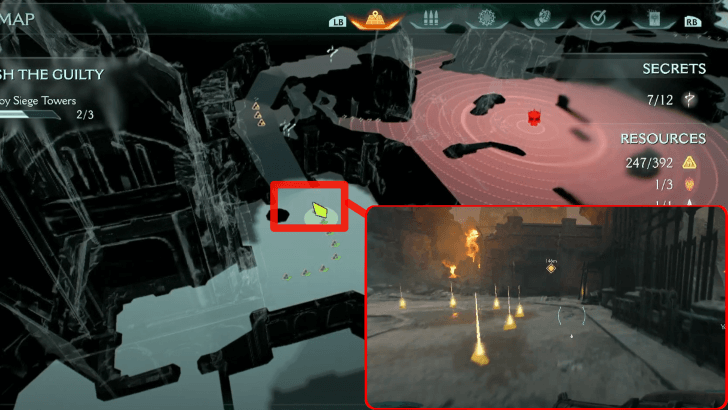 Gold Trail 15 |
Chapter 20 -
Resurrection
From Gold Chest 2, jump down the platform and go to the left. You will see a door that requires a Blue Key. Enter this door and turn right. |
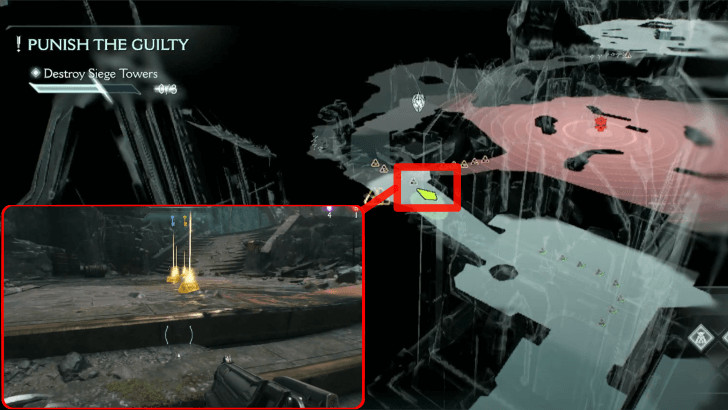 Gold Trail 16 |
Chapter 20 -
Resurrection
From Gold Trail 15, simply follow the path on the left. |
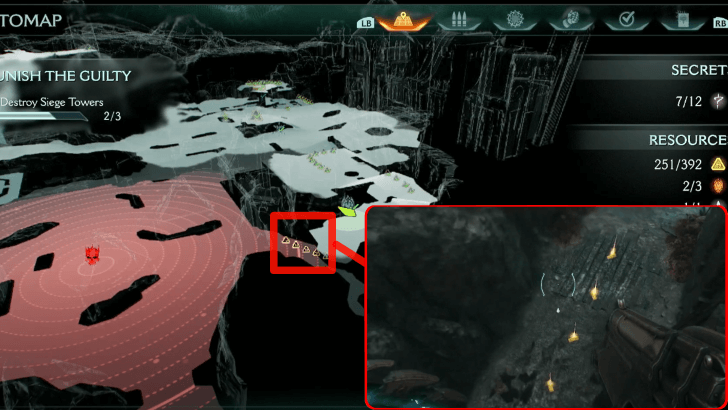 Gold Trail 17 |
Chapter 20 -
Resurrection
From Ruby 2, jump down the cliff and land on the Gold Trail below. |
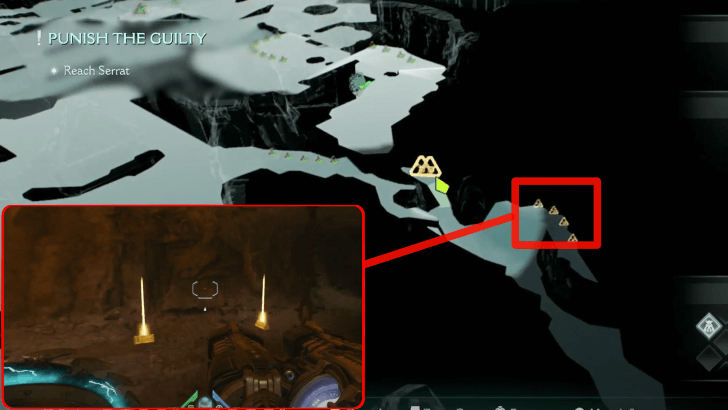 Gold Trail 18 |
Chapter 20 -
Resurrection
This Gold Trail is right across Gold Caches 7. You can reach this by stepping onto the rising platform and hopping off. |
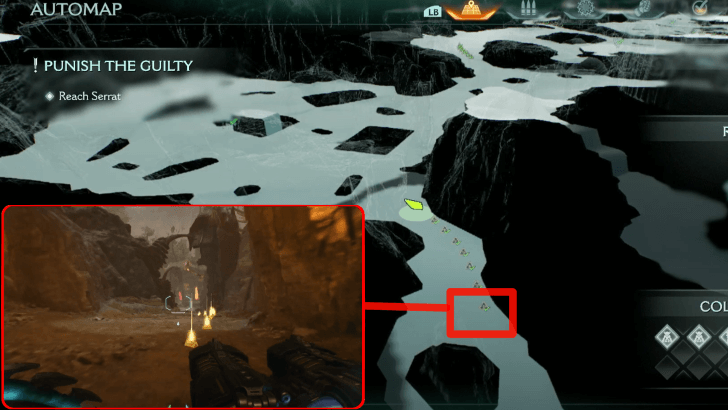 Gold Trail 19 |
Chapter 20 -
Resurrection
Continue down the cave path from Gold Cache 8 to get this. |
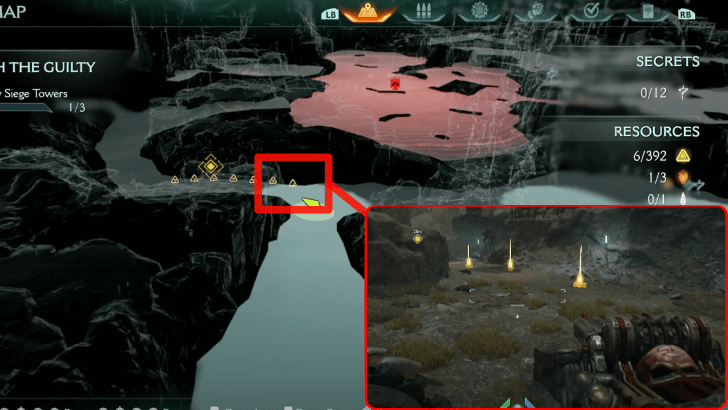 Gold Trail 2 |
Chapter 20 -
Resurrection
From Gold Trail 1, go straight ahead and turn left. It is also nearby Ruby 1. |
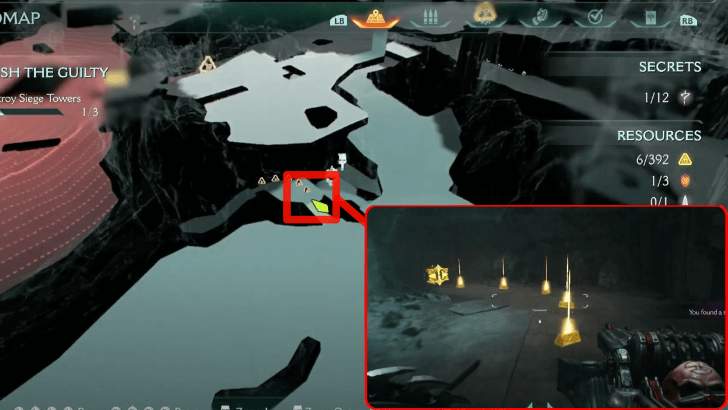 Gold Trail 3 |
Chapter 20 -
Resurrection
From Gold Trail 2, there is a path on the opposite side of the area that turns left. Follow that path and climb up the area past the nearby broken wall. Shield Charge the cannon to unlock a hidden area. This Gold trail is found leading to a door requiring a yellow key. |
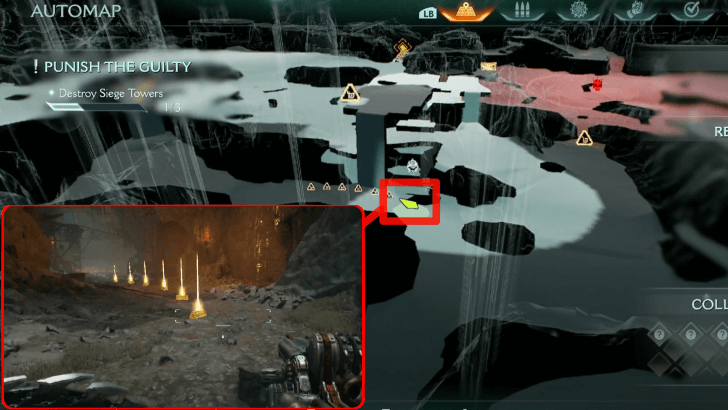 Gold Trail 4 |
Chapter 20 -
Resurrection
After getting out of the secret area in Gold Trail 3, make a right u-turn. |
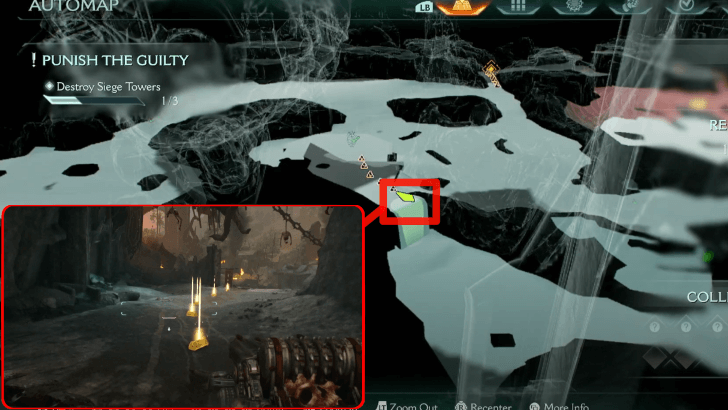 Gold Trail 5 |
Chapter 20 -
Resurrection
Directly in front of Gold Trail 4 are Hell Cultists. Go past this group and climb up the wall on the right. |
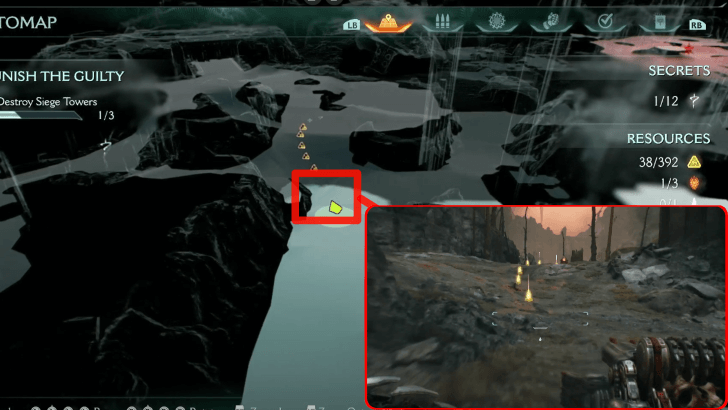 Gold Trail 6 |
Chapter 20 -
Resurrection
Go the opposite direction from Gold Cache 2 until you reach the other side of the area. |
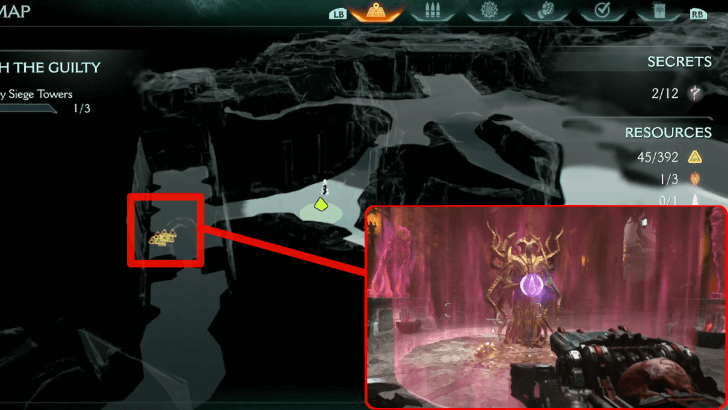 Gold Trail 7 |
Chapter 20 -
Resurrection
From Wraithstone 1 enter the adjacent room to the left. |
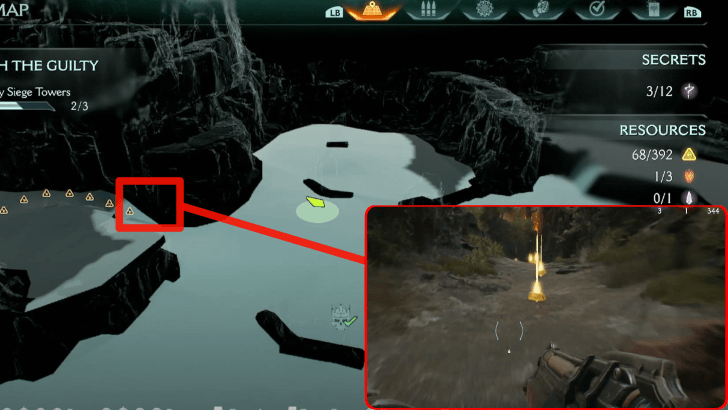 Gold Trail 8 |
Chapter 20 -
Resurrection
Can be found to the left of the area where you find Demonic Essence: Ammo. It also leads to the Yellow Secret Key. |
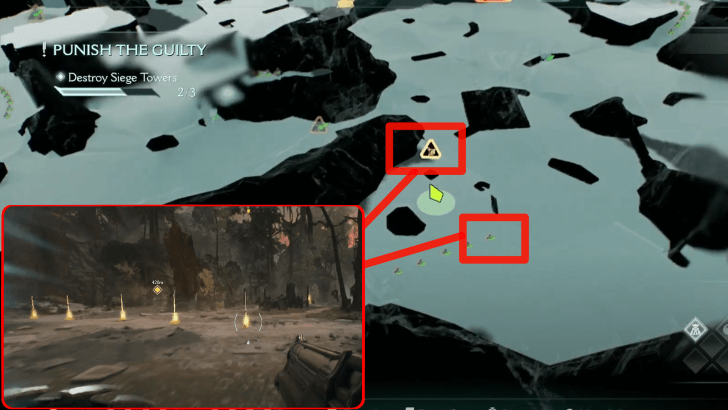 Gold Trail 9 and Gold Cache 4 |
Chapter 20 -
Resurrection
In the area where you get the Demonic Essence: Ammo, there is a wall on the right side that you can climb to reach elevated ground. |
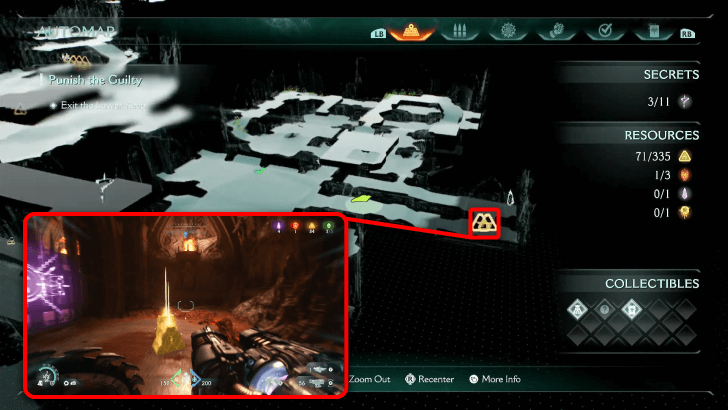 Gold Cache 1 |
Chapter 22 -
Reckoning
After you drop back down after collecting the gold on the organic bridge, the caches are at the end of the hallway. |
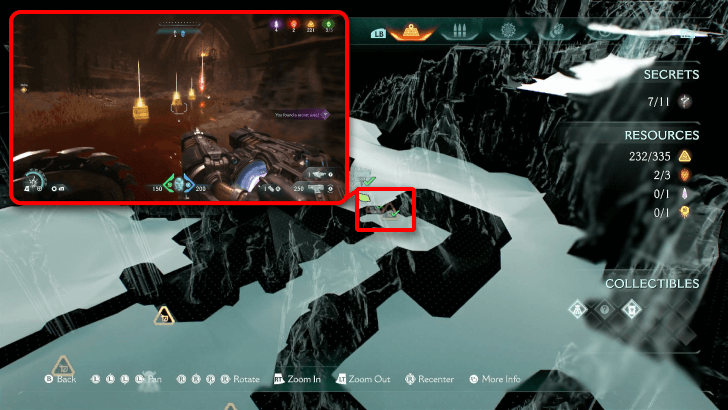 Gold Cache 2 |
Chapter 22 -
Reckoning
After obtaining the Purple Key, you can now return to previous areas that had a locked gate. Gold Cache 2 is located nearby the Marok Codex, inside the hill. Follow along the base of the hill until you come across the entrance and proceed. You'll be able to find Gold Cache 2 and Ruby 3 in this hidden area. |
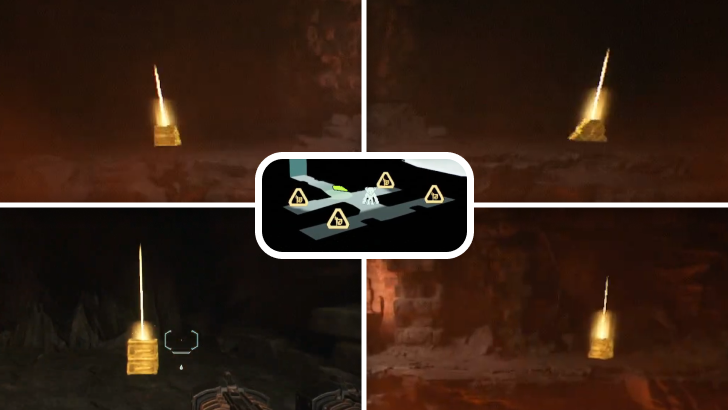 Gold Cache 3 |
Chapter 22 -
Reckoning
After obtaining the Purple Key, you can now return to previous areas that had a locked gate. Around the area where Life Sigil 3 is, circle around to the back and drop down the hole. You'll be able to pick up Gold Cache 4 and the Ahzrak Toy here. |
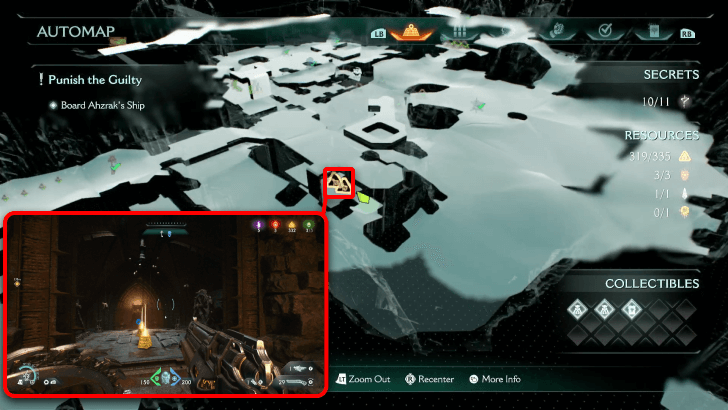 Gold Cache 4 |
Chapter 22 -
Reckoning
After obtaining the Purple Key, you can now return to previous areas that had a locked gate. Near the location of the Blue Skull, turn around the corner and look for a slope in the courtyard. Down this area will be a locked gate with some Gold Cache hiding behind a locked gate. |
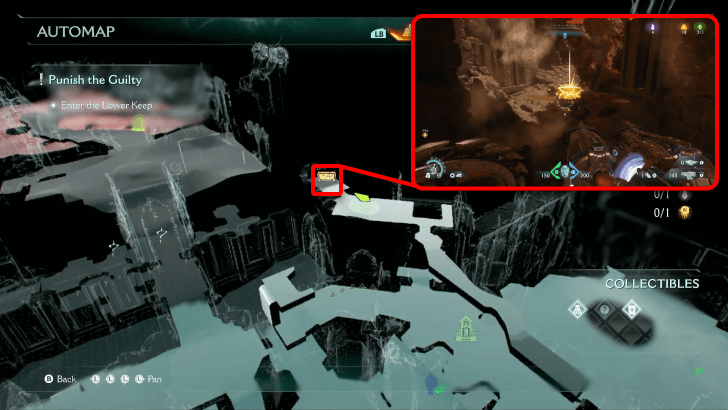 Gold Chest 1 |
Chapter 22 -
Reckoning
Before opening the gate of the next area with the Blue Skull, there is a room with a chasm that contains a jump pad. When you drop down to it, it'll send you to a higher platform where up ahead will be the gold chest. |
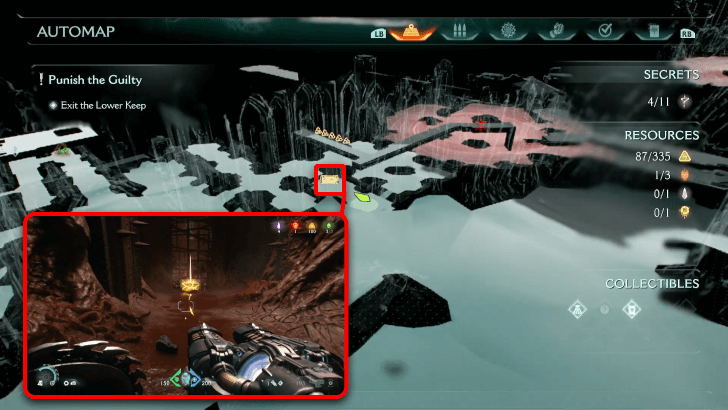 Gold Chest 2 |
Chapter 22 -
Reckoning
After you unlock the gate by throwing your shield at the mechanism, proceed through the new area. You'll have to get rid of some demons loitering in the area, and Shield Charge the blue stone barrier to get to the secret Gold Chest 2. |
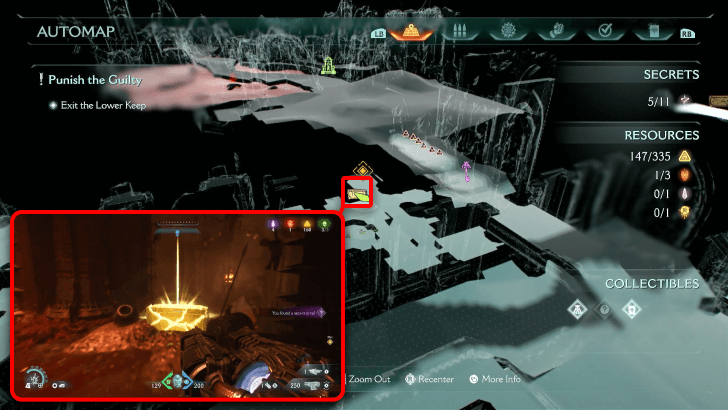 Gold Chest 3 |
Chapter 22 -
Reckoning
In the same area as Gold Trail 4, Shield Charge a nearby blue barrier hiding a mechanism that will drop down a climbable surface. There'll be Armor and HP refill, and Gold Chest 2 just around the corner. |
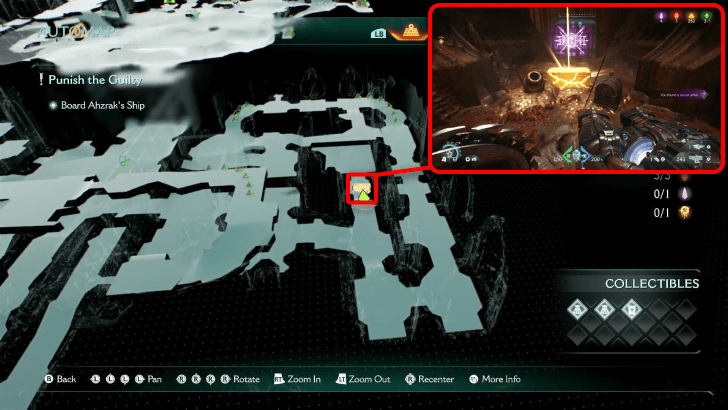 Gold Chest 4 |
Chapter 22 -
Reckoning
After obtaining the Purple Key, you can now return to previous areas that had a locked gate. Return to the path you used when picking up the Blue Skull, and unlock the gate with your key. Gold Chest 3 is just behind the gate. |
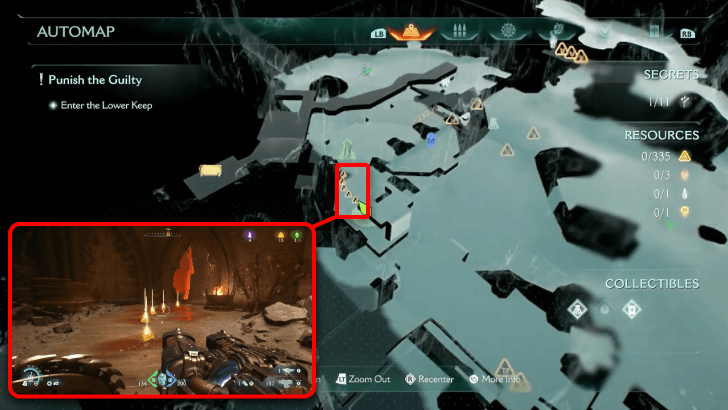 Gold Trail 1 |
Chapter 22 -
Reckoning
Nearby the gate locked by the Blue Skull, there is a gate over to the side. Beside the entrance, there is a green barricade that can be Shield Charged, and will reveal a mechanism to drop the climbable surface beside it. Climb up, pull the lever, and push the box with another Shield Charge. The gold trail is just past the wall. |
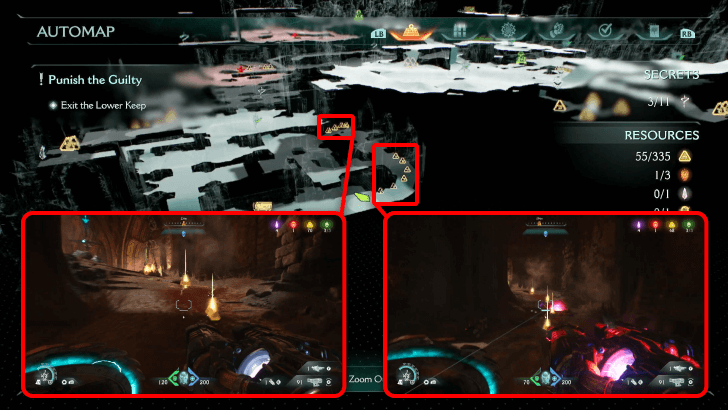 Gold Trail 2 |
Chapter 22 -
Reckoning
After you pull the lever on the way to the objective, enter the newly unlocked area and keep proceeding until you come across the gold trail in the hallway. |
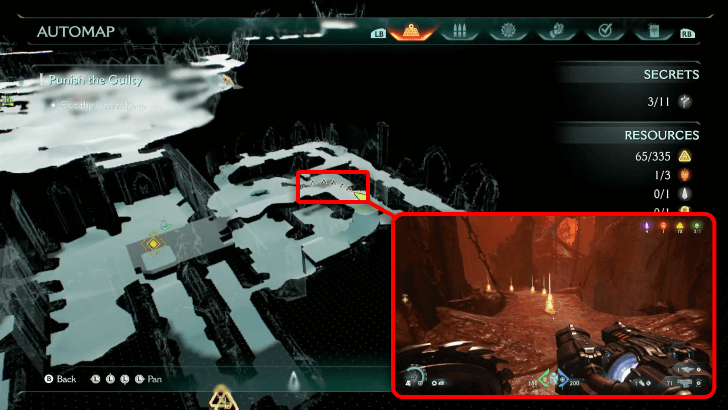 Gold Trail 3 |
Chapter 22 -
Reckoning
Climb up the surface, to another organic bridge. Collect the gold as you proceed. |
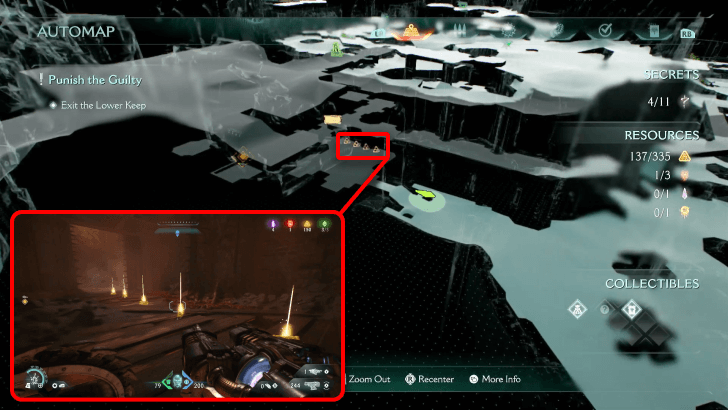 Gold Trail 4 |
Chapter 22 -
Reckoning
After fighting the demons in the courtyard, there is a nearby building hiding gold. The entrance is beside the base of the plateau, and there is gold trail on the right. |
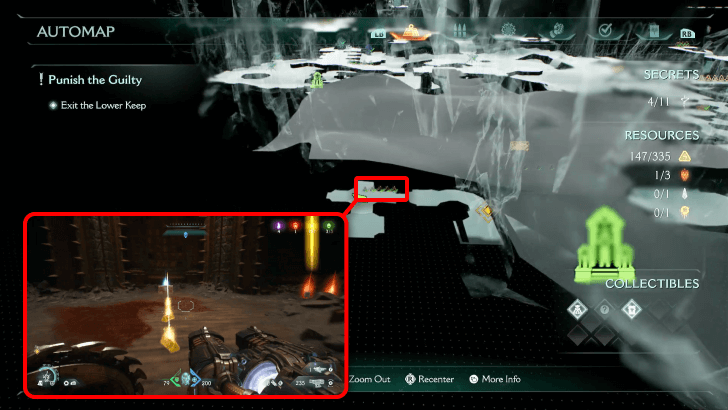 Gold Trail 5 |
Chapter 22 -
Reckoning
After picking up Gold Trail 4, keep proceeding through the hallway and fight the Mancubus that bursts out the wall. There'll be more gold waiting behind the hidden room. |
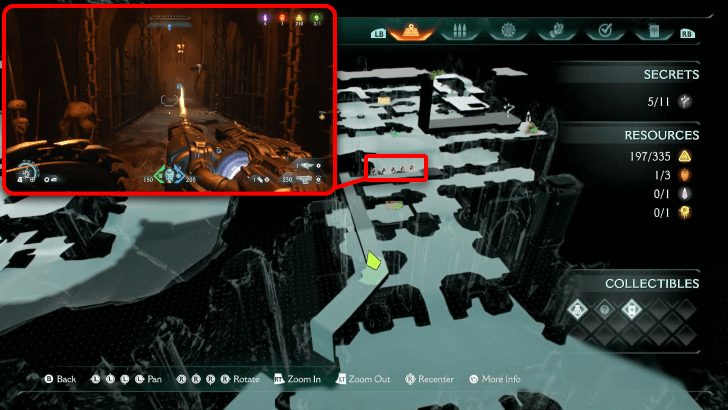 Gold Trail 6 |
Chapter 22 -
Reckoning
After picking up Gold Chest 2, proceed through the footpath until you come across the organic bridge. You'll be able to pick up the gold trail after taking care of the demon. |
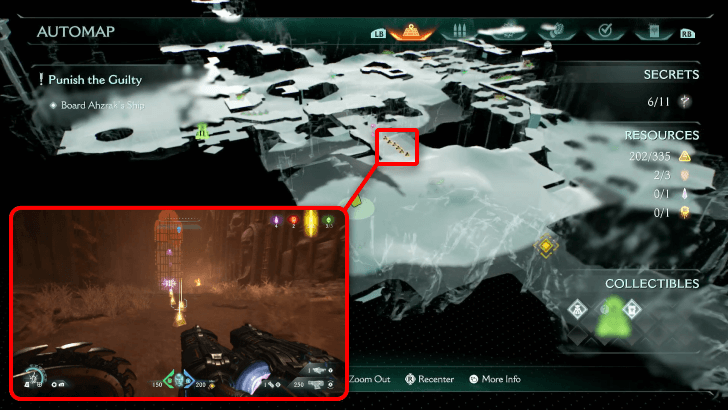 Gold Trail 7 |
Chapter 22 -
Reckoning
You can find this around the area of the Purple Key. It'll be around the corner after completing the objective Exit the Lower Keep. |
 Gold Trail 8 |
Chapter 22 -
Reckoning
After obtaining the Purple Key, you can now return to previous areas that had a locked gate. Nearby a Sentinel Shrine, there is a locked gate hiding Gold Trail 8 and Life Sigil 3. |
Full Walkthrough and List of Chapters
How Many Gold Are There?
4165 Gold to Collect
There are a total of 4165 Gold you can collect from Gold Trails, Gold Caches, and Gold Chests throughout the chapters.
Gold that are obtained through Mission Challenges are not included in this final count, so do Mission Challenges to gain extra Gold for your upgrades.
How to Use Gold
Use Gold to Upgrade Weapons
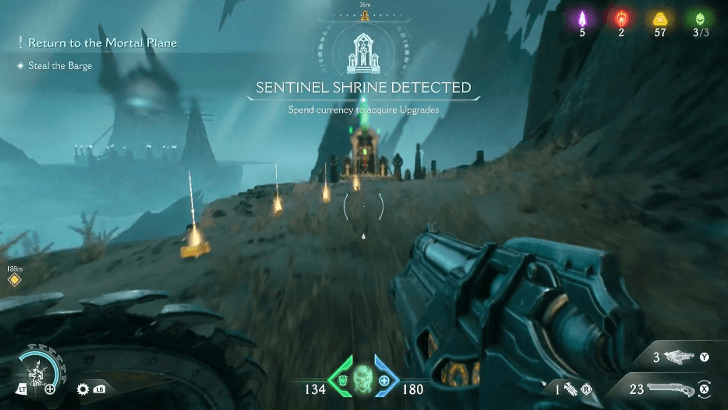
The Sentinel Shrine is used to upgrade your guns, melee weapons, or shield using Gold. Gold is the currency used for the earlier upgrade tiers, but it is replaced by Rubies and Wraithstones at higher tiers.
Doom: The Dark Ages Related Guides

All Resources
Comment
Author
All Gold Locations
improvement survey
03/2026
improving Game8's site?

Your answers will help us to improve our website.
Note: Please be sure not to enter any kind of personal information into your response.

We hope you continue to make use of Game8.
Rankings
- We could not find the message board you were looking for.
Gaming News
Popular Games

Genshin Impact Walkthrough & Guides Wiki

Honkai: Star Rail Walkthrough & Guides Wiki

Umamusume: Pretty Derby Walkthrough & Guides Wiki

Pokemon Pokopia Walkthrough & Guides Wiki

Resident Evil Requiem (RE9) Walkthrough & Guides Wiki

Monster Hunter Wilds Walkthrough & Guides Wiki

Wuthering Waves Walkthrough & Guides Wiki

Arknights: Endfield Walkthrough & Guides Wiki

Pokemon FireRed and LeafGreen (FRLG) Walkthrough & Guides Wiki

Pokemon TCG Pocket (PTCGP) Strategies & Guides Wiki
Recommended Games

Diablo 4: Vessel of Hatred Walkthrough & Guides Wiki

Fire Emblem Heroes (FEH) Walkthrough & Guides Wiki

Yu-Gi-Oh! Master Duel Walkthrough & Guides Wiki

Super Smash Bros. Ultimate Walkthrough & Guides Wiki

Pokemon Brilliant Diamond and Shining Pearl (BDSP) Walkthrough & Guides Wiki

Elden Ring Shadow of the Erdtree Walkthrough & Guides Wiki

Monster Hunter World Walkthrough & Guides Wiki

The Legend of Zelda: Tears of the Kingdom Walkthrough & Guides Wiki

Persona 3 Reload Walkthrough & Guides Wiki

Cyberpunk 2077: Ultimate Edition Walkthrough & Guides Wiki
All rights reserved
© 2025 ZeniMax Media Inc. All Rights Reserved.
The copyrights of videos of games used in our content and other intellectual property rights belong to the provider of the game.
The contents we provide on this site were created personally by members of the Game8 editorial department.
We refuse the right to reuse or repost content taken without our permission such as data or images to other sites.




![Monster Hunter Stories 3 Review [First Impressions] | Simply Rejuvenating](https://img.game8.co/4438641/2a31b7702bd70e78ec8efd24661dacda.jpeg/thumb)


