Chapter 12: Sentinel Command Station Secrets and Walkthrough
☆ Doom: The Dark Ages is live now!
★ Collectibles | Secrets | Walkthrough
┗ Resources | Codex | Toy
★ Trophies | Beginner's Guide | Enemies
☆ Skins: Twitch Drops | Prince St. Pizza
★ FAQs: Co-op | DLC | Specs | Glory Kills

Chapter 12: Sentinel Command Station in Doom: the Dark Ages contains 9 secrets and 3 collectibles. Learn how to get all the secrets, gold, and collectibles, as well as how to complete the Mission Challenges in this Chapter 12 walkthrough guide.
| ◄ Previous Chapter | Next Chapter ▶ |
|---|---|
| Hellbreaker | From Beyond |
Sentinel Command Station Secrets and Collectibles
Sentinel Command Station Interactive Map
| Jump to a Collectible! | |
|---|---|
| Toys | 1 |
| Skins | 1 |
| Codex | 1 |
| Life Sigils | 2 |
| Gold | 177 |
| Rubies | 1 |
| Wraithstone | 1 |
| Demonic Essence | 1 |
| Secrets | 9 |
Sentinel Command Station Toys
| Item | How to Get |
|---|---|
 (Secret 9/9) |
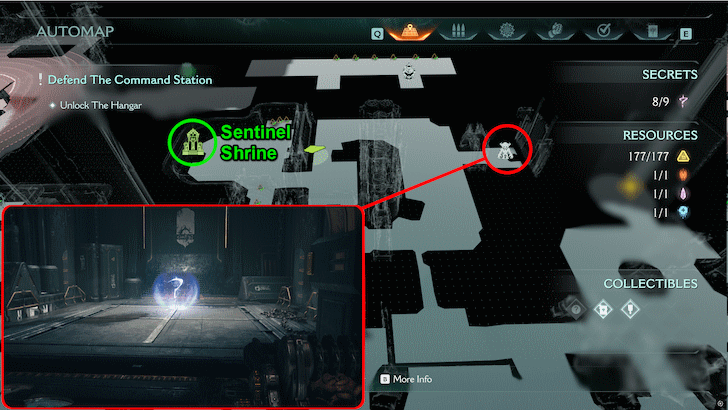
This toy is locked behind a gate near the Sentinel Shrine that needs the Secret Key to unlock. You'll find the Secret Key near the end of the chapter in a secret room close to the Yellow Keycard. This can be found near the end of the final objective ▼. |
Sentinel Command Station Skins
| Item | How to Get |
|---|---|
 (Secret 2/9) |
After dropping down to the command room, you'll notice a secret item behind a locked gate to your left. Find the breakable wall near the hologram at the center of the room to get to the path that leads to this collectible. This can be found near the end of the first objective ▼. |
Sentinel Command Station Codex Entries
| Item | How to Get |
|---|---|
 (Secret 1/9) |
Right after leaving the vents at the start of the chapter, continue straight until you find an opening on the wall to your right. You'll find the codex in this hole in the wall. This can be found near the start of the first objective ▼. |
Sentinel Command Station Life Sigils
| Item | How to Get |
|---|---|
 (Secret 3/9) |
After climbing and entering the vent near the first Sentinel Shrine, turn right instead of heading to the turrets shooting through the vents. This can be found near the start of the second objective ▼. |
 (Secret 6/9) |
Access this vent from the hidden breakable wall in the vertical shaft near the Yellow Keycard. This can be found near the start of the third objective ▼. |
Sentinel Command Station Gold
| Item | How to Get |
|---|---|
 |
Right before leaving the vents at the start of the chapter, turn around to find this Gold Cache behind you. This can be found near the start of the first objective ▼. |
 |
Right after exiting the vents at the start of the chapter, continue straight until you find an opening on the wall to your right. You'll find a Codex entry and a bunch of Gold in this hole in the wall. This can be found near the start of the first objective ▼. |
 (Secret 2/9) |
After dropping down to the command room, you'll notice a secret item behind a locked gate to your left. Find the breakable wall near the hologram at the center of the room. This opens up to a secret area with this Gold trail in it. This can be found near the end of the first objective ▼. |
 (Secret 2/9) |
After finding the previous Gold Trail, you'll find this cache at the end of the same room on top of the flat train cart. This can be found near the end of the first objective ▼. |
 |
After activating the first lever in this room, it will open a path to the room with the Sentinel Shrine and this trail of Gold. This can be found near the start of the second objective ▼. |
 |
After climbing and entering the vent near the first Sentinel Shrine, turn right instead of heading to the turrets shooting through the vents. This can be found near the start of the second objective ▼. |
 |
After obtaining the Demonic Essence Health and clearing the next room full of zombies, this chest will be in the next room along with the lever that continues the chapter. This can be found during the second objective ▼. |
 (Secret 4/9) |
After using the elevator and crossing the gap with the Mancubus on the other side, do not proceed to the next hallway yet. Instead, drop down the broken floor at the end to reach a secret area with a Ruby and a Gold cache. This can be found near the end of the second objective ▼. |
 |
Found in the same room where the Yellow Keycard is. This can be found at the start of the third objective ▼. |
 (Secret 5/9) |
Open the first locked yellow gate after obtaining the Yellow Keycard, then sprint through the gap without jumping to reach this secret area with a Gold chest. A jump pad is available at the bottom in case you missed the jump. This can be found at the start of the third objective ▼. |
 |
There's a breakable wall below the very first yellow door you unlock, which leads to a secret area including this Gold cache. This can be found near the start of the third objective ▼. |
Sentinel Command Station Rubies
| Item | How to Get |
|---|---|
 (Secret 4/9) |
After using the elevator up and crossing the gap with the Mancubus on the other side, do not proceed to the next hallway yet. Instead, drop down the broken floor at the end to reach a secret area with this Ruby and a Gold cache. This can be found near the end of the second objective ▼. |
Sentinel Command Station Wraithstone
| Item | How to Get |
|---|---|
 (Secret 8/9) |
Guarded by a Agaddon Hunter inside a room right across where the Secret Key is. The Secret Key is required to open this room. This can be found near the start of the third objective ▼. |
Sentinel Command Station Demonic Essence
| Item | How to Get |
|---|---|
 |
Obtained by slaying the Pinky Rider after getting the Ravager weapon. This essence is not missable as it's part of the main mission. This can be found during the second objective ▼. |
Sentinel Command Station Walkthrough
| Main Objectives | |
|---|---|
| 1 |
Find a Way Back to Serrat
Collectibles: Gold Cache 1 Gold Trail 1 – Secret 1/9 Sentinel Command Station Codex – Secret 1/9 Chainshot Nightmare Skin – Secret 2/9 Gold Trail 2 – Secret 2/9 Gold Cache 2 – Secret 2/9 |
| 2 |
Find the Hangar Key Card
Collectibles: Gold Trail 3 Gold Trail 4 Life Sigil 1 – Secret 3/9 Ravager Weapon Demonic Essence Health Gold Chest 1 Ruby – Secret 4/9 Gold Cache 3 – Secret 4/9 |
| 3 |
Open Hangar
Collectibles: Gold Trail 5 and Cache 4 Gold Chest 2 – Secret 5/9 Gold Cache 5 Life Sigil 2 – Secret 6/9 Secret Key – Secret 7/9 Wraithstone – Secret 8/9 Shield Rune Kreed Maykr Toy – Secret 9/9 |
1. Find a Way Back to Serrat
| 1 |
 Interact with the consoles on two gates and wait for the nearby vent to open. |
|---|---|
| 2 |
 Go through the vent, but before leaving it, turn around to find a Gold cache. Collectibles: Gold Cache 1 |
| 3 |
 After leaving the vents, you should find more collectibles in a hole on the wall. Afterwards, find your way to the command center. Collectibles: Gold Trail 1 – Secret 1/9, Sentinel Command Station Codex – Secret 1/9 |
| 4 |
 Drop down to the command center and search for a breakable wall near the hologram for another secret area before leaving this room and dropping down to the main objective. Collectibles: Chainshot Nightmare Skin – Secret 2/9, Gold Trail 2 – Secret 2/9, Gold Cache 2 – Secret 2/9 |
2. Find the Hangar Key Card
| 1 |
 Drop down to the center of the mission area from the command center room and clear the area of all the demons. |
|---|---|
| 2 |
 Pass through the hole in the wall and turn on the lever to unlock the room with the Sentinel Shrine. Turn on the lever in that room to unlock the nearby vents. Collectibles: Gold Trail 3 |
| 3 |
 Climb up the wall and into the vent. Before proceeding to where the turrets are, collect the Gold and Life Sigil on the opposite side first. Collectibles: Gold Trail 4, Life Sigil 1 – Secret 3/9 |
| 4 |
 Drop down the vent and obtain the new Ravager weapon from the weapon drop. Use this, or any weapon of your choice, to clear the next room and defeat the Leader. Collectibles: Ravager Weapon, Demonic Essence Health |
| 5 |
 Find the lever that opens the path back to the central room. Don't forget to grab the nearby gold before continuing to the newly unlocked elevator. Collectibles: Gold Chest 1 |
| 6 |
 Use the elevator in the newly unlocked room beside the central room. |
| 7 |
 After reaching the upper section of the Command Station, use your shield to cross the gap where the Mancubus is. Upon reaching this corridor, do not continue to the next room yet, instead, go down the broken floor to get to a secret area and grab a Ruby. You can use Shield Charge on the large square object to find your way back out. Collectibles: Ruby – Secret 4/9, Gold Cache 3 – Secret 4/9 |
| 8 |
 Clear the hallway full of empowered enemies and an enemy Enforcer. You'll find the Yellow Keycard and some Gold in the room after eliminating the Enforcer and its horde. Collectibles: Gold Trail 5 and Cache 4, Yellow Keycard |
3. Open the Hangar
| 1 |
 There are 4 Secret Areas surrounding the Yellow Keycard room. To get the first one, open the Yellow Keycard gate to unlock a vertical shaft that goes back to the lower section of the Command Station. The secret room will be just across the newly unlocked gate. You can sprint through the gap without jumping to reach the Secret Area and break the Gold chest in the room. Collectibles: Gold Chest 2 – Secret 5/9 |
|---|---|
| 2 |
 The next hidden area is behind a breakable wall directly across the Secret Area and below the newly unlocked Yellow Keycard gate. From the Gold chest secret area, use Shield Charge to pass through the breakable wall and get a cache of Gold. Collectibles: Gold Cache 5 |
| 3 |
 Find the Life Sigil Secret in these vents and head towards the room where the Secret Key is. Be careful of the incoming ambush! Collectibles: Life Sigil 2 – Secret 6/9 |
| 4 |
 Grab the Secret Key and use it to unlock the room across the hall corridor. This room will have a Wraithstone inside but requires you to kill the Agaddon Hunter that spawns in the middle of this cramped room. Collectibles: Secret Key – Secret 7/9, Wraithstone – Secret 8/9 |
| 5 |
 Continue where you left off from the main mission and go down the vertical shaft after the room where you get the Yellow Keycard. Interact with the fountain found in the room at the bottom to obtain the Auto Turret Shield Rune. Collectibles: Shield Rune |
| 6 |
 Continue back to the central room and prepare for another ambush. After clearing the central room of enemies, get back to the area where the Sentinel Shrine is and use the Secret Key to open the locked door and obtain the Kreed Maykr Toy. Collectibles: Kreed Maykr Toy |
| 7 |
 Use the Yellow Keycard to open the hangar and complete the chapter. |
Secret Key Location

You'll find the Chapter 12 Secret Key in a Secret Area near where you get the Yellow Keycard. To get there, find and break through the hidden breakable wall in the vertical shaft near where you get the Yellow Keycard. The hidden vent will lead to the secret area where the Secret Key is. Stay sharp, however, as you'll get ambushed right after entering this secret room.
The Secret Key counts as the 7th Secret out of 9 in this Chapter and can be found during the third objective ▲.
Yellow Keycard Location

You'll find the Yellow Keycard as part of the chapter's main objectives. Eventually, you'll unlock the elevator that takes you to the upper section of the chapter, then you'll have to clear a hallway full of empowered Soldiers with an Enforcer enemy at the end. The Yellow Keycard will be on a corpse in the room after the Enforcer enemy.
Sentinel Command Station Mission Challenges
| Challenge | Details and Reward |
|---|---|
| Punching Bag | Strike a Battleknight with a melee attack 10 times Reward: 50 Gold |
| Wait For It | Kill 10 demons with explosive barrels Reward: 1 Ruby |
| Skeleton Key | Open 2 Secret Doors Reward: 50 Gold |
Punching Bag

Battleknights are axe-wielding, heavily armored variants of Hell Knights. You’ll encounter several throughout this chapter, so be sure to land melee attacks on them whenever possible. Parrying will help recharge your melee gauge, making it easier to land the required hits.
Wait For It

After acquiring the Ravager and defeating the Leader in the following room, you’ll enter a room filled with over a dozen Zombies and several explosive barrels. Fire at one of the barrels to wipe out the group and complete this challenge easily.
This encounter happens between steps 4 and 5 in the Find the Hangar Key Card section of the walkthrough.
Skeleton Key
| Secret Door Location | How to Reach |
|---|---|
 |
Found in the hallway after obtaining the Secret Key. |
 |
This toy is locked behind a gate near the Sentinel Shrine that needs the Secret Key to unlock. |
This chapter contains two Secret Doors, both of which require the Secret Key. One is just beyond where you find the key, while the other is near the Sentinel Shrine.
The Secret Key itself is hidden behind a breakable wall within the vertical shaft located close to where you obtain the Yellow Keycard.
Chapter 12 Secret Key Location
Doom: The Dark Ages Related Guides

Full Walkthrough and List of Chapters
Comment
Author
Chapter 12: Sentinel Command Station Secrets and Walkthrough
improvement survey
03/2026
improving Game8's site?

Your answers will help us to improve our website.
Note: Please be sure not to enter any kind of personal information into your response.

We hope you continue to make use of Game8.
Rankings
- We could not find the message board you were looking for.
Gaming News
Popular Games

Genshin Impact Walkthrough & Guides Wiki

Honkai: Star Rail Walkthrough & Guides Wiki

Umamusume: Pretty Derby Walkthrough & Guides Wiki

Pokemon Pokopia Walkthrough & Guides Wiki

Resident Evil Requiem (RE9) Walkthrough & Guides Wiki

Monster Hunter Wilds Walkthrough & Guides Wiki

Wuthering Waves Walkthrough & Guides Wiki

Arknights: Endfield Walkthrough & Guides Wiki

Pokemon FireRed and LeafGreen (FRLG) Walkthrough & Guides Wiki

Pokemon TCG Pocket (PTCGP) Strategies & Guides Wiki
Recommended Games

Diablo 4: Vessel of Hatred Walkthrough & Guides Wiki

Fire Emblem Heroes (FEH) Walkthrough & Guides Wiki

Yu-Gi-Oh! Master Duel Walkthrough & Guides Wiki

Super Smash Bros. Ultimate Walkthrough & Guides Wiki

Pokemon Brilliant Diamond and Shining Pearl (BDSP) Walkthrough & Guides Wiki

Elden Ring Shadow of the Erdtree Walkthrough & Guides Wiki

Monster Hunter World Walkthrough & Guides Wiki

The Legend of Zelda: Tears of the Kingdom Walkthrough & Guides Wiki

Persona 3 Reload Walkthrough & Guides Wiki

Cyberpunk 2077: Ultimate Edition Walkthrough & Guides Wiki
All rights reserved
© 2025 ZeniMax Media Inc. All Rights Reserved.
The copyrights of videos of games used in our content and other intellectual property rights belong to the provider of the game.
The contents we provide on this site were created personally by members of the Game8 editorial department.
We refuse the right to reuse or repost content taken without our permission such as data or images to other sites.


![Everwind Review [Early Access] | The Shaky First Step to A Very Long Journey](https://img.game8.co/4440226/ab079b1153298a042633dd1ef51e878e.png/thumb)

![Monster Hunter Stories 3 Review [First Impressions] | Simply Rejuvenating](https://img.game8.co/4438641/2a31b7702bd70e78ec8efd24661dacda.jpeg/thumb)


