Chapter 10: The Forsaken Plains Secrets and Walkthrough
☆ Doom: The Dark Ages is live now!
★ Collectibles | Secrets | Walkthrough
┗ Resources | Codex | Toy
★ Trophies | Beginner's Guide | Enemies
☆ Skins: Twitch Drops | Prince St. Pizza
★ FAQs: Co-op | DLC | Specs | Glory Kills
Chapter 10: The Forsaken Plains in Doom: the Dark Ages contains 10 secrets and 5 collectibles. Learn how to get all the secrets, gold, and collectibles, as well as how to complete the Mission Challenges in this Chapter 10 walkthrough guide.
| ◄ Previous Chapter | Next Chapter ▶ |
|---|---|
| Ancestral Forge | Hellbreaker |
The Forsaken Plains Walkthrough
| Main Objectives | |
|---|---|
| 1 | Breach the front gate Secrets: Life Sigil 1 – Secret #1 |
| 2 | Destroy the Hell Cannons
Secrets: Life Sigil 1 – Secret #1 Demonic Essence - Skull Ammo – Secret #2 Gold Chest 1 (x50) – Secret #3 Ruby 2 – Secret #4 Cyberdemon Toy – Secret #5 Prince Ahzrak Codex Secret #6 Life Sigil 2 – Secret #7 Ruby 3 – Secret #8 Life Sigil 3 – Secret #9 |
| 3 | Obtain the Atlan Core |
| 4 | Power up the Atlan
Secrets: Gold Cache 3 – Secret #10 |
1. Breach the Front Gate
| 1 | 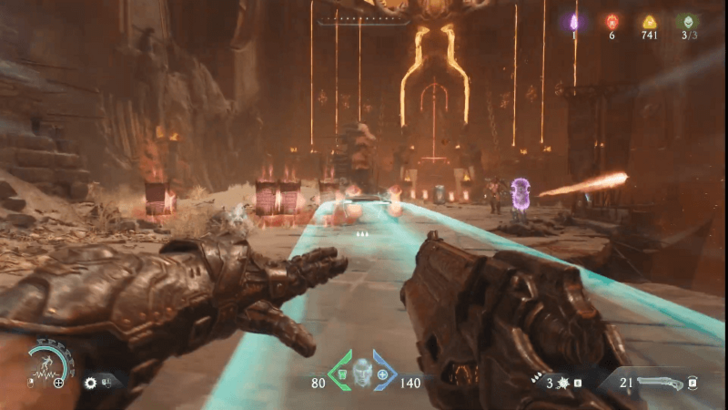 Clear the horde of enemies standing near the front gate to obtain the Rocket Launcher. |
|---|---|
| 2 | 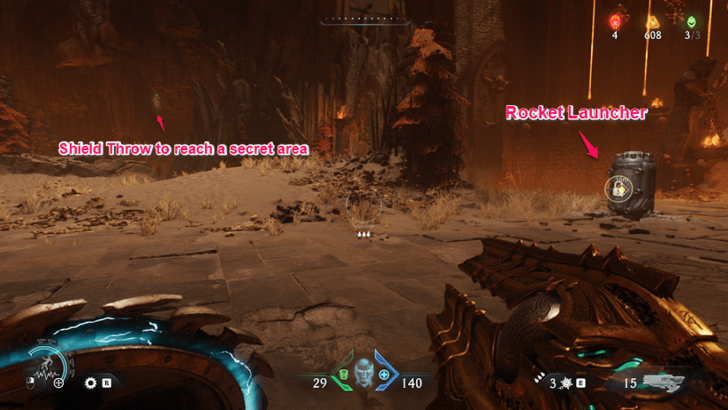 After clearing the enemies, shield recall jump using the green statue to the left to reach a secret area. Follow the objective marker to reach a point of no return and continue with the next objective. Collectibles: Life Sigil 1, Gold Trail 1 |
2. Destroy the Hell Cannons
| 1 | 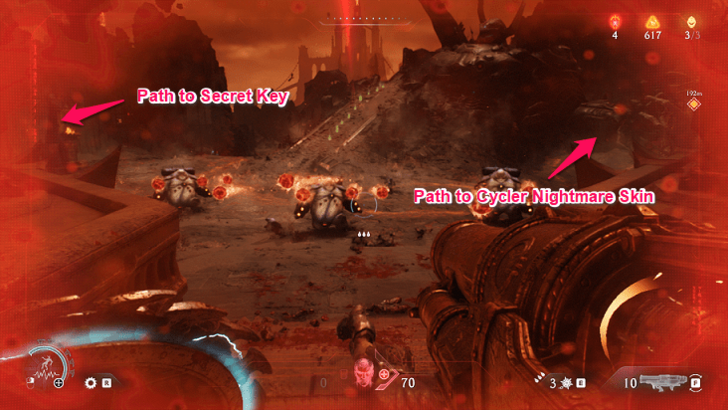 Upon entering the next area, you'll be tasked with taking down 2 Hell Cannons. Before destroying them, clear the horde of enemies before going to the right side to the first Hell Cannon. |
|---|---|
| 2 | 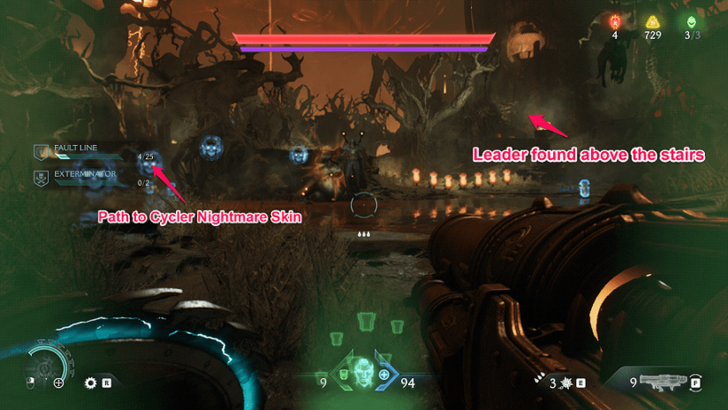 Face-off an enemy horde that includes a Armored Mancubus Leader before using the jump pad to the right and destroying the first hell cannon. Collectibles: Demonic Essence - Armor, Cycler Nightmare Skin |
| 3 | 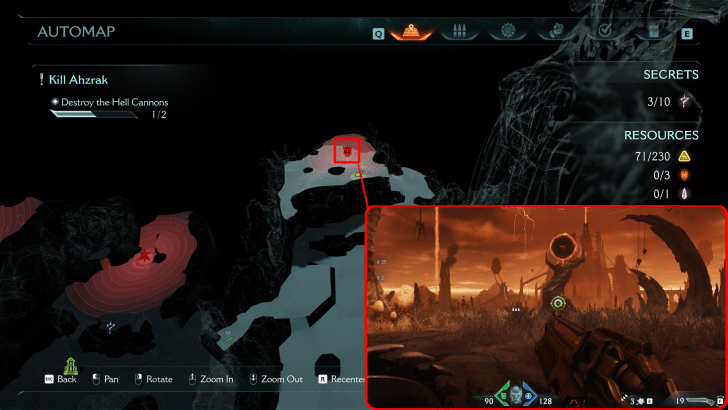 Collectibles: Demonic Essence - Skull Ammo |
| 4 | 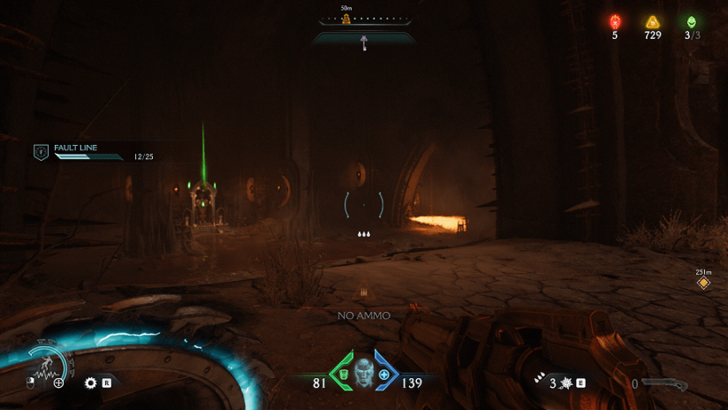 Use the blue jump pad behind the Gore Nest area to return to the battlefield earlier. Go to the where the Sentinel Shrine is to get some collectibles and upgrade as necessary. Collectibles: Gold Trail 2, Ruby 1, Gold Trail 3, Forsaken Plains Codex |
| 5 | 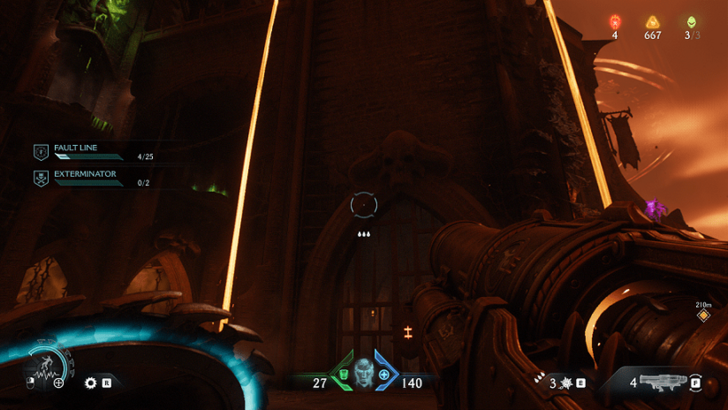 Return to the Atlan area and go to the left side to get the Secret Key. Collectibles: Gold Trail 4, Gold Chest 1 |
| 6 | 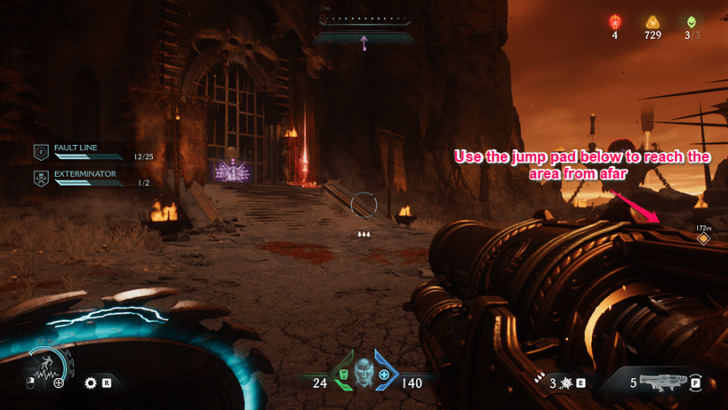 Use the Secret Key to open a gate nearby that contains the second Gore Nest and unlocks a Ruby after fighting a horde of enemies that include 2 Enforcers. Collectibles: Ruby 2, Cyberdemon Toy |
| 7 | 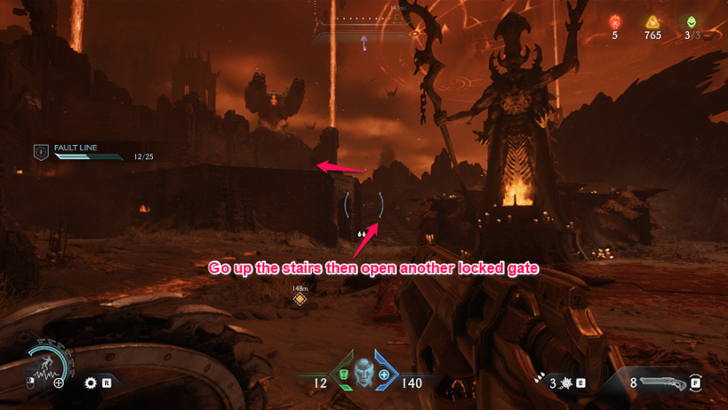 Return to the Atlan area and walk forward until you see a staircase to the left. Go up the stairs and open another locked gate to acquire another batch of collectibles. Collectibles: Gold Trail 5, Prince Ahzrak Codex |
| 8 | 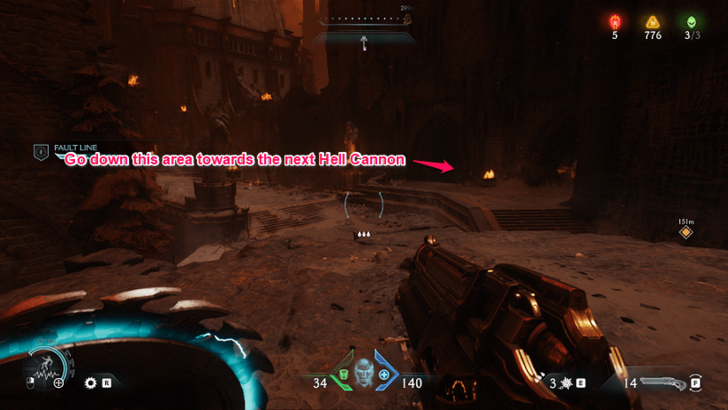 Exit the gate and go back to near the entrance of where you got the Secret Key. Enter the first doorway to the right where it will lead to a lower floor. Collectibles: Gold Trail 6, Life Sigil 2 |
| 9 | 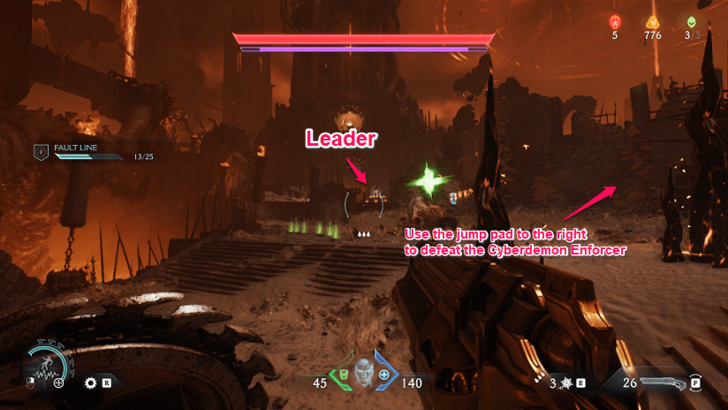 Fight off another horde of enemies that include a Cyberdemon Leader and Arachnotron Enforcer to get through the second Hell Cannon. After defeating them, enter the building and use the jump pad to reach the Hell Cannon. Collectibles: Demonic Essence - Health |
| 10 | 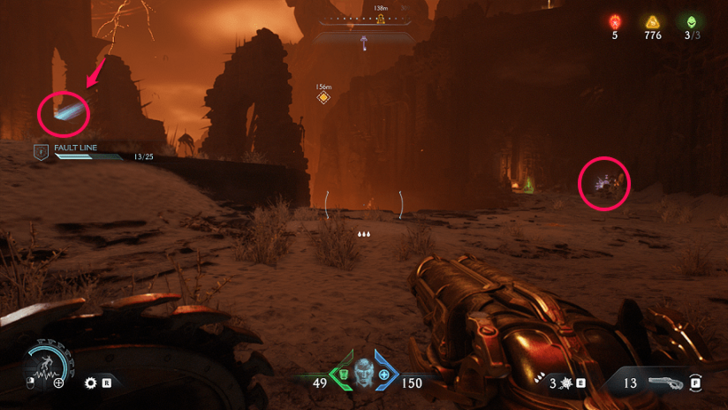 Before going to the main path in the middle, use the jump pad as you exit the battlefield and open another locked gate on the area below it for another batch of collectibles. Collectibles: Gold Chest 2, Ruby 3, Gold Trail 7 |
3. Obtain the Atlan Core
| 1 | 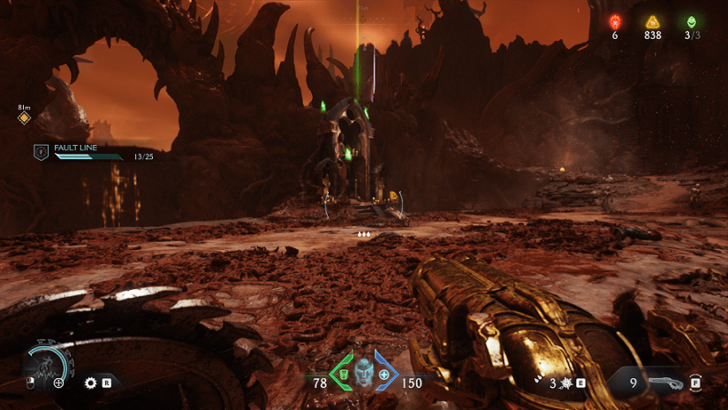 After destroying both Hell Cannons, proceed to the next marker to defeat the hordes of enemies surrounding the Atlan Core. After taking them down, climb up the Wall Scramble in the area and grab the core you need to power up the other Atlan. Collectibles: Life Sigil 3, Wraithstone |
|---|
4. Power up the Atlan
| 1 | 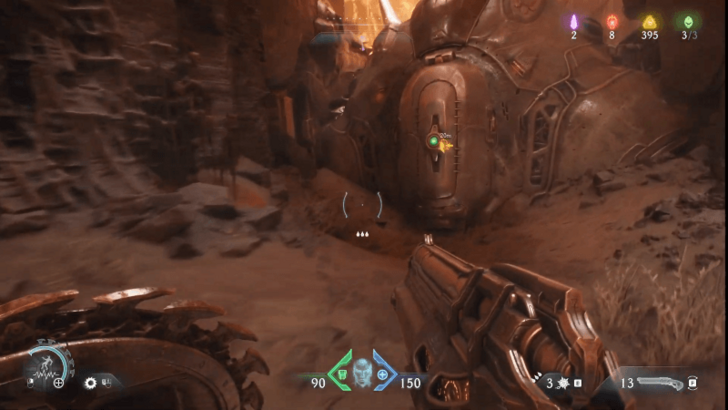 After obtaining the Atlan Core, make your way to the next section of the map where you'll power up the atlan and enter its cockpit. Collectibles: Gold Chest 3 |
|---|
Secret Key Location
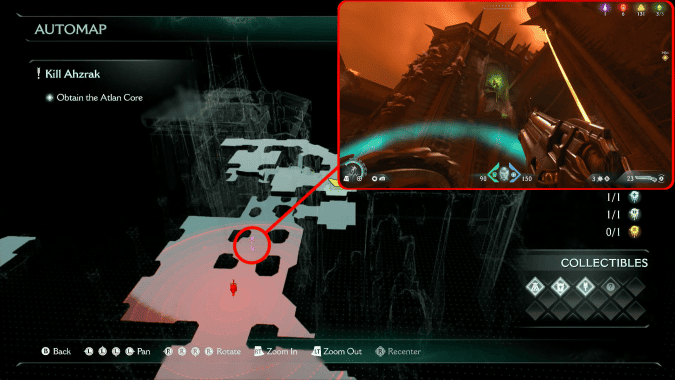
Go behind the tower with the key and use the Shield Recall Jump to enter the tower. Turn right to grab the Gold Trail, then step onto the balcony to destroy the superheated metal. Continue through the hallway, then turn right to climb the tower from outside. Turn right to reach the secret area with a Gold Cache, then backtrack the hallway to reach the drop going to the Secret Key.
Gun Weapon: Rocket Launcher
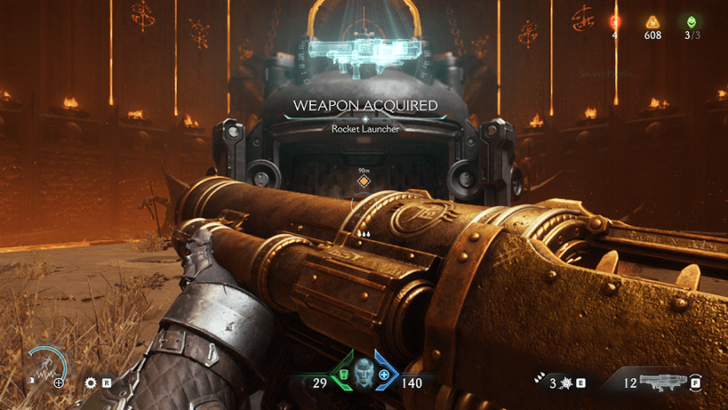
This chapter introduces a new gun weapon: Rocket Launcher. The Rocket Launcher is located in the beginning of the chapter shortly after defeating the first wave of enemies. This weapon will be important in achieving the Rocket Man mission challenge.
Rocket Launcher Upgrades and How to Get
The Forsaken Plains Secrets and Collectibles
The Forsaken Plains Interactive Map
| Jump to a Collectible! | |
|---|---|
| Toys | 1 |
| Skins | 2 |
| Codex | 2 |
| Life Sigils | 3 |
| Demonic Essence | 3 |
| Gold | 230 |
| Rubies | 3 |
| Wraithstone | 1 |
| Secrets | 10 |
The Forsaken Plains Toys
| Item | How to Get |
|---|---|
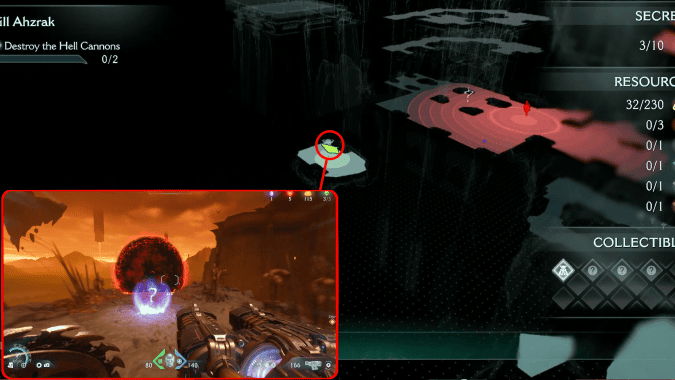 Cyberdemon Toy (Secret 5/10) |
During the second objective face the locked gate with a Ruby then head right, below the cliff there will be a jump pad that will lead you to a Cyberdemon Toy. This can be obtained during the second objective ▲ |
The Forsaken Plains Skins
| Item | How to Get |
|---|---|
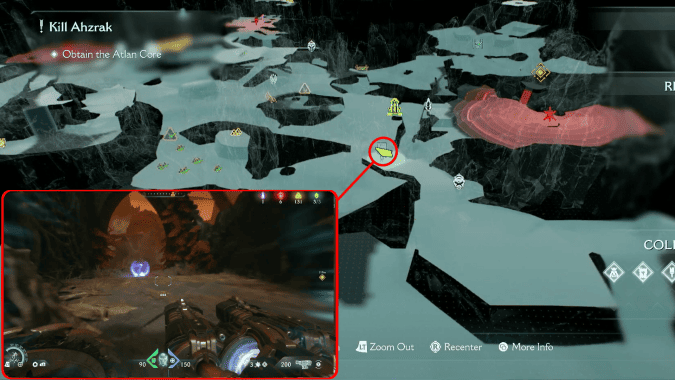 |
After the first objective, take the right passageway from the Atlan and continue until you reach the Hell Cannon. Afterward, scale the cliff that leads to the Wraithstone. just before the drop you'll obtain the Cycler Nightmare Skin. This is found during the second objective ▲ |
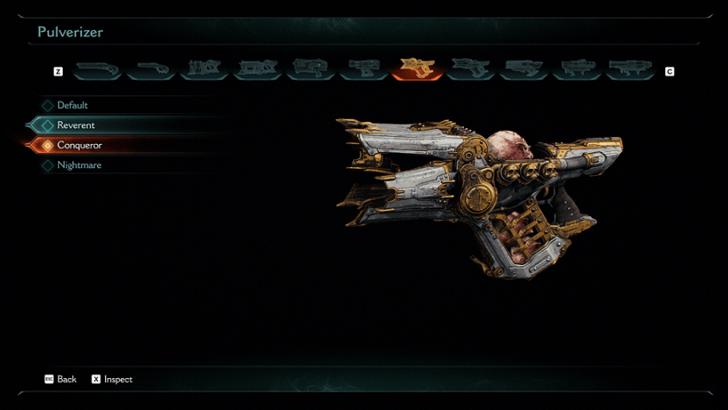 (Mission Challenge) |
This weapon skin can only be acquired after achieving the Exterminator mission challenge. |
The Forsaken Plains Codex Entries
| Item | How to Get |
|---|---|
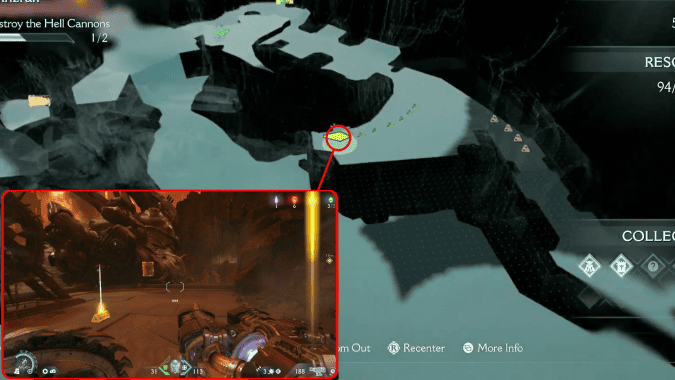 |
From the rightmost sentinel shrine of the map, head right until you reach the Atlan hand where the codex is located. This is obtained during the second objective ▲ |
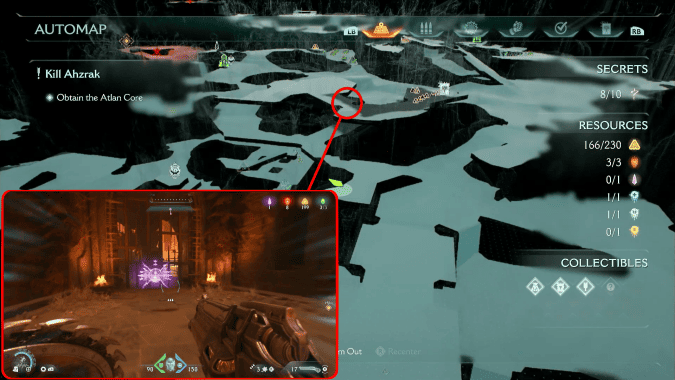 (Secret 6/10) |
Facing the Atlan, take the path to the left and use the stairs to get to the next level. Open the locked gate with the Secret Key to access the Gold Trail and Codex. This is obtained near the second objective ▲ |
The Forsaken Plains Life Sigils
| Item | How to Get |
|---|---|
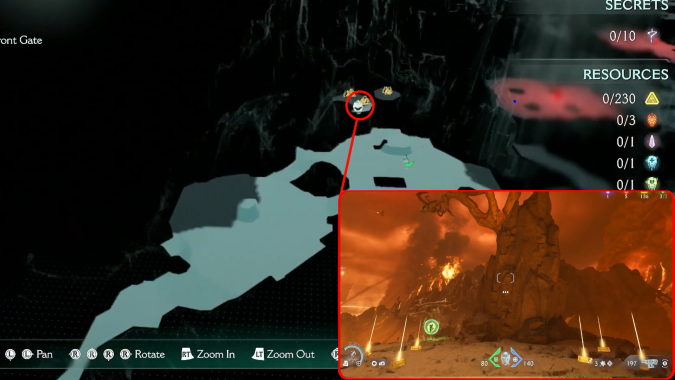 Life Sigil 1 (Secret 1/10) |
Right before you reach the gate in the first objective, there is a cliff on the right with one Life Sigil. Use shield recall jump on the nearby cliff and jump to the cliff with the Life Sigil on it. This can be obtained during the first objective ▲ |
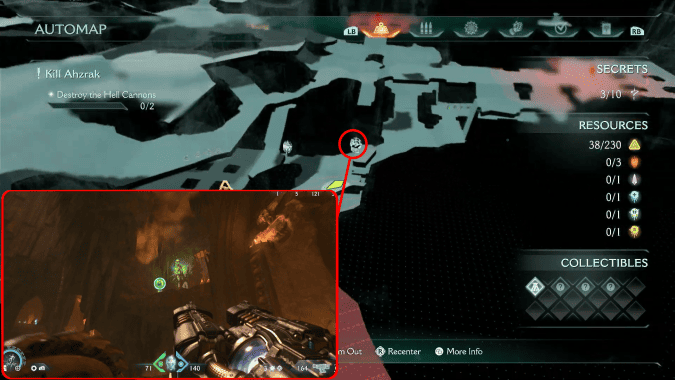 Life Sigil 2 (Secret 7/10) |
After taking the Secret Key, take the path on the right until you reach a broken building. Scale the wall and on the left there will be a Shield Recall Jump that will lead you to a Life Sigil. This can be acquired during the second objective ▲ |
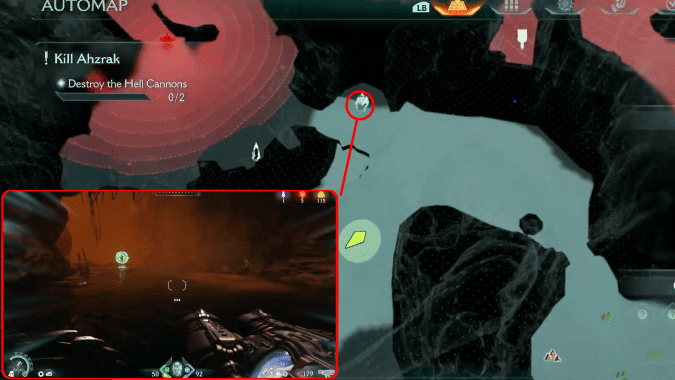 Life Sigil 3 (Secret 9/10) |
Beneath the Wraithstone between the two Hell Cannons, there will be a passage that leads to a Life Sigil on the right. This is found near the second objective ▲ |
The Forsaken Plains Demonic Essence
| Item | How to Get |
|---|---|
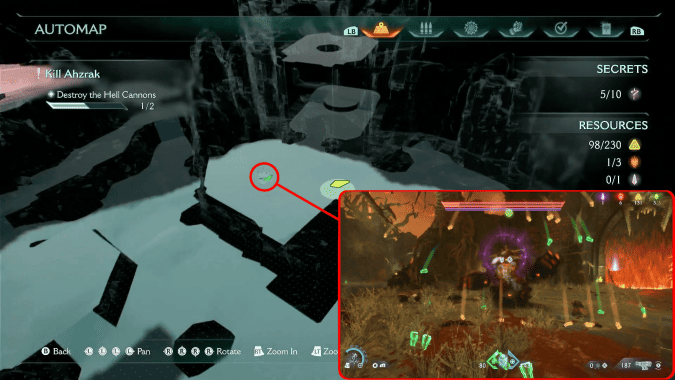 |
After the first objective, take the right passageway from the Atlan and continue until you reach the Hell Cannon. Below the Tower is an Armored Mancubus Leader which will grant the Demonic Essence: Armor. This can be obtained during the second objective ▲ |
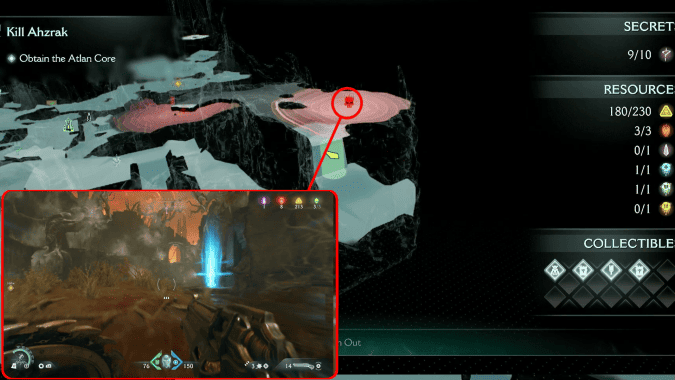 (Secret 2/10) |
After the first objective, take the right passageway from the Atlan and continue until you reach the Hell Cannon. Keep heading north of the Hell Cannon tower and climb the cliff to reach the secret area with the Gore Nest and Revenant Leader. This is obtained during the second objective ▲ |
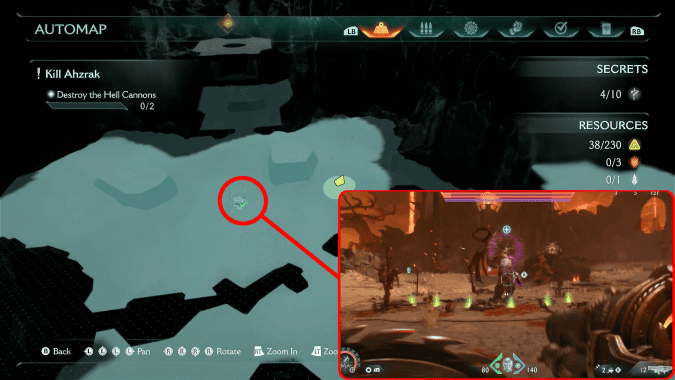 |
Take the left passage while facing the Wraithstone. Below the Hell Cannon Tower is a Cyberdemon Leader which will grant the Demonic Essence: Health.This essence can be acquired after defeating a leader during the second objective ▲ |
The Forsaken Plains Gold
| Item | How to Get |
|---|---|
 Gold Trail 1 (x9) |
Before you reach the gate in the first objective, there is a cliff on the right with three Gold Trails. Use shield recall jump on the nearby cliff to obtain the first Gold Trail, then jump to the cliff with the remaining two Gold Trails. This can be acquired near the first objective ▲ |
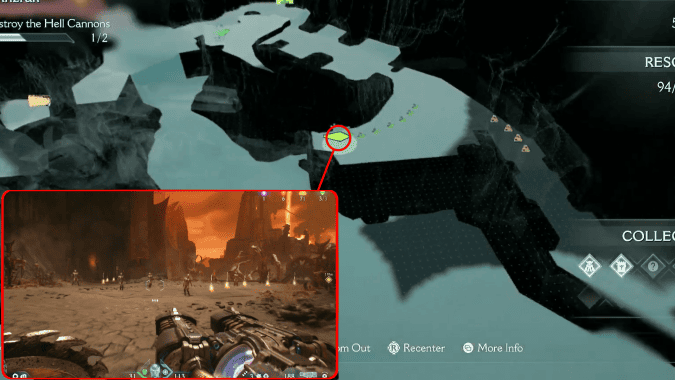 Gold Trail 2 (x10) |
From the rightmost sentinel shrine of the map, head right until you reach the Atlan hand. This can be obtained as you go through the second objective ▲ |
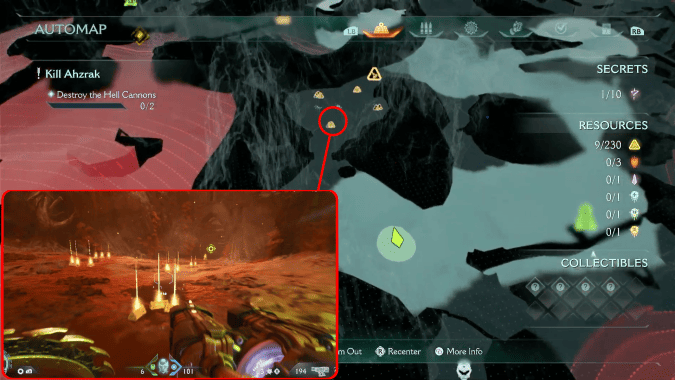 Gold Trail 3 (x26) |
Drop down from the cliff where you obtained the Cycler Nightmare Skin and turn left towards the area with Tentacles. There you'll find 6 Gold Trails. This gold trail can be found during the second objective ▲ |
 Gold Trail 4 (x11) |
Facing the Atlan, take the path to the left and use the stairs to get to the next level. Open the locked gate with the Secret Key to access the Gold Trail and Codex. This is acquired during the second objective ▲ |
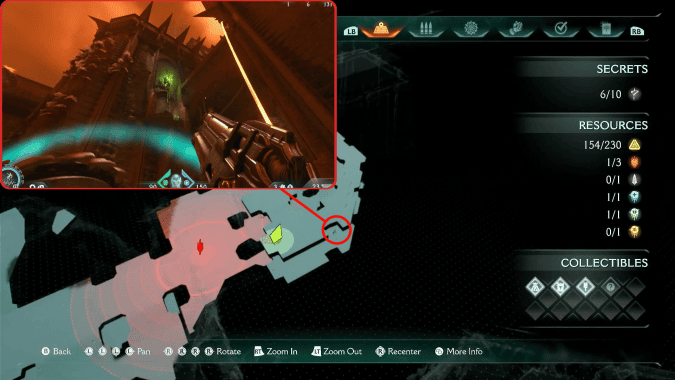 Gold Trail 5 (x6) |
On your way to obtain the Secret Key, you'll pass through a Trail of Gold right after you use a shield recall jump on the tower. This can be acquired during the second objective ▲ |
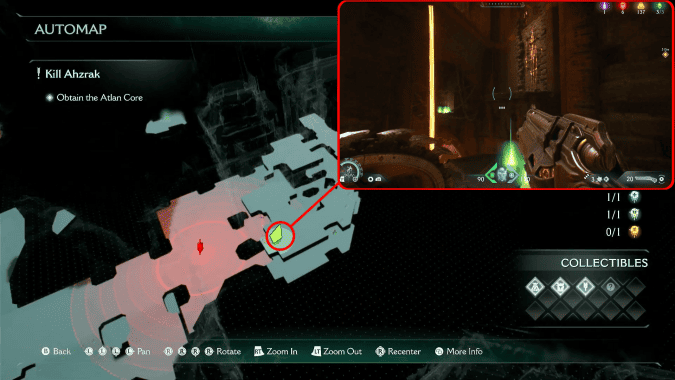 Gold Chest 1 (x50) (Secret 3/10) |
On the Secret Key tower, before you drop down to obtain the secret key, jump to the left to obtain a Gold Cache. This is procured while going through the second objective ▲ |
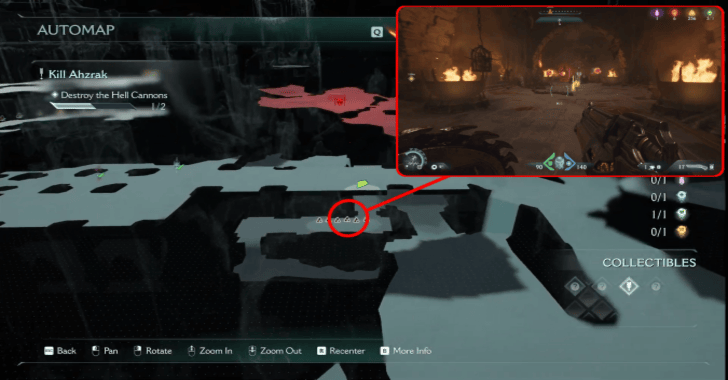 Gold Trail 6 (x6) |
On the bridge before you reach the Secret Key tower, drop down on the left and follow the underpassage of the bridge, then make another drop on the right until you reach a broken window that leads to the Gold Trail. This is obtained during the second objective ▲ |
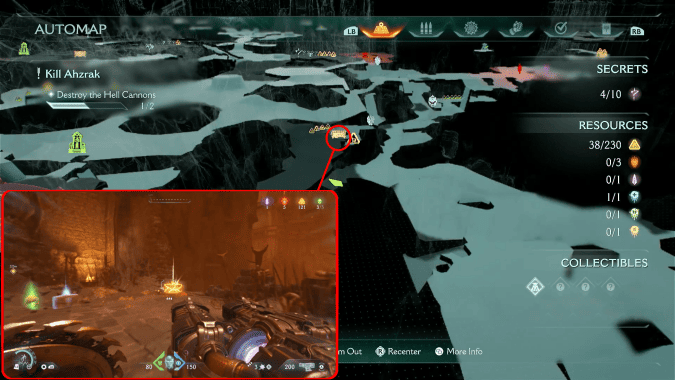 Gold Chest 2 (x50) |
After destroying the Hell Cannon on the left, head straight until you reach a ruined archway with a jump pad. Head left to break the Gold Cache and obtain 50 Gold. You can get this while exploring the area during the second objective ▲ |
 Gold Trail 7 (x12) |
After destroying the Hell Cannon on the left, head straight until you reach a ruined archway with a jump pad. Head right to open the locked door with the Secret Key to obtain the Gold and Ruby. You can get this near the second objective ▲ |
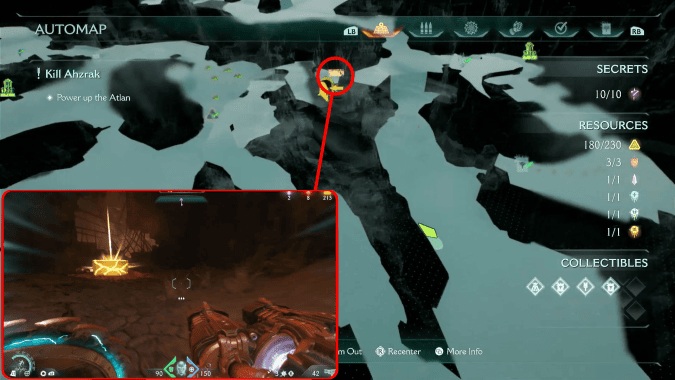 Gold Chest 3 (x50) (Secret 10/10) |
Climb the Atlan and drop down behind it. Continue following the objective marker until you reach the Gold Cache. This is acquired before completing the last objective ▲ |
The Forsaken Plains Rubies
| Item | How to Get |
|---|---|
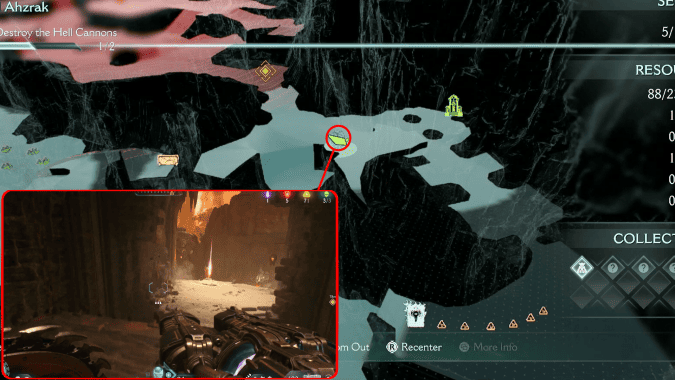 |
Near the rightmost sentinel shrine during the second objective, head right to see a passage full of flame traps, then wait until the elevator goes up. Jump to the right to reach the cliff with the Ruby. This is acquired during the second objective ▲ |
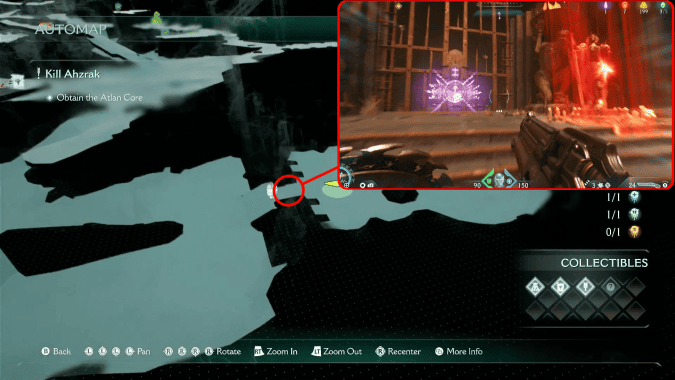 (Secret 4/10) |
After taking the Secret Key head straight and unlock the gate. Destroy the green seal and kill all enemies inside to access the Ruby. The last Ruby can also be obtained during the second objective ▲ |
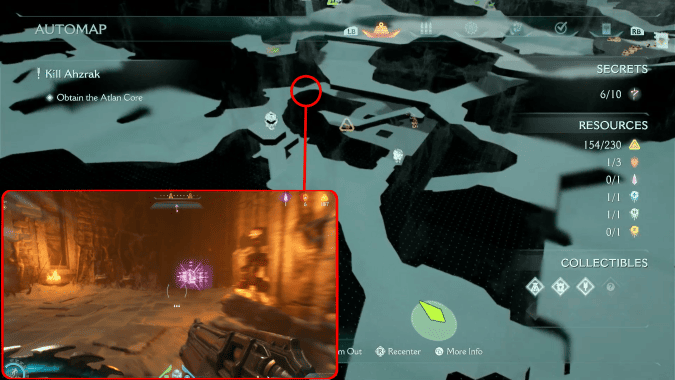 |
After destroying the Hell Cannon on the left, head straight until you reach a ruined archway with a jump pad. Head right to open the locked door with the Secret Key to obtain the Gold and Ruby. This Ruby is also near the second objective ▲ |
The Forsaken Plains Wraithstone
| Item | How to Get |
|---|---|
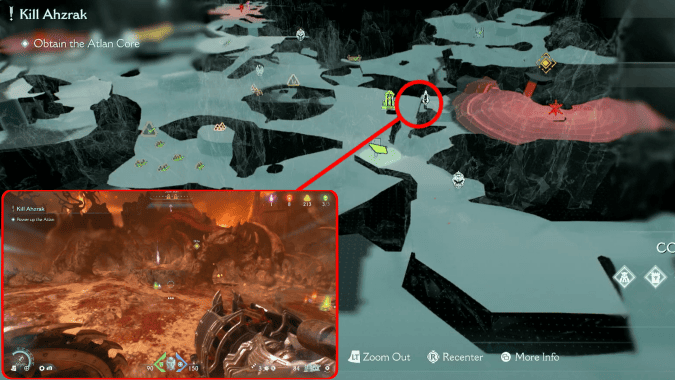 |
Kill all enemies once you obtain the Atlan Core to access the Wraithstone. You'll need to destroy both Hell Cannons to reach this area. This can be found after the third objective ▲ |
The Forsaken Plains Mission Challenges
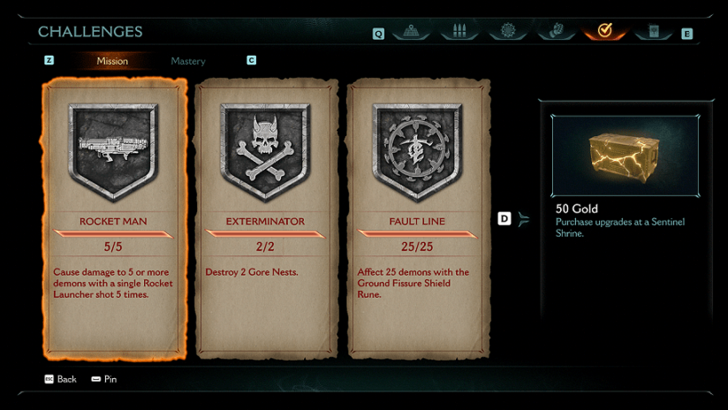 |
|
| Challenge | Details and Reward |
|---|---|
| Rocket Man | Cause damage to 5 or more demons with a single Rocket Launcher shot 5 times. Reward: 50 Gold |
| Exterminator | Destroy 2 Gore Nests. Reward: Reverent Pulverizer Skin |
| Fault Line | Affect 25 demons with the Ground Fissure Shield Rune. Reward: 50 Gold |
Rocket Man
Once the Rocket Launcher has been acquired, equip it and use it against a group of enemies whenever available. Replenish its ammo when it runs low by melee attacking any enemy unit on sight.
Rocket Launcher Upgrades and How to Get
Exterminator
| 1 |  This first Gore Nest is located above a cliff far beyond the Hell Cannon at the right side. |
|---|---|
| 2 | 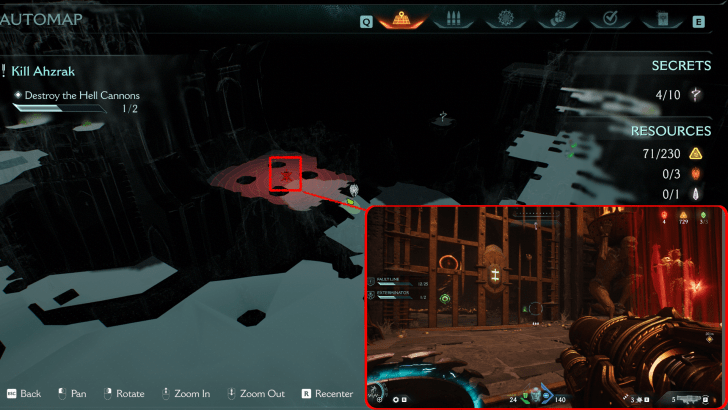 The second Gore Nest is located behind a locked gate with a Ruby outside to the left of the map that can be unlocked with a Secret Key. |
Destroy two Gore Nests to earn the Reverent Pulverizer Skin.
How to Get Reverent Pulverizer Skin
Fault Line
Achieve this challenge by equipping the Ground Fissure shield rune. During battle, wait for multiple enemies to group up with a heavy unit that has a ranged attack (Revenant, Imp Stalker, etc). Parry their green ranged attack to trigger the shield rune until this challenge is completed.
Rune List and Best Runes to Use
Doom: The Dark Ages Related Guides

Full Walkthrough and List of Chapters
Comment
Author
Chapter 10: The Forsaken Plains Secrets and Walkthrough
improvement survey
03/2026
improving Game8's site?

Your answers will help us to improve our website.
Note: Please be sure not to enter any kind of personal information into your response.

We hope you continue to make use of Game8.
Rankings
- We could not find the message board you were looking for.
Gaming News
Popular Games

Genshin Impact Walkthrough & Guides Wiki

Honkai: Star Rail Walkthrough & Guides Wiki

Umamusume: Pretty Derby Walkthrough & Guides Wiki

Pokemon Pokopia Walkthrough & Guides Wiki

Resident Evil Requiem (RE9) Walkthrough & Guides Wiki

Monster Hunter Wilds Walkthrough & Guides Wiki

Wuthering Waves Walkthrough & Guides Wiki

Arknights: Endfield Walkthrough & Guides Wiki

Pokemon FireRed and LeafGreen (FRLG) Walkthrough & Guides Wiki

Pokemon TCG Pocket (PTCGP) Strategies & Guides Wiki
Recommended Games

Diablo 4: Vessel of Hatred Walkthrough & Guides Wiki

Fire Emblem Heroes (FEH) Walkthrough & Guides Wiki

Yu-Gi-Oh! Master Duel Walkthrough & Guides Wiki

Super Smash Bros. Ultimate Walkthrough & Guides Wiki

Pokemon Brilliant Diamond and Shining Pearl (BDSP) Walkthrough & Guides Wiki

Elden Ring Shadow of the Erdtree Walkthrough & Guides Wiki

Monster Hunter World Walkthrough & Guides Wiki

The Legend of Zelda: Tears of the Kingdom Walkthrough & Guides Wiki

Persona 3 Reload Walkthrough & Guides Wiki

Cyberpunk 2077: Ultimate Edition Walkthrough & Guides Wiki
All rights reserved
© 2025 ZeniMax Media Inc. All Rights Reserved.
The copyrights of videos of games used in our content and other intellectual property rights belong to the provider of the game.
The contents we provide on this site were created personally by members of the Game8 editorial department.
We refuse the right to reuse or repost content taken without our permission such as data or images to other sites.




![Everwind Review [Early Access] | The Shaky First Step to A Very Long Journey](https://img.game8.co/4440226/ab079b1153298a042633dd1ef51e878e.png/thumb)

![Monster Hunter Stories 3 Review [First Impressions] | Simply Rejuvenating](https://img.game8.co/4438641/2a31b7702bd70e78ec8efd24661dacda.jpeg/thumb)


