All Ruby Locations
☆ Doom: The Dark Ages is live now!
★ Collectibles | Secrets | Walkthrough
┗ Resources | Codex | Toy
★ Trophies | Beginner's Guide | Enemies
☆ Skins: Twitch Drops | Prince St. Pizza
★ FAQs: Co-op | DLC | Specs | Glory Kills
This is a list of all Rubies and their locations in Doom: The Dark Ages. Read on and check out the full list of Ruby locations per chapter, how to get them, how many Rubies are there, and how to use Rubies in this guide!
All Ruby Locations
Ruby Interactive Map
All Rubies in All Chapters
※ Select the search criteria below then press the Search button to filter the resources. Resources with a red asterisk are secrets.
| Resources | Chapter and How to Get |
|---|---|
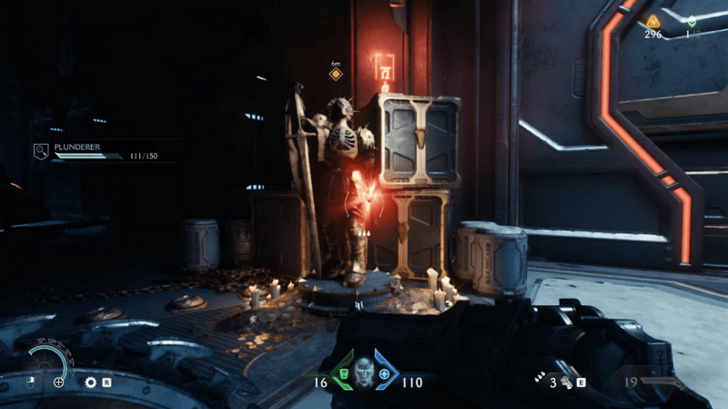 Ruby 1 |
Chapter 4 -
Sentinel Barracks
This one is is part of the main quest marker and cannot be missed. It is found near the Atlan hangar area before you acquire the Impaler weapon. This can be found near the end of the first objective. |
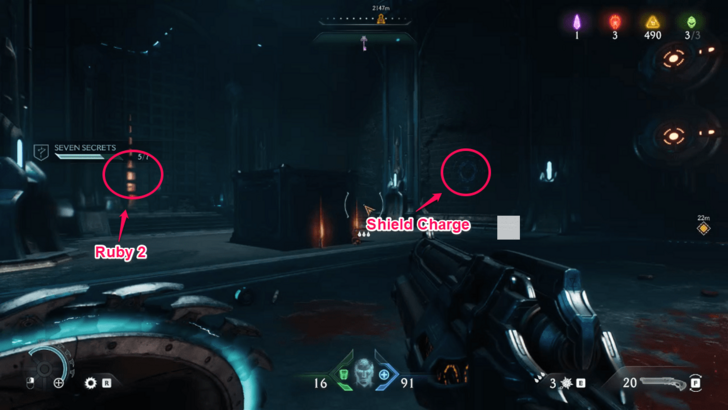 Ruby 2 |
Chapter 4 -
Sentinel Barracks
After jumping down the broken bridge, turn around and you will see an area far back. Access this secret area by jumping and go through enemies and fireballs, picking up gold trail 5 and the secondy ruby found near Hell Cultists. These can be found after defeating the Mancubus Leader during the second objective. |
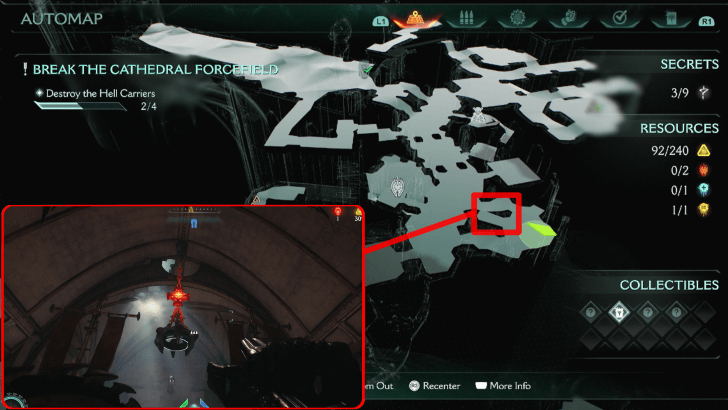 Ruby 1 |
Chapter 5 -
The Holy City of Aratum
In the first room you enter shortly after getting the Super Shotgun, there is a green button on the floor which opens a gate leading to the Ruby. To keep the button pressed, throw your Shield at the chandelier directly above the green button to knock it down. This can be found in Hell Carrier 3 during the second objective. |
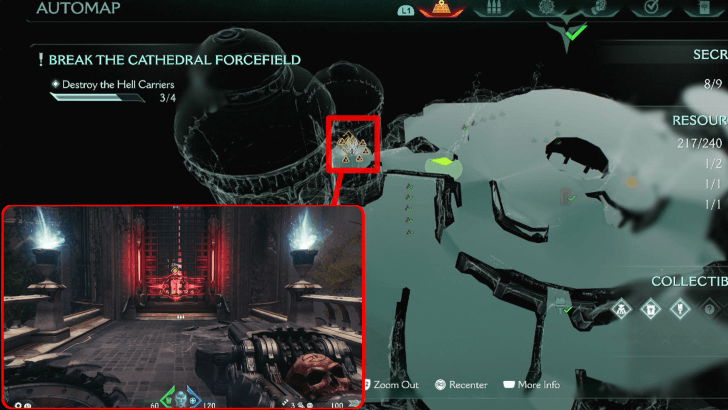 Ruby 2 |
Chapter 5 -
The Holy City of Aratum
Use the Red Keycard in the locked area right above Gold Trail 6. It can be found in the same Secret Landing Spot during the second objective. |
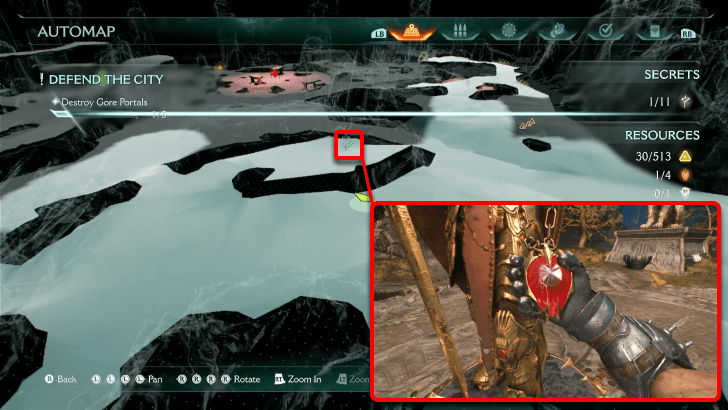 Ruby 1 |
Chapter 6 -
Siege - Part 1
To unlock this Ruby, find and destroy three wolf statues . It can be found close by where the Secret Key is, continuing past the destroyed village to a shallow riverbank, towards some rocky hills. |
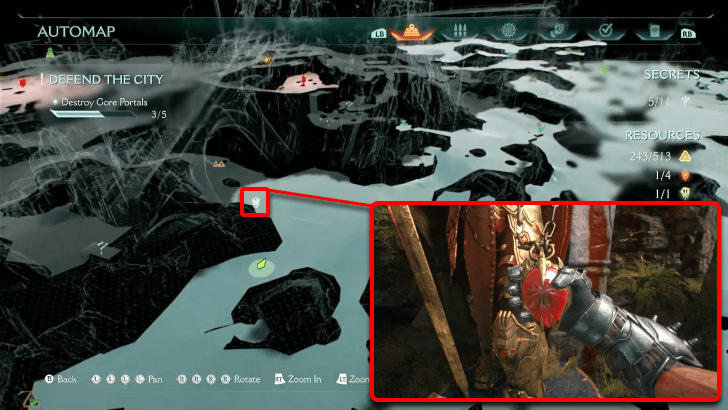 Ruby 2 |
Chapter 6 -
Siege - Part 1
This Ruby is found near the area of Life Sigil 2, just below a massive stone structure part of the castle. |
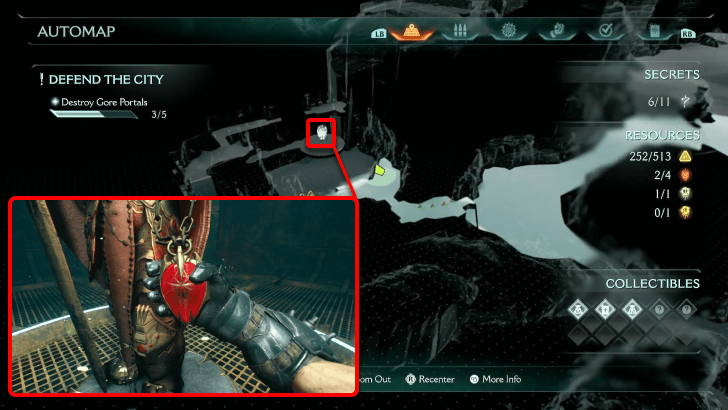 Ruby 3 |
Chapter 6 -
Siege - Part 1
Nearby one of the Gore Portals is a tiny valley where bodies are hanging from the wooden beams. There will be an entrance around the area, that will lead to gunfight against demons. Defeating them will unlock the climbable wooden board that will lead to a cave entrance leading to the Ruby and other goodies. |
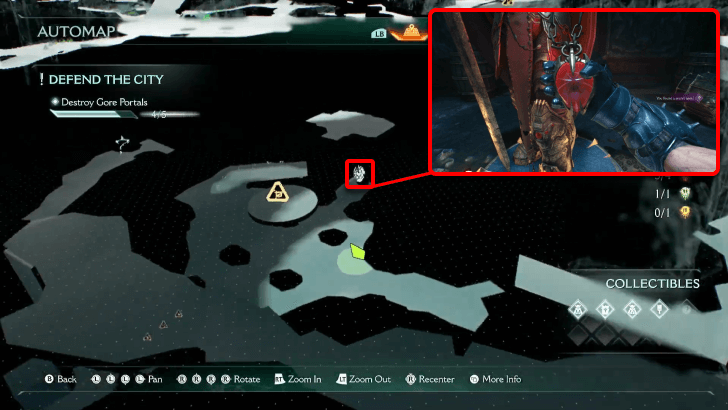 Ruby 4 |
Chapter 6 -
Siege - Part 1
Littered along the path nearby the Slayer Toy are broken wooden structures. Continue beside the mountain until you see an opening that reveals an entrance to a cave. Jump down and grab the Ruby from the statue from there! |
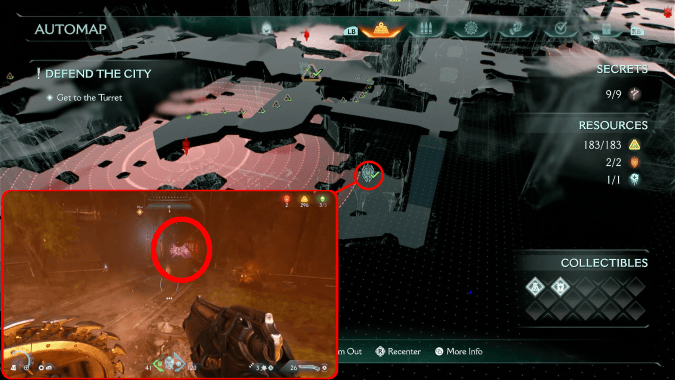 Ruby 1 |
Chapter 7 -
Siege - Part 2
After getting the Secret Key, drop down into the courtyard area to find a door with a purple lock in the middle of the wall. Go inside to find the Ruby. |
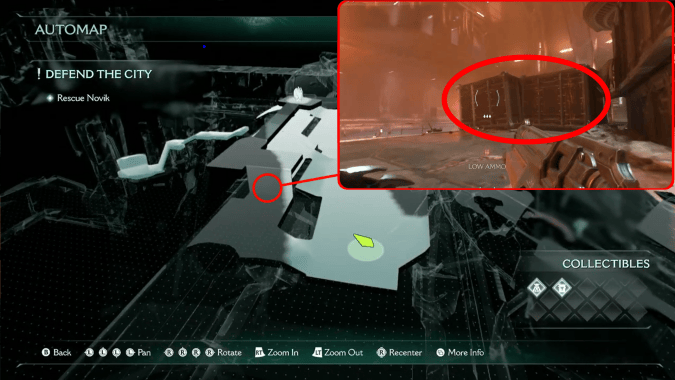 Ruby 2 |
Chapter 7 -
Siege - Part 2
In the area with the crashed airship, find two crates which you can climb up. Go along the path to find the Ruby. |
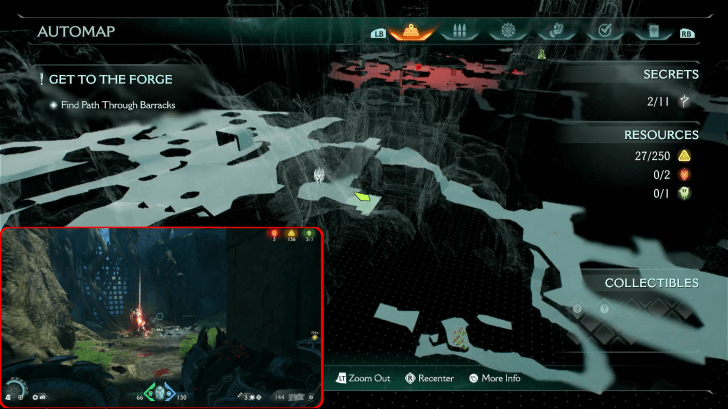 Ruby 1 |
Chapter 8 -
Abyssal Forest
After getting the 5th gold trail, go to the end of the path and climb up with the blue jump booster. Defeat the lone enemy in the area and you can reach the ruby. |
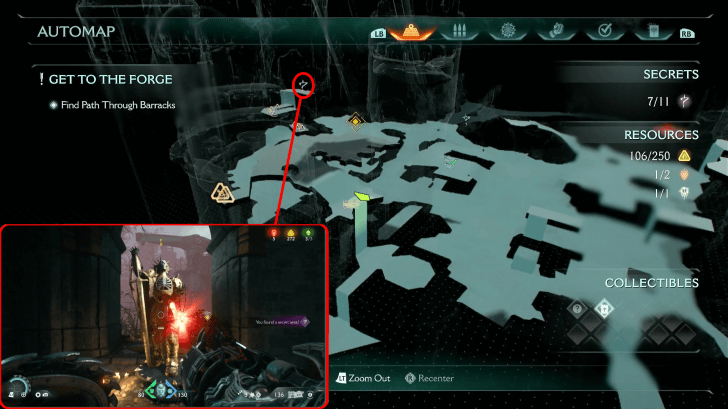 Ruby 2 |
Chapter 8 -
Abyssal Forest
Head to the ledge directly left of the cannon. Follow the path until you reach a climbable wall, where you will find the second Ruby. |
 Ruby 1 |
Chapter 9 -
Ancestral Forge
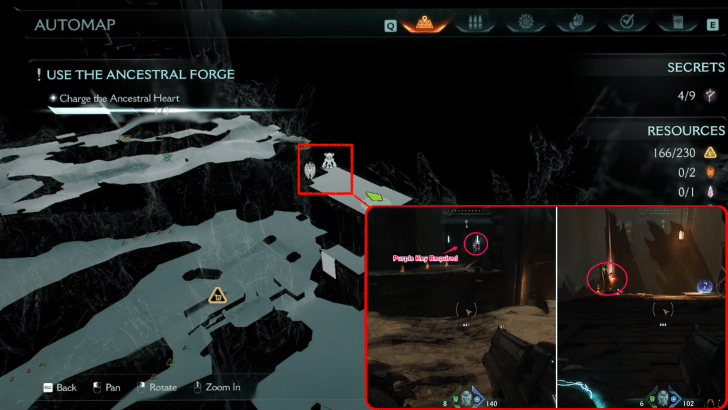
Open the locked gate with the Purple Key and defeat enemies as you climb towards the area to find this Ruby beside the Vagary Toy. |
 Ruby 2 |
Chapter 9 -
Ancestral Forge
Access this secret area by shield charging through the wall found below the Ancestral Forge. Shield throw towards the breakable metal to open the gate and acquire the second Ruby. |
 Ruby 1 |
Chapter 10 -
The Forsaken Plains
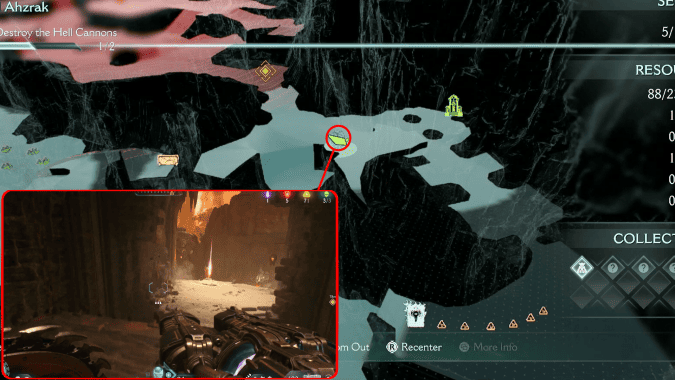
Near the rightmost sentinel shrine during the second objective, head right to see a passage full of flame traps, then wait until the elevator goes up. Jump to the right to reach the cliff with the Ruby. This is acquired during the second objective. |
 Ruby 2 |
Chapter 10 -
The Forsaken Plains
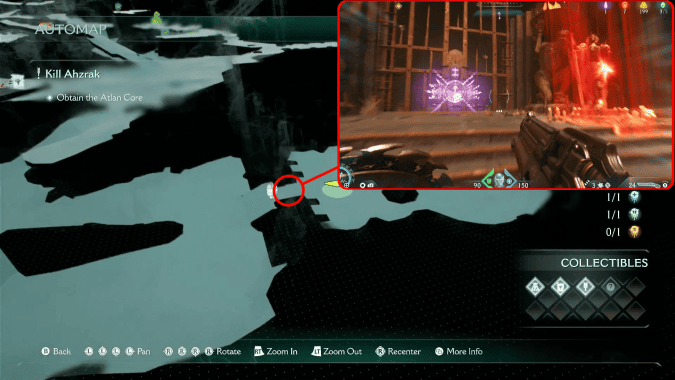
After taking the Secret Key head straight and unlock the gate. Destroy the green seal and kill all enemies inside to access the Ruby. The last Ruby can also be obtained during the second objective. |
 Ruby 3 |
Chapter 10 -
The Forsaken Plains
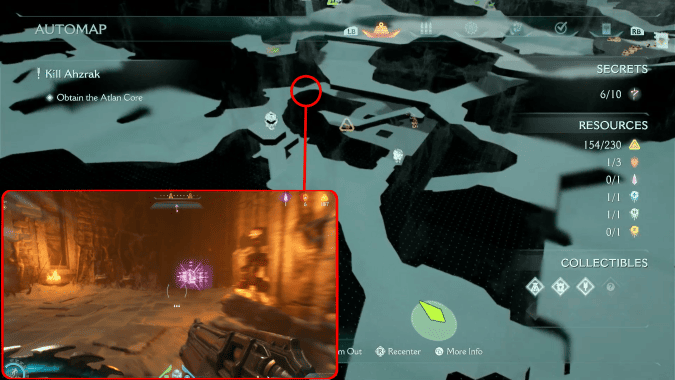
After destroying the Hell Cannon on the left, head straight until you reach a ruined archway with a jump pad. Head right to open the locked door with the Secret Key to obtain the Gold and Ruby. This Ruby is also near the second objective. |
 Ruby |
Chapter 12 -
Sentinel Command Station
After using the elevator up and crossing the gap with the Mancubus on the other side, do not proceed to the next hallway yet. Instead, drop down the broken floor at the end to reach a secret area with this Ruby and a Gold cache. |
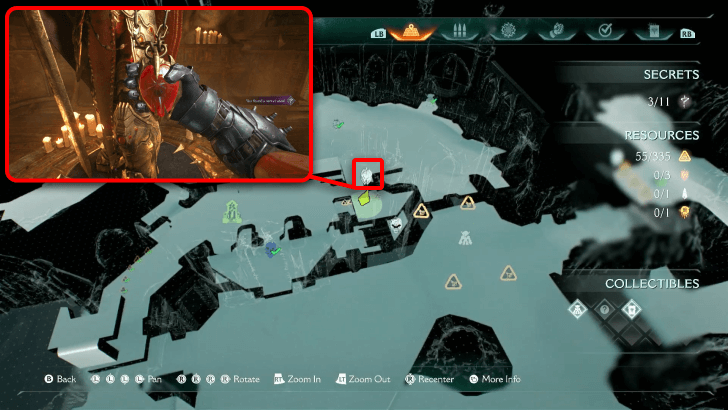 Ruby 1 |
Chapter 12 -
Sentinel Command Station
You'll have to climb up the same platform where Gold Chest 1 is found, then walk on an organic bridge held up by chains to get to a hole that'll drop you down to Ruby 1. |
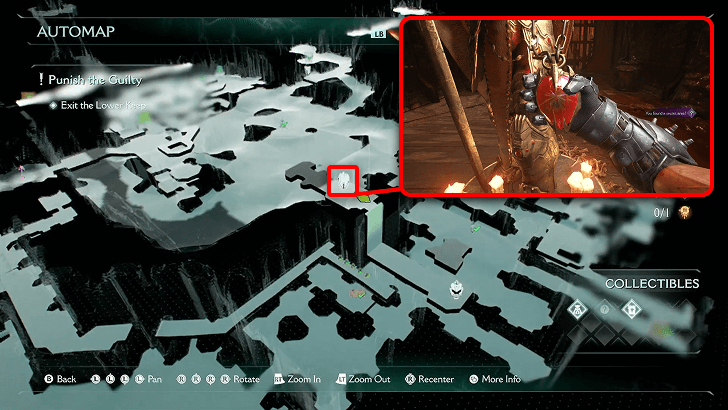 Ruby 2 |
Chapter 12 -
Sentinel Command Station
You'll be able to access this Ruby after finding Gold Trail 5 and Life Sigil 2. After climbing up the footbridge, recall your shield to raise the gate blocking the next area. Climb up the surface, and you'll be met with Ruby 2. |
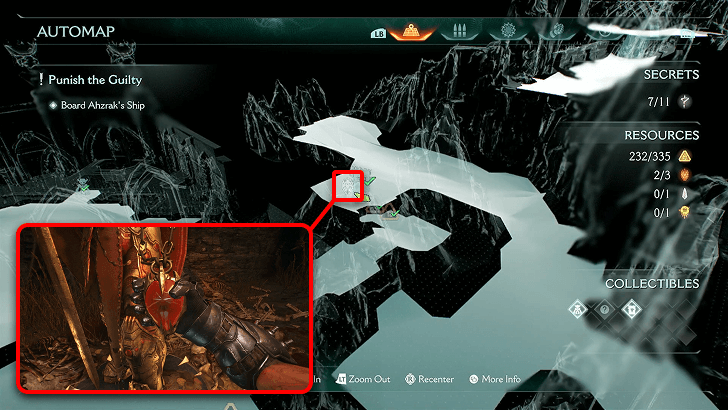 Ruby 3 |
Chapter 12 -
Sentinel Command Station
After obtaining the Purple Key, you can now return to previous areas that had a locked gate. Ruby 3 is located nearby the Marok Codex, inside the hill. Follow along the base of the hill until you come across the entrance and proceed. You'll be able to find Gold Cache 2 and Ruby 3 in this hidden area. |
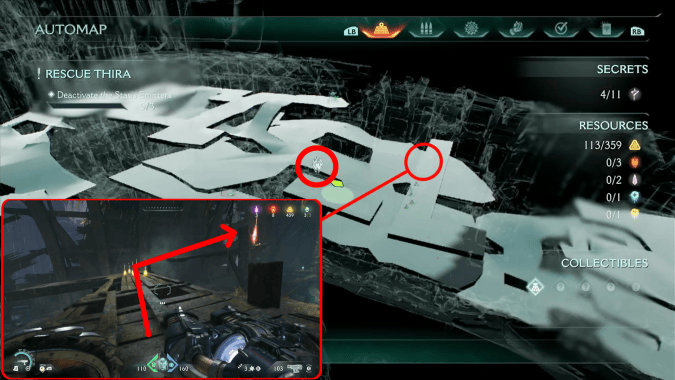 Ruby 1 |
Chapter 14 -
Spire of Nerathul
On the ground below, there is a jump pad which will launch you directly upwards. Land on the wooden walkway with a Gold Trail on it, and follow the trail to the Ruby. |
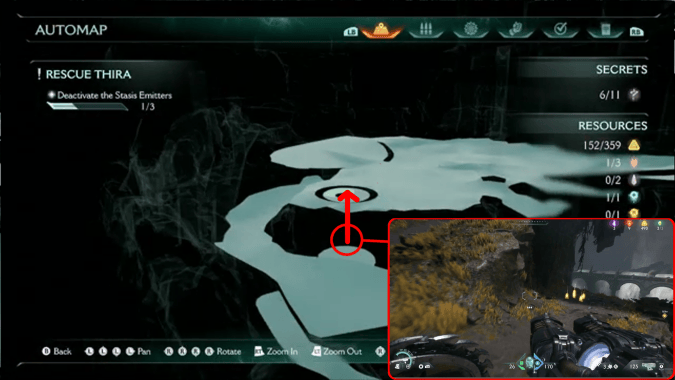 Ruby 2 |
Chapter 14 -
Spire of Nerathul
From the location of Gold Cache 3, go into the nearby tunnel and avoid the fireballs to find an opening at the end; enter to reach a room with the Ruby. |
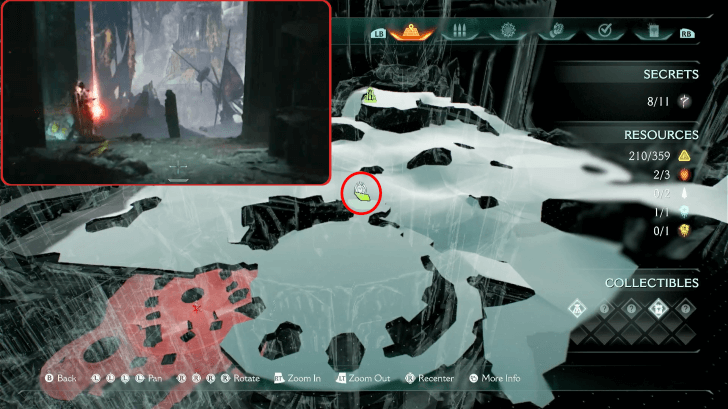 Ruby 3 |
Chapter 14 -
Spire of Nerathul
Found close to the arena, where you fight a cyberdemon in an enclosed location. |
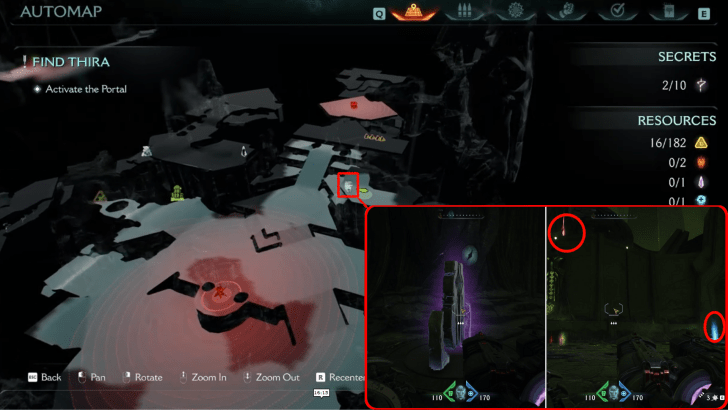 Ruby 1 |
Chapter 15 -
City of Ry'uul
Use the purple device in the area where the first gold trail is. This will activate a jump platform near the main portal. Use this platform to reach a secret area and acquire the first Ruby. |
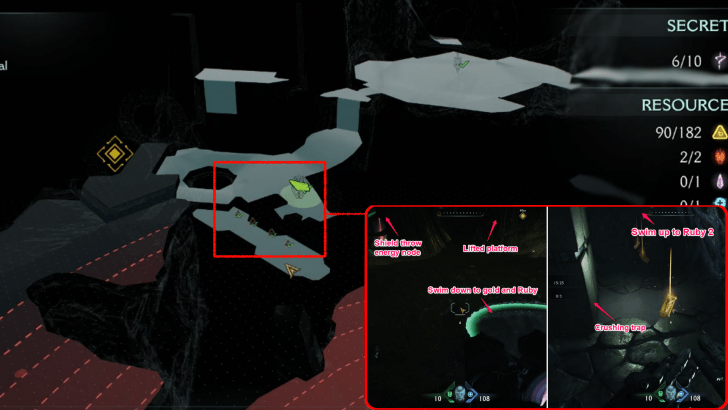 Ruby 2 |
Chapter 15 -
City of Ry'uul
Access this secret area by shield throwing the energy node to lift the platform in front. Swim through the water under it and follow the first gold trail while avoiding the crushing traps until you surface and acquire the second Ruby. |
 Ruby 1 |
Chapter 16 -
The Kar'Thul Marshes
Enter the portal near Gold Trail 1. Enter the area and finish the Ruby Puzzle. |
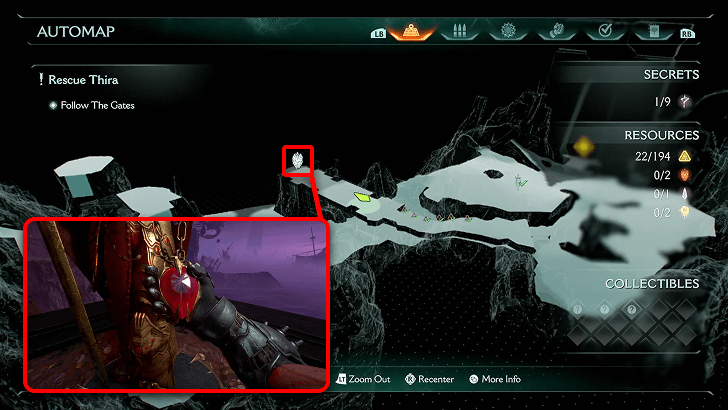 Ruby 1 |
Chapter 17 -
Temple of Lomarith
As you go through the beach in the starting area, there is a Shield Recall Jump you can make that will lead you to a gold trail and Ruby 1. |
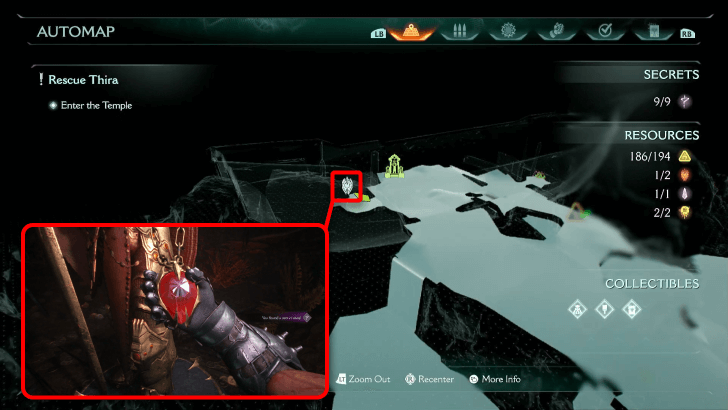 Ruby 2 |
Chapter 17 -
Temple of Lomarith
Hop over to the ship acting as a bridge on the far side of the temple, and you'll find a Sentinel Shrine and a locked gate waiting for you at the end. Unlock the gate with the Purple Key to reveal the Ruby. |
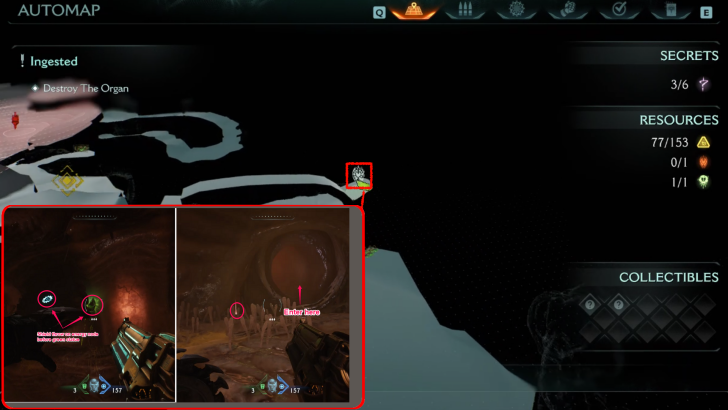 Ruby |
Chapter 18 -
Belly of the Beast
Access this secret area by shield throwing on the energy node to move the body part, then quickly shield recall jump onto the higher platform. After jumping, turn around and enter the path towards the Ruby. This can be obtained during the second objective. |
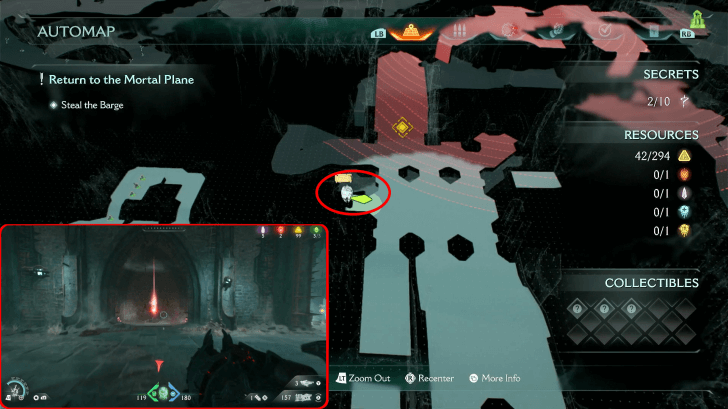 Ruby |
Chapter 19 -
Harbor of Souls
To open the gate barring the way to the Ruby, use the elevator in the middle of the room and jump to the opposite side of the Ruby. Once you're there, use shield throw on the mechanism on the opposite side, and you'll find the way to the Ruby will open once you hop back down. This can be obtained during the first objective. |
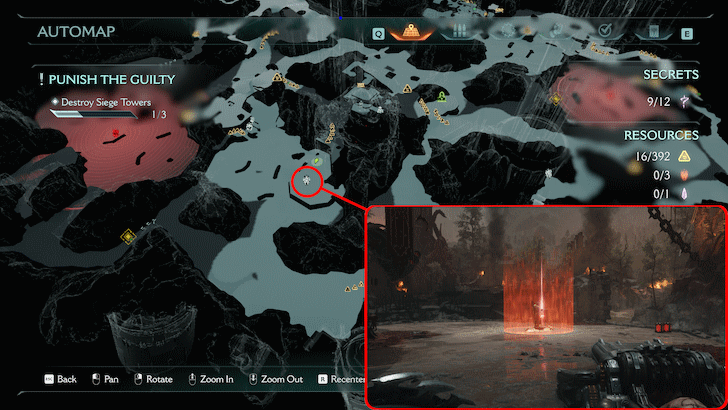 Ruby 1 |
Chapter 20 -
Resurrection
You'll find this northwest from the starting point. Clear the nearby hell gate to unlock this Ruby. |
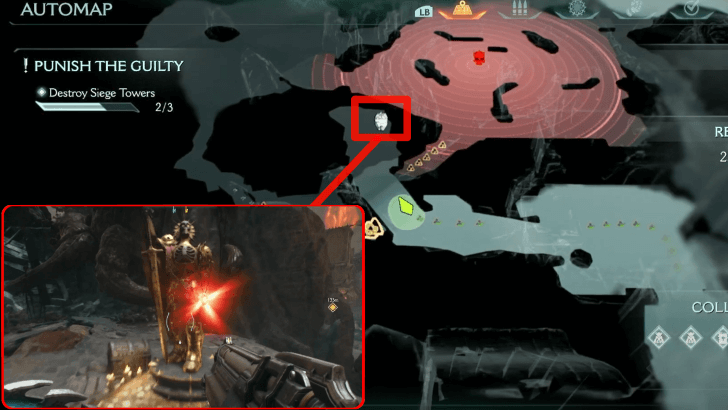 Ruby 2 |
Chapter 20 -
Resurrection
Use the Blue Key to open the path that leads to this Ruby. |
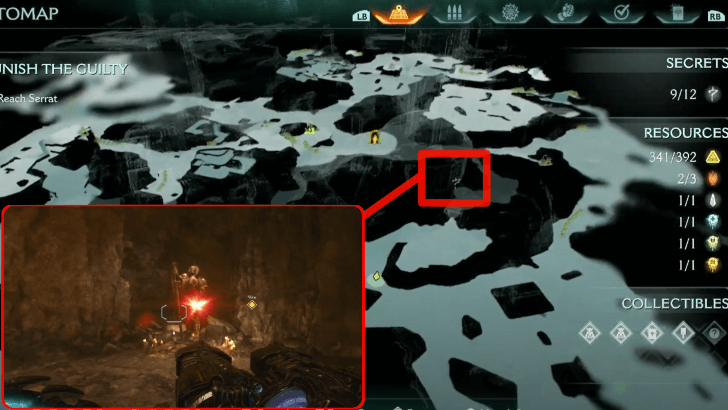 Ruby 3 |
Chapter 20 -
Resurrection
Continue down the path for Gold Trail 19 and make a right u-turn. The Secret Key is needed to open the door leading to this. |
Full Walkthrough and List of Chapters
How Many Rubies Are There?
33 Rubies in Total
There are 33 Rubies that you can collect throughout the chapters. Rubies are sometimes within secret areas, so you'll have to keep an eye out on possible hidden entrances to obtain them.
How to Use Rubies
Use Rubies to Upgrade Weapons
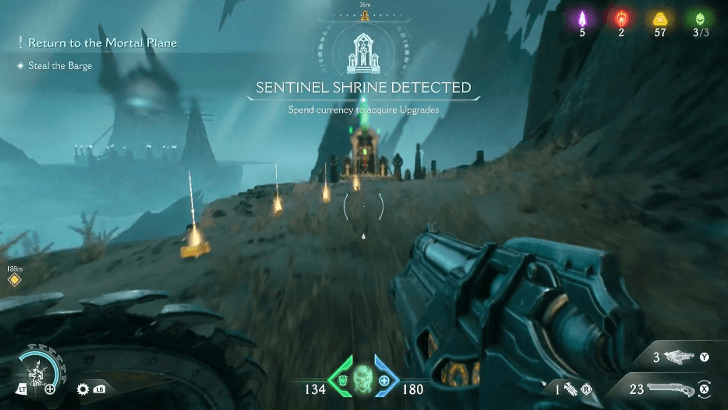
Rubies are used to upgrade your guns, melee weapons, or shield at a Sentinel Shrine. Rubies replace Gold as the currency used to purchase middle-tier upgrades, and will get replaced by Wraithstones on higher tiers.
Doom: The Dark Ages Related Guides

All Resources
Comment
Author
All Ruby Locations
improvement survey
03/2026
improving Game8's site?

Your answers will help us to improve our website.
Note: Please be sure not to enter any kind of personal information into your response.

We hope you continue to make use of Game8.
Rankings
- We could not find the message board you were looking for.
Gaming News
Popular Games

Genshin Impact Walkthrough & Guides Wiki

Honkai: Star Rail Walkthrough & Guides Wiki

Umamusume: Pretty Derby Walkthrough & Guides Wiki

Pokemon Pokopia Walkthrough & Guides Wiki

Resident Evil Requiem (RE9) Walkthrough & Guides Wiki

Monster Hunter Wilds Walkthrough & Guides Wiki

Wuthering Waves Walkthrough & Guides Wiki

Arknights: Endfield Walkthrough & Guides Wiki

Pokemon FireRed and LeafGreen (FRLG) Walkthrough & Guides Wiki

Pokemon TCG Pocket (PTCGP) Strategies & Guides Wiki
Recommended Games

Diablo 4: Vessel of Hatred Walkthrough & Guides Wiki

Fire Emblem Heroes (FEH) Walkthrough & Guides Wiki

Yu-Gi-Oh! Master Duel Walkthrough & Guides Wiki

Super Smash Bros. Ultimate Walkthrough & Guides Wiki

Pokemon Brilliant Diamond and Shining Pearl (BDSP) Walkthrough & Guides Wiki

Elden Ring Shadow of the Erdtree Walkthrough & Guides Wiki

Monster Hunter World Walkthrough & Guides Wiki

The Legend of Zelda: Tears of the Kingdom Walkthrough & Guides Wiki

Persona 3 Reload Walkthrough & Guides Wiki

Cyberpunk 2077: Ultimate Edition Walkthrough & Guides Wiki
All rights reserved
© 2025 ZeniMax Media Inc. All Rights Reserved.
The copyrights of videos of games used in our content and other intellectual property rights belong to the provider of the game.
The contents we provide on this site were created personally by members of the Game8 editorial department.
We refuse the right to reuse or repost content taken without our permission such as data or images to other sites.


![Monster Hunter Stories 3 Review [First Impressions] | Simply Rejuvenating](https://img.game8.co/4438641/2a31b7702bd70e78ec8efd24661dacda.jpeg/thumb)


