Chapter 20: Resurrection Secrets and Walkthrough
☆ Doom: The Dark Ages is live now!
★ Collectibles | Secrets | Walkthrough
┗ Resources | Codex | Toy
★ Trophies | Beginner's Guide | Enemies
☆ Skins: Twitch Drops | Prince St. Pizza
★ FAQs: Co-op | DLC | Specs | Glory Kills
Chapter 20: Resurrection in Doom: the Dark Ages contains 12 secrets and 5 collectibles. Learn how to get all the secrets, gold, and collectibles, as well as how to complete the Mission Challenges in this Chapter 20 walkthrough guide.
List of Contents
| ◄ Previous Chapter | Next Chapter ▶ |
|---|---|
| Harbor of Souls | The Final Battle |
Resurrection Secrets and Collectibles
Resurrection Interactive Map
| Jump to a Collectible! | |
|---|---|
| Toys | 2 |
| Skins | 1 |
| Codex | 2 |
| Life Sigils | 3 |
| Gold | 392 |
| Rubies | 3 |
| Wraithstone | 1 |
| Demonic Essence | 3 |
| Secrets | 12 |
Resurrection Toys
| Item | How to Get |
|---|---|
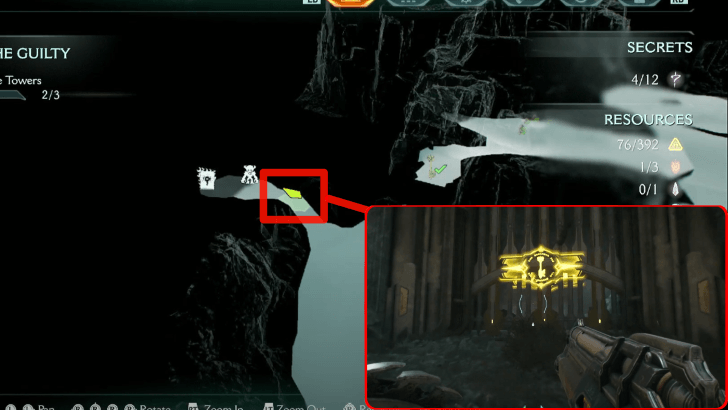 (Secret 4/12) |
Jump down the cliff where you can find the Yellow Key and turn right. You will see a big yellow gate containing this Toy. This is obtained during the second objective. |
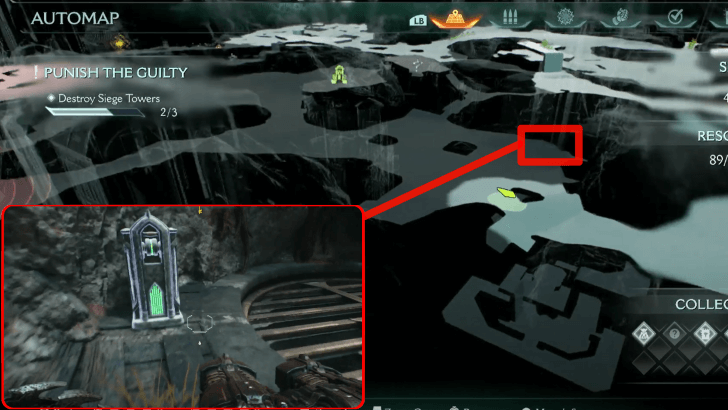 (Secret 5/12) |
While following the objective ping for the third Siege Tower, you will come across an area with several enemies. In the far right corner of the area is a lever opens a path down to a secret area. The gate blocking off this toy can be opened by climbing up a bit and using your shield to trigger the mechanism across the room. This is obtained during the second objective. |
Resurrection Skins
| Item | How to Get |
|---|---|
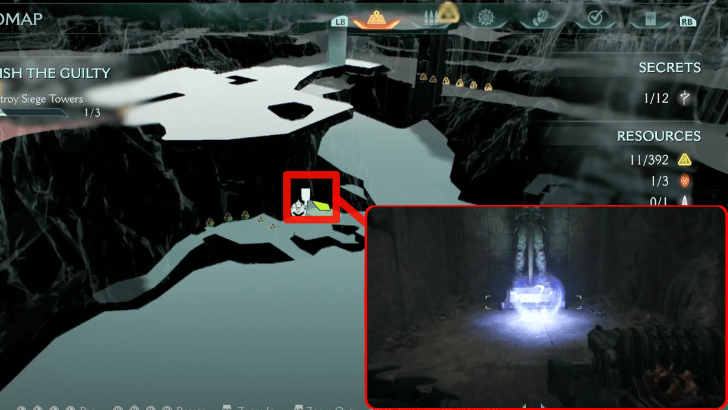 |
It can be seen in the same area as Gold Trail 3. Proceed further into the secret area. This is obtained during the second objective. |
Resurrection Codex Entries
| Item | How to Get |
|---|---|
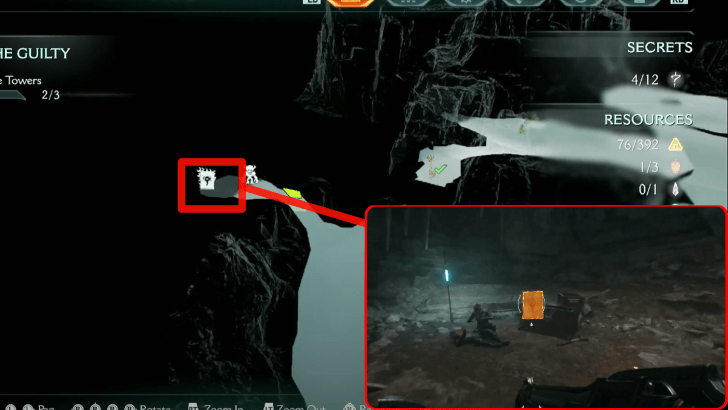 |
Can be found in the same room as the Cosmic Baron Toy. This is obtained during the second objective. |
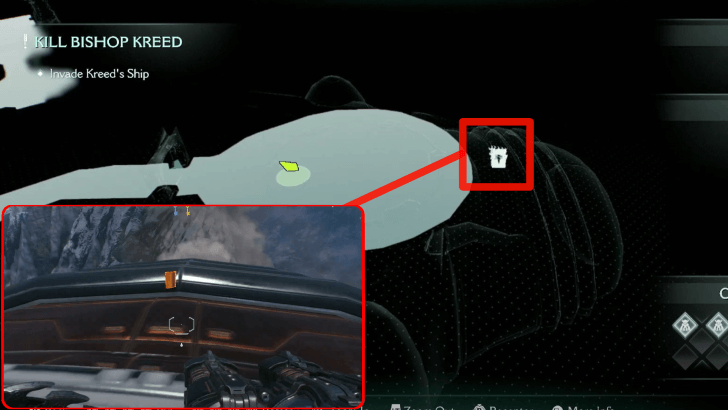 (Secret 12/12) |
After landing using the Serrat, go behind you. This is obtained during the fourth objective. |
Resurrection Life Sigils
| Item | How to Get |
|---|---|
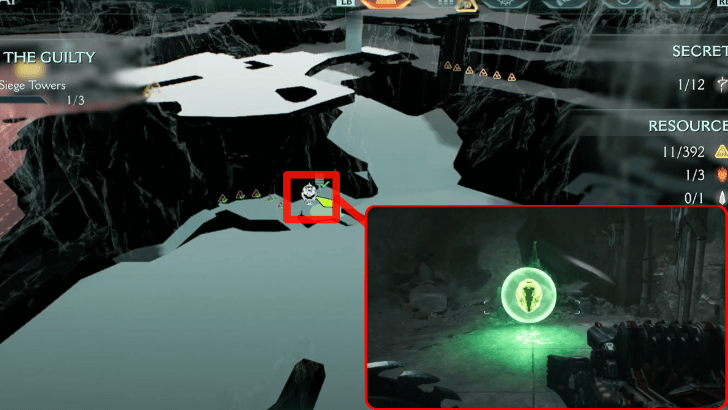 |
It can be seen in the same area as Gold Trail 3. Proceed further into the secret area. This is obtained during the second objective. |
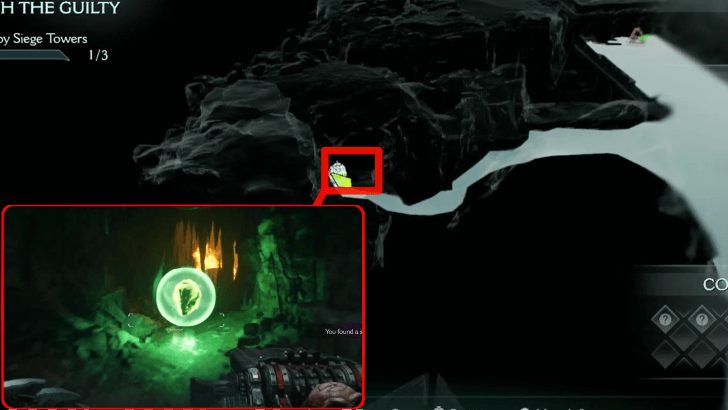 (Secret 3/12) |
From Gold Cache 3, turn right and enter the narrow path. Proceed further into the secret area. This is obtained during the second objective. |
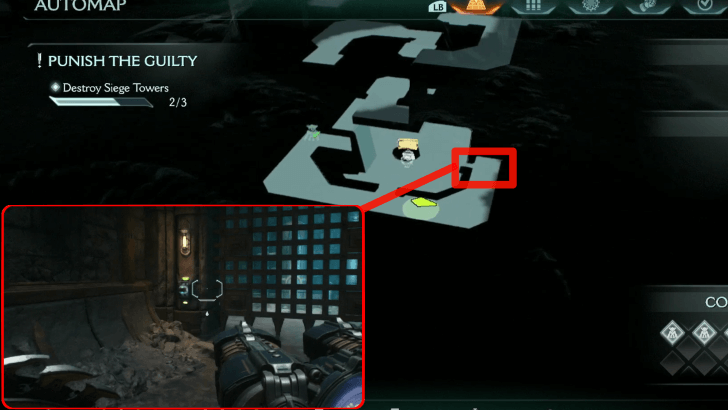 |
It can be found submerged in water. You can open the door leading to it by activating the switch on the opposite side of the Maykyr Drone Toy. This is obtained during the second objective. |
Resurrection Gold
| Item | How to Get |
|---|---|
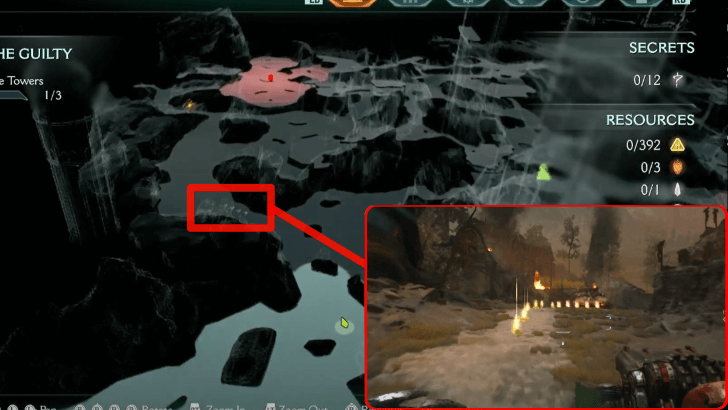 |
From Demonic Essence: Health, head left and continue onwards. You will encounter many enemies along the way, This is obtained during the second objective. |
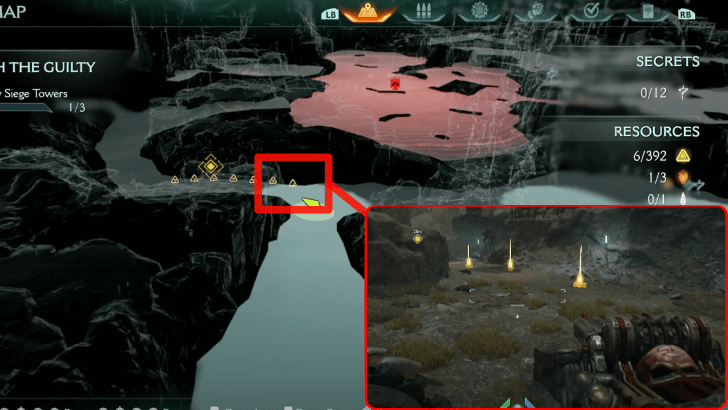 |
From Gold Trail 1, go straight ahead and turn left. It is also nearby Ruby 1. This is obtained during the second objective. |
 (Secret 1/12) |
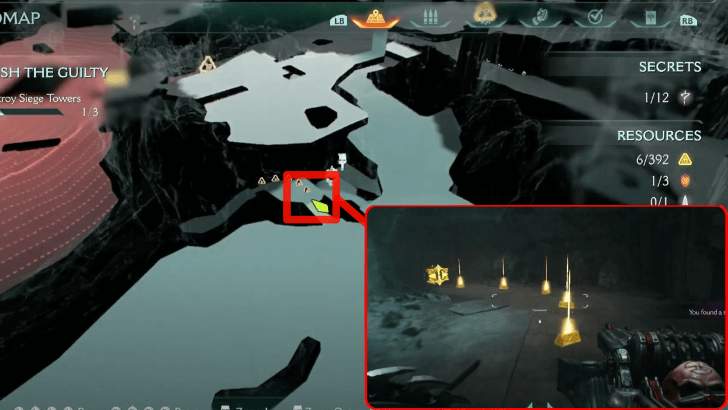
From Gold Trail 2, there is a path on the opposite side of the area that turns left. Follow that path and climb up the area past the nearby broken wall. Shield Charge the cannon to unlock a hidden area. This Gold trail is found leading to a door requiring a Yellow Key. This is obtained during the second objective. |
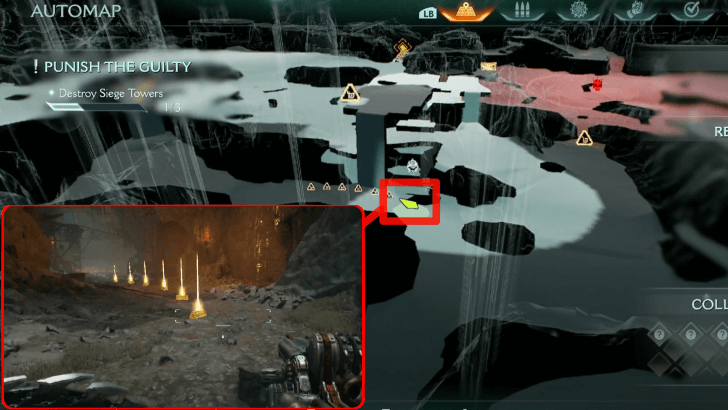 |
After getting out of the secret area in Gold Trail 3, make a right u-turn. This is obtained during the second objective. |
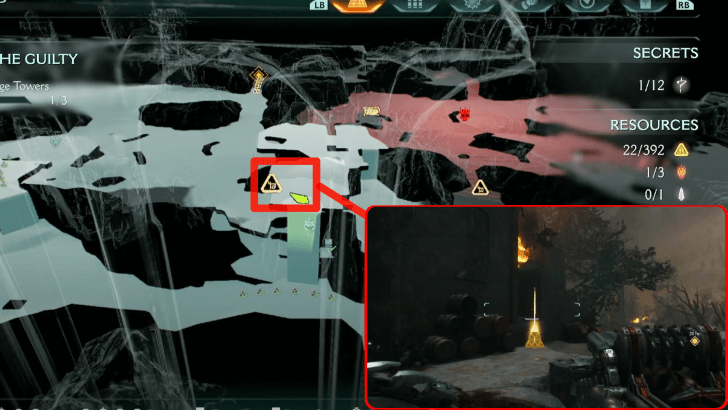 |
Can be found by climbing the wall beside Gold Trail 4. This is obtained during the second objective. |
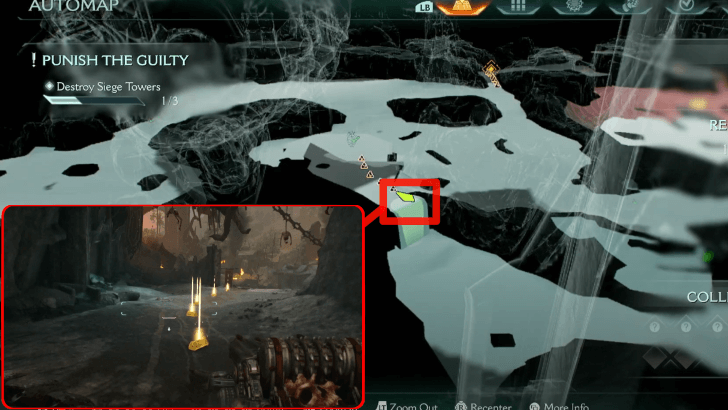 |
Directly in front of Gold Trail 4 are Hell Cultists. Go past this group and climb up the wall on the right. This is obtained during the second objective. |
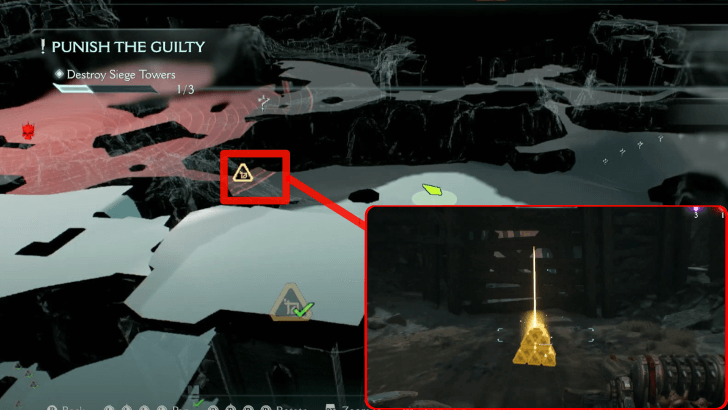 |
After jumping down the tower from Gold Cache 1, turn left. This is obtained during the first objective. |
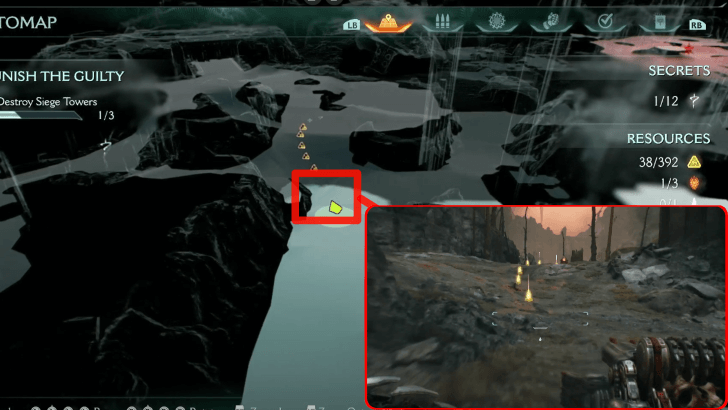 |
Go the opposite direction from Gold Cache 2 until you reach the other side of the area. This is obtained during the first objective. |
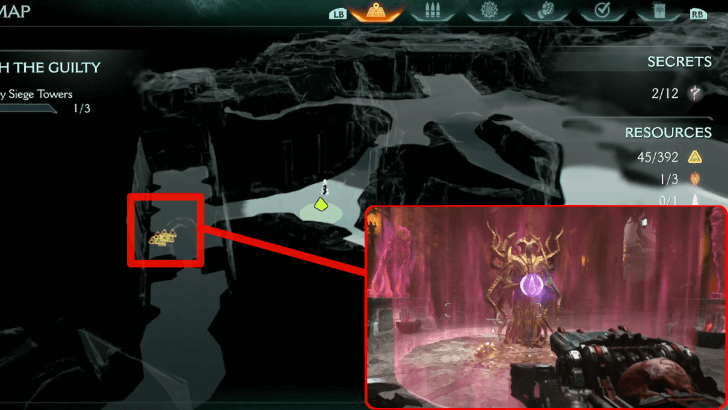 |
From Wraithstone 1 enter the adjacent room to the left. This is obtained during the second objective. |
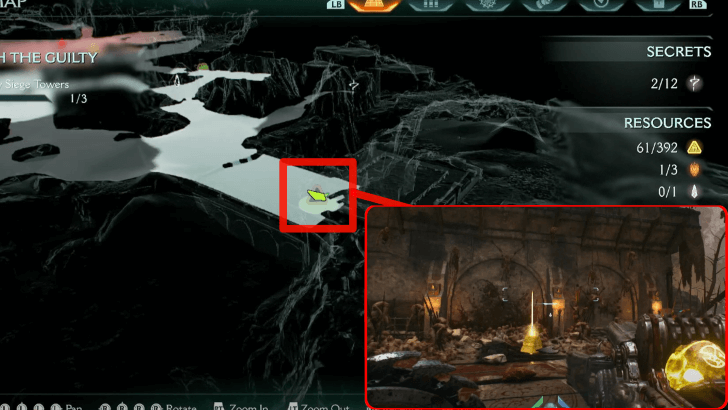 |
This Gold Cache can be found right across the Wraithstone, revealed after destroying the cannon covering it. This is obtained during the second objective. |
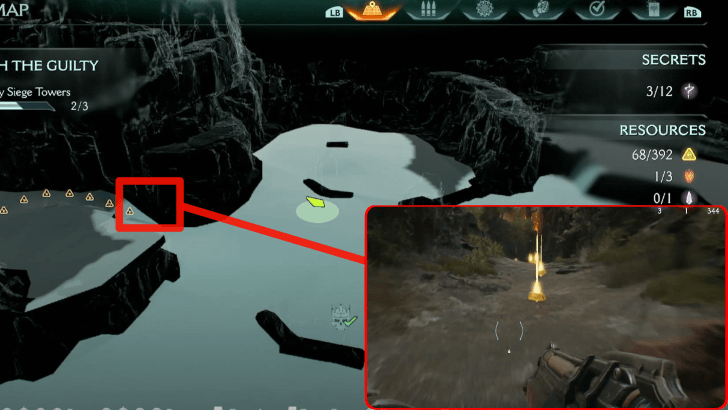 |
Can be found to the left of the area where you find Demonic Essence: Ammo. It also leads to the Yellow Key. This is obtained during the second objective. |
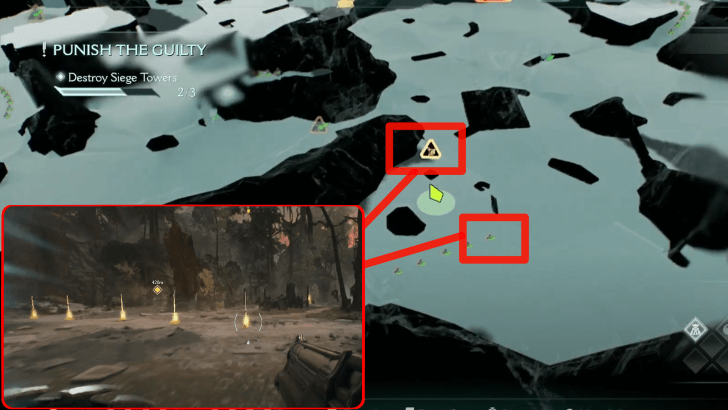 |
In the area where you get the Demonic Essence: Ammo, there is a wall on the right side that you can climb to reach elevated ground. This is obtained during the second objective. |
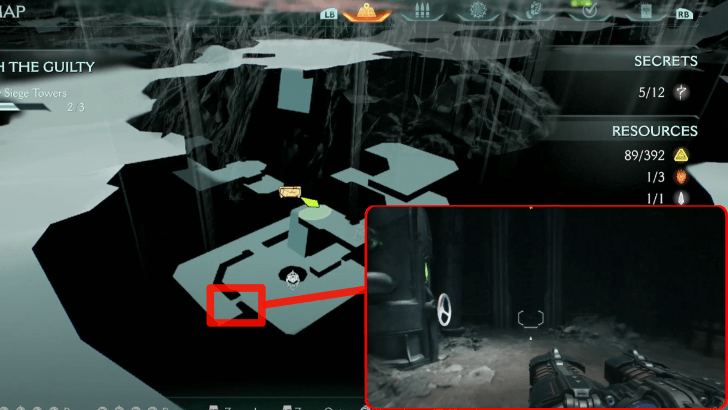 |
In the area where you get the Maykyr Drone Toy, fill the room with water by activating a valve behind one of two the doors. Use your Shield to activate the door mechanism. Follow the path leading upwards to get this Gold Chest. This is obtained during the second objective. |
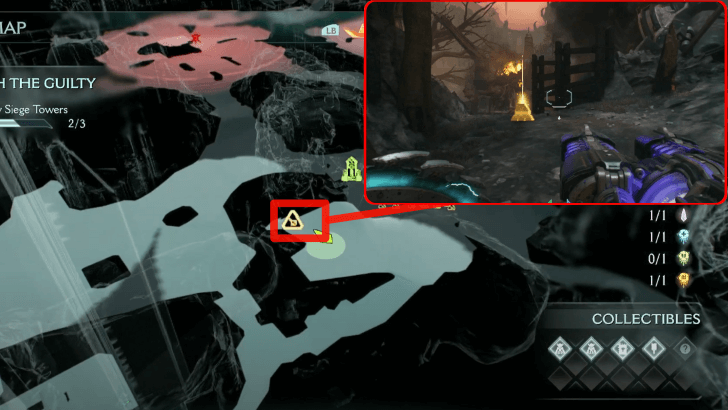 |
In the area where you get the Demonic Essence: Ammo, there is a wall on the right side that you can climb to reach elevated ground. This is obtained during the second objective. |
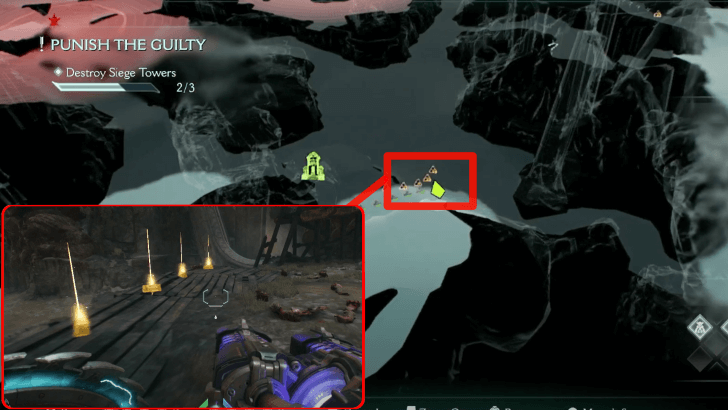 |
This Gold Trail can be found right next to Gold Cache 5. The first 6 gold can be found near the edge of the mound and the remaining 5 can be found by jumping down. This is obtained during the second objective. |
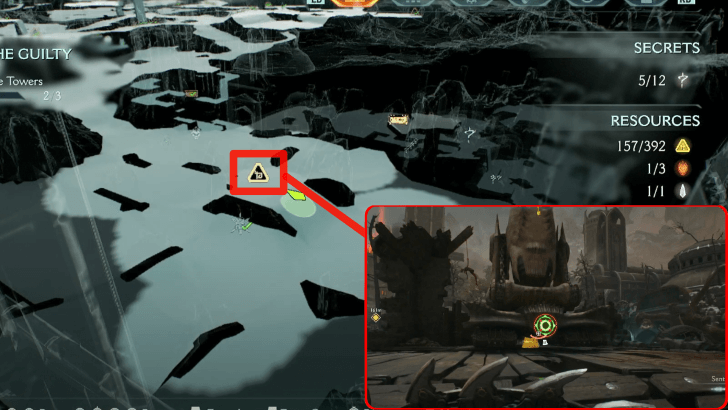 |
From Gold Trail 10, head to the path on the left. Kill the enemies in the area and proceed to the cannon. Shield Charge the Cannon to destroy it and get this Gold Cache. This is obtained during the second objective. |
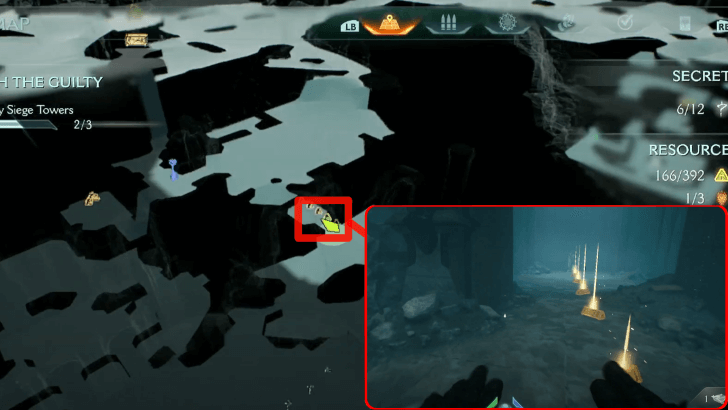 (Secret 6/12) |
From Gold Cache 6, go to the right side of the area and enter the path leading to the secret area. This Gold Trail is found underwater, and activating the switch this trail leads to will open a Shield mechanism. This is obtained during the second objective. |
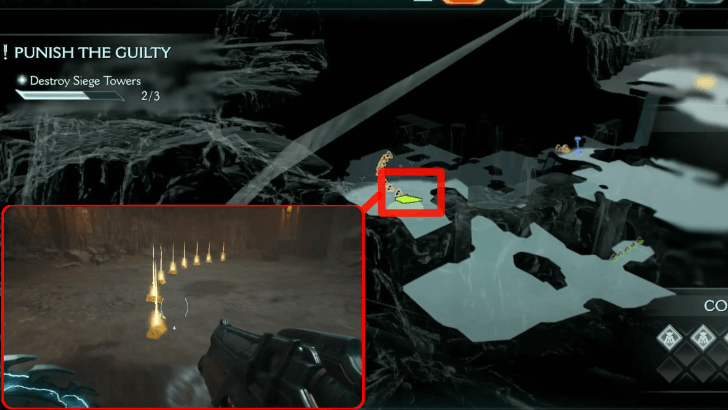 |
From Gold Trail 11, activate the Shield Mechanism you just unlocked to open the gate in front of you. Swim down and cross to the other room. This is obtained during the second objective. |
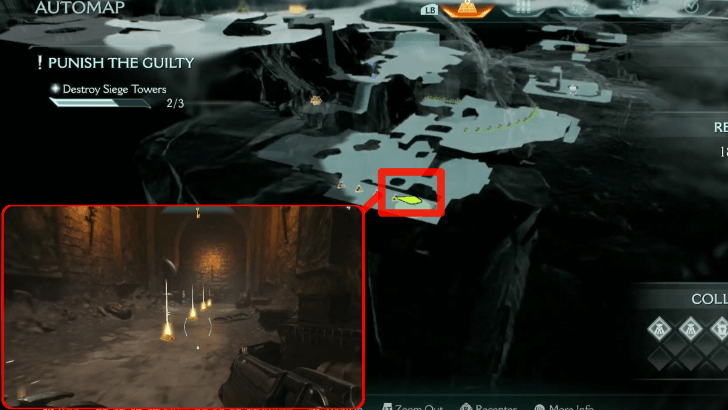 |
Follow the path ahead of Gold Trail 12 and jump down. Shield Charge though the breakable walls to reach this trail. This also leads to a switch that will flood the area with water. There are many projectiles flying overhead, so be careful! This is obtained during the second objective. |
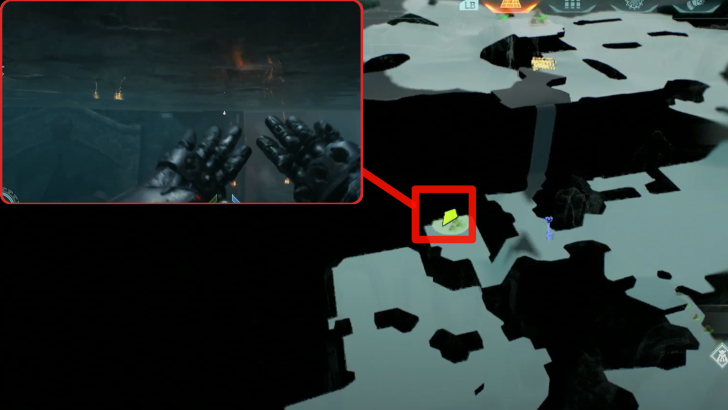 |
Once the switch from Gold Trail 13 has been activated, go out to the main room and swim towards the platform containing this Gold Trail. This is obtained during the second objective. |
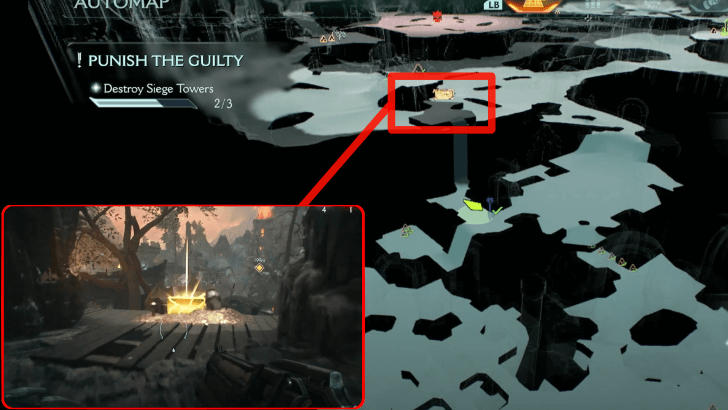 |
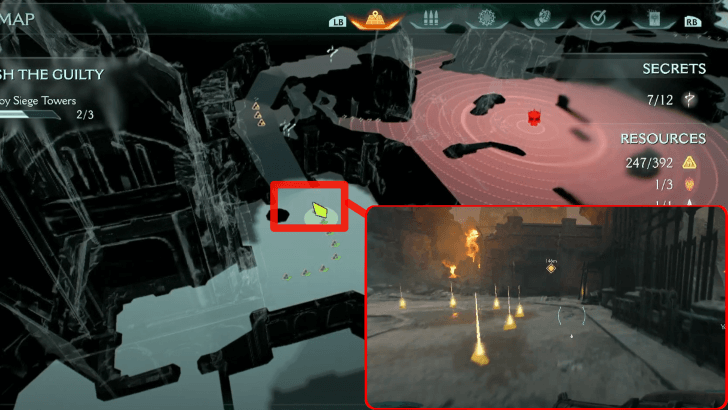
After getting the Blue Key, go left and climb the wall on the right. This leads you straight to the Gold Chest. This is obtained during the second objective. |
 (Secret 7/12) |
From Gold Chest 2, jump down the platform and go to the left. You will see a door that requires a Blue Key. Enter this door and turn right. This is obtained during the second objective. |
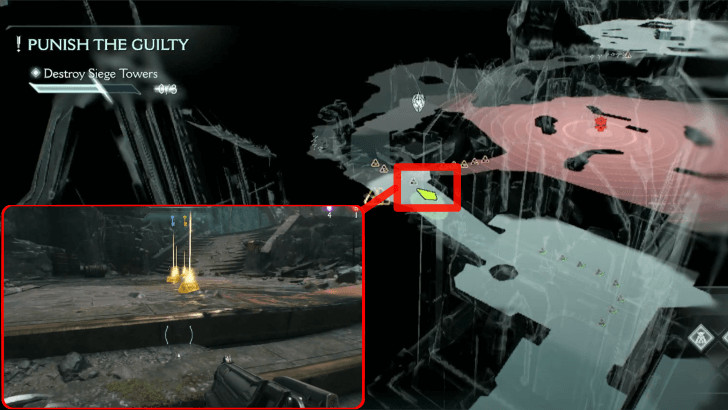 |
From Gold Trail 15, simply follow the path on the left. This is obtained during the second objective. |
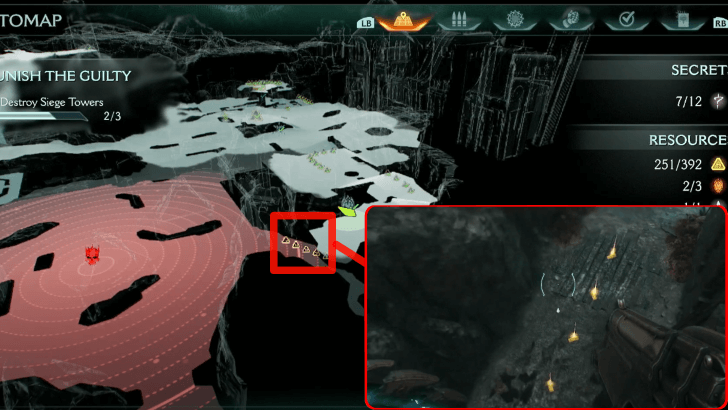 |
From Ruby 2, jump down the cliff and land on the Gold Trail below. This is obtained during the second objective. |
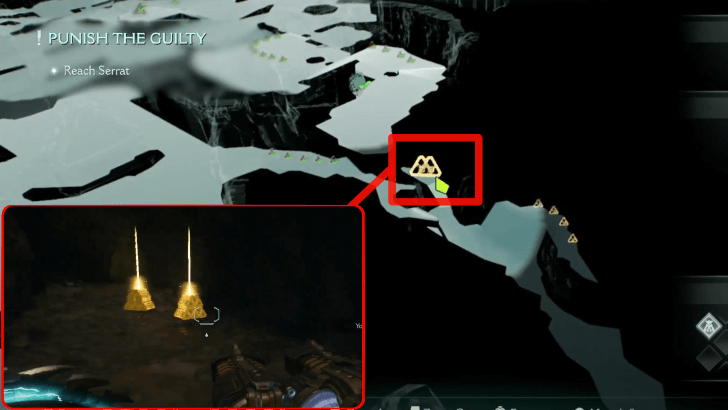 (Secret 8/12) |
Follow the path from Gold Trail 17, go down the cave, and turn left. Shield Charge through the breakable wall to unlock these Gold Caches. This is obtained during the second objective. |
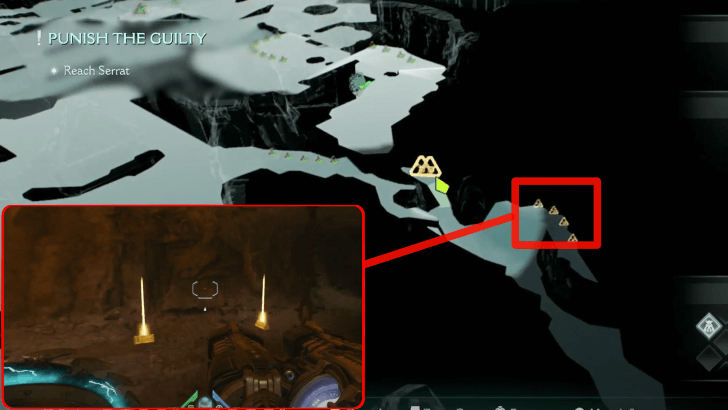 |
This Gold Trail is right across Gold Caches 7. You can reach this by stepping onto the rising platform and hopping off. This is obtained during the second objective. |
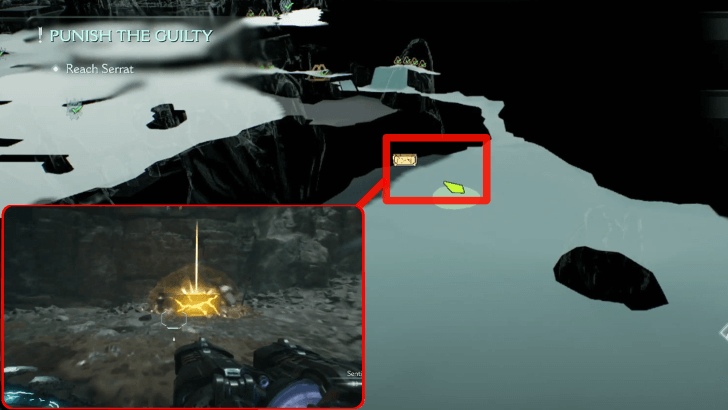 |
Continue down the cave path in Gold Trail 18, defeat all enemies within the area to unlock this Gold Chest. This is obtained during the second objective. |
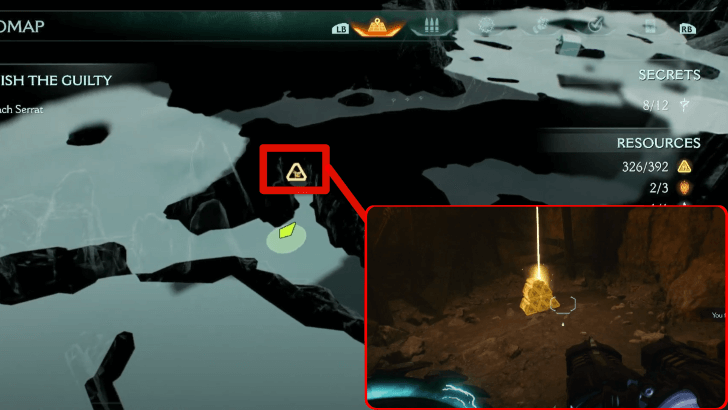 (Secret 9/12) |
After defeating enemies to get Gold Chest 3, head down the path on the right and Shield Charge through the breakable wall. This is obtained during the second objective. |
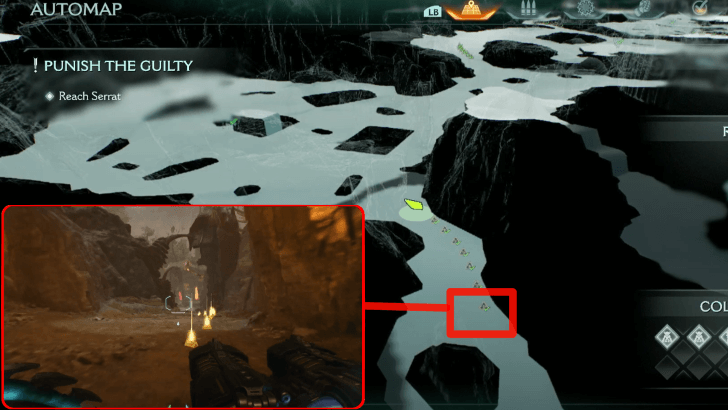 |
Continue down the cave path from Gold Cache 8 to get this. This is obtained during the second objective. |
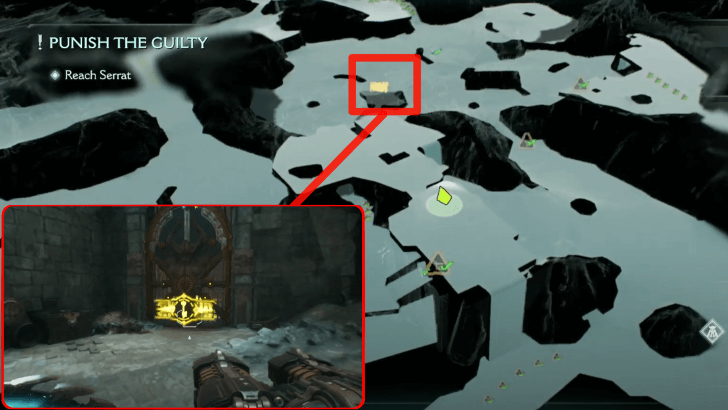 (Secret 11/12) |
Climb back up the wall where you found Gold Cache 1. Proceed further into the structure and use the Yellow Key to open the lock. This is obtained during the second objective. |
Resurrection Rubies
| Item | How to Get |
|---|---|
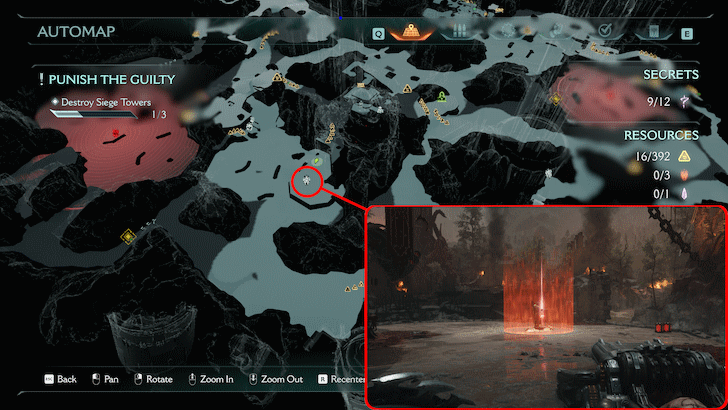 (Secret 1/5) |
Follow the path from Gold Trail 1 and turn right. It can be found on elevated ground near an area with enemies. This is obtained during the second objective. |
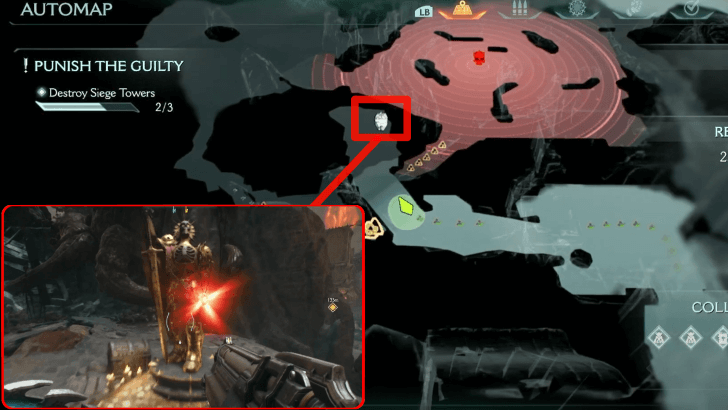 |
Follow the path from Gold Trail 15 and go straight ahead. This is obtained during the second objective. |
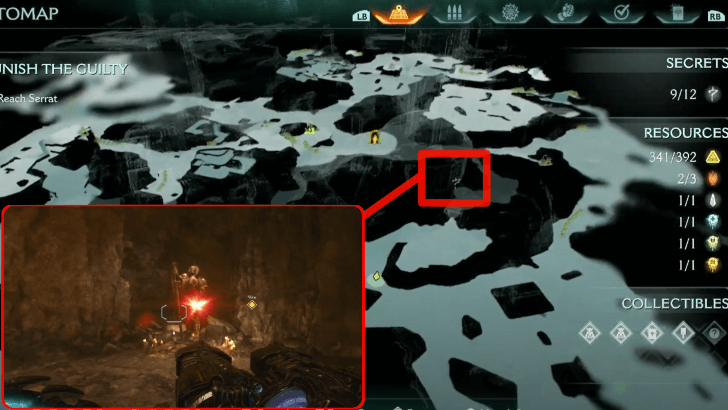 (Secret 10/12) |
Continue down the path for Gold Trail 19 and make a right u-turn. The Secret Key is needed to open the door leading to this. This is obtained during the second objective. |
Resurrection Wraithstones
| Item | How to Get |
|---|---|
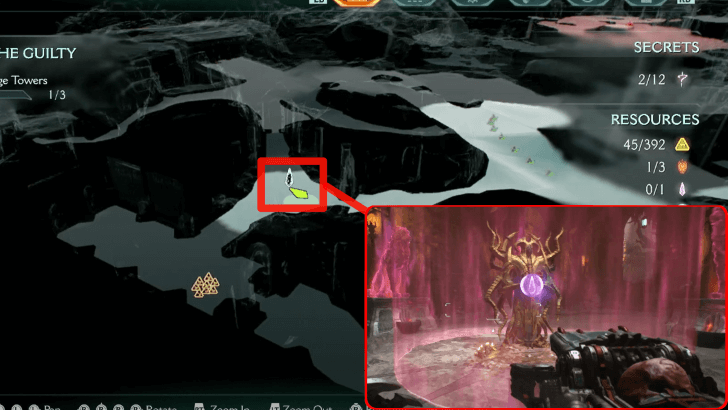 (Secret 2/12) |
This can be found in a narrow path near Gold Trail 6. Destroy all Wolf Statues to unlok the Wraithstone. This is obtained during the second objective. |
Resurrection Demonic Essence
| Item | How to Get |
|---|---|
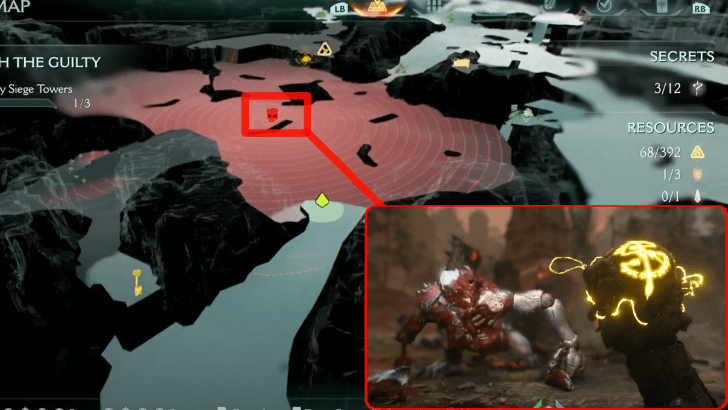
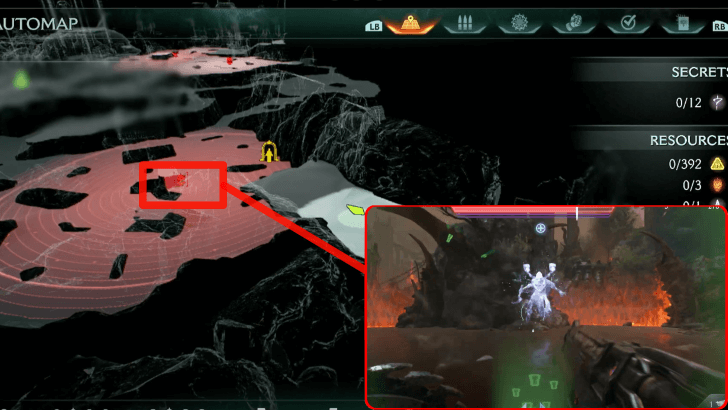 |
Upon spawning, follow the path you are in until you see a wide area with a leader. Defeat the leader to obtain the Demonic Essence: Health. This is obtained during the second objective. |
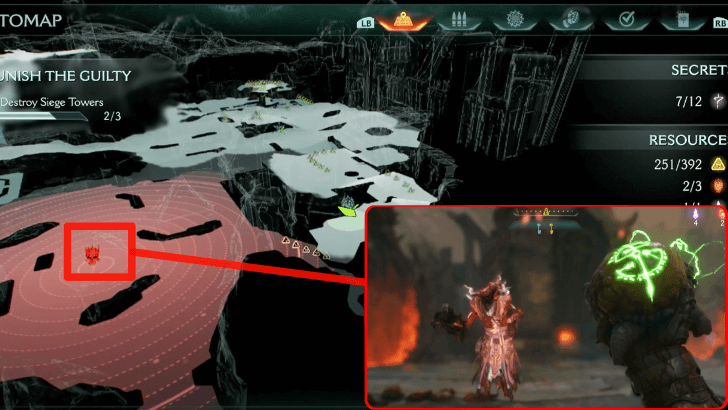
 |
Follow the objective ping when going towards the second Siege Tower. This is obtained during the second objective. |
 |
The leader for this Demonic Essence is found right next to Gold Trail 17. This is obtained during the second objective. |
Wolf Statue Locations
| Chapter 20 Wolf Statue Locations | |
|---|---|
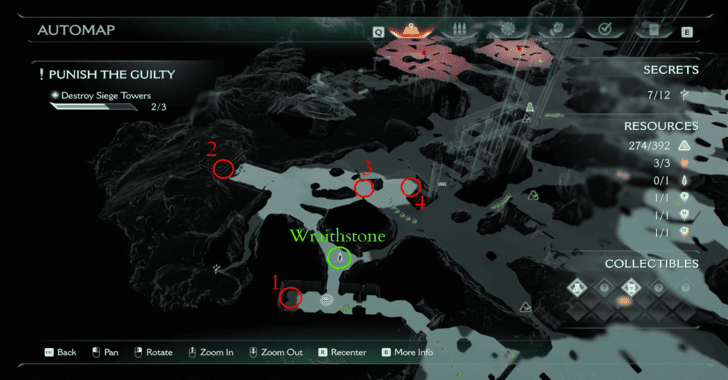 |
The Wolf Puzzle for Resurrection is located directly at the opposite side of your starting point. Once you reach the Wolf Statue with an Armored Mancubus Enforcer, head to the underpassage on the left to reach the Wolf Puzzle.
Wolf Statue Location Details
| ✔️ | Wolf Statue Location Details |
|---|---|
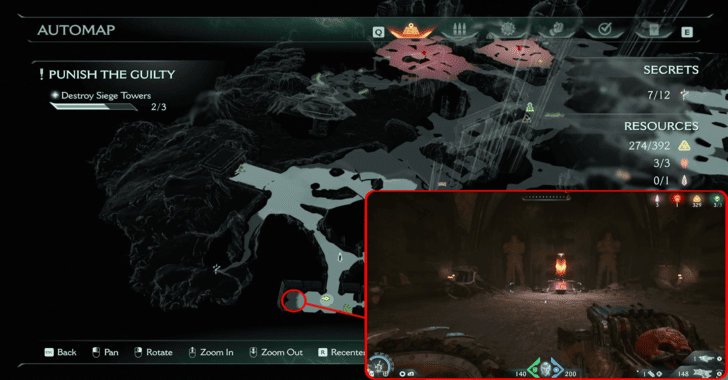 The first Wolf Statue is found in room with two knight statues located to the south of the Wraithstone relative to the image above. |
|
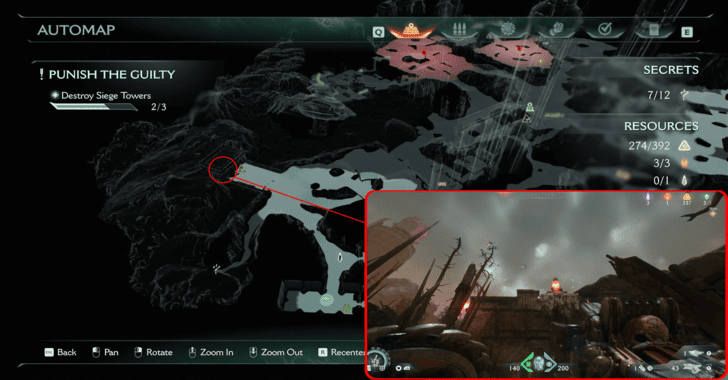 The second Wolf statue can be found atop a structure located west of the Wraithstone relative to the image above. |
|
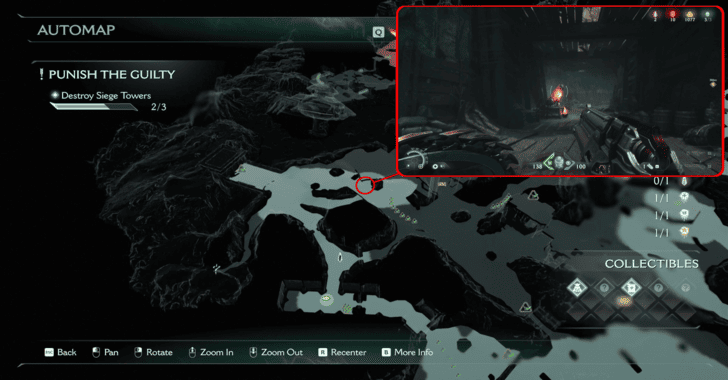 The third Wolf statue can be found underneath a wooden bridge located north of the Wraithstone. |
|
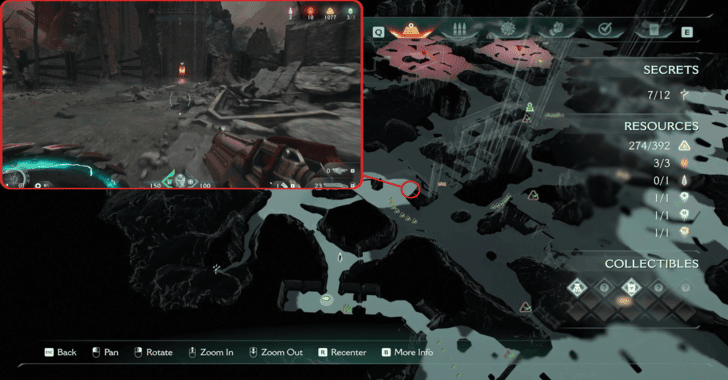 The fourth and final Wolf statue can be found just across from the third statue near a wall. |
Completing this Wolf Puzzle will grant access to the Wraithstone.
All Wolf Statue Locations and Solutions
Resurrection Walkthrough
| Main Objectives | |
|---|---|
| 1 | Return to the Mortal Plane |
| 2 | Destroy 3 Siege Towers Secrets: Gold Trail 3 – Secret #1 Wraithstone 1 – Secret #2 Life Sigil 2 – Secret #3 Cosmic Baron Toy – Secret #4 Maykyr Drone Toy – Secret #5 Gold Trail 11 – Secret #6 Gold Trail 15 – Secret #7 Gold Caches 7 – Secret #8 Gold Cache 8 – Secret #9 Ruby 3 – Secret #10 Gold Chest 4 – Secret #11 |
| 3 | Reach Serrat |
| 4 | Invade Kreed's Ship Collectible: Commander Valen Codex – Secret #12 |
1. Return to the Mortal Plane
| 1 | 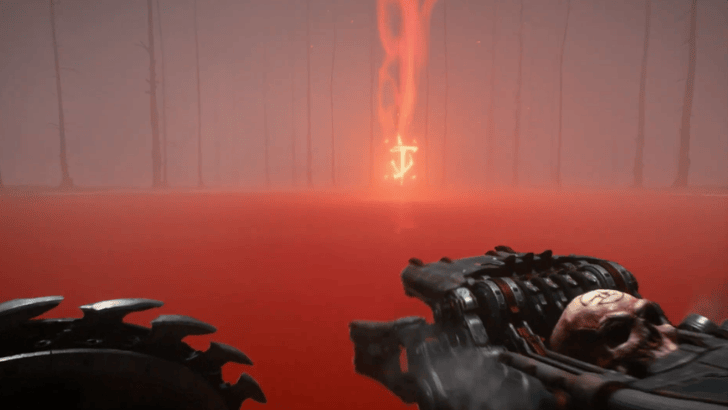 Upon spawning, follow the Objective Marker towards a pool of blood with the Mark of the Doom Slayer in the middle. Getting closer will trigger a cutscene that leads to your resurrection. |
|---|
2. Destroy 3 Siege Towers
| 1 | 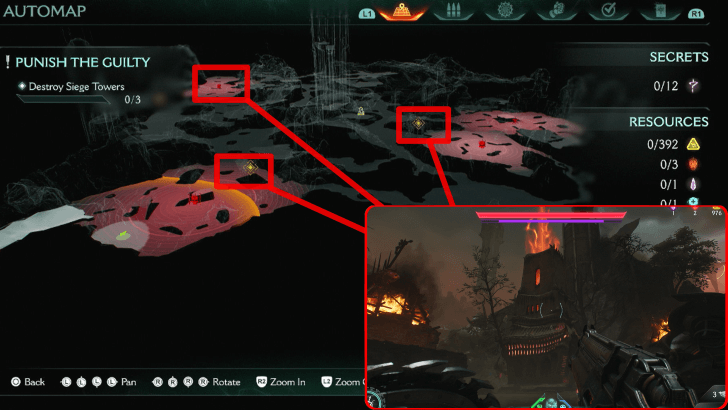 After your resurrection, follow the Objective Marker to the 3 Siege Towers you must destroy. These 3 Siege Towers are at opposite ends of the map. Collectibles: All Gold Trails(x120), All Gold Caches (x72), All Gold Chests (x200), All Rubies, Cosmic Baron Toy, Maykyr Drone Toy, All Life Sigils, Resurrection Codex, Weapon Skin, Wraithstone |
|---|---|
| 2 | 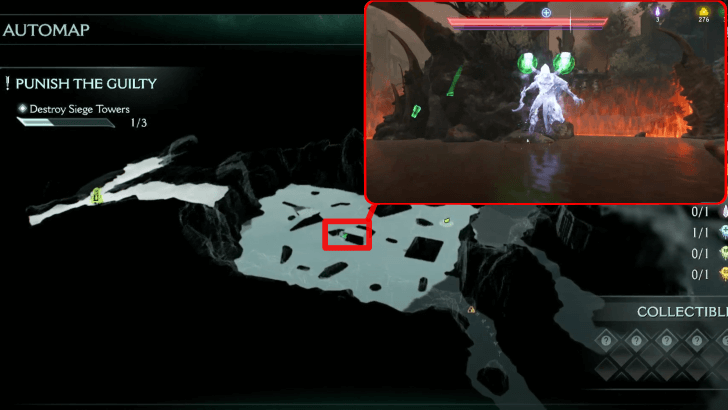 You will find the Siege Tower in the first area after spawning. Destroy the Siege Tower by defeating the Revenant Leader within the area. This enemy keeps its distance and hits you with long-range attacks, so parry whatever you can and try to fight up close. Collectibles: Demonic Essence: Health |
| 3 | 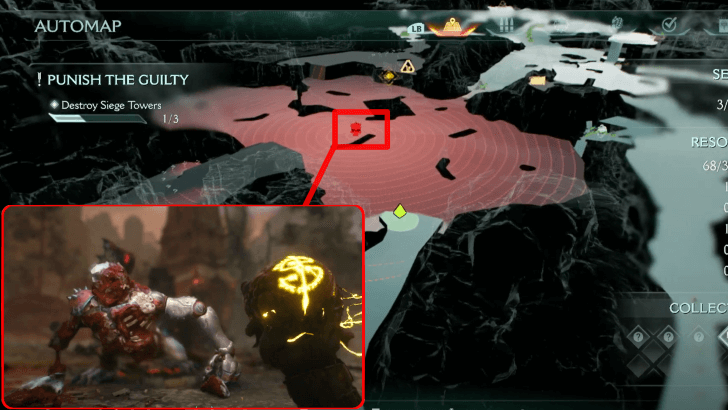 You will find second Siege Tower near the Yellow Key, to the left from where you first spawn. Destroy the Siege Tower by defeating the Komodo Leader within the area. This enemy will attack consecutively, so pay attention for parryable attacks. Collectibles: Demonic Essence: Ammo |
| 4 | 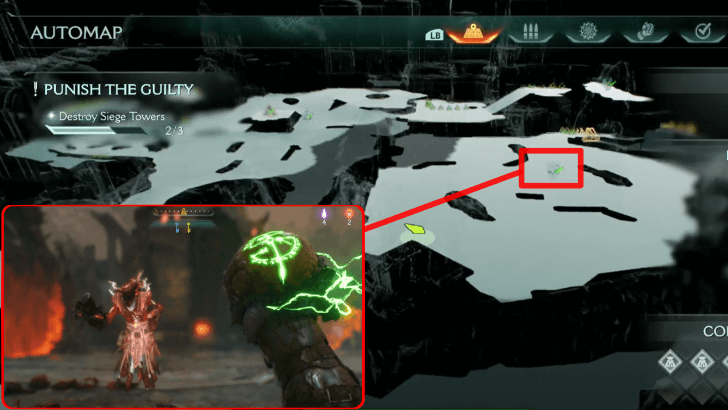 You will find the third Siege Tower in a wide area to the right of where you first spawn. Destroy the Siege Tower by defeating the Acolyte Leader within the area. Take out the spirit clone somewhere around the area to get rid of this enemy's purple barrier. Collectibles: Demonic Essence: Armor |
Yellow Secret Key Location
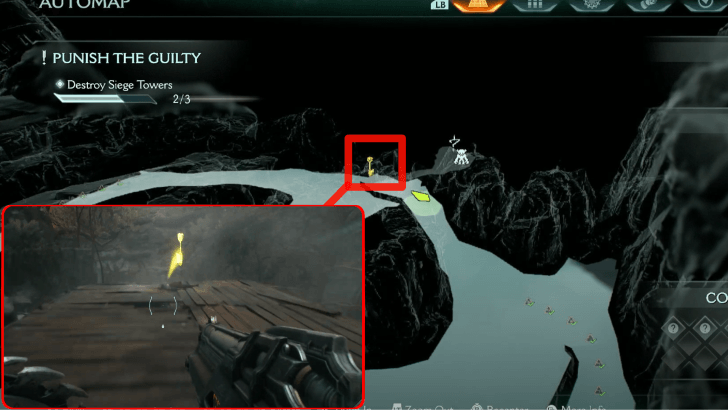
It can be seen at the end of a cliff near where you fight the leader for Demonic Essence: Ammo. The path leading up to this can be seen from Gold Trail 8.
3. Reach Serrat
| 1 | 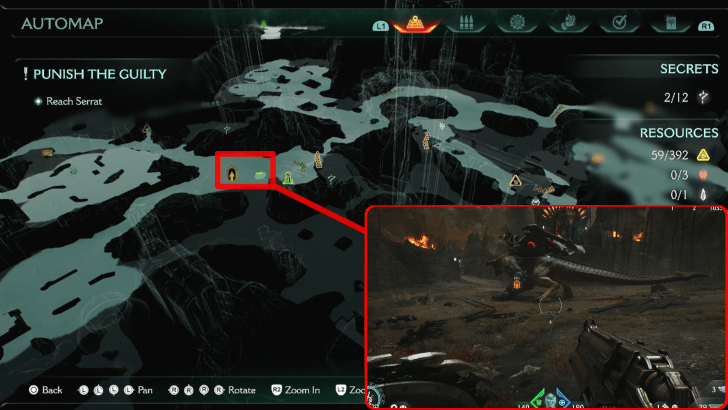 Follow the Objective Marker back to Serrat. Once in flight, follow the Objective Marker to Kreed's Ship. |
|---|
4. Invade Kreed's Ship
| 1 | 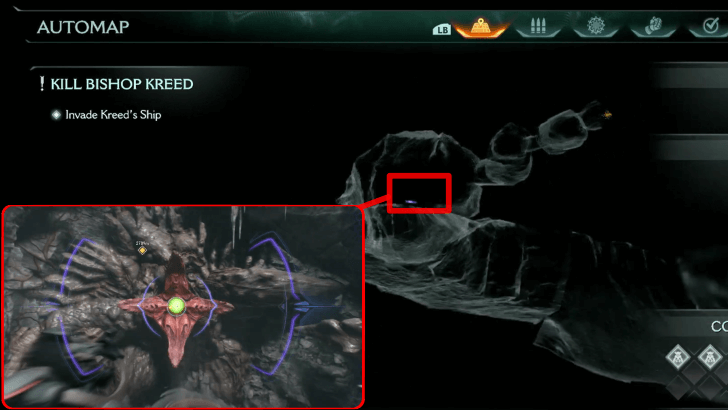 Along the way to Kreed's Ship, defeat an enemy blocking your path. Upon its defeat, you will encounter a Hell Fighter ship needed for the Master Hunter Mission Challenge. |
|---|---|
| 2 | 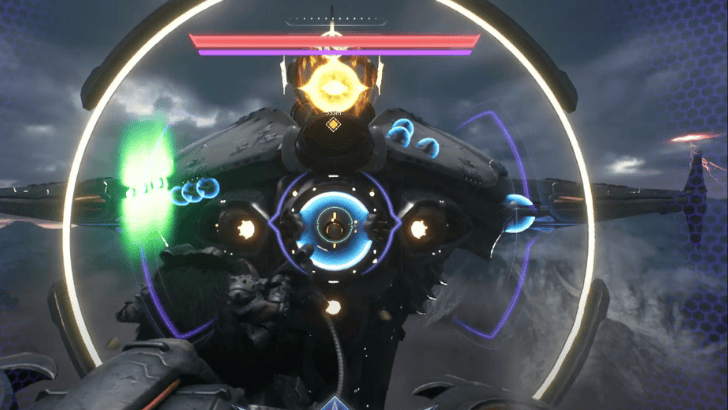 Destroy the cores on the ship in order to unlock the landing spot. Collectibles: Commander Valen Codex |
| 3 | 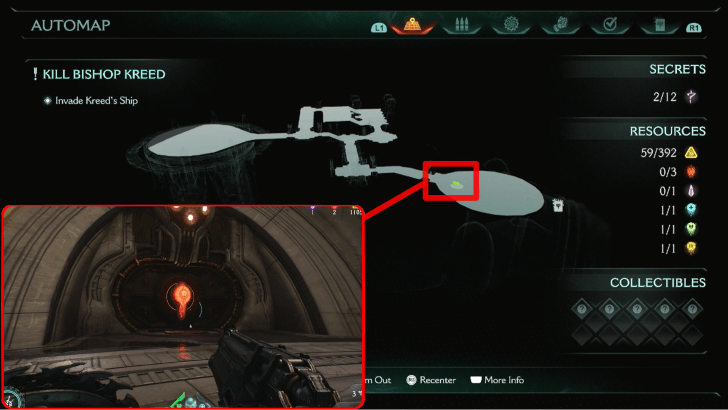 Shield Throw the lock on the gate to enter the ship. |
| 4 | 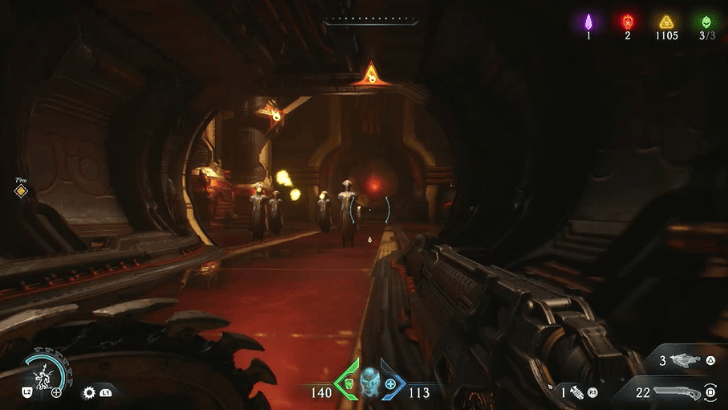 Follow the Objective Marker and kill all enemies within the area. |
| 5 | 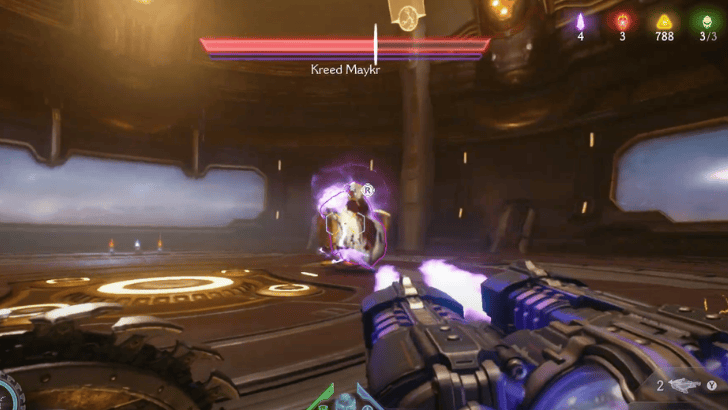 In the end, you will have to defeat Kreed Maykr. This stage is a two-phase boss fight, so prepare to stand and fight! |
Blue Secret Key Location
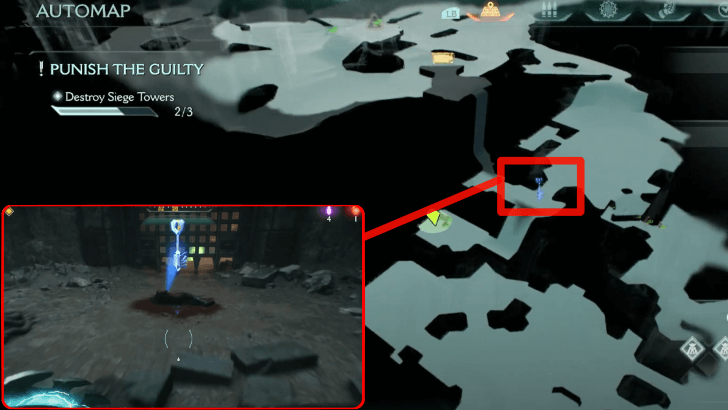
Once the secret area in Gold Trail 14 has been filled with water, climb up the wall on your right. This leads you straight to the Blue Secret Key.
Resurrection Boss Guide
| Kreed Maykr Combat Tips |
|---|
|
|
Use the Shield Saw Against the Floating Shields
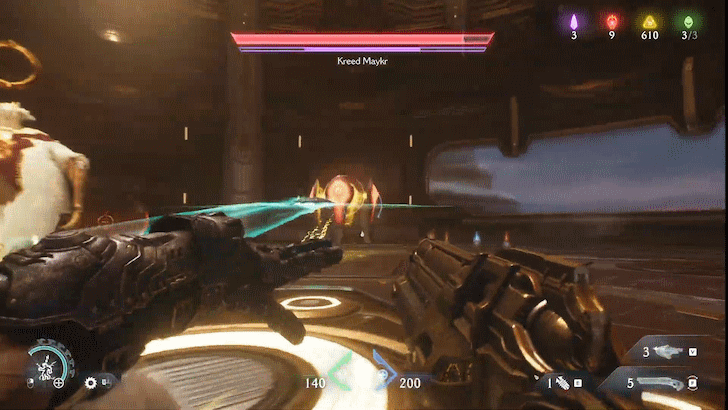
Kreed Maykr will occasionally generate lightning orbs surrounded by shields that constantly shock the ground around them. Throwing your Saw Shield at these floating shields detonates them, dealing damage to Kreed Maykr and any Maykr Drones close enough.
Charge at the Maykr Drones With Your Shield
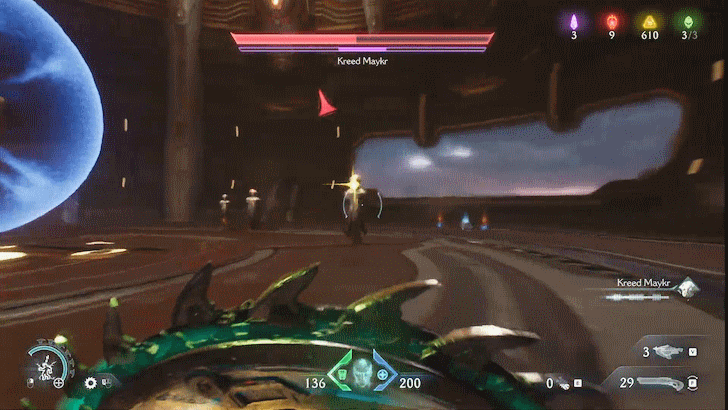
A quick way to get rid of the annoying Maykr Drones that are summoned is to use the Shield Charge against them. This will annihilate the target and any other drones near it, making it a quick tool that doesn't need you to change weapons to deal with them.
Stay As Far Away During the Bullet-Hell Section
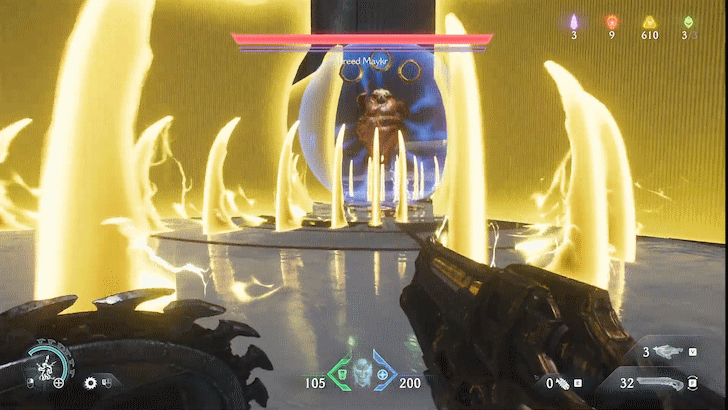
Once Kreed Maykr summons the yellow waves on the ground to start the bullet-hell section, it's best to stay as far away from the boss as possible. This gives you more space between the yellow wave projectiles to avoid damage.
Kreed Maykr Boss Guide and How to Beat
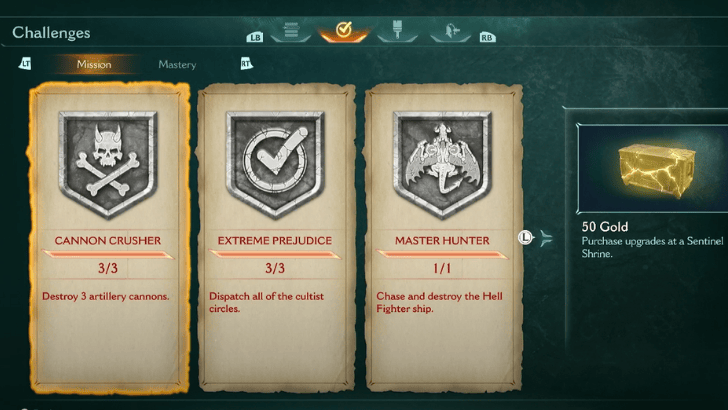
Resurrection Mission Challenges
 |
|
| Challenge | Details and Reward |
|---|---|
| Cannon Crusher | Destroy 3 Artillery Cannons Reward: 50 Gold |
| Extreme Prejudice | Dispatch all of the Cultist circles. Reward: Reverent Rocket Launcher |
| Master Hunter | Chase and Destroy the Hell Fighter ship. Reward: 50 Gold |
Cannon Crusher
| Chapter 20 Artillery Cannon Locations | |
|---|---|
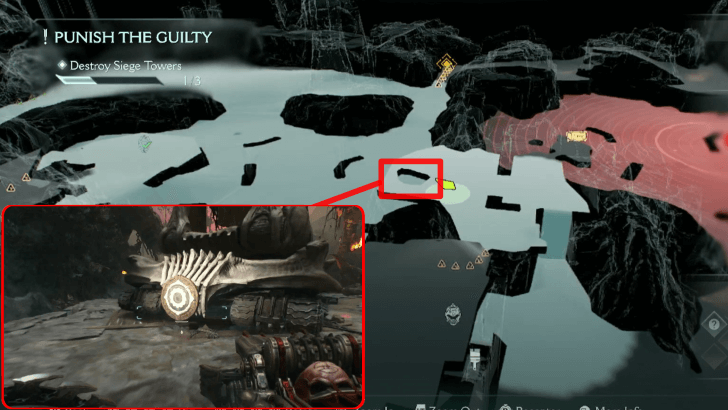 1 |
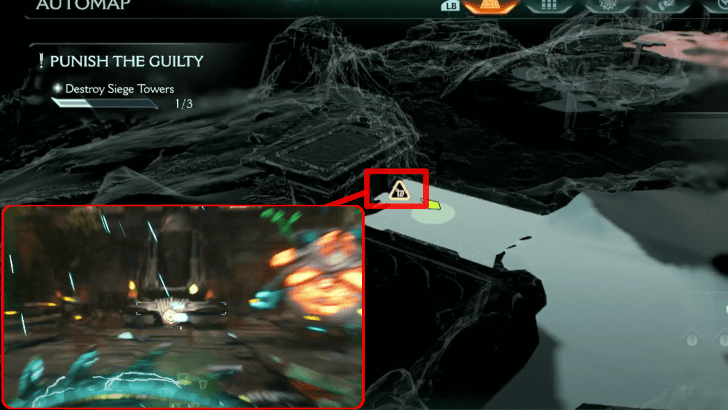 2 |
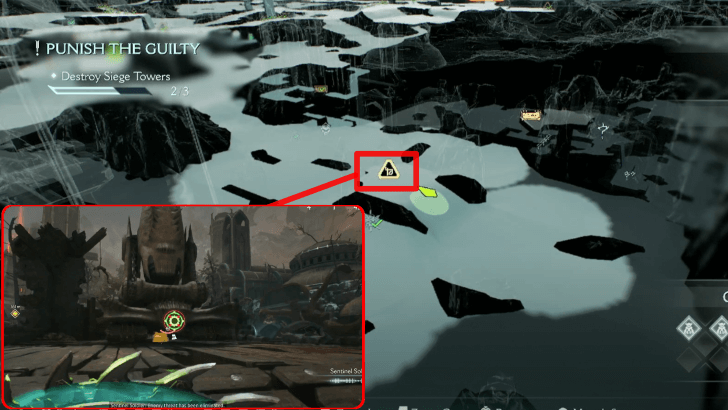 3 |
- |
Shield Charge through Artillery Cannons found within the second objective to destroy them.
Extreme Prejudice
| Chapter 20 Cultist Circles Locations | |
|---|---|
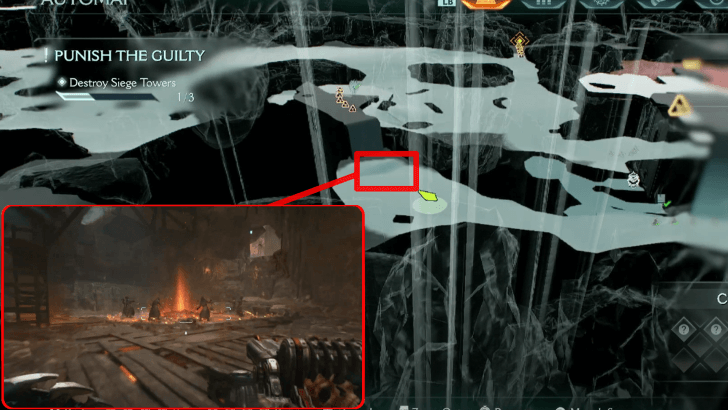 1 |
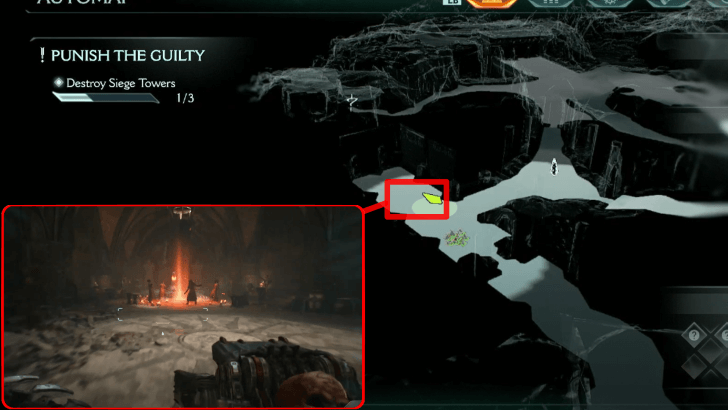 2 |
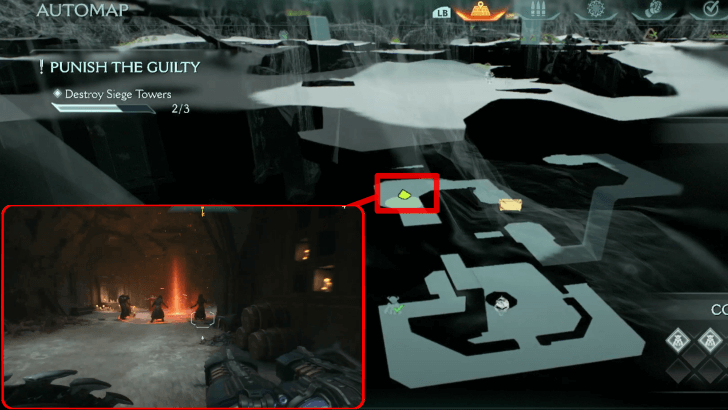 3 |
- |
Defeat all Cultists found within the second objective. Some of these Cultist circles are found within secret areas.
Master Hunter
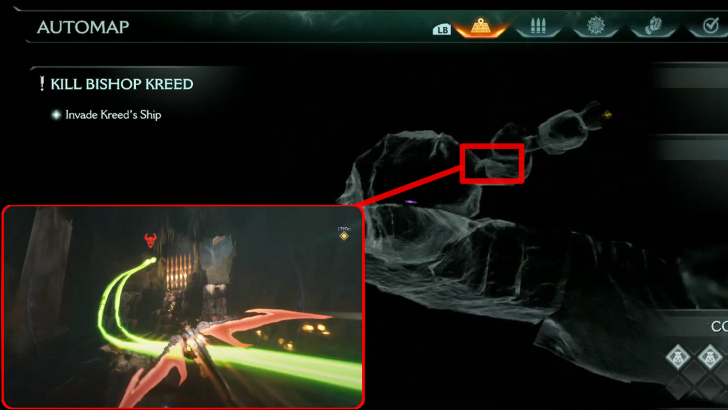
On your way to Kreed's Ship in the fourth objective, you will find the Hell Fighter ship you need for this Mission Challenge.
Doom: The Dark Ages Related Guides

Full Walkthrough and List of Chapters
Comment
Author
Chapter 20: Resurrection Secrets and Walkthrough
improvement survey
03/2026
improving Game8's site?

Your answers will help us to improve our website.
Note: Please be sure not to enter any kind of personal information into your response.

We hope you continue to make use of Game8.
Rankings
- We could not find the message board you were looking for.
Gaming News
Popular Games

Genshin Impact Walkthrough & Guides Wiki

Honkai: Star Rail Walkthrough & Guides Wiki

Umamusume: Pretty Derby Walkthrough & Guides Wiki

Pokemon Pokopia Walkthrough & Guides Wiki

Resident Evil Requiem (RE9) Walkthrough & Guides Wiki

Monster Hunter Wilds Walkthrough & Guides Wiki

Wuthering Waves Walkthrough & Guides Wiki

Arknights: Endfield Walkthrough & Guides Wiki

Pokemon FireRed and LeafGreen (FRLG) Walkthrough & Guides Wiki

Pokemon TCG Pocket (PTCGP) Strategies & Guides Wiki
Recommended Games

Diablo 4: Vessel of Hatred Walkthrough & Guides Wiki

Fire Emblem Heroes (FEH) Walkthrough & Guides Wiki

Yu-Gi-Oh! Master Duel Walkthrough & Guides Wiki

Super Smash Bros. Ultimate Walkthrough & Guides Wiki

Pokemon Brilliant Diamond and Shining Pearl (BDSP) Walkthrough & Guides Wiki

Elden Ring Shadow of the Erdtree Walkthrough & Guides Wiki

Monster Hunter World Walkthrough & Guides Wiki

The Legend of Zelda: Tears of the Kingdom Walkthrough & Guides Wiki

Persona 3 Reload Walkthrough & Guides Wiki

Cyberpunk 2077: Ultimate Edition Walkthrough & Guides Wiki
All rights reserved
© 2025 ZeniMax Media Inc. All Rights Reserved.
The copyrights of videos of games used in our content and other intellectual property rights belong to the provider of the game.
The contents we provide on this site were created personally by members of the Game8 editorial department.
We refuse the right to reuse or repost content taken without our permission such as data or images to other sites.




![Monster Hunter Stories 3 Review [First Impressions] | Simply Rejuvenating](https://img.game8.co/4438641/2a31b7702bd70e78ec8efd24661dacda.jpeg/thumb)


