Chapter 15: City of Ry'uul Secrets and Walkthrough
☆ Doom: The Dark Ages is live now!
★ Collectibles | Secrets | Walkthrough
┗ Resources | Codex | Toy
★ Trophies | Beginner's Guide | Enemies
☆ Skins: Twitch Drops | Prince St. Pizza
★ FAQs: Co-op | DLC | Specs | Glory Kills
Chapter 15: City of Ry'uul in Doom: the Dark Ages contains 10 secrets and 3 collectibles. Learn how to get all the secrets, gold, and collectibles, as well as how to complete the Mission Challenges in this Chapter 15 walkthrough guide.
| ◄ Previous Chapter | Next Chapter ▶ |
|---|---|
| Spire of Nerathul | The Kar'Thul Marshes |
City of Ry'uul Secrets and Collectibles
City of Ry'uul Interactive Map
| Jump to a Collectible! | |
|---|---|
| Toys | 1 |
| Skins | 1 |
| Codex | 1 |
| Life Sigils | 2 |
| Demonic Essence | 2 |
| Gold | 182 |
| Rubies | 2 |
| Wraithstone | 1 |
| Secrets | 10 |
City of Ry'uul Toys
| Item | How to Get |
|---|---|
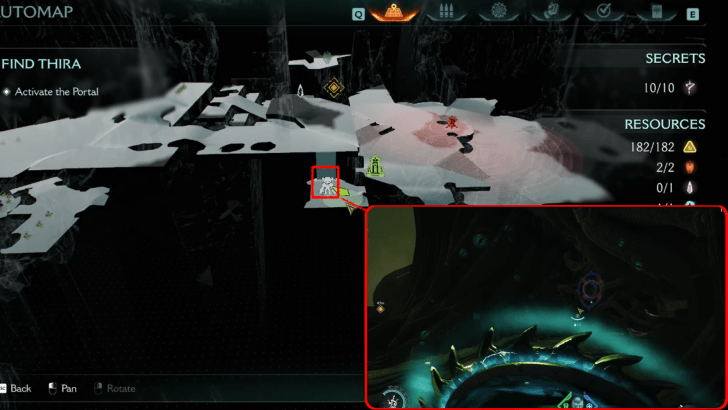 (Secret 10/10) |
This secret area is found near the end of the chapter. Before getting the Wraithstone and using the Cosmic Eye beside it, use shield charge on the wooden barrier to the right. This can be obtained during the first objective ▼. |
City of Ry'uul Skins
| Item | How to Get |
|---|---|
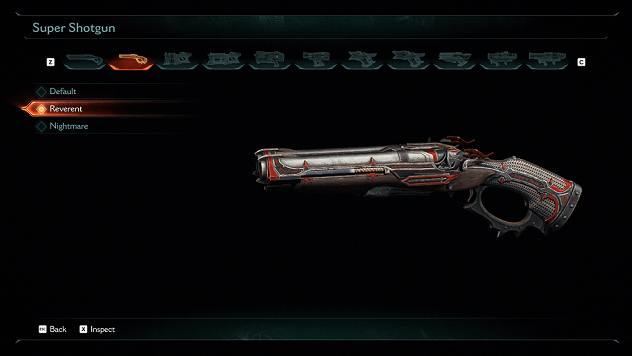 (Mission Challenge) |
This weapon skin can only be acquired after achieving the Face Cracker mission challenge. |
City of Ry'uul Codex Entries
| Item | How to Get |
|---|---|
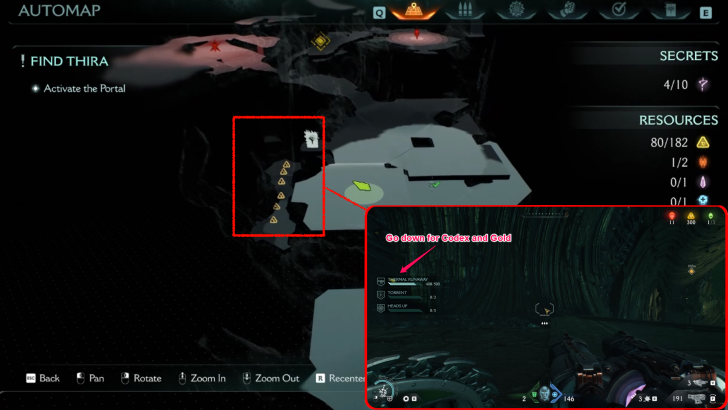 (Secret 5/10) |
Access this secret area below the area where you first encounter an Acolyte. Go down a platform and follow the trail of gold until you reach the City of Ry'uul Codex. This can be obtained during the first objective ▼. |
City of Ry'uul Life Sigils
| Item | How to Get |
|---|---|
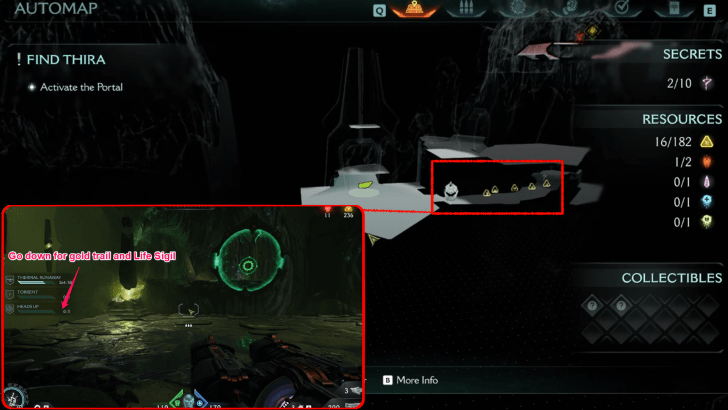 (Secret 3/10) |
This secret area is found by going down a platform to the left before shield charging through the 2nd green ring. Follow the trail of gold and defeat Tentacles to reach the first Life Sigil. This can be obtained during the first objective ▼. |
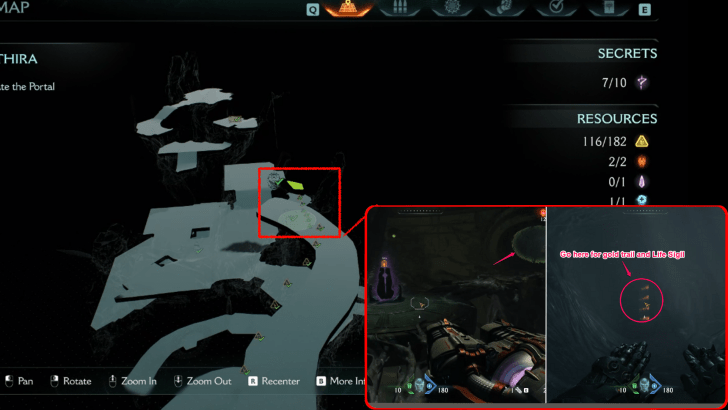 (Secret 7/10) |
Move past the purple device and go to the right to access this secret area. Carefully swim through the fireball path until you reach a trail of gold and a second Life Sigil. This can be obtained during the first objective ▼. |
City of Ry'uul Demonic Essence
| Item | How to Get |
|---|---|
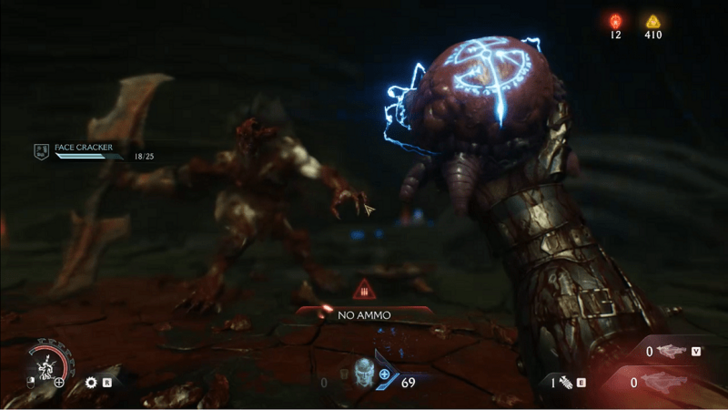 |
Obtained by defeating the Agaddon Hunter Leader. Increases maximum health capacity. his can be obtained during the first objective ▼. |
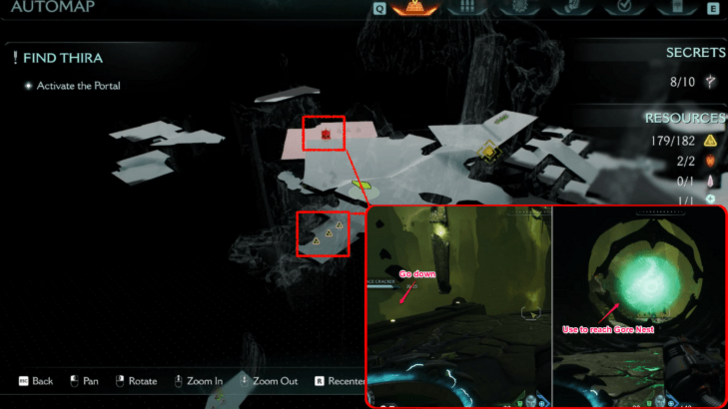 (Secret 9/10) |
Obtained by defeating the Mancubus Leader found after destroying a Gore Nest. Reach this secret area by going down a platform and using a green ring to shield charge. Increases maximum armor capacity. This can be obtained during the first objective ▼. |
City of Ry'uul Gold
| Item | How to Get |
|---|---|
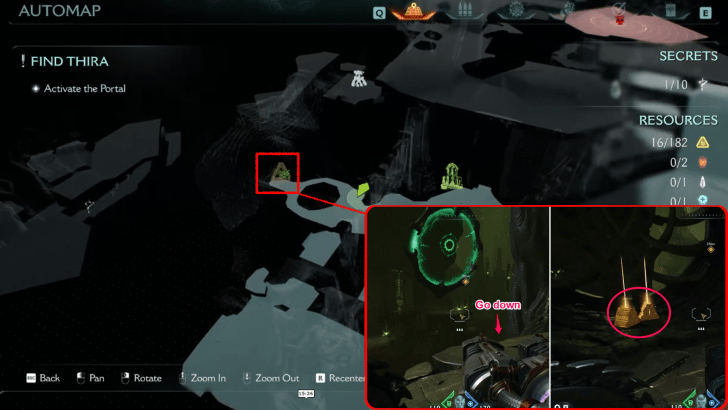 (Secret 1/10) |
Before going through the first shield charge ring, go down the platform and shield charge a wooden barrier before shield recall jumping and using a lift towards a secret area. This gold trail is near a purple device. This can be obtained during the first objective ▼. |
 (Secret 3/10) |
This secret area is found by going down a platform to the left before shield charging through the 2nd green ring. Follow the trail of gold and defeat Tentacles to reach the first Life Sigil. This can be obtained during the first objective ▼. |
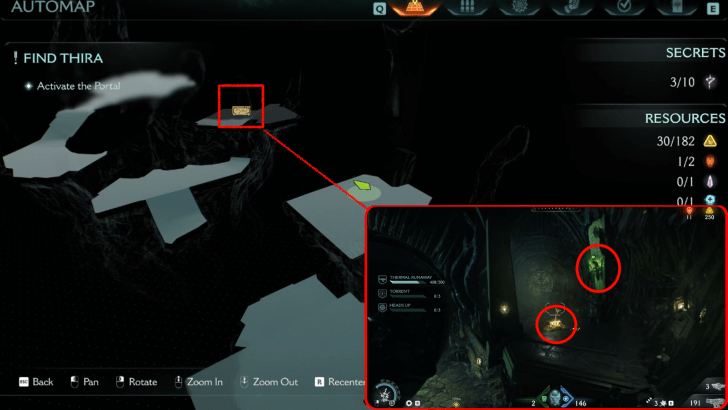 (Secret 4/10) |
This secret area is found by using shield recall jump from the area where you first encounter an Acolyte. Use the shield to reach the higher platform. This can be obtained during the first objective ▼. |
 (Secret 5/10) |
Access this secret area below the area where you first encounter an Acolyte. Go down a platform and follow the trail of gold] until you reach the City of Ry'uul Codex. This can be obtained during the first objective ▼. |
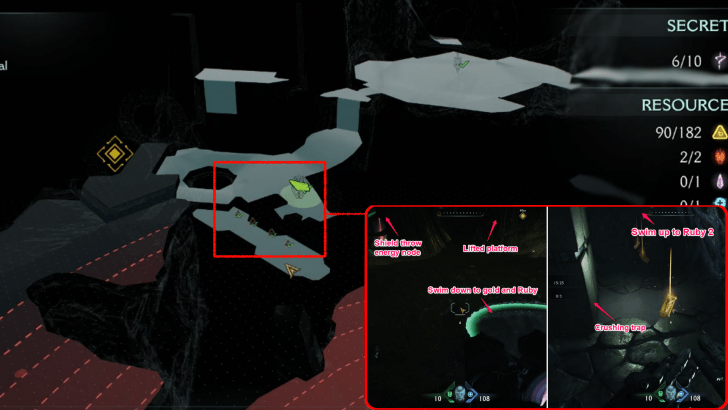 (Secret 6/10) |
Access this secret area by shield throwing the energy node to lift the platform in front. Swim through the water under it and follow the trail of gold while avoiding the crushing traps until you surface and acquire the second Ruby. This can be obtained during the first objective ▼. |
 (Secret 7/10) |
Move past the purple device and go to the right to access this secret area. Carefully swim through the fireball path until you reach a trail of gold and a second Life Sigil. This can be obtained during the first objective ▼. |
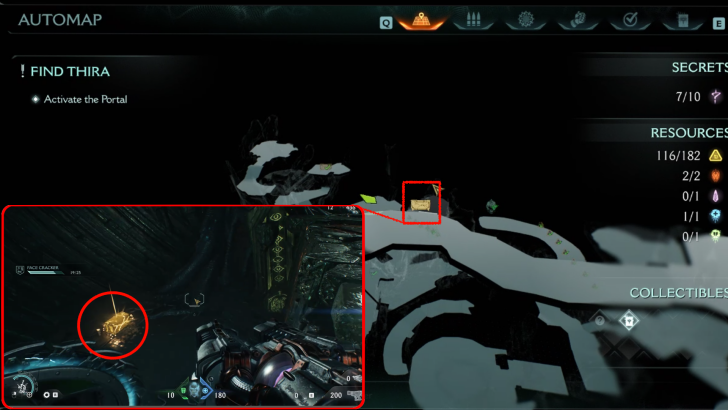 (Secret 8/10) |
This secret area is found beside a narrow platform with an Armored Mancubus and a Whiplash. Defeat the enemies before going down to the right and collecting the chest. This can be obtained during the first objective ▼. |
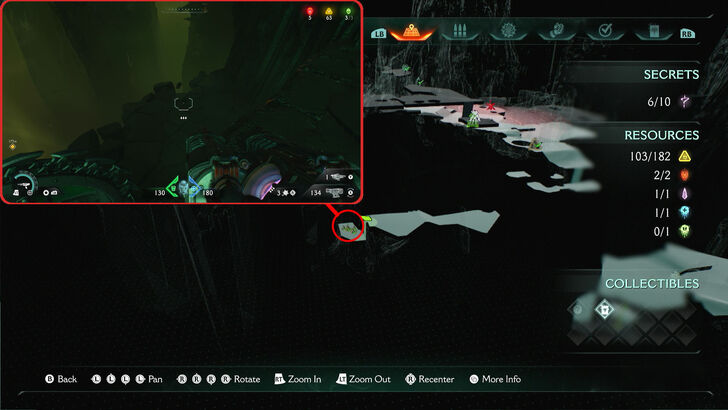 |
Shield charge through the second ring past Gold Trail 2, but don't go through the third. A trail of gold should be visible near the ledge. This can be obtained during the first objective ▼. |
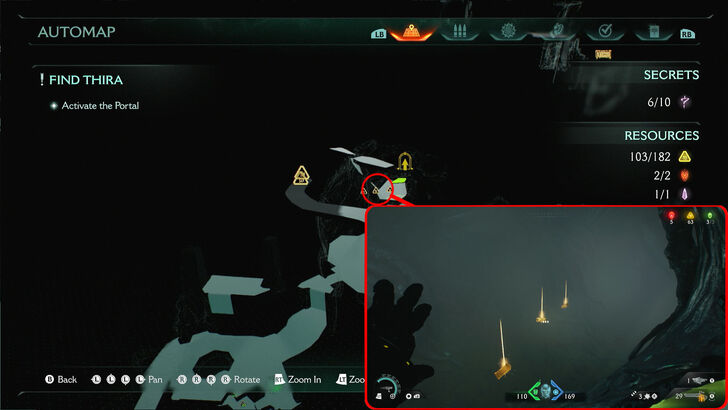 |
This trail of gold can be found when you swim in the corridor past the purple stone that activates the elevator on the third area. |
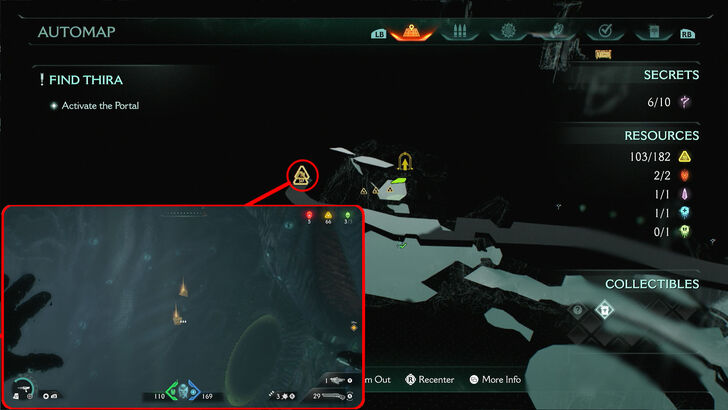 |
This cache of gold can be found when you swim in the corridor past the purple stone that activates the elevator on the third area. |
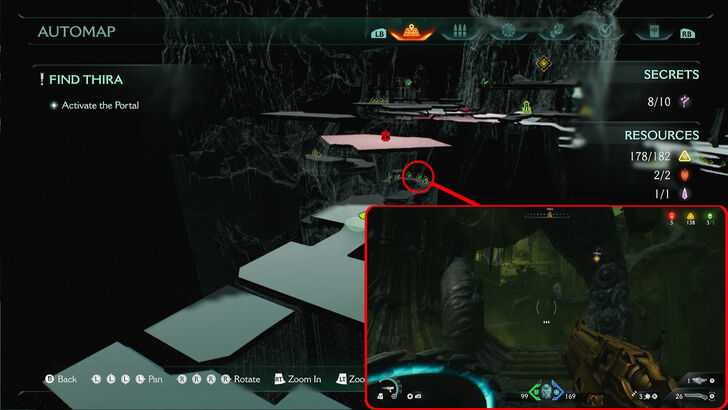 |
This trail of gold can be found when you go through another Shield Charge ring and into Area 4. This will be beneath an encounter area. |
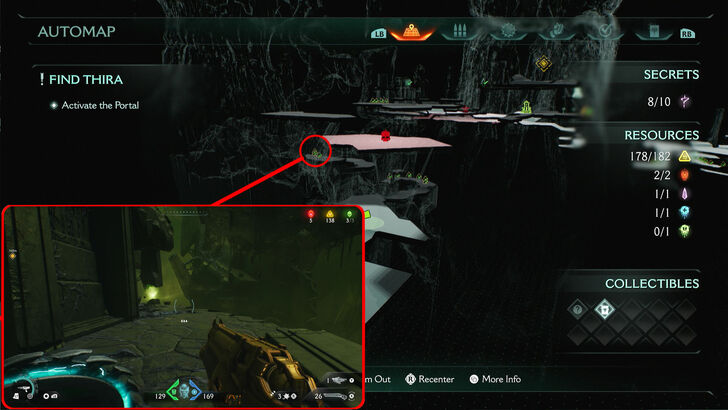 |
This trail of gold is found on the way to the encounter area in Area 4. |
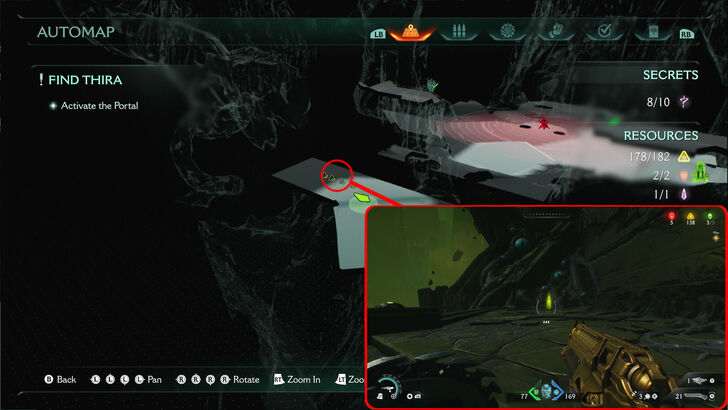 |
Shield Charge through another ring to get back to the first area. On the way, you'll find this trail of gold. |
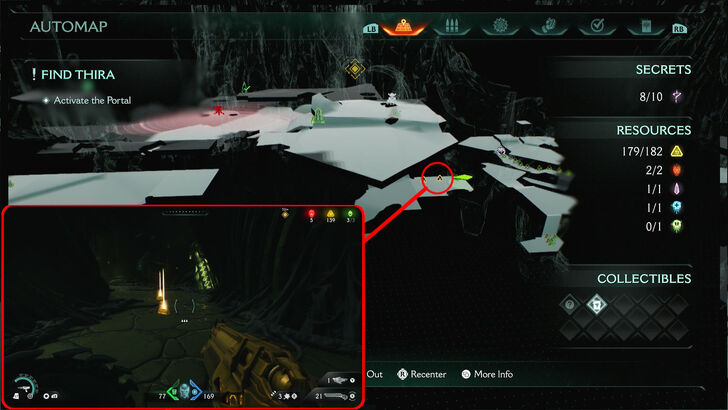 |
This trail of gold can be found in the Gore Nest area where you fight the Mancubus for a Demonic Armor Essence. |
City of Ry'uul Rubies
| Item | How to Get |
|---|---|
 (Secret 2/10) |
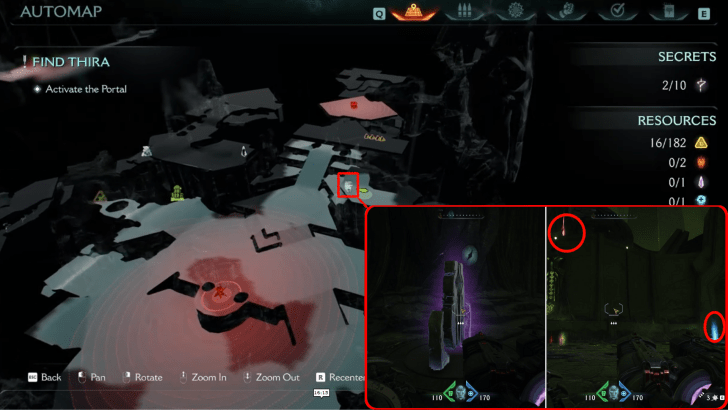
Use the purple device in the area where the first gold trail is. This will activate a jump platform near the main portal. Use this platform to reach a secret area and acquire the first Ruby. This can be obtained during the first objective ▼. |
 (Secret 6/10) |
Access this secret area by shield throwing the energy node to lift the platform in front. Swim through the water under it and follow the first gold trail while avoiding the crushing traps until you surface and acquire the second Ruby. This can be obtained during the first objective ▼. |
City of Ry'uul Wraithstones
| Item | How to Get |
|---|---|
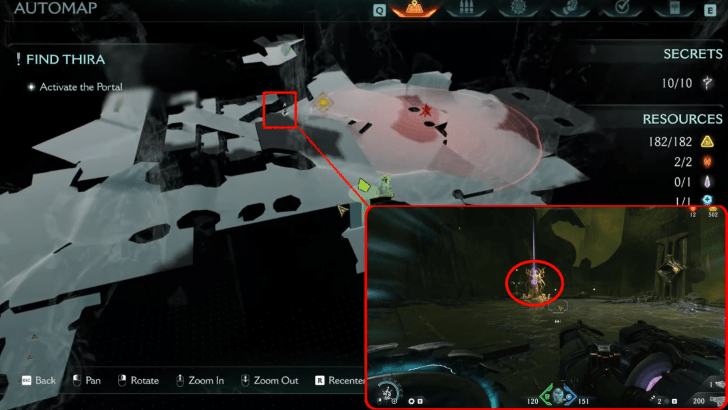 |
This can be found near the end of the chapter beside the Cosmic Eye that opens the main portal. This can be obtained during the first objective ▼. |
City of Ry'uul Walkthrough
| Main Objectives | |
|---|---|
| 1 | Activate the Portal Secrets: Gold Trail 1 (x16) – Secret #1 Ruby 1 – Secret #2 Life Sigil 1 and Gold Trail 2 (x9) – Secret #3 Gold Chest 1 (x50) – Secret #4 City of Ry'uul Codex and Gold Trail 3 (x6) – Secret #5 Ruby 2 and Gold Trail 4 (x4) – Secret #6 Life Sigil 2 and Gold Trail 5 (x7) – Secret #7 Gold Chest 2 (x50) – Secret #8 Demonic Essence - Armor – Secret #9 Agaddon Hunter Toy – Secret #10 |
| 2 | Pass through the Gate |
1. Activate the Portal
| 1 | 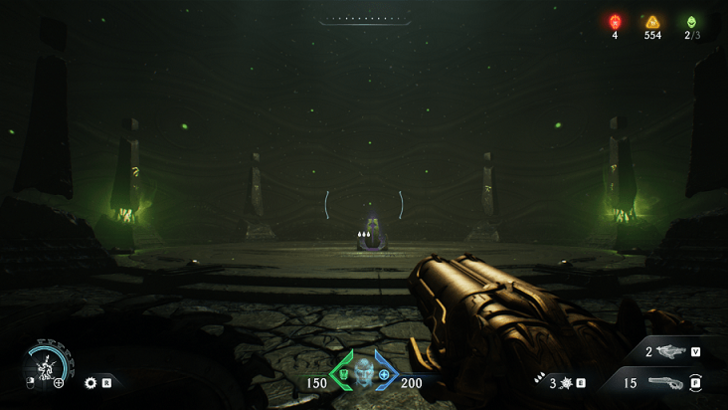 Swim through the water section until you get to a purple device that will lift you to the main portal area. |
|---|---|
| 2 | 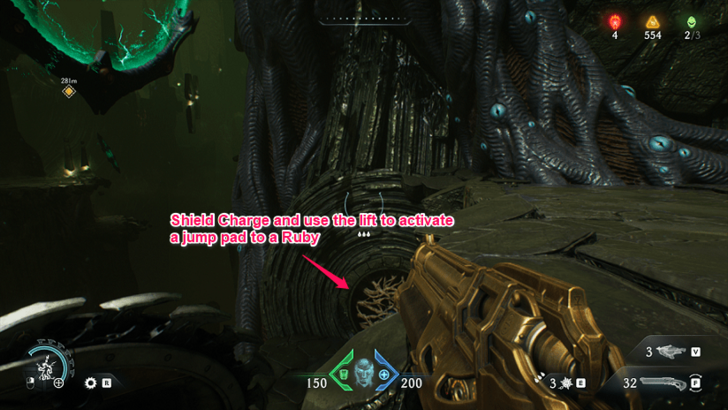 Drop down the platform below the first green ring to activate a path towards a Ruby. Collectibles: Gold Trail 1 (x16), Ruby 1 |
| 3 |  Shield charge around green rings to fly around platforms and defeat a wave of enemies. You will eventually encounter the first Cosmic Eye. Line it up with the temple door until it glows, then use shield throw. Collectibles: Gold Trail 1 (x16), Ruby 1, Life Sigil 1, Gold Trail 2 (x9) |
| 4 | 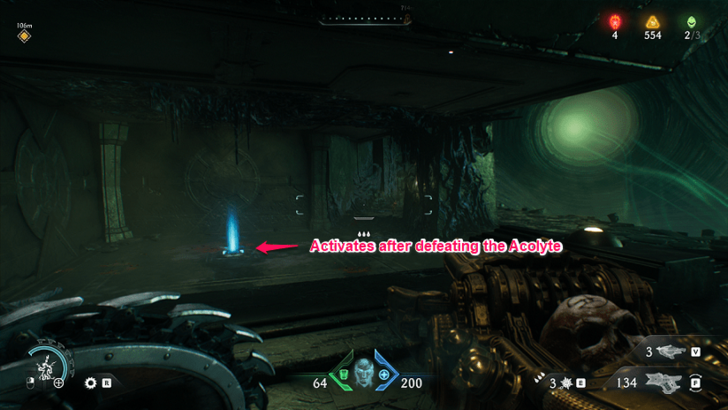 Defeat the Acolyte in the area to activate the jump pad and reach the next objective marker and a few collectibles. Collectibles: Gold Chest 1 (x50), City of Ry'uul Codex, Gold Trail 3 (x6) |
| 5 | 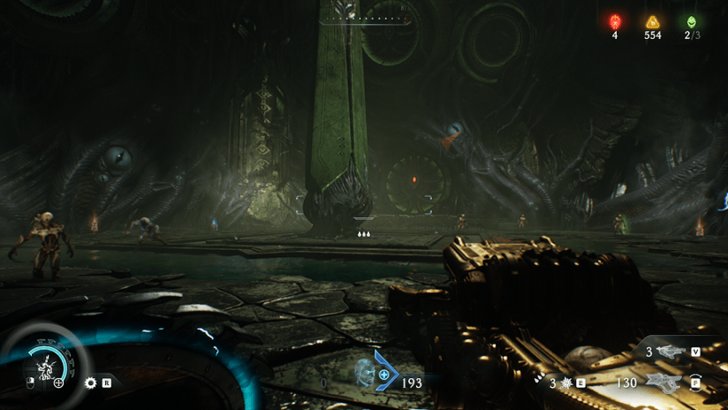 Continue following the objective marker and fight your way through another horde with the newly acquired Dreadmace. |
| 6 | 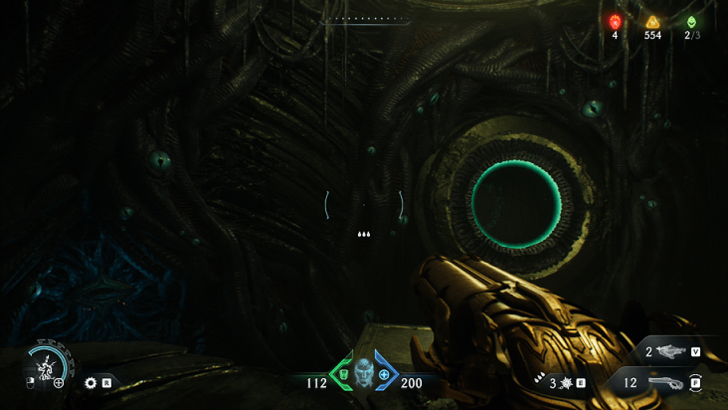 Go to the next area and use the shield throw on the Energy Node to lift the platform before lining up with another Cosmic Eye to open the path. Collectibles: Ruby 2, Gold Trail 4 (x4) |
| 7 | 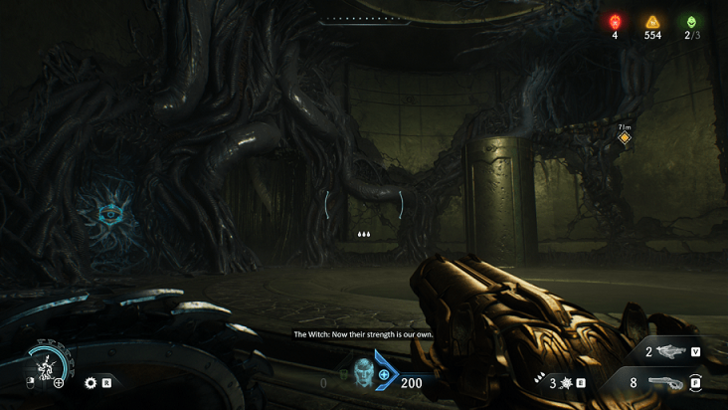 Defeat another horde with an Agaddon Hunter Leader before dropping down to a puzzle area. Collectibles: Demonic Essence - Health |
| 8 | 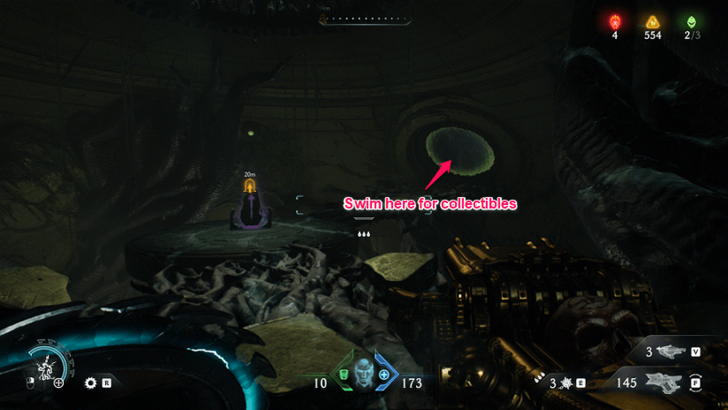 Continue following the objective marker to return to the area where you got the Dreadmace. Swim around until you reach a purple device that lifts you to the next area. Collectibles: Life Sigil 2, Gold Trail 5 (x7) |
| 9 | 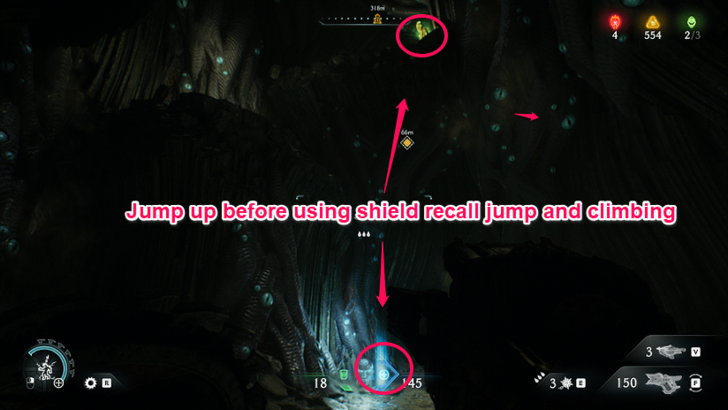 Fight your way through a Mancubus and Whiplash before making your way up using blue jump pads and shield recall statues. Collectibles: Gold Chest 2 (x50), |
| 10 | 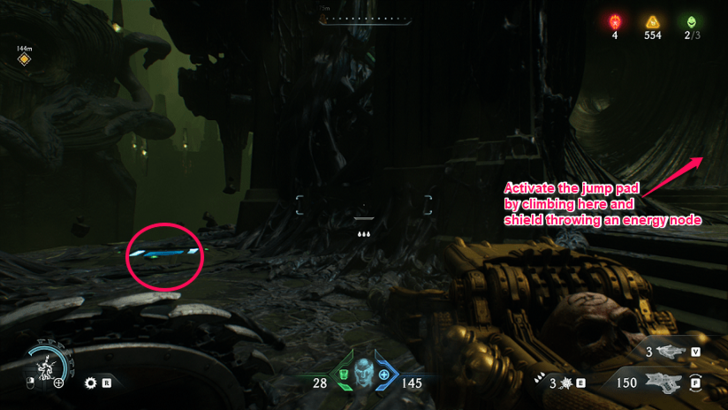 Shield charge through green rings and use a shield throw on one energy node to activate the last jump pad before reaching the last area. Collectibles: Demonic Essence - Armor |
| 11 | 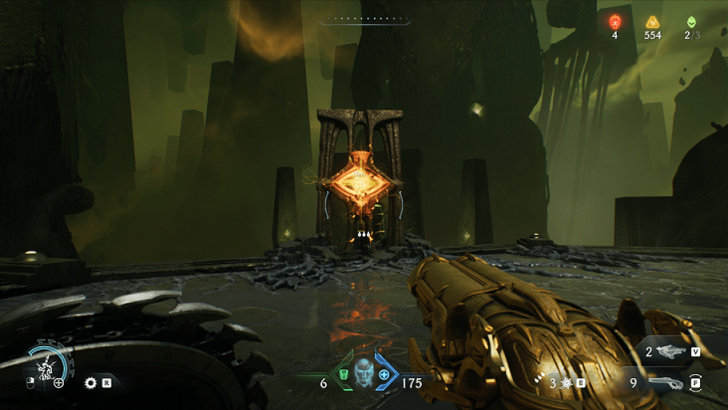 Climb the last wall before turning left and following the objective marker until you return to the main portal area. Collectibles: Agaddon Hunter Toy, Wraithstone |
2. Pass Through The Gate
| 1 | 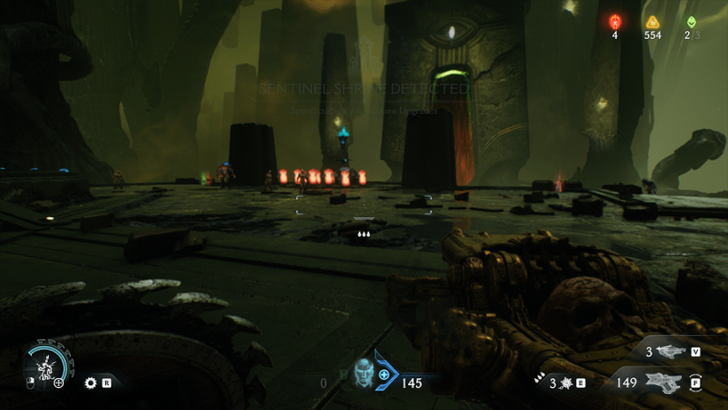 Defeat every wave of enemies that arrive after shield throwing another Cosmic Eye to complete the chapter. |
|---|
Block Puzzle Area
Use shield throw on the energy node to the left to reach a swimming area and find the chain that breaks the metal block. Drop down along with the metal block before shield charging it to reach the next path.
City of Ry'uul Block Puzzle Guide
Melee Weapon: Dreadmace
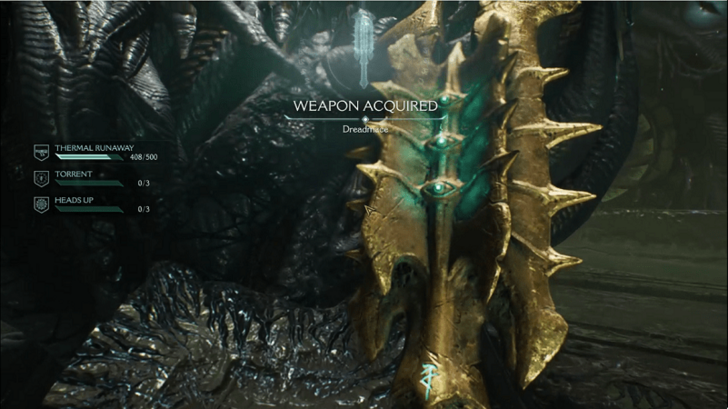
This chapter introduces a new melee weapon: Dreadmace. The Dreadmace is located in the middle of the chapter shortly after acquiring the City of Ry'uul codex entry. This melee weapon will be important in achieving the Face Cracker mission challenge and getting the Reverent Super Shotgun Skin.
Dreadmace Upgrades and How to Get
City of Ry'uul Mission Challenges
 |
|
| Challenge | Details and Reward |
|---|---|
| Heads Up | Parry 3 Cacodemons. Reward: 50 Gold |
| Face Cracker | Damage 25 demons with Dreadmace. Reward: Reverent Super Shotgun Skin |
| Torrent | Stun 8 demons with a single Heaven Splitter storm 3 times. Reward: 50 Gold |
Heads Up
Keep your distance from Cacodemons to provoke them into using their ranged attacks. After its energy fence attack, it will fire a green projectile that can be parried until this challenge is completed.
Face Cracker
Once the Dreadmace has been acquired, equip it and use it against a group of enemies whenever available. Refresh its charges by parrying melee or ranged attacks from heavy units such as Hell Knights, Imp Stalker, Whiplashes, etc.
Dreadmace Upgrades and How to Get
Torrent
Achieve this challenge by equipping the Heaven Splitter shield rune. During battle, wait for multiple enemies to group up with a heavy unit that has a ranged attack (Revenant, Imp Stalker, etc). Parry their green ranged attack to trigger the shield rune until this challenge is completed.
Rune List and Best Runes to Use
Doom: The Dark Ages Related Guides

Full Walkthrough and List of Chapters
Comment
Author
Chapter 15: City of Ry'uul Secrets and Walkthrough
improvement survey
03/2026
improving Game8's site?

Your answers will help us to improve our website.
Note: Please be sure not to enter any kind of personal information into your response.

We hope you continue to make use of Game8.
Rankings
- We could not find the message board you were looking for.
Gaming News
Popular Games

Genshin Impact Walkthrough & Guides Wiki

Honkai: Star Rail Walkthrough & Guides Wiki

Umamusume: Pretty Derby Walkthrough & Guides Wiki

Pokemon Pokopia Walkthrough & Guides Wiki

Resident Evil Requiem (RE9) Walkthrough & Guides Wiki

Monster Hunter Wilds Walkthrough & Guides Wiki

Wuthering Waves Walkthrough & Guides Wiki

Arknights: Endfield Walkthrough & Guides Wiki

Pokemon FireRed and LeafGreen (FRLG) Walkthrough & Guides Wiki

Pokemon TCG Pocket (PTCGP) Strategies & Guides Wiki
Recommended Games

Diablo 4: Vessel of Hatred Walkthrough & Guides Wiki

Fire Emblem Heroes (FEH) Walkthrough & Guides Wiki

Yu-Gi-Oh! Master Duel Walkthrough & Guides Wiki

Super Smash Bros. Ultimate Walkthrough & Guides Wiki

Pokemon Brilliant Diamond and Shining Pearl (BDSP) Walkthrough & Guides Wiki

Elden Ring Shadow of the Erdtree Walkthrough & Guides Wiki

Monster Hunter World Walkthrough & Guides Wiki

The Legend of Zelda: Tears of the Kingdom Walkthrough & Guides Wiki

Persona 3 Reload Walkthrough & Guides Wiki

Cyberpunk 2077: Ultimate Edition Walkthrough & Guides Wiki
All rights reserved
© 2025 ZeniMax Media Inc. All Rights Reserved.
The copyrights of videos of games used in our content and other intellectual property rights belong to the provider of the game.
The contents we provide on this site were created personally by members of the Game8 editorial department.
We refuse the right to reuse or repost content taken without our permission such as data or images to other sites.




![Everwind Review [Early Access] | The Shaky First Step to A Very Long Journey](https://img.game8.co/4440226/ab079b1153298a042633dd1ef51e878e.png/thumb)

![Monster Hunter Stories 3 Review [First Impressions] | Simply Rejuvenating](https://img.game8.co/4438641/2a31b7702bd70e78ec8efd24661dacda.jpeg/thumb)


