Chapter 22: Reckoning Secrets and Walkthrough
☆ Doom: The Dark Ages is live now!
★ Collectibles | Secrets | Walkthrough
┗ Resources | Codex | Toy
★ Trophies | Beginner's Guide | Enemies
☆ Skins: Twitch Drops | Prince St. Pizza
★ FAQs: Co-op | DLC | Specs | Glory Kills
Chapter 22: Reckoning in Doom: the Dark Ages contains 11 secrets and 5 collectibles. Learn how to get all the secrets, gold, and collectibles, as well as how to complete the Mission Challenges in this Chapter 22 walkthrough guide.
| ◄ Previous Chapter | Next Chapter ▶ |
|---|---|
| The Final Battle | - |
Reckoning Secrets and Collectibles
Interactive Map
| Jump to a Collectible! | |
|---|---|
| Toys | 2 |
| Codex | 1 |
| Life Sigils | 2 |
| Gold | 335 |
| Rubies | 3 |
| Wraithstone | 1 |
| Demonic Essence | 1 |
| Secrets | 11 |
Reckoning Toys
| Item | How to Get |
|---|---|
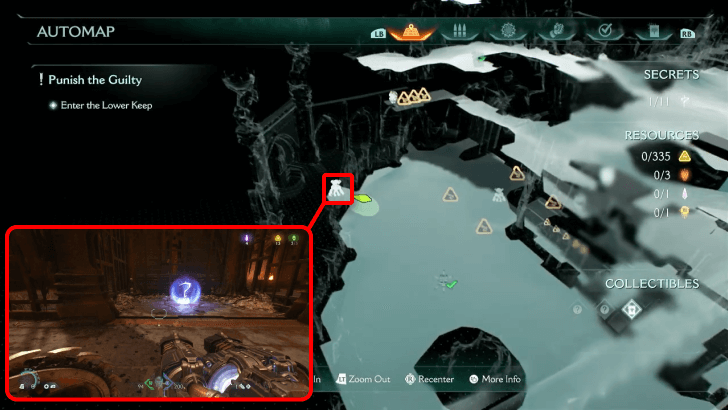 |
You must clear away the demons in an area located near the first Sentinel Shrine you'll come across. This can be obtained while going through the second objective ▼. |
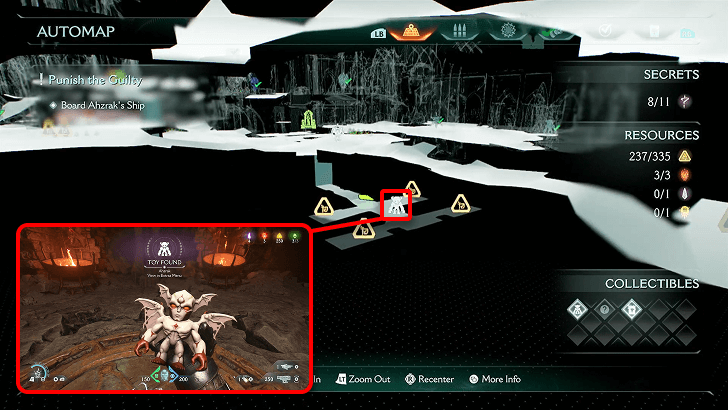 |
After obtaining the Purple Key, you can now return to previous areas that had a locked gate. Around the area where Life Sigil 3 is, circle to the back and drop down the hole. You'll be able to pick up Gold Cache 4 and the Ahzrak Toy here. This can be obtained while going through the third objective ▼. |
Reckoning Codex Entries
| Item | How to Get |
|---|---|
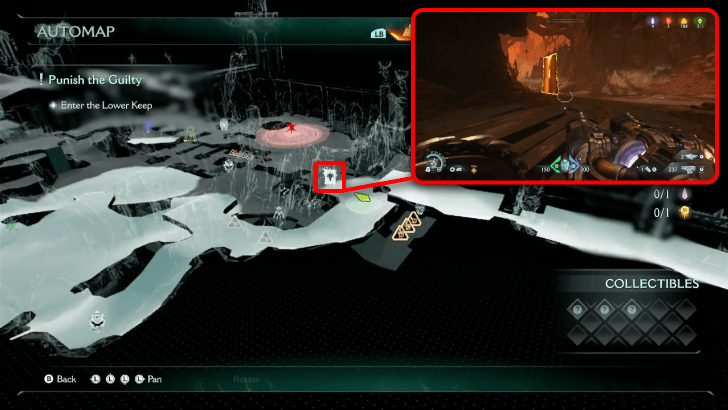 |
Clear the demons in the starting area, then head up the little cave up a hill near where you initially dropped off. Climb up the hill to find the Marok Codex, just a little past Life Sigil 1. This can be obtained while going through the first objective ▼. |
Reckoning Life Sigils
| Item | How to Get |
|---|---|
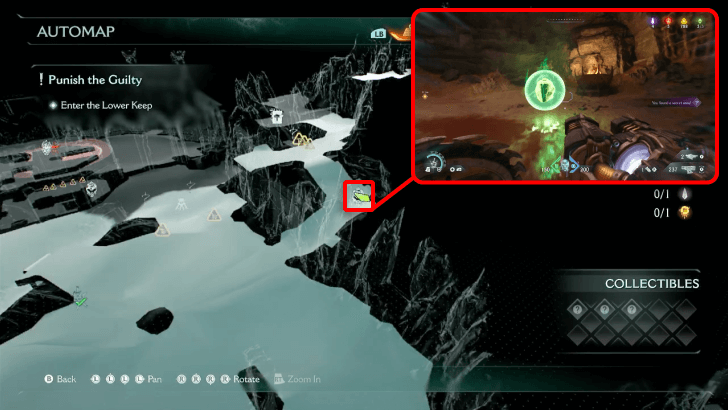 (Secret 1/11) |
After you clear the demons in the starting area, there is a little cave up a hill near where you initially dropped off. Climb up the hill to find the Life Sigil. This can be obtained while going through the first objective ▼. |
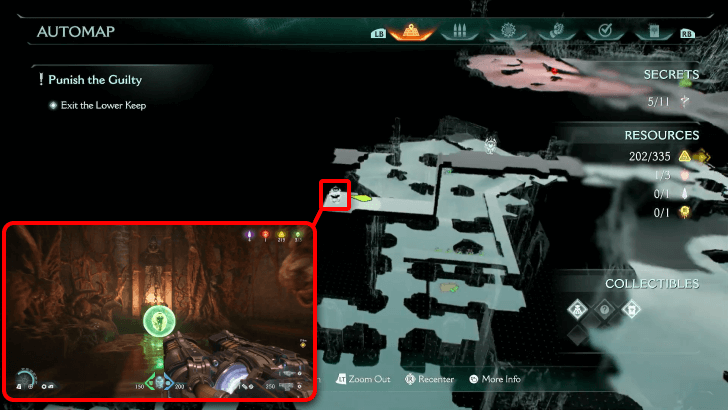 |
You'll be able to access Life Sigil 2 after picking up Gold Trail 5. Afterwards, throw your Shield at the
mechanism mechanism 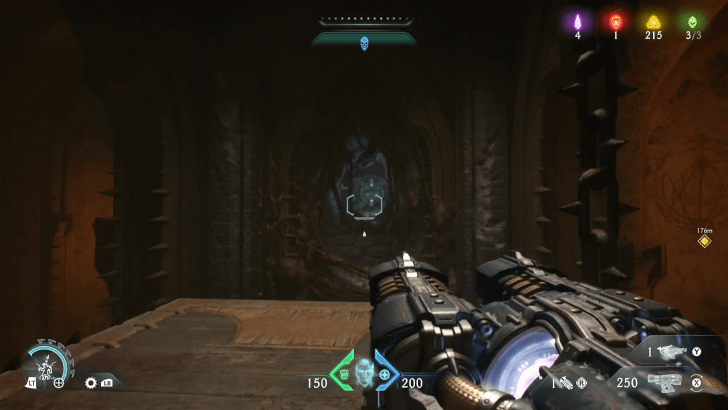 |
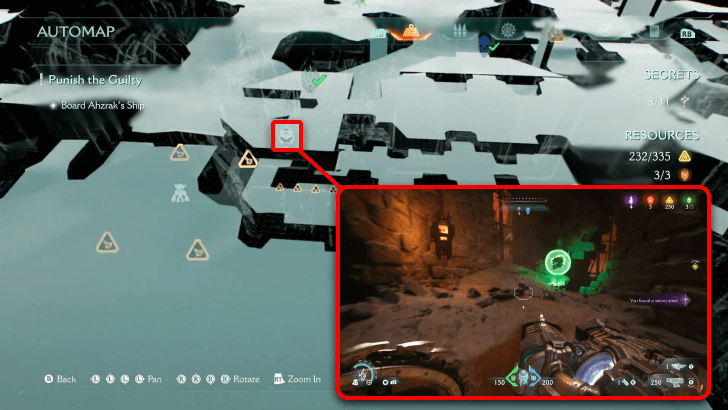 (Secret 8/11) |
After obtaining the Purple Key, you can now return to previous areas that had a locked gate. Nearby a Sentinel Shrine, there is a locked gate hiding Gold Trail 8 and Life Sigil 3. This can be obtained while going through the third objective ▼. |
Reckoning Gold
| Item | How to Get |
|---|---|
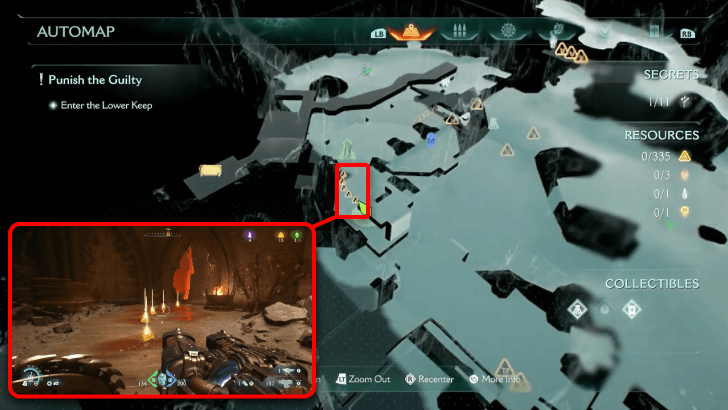 |
Nearby the gate locked by the Blue Skull, there is a gate over to the side. Beside the entrance, there is a green barricade that can be Shield Charged, and will reveal a mechanism to drop the climbable surface beside it. Climb up, pull the lever, and push the box with another Shield Charge. The gold trail is just past the wall. This can be obtained while going through the second objective ▼. |
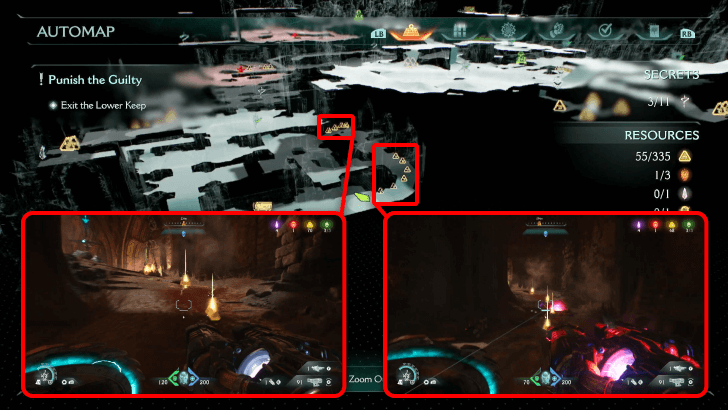 |
After you pull the lever on the way to the objective, enter the newly unlocked area and keep proceeding until you come across the gold trail in the hallway. This can be obtained while going through the second objective ▼. |
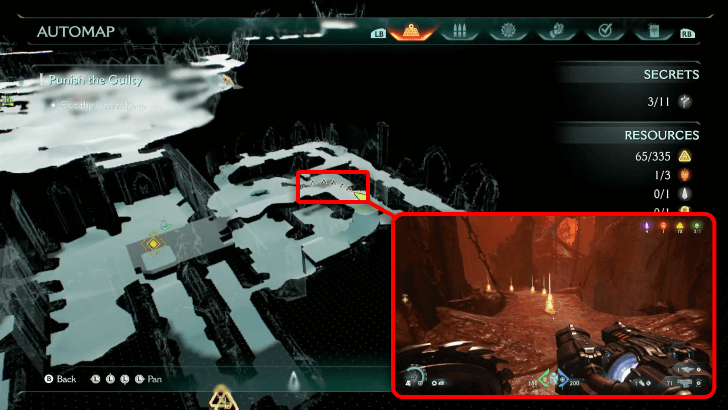 |
Climb up the surface to another organic bridge. Collect the gold as you proceed. This can be obtained while going through the third objective ▼. |
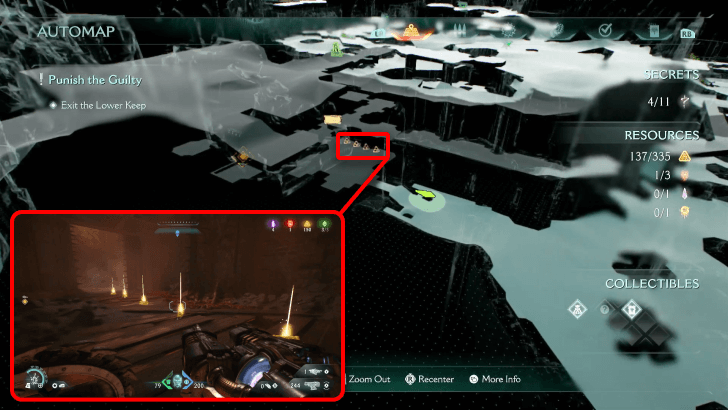 |
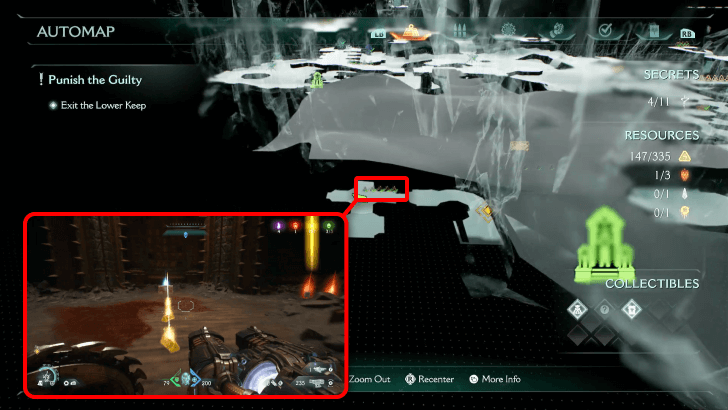
After fighting the demons in the courtyard, there is a nearby building hiding gold. The entrance is beside the base of the plateau, and there is a gold trail on the right. This can be obtained while going through the third objective ▼. |
 |
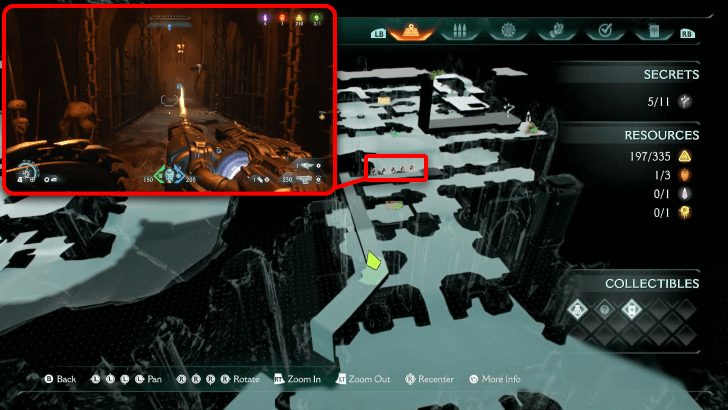
After picking up Gold Trail 4, keep proceeding through the hallway and fight the Mancubus that bursts out the wall. There'll be more gold waiting behind the hidden room. This can be obtained while going through the third objective ▼. |
 |
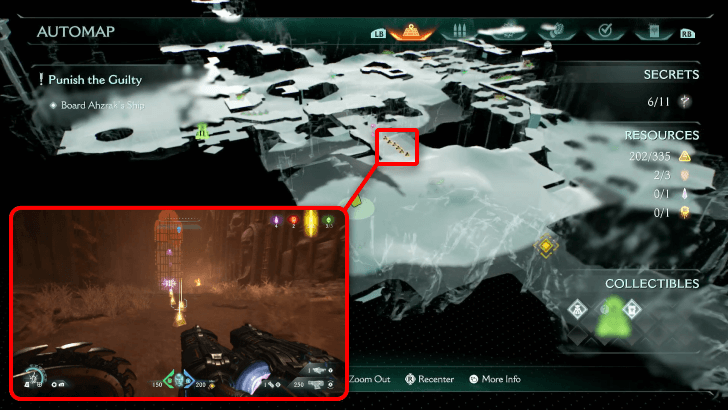
After picking up Gold Chest 2, proceed through the footpath until you come across the organic bridge. You'll be able to pick up the gold trail after taking care of the demon. This can be obtained while going through the third objective ▼. |
 |
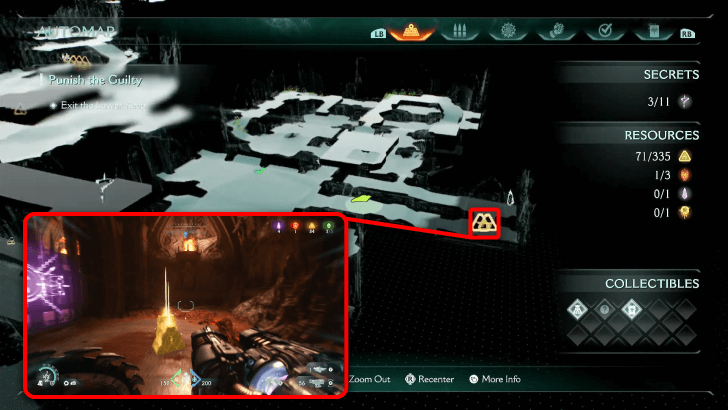
You can find this around the area of the Purple Key. It'll be around the corner after completing the objective Exit the Lower Keep. This can be obtained while going through the third objective ▼. |
 |
After obtaining the Purple Key, you can now return to previous areas that had a locked gate. Nearby a Sentinel Shrine, there is a locked gate hiding Gold Trail 8 and Life Sigil 3 |
 |
After you drop back down after collecting the gold on the organic bridge, the caches are at the end of the hallway. This can be obtained while going through the third objective ▼. |
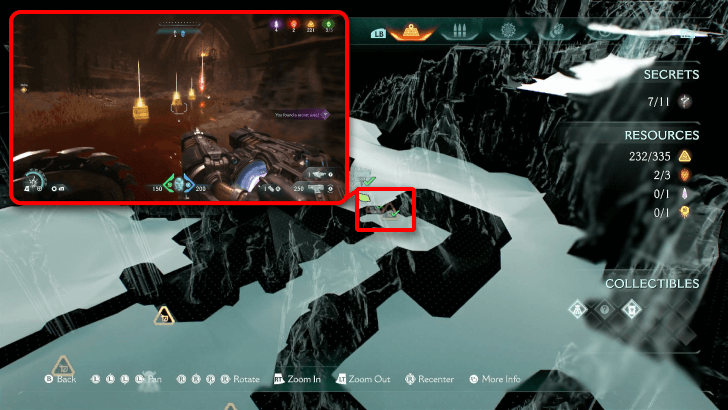 |
After obtaining the Purple Key, you can now return to previous areas that had a locked gate. Gold Cache 2 is located nearby the Marok Codex, inside the hill. Follow along the base of the hill until you come across the entrance and proceed. You'll be able to find Gold Cache 2 and Ruby 3 in this hidden area. This can be obtained while going through the third objective ▼. |
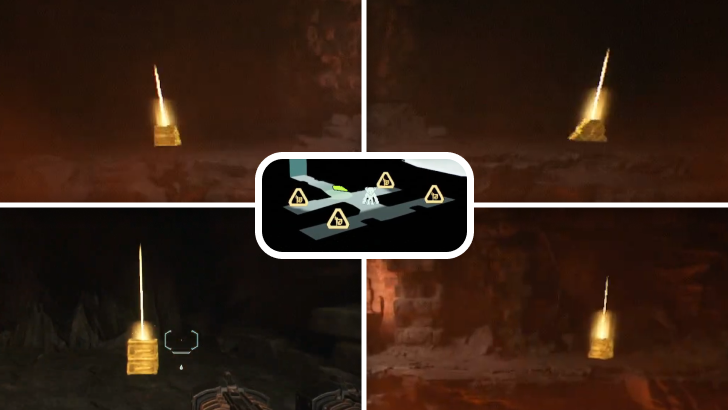 |
After obtaining the Purple Key, you can now return to previous areas that had a locked gate. Around the area where Life Sigil 3 is, circle to the back and drop down the hole. You'll be able to pick up Gold Cache 4 and the Ahzrak Toy here. This can be obtained while going through the third objective ▼. |
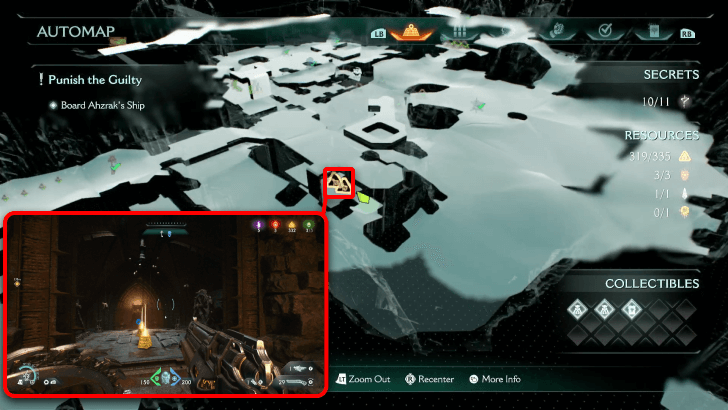 (Secret 11/11) |
After obtaining the Purple Key, you can now return to previous areas that had a locked gate. Near the location of the Blue Skull, turn around the corner and look for a slope in the courtyard. Down this area will be a locked gate with some Gold Cache hiding behind a locked gate. This can be obtained while going through the third objective ▼. |
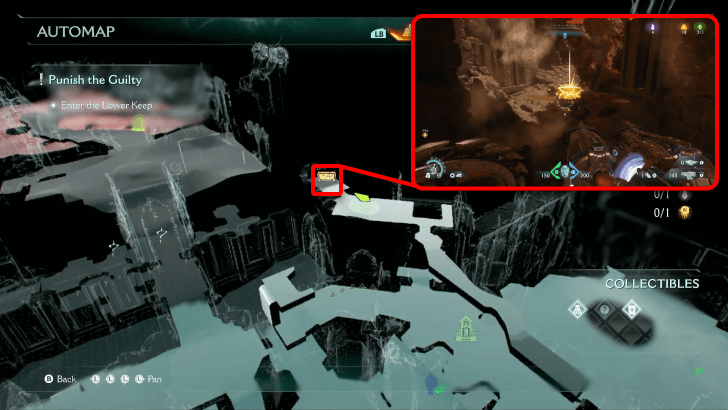 (Secret 2/11) |
Before opening the gate of the next area with the Blue Skull, there is a room with a chasm that contains a jump pad. When you drop down to it, it'll send you to a higher platform where up ahead will be the gold chest. This can be obtained while going through the second objective ▼. |
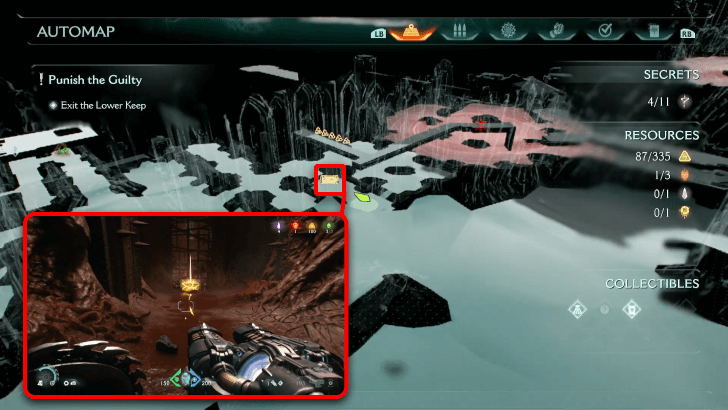 (Secret 4/11) |
After you unlock the gate by throwing your shield at the mechanism, proceed through the new area. You'll have to get rid of some demons loitering in the area, and Shield Charge the
blue stone barrier blue stone barrier 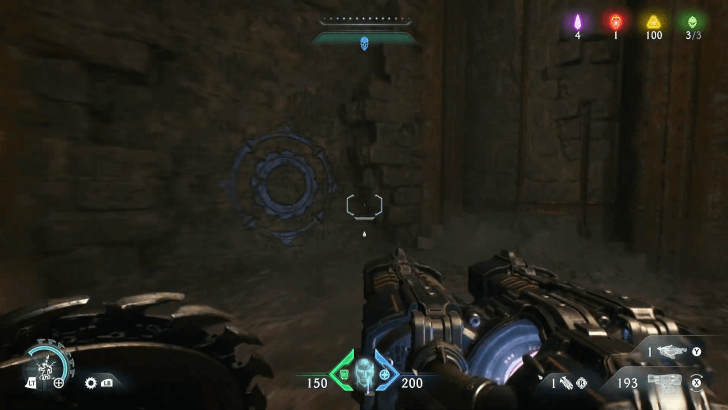 |
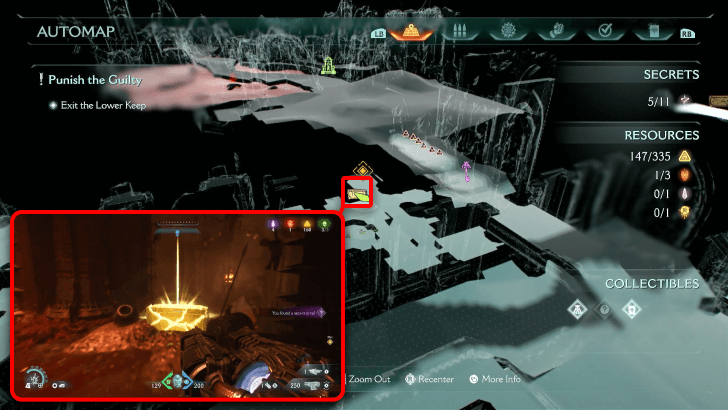 (Secret 5/11) |
In the same area as Gold Trail 4, Shield Charge a nearby blue barrier hiding a mechanism that will drop down a climbable surface. There'll be Armor and HP refill, and Gold Chest 2 just around the corner. This can be obtained while going through the third objective ▼. |
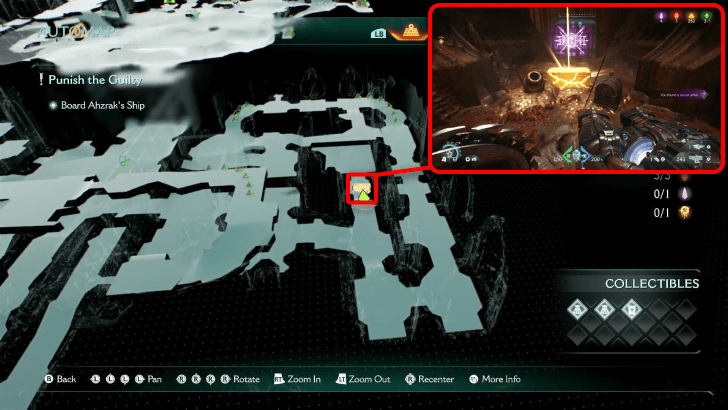 (Secret 9/11) |
After obtaining the Purple Key, you can now return to previous areas that had a locked gate. Return to the path you used when picking up the Blue Skull, and unlock the gate with your key. Gold Chest 3 is just behind the gate. This can be obtained while going through the third objective ▼. |
Reckoning Rubies
| Item | How to Get |
|---|---|
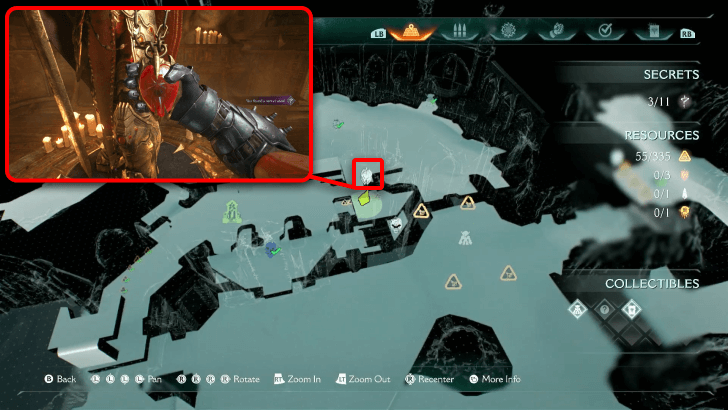 (Secret 3/11) |
You'll have to climb up the same platform where Gold Chest 1 is found, then walk on an organic bridge held up by chains to get to a hole that'll drop you down to Ruby 1. This can be obtained while going through the second objective ▼. |
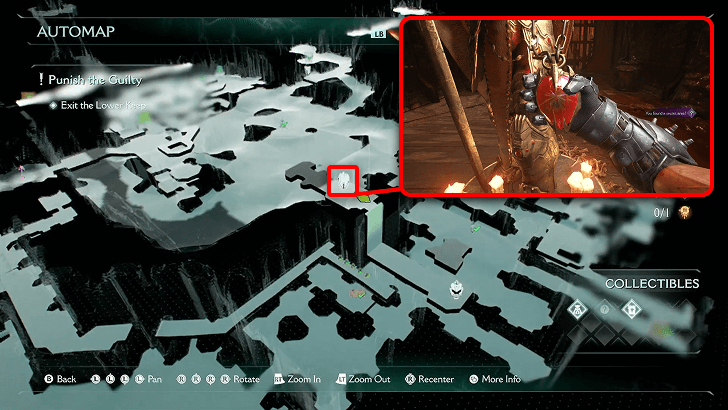 (Secret 6/11) |
You'll be able to access this Ruby after finding Gold Trail 5 and Life Sigil 2. After climbing up the footbridge, recall your shield to raise the gate blocking the next area. Climb up the surface, and you'll be met with Ruby 2. This can be obtained while going through the third objective ▼. |
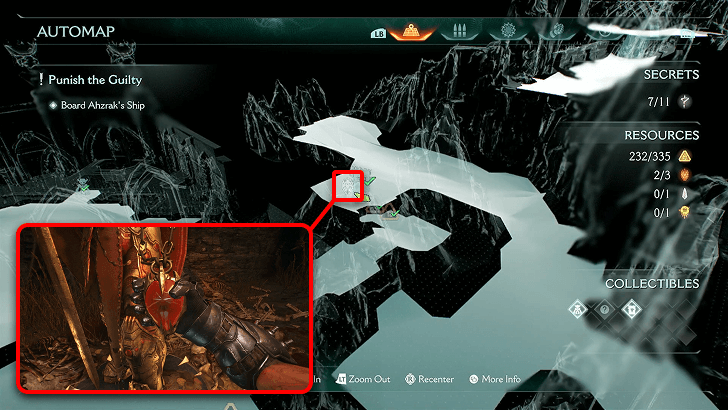 (Secret 7/11) |
After obtaining the Purple Key, you can now return to previous areas that had a locked gate. Ruby 3 is located nearby the Marok Codex, inside the hill. Follow along the base of the hill until you come across the entrance and proceed. You'll be able to find Gold Cache 2 and Ruby 3 in this hidden area. This can be obtained while going through the third objective ▼. |
Reckoning Wraithstones
| Item | How to Get |
|---|---|
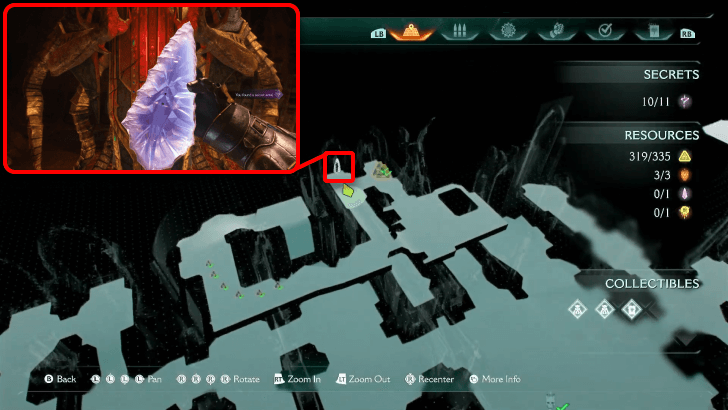 (Secret 10/11) |
After obtaining the Purple Key, you can now return to previous areas that had a locked gate. Return to the path you used when picking up the Blue Skull, and the Wraithstone will be just around the corner, and is accessed by unlocking the gate with your key. This can be obtained while going through the third objective ▼. |
Reckoning Demonic Essence
| Item | How to Get |
|---|---|
 |
Defeat the Leader near the end of the level to earn a capacity upgrade for your Launcher ammo. This can be obtained while going through the fourth objective ▼. |
Reckoning Walkthrough
| Main Objectives | |
|---|---|
| 1 | Clear the Temple Grounds
Secrets: LIfe Sigil 1, Marok Codex Secret #1 |
| 2 | Enter the Lower Keep
Secrets: Gold Chest 1 - Secret #2 Ruby 1 - Secret #3 |
| 3 | Exit the Lower Keep
Secrets: Gold Chest 2 and 3 - Secret #4 and #5 Ruby 2 and 3 - Secret #6 and 7 Gold Trail 8 & Life Sigil 3 - Secret #8 Gold Chest 4 - Secret #9 Wraithstone - Secret #10 Gold Cache 3 - Secret #11 |
| 3 | Board Ahzrak's Ship and Destroy Him |
1. Clear the Temple Grounds
| 1 |
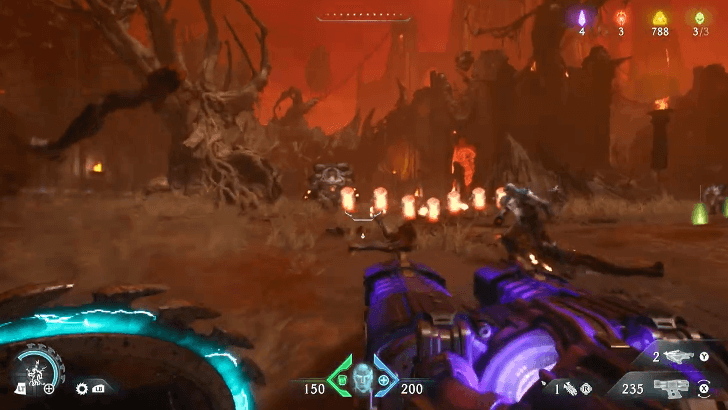 Proceed to the temple grounds and defeat the first group of enemies in the open arena. This will open several areas for you to explore and the path to your next objective. There will be a purple gate that can only be opened with a purple key. For now, ignore it and come back to it later. Collectibles: LIfe Sigil 1, Marok Codex |
|---|
2. Pass Through the Lower Keep
| 1 |
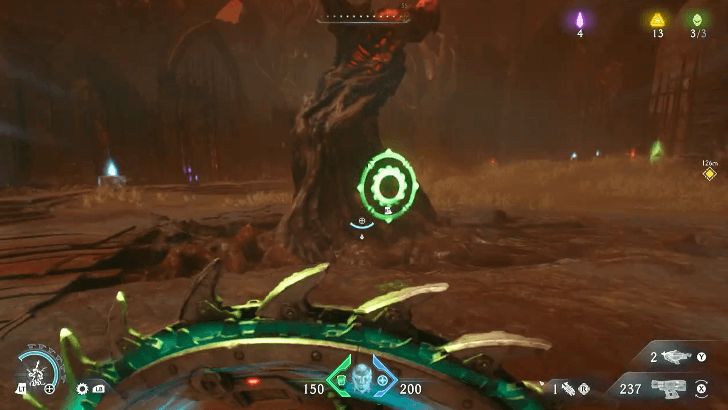 After exploring the area, head to the next one by following the objective markers. Use your shield charge to hit the tree with the green sigil and initiate the next combat encounter. There are two cosmic barons in this encounter, so take this opportunity to complete the Death Clock mission. Collectible: The Old One Toy |
|---|---|
| 2 |
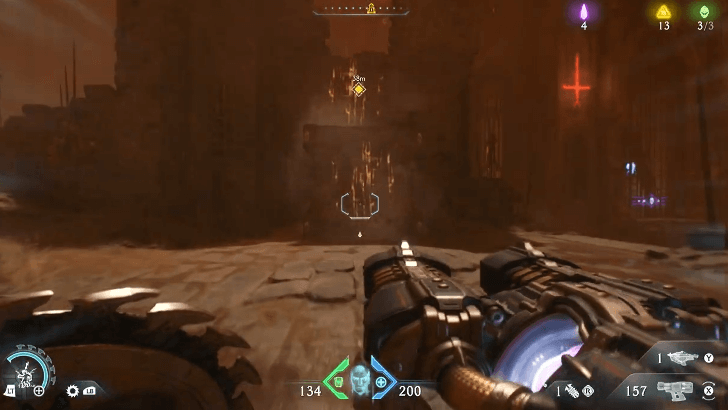 Solve the lever puzzle, then climb onto the wall to reach the next area. ┗ Lever Puzzle Solution |
| 3 |
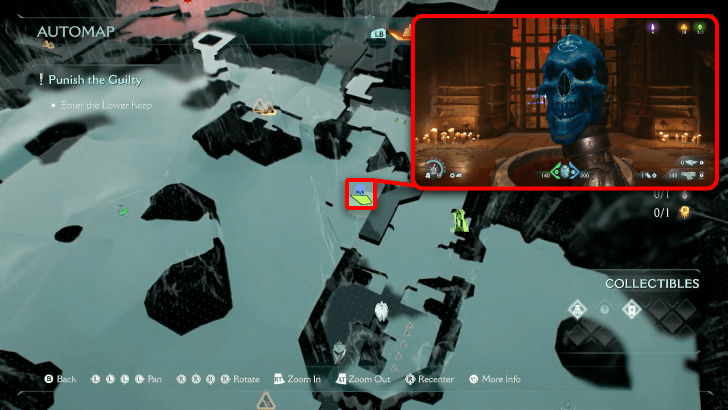 Defeat the nearby demons, then grab the Blue Skull Key. Use the blue jump boost to access the higher area. You can use this area as a shortcut to double back to the first area. Collectibles Gold Trail 1, Gold Chest 1, Ruby 1 |
Lever Puzzle Solution
| 1 |
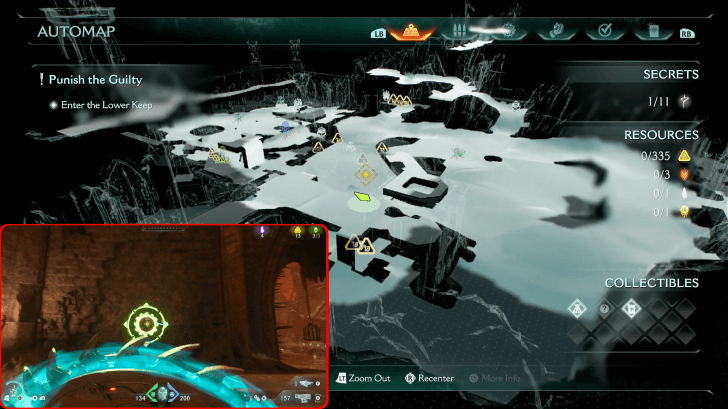
Begin by heading to the marked objective area. Look for the green, glowing sigil on a wall and use Shield Charge to access the mechanism behind it. |
|---|---|
| 2 |
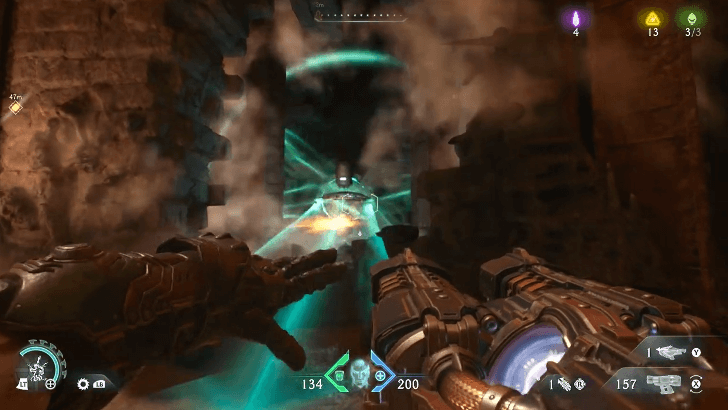 Use the shield throw to lower the wall on the right. |
| 3 |
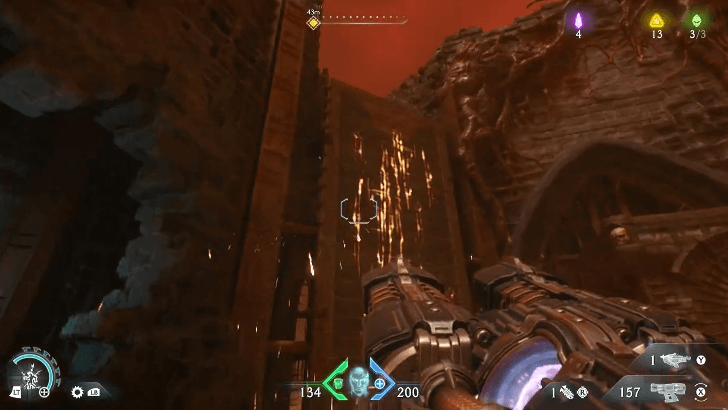 With your shield embedded in the mechanism, climb the wall to reach the hidden, locked area. Inside, you will find a lever lever 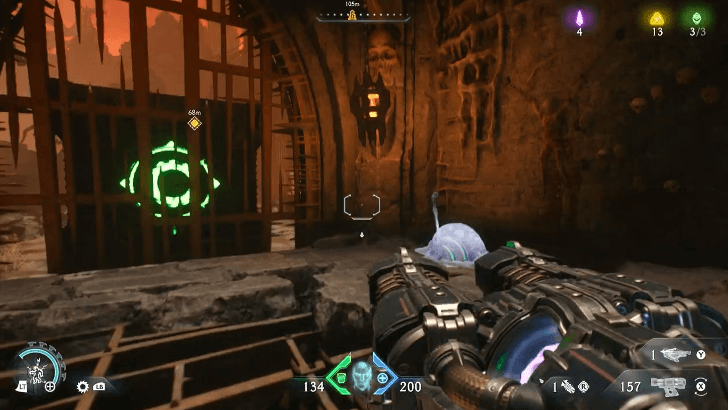 |
| 4 |
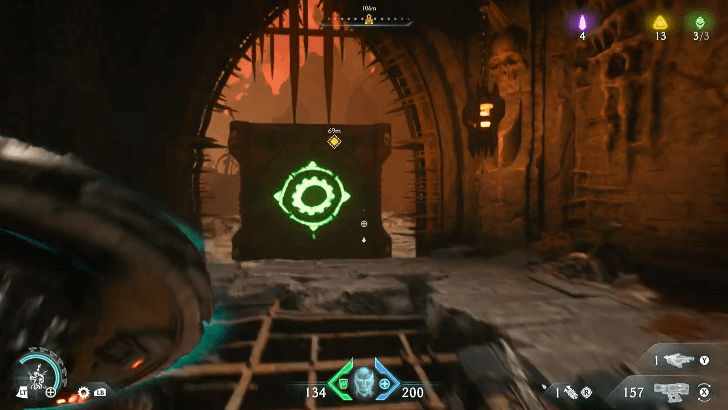 With the gate lowered, use shield charge to push the box with the green sigil into position. You may now use this box to mantle to the wall leading to the next area. |
3. Exit the Lower Keep
| 1 |
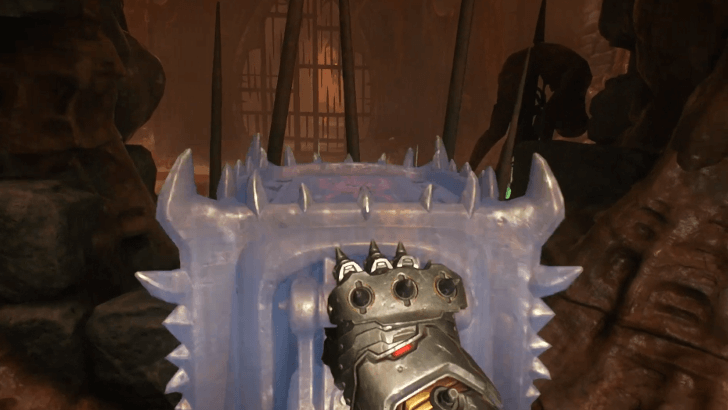 Once you return to the first area, use the Blue Skull Key to access the next one. Defeat any demons you encounter, then pull the lever to continue. Collectibles Gold Trail 2-3 |
|---|---|
| 2 |
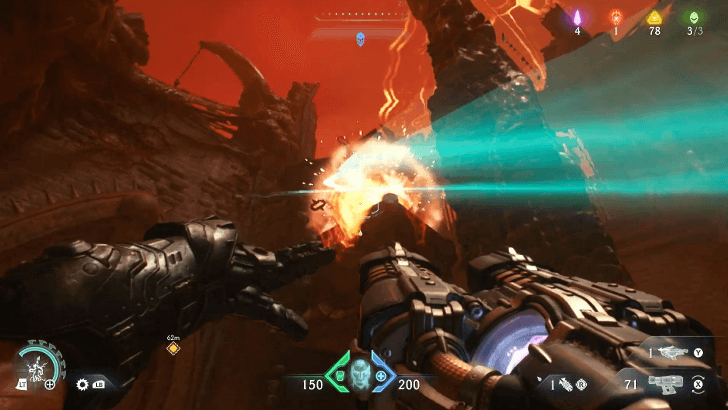 Use the shield throw to lower the hanging box. Once it is lowered, use the shield charge on its left side to get it into position. Then, head to its front to push it across the next room. This will allow you to climb up. Collectibles Gold Chest 2, Gold Cache 1 |
| 3 |
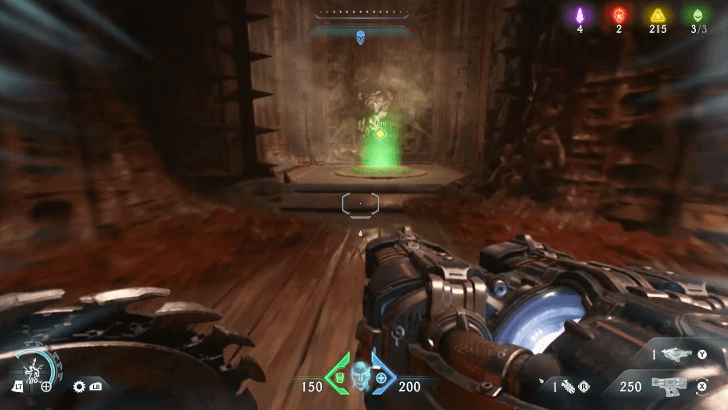 Make your way through the keep until you reach the elevator. The sections are straightforward, but there are plenty of collectibles in each one, so take the time to grab the ones you want. Collectibles Gold Trail 4-6, Gold Chest 3, Life Sigil 2 |
| 4 |
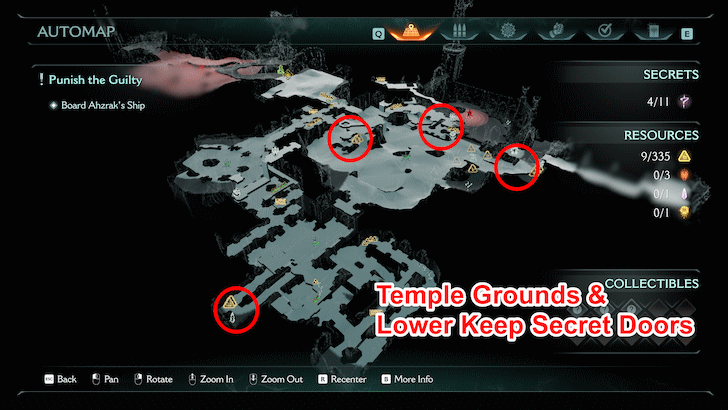 After the elevator ride ends, you can pick up the purple key to get more collectibles or proceed to the objective marker where Ahzrak's ship is. Collectibles: Ahzrak Toy, Ruby 3, LIfe Sigil 3, Gold Trail 7 - 8, Gold Cache 2-4, Gold Chest 4, Wraithstone |
Purple Key Location
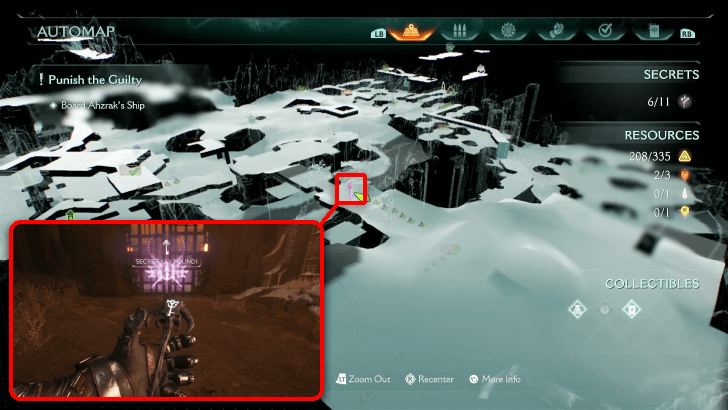
You'll come across the Purple Key right after you complete the objective Exit the Lower Keep. Instead of following the objective marker, turn around the corner to a little foothpath that leads Gold Trail 7 and the Purple Key.
4. Board Ahzrak's Ship and Destroy Him
| 1 |
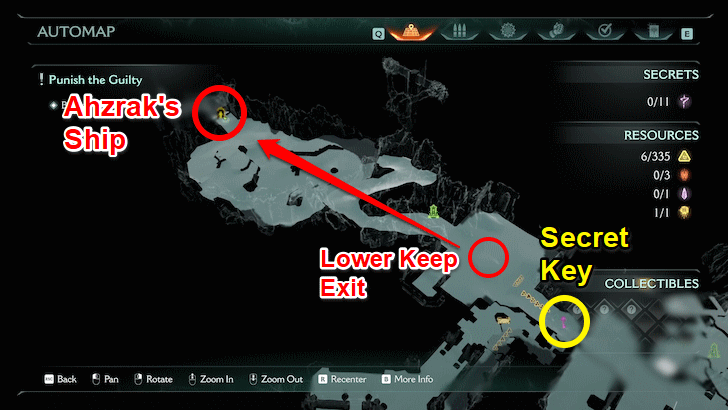 After collecting all the Secrets in the Temple Grounds and Lower Keep, you can proceed past the area where you picked up the Secret Key and purchase any necessary upgrades on the Sentinel Shrine that you'll pass by. Prepare for a hectic fight against demon leaders and enforcers in the upcoming encounter. Collectibles Demonic Essence - Ammo |
|---|---|
| 2 |
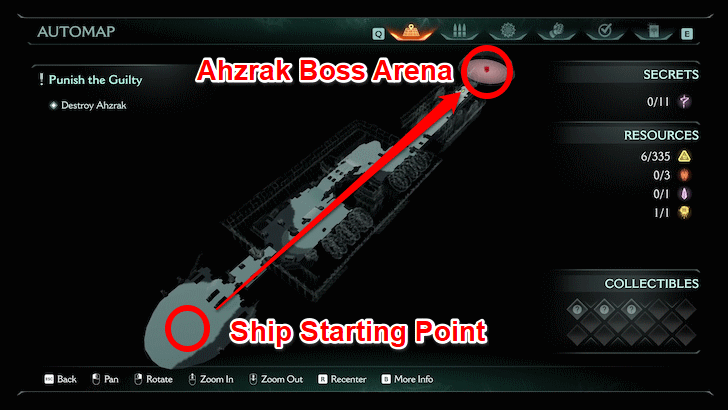 Continue to the mission marker after clearing the previous encounter to board Ahzrak's ship and make your way pass through the whole ship to enter Ahzrak's room for the Ahzrak and Witch Boss Fight. ┗ Ahzrak and Witch Boss Fight Tips |
Ahzrak and Witch Boss Fight Tips
| 1 |
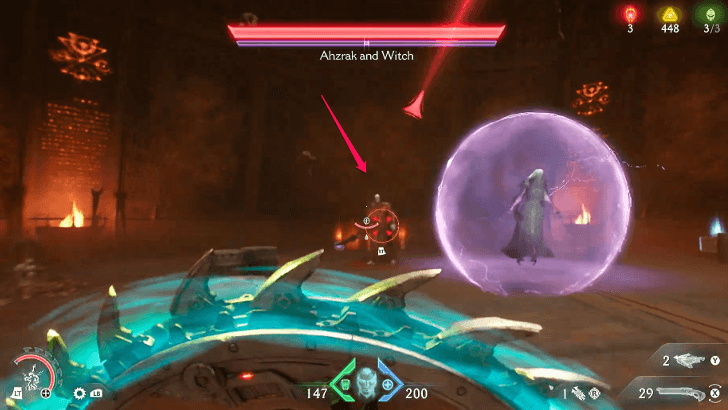 Both bosses will be on the field at the start of the fight. One of them will be surrounded by a shield, rendering them invulnerable. Focus your firepower on the unshielded boss. |
|---|---|
| 2 |
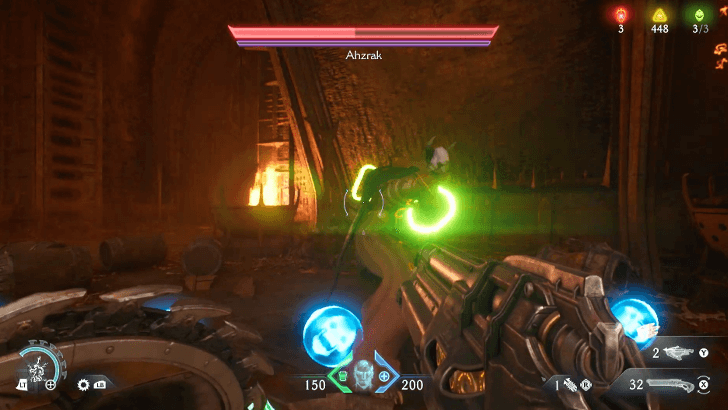 After alternating bosses, the Witch will eventually go down, and only Ahzerak will remain. Keep your distance, and parry Ahzerak's lunging spear attacks. While avoiding the red ranged projectiles. |
Reckoning Boss Guide
| Ahzrak and Witch Combat Tips |
|---|
|
|
Use Shield Charge to Chase Down the Witch
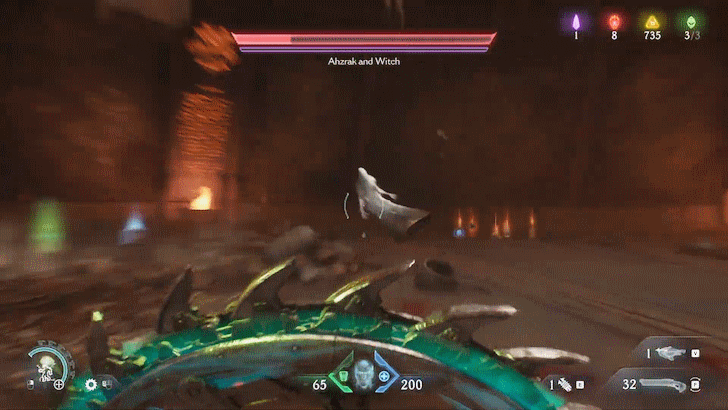
The Witch alternates between shielding herself and Ahzrak with a protective barrier. When the barrier is placed on Ahzrak, shift your focus to the Witch. However, she is extremely agile and difficult to pin down. Use your Shield Charge to close the distance quickly and capitalize on the opportunity with close-range weapons.
You Can Block or Even Jump Over Most Projectiles
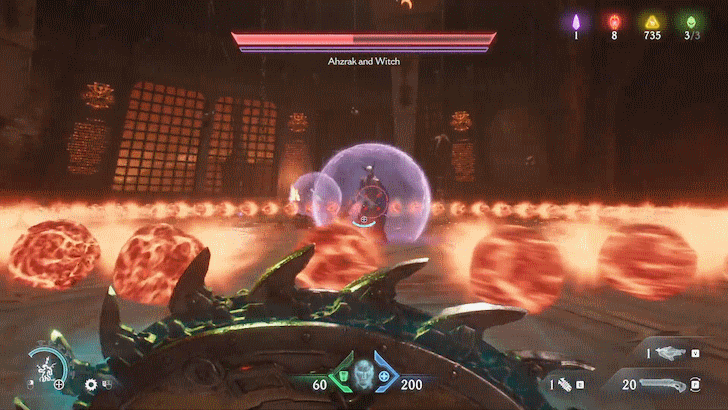
Throughout the fight, you'll be bombarded with waves of projectiles. Most of them can be blocked to completely negate damage, though it will slightly deplete your shield’s durability.
Alternatively, many projectiles, especially in the bullet-hell phases, can be jumped over. Sprinting before jumping gives you more height and airtime, making it easier to clear incoming volleys.
Use Weapons That Can Dish Out Damage Between Parries
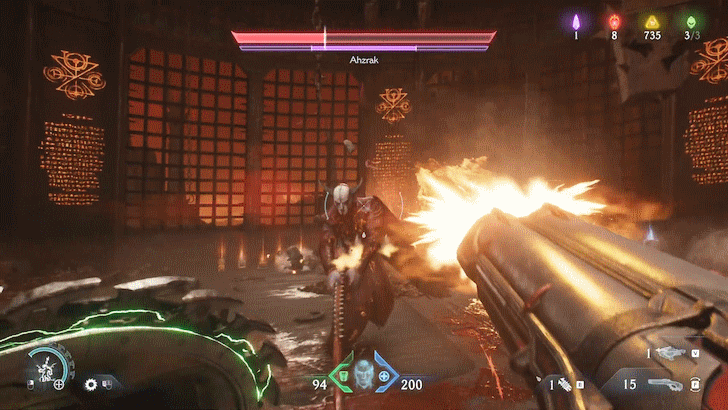
Like in your previous battle with Ahzrak, he will unleash rapid melee combos that are meant to be parried. Equip weapons that deal strong damage in short bursts, such as the Impaler or triple-shot Combat Shotgun, to punish him between successful parries.
Ahzrak and Witch Boss Guide and How to Beat
Reckoning Mission Challenges
| Challenge | Details and Reward |
|---|---|
| Death Clock | Kill 2 Cosmic Baron demons within 5 seconds of each other Reward: Reverent Ravager Skin |
| Thy Flesh Consumed | Kill a large number of demons within 10 seconds Reward: 100 Gold |
Death Clock
The demon portal encounter that you can activate near the first Sentinel Shrine will contain two Cosmic Barons that you can kill or eliminate at the same time with area-of-effect weapons or with the BFC.
Thy Flesh Consumed
The first area of the chapter is the best place to complete this challenge, as the encounter there is filled with dozens of Shield Soldiers that you can use your Shield Saw against to eliminate a whole group of them. You can also use the BFC in this same section to complete the challenge.
Doom: The Dark Ages Related Guides

Full Walkthrough and List of Chapters
Comment
Author
Chapter 22: Reckoning Secrets and Walkthrough
improvement survey
03/2026
improving Game8's site?

Your answers will help us to improve our website.
Note: Please be sure not to enter any kind of personal information into your response.

We hope you continue to make use of Game8.
Rankings
- We could not find the message board you were looking for.
Gaming News
Popular Games

Genshin Impact Walkthrough & Guides Wiki

Honkai: Star Rail Walkthrough & Guides Wiki

Umamusume: Pretty Derby Walkthrough & Guides Wiki

Pokemon Pokopia Walkthrough & Guides Wiki

Resident Evil Requiem (RE9) Walkthrough & Guides Wiki

Monster Hunter Wilds Walkthrough & Guides Wiki

Wuthering Waves Walkthrough & Guides Wiki

Arknights: Endfield Walkthrough & Guides Wiki

Pokemon FireRed and LeafGreen (FRLG) Walkthrough & Guides Wiki

Pokemon TCG Pocket (PTCGP) Strategies & Guides Wiki
Recommended Games

Diablo 4: Vessel of Hatred Walkthrough & Guides Wiki

Fire Emblem Heroes (FEH) Walkthrough & Guides Wiki

Yu-Gi-Oh! Master Duel Walkthrough & Guides Wiki

Super Smash Bros. Ultimate Walkthrough & Guides Wiki

Pokemon Brilliant Diamond and Shining Pearl (BDSP) Walkthrough & Guides Wiki

Elden Ring Shadow of the Erdtree Walkthrough & Guides Wiki

Monster Hunter World Walkthrough & Guides Wiki

The Legend of Zelda: Tears of the Kingdom Walkthrough & Guides Wiki

Persona 3 Reload Walkthrough & Guides Wiki

Cyberpunk 2077: Ultimate Edition Walkthrough & Guides Wiki
All rights reserved
© 2025 ZeniMax Media Inc. All Rights Reserved.
The copyrights of videos of games used in our content and other intellectual property rights belong to the provider of the game.
The contents we provide on this site were created personally by members of the Game8 editorial department.
We refuse the right to reuse or repost content taken without our permission such as data or images to other sites.




![Everwind Review [Early Access] | The Shaky First Step to A Very Long Journey](https://img.game8.co/4440226/ab079b1153298a042633dd1ef51e878e.png/thumb)

![Monster Hunter Stories 3 Review [First Impressions] | Simply Rejuvenating](https://img.game8.co/4438641/2a31b7702bd70e78ec8efd24661dacda.jpeg/thumb)


