Chapter 16: The Kar'Thul Marshes Secrets and Walkthrough
☆ Doom: The Dark Ages is live now!
★ Collectibles | Secrets | Walkthrough
┗ Resources | Codex | Toy
★ Trophies | Beginner's Guide | Enemies
☆ Skins: Twitch Drops | Prince St. Pizza
★ FAQs: Co-op | DLC | Specs | Glory Kills
Chapter 16: The Kar'Thul Marshes in Doom: the Dark Ages contains 5 secrets and 6 collectibles. Learn how to get all the secrets, gold, and collectibles, as well as how to complete the Mission Challenges in this Chapter 16 walkthrough guide.
List of Contents
| ◄ Previous Chapter | Next Chapter ▶ |
|---|---|
| City of Ry'uul | Temple of Lomarith |
Chapter 16: The Kar'Thul Marshes Wolf Statue Locations
| Chapter 16 Wolf Statue Locations | |
|---|---|
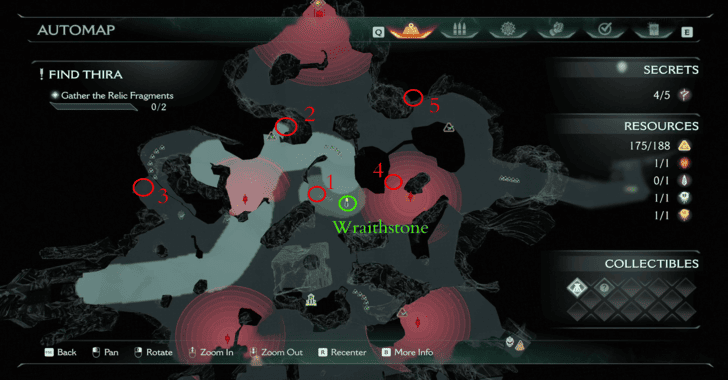 |
The Wolf Puzzle in the Kar'Thul Marshes is located in an underground passage to the left of the Sentinel Shrine in the middle of the map.
Wolf Statue Location Details
| ✔️ | Wolf Statue Location Details |
|---|---|
 The first wolf statue can be found on the path to the left of the Wraithstone relative to the orientation of the image above. |
|
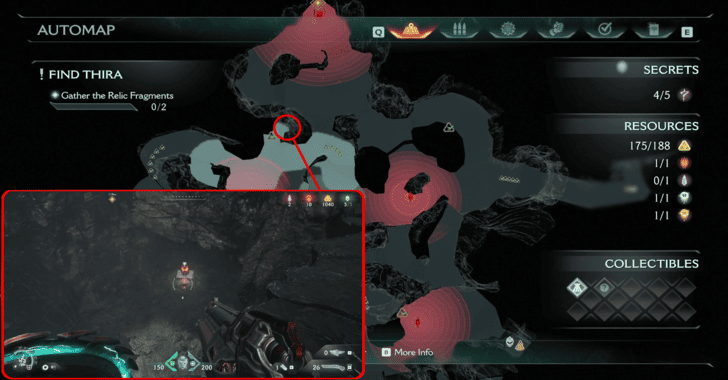 The second wolf statue can be found in a small crevice to northwest of the Wraithstone relative to the image above. |
|
 The third wolf statue is at the end of the open field on the far left of the mission area. |
|
 The fourth wolf statue can be found in a ditch located on the right of the Wraithstone guarded by a tentacle. |
|
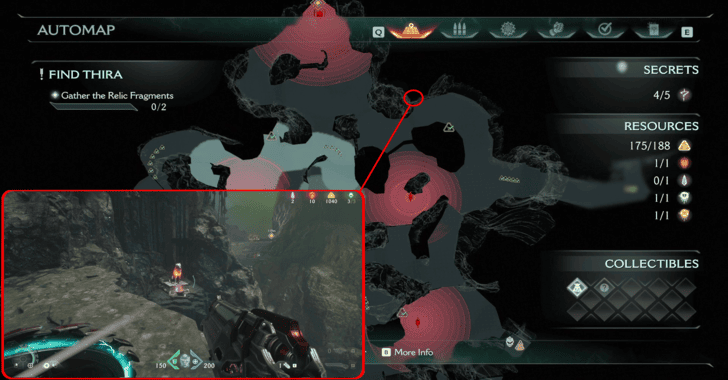 The fifth wolf statue can be found near a cliffside located on the far northeast side of the image. |
Completing this Wolf Puzzle will grant access to the Wraithstone.
All Wolf Statue Locations and Solutions
The Kar'Thul Marshes Secrets and Collectibles
The Kar'Thul Marshes Interactive Map
| Jump to a Collectible! | |
|---|---|
| Toys | 1 |
| Codex | 1 |
| Life Sigils | 1 |
| Gold | 188 |
| Rubies | 1 |
| Wraithstone | 1 |
| Demonic Essence | 2 |
| Secrets | 5 |
The Kar'Thul Marshes Toys
| Item | How to Get |
|---|---|
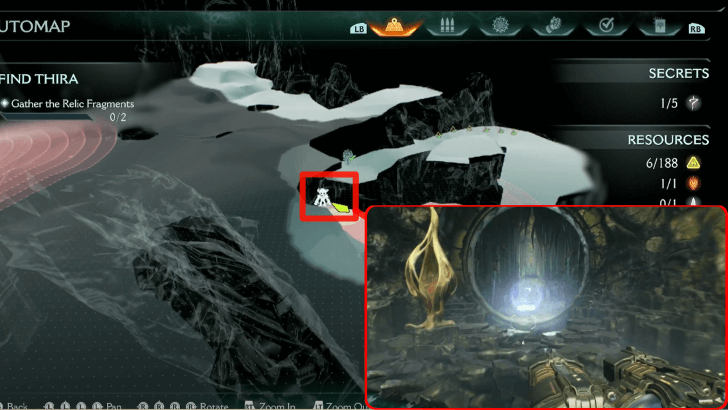 |
To the right of Gold Trail 1, you'll find a Mancubus standing on a pressure plate. Step onto the plate yourself, then break the lock across the area with your Shield. Drop down, head right, and you’ll reach the Toy. This is obtained during the first objective ▼. |
The Kar'Thul Marshes Codex Entries
| Item | How to Get |
|---|---|
 (Secret 4/5) |
It can be seen in the same area as Gold Cache 4. This is obtained during the first objective ▼. |
The Kar'Thul Marshes Life Sigils
| Item | How to Get |
|---|---|
 |
After obtaining the Relic Fragment near Demonic Essence: Ammo, turn around and go along the right side of the map until you reach this Life Sigil. It can be found next to Gold Trail 7. This is obtained during the first objective ▼. |
The Kar'Thul Marshes Gold
| Item | How to Get |
|---|---|
 |
Upon spawning, head immediately to the left and turn left the first corner you see. Jump off the cliff, the Gold Trail is immediately below you. This is obtained during the first objective ▼. |
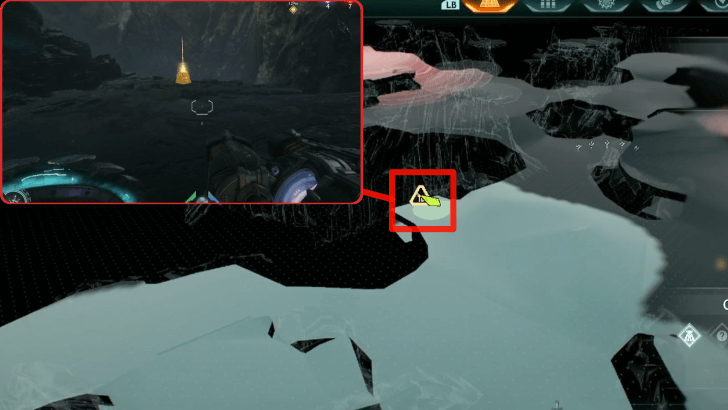 |
You can find this to the left of the Hell Knight Toy, at the edge of a cliff. From there, turn around and This is obtained during the first objective ▼. |
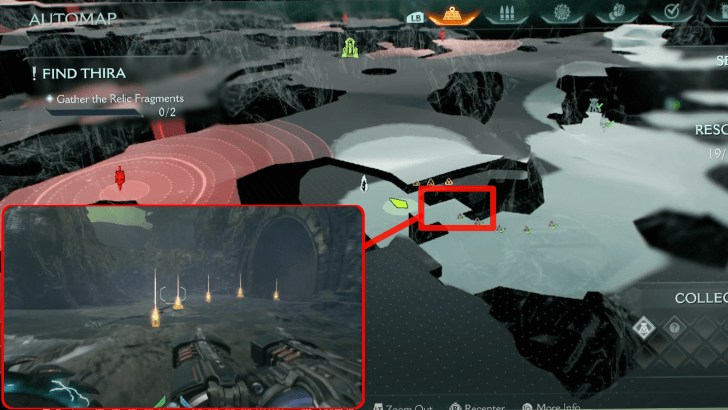 |
From Gold Cache 1, turn around and turn left. You will immediately see this Gold Trail. There will be 5 at first, jump down the hidden area and turn right for the remaining 3 Gold. This is obtained during the first objective ▼. |
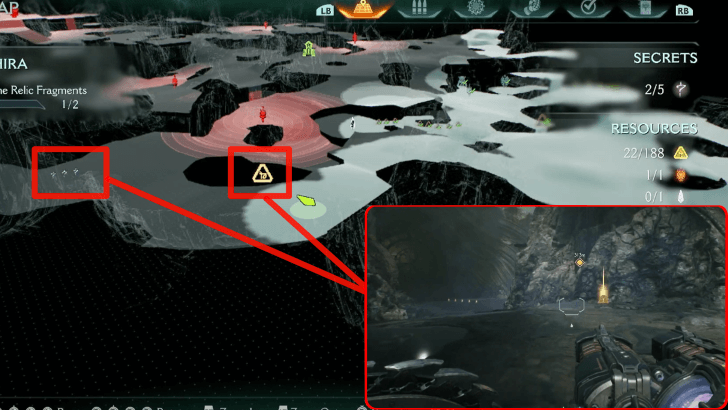 |
Right after obtaining the Relic Fragment near the Demonic Essence: Armor, turn around, go straight, and turn left. This is obtained during the first objective ▼. |
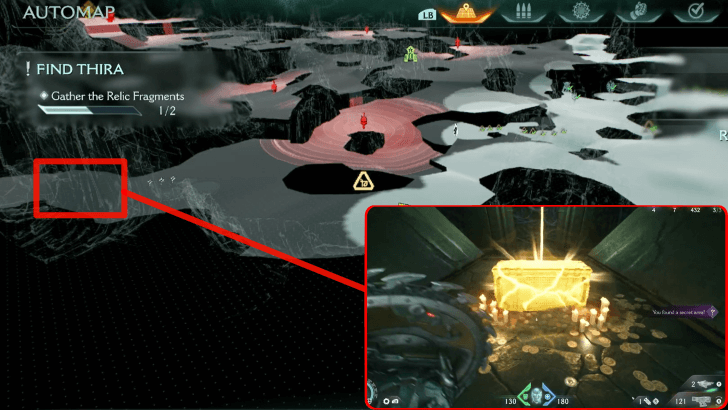 (Secret 3/5) |
Directly in front of Gold Trail 3 is a Rotating Room Puzzle. Solve this and reach the Gold Cache at the end of the room. This is obtained during the first objective ▼. |
 |
From Gold Chest 1, turn left, go straight ahead, and jump down the ledge. You will see the Gold Cache on the right. This is obtained during the first objective ▼. |
 |
From Gold Cache 3, go straight ahead into a wide area full of enemies. After defeating the enemies, turn right and climb a short wall. This is obtained during the first objective ▼. |
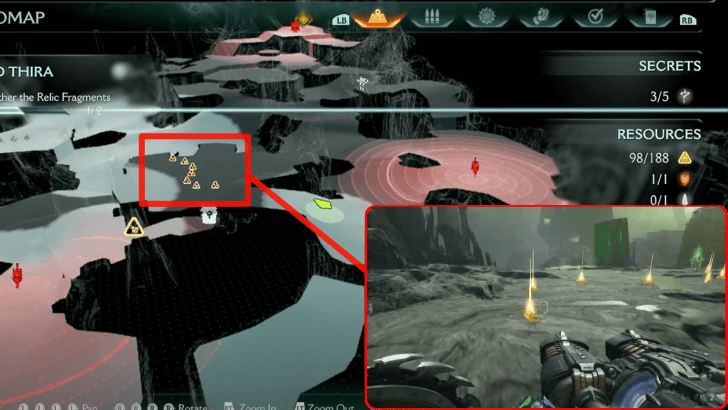 |
From Gold Trail 4, continue onwards and into a wide area full of enemies. From there, turn right and up a small mound. This is obtained during the first objective ▼. |
 |
This can be found right below the mound Gold Trail 5 is on. To unlock the area, go to the opposite side of the mound and throw your shield at the mechanism to open the door. This is obtained during the first objective ▼. |
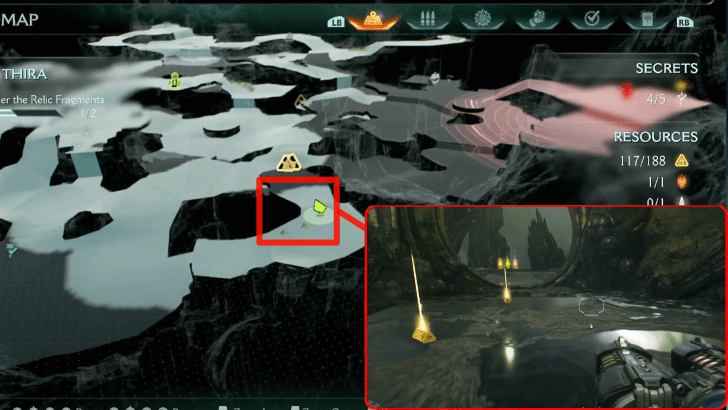 |
This can be found near one of the two Relic Fragments, on top of a slope. This is obtained during the first objective ▼. |
 (Secret 5/5) |
A big black and green gate can be found next to Gold Trail 6 & Gold Caches 5. This is an Infinite Room Puzzle you must solve to get the Gold Chest. This is obtained during the first objective ▼. |
 |
After obtaining the Relic Fragment near Demonic Essence: Ammo, turn around and go along the right side of the map until you reach this Gold Trail. This is obtained during the first objective ▼. |
The Kar'Thul Marshes Rubies
| Item | How to Get |
|---|---|
 (Secret 1/5) |
Enter the portal near Gold Trail 1. Enter the area and finish the Ruby Puzzle. This is obtained during the first objective ▼. |
The Kar'Thul Marshes Wraithstones
| Item | How to Get |
|---|---|
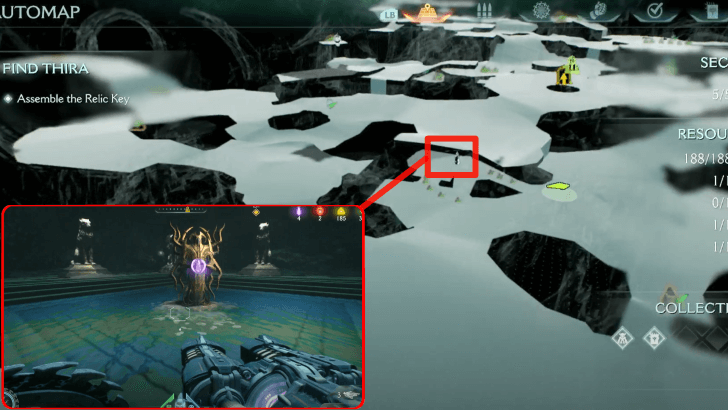 (Secret 2/5) |
Destroy all Wolf Statues within the area to unlock the Wraithstone. It can be found near Gold Trail 2. This is obtained during the first objective ▼. |
The Kar'Thul Marshes Demonic Essence
| Item | How to Get |
|---|---|
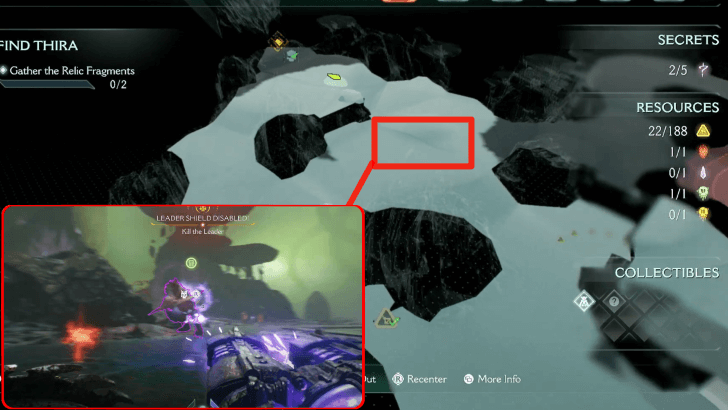 |
Obtained after killing the leader near Gold Trail 2 or one of the Relic Fragments. This is obtained during the first objective ▼. |
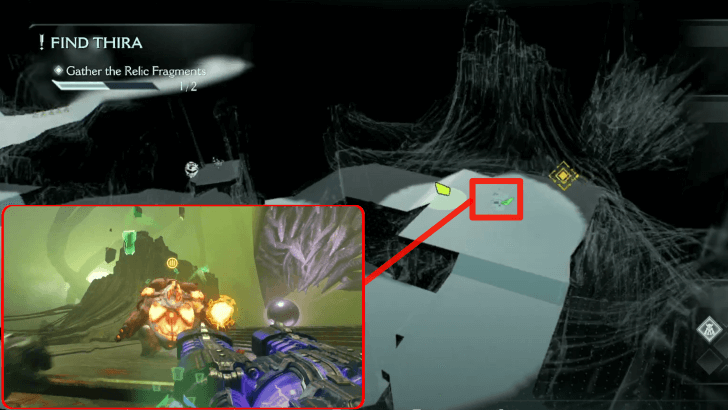 |
Obtained after killing the leader near one of the Relic Fragments. This is obtained during the first objective ▼. |
The Kar'Thul Marshes Walkthrough
| Main Objectives | |
|---|---|
| 1 | Gather 2 Relic Fragments Secrets: Ruby 1 – Secret #1 Wraithstone 1 – Secret #2 Gold Chest 1 (x50) – Secret #3 The Witch Codex – Secret #4 Gold Chest 2 (x50) – Secret #5 |
| 2 | Assemble the Relic Key |
| 3 | Enter the Portal |
1. Gather 2 Relic Fragments
| 1 | 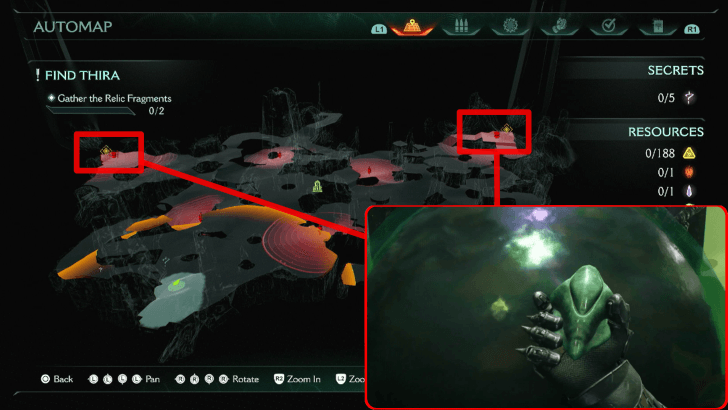 Upon spawning, follow the Objective Marker towards 2 Relic Fragments. They are located on opposite sides of the map. Collectibles: All Gold Trails(x41), All Gold Caches (x48), All Gold Chests (x100), Ruby, Battle Knight Toy, All Life Sigils, The Witch Codex, Wraithstone |
|---|---|
| 2 | 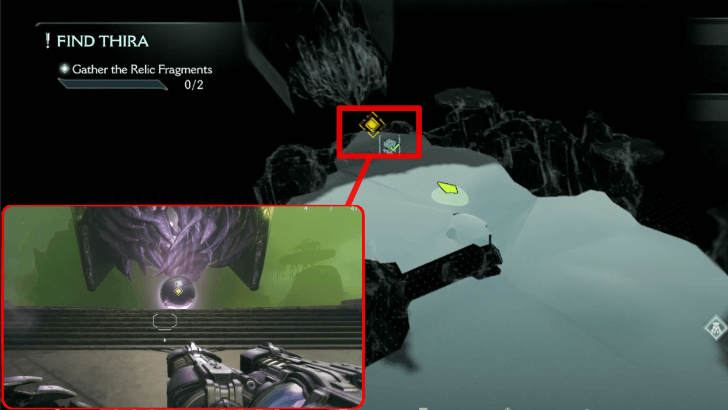 The first Relic Fragment can be obtained after defeating the Agaddon Hunter Leader within the area. Most of its attacks are parryable, just watch out for its Shield Charge and follow up attack that knocks you back a considerable distance. Collectibles: Demonic Essence: Armor |
| 3 | 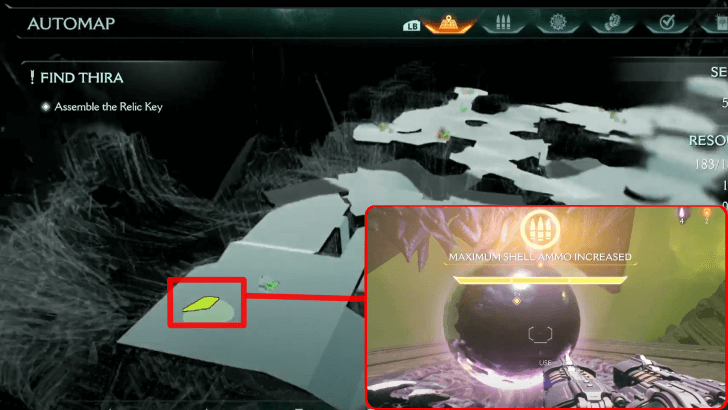 The second Relic Fragment can be obtained after defeating the Mancubus Leader within the area. This boss has a lot of mid-long ranged attacks, so make sure to position yourself properly against it. Collectibles: Demonic Essence: Ammo |
2. Assemble the Relic Key
| 1 |  Follow the Objective Marker to an elevator that will lead you down an underground area. |
|---|---|
| 2 | 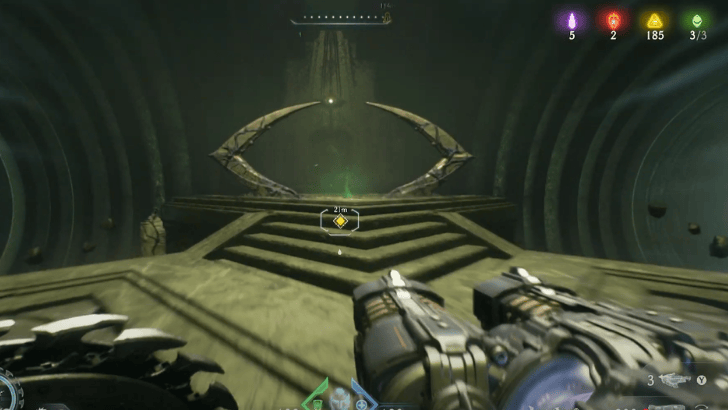 Approach the green platform ahead and press the "Use" button to assemble to Relic Key. |
3. Enter the Portal
| 1 | 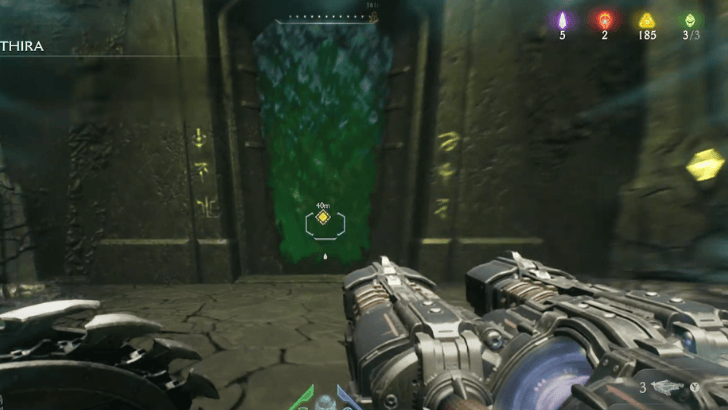 After assembling the Relic Key, proceed onwards into the green portal. This will teleport you underwater. |
|---|---|
| 2 | 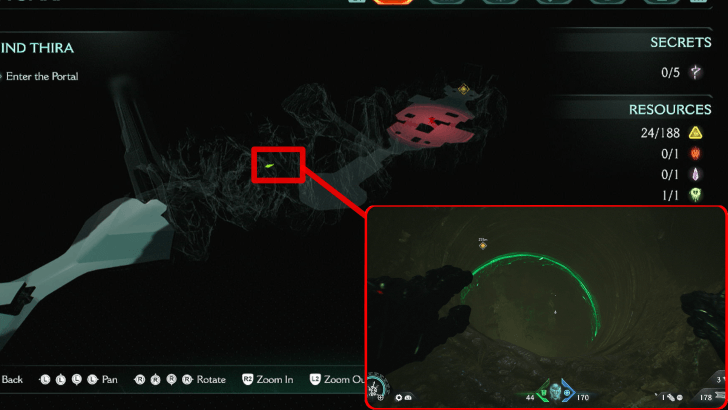 Follow the Objective Marker and pass through the other end of the underwater tunnel, leading to dry land once again. |
| 3 | 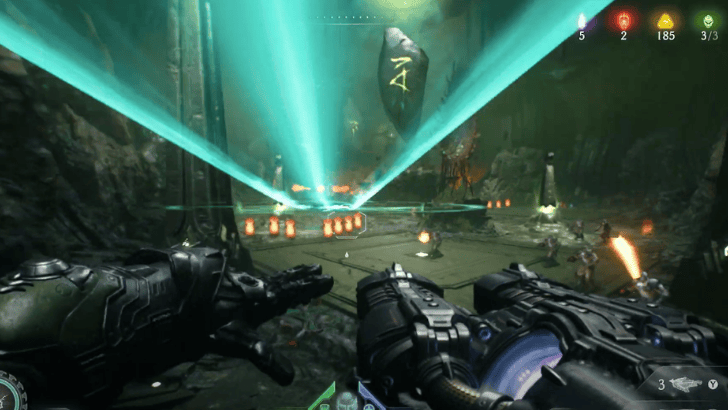 Follow the Objective Marker and proceed into the next room, which is full of enemies you must defeat to pass through. |
| 3 | 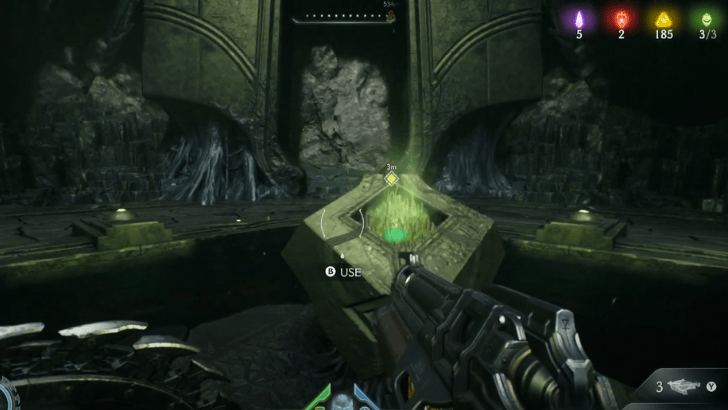 Follow the Objective Marker to this device and interact with it to open another portal. Entering this portal marks the end of the chapter. |
The Kar'Thul Marshes Mission Challenges
| Challenge | Details and Reward |
|---|---|
| Hunter | Destroy all of the wolf statues in the swamps Reward: Reverent Weapon Skin |
| Roundup | Kill 20 or more demons with a single BFC shot Reward: 100 Gold |
Hunter

There are five total wolf statues in the swamp which you can destroy with the Shield Throw to unlock a secret area containing a Wraithstone. All of the wolf statues can be found on the open-area section of the chapter during the first objective.
Roundup
There's a morale encounter against an Agaddon Hunter Leader at the northwest edge of the map from where you start the chapter. This area has dozens of Shield Soldiers as well as other fodder demons that when properly lured to the center can easily complete this challenge when firing a BFC bolt.
Ballistic Force Crossbow Upgrades and How to Get
Doom: The Dark Ages Related Guides

Full Walkthrough and List of Chapters
Comment
Author
Chapter 16: The Kar'Thul Marshes Secrets and Walkthrough
improvement survey
03/2026
improving Game8's site?

Your answers will help us to improve our website.
Note: Please be sure not to enter any kind of personal information into your response.

We hope you continue to make use of Game8.
Rankings
- We could not find the message board you were looking for.
Gaming News
Popular Games

Genshin Impact Walkthrough & Guides Wiki

Honkai: Star Rail Walkthrough & Guides Wiki

Umamusume: Pretty Derby Walkthrough & Guides Wiki

Pokemon Pokopia Walkthrough & Guides Wiki

Resident Evil Requiem (RE9) Walkthrough & Guides Wiki

Monster Hunter Wilds Walkthrough & Guides Wiki

Wuthering Waves Walkthrough & Guides Wiki

Arknights: Endfield Walkthrough & Guides Wiki

Pokemon FireRed and LeafGreen (FRLG) Walkthrough & Guides Wiki

Pokemon TCG Pocket (PTCGP) Strategies & Guides Wiki
Recommended Games

Diablo 4: Vessel of Hatred Walkthrough & Guides Wiki

Fire Emblem Heroes (FEH) Walkthrough & Guides Wiki

Yu-Gi-Oh! Master Duel Walkthrough & Guides Wiki

Super Smash Bros. Ultimate Walkthrough & Guides Wiki

Pokemon Brilliant Diamond and Shining Pearl (BDSP) Walkthrough & Guides Wiki

Elden Ring Shadow of the Erdtree Walkthrough & Guides Wiki

Monster Hunter World Walkthrough & Guides Wiki

The Legend of Zelda: Tears of the Kingdom Walkthrough & Guides Wiki

Persona 3 Reload Walkthrough & Guides Wiki

Cyberpunk 2077: Ultimate Edition Walkthrough & Guides Wiki
All rights reserved
© 2025 ZeniMax Media Inc. All Rights Reserved.
The copyrights of videos of games used in our content and other intellectual property rights belong to the provider of the game.
The contents we provide on this site were created personally by members of the Game8 editorial department.
We refuse the right to reuse or repost content taken without our permission such as data or images to other sites.




![Monster Hunter Stories 3 Review [First Impressions] | Simply Rejuvenating](https://img.game8.co/4438641/2a31b7702bd70e78ec8efd24661dacda.jpeg/thumb)


