Chapter 6: Siege Part 1 Secrets and Walkthrough
☆ Doom: The Dark Ages is live now!
★ Collectibles | Secrets | Walkthrough
┗ Resources | Codex | Toy
★ Trophies | Beginner's Guide | Enemies
☆ Skins: Twitch Drops | Prince St. Pizza
★ FAQs: Co-op | DLC | Specs | Glory Kills
Chapter 6: Siege - Part 1 in Doom: The Dark Ages contains 11 secrets and 5 collectibles. Learn how to get all the secrets, gold, and collectibles, as well as how to complete the Mission Challenges in this Chapter 6 walkthrough guide.
| ◄ Previous Chapter | Next Chapter ▶ |
|---|---|
| The Holy City of Aratum | Siege - Part 2 |
Siege Part 1 Secrets and Collectibles
Siege Part 1 Interactive Map
| Jump to a Collectible! | |
|---|---|
| Toys | 2 |
| Skins | 2 |
| Codex | 2 |
| Life Sigils | 3 |
| Demonic Essence | 2 |
| Gold | 513 |
| Rubies | 4 |
| Secrets | 11 |
Siege Part 1 Toys
| Item | How to Get |
|---|---|
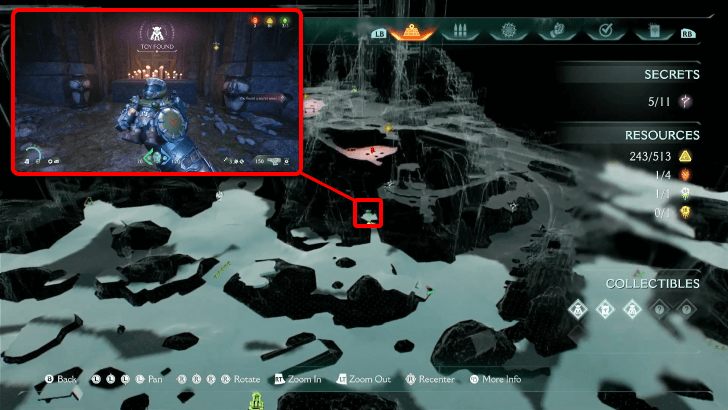 (Secret 5/11) |
There is an opening at the base of the mountain nearby where the Purple Key can be found. The gate will need the same key, and behind it will be the Slayer Toy. This can be found near the second objective ▼ |
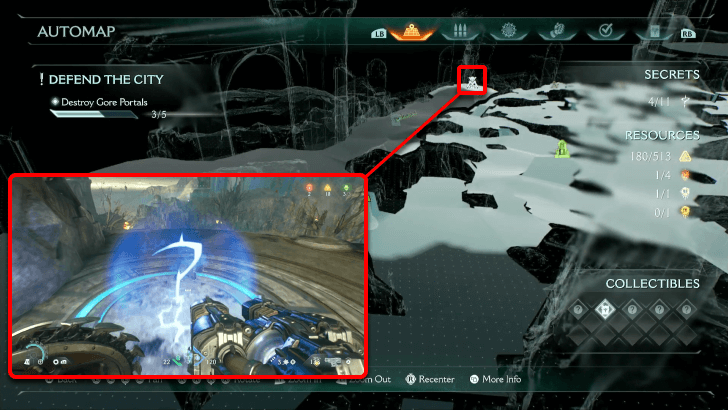 |
Nearby one of the Sentinel Shrines is a giant statue. Climb up the path, and at the feet of the statue is the Mancubus Toy. This can be found during the first Gore Portal. This can be found during the first Gore Portal ▼. |
Siege Part 1 Skins
| Item | How to Get |
|---|---|
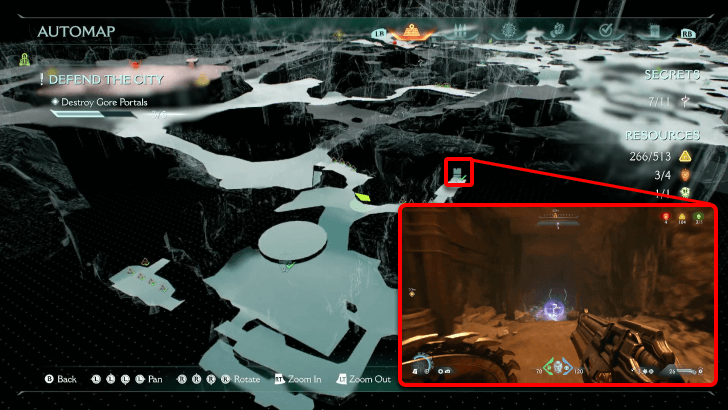 (Secret 7/11) |
In the same area as where Ruby 3 can be found, the weapon skin is nearby. Jump down the platform and follow a trail of gold to lead you to a locked gate nearby that uses the Purple Key. This will reveal the Nightmare Impaler Skin. This can be found near the second objective ▼. |
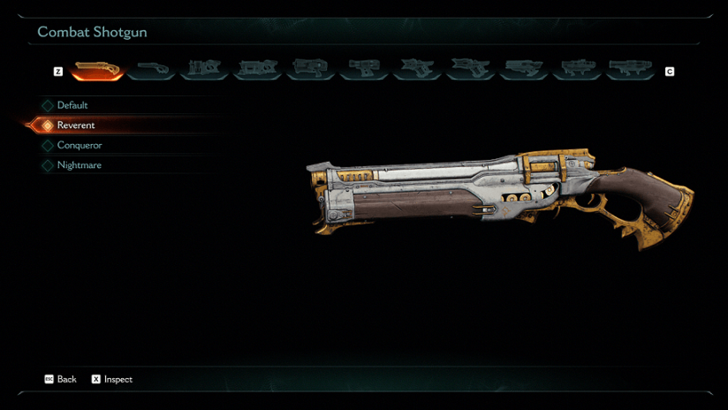 (Mission Challenge) |
This weapon skin can only be acquired after achieving the Siege Breaker mission challenge. |
Siege Part 1 Codex Entries
| Item | How to Get |
|---|---|
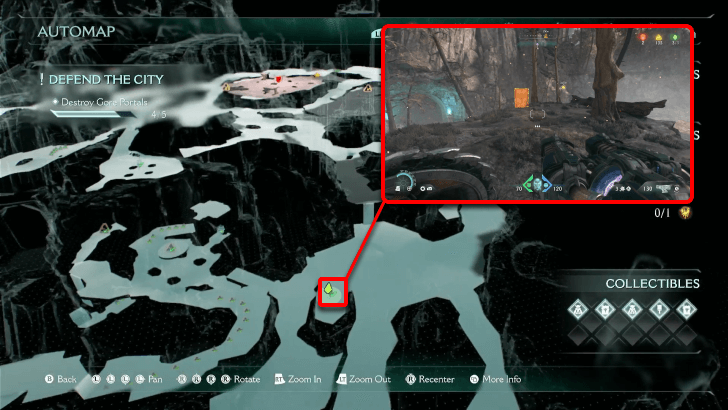 |
This codex is nearby Ruby 4, found by exiting the secret mine area, then sprint jumping onto the nearby hill. This can be found near the third Gore Portal ▼. |
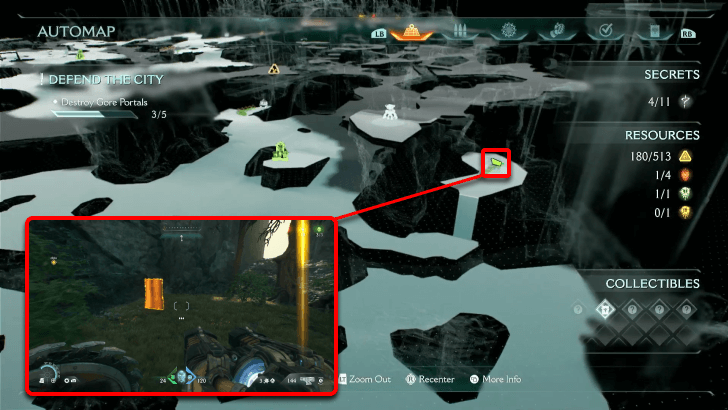 |
Nearby the Sentinel Shrine and the Mancubus Toy, the Codex entry can be found by climbing up the cliffside near the riverbank and following the trail of gold. This can be found during the first Gore Portal ▼. |
Siege Part 1 Life Sigils
| Item | How to Get |
|---|---|
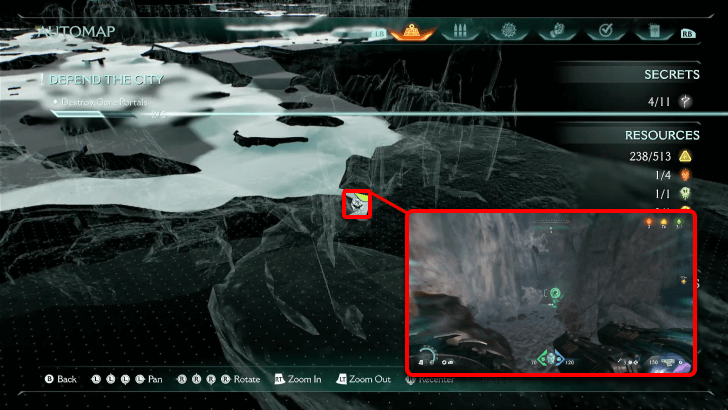 (Secret 1/11) |
This Life Sigil is found nearby an Artillery and Life Sigil 2. It is hidden beside the waterfall and is floating on top of the bank. This can be found near the second objective ▼. |
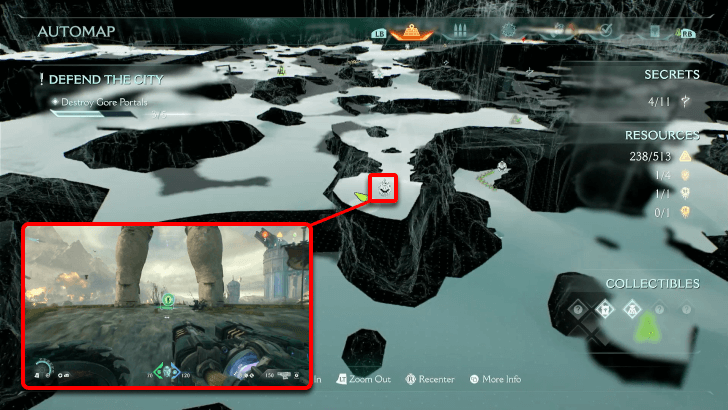 |
There is a secret placed on top of the cliff at the feet of a giant statue, which is where you can find the Life Sigil. There is a nearby Sentinel Shrine just below. This can be found during the first Gore Portal ▼. |
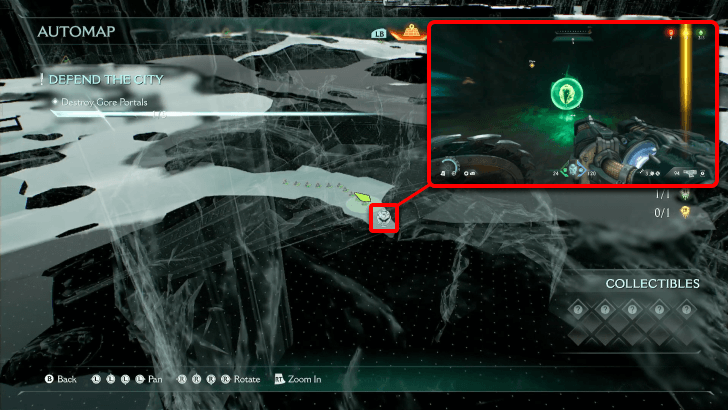 |
Nearby a Sentinel Shrine is a Life Sigil guarded by Tentacles that will burst from the ground. This can be found during the first Gore Portal ▼ |
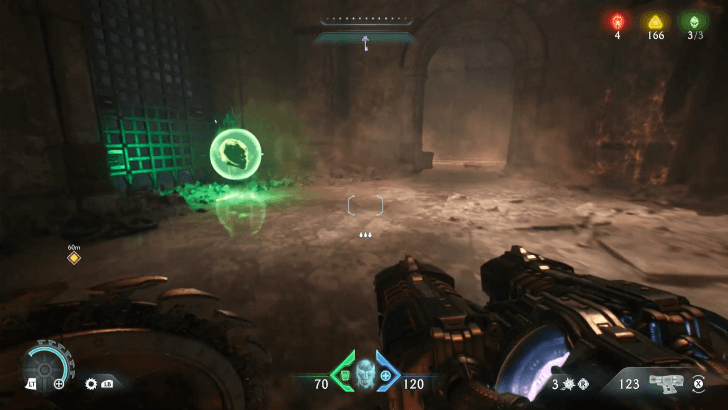 |
This Life Sigil is inside one of the isolated portal areas where Hell Cultists are powering a Gore Portal. It can be found by taking a jump pad to an upper platform, where it rests beside the gate. This can be found near the third Gore Portal ▼. |
Siege Part 1 Demonic Essence
| Item | How to Get |
|---|---|
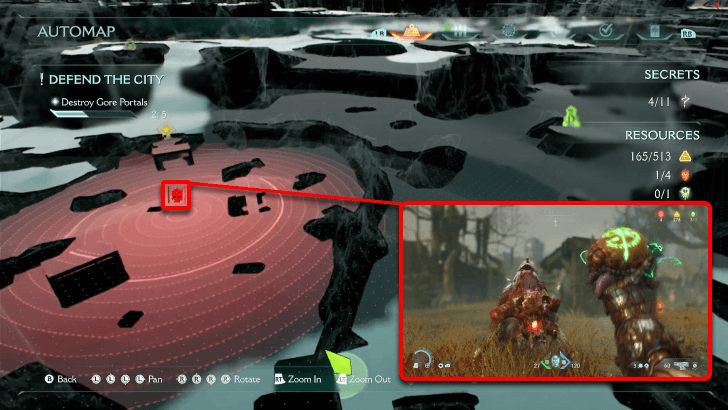 |
There is a nearby Sentinel Shrine, as well as a Gore Portal to find this Leader's location. Defeating it will earn you a maximum armor upgrade. This can be found during the first Gore Portal ▼ |
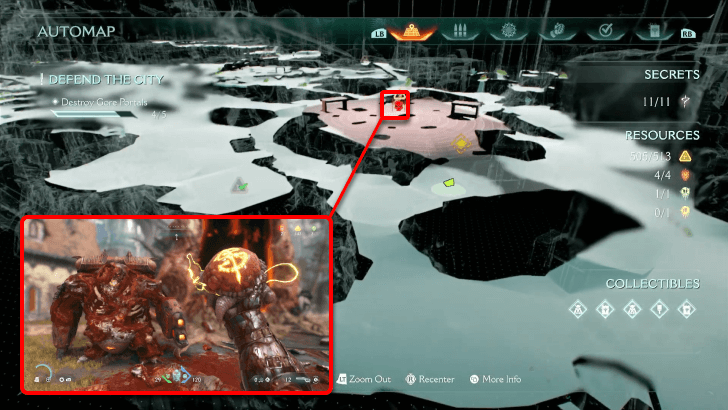 |
The second Leader is also guarding a Gore Portal, making it easy to find. Defeating it will earn you a capacity upgrade for Spike Ammo. This can be found during the fourth Gore Portal ▼ |
Siege Part 1 Gold
| Item | How to Get |
|---|---|
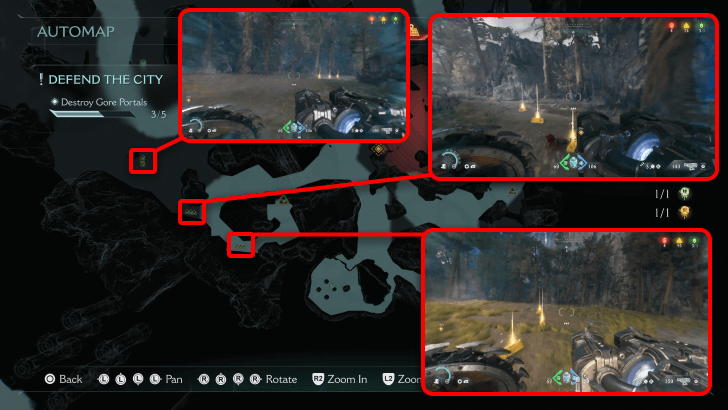 |
There is an intermittent trail of gold leading to an Artillery near Gore Portal 2. This can be found during the second Gore Portal ▼. |
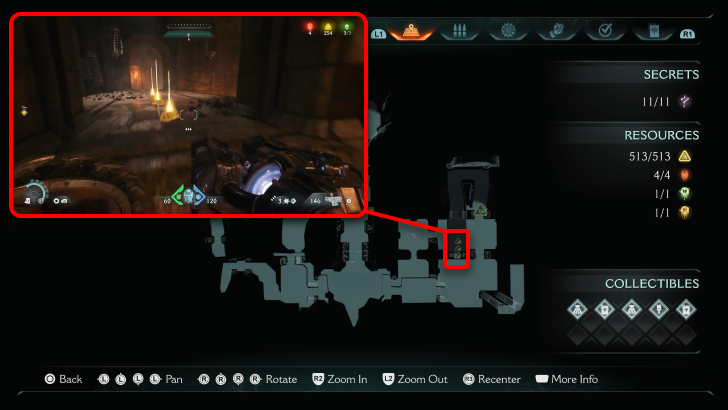 |
On the bridge path on the way to one of the levers inside an isolated portal area. This can be found during the second Gore Portal ▼ |
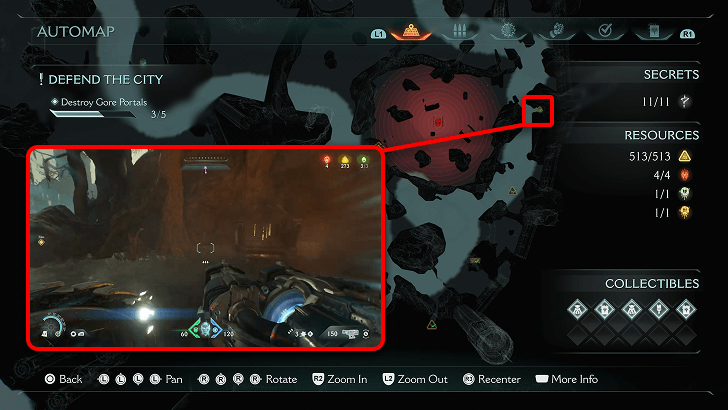 |
On the far side of the map, leading up to an Artillery. |
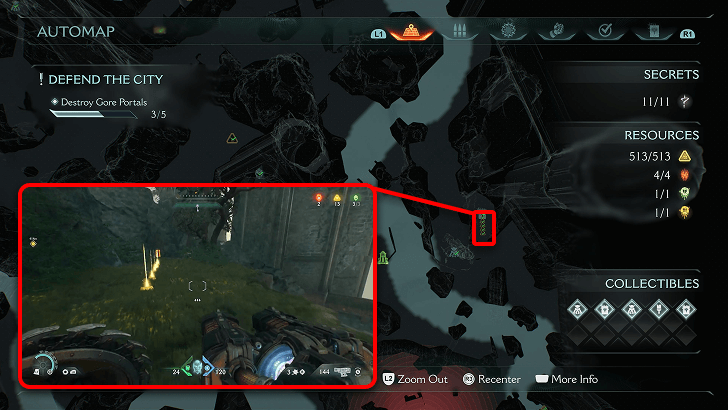 |
Trail of gold leading to the Siege - Part 1 Codex, nearby the Mancubus Toy.This can be found during the first Gore Portal ▼ |
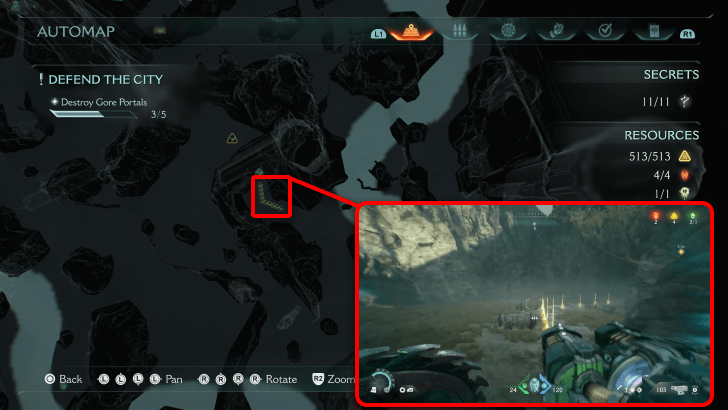 |
In a small alcove, leading up to a Life Sigil. |
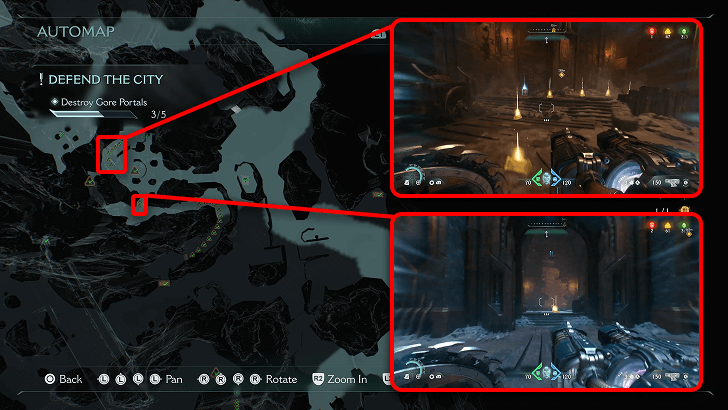 |
Trail of gold leading up to a Secret Area and a lever. This can be found near the third Gore Portal ▼ |
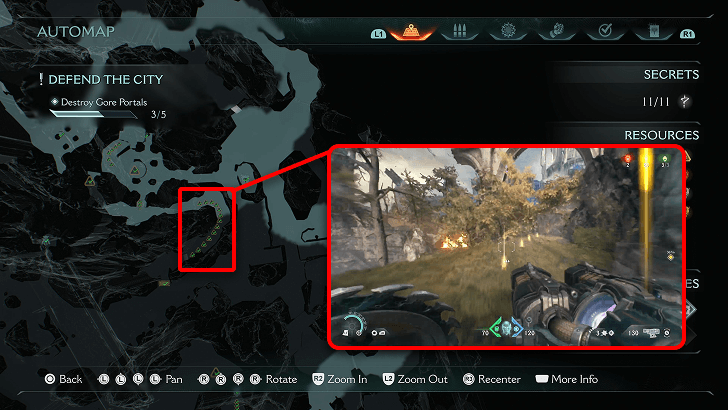 |
Trail of gold after exiting the central mountain's cave, leading up to a gold chest up on a cliff. This can be found near the third Gore Portal ▼ |
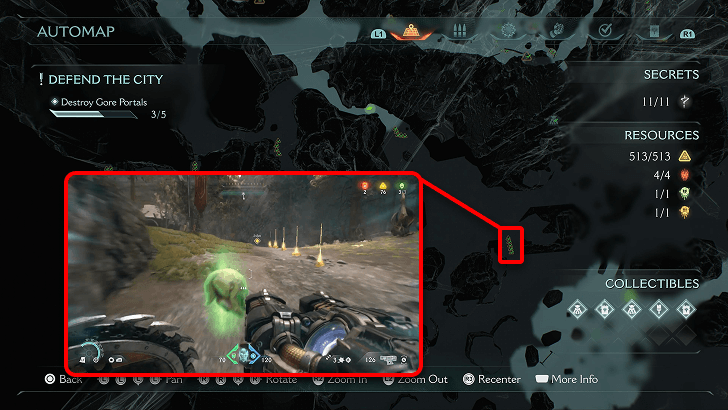 |
Near where you exited from in the beginning, on the bank of the river. This can be found near the second objective ▼ |
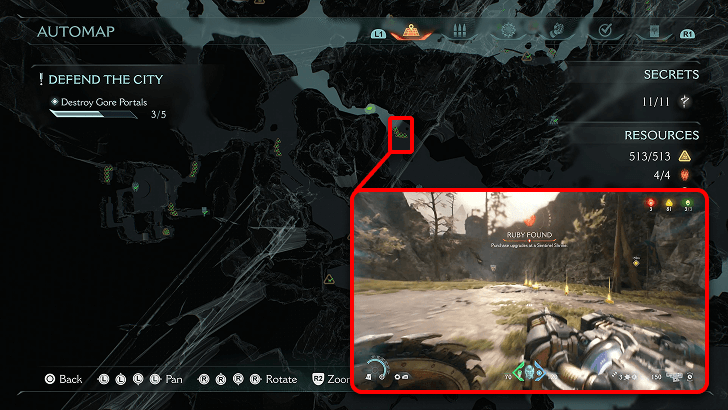 |
Placed below a stone structure, nearby Ruby 2. This can be found near the second objective ▼ |
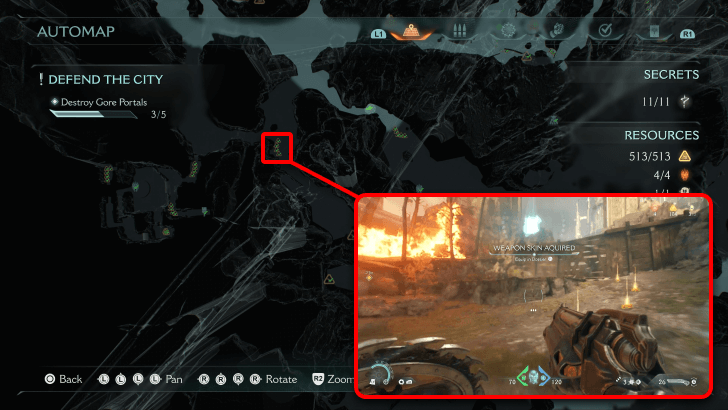 |
Trail of gold going up a cliff, leading to an Artillery. This can be found near the second objective ▼ |
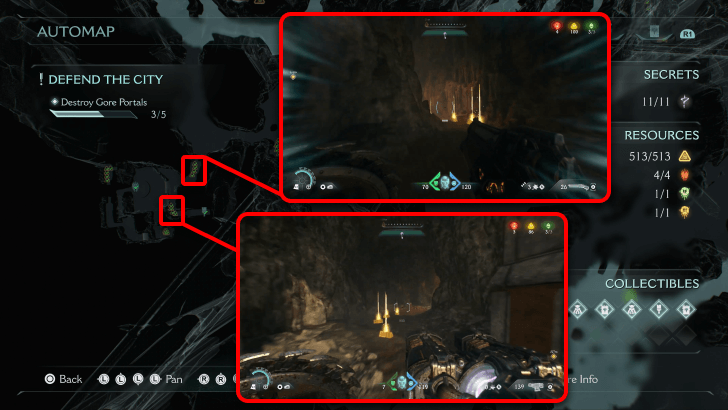 |
Trail of gold leading to a weapon skin in a hidden nook inside the mountain. This can be found near the second objective ▼ |
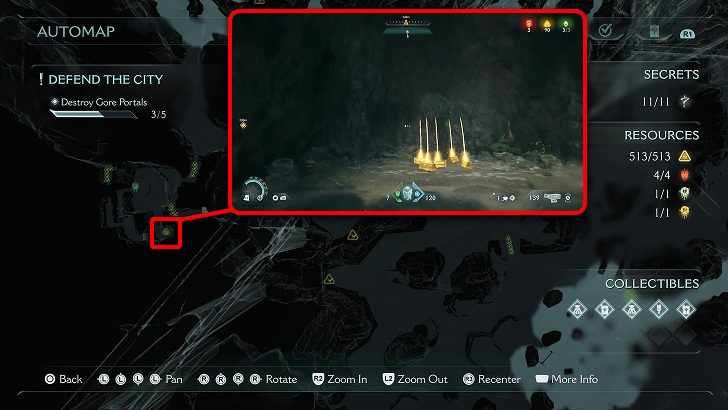 |
Can be seen after resurfacing from underwater on a small rocky platform. This can be found near the second objective ▼ |
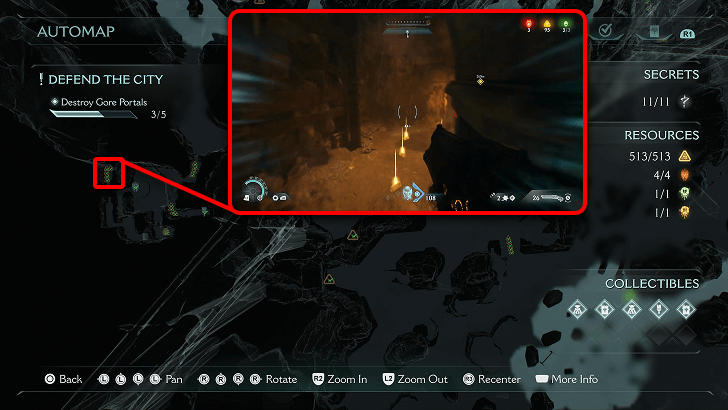 |
Trail of gold after exiting a cave on the far side of the map, containing a Ruby. This can be found near the second objective ▼ |
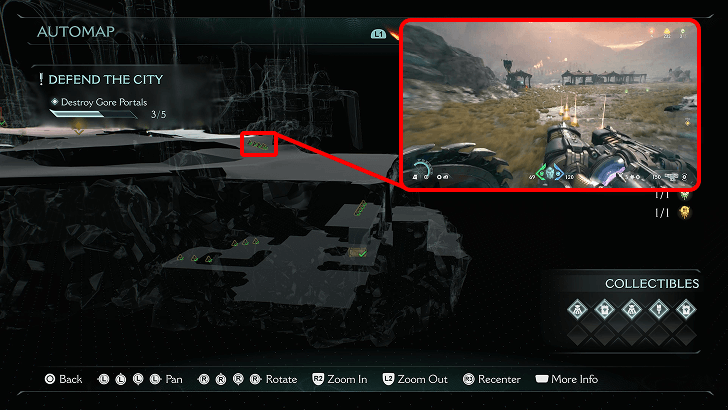 |
Trail of gold that leads up to a Secret Area of the map. This can be found during the fourth Gore Portal ▼ |
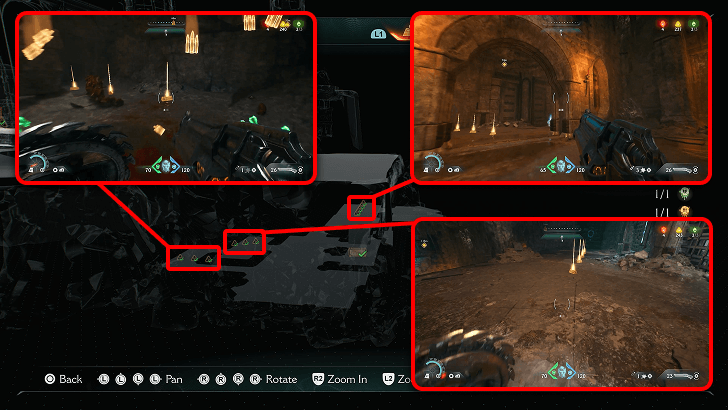 |
All the gold found in the secret area in the far side of the map. This can be found during the fourth Gore Portal ▼ |
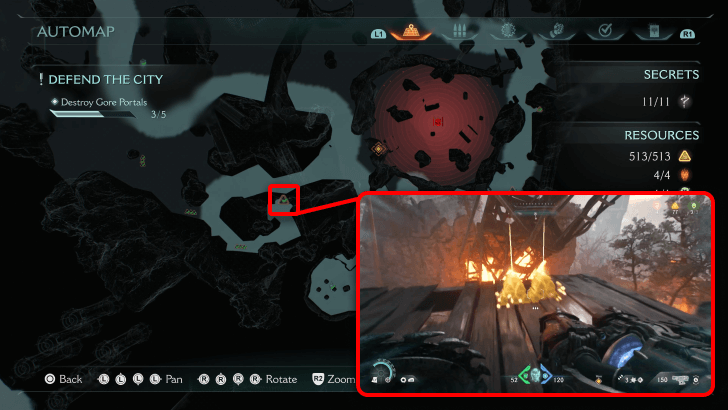 |
Follow the path to the forest and defeat the enemies to remove the barrier around it. This can be found during the second Gore Portal ▼ |
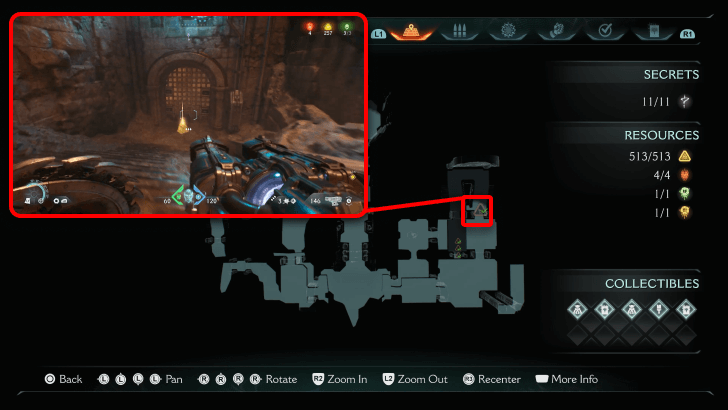 (Secret 2/11) |
In the area where you jump through a portal to access, there is a gold cache hiding behind a locked gate. Break the metal lock holding up the metal box, then Shield Recall Jump to the higher platform across you. Shield Charging the wooden bridge will raise the gate beside the other platform, so hop down to the platform to get up on the unlocked area. Make your way across the bridge and down the stairs, and that's how you get to the gold cache. This can be found during the second Gore Portal ▼ |
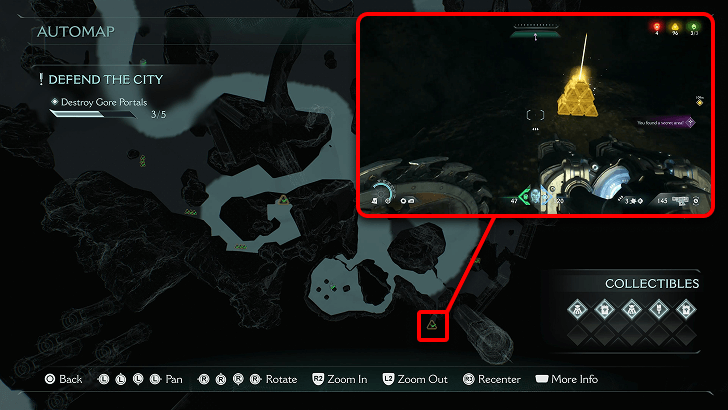 (Secret 4/11) |
Nearby one of the objectives is a hidden nook in the mountain, with a wooden barricade. Breaking it with a Shield Charge will reveal a gold cache. This can be found during the second Gore Portal ▼ |
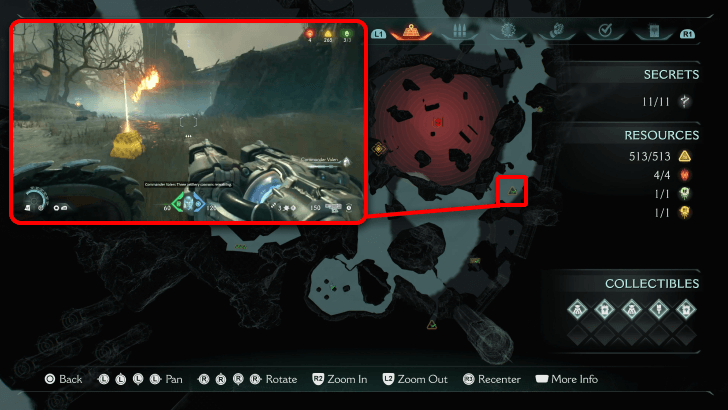 |
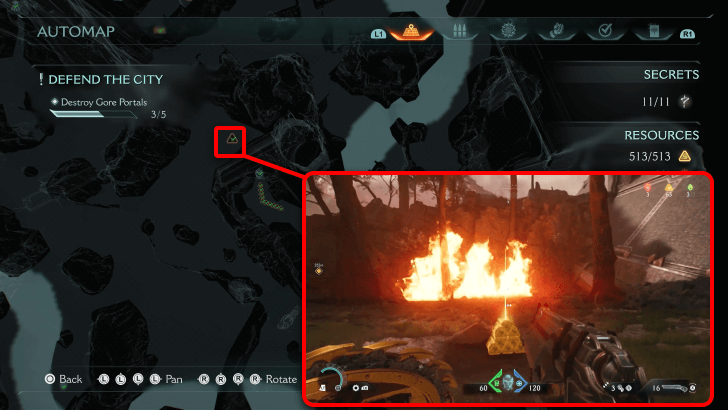
A cache of gold dropped after destroying an Artillery. This can be found during the first Gore Portal ▼ |
 |
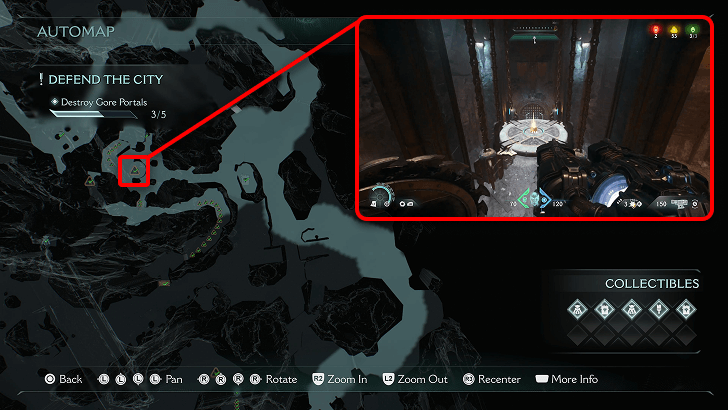
A cache of gold dropped after destroying an Artillery. This can be found during the first Gore Portal ▼ |
 |
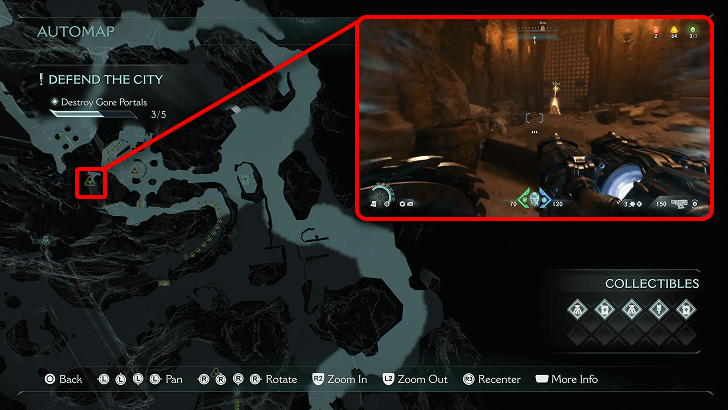
Found on the central platform inside the central mountain. This can be found during the third Gore Portal ▼ |
 |
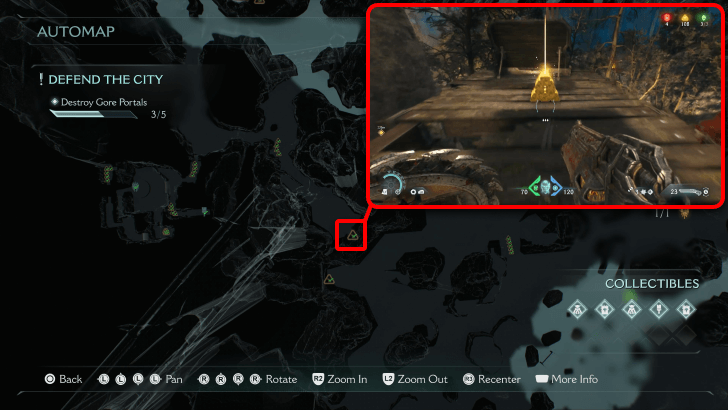
Found before exiting the central mountain's cave. This can be found during the third Gore Portal ▼ |
 |
A cache of gold dropped after destroying an Artillery. This can be found during the fourth Gore Portal. This can be found during the third Gore Portal ▼ |
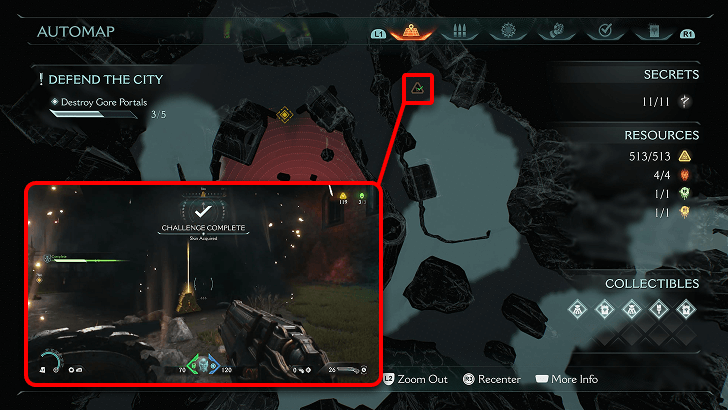 |
A cache of gold dropped after destroying an Artillery. This can be found during the fourth Gore Portal. This can be found during the fourth Gore Portal ▼ |
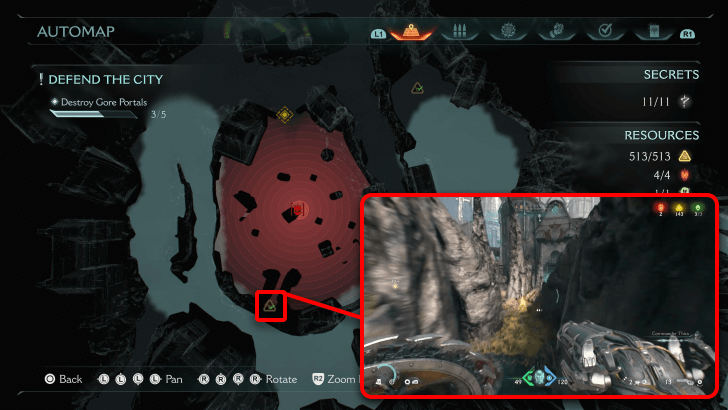 |
Near the Gore Portal on the far side of the map. This can be found during the third Gore Portal. This can be found during the fourth Gore Portal ▼ |
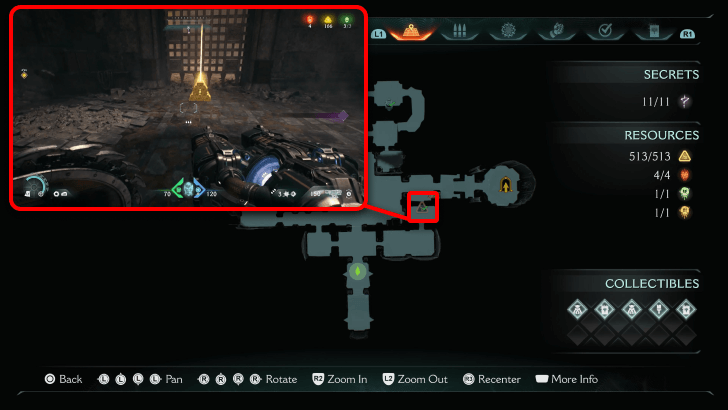 (Secret 8/11) |
In the portal where you get the Chainshot, there is a blue-marked wall nearby which you can smash through to find a secret Gold Cache. This can be found during the third Gore Portal. This can be found during the fourth Gore Portal ▼ |
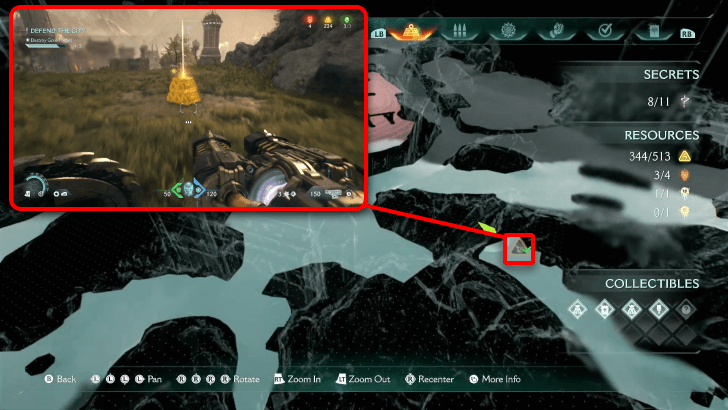 |
Found after exiting one of the isolated portal areas, before jumping off a cliff. This can be found during the fourth Gore Portal ▼ |
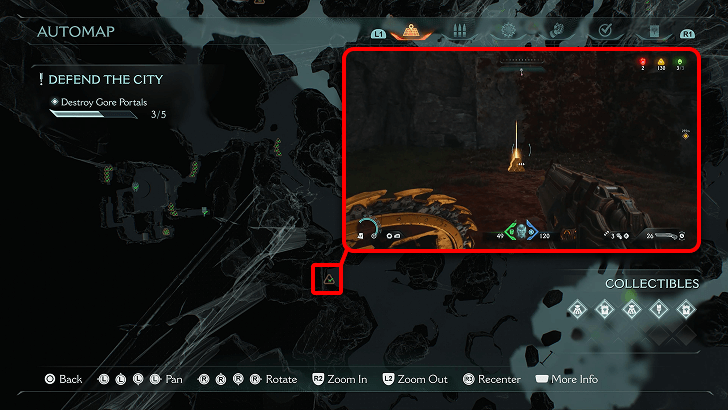 |
Situated nearby a Life Sigil, it is located by the base of a cliff holding an Artillery. This can be found during the second Gore Portal ▼ |
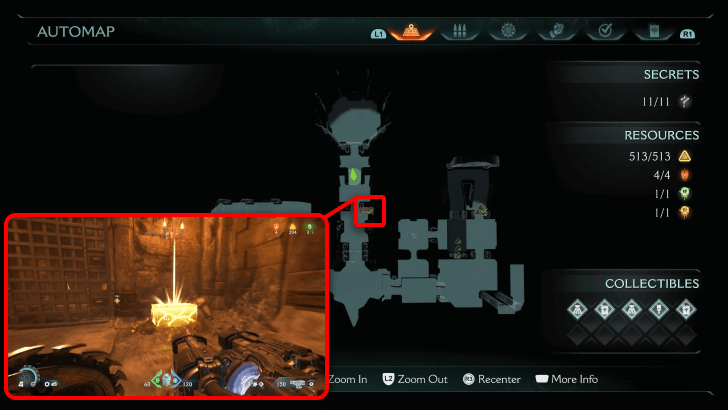 |
Found inside one of the isolated portal areas, right before encountering the Hell Cultists. This can be found during the second Gore Portal ▼ |
 (Secret 3/11) |
Behind a locked gate of a tower is a gold chest. To access it, walk around the shallow waters right up to the banner hanging up a pole.
Underneath the banner Underneath the banner 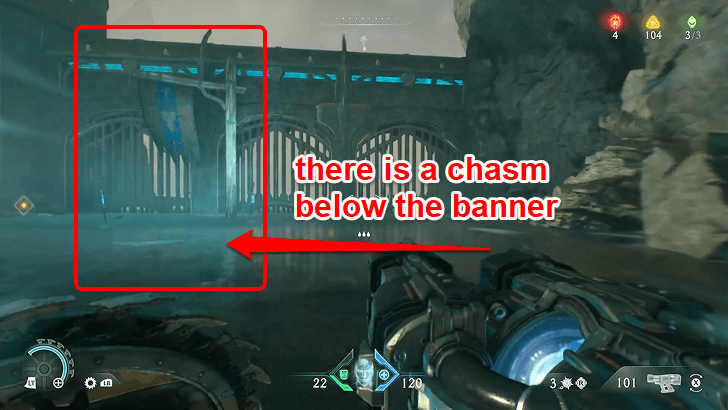 |
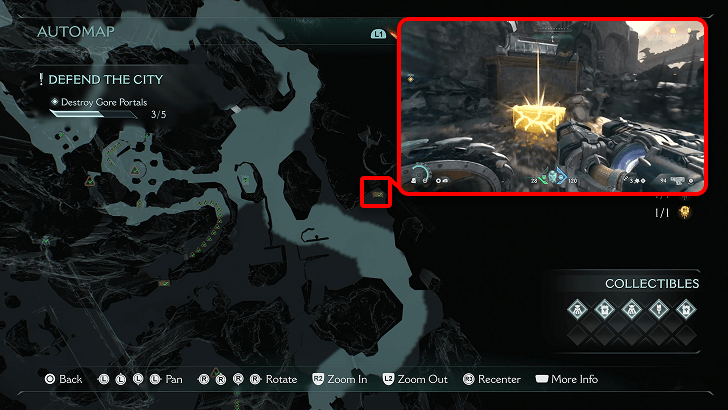 |
On the far side of the map, a little bit farther from the Siege - Part 1 Codex. This can be found during the first Gore Portal ▼ |
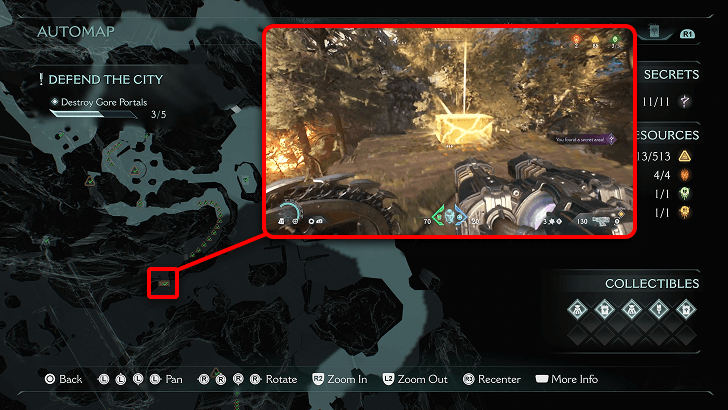 (Secret 9/11) |
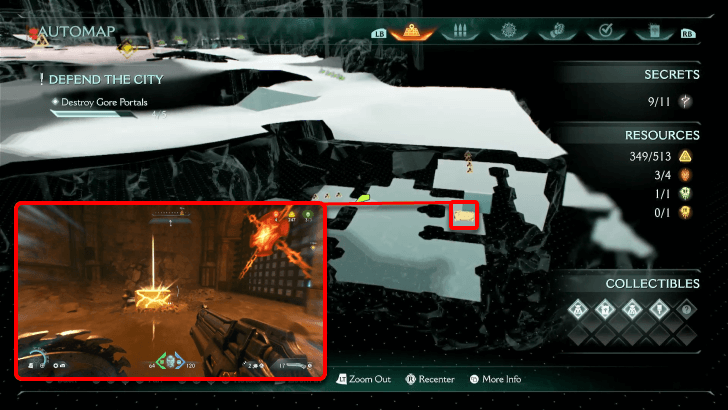
Up on a wooden plank, after exiting the central mountain. A the Gold Trail leads up to it, and on the opposite is the Kreed Maykr Codex. This can be found nearby the third Gore Portal ▼ |
 (Secret 11/11) |
Nearby one of the Sentinel Shrines is a portal that will lead to a secret area. Throw your Shield at the
gate gate 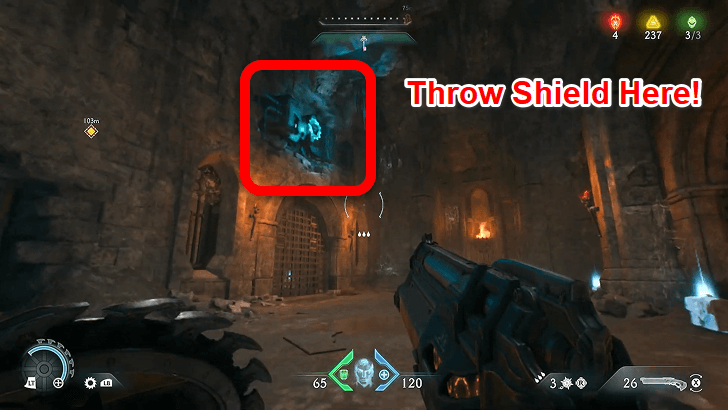 |
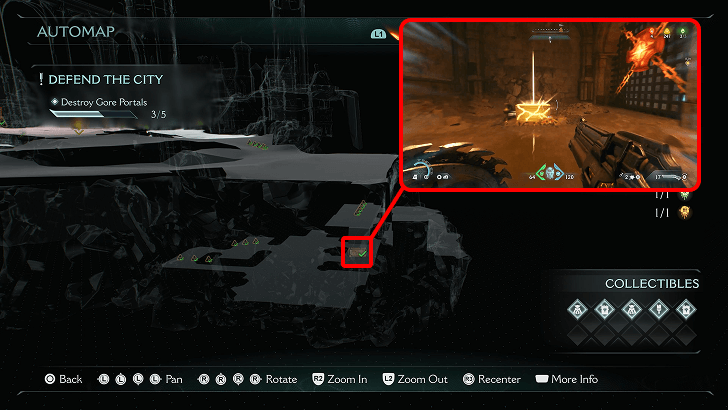 |
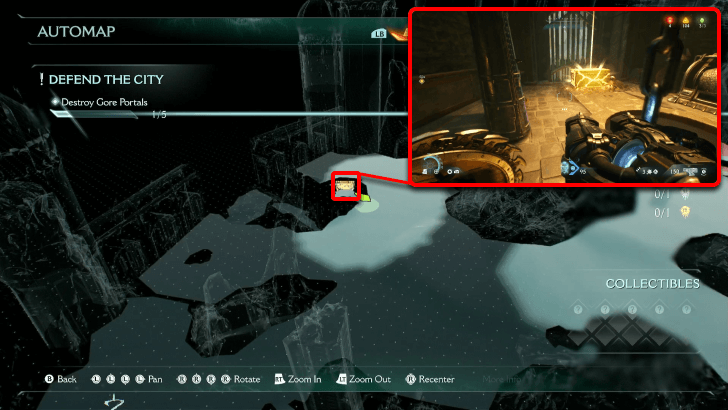
Found inside one of the isolated portal areas, right before encountering the Hell Cultists. This can be found during the third Gore Portal ▼ |
Siege Part 1 Rubies
| Item | How to Get |
|---|---|
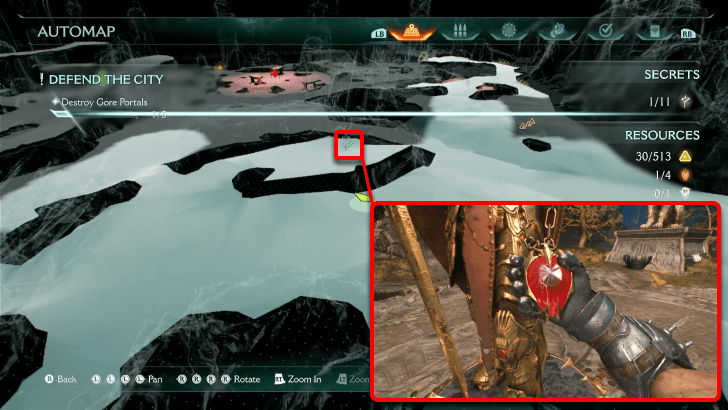 |
To unlock this Ruby, find and destroy
three wolf statues three wolf statues 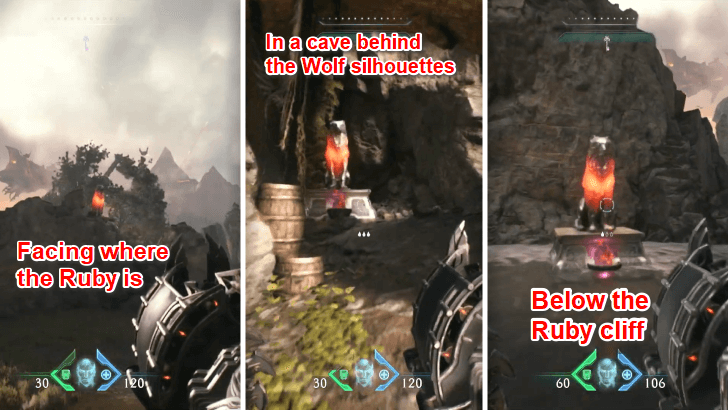 |
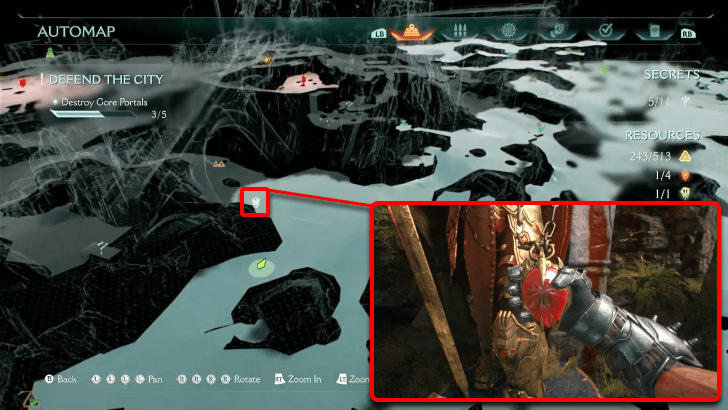 |
This Ruby is found near the area of Life Sigil 2, just below a massive stone structure part of the castle. This can be found near the second objective ▼ |
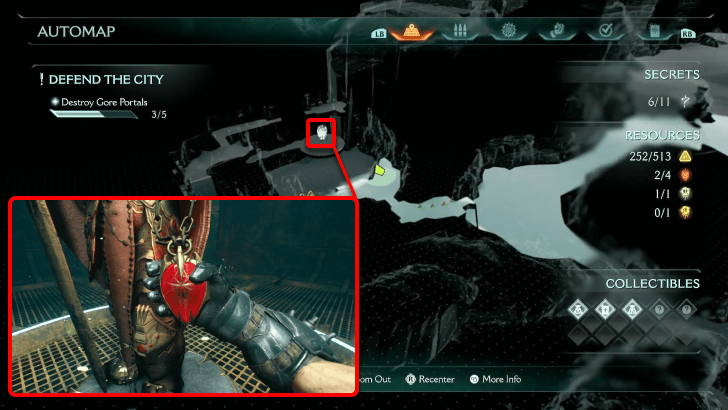 (Secret 6/11) |
Nearby one of the Gore Portals is a tiny valley where bodies are hanging from the wooden beams. There will be an entrance around the area, that will lead to gunfight against demons. Defeating them will unlock the climbable wooden board that will lead to a cave entrance leading to the Ruby and other goodies. This can be found near the second objective ▼. |
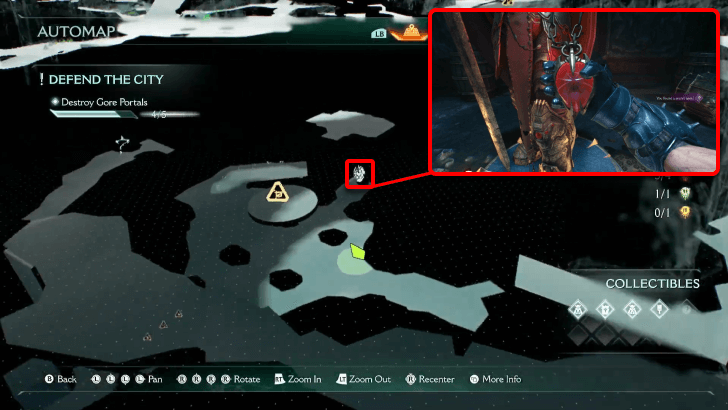 (Secret 10/11) |
Littered along the path nearby the Slayer Toy are broken wooden structures. Continue beside the mountain until you see an opening that reveals an entrance to a cave. Jump down and grab the Ruby from the statue from there! This can be found during the first Gore Portal ▼. |
Siege Part 1 Walkthrough
| Main Objectives | |
|---|---|
| 1 | Get to the Battlefield |
| 2 | Destroy Gore Portals
Secrets: Life Sigil 1 - Secret #1 Gold Cache 2 - Secret #2 Gold Chest 1 - Secret #3 Gold Cache 3 - Secret #4 Slayer Toy - Secret #5 Ruby 3 - Secret #6 Nightmare Impaler Skin - Secret #7 Gold Cache 4 - Secret #8 Gold Chest 2 - Secret #9 Ruby 4 - Secret #10 Gold Chest 3 - Secret #11 |
| 3 | Fall Back to the Wall |
1. Get to the Battlefield
| 1 | 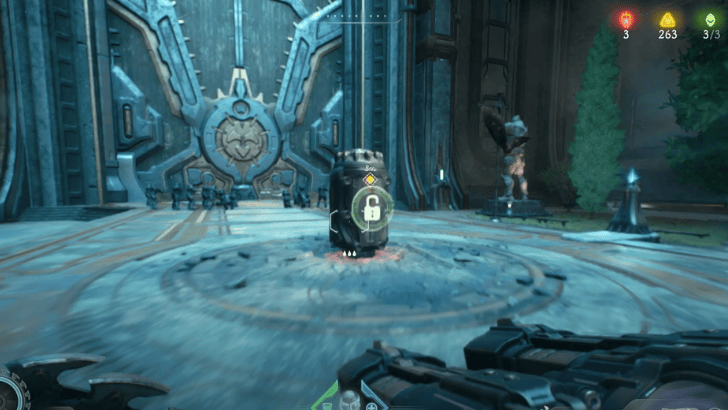 Upon spawning, follow the Objective Marker to unlock the Flail. Pass through the open gate. |
|---|
Melee Weapon: Flail
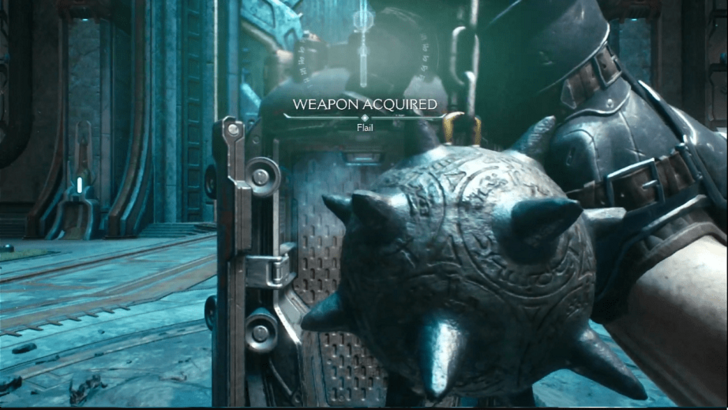
This chapter introduces a new melee weapon: Flail. The Flail is located in the beginning of the chapter shortly after exiting the castle. This melee weapon will be important in achieving the Unstoppable Force mission challenge.
2. Destroy Gore Portals
| 1 | 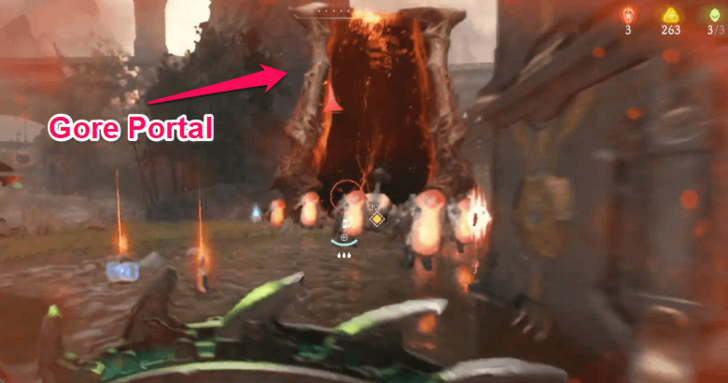 The battlefield is vast, and you must look for and destroy 5 Gore Portals. Luckily, the first one is there right as you step out of the castle! |
|---|---|
| 2 | 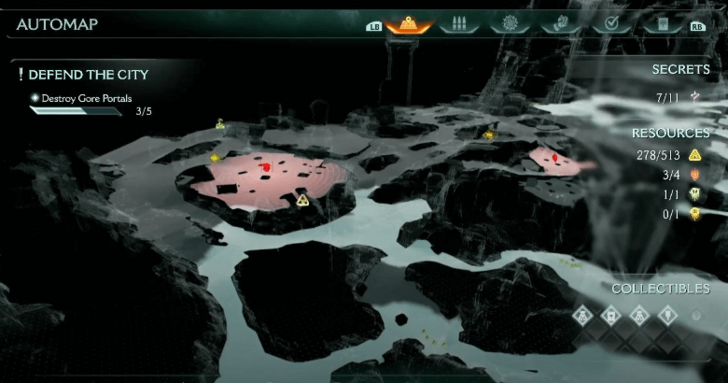 Aside from following the Objective Marker, you can also open your Dossier to open your map. In general, you can find Gore Portals where there are enemy hotspots. |
| 3 | 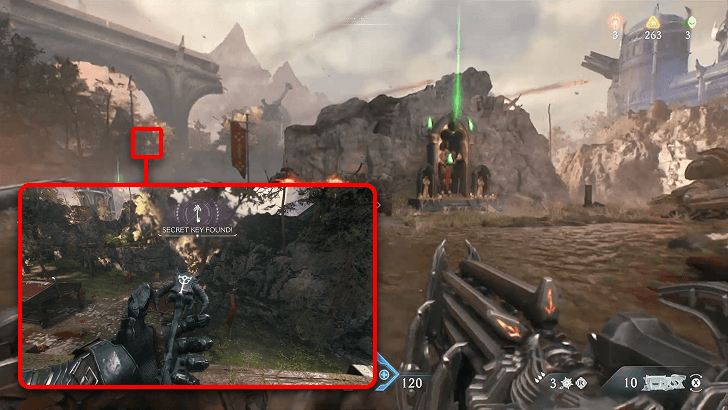 After the first Gore Portal when you step out of the starting area, the location of the Purple Key is right behind the Sentinel Shrine. This will be essential for finding Secrets later on. ┗ Secret Key Location |
Secret Key Location
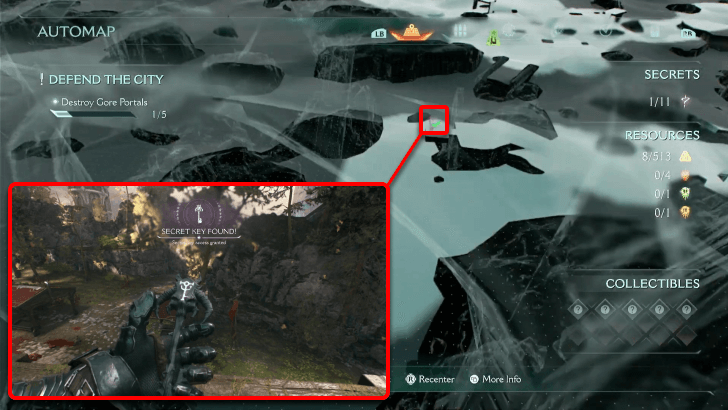
The path to the purple key can be unlocked after defeating the demons that spawn around its area. It can be seen just beyond the first Sentinel Shrine in the starting area.
Gore Portal 1
| 1 | 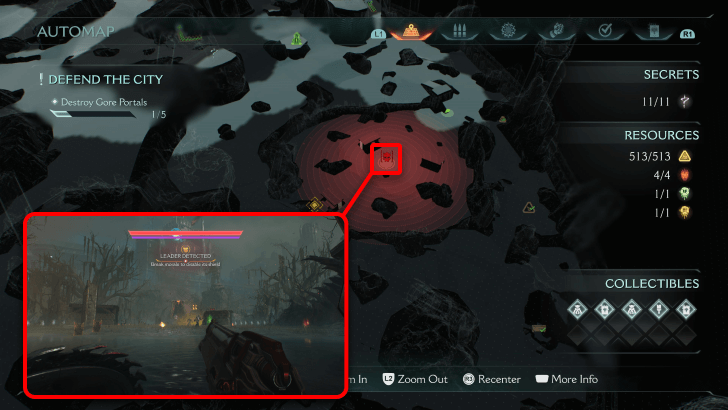 The nearest Gore Portal after picking up the Purple Key contains a Pinky Rider Leader, that will drop a Demonic Essence for increasing your maximum armor. Collectibles: Mancubus Toy, Kreed Maykr Codex, Life Sigil 3, Gold Trail 3-5, Gold Cache 3-4 |
|---|
Gore Portal 2
| 1 | 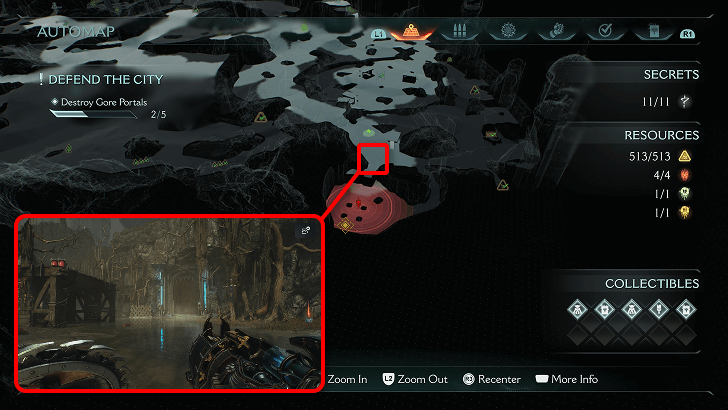 After clearing off the last Gore Portal, there is a cave entrance on the lower area of the map that will lead to the next Gore Portal. Collectibles: Gold Trail 1 Gold Cache 1 |
|---|---|
| 2 | 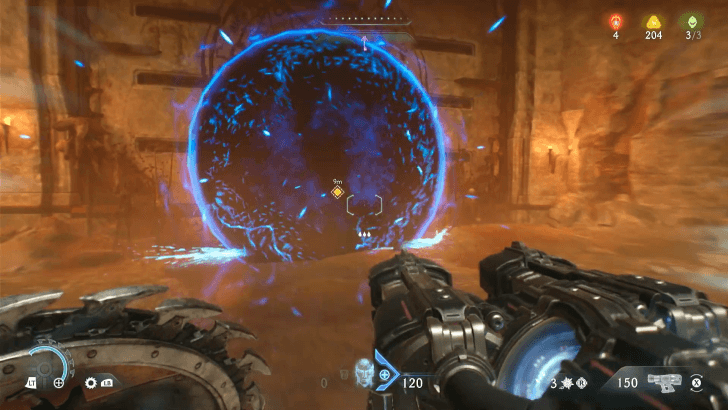 Dropping down to the cavern will spawn Hell Knights and a single Cyberdemon. Defeating them will open the portal to a new area. |
| 3 | 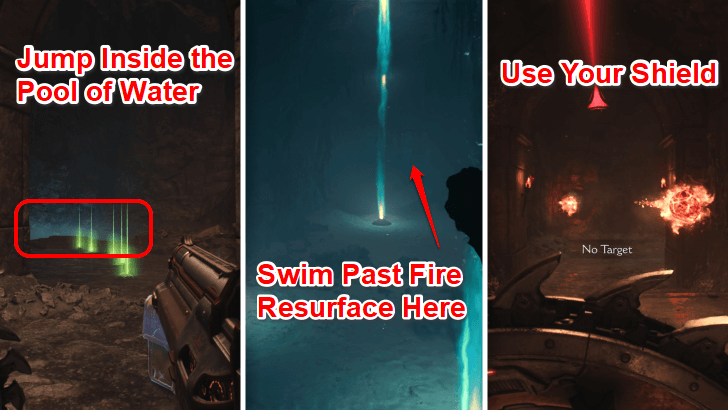 Jump in the pool of water to the left side of the chamber. Avoid and swim past all the fire blockades whilst underwater, and when you resurface, use your Shield to get past the fireballs in the hallway. |
| 4 | 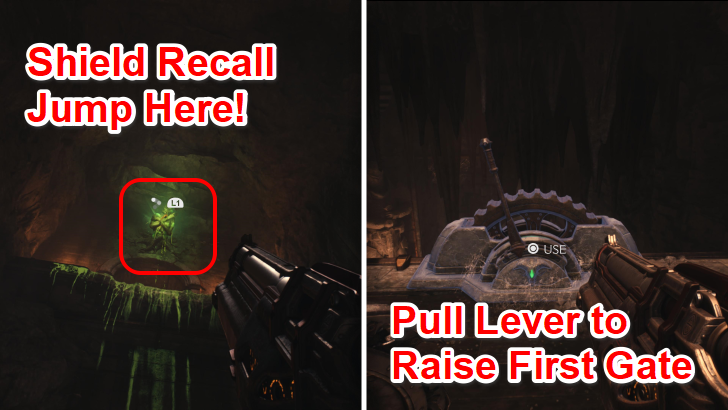 Above you will be a Shield Recall Jump, and at the upper platform will be the lever to open the gate. Pull the lever, and one of two gates to the Hell Cultists will open. Jump down to return to the first chamber. |
| 5 | 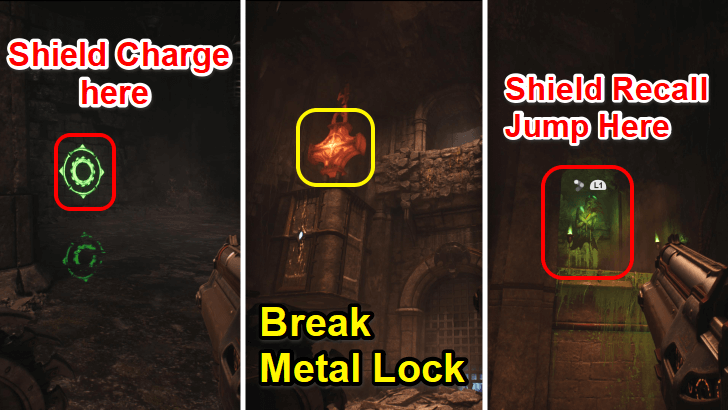 Shield Charge the green barricade, then throw your Shield at the Metal Lock to bring the weights down. Climb up, and you’ll notice across from you is a Shield Recall Jump. |
| 6 | 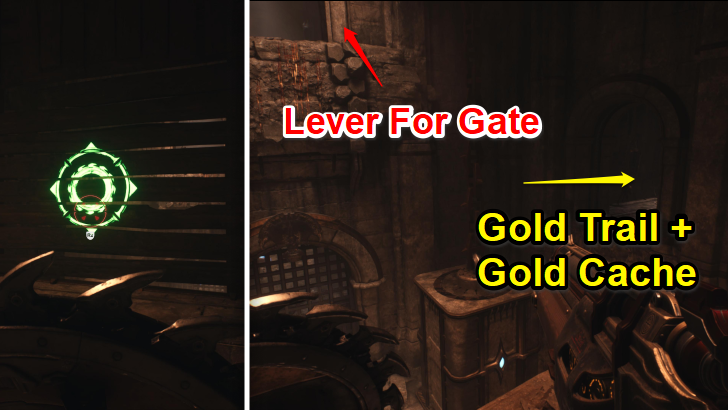 Bring the Green Barricade down, and you'll be able to go two paths. The pathway to the right will lead to a collectible, or continue forward and pull the lever to proceed. Collectibles: Gold Trail 2 & Gold Cache 2 |
| 7 | The final gate will now be unlocked, and let you proceed to the final chamber. Slay the Hell Cultists keeping the Gore Portal open to finish this area. Make sure to break the Gold Chest on the way to the final chamber. Collectibles: Gold Chest 2 |
Gore Portal 3
| 1 | 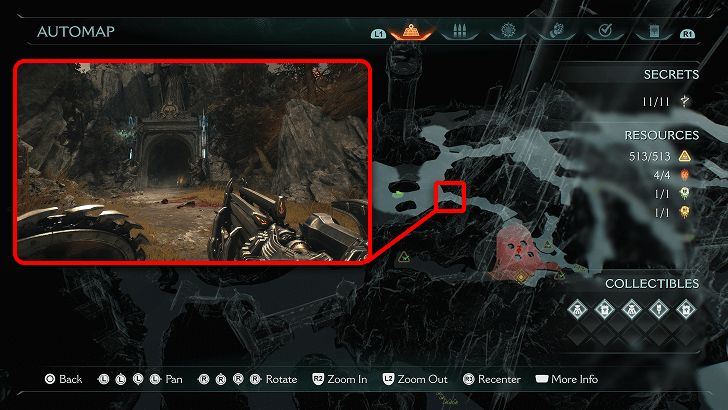 The next Gore Portal is located within the central mountain of the map. The entrance will be towards the back, and you'll have to defeat the demons that spawn near the entrance in order for the ward to disappear. |
|---|---|
| 2 | 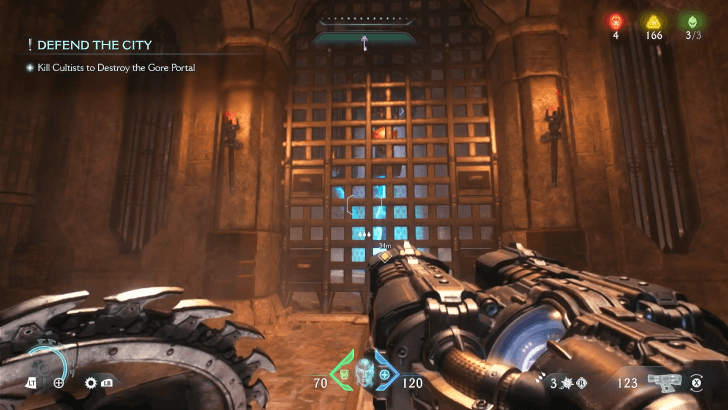 Notice when you step on the pressure pad in the first chamber, a mechanism ahead of you slides up to show a metal lock you can throw your Shield at later on. Keep that in mind as you proceed. |
| 3 | 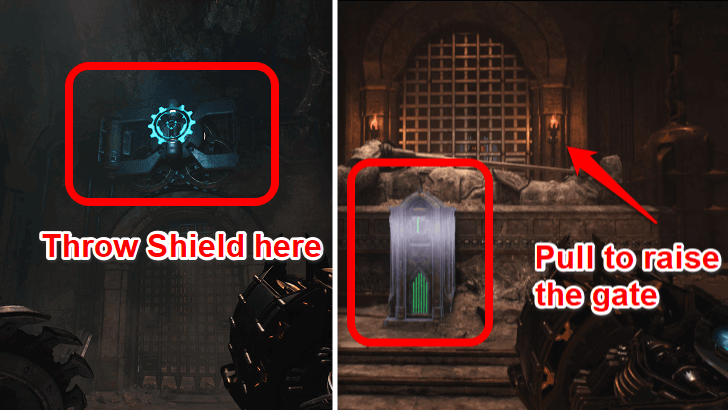 Turn to the left chamber, and throw your Shield at the blue mechanism at the top of the gate. Keep to your left until you arrive at a tomb, where a lever rests at the side. This will unlock the gate ahead of you. |
| 4 | 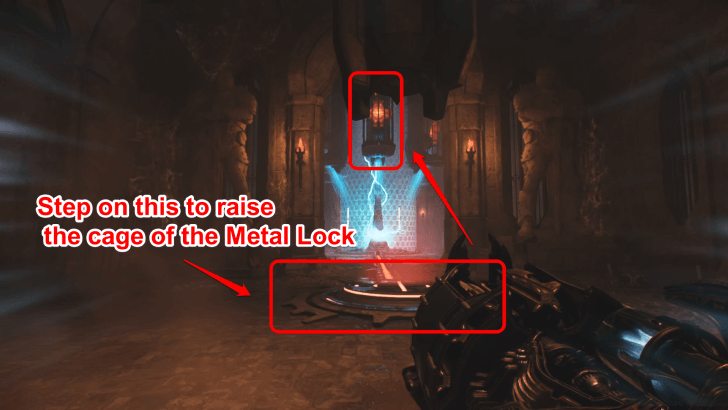 Step on the pressure plate in front of the gate to reveal a metal lock above you. Throw your Shield at the Metal Lock to break it. |
| 5 | 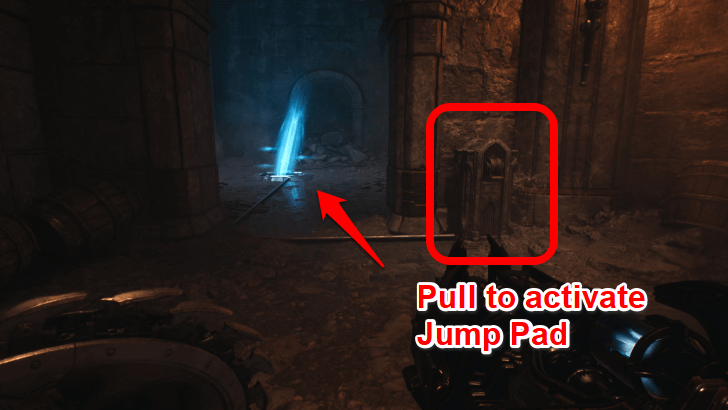 Head to the left, and pull the lever near the entrance to activate the jump pad. Using it will get you to the upper platform. Collectibles: Life Sigil 4 |
| 6 | 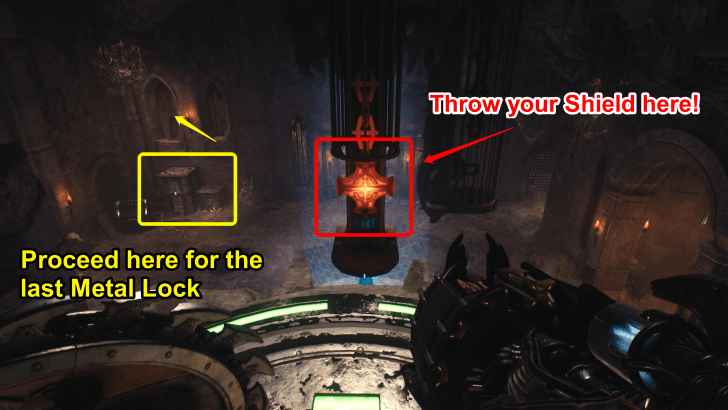 Step on the pressure pad there to break the next Metal Lock. Proceed to the next Metal Lock by using the boxes indicated above to get to the next area. |
| 7 | 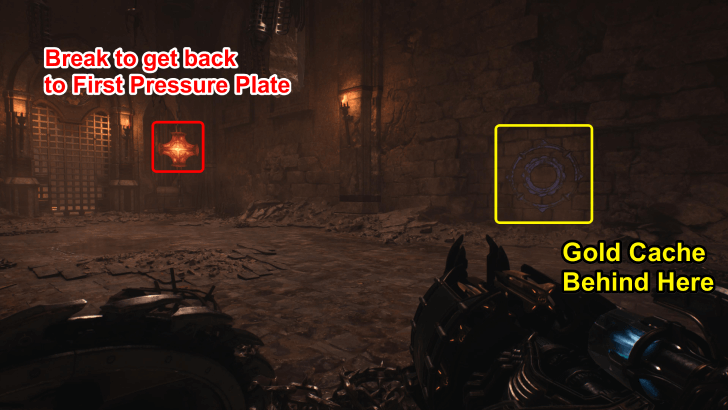 Before proceeding, there is a blue barricade nearby hiding a Gold Cache. Break the Metal Lock to return to the first area, with the gate now raised. This will allow you to break the Metal Lock previously unavailable. Collectibles: Gold Cache 10 |
| 8 | 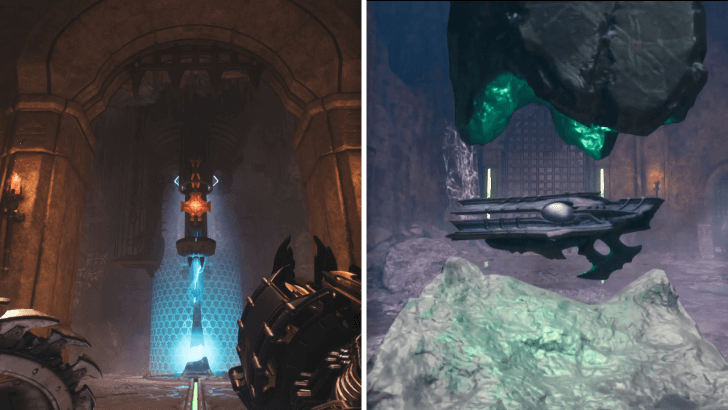 Break the Metal Lock now available to you, and you can now pick up your prize. Pick up the Reaver Chainshot, and slay the demons spawning in your area! Afterwards, you can proceed to the final chamber and slay the Hell Cultists to disable the Gore Portal. Collectibles: Gold Chest 5, Gold Cache 11 |
Gun Weapon: Chainshot
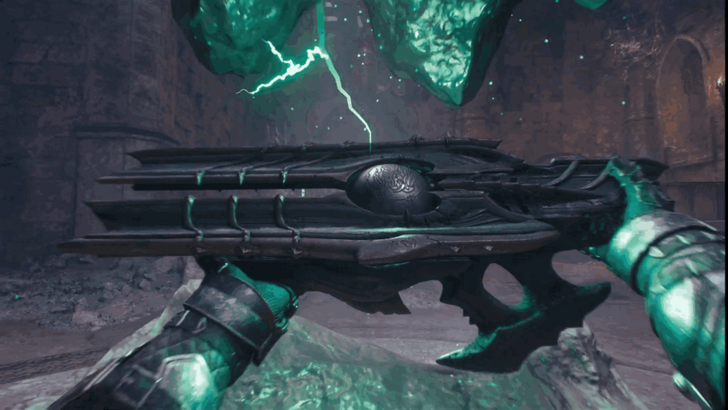
This chapter introduces a gun: Reaver Chainshot. The Chainshot is located in one of the objective wheres you must kill cultists to destroy the Gore Portal.
Reaver Chainshot Upgrades and How to Get
Gore Portal 4
| 1 | 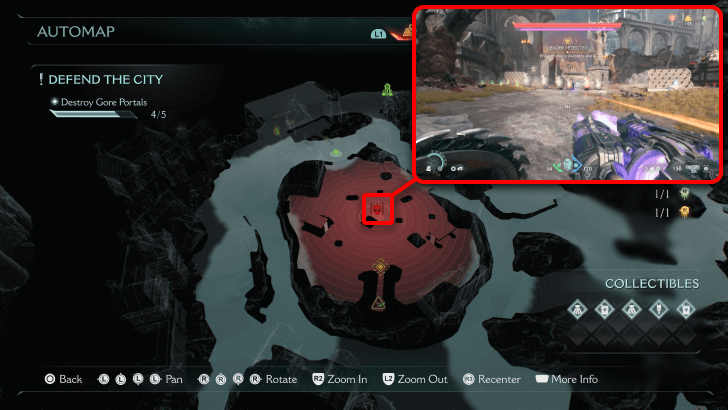 The last Gore Portal will have a Mancubus Leader battle, where defeating it will earn you a Demonic Essence that will increase your maximum Spike ammo capacity. Collectibles: Gold Cache 8-9 |
|---|
Fall Back to the Wall
| 1 | 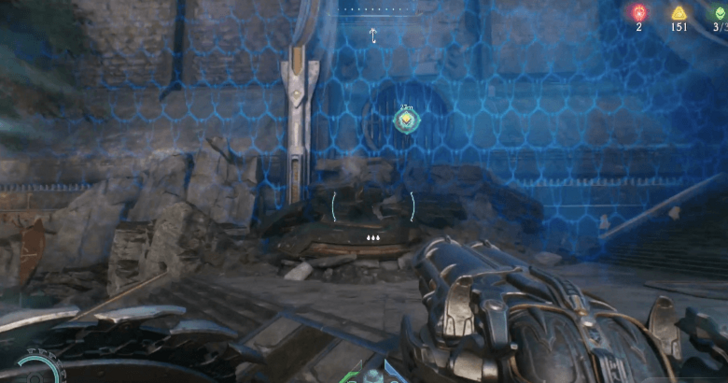 Follow the Objective Marker back to where you first spawned. The Objective Marker will lead you to a breakable wall you can Shield Break through to end the chapter. |
|---|
Wolf Statue Locations
| Chapter 6 Wolf Statue Locations | |
|---|---|
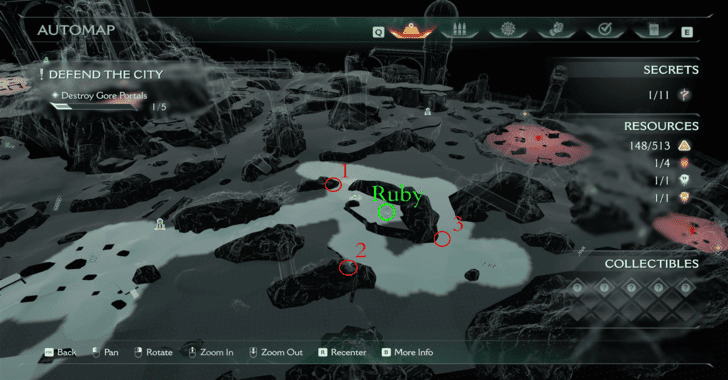 |
The wolf puzzle for Siege Part 1 can be found during the second objective, where you're tasked to shut down the demonic portals. The Wolf statues are nearby the first Sentinel Shrine you'll encounter in the chapter.
Wolf Statue Location Details
| ✔️ | Wolf Statue Location Details |
|---|---|
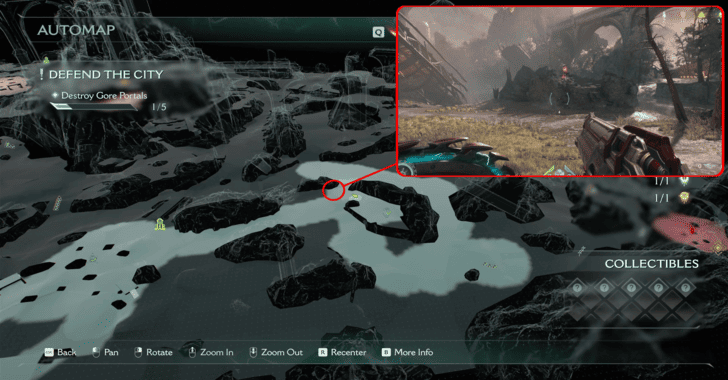 The first Wolf Statue can be found directly across from the statue holding the Ruby. |
|
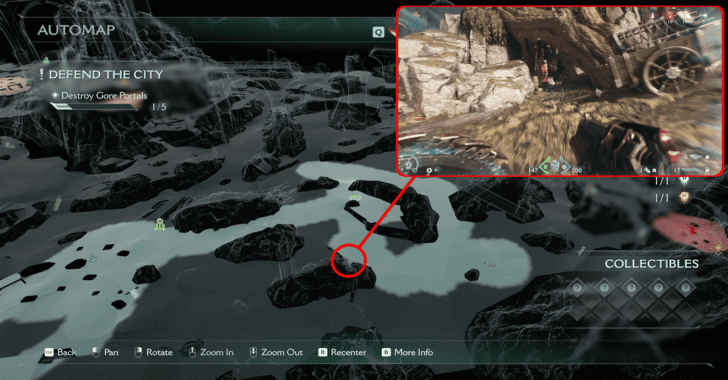 The second Wolf Statue can be found to the right of the Ruby behind a cart inside a small cavern. |
|
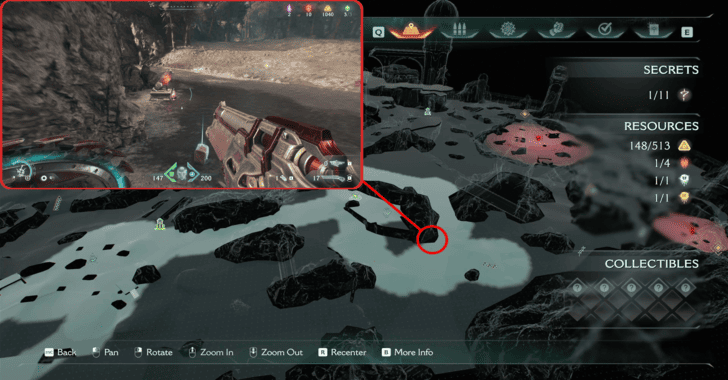 The third Wolf Statue can be found in a lowered ditch area behind the statue holding the Ruby. |
Completing this Wolf Puzzle will grant access to the Ruby.
All Wolf Statue Locations and Solutions
Siege Part 1 Mission Challenges
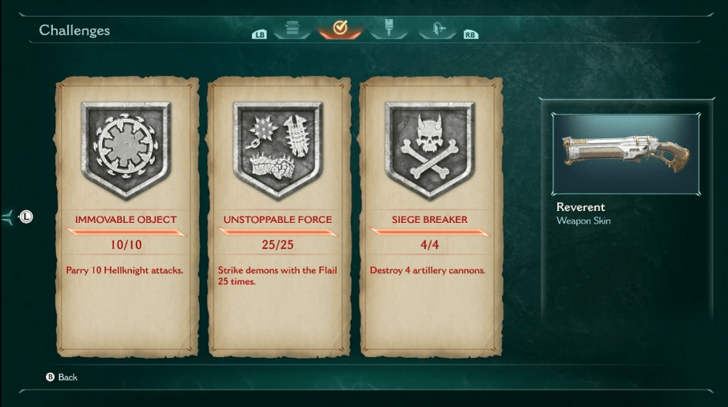 |
|
| Challenge | Details and Reward |
|---|---|
| Immovable Object | Parry 10 Hell Knight attacks Reward: 50 Gold |
| Unstoppable Force | Strike demons with the Flail 25 times Reward: 50 Gold |
| Siege Breaker | Destroy 4 artillery cannons Reward: Reverent Combat Shotgun Skin |
Immovable Object
Face off against Hell Knights found throughout the chapter and parry every green melee attack they perform. All attacks can be parried but be careful as they perform it fast.
Unstoppable Force
Once the Flail has been acquired, equip it and use it against a group of enemies whenever available. Refresh its charges by parrying melee or ranged attacks from heavy units such as Hell Knights, Imp Stalker, Mancubus, etc.
Siege Breaker
| 1 | 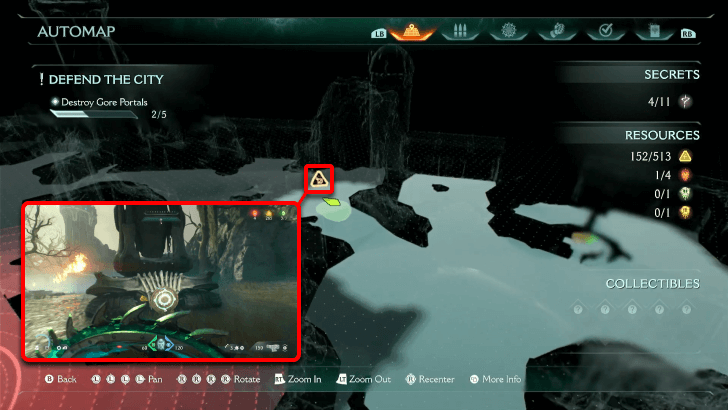 This artillery is located nearby one of the Gore Portals, with Gold Trail 1 |
|---|---|
| 2 | 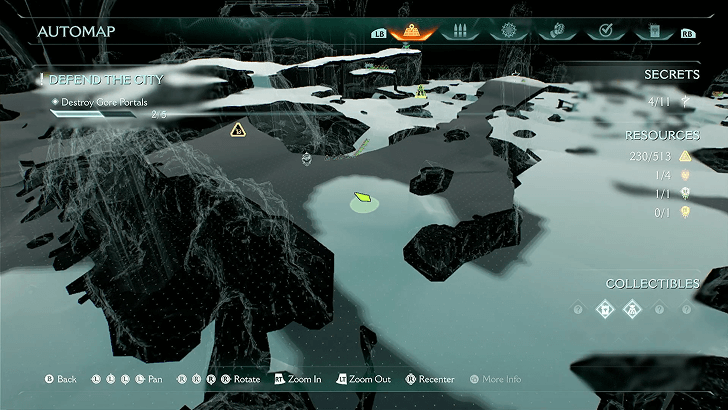 This artillery is on the cliff, above Life Sigil 3. |
| 3 | 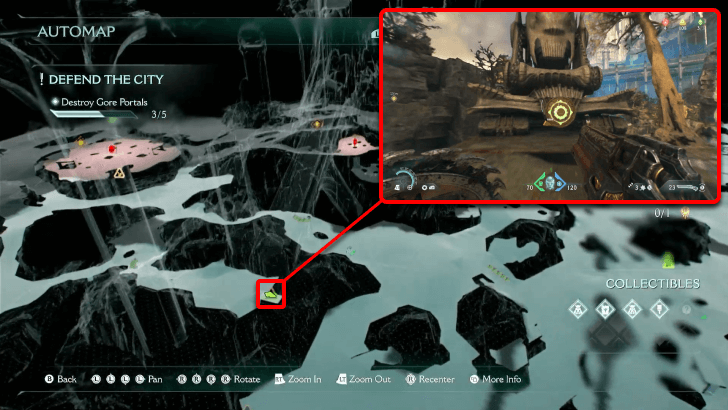 This artillery is placed on top a cliff, nearby Gold Cache 15, and Ruby 2. |
| 4 | 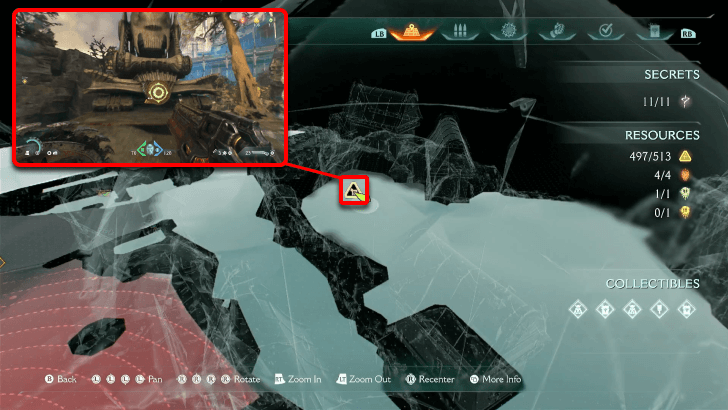 This artillery is on the far side of the map, nearby a Gore Portal containing the Mancubus Leader. |
Destroy four of the artillery cannons guarded by demons to earn the Reverent Combat Shotgun Skin.
Doom: The Dark Ages Related Guides

Full Walkthrough and List of Chapters
Comment
Author
Chapter 6: Siege Part 1 Secrets and Walkthrough
improvement survey
03/2026
improving Game8's site?

Your answers will help us to improve our website.
Note: Please be sure not to enter any kind of personal information into your response.

We hope you continue to make use of Game8.
Rankings
- We could not find the message board you were looking for.
Gaming News
Popular Games

Genshin Impact Walkthrough & Guides Wiki

Honkai: Star Rail Walkthrough & Guides Wiki

Umamusume: Pretty Derby Walkthrough & Guides Wiki

Pokemon Pokopia Walkthrough & Guides Wiki

Resident Evil Requiem (RE9) Walkthrough & Guides Wiki

Monster Hunter Wilds Walkthrough & Guides Wiki

Wuthering Waves Walkthrough & Guides Wiki

Arknights: Endfield Walkthrough & Guides Wiki

Pokemon FireRed and LeafGreen (FRLG) Walkthrough & Guides Wiki

Pokemon TCG Pocket (PTCGP) Strategies & Guides Wiki
Recommended Games

Diablo 4: Vessel of Hatred Walkthrough & Guides Wiki

Fire Emblem Heroes (FEH) Walkthrough & Guides Wiki

Yu-Gi-Oh! Master Duel Walkthrough & Guides Wiki

Super Smash Bros. Ultimate Walkthrough & Guides Wiki

Pokemon Brilliant Diamond and Shining Pearl (BDSP) Walkthrough & Guides Wiki

Elden Ring Shadow of the Erdtree Walkthrough & Guides Wiki

Monster Hunter World Walkthrough & Guides Wiki

The Legend of Zelda: Tears of the Kingdom Walkthrough & Guides Wiki

Persona 3 Reload Walkthrough & Guides Wiki

Cyberpunk 2077: Ultimate Edition Walkthrough & Guides Wiki
All rights reserved
© 2025 ZeniMax Media Inc. All Rights Reserved.
The copyrights of videos of games used in our content and other intellectual property rights belong to the provider of the game.
The contents we provide on this site were created personally by members of the Game8 editorial department.
We refuse the right to reuse or repost content taken without our permission such as data or images to other sites.




![Everwind Review [Early Access] | The Shaky First Step to A Very Long Journey](https://img.game8.co/4440226/ab079b1153298a042633dd1ef51e878e.png/thumb)

![Monster Hunter Stories 3 Review [First Impressions] | Simply Rejuvenating](https://img.game8.co/4438641/2a31b7702bd70e78ec8efd24661dacda.jpeg/thumb)


