This survey will take about 1 minute.
Your answers will help us to improve our website.
Kirby and the Forgotten Land
Enter the Fiery Forbidden Lands Waddle Dee Locations and Missions Walkthrough
This is a walkthrough for the Enter the Fiery Forbidden Lands stage in Kirby and the Forgotten Land. Read on to learn how to clear all Enter the Fiery Forbidden Lands stage missions, see Waddle Dee and Figure locations, Enemy Information, and more!
| Previous Stage | Next Stage |
|---|---|
| Collector in the Sleepless Valley | Conquer the Inferno Road |
List of Contents
Enter the Fiery Forbidden Lands Walkthrough Video
Enter the Fiery Forbidden Lands Missions and Abilities
Missions List
| Mission | Waddle Dees |
|---|---|
| 3 | |
| 4 | |
| 1 | |
| 1 | |
| 1 |
Waddle Dee Locations for All Missions
Copy Abilities
 Needle Needle
|
 Sword Sword
|
 Fire Fire
|
 Drill Drill
|
Enter the Fiery Forbidden Lands Mission Completion Order
This stage has a total of three areas. Follow the table below to clear each mission in order.
Area 1
| Area 1 Missions | ||
|---|---|---|
| 1 | 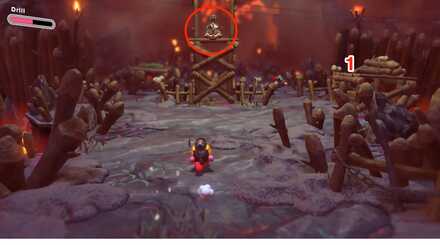 |
Defeat the first lookout Awoofy |
| 2 | 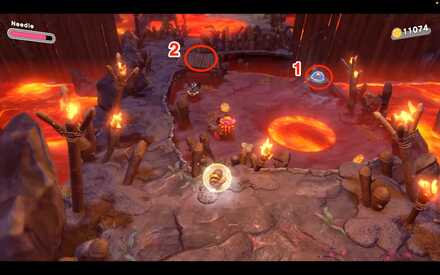 |
Grab the 1st figure |
| 3 | 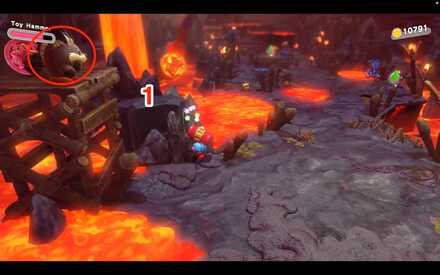 |
Defeat the second lookout Awoofy |
| 4 | 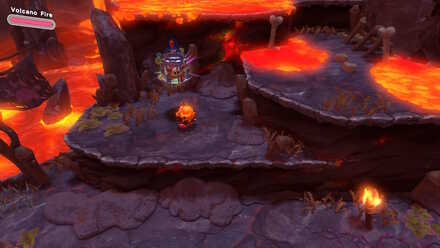 |
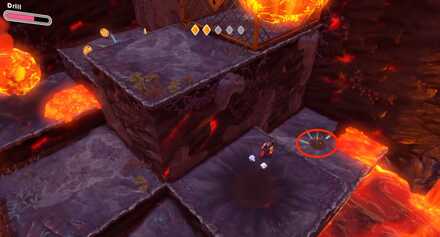
Collect the five diamonds to rescue the 1st hidden Waddle Dee |
Area 2
| Area 2 Missions | ||
|---|---|---|
| 5 | 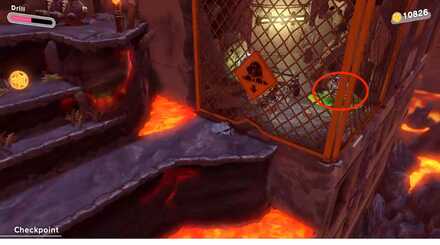 |
Rescue the 2nd hidden Waddle Dee |
| 6 | 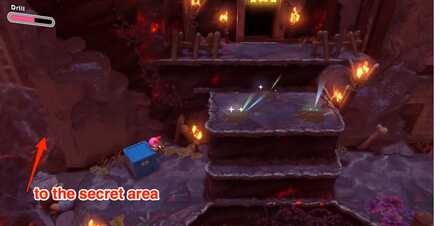 |
Find the secret passage |
| 7 | 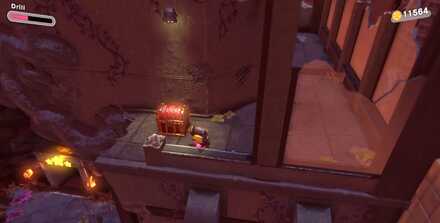 |
Grab the 2nd figure |
Area 3
Enter the Fiery Forbidden Lands Hidden Waddle Dee Locations
1: Quickly Collect the Green Crystals
Grab the green crystals located on the sinking island to rescue the first hidden Waddle Dee.
Green Crystal Locations
| Crystal Location | How to Get |
|---|---|
 |
Located on the right side of the main path. |
 |
Break the crate to get the crystal. |
 |
Jump on top of the wood platform. |
 |
Break the blue crate. |
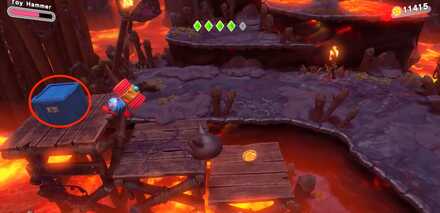 |
Break the blue crate on the highest platform. |
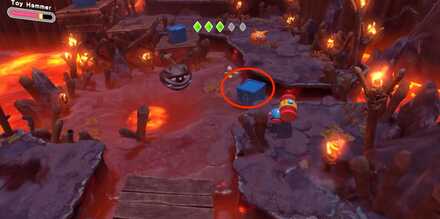
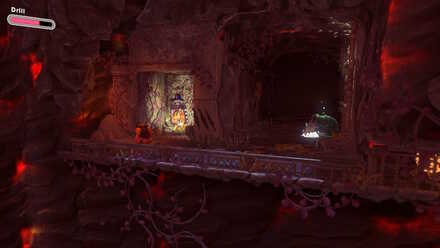
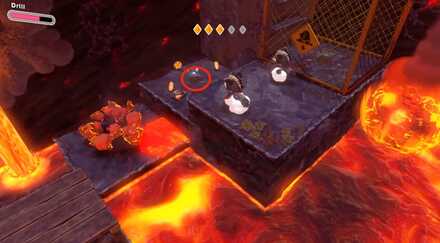
2: Dig Under the Metal Fence in the Third Area
There is a metal fence near the moving platform in the third area. Dig under it using the Drill Ability to get the Waddle Dee.
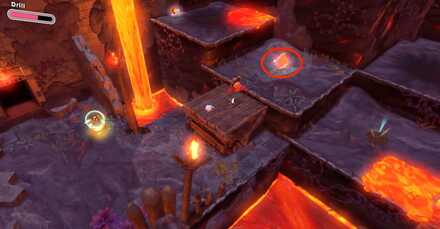
3: Grab the Orange Crystals on the Sinking Island
In order to raise the cage and get the Waddle Dee in this room, you must collect the 5 orange crystals before the island sinks. Make sure that you have the Drill Ability.
Orange Crystal Locations
| Crystal Location | How to Get |
|---|---|
 |
Located directly in front of you. |
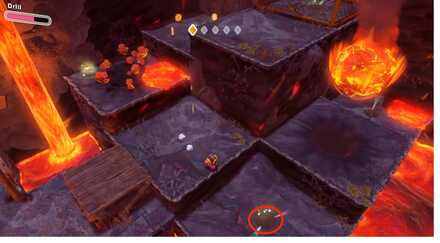 |
Search the patch of dirt immediately to the right of the 1st crystal. |
 |
Search the Patch of dirt in front of the area the 2nd crystal was located. It is best to grab this crystal first, since it is on the lowest level of the island and will be the first to sink. |
 |
On the upper left corner of the island. |
 |
Search the patch of dirt behind the metal fence. |
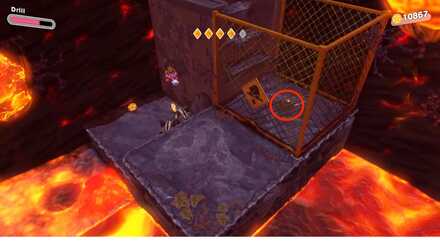
4: Check the Metal Cage Before the Goal
The final Waddle Dee is located behind a metal cage that you can dig under using the Drill Ability. Be sure to grab it before finishing the stage.
Enter the Fiery Forbidden Lands Lookout Awoofy Locations
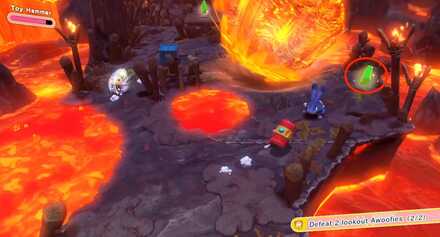
1: On the Main Path in the First Area
The first lookout Awoofy appears in the middle of the main path. If you jump to the platform on the right (1), you can reach the Awoofy by hovering.
2: On the Left Side in the Second Area
The second lookout Awoofy is on the left side of the main path of the second area. Use the stone platform to reach it.
Enter the Fiery Forbidden Lands Secret Passage Location
Head Left Before Leaving the Third Area
Before leaving the current area, head left along the narrow path to find the secret passage. Make sure that you have the Dig ability equipped beforehand. You will find lots of Star Coins and a Figure.
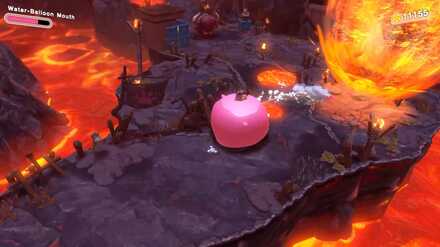
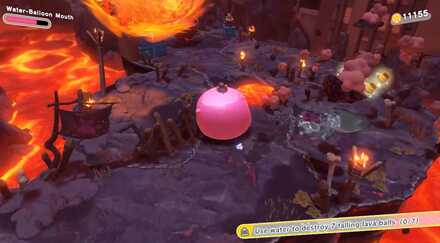
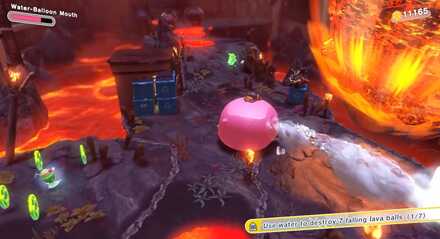
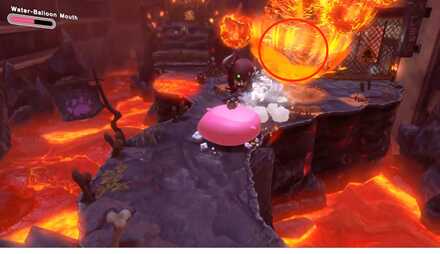
How to Destroy Lava Balls
Destroy Lava Balls with Water- Balloon Mouth Kirby
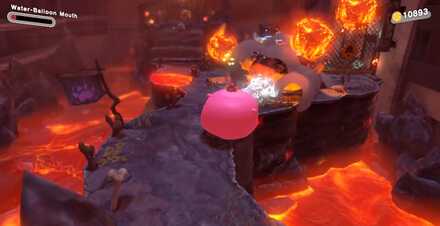
The only way to destroy the lava balls is to use Water- Balloon Mouth Kirby. Make sure to move within attacking range as quickly as possible−otherwise they will hit the ground.
Enter the Area from the Secret Room
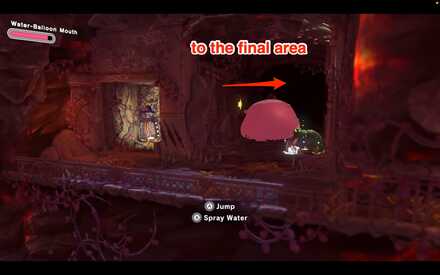
While there is a water spout in the final area. Entering the final area from the secret room in the previous area gives you an advantage, as you enter as Water-Balloon Kirby and are positioned closer to where the lava balls fall.
How to enter the secret room
 Enter the room through the lava ball makes an opening. |
 Collect the five orange crystals inside. |
Exit through the top of the room as Water-Ballon Kirby. |
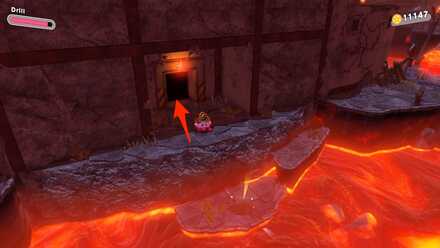
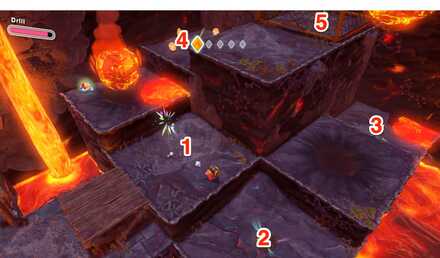
Move Quickly to Destroy the Lava Balls
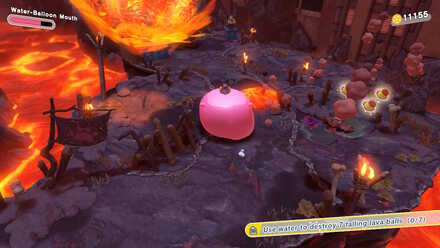
Although spraying water gets rid of enemies and lava, it slows down Kirby's movements. It is better to dodge as many obstacles as possible to get to the lava balls.
| Destroying the lava balls | |
|---|---|
 |
The first lava ball appears on your right. |
 |
the second lava ball will be on your left side. |
 |
The third lava ball appears on the right side, behind Kirby. Make usre no to move ahead to far so that you don't miss it. |
 |
The largest of the lava balls to fall, take it out before dealing with the others. |
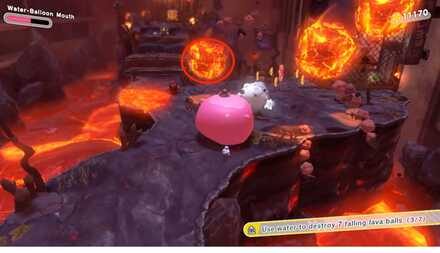 |
Not only does appear on the far left, it drops faster than the other lava balls. Destroy it quickly. |
 |
This lava ball is the closest to you on the right, so destorying it shouldn't be a problem. |
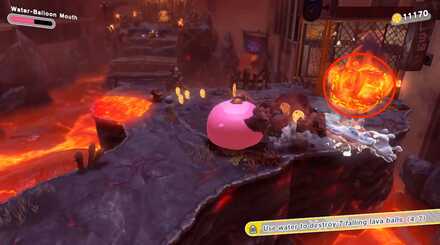 |
The last one, depending on your aiming can actually be destroyed as the same time as the sixth one. |
Enter the Fiery Forbidden Lands Figure Locations
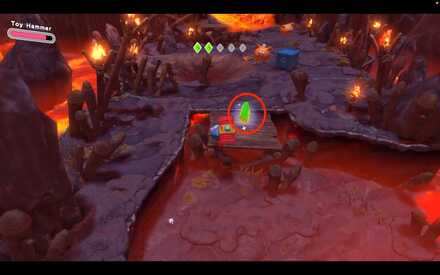
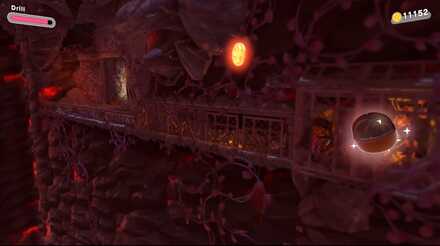
1: On the Wooden Ledge in the Sinking Island
Pressing the switch on the right side of the island (1) will cause the Figure to appear (2). Make sure to grab it before the island sinks completely.
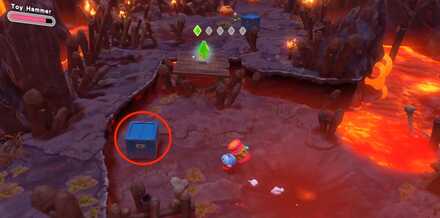
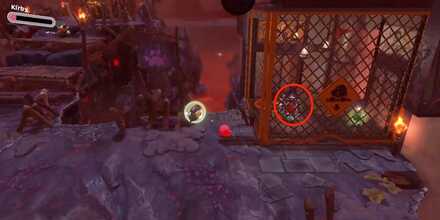
2: At the End of the Secret Passage
The second figure is located in a chest at the end of the secret passage. Check the part on the left of the third area's exit to find it.
3: Climb the Secret Staircase
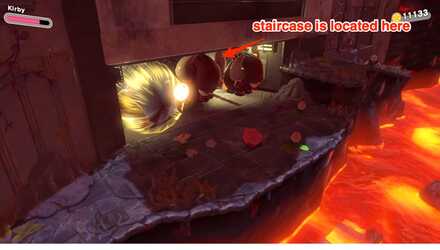
Defeat the enemies here to reveal a staircase. Going up the stairs will lead you to a room with a Figure.
4: In the Right Corner at the Top of the Secret Room
Check the area to the right of the secret room to find the fourth Figure.
Kirby and the Forgotten Land Related Guides
Redgar Forbidden Lands Walkthrough and Stage List
| List of Stages | |
|---|---|
 Enter the Fiery Forbidden Lands Enter the Fiery Forbidden Lands
|
 Conquer the Inferno Road Conquer the Inferno Road
|
 Burning, Churning Power Plant Burning, Churning Power Plant
|
 Gathering of the Beast Council Gathering of the Beast Council
|
 The Beast Pack's Final Stand The Beast Pack's Final Stand
|
 In the Presence of the King In the Presence of the King
|
Comment
Author

Enter the Fiery Forbidden Lands Waddle Dee Locations and Missions Walkthrough
Please participate in our site
improvement survey
03/2026
improvement survey
03/2026
Would you assist in
improving Game8's site?
improving Game8's site?

×
We are listening to our users' valuable opinions and discussing how to act on them.
The information collected through this survey will be used for the purpose of improving our services. In addition, the information will only be disclosed a part of a statistic in a format that will not allow identification of personal information.
Begin Survey
Not Now
×
Please rate each item regarding Game8.co's Advertisements.
Amount of Ads
Very Dissatisfied
Somewhat Dissatisfied
Fine
Somewhat Satisfied
Highly Satisfied
Placement of Ads
Timing of Ad Display
Ad Loading Speed
Safeness of Ads
Content of Ads
×
Please rate each item regarding Game8.co's Quality of Articles.
Amount of information
Very Dissatisfied
Somewhat Dissatisfied
Fine
Somewhat Satisfied
Highly Satisfied
Frequency of updates
Speed of new information
Accuracy of articles
Understandibility of articles
Readability of sentences
×
Please rate each item regarding Game8.co's Usability of the Site.
Ease of finding information
Very Dissatisfied
Somewhat Dissatisfied
Fine
Somewhat Satisfied
Highly Satisfied
Loading Speed
Use of Color
Font Size
Visibility of Images
Easy to Understand Layout
×
Please rate each item regarding Game8.co's Message Boards, Comments.
Ease of Writing
Very Dissatisfied
Somewhat Dissatisfied
Fine
Somewhat Satisfied
Highly Satisfied
Readability
Ease in Finding Information
Comment Quality
Comment Quantity
Admin Response
×
Please rate each item regarding Game8.co's Site's new design.
Please rate our site's new design
Very Dissatisfied
Somewhat Dissatisfied
Fine
Somewhat Satisfied
Highly Satisfied
Do you think that the website's design change makes the site easier to use?
Has the new design made it easier for you to find information on the site?
Has the new design improved the overall visual appeal of the site?
How would you rate your overall satisfaction with the new design of the site?
×
How likely are you to recommend Game8 to someone you know?
Very Unlikely
0
1
2
3
4
5
6
7
8
9
10
Very Likely
If you have other opinions regarding potential improvement to the website, please share them with us. We would appreciate your honest opinion.
Note: This is a free response section, so you can proceed without entering anything.
Note: Please be sure not to enter any kind of personal information into your response.
Note: Please be sure not to enter any kind of personal information into your response.
×
Thank You
×
Thank you for participating in our survey! Your answers will help us to improve the quality of our website and services.
We hope you continue to make use of Game8.
We hope you continue to make use of Game8.
Close
Rankings
- We could not find the message board you were looking for.
Gaming News


![Slay the Spire 2 Review [Early Access] | Still the Deckbuilder to Beat](https://img.game8.co/4433115/44e19e1fb0b4755466b9e516ec7ffb1e.png/thumb)

![Resident Evil Village Review [Switch 2] | Almost Flawless Port](https://img.game8.co/4432790/e1859f64830960ce4248d898f8cd38d9.jpeg/thumb)
Popular Games

Genshin Impact Walkthrough & Guides Wiki
Honkai: Star Rail Walkthrough & Guides Wiki
Umamusume: Pretty Derby Walkthrough & Guides Wiki
Pokemon Pokopia Walkthrough & Guides Wiki
Resident Evil Requiem (RE9) Walkthrough & Guides Wiki
Monster Hunter Wilds Walkthrough & Guides Wiki
Wuthering Waves Walkthrough & Guides Wiki
Arknights: Endfield Walkthrough & Guides Wiki
Pokemon FireRed and LeafGreen (FRLG) Walkthrough & Guides Wiki
Pokemon TCG Pocket (PTCGP) Strategies & Guides Wiki


Recommended Games
Fire Emblem Heroes (FEH) Walkthrough & Guides Wiki
Diablo 4: Vessel of Hatred Walkthrough & Guides Wiki
Yu-Gi-Oh! Master Duel Walkthrough & Guides Wiki
Super Smash Bros. Ultimate Walkthrough & Guides Wiki
Pokemon Brilliant Diamond and Shining Pearl (BDSP) Walkthrough & Guides Wiki
Elden Ring Shadow of the Erdtree Walkthrough & Guides Wiki
Monster Hunter World Walkthrough & Guides Wiki
The Legend of Zelda: Tears of the Kingdom Walkthrough & Guides Wiki
Persona 3 Reload Walkthrough & Guides Wiki
Cyberpunk 2077: Ultimate Edition Walkthrough & Guides Wiki


All rights reserved
© HAL Laboratory, Inc. / Nintendo
The copyrights of videos of games used in our content and other intellectual property rights belong to the provider of the game.
The contents we provide on this site were created personally by members of the Game8 editorial department.
We refuse the right to reuse or repost content taken without our permission such as data or images to other sites.