Fallen-Star Beach Starry Locations and Missions Walkthrough
This is a walkthrough for the Fallen-Star Beach stage in Kirby and the Forgotten Land Star-Crossed World DLC. See the location of all the Starries, how to complete all missions, and discover all the hidden locations!
| Previous Stage | Next Stage |
|---|---|
| Lost in Alivel Mall | Washed Away at the Cement Summit |
List of Contents
Fallen-Star Beach Missions and Abilities
Missions List
| Mission | Starries |
|---|---|
| 3 | |
| 3 | |
| 1 | |
| 1 | |
| 1 |
Copy Abilities
 Tornado Tornado
|
 Needle Needle
|
 Bomb Bomb
|
 Sword Sword
|
 Ranger Ranger
|
Fallen-Star Beach Mission Completion Order
Area 1
| Area 1 Missions | ||
|---|---|---|
| 1 | 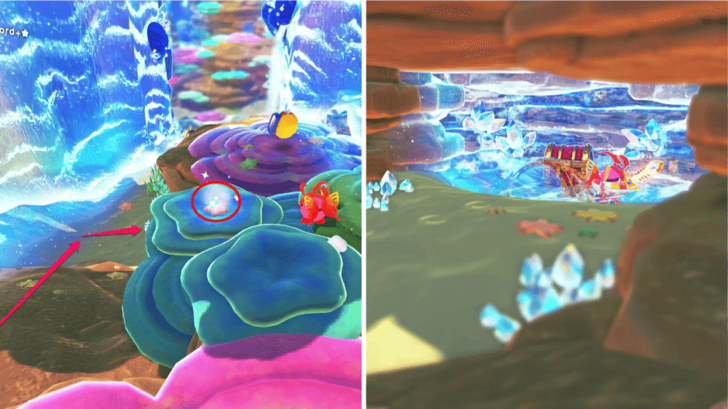 |
Find the 1st Treasure in the Ocean |
| 2 |  |
Find the 2nd Treasure in the Ocean |
| 3 | 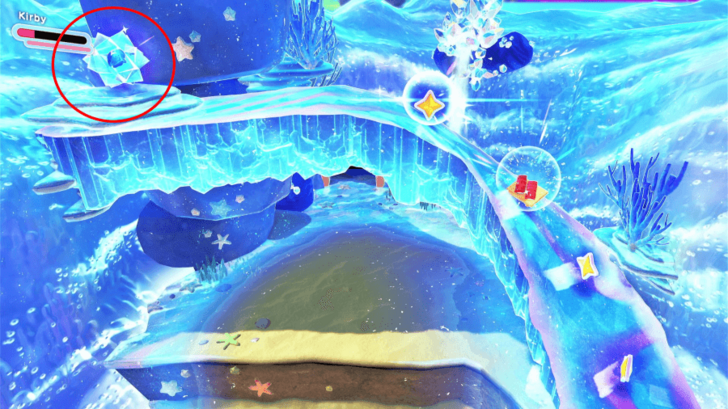 |
Save the 1st Hidden Starry |
Area 2
| Area 2 Missions | ||
|---|---|---|
| 1 | 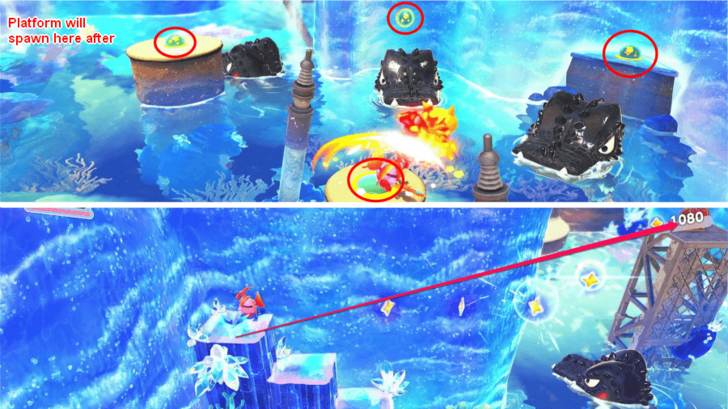 |
Find the 3rd Treasure in the Ocean |
| 2 |  |
Find the 4th Treasure in the Ocean |
| 3 | 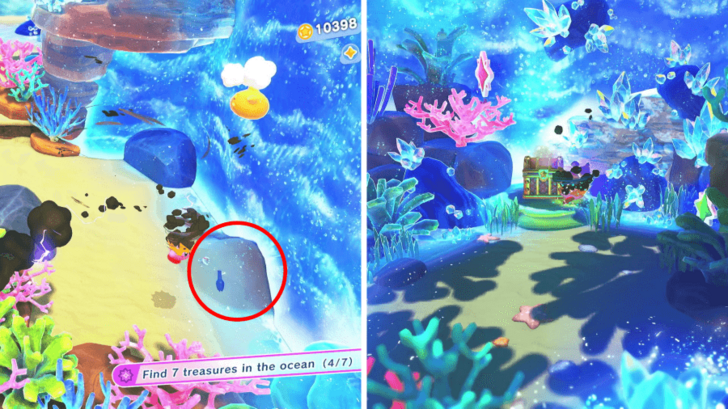 |
Find the 5th Treasure in the Ocean |
| 4 | 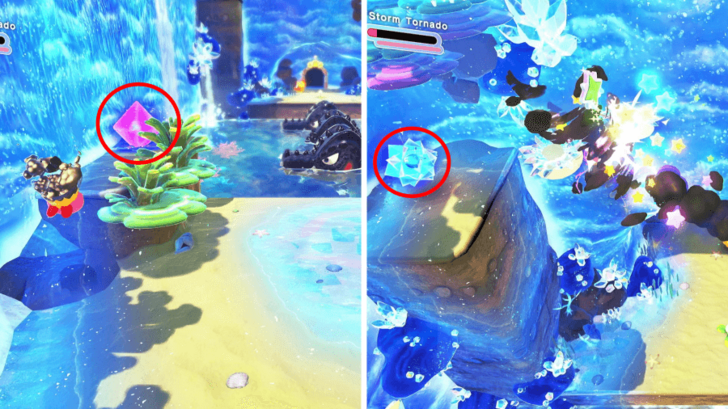 |
Save the 2nd Hidden Starry |
Area 3
| Area 3 Missions | ||
|---|---|---|
| 1 | 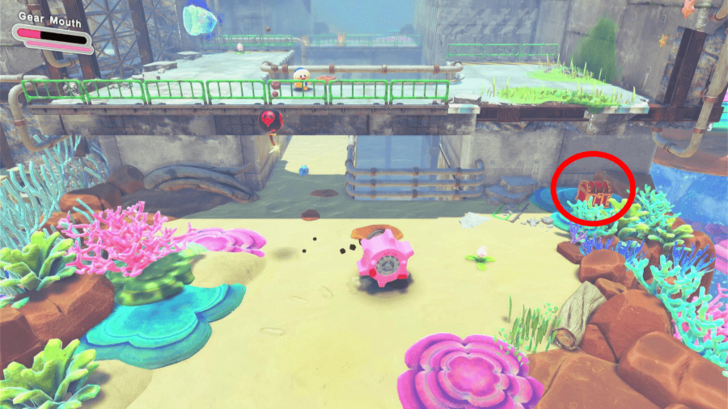 |
Find the 6th Treasure in the Ocean |
| 2 | 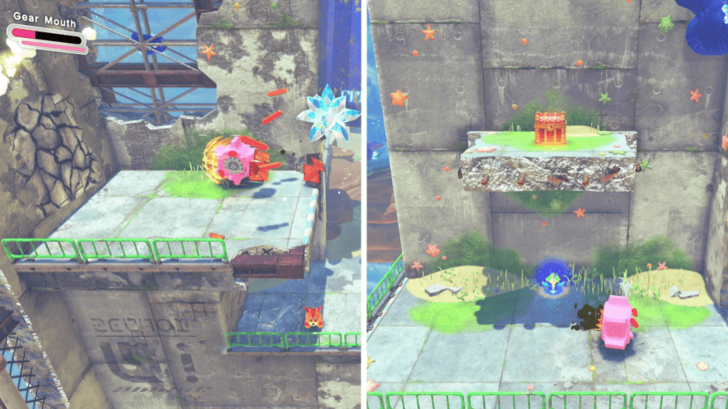 |
Find the 7th Treasure in the Ocean |
| 2 | 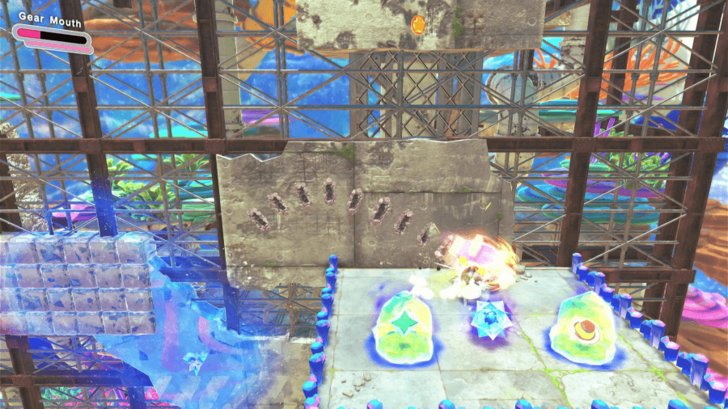 |
Save the 3rd Hidden Starry |
| 2 | 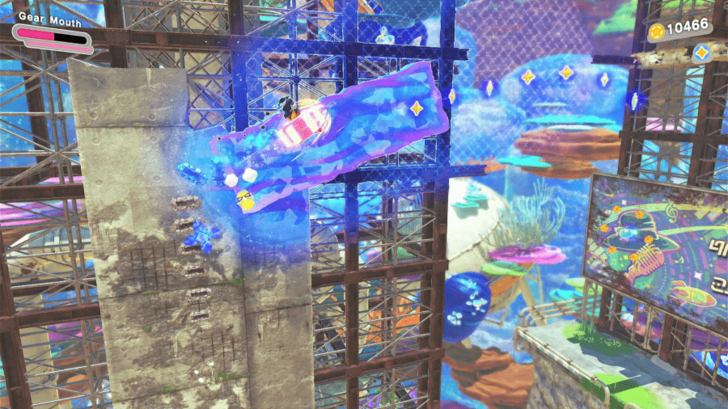 |
Jump as a Gear, and Stick to a Big Sign |
Fallen-Star Beach Hidden Starry Locations
1. Defeat the Crystal Monster

Defeat the Crystal Monster at the end of the first area to get the first hidden Starry. A platform that will lead to the Starry will emerge after the fight.
2. At the End of the 2nd Area

You can find the second Starry at the end of the second area. You must activate the pink crystal on the left and rush over to the Starry to get it. You will need the Tornado here as the platforms will disappear very quickly.
3. Collect 5 Green Stones

You can get the final Starry by collecting all 5 Green Stones in the third area. After collecting all of them, climb to the right to save the last Starry.
Note that you can collect these stones in any order!
| 1st Stone | 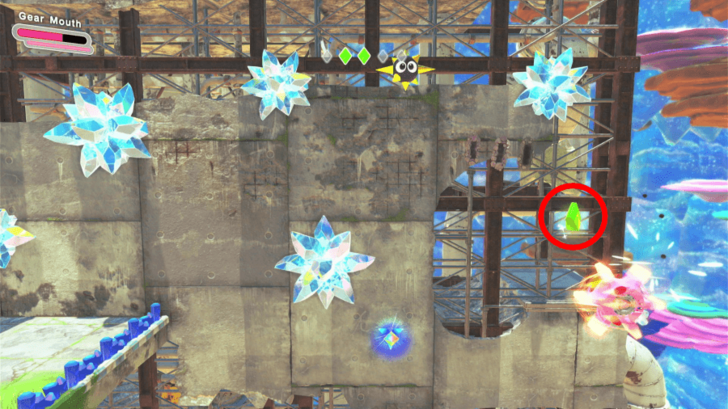 |
|---|---|
| 2nd Stone | 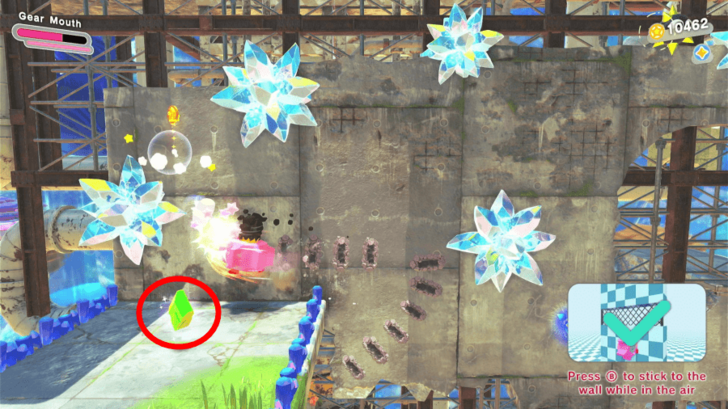 |
| 3rd Stone |  |
| 4th Stone | 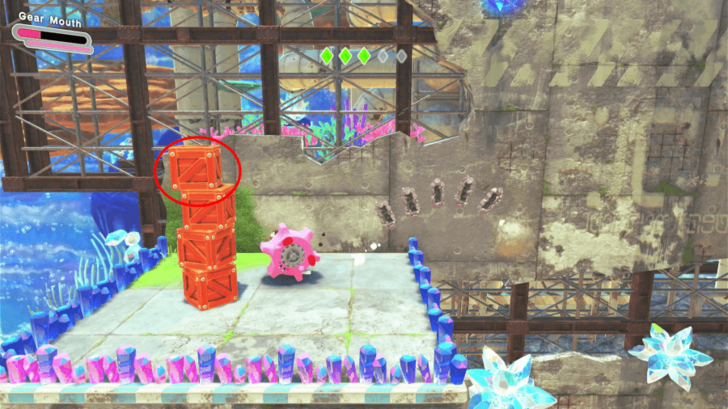 |
| 5th Stone | 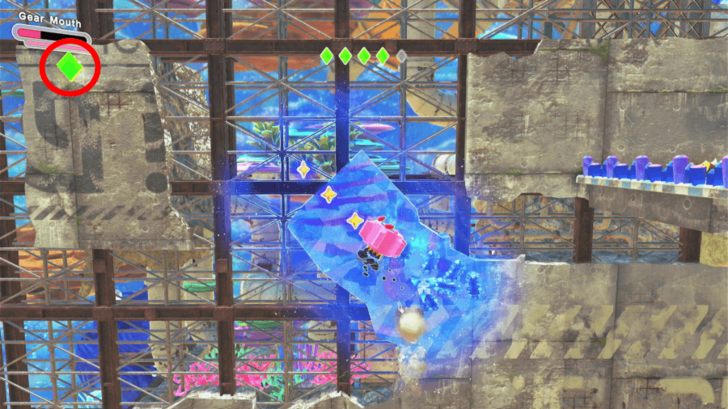 |
Fallen-Star Beach Treasure Locations
1. Hidden Cave in the 1st Area

You can find the first treasure inside a hidden cave in the first area. You can find it by touching the sparkling light and following the coins that will spawn on the left.
2. In the Middle Part of the 1st Area

The second treasure is in the middle part of the 1st area. You must activate the crystal on the rightmost side to summon a new platform with the chest on it.
3. On Top of a Tower in the 2nd Area

You can find the third treasure on top of a tower in the second area. You can get there by activating all the Green Switches and hitting the crystal that appears on the new platform.
Climb the crystal stairs afterward and use the Tornado's attack to reach the tower. If you don't have a Tornado Ability equipped yet, you can consume the Twister enemy before this area.
4. Buried in the Sand in the 2nd Area

The fourth treasure is buried in the sand after the third treasure. You can clear the sand using a Tornado attack to unearth the treasure.
5. In a Hidden Cave in the 2nd Area

The fifth treasure is very close to the fourth treasure and is hidden in a cave. You can access the cave by removing the sand on the right and revealing the entrance.
6. After the 1st Long Climb in the 3rd Area

You can find the sixth treasure after the first long climb with the Gear. You will find it on the corner on the right once you reach the top.
7. Behind a Cracked Wall in the 3rd Area

You can find the last treasure behind a cracked wall in the third area. You should be able to see the wall near a blue sign. Attack the wall with the Gear to destroy the wall and get the last treasure.
Fallen-Star Beach Big Sign Location
Make a Huge Jump after Getting the Last Starry

The big sign for this stage's mission is found after getting the last Starry. You must activate the crystal above to spawn a new platform that will help you propel yourself towards the big sign on the other side.
Fallen-Star Beach Figure Locations
1. Hidden in Waterfall in the First Area
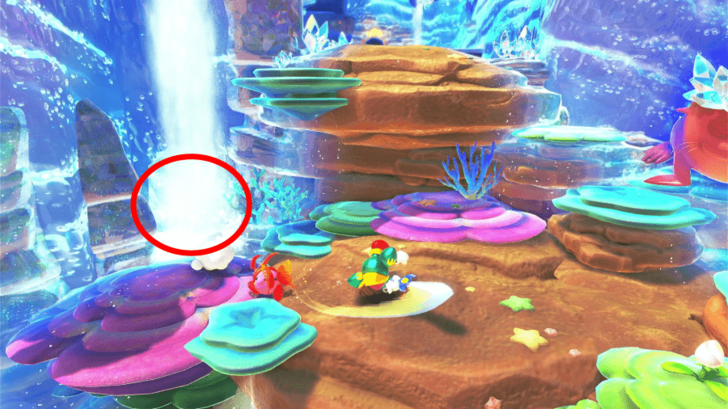
You can find a Figure behind a waterfall in the middle part of the first area. You can find it below the second Treasure Chest in the stage.
2. Inside a Hidden Cave

The next figure is inside the fifth Trreasure Chest in a hidden cave. You can get inside the cave by removing the sand off the entrance using Tornado.
3. Right Side of the Second Gear Climb
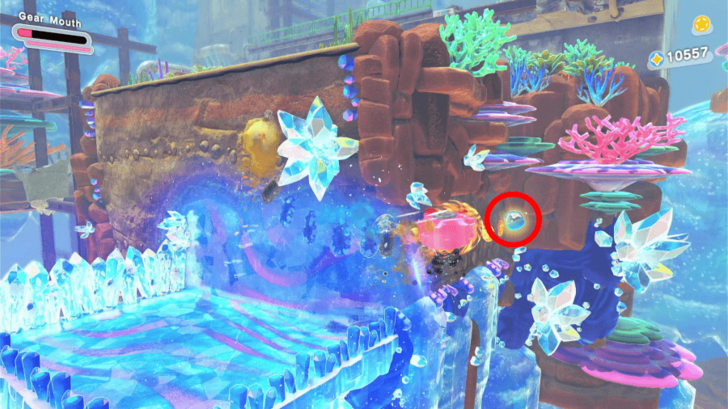
You can get the next one on the right side of the second gear climb. You will see the figure once you roll over to the right side of the crystal platform near the top.
4. Attach to the Big Sign
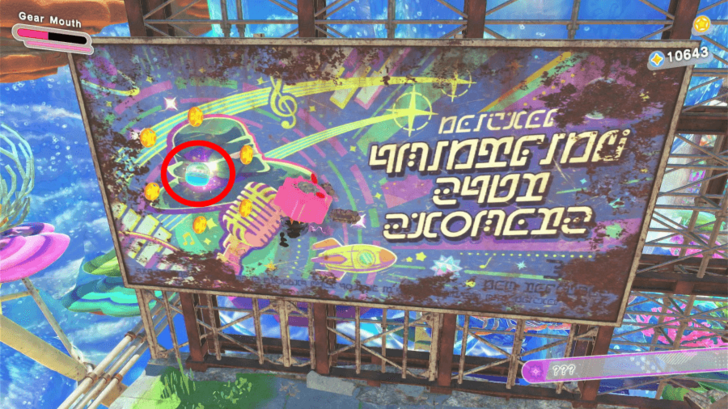
You can only get the last Figure on this stage by sticking to the Big Sign near the end of the stage.
Kirby and the Forgotten Land Related Guides

Comment
Author
Fallen-Star Beach Starry Locations and Missions Walkthrough
improvement survey
04/2026
improving Game8's site?

Your answers will help us to improve our website.
Note: Please be sure not to enter any kind of personal information into your response.

We hope you continue to make use of Game8.
Rankings
- We could not find the message board you were looking for.
Gaming News
Popular Games

Genshin Impact Walkthrough & Guides Wiki

Crimson Desert Walkthrough & Guides Wiki

Umamusume: Pretty Derby Walkthrough & Guides Wiki

Honkai: Star Rail Walkthrough & Guides Wiki

Monster Hunter Stories 3: Twisted Reflection Walkthrough & Guides Wiki

Wuthering Waves Walkthrough & Guides Wiki

The Seven Deadly Sins: Origin Walkthrough & Guides Wiki

Pokemon TCG Pocket (PTCGP) Strategies & Guides Wiki

Pokemon Pokopia Walkthrough & Guides Wiki

Zenless Zone Zero Walkthrough & Guides Wiki
Recommended Games

Monster Hunter World Walkthrough & Guides Wiki

Fire Emblem Heroes (FEH) Walkthrough & Guides Wiki

Pokemon Brilliant Diamond and Shining Pearl (BDSP) Walkthrough & Guides Wiki

Super Smash Bros. Ultimate Walkthrough & Guides Wiki

Diablo 4: Vessel of Hatred Walkthrough & Guides Wiki

Cyberpunk 2077: Ultimate Edition Walkthrough & Guides Wiki

Yu-Gi-Oh! Master Duel Walkthrough & Guides Wiki

Elden Ring Shadow of the Erdtree Walkthrough & Guides Wiki

The Legend of Zelda: Tears of the Kingdom Walkthrough & Guides Wiki

Persona 3 Reload Walkthrough & Guides Wiki
All rights reserved
© HAL Laboratory, Inc. / Nintendo
The copyrights of videos of games used in our content and other intellectual property rights belong to the provider of the game.
The contents we provide on this site were created personally by members of the Game8 editorial department.
We refuse the right to reuse or repost content taken without our permission such as data or images to other sites.
 Meteor Shower's Arrival
 Lost in Alivel Mall
 Fallen-Star Beach
 Washed Away at the Cement Summit
 Crossing Wondaria
 Spinning Dream Parade
 Frost Street Snow Park
 Freezing Wind and Some Snowmen
 Wastes That Count Time
 Moonlight Canyon Labyrinth
 Crumbling Fiery Forbidden Lands
 Crystal Beast Pack Volcano Battle
 Fallen-Star Volcano




![Forza Horizon 6 Review [Preview] | Beautiful Roads With a Whole Lot of Oversteer](https://img.game8.co/4460981/a7254c24945c43fbdf6ad9bea52b5ce9.png/thumb)


