 under the page's title to be notified of any updates!
This survey will take about 1 minute.
Your answers will help us to improve our website.
Hytale
Progression Guide
★ Best Weapons Tier List
☆ Best and Recommended Settings
★ Spawn Items Using Item IDs!
☆ Multiplayer Guide
★ Best Fuel for Furnace
☆ All Ore Locations
This a walkthrough and progression guide for Hytale. Learn what to do first in Echo of Orbis with a step-by-step guide to unlocking features and progressing through the game.
List of Contents
| Attention! | This progression guide is still under construction, and will be updated as we discover more content. |
|---|
Walkthrough and Progression Guide
List of All Main Objectives
Hytale’s Echo of Orbis is the survival exploration mode featured during Early Access. This world focuses on building, crafting, and locating interactable artifacts that lead to further discovery.
This guide is divided into parts, each with a set of objectives designed to help you familiarize yourself with the mechanics, explore the landscape, and progress through the game.
Part 1: Unlock Memories
| Step | Key Objectives |
|---|---|
| 1 | Head to the Forgotten Temple Gateway |
| 2 | Enter the Gateway to Reach the Forgotten Temple |
| 3 | Activate the Heart of Orbis |
Head to the Forgotten Temple Gateway
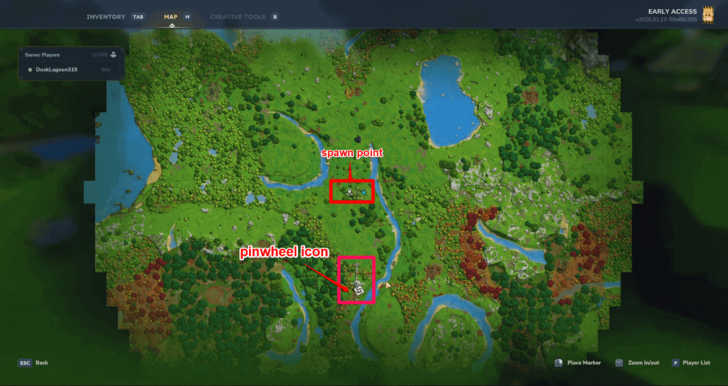
The location of the Forgotten Temple Gateway varies by world seed.
As soon as you exit the spawn room, open your map and locate the Forgotten Temple Gateway, marked by a pinwheel icon. We highly recommend doing this first to unlock the Memories feature early, which logs every creature you discover and unlocks upgrades for every completed category.
Be sure to craft tools for gathering resources and a sword to defend yourself along the way.
Enter the Gateway to Reach the Forgotten Temple
| 1 | Go Through the Forgotten Temple Gateway |
|---|---|
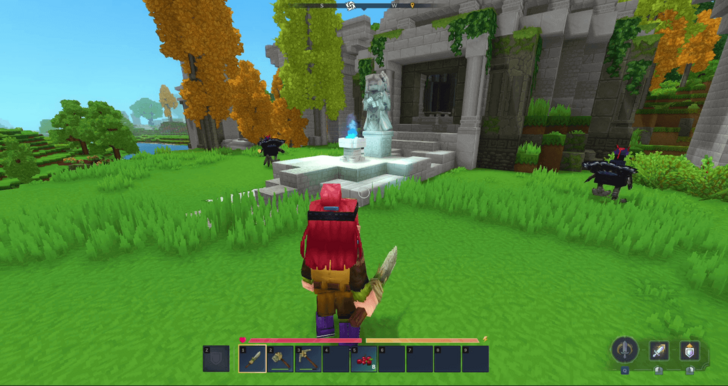 You will know you have found the temple entrance when you see a statue with a brazier lit with blue fire. |
|
| 2 | 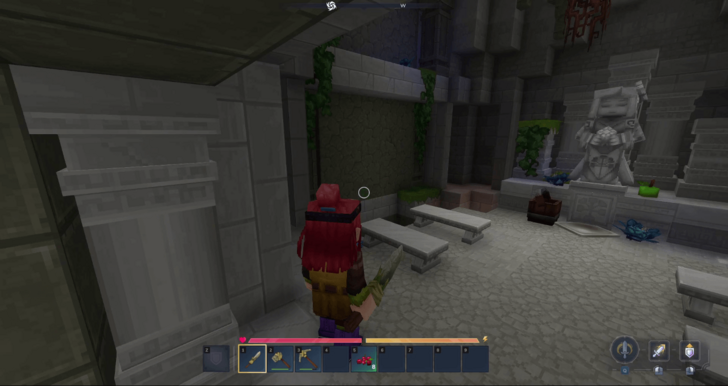 Proceed through the entrance behind the statue and head down the stairs to the left. |
| 3 | 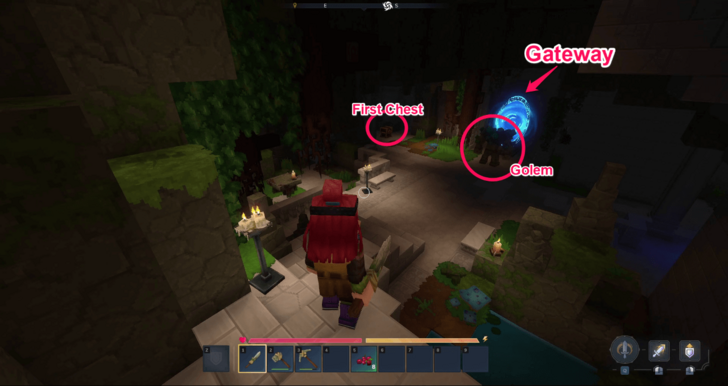 The area below is guarded by a golem. You do not need to fight it now, as you can go back and defeat it much later. Simply avoid it and slip past. Make sure to grab the loot from the chest at the northwestern corner of the room. ▶ How to Beat Earthen Golem |
| 4 | 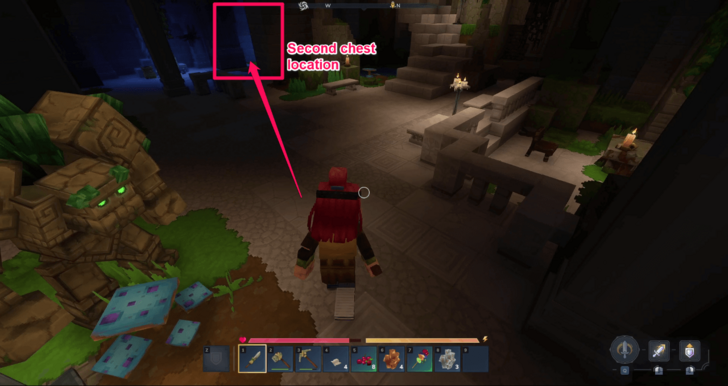 Next, loot the second chest hidden in the southeastern corner. |
| 5 | 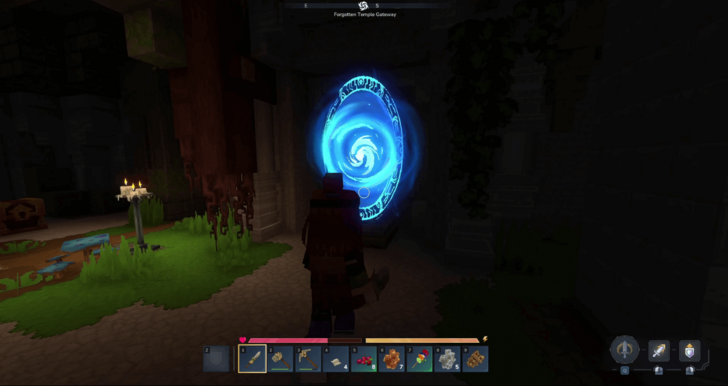 Once you have collected the items from both chests, quickly enter the portal along the northern wall. |
Activate the Heart of Orbis
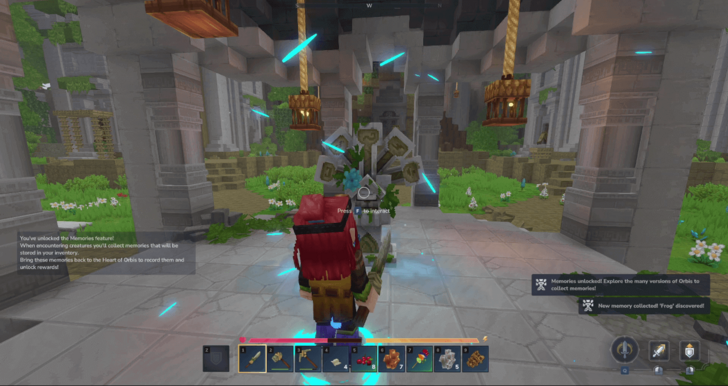
After you cross the gateway, you'll be immediately transported to the Forgotten Temple. Head north and interact with the stele in the shrine at the center to unlock Memories.
Once it's unlocked, you now have access to the Memories button in your Inventory Tab to view a copy of the creatures you've discovered and will be recorded in the Heart of Orbis. Before leaving, don't forget to look around the Forgotten Temple to scan the creatures there.
Note: Resources at the Forgotten Temple cannot be gathered.
List of All Memories and Rewards
Side Objectives
| Priority | Side Objectives |
|---|---|
| ★★ | Gather Rubble, Plant Fibers, and Sticks. |
| ★★ | Craft a Crude Hatchet, Crude Pickaxe, and Crude Sword. |
| ★ | Craft Crude Torches. |
While at the spawn area, consider gathering enough resources to craft basic tools for more efficient gathering. In addition to your standard equipment, craft a Torch to ensure you are prepared in case your travels extend into the night.
Part 2: Build Your Base
| Step | Key Objectives |
|---|---|
| 1 | Collect Materials and Supplies |
| 2 | Craft Survival Essentials |
| 3 | Build a Base Near the Temple |
Collect Materials and Supplies

After exiting the temple and returning to your world, proceed to pick up all the resources you can find nearby on the ground like berries. Collect materials for crafting and food such as stones, wood, meat, and hide by breaking up stone blocks, cutting up trees, and hunting wild animals. Your primary tools are sufficient enough for this.
Craft Survival Essentials
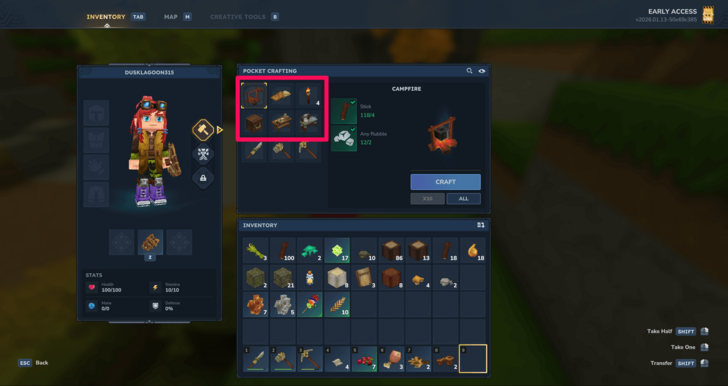
Once you have plenty of materials, craft a Campfire, Crude Bedroll, Wooden Chest, and a Workbench. These will be the first structures you need to establish your base.
The Wooden Chest is for storing your materials, while the Workbench will enable you to craft upgraded tools and unlock more advanced crafting structures.
Build Your Base Near the Temple
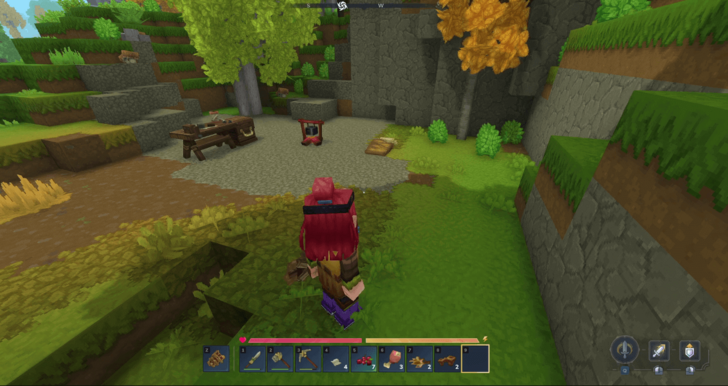
Set up your base in a safe area near the temple, ensuring quick access whenever you need to record Memories. Make sure to position the campfire in the center; it will serve as a dual-purpose station for cooking food and providing light during the night.
Next, designate an adequate space for your Workbench and Wooden Chest. It is best to leave extra room for adding the advanced crafting structures beside them as you progress.
Finally, place your Crude Bedroll in a preferred spot and interact with it to set your respawn point.
Side Objectives
| Priority | Side Objectives |
|---|---|
| ★★★★ | Gather Tree Trunks, Stones, and Hides. |
| ★★★★ | Gather Raw Meat and Berries. |
| ★★★ | Gather ample wood such as Logs, Trunks, and Sticks to fuel the Campfire. |
| ★★ | Stash your supplies in the Wooden Chest to prevent losing them if you die. |
Make sure you have enough food as eating is the primary form of healing in Hytale. Keeping your important supplies in a Wooden Chest ensures you don't drop them upon death, which is especially useful when traveling long distances from your respawn point.
Part 3: Mine Copper and Iron
| Step | Key Objectives |
|---|---|
| 1 | Search for Copper and Iron Deposits in Caves |
| 2 | Use Pickaxe to Mine Ores |
| 3 | Craft a Furnace |
| 4 | Use the Furnace to Turn Ores into Ingots |
Search for Copper and Iron Deposits in Caves
| 1 | Find Copper and Iron in Caves |
|---|---|
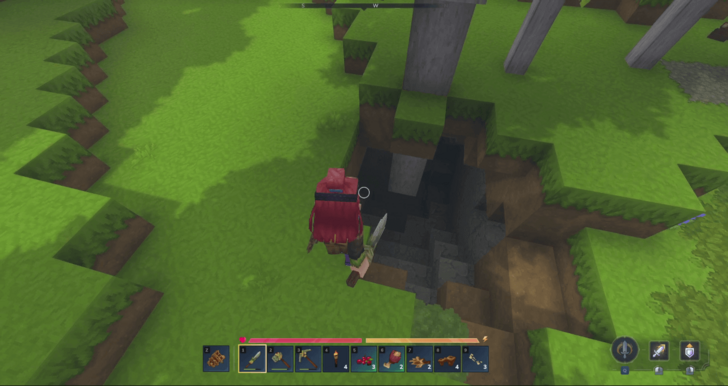 Once you're done setting up camp, begin gathering resources for crafting and upgrades. Look for an opening in the ground that descends into a tunnel to access the caves below. |
|
| 2 | 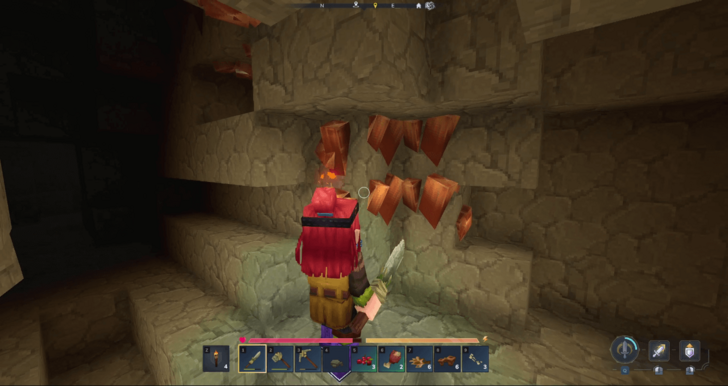 Before going down, equip Torches in your utility slot so you can light your path with one hand while using a pickaxe with the other. Follow the tunnel until you find copper and iron deposits embedded in stone blocks. |
| 3 | 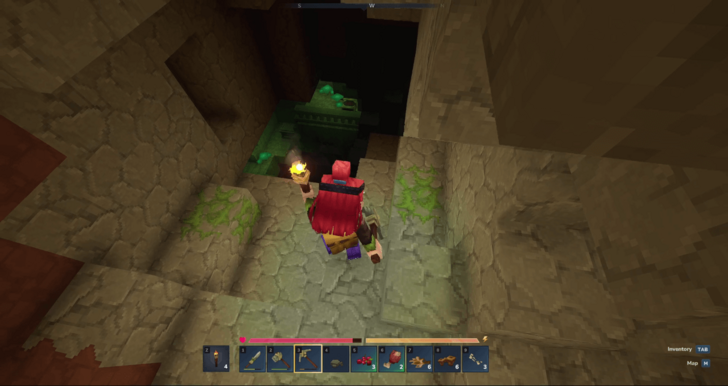 Watch your step as you go deeper. Some tunnels drop off abruptly, and a long fall will not only damage you but also leave you lost or vulnerable to ambush by hostile creatures. |
| 4 | 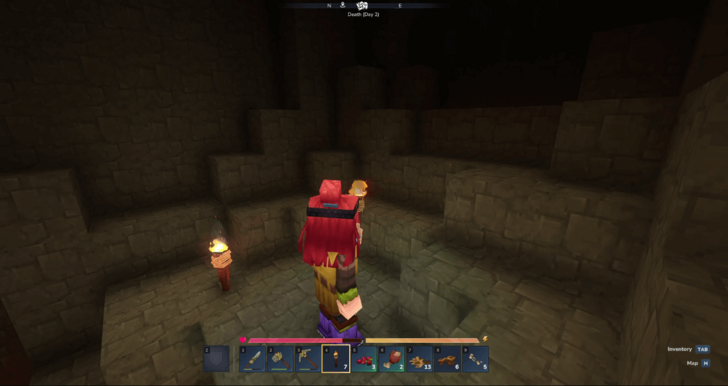 Tip: Place Torches on the ground to your right to mark your route so you can easily navigate your way back to the surface. |
Use Pickaxe to Mine Ores
When you find the mineral deposits, use your pickaxe to break the stone blocks and extract the copper and iron ores. Gather as many as you can find, since you’ll need plenty for crafting.
Some caves only contain copper. If you can't find iron, continue exploring other tunnel entrances until you discover a more resource-rich cave.
Craft a Furnace
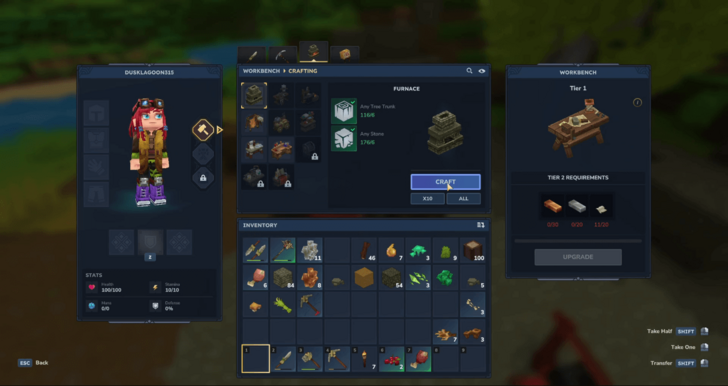
| Item | Requirements |
|---|---|
| Furnace |
・Any Tree Trunk x6 ・Any Stone x6 |
After you’ve collected a generous amount of Copper and Iron Ore, head back to your base. Once there, use your Workbench to craft a Furnace.
Position the Furnace near your Workbench in a dedicated workspace to keep your crafting area organized.
Use the Furnace to Turn Ores into Ingots
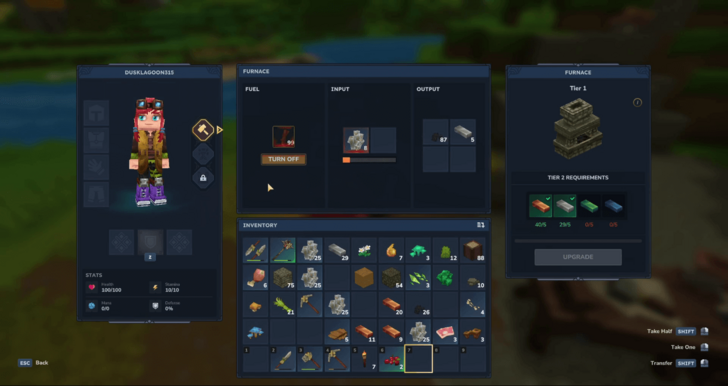
With the Furnace in place, you are ready to process your ores. Interact with the Furnace and place a fuel source in its fuel slot to turn it on. Similar to the campfire, it is best to use Sticks and the Charcoal it produces as fuel.
Finally, place the ores in the input slot to smelt them into ingots.
Side Objectives
| Priority | Side Objectives |
|---|---|
| ★★★★★ | Gather Sticks for fuel. |
| ★★★★ | Kill Rats for Light Hide. |
| ★★★★ | Kill humanoid enemies for Linen Scraps. |
Be sure to kill any Wild Rats you find within the caves for their Light Hide. You should also hunt Skeletons and other humanoids for Linen Scraps, as you'll need both of these resources for crafting equipment later.
Part 4: Craft Specialized Crafting Structures
| Step | Key Objectives |
|---|---|
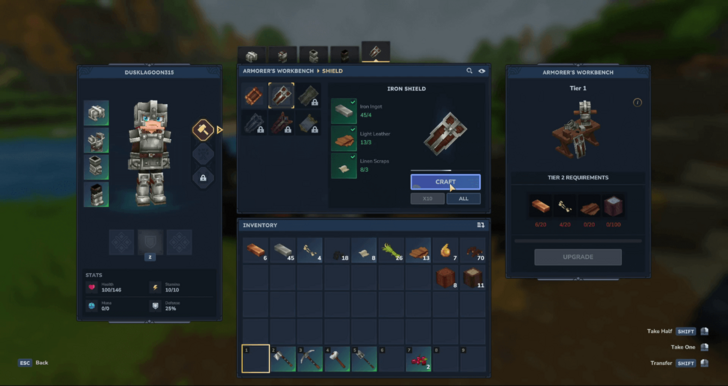
| 1 | Craft Armorer's Workbench |
| 2 | Craft Blacksmith's Anvil |
| 3 | Craft Tanning Rack |
Craft Armorer's Workbench
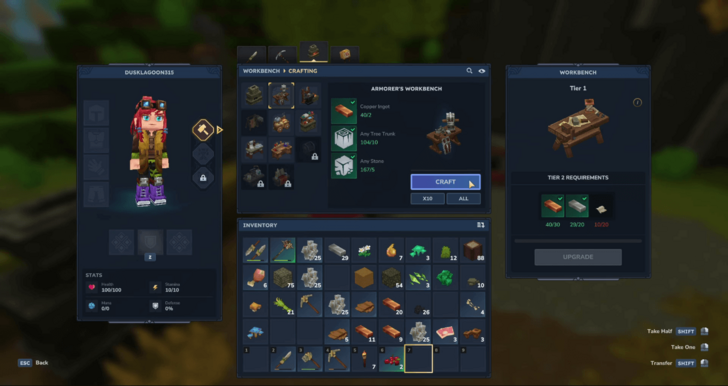
| Item | Requirements |
|---|---|
| Armorer's Workbench |
・Copper Ingot x2 ・Any Tree Trunk x10 ・Any Stone x5 |
Craft an Armorer's Workbench to unlock crafting of armor such as helmets, cuirass, gauntlets, greaves, and shields.
Craft Blacksmith's Anvil
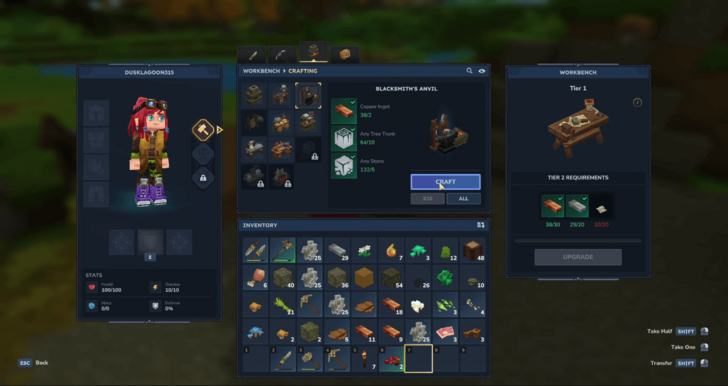
| Item | Requirements |
|---|---|
| Blacksmith's Anvil |
・Copper Ingot x2 ・Any Tree Trunk x10 ・Any Stone x5 |
Craft a Blacksmith's Anvil to unlock crafting of higher tier weapons using materials like copper, iron, and thorium.
Craft Tanning Rack
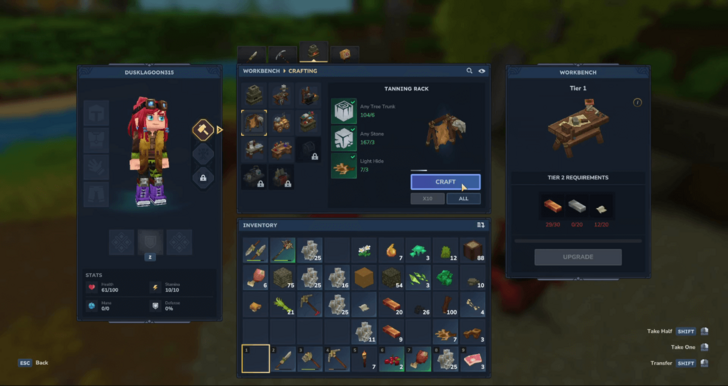
| Item | Requirements |
|---|---|
| Tanning Rack |
・Any Tree Trunk x6 ・Any Stone x3 ・Light Hide x3 |
Craft a Tanning Rack to turn hides into leather, which is used for crafting armor.
Side Objectives
| Priority | Side Objectives |
|---|---|
| ★★★ | Upgrade Workbench to Tier 2. |
| ★★ | Craft Salvager's Workbench. |
Upgrade your Workbench to Tier 2 to unlock the Salvager's Workbench and craft it. This station is used to recycle tools and equipment to retrieve some of the materials used in crafting them.
Part 5: Upgrade Equipment and Tools
| Step | Key Objectives |
|---|---|
| 1 | Craft Iron Tools |
| 2 | Craft Weapon and Armor |
Craft Iron Tools
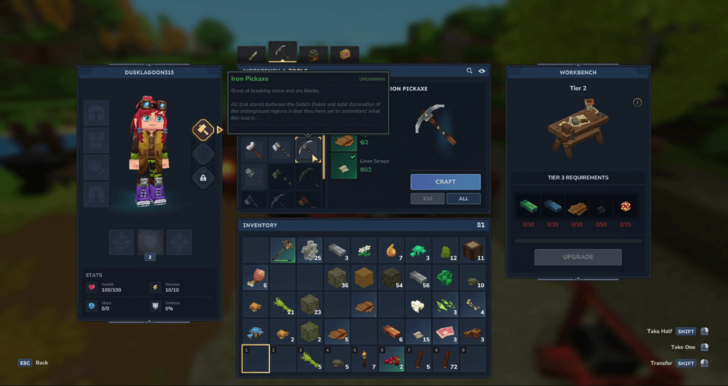
Using your Iron Ingots, craft Iron-tier tools. These are significantly more durable, allowing you to harvest resources for longer periods before needing repairs.
Craft Iron Weapon and Armor
With the Blacksmith's Anvil and Armorer's Workbench ready, craft Iron tier armor and weapons to equip yourself. If you were diligent in your mining, you should have enough resources for a full set and a weapon of your choice.
We highly recommend crafting Iron equipment directly and skipping Copper, as Copper is better saved for building workstations. Additionally, Iron equipment is more durable and has higher resistance than the Copper tier, and since you’ll eventually need to upgrade anyway, it’s best to make the jump now.
Side Objectives
| Priority | Side Objectives |
|---|---|
| ★★ | Use Salvager's Workbench to recycle Crude tier equipment. |
| ★★ | Craft Repair Kits for repairing your tools. |
Since you now have higher-tier equipment, use the Salvager's Workbench to recycle your old Crude weapons and tools. This not only recovers valuable materials but also frees up storage space for your new gear.
Consider crafting Repair Kits as well, these allow you to restore your tools' efficiency on the go without needing to return to base.
Part 6: Craft a Teleporter
| Step | Key Objectives |
|---|---|
| 1 | Mine Thorium Ores |
| 2 | Collect Essence of the Void |
| 3 | Gather Azure Logs |
| 4 | Gather Azure Kelps |
| 5 | Craft Arcanist's Workbench |
| 6 | Craft Teleporters |
Mine Thorium Ores
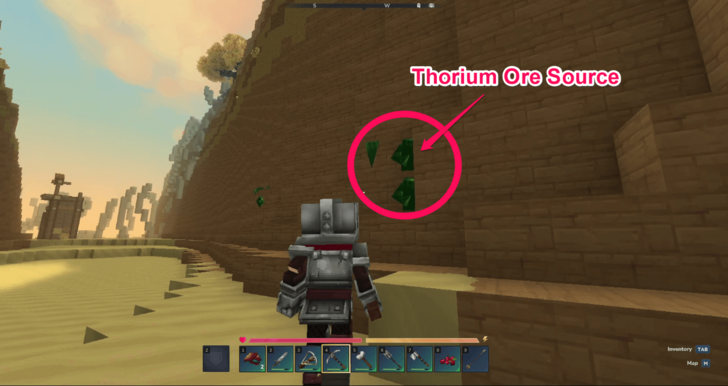
Head to a Desert biome, like the Howling Sands Badlands, and check the side of the cliffs for green mineral outcroppings. Break these green deposits with your Pickaxe to extract the Thorium Ores.
You'll need 10 Thorium Ores to turn into Ingots for the Arcanist's Workbench, but we highly recommend gathering plenty so you can also upgrade to Thorium-tier weapon and armor.
Collect Essence of the Void
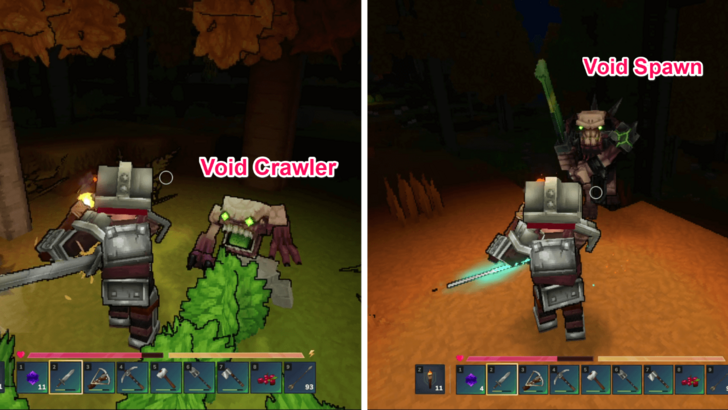
Hunt down Voidspawns, creatures that only appear at night, to get the Essence of the Void they drop. You'll need 20 to craft the Arcanist's Workbench.
If you're having difficulty encountering these enemies in your immediate area, go to an Orange Forest biome where they are certain to spawn and wait there until it's nighttime. You can spot them by their green glowing eyes.
How to Get Essence of the Void
Gather Azure Logs

Head to a Blue Forest biome and chop down trees with blue leaves to obtain Azure Logs. It is best to get as many as you can, since these logs can also be used for crafting other structures.
Gather Azure Kelps
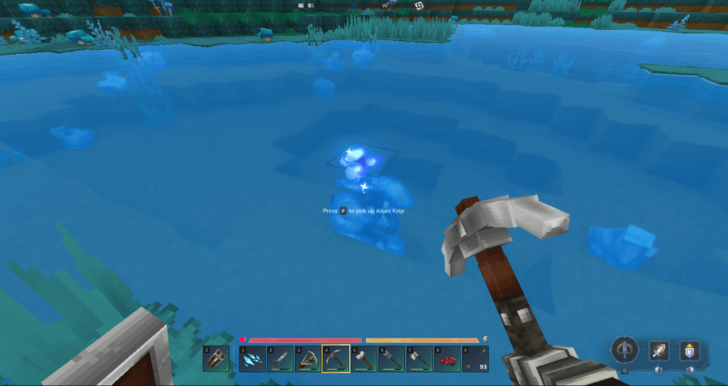
Azure Kelp can also be found in Blue Forest biomes. Look for these shimmering, crystal-like blue plants growing in bodies of water. You'll need at least 2 for a pair of teleporters.
Craft Arcanist's Workbench
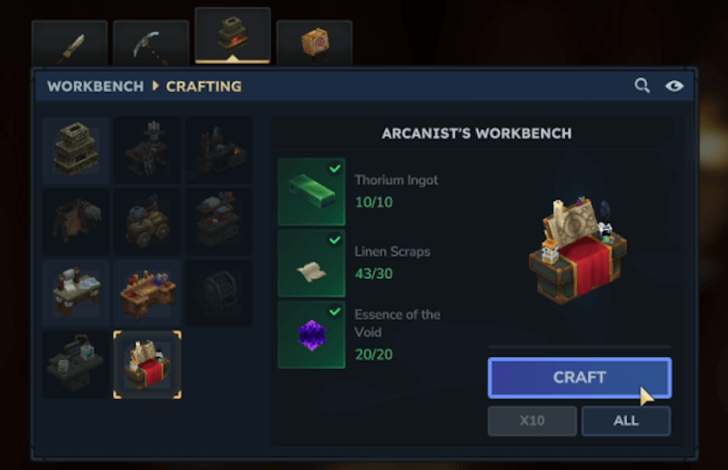
| Item | Requirements |
|---|---|
| Arcanist's Workbench |
・Thorium Ingots x10 ・Linen Scraps x30 ・Essence of the Void x20 |
When you have finished gathering all the required materials, craft the Arcanist's Workbench with your Tier 2 Workbench.
Craft Teleporters
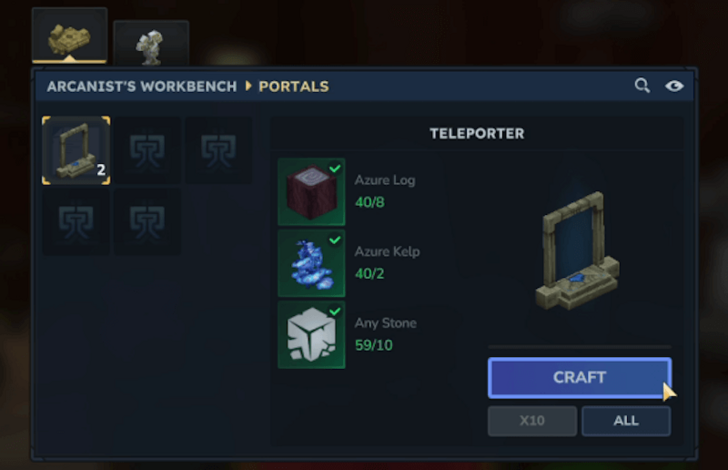
| Item | Requirements |
|---|---|
| Teleporter |
・Azure Logs x8 ・Azure Kelps x2 ・Any Stone x10 |
Once you have the Arcanist's Workbench, you can now craft the Teleporter. Each craft produces a pair of teleporters, as two are required to create a link.
You can put one beside your base and the other at a place you need to return to repeatedly. A warp icon will be displayed on your map, which marks the location of your teleporters.
How to Craft and Use Teleporters
Side Objectives
| Priority | Side Objectives |
|---|---|
| ★★★★★ | Craft a Shortbow or an Ironhand Crossbow. |
| ★★★★★ | Craft Arrows. |
Before heading to the Desert or hunting Voidspawns, craft a bow and arrows. Ranged weapons are essential for these areas, as you will encounter flying enemies such as the Scarak Seeker and Void Eye.
Part 7: Build a Basic Farm
| Step | Key Objectives |
|---|---|
| 1 | Craft Farmer's Workbench |
| 2 | Craft Farming Tools |
| 3 | Craft Seeds |
| 4 | Plot Your Seedbed |
| 5 | Plant Seeds |
Craft Farmer's Workbench
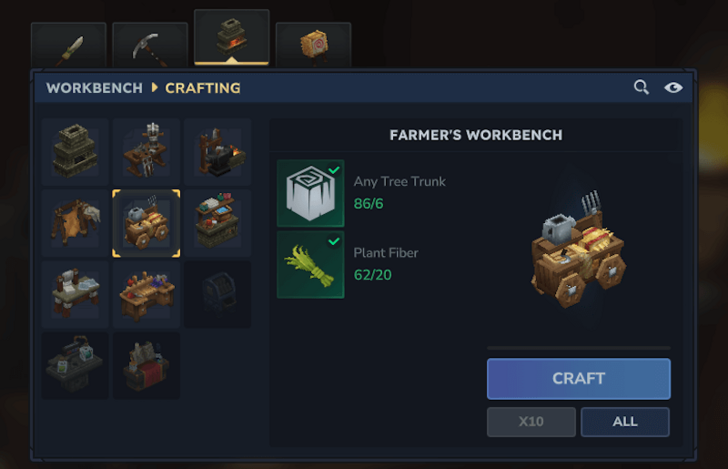
| Item | Requirements |
|---|---|
| Farmer's Workbench |
・Any Tree Trunk x6 ・Plant Fiber x20 |
To start your farm, craft a Farmer's Workbench. This is your workstation for all your farming essentials.
Craft Farming Tools
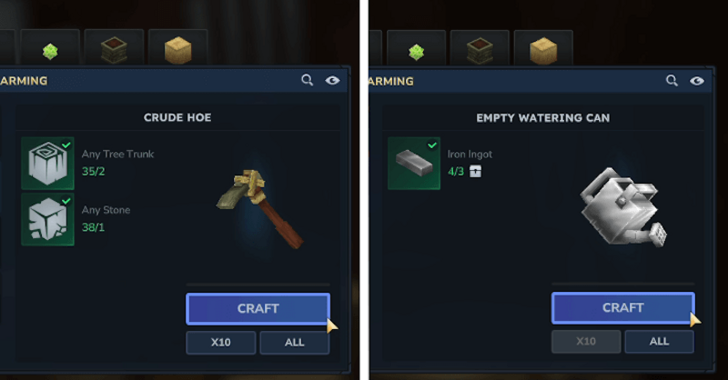
| Item | Requirements |
|---|---|
| Crude Hoe |
・Any Tree Trunk x2 ・Any Stone x1 |
| Watering Can (Optional) |
・Iron Ingot x3 |
Using a Farmer's Workbench, craft a Crude Hoe and a Watering Can. The hoe is for tilling the ground to create plots. While the watering can is optional, we recommend crafting it, as watering your crops will make them grow faster.
Craft Seeds
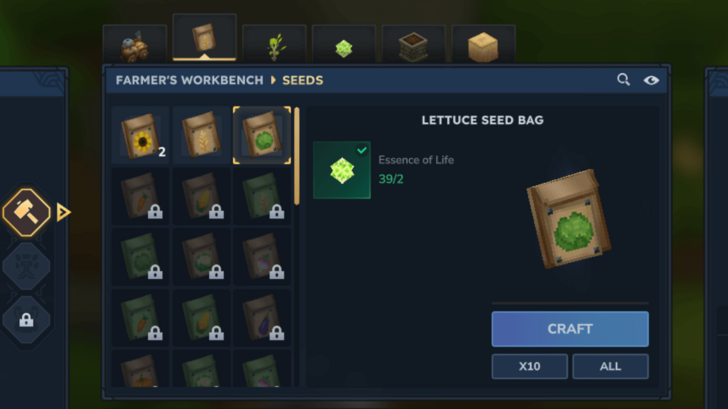
Next, Craft seeds that are unlocked in your Farmer's Workbench. Crafting any kind of seed requires Essence of Life. You can gather it by harvesting wild crops found in the world.
Plot Your Seedbed
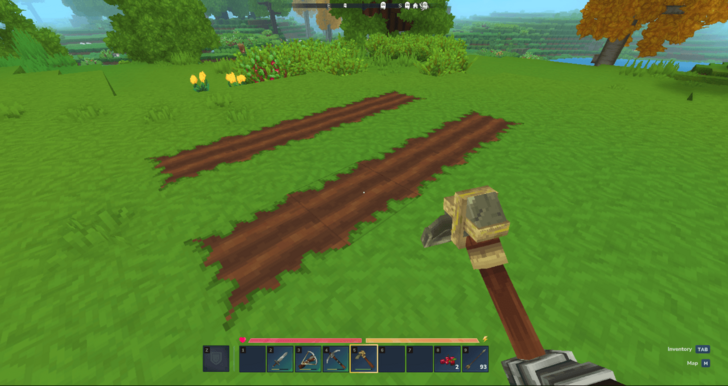
Find an area near your base that is also close to a river to set up your farm. This saves time when refilling your watering can.
Using the Crude Hoe, create plots. You can keep it simple by allocating 5 plots for each type of seed you have for now, then expand later.
Plant Seeds
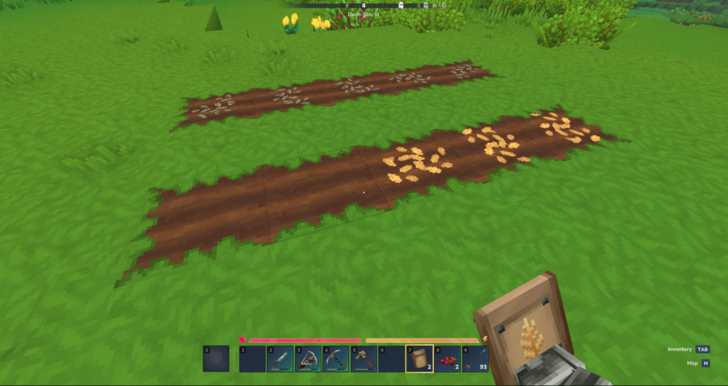
Once your seedbed is complete, plant each seed in its own plot. If you crafted a Watering Can, equip it and wade in the river to fill it up. Afterwards, point the can toward each plot to water your crops.
Side Objectives
| Priority | Side Objectives |
|---|---|
| ★★★ | Craft Builder's Workbench. |
| ★★★ | Craft Fences. |
To prevent mobs from trampling your crops, you can also surround your plot with Fences. Craft a builder's workbench and gather Beech logs or Oak logs to craft fences.
Part 8: Stock Up on Food
| Step | Key Objectives |
|---|---|
| 1 | Craft a Chef's Stove |
| 2 | Cook Dishes |
Craft a Chef's Stove
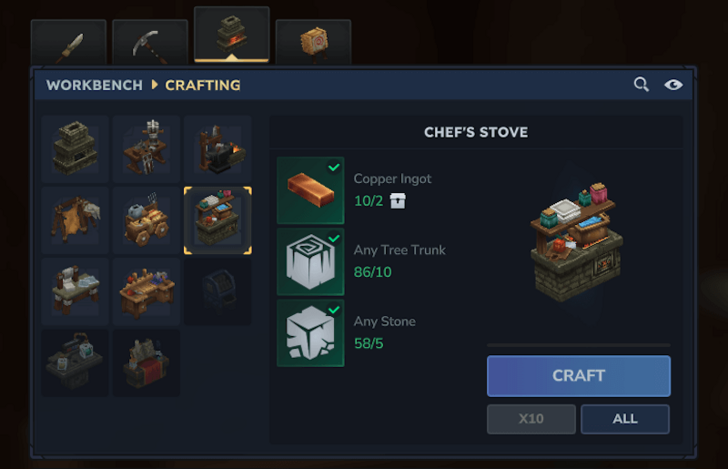
| Item | Requirements |
|---|---|
| Chef's Stove |
・Copper Ingots x2 ・Any Tree Trunks x10 ・Any Stone x5 |
Now that you've got a farm, once your crops mature, you can harvest and cook them for a steady food supply. Craft a Chef's Stove at your Workbench to unlock crafting dishes.
Cook Dishes
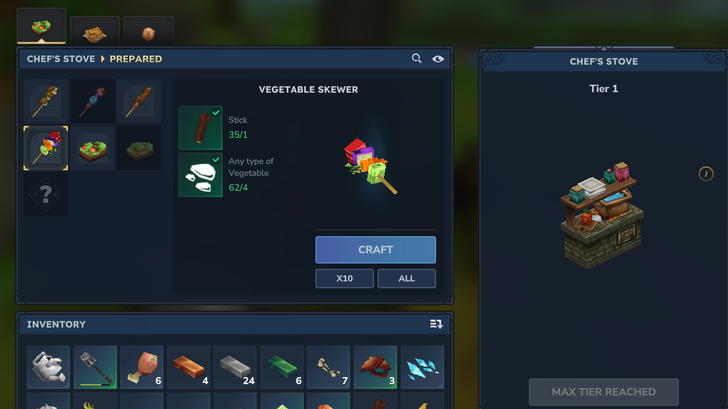
The recipes you've unlocked will show up on your Chef's Stove. You can cook any recipe for which you have available ingredients. Bonus effects granted by the dishes will be displayed if you hover over them.
We highly recommend bringing food before going on long travels or fighting bosses, since food is currently your primary source of healing. You can stock up on food in your inventory and wooden chests, as food in Hytale does not spoil.
Side Objectives
| Priority | Side Objectives |
|---|---|
| ★★★ | Cook several dishes and store them. |
| ★★ | Craft a Wooden Chest. |
Cook as many dishes as you'd like to store. Additionally, craft a dedicated Wooden Chest as separate storage for your ingredients and dishes to keep your food supply organized.
Part 9: Upgrade to Thorium Equipment
| Step | Key Objectives |
|---|---|
| 1 | Upgrade Equipment Workstations to Tier 2 |
| 2 | Craft Thorium-tier Weapon and Armor |
Upgrade Equipment Workstations to Tier 2
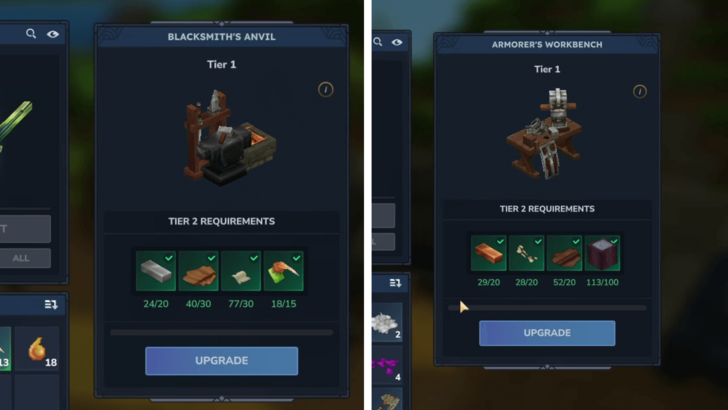
| Item | Requirements |
|---|---|
| Blacksmith's Anvil Tier 2 |
・Iron Ingot x20 ・Light Leather x30 ・Linen Scraps x30 ・Venom Sac x15 |
| Armorer's Workbench Tier 2 |
・Copper Ingot x20 ・Bone Fragments x20 ・Medium Leather x20 ・Azure Log x100 |
To craft equipment of the next tier after iron, upgrade your Blacksmith's Anvil and Armorer's Workbench to tier 2.
Craft Thorium-tier Weapon and Armor
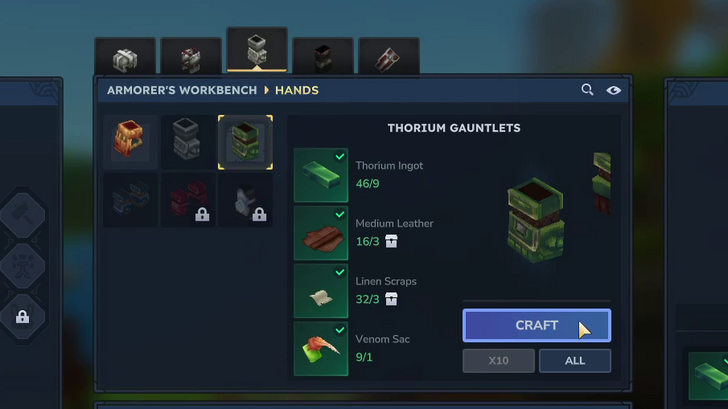
Craft Thorium weapons and armor with your leftover Thorium ores to upgrade your equipment to a higher tier. Crafting a set of gear will also require several Medium Leather, Linen Scraps, and Venom Sacs.
With the addition of Venom Sacs, each piece of Thorium Armor provides a percentage of Poison Resistance.
Side Objectives
| Priority | Side Objectives |
|---|---|
| ★★★★★ | Hunt medium-sized animals for Medium Hide. |
| ★★★★★ | Hunt small-sized animals for Light Hide. |
| ★★★★★ | Hunt Spiders for Venom Sac. |
| ★★★★★ | Kill humanoid mobs for Bone Fragments. |
Take caution when hunting Spiders for Venom Sacs, as you will be poisoned (taking damage over time) if they manage to hit you.
Part 10: Upgrade to Cobalt Equipment
| Step | Key Objectives |
|---|---|
| 1 | Mine Cobalt Ore |
| 2 | Craft Cobalt-tier Weapon and Armor |
Mine Cobalt Ore
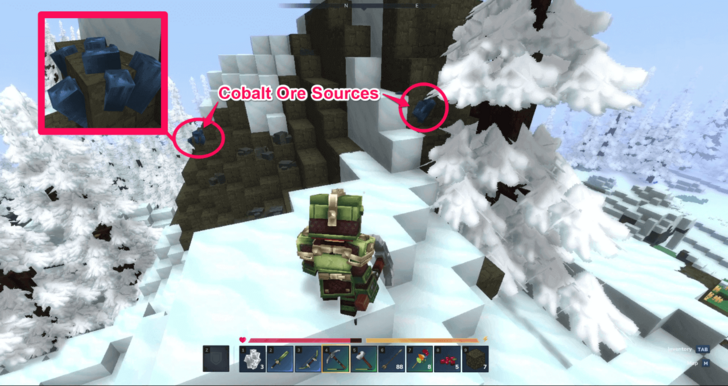
Head to a mountain with brown and white blocks in Cold biomes and search for blue mineral deposits to mine cobalt ores. Then, smelt the ores in your Furnace to get Cobalt Ingots.
Craft Cobalt-tier Weapon and Armor
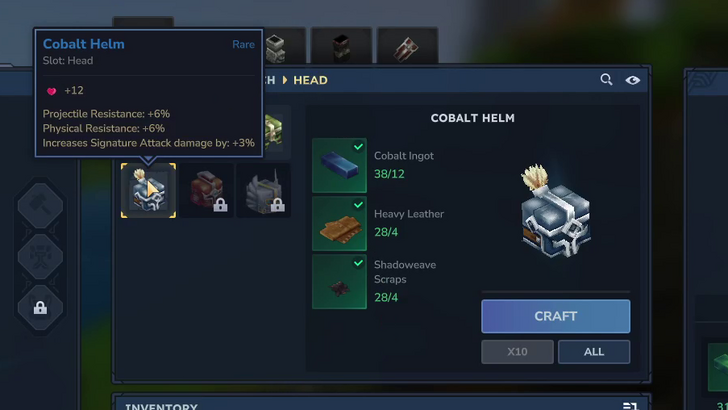
Once you have enough Cobalt Ingots and have collected other required materials such as Heavy Leather and Shadoweave Scraps, you can craft the Cobalt armor and weapons of your choice.
Switching from Thorium to Cobalt will remove your Poison Resistance bonus. However, each piece of Cobalt-tier armor will increase your Signature Attack Damage by a certain percentage instead.
If you want to maintain having higher poison resistance, you can retain either the Thorium Cuirass (Poison Resistance +27%) or Thorium Greaves (Poison Resistance +21%) as part of your gear set.
| Priority | Side Objectives |
|---|---|
| ★★★★★ | Hunt large animals for Heavy Hides. |
| ★★★★★ | Kill Outlanders for Shadoweave Scraps. |
Hunt large animals such as the Grizzle Bear, Polar Bear, Crocodile, and Mosshorn for Heavy Hides. Afterwards, put them on the Tanning Rack to turn them into Heavy Leather.
Shadoweave Scraps are obtained from defeating Outlanders, which are mostly found in groups located in small villages, large forts, or even coastal towns along the edges of cold and icy regions.
Part 11: Upgrade to Adamantite Equipment
| Step | Key Objectives |
|---|---|
| 1 | Mine Adamantite Ores |
| 2 | Upgrade Equipment Workstations to Tier 3 |
| 3 | Craft Adamantite-tier Weapon and Armor |
Mine Adamantite Ores
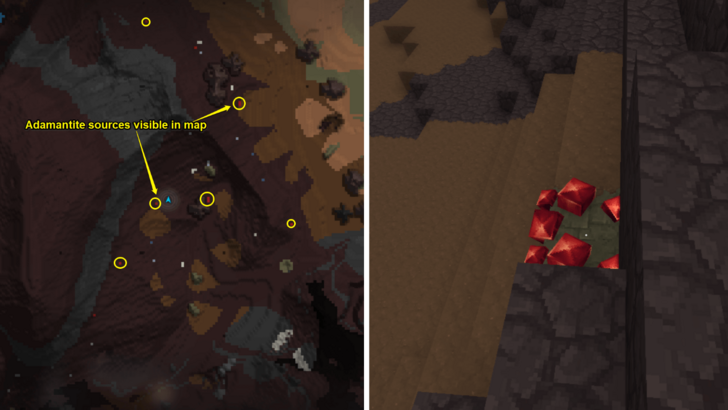
Head to a volcanic region—areas usually found near the ocean or islands—and look for purple blocks. Search for red mineral deposits to mine Adamantite ore. You can spot these deposits on your map as small red squares.
Upgrade Equipment Workstations to Tier 3
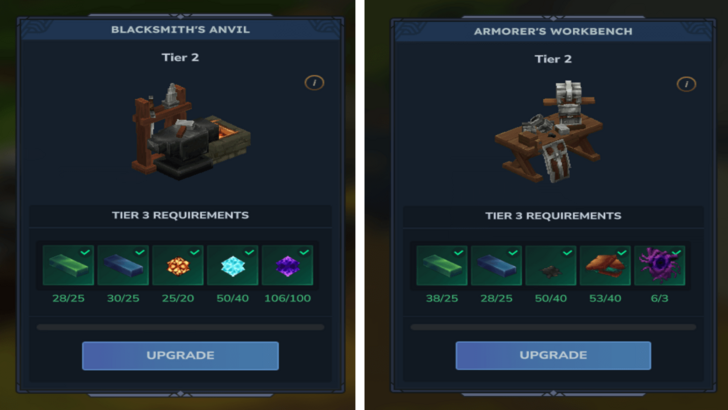
| Item | Requirements |
|---|---|
| Blacksmith's Anvil (Tier 3) |
・Thorium Ingot x25 ・Cobalt Ingot x 25 ・Essence of Fire x20 ・Essence of Ice x40 ・Essence of the Void x100 |
| Armorer's Workbench (Tier 3) |
・Thorium Ingot x25 ・Cobalt Ingot x25 ・Shadoweave Scraps x40 ・Sturdy Chitin x40 ・Voidheart x3 |
To be able to craft gear using Adamantite Ingots, you need to upgrade your Blacksmith's Anvil and Armorer's Workbench to Tier 3.
Craft Adamantite-tier Weapon and Armor
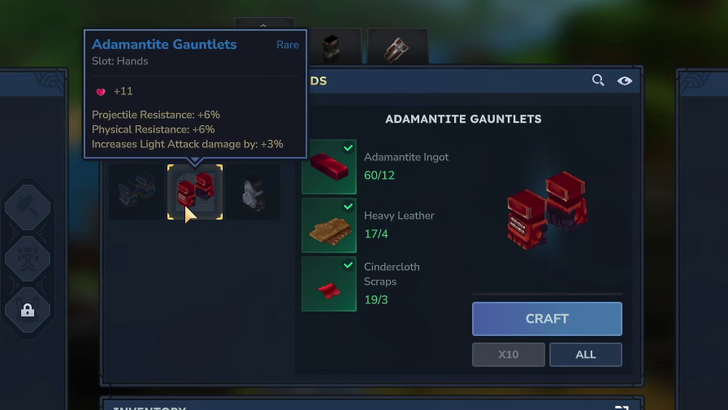
Once you have a Tier 3 Blacksmith's Anvil and Tier 3 Armorer's Workbench, you can start crafting Adamantite weapons and armor. Adamantite-tier equipment grants a percentage increase to light attack damage.
You can choose to upgrade further to Mithril; however, you will need to switch to Creative Mode to do so.
Adamantite is currently the highest-tier ore that spawns in the overworld in Survival Mode. Minerals of Epic rarity and above—including Mithril, Onyxium, and Prisma—are not yet mineable and can only be accessed via Creative Mode.
| Priority | Side Objectives |
|---|---|
| ★★★★★ | Collect Essence of Fire. |
| ★★★★★ | Collect Essence of Ice. |
| ★★★★★ | Collect Essence of the Void. |
| ★★★★★ | Hunt Voidspawns for Voidheart. |
| ★★★★★ | Collect Sturdy Chitin. |
| ★★★★★ | Gather Shadoweave Scraps. |
| ★★★★★ | Gather Cindercloth Scraps. |
Essence of Fire is dropped by enemies found in the volcanic layer, while Essence of Ice is dropped by enemies in cold or icy biomes. Cindercloth Scraps can be gathered from enemies in volcanic biomes.
When collecting Voidhearts, target Void Eyes specifically, as they have the highest chance to drop them. You can obtain Sturdy Chitin from Scorpions, Armadillos, and Scarab Seekers found in Desert biomes.
Part 12: Defeat the Golems in All Forgotten Temple Gateways
| Step | Key Objectives |
|---|---|
| 1 | Defeat the Guardian Golem |
| 2 | Locate Other Forgotten Temple Gateways |
Defeat the Guardian Golem

Now that you have advanced gear, you are fully equipped to handle boss encounters with ease. You can begin by fighting the Earthen Golem found in the first Forgotten Temple Gateway you found in the Emerald Wilds.
Afterwards, explore the map to fight the other golems guarding the other gateways.
Locate Other Forgotten Temple Gateways

There are multiple Forgotten Temple Gateways scattered throughout the Echo of Orbis, with one confirmed in every biome (Desert, Ice, Volcanic, etc.). Each gateway leads to the same Forgotten Temple, which is guarded by a golem and contains two chests.
Travel around each zone until you see a pinwheel icon appear on your map, indicating the location of another gateway.
| Priority | Side Objectives |
|---|---|
| ★★★ | Raid Points of Interests in the map. |
While exploring, take this time to clear out enemies in POIs. Some of the forts not only have standard mobs, but also bosses.
Part 13: Access the Other Realms
| Step | Key Objectives |
|---|---|
| 1 | Craft the Ancient Gateway |
| 2 | Craft a Key Fragment |
| 3 | Summon the Portal |
| 4 | Enter the Portal |
Craft the Ancient Gateway
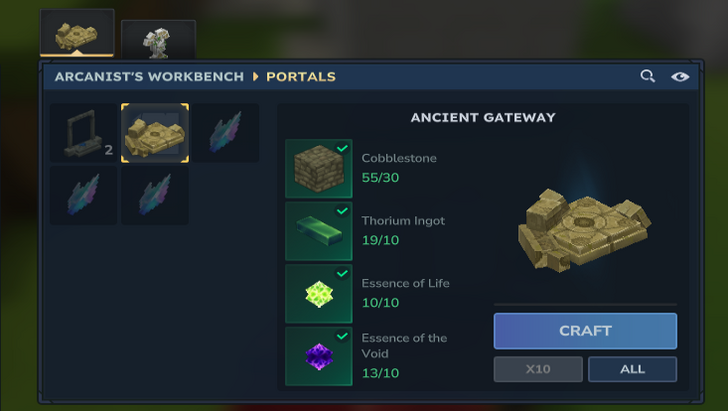
| Item | Requirements |
|---|---|
| Ancient Gateway |
・Cobblestone x30 ・Thorium Ingot x10 ・Essence of Life x10 ・Essence of the Void x10 |
Once you have recorded 100 Memories, you will unlock the recipes for the Ancient Gateway and Key Fragments at the Arcanist's Workbench. By pairing the gateway with a specific key, you can travel into the other realms of Orbis.
Gather the necessary materials and craft your Ancient Gateway to begin.
Craft a Key Fragment
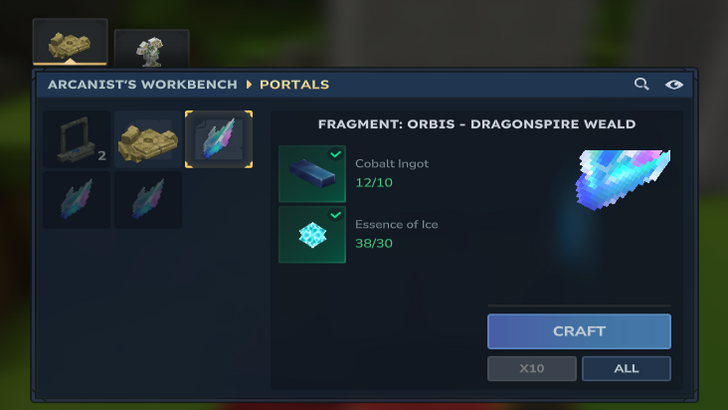
| Item | Requirements |
|---|---|
| Dragonspire Weald |
・Cobalt Ingot x10 ・Essence of Ice x30 |
| The Dread Wade |
・Adamantite Ingot x10 ・Essence of Fire x30 |
| Windrider Valley |
・Thorium Ingot x10 ・Essence of Life x30 |
Craft the Key Fragment for the realm you wish to explore. Consider starting with the Dragonspire Weald, a domain where a Frost Dragon sleeps on top of a snowy mountain.
In the game's current version, you cannot fight this dragon yet and remains unresponsive to players.
Summon the Portal
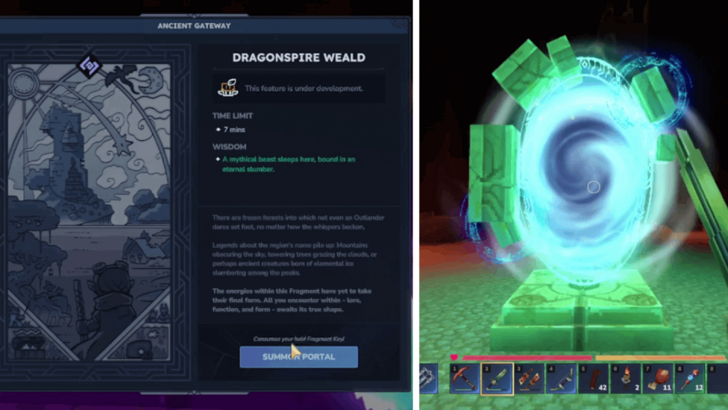
After crafting both the gateway and the key, head to a clear area and place the Ancient Gateway on the ground. Interact with it and use your Key Fragment.
A notification will appear showing how long you can remain in the other realm, accept the prompt to summon the portal.
Enter the Portal

After summoning, wait a moment for the portal to manifest and stabilize. Once you step through, you'll find yourself in a different map.
You can explore the realm within the time limit shown in the top right corner of your screen. When the time is up, you'll be transported back to your own world automatically. Be careful as you will be dropped in a random location.
Note: It may take some time to load the new realm and you may experience a brief black screen during the transition.
| Priority | Side Objectives |
|---|---|
| ★★★★★ | Record 100 Memories. |
Explore the different biomes of your world to discover new creatures and accumulate at least 100 Memories. Record these Memories in the Heart of Orbis to unlock the recipes for the Ancient Gateway and Key Fragments.
Hytale Related Guides
Hytale Wiki
| Hytale Wiki Contents | |
|---|---|
 Walkthrough Walkthrough |
 Materials Materials |
 Bosses Bosses |
 Crafting Recipes Crafting Recipes |
 Tips and Tricks Tips and Tricks |
 Weapons Weapons |
 Armor Armor |
 Memories Memories |
 Map, Zones, and Biomes Map, Zones, and Biomes |
 Mobs Mobs |
 Bugs and Errors Bugs and Errors |
 News and Updates News and Updates |
Recommended Guides
| Best Guides | |
|---|---|
| Best Weapons Tier List | Best Fuel |
| Best Base Locations | Best Food |
| Best Hytale Servers | - |
| Recommended Guides | |
| Console Commands List | List of Item IDs |
| Forgotten Temple Guide | Endgame Guide |
| Guides for Starting Out | |
| Best Things to Craft First | Best Settings |
| Game Modes Explained | - |
Author

Progression Guide
Please participate in our site
improvement survey
04/2026
improvement survey
04/2026
Would you assist in
improving Game8's site?
improving Game8's site?

×
We are listening to our users' valuable opinions and discussing how to act on them.
The information collected through this survey will be used for the purpose of improving our services. In addition, the information will only be disclosed a part of a statistic in a format that will not allow identification of personal information.
Begin Survey
Not Now
×
Please rate each item regarding Game8.co's Advertisements.
Amount of Ads
Very Dissatisfied
Somewhat Dissatisfied
Fine
Somewhat Satisfied
Highly Satisfied
Placement of Ads
Timing of Ad Display
Ad Loading Speed
Safeness of Ads
Content of Ads
×
Please rate each item regarding Game8.co's Quality of Articles.
Amount of information
Very Dissatisfied
Somewhat Dissatisfied
Fine
Somewhat Satisfied
Highly Satisfied
Frequency of updates
Speed of new information
Accuracy of articles
Understandibility of articles
Readability of sentences
×
Please rate each item regarding Game8.co's Usability of the Site.
Ease of finding information
Very Dissatisfied
Somewhat Dissatisfied
Fine
Somewhat Satisfied
Highly Satisfied
Loading Speed
Use of Color
Font Size
Visibility of Images
Easy to Understand Layout
×
Please rate each item regarding Game8.co's Message Boards, Comments.
Ease of Writing
Very Dissatisfied
Somewhat Dissatisfied
Fine
Somewhat Satisfied
Highly Satisfied
Readability
Ease in Finding Information
Comment Quality
Comment Quantity
Admin Response
×
Please rate each item regarding Game8.co's Site's new design.
Please rate our site's new design
Very Dissatisfied
Somewhat Dissatisfied
Fine
Somewhat Satisfied
Highly Satisfied
Do you think that the website's design change makes the site easier to use?
Has the new design made it easier for you to find information on the site?
Has the new design improved the overall visual appeal of the site?
How would you rate your overall satisfaction with the new design of the site?
×
How likely are you to recommend Game8 to someone you know?
Very Unlikely
0
1
2
3
4
5
6
7
8
9
10
Very Likely
If you have other opinions regarding potential improvement to the website, please share them with us. We would appreciate your honest opinion.
Note: This is a free response section, so you can proceed without entering anything.
Note: Please be sure not to enter any kind of personal information into your response.
Note: Please be sure not to enter any kind of personal information into your response.
×
Thank You
×
Thank you for participating in our survey! Your answers will help us to improve the quality of our website and services.
We hope you continue to make use of Game8.
We hope you continue to make use of Game8.
Close
Rankings
- We could not find the message board you were looking for.
Gaming News


![Forza Horizon 6 Review [Preview] | Beautiful Roads With a Whole Lot of Oversteer](https://img.game8.co/4460981/a7254c24945c43fbdf6ad9bea52b5ce9.png/thumb)
![Borderlands Mobile Review [Playtest] | The Same Borderlands Made Easy](https://img.game8.co/4465500/aac0c880a39ec5cd46073e49d18f3ed5.png/thumb)
Popular Games

Genshin Impact Walkthrough & Guides Wiki
Crimson Desert Walkthrough & Guides Wiki
Umamusume: Pretty Derby Walkthrough & Guides Wiki
Honkai: Star Rail Walkthrough & Guides Wiki
Monster Hunter Stories 3: Twisted Reflection Walkthrough & Guides Wiki
Wuthering Waves Walkthrough & Guides Wiki
The Seven Deadly Sins: Origin Walkthrough & Guides Wiki
Pokemon TCG Pocket (PTCGP) Strategies & Guides Wiki
Pokemon Pokopia Walkthrough & Guides Wiki
Zenless Zone Zero Walkthrough & Guides Wiki


Recommended Games
Fire Emblem Heroes (FEH) Walkthrough & Guides Wiki
Pokemon Brilliant Diamond and Shining Pearl (BDSP) Walkthrough & Guides Wiki
Super Smash Bros. Ultimate Walkthrough & Guides Wiki
Diablo 4: Vessel of Hatred Walkthrough & Guides Wiki
Cyberpunk 2077: Ultimate Edition Walkthrough & Guides Wiki
Yu-Gi-Oh! Master Duel Walkthrough & Guides Wiki
Elden Ring Shadow of the Erdtree Walkthrough & Guides Wiki
Monster Hunter World Walkthrough & Guides Wiki
The Legend of Zelda: Tears of the Kingdom Walkthrough & Guides Wiki
Persona 3 Reload Walkthrough & Guides Wiki


All rights reserved
©2026 HYPIXEL STUDIOS CANADA INC. ALL RIGHTS RESERVED.
The copyrights of videos of games used in our content and other intellectual property rights belong to the provider of the game.
The contents we provide on this site were created personally by members of the Game8 editorial department.
We refuse the right to reuse or repost content taken without our permission such as data or images to other sites.
I was looking for information about Ferans as well, they were skittish at first and then hostile (I accidentally hit the shaman) but at no point in time was I able to offer food or goods as I saw suggested anywhere, I was also unable to trade or get anywhere near them. That was my first and last interaction with them