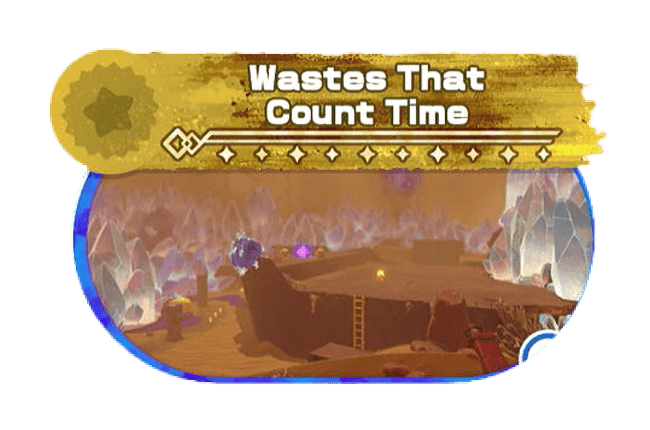
Wastes That Count Time Starry Locations and Missions Walkthrough
This is a walkthrough for the Wastes That Count Time stage in Kirby and the Forgotten Land Star-Crossed World DLC. See the location of all the Starries, how to complete the missions, and discover all the hidden locations!
| Previous Stage | Next Stage |
|---|---|
| Freezing Wind and Some Snowmen | Moonlight Canyon Labyrinth |
List of Contents
Wastes That Count Time Missions and Abilities
Missions List
| Mission | Starries |
|---|---|
| 3 | |
| 4 | |
| 1 | |
| 1 | |
| 1 |
Copy Abilities
 Tornado Tornado
|
 Sword Sword
|
 Ice Ice
|
 Fire Fire
|
 Drill Drill
|
 Ranger Ranger
|
 Crash Crash
|
Wastes That Count Time Mission Completion Order
Area 1
Area 2
| Area 2 Missions | ||
|---|---|---|
| 1 | Defeat all Enemies with Sign Mouth | |
| 2 | 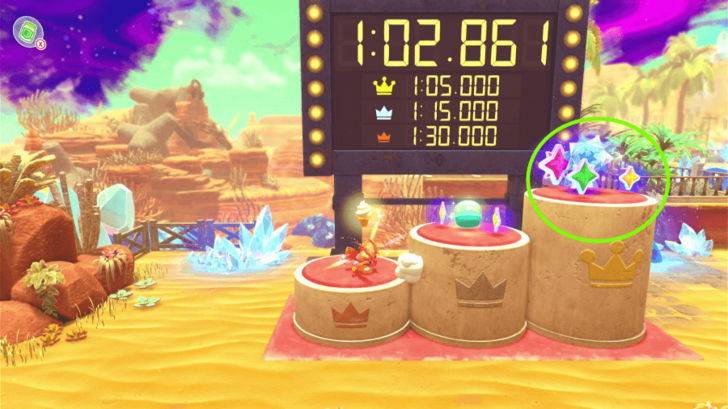 |
Save the 4th Hidden Starry |
Wastes That Count Time Hidden Starry Locations
1. On Top of the Pillar in the 1st Area
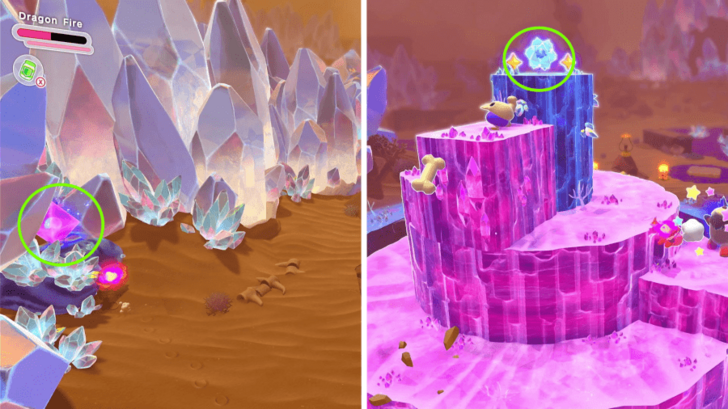
You can find the first hidden Starry on top of the pillar in the first area. You can get to the top by destroying the Purple Crystal on the left side to bring out the temporary platforms. These platforms will disappear after some time, so try to get the Starry quickly!
2. Behind the Shutter Located West of the 1st Area
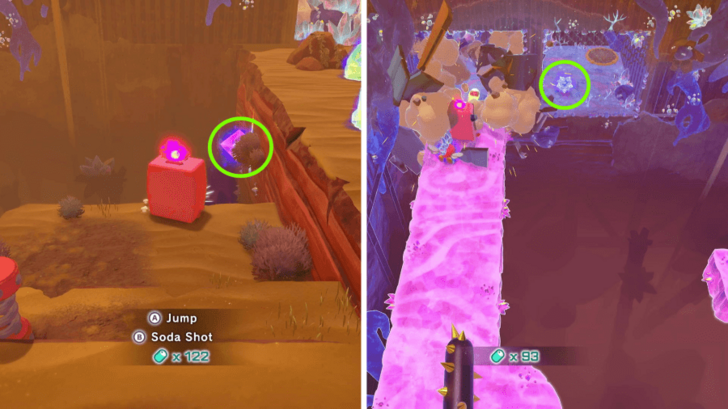
You can find the second Starry on the west part of the first area. You must destroy the Purple Crystal using the Vending Machine and then walk towards the cracked shutter at the end.
Shoot the cracked shutter with the Vending Machine to open it up and get the Starry! Remember to do it fast as there is a timer for the summoned platforms.
3. On Top of the Pillar on the Ship in the 1st Area
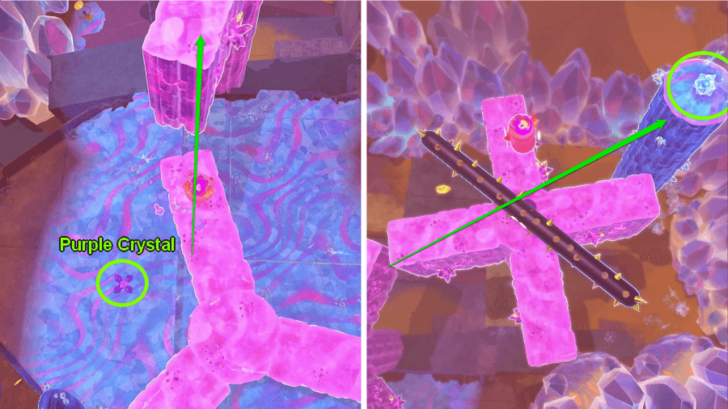
You can find the third Hidden Starry on top of the pillar that will spawn on the ship once you destroy the purple flower. If you can finish it in first try, you will complete the other mission featuring this timed trial!
4. Finish in 1 Minute and 5 Seconds in the Sign Mouth Trial

You can get the final Starry at the end of the stage if you manage to finish the Sign Mouth Trial within 1 minute and 5 seconds. Just jump on the crown pillar at the end when you finish on time to get the Starry.
Wastes That Count Time Lantern Locations
1. Near the Huge Crater
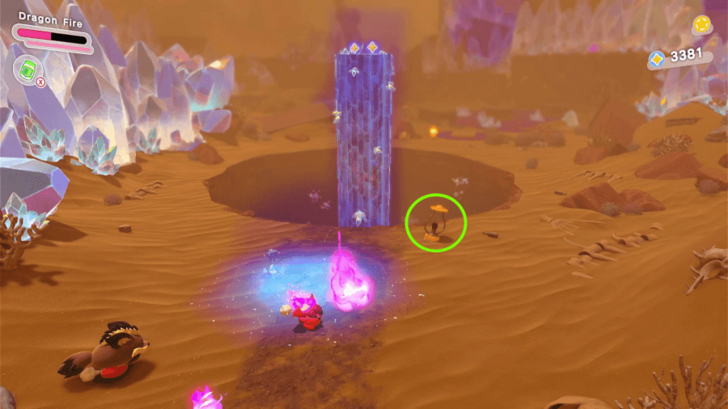
You can find the first Lantern near the crater of the first area. You can light it up by getting a Fire Ability from an enemy.
2. Opposite Side of the 1st Lantern
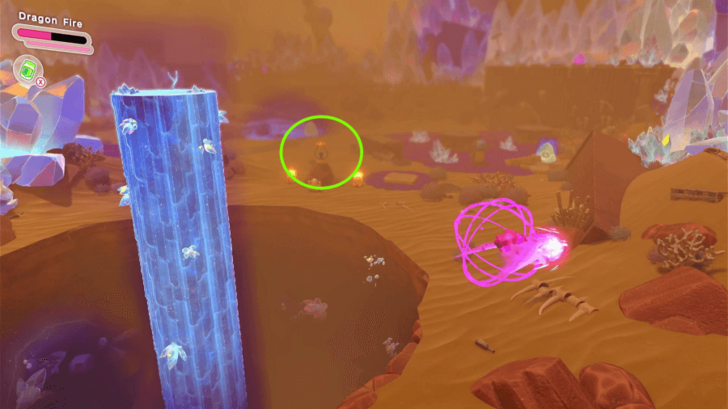
The next Lantern is close to the first Lantern. You can find it on the opposite side of the first one.
3. Northeast of the Poison Puddle
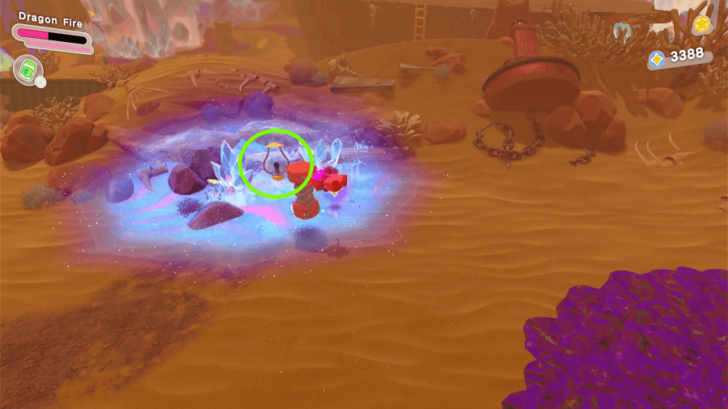
You can find the third Lantern northeast of the first poison puddle in the first area. You will find it in between two small crystals.
4-5. Near the Ship
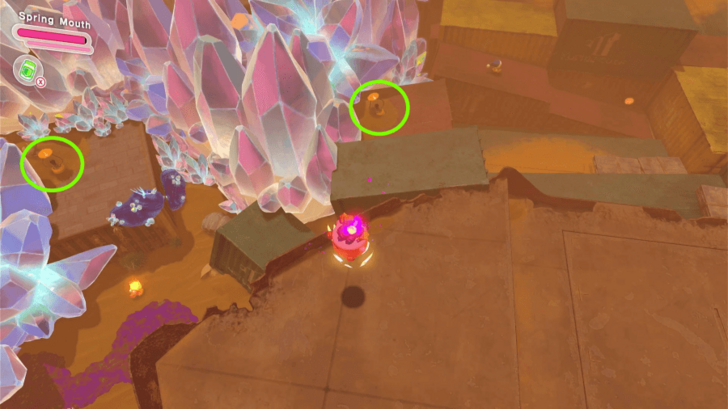
The last two Lanterns are located north of the ship. You should be able to spot both of them if you go on deck of the ship.
Wastes That Count Time Ship Timed Platforming Sequence
Video Playthrough
The Timed Platforming Sequence on top of the ship is located north of the first area. You must break the Purple Crystal on the deck to start the timed trial.
Wastes That Count Time Sign Mouth Enemy Locations
Video Playthrough
Most of the enemies can be seen along the way, but there are a few that requires you to break the crystals to see them. If you miss them, you can always try again by riding the Blue Star on the left.
Wastes That Count Time Secret HAL Room
Destroy 2 Crystals with Green Starry Coins
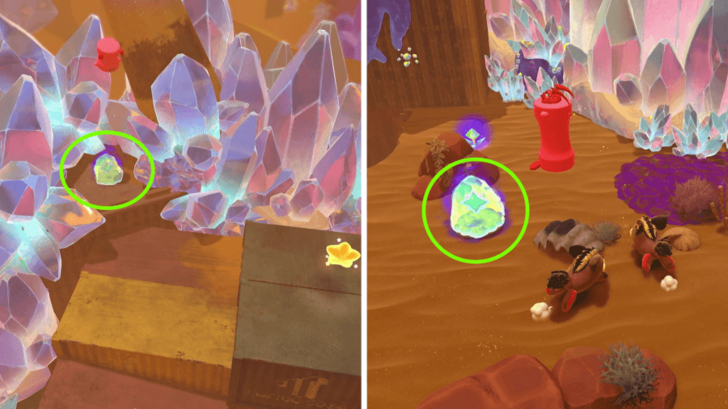
Destroy the two Crystals with Green Starry Coins to unlock the HAL Room. You can find the first one near the Star to the north. The other one is slightly on the west side, near the large crystal and small puddle.
Climb the Cliff on the Left on the Spawn Point
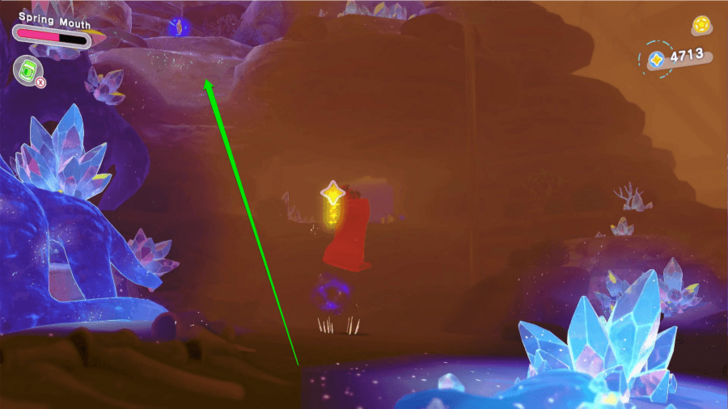
Return to the spawn area after destroying the crystals. Climb the cliff on the left once you get there to reach the cave where the HAL Room is located.
Destroy All Crystals
Destroy the 4 crystals to summon all HAL letters on the ground and reap its rewards. You can get the first one on the left, the second one on the letter H, and the last one on top of letter L.
HAL Room Locations: How to Find All Secret HAL Rooms
Wastes That Count Time Figure Locations
1. Timed Platform Sequence Before the Ship
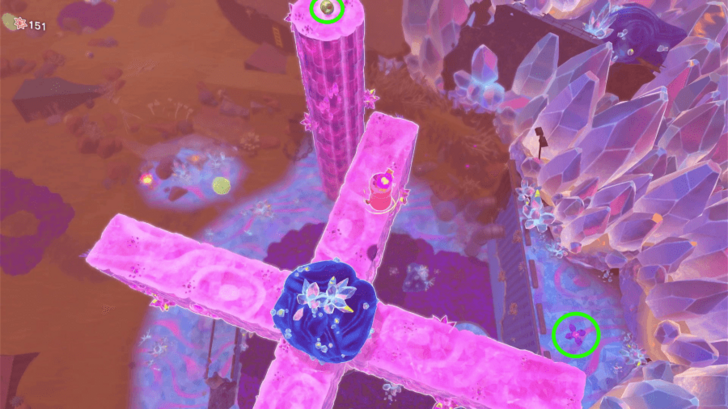
You can get the first Figure by doing the timed platform sequence on the east side before the ship. You can activate the timed platform sequence by destroying the purple crystal on the right, on top of the metal structure.
2. In the Secret HAL Room
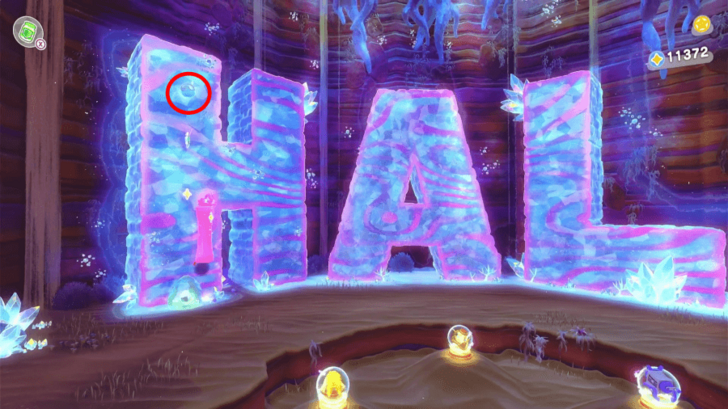
The second Figure is inside the Secret HAL Room. You will find it on the top left part of the Letter H after completing the HAL word.
3. Collect 5 Green Fragments
| 1st | 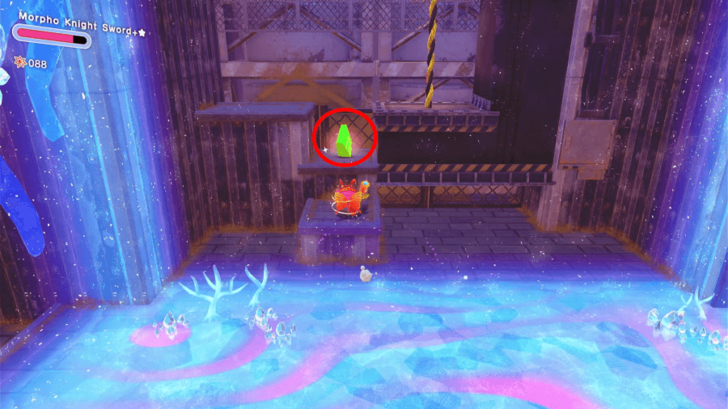 |
|---|---|
| 2nd | 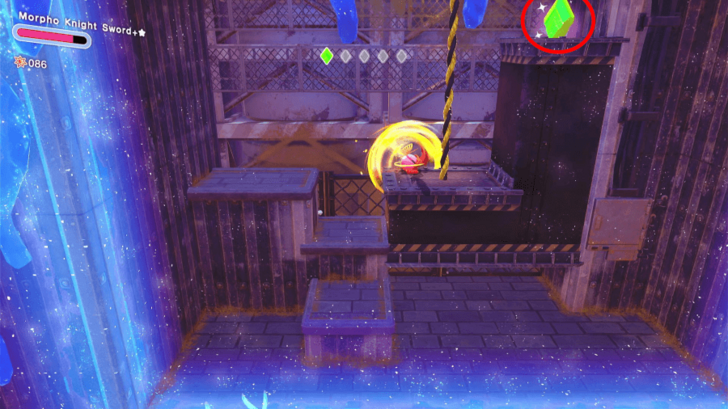 |
| 3rd | 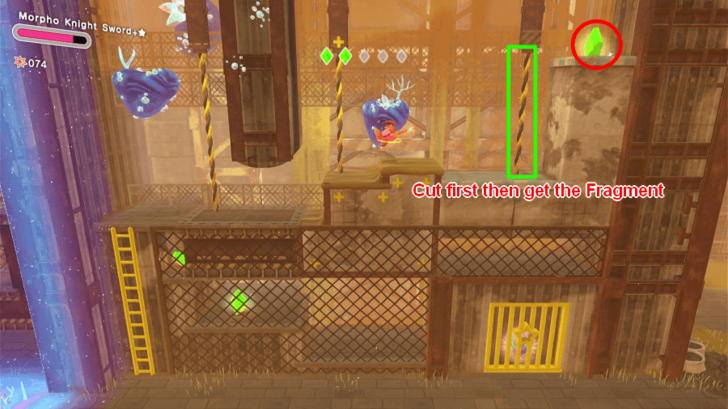 |
| 4th | 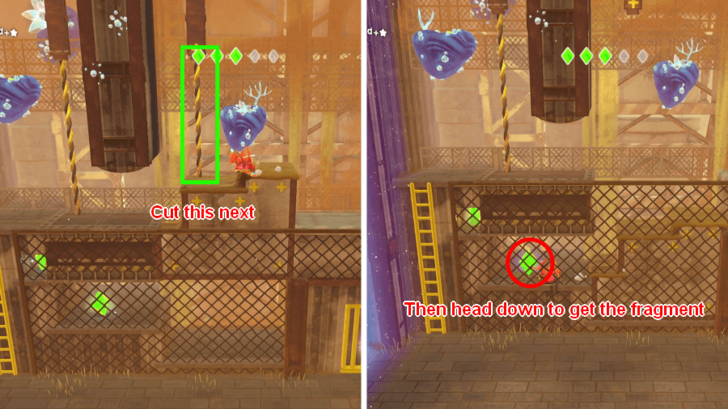 |
| 5th | 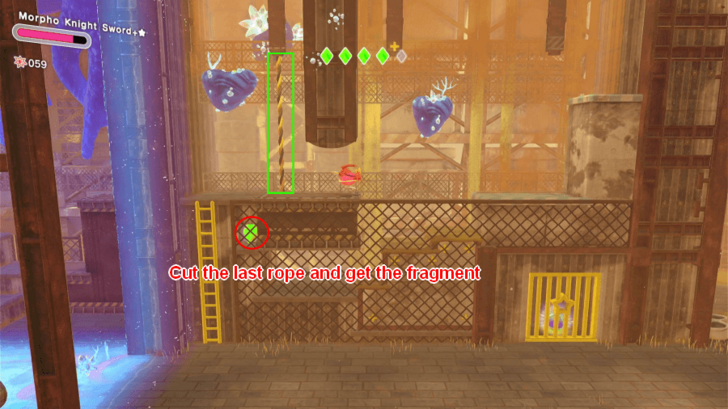 |
Collect the 5 Green Fragments after defeating the boss in the second area to get the next figure. You must cut the wires in the correct order to get all the fragments!
4. Finish Under 1:15 in the Sign Mouth Area

You can get the last Figure after finishing the Sign Mouth area within 1 minute and 15 seconds. You will be able to get the Figure on the second place stand after the Sign Mouth area.
Kirby and the Forgotten Land Related Guides

Comment
Author
Wastes That Count Time Starry Locations and Missions Walkthrough
improvement survey
04/2026
improving Game8's site?

Your answers will help us to improve our website.
Note: Please be sure not to enter any kind of personal information into your response.

We hope you continue to make use of Game8.
Rankings
- We could not find the message board you were looking for.
Gaming News
Popular Games

Genshin Impact Walkthrough & Guides Wiki

Crimson Desert Walkthrough & Guides Wiki

Umamusume: Pretty Derby Walkthrough & Guides Wiki

Honkai: Star Rail Walkthrough & Guides Wiki

Monster Hunter Stories 3: Twisted Reflection Walkthrough & Guides Wiki

Wuthering Waves Walkthrough & Guides Wiki

The Seven Deadly Sins: Origin Walkthrough & Guides Wiki

Pokemon TCG Pocket (PTCGP) Strategies & Guides Wiki

Pokemon Pokopia Walkthrough & Guides Wiki

Zenless Zone Zero Walkthrough & Guides Wiki
Recommended Games

Monster Hunter World Walkthrough & Guides Wiki

Fire Emblem Heroes (FEH) Walkthrough & Guides Wiki

Pokemon Brilliant Diamond and Shining Pearl (BDSP) Walkthrough & Guides Wiki

Super Smash Bros. Ultimate Walkthrough & Guides Wiki

Diablo 4: Vessel of Hatred Walkthrough & Guides Wiki

Cyberpunk 2077: Ultimate Edition Walkthrough & Guides Wiki

Yu-Gi-Oh! Master Duel Walkthrough & Guides Wiki

Elden Ring Shadow of the Erdtree Walkthrough & Guides Wiki

The Legend of Zelda: Tears of the Kingdom Walkthrough & Guides Wiki

Persona 3 Reload Walkthrough & Guides Wiki
All rights reserved
© HAL Laboratory, Inc. / Nintendo
The copyrights of videos of games used in our content and other intellectual property rights belong to the provider of the game.
The contents we provide on this site were created personally by members of the Game8 editorial department.
We refuse the right to reuse or repost content taken without our permission such as data or images to other sites.
 Meteor Shower's Arrival
 Lost in Alivel Mall
 Fallen-Star Beach
 Washed Away at the Cement Summit
 Crossing Wondaria
 Spinning Dream Parade
 Frost Street Snow Park
 Freezing Wind and Some Snowmen
 Wastes That Count Time
 Moonlight Canyon Labyrinth
 Crumbling Fiery Forbidden Lands
 Crystal Beast Pack Volcano Battle
 Fallen-Star Volcano




![Forza Horizon 6 Review [Preview] | Beautiful Roads With a Whole Lot of Oversteer](https://img.game8.co/4460981/a7254c24945c43fbdf6ad9bea52b5ce9.png/show)


![Forza Horizon 6 Review [Preview] | Beautiful Roads With a Whole Lot of Oversteer](https://img.game8.co/4460981/a7254c24945c43fbdf6ad9bea52b5ce9.png/thumb)


