Tender Valley Dungeon Guide
★ Patch 7.05 is Now Live! | All 7.05 Guides
┗ Buffs and Nerfs | Tomestones of Heliometry
┗ Master Crafting Recipes | Cenote Ja Ja Gural
┗ Quetzali Gear | Dark Horse Champion Gear
☆ Latest News | Tips and Tricks | Job Guide | Quests
★ Dungeons | Trials | Raids | Savage Raids
Tender Valley is a level 100 dungeon in Final Fantasy XIV Dawntrail (FF14). Read to to learn more about the dungeon, guides on how to beat each boss, and how to unlock!
1st Boss Guide: Barreltender
Heavyweight Needles
The attack creates several conal AoEs with gaps in between. Some gaps are larger than others. Just before the attack completes, the conal AoEs expand to cover the smaller gaps, so players should position themselves in the largest gaps. Additionally, spines appear at the arena's edges, causing Bleeding to anyone who steps on them.
Tender Drop + Barrel Breaker
| Thorny Cactus | Spineless Cactus |
|---|---|
 |
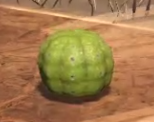 |
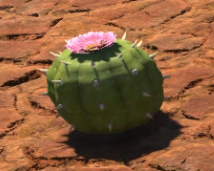
Drops multiple cacti onto the arena, most with spines and a flower, and two bare. A radial knockback from the center will occur, so position yourself to be knocked towards a bare cactus. Each cactus will then perform a point-blank AoE, with spiked cacti having larger AoEs. Alternatively, position yourself near a bare cactus and use knockback resistance.
Prickly Left/Prickly Right
Prickly Left or Prickly Right is an attack that begins with a half-room cleave telegraphed in the cast's direction, expanding into a wide sweep that hits most of the arena. The only safe zone is a narrow cone directly opposite the cast's name.
2nd Boss Guide: Anthracite
Anthrabomb
Summons three black circle symbols and arrows, marking the spots where bombs will drop and explode as large, delayed circle AoEs.
Pattern 1
If the bomb's trajectory arrow is grey, a circular AoE will occur at the point of impact. Avoid moving away from the point of impact.
Pattern 2
If the bomb's trajectory arrow is yellow, the bomb will enter a round or square hole at the arrow's tip, triggering a linear AoE from a matching hole on the outer perimeter. Since the AoE will come from a hole of the same shape, be sure to check the shape of the hole at the tip of the yellow arrow.
Pattern 1 & 2
From the middle of the battle onwards, Anthracite will combine Pattern 1 and Pattern 2. With both circular and linear area attacks, safe spots will be narrower. Position yourself to avoid being hit by both types of attacks.
Carniflagration
Similar to the third use of Anthrabomb (with both grey and yellow arrows), but this sequence happens three times in a row. The next set of arrow telegraphs will appear just before the previous AoEs resolve, requiring players to consider the order of mechanics and dodge accordingly. Before the third set of AoEs resolve, each player will also receive a spread AoE marker (Anthrabomb).
3rd Boss Guide: The Greatest Serpent of Tural
Bouncy Council
| Linear AoE | Circular AoE |
|---|---|
 |
 |
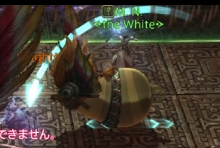
Summons four untargetable clones, each telegraphing a horizontal, vertical, or diagonal line AoE based on the blue arrows above them.
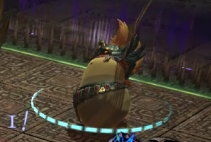
Circle AoE
After a while, it will start telegraphing a point-blank AoE, based on the spinning blue arrows around them.
Combination
Now summons four clones in the four corners of the room. Two adjacent clones will use point-blank AoEs, while the other two will use line AoEs.
Greatest Labyrinth
Each player gets the debuff, The Greatest Curse
, that lasts 15 seconds and can only be removed by stepping on a glowing floor, while moving floors appear on the field. If you don't reach the outer glowing floor in time, you'll die instantly. Find a moving floor connected to the glowing one and go there. It's best to follow the moving floor from the correct glowing spot to find it quickly, rather than searching from the inside.
Moist Summoning
Summons an untargetable Great Serpent of Tural, which targets a random player with three sequential stack AoEs, dealing physical damage and creating puddles. Players who stay in a puddle too long will get a 15s damage-over-time debuff called Sludge.
Great Torrent
Summons numerous sequential wave AoEs across the arena. It’s a knockback attack from the edge of the field. Avoid stepping into that range when knocked back.
Tender Valley Dungeon Information
| Tender Valley | |
|---|---|
 |
|
| Level | 100 |
| Item Level | 670 |
| Party Size | 1~4 |
| Time Limit | 90 min |
| Requisite Quest | It Belongs in a Museum |
FFXIV Dawntrail Related Guides
List of Dawntrail Dungeons
| All Dawntrail Dungeons | |
|---|---|
| Ihuykatumu Dungeon | Worqor Zormor |
| The Skydeep Cenote | Vanguard Dungeon |
| Origenics Dungeon | Alexandria Dungeon |
| The Strayborough Deadwalk | Tender Valley Dungeon Guide |
Comment
Author
Tender Valley Dungeon Guide
improvement survey
03/2026
improving Game8's site?

Your answers will help us to improve our website.
Note: Please be sure not to enter any kind of personal information into your response.

We hope you continue to make use of Game8.
Rankings
- We could not find the message board you were looking for.
Gaming News
Popular Games

Genshin Impact Walkthrough & Guides Wiki

Honkai: Star Rail Walkthrough & Guides Wiki

Umamusume: Pretty Derby Walkthrough & Guides Wiki

Pokemon Pokopia Walkthrough & Guides Wiki

Resident Evil Requiem (RE9) Walkthrough & Guides Wiki

Monster Hunter Wilds Walkthrough & Guides Wiki

Wuthering Waves Walkthrough & Guides Wiki

Arknights: Endfield Walkthrough & Guides Wiki

Pokemon FireRed and LeafGreen (FRLG) Walkthrough & Guides Wiki

Pokemon TCG Pocket (PTCGP) Strategies & Guides Wiki
Recommended Games

Diablo 4: Vessel of Hatred Walkthrough & Guides Wiki

Cyberpunk 2077: Ultimate Edition Walkthrough & Guides Wiki

Fire Emblem Heroes (FEH) Walkthrough & Guides Wiki

Yu-Gi-Oh! Master Duel Walkthrough & Guides Wiki

Super Smash Bros. Ultimate Walkthrough & Guides Wiki

Pokemon Brilliant Diamond and Shining Pearl (BDSP) Walkthrough & Guides Wiki

Elden Ring Shadow of the Erdtree Walkthrough & Guides Wiki

Monster Hunter World Walkthrough & Guides Wiki

The Legend of Zelda: Tears of the Kingdom Walkthrough & Guides Wiki

Persona 3 Reload Walkthrough & Guides Wiki
All rights reserved
© SQUARE ENIX
Square Enix, Inc., 999 N. Pacific Coast Highway, El Segundo, California 90245
LOGO ILLUSTRATION:© YOSHITAKA AMANO
The copyrights of videos of games used in our content and other intellectual property rights belong to the provider of the game.
The contents we provide on this site were created personally by members of the Game8 editorial department.
We refuse the right to reuse or repost content taken without our permission such as data or images to other sites.





![Monster Hunter Stories 3 Review [First Impressions] | Simply Rejuvenating](https://img.game8.co/4438641/2a31b7702bd70e78ec8efd24661dacda.jpeg/thumb)


