This survey will take about 1 minute.
Your answers will help us to improve our website.
FFXIV Dawntrail 7.05 (FF14)
M2S Raid Guide
★ Patch 7.05 is Now Live! | All 7.05 Guides
┗ Buffs and Nerfs | Tomestones of Heliometry
┗ Master Crafting Recipes | Cenote Ja Ja Gural
┗ Quetzali Gear | Dark Horse Champion Gear
☆ Latest News | Tips and Tricks | Job Guide | Quests
★ Dungeons | Trials | Raids | Savage Raids
AAC Light-heavyweight M2 (Savage) is the first savage raid in the first tier of the Arcadion in Final Fantasy XIV Dawntrail (FF14). Read on to learn more about the boss, Black Cat, and a guide to the raid mechanics and attack patterns during the boss fight!
List of Contents
AAC Light-heavyweight M2 (Savage) Raid Guide
Honey B. Main Mechanics
| Moves | Description |
|---|---|
| Call Me Honey | AoE attack that deals damage to all players |
| Killer Sting | A Tank buster attack that deals physical damage between two tanks. |
| Stinging Slash | A double Tank buster attack in wide conal shape, hitting everything behind both tanks. |
| Honey Beeline | A line AoE attack that hits anyone who's in front and behind Honey B. Summons Splinter puddles of honey around the room. |
| Tempting Twist | A donut AoE attack around Honey B Lovely, leaving her hitbox as the only safe spot. Summons Splinter puddles of honey around the room. |
| Drop of Venom | Honey B. Lovely coats her weapon. After the next Tempting Twist or Honey Beeline, four players of the same role will be targeted with AoE damage that's shared between each other. Deals magic poison damage, split between two players, and inflicts a poison resistance debuff. |
| Splash of Venom | Same with Drop of Venom, except all players will be targeted with an unmarked AoE. Deals magic poison damage and inflicts a poison resistance debuff. |
This is the list of moves Honey B. Lovely will use throughout the fight regardless of phase.
Heart Gauge

The Heart Gauge is Honey B. Lovely's main gimmick, and is applied when Honey B uses her Beats move. Each time Honey B. attacks, one heart stack will be added, which increases DoT, and upon reaching four heart stacks, the player will be stunned for six seconds with Fatal Attraction. Each time a player gets stunned, Honey B. Lovely will restore a little bit of HP and gains a stack of Queen Bee, which increases her damage.
Honey B. Phase 1
| Moves | Description |
|---|---|
| Honey B. Live: 1st Beat | A Raid-wide magical attack that transitions the arena and applies the Heart Gauge above the player's head. |
| Centerstage Combo | Donut-shaped AoE around Honey B, extending with cross conal AoEs, followed up by a wide plus sign-shaped AoE, then a point-blank AoE with cross AoEs. Getting hit by any of these increases the Heart Gauge. |
| Outerstage Combo | Same as Centerstage Combo but in reverse order. |
| Love Me Tender | Summons Fracture towers. Fracture: Towers spawned in the arena that must be soaked. Soaking a tower increases the Heart Gauge by 1; if not soaked, all players take massive damage, and everyone's Heart Gauge increases by 1. This inflicts approximately 12,000 magic damage. |
| Loveseeker | AoE attack around Honey B that inflicts 1 heart when hit. |
| Heartsick | AoE attack that inflicts a total of four hearts to players. If four players are within the area, each player will receive one heart each. Deals magic damage divided among the players in the stack. |
| Honey B. Finale | Ends the Beats phase, removes the Heart Gauge and deals magic damage to all players. |
Centerstage/Outerstage Combo Patterns
| Centerstage Combo Patterns | |
|---|---|
 1. Donut-shaped AoE with extending cross conal AoEs. |
 2. Wide plus sign-shaped AoE |
 3. Point-blank AoE with extending cross AoEs. |
|
| Outerstage Combo Patterns | |
3. Point-blank AoE with extending cross AoEs. |
2. Wide plus sign-shaped AoE |
1. Donut-shaped AoE with extending cross conal AoEs. |
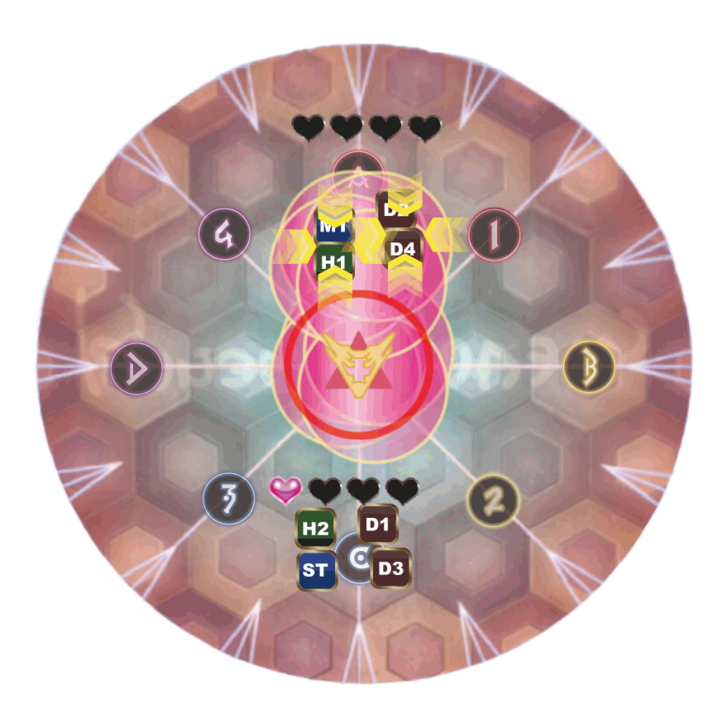
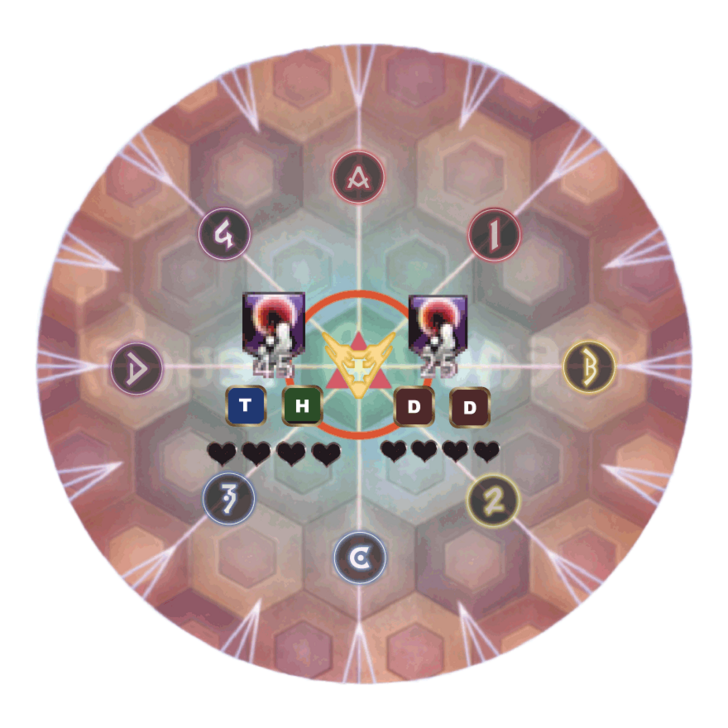
Love Me Tender → Love Seeker → Love Me Tender
| Love Me Tender → Love Seeker → Love Me Tender | |
|---|---|
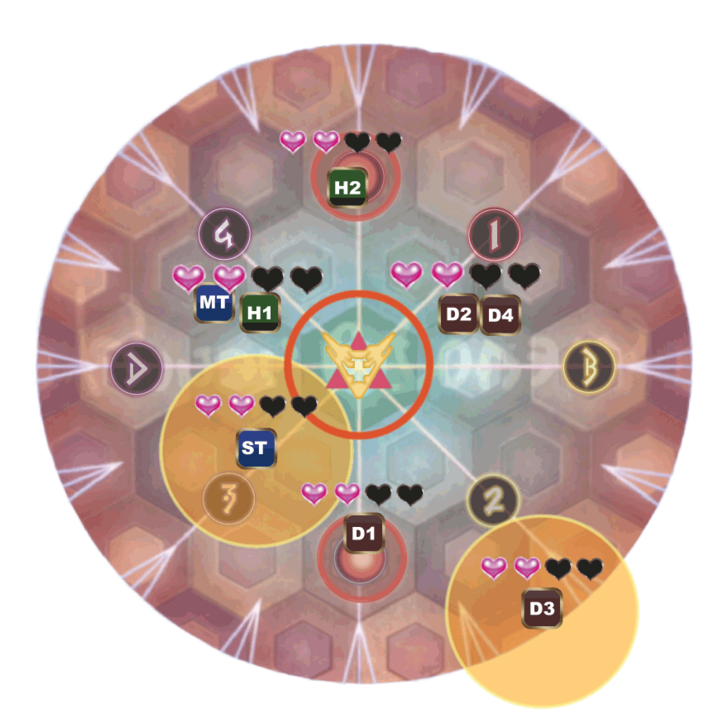
 1. Melee DPS will deal with the towers inside while ranged DPS will take down the towers outside. |
 2. After Honey B. uses a circular AoE, hearts will appear from the center and from the outside edge. |
 3. The Melee DPS team with two hearts will deal with Honey B.'s minions around her while dodging the hearts. |
When stepping on a tower, each step accumulates one heart stack. The melee team should step on the tower to gain two hearts, while the ranged team should step on it to gain three hearts. Towers appear in two locations: some closer to the boss on the inside, and some farther from the boss on the outside. Ensure the melee team steps on the inside towers first.
Honey B then casts Love Seeker and performs a circular area attack around her, causing hearts to appear at both the center and the outer periphery. Shortly after the hearts appear, she casts Love Me Tender again to perform a split attack on the player with the fewest hearts. Use the melee team, which has accumulated two hearts from the first Love Me Tender, to avoid crossing hearts and manage the split attacks around the boss.
Honey B. Phase 2
| Moves | Description |
|---|---|
| Honey B. Live: 2nd Beat | A Raid-wide magical attack that transitions the arena and applies three heart marks above the player's head |
| Alarm Pheromones (1st Time) | Summons Groupbees around the outer perimeter of the stage that use Binding Love. Binding Love: Line AoEs that knock random players back. |
| Spread Love | This is Splash of Vemon but it also increases the Heart Gauge by 1. |
| Drop of Love | This is Drop of Vemon but it also increases the Heart Gauge by 1. |
| Love Me Tender | In Phase 2, it summons AoEs with the towers from Phase 1. |
| Heartsick | Deals less damage this phase but still raises the Heart Gauge by 4. |
| Heartsore | Two players will be marked and damaged by an AoE and their Heart Gauge will increase by 1. |
Alarm Pheromone (1st Time)
The first Alarm Pheromone is a mechanic also present in the normal version of this fight. It involves bees swarming around the outer perimeter and launching a linear AoE at each player. There is no definitive solution at the moment, but we are working on looking for a reliable strategy to beat this.
Memorize the attack patterns, then rush into the AoE attacks one by one. Alternatively, sprint around the arena to escape from the AoEs. Utilize any method you can think of to avoid these attacks with all your effort.
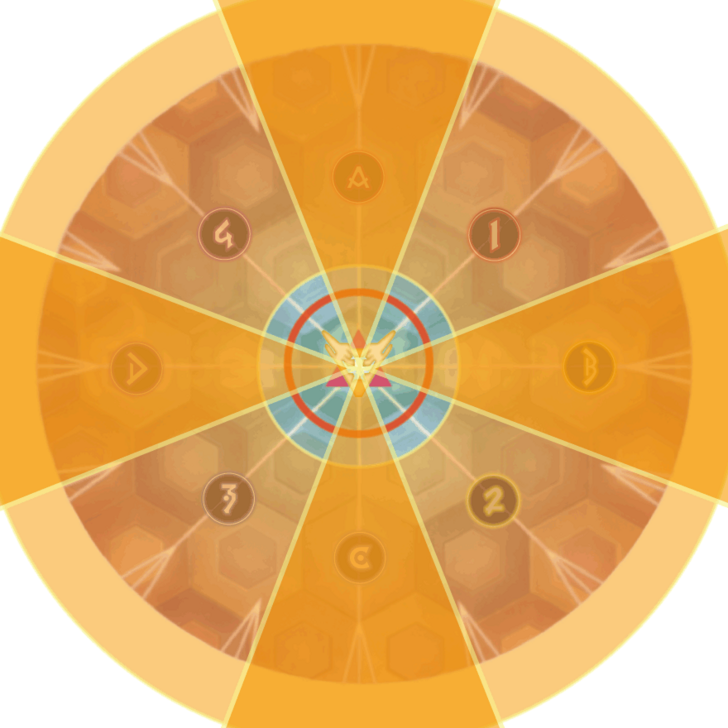
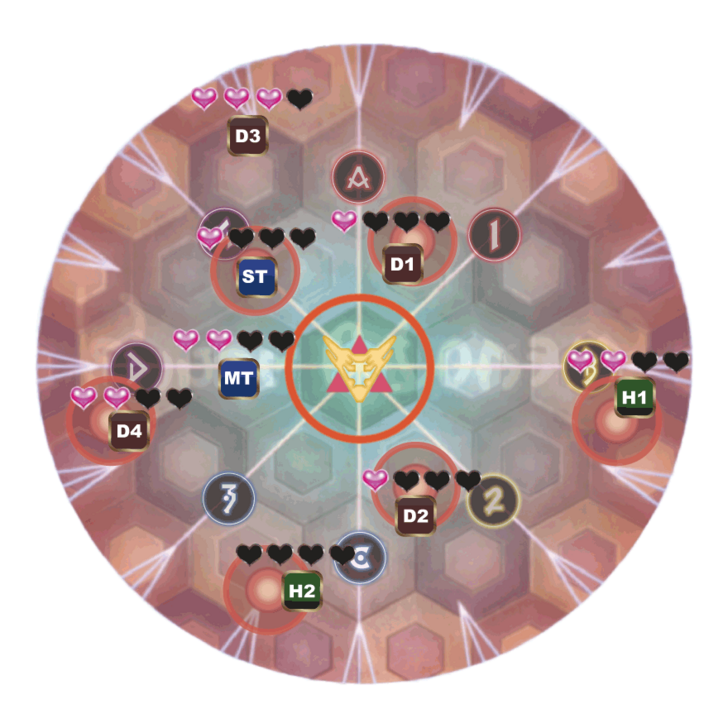
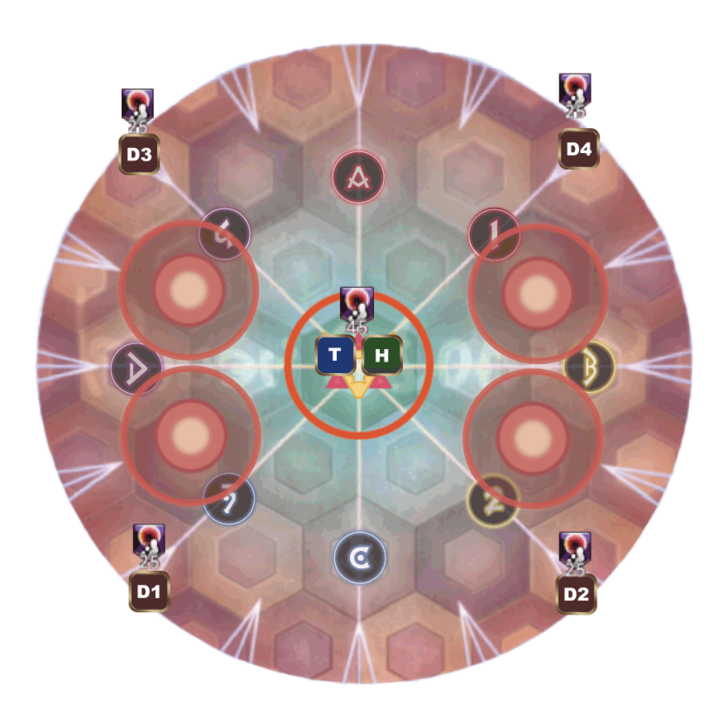
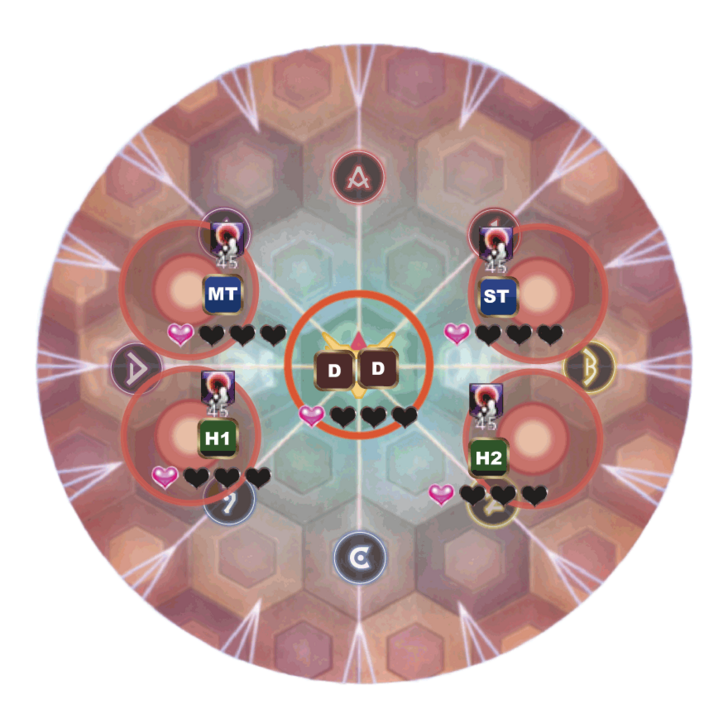
Honey B. Live: 2nd Beat
| Honey B. Live: 2nd Beat Patterns | |
|---|---|
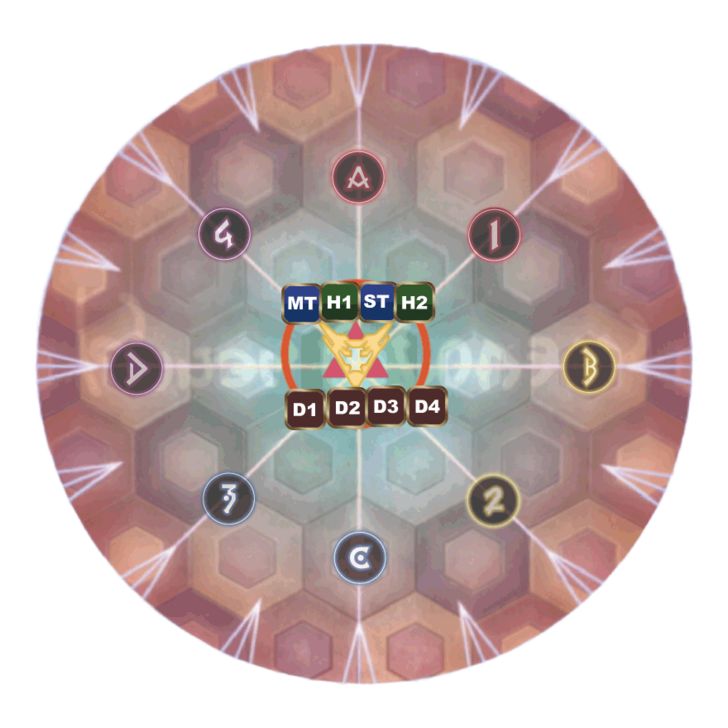
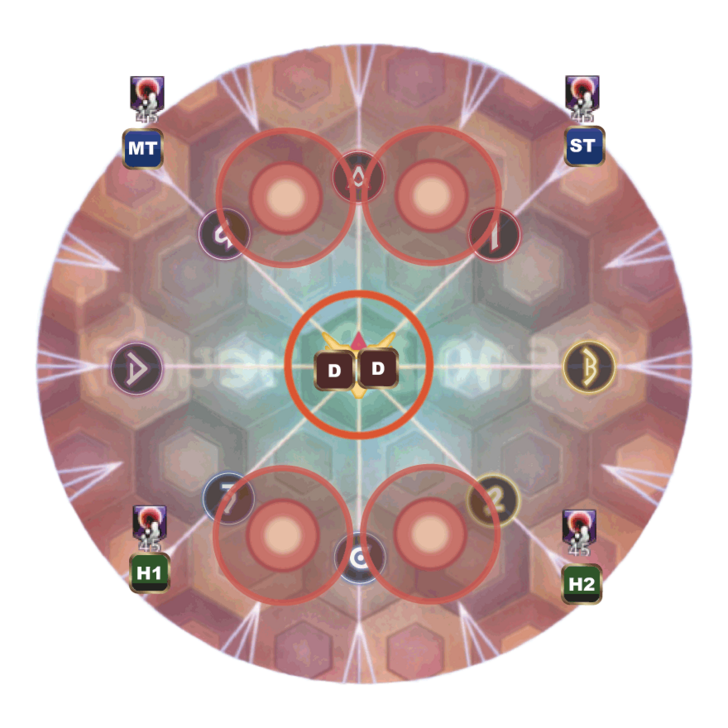
 1. 2nd Beat starts. Players with 1 ♡s will gather on the south side, those with no ♡ will gather at Honey B's feet. She will also be charging Spread Love, which is an AoE attack, or Share Love which is a stack attack. |
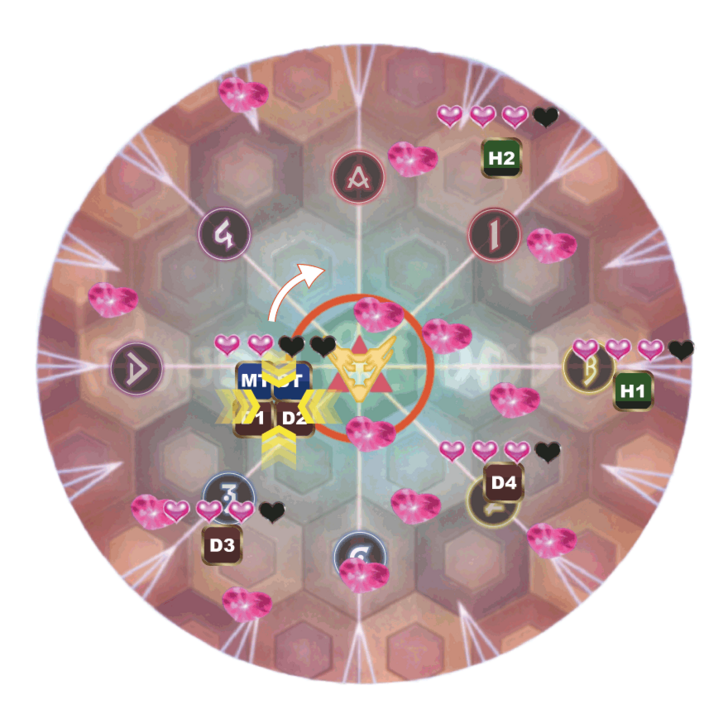
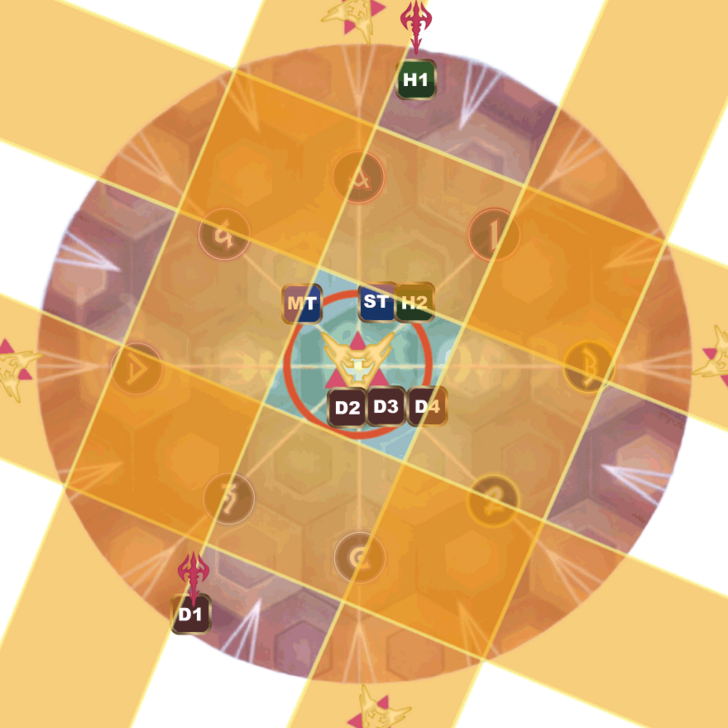
 2. Honey B. will cast Love Me Tender. Afterwards, everyone will get a stack and start leaving AoEs. Move north. |
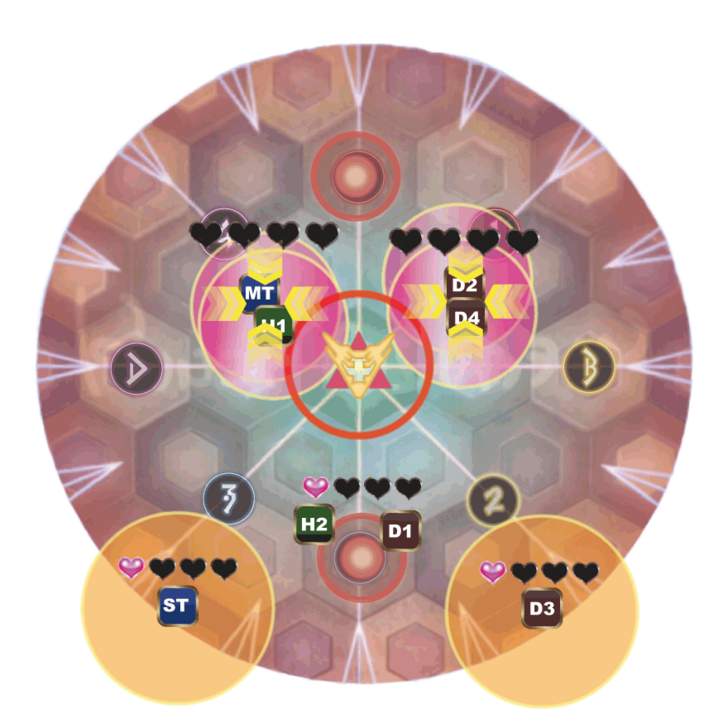 3. The ♡0 group divides into east and west, with tanks and DPS assigned to each side to manage the range. The ♡1 group's members handle the range. Towers will then appear. The image shows them appearing in the north and south, though they can also appear in the east and west. |
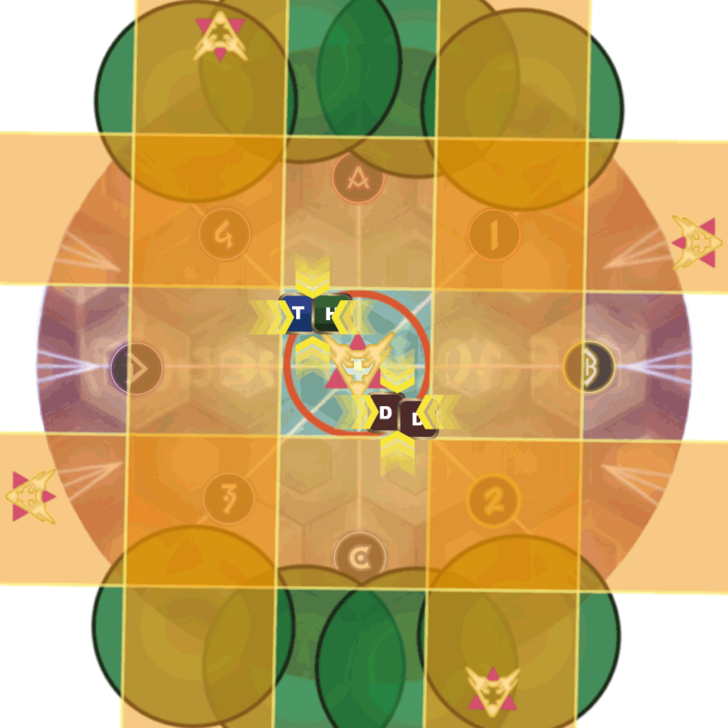
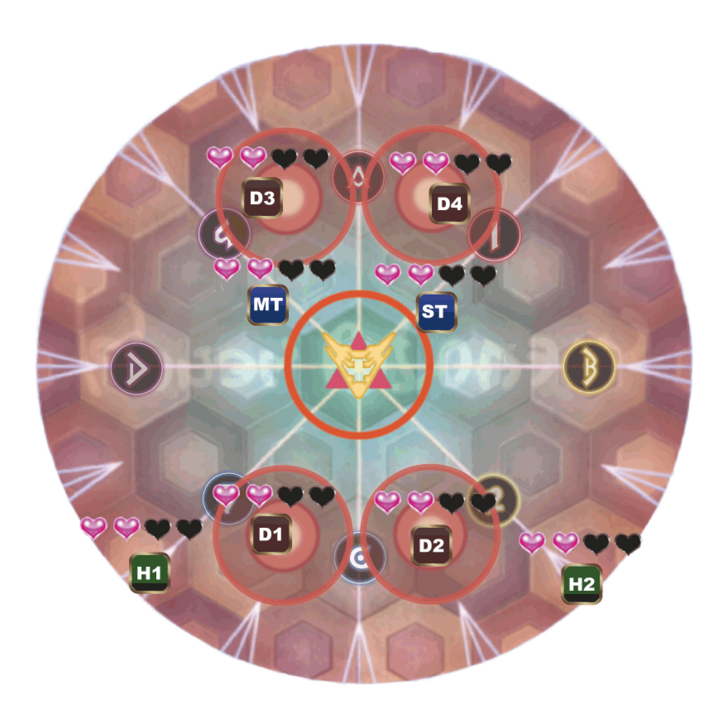
 4.The pair stack lands between the 4th and 5th area discards of the ♡0 group. |
 5. Players with 1 ♡s who have nothing on them will step on the towers. Tanks will step on the towers that appear in the north or west, while DPS will step on the towers that appear in the south or east. |
 6. Tower stepping has been completed. Additionally, Players with 1 ♡s AoE lands. After this, Honey B will use Tempting Twist or Honey Beeline, so handle them appropriately to finish. |
Honey B. Phase 3
| Moves | Description |
|---|---|
| Honey B. Live: 3rd Beat | Same as the last two beats, but now she inflicts a debuff called Poison 'n' Pop. Poison 'n' Pop: A debuff that explodes and damages anyone inflicted and players around them after the debuff expires. Adds 1 heart to the Heart Gauge as well. |
| Poison Sting | Honey B. marks one player per role and drops a poison puddle that deals damage and inflicts a vulnerability debuff. |
| Bee Sting | This is a stack marker that's inflicted on two random players, one from each role. Deals damage that split between the two marker players and adds a piercing debuff. |
| Alarm Pheromones (2nd Time) | Same as the first time but now the line AoEs are static and form a square in the middle of the arena, forming safe zones outside. |
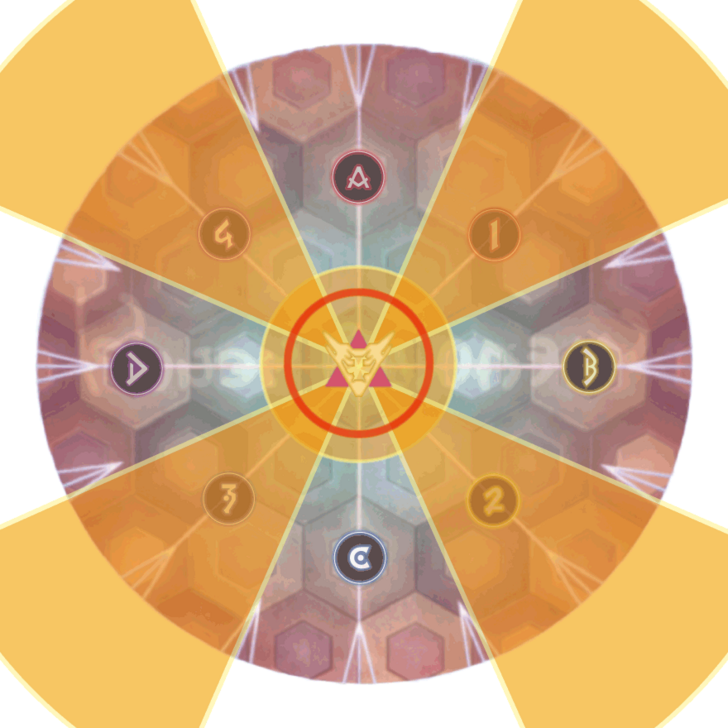
Alarm Pheromone (2nd Time)
| Alarm Pheromones Patterns | |
|---|---|
 1.Honey B. casts Alam Pheromones. Tanks and healers gather in the north, while DPS gather in the south. |
 2. The Poison Sting target will throw the poison puddle at the safe zone formed by the outer bees' straight-line attack. |
 3. Honey B. will attack with puddles of poison where the green circles are. She will repeat this 4 times. |
 4. Bee Sting will be casted. Gathering at the center inner circle will be safer since there is not a lot of overlap between teams. |
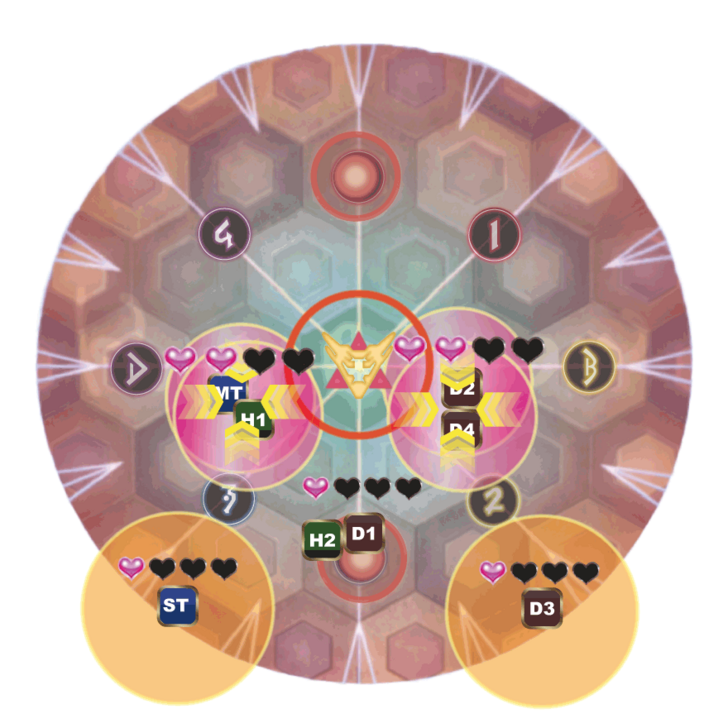
Honey B. Live: 3rd Beat
| Honey B. Live: 3rd Beat Patterns | |
|---|---|
 1. 3rd Beat starts. All players have the Poison 'n' Pop debuff. Note that Spread Love or Drop of Love will be casted immediately after. |
 2. Focus on dodging Centerstage/Outerstage Combo. |
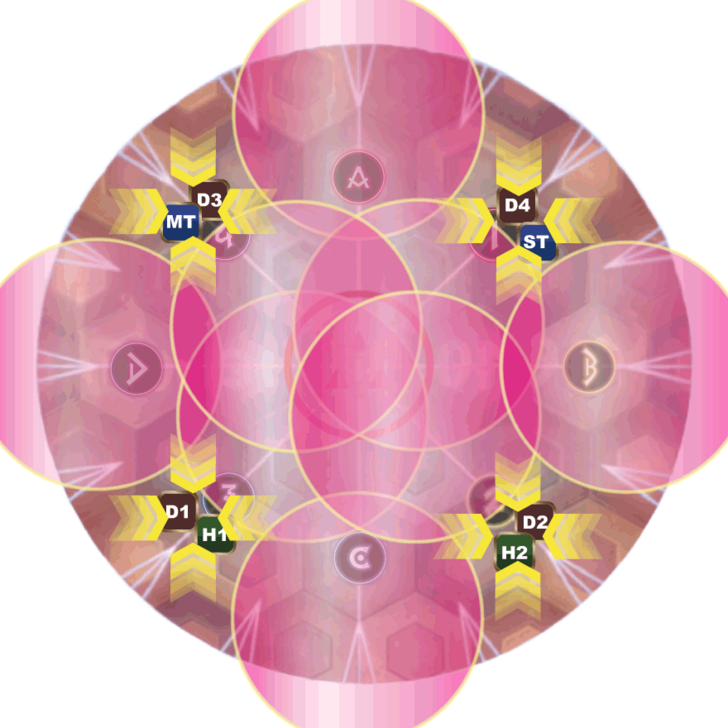
 3. Roles with the shorter debuff will head to the intercardinal positions to let their debuff explode. Fracture towers will appear afterwards. Those without will stay in the center to get rid of the towers. |
 4. Debuff explodes, leaving the center as the safe space. |
 5. After the debuff explodes, the roles in the center can immediately go and attack the towers. |
 6. Another round of Centerstage/Outerstage Combos. Roles will be reversed now, and those in the center before will now be the roles with the debuff. |
 7. Repeat Step 3 |
 8. Repeat Step 4 |
 9. After the debuff explodes, the roles in the center can immediately go and attack the towers. |
 10. Honey B. casts Honey Beeline or Tempting Twist followed by Spread Love or Drop of Love, this image shows her Tempting Twist move. |
 11. Spread Love or Drop of Love immediately after the last spell. This image shows Spread Love attack. |
Honey B. Phase 4
| Moves | Description |
|---|---|
| Rotten Honey | Inflicts magic damage to all players. Each player receives either Beeloved Venom: Alpha or Beeloved Venom: Beta. |
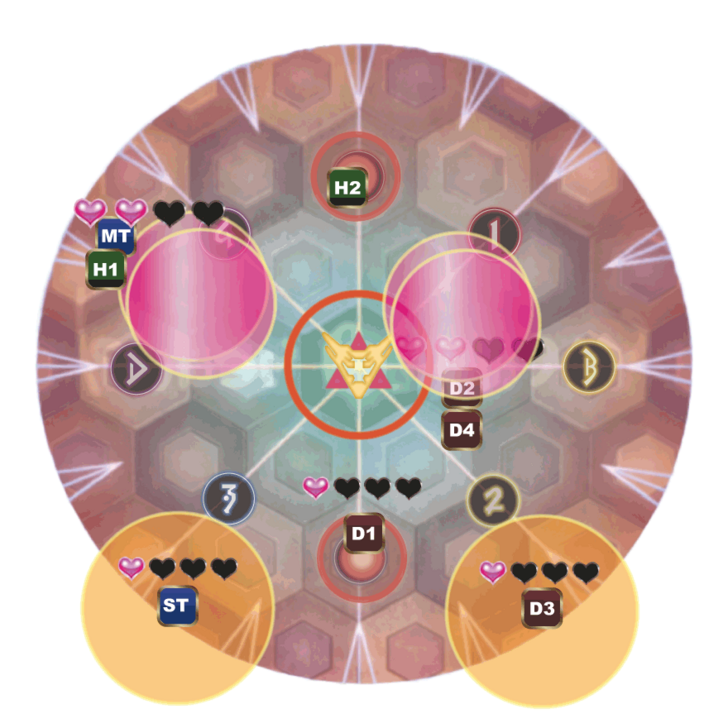
Rotten Honey
| When Beeloved Vemon: Alpha and Beta join together, they will neutralize and cause an explosion that damages everyone nearby and applies a magic vulnerability debuff. | |
Rotten Honey is a raidwide attack that damages and gives all players either the Alpha or Beta debuff. These debuff have four patterns: 12s, 28s, 44s, and 1m. Those with the shortest debuffs will go to the center to make sure no other players will get damaged.
| Rotten Honey Patterns | |
|---|---|
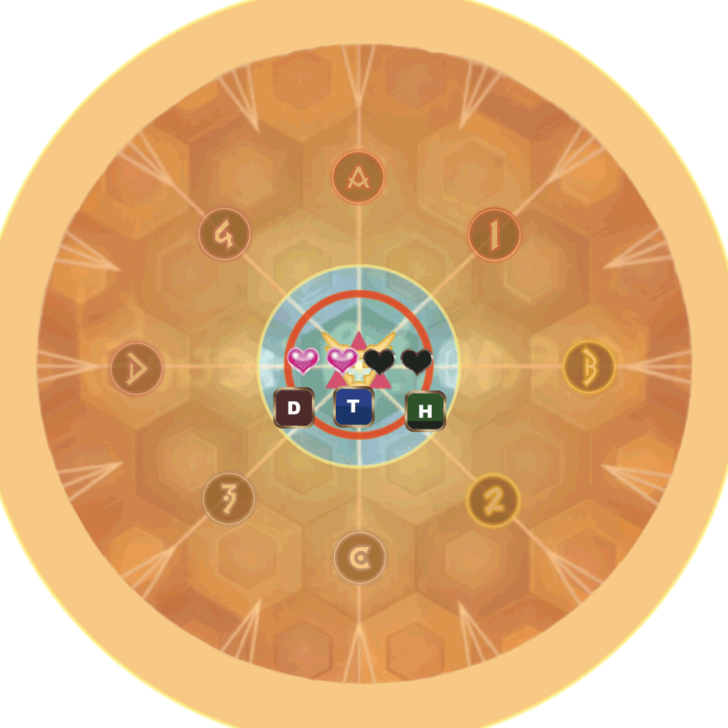
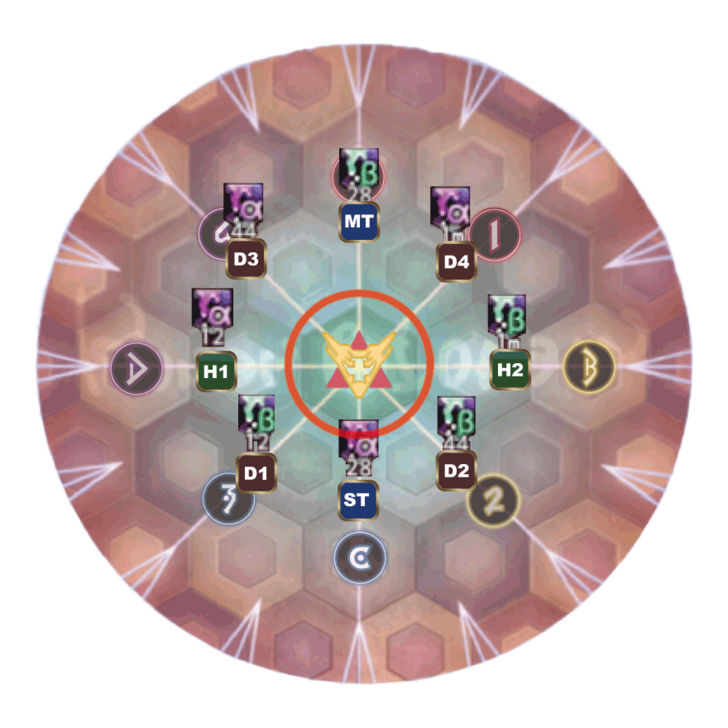 1. Honey B. casts Rotten Honey. Everyone will spread out around Honey B.. |
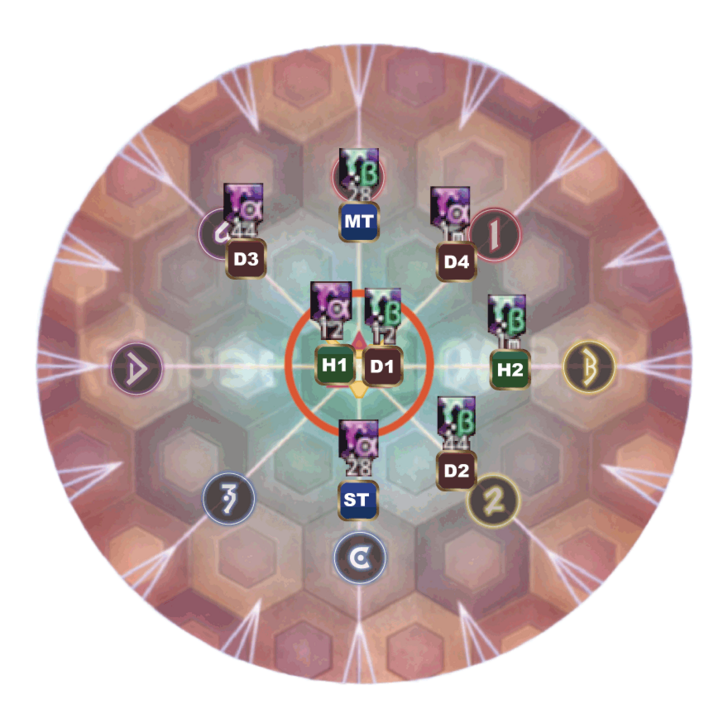 2. Those with the 12s debuff, run towards the boss, and heal and attack. Running to the center will prevent damaging your other companions. |
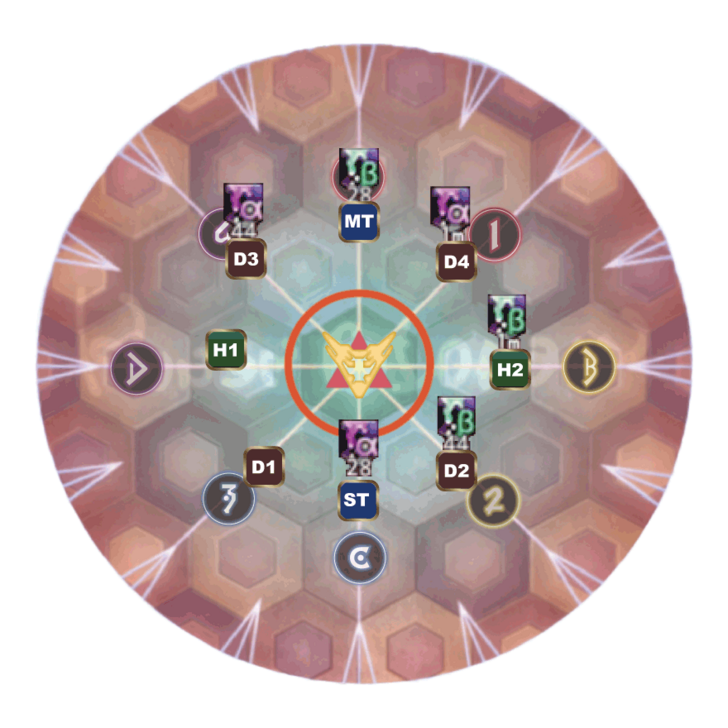 3. Honey B. casts Call Me Honey in between the debuffs expiring. |
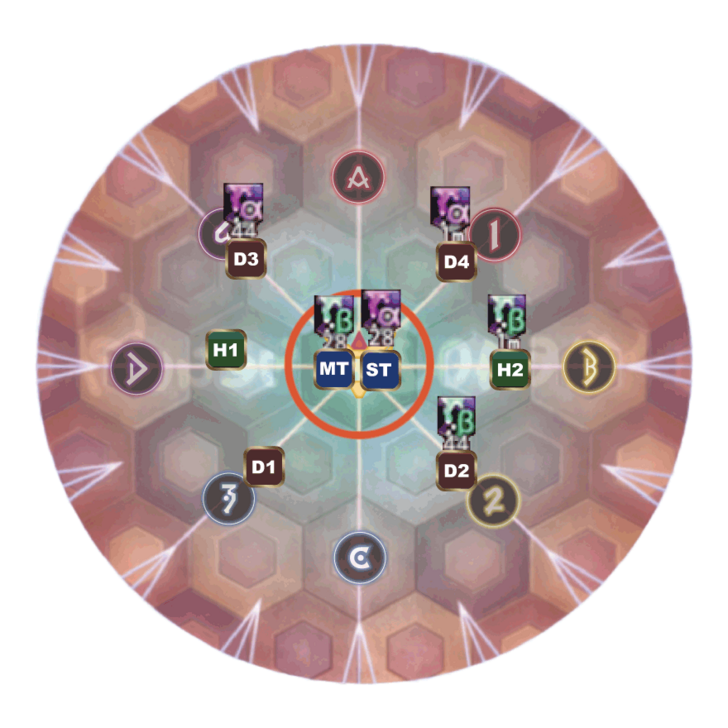 4.If you see a chance for recovery, make sure to take it. This leaves you with 5-6 seconds of the debuff left. Then repeat all steps. |
Sheer Heart Attack
After the fourth cast of Rotten Honey, Honey B. will cast Sheer Heart Attack which will signal that the raid is about to end. Make sure to defeat this queen bee before she wipes the whole raid out!
How to Unlock AAC Light-heavyweight M2 (Savage)
Complete The Neoteric Witch
AAC Light-heavyweight M2 (Savage) will be unlocked after completing the quest “The Neoteric Witch” from the questline received from the Stylish Stranger in Solution Nine (X:19.1, Y:18.8)
AAC Light-heavyweight M2 (Savage) Information
| AAC Light-heavyweight M2 (Savage) | |
|---|---|
 |
|
| Level | 100 |
| Item Level | 705 |
| Party Size | 8 |
| Time Limit | 90 min |
| Requisite Quest | The Neoteric Witch |
FFXIV Dawntrail Related Guides
List of Dawntrail Raids
Comment
Author

Please participate in our site
improvement survey
03/2026
improvement survey
03/2026
Would you assist in
improving Game8's site?
improving Game8's site?

×
We are listening to our users' valuable opinions and discussing how to act on them.
The information collected through this survey will be used for the purpose of improving our services. In addition, the information will only be disclosed a part of a statistic in a format that will not allow identification of personal information.
Begin Survey
Not Now
×
Please rate each item regarding Game8.co's Advertisements.
Amount of Ads
Very Dissatisfied
Somewhat Dissatisfied
Fine
Somewhat Satisfied
Highly Satisfied
Placement of Ads
Timing of Ad Display
Ad Loading Speed
Safeness of Ads
Content of Ads
×
Please rate each item regarding Game8.co's Quality of Articles.
Amount of information
Very Dissatisfied
Somewhat Dissatisfied
Fine
Somewhat Satisfied
Highly Satisfied
Frequency of updates
Speed of new information
Accuracy of articles
Understandibility of articles
Readability of sentences
×
Please rate each item regarding Game8.co's Usability of the Site.
Ease of finding information
Very Dissatisfied
Somewhat Dissatisfied
Fine
Somewhat Satisfied
Highly Satisfied
Loading Speed
Use of Color
Font Size
Visibility of Images
Easy to Understand Layout
×
Please rate each item regarding Game8.co's Message Boards, Comments.
Ease of Writing
Very Dissatisfied
Somewhat Dissatisfied
Fine
Somewhat Satisfied
Highly Satisfied
Readability
Ease in Finding Information
Comment Quality
Comment Quantity
Admin Response
×
Please rate each item regarding Game8.co's Site's new design.
Please rate our site's new design
Very Dissatisfied
Somewhat Dissatisfied
Fine
Somewhat Satisfied
Highly Satisfied
Do you think that the website's design change makes the site easier to use?
Has the new design made it easier for you to find information on the site?
Has the new design improved the overall visual appeal of the site?
How would you rate your overall satisfaction with the new design of the site?
×
How likely are you to recommend Game8 to someone you know?
Very Unlikely
0
1
2
3
4
5
6
7
8
9
10
Very Likely
If you have other opinions regarding potential improvement to the website, please share them with us. We would appreciate your honest opinion.
Note: This is a free response section, so you can proceed without entering anything.
Note: Please be sure not to enter any kind of personal information into your response.
Note: Please be sure not to enter any kind of personal information into your response.
×
Thank You
×
Thank you for participating in our survey! Your answers will help us to improve the quality of our website and services.
We hope you continue to make use of Game8.
We hope you continue to make use of Game8.
Close
Rankings
- We could not find the message board you were looking for.
Gaming News


![Monster Hunter Stories 3 Review [First Impressions] | Simply Rejuvenating](https://img.game8.co/4438641/2a31b7702bd70e78ec8efd24661dacda.jpeg/thumb)
Popular Games

Genshin Impact Walkthrough & Guides Wiki
Honkai: Star Rail Walkthrough & Guides Wiki
Umamusume: Pretty Derby Walkthrough & Guides Wiki
Pokemon Pokopia Walkthrough & Guides Wiki
Resident Evil Requiem (RE9) Walkthrough & Guides Wiki
Monster Hunter Wilds Walkthrough & Guides Wiki
Wuthering Waves Walkthrough & Guides Wiki
Arknights: Endfield Walkthrough & Guides Wiki
Pokemon FireRed and LeafGreen (FRLG) Walkthrough & Guides Wiki
Pokemon TCG Pocket (PTCGP) Strategies & Guides Wiki


Recommended Games
Diablo 4: Vessel of Hatred Walkthrough & Guides Wiki
Cyberpunk 2077: Ultimate Edition Walkthrough & Guides Wiki
Fire Emblem Heroes (FEH) Walkthrough & Guides Wiki
Yu-Gi-Oh! Master Duel Walkthrough & Guides Wiki
Super Smash Bros. Ultimate Walkthrough & Guides Wiki
Pokemon Brilliant Diamond and Shining Pearl (BDSP) Walkthrough & Guides Wiki
Elden Ring Shadow of the Erdtree Walkthrough & Guides Wiki
Monster Hunter World Walkthrough & Guides Wiki
The Legend of Zelda: Tears of the Kingdom Walkthrough & Guides Wiki
Persona 3 Reload Walkthrough & Guides Wiki


All rights reserved
© SQUARE ENIX
Square Enix, Inc., 999 N. Pacific Coast Highway, El Segundo, California 90245
LOGO ILLUSTRATION:© YOSHITAKA AMANO
The copyrights of videos of games used in our content and other intellectual property rights belong to the provider of the game.
The contents we provide on this site were created personally by members of the Game8 editorial department.
We refuse the right to reuse or repost content taken without our permission such as data or images to other sites.