Everkeep (Extreme) Trial Guide
★ Patch 7.05 is Now Live! | All 7.05 Guides
┗ Buffs and Nerfs | Tomestones of Heliometry
┗ Master Crafting Recipes | Cenote Ja Ja Gural
┗ Quetzali Gear | Dark Horse Champion Gear
☆ Latest News | Tips and Tricks | Job Guide | Quests
★ Dungeons | Trials | Raids | Savage Raids
Everkeep (Extreme) is a High-End Trial in FFXIV Dawntrail (FF14). Learn how to beat Everkeep (Extreme), its mechanics, and strategies to use to win the fight here.
List of Contents
Everkeep (Extreme) Trial Information
| Everkeep (Extreme) Details | |
|---|---|
| Level Sync | Level 100 Item Level: 690 |
| Time Limit | 60 minutes |
| Party Size | 8 Players 2 Tanks / 2 Healers / 4 DPS |
| How to Unlock | Complete the required quest How the West Was Sung. |
Make sure to have a total of Item Level 690, fully-meld gearsets, lvl 100 raid food and pots before attempting this trial!
Everkeep (Extreme) Trial Preparations
Most Recommended Raid Food
These are all of the most recommended raid food for all roles in patch 7.05 of FFXIV Dawntrail (FF14)!
Tank Raid Food
| Food | Effect |
|---|---|
| HQ Roast Chicken |
Direct Hit Rate +8% (Max 105) Vitality +8% (Max 162) Determination +8% (Max 63) |
| HQ Churrasco |
Critical Hit +8% (Max 105) Vitality +8% (Max 162) Skill Speed +8% (Max 63) |
| HQ Moqueca |
Determination +8% (Max 105) Vitality +8% (Max 162) Critical Hit +8% (Max 63) |
All DPS Raid Food
| Food | Effect |
|---|---|
| HQ Moqueca |
Determination +8% (Max 105) Vitality +8% (Max 162) Critical Hit +8% (Max 63) |
| HQ Roast Chicken |
Direct Hit Rate +8% (Max 105) Vitality +8% (Max 162) Determination +8% (Max 63) |
| HQ Churrasco |
Critical Hit +8% (Max 105) Vitality +8% (Max 162) Skill Speed +8% (Max 63) |
| HQ Pine Orange Jelly |
Critical Hit +8% (Max 105) Vitality +8% (Max 162) Spell Speed +8% (Max 63) |
All Healer Raid Food
| Food | Effect |
|---|---|
| HQ Pine Orange Jelly |
Critical Hit +8% (Max 105) Vitality +8% (Max 162) Spell Speed +8% (Max 63) |
| HQ Moqueca |
Determination +8% (Max 105) Vitality +8% (Max 162) Critical Hit +8% (Max 63) |
| HQ Roast Chicken |
Direct Hit Rate +8% (Max 105) Vitality +8% (Max 162) Determination +8% (Max 63) |
Partners, Waymarks, and Light Parties Stack Setup
Make sure to assign partners, put waymarks, and light party stack setups before starting the fight.
Tanks are usually partnered with Melee DPS and Healers are paired with all Ranged DPS.
Discuss the pairings with the group and take notes to avoid confusion later on.
Everkeep (Extreme) 1st Phase Mechanics
Actualize
Zoraal Ja will cast Actualize to mark the beginning of the first phase.
Shield and heal the party to full after getting hit by raid-wide damage.
Multidirectional Divide
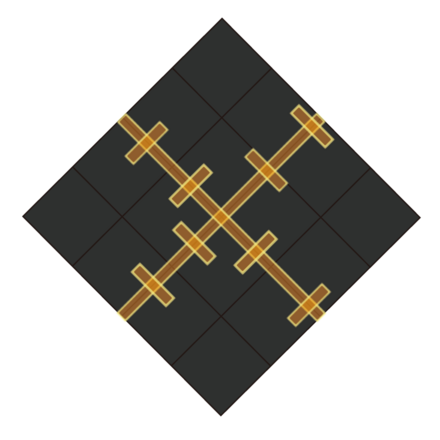
During Multidirectional Divide, a cross-shaped line AoE will appear on the arena and players will need to reposition to a safe side first.
Forward Half or Backward Half
| Forward Half or Backward Half Positions | |
|---|---|
 |
 |
 |
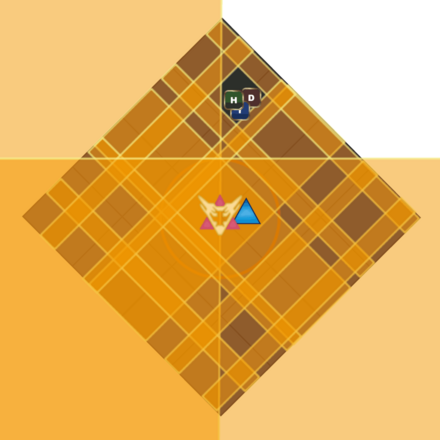 |
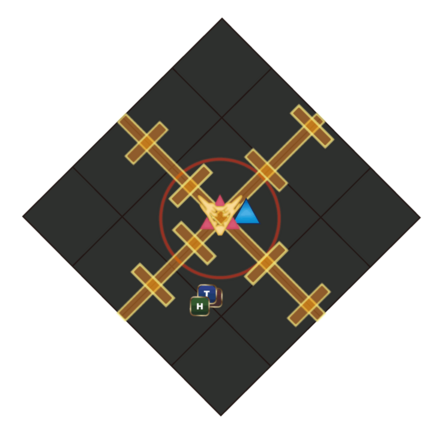
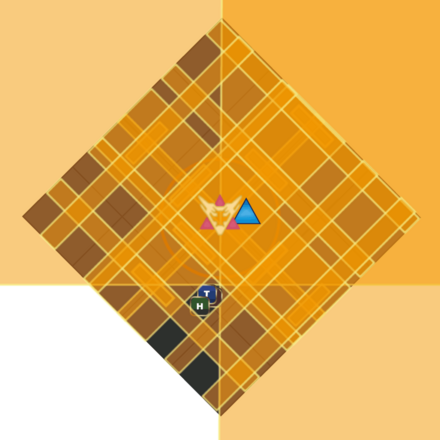
Forward Half or Backward Half will be casted, so watch what Zoraal Ja casts before repositioning.
If it's Forward Half, refer to the waymarks for repositioning, and stand in front of the glowing sword's side.
If it's Backward Half, refer to the waymarks again, and stand on the opposite side of the glowing sword's side.
Regicidal Rage
| Regicidal Rage Positions | |
|---|---|
 |
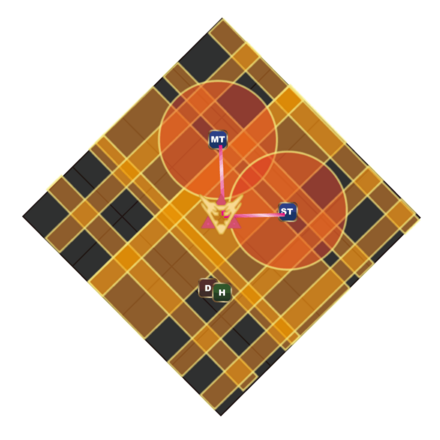 |
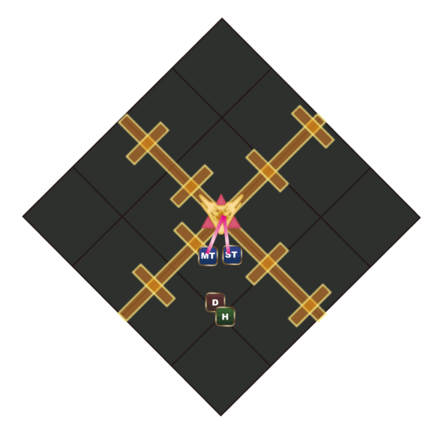
Zoraal Ja will now cast another Multidirectional Divide and plant another cross-shaped AoE, followed by Regicidal Rage which spawns a tankbuster tether for both Tanks.
Tanks need to move to the left and right sides of the field and use cooldowns to withstand the damage while the rest of the party repositions to a safe spot.
Everkeep (Extreme) 2nd Phase Mechanics
Dawn of An Age
While the boss is casting Dawn of An Age, shield up and heal the party to full and get ready for Vollok and Sync mechanics.
Vollok and Sync
| Vollok and Sync Positions | |
|---|---|
 |
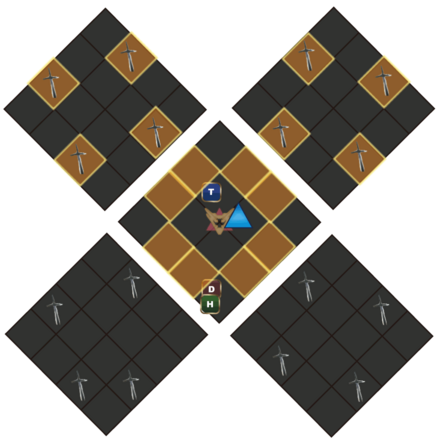 |
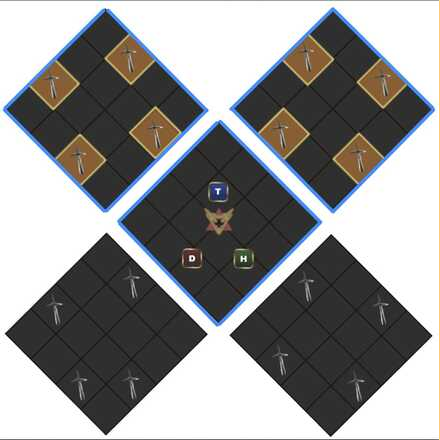
Four platforms with swords buried on specific tiles will spawn outside the arena during Vollok, and will be copied over to the center platform during Sync.
To avoid getting damaged, observe the glowing tiles that will be copied over, then stand on an empty tile to avoid damage.
Half Full and Sync
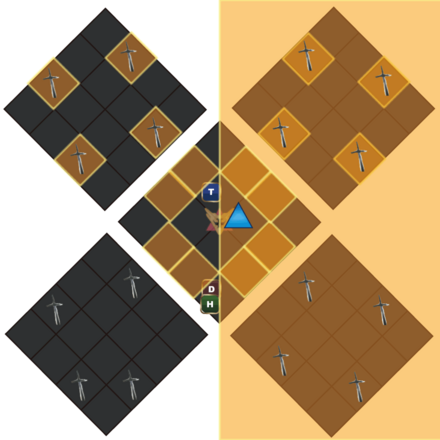
While Sync is ongoing, the boss will cast Half Full which goes out almost at the same time as Sync.
Determine the safe spot by staying at a corner of an empty tile, and reposition again for the next mechanic.
Greater Gateway
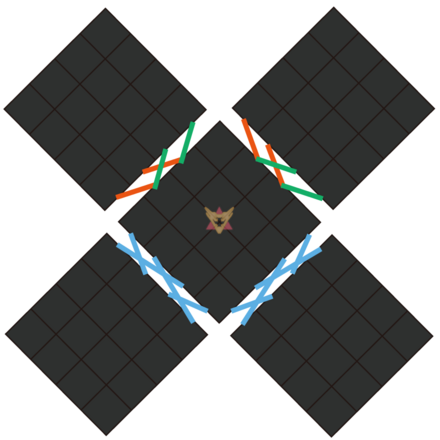
During Greater Gateway, there will be blue, red, and green tethers connected to the platforms.
Two outer platforms will gain blue tethers, with the rest having red and green tethers.
Blade Warp and Fire Portal
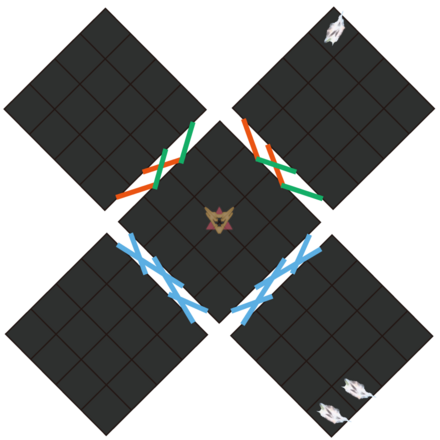
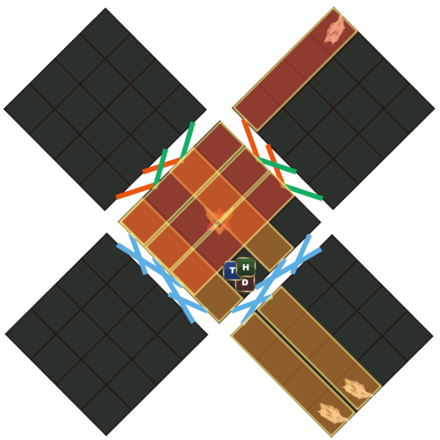
During Blade Warp and Fire Portal, swords are placed on the blue tether platform, then on the adjacent red and green platforms.
How to Dodge Red, Blue, and Green Line AoEs
| Red and Green Line AoE Positions | |
|---|---|
 |
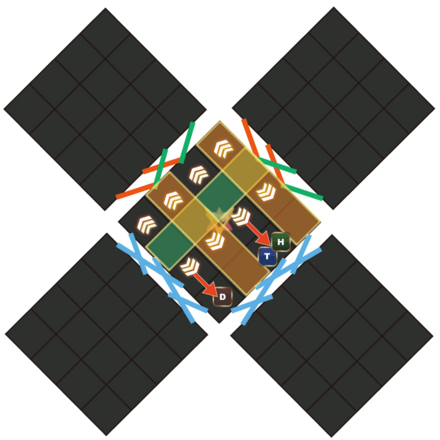 |
During this mechanic, there will always be two safe tiles to stand on. To know where to stand, look at the blue tethers first . Determine where the blue tether line AoEs will go out and take note of it.
For red tether AoEs, always know that there will be three line AoEs placed on the arena. Trace which portal the sword will exit to and piece it together where the blue tether line AoEs will land to know the safe spots.
For green tether AoEs, players will be marked with knockback markers. Simply use Arm's Length or Surecast to have knockback immunity.
Chasm of Vollok
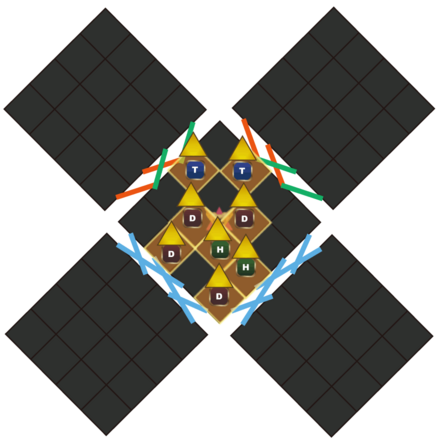
Immdeiately after the tethers, Chasm of Vollok will be casted and players will have a yellow triangle marker. All players must stand on their own tile, and healers should be ready to heal the party to full.
Everkeep (Extreme) 3rd Phase Mechanics
Actualize
To start the third phase, the boss will cast Actualize again, deal raid-wide damage, and change the arena back to normal.
Projection of Triumph
| Projection of Triumph Positions | |
|---|---|
 |
 |
 |
 |
 |
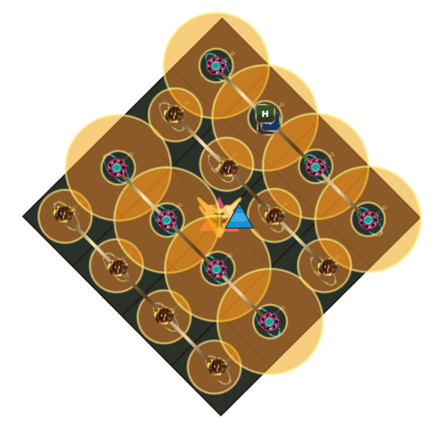 |
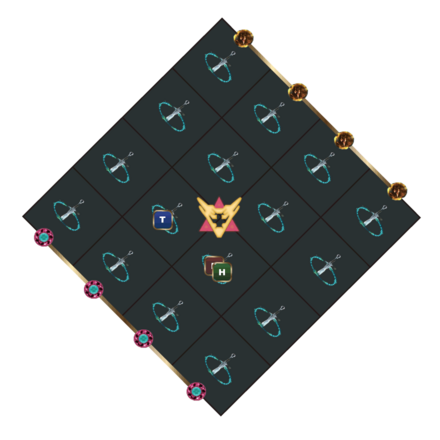
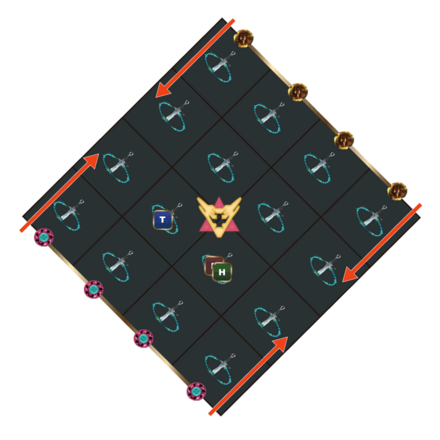
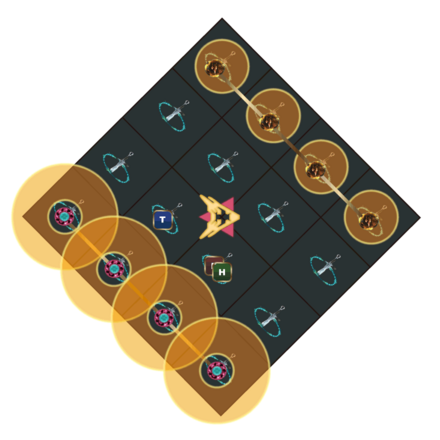
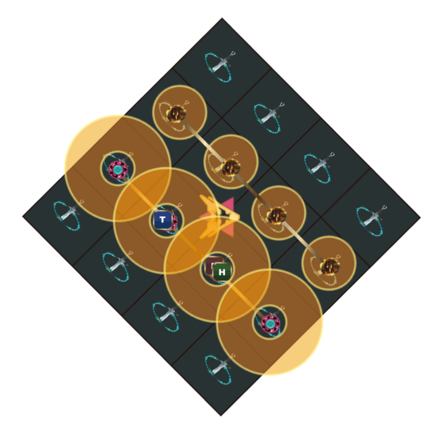
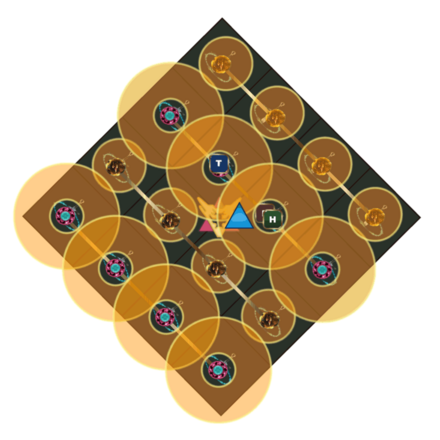
Zoraal Ja will cast Projection of Triumph and place a 4x4 grid of swords on the arena, along with two opposing tethers outside the arena. One tether is a telegraphing point-blank circle AoE and the other is a telegraphing donut AoE.
On the second activation of projection of Triumph, the tethered AoEs will start moving forward.
Stand in between two sword tiles to avoid the point blank AoE, then reposition to stand on a sword tile to dodge the donut AoE.
Projection of Triumph and Forward or Backward Half
| Forward Half and Backward Half Positions | |
|---|---|
 |
 |
 |
 |
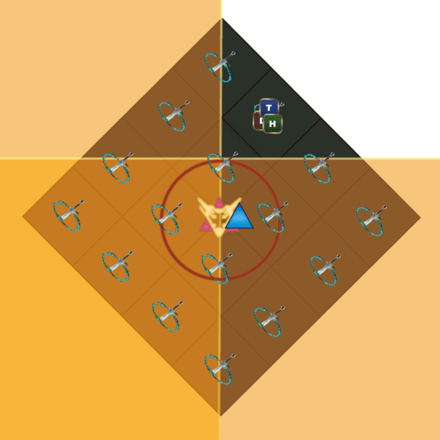
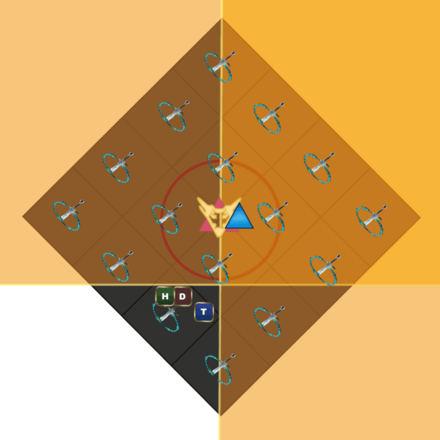
Zoraal Ja will now mix a Forward Half or Backward Half mechanic while the tethers are crossing over.
Avoid the tether mechanics first, then quickly reposition to either the front or the opposite side of Zoraal Ja's glowing sword to dodge Forward Half or Backward Half damage and survive.
Actualize and Projection of Turmoil
Zoraal Ja will cast another Actualize, so heal and mitigate damage as the platform changes. Immediately after, the boss will cast Projection of Turmoil which places a Projection debuff on all players.
To easily deal with this mechanic, make waymarkers with Tanks on the top corners and a diagonal formation for the rest and discuss role placements from there.
It's easier to have tanks cooldown their solo stacks first, then have the tanks reposition and stack with DPS next. Keep stacking and repositioning to the next player that is yet to get hit, and make sure to keep heals and shields up while this mechanic is still ongoing.
After all players have stacked, get ready to use huge mitigations for Bitter Whirlwind.
Bitter Whirlwind
Bitter Whirlwind is an AoE Tankbuster that inflicts 4-second vulns and hits three times within 7 seconds.
The Main Tank can simply use their invuln and healers can focus their heals on the MT to withstand on all three hits.
Everkeep (Extreme) 4th Phase Mechanics
Dawn of An Age
To start the 4th phase of the fight, Zoraal Ja will cast Dawn of An Age and change the arena. Mitigate and heal the party to survive raid-wide damage.
Drum of Vollok
Enumerations will be placed on each role, so reposition to the edge of the arena near the empty platform as pairs, with ranged outside and melee inside.
During Drum of Vollok, the targeted roles with enumeration will fly over to the empty platform.
Vollok
The boss will now cast Vollok and place a gigantic sword on both platforms that take up two lines and eight tiles overall.
Reposition to the safe spot beside it.
Sync and Chasm of Vollok
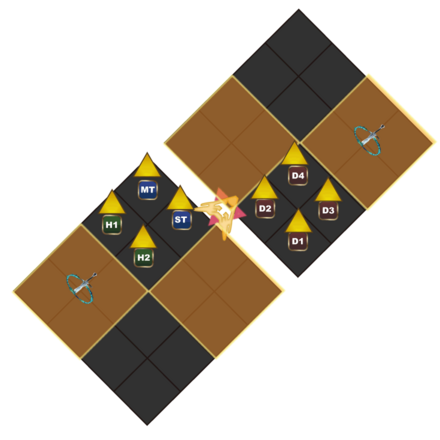
Sync and Chasm of Vollok markers will be placed on all players. Stand on your own tile or reposition to another if someone's already standing on the tile.
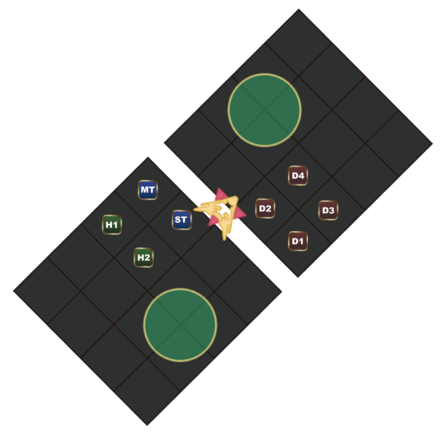
Aero III
| Aero III Positions | |
|---|---|
 |
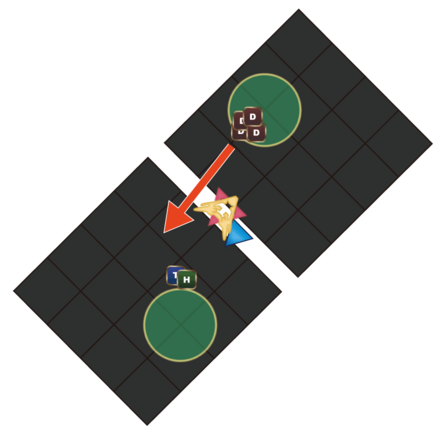 |
Immediately after, Aero III goes out and places a tornado on the arena.
Players can use the Tornado to cross over to the next platform, however, this places a Wind Resistance Down debuff on players that interact with it.
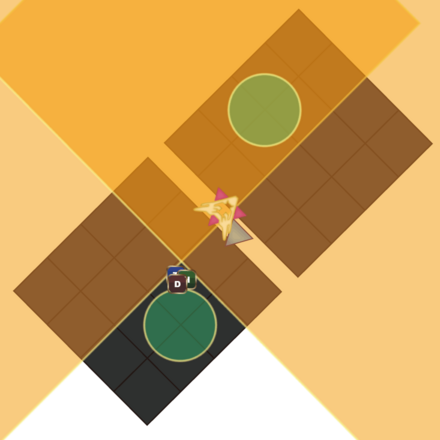
Aero III and Forward Half or Backward Half
| Forward Half and Backward Half Positions | |
|---|---|
 |
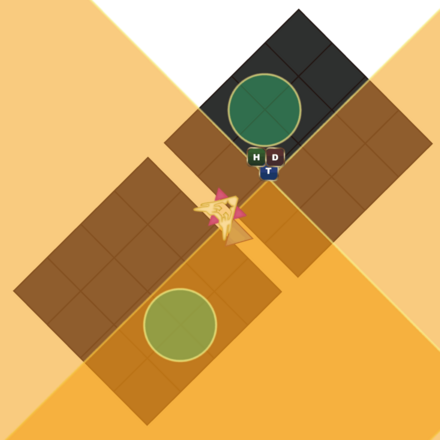 |
After a while, Zoraal Ja will mix either Forward Half or Backward Half mechanics again. Use the tornado when necessary and cross over to get to the safe spot.
Take note that players who try to use the tornado for the second time will get knocked out due to the Wind Resistance Debuff.
Duty's Edge
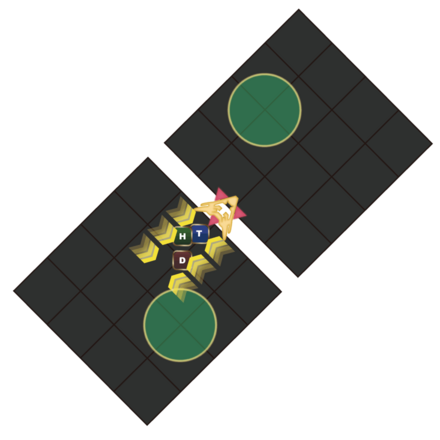
During Duty's Edge, a 4-hit stack marker that inflicts a stacking Magic Vuln shows up so all players need to stack, mitigate, and heal through the mechanic to survive.
Burning Chains
| Burning Chains Positions | ||
|---|---|---|
 |
 |
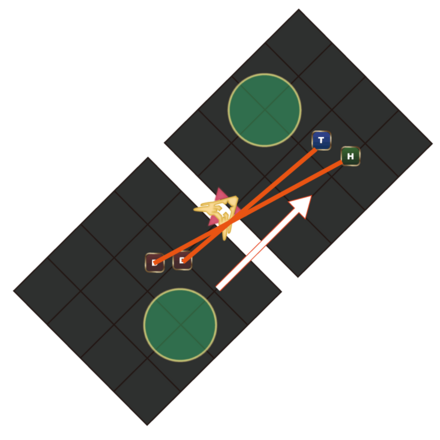 |
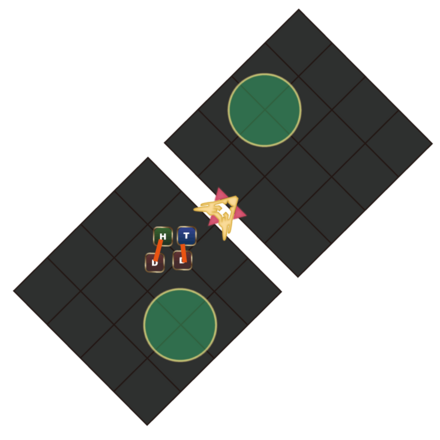
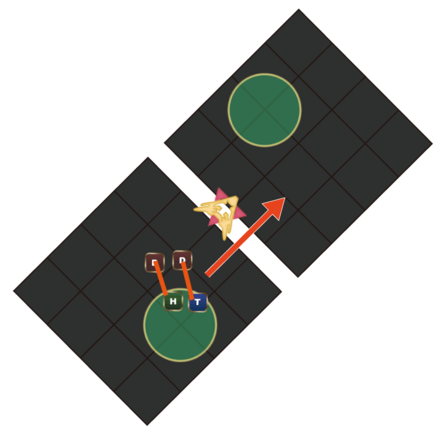
Immediately after, Burning Chains will be casted and tethers all DPS to each Healer. To break the chains, those who are chained need to be on one platform, and run to the farthest part of the arena.
The chains need to be broken before the cast finishes or those who are chained will instantly die. Once Zoraal Ja casts Actualize, get ready to mitigate, shield and heal the party to get ready for the next phase.
Everkeep (Extreme) 5th Phase Mechanics
Projection of Turmoil and Half Circuit
| Projection of Turmoil Positions | |
|---|---|
 |
 |
 |
 |
 |
- |
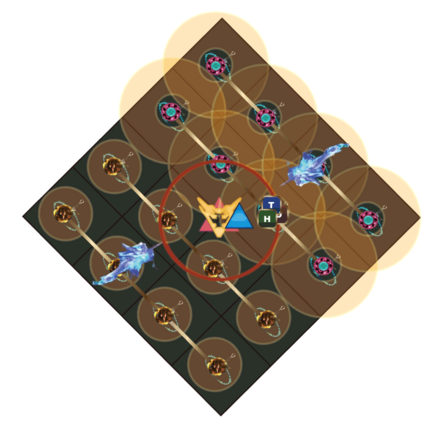
After Actualize, the boss will cast Projection of Turmoil and mix it with his Half Circuit mechanic.
As usual, do the Projection of Turmoil tether mechanics first, then watch Zoraal Ja's glowing swords to determine where you need to stand. if the swords are within the boss's hitbox, move away. If the swords are pointing outwards, find a spot near the boss to stand on.
Regicidal Rage
Regicidal Rage will be casted immediately after the first Projection of Turmoil is done, so try to stay still as much as possible to let the Tanks grab tethers, cooldown and soak incoming damage.
Projection of Turmoil and Half Full
The second Projection of Turmoil now begins and will be mixed with Half Full mechanics. As everyone moves and repositions to stack with the next player, Zoraal Ja will start casting Half Full so determine which side he will h it and stand on the opposite one while avoiding the tether's mechanics!
Finally, Tanks will need to cooldown and soak the damage from Bitter Whirlwind and everybody needs to mitigate damage, shield, and heal up once the boss casts Dawn of An Age.
Everkeep (Extreme) Final Phase Mechanics
Dawn of An Age
For the start of the final phase, the boss casts Dawn of An Age that deals raid-wide damage and transforms the arena to the one with four platforms.
He will place swords on the outer platforms once he casts Vollok, and copy over the sword tiles to the center during Sync. Simply reposition to dodge this mechanic.
Chasm of Vollok and Duty's Edge
| Positions | |
|---|---|
 |
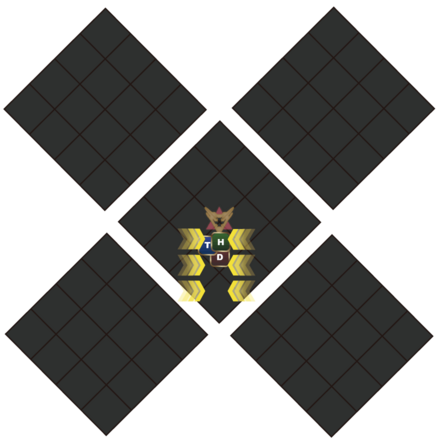 |
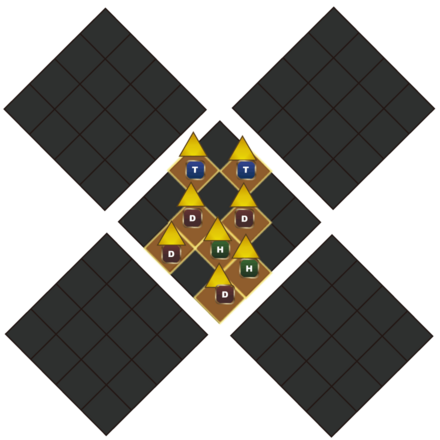
Right after Sync, another Chasm of Vollok markers will be placed on all players, so stand on a tile alone and soak damage. Quickly heal the party to full and shields to mitigate incoming damage from the 4-hit stack marker of Duty's Edge.
Greater Gateway will be repeated along with Blade Warp and Fire Portal so repeat the steps to know the safe spots!
Actualize and Multidirectional Divide - Enrage
| Forward Half or Backward Half Positions | |
|---|---|
 |
 |
 |
 |
For the final and enrage phase, Zoraal Ja will cast his final Actualize, deal raid-wide damage, and change the arena back to normal so shield and heal up.
Multidirectional Divide will be repeated, and Zoraal ja will finally enter enrage mode.
Focus on dealing damage and dps until the boss gets defeated or wipe if his enrage cast finishes.
Everkeep (Extreme) Rewards
These are all of the rewards that can be obtained from Everkeep (Extreme) trial in FFXIV Dawntrail (FF14)!
Take note that there are no Armor or Weapon rewards for clearing this fight.
All Everkeep (Extreme) Accessories
| Note: We will go back and update this section once we have all of the necessary information! |
Wings of Resolve Preview
Wings of Resolve is a rare mount drop from Everkeep (Extreme) and can only be obtained by rolling high on the reward.
Other Worqor Lar Dor (Extreme) Rewards
Players obtain the Everkept achievement, 15 Allagan Tomestones of Aesthetics, and one Resilient Totem per successful run.
These totems can be exchanged at Solution Nine by talking to Uah'shepya who is found at (X:8.7 Y:13.5).
Other drops like Zoraal Ja Card, Skyruin Weapon Coffer (IL 710), Faded Copy of The Skyruin, and Ruinous Prime all depend on RNG when dropping.
FFXIV Dawntrail Related Guides
List of Dawntrail Trials
| All Dawntrail Trials | |
|---|---|
| Worqor Lar Dor (Normal) | Everkeep (Normal) |
| The Interphos | Worqor Lar Dor (Extreme) |
| Everkeep (Extreme) | |
Comment
Author
Everkeep (Extreme) Trial Guide
improvement survey
03/2026
improving Game8's site?

Your answers will help us to improve our website.
Note: Please be sure not to enter any kind of personal information into your response.

We hope you continue to make use of Game8.
Rankings
- We could not find the message board you were looking for.
Gaming News
Popular Games

Genshin Impact Walkthrough & Guides Wiki

Honkai: Star Rail Walkthrough & Guides Wiki

Umamusume: Pretty Derby Walkthrough & Guides Wiki

Pokemon Pokopia Walkthrough & Guides Wiki

Resident Evil Requiem (RE9) Walkthrough & Guides Wiki

Monster Hunter Wilds Walkthrough & Guides Wiki

Wuthering Waves Walkthrough & Guides Wiki

Arknights: Endfield Walkthrough & Guides Wiki

Pokemon FireRed and LeafGreen (FRLG) Walkthrough & Guides Wiki

Pokemon TCG Pocket (PTCGP) Strategies & Guides Wiki
Recommended Games

Diablo 4: Vessel of Hatred Walkthrough & Guides Wiki

Cyberpunk 2077: Ultimate Edition Walkthrough & Guides Wiki

Fire Emblem Heroes (FEH) Walkthrough & Guides Wiki

Yu-Gi-Oh! Master Duel Walkthrough & Guides Wiki

Super Smash Bros. Ultimate Walkthrough & Guides Wiki

Pokemon Brilliant Diamond and Shining Pearl (BDSP) Walkthrough & Guides Wiki

Elden Ring Shadow of the Erdtree Walkthrough & Guides Wiki

Monster Hunter World Walkthrough & Guides Wiki

The Legend of Zelda: Tears of the Kingdom Walkthrough & Guides Wiki

Persona 3 Reload Walkthrough & Guides Wiki
All rights reserved
© SQUARE ENIX
Square Enix, Inc., 999 N. Pacific Coast Highway, El Segundo, California 90245
LOGO ILLUSTRATION:© YOSHITAKA AMANO
The copyrights of videos of games used in our content and other intellectual property rights belong to the provider of the game.
The contents we provide on this site were created personally by members of the Game8 editorial department.
We refuse the right to reuse or repost content taken without our permission such as data or images to other sites.





![Monster Hunter Stories 3 Review [First Impressions] | Simply Rejuvenating](https://img.game8.co/4438641/2a31b7702bd70e78ec8efd24661dacda.jpeg/thumb)


