This survey will take about 1 minute.
Your answers will help us to improve our website.
FFXIV Dawntrail 7.05 (FF14)
M1S Raid Guide
★ Patch 7.05 is Now Live! | All 7.05 Guides
┗ Buffs and Nerfs | Tomestones of Heliometry
┗ Master Crafting Recipes | Cenote Ja Ja Gural
┗ Quetzali Gear | Dark Horse Champion Gear
☆ Latest News | Tips and Tricks | Job Guide | Quests
★ Dungeons | Trials | Raids | Savage Raids
AAC Light-heavyweight M1 (Savage) is the first savage raid in the first tier of the Arcadion in Final Fantasy XIV Dawntrail (FF14). Read on to learn more about its macros, the guide to the raid mechanics and attack patterns of Black Cat, how to unlock, and its basic information here!
List of Contents
AAC Light-heavyweight M1 (Savage) Raid Guide
| List of Moves | ||
|---|---|---|
| Quadruple Crossing | Biscuit Maker | Nine Lives |
| Soul Shade | Bloody Scratch | Mouser |
| Shockwave | Leaping One-two Paw | Leaping Quadruple Crossing |
| Tempest Tear | Nail Chipper | Spread Nail |
| Raining Cats | ||
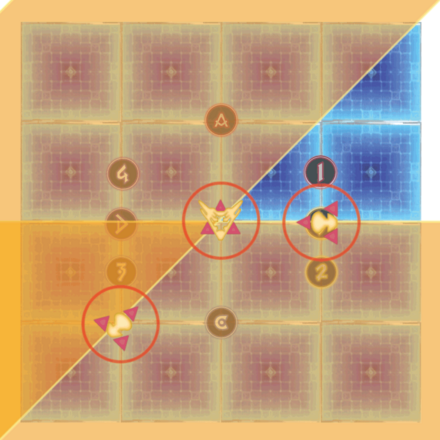
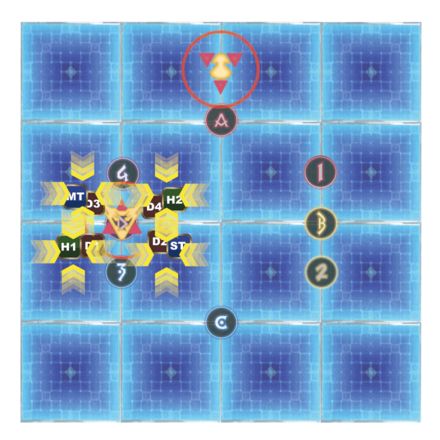
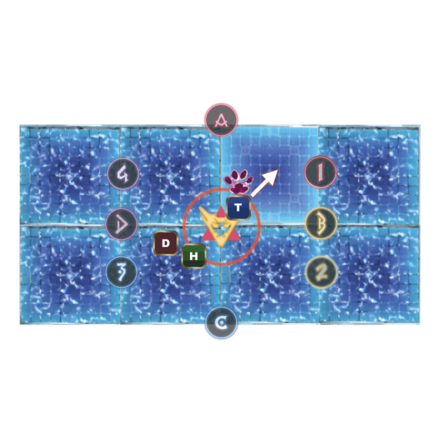
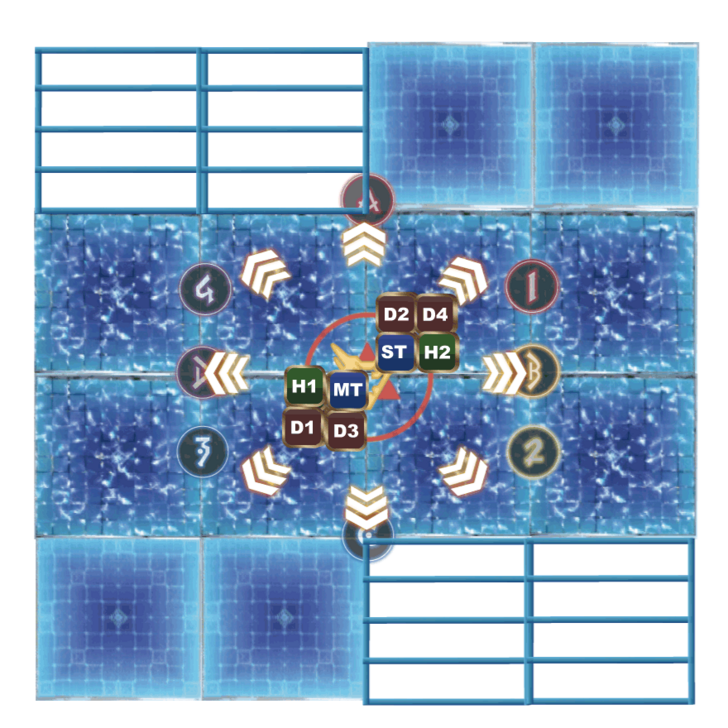
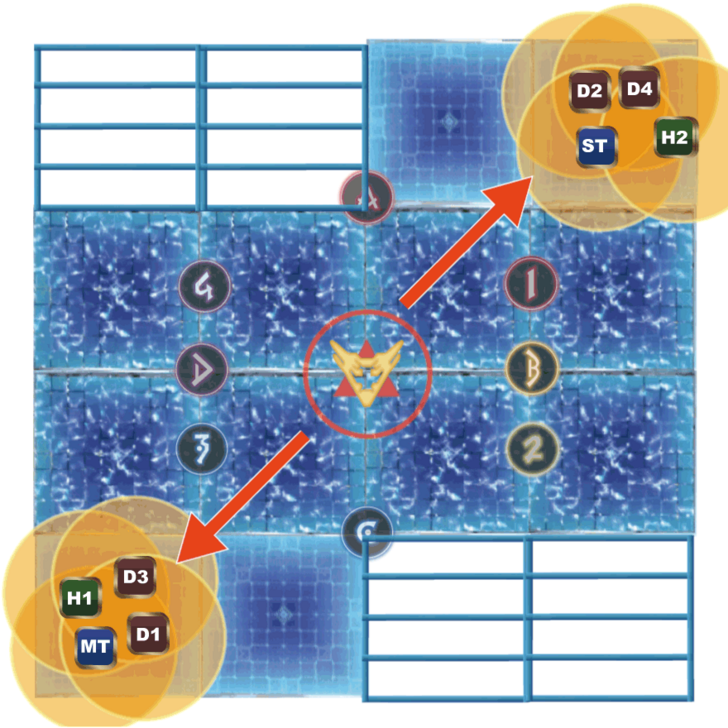
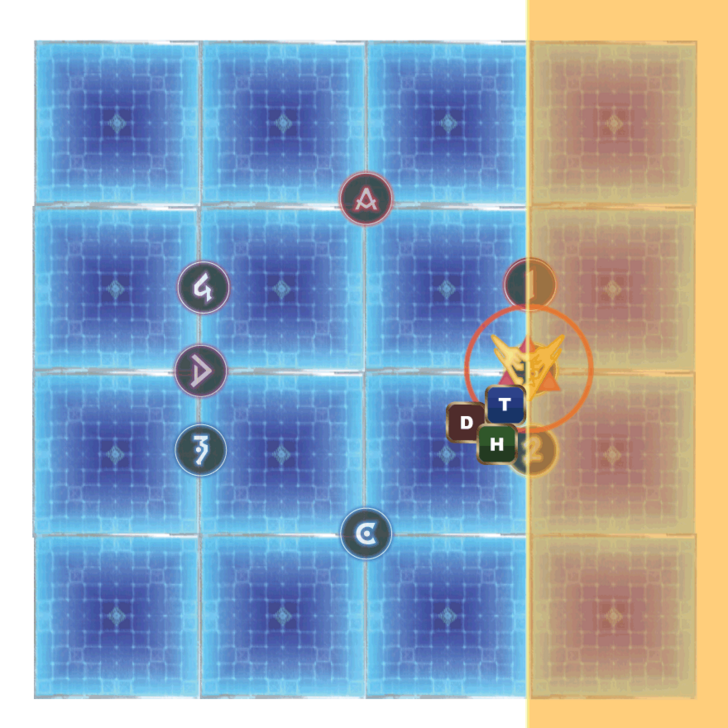
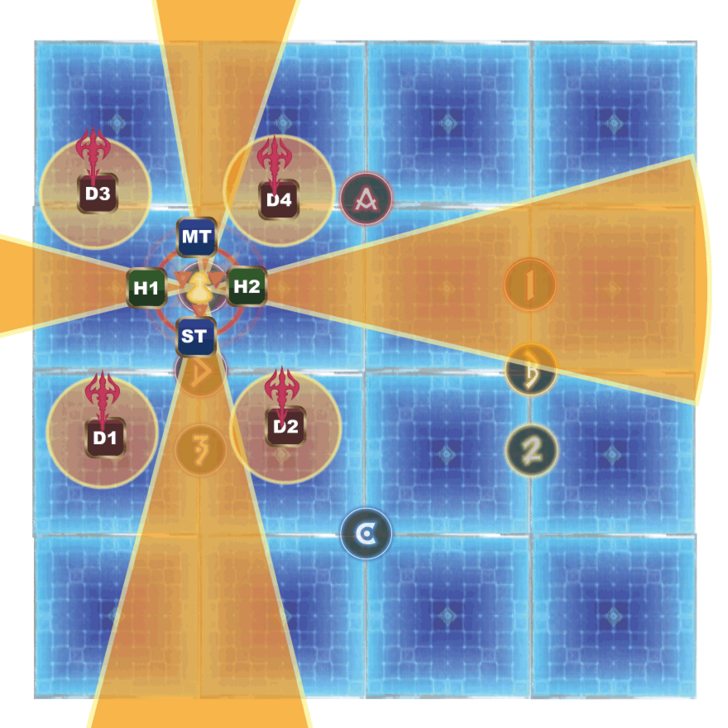
Quadruple Crossing
Four sets of lines will start to appear on the floor in either the cardinals (+) or the diagonals (×). Black Cat will launch conal attacks in the marked directions in sequence so stay on the second set of lines first to dodge the first set and then move after the first attack to dodge the second set.
The first two shots of Quadruple Crossing will hit the person closest to the boss in a fan-shaped area. From the third or fourth shot, the boss will continue to hit the same fan-shaped area as the first or second shots.
Move Sequence
| Quadruple Crossing Sequence | |
|---|---|
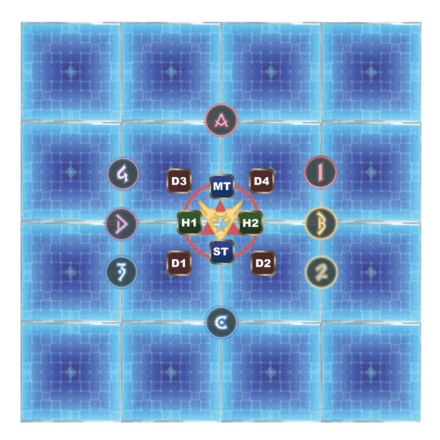 ① TH approaches the boss first and spreads out in a cross pattern. DPS stays a little distance away from the boss in an X pattern. |
 ② The first hit activates a fan-shaped area. |
 ③ Immediately afterward, the DPS approaches the boss and spreads out in a cross pattern. The TH moves away from the boss and spreads out in an X pattern. |
 ④ The second area effect is activated. |
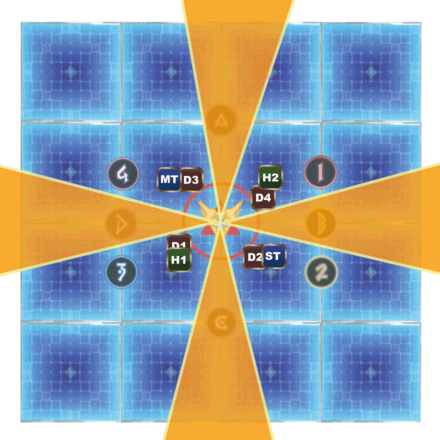 ⑤ The 3rd and 4th shots will come from the same place as the 1st and 2nd shots, so wait in an X shape. |
|
Approach the boss in the order of TH → DPS for the first and second shots, and receive the area with a cross spread. The third and fourth shots will be a series of cross-shaped areas from the first and second shots, so let everyone wait in the X-shaped safe area.
Biscuit Maker
This is a two-hit strong attack for the tank. The first attack reduces slash resistance, so ST should use Switch while casting Biscuit Maker. If it hits ST, MT can take it back with Taunt. It's a single-target attack, not a ranged attack, so it's okay for two tanks to overlap.
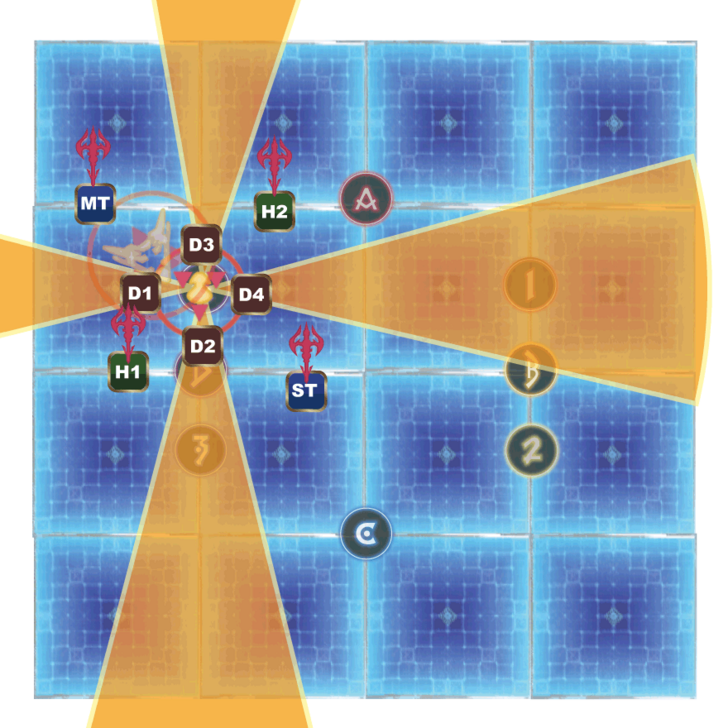
Nine Lives + One-two Paw + Soul Shade + Double Claw
| NL + OP + SS + DC Sequence | |
|---|---|
 ① One-two Paw chant. In the image, start with attacking the left half. |
 ② Second One-two Paw. Right half attack. |
 ③ Soul Shade on the clone. The clone will use the same attacks as the main body in the same order. |
 ④ One-two Paw from the clone. The first shot is from the left side, just like the main body. |
 ⑤ Second One-two Paw. Right half attack. The safe place can be diagonally opposite the first safe place. |
 ⑥ The first shot when the One-two Paw are applied in the order of right half, then left half. |
 ⑦ The second shot when the One-two Paw is applied in the order of right half first, then left half. |
 ⑧ Immediately after the clone attack ends, a Double Claw or Quad Claw will come. In this part, the pair splits into Quad Claws. |
 If it's Double Claw, they'll split into MT and ST groups and attack equally. |
|
Nine Lives releases a red aura and then creates clones of himself in a gimmick that involves a One-two Paw followed by two clones.
One-two Paw is a two-part attack that attacks half of the field, starting with the arm that was raised first. After that, the boss uses Soul Shade to command its clone to perform the action (One-two Paw) that the boss itself just performed.
After the two clones use One-two Paw, the main body will cast either Double Claw or Quad Claw. Double Claw is a split attack that targets all enemies, so you will split into MT and ST groups to receive it, and Quad Claw is a pair attack, so follow the macro and receive the attack in a cross pair.
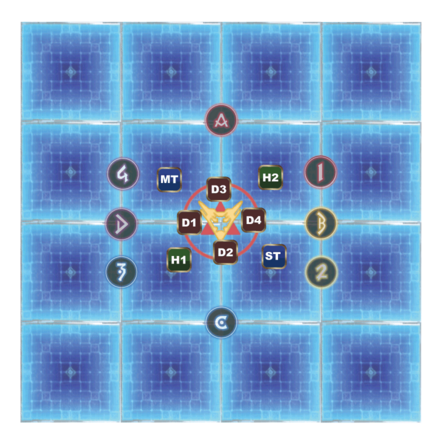
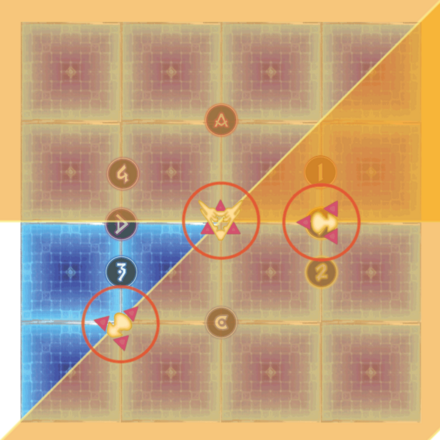
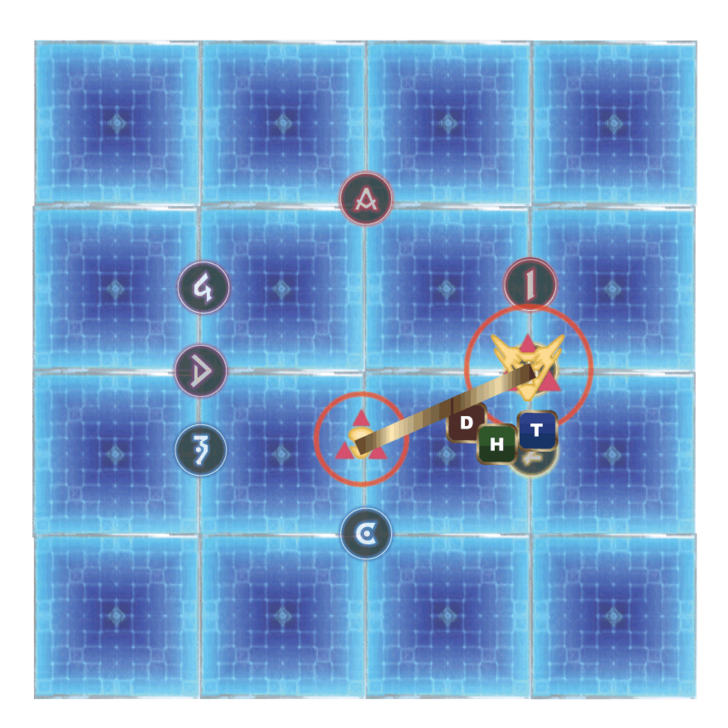
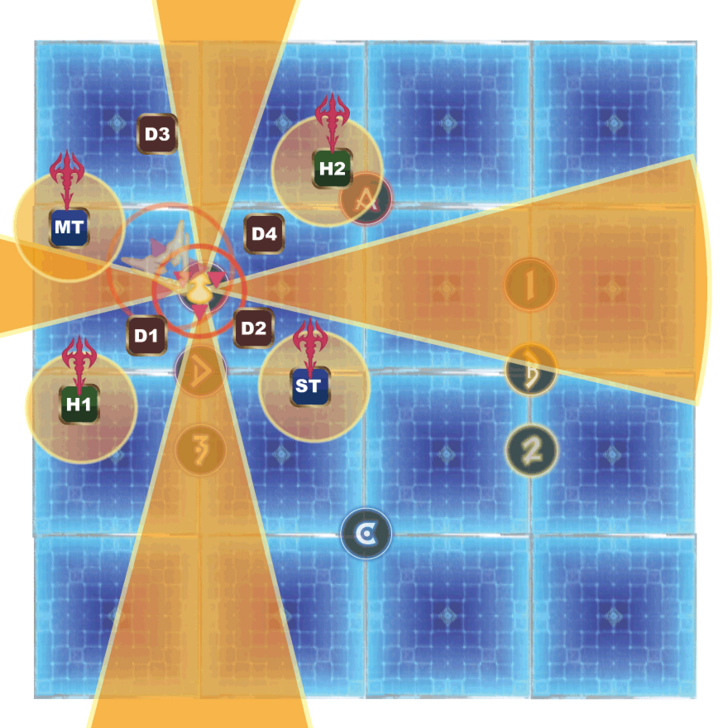
Soul Shade + Leaping Quadruple Crossing + Double Claw or Quad Claw
| SS + LQP + DC Sequence | |
|---|---|
 ① Soul Shade lets the clone learn the Double Claw or Quad Claw of the previous gimmick. |
 ② Casts Leaping Quadruple Crossing which will be activated from the marker's location. The TH should be in position to spread out in a cross when it is activated. |
 ③ Quadruple Crossing is activated. TH receives it with a cross first. |
 ④ Activate the second shot. The DPS also moves in a cross shape. |
 ⑤The 3rd and 4th shots will activate the cross-shaped area of the 1st and 2nd shots, so wait in an X-shaped position |
 ⑥ Double or quad clones are activated. This example shows a double clone. |
 ⑦ If the clones are quads, receive them with an X-shaped spread placement. |
|
Leaping Quadruple Crossing moves to the marker's location while keeping the boss facing in the same direction and executes the move. After Quadruple Crossing, the clone will launch Double Claw or Quad Claw from the previous gimmick.
Bloody Scratch
Bloody Scratch will deal physical raid-wide damage. Mitigate with shields and heals from the healers, Reprisal from the tanks, and Feint from melee DPS as needed.
Mouser + Copycat
This is a move that breaks the field. Of the four squares in the center, pay attention to the two on the north or south side, and check where the sign appears twice. Then, avoid it and move to a floor that won't break.
Move Sequence
| Copycat Sequence | |
|---|---|
 ① After Mouser, the field is restored. Four of the eight squares are new. |
 ② A Copycat appears and a marker is placed on the person to be hit. Since it was placed on the flat side, use the new square on the outside. |
 ③A player will be launched and a cross-shaped area will be activated from the target's location. Anyone other than the target should move out of the cross-shaped area. |
 ④ Next, the tank will be launched. Melee jobs should use the new squares. |
 ⑤ Activates within range. Whether it launches or stuns the enemy on the spot is random. |
|
Difference Between Clone Attacks
| Clone Attacks | |
|---|---|
 Standing Left Arm Standing Left Arm |
 Bending Right Arm Bending Right Arm |
| Hit the player where they are and stun them in place. | Moves behind the player and launches an uppercut into the air, sending the player flying in the direction he is facing. |
Clone Launch Method
| Clone Cheese |
|---|
 Stand in a corner and face diagonally. If you stun the enemy, they will be stunned on the spot, and if you launch them, they will simply be sent flying diagonally within one square. |
There is a way to launch a clone into the air within one square. The clone waits at one of the four corners of the square and faces the diagonal. This is the solution, so even if it is launched, it will land without falling.
The advantage of using this method is that you don't have to check to see if the clone is being stunned or launched, and it's easy to determine where the cross will appear.
Shockwave
| Shockwave Sequence | |
|---|---|
 ① The field tiles will be fixed and the ones where it fixes quickly are the tiles with the most glowing lines which are the northeast and southwest ones. |
 ② Spread out so that you can fly to a location where you can revive quickly. |
 ③ Tiles start getting fixed. |
 ④ Knockback occurs. |
 ⑤ Spread out in areas where the ranges don't overlap. Melee jobs should use their close-combat skills to spread out around the boss so that they don't overlap with other melees. Note: The locations shown in the image are just examples. As long as they don't overlap, anywhere is fine. |
|
Shockwave is a radial knockback attack that deals magical damage and pushes you away from the center. Position yourself to get knocked back diagonally to a safe tile as knockback immunities like Arm's Length will not work on this.
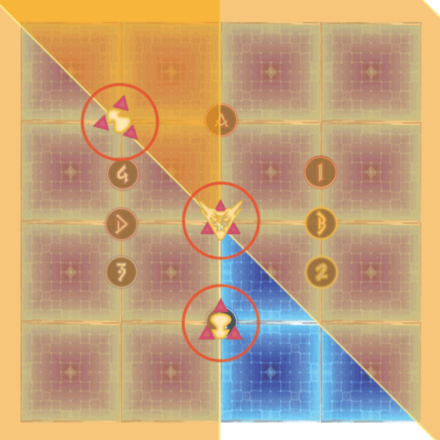
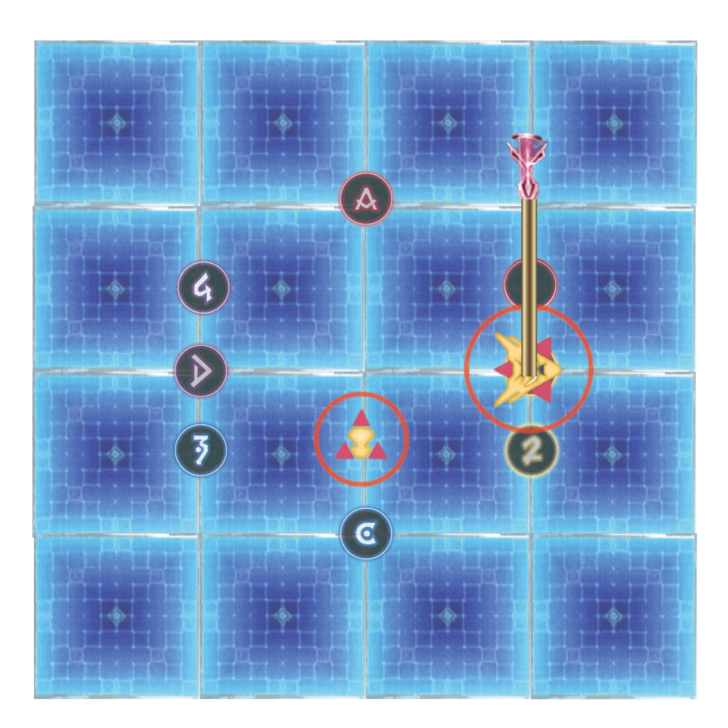
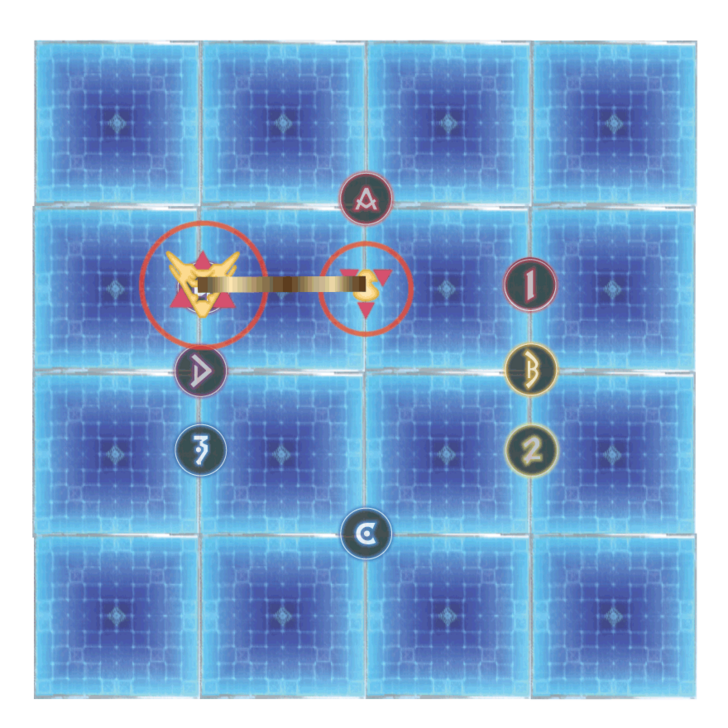
Reaping One-two Paw + Soul Shade
| ROP + SS Sequence | |
|---|---|
 ① A line will extend from the boss to the left or right. At the same time, one of the hands will light up. |
 ② Slide in the direction of the line and attack halfway. |
 ③ Immediately afterwards, attack from the opposite hand |
 ④ Save the movement direction and attack order of either the north or south clone, and the gimmick ends. |
For the Reaping One-two Paw, the boss slides in the direction of the line while keeping its orientation the same, and performs two consecutive One-two Paw attacks. Wait in the safe area at the destination, and when the first attack occurs, run to the area to avoid it.
The Soul Shade that follows will connect the boss to the clones that appear to the north or south with a line, saving the direction of movement for the Reaping and the order of attack for the One-two Paw. Later, the clones will slide in the same direction and use the One-two Paw, so make sure you remember this.
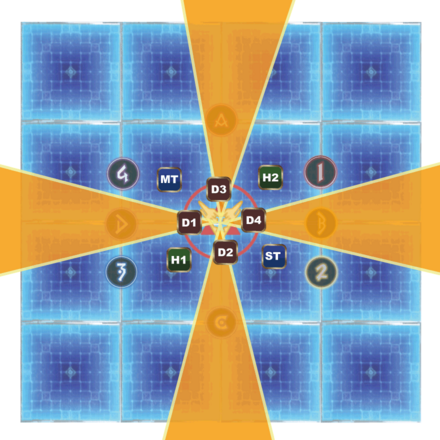
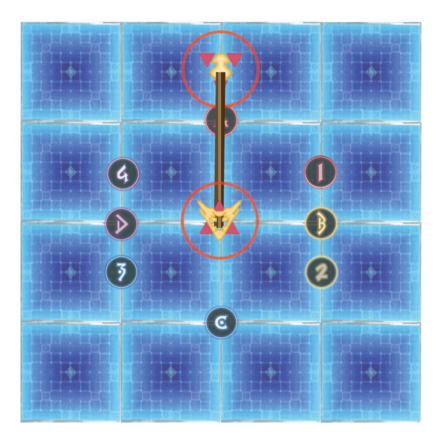
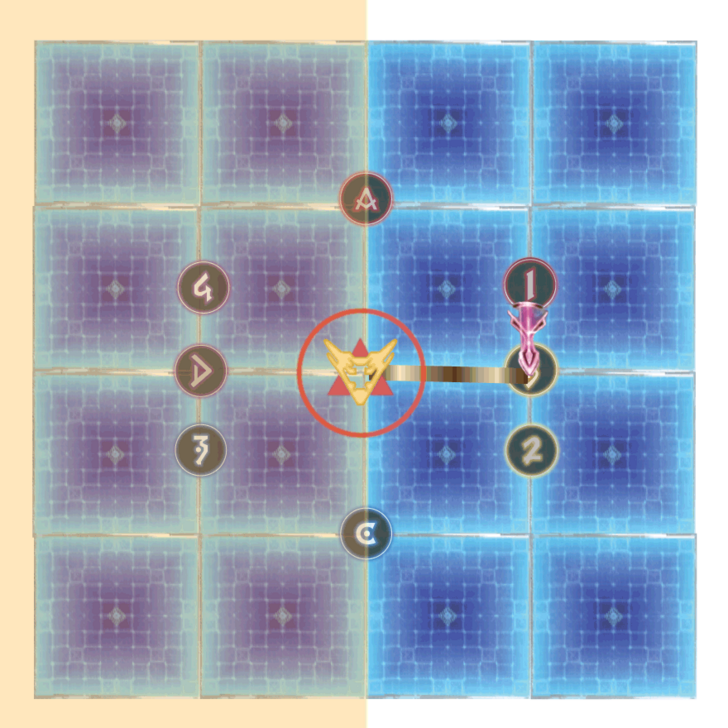
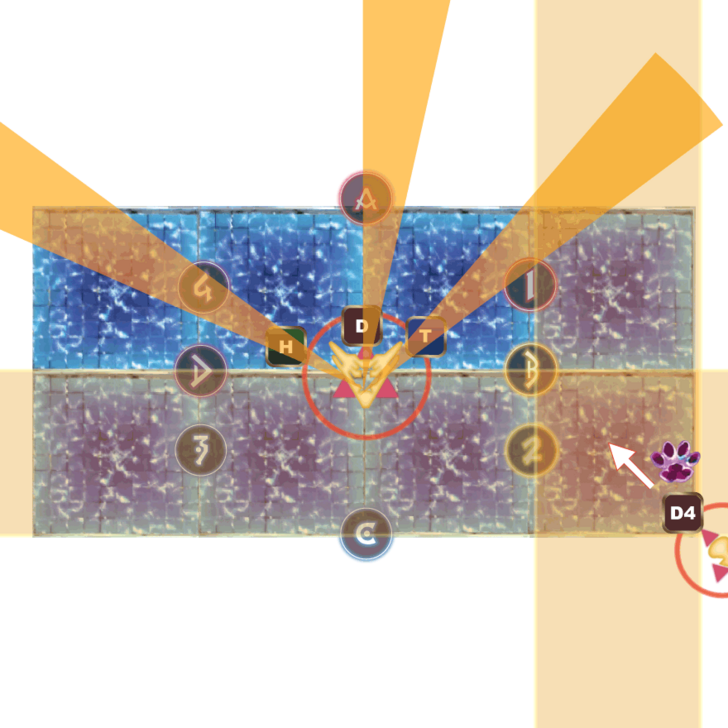
Leaping Quadruple Crossing + Soul Shade
| LBC + SS Sequence | |
|---|---|
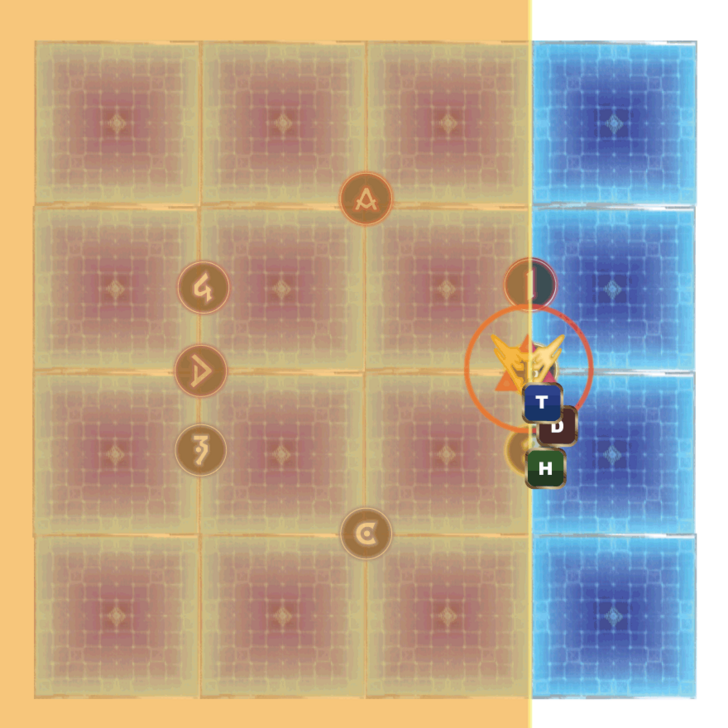
 ① The boss faces the center, with lines extending to the left or right. |
 ② It will move in the direction of the line and perform a Quadruple Crossing, so TH will spread out and approach to guide it. Note: The boss will spread out based on the direction it is facing. |
 ③ TH and DPS switch places and DPS induces the second attack. |
 ④ Avoid the 3rd and 4th Quadruple Crossing on a diagonal safe spot |
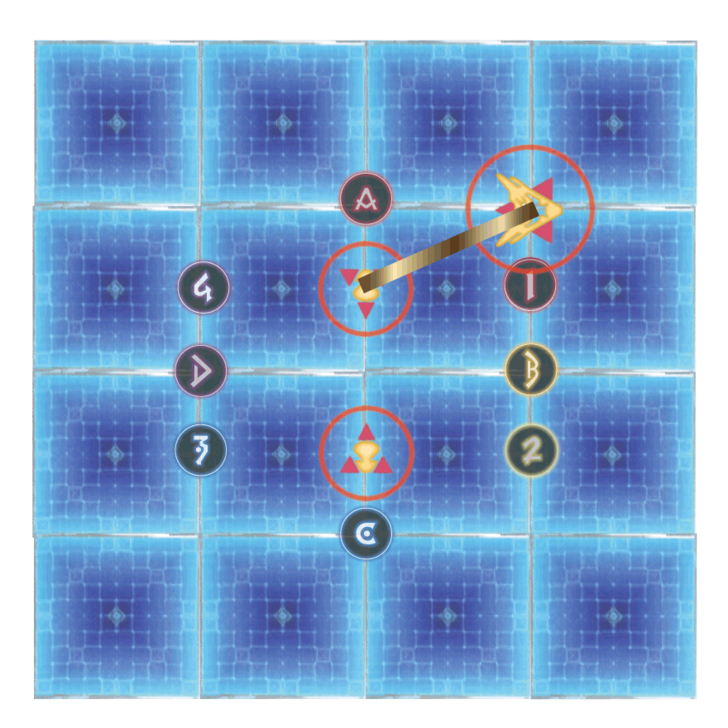 ⑤ A line connects with either the north or south clone, preserving the movement direction and attack. |
|
From the place where it moved with the Leaping One-two Paw, it will use the Leaping Quadruple Crossing. The method of dealing with it is the same as the Quadruple Crossing in the first half, but here it will scatter based on the direction of the boss instead of clones. Therefore, make sure to check the direction of the boss and your scattering position in advance.
Immediately after this, the boss will use Soul Shade to save the direction it moved and its attack in a line connected to its other self. It will be important to remember whether the boss moved left or right later.
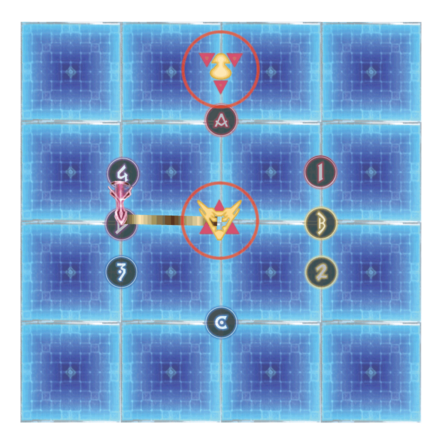
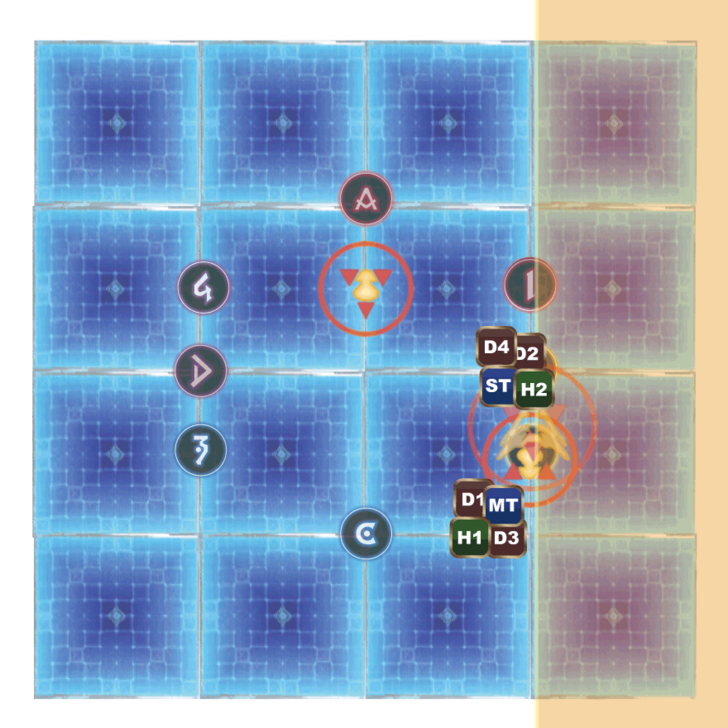
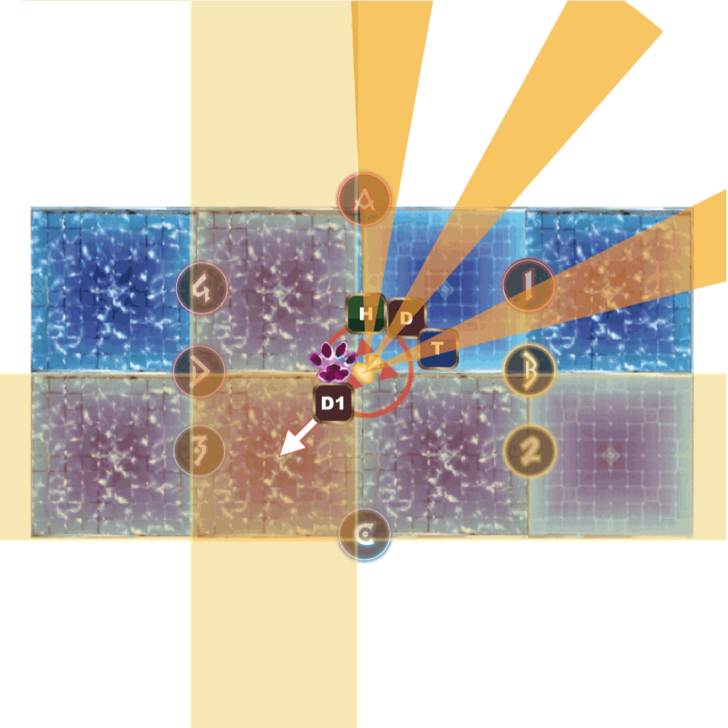
Tempest Tear + One-two Paw
| Move Sequence | |
|---|---|
 ① The clone that has saved the One-two Paw is connected to the boss with a line. Note: The MT should guide the boss to the number marker where the clone will move. |
 ② The first One-two Paw and Tempest Tear will land where the clones move, so split up into a front MT group and a rear ST group based on the boss's direction. |
 |
|
When a line connects the boss and the clone that saved the One-two Paw, the boss will use Tempest Tear and the clone will use One-two Paw. It will move in the same direction as the previous Reaping One-two Paw and attack the left and right halves in the same order, so remember the saved order and deal with it.
For example, if the main body moves to the right with the previous Reaping One-two Paw and attacks in the order of left hand, then right hand, the clone will also slide to the right and attack in the order of left hand, then right hand. Note that the direction of the clone's movement is based on the orientation of the clone.
Tempest Tear is a linear split attack that targets two healers so that the MT team will gather in front and the ST team will gather behind the boss in a split attack based on the direction of the boss. At this time, Tempest Tear and the first One-two Paw will land simultaneously, so you need to be slightly off to the safe side of the boss's front or back.
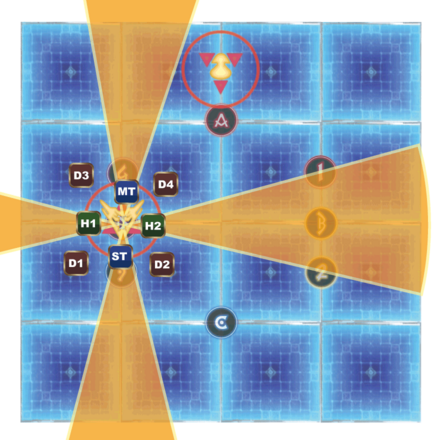
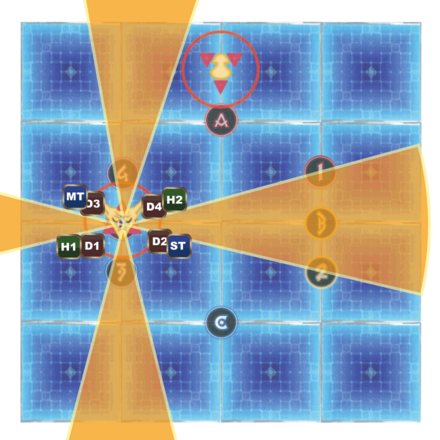
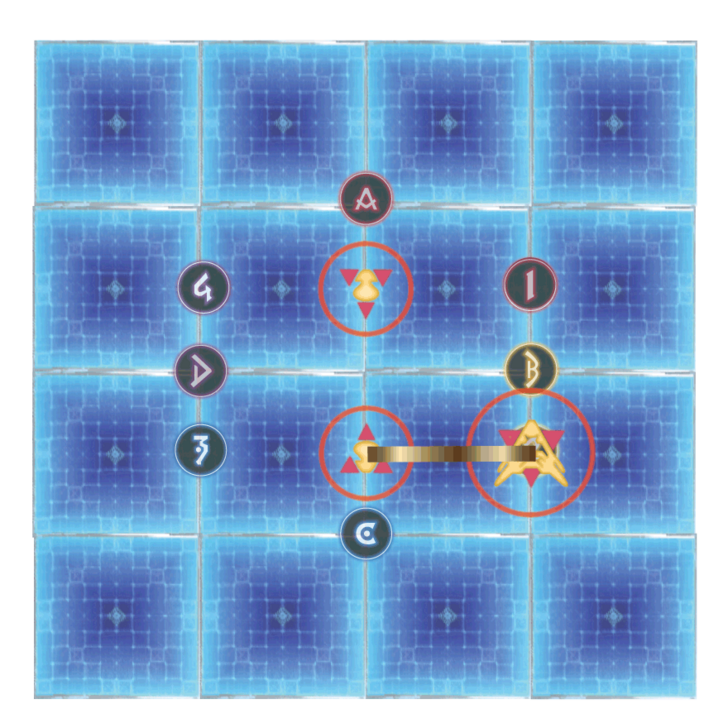
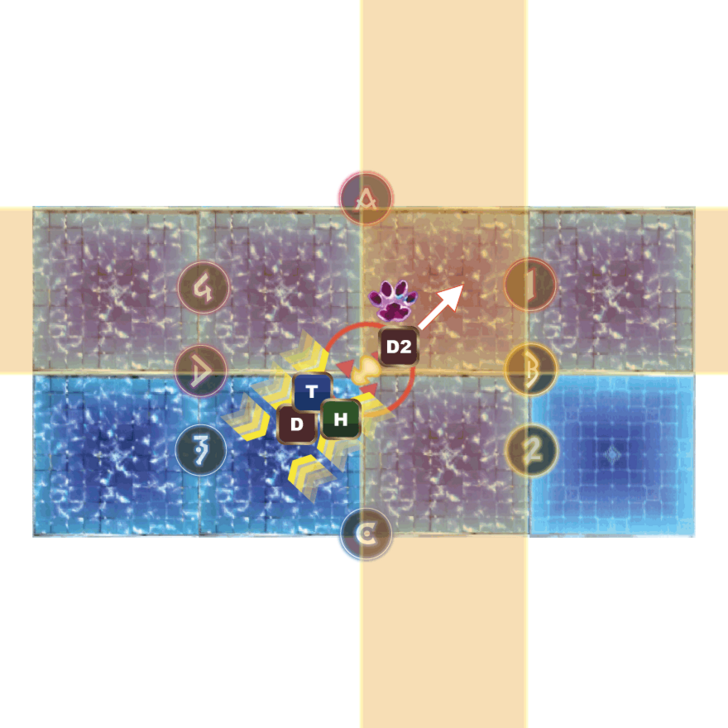
Nail Chipper + Quadruple Crossing (x2)
| Move Sequence | |
|---|---|
 ① A line connects the boss and the clone that stores the Quadruple Crossing move. Note: The MT should guide the boss to the number marker where the clone will move. |
 ② The four people who were not marked with the AoE marker should guide the first Quadruple Crossing of the clones, while the first Quadruple Crossing of the boss and the first Nail Chipper will hit at the same time. |
 ③ The four people who got the AoE marker first will guide the second Quadruple Crossing. |
 ④ The third Quadruple Crossing will be activated, so avoid it by making an X shape. |
 ⑤ At the same time as the fourth Quadruple Crossing, the second Nail Chipper hits the four people who have AoE markers. |
|
When the boss and the clone that has stored the Quadruple Crossing are connected by a line, the boss will use Nail Chipper and the clone will use the Quadruple Crossing. The Nail Chipper is a small AoE that occurs after a marker appears above the head, and happens alternately between TH4 and DPS4.
At this time, the clone will move in the direction of the previous Leaping Quadruple Crossing and attack. If you move left during that, the clone will also move left before using Quadruple Crossing. The MT should guide the main body to the clone's destination in advance.
Mouser + Copycat + Overshadow or Spread Nail
| Move Sequence | |
|---|---|
 ① When Overshadow is cast, the attack from the clone will be split equally among the seven people other than the target. |
 ② When Spread Nail is cast, a cone-shaped area attack will hit one tank, one DPS, and one healer, so gather together according to your role and deal with it. |
 ③ In the case of overshadowing, when dealing with a split attack in the center, it is also divided among seven people. |
 ④ Be careful when using Spread Nail to deal with a split attack in the center, as this narrows the safe area. |
The second half of Copycat starts with the same Mouser as the first half. After this the boss will use either a slam or launch attack with its clone, along with a straight-line splitting attack, Overshadow, or a fan-area attack, Spread Nail, which targets three people. You can tell which one will be used by the boss's chant.
Overshadow is Split into 7 Players
Overshadow is a simple linear attack that splits the attack evenly, so there is no problem if seven people gather together, excluding the person the clone is attacking, and split the attack evenly.
Spread Nail is Chosen by Role
Spread Nail is a cone-shaped area attack that targets one tank, one healer, and one DPS. When you look at the boss, group together by role such as two tanks on the left, four DPS in the middle, and two healers on the right.
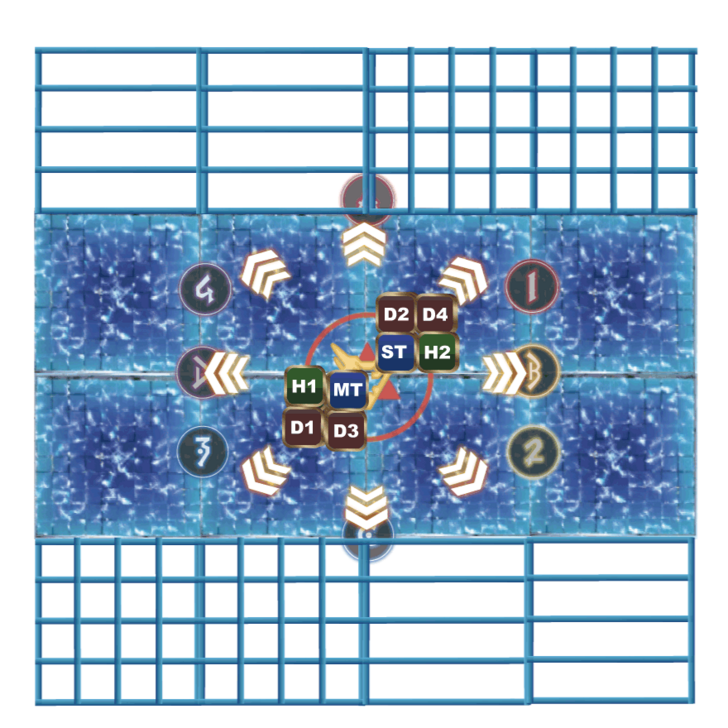
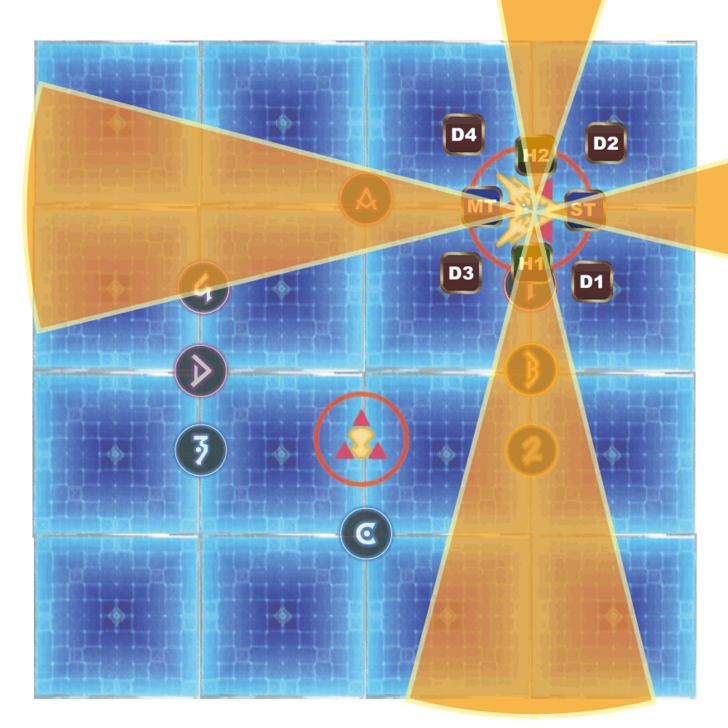
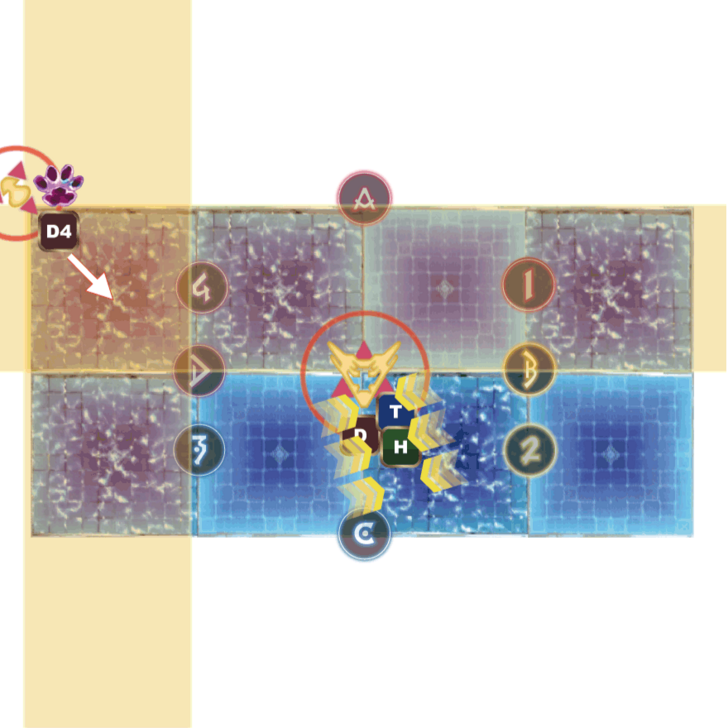
Raining Cats
| Move Sequence | |
|---|---|
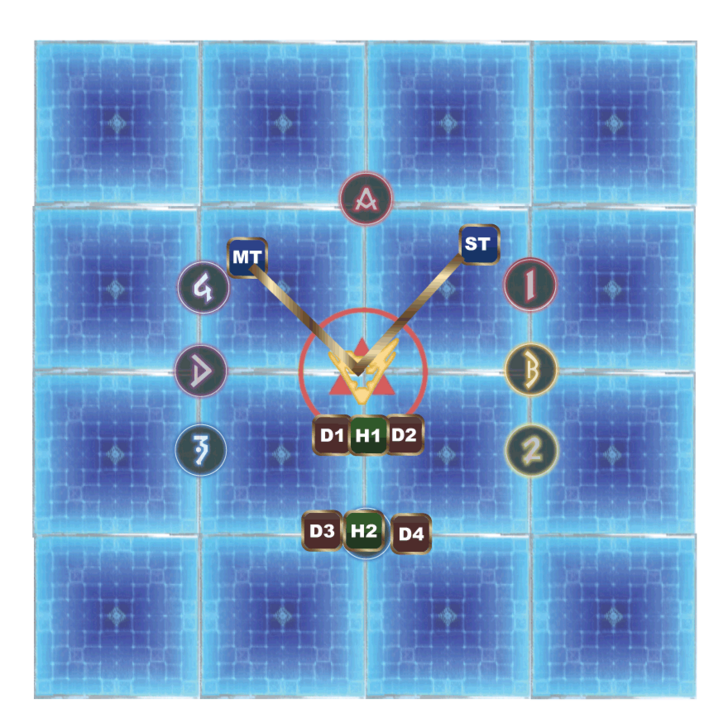 ① The tank will take the two lines from the boss, the MT will take the northwest, and the ST will take the northeast to deal with the fan-shaped area. H1D1D2 will gather behind the boss, while H2D3D4 will gather on the south outer perimeter. |
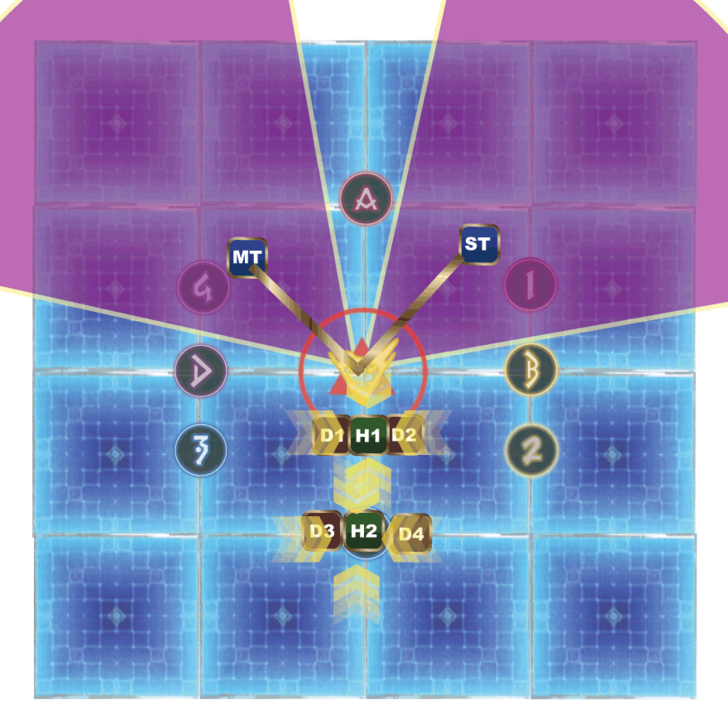 ② A fan-shaped attack on the tank that took the line, and four consecutive three-person attacks. Note: Tanks are invincible against the second and third attacks. |
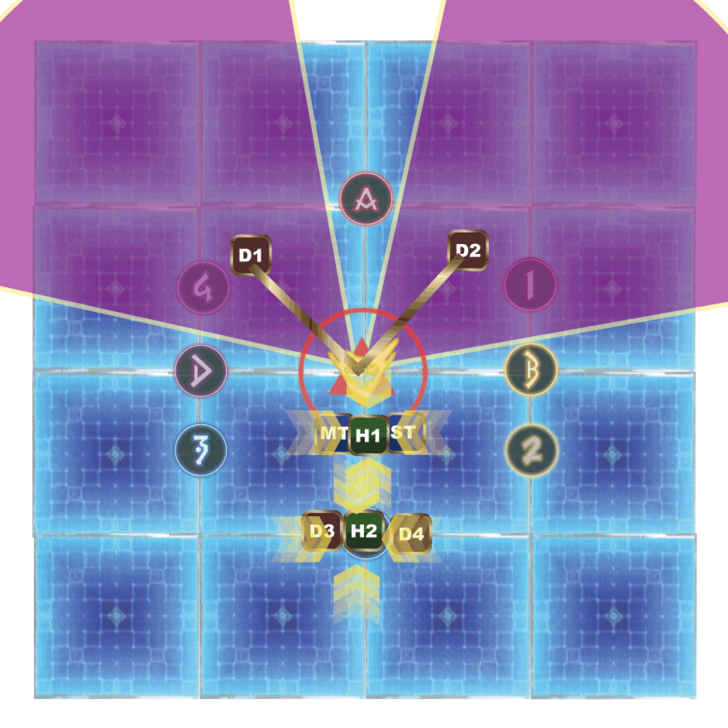 ③ After the third round, MT and D1, and ST and D2 take turns to take the fourth round. |
|
Raining Cats is a move that causes a fan-shaped attack on the targets with a line and a split attack on the people closest and farthest from the boss four times in a row. The two tanks each take one line and stand on the north side to deal with the fan-shaped attack. D1D2H1 should gather just behind the boss, while D3D4H2 should gather on the south of the boss by the outer edge to receive the split attack.
For the two tanks, use the invincibility skill when you receive the first cone-area attack, and deal with the second and third attacks with invincibility. Since the invincibility will end before the fourth attack, after the third attack, hand the line to the melee DPS and switch positions to deal with the fourth attack.
AAC Light-heavyweight M1 (Savage) Timeline
| No. | Move | Effect |
|---|---|---|
| 1 | Quadruple Crossing | Fan-shaped area on 4 people closest to the boss. → Fan-shaped area on 4 people closest to the boss. → Fan-shaped area in the same place as the first time. → Fan-shaped area in the same place as the second time. |
| 2 | Biscuit Maker | Deals two consecutive strong attacks to the tank. |
| 3 | Nine Lives | Chant. |
| 4 | One-two Paw | Two consecutive half-side attacks in the order the boss hands glow. (Left or right) |
| 5 | Soul Shade | Stores the attack order of One-two Paw for two clones. |
| 6 | Nine Lives | Summons two clones that does One-two Paw. |
| 7 | Double Claw or Quad Claw | Doubles are split in a 4:4 ratio, while Quads are split by pair. |
| 8 | Soul Shade | Store the previous Double or Quad Claw to the clone. |
| 9 | Leaping Quadruple Crossing | Slide in the direction of the line and perform a fan-shaped area attack. |
| 10 | Double Claw or Quad Claw from clone | Doubles are split 4:4, Quads are split by pair but instead used by the clones. |
| 11 | Bloody Scratch | Physical raid-wide damage. |
| 12 | Mouser | 10 consecutive AoE attacks. Floors hit by 2 attacks will be destroyed. |
| 13 | Copycat | TH4 or DPS4 will receive a slam or launch attack + cross-shaped area attack. If the attack is received on a cracked floor, the floor will be destroyed. |
| 14 | Biscuit Maker | Deals two consecutive strong attacks to the tank. |
| 15 | Shockwave | An AoE attack on everyone following a non-negatable knockback attack. |
| 16 | Nine Lives | Chant. |
| 17 | Leaping One-two Paw | Move in the direction of the line and perform two consecutive half-surface attacks with One-two Paw. |
| 18 | Soul Shade | Saves the previous movement direction and attack for either the north or south clone. |
| 19 | Leaping Quadruple Crossing | Slide in the direction of the line and perform a fan-shaped area attack. |
| 20 | Soul Shade | Saves the previous movement direction and attack for either the north or south clone. |
| 22 | Nail Chipper + Quadruple Crossing (x2) | AoE attack on 4 TH or 4 DPS + 4 consecutive fan area attacks from the clone's Quadruple Crossing. Note: 22nd and random order. |
| 22 | Tempest Tear + One-two Paw (clone) | A straight split attack on two healers and two half-face attacks from the clone's One-two Paw. Note: 21st and random order. |
| 22 | Bloody Scratch | Physical raid-wide damage. |
| 22 | Mouser | 10 consecutive AoE attacks. Floors hit by 2 attacks will be destroyed. |
| 22 | Copycat | Creates a clone that launches or slams down. |
| 27 | Overshadow | A linear splitting attack that occurs at the same time as a slamming attack. |
| 22 | Spread Nail | At the same time as launching the clones, a cone-shaped attack occurs on one random person per role. |
| 27 | Biscuit Maker | Deals two consecutive strong attacks to the tank. |
| 22 | Shockwave | An AoE attack on everyone following a non-negatable knockback attack. |
| 21 | Raining Cats | A fan-area attack on the person with the line and a split attack on the closest and furthest people 4 times in a row. |
How to Unlock AAC Light-heavyweight M1 (Savage)
Complete The Neoteric Witch
AAC Light-heavyweight M1 (Savage) will be unlocked after completing the quest “The Neoteric Witch” from the questline received from the Stylish Stranger in Solution Nine (X:19.1, Y:18.8)
AAC Light-heavyweight M1 (Savage) Information
| AAC Light-heavyweight M1 (Savage) | |
|---|---|
 |
|
| Level | 100 |
| Item Level | 700 |
| Party Size | 8 |
| Time Limit | 90 min |
| Requisite Quest | The Neoteric Witch |
FFXIV Dawntrail Related Guides
List of Dawntrail Raids
Author

Please participate in our site
improvement survey
03/2026
improvement survey
03/2026
Would you assist in
improving Game8's site?
improving Game8's site?

×
We are listening to our users' valuable opinions and discussing how to act on them.
The information collected through this survey will be used for the purpose of improving our services. In addition, the information will only be disclosed a part of a statistic in a format that will not allow identification of personal information.
Begin Survey
Not Now
×
Please rate each item regarding Game8.co's Advertisements.
Amount of Ads
Very Dissatisfied
Somewhat Dissatisfied
Fine
Somewhat Satisfied
Highly Satisfied
Placement of Ads
Timing of Ad Display
Ad Loading Speed
Safeness of Ads
Content of Ads
×
Please rate each item regarding Game8.co's Quality of Articles.
Amount of information
Very Dissatisfied
Somewhat Dissatisfied
Fine
Somewhat Satisfied
Highly Satisfied
Frequency of updates
Speed of new information
Accuracy of articles
Understandibility of articles
Readability of sentences
×
Please rate each item regarding Game8.co's Usability of the Site.
Ease of finding information
Very Dissatisfied
Somewhat Dissatisfied
Fine
Somewhat Satisfied
Highly Satisfied
Loading Speed
Use of Color
Font Size
Visibility of Images
Easy to Understand Layout
×
Please rate each item regarding Game8.co's Message Boards, Comments.
Ease of Writing
Very Dissatisfied
Somewhat Dissatisfied
Fine
Somewhat Satisfied
Highly Satisfied
Readability
Ease in Finding Information
Comment Quality
Comment Quantity
Admin Response
×
Please rate each item regarding Game8.co's Site's new design.
Please rate our site's new design
Very Dissatisfied
Somewhat Dissatisfied
Fine
Somewhat Satisfied
Highly Satisfied
Do you think that the website's design change makes the site easier to use?
Has the new design made it easier for you to find information on the site?
Has the new design improved the overall visual appeal of the site?
How would you rate your overall satisfaction with the new design of the site?
×
How likely are you to recommend Game8 to someone you know?
Very Unlikely
0
1
2
3
4
5
6
7
8
9
10
Very Likely
If you have other opinions regarding potential improvement to the website, please share them with us. We would appreciate your honest opinion.
Note: This is a free response section, so you can proceed without entering anything.
Note: Please be sure not to enter any kind of personal information into your response.
Note: Please be sure not to enter any kind of personal information into your response.
×
Thank You
×
Thank you for participating in our survey! Your answers will help us to improve the quality of our website and services.
We hope you continue to make use of Game8.
We hope you continue to make use of Game8.
Close
Rankings
- We could not find the message board you were looking for.
Gaming News


![Monster Hunter Stories 3 Review [First Impressions] | Simply Rejuvenating](https://img.game8.co/4438641/2a31b7702bd70e78ec8efd24661dacda.jpeg/thumb)
Popular Games

Genshin Impact Walkthrough & Guides Wiki
Honkai: Star Rail Walkthrough & Guides Wiki
Umamusume: Pretty Derby Walkthrough & Guides Wiki
Pokemon Pokopia Walkthrough & Guides Wiki
Resident Evil Requiem (RE9) Walkthrough & Guides Wiki
Monster Hunter Wilds Walkthrough & Guides Wiki
Wuthering Waves Walkthrough & Guides Wiki
Arknights: Endfield Walkthrough & Guides Wiki
Pokemon FireRed and LeafGreen (FRLG) Walkthrough & Guides Wiki
Pokemon TCG Pocket (PTCGP) Strategies & Guides Wiki


Recommended Games
Diablo 4: Vessel of Hatred Walkthrough & Guides Wiki
Cyberpunk 2077: Ultimate Edition Walkthrough & Guides Wiki
Fire Emblem Heroes (FEH) Walkthrough & Guides Wiki
Yu-Gi-Oh! Master Duel Walkthrough & Guides Wiki
Super Smash Bros. Ultimate Walkthrough & Guides Wiki
Pokemon Brilliant Diamond and Shining Pearl (BDSP) Walkthrough & Guides Wiki
Elden Ring Shadow of the Erdtree Walkthrough & Guides Wiki
Monster Hunter World Walkthrough & Guides Wiki
The Legend of Zelda: Tears of the Kingdom Walkthrough & Guides Wiki
Persona 3 Reload Walkthrough & Guides Wiki


All rights reserved
© SQUARE ENIX
Square Enix, Inc., 999 N. Pacific Coast Highway, El Segundo, California 90245
LOGO ILLUSTRATION:© YOSHITAKA AMANO
The copyrights of videos of games used in our content and other intellectual property rights belong to the provider of the game.
The contents we provide on this site were created personally by members of the Game8 editorial department.
We refuse the right to reuse or repost content taken without our permission such as data or images to other sites.