This survey will take about 1 minute.
Your answers will help us to improve our website.
FFXIV Dawntrail 7.05 (FF14)
M3S Raid Guide
★ Patch 7.05 is Now Live! | All 7.05 Guides
┗ Buffs and Nerfs | Tomestones of Heliometry
┗ Master Crafting Recipes | Cenote Ja Ja Gural
┗ Quetzali Gear | Dark Horse Champion Gear
☆ Latest News | Tips and Tricks | Job Guide | Quests
★ Dungeons | Trials | Raids | Savage Raids
AAC Light-heavyweight M3 (Savage) is the third savage raid in the first tier of the Arcadion in Final Fantasy XIV Dawntrail (FF14). Read on to learn more about its macros, the guide to the raid mechanics and attack patterns of Brute Bomber, how to unlock, and its basic information here!
List of Contents
AAC Light-heavyweight M3 (Savage) Raid Guide
Brutal Impact
Brutal Impact deals physical raid-wide damage each hit for a total of four hits. Mitigate with shields and heals from the healers, Reprisal from the tanks, and Feint from melee DPS as needed.
Knuckle Sandwich
Knuckle Sandwich targets the off-tank with a telegraphed tankbuster that deals physical damage. The off-tank can stack with the main tank to split the damage between them while using defensives to reduce the damage.
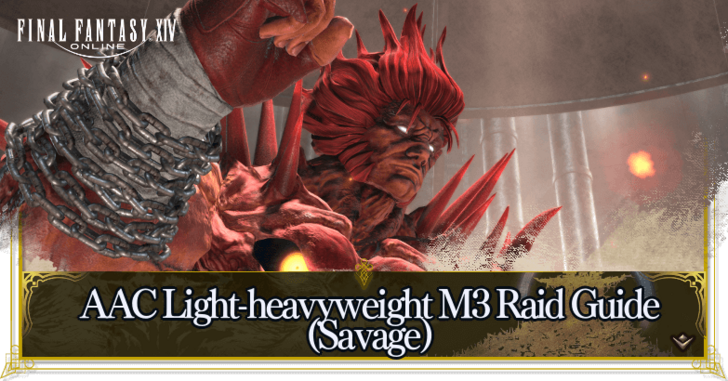
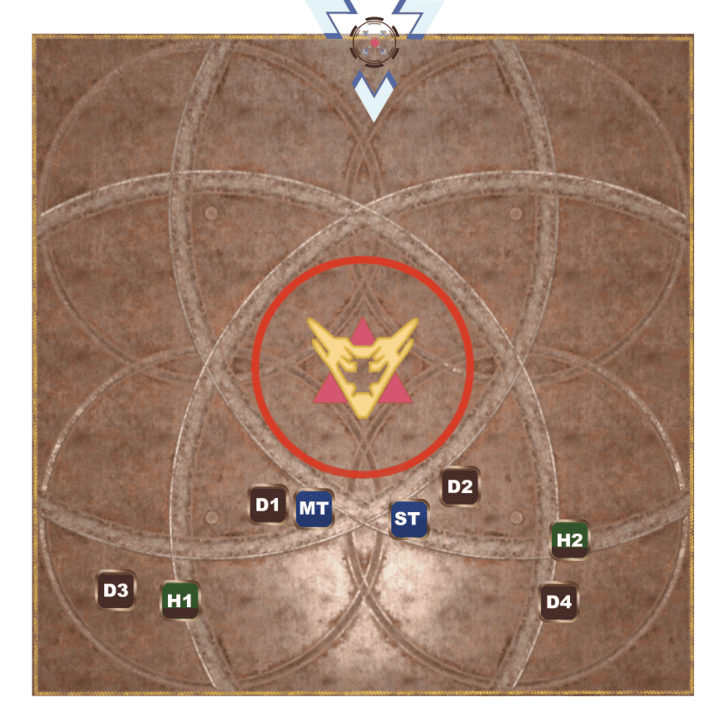
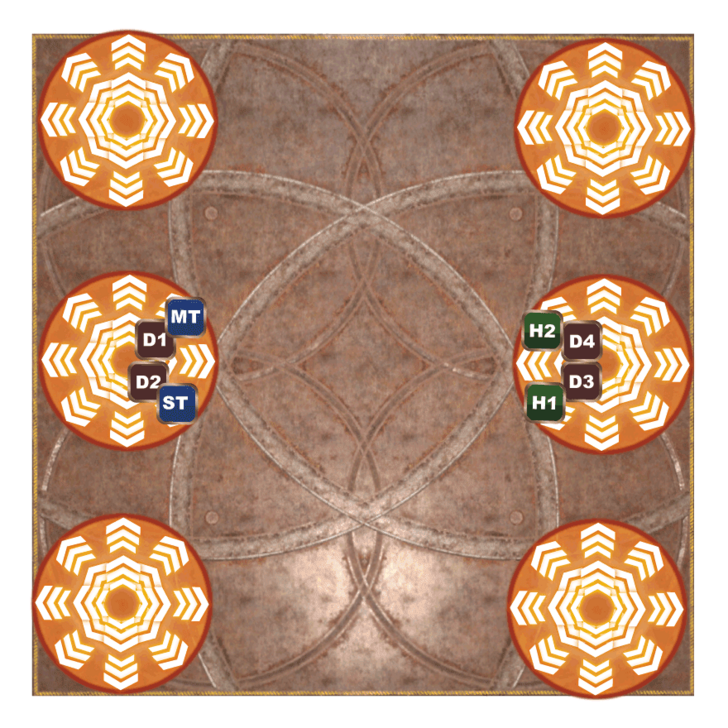
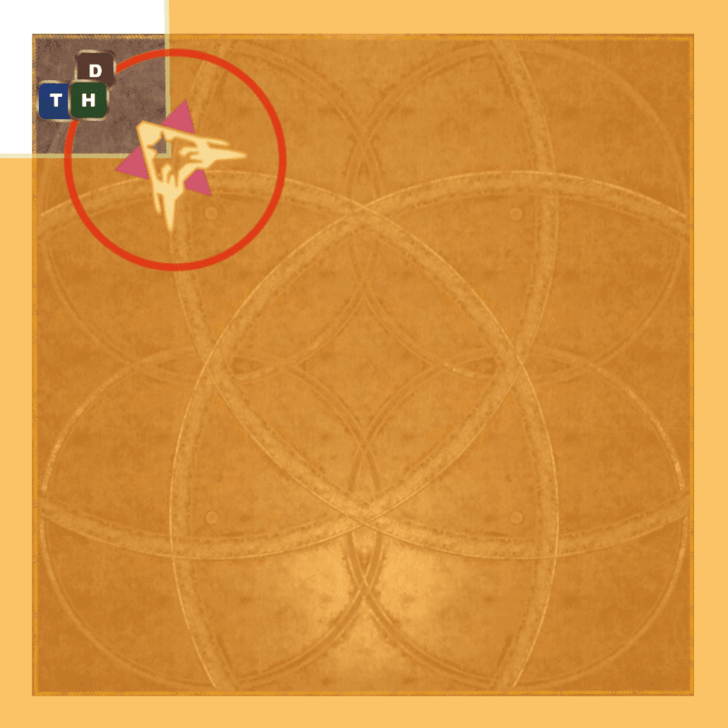
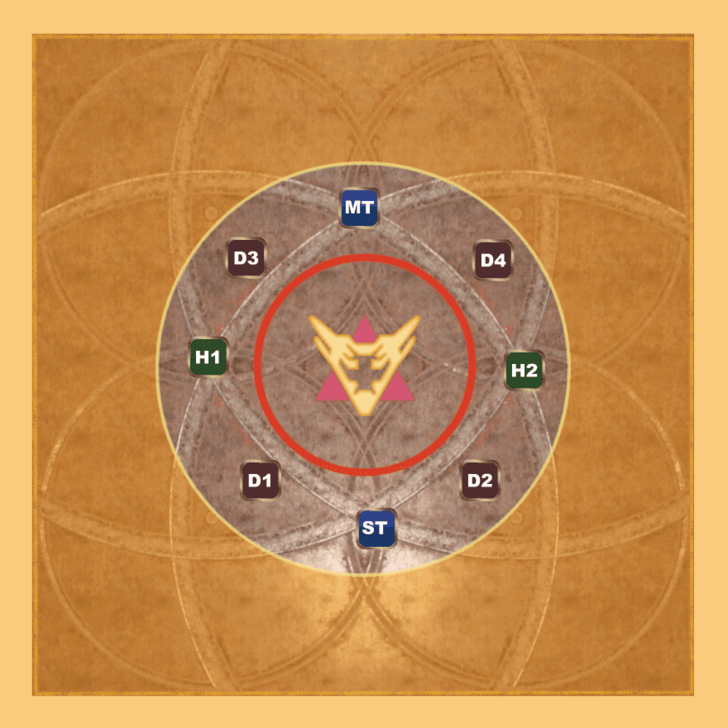
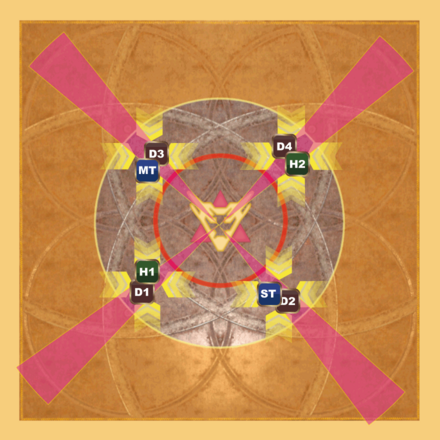
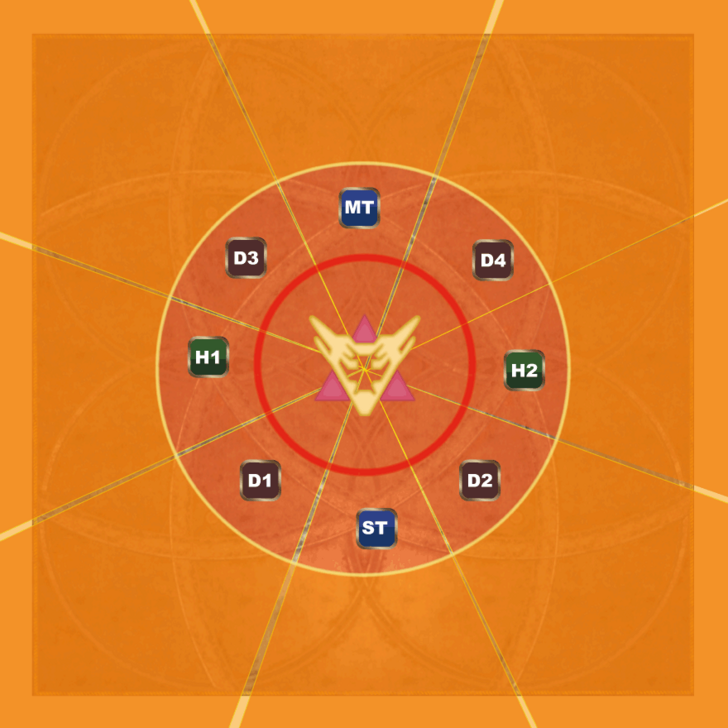
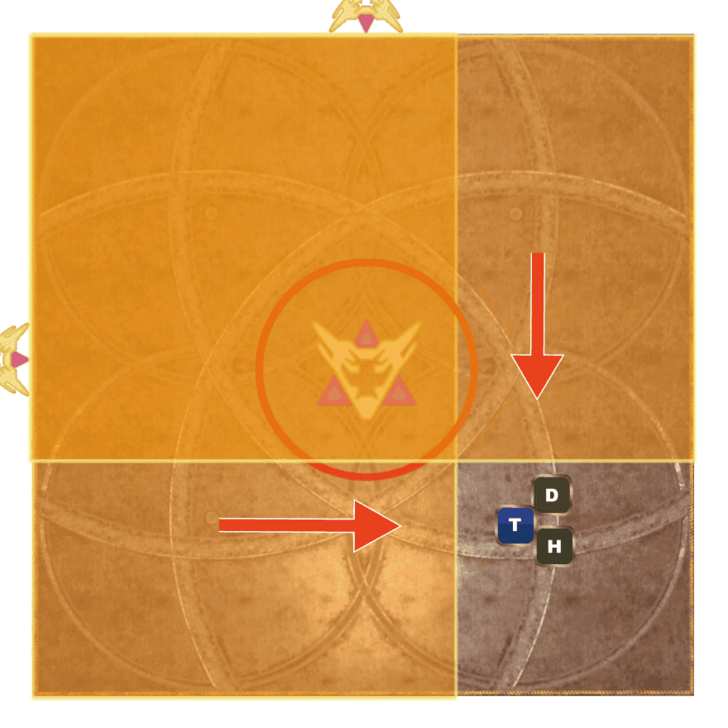
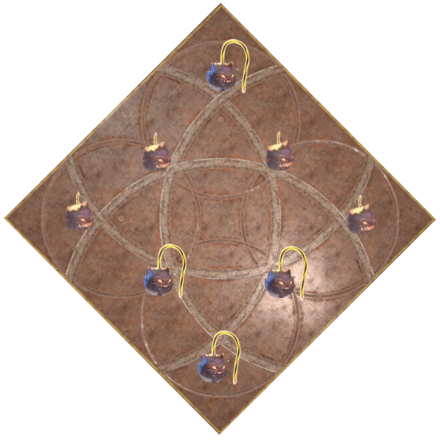
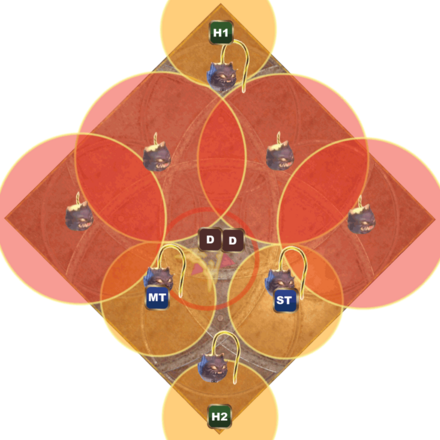
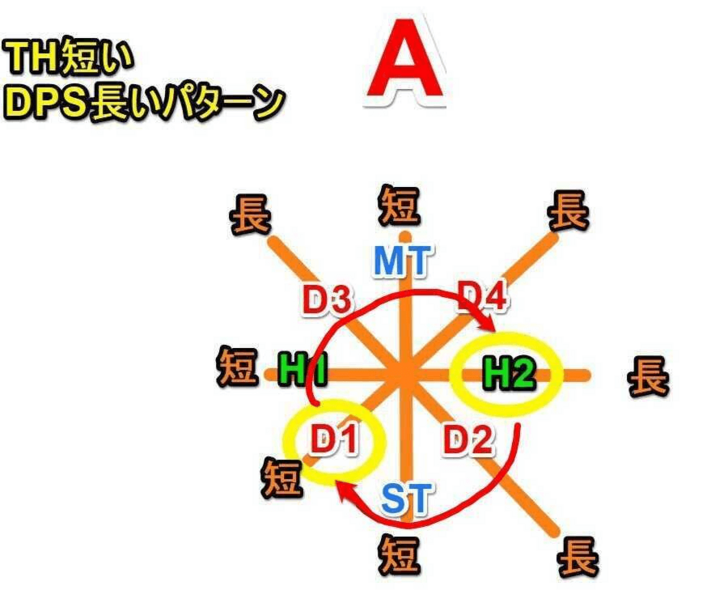
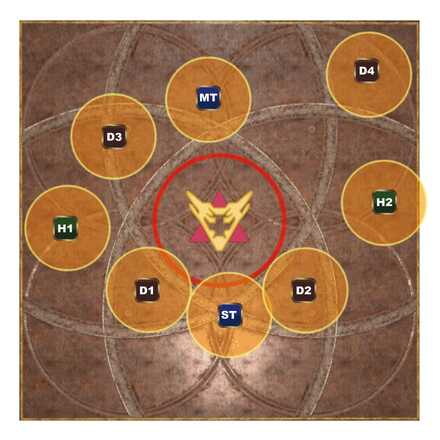
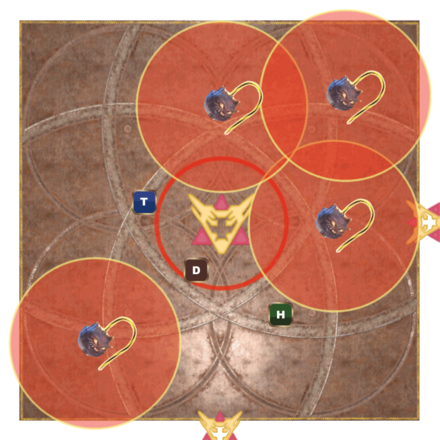
Quadruple or Octuple Lariat
| Quadruple Pattern | |
|---|---|
 ① The boss will launch a circular AoE, so prepare to move away. |
 ② At the same time as the AoE, a fan area will occur that can be dealt with in pairs, so move away from the boss and deal with it in pairs of MTD3/STD2/H1D1/H2D4. |
| Octuple Pattern | |
 ① The boss will launch a circular AoE, so prepare to move away. |
 ② At the same time as the AoE, a fan area appears on everyone so move away and spread out in 8 directions to receive it. |
In the Lariat, the boss will attack in a circular and fan-shaped AoE at the same time. The fan-attack will be split between two people in a Quadruple Lariat, while the Octuple Lariat will require your team to spread out in eight directions, so try to move away from the boss and deal with them in pairs or spread out.
Quadruple Lariat Range is Narrow
The fan-shaped AoE of a Quadruple Lariat is very narrow, so make sure to overlap your pair firmly. If you are even slightly out of position and end up receiving the attack alone, you will be defeated, so be careful.
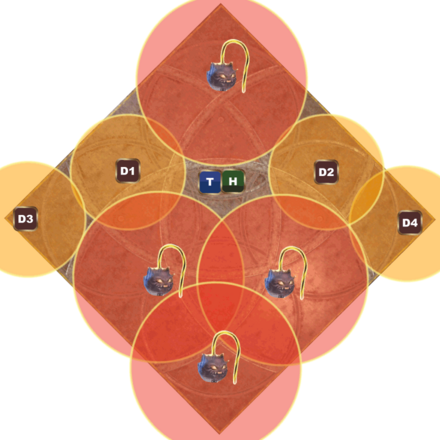
Quadraboom or Octoboom Dive
| Quadraboom Pattern | |
|---|---|
 ① Distance attacks occur from the center of the outer perimeter in the direction the boss is facing, so stay away from the back of the boss. |
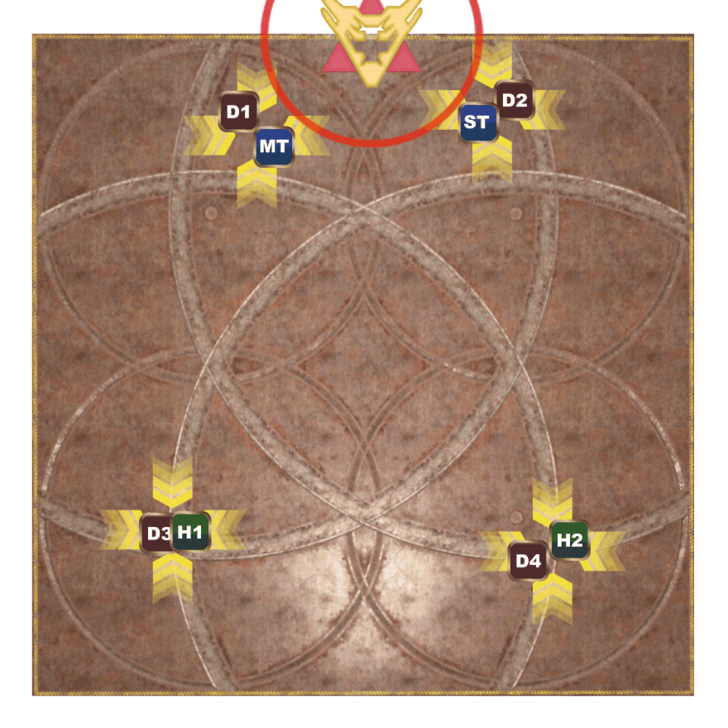 ② In the case of Quadraboom Dive, after the distance attack hits, it is split among pairs and received by MTD1/STD2/H1D3/H2D4. |
| Octoboom Pattern | |
 ① Distance attacks occur from the center of the outer perimeter in the direction the boss is facing, so stay away from the back of the boss. |
 ② In the case of Octoboom Dive, the distance attack will spread out after impact so the positions will not overlap. |
Octoboom Dive has Narrow Spaces
In the case of Octoboom Dive, the melee group that will be spread out near the boss will have a very narrow space, so be careful not to overlap the explosion. After the melee group approaches with the rush skill, it is safe to move away a little to leave space for the melee group.
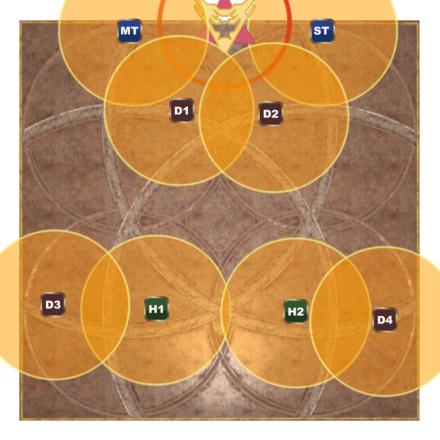
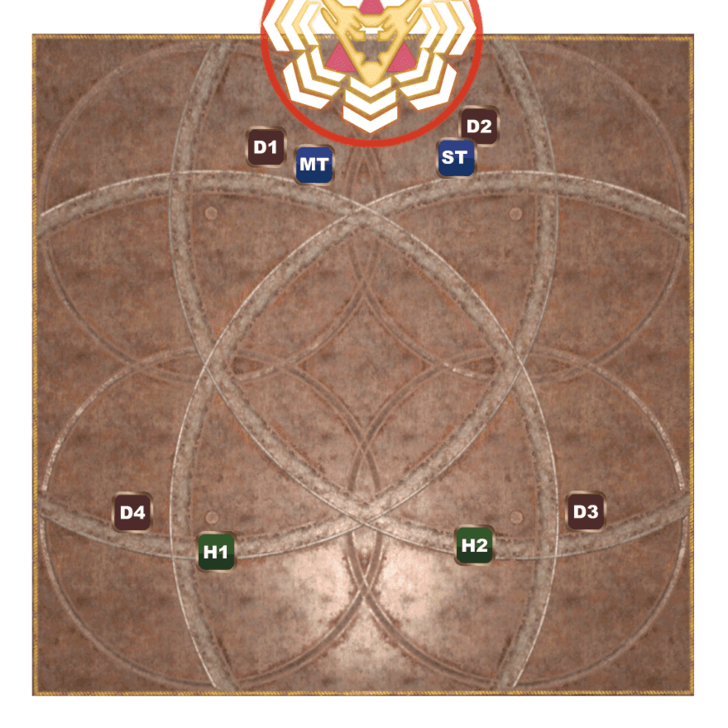
Barbarous Barrage + Murderous Mist
| Move Sequence | |
|---|---|
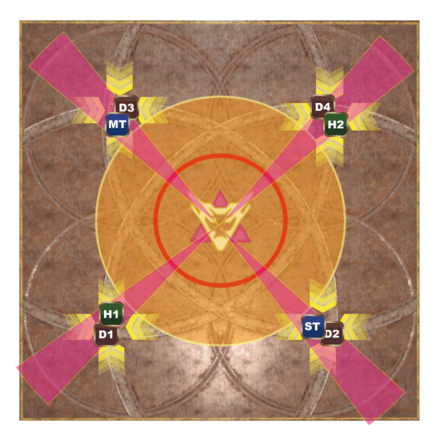
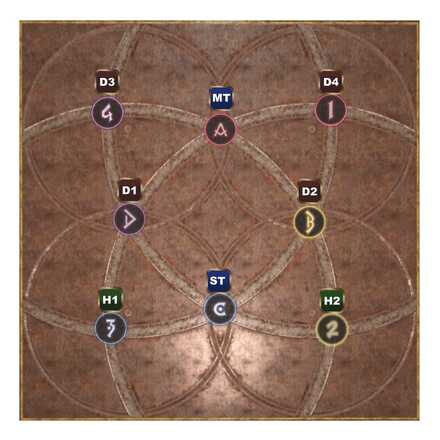
 ① Six towers will appear, so split into 4:4 melee and ranged teams to deal with them. If three towers appear on the north and south sides, the melee team will step on the north tower and the ranged team will step on the south tower for four people. |
 If there are three towers on the east and west sides, the melee team will step on the west tower and the ranged team will step on the east tower for four players. |
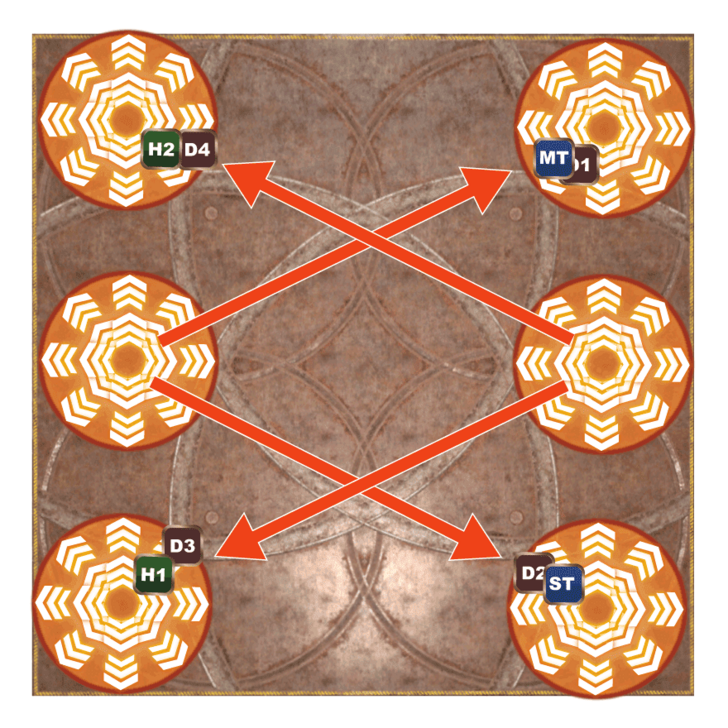 ② Face the center, MTD1/H1D3 will fly to the far left, and STD2/H2D4 will fly to the far right when they get hit by the knockback. |
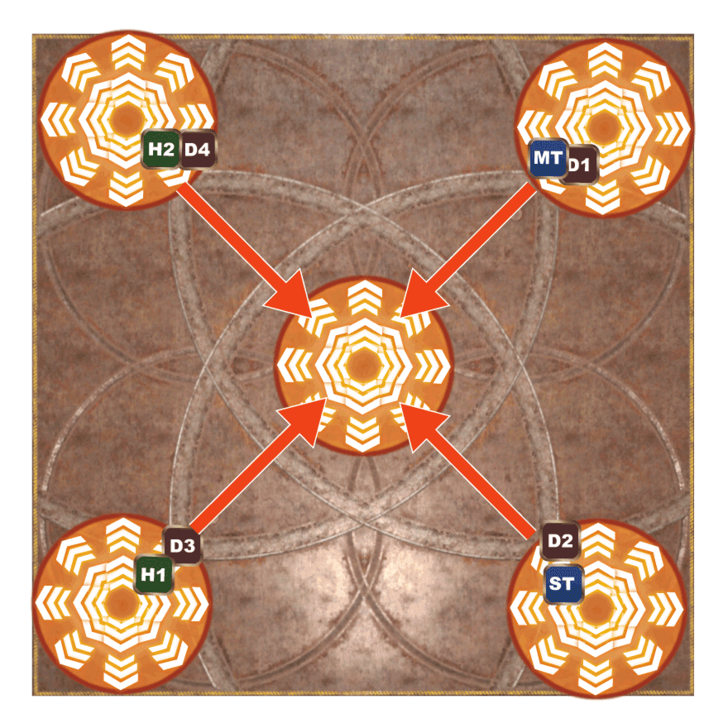 ③ From the two-player tower in the four corners where you were knocked back, you will be then knocked back again towards the center |
 ④ The boss moves to the four corners, so use the knockback to fly towards the boss from the central tower. |
 ⑤ Avoid Murderous Mist (270 degree attack) behind the boss to end the gimmick. |
Six towers that generate knockback attacks will appear on either the north-south or east-west sides. Of the six towers that appear, the four-player tower in the middle will be the first to land, so melee teams should enter the north or west tower, and ranged teams should enter the south or east tower.
When the towers land, knockback occurs from the center of the tower, so MTD1/H1D3 will be knocked back to the far left when looking at the center, and STD2/H2D4 will be knocked back to the far right when looking at the center .
If you are blown away in the direction you are assigned, then use the two-player tower to jump to the center. The boss will move randomly to one of the four corners, so jump towards the boss from the last central tower . Finally, the boss will use Murderous Mist from the back safety area, so avoid it by jumping behind the boss to end the gimmick.
Doping Draught
The boss moves to the center and casts Doping Draught to strengthen each attack. This is a special move that does not have an attack judgment, so just keep attacking without worrying.
Quadruple or Octuple Lariat
 If the boss has flames on both arms, the attack will be a donut-shaped AoE instead of a circular AoE. |
|
| Quadruple Pattern | |
|---|---|
 ① The boss will launch a donut-shaped AoE, so get close beforehand. |
 ② At the same time as the donut AoE occurs, a fan AoE will also occur, so deal with it in pairs in MTD3/STD2/H1D1/H2D4 near the boss. |
| Octuple Pattern | |
 ①The boss will launch a donut AoE, so get close beforehand. |
 ② At the same time as the donut AoE appears, a fan AoE appears around everyone as well, so spread out in 8 directions near the boss to receive it. |
Doping Draught adds new attack patterns. If the boss has flames on both arms when casting, it will be a donut-shaped AoE. If the boss does not have flames it will be a circular AoE. There is no change to the fact that the attack is split between two bosses for Quadruple Lariat, and spread out for Octuple Lariat.
Also, if the boss uses Doping Draught and hit a Quadruple or Octuple Lariat, the boss will definitely be enveloped in flames and perform a donut-shaped AoE, but its moves will be random after that.
Quadraboom or Octoboom Dive
If the boss has flames on both arms, the knockback attack will come from the outer perimeter of the direction the boss is facing, instead of from the distance. |
|
| Quadruple Pattern | |
|---|---|
 ① The knockback attack will occur from the center of the outer perimeter in the direction the boss is facing, so get close when it occurs or block it with Arms Length or Surecast. |
 ② In the case of Quadraboom, the knockback attack is split among pairs after it hits, so it will be received by MTD1/STD2/H1D3/H2D4. |
| Octuple Pattern | |
 ① The knockback attack will occur from the center of the outer perimeter in the direction the boss is facing, so get close when it occurs or block it with Arms Length or Surecast. |
 ② In the case of Octoboom, the distanced attack will spread out after impact, so the positions will not overlap. |
After Doping Draught, if the boss has flames on both arms when casting Quadraboom or Octoboom Dive, it will knock back from the outer perimeter of the boss's direction. If it does not have flames, it will attack from the boss's direction. There is no change in the fact that Quadraboom are split between the two, and Octoboom are scattered. It is recommended to use Arms Length and Surecast for knockback, as they are effective.
If you are not using a knockback nullification skill, be careful of the direction you are blown away so you don't get knocked back to the outer perimeter.
The Quadraboom or Octoboom Dive immediately after Doping Draught will definitely cause a knockback attack. After that, it will be random so make sure to check the boss carefully.
Brutal Impact
When strengthened by Doping Draught, Brutal Impact's attack count increases to 6. The damage taken will increase significantly compared to before doping, so use mitigation skills and barriers to reduce the damage taken.
Knuckle Sandwich
After Doping Draught, the number of attacks for the Knuckle Sandwich to the two tanks also increases to 6. At this stage, the damage is still something that a single MT can withstand.
Tag Team + Chain Deathmatch + Lariat Combo
| Move Sequence | |
|---|---|
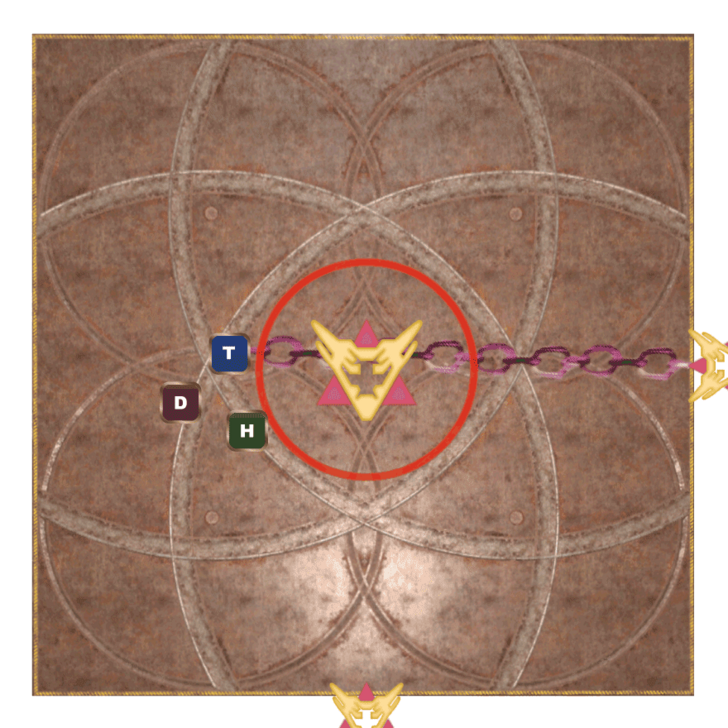 ① Two clones are summoned by chanting the Tag Team spell, and one of them is chained to the other clone. Note: Whichever clone you are chained to will be random. |
 ② The two clones will perform a Lariat Combo but you will only receive the attack of the chained clone. |
 ③ The two clones perform another Lariat Combo. |
|
For Tag Team, two clones are summoned onto the field. In the subsequent Chain Deathmatch, you will be chained to one of the clones, and the two clones will perform a Lariat Combo that attacks half of the opponent's area. You must hit the first Lariat Combo of the chained clone while avoiding the Lariat Combo of the non-chained clone.
After that, he will perform another Lariat Combo, so avoid both of them. The second Lariat Combo will be on the diagonal side of the first one, so while you are dealing with the first Lariat Combo, check where the safe area will be.
Final Fusedown
| Long Fuse on Tank | |
|---|---|
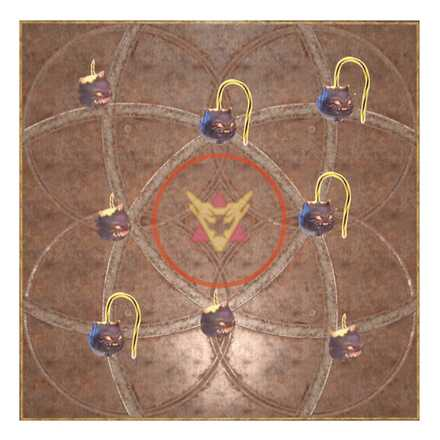 ① Eight bombs will appear on the field. |
 ②The long fuse bomb that is alone is the north point. |
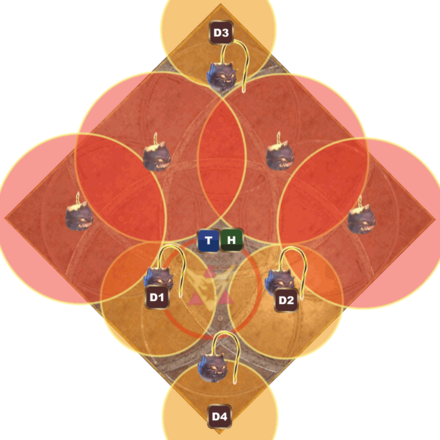 ③ The four DPS with the shortest fuses will disperse to their designated positions determined by the macro. The other four Tanks and Healers will wait in the center. |
 ④ After the first explosion, the four Tanks and Healers with the long fuses will disperse to their designated positions determined by the macro. The other four DPS players will wait in the center. |
| Long Fuse on DPS | |
 ① Eight bombs will appear on the field. |
 ②The long fuse bomb that is alone is the north point. |
 ③ The four Tanks and Healers players with short fuses will disperse to their designated positions determined by the macro. The other four DPS will wait in the center. |
 ④ After the first explosion, the four DPS with the longest fuses will disperse to their designated positions determined by the macro. The other four Tanks and Healers will wait in the center. |
Eight bombs appear on the field, and the ones with the shortest fuse explode first, followed by the long ones. Players are also given short and long fuses based on their roles, divided into tank, healer, and DPS.
The Long Fuse player will deal with the explosion of the Short Fuse, and vice versa. The waiting position for the group of players who do not deal with the fuse will be near the center.
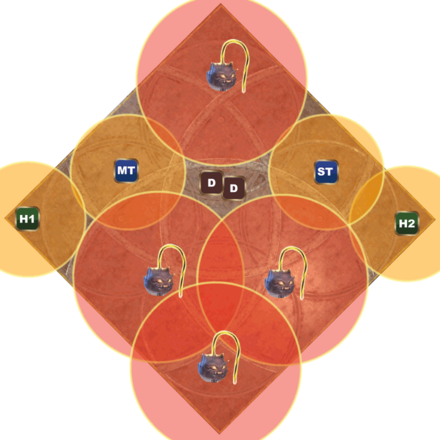
Fusefield + Bombarian Flame
| Move Sequence | |
|---|---|
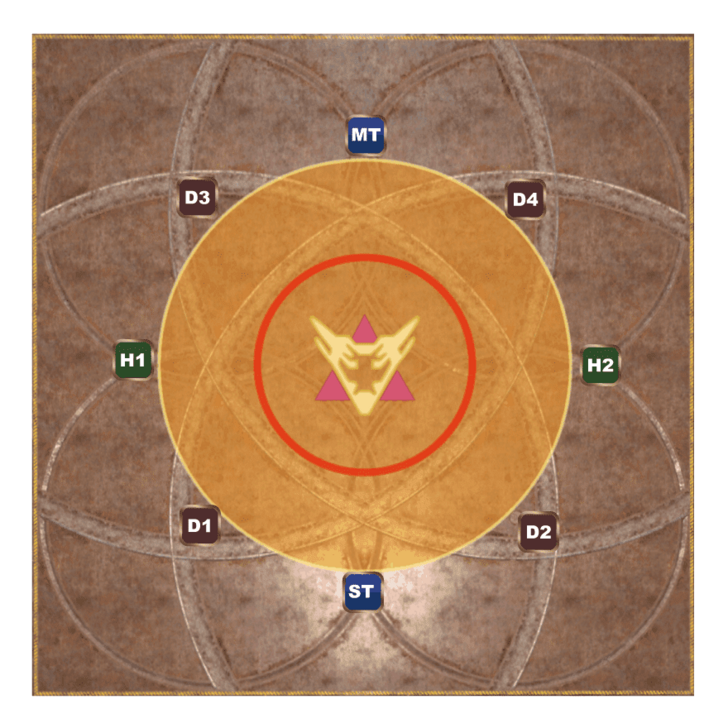
 ① Stand on the fuse at the basic Spread positions. Note: This shows a TH with a Short Fuse and a DPS with a Long Fuse. |
 ② People who are not assigned the same length of fuse at their spreading position (H2 and D1) needs to move clockwise to an open fuse. |
 ③ When everyone has reached their assigned fuse, they need to step on the fuse in the order of their role starting with the person with the shortest fuse. Order of Role: MT>ST>H1>H2/D1>D2>D3>D4 |
|
The Fusefield is a gimmick that creates an AoE that will disable you if you enter the center, and eight fuses (4 short fuse, 4 long fuse) are connected to it. At the same time, the player is also hit with a debuff called Bombarium, which has a time limit (44 seconds and 25 seconds, divided into TH and DPS groups). The Bombarian Flame lights the fuses, and if the fuse fire reaches the central area, it will wipe you out so try to step on the fuse you are responsible for to put it out before that happens.
Wait for the Debuff to Time Out and Your HP to Return Before Stepping on the Fuse
If you step on the fuse, you will receive damage to all enemies and a resistance reduction Debuff every time. If the next person steps on the fuse while your HP is low or you still have the resistance reduction debuff, you will be wiped out, so make sure to wait until your HP has returned and the debuff has disappeared before dealing with the fuse.
Quabraboom or Octoboom Bombarian Special
| Move Sequence | |
|---|---|
 ① After 5 consecutive attacks on all enemies, the 6th attack will activate a circular AoE so try to move away. |
 ②The donut AoE will be activated immediately after the 7th hit, so get inside the boss' target circle. |
 ③ A knockback attack warning will appear. Spread out in an X formation. |
 ④ Knock back when performing a dive attack. |
 ⑤ Then a Quabraboom Dive is activated. |
 ⑥ Then a Octoboom Dive is activated. |
This move has a total of 10 consecutive physical attacks. The final center attack has a knockback attack followed by a Quabraboom or Octoboom Dive.
The order is 5 consecutive physical attacks → a circle AoE around the boss → a donut AoE in the boss's safe zone → a physical AoE → a knockback from a dive from outside the field → a Quabraboom or Octoboom Dive. Be especially careful of the 6th and 7th AoE attacks, the last knockback, and the Dive attack after the knockback.
Adjust the position of the knockback so that it flies to one of the four corners of the field. If it flies in a cross direction, it will cause you to go outside the field so try to avoid that.
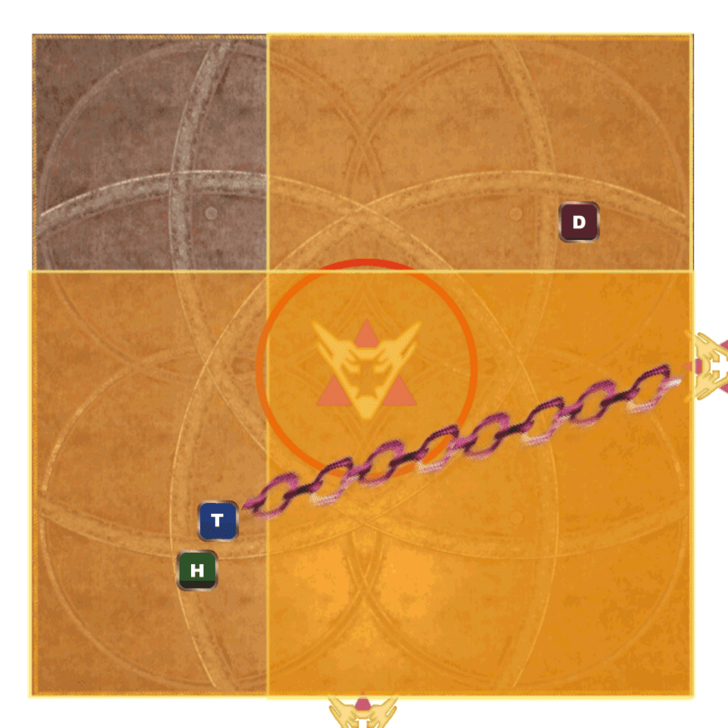
Fuses of Fury + Tag Team + Chain Deathmatch
| Move Sequence | |
|---|---|
 ① A fuse bomb appears. |
 ② Then a chain is formed from the boss and its clone. |
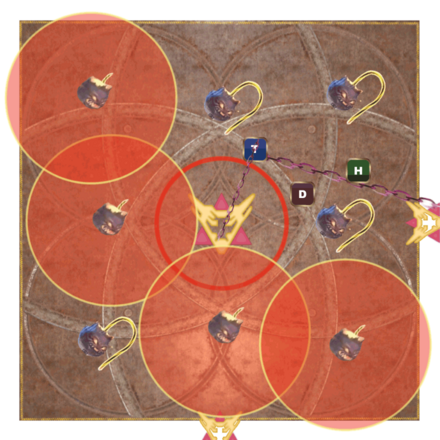 ③ The short fuse will explode first so try to move to the side of the bomb with the long wire. |
 ④ Next, a long fuse will be activated. At this time, the clone will prepare for a Lariat, so go to the position where the Murderous Mist will hit and where the clone's Lariat will hit you. |
 ⑤ Clone Lariat + Murderous Mist is activated. |
 ⑥ The second Lariat is launched which is diagonally opposite the first Lariat. |
This is a Chain Deathmatch gimmick involving the boss itself and its clones while avoiding the explosions of fuse bombs. Since everyone will definitely be hit by Murderous Mist, get in a position where you will be hit by one of the clone Lariats within range of the 270-degree Murderous Mist. The clones will also hit you twice, so move to the safe area opposite the first Lariat to avoid the second one.
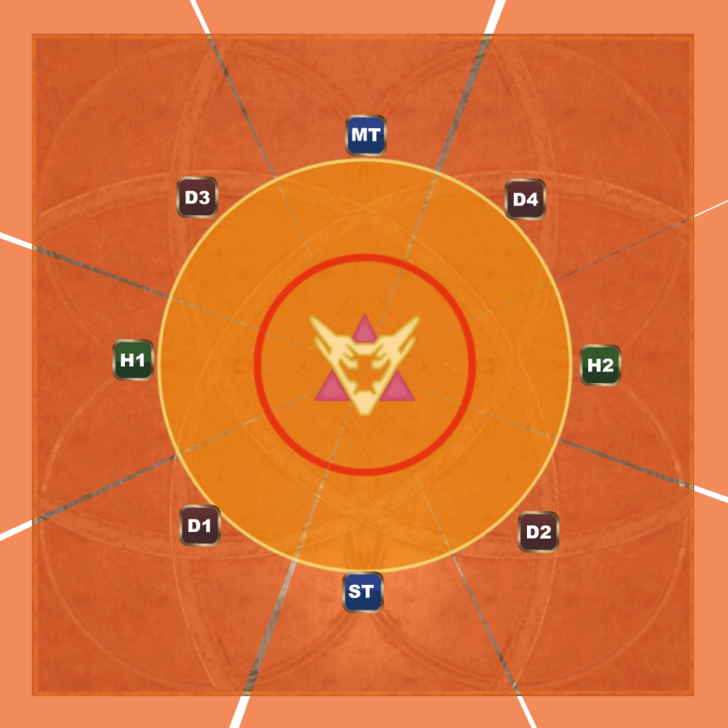
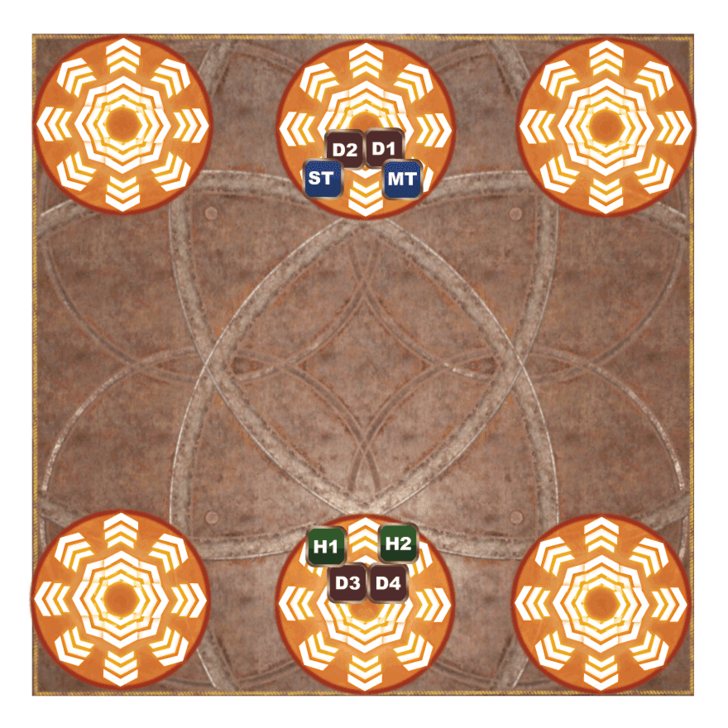
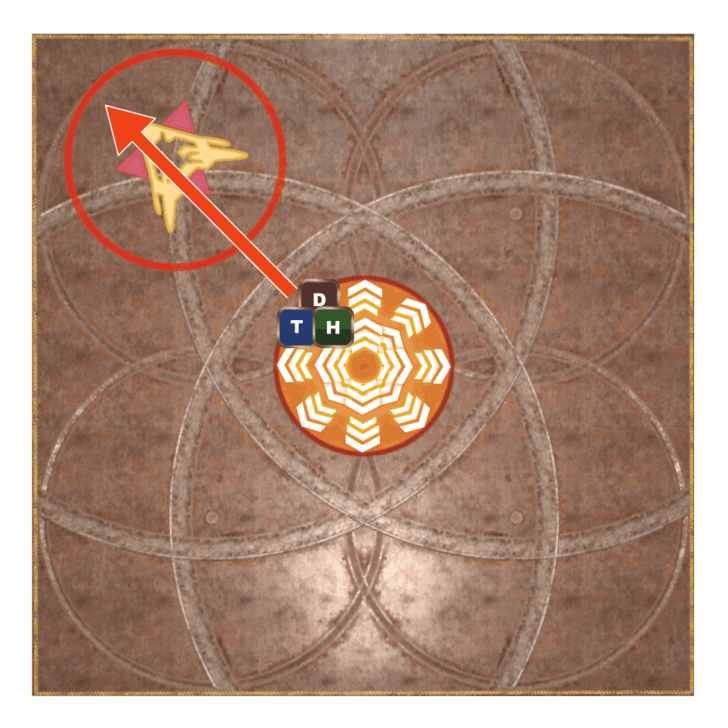
Fuse or Foe + Infernal Spin
Fuse or Foe gives 4 people a long fuse and 4 people a short fuse. It's a gimmick to avoid the signs of the rotating fan, circle, and donut AoE. With this method, you do not need to check the length of the fuse attached to you , so first focus on avoiding the explosive spinning fire.
Once you have avoided the spinning fire, quickly move to the vicinity of your spread out positions and avoid the warning range that appears with small movements around that marker. If each person avoids the warning range near their own marker, the fuse explosion will naturally be dealt with.
| Player Positions | |
|---|---|
 |
 |
Barbarous Barrage + Lariat Combo
In the first half of the Barbarous Barrage, the last attack is a 270-degree Murderous Mist, but in the second half, it changes to a Lariat Combo attack. The Lariat Combo is a move that attacks the boss's glowing arm twice in a row, so avoid it by being knocked back diagonally from the final central tower of the Barbarous Barrage to the side where the boss's arm is not glowing.
After avoiding the first lariat, immediately check the boss's arm on the outer perimeter to determine the safe spot for the second lariat. At this time, the boss will not attack on the opposite side of the first lariat, but may attack twice in a row on the same side , so make sure to check the boss's glowing arm.
Ultimate Bombarian Special
It's a time-out attack. However, the time doesn't run out immediately after the incantation is complete. The Bombarian Special consists of 5 consecutive attacks, a circular AoE around the boss, and a donut-shaped AoE as well. You can attack for about 15 seconds after the incantation is complete, so try work together during this time and keep attacking.
AAC Light-heavyweight M3 (Savage) Timeline
| No. | Action | Effect |
|---|---|---|
| 1 | Brutal Impact | Continuous physical attacks on all targets. |
| 2 | Knuckle Sandwich | Physical consecutive attack for the main tank |
| 3 | Quadruple or Octuple Lariat | Boss-centered circular AoE. Quadruple: 4-way split Octuple: 8-way scattered fan AoE |
| 4 | Quadraboom or Octoboom Dive | Distance attack from the outer perimeter of the direction the boss is facing. Quadraboom: 4 shock split Octoboom: 8 shock scattered circular AoE |
| 5 | Brutal Impact | Continuous physical attacks on all targets. |
| 6 | Barbarous Barrage | Destroy 3 towers in a row that knocks back when stepped on. |
| 7 | Murderous Mist | The boss moves to one of the four corners and attacks in a 270-degree fan-shaped AoE. |
| 8 | Doping Draught | A technique that strengthens the boss. Subsequent attacks and tank attacks will increase in number. |
| 9 | Quadruple or Octuple Lariat | If the boss arms are on fire, a new donut AoE will be added. |
| 10 | Quadraboom or Octoboom Dive | If the boss arms are on fire, a knockback will be added from the point of impact. |
| 11 | Brutal Impact | Continuous physical attacks on all targets. |
| 12 | Knuckle Sandwich | Physical consecutive attack for the main tank |
| 13 | Tag Team | Two clones of the boss appear on the outer perimeter. |
| 14 | Chain Deathmatch | Be chained to one of the clones. → The two clones will launch two consecutive Lariat attacks. The first one will only be hit by the one connected by the chain. → The second one will be avoided by both. |
| 15 | Quadruple or Octuple Lariat | Boss-centered circular AoE. Quadruple: 4-way split Octuple: 8-way scattered fan AoE< |
| 16 | Brutal Impact | Continuous physical attacks on all targets. |
| 17 | Final Fusedown | Four players are given long fuses, and the remaining four are given short fuses. 8 bombs will also appear on the field for the player to defuse. |
| 18 | Quadraboom or Octoboom Dive | Distance attack from the outer perimeter of the direction the boss is facing. Quadraboom: 4 shock split Octoboom: 8 shock scattered circular AoE |
| 19 | Fusefield | Step on each fuse that appears on the field before it reaches the center. |
| 20 | Knuckle Sandwich | Physical consecutive attack for the main tank |
| 21 | Quadraboom or Octoboom Bombarian Special | 5 consecutive area attacks → circle area around boss → donut AoE → knockback from center → pair split or scattered circle AoE |
| 22 | Fuses of Fury | Bombs with short and long fuses appear on the field → the short bombs explode before the long bombs explode |
| 23 | Tag Team | Two clones appear on the outer perimeter, performing two consecutive Lariats. |
| 24 | Chain Deathmatch | The boss itself is connected to one of the outer clones by a chain. |
| 25 | Murderous Mist | Attack the boss 270 degrees in the direction it is facing (it will hit you on purpose because it is chained to the boss). |
| 26 | Quadraboom or Octoboom Dive | Distance attack from the outer perimeter of the direction the boss is facing. Quadraboom: 4 shock split Octoboom: 8 shock scattered circular AoE |
| 27 | Brutal Impact | Continuous physical attacks on all targets. |
| 28 | Knuckle Sandwich | Physical consecutive attack for the main tank |
| 29 | Fuse or Foe | All players will be given a long or short fuse. |
| 30 | Infernal Spin | The boss spins and attacks in a fan-shaped AoE in front of the enemy, with multiple circular or donut AoEs appearing in succession. |
| 31 | Quadruple or Octuple Lariat | Boss-centered circular AoE. Quadruple: 4-way split Octuple: 8-way scattered fan AoE |
| 32 | Brutal Impact | Continuous physical attacks on all targets. |
| 33 | Barbarous Barrage | Destroy 3 towers in a row that knocks back when stepped on. |
| 34 | Lariat Combo | 2 consecutive Lariats towards the glowing arm. |
| 35 | Knuckle Sandwich | Physical consecutive attack for the main tank |
| 36 | Doping Draught | A technique that strengthens the boss. Subsequent attacks and tank attacks will increase in number. |
| 37 | Ultimate Bombardier Special | Time runs out after consecutive area attacks Note: The time does not expire immediately after chanting is completed. |
How to Unlock AAC Light-heavyweight M3 (Savage)
Complete The Neoteric Witch
AAC Light-heavyweight M3 (Savage) will be unlocked after completing the quest “The Neoteric Witch” from the questline received from the Stylish Stranger in Solution Nine (X:19.1, Y:18.8)
AAC Light-heavyweight M3 (Savage) Information
| AAC Light-heavyweight M3 (Savage) | |
|---|---|
 |
|
| Level | 100 |
| Item Level | 710 |
| Party Size | 8 |
| Time Limit | 90 min |
| Requisite Quest | The Neoteric Witch |
FFXIV Dawntrail Related Guides
List of Dawntrail Raids
Comment
Author

Please participate in our site
improvement survey
03/2026
improvement survey
03/2026
Would you assist in
improving Game8's site?
improving Game8's site?

×
We are listening to our users' valuable opinions and discussing how to act on them.
The information collected through this survey will be used for the purpose of improving our services. In addition, the information will only be disclosed a part of a statistic in a format that will not allow identification of personal information.
Begin Survey
Not Now
×
Please rate each item regarding Game8.co's Advertisements.
Amount of Ads
Very Dissatisfied
Somewhat Dissatisfied
Fine
Somewhat Satisfied
Highly Satisfied
Placement of Ads
Timing of Ad Display
Ad Loading Speed
Safeness of Ads
Content of Ads
×
Please rate each item regarding Game8.co's Quality of Articles.
Amount of information
Very Dissatisfied
Somewhat Dissatisfied
Fine
Somewhat Satisfied
Highly Satisfied
Frequency of updates
Speed of new information
Accuracy of articles
Understandibility of articles
Readability of sentences
×
Please rate each item regarding Game8.co's Usability of the Site.
Ease of finding information
Very Dissatisfied
Somewhat Dissatisfied
Fine
Somewhat Satisfied
Highly Satisfied
Loading Speed
Use of Color
Font Size
Visibility of Images
Easy to Understand Layout
×
Please rate each item regarding Game8.co's Message Boards, Comments.
Ease of Writing
Very Dissatisfied
Somewhat Dissatisfied
Fine
Somewhat Satisfied
Highly Satisfied
Readability
Ease in Finding Information
Comment Quality
Comment Quantity
Admin Response
×
Please rate each item regarding Game8.co's Site's new design.
Please rate our site's new design
Very Dissatisfied
Somewhat Dissatisfied
Fine
Somewhat Satisfied
Highly Satisfied
Do you think that the website's design change makes the site easier to use?
Has the new design made it easier for you to find information on the site?
Has the new design improved the overall visual appeal of the site?
How would you rate your overall satisfaction with the new design of the site?
×
How likely are you to recommend Game8 to someone you know?
Very Unlikely
0
1
2
3
4
5
6
7
8
9
10
Very Likely
If you have other opinions regarding potential improvement to the website, please share them with us. We would appreciate your honest opinion.
Note: This is a free response section, so you can proceed without entering anything.
Note: Please be sure not to enter any kind of personal information into your response.
Note: Please be sure not to enter any kind of personal information into your response.
×
Thank You
×
Thank you for participating in our survey! Your answers will help us to improve the quality of our website and services.
We hope you continue to make use of Game8.
We hope you continue to make use of Game8.
Close
Rankings
- We could not find the message board you were looking for.
Gaming News


![Monster Hunter Stories 3 Review [First Impressions] | Simply Rejuvenating](https://img.game8.co/4438641/2a31b7702bd70e78ec8efd24661dacda.jpeg/thumb)
Popular Games

Genshin Impact Walkthrough & Guides Wiki
Honkai: Star Rail Walkthrough & Guides Wiki
Umamusume: Pretty Derby Walkthrough & Guides Wiki
Pokemon Pokopia Walkthrough & Guides Wiki
Resident Evil Requiem (RE9) Walkthrough & Guides Wiki
Monster Hunter Wilds Walkthrough & Guides Wiki
Wuthering Waves Walkthrough & Guides Wiki
Arknights: Endfield Walkthrough & Guides Wiki
Pokemon FireRed and LeafGreen (FRLG) Walkthrough & Guides Wiki
Pokemon TCG Pocket (PTCGP) Strategies & Guides Wiki


Recommended Games
Diablo 4: Vessel of Hatred Walkthrough & Guides Wiki
Cyberpunk 2077: Ultimate Edition Walkthrough & Guides Wiki
Fire Emblem Heroes (FEH) Walkthrough & Guides Wiki
Yu-Gi-Oh! Master Duel Walkthrough & Guides Wiki
Super Smash Bros. Ultimate Walkthrough & Guides Wiki
Pokemon Brilliant Diamond and Shining Pearl (BDSP) Walkthrough & Guides Wiki
Elden Ring Shadow of the Erdtree Walkthrough & Guides Wiki
Monster Hunter World Walkthrough & Guides Wiki
The Legend of Zelda: Tears of the Kingdom Walkthrough & Guides Wiki
Persona 3 Reload Walkthrough & Guides Wiki


All rights reserved
© SQUARE ENIX
Square Enix, Inc., 999 N. Pacific Coast Highway, El Segundo, California 90245
LOGO ILLUSTRATION:© YOSHITAKA AMANO
The copyrights of videos of games used in our content and other intellectual property rights belong to the provider of the game.
The contents we provide on this site were created personally by members of the Game8 editorial department.
We refuse the right to reuse or repost content taken without our permission such as data or images to other sites.