Fossil Roo (Disc 2)
This is the Story Walkthrough for Fossil Roo (Disc 2) from Final Fantasy IX (FFIX, FF9). Read on for more information about objectives and bosses within this section.
List of Contents
| Previous Chapter |
Next Chapter |
|---|---|
| Pinnacle Rock | Black Mage Village |
Fossil Roo - Objectives
| Objectives | |
|---|---|
| 1 | Exit Lindblum through the Dragon's Gate and head to Qu's Marsh. |
| 2 | Head deeper until you reach Master Quale's hut. |
| 3 | Head back to the two Moogles then head right. Go through the rightmost entrance to the thicket. |
| 4 | Enter the newly discovered path to enter Fossil Roo. |
| 5 | Run away from the Armodullahan then prepare for a boss fight. |
| Boss | Lani |
| 6 | Head deeper until you see a Gargant. |
| 7 | Pluck the flower near the Gargant tunnel then interact with the tunnel to ride the Gargant. |
| 7 | Head deeper until you see a Treasure Hunter. Go north and ride the gargant. |
| 8 | Activate Switch No.1 then ride the Gargant. |
| 9 | Head north then at the end of the path, activate Switch No.2 |
| 10 | Return then ride the Gargant back to Switch No.1 |
| 11 | Flip Switch No.1 then return to the Treasure Hunter by riding the Gargant. |
| 12 | Take the path south-west then ride the Gargant. |
| 13 | Climb the stairs then flip Switch No.4. Head right then ride the Gargant there. |
| 14 | Climb the vine to the upper left most part then activate Switch No.3. |
| 15 | Once Switch No.3 is activated, head to the bottom right path and ride the Gargant to exit Fossil Roo. |
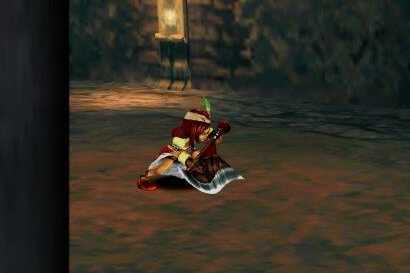
Armodullahan
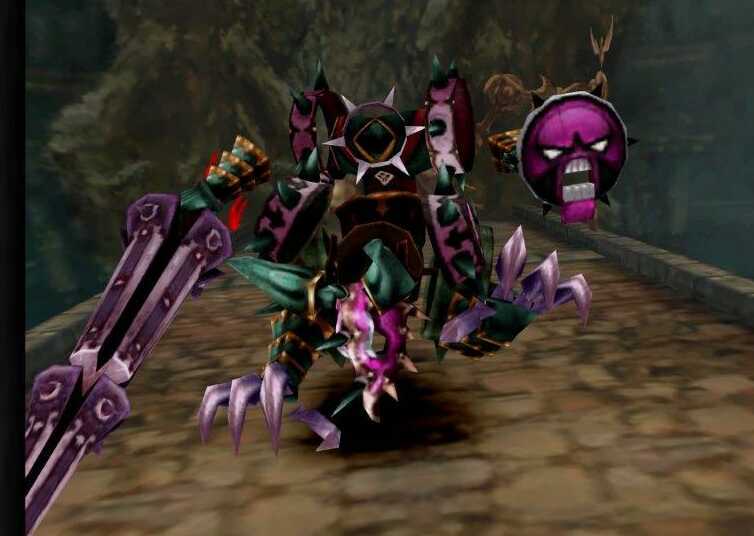
There will be several pendulum blades but they will deal no damage to your party. If the Armodullahan does catch up with your party, just use a single Thundara spell and it will fall temporarily.
Map Guide
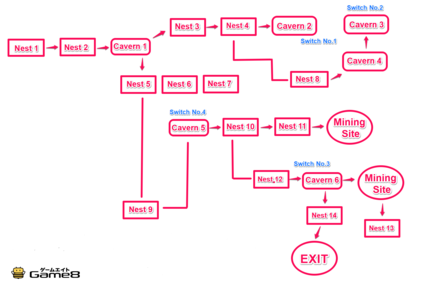 Enlarge
Riding Gargants
To ride Gargants, pluck a flower near the area then interact with the Gargant's path to lift up the flower. This will allow Zidane to ride the Gargant while they eat the flower.
Fossil Roo - Items and Equipment
| Item | Quantity | Location |
|---|---|---|
| Ore & Ether | x2 | Received from Quale when you catch 2 or 5 frogs. |
| Elixir | x1 | Located in the open cell, at the very beginning of the dungeon. |
| Fairy Earrings | x1 | Acquired outside after being dropped off. |
| Ether | x1 | Obtained by going through the top path. |
| Lamia's Tiara | x1 | Located at the ledge above the mining site. |
| Select Items | Ores and Hi-Potions, or a Madain's Ring | Acquired through digging. |
| Survival Vest | x1 | Located to the far left side. |
Fairy Earrings
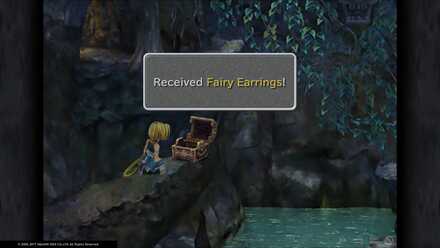
From the second destination where the Gargant dropped you, keep descending the stairs until you pass the Moogles. Pick up the flower to call a Gargant that will bring you to a treasure chest.
Lamia's Tiara
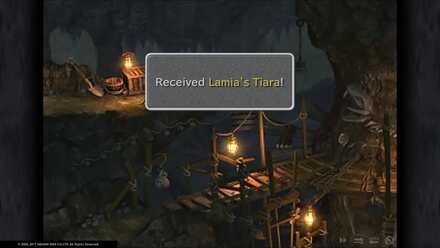
Area 1: From the second destination where the Gargant dropped you, descend the stairs and head right, making your way out onto a balcony.
Area 2: Call a Gargant to drop you in the next destination, take a right, and activate the switch.
Area 3: Go back and call the Gargant again and it will bring you to another area. Circle around and pull the switch here.
After doing so, keep riding the Gargants until you return to Area 1. When you have successfully returned, descend the stairs past the Moogles. Summon the Gargant here to bring you to another destination.
Area 4: You will notice the location has changed and is no longer the area where you got the Fairy Earrings. From there, climb up the stairs and activate the switch. Go out to the balcony and call the Gargant.
Area 5: Once you arrive, head right to get to the treasure chest.
Survival Vest

From Area 4 flip the switch again to change the destination of the Gargant. Ride the Gargant to take you to another area.
Area 6: From here, head right and climb the vines until you get to the upper left tunnel. Enter the tunnel to get to the mining site. The treasure chest is located at the lower left side of the screen from the miner's location.
Fossil Roo - Shops
Treasure Hunter's Inventory
Items
| Item Name | Price |
|---|---|
| Phoenix Down | 150 Gil |
| Annoyntment | 150 Gil |
| Tent | 800 Gil |
| Remedy | 300 Gil |
| Echo Screen | 50 Gil |
| Eye Drops | 50 Gil |
| Soft | 100 Gil |
| Antidote | 50 Gil |
| Potion | 50 Gil |
Weapons
| Weapon Name | Price |
|---|---|
| Ice Brand | 3780 Gil |
| Stardust Rod | 760 Gil |
| Multina Racket | 750 Gil |
| Partisan | 1600 Gil |
Armor
| Armor Name | Price |
|---|---|
| Mage's Hat | 600 Gil |
| Bandana | 500 Gil |
| Mythril Helm | 1000 Gil |
| Mythril Armlet | 500 Gil |
| Thunder Gloves | 1200 Gil |
| Mythril Armor | 1830 Gil |
| Mythril Vest | 1180 Gil |
| Chain Plate | 810 Gil |
| Chain Plate | 810 Gil |
| Adaman Vest | 1600 Gil |
Mogki's and Kuppo's Mogshop
Items
| Item Name | Price |
|---|---|
| Phoenix Down | 150 Gil |
| Annoyntment | 150 Gil |
| Tent | 800 Gil |
| Echo Screen | 50 Gil |
| Eye Drops | 50 Gil |
| Soft | 100 Gil |
| Antidote | 50 Gil |
| Potion | 50 Gil |
Weapons
This shop sells no weapons.
Armor
This shop sells no armor.
Fossil Roo Boss Fights
Lani
Lani is a hunter hired to claim something Garnet has so she focuses Garnet throughout the fight. For more information about Lani, see the link below.
How to Beat Lani
Final Fantasy IX - Related Links
 Go back to the Main Story Walkthrough Front Page
Author

Fossil Roo (Disc 2)
Rankings
- We could not find the message board you were looking for.
Gaming News


Popular Games

Genshin Impact Walkthrough & Guides Wiki
Umamusume: Pretty Derby Walkthrough & Guides Wiki
Pokemon Pokopia Walkthrough & Guides Wiki
Honkai: Star Rail Walkthrough & Guides Wiki
Monster Hunter Stories 3: Twisted Reflection Walkthrough & Guides Wiki
Arknights: Endfield Walkthrough & Guides Wiki
Wuthering Waves Walkthrough & Guides Wiki
Zenless Zone Zero Walkthrough & Guides Wiki
Pokemon TCG Pocket (PTCGP) Strategies & Guides Wiki
Monster Hunter Wilds Walkthrough & Guides Wiki


Recommended Games
Fire Emblem Heroes (FEH) Walkthrough & Guides Wiki
Diablo 4: Vessel of Hatred Walkthrough & Guides Wiki
Cyberpunk 2077: Ultimate Edition Walkthrough & Guides Wiki
Yu-Gi-Oh! Master Duel Walkthrough & Guides Wiki
Super Smash Bros. Ultimate Walkthrough & Guides Wiki
Pokemon Brilliant Diamond and Shining Pearl (BDSP) Walkthrough & Guides Wiki
Elden Ring Shadow of the Erdtree Walkthrough & Guides Wiki
Monster Hunter World Walkthrough & Guides Wiki
The Legend of Zelda: Tears of the Kingdom Walkthrough & Guides Wiki
Persona 3 Reload Walkthrough & Guides Wiki


All rights reserved
© 2000, 2020 SQUARE ENIX CO., LTD. All Rights Reserved.
LOGO ILLUSTRATION:© 2000 YOSHITAKA AMANO
FINAL FANTASY, SQUARE ENIX and the SQUARE ENIX logo are registered trademarks or trademarks of Square Enix Holdings Co., Ltd.
The copyrights of videos of games used in our content and other intellectual property rights belong to the provider of the game.
The contents we provide on this site were created personally by members of the Game8 editorial department.
We refuse the right to reuse or repost content taken without our permission such as data or images to other sites.