Tetra Master Rules and Basics
This page contains information on the card game Tetra Master from Final Fantasy IX (FFIX, FF9). Read on to learn more about the rules of the game and how to read the cards!
List of Contents
Tetra Master - The Rules
The Game Board
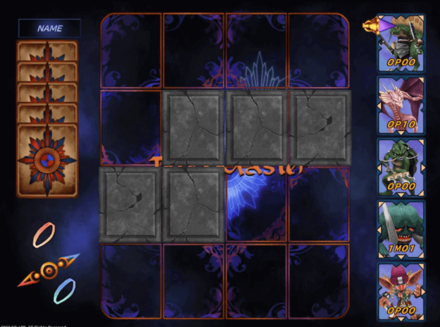
Tetra Master is played on a 4 by 4 grid with each player placing a card in each square. The catch, however, is that in each match squares on the board will be blocked off at random, forcing the player to make their choices wisely with each game.
An example of a Tetra Master game board.
How to Play
The goal of the game is to use the cards in your posession to take over your opponent's cards. Players select 5 cards from their collection, followed by a coin toss, and take turns placing them on the game board in an attempt to capture as many cards as possible. Cards in your posession are blue, while cards taken over by your opponent will turn red. When a card has been placed in each square, the player with the most cards wins. The winner then gets to select a card from their opponent's hand that they were in posession of at the end of the match. For example, if you win a game of Tetra Master and took control of 3 out of 5 of your opponent's hand, you would not be able to claim a card from the remaining 2 that you did not capture.
Tetra Master - The Cards
How to Read the Cards
To better understand exactly how to win a game of Tetra Master, knowing what the symbols, letters, and numbers on each card mean is vital. The following will give you a rundown of what each stands for.
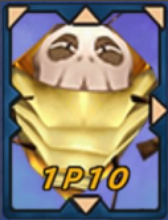
Everyone's favorite Regent, now forever available in card form!
Arrows
Each card has a random assortment of arrows that are used in capturing your opponent's cards. If the card you place does not have an arrow in the direction of another card then nothing will happen. When a card is placed with one of its arrows directed at an opponent's card, their card will be captured without resistance. However, if your card's arrow is pointed at your opponent's card's arrow, a card battle will ensue, leaving the stronger of the two cards the victor.
First Digit
The first digit represents the attack power of the card. This is measured on a hexidecimal scale of 1-9 A-F, with the higher digit representing higher attack power. However, not every card is capable of reaching the highest digit.
Second Digit
The second digit represents the card's attack type. There are four different attack types listed in the table below:
| Attack Type | Definition |
|---|---|
| P | Physical attack. Physical attackers target the enemy's physical defence. |
| M | Magical attack. Magical attackers target the enemy's magic defense. |
| X | Flexible type. Flexible attackers target the lower of the enemy's two defenses. |
| A | Assault type. Assault attackers use the highest value on their card, be it attack power, physical defense, or magic defense to target the enemy card's lowest value. |
Third Digit
The third digit is for physical defense. The higher the physical defense, the less damage they will take from a physical attacker.
Fourth Digit
The fourth digit stands for magic defense. A higher magic defense stat will protect your card from magic attackers.
Card Strength
Aside from the card type, as stated above each other stat is based on a hexidecimal value with a degree of randomness. When a card attacks, its attack power is decided by the number range (listed below) and the associated range. When a card defends, the same happens with its physical or magical defense depending on the incoming attack type. Whether the card is captured or not is left up to a game of chance as the values decided in the end are randomly generated based on all of these values. To this end, choose cards with higher values for a higher chance of success!
| Attack Power | Power Range | Attack Power | Power Range |
|---|---|---|---|
| 0 | 2-15 | 8 | 128-143 |
| 1 | 16-31 | 9 | 144-159 |
| 2 | 32-47 | A | 160-175 |
| 3 | 48-63 | B | 176-191 |
| 4 | 64-79 | C | 192-207 |
| 5 | 80-95 | D | 208-223 |
| 6 | 96-111 | E | 224-239 |
| 7 | 112-127 | F | 240-255 |
Putting it All Together
Knowing all of this, we can roughly gauge the strength of any card. As an example, we'll figure out about how strong the Oglop card posted above is. With a value of 1P10, we can see that its attack power is incredibly low with an HP value of 16-31. The P tells us that this slippery creature is a physical attacker and the final 2 digits tell us it has a physical defense of 1 and magic defense of 0. This is not a card you want in your hand! Many other stronger cards exist within the game, so get out there and find them!
Collector Level
Inside your card menu you may have noticed something called Collector Lv. Increasing your collector level requires points calculated by the cards you obtain throughout the course of the game and a few other factors that will be listed below.
How to Get Points
Each card provides a number of points based on its uniqueness, its arrow pattern, and its attack type.
| Requirement | Points | Total Points |
|---|---|---|
| Unique Card | 10 | 1000 |
| A Type Card | 2 | 200 |
| Unique Arrow Pattern | 5 | 500 |
Based on the table above, you will need to evolve all of your cards to A type, collect every unique card, and each card must have a different pattern of arrows to reach the highest collector level. X type cards give points as well, but not enough to reach the highest level.
Collector Levels
| Collector Level | Required Points | Rank | Collector Level | Required Points | Rank |
|---|---|---|---|---|---|
| 1 | 0 | Beginner | 17 | 1350 | Champion |
| 2 | 300 | Novice | 18 | 1360 | Analyst |
| 3 | 400 | Player | 19 | 1370 | General |
| 4 | 500 | Senior | 20 | 1380 | Expert |
| 5 | 600 | Fan | 21 | 1390 | Shark |
| 6 | 700 | Leader | 22 | 1400 | Specialist |
| 7 | 800 | Coach | 23 | 1420 | Elder |
| 8 | 900 | Advisor | 24 | 1470 | Dominator |
| 9 | 1000 | Director | 25 | 1510 | Maestro |
| 10 | 1100 | Dealer | 26 | 1550 | King |
| 11 | 1200 | Trader | 27 | 1600 | Wizard |
| 12 | 1250 | Commander | 28 | 1650 | Authority |
| 13 | 1300 | Doctor | 29 | 1680 | Emperor |
| 14 | 1320 | Professor | 30 | 1690 | Pro |
| 15 | 1330 | Veteran | 31 | 1698 | Master |
| 16 | 1340 | Freak | 32 | 1700 | The Collector |
Gather as many unique cards as you can and become the greatest Tetra Master collector ever!
Final Fantasy IX Related Links
 Return to the Tetra Master Front Page Return to the Tetra Master Front Page |
Author
Tetra Master Rules and Basics
Rankings
- We could not find the message board you were looking for.
Gaming News
Popular Games

Genshin Impact Walkthrough & Guides Wiki

Umamusume: Pretty Derby Walkthrough & Guides Wiki

Crimson Desert Walkthrough & Guides Wiki

Monster Hunter Stories 3: Twisted Reflection Walkthrough & Guides Wiki

Honkai: Star Rail Walkthrough & Guides Wiki

Pokemon Pokopia Walkthrough & Guides Wiki

The Seven Deadly Sins: Origin Walkthrough & Guides Wiki

Wuthering Waves Walkthrough & Guides Wiki

Zenless Zone Zero Walkthrough & Guides Wiki

Arknights: Endfield Walkthrough & Guides Wiki
Recommended Games

Fire Emblem Heroes (FEH) Walkthrough & Guides Wiki

Diablo 4: Vessel of Hatred Walkthrough & Guides Wiki

Cyberpunk 2077: Ultimate Edition Walkthrough & Guides Wiki

Yu-Gi-Oh! Master Duel Walkthrough & Guides Wiki

Super Smash Bros. Ultimate Walkthrough & Guides Wiki

Pokemon Brilliant Diamond and Shining Pearl (BDSP) Walkthrough & Guides Wiki

Elden Ring Shadow of the Erdtree Walkthrough & Guides Wiki

Monster Hunter World Walkthrough & Guides Wiki

The Legend of Zelda: Tears of the Kingdom Walkthrough & Guides Wiki

Persona 3 Reload Walkthrough & Guides Wiki
All rights reserved
© 2000, 2020 SQUARE ENIX CO., LTD. All Rights Reserved.
LOGO ILLUSTRATION:© 2000 YOSHITAKA AMANO
FINAL FANTASY, SQUARE ENIX and the SQUARE ENIX logo are registered trademarks or trademarks of Square Enix Holdings Co., Ltd.
The copyrights of videos of games used in our content and other intellectual property rights belong to the provider of the game.
The contents we provide on this site were created personally by members of the Game8 editorial department.
We refuse the right to reuse or repost content taken without our permission such as data or images to other sites.


![Star Savior Review [First Impressions] | Engaging, Entertaining, and Expensive](https://img.game8.co/4447603/8f500e9bf666bdb8adb1af478e9dfdbd.png/show)


